
11/23/2015
Step by Step Guide for
Exchange Server 2016 MS Messaging Solution
Md Shaifullah Mozide Palash OVIWIN

Step by Step Guide for Exchange Server 2016
1
Table of Contents 1. Operating System Support for Exchange Server 2016 .......................................................................... 2
2. Active Directory Preparation ................................................................................................................ 2
3. Prerequisites for Mailbox Server Role .................................................................................................. 5
4. Prepare Active Directory and domains ................................................................................................. 7
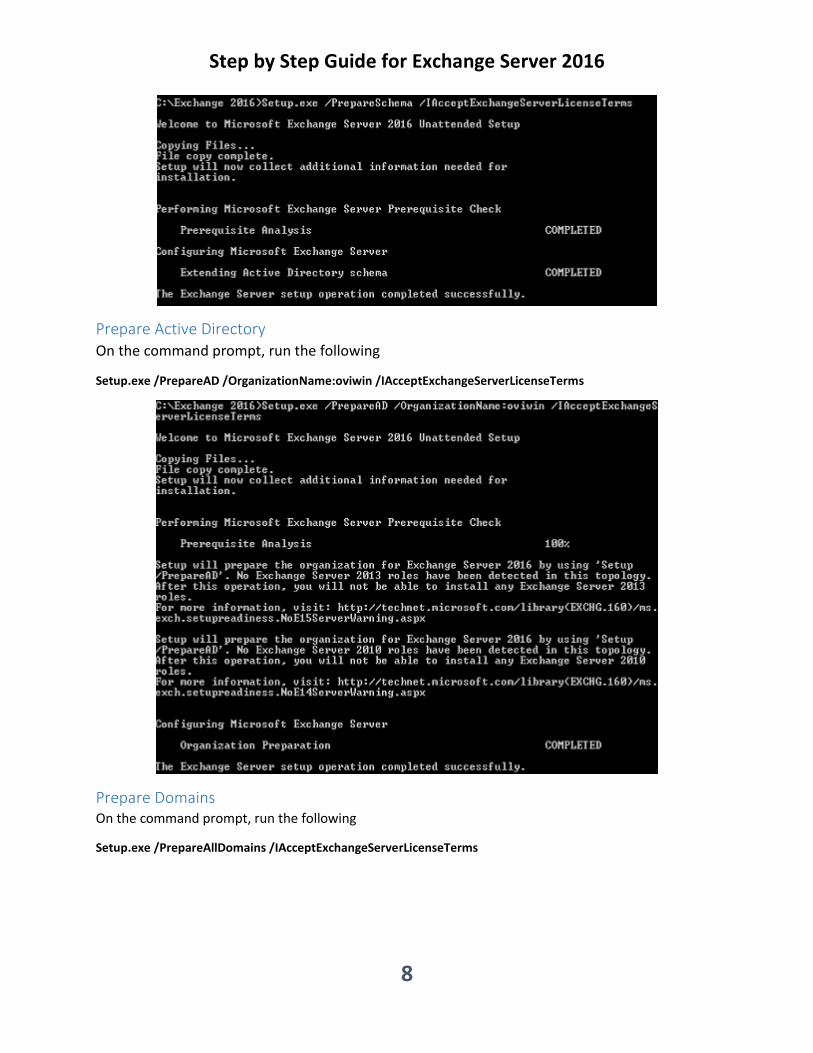
Extend Active Directory Schema ............................................................................................................... 7
Prepare Active Directory ........................................................................................................................... 8
Prepare Domains....................................................................................................................................... 8
5. Installing Exchange Server 2016 ........................................................................................................... 9
6. Configuring the URL for Exchange 2016 ............................................................................................. 20
7. Internal DNS Records .......................................................................................................................... 28
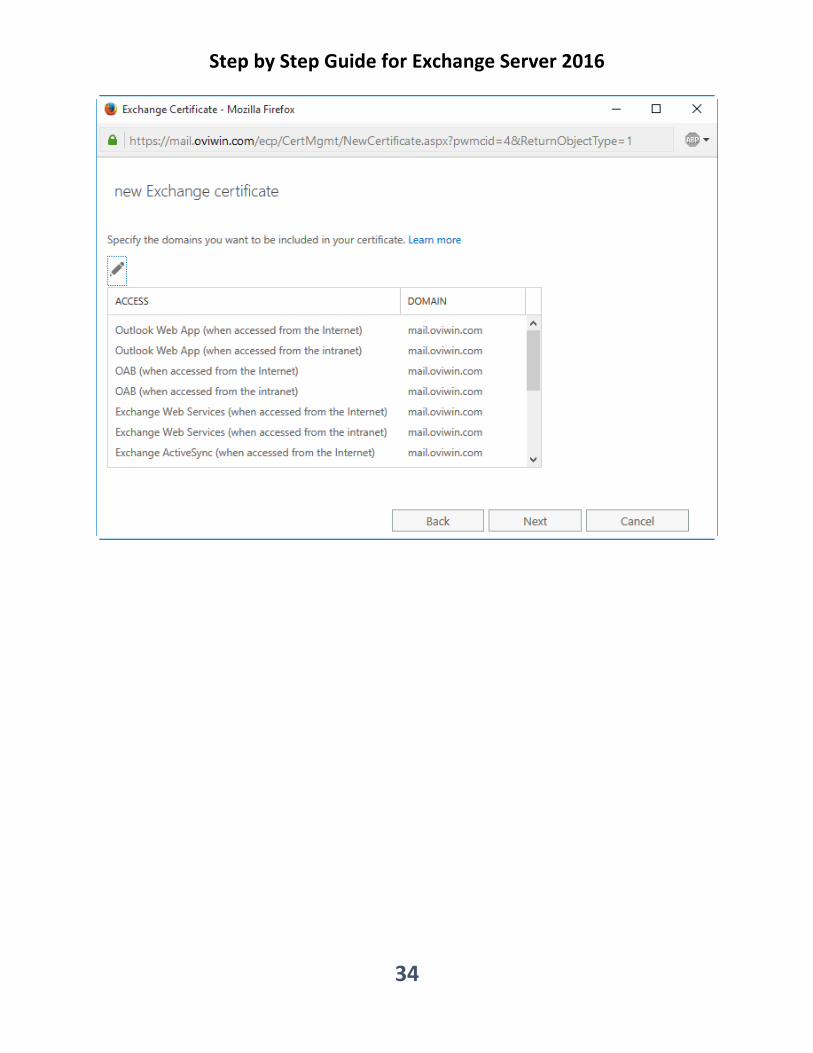
8. Install a Valid SSL Certificate ............................................................................................................... 28
9. Exchange Service Check ...................................................................................................................... 41
10. Create Mailbox Database ...................................................................................................................... 42
11. Create User Mailbox ............................................................................................................................. 44
12. Test Internal Mail flow .......................................................................................................................... 46
13. Outbound Mail Flow for Exchange Server 2016 ................................................................................... 46
14. Inbound Mail Flow for Exchange Server 2016 ...................................................................................... 52
15. Configuring Accepted Domain .............................................................................................................. 53
16. Configuring Email Address Policies ....................................................................................................... 55

Step by Step Guide for Exchange Server 2016
2
The following section describes a step-by-step guide for the installation of Microsoft® Exchange
Server 2016. The installation considers a single server deployment of Exchange Server 2016 with
the Mailbox role. Additional details of the topology and architecture of the lab environment which
was used in the installation is described here;
Operating System-Windows Server 2008 R2
Forest Functional Level-Windows Server 2008 R2
Domain Functional Level-Windows Server 2008 R2
IP Address-192.168.10.101
FQDN-dc01.oviwin.com
Domain Controller Exchange Server 2016
Operating System-Windows Server 2012 R2Installed Role-Mailbox RoleIP Address-192.168.10.102FQDN-exch01.oviwin.com
1. Operating System Support for Exchange Server 2016
The following operating systems are supported;
Component Operating System
Mailbox and Edge Server Role Windows Server 2012 R2 Standard or Datacenter
Windows Server 2012 Standard or Datacenter
Windows Server vNext
Management Tools Windows Server 2012 R2 Standard or Datacenter
Windows Server 2012 Standard or Datacenter
64-bit edition of Windows 8.1
2. Active Directory Preparation
The first task in the installation of any version of Exchange is to prepare the Active Directory environment where the Exchange Server will be placed.
However, prior to the preparation, it should be checked against the following Network and Directory Server requirements;

Step by Step Guide for Exchange Server 2016
3
Component Operating System
Domain controllers Windows Server 2012 R2 Standard or Datacenter
Windows Server 2012 R2 Standard or Datacenter
Windows Server 2008 R2 Standard/Enterprise/Datacenter
Windows Server 2008 Standard/Enterprise/Datacenter
Active Directory forest Windows Server 2008 or higher
Once the above requirements are verified for consistency, proceed with the following preparation tasks on the server/computer which will be used to prepare the Active Directory using the Exchange Server 2016 Active Directory Prepare module.
Install Microsoft .Net Framework 4.5

Step by Step Guide for Exchange Server 2016
4

Step by Step Guide for Exchange Server 2016
5
Open Windows PowerShell and run the following command to install the Remote Tools Administration Pack.
Install-WindowsFeature RSAT-ADDS
3. Prerequisites for Mailbox Server Role The following section instructs the prerequisite installation that should be performed in a server running
a standalone Exchange 2016 server with the Mailbox Server Role.
Open a Windows PowerShell then Run the following command to install the required Windows
components
Install-WindowsFeature AS-HTTP-Activation, Desktop-Experience, NET-Framework-45-Features, RPC-over-HTTP-
proxy, RSAT-Clustering, RSAT-Clustering-CmdInterface, RSAT-Clustering-Mgmt, RSAT-Clustering-PowerShell,
Web-Mgmt-Console, WAS-Process-Model, Web-Asp-Net45, Web-Basic-Auth, Web-Client-Auth, Web-Digest-Auth,
Web-Dir-Browsing, Web-Dyn-Compression, Web-Http-Errors, Web-Http-Logging, Web-Http-Redirect, Web-Http-
Tracing, Web-ISAPI-Ext, Web-ISAPI-Filter, Web-Lgcy-Mgmt-Console, Web-Metabase, Web-Mgmt-Console, Web-
Mgmt-Service, Web-Net-Ext45, Web-Request-Monitor, Web-Server, Web-Stat-Compression, Web-Static-Content,
Web-Windows-Auth, Web-WMI, Windows-Identity-Foundation
Install Microsoft Unified Communications Managed API 4.0, Core Runtime 64-bit

Step by Step Guide for Exchange Server 2016
6

Step by Step Guide for Exchange Server 2016
7
4. Prepare Active Directory and domains To prepare the active Directory and the Domains for Exchange 2016, follow the following steps. To execute
the commands, the commands should be run using the Schema Admins group and the Enterprise Admins
group membership
Extend Active Directory Schema Mount the Exchange Server 2016 installation Media. Open up a Command Prompt session and navigate
to the setup files from the command prompt. Type the following command followed by an Enter
Setup.exe /PrepareSchema /IAcceptExchangeServerLicenseTerms
Step by Step Guide for Exchange Server 2016
8
Prepare Active Directory On the command prompt, run the following
Setup.exe /PrepareAD /OrganizationName:oviwin /IAcceptExchangeServerLicenseTerms
Prepare Domains On the command prompt, run the following
Setup.exe /PrepareAllDomains /IAcceptExchangeServerLicenseTerms

Step by Step Guide for Exchange Server 2016
9
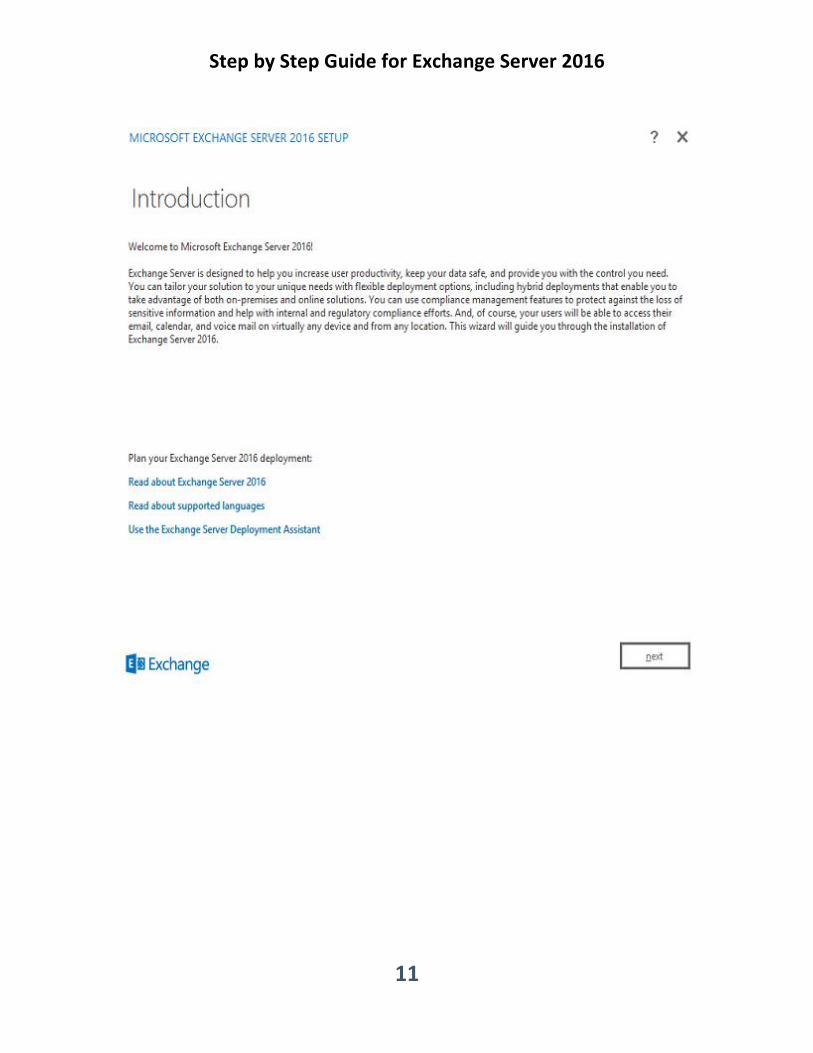
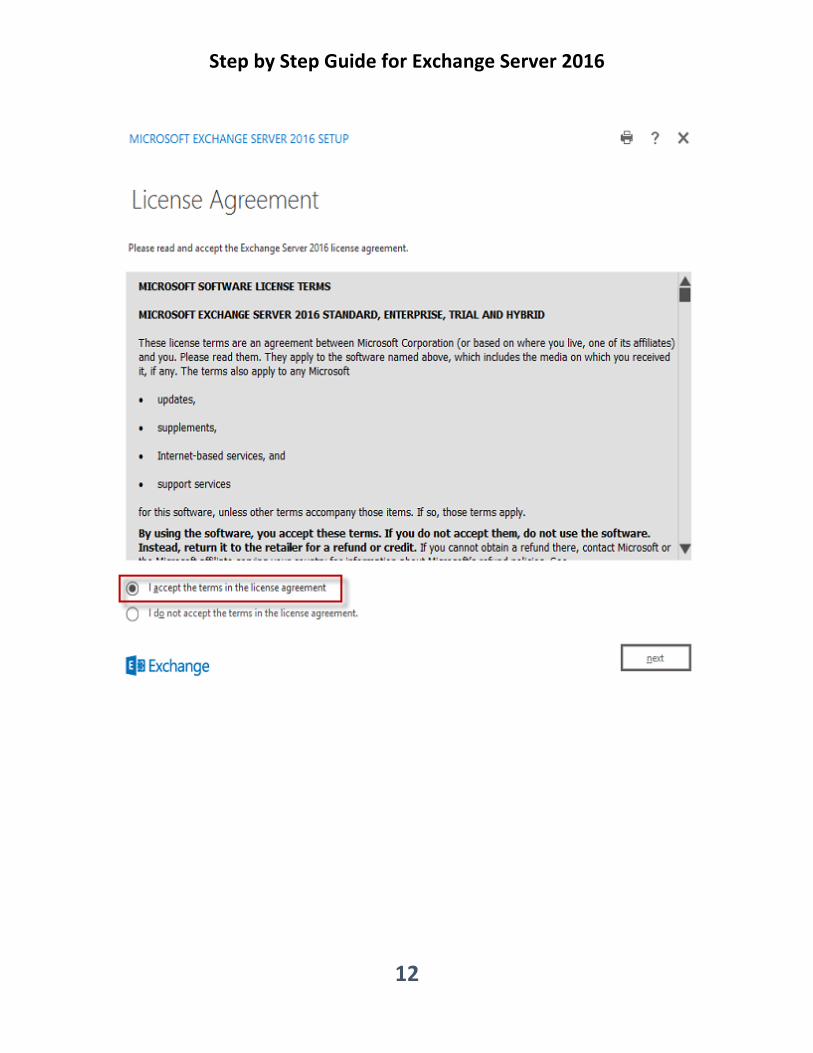
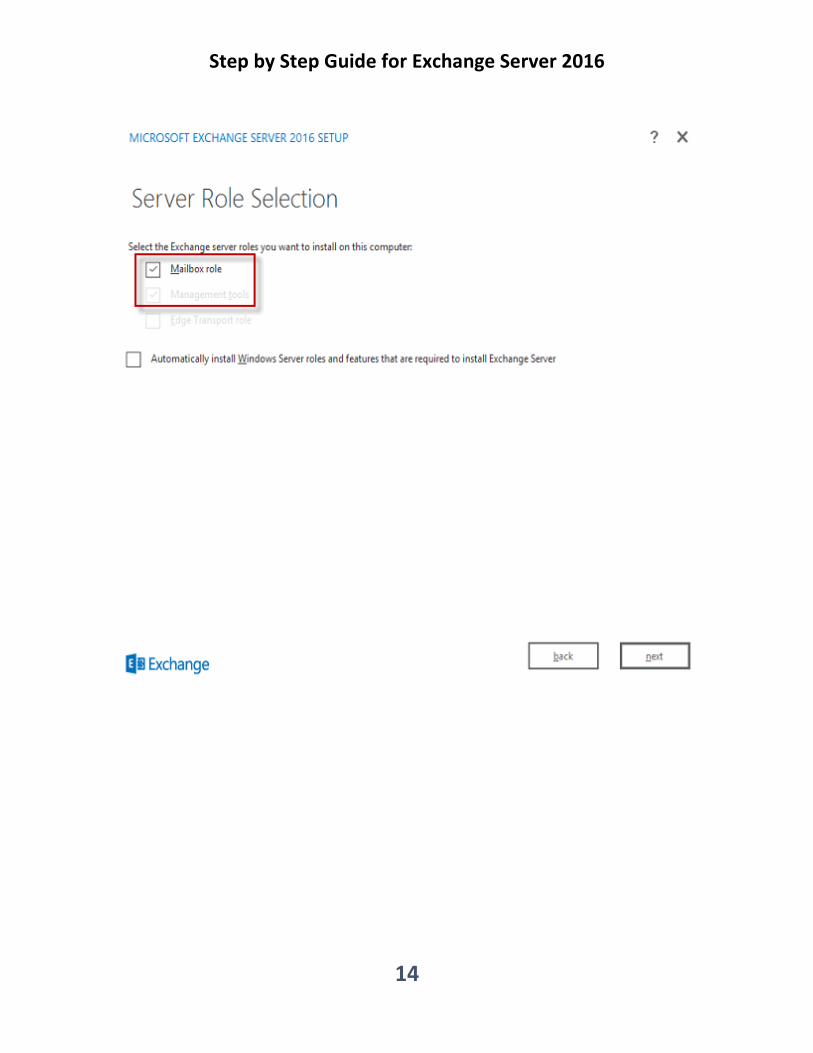
5. Installing Exchange Server 2016
The below section describes the installation of the Mailbox Server role for Exchange Server 2016.
If you’re installing the first Exchange 2016 server in the organization, and the Active Directory
preparation steps have not been performed, the account you use must have membership in the
Enterprise Administrators group. If you haven’t previously prepared the Active Directory Schema,
the account must also be a member of the Schema Admins group.

Step by Step Guide for Exchange Server 2016
10
Step by Step Guide for Exchange Server 2016
11
Step by Step Guide for Exchange Server 2016
12

Step by Step Guide for Exchange Server 2016
13
Step by Step Guide for Exchange Server 2016
14

Step by Step Guide for Exchange Server 2016
15

Step by Step Guide for Exchange Server 2016
16

Step by Step Guide for Exchange Server 2016
17

Step by Step Guide for Exchange Server 2016
18

Step by Step Guide for Exchange Server 2016
19
Step by Step Guide for Exchange Server 2016
20
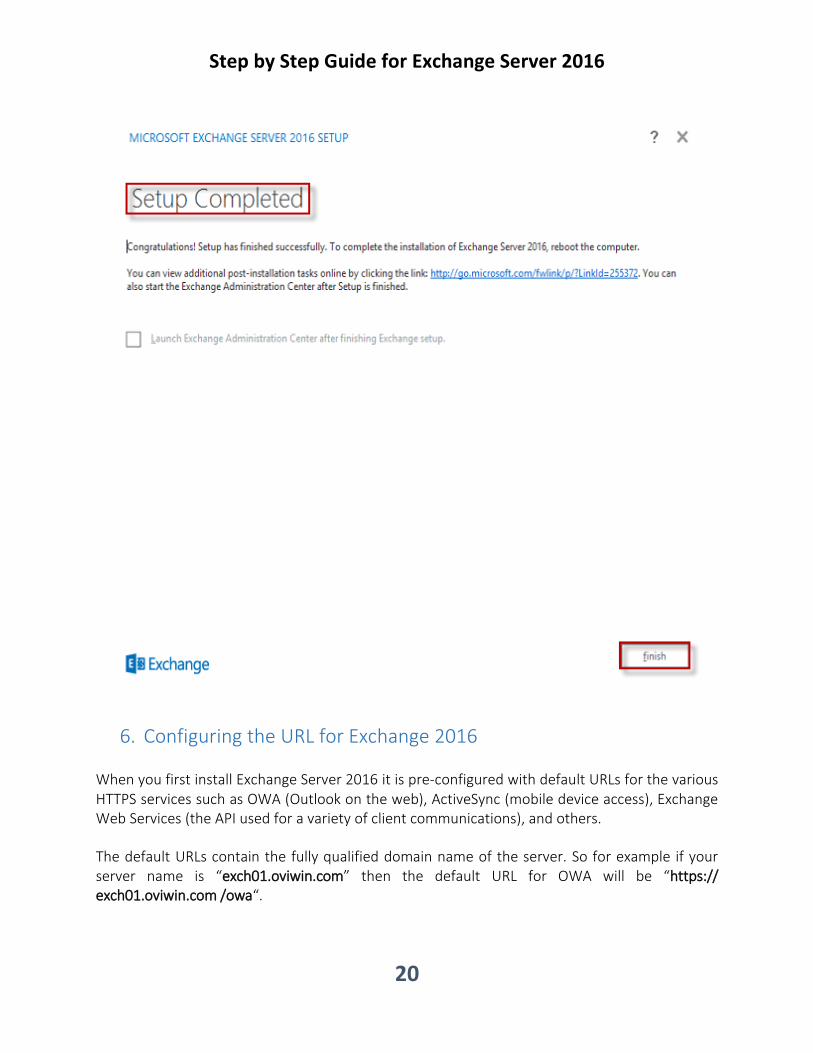
6. Configuring the URL for Exchange 2016
When you first install Exchange Server 2016 it is pre-configured with default URLs for the various HTTPS services such as OWA (Outlook on the web), ActiveSync (mobile device access), Exchange Web Services (the API used for a variety of client communications), and others.
The default URLs contain the fully qualified domain name of the server. So for example if your server name is “exch01.oviwin.com” then the default URL for OWA will be “https:// exch01.oviwin.com /owa“.
Step by Step Guide for Exchange Server 2016
21
These default URLs allow the services to function but they are not suitable for production deployments for several reasons such as:
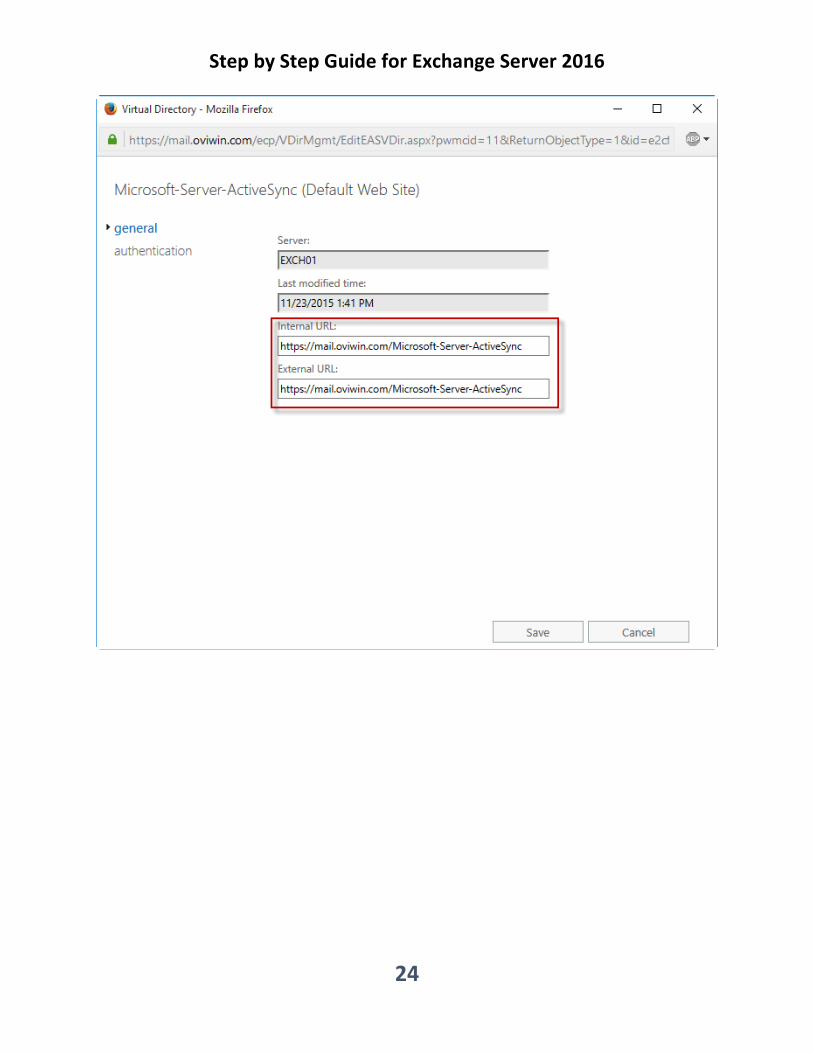
They are difficult for end users to remember (this primarily impacts Outlook on the web, where users tend to find it easier to remember a URL such as “mail.oviwin.com “)
A URL containing a specific server name can’t be load-balanced across multiple servers in a high availability deployment
The internal AD namespace for many organizations is not a valid domain name on the internet, for example oviwin.local, which makes it impossible to acquire SSL certificates for Exchange 2016.
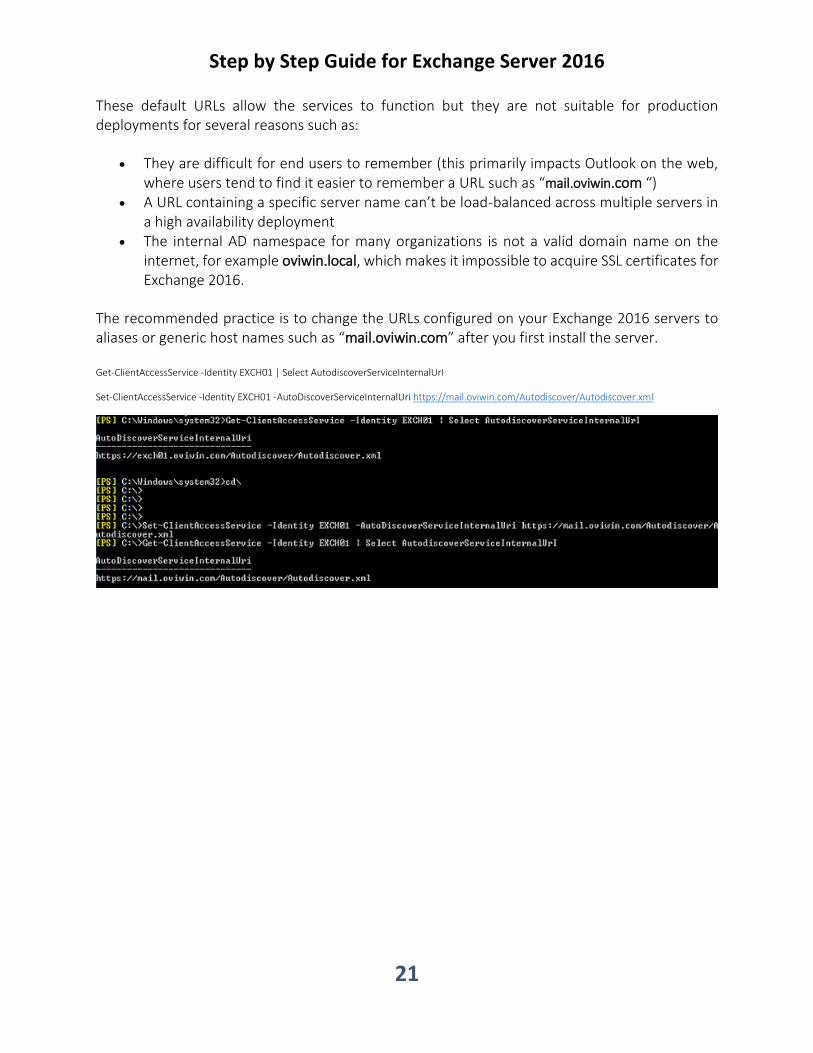
The recommended practice is to change the URLs configured on your Exchange 2016 servers to aliases or generic host names such as “mail.oviwin.com” after you first install the server.
Get-ClientAccessService -Identity EXCH01 | Select AutodiscoverServiceInternalUrI
Set-ClientAccessService -Identity EXCH01 -AutoDiscoverServiceInternalUri https://mail.oviwin.com/Autodiscover/Autodiscover.xml

Step by Step Guide for Exchange Server 2016
22

Step by Step Guide for Exchange Server 2016
23
Step by Step Guide for Exchange Server 2016
24

Step by Step Guide for Exchange Server 2016
25

Step by Step Guide for Exchange Server 2016
26

Step by Step Guide for Exchange Server 2016
27
Run the following command
iisreset /stop
iisreset /start

Step by Step Guide for Exchange Server 2016
28
7. Internal DNS Records
8. Install a Valid SSL Certificate
Exchange Server 2016 communicates with clients, applications and other servers over a variety of network protocols such as HTTPS, SMTP, IMAP and POP. Much of this communication, particularly clients and applications, involves username and password-based authentication. When user credentials are sent over the network they are sent “in the clear”, meaning they can potentially be intercepted and read by an attacker. Other information transmitted during the session may also be sensitive and prone to abuse if interception was possible.
To secure these communications Exchange Server 2016 uses SSL certificates to encrypt the network traffic between the server, clients and applications. This includes:
Outlook connecting to Outlook Anywhere (RPC-over-HTTP) or MAPI-over-HTTP Web browsers connecting to Outlook on the web (OWA) Mobile devices connecting to ActiveSync to access mailboxes and calendars Applications connecting to Exchange Web Services (EWS) for free/busy and other lookups Email clients connecting to secure POP or IMAP TLS encrypted SMTP between Exchange servers or other email servers
When Exchange Server 2016 is first installed it generates a self-signed SSL certificate that is then enabled for IIS (HTTPS services like OWA, EWS and ActiveSync), SMTP, POP and IMAP. The self-signed certificate allows the server to be “secure by default” and begin encrypting network communications right from the start, but it is only intended to be used temporarily while you provision the correct SSL certificates for your environment.
When deploying Exchange Server 2016 you should plan to replace the self-signed certificate with a valid SSL certificate for your deployment scenario. This involves an investment of anywhere from $99 to several thousand dollars depending on your Client Access namespace scenario, the type of certificate you purchase, and which certificate authority you purchase it from.
If you’re tempted to stick with the self-signed certificate, or to try and disable SSL requirements on Exchange services, I strongly recommend you do not do those things.

Step by Step Guide for Exchange Server 2016
29
Deliberately trying to reduce the security of your Exchange environment is unwise The hours you’ll spend configuring and troubleshooting your attempted workarounds is
more costly than just buying the correct SSL certificate Some stuff just flat out won’t work if you try to work around SSL requirements
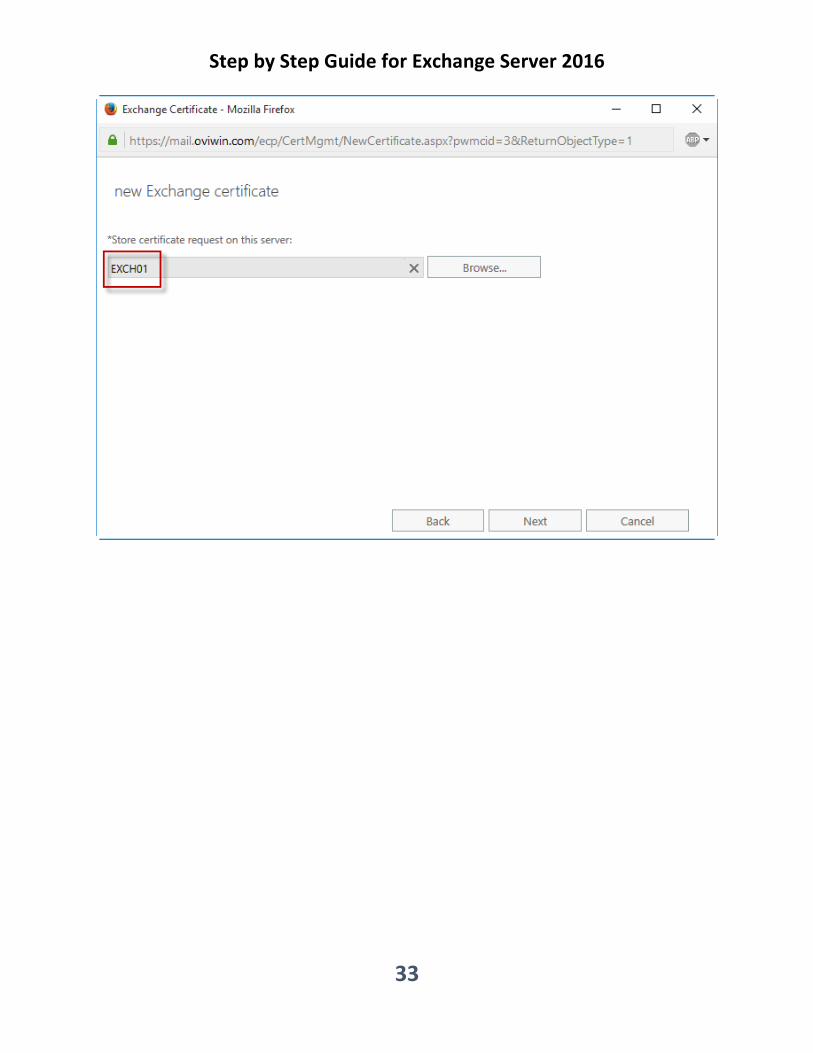
With the namespaces correctly configured, and DNS records in place, you will then need to
provision an SSL certificate for the Exchange 2016 server.

Step by Step Guide for Exchange Server 2016
30

Step by Step Guide for Exchange Server 2016
31

Step by Step Guide for Exchange Server 2016
32
Step by Step Guide for Exchange Server 2016
33
Step by Step Guide for Exchange Server 2016
34

Step by Step Guide for Exchange Server 2016
35

Step by Step Guide for Exchange Server 2016
36

Step by Step Guide for Exchange Server 2016
37

Step by Step Guide for Exchange Server 2016
38

Step by Step Guide for Exchange Server 2016
39

Step by Step Guide for Exchange Server 2016
40
Run the following command

Step by Step Guide for Exchange Server 2016
41
iisreset /stop
iisreset /start
The common causes of Outlook security alerts containing certificate warnings are misconfigured Exchange
server namespaces, and invalid SSL certificates. Using the steps demonstrated above you can reconfigure
your namespaces and/or install a valid SSL certificate. When your Exchange server’s configuration has
been corrected the Outlook security alerts should stop appearing for your end users.
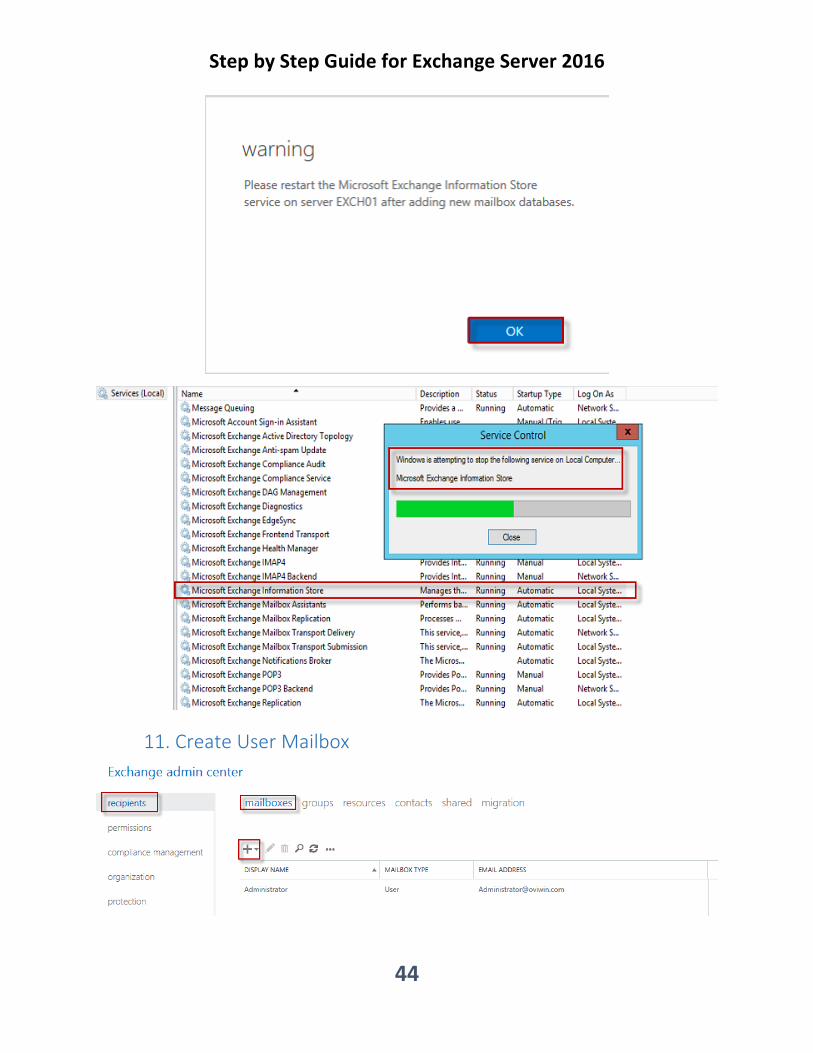
9. Exchange Service Check

Step by Step Guide for Exchange Server 2016
42
10. Create Mailbox Database
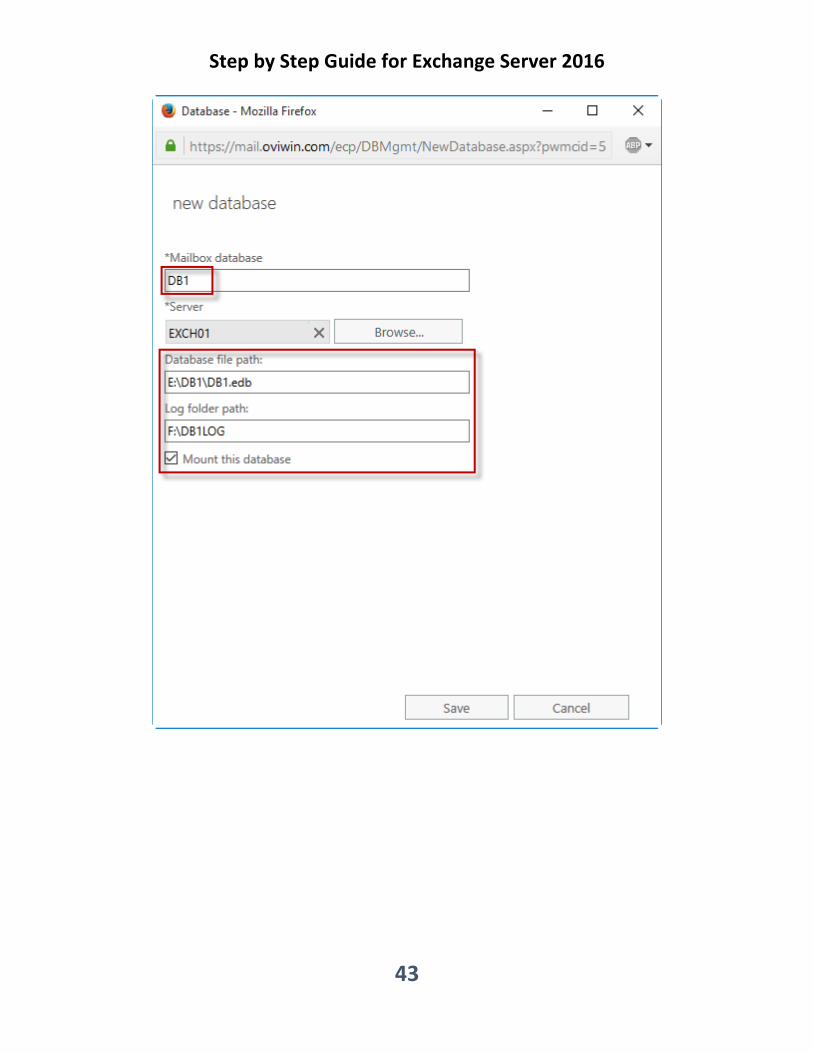
Step by Step Guide for Exchange Server 2016
43
Step by Step Guide for Exchange Server 2016
44
11. Create User Mailbox

Step by Step Guide for Exchange Server 2016
45
Step by Step Guide for Exchange Server 2016
46
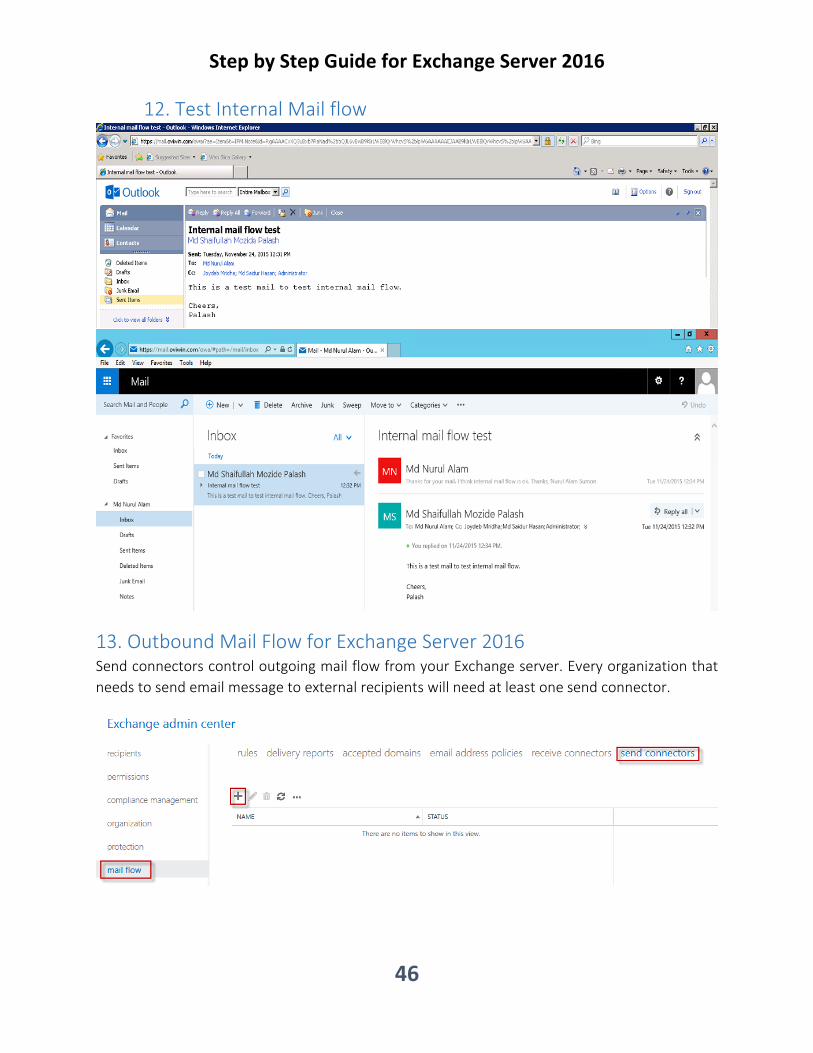
12. Test Internal Mail flow
13. Outbound Mail Flow for Exchange Server 2016 Send connectors control outgoing mail flow from your Exchange server. Every organization that
needs to send email message to external recipients will need at least one send connector.

Step by Step Guide for Exchange Server 2016
47
Next you’ll need to decide how the outbound emails will be delivered. There are two choices – by
MX record, or via smart host. MX record delivery involves your Exchange server looking up the MX
records of the recipient’s domain in DNS, and then connecting directly to their email server via
SMTP to deliver the email message. Smart host delivery involves your Exchange server sending the
messages to a specified IP address or host name for another system (typically an email security
appliance or cloud service) that is then responsible for the further delivery of that email message.

Step by Step Guide for Exchange Server 2016
48
For this example I’m going to use MX records to deliver the message. My server already has
outbound firewall access on TCP port 25, and can resolve MX records on the internet using DNS,
so at a basic level this should work fine. There are other considerations such as SPF and IP
reputation in the real world that may impact the delivery of email messages from your server.

Step by Step Guide for Exchange Server 2016
49
Set the address space for the send connector. An address space of “*” means “any domain” and is
suitable if you have one send connector that is used for all outbound mail flow. You can use this
address space option if you later need to configure specific send connectors for different domains.

Step by Step Guide for Exchange Server 2016
50
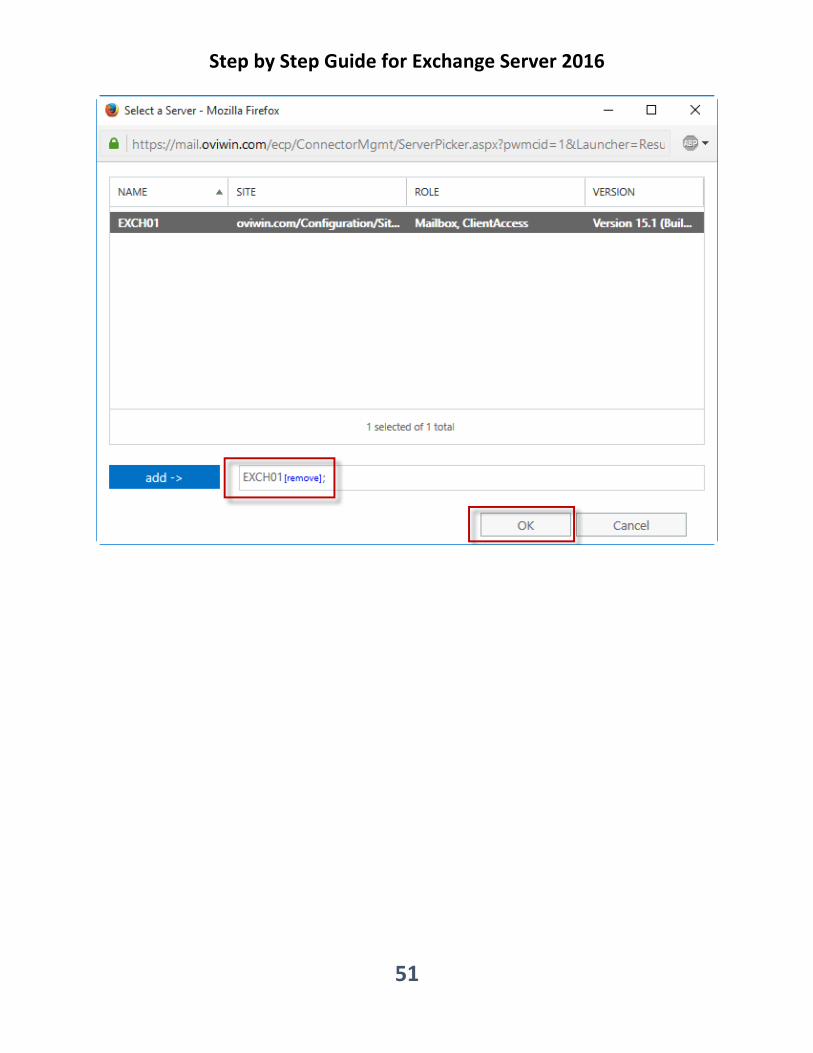
Step by Step Guide for Exchange Server 2016
51

Step by Step Guide for Exchange Server 2016
52
14. Inbound Mail Flow for Exchange Server 2016
Configuring inbound mail flow for an Exchange Server 2016 environment is reasonably simple, however there are several different parts involved. For your server to receive email from the internet and deliver it to internal recipients there needs to be:
An Accepted Domain configured for the organization An email address assigned to the recipient MX records in your public DNS zone SMTP connectivity from external senders to your Exchange server, or a mail route that
leads to your Exchange server
The Exchange server will accept SMTP connections using a receive connector. A receive connector that is suitable for incoming email from the internet is pre-configured for you by Exchange setup,

Step by Step Guide for Exchange Server 2016
53
so there’s no need for you to configure one yourself. The receive connector is named Default Frontend exch01.
If you look at the properties of that connector you might notice that “Anonymous Users” is enabled as a permission group. Yes this is the correct configuration for the connector, and no that does not mean it can be abused as an open relay.
15. Configuring Accepted Domain
Accepted domains define which domain names your Exchange servers will accept email for. When
you install a new Exchange 2016 server the DNS name of the Active Directory forest is
automatically added as an accepted domain for the Exchange organization. If your Active
Directory forest DNS name happens to match the SMTP domain you plan to use for email, then
there’s no additional work required here. Similarly, if you’re installing Exchange 2016 into an
existing Exchange organization, the accepted domains are likely already configured.

Step by Step Guide for Exchange Server 2016
54
You can view your accepted domains in the Exchange Admin Center. Navigate to mail flow and
then choose accepted domains. In my test environment the accepted domain of oviwin.com is
already present.
Notice the three options for the type of domain. The explanations are very clear, but to summarize:

Step by Step Guide for Exchange Server 2016
55
Authoritative – a domain for which your servers host the only recipients. For most
scenarios this will be the correct choice.
Internal relay – a domain for which your servers host some, but not all of the recipients.
A typical use case for this type of accepted domain is a shared SMTP namespace, which is
often required when two companies are merging or separating.
External relay – a domain for which your server receives email, but hosts none of the
recipients.
16. Configuring Email Address Policies

Step by Step Guide for Exchange Server 2016
56

Step by Step Guide for Exchange Server 2016
57


