
Printed in England 0997 HA023805 Iss 3
© Copyright Eurotherm Controls Limited 1994All rights strictly reserved. No part of this document may be stored in a retrieval system, or transmitted, in any form or by any means withoutprior written permission from Eurotherm Controls Limited.Every effort has been taken to ensure the accuracy of this specification. However in order to maintain our technological lead we are continu-ously improving our products which could, without notice, result in amendments or omissions to this specification. We cannot accept respon-sibility for damage, injury loss or expenses resulting therefrom.
94 and 94C
Installation andOperatingHandbook


94 Installation Instructions Cont.i
MODEL 94 and 94C TEMPERATURE CONTROLLERS
Contents pageSafety and EMC information . . . . . . . . . . . . . . . iii
Chapter 1 MECHANICAL INSTALLATIONPanel cut-out . . . . . . . . . . . . . . . . . . . . . . . . . 1-1
Chapter 2 ELECTRICAL CONNECTIONSPower . . . . . . . . . . . . . . . . . . . . . . . . . . . . . . 2-2Output 1 . . . . . . . . . . . . . . . . . . . . . . . . . . . . 2-2Output 2 . . . . . . . . . . . . . . . . . . . . . . . . . . . . 2-2Alarm 1 . . . . . . . . . . . . . . . . . . . . . . . . . . . . 2-2Alarm 2 . . . . . . . . . . . . . . . . . . . . . . . . . . . . 2-2Snubbers. . . . . . . . . . . . . . . . . . . . . . . . . . . . 2-2Control input. . . . . . . . . . . . . . . . . . . . . . . . . 2-3Logic input (terminals 16 and 17) . . . . . . . . . . 2-3Communications (terminals 11 through 15) . . 2-4Rear terminal covers . . . . . . . . . . . . . . . . . . . 2-4
Chapter 3 CONFIGURATIONProcedure . . . . . . . . . . . . . . . . . . . . . . . . . . . 3-1Configiration code. . . . . . . . . . . . . . . . . . . . . 3-3Configuration examples . . . . . . . . . . . . . . . . . 3-5
Chapter 4 OPERATIONBasic procedures . . . . . . . . . . . . . . . . . . . . . . 4-1Open list . . . . . . . . . . . . . . . . . . . . . . . . . . . . 4-1Protected lists . . . . . . . . . . . . . . . . . . . . . . . . 4-1Scroll list parameters . . . . . . . . . . . . . . . . . . . 4-2Adjustable parameters . . . . . . . . . . . . . . . . . . 4-3Alarms . . . . . . . . . . . . . . . . . . . . . . . . . . . . . 4-7Display messages . . . . . . . . . . . . . . . . . . . . . 4-9
Chapter 5 TUNING AND ADJUSTMENTSPID self tune procedure . . . . . . . . . . . . . . . . . 5-1PID manual tuning and procedure . . . . . . . . . 5-2Automatic droop compensation . . . . . . . . . . . 5-3ON/OFF control adjustment. . . . . . . . . . . . . . 5-3

94 Installation InstructionsCont.ii
Chapter 6 COMMUNICATIONSGeneral .........................................................6-1EI Bisyc protocol .............................................6-1Process parameters.........................................6-2Enumerated parameters..................................6-7Hexadecimal parameters ................................6-7Modbus and Jbus protocols...........................6-12Process parameters.......................................6-12Binary parameters ........................................6-12Bit parameters ..............................................6-18Functions .....................................................6-19Error codes...................................................6-19Status byte....................................................6-20Reconfiguration through communications ......6-20Telemetry parameters ...................................6-21
Chapter 7 USER'S RECORDS

94 Installation Instructions Cont.iii
SAFETY AND EMC INFORMATION
Please read this section before installing the controller
This controller meets the requirements of the European Directive on Safety and EMC, however it is the responsibility of the installer to ensure the safety and EMC compliance ofany particular installation.
SafetyThis controller complies with the European Low Directive 73/23/EEC, amended by93/68/EEC by the application of the safety standard EN 61010(93).
Electromagnetic compatibilityThis controller conforms with the essential protection requirements of the EMC Directive89/336/EEC, amended by 93/68/EEC by the application of a technical construction file.
INSTALLATION REQUIREMENTS FOR EMCTo ensure compliance with the European EMC directive certain installation precautions arenecessary as follows:
• For general guidance refer to Eurotherm Controls EMC Installation Guide HA025464.• When using relay or triac outputs it may be necessary to fit a filter suitable for
suppressing the emissions. The filter requirements will depend on the type of load. For typical applications we recommended Schaffner or FN321or FN612.
• This product meets the general requirements of the generic industrial standards EN50081-2 and EN50082-2. For more information on the product compliance see the Technical construction file.
• It may be that this product is to be included in equipment that is to be used in theenvironment defined in the light industrial or commercial environment of EN50081-1 and EN50082-1. In this case the unit should be mounted in a suitable metallic cabinet toenclose any electromagnetic emissions. All cables passing out side the cabinet including the mains leads should pass through suitable RF filtering such as Schaffner FN321 or FN612.
Routing of wiresTo minimise the pick-up of electrical noise, the logic output wiring and the sensor input writing should be routed away from high-current power cables. Where it is impractical to dothis, you should use shielded cables with the shield grounded at both ends.
SERVICE AND REPAIRThis controller has no user serviceable parts. Contact your nearest Eurotherm Controls agentfor repair.

94 Installation InstructionsCont.iv
Technical specification for safety purposesEquipment ratingsSupply voltage: 85 to 264V a.c. ~.Supply frequency: 48 to 52, or 58 to 62Hz a.c. ~.Power consumption: 5 WattsRelay output: Maximum of 264V a.c. ~. Minimum of 10V peak
Maximum current, 2A resistiveLeakage current: Snubber components may be fitted externally. The leakage current
through these snubber components is less than 2mA at 264V a.c. 50Hz.
Over current protection: External over current protection devices are required that match thewiring of the installation. A minimum of 0.5mm2 or 16/0,2mm wireis recommended. Independent fuses are required for the instrument supply and each relay output. suitable fuses are T type, (IEC 127; time-lag) as follows:Instrument supply: 1A (T)Relay outputs: 2A (T)
Low level I/O: All other input and output connections are intended for low level signals less than 42V.
Environmental ratingsPanel sealing: Instruments are intended to be panel mounted. An optional panel
gasket is available to provide panel sealing to IP54 as defined in EN 60529 or NEMA 3.
Operating temperature: 0 to 55°C. Ensure the enclosure provides adequate ventilation.Relative humidity: 5 to 95%, non-condensing.Atmosphere: The instrument is not suitable for use above 200m or in explosive
or corrosive atmospheres.Electrical safety EN 61010(93), Installation category II, pollution degree 2.Installation category II: Voltage transients on any mains power connected to the instrument
must not exceed 2.5kV.Pollution degree 2: Conductive pollution must be excluded from the cabinet in which
the instrument is mounted.Isolation: PV input, channel 1 logic output, dc output, relay output and digital
communications all have reinforced isolation which provides protection against electric shock. Channel 2 logic output and the digital input are electrically connected to PV input.
Safety symbolsVarious symbols are used on the instrument, they have the following meaning:
Caution, (refer to the Equipment is protected accompanying by reinforced insulationdocuments)
Equipment that is protected with reinforced insulation does not require a protective conductor.

94 Installation Instructions Cont.v
INSTALLATION SAFETY REQUIREMENTS
PersonnelInstallation must only be carried out by qualified personnel.
Enclosure of live partsTo prevent hands or metal tools touching parts that may be electrically live, the controllermust be installed in an enclosure.
WiringIt is important to connect the controller in accordance with the data given in this handbook.Take particular care not to connect AC supplies to the low voltage sensor input or DC or logicinputs and output. Wiring installations must comply with all local wiring regulations.
IsolationThe installation must include a power isolating switch or circuit breaker. This device shouldbe in close proximity to the controller, within easy reach of the operator and marked as thedisconnecting device for the instrument.
Overcurrent protectionTo protect the internal PCB tracking within the controller against excess currents, the ACpower supply to the controller and power outputs must be wired through the fuse or circuitbreaker specified in the technical specification.
Voltage ratingThe maximum continuous voltage applied between any of the following terminals must notexceed 264V ac:• power supply to relay, logic or sensor connections;• relay output to logic or sensor connections;• any connection to ground
The controller should not be wired to a three phase supply with an unearthed star connection.Under fault conditions such a supply could rise above 264V ac with respect to ground and theproduct would not be safe.Voltage transients across the power supply connections, and between the power supply andground, must not exceed 2.5k V. Where occasional voltage transients over 2.5k V are expected or measured, the power installation to both the instrument supply and load circuitsshould include a transient limiting device.These units will typically include gas discharge tubes and metal oxide varistors that limit andcontrol voltage transients on the supply line due to lightening strikes or inductive load switching. Devices are available in a range of energy ratings and should be selected to suitconditions at the installation.

94 Installation InstructionsCont.vi
Conductive pollutionConductive pollution must be excluded from the cabinet in which the instrument is mounted.For example, carbon dust is a conducting pollution. To secure a suitable atmosphere in conditions of conductive pollution, fit an air filter to the air intake of the cabinet. Where condensation is likely, for example in low temperatures, include a thermostatically controlledheater in the cabinet.
GroundingThe channel 2 logic output and digital input are not isolated from the sensor input. Because ofthis, two possible conditions need to be considered:• The temperature sensor may be connected to the electrical heating element and hence be at
the heater supply voltage. The controller is designed to operate under these conditions but the channel 2 logic output and digital input will also be at the heater potential. You must ensure that this will not damage the power control device that is connected to the channel 2 logic output and digital input and that some one servicing the equipment does not touch the sensor input, or the channel 2 logic output, or the digital input connections while they are live.
• In some installations it is a requirement to replace the temperature sensor while the controller is still powered up. Under these conditions, we recommend that the shield of thetemperature detector is grounded. Do not rely on grounding through the framework of the machine.
Electrostatic discharge precautionsWhen the controller is removed from its sleeve, some of the exposed electronic componentsare vulnerable to damage by electrostatic discharge from someone handling the controller. Toavoid this, before handling the unplugged controller discharge yourself to ground.
Over-temperature protectionWhen designing any control system it is essential to consider what will happen if any part ofthe system should fail. In temperature control applications the primary danger is that the heating will remain constantly on. A part from spoiling the product, this could damage anyprocess machinery being controlled, or even cause a fire.Reasons why the heating might remain constantly on include:• the temperature sensor becoming detached from the process;• thermocouple or thermocouple wiring becoming short circuit;• the controller failing with its heating output constantly on;• an external valve or contactor sticking in the heating condition;• the controller setpoint set too high.Where damage or injury is possible, we recommend fitting a separate over-temperature protection unit, with an independent temperature sensor, which will isolated the heating circuit.Please note that the alarm relays within the controller will not give protection under all failureconditions.

94 Installation Instructions
Mechanical Installation
Cont.1-i
Chapter 1
MECHANICAL INSTALLATION
Contents page
Panel cut-out.............................................................................1-1
Mec
hanic
al


Chapter 1 MECHANICAL INSTALLATION
Panel cut-out
• Prepare panel cutout in sheet metal enclosure. Enclosure temperature must remain within 0-55°C range.
• Install the optional front panel gasket (part no. BO133943) if required. Remove the backing from the gasket and apply it around the panel cutout on the outside of the panel.
• Slide instrument sleeve into the cutout from the front of the panel.• Position the mounting bracket on the rear of the instrument sleeve with the 2 clips
facing the rear.• While holding the sleeve, slide the mounting bracket towards the panel until the
clips engage on the ratchets. While still pulling back on the sleeve, press on the upper left and lower right hand corners of the bracket to seat the mounting bracket. Another push on the clips with a screwdriver might be necessary to secure the installation.
Panel cutout and minimum spacing. Maximum panel thickness : 13mm.
-0.045mm +0.6
R0.5mmmax. radii
59mm min.
x
-0.092mm +0.8
130mm min.
Mechanical Installation
94 Installation Instructions 1-1
Mec
hanic
al

Dimensions
Panel depth: with rear terminal cover: 126.1mm with gasket fitted: less 1.5mm
96mm
122.1mm15.3mm48mm
Mechanical Installation
94 Installation Instructions1-2

94 Installation Instructions
Electrical Connections
Cont.2-i
Chapter 2
ELECTRICAL CONNECTIONS
Contents page
Power .......................................................................................2-2
Output 1...................................................................................2-2
Output 2...................................................................................2-2
Alarm 1 ....................................................................................2-2
Alarm 2 ....................................................................................2-2
Snubbers ..................................................................................2-2
Control input.............................................................................2-3
Logic input (terminals 16 and 17)...............................................2-3
Communications (terminals 11 through 15) ................................2-4
Rear terminal covers ..................................................................2-4
Elec
tric
al


Electrical Connections
94 Installation Instructions 2-1
Elec
tric
al
Chapter 2 ELECTRICAL CONNECTIONS
WARNING!
Ensure that the maximum voltage which is applied to the unit powersupply, between any two isolated circuits, or between any isolated circuit and ground does not exceed 264Vac.
Caution
It is the user’s responsibility to calculate the maximum possible current in each power and common wire. Do not exceed the rated current for any particular wire size permitted by the local electricalcode. Overheated wires and damaged insulation may result fromoverloading.
1
2
3
4
5R
elay
Com
OU
TP
UT
1 load
2A
N/O
linesnubber
678910
22
1Aline
neutral85 to 264Vac50 or 60Hz
Relay
N/O
Com
N/C
line
Closed in alarm
Open in alarm
AL
AR
M 1
snubber
snubber
2A
Relay
N/O
Com
N/C
line
(Closed in alarm)
(Open in alarm)
AL
AR
M 2
snubber
snubber
2A
signal (+)
0V(-)
DC: 0-20mA or 4-20mA @18Vlogic: 18V @ 20mA
Logic or DC
Relay
Comline
load
OU
TP
UT
2
snubber
2A
N/O
11
12
13
14
15
INP
UT
1617181920
21
RTD-3
—
T/C
I
V-
V++
signal (+)
0V(-)
9V (15mA max.)
OU
TP
UT
2
Logic
CO
MM
UN
ICA
TIO
NS
DIG
ITA
L IN
PU
T
SP2 SP1
B TXD
B ´ RXD
A ´ RXD
common
A TXD
AAAAAAAAAAAAAAAAA
AAAAAAAAAAAAA
AAAA
AAAA
AAAAAAAAAAAAAAAAAA
AAAAAAAAAAAAAAAAAA
AAAA
chassis ground

Electrical Connections
94 Installation Instructions2-2
PowerRespect the polarity of the AC power supply: line wire must be connected to terminal22, and the neutral must be connected to terminal 21. Place a 1-Amp fuse in the line-side of the AC supply.
Output 1• Logic output (terminals 1 and 2): Signal goes high (current flows) during ON
phase of output cycle (yellow “OP1” lamp ON). Output 1 is isolated.• DC analog signal output (terminals 1 and 2): 0 to 20mA or 4 to 20mA output is
available. Yellow “OP1” lamp is ON whenever the output power demand is greater than zero.
• Relay (terminals 3 and 4): Contact is closed during ON phase of output cycle (yellow “OP1” lamp ON). Relay channel operative only when the appropriate configuration is selected. A snubber may be required; see 'Snubbers'.
Output 2• Logic output (terminals 16 and 17): Signal goes high (current flows) during ON
phase of output cycle (yellow “OP2” lamp ON). Connect only to opto-isolated device loads, never connect to any grounded circuit. Keep wiring run shorter than 1m and well away from noise generating circuits.
NOTE: Logic output 2 is NOT isolated from the control input
• Relay (terminals 5, 6 and 7): The relay output 2 is available only when channel 2 is not used as alarm 2. Relay contact shorts terminals 6 and 7 during ON phase of output cycle (yellow “OP1” lamp ON). Relay channel operative only when the appropriate configuration is selected. A snubber may be required; see 'Snubbers'.
Alarm 1The alarm 1 output is failsafe: the relay is de-energized during the alarm condition orpower down (terminals 8 and 9 shorted). The red “AL1” lamp is ON during an alarmcondition. The attached alarm circuit should be designed for failsafe operation andfused appropriately. A snubber may be required; See 'Snubbers'.
Alarm 2The alarm 2 output is available only when channel 2 is not used as output 2. The alarm2 output is failsafe: the relay is de-energized during the alarm condition (red “AL2”lamp ON) or power down (terminals 5 and 6 shorted). The red “AL2” lamp is ON during an alarm condition. The attached alarm circuit should be designed for failsafeoperation and fused appropriately. A snubber may be required; see 'Snubbers'.
SnubbersConnect snubbers CZ140398 (22nf + 100Ω) across the appropriate output or alarmrelay contacts when driving AC inductive loads (mechanical contactors andsolenoids). Do not use snubbers when driving high impedance loads. The snubber

passes 1mA in 120Vac circuits, and 2mA in 240Vac circuits; this is sufficient to holdin certain relays with high impedance coils and should not be used in such installations.
WARNING!
When an alarm contact is to be implemented as part of a failsafe alarmscheme, it is the user’s responsibility to verify that the effect of thesnubber does not interfere with the operation of the circuit. Certainhigh impedance circuits are not able to detect a contact opening whenthe snubber is placed across the contact. In these cases the snubbershould not be installed across the relay contact.
Control input
WARNING!
This temperature controller must have its own input sensor. Neverconnect the input terminals 19 and 20 in parallel with the input of anyother instrument, e.g. recorder, alarm unit, etc. The parallelled inputsof other instruments interfere with proper operation of the sensor breakdetection circuitry and may also impair the measurement accuracy.
NOTE: The input circuit and the logic output 2 (terminals 16 and 17)are NOT isolated from one another.
Use of shielded, twisted pair is recommended for the input sensor. The shield must beconnected to terminal 20 even when grounded elsewhere.• Thermocouple: Use appropriate compensation cable. Keep loop resistance as low
as possible (1kΩ maximum).• RTD: Use 3 copper wires of same length and diameter.
(20Ω/lead maximum resistance.)
Logic input (terminals 16 and 17)Connect 2-position selector switch (SPST). Open switch position corresponds to setpoint 1 selection. Keep wiring run shorter than 1m and well away from noise generating circuits. This input is suitable for isolated contact inputs only.
NOTE: The logic input is NOT isolated from the control input. Do notconnect logic inputs of several Model 94s in parallel; use separate contacts for each one.
Electrical Connections
94 Installation Instructions 2-3
Elec
tric
al

Electrical Connections
94 Installation Instructions2-4
Communications (terminals 11 through 15)Use Belden #9843 or an equivalent low capacitance, extended distance computercable. Attach the shields to the the chassis ground at the supervisor-end of the link.
Rear terminal coversAfter wiring, attach 2 rear terminal covers BD133125 with 2 screws FY133264U001.

94 Installation Instructions
Configuration
Cont.3-i
Chapter 3
CONFIGURATION
Contents page
Procedure .................................................................................3-1
Configuration code ...................................................................3-3
Configuration examples.............................................................3-5
Confi
gura
tion


Configuration
94 Installation Instructions 3-1
Confi
gura
tion
Chapter 3 CONFIGURATION
Procedure
NOTE: Before configuring the instrument, select the 8 digits of theconfiguration code (listed in section 'Configuration Code', and on theinstrument label) and write them down!
1.Cycle power OFF and ON. Self test follows: tESt 1111 appears, then 8888 8888, followed by the 8-digit configuration code. Touch secret key when 8-digit configuration code appears after self test to enter configuration mode.
2.See configuration code with first digit blinking (leftmost digit in upper display).
3.Enter new code: = select digit position (1 through 8) = modify digit value.
4.To exit configuration mode do either:
Secret key = accept new configuration; parameter value check follows. This is alist of all scroll list parameters (and their values) that pertain to thenew configuration. Parameters not required for the selected configuration are removed from the list.
= abort; return to previous configuration.
NOTE: After changing the configuration code, it is important that theuser verify the value of each parameter. Changing the input sensortype or display range could result in forced modifications to someparameter values. These might not be what are required for the application, and should be set to new values appropriate to the newconfiguration.

Configuration
94 Installation Instructions3-2
Configuring the Model 94Pushbutton functions during configuration (in bubbles)
and configuration code digit functions
AAAAAA
sensor type
select digit position (1 through 8)
modify digit value
communicationsprotocol
channel 1 and channel 2output functions
alarm 1 function
AL1OP1
EUROTHERM
return to previous configuration
OP2 AL2display rangeand units
channel 1 control andoutput type
channel 2 control andoutput type
alarm 2 function
secret key:accept new configuration

Configuration
94 Installation Instructions 3-3
Confi
gura
tion
Configuration codeUPPER DISPLAY
1st digit: Sensor typefull specified range
°F min °F max °C min °C max
0 RTD (units’ precision display) -148 1112 -100 6001 RTD (tenths’ precision display) -99.9 999.9 -99.9 600.02 B—Pt-30%Rh/Pt-6%Rh 1112 3308 600 18203 J—Fe/SAMA constantan -328 2192 -200 12004 K—Chromel™/Alumel™ -418 2502 -250 13725 L—Fe/Konstantan -148 1652 -100 9006 N—NiCroSil/NiSil 32 2372 0 13007 Platinel II™ -418 2543 -250 13958 R—Pt-13%Rh/Pt 32 3213 0 17679 S—Pt-10%Rh/Pt 32 3213 0 1767A T—Cu/Adams constantan -427 752 -255 400
2nd digit: Channel 1 and channel 2 output functions· Refer to illustration on 3-6.· The logic output 2 (terminals 16 and 17) is not
operative on channel 2 if alarm 2 selected (selections 6 and 7).
· Digital input 2 (terminals 16 and 17) can be configured for operation with any of the channel 2 output functions; see the 4th digit in upper display.
3rd digit: Channel 1 control and output type· Analog DC outputs
(selections 4 and 5) are available only on those units with DC output option.
4th digit: Channel 2 control and output type· Control type relevant only if channel 2
configured as output 2 (not as alarm 2). · To enable digital input when channel 2 is
configured as alarm 2 or disabled, select 4 or 5.
channel 1 channel 2
0 heat cool1 cool heat2 heat disabled3 cool disabled4 disabled heat5 disabled cool6 heat alarm 27 cool alarm 2
control type output type
0 ON/OFF logic & relay1 ON/OFF logic only2 PID logic & relay3 PID logic only4 PID 4-20mA DC5 PID 0-20mA DC
control type output type
0 ON/OFF logic & relay1 ON/OFF logic only2 PID logic & relay3 PID logic only4 ON/OFF relay & dig. I/P
5 PID relay & dig. I/P

Configuration
94 Installation Instructions3-4
LOWER DISPLAY1st digit: Alarm 1 function
Selections 8 through C: temperature alarm islogically “ORed” with sensor break and loopbreak alarms, i.e. the alarm relay trips if thetemperature alarm OR the sensor break alarmOR the loop break alarm is active.
2nd digit: Alarm 2 functionSelections 8 through C: temperature alarm islogically “ORed” with sensor break and loopbreak alarms, i.e. the alarm relay trips if thetemperature alarm OR the sensor break alarmOR the loop break alarm is active.Selection relevant only if alarm 2 enabled.
3rd digit: Display range and unitsUse only selections 6 through 8 for type Bthermocouple or RTD input.The effective span is selected here. For selections 0 through 5, the effective span isidentical to the upper range limit.
0 Off (no alarm function)1 Deviation low alarm2 Deviation high alarm3 Deviation band alarm4 Full scale low alarm5 Full scale high alarm6 Sensor break alarm7 Loop break alarmSensor break and loop break alarmsin combination with temperaturealarm:8 Deviation low alarm9 Deviation high alarmA Deviation band alarmB Full scale low alarmC Full scale high alarm
0 Off (no alarm function)1 Deviation low alarm2 Deviation high alarm3 Deviation band alarm4 Full scale low alarm5 Full scale high alarm6 Sensor break alarm7 Loop break alarmSensor break and loop break alarms in combination with temperature alarm:8 Deviation low alarm9 Deviation high alarmA Deviation band alarmB Full scale low alarmC Full scale high alarm
upper disp. prop. bandrange limit units units
0 400°C °C °C1 752°F °F °F2 400°C °C % of 4003 800°C °C °C4 1472°F °F °F5 800°C °C % of 8006 Sensor °C °C7 upper °F °F8 limit °C % of span

Configuration
94 Installation Instructions 3-5
Confi
gura
tion
For selections 6 through 8, it is the full span of the selected input sensor. The effective span is used as a limit for several parameters. See Adjustable parameterstable p. 4-4.
4th digit: Communications protocolCommunications option available only on Model94c.
Configuration examplesExample 1Upper display 4 0 2 2Lower display 5 5 8 0Upper display:1st digit 4 Type K thermocouple input;2nd digit 0 Heat/cool controller with heat output on channel 1 and cool output
on channel 2;3rd digit 2 PID control on channel 1 (heat) output, both relay and logic outputs
operative;4th digit 2 PID control on channel 2 (cool) output, both relay and logic outputs
operative.Lower display:1st digit 5 Full scale high alarm2nd digit 5 Setting irrelevant—alarm 2 not configured;3rd digit 8 Sensor range from -250C to 1372°C, display units and proportional
band units in % of span;4th digit 0 Communications disabled.
Example 2Upper display 6 6 4 4Lower display 3 7 6 1Upper display:1st digit 6 Type N thermocouple input;2nd digit 6 Heat only controller with heat output on channel 1 and alarm 2
output on channel 2;3rd digit 4 PID control on channel 1 (heat) output, 4-20mA DC output;4th digit 4 Digital input enabled (control type selection irrelevant when channel
2 is configured for alarm 2).Lower display:1st digit 3 Deviation band alarm;2nd digit 7 Loop break alarm;3rd digit 6 Sensor range from 0°C to 1300°C, display units and proportional
band units in °C;4th digit 1 EI-Bisync communications enabled.
protocol parity
0 Disabled N/A1 EI BiSyc even2 MODBUS/JBUS even3 MODBUS/JBUS odd4 MODBUS/JBUS none

Configuration
94 Installation Instructions3-6
Logic or DCoutput
Form Arelay output
Form Crelayoutput
Form Crelayoutput
Logic outputor dig. input
Ch. 1HEAT
Ch. 2COOL
Alarm 1
COOL
0Config. Logic or DC
output
Form Arelay output
Form Crelayoutput
Form Crelayoutput
Logic outputor dig. input
Ch. 1OFF
Ch. 2HEAT
Alarm 1
HEAT
4Config.
Logic or DCoutput
Form Arelay output
Form Crelayoutput
Form Crelayoutput
Logic outputor dig. input
Ch. 1COOL
Ch. 2HEAT
Alarm 1
HEAT
1Config. Logic or DC
output
Form Arelay output
Form Crelayoutput
Form Crelayoutput
Logic outputor dig. input
Ch. 1OFF
Ch. 2COOL
Alarm 1
COOL
5Config.
Logic or DCoutput
Form Arelay output
Form Crelayoutput
Form Crelayoutput
Logic outputor dig. input
Ch. 1HEAT
Ch. 2OFF
Alarm 1
OFF
2Config. Logic or DC
output
Form Arelay output
Form Crelayoutput
Form Crelayoutput
Logic outputor dig. input
Ch. 1HEAT
Ch. 2AL 2
Alarm 1
OFF
6Config.
Logic or DCoutput
Form Arelay output
Form Crelayoutput
Form Crelayoutput
Logic outputor dig. input
Ch. 1COOL
Ch. 2OFF
Alarm 1
OFF
3Config. Logic or DC
output
Form Arelay output
Form Crelayoutput
Form Crelayoutput
Logic outputor dig. input
Ch. 1COOL
Ch. 2AL 2
Alarm 1
OFF
7Config.
Channel assignment configurations as viewed from rear (2nd config. digit, upper display). Digitalinput 2 always available for 2nd setpoint if logic output not available.

Operation
94 Installation Instructions Cont.4-i
Chapter 4
OPERATION
Contents page
Basic procedures.......................................................................4-1
Open list ..................................................................................4-1
Protected lists ............................................................................4-1
Scroll list parameters .................................................................4-2
Adjustable parameters ..............................................................4-3
Alarms .....................................................................................4-7
Display messages......................................................................4-9
Oper
ation


Operation
94 Installation Instructions 4-1
Oper
ation
Chapter 4 OPERATION
Basic proceduresRefer to illustration below and over page.
Open list• To light up buttons: touch any button on front panel.• To modify setpoint: or .
• To view next parameter: use .• To modify a parameter value: with the parameter mnemonic in upper display, use
or .
Protected lists• To enter protected lists: use until °C or °F appears in open list, then use
"secret key"; then...• To verify configuration: Use "secret key" when Id 94c is displayed.
Inspect upper and lower configuration words (CF U and CF L) with .
Model 94: front panel pushbuttons, displays and lamps
• To view sub-list headers (those displays with List in the lower display): use .• To access parameters in a sub-list when at a sub-list header: use "secret key".
Then inspect and change parameter values as in the open list. To move to another sub-list, first return to the measured value display.
• To return to measured value (unattended) display when in a sub-list: use "secret key".
measured value orparameter mnemonic
decrease value increase value
setpoint orparameter value
AAAA
secret key
output 1 active
output 2 active
AL1OP1
EUROTHERM
next parameter
OP2 AL2 alarm 2 active
alarm 1 active

Measured valueSetpoint
Measured valueC or F
tunEvalue
SP.12value
A1.SPvalue
A2.SPvalue
Unattended display
s Id94
s
CF Uvalue
CF Lvalue
ID List
Open list Protected lists
PIDLiSt
s
ProPvalue
dEr.tvalue
s
Key
= scroll button
= secret button
Cb.Lovalue
Cb.Hivalue
Adcvalue
OPLiSt
s
H Ctvalue
H Hyvalue
C Ctvalue
C Hyvalue
HC.dbvalue
rEL.Cvalue
Coolvalue
H PLvalue
C PLvalue
LP.brvalue
Int.tvalue
SPLiSt
s
SP.Hivalue
SP.Lovalue
SP.rrvalue
SP 1value
SP 2value
SP.SPvalue
OFStvalue
LinE or FILtvalue
ALLiSt
s
A1.Hivalue
A1.Lovalue
A1Hyvalue
A2.Hivalue
A2.Lovalue
A2.Hyvalue
ttyLiSt
s
bAUdvalue
Addrvalue
FLSHvalue
Sub-list headers
Sub-lists
Model 94 scroll list parameters
NOTE: Only those parameters required by theconfiguration appear in the scroll lists!
Operation
94 Installation Instructions4-2

Operation
94 Installation Instructions 4-3
Mn
em
on
icP
ara
mete
rA
dju
sta
ble
ra
ng
eC
om
men
tsB
isyn
cM
od
/JO
pen
lis
tN
one
Setp
oint
1 or
set
poin
t 2“S
P.L
o”
to “
SP.H
i”D
ispl
ayed
with
out m
nem
onic
in u
natte
nded
mod
eSL
or
17 o
r(w
hich
ever
is a
ctiv
e)C
anno
t be
mod
ified
if s
elf t
unin
g in
pro
gres
s.S2
18°C
or °F
Dis
play
uni
tsVi
ew o
nly.
“Lin
” fo
r no
n-te
mpe
ratu
re s
enso
rs.
—-
—-
tun
ESe
lf tu
ne o
n de
man
dD
isab
le s
elf t
une
oroFF
TU32
self
tuni
ng c
ompl
eted
Star
t sel
f tun
e on
hea
t-H
EAt
only
loop
Star
t sel
f tun
e on
coo
l-C
ooL
only
loop
Star
t sel
f tun
e on
hea
t/H
tCL
cool
loop
SP.1
2Se
tpoi
nt s
elec
tion
Setp
oint
1 a
ctiv
eSP
1D
ispl
ayed
onl
y if
“SP
.SP
” =
“SP
12
”. “
SP 2
” fla
shes
SS20
Setp
oint
2 a
ctiv
eSP
2in
low
er d
ispl
ay if
sec
ond
setp
oint
sel
ecte
d.A
1.S
PA
larm
1 &
2 s
etpo
ints
Ala
rm 1
: “A
1.L
o”
to “
A1.H
i”Fo
r ea
ch a
larm
, not
dis
play
ed if
con
figur
ed
A1
13A
2.S
PA
larm
2:
“A2.L
o”
to “
A2.H
i”un
ique
ly fo
r se
nsor
bre
ak o
r lo
op b
reak
ala
rm, o
rA
214
if al
arm
is d
isab
led.
Pro
tect
ed
lis
t en
try
poin
tId
Mod
el n
umbe
rVi
ew o
nly:
“94
” or
“94
c”II
122
CF
UU
pper
con
figur
atio
n C
an b
e ch
ange
d up
on p
ower
up
only
.C
U48
code
Vie
w o
nly.
(fi
rst 4
dig
its)
CF
LLo
wer
con
figur
atio
n co
deC
L49
(last
4 d
igits
)
Pid
LiS
tP
roP
Prop
ortio
nal b
and
“1 l.
s.d.
to e
ffect
ive
span
, or
XP6
0.1
to 1
00.0
% o
f effe
ctiv
e sp
anIn
t.t
Inte
gral
tim
e co
nsta
nt“o
FF”
plus
10
to 2
000s
TI8
dEr
.tD
eriv
ativ
e tim
e co
nsta
nt“o
FF”
plus
1 to
200
sTD
9C
b.L
oLo
w c
utba
ck“A
uto
” pl
us 1
l.s.
d. to
effe
ctiv
eW
hen
set t
o “A
uto
”, “
Cb
.Lo
” =
3 x
“P
roP
”.LB
34sp
anC
b.H
iH
igh
cutb
ack
“Au
to”
plus
1 l.
s.d.
to e
ffect
ive
Whe
n se
t to
“Au
to”,
“C
b.H
i” =
3 x
“P
roP
”.H
B35
span
Table 4.1 - Adjustable parameters (Part 1)
Oper
ation

Operation
94 Installation Instructions4-4
Mn
em
on
icP
ara
mete
rA
dju
sta
ble
ra
ng
eC
om
men
tsB
isyn
cM
od
/JO
pen
lis
tA
dc
Aut
omat
ic d
roop
Dis
able
d or
0%
res
et
oFF
PI o
r PI
D o
pera
tion.
AC
36co
mpe
nsat
ion
Rese
t fix
ed a
t 50%
of
Sets
pro
port
iona
l ban
d sy
mm
etric
ally
abo
ut(s
imila
r to
man
ual r
eset
)ou
tput
50P
cse
tpoi
nt in
PD
or
P op
erat
ion.
A
pplic
atio
n of
cal
cula
ted
on
Mai
ntai
ns la
st c
alcu
late
d or
set
val
ue o
f man
ual
rese
tre
set.
Cal
cula
tion
of r
equi
red
Mom
enta
ry s
ettin
g w
hich
add
s pr
opor
tiona
l err
or
rese
t C
Alc
to c
urre
nt m
anua
l res
et v
alue
.O
P L
ist
H c
tH
eat c
ycle
tim
e fo
r0.
2 to
240
.0s
Dis
play
ed o
nly
for
time
prop
ortio
ned
PID
or
CH
10lo
gic
outp
ut ty
peO
N/O
FF h
eat o
utpu
ts.
Hea
t cyc
le ti
me
for
5.0
to 2
40.0
sFo
r O
N/O
FF c
ontr
ol, b
ecom
es m
inim
um h
eat O
Nre
lay
outp
ut ty
peor
OFF
tim
e.H
Hy
Hea
t hys
tere
sis
1 l.s
.d. t
o ef
fect
ive
span
Dis
play
ed o
nly
for
ON
/OFF
hea
t out
put.
YH37
C c
tC
ool c
ycle
tim
e:D
ispl
ayed
onl
y fo
r tim
e pr
opor
tione
d PI
D o
r C
C38
for
logi
c ou
tput
type
0.2
to 2
40.0
sO
N/O
FF c
ool o
utpu
ts.
for
“Fan
” co
ol a
lgor
ithm
1.0
to 2
40.0
sFo
r O
N/O
FF c
ontr
ol, b
ecom
es m
inim
um c
ool O
Nfo
r re
lay
outp
ut ty
pe5.
0 to
240
.0s
or O
FF ti
me.
C H
yC
ool h
yste
resi
s1
l.s.d
. to
effe
ctiv
e sp
anD
ispl
ayed
onl
y fo
r O
N/O
FF c
ool o
utpu
t.YC
39H
C.d
bH
eat-
cool
dea
dban
d:D
ispl
ayed
onl
y if
cool
ing
enab
led.
DB
40fo
r O
N/O
FF c
ool c
ontr
ol-1
0.0
to 1
0.0%
of e
ffect
ive
span
Set t
o 0.
0% e
xcep
t if r
equi
red
by p
roce
ss.
for
PID
coo
l con
trol
-10.
0 to
10.
0% o
f out
put p
ower
rEL.
CRe
lativ
e co
ol g
ain
0.1
to 1
0.0
Dis
play
ed o
nly
for
heat
/coo
l PID
con
trol
.RG
41(w
ith r
espe
ct to
hea
tSu
gges
ted
star
ting
valu
es:
chan
nel)
0.2
to 0
.5 fo
r “H
2O
” co
olin
g al
gorit
hm1.
0 fo
r “O
IL”
cool
ing
algo
rithm
2.0
for
“FA
n” c
oolin
g al
gorit
hmO
P L
iSt
CO
OL
Coo
ling
algo
rithm
Dis
play
ed o
nly
for
time-
prop
ortio
ning
PID
coo
ling.
CA
42se
lect
ion
Line
arLi
n“L
inea
r, m
in. O
N ti
me
= 4
0ms”
Evap
orat
ive
wat
erH
2O
“Non
-lin
ear,
min
. ON
tim
e =
40m
s”Fa
nFA
n“N
on-l
inea
r, m
in. O
N ti
me
= 0
.5s”
Oil
or n
on e
vapo
rativ
eO
IL“N
on-l
inea
r, m
in. O
N ti
me
= 4
0ms”
wat
erH
PL
Hea
t pow
er li
mit
0.0
to 1
00.0
%D
ispl
ayed
onl
y fo
r PI
D h
eatin
g.H
O43
C P
LC
ool p
ower
lim
it0.
0 to
100
.0%
Dis
play
ed o
nly
for
PID
coo
ling.
LO44
LP.b
rLo
opbr
eak
time
“oFF
” pl
us 1
0 to
400
0sBT
45
Table 4.1 - Adjustable parameters (Part 2)

Operation
94 Installation Instructions 4-5
SP L
iSt
SP.H
iSe
tpoi
nts
1 an
d 2
Gre
ater
of c
urre
nt v
alue
of “
SP 1
”H
S21
high
lim
itor
“SP
2”
to u
pper
ran
ge li
mit.
SP.L
OSe
tpoi
nts
1 an
d 2
Low
er r
ange
lim
it to
less
er o
f LS
22lo
w li
mit
“SP
1”
or “
SP 2
”.SP
.rr
Setp
oint
ram
p ra
te“o
FF”
plus
0.1
0 to
1/1
0 of
For
non-
tem
pera
ture
inpu
ts:
0.01
to 1
/10
effe
ctiv
eRR
23ef
fect
ive
span
°C
/min
.sp
an o
r di
spla
y lim
it(o
r °F
/min
.)SP
1Se
tpoi
nt 1
“SP
.Lo
” to
“SP
.Hi”
For
adju
stm
ent o
f set
poin
t not
cur
rent
ly d
ispl
ayed
SL17
SP 2
Setp
oint
2in
Ope
n Li
st.
S218
SP.S
PSe
tpoi
nt m
ode
sele
ctio
nSe
tpoi
nt 1
onl
ySP
1SM
19Se
tpoi
nts
1 an
d 2
SP.1
2se
lect
able
from
fron
t onl
ySe
tpoi
nts
1 an
d 2
IP 2
Dis
play
ed o
nly
if ch
anne
l 2 is
con
figur
ed a
sse
lect
able
from
rea
r in
put o
nly
digi
tal i
nput
.O
FSt
Cal
ibra
tion
offs
et-5
0.0
to 5
0.0°
CPO
24-9
0.0
to 9
0.0°
F±
10.0
0% o
f effe
ctiv
e sp
an fo
r Li
nSP
LiS
tLi
nE
Line
freq
uenc
y50
Her
tz50
“If
disp
laye
d, s
et to
app
ropr
iate
freq
uenc
y.”
—-
—-
60 H
ertz
60FI
LtIn
put f
ilter
1.0
to 1
0.0
sec
“If d
ispl
ayed
, use
1.6
sec
as
a st
artin
g va
lue.
In-”
IF25
crea
se fo
r gr
eate
r fil
terin
g of
noi
sy s
igna
ls.
AL
LiSt
A1.H
iA
larm
1 s
etpo
int h
igh
Cur
rent
val
ue o
f “A
1.S
P”
toN
ot d
ispl
ayed
if c
onfig
ured
uni
quel
y fo
r se
nsor
U1
26lim
itup
per
rang
e lim
itbr
eak
or lo
op b
reak
ala
rm, o
r if
alar
m is
dis
able
d.A
1.L
oA
larm
1 s
etpo
int l
owLo
wer
ran
ge li
mit
to c
urre
nt v
alue
Z127
limit
for
full
scal
e al
arm
sof
“A
1.S
P”
Ala
rm 1
set
poin
t low
1 l.s
.d. t
o cu
rren
t val
ue o
f “A
1.S
P”
limit
for
devi
atio
n ba
ndal
arm
sA
1.H
YA
larm
1 h
yste
resi
s1
l.s.d
. to
effe
ctiv
e sp
anY1
28A
2.H
iA
larm
2 s
etpo
int h
igh
Cur
rent
val
ue o
f “A
2.S
P”
toN
ot d
ispl
ayed
if c
onfig
ured
uni
quel
y fo
r se
nsor
U2
30lim
itup
per
rang
e lim
itbr
eak
or lo
op b
reak
ala
rm, o
r if
alar
m is
dis
able
d.A
2.L
oA
larm
2 s
etpo
int l
owLo
wer
ran
ge li
mit
to c
urre
nt v
alue
Z230
limit
for
full
scal
e al
arm
sof
“A
2.S
P”
Ala
rm 2
set
poin
t low
1 l.s
.d. t
o cu
rren
t val
ue o
f “A
2.S
P”
limit
for
devi
atio
n ba
ndal
arm
sA
2.H
YA
larm
2 h
yste
resi
s1
l.s.d
. to
effe
ctiv
e sp
anY2
31
Table 4.1 - Adjustable parameters (Part 3)
Oper
ation

Operation
94 Installation Instructions4-6
Table 4.1 - Adjustable parameters (Part 4)
Mn
em
on
icP
ara
mete
rA
dju
sta
ble
ra
ng
eC
om
men
tsB
isyn
cM
od
/J
tty
LiSt
bA
Ud
Baud
rat
e se
lect
ion
300
baud
300
BR46
600
baud
600
1200
bau
d12
0024
00 b
aud
2400
4800
bau
d48
0096
00 b
aud
9600
19,2
00 b
aud
19.2
Ad
dr
Inst
rum
ent a
ddre
ss0.
0 to
9.9
EI-B
isyn
ch a
ddre
ss r
ange
AD
1 to
255
Mod
bus
and
Jbus
add
ress
ran
ge47
FLSH
Push
butto
n fla
sh d
urin
gO
Non
Usi
ng p
ushb
utto
ns o
verr
ides
pus
hbut
ton
flash
ing.
—-
—-
tran
smis
sion
OFF
oFF
Not
adj
usta
ble
thro
ugh
com
mun
icat
ions
link
.

Operation
94 Installation Instructions 4-7
AlarmsOne or 2 alarm output channels can be configured for operation: alarm 1 and alarm 2.The following descriptions apply to both.
Temperature alarm (configuration codes “1” through “5” for operation)If the measured value enters the alarm condition as defined by the configuration code,the appropriate red “AL1” or ”AL2” lamp lights up and the alarm relay is de-en-ergized (failsafe operation). The alarm is non latching; the lamp goes out and thealarm relay is re-energized as soon as the measured value enters the “safe” condition.
Sensor break alarm (For alarm relay output select configuration code “6” or “8”through “C” ). If the controller has detected that the sensor circuit has failed, then theoutput power level is forced to 0% and SnSr FAIL is displayed.A failed sensor is detected if:• the input signal is out of the selected sensor’s range,• the input is open circuit, or• the controller’s operating temperature is outside of the specified operating range (thermocouple inputs only).Upon reinstatement of the input sensor, the controller resumes controlling with thesame output power level used at the moment of the break.
Loop break alarm (For alarm relay output select configuration code “7” or “8”through “C” )For PID control, a loop break alarm occurs if the output remains at 0 or 100% and themeasured value moves less than 1/2 of ProP setting toward the setpoint within timesetting of LP.br.For ON/OFF control, a loop break alarm occurs if the measured value moves less than10% of the effective span towards the setpoint within the time setting of LP.br andthere is no change in the output state. [For definition of effective span, see section'Configuration Code' pg 3-3, (3rd digit, lower display).]If the unit detects a break in the control loop, then LP.Br is displayed. The display(and optional relay operation) is latching. To reset, touch any key while LP.Br is displayed. The output level is determined by the control algorithm during the alarmcondition.If self tuning is used to determine the PID parameter values, then the value of LP.brcan be automatically determined at the same time. Set LP.br to any value except oFFbefore starting self tuning; LP.br is then set to 2 x Int.t upon the completion of selftuning.To determine starting values for LP.br manually:PID control: Set LP.Br equal to or slightly longer than Int.t.ON/OFF control: Set LP.Br equal to one period of oscillation around setpoint (ON +OFF times).For both types of control: increase LP.Br if spurious alarms occur; decrease forgreater sensitivity.
Oper
ation

Operation
94 Installation Instructions4-8
NOTE: The above described operation of sensor break and loop breakalarms always occurs irrespective of the configuration of the alarmrelay.

Operation
94 Installation Instructions 4-9
Table 4.2 - Display messages
Mess
ag
eD
isp
lay
con
dit
ion
Use
r a
ctio
n/c
om
men
tsLO
OP
STA
TUS
MES
SAG
ESSn
SrSe
nsor
fail.
Inpu
t ope
n or
rev
erse
d; m
easu
red
Verif
y in
put s
enso
r an
d co
nnec
tions
. Mes
sage
FAIL
valu
e ou
tsid
e of
con
figur
ed r
ange
.di
sapp
ears
whe
n in
put s
igna
l is
rein
stat
ed.
mea
sure
d va
lue
Brea
k de
tect
ed in
con
trol
loop
. “V
erify
out
put d
evic
e, fu
ses,
wiri
ng a
nd h
eate
r.”
LP.b
rC
heck
that
inpu
t wiri
ng is
not
sho
rted
.A
ckno
wle
dge
by to
uchi
ng a
ny k
ey.
mea
sure
d va
lue
Setp
oint
ram
ping
in p
rogr
ess.
Setp
oint
and
“SP
.rr”
par
amet
erSP
.rr
still
use
r-ad
just
able
dur
ing
ram
ping
.m
easu
red
valu
eSe
tpoi
nt 2
sel
ecte
d.Se
tpoi
nt 1
may
be
adju
sted
in p
rote
cted
list
.SP
2H
HH
HM
easu
red
valu
e gr
eate
r th
an h
igh
sens
or li
mit.
Uni
t sho
uld
not b
e us
ed in
this
ran
ge.
setp
oint
LLLL
Mea
sure
d va
lue
less
than
low
sen
sor
limit.
Uni
t sho
uld
not b
e us
ed in
this
ran
ge.
setp
oint
para
m. m
nem
onic
Para
met
er v
alue
out
of r
ange
. May
hav
e re
sulte
dIn
gen
eral
, che
ck (a
nd r
eset
if r
equi
red)
LLLL
or H
HH
Hfr
om c
hang
e of
con
figur
atio
n co
de.
para
met
er v
alue
s af
ter
reco
nfig
urat
ion.
SELF
TU
NE
MES
SAG
ESm
easu
red
valu
eSe
lf tu
ning
in p
rogr
ess.
Ann
unci
atio
n on
ly. A
djus
tmen
t of s
etpo
int a
ndtu
nE
PID
val
ues
inhi
bite
d du
ring
self
tuni
ng.
tun
ESe
lf tu
ning
ope
ratio
n ha
s fa
iled
beca
use
Ack
now
ledg
e by
touc
hing
any
key
. Rem
ove
FAIL
cont
rolle
r ca
nnot
mai
ntai
n se
tpoi
nt.
“cau
se o
f fai
lure
: e.
g. h
eate
r fu
se b
low
n, e
tc.”
Lin
ELo
ss o
f con
trol
ler
pow
er d
urin
g se
lf-tu
ning
Ack
now
ledg
e by
touc
hing
any
key
. Ver
ifyFA
ILop
erat
ion
rend
ers
sam
pled
dat
a qu
estio
nabl
e.po
wer
sup
ply.
Rei
nitia
te s
elf t
unin
g pr
oced
ure.
SELF
DIA
GN
OST
IC M
ESSA
GES
tESt
Inte
rnal
sel
f tes
t upo
n po
wer
up.
Repl
ace
unit
if al
l fou
r 1’
s do
not
ligh
t up
or1111
fails
to g
o to
“8888
”.D
o no
t tou
ch fr
ont p
anel
dur
ing
self
test
.M
ess
ag
eD
isp
lay
con
dit
ion
Use
r a
ctio
n/c
om
men
ts8888
Dis
play
test
afte
r ab
ove
self
test
. Las
ts fo
rU
ser
shou
ld v
erify
that
all
digi
ts a
nd la
mps
ligh
t8888
appr
oxim
atel
y 3
seco
nds.
up to
pre
vent
err
oneo
us r
eadi
ngs.
EEM
emor
y co
rrup
tion.
Verif
y an
d co
rrec
t all
para
met
er a
nd c
onfig
ura-
FAIL
tion
valu
es. I
f dis
play
per
sist
s, r
epla
ce u
nit.
tty
Com
mun
icat
ions
har
dwar
e er
ror.
C
ycle
pow
er.
If di
spla
y pe
rsis
ts, r
epla
ce u
nit.
FAIL
(Mod
el 9
4c o
nly)
[Whi
le a
wai
ting
a re
plac
emen
t uni
t, it
is p
ossi
ble
to u
se u
nit w
ithou
t com
mun
icat
ions
by
disa
blin
gco
mm
unic
atio
ns in
con
figur
atio
n. S
et th
e la
stdi
git o
f the
con
figur
atio
n co
de to
“0”
.]
Oper
ation

Tuning and Adjustments
94 Installation Instructions Cont.5-i
Chapter 5
TUNING AND ADJUSTMENTS
Contents page
PID self tune procedure . . . . . . . . . . . . . . . . . . . . . . . . . . . . . . .5-1
PID manual tuning and procedure . . . . . . . . . . . . . . . . . . . . . . .5-2
Automatic droop compensation . . . . . . . . . . . . . . . . . . . . . . . . .5-3
ON/OFF control adjustment . . . . . . . . . . . . . . . . . . . . . . . . . . .5-3
Tunin
g


Tuning and Adjustments
94 Installation Instructions 5-1
Tunin
g
Chapter 5 TUNING AND ADJUSTMENTS
WARNING!
The two PID tuning procedures presented here are based on perturbation response; the step changes involved may be detrimental tosensitive systems.
Caution
On water cooled evaporative systems tuned with the self-tuning algorithm, damage can result to the system if COOL is improperly set.Be sure that COOL is set to H2O in this case.
For water cooling, be sure that the flow rate is correctly set before tuning.
NOTE: SP.rr must be set to oFF before performing either manual orself-tuning.
PID self tuning procedure
1. Set appropriate values for all parameters except ProP, Int.t, dEr.t, and LP.br. Also, set Cb.Lo and Cb.Hi to Auto if it is desired that their values be automatically determined.For PI control set dEr.t = oFF. For PD control set Int.t = oFF. For proportional only control set Int.t = dEr.t = oFF.The value for LP.br is also determined if the starting value is not set to oFF.It is important that the cycle time parameters (H ct and C ct) and the maximum power limit parameters (H PL and C PL) be set before the tuning operation. It is of extreme importance that COOL be correctly set.
2. Initiate self tuning by setting tunE to • Ht.Cl for heat/cool loops;• HEAt for heat-only loops or PID heat/ON/OFF cool loops; or• COOL for cool-only loops or ON/OFF heat/PID cool loops.
The tunE message will flash in the lower display.

3. Wait for the tuning operation to finish: tunE will no longer displayed.
4. The values for ProP, Int.t, and dEr.t, as well as Cb.Lo, Cb.Hi and LP.br can be viewed in the protected sub-lists.
5. See the Display messages table for tuning messages. (table 4.2)
PID manual tuning procedure
NOTE: Wait a sufficient period of time after each adjustment to see ifthe system will stabilize.
Heat-only or cool-only systems1. Set Cb.Lo and Cb.Hi to Auto. Set the
setpoint to the normal operating temperature. ProP = minimum, Int.t = OFF, and dEr.t = OFF. Observe the peak-to-peak amplitude (A) and period (T) of the oscillation of the measured value. This oscillation may not necessarily be centered about the setpoint.
2. Set ProP = 1.1 x A. If stable (probably not at setpoint) go to 3. If not, increase ProP until the temperature is stable.
3. Set Int.t = T. Wait at least 2 x T. If system becomes stable at setpoint, go to 4. If not, increase Int.t in small (<30%) steps until the temperature is stable at setpoint.
4. Set dEr.t = Int.t/6. If stable, go to 5. If not decrease dEr.t in small steps until temperature is stable. (dEr.t might have to be turned oFF.)
5. The loop should now be stable at setpoint. If not, try the following:• If Int.t is shorter than the period of oscillation, increase Int.t to be slightly longer
than the period. If stability is not achieved after several small increases, then try:• Increase ProP in several small (<30%) steps. If oscillations continue, try:• Set dEr.t = oFF. If the temperature is still unstable, try:• Set Int.t = oFF. If stable, go to 3 above and repeat. If not, increase ProP until
temperature is stable, then go to 3.
Heat/cool systemsThe procedure is similar to the procedure outlined above, except that a starting valueof rEL.c must be set before beginning. Use the starting values given in the Adjustableparameters table.
Tuning and Adjustments
94 Installation Instructions5-2
T
A

If there is not enough cooling action (rEL.c too small) the temperature remains above setpoint for a prolonged period of time and is very sluggishin dropping back to setpoint (assuming that the controller is requesting cooling out-put). Increase the value of rEL.c in this case.If there is too much cooling action (rEL.c too large) the temperature is rapidly pulleddown each time cooling is applied. This is characterized by a sawtooth shaped wave-form. Reduce the value of rEL.c.
Automatic droop compensationThe parameter Adc implements manual reset automatically. It can be used only if Int.t = oFF. Adc has two uses for PD or proportional only control loops:
• To place the proportional band symmetrically about the set point. Set Adc to 50pc.
• To reduce droop. Wait until the measured value has stabilized near the setpoint, thenset Adc to CALC. The loop resettles with little or no error. To remove further errors, wait for steady state and reselect CALC.The Adc value is maintained if the power to the instrument is cycled OFF and ON.
ON/OFF control adjustmentThe cycle time parameters, H ct and C ct, take on a different role in ON/OFF control—they define the minimum ON and OFF dwell times of the heat and cool outputs. This permits protection of output devices (such as mechanical contactors) and loads (such as compressors) from high switching frequencies without having to set hysteresis too wide.
First set H ct (and/or C ct) to the minimum switching ON or OFF time tolerated bythe output device or the load. Then progressively increase the hysteresis (H Hy and/orC Hy) to increase the time between output switching operations.
output demand level
temperature
setpoint
0%
heat
cool
Tuning and Adjustments
94 Installation Instructions 5-3
Tunin
g

Tuning and Adjustments
94 Installation Instructions5-4

94 Installation Instructions
Communications
Cont.6-i
Chapter 6
COMMUNICATIONS
Contents page
General....................................................................................6-1
EI Bisyc protocol........................................................................6-1
Process parameters ...................................................................6-2
Enumerated parameters ............................................................6-7
Hexadecimal parameters...........................................................6-7
Modbus and Jbus protocols .....................................................6-12
Process parameters .................................................................6-12
Binary parameters...................................................................6-12
Bit parameters ........................................................................6-18
Functions................................................................................6-19
Error codes .............................................................................6-19
Status byte ..............................................................................6-20
Reconfiguration through communications .................................6-20
Telemetary parameters............................................................6-21
Com
ms


Communications
94 Installation Instructions 6-1
Com
ms
Chapter 6 COMMUNICATIONS
(Model 94c only)
General• The communications hardware standard complies electrically with EIA-485, but is
connected as described by EIA-422-A. Refer to section 'Communications' p.2-4 for the wiring. Two different protocols can be selected by the configuration code (lower display, 4th digit): EI Bisync and Jbus/Modbus. It is assumed that the reader has access to documentation for the appropriate protocol; the information inthis manual pertains only to the Model 94c.
• It is possible to begin communications with the Model 94c approximately 10 seconds after the unit completes power-up self tests and parameter value check.
• Parameter value updates are verified against any existing limits that may apply to that parameter; e.g., the value of Setpoint 1 (SL) cannot be modified to 500 if the current value of Setpoints 1 and 2 high limit (HS) is 400. In such cases it is necessary to adjust first the subordinating parameter values, then the dependent parameter value.
• Any parameter can be read from (and written to, if read/write) even though it maynot be accessible from the front panel for the current configuration. For example, the PID parameters are not available for viewing or adjustment from the front panel if the unit is configured for ON/OFF control only. Through the communications link, however, the PID parameters can be retreived and modified as desired, even though they have no influence on ON/OFF control.
• During self tuning most read/write parameters become read-only. Those that do remain read/write are indicated in Tables 6.1 and 6.3.
EI Bisync protocolFor information concerning the protocol, refer to Doc. No. HA020161, InstrumentCommunications Handbook.The instrument parameters available through communications are listed in Table 6.1:EI Bisync Parameters. These parameters include: process parameters in engineeringunits, enumerated parameters, and hexadecimal (binary) parameters. The parametersare presented in the fast poll scroll order. Refer to Table 4.1 for further informationconcerning the use of each parameter.

Communications
94 Installation Instructions6-2
Process parametersThe precision and the units of the process parameters for communications purposesconform to those used on the front panel. If parameter values with more precision thanthe display value are received by the controller, they are accepted and rounded to thethe display precision for retransmission (if requested) to the host. The parameter limitsand display precisions are listed in Table 4.1.
Values for certain process parameters can be inspected only through the communica-tions link. The data format and units for those parameters related to the measuredvalue (SP, ER, 1S, and 1L) correspond to those for the measured value. The data format, range, and units for the 3 output power parameters (OP, 1P, and 2P) are givenin Table 6.1.

Communications
94 Installation Instructions 6-3
Com
ms
Table 6.1 - EI bisyc parameters (Part 1)
Fast
poll
EI B
isyn
cFr
on
tP
ara
mete
rD
ata
form
at
Acc
ess
Com
men
tssc
roll
mn
em
on
icp
an
el
ord
er
mn
em
on
ic1
PVN
one
Mea
sure
d va
lue
“°C
, °F
or L
in u
nits
”R/
O2
SWN
one
Stat
us w
ord
See
“Hex
adec
imal
R/W
“Rem
ains
R/W
eve
n if
TU =
HEA
T,Pa
ram
eter
s” ta
ble
CO
OL,
or
HTC
L.”
3O
PN
one
Out
put p
ower
-100
to 0
% (c
ool o
nly)
R/O
Valid
onl
y if
at le
ast o
ne o
utpu
t is
(unc
ompe
nsat
ed)
0 to
100
% (h
eat o
nly)
conf
igur
ed fo
r PI
D c
ontr
ol.
-100
to 1
00%
(hea
t/co
ol)
Repr
esen
ts P
ID a
lgor
ithm
out
put
with
out e
ffect
s of
HO
, LO
, RG
, DB
and
CA
.4
SPN
one
Inst
anta
neou
s se
tpoi
nt“°
C, °
F or
Lin
uni
ts”
R/O
Repr
esen
ts e
ffect
s of
ram
ping
an
d of
sw
itchi
ng b
etw
een
SL a
nd
S2. N
ot u
pdat
ed if
“Sn
Sr F
AIL
” di
spl
ayed
.5
SLSP
1Se
tpoi
nt 1
“°C
, °F
or L
in u
nits
”R/
W“T
arge
t” s
etpo
int
6S2
SP2
Setp
oint
2“°
C, °
F or
Lin
uni
ts”
R/W
“Tar
get”
set
poin
t7
SSSP
.12
Setp
oint
sel
ectio
nEn
umer
ated
:A
SCII:
R/W
“_”
indi
cate
s a
man
dato
ry s
pace
in0
SP_1
ASC
II pa
ram
eter
mne
mon
ic [A
SCII
1SP
_220
(hex
) or
32(d
ec)].
USE
ALL
CA
PS.
8SM
SP.S
PSe
tpoi
nt m
ode
sele
ctio
nEn
umer
ated
:A
SCII:
R/W
“_”
indi
cate
s a
man
dato
ry s
pace
in0
SP_1
ASC
II pa
ram
eter
mne
mon
ic [A
SCII
1SP
1220
(hex
) or
32(d
ec)].
USE
ALL
C
APS
.2
IP_2
9RR
SP.r
rSe
tpoi
nt r
amp
rate
°C/m
in.,
°F/m
in. o
rR/
W“0
” di
sabl
es r
ampi
ng, i
.e. s
tep
Lin
units
/min
.ch
ange
s in
set
poin
t are
ena
bled
.10
XPPr
oPPr
opor
tiona
l ban
d°C
, °F,
Lin
; or
% o
fR/
Wef
fect
ive
span
11TI
Int.t
Inte
gral
tim
e co
nsta
ntSe
cond
sR/
W“0
” tu
rns
inte
gral
act
ion
OFF
, i.e
.Pr
opor
tiona
l-on
ly o
r PD
con
trol
12TD
dEr.
tD
eriv
ativ
e tim
e co
nsta
ntSe
cond
sR/
W“0
” tu
rns
deriv
ativ
e ac
tion
OFF
,i.e.
Prop
ortio
nal-
only
or
PI c
ontr
ol13
LBC
B.Lo
Low
cut
back
“°C
, °F
or L
in u
nits
”R/
W“0
” se
ts “
Cb.
Lo”
to “
Aut
o”, i
.e.”
“Cb.
Lo”
= 3
x “
ProP
”

Communications
94 Installation Instructions6-4
Table 6.1EI bisyc parameters (Part 2)
Fast
poll
EI B
isyn
cFr
on
tP
ara
mete
rD
ata
form
at
Acc
ess
Com
men
tssc
roll
mn
em
on
icp
an
el
ord
er
mn
em
on
ic14
HB
CB.
Hi
Hig
h cu
tbac
k“°
C, °
F or
Lin
uni
ts”
R/W
“0”
sets
“C
b.H
i” to
“A
uto”
, i.e
.”“C
b.H
i” =
3 x
“Pr
oP”
15TU
tunE
Self
tune
on
dem
and
Enum
erat
ed:
ASC
II:R/
WU
SE A
LL C
APS
.0
OFF
Rem
ains
R/W
eve
n if
TU =
HEA
T,1
HEA
TC
OO
L, o
r H
TCL.
”2
CO
OL
Can
be
set t
o H
EAT,
CO
OL
or
3H
TCL
HTC
L on
ly if
RR
= 0
.16
A1
A1.
SPA
larm
1 s
etpo
int
“°C
, °F
or L
in u
nits
”R/
W17
A2
A2.
SPA
larm
2 s
etpo
int
“°C
, °F
or L
in u
nits
”R/
W18
CH
H c
tH
eat c
ycle
tim
eSe
cond
sR/
W19
YHH
Hy
Hea
t hys
tere
sis
“°C
, °F
or L
in u
nits
”R/
W20
CC
C c
tC
ool c
ycle
tim
eSe
cond
sR/
W21
YCC
Hy
Coo
l hys
tere
sis
“°C
, °F
or L
in u
nits
”R/
W22
DB
HC
.db
Hea
t-co
ol d
eadb
and
% o
f effe
ctiv
e sp
an (i
fR/
WO
N/O
FF c
ool c
ontr
ol)
% o
f out
put p
ower
(if
PID
coo
l con
trol
)23
AC
Adc
Aut
omat
ic d
roop
Enum
erat
ed:
ASC
II:R/
WU
SE A
LL C
APS
.co
mpe
nsat
ion
0O
FF1
50PC
2O
N3
CA
LC24
CA
CO
OL
Coo
ling
algo
rithm
Enum
erat
ed:
ASC
II:R/
WU
SE A
LL C
APS
.se
lect
ion
0LI
N1
H2O
2FA
N3
OIL
25H
OH
PL
Hea
t pow
er li
mit
% o
f out
put p
ower
R/W
26LO
C P
LC
ool p
ower
lim
it%
of o
utpu
t pow
erR/
W27
POO
FSt
Cal
ibra
tion
offs
etR/
W28
IFFI
LtIn
put f
ilter
Seco
nds
R/W

Communications
94 Installation Instructions 6-5
Com
ms
Table 6.1 - EI bisyc parameters (Part 3)
29RG
rEL.
CRe
lativ
e co
ol g
ain
Uni
tless
coe
ffici
ent
R/W
30BT
LP.b
rLo
opbr
eak
time
Seco
nds
R/W
“0”
disa
bles
loop
brea
k de
tect
ion.
31Y1
A1.
HY
Ala
rm 1
hys
tere
sis
“°C
, °F
or L
in u
nits
”R/
W32
Y2A
2.H
YA
larm
2 h
yste
resi
s“°
C, °
F or
Lin
uni
ts”
R/W
33U
1A
1.H
IA
larm
1 s
etpo
int h
igh
“°C
, °F
or L
in u
nits
”R/
Wlim
it34
Z1A
1.Lo
Ala
rm 1
set
poin
t low
“°C
, °F
or L
in u
nits
”R/
Wlim
it35
U2
A2.
HI
Ala
rm 2
set
poin
t hig
h“°
C, °
F or
Lin
uni
ts”
R/W
limit
36Z2
A2.
LoA
larm
2 s
etpo
int l
ow“°
C, °
F or
Lin
uni
ts”
R/W
limit
37M
NN
one
Mod
e nu
mbe
rSe
e “H
exad
ecim
alR/
WRe
mai
ns R
/W e
ven
if TU
= H
EAT,
”Pa
ram
eter
s” ta
ble
CO
OL,
or
HTC
L.”
38ER
Non
eEr
ror
(mea
sure
d va
lue
-°C
, °F
or L
in u
nits
R/O
setp
oint
)39
1PN
one
Cha
nnel
1 o
utpu
t pow
er0
to 1
00%
R/O
Repr
esen
ts P
ID a
lgor
ithm
out
put
(com
pens
ated
)w
ith e
ffect
s of
HO
or
LO, R
G, D
B,an
d C
A.
402P
Non
eC
hann
el 2
out
put p
ower
0 to
100
%R/
ORe
pres
ents
PID
alg
orith
m o
utpu
t(c
ompe
nsat
ed)
with
effe
cts
of H
O o
r LO
, RG
, DB,
and
CA
.41
HS
SP.H
iSe
tpoi
nts
1 an
d 2
“°C
, °F
or L
in u
nits
”R/
Whi
gh li
mit
42LS
SP.L
OSe
tpoi
nts
1 an
d 2
“°C
, °F
or L
in u
nits
”R/
Wlo
w li
mit
431H
Non
eSe
nsor
hig
h lim
it“°
C, °
F or
Lin
uni
ts”
R/O
441L
Non
eSe
nsor
low
lim
it“°
C, °
F or
Lin
uni
ts”
R/O
45BR
bAU
dBa
ud r
ate
sele
ctio
nEn
umer
ated
:A
SCII:
R/W
030
01
600
212
003
2400
448
005
9600
619
.2

Communications
94 Installation Instructions6-6
Fast
poll
EI B
isyn
cFr
on
tP
ara
mete
rD
ata
form
at
Acc
ess
Com
men
tssc
roll
mn
em
on
icp
an
el
ord
er
mn
em
on
ic46
AD
Add
rIn
stru
men
t add
ress
0.0
to 9
.9 (g
roup
R/
WD
ecim
al p
oint
is r
equi
red.
and
unit)
47BL
Non
eBu
ffer
leng
thSe
e “H
exad
ecim
alR/
WRe
mai
ns R
/W e
ven
if TU
= H
EAT,
Para
met
ers”
tabl
eC
OO
L, o
r H
TCL.
48EE
Non
eC
omm
unic
atio
ns e
rror
See
“Hex
adec
imal
R/W
code
Para
met
ers”
tabl
e49
CU
CF
UU
pper
con
figur
atio
nSe
e “H
exad
ecim
alR/
WSe
e “R
econ
figur
atio
n th
roug
hco
de (f
irst 4
dig
its)
Para
met
ers”
tabl
eco
mm
unic
atio
ns”
50C
LC
F L
Low
er c
onfig
urat
ion
See
“Hex
adec
imal
R/W
See
“Rec
onfig
urat
ion
thro
ugh
code
(las
t 4 d
igits
)Pa
ram
eter
s” ta
ble
com
mun
icat
ions
”51
CW
Non
eC
onfig
urat
ion
writ
eEn
umer
ated
:A
SCII:
R/W
See
“Rec
onfig
urat
ion
thro
ugh
enab
le0
LOC
Kco
mm
unic
atio
ns”
1G
O52
IMN
one
Inst
rum
ent m
ode
Enum
erat
ed:
ASC
II:R/
WSe
e “R
econ
figur
atio
n th
roug
h0
OPR
com
mun
icat
ions
”1
unus
ed2
CO
NF
53II
IdM
odel
num
ber
See
“Hex
adec
imal
R/O
Para
met
ers”
tabl
e54
V0N
one
Mai
n m
icro
cont
rolle
rSe
e “H
exad
ecim
alR/
Ove
rsio
n nu
mbe
rPa
ram
eter
s” ta
ble
55V1
Non
eC
omm
unic
atio
ns m
icro
See
“Hex
adec
imal
R/O
cont
rolle
r ve
rsio
n no
.Pa
ram
eter
s” ta
ble
56C
IN
one
Con
figur
atio
n in
fo.
See
“Hex
adec
imal
R/O
Para
met
ers”
tabl
e57
DI
Non
eD
igita
l tel
emet
ry in
put
See
“Hex
adec
imal
R/O
Ava
ilabl
e on
ly o
n co
mm
s m
icro
-Pa
ram
eter
s” ta
ble
cont
rolle
r ve
rsio
n no
s. 1
.1 a
ndgr
eate
r.58
DO
Non
eD
igita
l tel
emet
ry o
utpu
tSe
e “H
exad
ecim
alR/
WA
vaila
ble
only
on
com
ms
mic
ro-
Para
met
ers”
tabl
eco
ntro
ller
vers
ion
nos.
1.1
and
grea
ter.
Rem
ains
R/W
eve
n if
TU =
HEA
T,C
OO
L, o
r H
TCL.
Table 6.1 - EI bisyc parameters (Part 4)

Communications
94 Installation Instructions 6-7
Com
ms
Enumerated parametersEnumerated parameters can transmit and receive either numeric values (0, 1, 2…) orASCII strings preceded by an apostrophe (ASCII 2716 or 3910): e.g. ‘OFF, ‘HEAT,‘COOL… If the instrument receives any enumerated parameter value in ASCII, allother parameters switch into the ASCII mode. Similarly, while in the ASCII mode,reception of a numeric value causes all other parameters to revert to the numericmode. Both the numeric and ASCII enumerations are presented in Table 6.1.Enumerated parameters default to the numeric mode after the power is cycled to theinstrument.
Hexadecimal parametersHexadecimal parameter values consist of a string of 4 ASCII characters (0 through 9and A through F) preceded by > (3E16 or 6210). In some parameters certain hexadeci-mal characters are decomposed into 4 binary bits.In the Table 6.2 the 4 hexadecimal characters are represented from left to right as A,B, C, and D. Character A consists of the most significant bits (bits 15 through 12),character B consists of bits 11 through 8, and so forth. Each bit can have its own levelof access—either read/write (R/W) or read only (R/O). Read/write bits serve both as ameans of annunciation (read function) and as an input (write function). The writefunctions are presented in italics in the table. Several generalizations concerningread/write bits can be made:• Normally there are no bits that need to be set; it is only necessary to write zeroes.
Writing a 1 to a bit has no effect and is ignored; no NAK is retransmitted to the host in this case. (EXCEPTION: It is permitted to write a 1 to the digital telemetryoutput parameter DO.)
• To clear all clearable bits in a word transmit 000016. No NAK is returned if an attempt is made to clear a read-only bit, or if a read/write bit cannot be cleared.
• To clear a specific bit, transmit a word containing all ones except for a 0 in the place of the bit to be cleared.

Communications
94 Installation Instructions6-8
Table 6.2 - EI bisyc and Modbus/Jbus hexadecimal/binary parameters (Part 1)
EI B
isyn
cP
ara
mete
rD
ata
form
at
Com
men
tsm
nem
on
icH
ex
Bit
Bit
Rea
d f
un
ctio
nA
ccess
(M/J
bu
sd
igit
No.
valu
eIn
ita
lics
: W
rite
fu
nct
ion
(if
an
y)a
dd
ress
)SW
Stat
us w
ord
A15
0N
ot u
sed
R/O
(4)
140
Not
use
dR/
O13
1Se
tpoi
nt 2
act
ive
R/O
0Se
tpoi
nt 1
act
ive
121
Any
una
ckno
wle
gded
ala
rm p
rese
ntR/
WEI
bis
ync
only
: Sa
me
info
.0
No
unac
know
legd
ed a
larm
s pr
esen
tav
aila
ble
in b
it 15
of
Ack
now
ledg
ala
rms
“MN
”. W
ritin
g to
one
pa
ram
eter
als
o w
rites
to
the
othe
r.B
111
Setp
oint
ram
ping
ena
bled
R/O
0Se
tpoi
nt r
ampi
ng d
isab
led
101
Ala
rm 1
act
ive
R/O
0A
larm
1 c
lear
ed9
1Se
lf tu
ne in
pro
gres
s (T
U =
HEA
T,
R/O
CO
OL
or H
TCL)
0Se
lf tu
ne O
FF (T
U =
OFF
)8
1A
larm
2 a
ctiv
eR/
O0
Ala
rm 2
cle
ared
C7
1C
omm
s fa
ult (
“tty
FA
IL”
disp
laye
d)R/
W0
No
com
mun
icat
ions
faul
tA
ckno
wle
dge
“tty
FA
IL”;
cle
ar m
essa
gefr
om d
ispl
ay6
1M
emor
y co
rrup
tion
(“EE
FA
IL”
disp
laye
d)R/
W0
No
mem
ory
corr
uptio
n; “
EE F
AIL
” no
tdi
spla
yed
Ack
now
ledg
e “E
E FA
IL”;
cle
ar m
essa
gefr
om d
ispl
ayC
51
Para
met
er v
alue
cha
nged
from
fron
t pan
elR/
WEI
bis
ync
only
: Sa
me
info
.0
No
chan
ge in
par
amet
erav
aila
ble
in b
it 14
of
Ack
now
ledg
e ch
ange
in p
aram
eter
“MN
”. W
ritin
g to
one
pa
ram
eter
als
o w
rites
to
the
othe
r.

Communications
94 Installation Instructions 6-9
Com
ms
Table 6.2 - EI bisyc and Modbus/Jbus hexadecimal/binary parameters (Part 2)
41
“Tun
E FA
IL”
or “
LinE
FA
IL”
disp
laye
dR/
W0
“Tun
E FA
IL”
or “
LinE
FA
IL”
not d
ispl
ayed
Ack
now
ledg
e “T
unE
FAIL
” or
“Li
nE F
AIL
”;cl
ear
mes
sage
from
dis
play
D3
1“L
P.br
” di
spla
yed
R/W
0“L
P.br
” no
t dis
play
ed“C
lear
“LP
.br”
from
fron
t pan
el, i
f pos
sibl
e”2
0N
ot u
sed
R/O
11
Sens
or fa
il c
ondi
tion
(“Sn
Sr F
AIL
”R/
Odi
spla
yed)
0“S
nSr
FAIL
” no
t dis
play
ed0
0Fr
ee d
ata
form
atR/
OEI
bis
ync
only
: Fi
xed
form
at
not s
uppo
rted
by
94c.
MN
Mod
e nu
mbe
rA
151
Any
una
ckno
wle
gded
ala
rm p
rese
ntR/
WSa
me
info
rmat
ion
avai
labl
e in
bit
12 o
f “SW
”.W
ritin
g 0
No
unac
know
legd
ed a
larm
s pr
esen
tto
one
par
amet
er a
lso
Ack
now
ledg
e al
arm
sw
rites
to th
e ot
her.
141
Para
m'r
valu
e ch
ange
d fr
om fr
ont p
anel
R/W
Sam
e in
form
atio
n av
aila
ble
0N
o ch
ange
in p
aram
eter
in b
it 5
of “
SW”.
Writ
ing
to o
ne p
aram
eter
A
ckno
wle
dge
chan
ge in
par
amet
eral
so w
rites
to th
e ot
her.
130
Not
use
dR/
O12
1M
emor
y co
rrup
tion
OR
com
ms
faul
tR/
ORe
flect
s lo
gica
l ORi
ng o
f bits
(“EE
FA
IL”
OR
“tty
FA
IL”
disp
laye
d)6
and
7 of
“SW
”.0
No
mem
ory
corr
uptio
n O
R no
t com
ms
faul
t(N
eith
er “
EE F
AIL
” no
r “t
ty F
AIL
” di
spla
yed)
B11
0Fr
ee d
ata
form
atR/
OFi
xed
form
at n
ot s
uppo
rted
by
94c
.10
1Se
nsor
fail
con
ditio
n (“
SnSr
FA
IL”
R/O
disp
laye
d)0
“SnS
r FA
IL”
not d
ispl
ayed
91
Rese
t or
inst
rum
ent p
ower
cyc
le h
asR/
Woc
curr
ed.
0Re
set o
r in
stru
men
t pow
er c
ycle
has
not
occu
rred
.A
ckno
wle
dge
rese
t

Communications
94 Installation Instructions6-10
Table 6.2 - EI bisyc and Modbus/Jbus hexadecimal/binary parameters (Part 3)
EI B
isyn
cP
ara
mete
rD
ata
form
at
Com
men
tsm
nem
on
icH
ex
Bit
Bit
Rea
d f
un
ctio
nA
ccess
(M/J
bu
sd
igit
No.
valu
eIn
ita
lics
: W
rite
fu
nct
ion
(if
an
y)a
dd
ress
)M
NM
ode
num
ber
A8
0N
ot u
sed
R/O
Cal
l00
00N
ot u
sed
R/O
Dal
l00
00N
ot u
sed
R/O
CI
Con
figur
atio
nA
150
Not
use
dR/
Oin
form
atio
n14
1D
ual f
orm
at s
uppo
rtR/
OVa
riabl
e le
ngth
dat
a tr
ans
mis
sion
sup
port
ed.
130
Mul
ti-bl
ock
supp
ort
R/O
Mul
ti-bl
ock
data
tr
ansi
ssio
n n
ot s
uppo
rted
.12
0N
ot u
sed
R/O
Bal
l00
01Pr
imar
y ca
tego
ryR/
OEu
roth
erm
con
trol
ler
Cal
l00
01Se
cond
ary
cate
gory
R/O
Euro
ther
m c
ontr
olle
rD
all
0001
Tert
iary
cat
egor
yR/
OEu
roth
erm
con
trol
ler
DI
Dig
ital
Aal
l00
00N
ot u
sed
R/O
Ava
ilabl
e on
ly if
Com
ms
(51)
tele
met
ary
Bal
l00
00N
ot u
sed
R/O
mic
roco
ntro
ller
vers
ion
no.
inpu
tis
1.1
or
grea
ter.
Cal
l00
00N
ot u
sed
R/O
See
“Tel
emet
ryD
30
Not
use
dR/
OPa
ram
eter
s”.
20
Not
use
dR/
O1
1D
igita
l inp
ut c
lose
dR/
O0
Dig
ital i
nput
ope
n0
0N
ot u
sed
R/O
DO
Dig
ital
Aal
l00
00N
ot u
sed
R/O
Ava
ilabl
e on
ly if
Com
ms
(52)
tele
met
ary
Bal
l00
00N
ot u
sed
R/O
mic
roco
ntro
ller
vers
ion
no.
outp
utis
1.1
or
grea
ter.
C7
0N
ot u
sed
R/O
See
“Tel
emet
ry P
aram
eter
s”
60
Not
use
dR/
O5
1A
larm
1 r
elay
ene
rgiz
edR/
WEn
ergi
ze A
larm
1 r
elay
0A
larm
1 r
elay
de-
ener
gize
dD
e-en
ergi
ze A
larm
1 r
elay
40
Not
use
dR/
OD
all
0000
Not
use
dR/
O

Communications
94 Installation Instructions 6-11
Com
ms
Table 6.2 - EI bisyc and Modbus/Jbus hexadecimal/binary parameters (Part 4)
BLM
ax. b
uffe
rA
B07
7-ch
arac
ter
tran
smis
sion
buf
fer
R/W
No.
of c
har.
bet
wee
n ST
Xle
ngth
088
char
acte
r tr
ansm
issi
on b
uffe
ran
d ET
X. R
ever
ts to
07
afte
run
it re
set.
CD
088-
char
acte
r co
mm
unic
atio
ns b
uffe
rR/
OM
ax. t
rans
mis
sion
buf
fer
leng
thEE
Com
ms
AB
00N
o er
ror
R/O
erro
r co
de:
01In
valid
mne
mon
icIn
stru
men
t err
or02
Com
mun
icat
ions
che
cksu
m e
rror
code
:03
Line
err
or -
par
ity, f
ram
ing
or o
verr
un04
Not
use
d05
Writ
e at
tem
pt o
n re
ad-o
nly
para
met
er06
Not
use
d07
Inva
lid d
ata
form
at08
Dat
a ou
t of r
ange
Inst
rum
ent
C1
Prim
ary
cate
gory
- E
urot
herm
con
trol
ler
R/O
Dup
licat
e of
info
rmat
ion
in C
I, ca
tego
ryhe
x di
git B
.In
stru
men
tD
0N
o er
ror
R/O
er
ror
1C
hara
cter
err
or-
parit
y, fr
amin
g or
ca
tego
ryov
erru
n2
Mes
sage
dat
a er
ror
(che
cksu
m)
7In
valid
mes
sage
(e.g
. mne
mon
ic u
nkno
wn)
8In
valid
mes
sage
con
tent
(e.g
. ran
ge e
rror
acc
ess)
CU
Upp
erA
BCD
any
valid
See
chap
ter
3, 'C
onfig
urat
ion
code
' R/
WSe
e 'R
econ
figur
atio
n th
roug
h (4
8)co
nfig
urat
ion
com
mun
icat
ions
'co
de (f
irst 4
dig
its)
CU
Upp
erA
BCD
any
valid
See
chap
ter
3, 'C
onfig
urat
ion
code
' R/
WSe
e 'R
econ
figur
atio
n th
roug
h (4
9)co
nfig
urat
ion
com
mun
icat
ions
'co
de (f
irst 4
dig
its)
IIM
odel
no.
ABC
D94
C0
Mod
el 9
4cR/
OV0
Mai
n A
B00
-99
Maj
or v
ersi
on n
umbe
rR/
OEx
ampl
e: 0
102
= v
ersi
on 1
.2(1
23)
mic
roco
ntro
ller
CD
00-9
9M
inor
ver
sion
num
ber
vers
ion
no.
V1C
omm
s A
B00
-99
Maj
or v
ersi
on n
umbe
rR/
OEx
ampl
e: 0
102
= v
ersi
on 1
.2(1
24)
mic
roco
ntro
ller
CD
00-9
9M
inor
ver
sion
num
ber
vers
ion
no.

Communications
94 Installation Instructions6-12
Modbus and Jbus protocolsRefer to Modbus or Jbus documentation for generalities about these protocols; theRTU (remote terminal unit) version is implemented. Modbus and Jbus are treated as acombined protocol; the parameter addresses are the same in both cases.
The instrument parameters available through communications are listed in Table 6.3:Modbus/Jbus Parameters. These parameters include the word parameters: processparameters in engineering units, enumerated parameters, and hexadecimal (binary)parameters. Refer to Table 4.1 for further information concerning the use of eachparameter.
Word addresses 0, 7, 33, and 53 through 120 do not contain parameters and are read-only. When read, addresses 0, 7, and 33 return a value of 0. Addresses 53 through 120return the largest negative number, -32768.
If a block read uses a valid starting address, but attempts to read bit addreses beyond16 or word addresses beyond 124, only the valid parameters are returned. The bytecount in the reply reflects only the data up to the highest address (16 or 124 as the casemay be).
Process parametersThe precision and the units of the process parameters for communications purposesconform to those used on the front panel. Since data are always transmitted as integers, the placement of the decimal point is implicit to the particular parameter.Parameter resolutions are listed in Table 6.3. Those parameters for which the resolution follows that of the measured value (PV) have “As PV” for the entry in the“Resolution” column of the table. The parameter limits are listed in Table 4.1.
Values for certain process parameters can be inspected only through the communications link. The data format and units for those parameters related to themeasured value (addresses 2, 5, 11, and 12) correspond to those for the measuredvalue. The resolution, range, and units for the 3 output power parameters (addresses 3,15, and 16) are given in Table 6.3.
Binary parametersBinary parameters consist of a 16-bit word which is either interpreted on a bit-wise orhalf-byte-wise basis. They are presented in Table 6.2; the Modbus/Jbus addresses areindicated in italics.Each bit can have its own level of access—either read/write (R/W) or read only (R/O).Read/write bits serve both as a means of annunciation (read function) and as an input(write function). The write functions are presented in italics in the table. Several generalizations concerning read/write bits can be made:

Communications
94 Installation Instructions 6-13
Com
ms
• Normally there are no bits that need to be set; it is only necessary to write zeroes. Writing a 1 to a bit has no effect and is ignored; no error code is retransmitted to the host in this case. (EXCEPTION: It is permitted to write a 1 to the digital telemetry output parameter—address 52.)
• To clear all clearable bits in a word transmit 000016. No error code is returned if an attempt is made to clear a read-only bit, or if a read/write bit cannot be cleared.
• To clear a specific bit, transmit a word containing all ones except for a 0 in the place of the bit to be cleared.

Communications
94 Installation Instructions6-14
Mod
bu
s/Fr
on
tP
ara
mete
rD
ata
form
at
Reso
luti
on
Acc
ess
Com
men
tsJb
us
word
pa
nel
ad
dre
ssm
nem
on
ic0
Non
eN
ot u
sed
—-
—-
R/O
1N
one
Mea
sure
d va
lue
(PV)
“°C
, °F
or L
in u
nits
”1,
0.1
,R/
Oor
0.0
12
Non
eIn
stan
tane
ous
setp
oint
“°C
, °F
or L
in u
nits
”A
s PV
R/O
Repr
esen
ts e
ffect
s of
ram
pin
g an
d of
sw
itchi
ng b
etw
een
17 a
nd 1
8. N
ot u
pdat
ed if
“S
nSr
FAIL
” di
spla
yed.
3N
one
Out
put p
ower
-100
to 0
% (c
ool o
nly)
1R/
OVa
lid o
nly
if at
leas
t one
out
-(u
ncom
pens
ated
)0
to 1
00%
(hea
t onl
y)pu
t is
conf
igur
ed fo
r PI
D
cont
rol.
-100
to 1
00%
(hea
t/co
ol)
Repr
esen
ts P
ID a
lgor
ithm
ou
tput
with
out e
ffect
s of
40
thro
ugh
44.
4N
one
Stat
us w
ord
See
“Hex
adec
imal
—-
R/W
“Rem
ains
R/W
eve
n Pa
ram
eter
s” ta
ble
if va
lue
of 3
2 =
1,
2, o
r 3
5N
one
Erro
r (m
easu
red
valu
e -
°C, °
F or
Lin
uni
tsA
s PV
R/O
setp
oint
)6
ProP
Prop
ortio
nal b
and
“°C
, °F,
Lin
; or
% o
f”A
s PV
or
R/W
effe
ctiv
e sp
an0.
1 if
%7
Non
eN
ot u
sed
—-
—-
R/O
8In
t.tIn
tegr
al ti
me
cons
tant
Seco
nds
1R/
W““
0” tu
rns
inte
gral
act
ion
OFF
, i.e
.”Pr
opor
tiona
l-on
ly
or P
D c
ontr
ol9
dEr.
tD
eriv
ativ
e tim
e co
nsta
ntSe
cond
s1
R/W
““0”
turn
s de
rivat
ive
actio
n O
FF, i
.e.”
Pro
port
iona
l-on
ly
or P
I con
trol
10H
ct
Hea
t cyc
le ti
me
Seco
nds
0.1
R/W
11N
one
Sens
or lo
w li
mit
“°C
, °F
or L
in u
nits
”A
s PV
R/O
12N
one
Sens
or h
igh
limit
“°C
, °F
or L
in u
nits
”A
s PV
R/O
13A
1.SP
Ala
rm 1
set
poin
t“°
C, °
F or
Lin
uni
ts”
As
PVR/
W14
A2.
SPA
larm
2 s
etpo
int
“°C
, °F
or L
in u
nits
”A
s PV
R/W
Table 6.3 - Modbus/Jbus word parameters (Part 1)

Communications
94 Installation Instructions 6-15
Com
ms
15N
one
Cha
nnel
1 o
utpu
t pow
er0
to 1
00%
1R/
ORe
pres
ents
PID
alg
orith
m
(com
pens
ated
)ou
tput
with
effe
cts
of 4
1 th
roug
h 44
.16
Non
eC
hann
el 2
out
put o
pwer
0 to
100
%1
R/O
Repr
esen
ts P
ID a
lgor
ithm
(c
ompe
nsat
ed)
outp
ut w
ith e
ffect
s of
40
thro
ugh
44.
17SP
1Se
tpoi
nt 1
“°C
, °F
or L
in u
nits
”A
s PV
R/W
“Tar
get”
set
poin
t18
SP2
Setp
oint
2“°
C, °
F or
Lin
uni
ts”
As
PVR/
W“T
arge
t” s
etpo
int
19SP
.SP
Setp
oint
mod
e se
lect
ion
Enum
erat
ed:
Dis
play
:1
R/W
0SP
11
SP.1
22
IP 2
20SP
.12
Setp
oint
sel
ectio
nEn
umer
ated
:D
ispl
ay:
1R/
W0
SP 1
1SP
221
SP.H
iSe
tpoi
nts
1 an
d 2
“°C
, °F
or L
in u
nits
”A
s PV
R/W
high
lim
it22
SP.L
OSe
tpoi
nts
1 an
d 2
“°C
, °F
or L
in u
nits
”A
s PV
R/W
low
lim
it3
HtC
L23
SP.r
rSe
tpoi
nt r
amp
rate
“°C
/min
., °F
/min
. or
“0.
01R/
W““
0” d
isab
les
ram
ping
, i.e
. st
ep”
chan
ges
inse
tpoi
nt
are
enab
led.
24O
FSt
Cal
ibra
tion
offs
et“°
C, °
F or
Lin
uni
ts”
0.1
if °C
R/
Wor
°F
0.01
if
Lin
25FI
LtIn
put f
ilter
Seco
nds
0.1
R/W
26A
1.H
iA
larm
1 s
etpo
int h
igh
“°C
, °F
or L
in u
nits
”A
s PV
R/W
limit
27A
1.Lo
Ala
rm 1
set
poin
t low
“°C
, °F
or L
in u
nits
”A
s PV
R/W
limit
28A
1.H
YA
larm
1 h
yste
resi
s“°
C, °
F or
Lin
uni
ts”
As
PVR/
W29
A2.
Hi
Ala
rm 2
set
poin
t hig
h“°
C, °
F or
Lin
uni
ts”
As
PVR/
Wlim
it
Table 6.3 - Modbus/Jbus word parameters (Part 2)

Communications
94 Installation Instructions6-16
Table 6.3 - Modbus/Jbus word parameters (Part 3)
Mod
bu
s/Fr
on
tP
ara
mete
rD
ata
form
at
Reso
luti
on
Acc
ess
Com
men
tsJb
us
word
pa
nel
ad
dre
ssm
nem
on
ic30
A2.
LoA
larm
2 s
etpo
int l
ow“°
C, °
F or
Lin
uni
ts”
As
PVR/
Wlim
it31
A2.
HY
Ala
rm 2
hys
tere
sis
“°C
, °F
or L
in u
nits
”A
s PV
R/W
32tu
nESe
lf tu
ne o
n de
man
dEn
umer
ated
:Dis
play
:1
R/W
“Rem
ains
R/W
eve
n if
valu
e0
oFF
of 3
2 =
1, 2
or
31
HEA
t“C
an b
e se
t to
1, 2
or
3 on
ly2
Coo
L23
= 0
33N
one
Not
use
d—
-—
-R/
O34
Cb.
LoLo
w c
utba
ck“°
C, °
F or
Lin
uni
ts”
As
PVR/
W““
0” s
ets
“Cb.
Lo”
to “
Aut
o”,
i.e.”
“C
b.Lo
” =
3 x
“Pr
oP”
35C
b.H
iH
igh
cutb
ack
“°C
, °F
or L
in u
nits
”A
s PV
R/W
““0”
set
s “C
b.H
i” to
“A
uto”
, i.e
. “C
b.H
i” =
3 x
“Pr
oP”
36A
dcA
utom
atic
dro
opEn
umer
ated
: D
ispl
ay:
1R/
Wco
mpe
nsat
ion
0oF
F1
50Pc
2on
3C
ALC
37H
Hy
Hea
t hys
tere
sis
“°C
, °F
or L
in u
nits
”A
s PV
R/W
38C
ct
Coo
l cyc
le ti
me
Seco
nds
0.1
R/W
39C
Hy
Coo
l hys
tere
sis
“°C
, °F
or L
in u
nits
”A
s PV
R/W
40H
C.d
bH
eat-
cool
dea
dban
d%
of e
ffect
ive
span
(if
0.1
R/W
ON
/OFF
coo
l con
trol
)%
of o
utpu
t pow
er (i
f PID
co
ol c
ontr
ol)
41rE
L.C
Rela
tive
cool
gai
nU
nitle
ss c
oeffi
cien
t0.
1R/
W42
CO
OL
Coo
ling
algo
rithm
Enum
erat
ed:D
ispl
ay:
1R/
Wse
lect
ion
0Li
n1
H2O
2FA
n3
OIL
43H
PL
Hea
t pow
er li
mit
% o
f out
put p
ower
0.1
R/W
44C
PL
Coo
l pow
er li
mit
% o
f out
put p
ower
0.1
R/W

Communications
94 Installation Instructions 6-17
Com
ms
45LP
.br
Loop
brea
k tim
eSe
cond
s1
R/W
“0”
disa
bles
loop
brea
k de
tect
ion.
46bA
Ud
Baud
rat
e se
lect
ion
Enum
erat
ed:
Dis
play
:1
R/W
030
01
600
212
003
2400
448
005
9600
619
.247
Add
rIn
stru
men
t add
ress
1 to
255
(dec
)1
R/W
48C
F U
Upp
er c
onfig
urat
ion
See
“Hex
adec
imal
1R/
WSe
e “R
econ
figur
atio
n co
de (f
irst 4
dig
its)
Para
met
ers”
tabl
eth
roug
h co
mm
unic
atio
ns”
49C
F L
Low
er c
onfig
urat
ion
See
“Hex
adec
imal
1R/
WSe
e “R
econ
figur
atio
n co
de (l
ast 4
dig
its)
Para
met
ers”
tabl
eth
roug
h co
mm
unic
atio
ns”
50N
one
Con
figur
atio
n w
rite
Enum
erat
ed:
Dis
play
:1
R/W
See
“Rec
onfig
urat
ion
enab
le0
(lock
)no
neth
roug
h co
mm
unic
atio
ns”
1 (g
o)no
ne51
Non
eD
igita
l tel
emet
ry in
put
See
“Hex
adec
imal
1R/
OA
vaila
ble
only
on
com
ms
Para
met
ers”
tabl
em
icro
-con
trol
ler
vers
ion
nos.
1.1
and
gre
ater
.52
Non
eD
igita
l tel
emet
ry o
utpu
tSe
e “H
exad
ecim
al1
R/W
Ava
ilabl
e on
ly o
n Pa
ram
eter
s” ta
ble
mic
ro-c
ontr
olle
r ve
rsio
n no
s. 1
.1 a
nd g
reat
er.
Rem
ains
R/W
eve
n if
valu
e of
32
= 1
, 2, o
r 3.
53-1
20N
one
Not
use
d—
-—
-R/
O12
1N
one
Com
pany
iden
tific
atio
n50
0 (d
ec)
1R/
O12
2Id
Mod
el n
umbe
rSe
e “H
exad
ecim
al1
R/O
Para
met
ers”
tabl
e12
3N
one
Mai
n m
icro
cont
rolle
rSe
e “H
exad
ecim
al1
R/O
vers
ion
num
ber.
Para
met
ers”
tabl
e12
4N
one
Com
mun
atio
ns m
icro
See
“Hex
adec
imal
1R/
Oco
ntro
ller
vers
ion
no.
Para
met
ers”
tabl
e
Table 6.3 - Modbus/Jbus word parameters (Part 4)
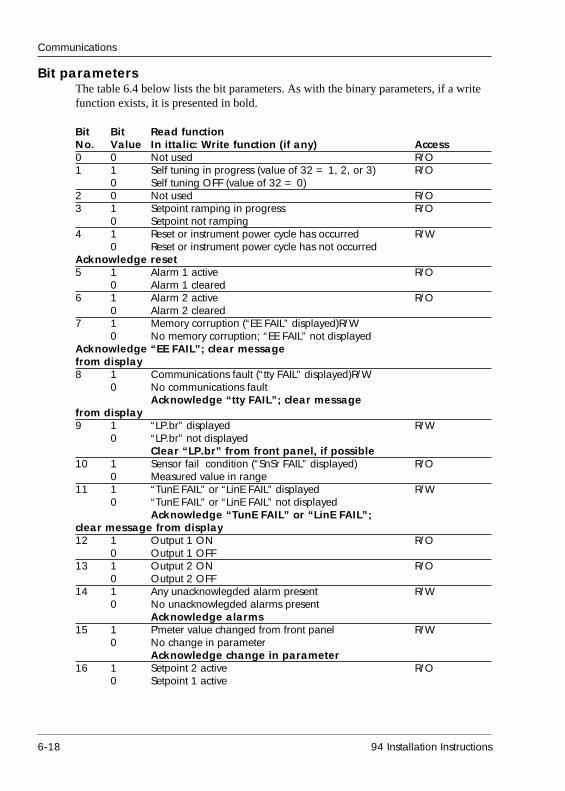
Communications
94 Installation Instructions6-18
Bit parametersThe table 6.4 below lists the bit parameters. As with the binary parameters, if a writefunction exists, it is presented in bold.
Bit Bit Read functionNo. Value In ittalic: Write function (if any) Access0 0 Not used R/O1 1 Self tuning in progress (value of 32 = 1, 2, or 3) R/O
0 Self tuning OFF (value of 32 = 0)2 0 Not used R/O3 1 Setpoint ramping in progress R/O
0 Setpoint not ramping4 1 Reset or instrument power cycle has occurred R/W
0 Reset or instrument power cycle has not occurredAcknowledge reset5 1 Alarm 1 active R/O
0 Alarm 1 cleared6 1 Alarm 2 active R/O
0 Alarm 2 cleared7 1 Memory corruption (“EE FAIL” displayed)R/W
0 No memory corruption; “EE FAIL” not displayedAcknowledge “EE FAIL”; clear message from display8 1 Communications fault (“tty FAIL” displayed)R/W
0 No communications faultAcknowledge “tty FAIL”; clear message
from display9 1 “LP.br” displayed R/W
0 “LP.br” not displayedClear “LP.br” from front panel, if possible
10 1 Sensor fail condition (“SnSr FAIL” displayed) R/O0 Measured value in range
11 1 “TunE FAIL” or “LinE FAIL” displayed R/W0 “TunE FAIL” or “LinE FAIL” not displayed
Acknowledge “TunE FAIL” or “LinE FAIL”;clear message from display12 1 Output 1 ON R/O
0 Output 1 OFF13 1 Output 2 ON R/O
0 Output 2 OFF14 1 Any unacknowlegded alarm present R/W
0 No unacknowlegded alarms presentAcknowledge alarms
15 1 P'meter value changed from front panel R/W0 No change in parameter
Acknowledge change in parameter16 1 Setpoint 2 active R/O
0 Setpoint 1 active

Communications
94 Installation Instructions 6-19
Com
ms
FunctionsThe following functions are implemented:
Code Operation01 or 02 Read n bits03 or 04 Read n words05 Write 1 bit06 Write 1 word07 Fast read of status byte
Table 6.5 - Modbus/Jbus functions
Error codesThese error codes are associated with the functions:
Function Error codecode 01:Invalid 02: Invalid 03: Invalid
function address data01 or 02 303 or 04 305 3 3 306 3 3 3
Table 6.6 - Modbus/Jbus error codes

Communications
94 Installation Instructions6-20
Status byteThe fast read function (07) returns the 8 read/only bits of information shown in Table6.7. These bits are a subset of the bit parameters in table 6.4 on page 6-24. Note that itis possible to write to these parameters only through the bit parameter addresses.
Bit No. Bit value Read functionIn fast read A bit addressstatus byte (Functions(Function 07) 01, 02, 05)0 1 1 Self tuning in progress (value of
32 = 1, 2, or 3)0 Self tuning OFF
(value of 32 = 0)1 3 1 Setpoint ramping enabled
0 Setpoint ramping disabled2 5 1 Alarm 1 active
0 Alarm 1 cleared3 6 1 Alarm 2 active
0 Alarm 2 cleared4 9 1 “LP.br” displayed
0 “LP.br” not displayed5 10 1 Sensor fail condition
(“SnSr FAIL” displayed)0 Measured value in range
6 12 1 Output 1 ON0 Output 1 OFF
7 13 1 Output 2 ON0 Output 2 OFF
Table 6.7 - Modbus/Jbus fast read function bits
Reconfiguration through communicationsThere are 2 methods for reconfiguring the Model 94c through digital communications:• Method one is the preferred method; it retains the original value of the instrument
address (AD in EI Bisync, 47 in Modbus/Jbus). Only the upper and lower configuration words can be modified.
• Method two, available only with the EI Bisync protocol, temporarily changes the instrument address to 0.0 during the configuration. Other parameter values in addition to the configuration words can be modified by repeating the procedure.
WARNING!
It is the user’s responsibility to ensure that remote reconfiguration ofthe controller would not present any hazard to personnel or equipment.Controller operation is momentarily disabled during reset.

Step Method 1 - with CW (50) Method 2 - with IMNo. EI Bisync and Modbus/Jbus EI Bisync only1 Write upper configuration codes Write CONF (or 2) to
to CU (4)) (if required). Write instrument IM.lower configuration code to Instrument address ADuse old configuration codes automatically set to 0.0. until reset occurs. Use this address duringContinue with original instrument reconfigurationaddress AD (47). procedure.
2 Write GO (or 1) to Configuration Write upper write enable CW (50). configuration code to NOTE: Any communication with CU (if required). Write the instrument between CU (48) lower configuration and/or CL (49) and CW(50) code to CL ( if required).cancels reset and reconfiguration. Instrument continues to
use old configurationcodes until reset occurs.Write OPR (or 0) to IM.AD reverts to original value.
3 Instrument resets if CU (48) and/or CL (49) have been changed. Parameter value check viewable on front panel display. Instrument does not control during reset.
4 Instrument controls with new Instrument controls withconfiguration. Set in new new configuration parameter value if required. values. Repeat
procedure for parame-ter values.
Table 6.8 - Procedures for reconfiguration through communications
Telemetry parametersTelemetry on the Model 94c allows remote reading of the state of the digital input andremote operation of the Alarm 1 relay. This feature is available on units whose communications microcontroller version no. (V1 or 124) is greater than or equal to1.1. The EI Bisync parameters involved are DI (Digital telemetry input) and DO(Digital telemetry output). The respective Modbus/Jbus addresses are 51 and 52.
Digital telemetry input DISetup• Both the upper configuration word and the setpoint mode selection parameter need
to be selected:Set the 4th digit of the upper configuration word CU to either 4 or 5.
• Setpoint mode selection SP.SP should be set to either SP 1 or SP.12. [Should IP 2 be selected, the digital telemetry input still operates, but changes in the input causethe instrument to toggle between SP 1 and SP 2.]
Communications
94 Installation Instructions 6-21
Com
ms

Communications
94 Installation Instructions6-22
Operation• Reading a value of 1 for DI indicates that the digital input
terminals are short-circuited. A value of zero indicates that the digital input terminals are open circuited. [If the digital telemetry input is not enabled, then the value of DI (51) represents the state of logic output 2 as determined by the configuration and the control algorithm.]
Digital telemetry output DOSetup• To enable set the 1st digit of the lower configuration word
CL to 5 (Full scale high alarm). [If it is attempted to write toDO without having previously made this configuration, then the instrument returns NAK (EI Bisync) or error code 01 (Modbus/Jbus).]
• After each instrument reconfiguration (and the subsequent parameter value check on the front display), the value of DO (52) must be initialized: Write a 1 to energize the Alarm 1 relay, or a zero to deenergize the relay.
Operation• To energize the Alarm 1 relay: Write a 1 to DO (52). The
AL1 lamp on the front panel goes out. • To deenergize the Alarm 1 relay: Write a zero to DO (52).
The AL1 lamp on the front panel lights up.• Table 6.9 details the values of the front panel parameters
and the communications parameters for the 2 possible values of DO (52).
Value of State of: Value of:DO (52) AL1 lamp A1.SP A1.HI A1.Lo
Alarm 1 relay A1 (13) U1 (26) Z1 (27)
1 OFF HHHH LLLL Prev. valueEnergized 15000.0 Prev. value Prev. value
0 ON LLLL Prev. value HHHHDeenergized -15000.0 Prev. value Prev. value
Table 6.9 - Digital telemetry output operation: Relationships between Alarm 1 relay state, and values of front panel parameters and communications parameters
NOTE: While the digital telemetry output func-tion is in use do not modify the values of A1.SP,A1.HI, and A1.Lo from the front panel orthrough the communications link.

94 Installation Instructions
Rec
ord
s
User's Records
Cont.7-i
Chapter 7
USERS'S RECORDS


Chapter 7 USER’S RECORDSWrite down parameter values in this table.
Open list ExampleSP Setpoint 70°C
°C Display units °Cor °F
tunE Self tune ondemand oFF
SP.12 Setpoint selection SP 1
A1.SP Alarm 1 setpoint 100°C
A2.SP Alarm 2 not setpoint configured
Protected list entry pointId Model number 94c 94 or 94c 94 or 94c 94 or 94c
CFU Upper config.code 3022
CFL Lower config. 5571code
Pid LIStProp Proportional
band 60°CInt.t Integral time
constant 360sDer.t Derivative time
constant 60sCb.Lo Low cutback 180°C
Cb.Hi High cutback 180°C
Adc Auto. droop compensation oFF
OP LIStH ct Heat cycle time 20s
H HY Heat hysteresis not configured
C ct Cool cycle time 10s
User's Records
94 Installation Instructions 7-1
Rec
ord
s

User's Records
94 Installation Instructions7-2
OP LISt (continued) ExampleC HY Cool not
hysteresis configuredHC.db Heat-cool
deadband 0.0%rEL.C Relative cool
gain 0.5COOL Cooling
algorithm H2OH PL Heat power
limit 100.0%C PL Cool power
limit 100.0%LP.br Loopbreak
time 720s
SP LIStSP.Hi Setpoints 1 & 2
high limit 100°CSP.Lo Setpoints 1 & 2
low limit 30°CSp.rr Setpoint
ramp rate oFFSP 1 Setpoint 1 70°C
SP 2 Setpoint 270°C
SP.SP Setpoint mode selection SP.12
OFSt Calibration offset 0.0°C
LinE Line frequency 60Hz
FILt Input filter 1.6s
AL LIStA1.Hi Alarm 1 SP
high limit 100°CA1.Lo Alarm 1 SP
low limit 100°CA1. Hy Alarm 1
hysteresis 2°CA2.Hi Alarm 2 SP not
high limit configuredA2.Lo Alarm 2 SP not
low limit configuredA2. Hy Alarm 2 not
hysteresis configured

tty LISt ExamplebAUd Baud rate
selection 19.2Addr Instrument
address 2.0FLSH Pushbutton
flash on
Write down parameter values in this table.Open listSP Setpoint
°C Display unitsor °F
tunE Self tune ondemand
SP.12 Setpoint selection
A1.SP Alarm 1 setpoint
A2.SP Alarm 2 setpoint
Protected list entry pointId Model number 94 or 94c 94 or 94c 94 or 94c 94 or 94c
CFU Upper config.code
CFL Lower config.code
Pid LIStProp Proportional
bandInt.t Integral time
constantDer.t Derivative time
constantCb.Lo Low cutback
Cb.Hi High cutback
Adc Auto. droop compensation
User's Records
94 Installation Instructions 7-3
Rec
ord
s

User's Records
94 Installation Instructions7-4
OP LIStH ct Heat cycle time
H HY Heat hysteresis
C ct Cool cycle time
C HY Coolhysteresis
HC.dbHeat-cool deadband
rEL.C Relative cool gain
COOLCooling algorithm
H PL Heat power limit
C PL Cool power limit
LP.br Loopbreaktime
SP LIStSP.Hi Setpoints 1 & 2
high limitSP.Lo Setpoints 1 & 2
low limitSp.rr Setpoint
ramp rateSP 1 Setpoint 1
SP 2 Setpoint 2
SP.SP Setpoint mode selection
OFSt Calibration offset
LinE Line frequency
FILt Input filter
AL LIStA1.Hi Alarm 1 SP
high limitA1.Lo Alarm 1 SP
low limitA1. HyAlarm 1
hysteresisA2.Hi Alarm 2 SP
high limit

AL LISt (continued)A2.Lo Alarm 2 SP
low limitA2. Hy Alarm 2
hysteresis
tty LIStbAUd Baud rate
selectionAddr Instrument
addressFLSH Pushbutton
flash
User's Records
94 Installation Instructions 7-5
Rec
ord
s
![S90 XS/S70 XS Editor VST Owner's Manual - Yamaha · Starting the S90 XS/S70 XS Editor VST S90 XS/S70 XS Editor VST Owner’s Manual 6 13. In Quick Set Up, select [1] or [2]. nFor](https://cdn.vdocument.in/doc/165x107/5fa5d7be5c20e054d9711161/s90-xss70-xs-editor-vst-owners-manual-yamaha-starting-the-s90-xss70-xs-editor.jpg)


