Please review site plans before proceeding. Contact LSI Customer Service at 1(800) 678-2001for installation support.
Read through all of the instructions prior to beginning installation, and verify (using the packinglist) that all parts have been received and are in good condition.
All shortages must be reported to LSI within seven days after receipt of material. Inspectshipment before letting the carrier leave. Buyer is responsible for placing claim against thedamage or lost goods during shipment. Products damaged during shipment require a freightclaim to be filed with freight carrier within seven days of receipt of goods on site. Freightdamaged goods are not covered under LSI's warranty.
Shortages or Freight Damage Claims
INSTALLATION INSTRUCTIONS FOR
CHEVRON G6 SPANNERS
JDE# 262373
SHEET 1 OF 10INSTRUCTIONS: 5100220A REV. 09/13/2007

On a typical installation for a G6 Spanner, the installer will need to provide four grade 5 bolts or
higher needed to bolt the spanner to the dispenser. The Installer must provide any additional
electrical components required by local codes to make final connection. All electrical connections
must be made with material conforming to NEC guidelines. White silicone caulk plus some
additional hardware may be required.
Installers should use shielded cable or minimally twisted pair per common practice. Only use a
conduit for the Class 1 circuit, which should be the same circuit/conduit as the dispenser power.
For Ovation, conduit is not required coming out of the electronic head up to the dispenser valance.
For Vista, conduit is required up to the Division 2 zone. It is prefered that the lighting not use
dispenser power.
The LSI G6 Spanner for Chevron is designed to bolt directly on top of the gasoline dispenser. This
illuminated pump topper is provided in four sizes to fit the most common dispensers on the market.
It is internally illuminated with 800ma high output long life fluorescent lamps. The system requires
120V/60Hz power. All power connections MUST comply with all local and NEC codes.
See Addendum A for compliance with California Title 24.
See Addendum B for wind load and strength calculations.
Materials Required
TEX
T
H
ERE
TEX
T
H
ERE
TEX
T
H
ERE
TEX
T
H
ERE
TEX
T
H
ER
E
SHEET 2 OF 10INSTRUCTIONS: 5100220B REV. 09/13/2007

5'-5 1/2"
2'-4 1/4"
OVATION BRKT= 25"
2'-4 3/16"
FITS: OVATION SERIES
OVATION iX
FITS: GILBARCO ADVANTAGE 48
GILBARCO ADVANTAGE 36 w/overhang
DRESSER WAYNE VISTA 580
DRESSER WAYNE VISTA 390 (POST 1992)
NARROW SPANNERNARROW SPANNERNARROW SPANNERNARROW SPANNER
9 9/16"OPEN
8 1/4"
1'-5 3/8"
10 1/2"
2'-5 5/16"
1'-9 1/2"(OPENING)
7 1/2"
1'-10 3/8"
2'-4 3/16" 2'-4 1/4"
5'-5 1/2"
VISTA 387 & 388BRKT= 28"
ADVANTAGE 48 BRKT= 39"
VISTA 390 & 590 BRKT= 41"
ADVANTAGE 38BRKT= 27"
REGULAR SPANNERREGULAR SPANNERREGULAR SPANNERREGULAR SPANNER
Spanner Types and Sizes
SHEET 3 OF 10INSTRUCTIONS: 5100220C REV. 09/13/2007

FITS: GILBARCO MPD SERIES
WIDE SPANNERWIDE SPANNERWIDE SPANNERWIDE SPANNER
FITS: DRESSER WAYNE MGD 390 (PRE 1992)
ENCORE 550
ENCORE 300
ENCORE 500
ENCORE S SERIES
EXTRA WIDE SPANNEREXTRA WIDE SPANNEREXTRA WIDE SPANNEREXTRA WIDE SPANNER
2'-1 3/8"
2'-0 1/2"(OPENING)
2'-8 5/16"
2'-6 3/8"
3'-1 5/16"
2'-5 1/2"(OPENING)
4 7/8"
2'-4 3/16"
2'-4 3/16"
4 7/8"
5'-5 1/2"
2'-4 1/4"
5'-5 1/2"
2'-4 1/4"
MPD BRKT= 41"
ENCORE BRKT= 32 3/8"
SHEET 4 OF 10INSTRUCTIONS: 5100220D REV. 09/13/2007

MOUNTING BRACKET
DETAIL A
1/4-20 BOLT1/4-20 BOLT
Step 1.Prepare dispenser for spanner. Remove the following items if present: dispenser lifting lugs (ifthey are needed but not provided, it is the installers responsibility to provide them), signage andany other item that may interfere with installation of spanner.
Step 2.It is also the installer's responsibility to pull electrical supply to the top of the valance, 120VAC60HZ minimum 1.5A, in compliance with NEC, UL, and applicable local codes or explosion proofrequirements. Be certain that the power is turned off before pulling any electrical connections.
Step 2A.This step is for the Ovation dispensers ONLY. Bolt the mounting brackets to dispenser headswith 1/4-20 bolts provided. See Detail A below.
Step 2B.For all other dispensers, the mounting bracket will not be required and the mounting bolts shallbe provided the installer.
(DRESSER WAYNE OVATION DISPENSER SHOWN)
USE 1/4-20 BOLT TO ATTACHTO DISPENSER HEAD
ELECTRICAL SUPPLY CAN BEPULLED THROUGH HERE
SHEET 5 OF 10INSTRUCTIONS: 5100220E REV. 09/13/2007

Step 4.
Before lifting the spanner into place, you may remove one face out of the spanner to make it easier
to bolt down the spanner to the dispenser. Remove the screws along the top and retain to replace
after installation.
Step 5.
Lift spanner into place and set on the top of the dispenser valance. A 1" dia. access hole is provided
to pull wiring as required to the ballast compartment in the spanner. Flexible conduit may be
provided, or the installer may be required to pull conduit from the ballast to the housing depending
on site conditions. Three wires, 14 ga. or larger, in black - neutral, white - line and green - ground
are required for the spanner. These may be spliced into the ballast wiring inside the cover or an
additional junction box can be added. Set the spanner into place without crimping or binding the
required power supply wires. Additional clearance holes may be required if the power access does
not line up or the spanner may be rotated/shifted slightly to align.
Step 6.
Bolt the spanner to the lifting lugs using the original bolts or replacement bolts of the same size and
length. Make certain the spanner is securely fastened, including lock washers or sealing compound
as necessary.
Step 3.Remove the end caps (or mode sign) on each end of the spanner. You do this by removing thetwo screws on top and bottom, also the screw on each side. Slide the cap off the end. Retainthe screws to replace after completing the installation.
DETAIL B
ER
ERE
REMOVE SCREWS ANDKEEP FOR LATER
SHEET 6 OF 10INSTRUCTIONS: 5100220F REV. 09/13/2007

Step 7.
Test the illumination to make sure it works, using the toggle switch on the bottom of the spanner.
Note that any time a lamp needs to be replaced, the power must be turned off.
TOGGLE SWITCH
DETAIL CSECTION VIEW THRU OVATION SPANNER
NOTE: LAMPS REMOVED IN THIS VIEW FOR CLARITY.
ACCESS HOLE FOR WIRINGLOCATED ON BOTTOM OF SPANNER
TOP VIEW OF OVATION SPANNER
SHEET 7 OF 10INSTRUCTIONS: 5100220G REV. 09/13/2007
DETAIL DSECTION VIEW - TYPICAL TOGGLE SWITCH PLACEMENT
TOGGLESWITCH
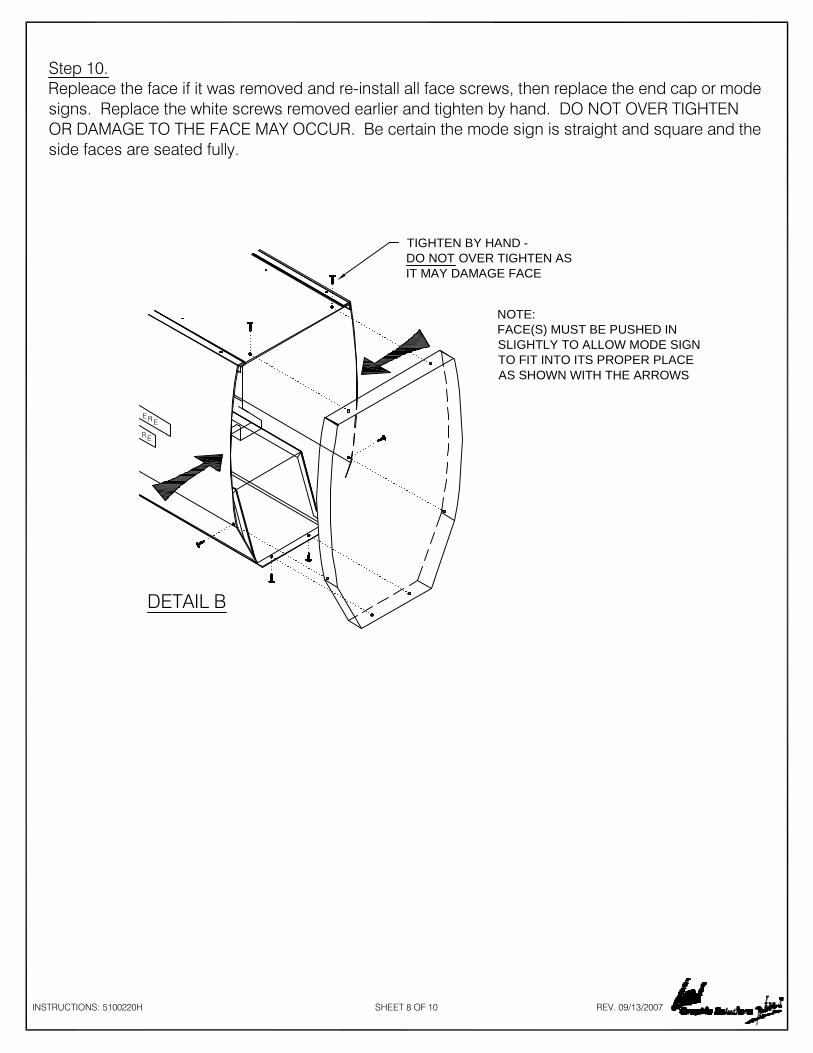
Step 10.
Repleace the face if it was removed and re-install all face screws, then replace the end cap or mode
signs. Replace the white screws removed earlier and tighten by hand. DO NOT OVER TIGHTEN
OR DAMAGE TO THE FACE MAY OCCUR. Be certain the mode sign is straight and square and the
side faces are seated fully.
DETAIL B
ER
ERE
TIGHTEN BY HAND -DO NOT OVER TIGHTEN ASIT MAY DAMAGE FACE
NOTE:FACE(S) MUST BE PUSHED INSLIGHTLY TO ALLOW MODE SIGNTO FIT INTO ITS PROPER PLACEAS SHOWN WITH THE ARROWS
SHEET 8 OF 10INSTRUCTIONS: 5100220H REV. 09/13/2007

Addendum A - California Title 24
The lamps and ballast used in the G6 spanner comply with the requirements of California Title 24.
Use Form OLTG-4-C for compliance.
For the component performance method, Alternative 1, the square footage of the sign is 12.9sft
column D, internally illuminated, list 1 in Column E, and enter 12 in column F. The allocated watts
will be 154.8W (12.9 x 12), column G. Enter "fluorescent" in column H, and "2" in column 1 for the
number of lamps (F60T8LLDL), and in column J enter "1" for the number of ballast (EB25). Column
K for total design input watts will be 80W. Enter "Y" in column L, indicating that 80 is less than 154.8.
For the prescriptive approach, Alternative 2, the power source is an electronic ballast with an output
frequency of 20kHz or more and the lamps are barrier coated rare earth phosphor T8 linear
fluorescents. On form OLTG-4-C check column Q and column S.
Addendum B - wind load calculations and mounting
The G6 spanner is designed to bolt to typical gasoline dispensers and resist 90mph windloads.
Additional stiffeners and brackets are added to model specific needs for wind loads up to 150mph.
The spanners have been empirically tested for the equivalent weight bearing strength.
If registered engineer calculations or wet sealed stamped drawings are required for permitting,
contact LSI Customer Service for further information. The following information is provided for use in
making site specific calculations. Wind speeds, seismic loads and local codes and conditions must
be taken into consideration. LSI Industries assumes no responsibility for the calculations. These
must be provided by a registered engineer for the local area where the spanners are installed.
The G6 spanner has a front elevation of 28.208" x 65.870", typical for all sizes. This presents a wind
load surface of 12.9sft. At a typical wind speed of 90mph, using UBC exposure C and 1.4 sign
coefficient, this equates to 30.8psf, or a load of 397.32lb. This load translates to a moment of
467ftlbs at the two attachment points to the top of a dispenser, or 233.5ftlb per attachment. All
structural components of the G6 spanner are fabricated from .063" 3003 aluminum. Faces are
formed from .093 polycarbonate plastic.
Attachments will vary by type: on an Ovation the mount is two pairs of 1/4-20 bolts 6" on center, on
an Advantage the mount is two 3/8" bolts on 14" centers, on a Vista is a pair of single 3/8" bolts
centered over 20", on Encore two 3/8" bolts on 21.633" centers. The 1/4-20 bolt pair, using Grade 5
high strength bolts, is adequate for this load - 467lb tension required, rated 3800lb. The 3/8" bolt
pair on 14" or 20" centers is adequate for this load - 220lb tension per bolt. The Vista single bolt
attachment is the greatest concern - with two bolts and a 25 1/2" bearing theoretically 439lb tension
if the base plate does not bend. We recommend self drilling fasteners be added to this stiffener into
the top of the dispenser if this can be done without impinging on any piping or electrical in the
dispenser.
SHEET 9 OF 10INSTRUCTIONS: 5100220J REV. 09/13/2007

A worst case scenario of 120mph, exposure D yields 71.7psf or a load of 925lb. The moment at the
top of the dispenser would be 1088ftlb, and load for 1/4-20 bolts of 1024lb. Since 1/4-20 Grade 5
bolts are rated for 3800lb breaking strength, this is adequate.
For Florida wind loads of 150mph, exposure D (flat terrain facing large bodies of water) yields
112.1psf, 1446lb, 1700ftlb moment, and 1600lb tension per bolt.
On typical pump height of 94", with the spanner sitting down an average of 4", the 397lb wind load
translates to 3576ftlb moment at the base of the dispenser. At 150mph, the adde4d moment at the
base is 1700ftlb. If the wind load surface of an average pump dimension of 94" x 48" is added, the
total moment at grade is 4,242ftlb for 90mph exp C, or 15,450ftlb at 150mph exp D. The strength of
the attachment to the dispenser and of the dispenser to the island is a question for the pump
manufacturer and installer.
This addresses the attachment of our spanner to the dispenser. It is our assumption that the faces
will blow out at wind speeds over 100mph, and relieve the load on the dispenser before any damage
can be transferred to the pump head or base.
SHEET 10 OF 10INSTRUCTIONS: 5100220K REV. 09/13/2007


