
OVE
INSTALLATION INSTRUCTIONS
ONE-PIECE TOILETK-17629T-M/K-17629T-SM
-1-, 2013
Copyright Kohler China Ltd., 2013
NOTES
�
�
�
�
�
Observe all local plumbing and building codes.
Shut off the water supply.
Ensure that the new drain has the correct roughing-indimension.
Carefully inspect the new fixture for any sign of damage.
Fixture dimensions are nominal and conform to tolerancesestablished by Standards (A112.19.2-2008).
: Handle vitreous china products very carefully.Vitreous china can break and chip if you over tightenbolts and nuts.
. The fill valvenut has been factory-tightened to design specifications.If re-tightening is required, wrench tighten 1/4 turn pastfinger tight.
WARNING: Risk of personal injury or product
damage
WARNING: Risk of external leakage
ASME
�
�
�
�
� A112.19.2-
2008.
1/4
ASME
�
�
�
Please read these instructions carefully to familiarizeyourself with the required tools, materials, and installationsequences. Follow the sections that pertain to yourparticular installation. This will help you avoid costlymistakes. In addition to proper installation, read alloperating and safety instructions.All information in these instructions is based upon thelatest product information available at the time ofpublication. Kohler China reserves the right to makechanges in product characteristics, packaging, oravailability at any time without notice.These instructions contain important care, cleaning, and
warranty information -
.
please leave instructions for the
consumer
�
�
� -
ORDERING INFORMATION
OVE Toilet K-17629T-MIncludes K-17669T-M
OVE Toilet K-17629T-SMIncludes K-17660T-M
OVE Toilet Seat
OVE Quiet-close Toilet Seat
®
®
K-17629T-M
K-17669T-M
K-17629T-SM
K-17660T-M
1089093-T01-E
Recommended Tools and Materials
�
�
�
�
�
�
�
�
�
�
�
�
�
(10") adjustable wrench
Supply shut-Off valve
Tape measure
Level
Sponge
Pipe wrench
Tubing cutter
Safety Glasses
Drill and assorted bits
Connector
Metal file
Hacksaw
Plus:
1/2" Nut Driver/Socket
�
�
�
�
�
�
�
�
�
�
�
�
�
10"
1/2"
-2-
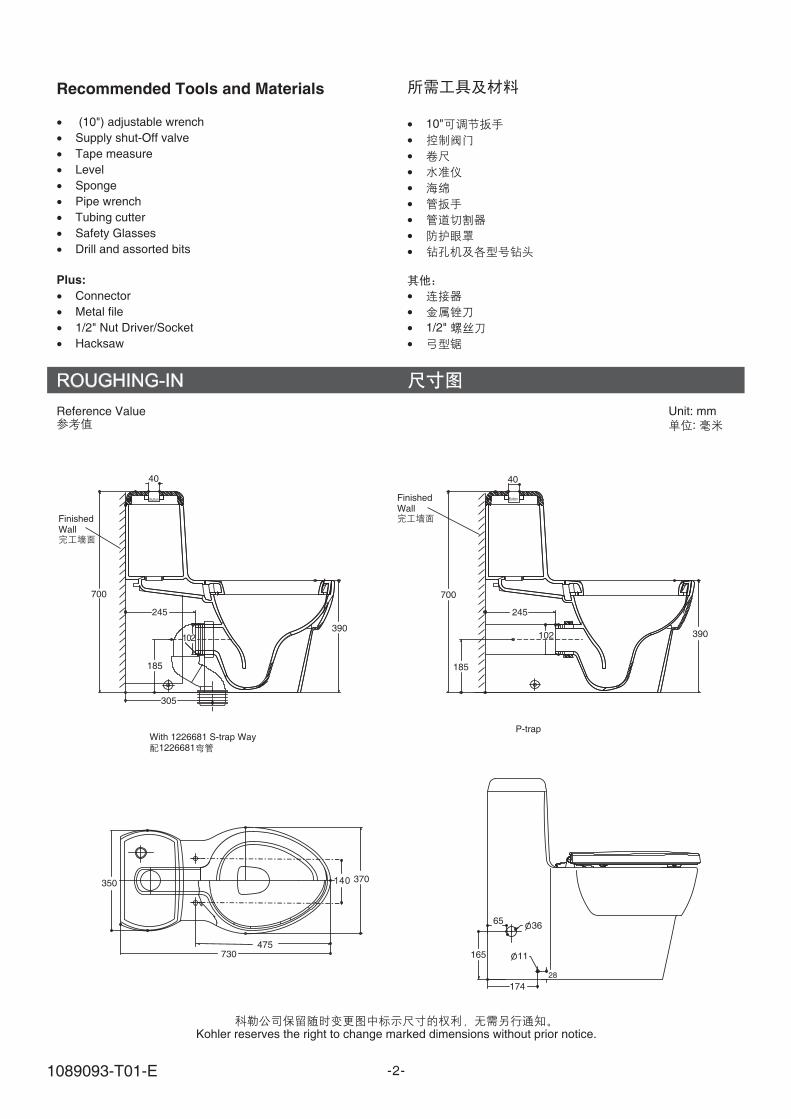
Unit: mm:
With 1226681 S-trap Way1226681
P-trap
O36
350 370
730
390
700
102
185
245
40
Button
390
700
305
102
185
245
40
Button
65
165
174
28
O11
Kohler reserves the right to change marked dimensions without prior notice.
FinishedWall
FinishedWall
Reference Value
475
140
1089093-T01-E
-3-
INSTALLATION
1. Remove the Existing Toilet
�
�
�
Turn off the water supply.
Flush the toilet, then sponge out all remaining water from
the tank.
Disconnect the supply shut-off valve(if present), and
remove the old bowl and tank.
CAUTION: Risk of hazardous gases. If the new toilet
is not installed immediately, temporarily stuff a rag in
the closet flange.
1.
�
�
�
( )
( )
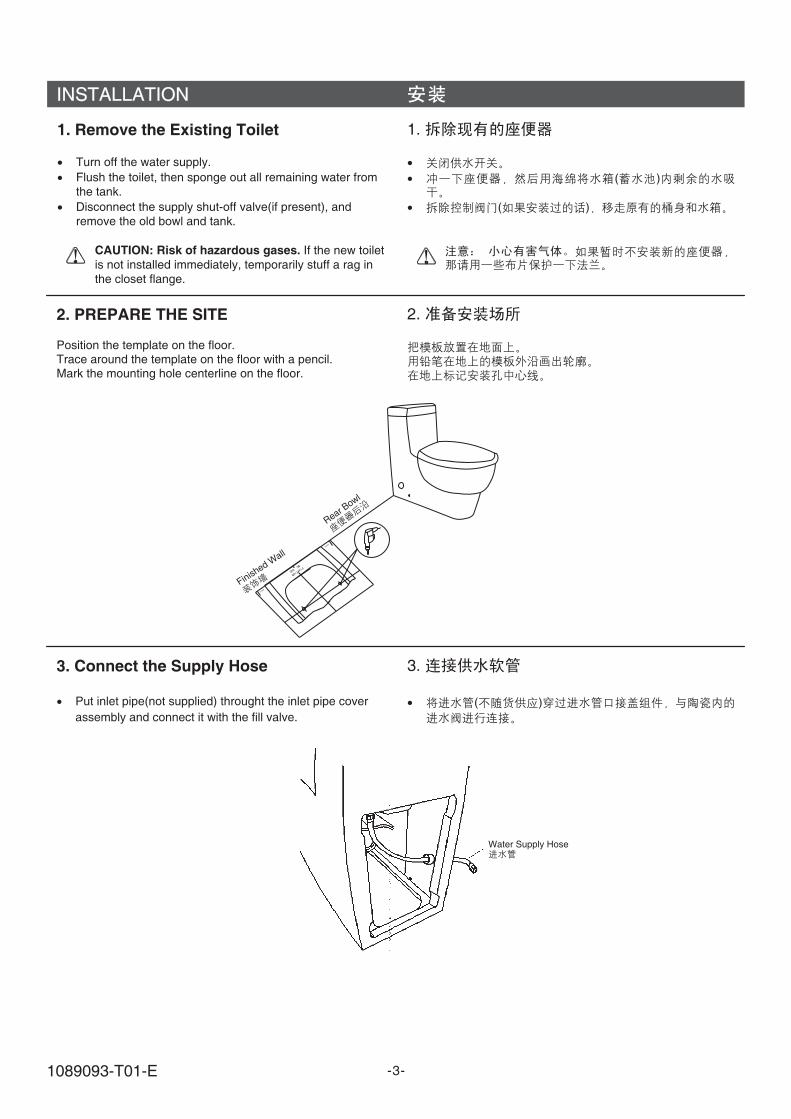
2. PREPARE THE SITE
Position the template on the floor.Trace around the template on the floor with a pencil.Mark the mounting hole centerline on the floor.
2.
Finished W
all
3. Connect the Supply Hose
� Put inlet pipe(not supplied) throught the inlet pipe cover
assembly and connect it with the fill valve.
3.
� ( )
Water Supply Hose
Rear Bowl
BACK
BACK
1089093-T01-E
-4-
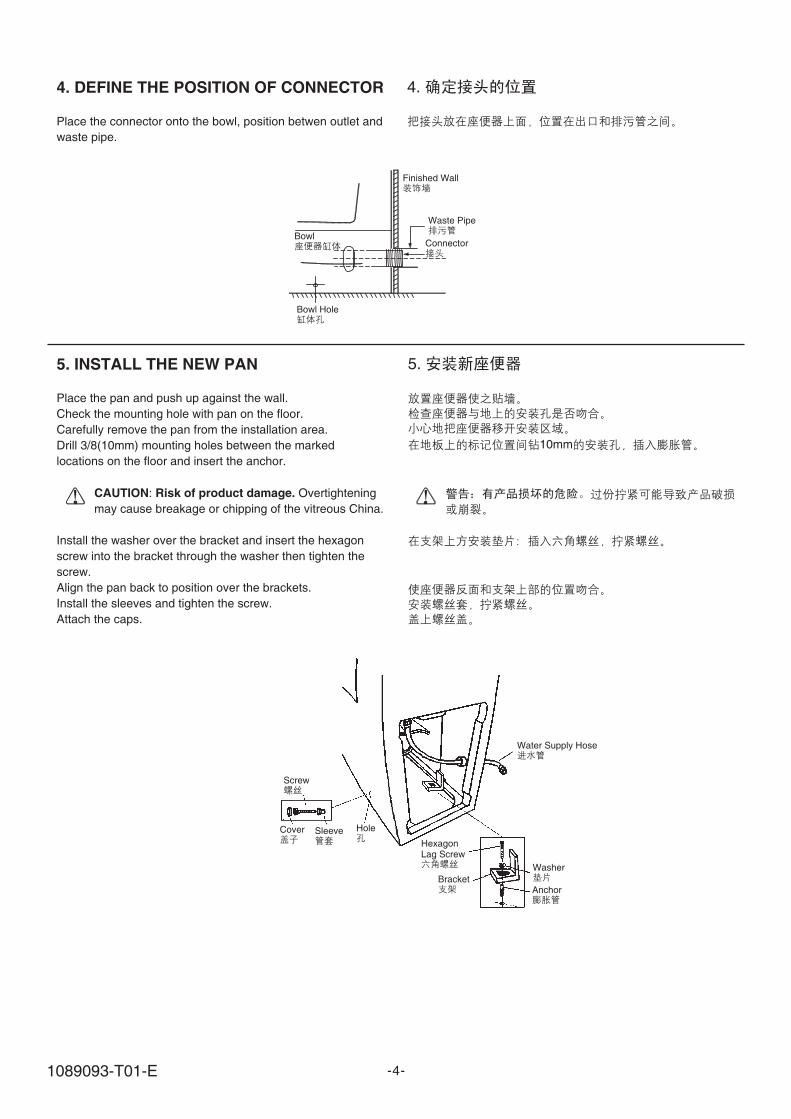
4. DEFINE THE POSITION OF CONNECTOR
Place the connector onto the bowl, position betwen outlet and
waste pipe.
4.
Finished Wall
Waste Pipe
ConnectorBowl
Bowl Hole
5. INSTALL THE NEW PAN
Place the pan and push up against the wall.
Check the mounting hole with pan on the floor.
Carefully remove the pan from the installation area.
Drill 3/8(10mm) mounting holes between the marked
locations on the floor and insert the anchor.
: Overtightening
may cause breakage or chipping of the vitreous China.
Install the washer over the bracket and insert the hexagon
screw into the bracket through the washer then tighten the
screw.
Align the pan back to position over the brackets.
Install the sleeves and tighten the screw.
Attach the caps.
CAUTION Risk of product damage.
5.
10mm
Water Supply Hose
Screw
HoleSleeve
HexagonLag Screw
Bracket
Washer
Anchor
Cover
1089093-T01-E
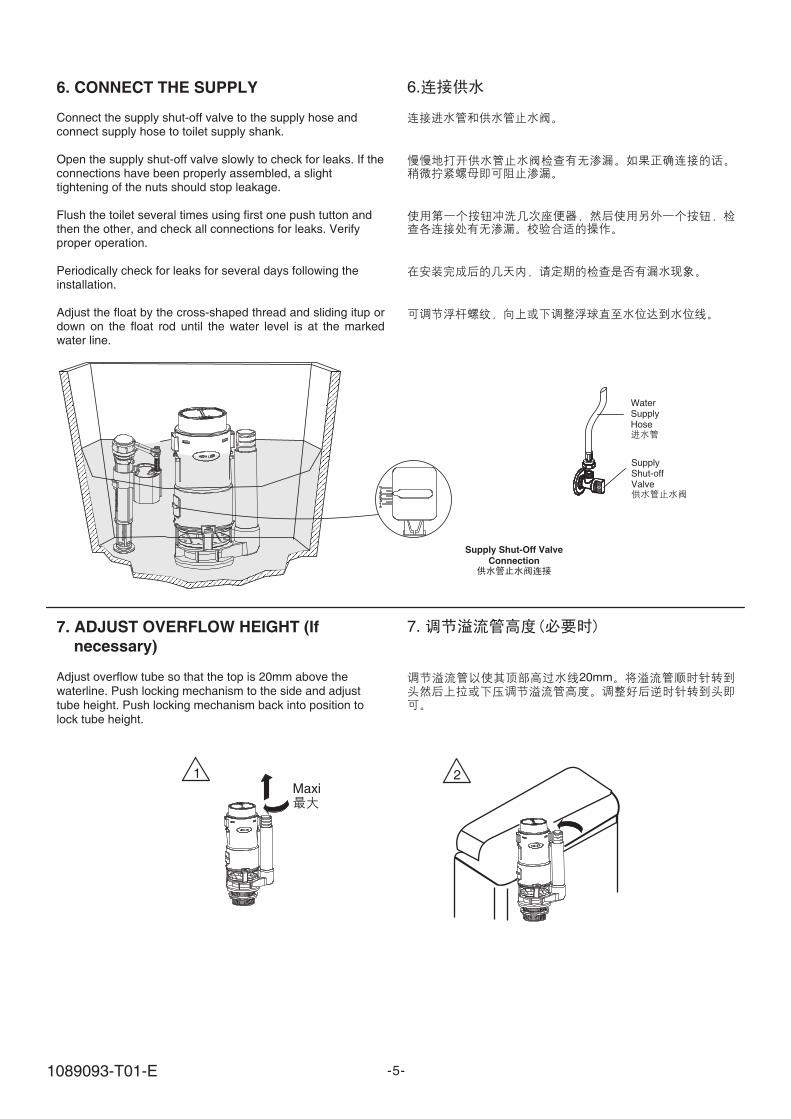
7. ADJUST OVERFLOW HEIGHT (If
necessary)
Adjust overflow tube so that the top is 20mm above thewaterline. Push locking mechanism to the side and adjusttube height. Push locking mechanism back into position tolock tube height.
7.
20mm
1Maxi
2
6. CONNECT THE SUPPLY
Connect the supply shut-off valve to the supply hose andconnect supply hose to toilet supply shank.
Open the supply shut-off valve slowly to check for leaks. If theconnections have been properly assembled, a slighttightening of the nuts should stop leakage.
Flush the toilet several times using first one push tutton andthen the other, and check all connections for leaks. Verifyproper operation.
Periodically check for leaks for several days following theinstallation.
Adjust the float by the cross-shaped thread and sliding itup ordown on the float rod until the water level is at the markedwater line.
6.
-5-
Supply Shut-Off ValveConnection
WaterSupplyHose
SupplyShut-offValve
1089093-T01-E

-6-
8. CONNECT PUSH BUTTON
Remove the protective pad and discard the pad.
Put large flange through hole in lid. Screw retaining ring
onto the flange.
Put the gray and green rod through flange hole.
Trim the rods up the top of the flange.
Install the push buttons onto the rods.
Flush the toilet several times and check all connections for
leak.
8.
1
2
3
5
6
4
1
2
3
5
6
4
9.
�
9. Install the Seat
� Install the toilet seat according to the packed instructions.
1089093-T01-E

This troubleshooting guide is for general aid only.
If the problem is water continuously running into the toilet, turn off the water supply to the toilet. If the waterlevel in the tank lowers, replace the seal of the flush valve. If the level in the tank remains constant, replace the float valve.Note: Do not flush.
1. Poor flush. A. Adjust tank water level to match waterline.
B. Fully open water supply shut-off valve.
C. Clear obstruction in trapway, jet, or bowl rim holes.
D. Clear obstruction in soil pipe or vent pipe.
3. Fill valve turns on/off by itself without toiletbeing flushed, or runs allowing water to entertank.
A. Clean or replace seal if seal is worn, dirty, or misaligned with flush valveseat or flush valve seat is damaged. Replace flush valve seal or flushvalve.
B. Remove tank and tighten flush valve nut if flush valve gasket is leaking.Do not overtighten. If leakage continues, replace gasket.
C. Clean fill valve seat/seat washer of debris, or replace piston/seatwasher assembly.
D. Replace fill valve if valve float sinks.E. Adjust tank water level if too high.
2. No flush. A. Remove the canister out of the flush valve and check mechanic system.
If it has some part damage, replace the new canister on the flush valve.
B. Adjust push rods to position properly on flush valve.
4. Long tank fill cycle. A. Fully open water supply shut-off valve.
B. Clean fill valve inlet, valve head, or supply line. Flush lines.
5. Noisy tank fill cycle. A. Partially close the water supply shut-off valve if water pressure to thetoilet is too high. Check toilet performance following any suchadjustment.
B. Remove dirt or obstruction in valve head, flush line.
2. A.
B.
4. A.
B.
3. / A.
B.
C. /
D.
E.
1. A.B.C.D.
5. A.
B.
-7-1089093-T01-E

(
) ( )
( )
( )
0 Co
CONSUMER RESPONSIBILITIES
If you live in a hard water area, make certain that the holes inthe toilet rim are kept clean to ensure proper bowl flushing.Toilet bowl cleaners should be used at least once a week.Use a long-handled brush to clean the rim holes, and to cleanas far into the trap as possible to prevent mineral depositsfrom forming.
Most toilet bowl cleaners are not harmful to the vitreous chinasurface of the toilet bowl. Please follow the bowl cleanermanufacturer is instructions carefully.
Do not use abrasive cleaners or solvents.
Do not use in-tank cleaners. Products containingchlorine (calcium hypochlorite) can seriously damagefittings in the tank. This damage can cause leakageand property damage.
Kohler Company shall not be responsible or liable for anydamage to these tank fittings caused by the use of cleanerscontaining chlorine (calcium hypochlorite).
WARNING: Risk of property or product damage.
'
Please do not use hard materials (likescouring pad) to clean product surface, especially theproduct logo.
CAUTION:
CAUTION: Don t use any cement while installing
the toilet.
WARNING: Risk of product damage.
Heat expansion of the toilet may damagethe feet of the toilet. Kohler will not be responsible forany damage because of using cement.
Do not throw into the toilet what is easy to block it,such as newspaper, paper pilch, sanitary towel.Do not bump the vitreous china with great force toprevent it from damaging and leaking.
Do not use the product in the water below 0 C.o
-8-1089093-T01-E


