
KUZMA STABI M TURNTABLE (without arm ) S/N……..
Instruction manual
2013-5
1
KUZMA LTD
INSTRUCTION MANUAL FOR STABI M turntable
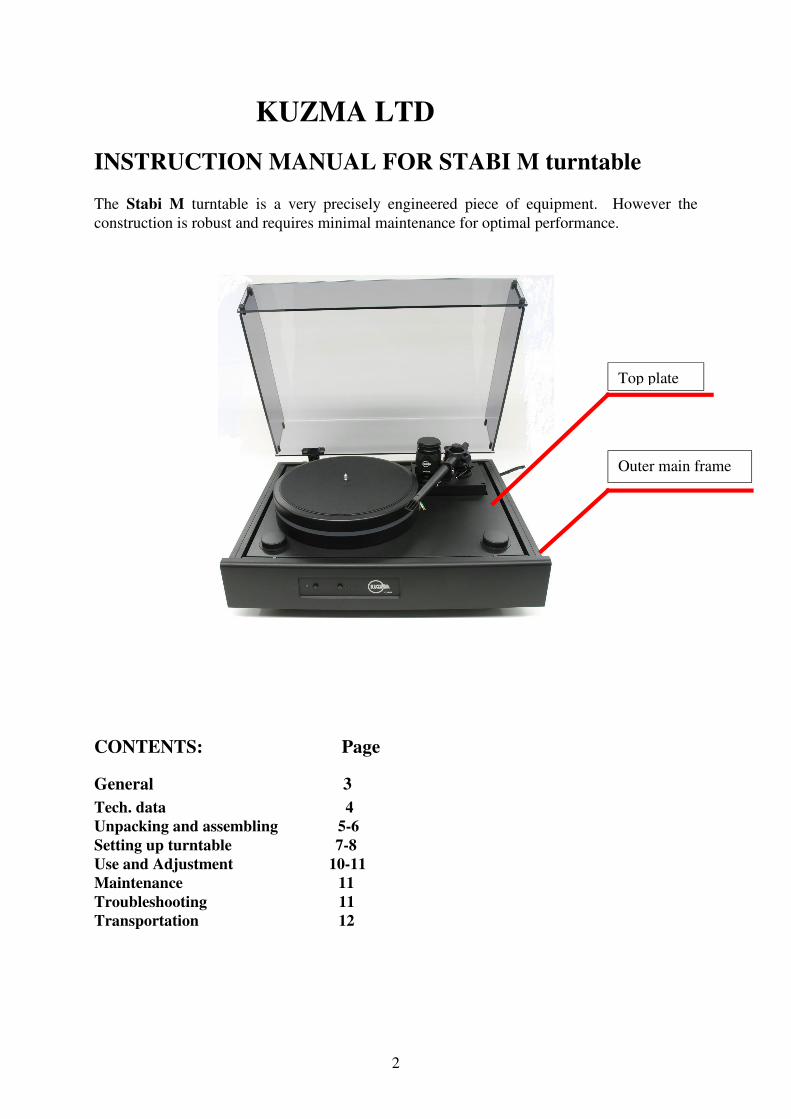
The Stabi M turntable is a very precisely engineered piece of equipment. However the
construction is robust and requires minimal maintenance for optimal performance.
CONTENTS: Page
General 3
Tech. data 4
Unpacking and assembling 5-6
Setting up turntable 7-8
Use and Adjustment 10-11
Maintenance 11
Troubleshooting 11
Transportation 12
2
Outer main frame
Top plate

General
STABI M is a modern turntable designed in a classic turntable style with the emphasis on
providing the best possible record playback.
The turntable's size allows even 12 inch tonearms to be mounted and covered with its massive
acrylic dust cover on spring hinges. The dust cover is constructed not to pick up any vibration
from loud music.
The turntable is assembled from various solid parts of aluminium, making the construction
rigid and absorbing vibration. On the outer sides of the main structure are solid aluminium
plates, which give the turntable mass and further increase structural rigidity and damping.
The covered spikes within the legs allow horizontal levelling of the whole turntable.
The top aluminium plate under the platter, has an elastically underhung main frame and
motor system below. This is insulated from the outer main turntable's structure via four big
elastic dampers, which allow for fine horizontal levelling of the platter and tonearm.
The platter is constructed from two pieces of 40mm thick aluminium with an acrylic
damping plate sandwiched between making a very inert support for records.
The bearing has an inverted shaft with a ruby ball which gives precise, low noise rotation to
a supporting subplatter.
The main frame carrying the main bearing and massive aluminium armboard, is bolted
together from solid aluminium blocks forming a unique damped rigid support.
The motor system: The DC motor itself is specially mounted inside a brass cup and
aluminium plate. This motor assembly is enclosed and suspended inside a massive brass
motor housing. Thus the main frame is doubly insulated from the motor system and yet
still maintains rigidity, allowing for max. torque momentum to be transmitted via the stiff
plastic belt to the subplatter. This gives the platter a high torque drive with the positive
properties of belt and idler drives, while minimising the negatives one.
The external power supply: This controls the DC motor with precise frequency and it has
very fine speed adjustments. The control panel on the front plate of the turntable has
start/stop and speed change functions. The full speed of platter of 33rpm is reached in just
over 3 seconds. There is also a remote control start/stop function.
3

Technical data:
Mass 60 kg
Platter mass 12 kg
Platter material aluminium& acrylic
Bearing type ruby ball- inverted
Shaft diameter 16 mm
Chassis/levelling aluminium/yes
Turntable levelling yes
Motor 1 DC ( three phase)
Belt material special
External power supply yes
Speeds 33, 45, 78 ( see page 10)
Armboard yes
No. of tonearms 1
Suspended special
Dimensions 610x500x290
Finishes black
Clamp yes
Mat yes
Lid yes
Accessories oil, Allen keys
Options: armboards
Optional: various predrilled armboards (SME, Graham, Triplanar, Ikeda, Ortofon,…)
Safety Precautions:
Electrical connection to the motor controller unit (PS DC) from the mains comes via the
cable. Please keep PS DC away from moisture and be careful not to damage the mains cable.
The same precaution applies to cables feeding the turntable motor and front panel.
Basic SetupNote: The turntable is packed in two wooden crates.
Note: Be careful when inserting the top plate into the main frame
Note: Some parts are heavy, so be careful when handling!
Note: Choose a suitable supporting table which can hold over 60 kg without warping.
Note: While the parts are packed in plastic bags for protection, these are not intended to be
strong enough to lift or carry the contents.
Note: Allow ventilation space above the motor controller unit.
4
Unpacking
The larger crate contains the outer frame with top plate and lid.
Unscrew the top screws and remove the inner top foam. Remove side foam around lid first
and put it aside. Then remove the wooden floor plate and top foam. Remove the side foam
around the turntable and then two people should lift it up and position it on a strong support.
The smaller crate contains the platter, subplatter, clamp, power supply, cables, armboard and
accessories,
Unscrew the top screws and remove the inner top foam. Then remove all parts except for the
platter and subplatter.
Accurately position the turntable. Remove the foam between the outer frame and top plate
then follow instructions for turntable assembly. Unpack subplatter and platter when needed.
Assembling
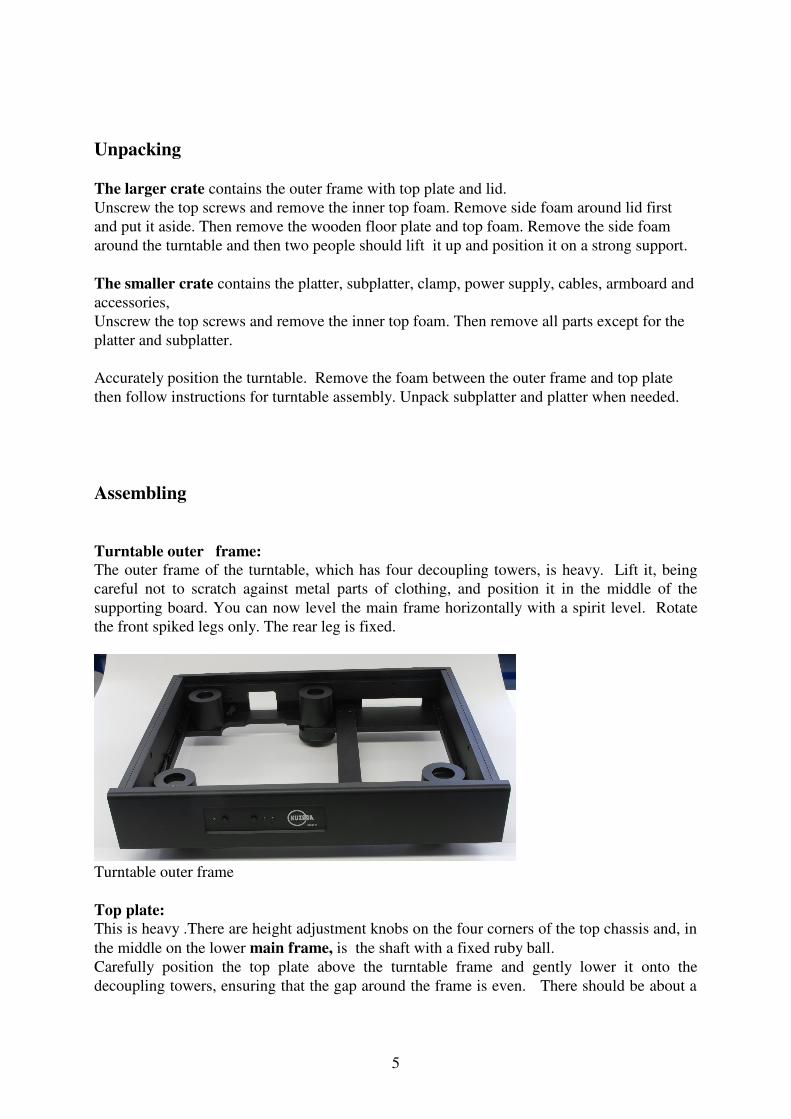
Turntable outer frame:
The outer frame of the turntable, which has four decoupling towers, is heavy. Lift it, being
careful not to scratch against metal parts of clothing, and position it in the middle of the
supporting board. You can now level the main frame horizontally with a spirit level. Rotate
the front spiked legs only. The rear leg is fixed.
Turntable outer frame
Top plate:
This is heavy .There are height adjustment knobs on the four corners of the top chassis and, in
the middle on the lower main frame, is the shaft with a fixed ruby ball.
Carefully position the top plate above the turntable frame and gently lower it onto the
decoupling towers, ensuring that the gap around the frame is even. There should be about a
5

3mm gap between the frame and the outer edge of the top of the plate. When gently pushed
down with both hands it will barely move.
Remove the protection cup from the bearing shaft. Be sure that it is clean. Locate the PVC
bottle with bearing oil and cut the top off the nozzle to allow drops to be poured onto the
shaft.
Altogether pour 35 drops of oil. This is not critical as any surplus will be caught in the lower
reservoir. By squeezing the PVC bottle pour 8-10 drops of oil in the well, which contains the
ruby ball. Then, by nearly touching the edge of the well with the dropper, allow the rest of the
oil to slowly run along the shaft into the lower well. Have a tissue handy in case of oil
spillage.
Clean your hands in case of oil contamination.
Gently position the subplatter over the shaft and slowly lower it down. A small amount of oil
& air might escape from the hole on the slope. If so, wipe it. Gently rotate the subplatter a
few times, lift it up half way and lower it again. It should rotate smoothly.
Top plate with subplatter and belt
Belt:
Position the belt onto the motor pulley first and then with fingers position belt over subplatter
perimeter. The belt is not very flexible but just stretch it into position by rotating the
subplatter a few times.
6

Note: Be careful when positioning the platter onto the subplatter if the armboard is already
mounted on the top chassis. There is only a small gap.
Platter:
Position the platter on the subplatter, holding the platter with both hands at the sides. Due to
the small gap between the lower edge of the platter and the top of the subchassis, do not hold
the platter underneath. Hold it firmly, so it will not slip. Be careful if the armboard is already
mounted because there is a small gap between the platter edge and the armboard corner.
Setting up the turntable
Front panel & top plate knob height adjustment
Mounting armboard and tonearm:
Note: The top chassis will reach its correct height position only when the weight of the platter
is added.
Suspension adjustment:
Height adjustment of the top plate is by rotation of the black knobs on the top. Turning the
adjustment knobs anticlockwise causes the top plate to rise. If you look at the edges of the top
of the plate and turntable outer frame they should be horizontally aligned. Adjust the height of
the top plate by turning the four knobs so that the top edge of the top plate is level with the
top of the turntable frame.
The best way to do this is to adjust two opposing knobs a little, then another two knobs a little
and the first pair again, etc. At this stage do not be too precise as the armboard and tonearm
have yet to be added and they will lower the top plate height.
7

Be sure that you have an armboard with the correct pre-cut. Mount armbase on the armboard
and then mount armboard on the turntable with four Allen keys. Fix firmly. The armboard
can be fixed in both directions, so be sure you mount it correctly orientated. If necessary a
second cut can be made on the armboard, but this is made of aluminium.
Mount the arm as instructed in the tonearm instruction manual. Route the tonearm cable
underneath the turntable below the armboard. With tonearms where the cable is not
connected to the tonearm below armboard, eg. 4Point, Air Line,….., the tonearm must be
fixed on the armboard before it is fixed onto the turntable. Position the cable into the gap on
the armboard, into the hole below the armboard and outwards through the hole on the rear of
the turntable panel. It is easier done by two people. Then mount armboard with tonearm onto
the top plate ( main frame) ensuring that the cable is not in the way.
It is necessary to readjust the height due to the added weight. Do this as described before, by
levelling it with outer frame and re check horizontally with spirit level.
Rear panel ( hinges & XLR connections)
Lid:
Insert the lid in the appropriate slots on the rear wall of the main frame. Lift it out in open
position!
Power supply:
DC power supply
8

General description:
The DC motor controller unit generates a precise sine wave output to control rotation of a
three phase frequency controlled DC motor. The signal is generated by a sophisticated
computer based program. This allows for smooth generation of the sine wave with very fine
choice of speed. Each speed can be selected, finely adjusted independently and then stored in
the memory. The PS is factory preset.
PS DC (DC Motor Power supply) connection:
Position the PS DC in such a way, that it will be convenient for operation of the turntable.
You should, however, allow space above for ventilation, of at least 10-20 mm.
At the rear of PS are two XLR outputs: 7pin XLR for motor connection and 5pin XLR for
front panel display .
Connect both XLR cables to the motor input in the slot and the panel input at the rear of the
turntable.
It may take few hours for a new turntable to settle to the perfectly correct speed. When the PS
is unplugged, the preset speeds will be stored.
Connect the mains cable to the mains and then switch on the PS DC at the front, which is then
left permanently on. A red light and green display will light up on the front of PS DC. Also
on the front panel of the turntable above the left side button, a red light will indicate the
start/stop function. On the right hand side a green light will indicate the chosen speed (left
LED 33, right LED 45). With the right hand button you can change speed, while the left hand
button will start or stop platter rotation. The same functions are on PS DC, where there are
also buttons for fine speed adjustment.
Operation:
1. Press the power button at the front of the PS DC firmly. After 10 sec the PS is ready. The
display will show 33 and above the start button a red LED will be shown. You can keep the
PS DC switched on all the time.
2. On pressing the start button the red LED will turn green and the platter should start
rotating. To stop the platter, simply press the start button again. The red LED will show and
the platter will stop rotating.
3. Press the speed button and the selected speed will change from 33 to 45. Press again and it
will return to 33.
4. Do not press the start button before the mains switch is on.
5. The same functions are also repeated on the turntable’s front panel.
With PS DC we supply a remote control. This will allow you to start or stop the platter from
your listening seat by aiming in the direction of the PS DC. Both Start/Stop lights will change
accordingly.
9
Use and adjustments
Platter rotation:
Ensure that the red LED lights up and the green display shows the selected speed, when the
PS DC is switch on. Press the start button. It is normal to hear some crackling sounds made
by the belt and this will disappear in a few days. If constant noise is heard, then check the
position of the belt on the motor pulley. Platter should reach 33rpm on 3 seconds.
Fine speed adjustment:
Observe on a strobe disc if the bars are stationary. If not (bars move in the same direction as
platter rotation then the speed is too high) then press the plus or minus buttons few times until
the bars are stationary (there are very small steps- so keep pressing a lot). On the display you
will see a green dot in the right bottom corner indicating that change is in process. Using a
sharp pen, press the “store” button and the green dot will disappear.
The first time the plus or minus button is used the changes in speed will be comparatively
large. Each time, however, the store button is pressed the changes will be smaller until, finally
, the speed changes are barley visible.
Resetting the PS causes the speed changes to be again greater.
Check speed independently for both speeds. When using the strobe disc, be sure to use it
properly. Check that you are looking at the correct speed and are using the correct strobe
light.
Factory preset speed:
If you find that your speed selection is out of range for some reason, you should reset the PS
DC to factory set outputs.
Turn the power off, wait 10 sec, press and hold the speed button and then press the power on.
When the display shows CU, release the speed button. The display will now show FA and
then 33. Your PS is now preset for factory preset speeds.
In this case when you set up the platter speed you might find that first steps are bigger until
you put the adjusted speed into the memory, then next steps will be much finer.
Temporary options:
78 rpm speed:
Platter not rotating: press stop function, then press and hold + button for 4-5 seconds, then
press speed button to show 78rpm. Then press start for platter rotation.
Display dimmer off:
Platter not rotating: press stop function, then press and hold – button for 4-5 seconds , then
press start for platter rotation and display will be switch off.
Temporary options will be switched off, when PS power button is turned off.
Clamp:
The function of the clamp is to press the record close to the platter mat, thus minimizing
vibration between the record and platter and decreasing warps of the record itself.
10

The clamp can be also used without washers. Gently screw down the clamp on top of the
record.
It is advisable to put a washer under the LP (thin for thick records and thick for thin records)
before screwing the clamp down. Observe the outer edge of the LP. To start with this edge
will be above the mat but will slowly lower to touch the mat. Hold the LP so that it does not
rotate. If the clamp is screwed too much, the outer edge will begin to rise.
Pressure should then be released by slightly unscrewing the clamp until the outer edge is
touching the mat again. This is the position in which the record is held in firmest contact with
the mat. With very bent records pay particular attention to the highest point of the rim.
With practice there is no need to stop spinning the platter while changing LPs or using the
clamp.
Maintenance
Mat:
The top surface of the mat can be cleaned using a roller textile cleaner. It can be peeled off
and returned back.
Bearing:
Oil in the bearing will last for 5-6 years or more. Running the bearing without oil will do no
harm due to the choice of materials and type of construction.
Oil should be added if the top reservoir (with ruby ball) is totally dry. The oil level will be
below the ruby ball as, when the subplatter is lowered onto the shaft, the bearing surface
increases the level of oil above the ruby ball. When the subplatter is removed you can see the
level of oil inside its sliding ring (brown colour). If it is above the sliding ring in the
subplatter there is plenty of oil. If excess oil is added it will run into the appropriate extra
reservoir.
Belt:
Periodically remove the platter and remove the belt. Clean the belt and running surfaces of
the motor pulley and the subplatter with a soft cloth soaked in alcohol (every 8-12 months).
For best performance replace belts every five years.
Troubleshooting
Platter not rotating:
Motor controller unit- check if the red LED is on
-green display should show 33 or 45, if not re-plug PS DC
- check both connection cables from PS DC to motor
Consult dealer or qualified electrician.
Very slow start:
Remove the platter and belt and check position of the belt and tension.
11

Wrong speed:
If you find out that your speed selection is way out of range for some reason, you should reset
PS to factory set outputs:
First check position of the belt.
Factory preset:
If the speed is totally incorrect: Reset to factory preset and then adjust correct speed on the PS
DC by using strobo disc:
Turn the power off, wait 10 sec and then press and hold speed button, then press power on.
When display will shows CU, release the speed button. The display will now show FA and
then 33. Your PS is now preset for factory preset speeds. See page 9.
Suspension:
While adjusting subchassis height you might unscrew rear left knob too high(shiny brass knob
is too high on thread) and it will run out of adjustment. In this case remove platter& tonearm,
lift up the subchassis and rotate brass knob underneath towards the end of the thread.
Transportation
For short distances dismantle the platter, and disconnect all cables. Block the tonearm's tube
and the top aluminium plate with foam inserts. Do not tilt more then 15 degrees for long
periods of time as this could cause bearing oil to spill.
If you need more tilt more than this angle, then you should remove the bearing oil and
subplatter and it is advisable to protect the ruby ball.
All parts are heavy and can be easily damaged by sliding around a transport vehicle.
Repacking in the original boxes is, therefore, recommended.
Kuzma Ltd
Hotemaze 17A
SI-4205 PREDDVOR
SLOVENIJA
Phone: + 386 4 25 35 450
Fax: + 386 4 25 35 454
E mail: [email protected]
www.kuzma.si
.
12

13


