Download - Lims Manual - LIMS - Home

PDF generated using the open source mwlib toolkit. See http://code.pediapress.com/ for more information.PDF generated at: Thu, 11 Jun 2015 18:49:13 CEST
Lims Manual

ContentsArticles
Contents 1General 4Glossary 4List/Grids 5Roles of the system 6Use cases 7User access 8Start page 9Tools 12View Tool 13My licenced tools 14Apply for licence 15All tools 16Tool status 17View Bookings 18My Bookings 19All Bookings 20Booking overview 21Batches 22Batch list 22Add batch 23Log 24Log status 24Log history by tool 25Log history by batch 25Verify night shift booking 26User 27My profile 27My statistics 28Send message 29User list 30My user lists 30Advanced 32Licences by user 33

My tools 33Tool timeblocking 34Disallow mail subjects 35Licences by tool 35Licences applications 36Instructors by user 37Instructors by tool 38Log fields 39Maintenance log fields 40Service log fields 40Courses 40Manage project members 41Project list 42New project 44Newsletter 45Internal info page 46Tag connections 47Tool down time 48Tool history 49Admin 50New university company 50New department 51New laboratory group 52New user 53New area room 54New process line 55Area room list 55Area closedown 56New area closedown 56Tool list 57Fares and Charges 58Regenerate invoices 60Invoice by project 60Invoice by tool 61Invoice by user 61Simulate invoices 62Simulated invoice by project 63Simulated invoice by tool 63

Simulated invoice by user 64Process line list 64Statistics for booked time 65Statistics for logged time 66Booked time list 67Logged time list 67Man hours 68Bookings without logs 68System settings 69External info page 73Night shift message 74External mail receivers 75Add external mail receiver 75Tag structure 76Admin user list 77User status 77New users to approve decline 77Process application 78Unlock user 79Info 79Chemical list 79General documents 80Tool documents 81Sitemap 82
ReferencesArticle Sources and Contributors 83Image Sources, Licenses and Contributors 85

Contents 1
Contents
Table of contents•• General
•• Glossary•• List/Grids•• Roles of the system
•• Use cases•• Start page•• Tools
•• View Tool•• My licenced tools•• Apply for licence•• All tools•• Tool status•• View Bookings
•• My Bookings•• All Bookings•• Booking overview
•• Batches•• Batch list•• Add batch
•• Log•• Log status•• Log history by tool•• Log history by batch
•• Verify night shift booking•• User
•• My profile•• Cleanroom_entrys•• My statistics•• Send message•• User list•• My user lists
•• Advanced•• Tool responsible
•• My tools•• Tool timeblocking•• Tool couples•• Disallow mail subjects•• Licences by user•• Licences by tool•• Licences applications•• Instructors by user

Contents 2
•• Instructors by tool•• Log fields•• Maintenance log fields•• Service log fields
•• Instructor•• Licences by user•• Licences by tool•• Licences applications•• Courses
•• Manage my projects•• Manage project members•• Project list•• New project
•• Newsletter•• Internal info page•• Tags
•• Tag connections•• Tool down time•• Tool history
•• Admin•• Add...
•• New university company•• New department•• New laboratory group•• New project•• New user•• New tool•• New area room•• New process line
•• Area / rooms•• Area room list•• New area room•• Area closedown•• New area closedown
•• Entities•• University company list•• New university company•• Department list•• Add department•• Laboratory Group list•• New laboratory group•• Manage Categories
•• Tools•• Tool list•• New tool
•• Fares and Charges

Contents 3
•• Invoices•• Invoice by project•• Invoice by tool•• Invoice by user•• Regenerate invoices•• Simulate invoices•• Simulated invoice by project•• Simulated invoice by tool•• Simulated invoice by user
•• Process lines•• Process line list•• New process line•• Manage tools for process line
•• Project•• Manage project members•• Project list•• New project
•• Statistics•• Statistics for booked time•• Statistics for logged time•• Booked time list•• Logged time list•• Man hours•• Bookings without logs
•• System info•• System settings•• External info page•• Night shift message•• External mail receivers•• Add external mail receiver
•• Tags•• Tag structure•• Tag connections
•• User•• User list•• New user•• User status•• New users to approve decline•• Unlock user
•• Info•• Area room list•• Chemical list•• General documents•• Tool documents•• Sitemap
•• User access

General 4
General•• Glossary•• List/Grids•• Roles of the system
Glossary
Glossary
Term Description
Tool Id A unique tool number. This Id is user defined.
Tool status The status of a tool. The statuses are Available, Warning and Down.
Tool category The tool type.
Tool down time The hours the tool has been unavailable.
Tool document Documents connected to the tool.
Booking A booking on a specific tool.
Calendar In the calendar the users can create/edit/view bookings. The calendar displays one week at a time.
Tool license To book a specific tool the user must have a licence for that tool.
Licence application Users that need to use certain tools must apply for a “driving” licence. The application is handled by the tool responsible.
Tool responsible A user category. There are 1st and 2nd tool responsible. The users in this category grants licenses and is permitted to edit toolproperties.
Practical coach The practical coach is a user that has helped an applicant using a specific tool. The practical coach is a user who has licencefor that specific tool
Supervisor When applying for membership in LIMS the applier must name his/her supervisor.
Instructor A user category that instructs new users how to use tools.
Project It is possible to Add/Create projects in LIMS. When booking a tool the user have to specify a project.
Batch It is possible to add and edit batches, to be referenced to when logging.
Night shift booking Certain rules apply when booking tools outside daytime hours.

Glossary 5
Newsletter Users with permission can create/edit and send the newsletter. The newsletter is usually sent at the end of the week.
Sitemap A map over the structure of the website.
Profile All users has a profile which can be edited by the users himself, email, password etc.
Process line(s) Tools used in a process flow can be grouped using a process line.
External mailreceivers
External mail addresses that will receive information messages from LIMS.
Internal info page The start page for LIMS. The page can be edited by users with higher permission levels.
Log The process for the users to log their work on a booking/tool.
Log fields It is possible to add/create custom log fields on every tool separately.
Fares and charges Sets hourly rates, monthly fee etc. Used when handling invoices.
Favorites A menu that contains the selected favorites in the LIMS system. The favorites are user defined and set in the “My Profile”section.
List/Grids
Lots of pages in the system are “List pages”, like User list, tool list, Booking list, project list, etc. Common for these pages are that they have a filterwith options – depending of type of page.
Some lists have a lot of viewable columns, a logged in user have the option to choose the columns to view. These settings are saved until the nexttime the user changes them.
Each list has some default columns that are showed the first time. You can always change back to “default” if you like (Restore to default button).
List/Grids 6
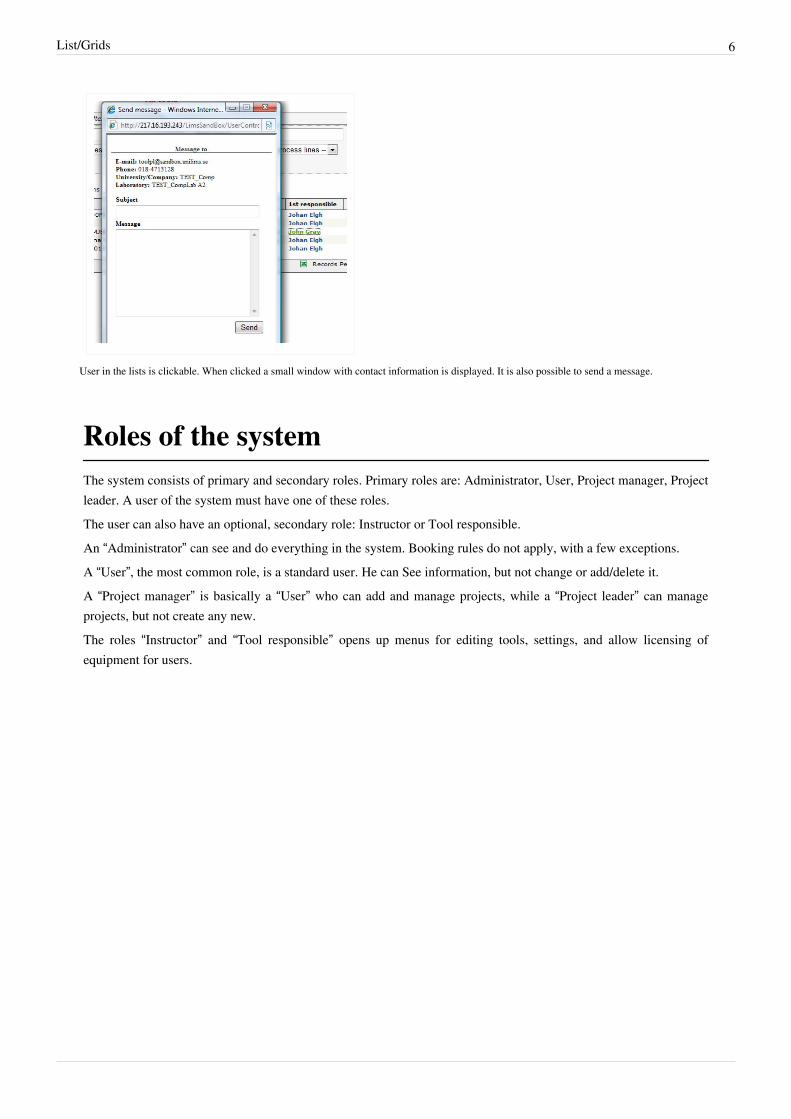
User in the lists is clickable. When clicked a small window with contact information is displayed. It is also possible to send a message.
Roles of the systemThe system consists of primary and secondary roles. Primary roles are: Administrator, User, Project manager, Projectleader. A user of the system must have one of these roles.The user can also have an optional, secondary role: Instructor or Tool responsible.An “Administrator” can see and do everything in the system. Booking rules do not apply, with a few exceptions.A “User”, the most common role, is a standard user. He can See information, but not change or add/delete it.A “Project manager” is basically a “User” who can add and manage projects, while a “Project leader” can manageprojects, but not create any new.The roles “Instructor” and “Tool responsible” opens up menus for editing tools, settings, and allow licensing ofequipment for users.

Use cases 7
Use casesThis section describes the workflow when performing some common tasks in LIMS.
Apply for access to LIMSWhen a potential user needs access to LIMS, the user has to apply for membership. Researchers, graduates, studentsand others that require access to the lab(s) can apply for membership from the start page by clicking the menu “Useraccess”.
The steps necessary by the applying user are explained in the section User access. After a user has sent anapplication applying for membership in LIMS an administrator has to process the application, these steps areexplained in the section Process application.Apply for tool licenceIf a user needs to book a tool, the user has to have a licence to use that particular tool. The steps performed whenapplying tool licenses are described in the section Apply for licence. A tool responsible has to approve or declineapplications, these steps are describe in the section Licences applications.To book a toolThe core of LIMS is the booking of tools. Booking a tool can be initiated from different sections in LIMS. The mostcommon way of doing this is from the start page. This is done by clicking “Book” to the left of one of the toolsdisplayed in the list My licenced tools and thereafter perform a booking on that specific tool. The booking procedureis described in the section Book a tool.Create a log connected to a booking or a toolThe recommended way is to create logs on bookings but some tools are not possible to book. In that case the user hasto create a log directly on that tool. Logging is usually performed from the start page in the list “My Bookings”. Howto create log on a booking see the section: Log for booked tools. How to create log on a tool see the section: Logwithout booking.Send messagesFrom within LIMS the user has the option to send messages to the other registered users in LIMS, how to do this isdescribed in the section: Send message.

User access 8
User access
MembershipResearchers, graduates, students and others that require access to the lab(s) can apply for membership from the startpage by clicking the menu “User access”.
Applying for membership is done in two steps. In the first step the applier enters name, age university etc.As seen below, the mandatory fields are First name, Last name and Age. The user that grants membership to LIMSwill probably require more data to be entered.
In step two of the membership process the applier enters username, password and telephone numbers.The applier clicks the button ”Finish” to send the application. Users responsible for processing "user applications"receive a message that there are new applications. These users are set in system settings by an administrator.

User access 9
Start pageHomeAfter a successful login the user is redirected to the start page shown below.From the start page it is possible for the user to do the most common tasks in LIMS.
Thestart page contains of following sections:- Notification box (Only Advanced users)- News- Booked tools, a list of booked tools- Logs without bookings, a list of logs- Project leader bookings, a list of bookings- My licenced tools (Favorites), a list of tools- My licenced tools (All licenced tools) , a list of toolsNotification box Some users (Administrators/Tool responsibles may have some additional info on the start page, like processing

Start page 10
applications. At the top of the page, both new licence applications(Tools) and new user applications(LIMS) aredisplayed.
By clicking the links the user can manage/process these applications.This box can also contain notifications about invalid entries to the cleanroom, and notification when a tool needsmaintainance.News (Internal info page)The news are displayed under the header “Important information about the lab”. Users with the role administrator,tool responsible, project manager and instructor are permitted to edit the internal info page/news page at Home »Advanced » Internal info page.
Booked Tools This section of the start page displays booked tools and started log entries that are not connected to a booking. See picture below.

Start page 11
The user can edit the bookings and perform logging from any of the lists. This is done by clicking the links “Edit” (toedit a booking) and ”Log” (to create a log on a booking).My licenced toolsThis section lists the tools where the user has a licence. As default, only the tools selected as favorites are displayed.Favorite tools are selected/deselected at Home » Tools » My licenced tools.

Start page 12
To see all licenced tools the user has to click the link “[All licenced tools]”. See picture below.
As seen above the user has the choice to performbookings, perform logging or view the tool information in the list. This is done by clicking the links “Book” (to booka tool), “View” (to view a tool information page) and ”Log” (to create a log on a tool without booking).
ToolsBold textHome » ToolsThe “Tools” menu is accessible to all users of the system.
•• View Tool•• My licenced tools•• Apply for licence•• All tools•• Tool status•• View Bookings
•• My Bookings•• All Bookings•• Booking overview
•• Batches•• Batch list•• Add batch
•• Log•• Log status•• Log history by batch•• Log history by batch
•• Verify night shift booking

View Tool 13
View ToolThis page is opened from several different tool lists like “All tools”, “Tool list”, “My Licensed tools” etc. View toolshows standard information, viewable to all users.
Fields showed under "Additional info" is selected at System settings

My licenced tools 14
My licenced toolsHome » Tools » My Licenced Tools
The page displays a list of the tools where the user has licence.
As seen above the user is able to perform bookings, perform logging or viewing the tool in the list.This is done by clicking the links “Book” (to book a tool), “View” (to view a tool) and ”Log” (to create a log on a toolwithout booking).It is also possible for the user to add or remove a tool as a favourite tool.The favourite tools are seen at the top of the list “My Licenced tools” in the LIMS start page.How to create log on a booking see the section: Log for booked tools.How to book a tool is described in the next section: Book a tool.

Apply for licence 15
Apply for licenceHome » Tools » Apply for licence
In this page a user can apply for a tool licence.The three different dates are suggestions for the necessary overhaul done by a tool responsible or an instructor.The practical coach is another user who has licence for that tool.The practical coach must be a user that has helped the applicant using the specific tool.The application is sent by mail to 1st or 2nd tool responsible and/or all instructors for that tool, and/or theresponsible user for the laboratory / group, where the applying user belong. This is determinated under SystemsettingsWhen the license is confirmed by a tool responsible or instructor the user receives a “driving” license for that tool.This means that the user is allowed to book and use that tool.The last field, "Short info of intended use" can be customized by a tool responsible, to contain a tool specificquestion.
Users, who are tagged (Tag connections) as a "practical coach" have the ability to make applications for other users.
The list, "--License for user --" containsall users who has has the applying user as their practical coach.

All tools 16
All toolsHome » Tools » All tools
This page lists all tools registered in the system. It is possible to do some filtering to narrow down the number oftools displayed.To apply for licence, click the link “Apply”.To book a tool click the link “Book”.To view the details click the link “View”.To perform logging, click the link “Log”.

Tool status 17
Tool statusHome » Tools » Tool status
This page lists all tools registered in the system displaying their current status.It is possible to do some filtering to narrow down the number of tools displayed.Users with proper permissions can change the status for a tool by clicking the link “Change status”.
Clicking "Change status gives a popup window with the info below.
When the user changes the tool status it will probably affect the bookings made on that tool.
Status change Effect
Available -> Warning When a booking is made a warning message will be displayed to the user.
Available/Warning ->Down
All future bookings will be deleted. If a booking spans into the down period that booking will be shortened to thenearest available ½ hour.
Down ->Available/Warning
If licenced users to that tool has activated e-mail notifications in “My Profile” they will receive a notification e-mailwhen a tool status changes from “Down”.

Tool status 18
Setting for E-mail notifications can be found under My profile
View BookingsHome » Tools » View Bookings
This part of the application give the users an overview of their own bookings and the opportunity to overview otherbookings as well.
- My Bookings - All Bookings - Booking overview
My Bookings 19
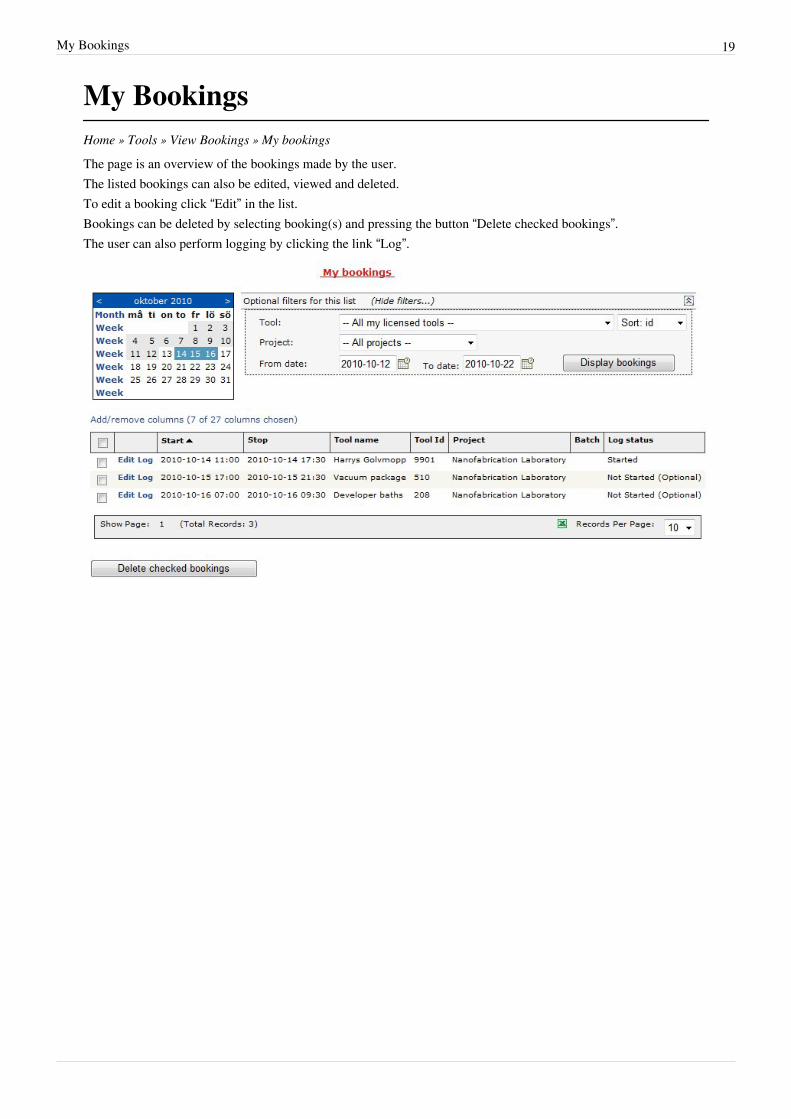
My BookingsHome » Tools » View Bookings » My bookings
The page is an overview of the bookings made by the user.The listed bookings can also be edited, viewed and deleted.To edit a booking click “Edit” in the list.Bookings can be deleted by selecting booking(s) and pressing the button “Delete checked bookings”.The user can also perform logging by clicking the link “Log”.

All Bookings 20
All BookingsHome » Tools » View Bookings » All bookings
The page lists all bookings for a tool AND/OR a project during a period of time.In the example below the user is listing all bookings in the project “Nanofabrication Laboratory”.The listed bookings can also be edited, viewed and deleted.To edit a booking click “Edit” in the list.Bookings can be deleted by selecting booking(s) and pressing the button “Delete checked bookings”.The user can also perform logging by clicking the link “Log”.

Booking overview 21
Booking overviewHome » Tools » View Bookings » Booking overview
This page can be used in two modes: Eighter you displays an overview of bookings the selected date. Or, you get aview for a week The user can choose some favourite tools, or use a filter to select specific tools to check forbookings.
Day view
Week view

Batches 22
BatchesHome » Tools » Batches
In this section the users have the possibility to view and manage batches.•• Batch list•• Add batch
Batch listHome » Tools » Batches » Batch list
A Batch is...The page lists batches in the system. By changing the filter it is possible to see all batches.The user has the possibility to edit/change the batch by clicking the link “edit”. It is also possible to display the loghistory by clicking the link “History”.

Add batch 23
Add batchHome » Tools » Batches » Add batch
A batch can be connected to a booking or a log.Following fields are mandatory:•• Project•• Responsible user•• Batch name•• Start date
Log 24
LogHome » Tools » Log
This section provides the user with a summary / overview of the logs created.•• Log history by batch•• Log history by batch
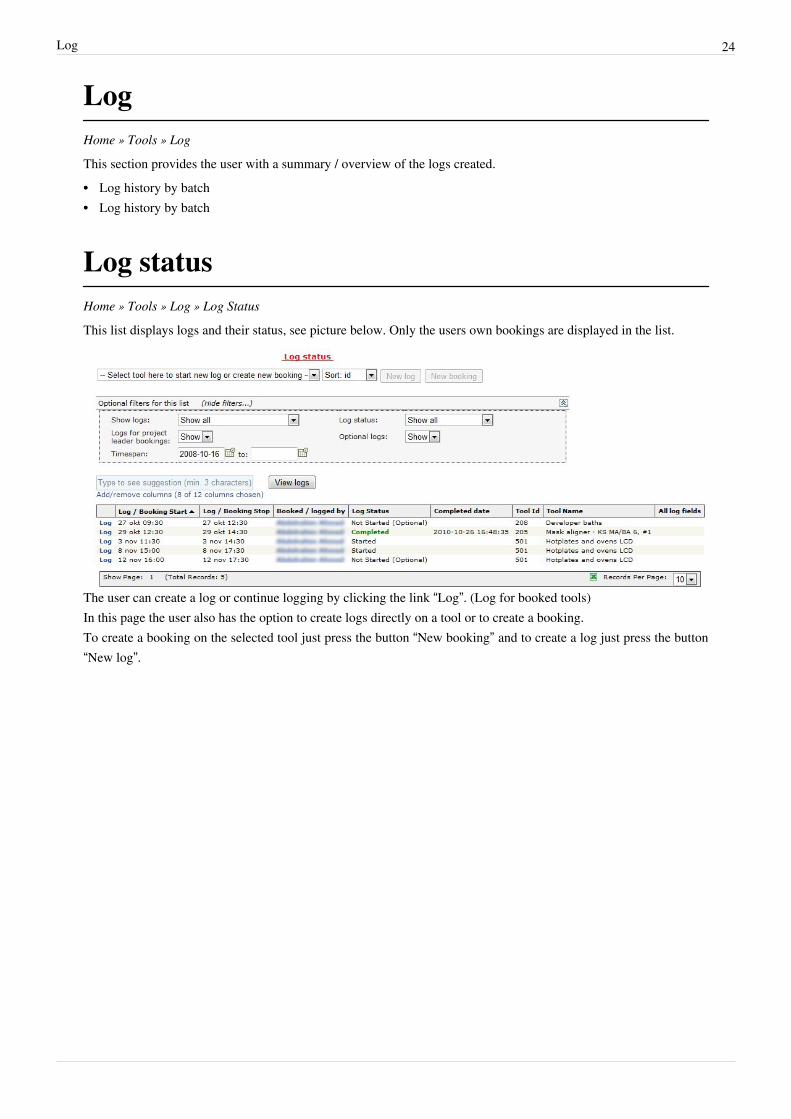
Log statusHome » Tools » Log » Log Status
This list displays logs and their status, see picture below. Only the users own bookings are displayed in the list.
The user can create a log or continue logging by clicking the link “Log”. (Log for booked tools)In this page the user also has the option to create logs directly on a tool or to create a booking.To create a booking on the selected tool just press the button “New booking” and to create a log just press the button“New log”.

Log history by tool 25
Log history by toolHome » Tools » Batches » Log history by tool
This page lists log entries by a specific tool.
Log history by batchHome » Tools » Batches » Log history by batch
This page lists all log entries where the user has entered a batch number/name in that specific log entry.

Verify night shift booking 26
Verify night shift bookingHome » Tools » Verify night shift booking
This page helps users to find lab buddies during night shift. Users search for bookings during the period of their labstay.If there are bookings during selected period they will be shown in the list.
A lab buddy is selected by clicking the link “select”.After selecting a lab buddy the user must confirm/complete the verification and optionally supply some extrainformation.

Verify night shift booking 27
An e-mail is sent to the selected lab buddy upon confirmation. The confirmed lab buddy is shown in the list “Verifiedusers in the lab”, see picture below.
UserHome » User
All users have access to the “User” menu.Pages found here:My profile - View and edit my own profileMy statistics - View some statistics over my bookings.Send message - Send messages to other usersUser list - View some user information of other users.My user lists - Page for createing own lists of users, for emails.
My profileHome » User » My Profile
There are five sections in “My Profile”:“Personal Info”, “Change Password”, “Email Settings”, “User Settings” and “Favorites”.In the different sections the logged in user can view and edit his/her settings.Personal InfoTo change the settings, simply edit the fields and press the button “Save Changes”.The checkboxes "Update E-mail in nodes" and "Update E-mail in portal" are only visible if LIMS is part of aLIMS-network.
Change PasswordIn this section the user can change the password by entering a new password and press the button called “ChangePassword”.The following does only apply if the LIMS i part of a LIMS-networkIf the checkbox called “Update password in nodes” is checked the password change is made in other connected LIMSnodes as well. If the checkbox called “Update password in portal” is checked the password will be updated in theportal as well. It is possible to distribute the current password to the other LIMS-nodes by clicking the link “Set thispassword as password in other nodes”. In this case it is not necessary to change the password, just click the link andthe password will be the same in all LIMS-nodes.Email settingsThis section allows the user to change the personal Email settings.When to receive an e-mail from the system, and if the system should send a confirmation mail as a copy to your selfwhen mailing an other user.User settingsThis is the settings for default project when booking, one or several booking windows at the same time, defaulttimeout for login, and using an iCalendar-feed.By clicking the link “Show” the link to the iCalendar feed is shown.By copying the link into a calendar that supports iCalendar (like the Google calendar) the user’s future bookings is shown in the calendar. How to add the LIMS-calender to your Google-calendar can be found here: http:/ / support.

My profile 28
google. com/ calendar/ answer/ 37100?hl=enHow to subscribe from Outlook: http:/ / office. microsoft. com/ en-us/ outlook-help/view-and-subscribe-to-internet-calendars-HA010167325. aspx (Ignore the part that the address has to start with awebcal - in this case, it's also working with the http.)ProjectsShows all projects for the user.CourcesShows all cources where the user has attended.FavoritesFavorites are created by checking different sections, see picture below to the left. The selected sections is displayedas “Favorites” in the left hand menu, see picture to the left.
My statisticsHome » User » My Statistics
Statistics is presented to the user, see picture below. The data displayed is a summary of the bookings performed bythe logged in user during selected period. There is also a estimated price for the bookings, based on the cost/hour.

Send message 29
Send messageHome » User » Send message
This page enables the user to send messages to other users registered in LIMS.
The user first selects a recipient type in the drop down box. When a recipient type is selected the page changesappearance and the user is presented with different options:• One user.
A text field is shown.Use the text field to enter the name of a user.The text field will display a list of users when entering the name.
• Several users.Displays a list of all users with filtering options.
• Tool responsible.Displays a drop down box containing all tools.
• Users of a specific tool.Displays a drop down box containing all tools.
• The booking system administrator.After selecting recipient type the user selects the actual recipient(s) and enters subject, the message text andattaches file(s).
• Defined filter list.Get's receivers based on a filter. Like: "all users with license on any sputter" (See: My user lists)
• Defined user listGet's receivers based on a predefined list. Like: "all my best friends" (See: My user lists)

User list 30
User listHome » User » User list
Displays users in LIMS, all users can be listed here.
My user listsHome » User » My user lists
This page offers the possibility to create two different types of lists• Filtered lists
This is a list of users that is created using one to many filters. Each filter consists of several parameters and the ifmany parameters is combined the filter will be using AND to get the users. This means that if you select "Allactive users" and one tool category, you will get users that are active and have license for a tool in the selectedcategory. When many filters are combined the system will use OR to get the list of users. This means that if onefilter says "All active users that have license on a tool in a category" and the other filter says "All active users thathave the role Lab User" the list of users will consist of active users that either have a license on a tool in theselected category or/and have the user role Lab User. A filter list is dynamic, which means that if somethingchanges with a user the list will automatically get updated.
• Users listsThis is a specific list of users. You have the possibility to add users to your lists and also remove them. You addusers by apply different filters and then check the users you want to add. A user list is static, which means that ifyou have created a user list based on a specific filter and a change is applied to one user which will cause he/shenot to appear in the filter anymore, the user will still remain in your user list.

My user lists 31
Filter listsThere are 7 different types of filter• Tool
When choosing a tool you will filter on either users that have a license on the selected tool, users that are first orsecond tool responsible on the selected tool or users that are instructor on the selected tool, all depending on thetype of user selected in the dropdown next to the tool dropdown
• Tool categoryWhen choosing a tool category you will filter on either users that have a license on one or more tools in theselected category, users that are first or second tool responsible on one or more tools in the selected category orusers that are instructor on one or more tools in the selected category, all depending on the type of user selected inthe dropdown next to the tool dropdown
• Tool areaWhen choosing a tool area you will filter on either users that have a license on one or more tools in the selectedarea, users that are first or second tool responsible on one or more tools in the selected area or users that areinstructor on one or more tools in the selected area all depending on the type of user selected in the dropdownnext to the tool dropdown
• User categoryWhen choosing a user category you will filter on users that are a member of that category
• User RoleWhen choosing a user role you will filter on users that have that specific user role
• Laboratory groupWhen choosing a laboratory group you will filter on users that belongs to that specific laboratory group
• ProjectWhen choosing a project you will filter on users that are a member of the selected project
When you have made you selectionyou can press "Add filter" to add yourfilter. You will then see your filter ontop of the page as well as a list of usersthat complies with the filter. There isno possibility to modify an alreadyadded filter. You you need to modifyit, the solution would be to delete itand add a new one. You can add asmany filters you want and the user listwill get larger with each filter since thesystem apply OR between each filter.
You can save your filter to an existinglist or to a new list. When saving to anexisting list you will overwrite this list.Existing lists are shown in thedropdown next to the "Save current filter to:"-label. If you wish to create a new list, simply supply a name in thetextbox to the right of the dropdown. Press "Save" when you have selected an existing filter/entered a new name.The filter list in the top right corner will get updated once you save a list. This list shows all the saved filter lists withthe number of filters in each filter list. By pressing "Show" you can load the filter and the current filter will getreplaced with the loaded one. You can then update the filter by removing or adding and then save it to the same listagain. By pressing "Delete" you can delete the filter. You you press "Load" right before "Delete" the deleted filter

My user lists 32
will still show as the current filter.
User lists
By using the filter you can get seedifferent users in the user table. Nextto each user there is a checkbox whichyou can press. The checked users canthen be added to a user list. Below theuser table there is a dropdown, textbox and a save button that give you the possibility to select an existing user list,supply a name for a new user list and save this user list so you can access it later.When saving users to an existing user list, you will not replace this list like with the filter lists, but instead add thechecked users that does already not exist in the list.The user list in the top right corner of the page displays the saved user lists together with the number of users in eachlist.By pressing "Show" you will see a list of the users in the list. The filters the hide and you can choose to deleteusers by check them and press "Delete checked". When you are finished with the user list just press "Go back". Bypressing "Delete" in the user list you will remove the user list.Even if a user list is static it is only the user id's that are saved in the list. If anything on the the user is changed, suchas the email address, it will get reflected in the user list without the need to re-save the list.
AdvancedThis section contains pages for advanced users, like "Tool responsibles", "Instructors" or other service employers.

Licences by user 33
Licences by userHome » Advanced » Tool responsible » Licenses by user
In this page a tool responsible manages licenses for using tools. This is done by selecting user and adding/removinglicenses for different tools.
My toolsHome » Advanced » Tool responsible » My tools
The page displays a list with the tools under the responsibility of the logged in user. The user also have thepossibility do some actions related to the tools in the list, edit, view, to perform logging, to set a service message andto set a general message.

Tool timeblocking 34
Tool timeblockingHome » Advanced » Tool responsible » Tool time blocking
The page for tool time blocking enables the tool responsible to block bookings on a tool during certain times.
Choose periodSpecifies a time period during which the specified blocking will be active.
Choose timeSpecifies a time during the day when the tool is blocked from being booked.
Choose daysSpecifies the days in the week when the blocking is active.
Choose time before releaseSpecifies how many hours before the specified time the booking block will be released.
An exampleAs seen in the picture above. The tool responsible has created a new blocking for a tool during the period2010-10-05 to 2010-12-31. During that time the tool cannot be booked in advance during 10:00 to 17:00 onTuesdays, Wednesdays, Thursdays and Fridays. These days users will be able to make bookings between 10:00 to17:00 from 06:00 (4 hours before 10:00). Tool blocking does not apply to tool responsible, administrators and

Tool timeblocking 35
members of the service project. They can book at any time.
Disallow mail subjectsHome » Advanced » Tool responsible » Allow/Disallow mail subject "booking cancelled"
When a booking is cancelled it is possible to send a mail with the subject “booking cancelled”.The list enables the tool responsible to allow or disallow mail with the subject “booking cancelled” when a bookinghas been cancelled. Toggle between enabling and disabling this feature by clicking True/False in the “Allow”column.
Licences by toolHome » Advanced » Tool responsible » Licenses by tool
In this page a tool responsible manages licenses for using tools. This is done by selecting a tool and adding/removinglicenses for different users.

Licences applications 36
Licences applicationsHome » Advanced » Tool responsible » Manage Licence applications
The first page shown displays applications from users applying for tool “driving” licenses. By clicking “Process” theuser can manage individual license applications.
The tool responsible manages the license application as seen below.The application can be declined, saved as pending and confirmed.There are also some text fields so that the tool responsible can supply the application with supplementaryinformation about the tool and its intended use.As soon as the application is confirmed the user can book that specific tool.Information about the user is also displayed, to the right.

Licences applications 37
Instructors by userHome » Advanced » Tool responsible » Instructors by user
This page is used to add/remove users as tool instructors. This is done by selecting user and adding tool to that user.The first page shown displays only a search field. Type/Select the name of the user who is going to be an instructor.Display the user’s tools by clicking the button “Display Tools”.
The tools available for that user are displayed as shown below. Add the user as instructor by selecting tools in the listnamed “Available Tools” and click the “Add tool(s)” button.

Instructors by user 38
Instructors by toolHome » Advanced » Tool responsible » Instructors by tool
This page is used to add/remove users as tool instructors. This is done by selecting tool and adding users asinstructors too that tool. When selecting a tool a list of available users is displayed, just select and add/remove usersas instructors in that list.

Log fields 39
Log fieldsHome » Advanced » Tool responsible » Log fields
This page is used for add/remove/edit additional log fields for a specific tool. Every tool has three standard logfields; these fields cannot be changed or removed from a tool. The standard log fields are: “Log start” (Date andtime), “Log stop” (Date and time) and “Additional info” (Text). To add additional log fields, start by selecting a tool.Current additional log fields are displayed as shown below. Add new log field by clicking the button “Add new logfield”. Edit existing log fields by clicking “Edit” in the list.
It is possible to add additional 9 numeric log fields and 9 additional text log fields. The fields can be set to Optional,Optional - but warning if not filled on and Compulsory.
Maintenance log fields 40
Maintenance log fieldsHome » Advanced » Tool responsible » Maintenance log fields
The functionality is the same as in “Log fields”. See the section Log fields for more information. The only differenceis that these custom fields only are available in maintenance projects.
Service log fieldsHome » Advanced » Tool responsible » Service log fields
The functionality is the same as in “Log fields”. See the section Log fields for more information.The only difference is that these custom fields only are available in service projects.
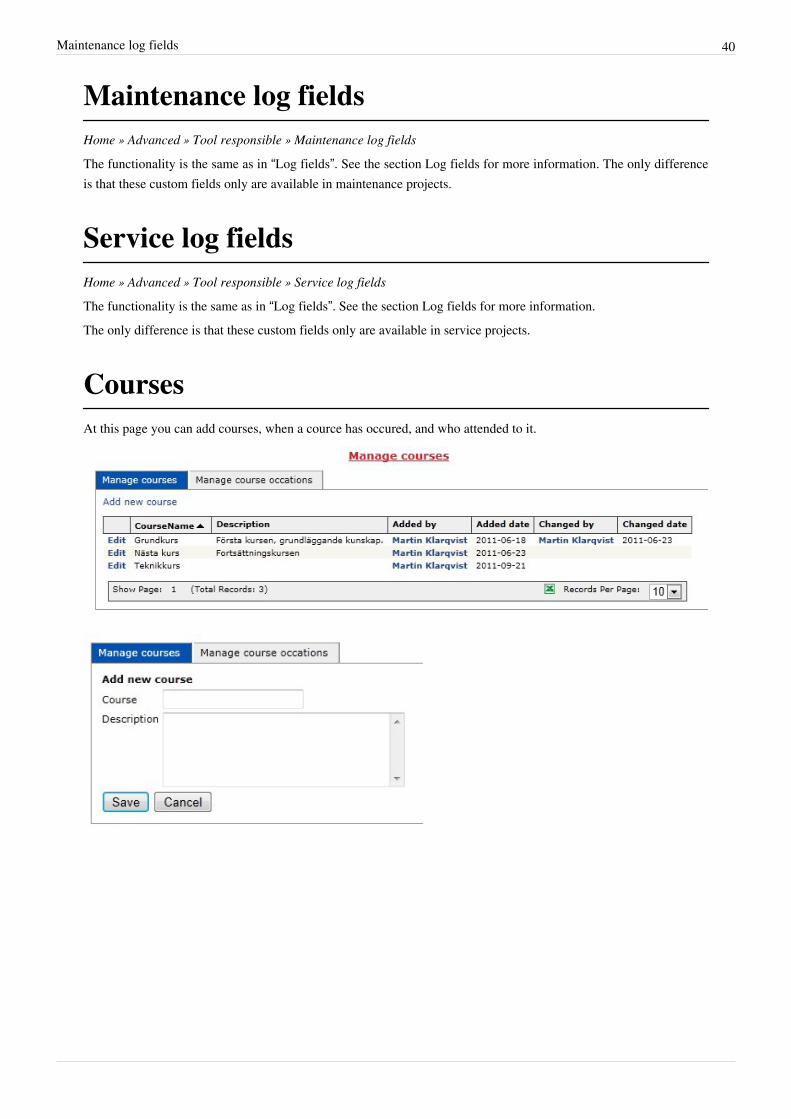
CoursesAt this page you can add courses, when a cource has occured, and who attended to it.

Courses 41
Manage project membersHome » Advanced » Manage my projects » Add/Manage project members
In this page the project managers can Add/Remove project members. This is eighter done by checking users andpressing the “Add” button or the “Remove” button.
Or, if you want to use the view where you start by searching for a user, and check the projects you want toadd/delete.

Manage project members 42
Project listHome » Advanced » Manage my projects » Project list
The page displays the projects registered in LIMS.
As shown below, users can send message to the project leader by clicking a name in the “Project leader” column.

Project list 43
As shown below, administrators and project managers can edit a project by clicking the “Edit” column.
To delete a project simply set the radio button “Is deleted” to true.

New project 44
New projectHome » Advanced » Manage my projects » New project
The page enables a project manager to create a new project.
All fields but “Supplementary info” are mandatory.
Project IdThis is the Id you choose for the project. This must be a unique number.
Project nameName of the project
Project categoryProject category field is a description, which can be defined at Manage project categories
Type of projectType of project. Can be "standard", "service", "maintenance". This affects the booking rules.
Laboratory / groupGroup responsible for the project
New project 45
Charge typeZero – Low – Medium – High. This is to set the cost for bookings within this project.
Project leaderResponsible for project
Start date / End dateDates for start and stop. It’s not possible too book before start or after stop.
Supplementary infoOptional. Short description of project.When changing charge type or laboratory group, the user must select a start month for the new charge, since cost iscalculated per month
NewsletterHome » Advanced » Newsletter
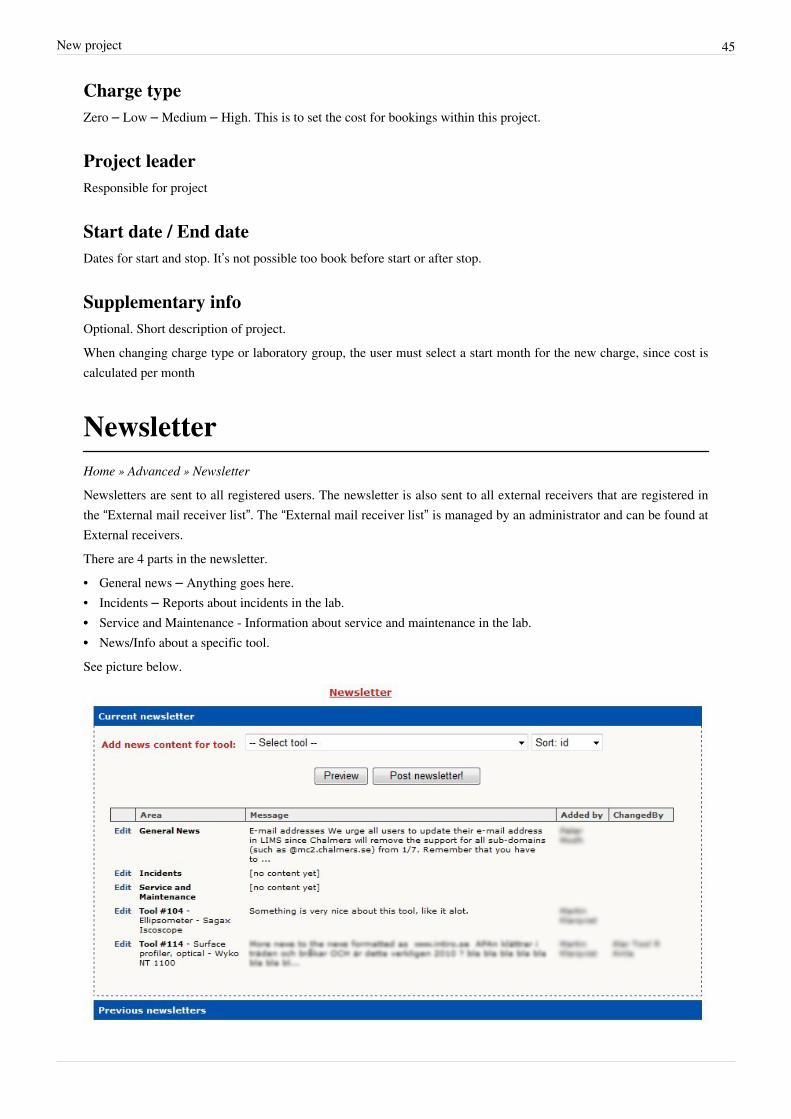
Newsletters are sent to all registered users. The newsletter is also sent to all external receivers that are registered inthe “External mail receiver list”. The “External mail receiver list” is managed by an administrator and can be found atExternal receivers.There are 4 parts in the newsletter.• General news – Anything goes here.• Incidents – Reports about incidents in the lab.•• Service and Maintenance - Information about service and maintenance in the lab.•• News/Info about a specific tool.See picture below.

Newsletter 46
The two rows in the bottom are news about specific tools.Permissions:•• An administrator is allowed to edit all parts of the newsletter.•• Only an administrator is allowed to post the newsletter.•• A tool responsible is allowed to add/edit news content about tools where the user is 1st or 2nd tool responsible.• A user with the role “tool responsible” is just allowed to view news content about any other tool.•• An instructor is only allowed to view news content about the tool(s).•• A project manager is only allowed to view news content about the tool(s).To edit the different parts of the newsletter simply click “Edit” on that specific row/part.Select a tool in the drop down to add news content about that specific tool.To send the newsletter simply click the button “Post newsletter”, this can only be performed by an administrator.
Internal info pageHome » Advanced » Internal Info Page
In this page the users can manage the content of the internal info page.The internal info page is the start page for LIMS. After a successful login the user will be directed to the start/homepage which displays the information entered for the internal info page along with information about the user’sbookings. Usually the information is about the latest changes and updates. Editing of the internal info page supportsformatting and adding pictures, se picture below.
The start page with the updated text and picture is shown below.

Internal info page 47
Tag connectionsThis page offers the user to manage the tag connections for the current lab, either by searching for tags and applythem to an entity or by traversing the tag structure and set connections for individual tags.
By searchWhen searching for tag the structure isn't important. Instead you will search by typing the word, description orsynonyms. The description on each
Tag searchThe search will continuously (as you type) match the entire search string against the Word, Description andSynonyms and display the matches in a drop down window. By using the keyboard or mouse you can select the tagof your choice. The chosen tag will get added below the search field and a list of matching tag connections will bedisplayed below.If another tag is searched and added the list is updated. The list will contain tag connections that match on any or allof the entered tags, all depending on the selected option of the radio buttons above the search field.
Display tags for an itemTo display the connected tags for an item you can either press the link in the entity name column for connections thatmatch the entered tags or in the tab menu choose what type of entity you look for and choose it in the drop down (fora user it is a search field with auto complete). When an entity is chosen the tags for that entity is shown below thesearch field.If an entity is chosen and you remove/add tags you will see that the "Refresh" and "Save" links in the tab areenabled. The "Refresh" link will restore the tags to the set of tags for the currently selected entity (pretty much asre-selecting it) and "Save" will save the new set of tags to the selected entity.If you for example have a newly created Tool that you wish to add tags to you can simply select the tool and thenstart adding tags. When you are satisfied with the set of tags you simply press save and you are done.

Tag connections 48
Description for a tag connectionYou can set a descriptive text for a tag connection. In the list of matching connections you simply press the"Description" column of the row (connection) you wish to set a description for. The text will change to an input fieldand you can start typing. When you press enter you will save the description. To cancel you can simply click onanother description field or elsewhere, and the input field will disappear and go back to the original text
By tag treeWhen viewing the tag tree you will only be able to apply connections for one tag at the time. In order to apply aconnection for a tag, simply press a tag in the structure. You will then see the current tag connections for that tag.You could then either press the link in the entity name column or choose an entity in the tab structure to be able toadd/change the tag connection of the current tag to the selected entityWhen an entity is selected you will also see the tag connections for that entity. You can then remove tag connectionsby clicking the remove link or select the tag, by pressing the select link, which will allow you to alter the tagconnection for that tag on the current entity. This is the same as clicking on the tag in the hierarchy.When you add or update a tag connection you simply enter the desired description for the connection and press "Addtag"/"Update tag". The option of clicking in the description field of the tag connection list to alter the description hasbeen removed when working with the tag tree.
Tool down timeHome » Advanced » Tool downtime
This page displays a list of the tool downtime during selected period, and how many hours the tool has not beenavailable for booking.
Click the tool name for details, a popup window will display the details as shown in picture below.

Tool down time 49
Tool historyHome » Advanced » Tool history
This page displays warnings, services and downtimes for a selected tool during for a specific year, or part of a year.The list displayed is very similar to the one displayed in the popup detail window in Tool downtime. See picturebelow.

Admin 50
AdminThis section contains pages for administrators, like settings, invoices and statistics.
New university companyHome » Admin » Entities » New university / company
Name and VAT are mandatory fields.
TypeOrganization type, values are “Commercial”, “University” or “Institute”.
Charge typeCan be “Zero”, “Low”, “Medium”, “High” This is to set the cost for bookings for people belonging to this type.

New department 51
New departmentHome » Admin » Entities » Add department
Only “Name” is mandatory. Choose a university / company to connect the department to.

New laboratory group 52
New laboratory groupHome » Admin » Entities » New laboratory / group
Only “Name” is mandatory. Choose a department to connect the Lab / group with.Laboratory / group are used at many places within the system. It tells belonging of a user, responsible group for atool or group, and used for calculate invoices.
New user 53
New userHome » Admin » User » New user
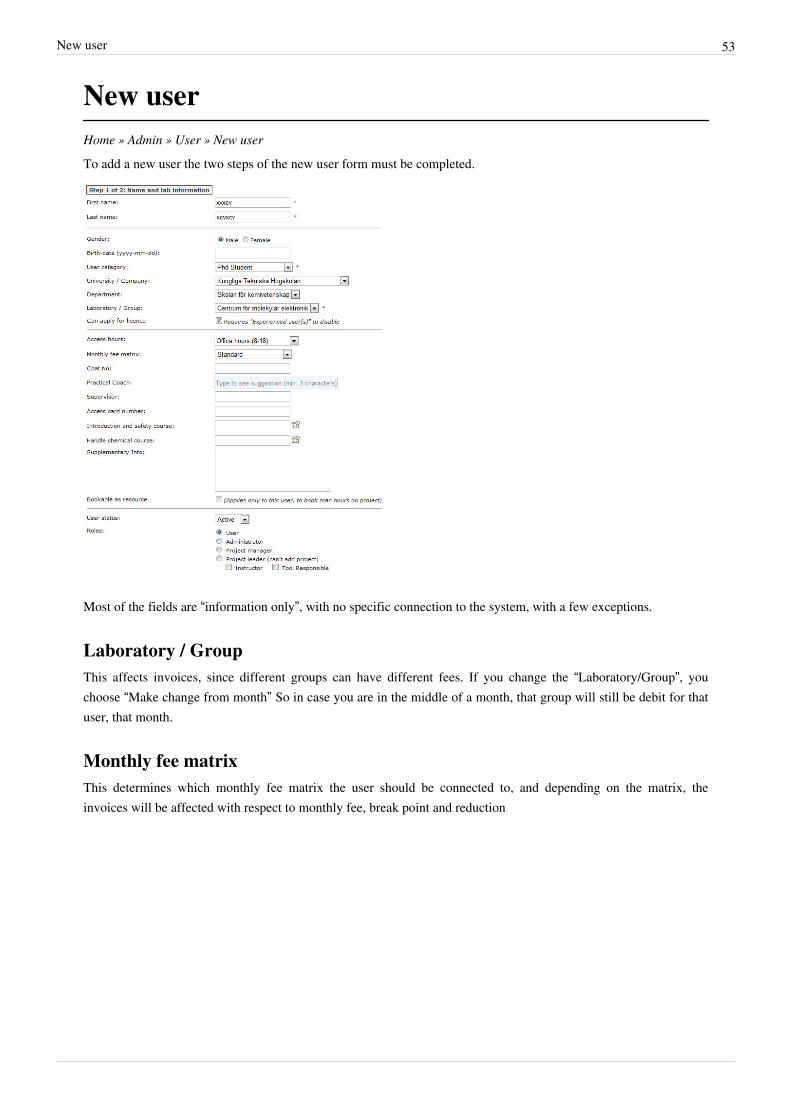
To add a new user the two steps of the new user form must be completed.
Most of the fields are “information only”, with no specific connection to the system, with a few exceptions.
Laboratory / GroupThis affects invoices, since different groups can have different fees. If you change the “Laboratory/Group”, youchoose “Make change from month” So in case you are in the middle of a month, that group will still be debit for thatuser, that month.
Monthly fee matrixThis determines which monthly fee matrix the user should be connected to, and depending on the matrix, theinvoices will be affected with respect to monthly fee, break point and reduction

New user 54
User statusActive / Inactive / Deleted. An Inactive user can still log in, but can not do anything in the system. A deleted usercan not log in at all. (Though, a deleted user can be set back to active again)
RolesA role determines what a user can see or do in the system. More info at: Roles of the system
Bookable as resourceThis is a setting that gives the user the option to book/log time in projects. Primary this function is for lab personnelthat are active in different projects, where someone else has booked. Project time by resource is found under Manhours
New area roomHome » Admin » Areas / Rooms » New area / room
“Room responsible” and “Name” are mandatory

New process line 55
New process lineHome » Admin » Process lines » New process line
Edit or adding a new process line gives only two options: Name and description, the name is mandatory. After youadded a process line, you can associate tools to it.
Area room listHome » Admin » Areas / Rooms » Area / room list

Area closedown 56
Area closedownHome » Admin » Areas / Rooms » Area closedown
New area closedownHome » Admin » Areas / Rooms » New area closedown
“Reason” is optional – rest is mandatory. “To Time” must occur after “From Time” During the period, no one will beable to book on equipment standing in that area. If there are any current bookings, they will be removed when youadd the “closedown”, so be careful.

New area closedown 57
Booking view during closedown
Tool listHome » Admin » Tools » Tool list

Tool list 58
It is possible to view a tool or edit a tool from the list.
Fares and ChargesEach matrix on this page has a history where you can view the values in the past. You can not alter the past valuesthough.
Hourly rate matrixThe Hourly rates are used for tools. Each too has an rate type that corresponds to to a row in the matrix. A projecthas, depending on its owner, a charge type, which will correspond to a column in the matrix.If the matrix needs to be altered simply press the "Change hourly rates" link. If the latest existing version starts in thecurrent month the date in the form will be set to the current month and any changes to the values will be updates tothis latest version. Otherwise a new version will be created. A new version will also be created if you change thestart month to a month in the future (when the latest starts the current month).I.e. if the current month is 201202 and the latest version starts this month and you press the change link, you will see2012-02 in the month text box. Any changes to the values will update this version, but if you change the start monthto 2012-03 the 201202 version will remain and a new version will be created that starts 201203.If the latest matrix in the history starts in the future any changes to the matrix will be updates to this version.You can not set the end months. These are set automatically to the month before the next start month.
Monthly fee matricesEach user that makes a booking must be connected to a monthly fee matrix. This controls the monthly fee that isbeing billed to the projects that this user makes a booking or to the laboratory group this user belongs to if he/she hasnot made any bookings for the invoice month period.The matrix also controls the discount that will affect the users booking and the break point in which the discountstarts.The monthly fee matrix consists of three values per column
Monthly feeEach user belongs to one and only one company. This company has a charge type that controls which column themonthly fee should be taken from. The monthly fee cost is only applied to the company the user belongs to. If theuser doesn't book in any projects that belongs to the same company the laboratory group will take the whole cost.The user can still book in projects that belongs to another company though.If the user books in at least one project that belongs to the same company these projects will divide the monthly feeequally between them.
Fares and Charges 59
Monthly break point and reductionThe monthly break point controls how much a user can book before the discount kicks in. Projects that belongs toother companies will of course pay for the time the user book in these projects. The break point is per company andproject charge type, that is projects with the same charge type belonging to the same company will share the discountof all hours booked in these projects, since they have the same break point and the same owner.An example can be that if the "High" break point is 20000 and we have two projects belonging to the same companythat the user has booked in. In project A the user has booked for the total cost of 20000 and in project B the user hasbooked for 10000. This will mean that the total break point for these projects is 20000 and the user has booked for30000. He/she will have the discount based on 10000, divided between the projects depending on how much of thetotal cost the project have.If the reduction for "High" is 60% the total discount will be 6000. Since project A have 2/3 of the total cost thisproject will also have 2/3 of the discount, that is 4000 and project B will have 1/3 of the discount, that is 2000.The bill for this user will be 20000 - 4000 = 16000 for project A and 10000 - 2000 = 8000 for project B. It is a totalof 24000 which is also the same as 30000 - 6000 = 24000. The discount is just divided between each project.If the user has booked in a third project with another charge type, but the project still belongs to the same companyas the other two projects, this project will have its own break point. It is only projects with the same charge typebelonging to the same company that will share the discount and break point, regardless of which company the userbelongs to.
EditingThe editing for these matrices works almost the same as the hourly rates matrix. You can add several matrices andname them. To add a matrix, simply press the "Add monthly fees" button. A new matrix in edit mode will appear andyou must specify a name and can change the start month if you wish. It is automatically set to the next month in thefuture. You also set the values and then press "Update", or "Cancel" if you wish not to create a matrix. Important tonotice is that once a matrix is created it cannot be deleted. Please contact the system administrator if you wish todelete it.The editing of values and start month of each matrix works like this: you press change fees and the latest fee has astart month that is the current month or a month in the future, you will edit this fee. If the latest fee starts before thecurrent month you will add a new.
Cost for man hour matrixThis matrix controls the cost for resource booking depending what project that makes the booking. The editing ofthis matrix functions in the same way as the hourly rates matrix.
Cost for cleanroom accessThis matrix controls the cost/fee for a user visiting the lab. When a user exits the lab, the time spent in the labb is(default) added to the users "default project". The user can later on redistribute the time to other project. The cost forcleanroom access can be added to the invoice specification.

Regenerate invoices 60
Regenerate invoicesHome » Admin » Invoices » Regenerate invoices
Since invoices are calculated, you must regenerate them if you have been changing a previous booking or logging.
Select period, and click “Ok” to regenerate the invoices.
Invoice by projectHome » Admin » Invoices » Invoice by project
This page groups generated invoices data on project. If this page is empty, you might need to Regenerate invoicesYou can choose one or several "invoices" and get a specification , by checking the invoices and click "showspecification"

Invoice by tool 61
Invoice by toolHome » Admin » Invoices » Invoice by tool This page groups generated invoices data on tool. If this page is empty,you might need to [Regenerate_invoices] Invoices can be filtered on Tool, Category, Project category and groupresponsible for the tool.
Invoice by userHome » Admin » Invoices » Invoice by tool This page groups generated invoices data on user and project. If this pageis empty, you might need to Regenerate invoicesYou can choose one or several "invoices" and get a specification , by checking the invoices and click "showspecification"

Simulate invoices 62
Simulate invoicesHome » Admin » Invoices » Simulate invoices
By changing fares and charges on this page, you can simulate invoices to see what the outcome would be.•• Step 1: Choose the period for which you want to simulate invoices by entering from-month and to-month
(YYYYMM).•• Step 2: Press button 'Step 2: Initialize values for given period'•• Step 3: Go through all lists below and change to desired values. For each textbox or dropdown list in the lists
below the actual real value (for your chosen to-month) is on the left of that textbox or dropdown list. If you pressenter after you have changed a value in a textbox the background will be changed for that cell to make it easier tosee the changes you have done.
•• Step 4: Press button 'Step 4: Start simulation calculation'.•• Step 5: Go to any of the other simulation pages to see the result of your simulation.

Simulated invoice by project 63
Simulated invoice by projectHome » Admin » Invoices » Simulated invoice by project
Simulated invoice by toolHome » Admin » Invoices » Simulated invoice by tool

Simulated invoice by user 64
Simulated invoice by userHome » Admin » Invoices » Simulated invoice by user
Process line listHome » Admin » Process lines

Statistics for booked time 65
Statistics for booked timeHome » Admin » Statistics » Statistics for booked time
This page shows bookings during a specific period of time, grouped by entities. Using the groups in different order,you can create a very specific report, example: “How many hours have Person X booked in the Project Y, on Tool Z,during period P?” Or, like above: “Booked hours, grouped by University/Company, during first quarter of 2009”

Statistics for logged time 66
Statistics for logged timeHome » Admin » Statistics » Statistics for logged time
This page works the same way as “statistics for booked time” – but displays a summary of the logged, time instead ofthe booked time.

Booked time list 67
Booked time listHome » Admin » Statistics » Booking list
This page shows all bookings within a certain period of time. Service bookings have the color of yellow,maintenance orange – but can be filtered not to be visible.
Logged time listHome » Admin » Statistics » Log list
A page just like booking list – but in this case, all logs during a certain period.
Man hours 68
Man hoursHome » Admin » Statistics » Man hours
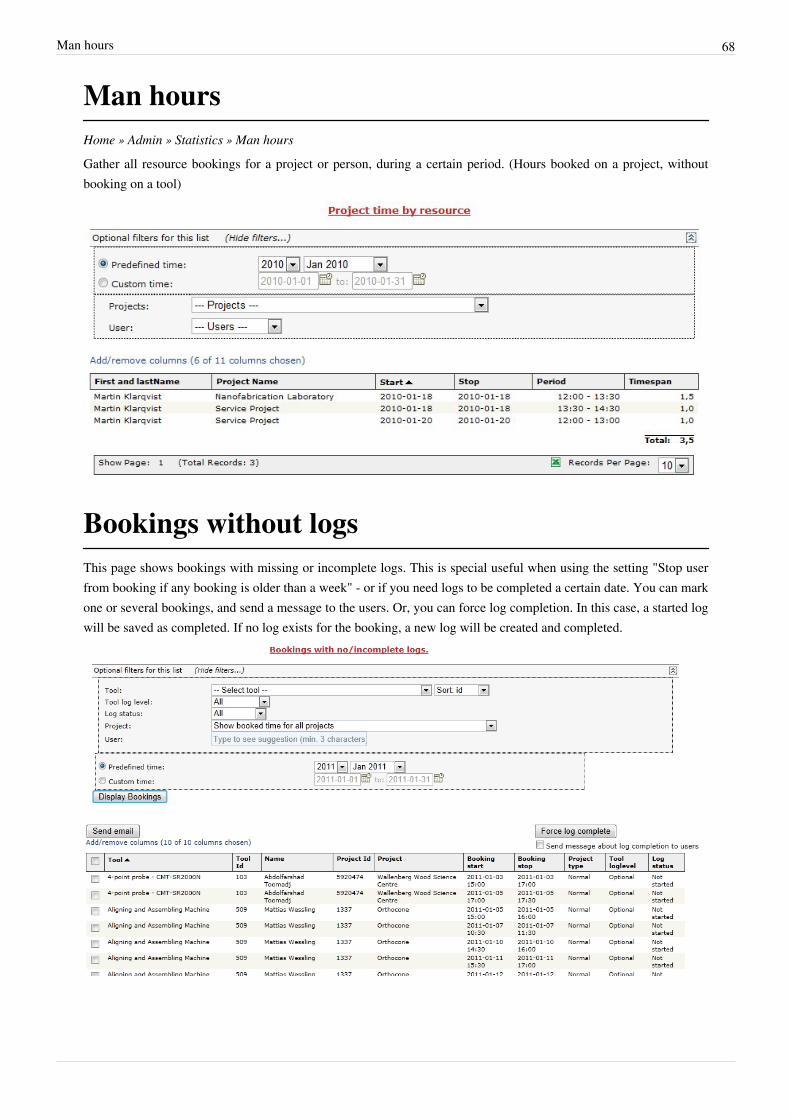
Gather all resource bookings for a project or person, during a certain period. (Hours booked on a project, withoutbooking on a tool)
Bookings without logsThis page shows bookings with missing or incomplete logs. This is special useful when using the setting "Stop userfrom booking if any booking is older than a week" - or if you need logs to be completed a certain date. You can markone or several bookings, and send a message to the users. Or, you can force log completion. In this case, a started logwill be saved as completed. If no log exists for the booking, a new log will be created and completed.
System settings 69
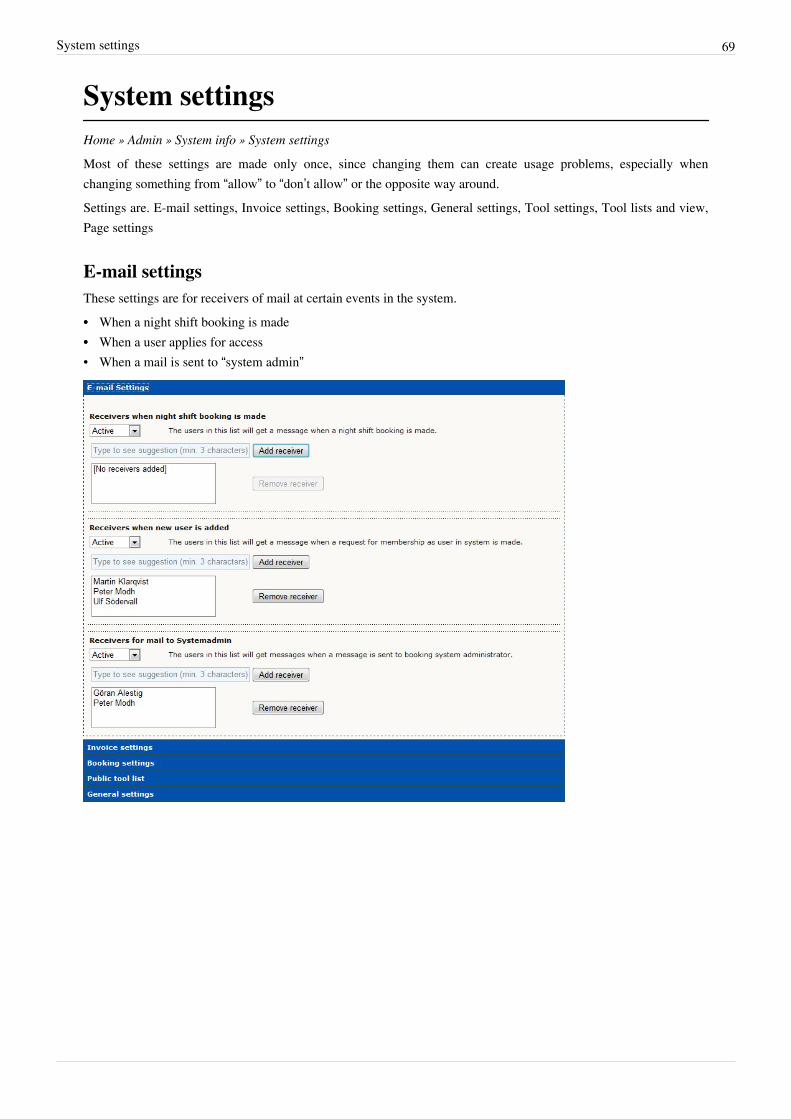
System settingsHome » Admin » System info » System settings
Most of these settings are made only once, since changing them can create usage problems, especially whenchanging something from “allow” to “don’t allow” or the opposite way around.Settings are. E-mail settings, Invoice settings, Booking settings, General settings, Tool settings, Tool lists and view,Page settings
E-mail settingsThese settings are for receivers of mail at certain events in the system.•• When a night shift booking is made•• When a user applies for access• When a mail is sent to “system admin”

System settings 70
Invoice settingsFor generation of invoice data.
Tool charge“Tool charge applies for all tools” or “No charge for tool owners” No charge for tool owners means that if a user doesa booking or log (depending on invoices are based on booked or logged time) and the project for that booking/log areowned by the same laboratory / group as the owner of the tool, the project will not be charged.
Monthly feesIf set to “Always charge monthly fee for active users” all active users will always pay monthly fee, regardlesswhether the user have booked or logged time (depending on invoices are based on booked or logged time) for agiven month or not.Note: If you make any changes to the invoice settings above, all invoice data will be re-generated (which cantake several minutes) next time someone opens any of the invoice-pages.

System settings 71
Booking settingsThese general rules apply to all users of the system.
Nightshift start and stopIn this case, a booking made between 07 and 18 is considered a ”daytime booking”, while a booking between 18 and07 is a nighttime.At nighttime, you are not allowed to be alone in the lab – just must have a so called “Lab buddy”. There can also be adifference in the amount of time you can book for a tool at day or at night. (Those settings are made at tool-level)
Startview, bookingsDefault sorting on startpage, when a user log in.Values: “Show from yesterday and newer”, “show from today and newer”, “show non logged bookings”
Missing log(s) for bookings with mandatory loggingYou can force the user to log his previous bookings, before he’s allowed to create a new.
Change logAllow user to change start time on an existing log.
Project leader bookingsShow the list of (if used) project leader bookings on homepage.
Logs without bookingsShow the list of logs with no connected booking.
Tool lists and view
System settings 72
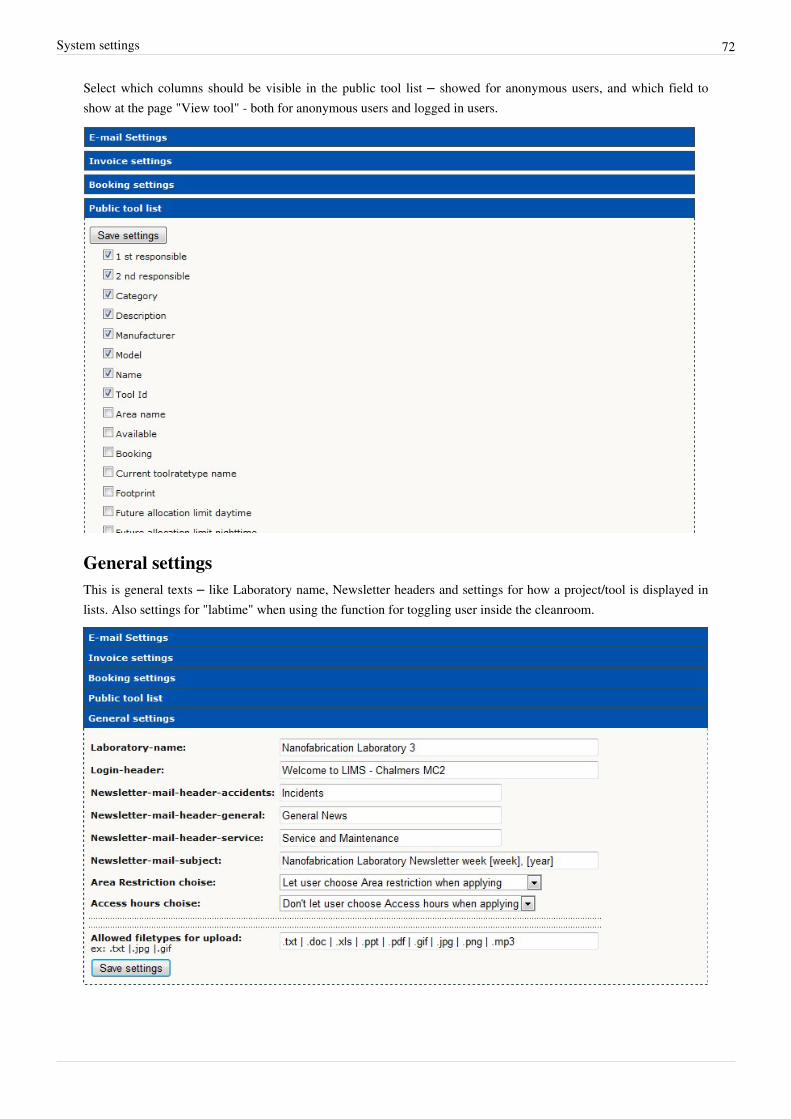
Select which columns should be visible in the public tool list – showed for anonymous users, and which field toshow at the page "View tool" - both for anonymous users and logged in users.
General settingsThis is general texts – like Laboratory name, Newsletter headers and settings for how a project/tool is displayed inlists. Also settings for "labtime" when using the function for toggling user inside the cleanroom.

System settings 73
Tool settingsSpecial settings for a tool, who will be noticed when a equipment needs maintainance and if "pricefactor" should beused. Pricefactor is a way to rise or lower a price for a special equipment.
Page settingsSettings for special pages, lite "Membership application", setting mandatory/visible fields.
External info pageHome » Admin » System info » External info page
This page controls the information published on the start page of the system, for anonymous users. Using the “whatyou see is what you get”-editor, you can format and adding text, links and information.

Night shift message 74
Night shift messageHome » Admin » System info » Nightshift message
This is the info showed when you are doing a booking that partly or whole are outside the daytime perimeters. Usingthe “what you see is what you get”-editor, you can format and adding text, links and information.
External mail receivers 75
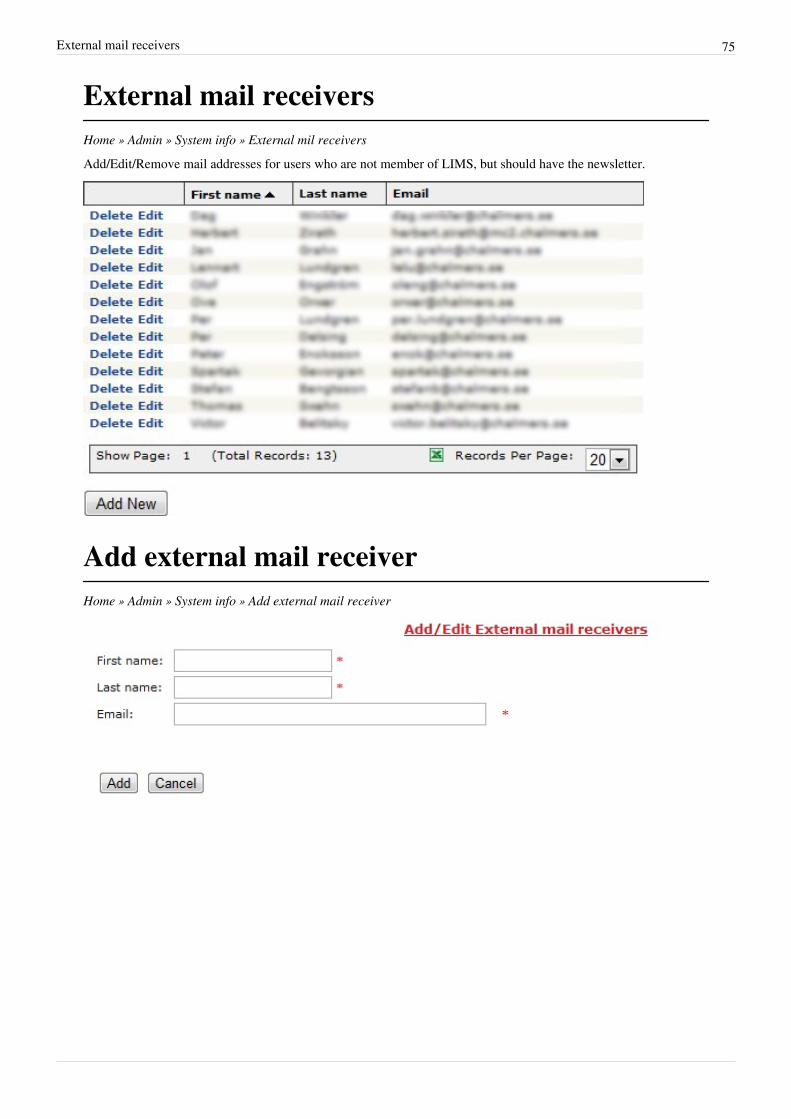
External mail receiversHome » Admin » System info » External mil receivers
Add/Edit/Remove mail addresses for users who are not member of LIMS, but should have the newsletter.
Add external mail receiverHome » Admin » System info » Add external mail receiver

Tag structure 76
Tag structureThis page offers the possibility to manage the tag structure. Tags must be created from a word with connectedsynonyms. This is because some tags might have the same word and the administrator shouldn't have to redefine thesynonyms for each tag.If the current lab has nodes, that is other labs that shares some information, the tag och word structure issynchronized between the nodes. At the bottom of the tag tree and word list you will see a status text that informsyou if the tags and words are in sync or not. If they are not in sync for some reason you can still modify the tree andword list but it is recommended not to. If you modify a word or a tag that doesn't exist in the other nodes the changewill not go through.
Word listThe list to the right displays all words in the system. Some words are not editable and some words are not deletable.Some words are connected to so called system tags which cannot be modified since they are required by the system.Therefore, these words are not editable or deletable. Some words are connected to tags that have child tags andtherefore these words cannot be deleted until the child tags have been deleted.By pressing the link "Add new word" at the top of the list you can type a new word with its synonyms. The word isrequired of course. To modify a word or its synonyms can can pres the edit button in the row. The synonyms shouldbe comma-separated. It is allowed to have a synonym that consists of two words. An example can be for the word"Gold", you could have the synonyms value "precious metal, Au". When you later search for tags you will get hits onthe synonyms. A renamed word will of course update the tree also.When you delete a word you will get a confirm dialog box that let you know if this word is used in tags and if thesetags have connections to entities, before you actually delete the word. When a word is deleted, the tags that use thisword are also deleted as well as their connections.
Tag treeThe tag tree shows the actual tag structure. The hierarchy is not really important to the end user, but is helpful to theadministrator in order to organize the tags. A tag is added by dragging a word from the word list to a node. The newtag will be child node to the node it was dropped on. You can also add a tag to the root by dragging it to the "RootNode" area.By dragging and dropping tags you can move tags around the tree. To delete a tag you simply right-click on the tagand choose delete. You will here get a confirm dialog box that informs you if the tag as connections and, ifapplicable, connections in other nodes.There is one more option in the right-click menu. A Tag description is set to describe the children for this tag. If youfor example have a tag named "Substrate Material" with the children "Au", "Ag" and "Si" and you set the description"Substrate" on the the tag, you will see this description when you search for the children using Tag connections bysearch, as "Au (Substrate)" etc.Some tags are not deletable and this is because they are either system tags or has child tags.

Admin user list 77
Admin user listHome » Admin » User » User list
The list displays all users. The list is configurable, it is possible to filter the content and selecting columns. You cansend a mail to a user, Edit a user or View a user.
User statusHome » Admin » User » User Status
User status is a list of users, based on their status, when they logged in the last time, and when they last attended to asafety-/chemical course.
New users to approve declineHome » Admin » User » New users to approve/decline
There are two ways to become a user of LIMS.1.1. An administrator creates an account.2.2. The user fills out a membership application.New applications ends up in this list, and users selected under System settings, email-settings, get an email and see anotification when they log in, that there are applications to process. New/Pending applications, is shown in a list onthis page.

Process application 78
Process application
Process applicationHome » Admin » User » New users to approve/declinePage for processing an application is split in two parts:The information that the applicant has entered, and fields corrected by administrator.
The administrator chooses which roles to apply to the user:
Thereare three options for an application:The administrator declines the application, when an application is declined a message is sent to the user explainingwhy he/she won’t be granted access.The administrator can save the application as pending – for example, he completes the fields, but wants the user togo a course before the user gets access.The administrator save and approve the user to use the system.

Unlock user 79
Unlock userHome » Admin » User » Unlock user
The system has a built in security, to prevent “brute force” – this means, if a user enters an invalid password fivetimes in a row, they account is locked. An administrator can from this page “unlock” it.
InfoGeneral info for users, like sitemap and general-, chemical-, and tooldocuments
Chemical listHome » Info » Chemical list
A standard user can view the list, and see the documents attached. An administrator, tool responsible or instructorcan add new chemicals to the list, and attach documents to the chemicals in the list. Add a document works the sameway as it does for a general document.

General documents 80
General documentsHome » Info » General documents
List documents
General documents are both viewable as logged in or anonymous user. Only a user with the role “administrator” canadd, edit or delete documents.
Add/Edit document
You can add two types of documents: Physical document, or link to document. In the first case, you select a file, anduploads it – in the second case, you point out a document on a network or on the internet.

Tool documents 81
Tool documentsHome » Info » Tool documents
List tool documents
“Tool documents” lists all tools and belonging documents. A logged in user can view the list and get the documents –an admin or tool responsible can add or edit documents.
Add / edit documents
Adding document for a tool works the same way as for adding a General document or a Chemical document. But inaddition, you also have to choose type of document: Control Specification, Recipe, Service Instructions, TechnicalDescription, Tool Manual, or User Instructions
Sitemap 82
SitemapThe sitemap lists all pages accessible for a user. An anonymous user (not log in) only sees a few pages, while anadministrator sees the whole structure of the site.

Article Sources and Contributors 83
Article Sources and ContributorsContents Source: http://www.myfablims.se/wiki/index.php?oldid=523 Contributors: Admin, MediaWiki default
General Source: http://www.myfablims.se/wiki/index.php?oldid=438 Contributors: Admin
Glossary Source: http://www.myfablims.se/wiki/index.php?oldid=192 Contributors: Admin
List/Grids Source: http://www.myfablims.se/wiki/index.php?oldid=462 Contributors: Admin
Roles of the system Source: http://www.myfablims.se/wiki/index.php?oldid=249 Contributors: Admin
Use cases Source: http://www.myfablims.se/wiki/index.php?oldid=423 Contributors: Admin
User access Source: http://www.myfablims.se/wiki/index.php?oldid=246 Contributors: Admin
Start page Source: http://www.myfablims.se/wiki/index.php?oldid=488 Contributors: Admin
Tools Source: http://www.myfablims.se/wiki/index.php?oldid=232 Contributors: Admin
View Tool Source: http://www.myfablims.se/wiki/index.php?oldid=233 Contributors: Admin
My licenced tools Source: http://www.myfablims.se/wiki/index.php?oldid=234 Contributors: Admin
Apply for licence Source: http://www.myfablims.se/wiki/index.php?oldid=250 Contributors: Admin
All tools Source: http://www.myfablims.se/wiki/index.php?oldid=236 Contributors: Admin
Tool status Source: http://www.myfablims.se/wiki/index.php?oldid=222 Contributors: Admin
View Bookings Source: http://www.myfablims.se/wiki/index.php?oldid=237 Contributors: Admin
My Bookings Source: http://www.myfablims.se/wiki/index.php?oldid=238 Contributors: Admin
All Bookings Source: http://www.myfablims.se/wiki/index.php?oldid=239 Contributors: Admin
Booking overview Source: http://www.myfablims.se/wiki/index.php?oldid=504 Contributors: Admin
Batches Source: http://www.myfablims.se/wiki/index.php?oldid=215 Contributors: Admin
Batch list Source: http://www.myfablims.se/wiki/index.php?oldid=214 Contributors: Admin
Add batch Source: http://www.myfablims.se/wiki/index.php?oldid=241 Contributors: Admin
Log Source: http://www.myfablims.se/wiki/index.php?oldid=242 Contributors: Admin
Log status Source: http://www.myfablims.se/wiki/index.php?oldid=427 Contributors: Admin
Log history by tool Source: http://www.myfablims.se/wiki/index.php?oldid=271 Contributors: Admin
Log history by batch Source: http://www.myfablims.se/wiki/index.php?oldid=220 Contributors: Admin
Verify night shift booking Source: http://www.myfablims.se/wiki/index.php?oldid=243 Contributors: Admin
User Source: http://www.myfablims.se/wiki/index.php?oldid=244 Contributors: Admin
My profile Source: http://www.myfablims.se/wiki/index.php?oldid=525 Contributors: Admin
My statistics Source: http://www.myfablims.se/wiki/index.php?oldid=513 Contributors: Admin
Send message Source: http://www.myfablims.se/wiki/index.php?oldid=515 Contributors: Admin
User list Source: http://www.myfablims.se/wiki/index.php?oldid=281 Contributors: Admin
My user lists Source: http://www.myfablims.se/wiki/index.php?oldid=223 Contributors: Admin
Advanced Source: http://www.myfablims.se/wiki/index.php?oldid=429 Contributors: Admin
Licences by user Source: http://www.myfablims.se/wiki/index.php?oldid=291 Contributors: Admin
My tools Source: http://www.myfablims.se/wiki/index.php?oldid=283 Contributors: Admin
Tool timeblocking Source: http://www.myfablims.se/wiki/index.php?oldid=287 Contributors: Admin
Disallow mail subjects Source: http://www.myfablims.se/wiki/index.php?oldid=289 Contributors: Admin
Licences by tool Source: http://www.myfablims.se/wiki/index.php?oldid=294 Contributors: Admin
Licences applications Source: http://www.myfablims.se/wiki/index.php?oldid=261 Contributors: Admin
Instructors by user Source: http://www.myfablims.se/wiki/index.php?oldid=298 Contributors: Admin
Instructors by tool Source: http://www.myfablims.se/wiki/index.php?oldid=300 Contributors: Admin
Log fields Source: http://www.myfablims.se/wiki/index.php?oldid=303 Contributors: Admin
Maintenance log fields Source: http://www.myfablims.se/wiki/index.php?oldid=304 Contributors: Admin
Service log fields Source: http://www.myfablims.se/wiki/index.php?oldid=306 Contributors: Admin
Courses Source: http://www.myfablims.se/wiki/index.php?oldid=422 Contributors: Admin
Manage project members Source: http://www.myfablims.se/wiki/index.php?oldid=485 Contributors: Admin
Project list Source: http://www.myfablims.se/wiki/index.php?oldid=316 Contributors: Admin
New project Source: http://www.myfablims.se/wiki/index.php?oldid=518 Contributors: Admin
Newsletter Source: http://www.myfablims.se/wiki/index.php?oldid=319 Contributors: Admin

Article Sources and Contributors 84
Internal info page Source: http://www.myfablims.se/wiki/index.php?oldid=322 Contributors: Admin
Tag connections Source: http://www.myfablims.se/wiki/index.php?oldid=452 Contributors: Admin
Tool down time Source: http://www.myfablims.se/wiki/index.php?oldid=325 Contributors: Admin
Tool history Source: http://www.myfablims.se/wiki/index.php?oldid=327 Contributors: Admin
Admin Source: http://www.myfablims.se/wiki/index.php?oldid=430 Contributors: Admin
New university company Source: http://www.myfablims.se/wiki/index.php?oldid=329 Contributors: Admin
New department Source: http://www.myfablims.se/wiki/index.php?oldid=331 Contributors: Admin
New laboratory group Source: http://www.myfablims.se/wiki/index.php?oldid=333 Contributors: Admin
New user Source: http://www.myfablims.se/wiki/index.php?oldid=404 Contributors: Admin
New area room Source: http://www.myfablims.se/wiki/index.php?oldid=337 Contributors: Admin
New process line Source: http://www.myfablims.se/wiki/index.php?oldid=368 Contributors: Admin
Area room list Source: http://www.myfablims.se/wiki/index.php?oldid=335 Contributors: Admin
Area closedown Source: http://www.myfablims.se/wiki/index.php?oldid=339 Contributors: Admin
New area closedown Source: http://www.myfablims.se/wiki/index.php?oldid=342 Contributors: Admin
Tool list Source: http://www.myfablims.se/wiki/index.php?oldid=345 Contributors: Admin
Fares and Charges Source: http://www.myfablims.se/wiki/index.php?oldid=516 Contributors: Admin
Regenerate invoices Source: http://www.myfablims.se/wiki/index.php?oldid=353 Contributors: Admin
Invoice by project Source: http://www.myfablims.se/wiki/index.php?oldid=512 Contributors: Admin
Invoice by tool Source: http://www.myfablims.se/wiki/index.php?oldid=509 Contributors: Admin
Invoice by user Source: http://www.myfablims.se/wiki/index.php?oldid=511 Contributors: Admin
Simulate invoices Source: http://www.myfablims.se/wiki/index.php?oldid=356 Contributors: Admin
Simulated invoice by project Source: http://www.myfablims.se/wiki/index.php?oldid=358 Contributors: Admin
Simulated invoice by tool Source: http://www.myfablims.se/wiki/index.php?oldid=361 Contributors: Admin
Simulated invoice by user Source: http://www.myfablims.se/wiki/index.php?oldid=364 Contributors: Admin
Process line list Source: http://www.myfablims.se/wiki/index.php?oldid=366 Contributors: Admin
Statistics for booked time Source: http://www.myfablims.se/wiki/index.php?oldid=374 Contributors: Admin
Statistics for logged time Source: http://www.myfablims.se/wiki/index.php?oldid=376 Contributors: Admin
Booked time list Source: http://www.myfablims.se/wiki/index.php?oldid=378 Contributors: Admin
Logged time list Source: http://www.myfablims.se/wiki/index.php?oldid=380 Contributors: Admin
Man hours Source: http://www.myfablims.se/wiki/index.php?oldid=382 Contributors: Admin
Bookings without logs Source: http://www.myfablims.se/wiki/index.php?oldid=436 Contributors: Admin
System settings Source: http://www.myfablims.se/wiki/index.php?oldid=501 Contributors: Admin
External info page Source: http://www.myfablims.se/wiki/index.php?oldid=391 Contributors: Admin
Night shift message Source: http://www.myfablims.se/wiki/index.php?oldid=393 Contributors: Admin
External mail receivers Source: http://www.myfablims.se/wiki/index.php?oldid=395 Contributors: Admin
Add external mail receiver Source: http://www.myfablims.se/wiki/index.php?oldid=397 Contributors: Admin
Tag structure Source: http://www.myfablims.se/wiki/index.php?oldid=451 Contributors: Admin
Admin user list Source: http://www.myfablims.se/wiki/index.php?oldid=399 Contributors: Admin
User status Source: http://www.myfablims.se/wiki/index.php?oldid=405 Contributors: Admin
New users to approve decline Source: http://www.myfablims.se/wiki/index.php?oldid=407 Contributors: Admin
Process application Source: http://www.myfablims.se/wiki/index.php?oldid=60 Contributors: Admin
Unlock user Source: http://www.myfablims.se/wiki/index.php?oldid=408 Contributors: Admin
Info Source: http://www.myfablims.se/wiki/index.php?oldid=431 Contributors: Admin
Chemical list Source: http://www.myfablims.se/wiki/index.php?oldid=414 Contributors: Admin
General documents Source: http://www.myfablims.se/wiki/index.php?oldid=412 Contributors: Admin
Tool documents Source: http://www.myfablims.se/wiki/index.php?oldid=418 Contributors: Admin
Sitemap Source: http://www.myfablims.se/wiki/index.php?oldid=433 Contributors: Admin

Image Sources, Licenses and Contributors 85
Image Sources, Licenses and ContributorsFile:Admin_external_mailreceiver.jpg Source: http://www.myfablims.se/wiki/index.php?title=File:Admin_external_mailreceiver.jpg License: unknown Contributors: AdminFile:Generalinfo_filters.jpg Source: http://www.myfablims.se/wiki/index.php?title=File:Generalinfo_filters.jpg License: unknown Contributors: AdminFile:Generalinfo_choosecolumns.jpg Source: http://www.myfablims.se/wiki/index.php?title=File:Generalinfo_choosecolumns.jpg License: unknown Contributors: AdminFile:Generalinfo_sendmessage.jpg Source: http://www.myfablims.se/wiki/index.php?title=File:Generalinfo_sendmessage.jpg License: unknown Contributors: AdminFile:User_Access_menu.jpg Source: http://www.myfablims.se/wiki/index.php?title=File:User_Access_menu.jpg License: unknown Contributors: AdminFile:Membership Form 1.jpg Source: http://www.myfablims.se/wiki/index.php?title=File:Membership_Form_1.jpg License: unknown Contributors: AdminFile:Membership_2.jpg Source: http://www.myfablims.se/wiki/index.php?title=File:Membership_2.jpg License: unknown Contributors: AdminFile:Advanced_menu_Internal_Info_Page_2.jpg Source: http://www.myfablims.se/wiki/index.php?title=File:Advanced_menu_Internal_Info_Page_2.jpg License: unknown Contributors:AdminFile:Home_2.jpg Source: http://www.myfablims.se/wiki/index.php?title=File:Home_2.jpg License: unknown Contributors: AdminFile:Home_3.jpg Source: http://www.myfablims.se/wiki/index.php?title=File:Home_3.jpg License: unknown Contributors: AdminFile:Home_5.jpg Source: http://www.myfablims.se/wiki/index.php?title=File:Home_5.jpg License: unknown Contributors: AdminFile:Home_6.jpg Source: http://www.myfablims.se/wiki/index.php?title=File:Home_6.jpg License: unknown Contributors: AdminFile:Home_7.jpg Source: http://www.myfablims.se/wiki/index.php?title=File:Home_7.jpg License: unknown Contributors: AdminFile:Tool_Menu.jpg Source: http://www.myfablims.se/wiki/index.php?title=File:Tool_Menu.jpg License: unknown Contributors: AdminFile:Equipment_equipmentview.jpg Source: http://www.myfablims.se/wiki/index.php?title=File:Equipment_equipmentview.jpg License: unknown Contributors: AdminFile:Tool_Menu_My_Licensed_Tools.jpg Source: http://www.myfablims.se/wiki/index.php?title=File:Tool_Menu_My_Licensed_Tools.jpg License: unknown Contributors: AdminFile:Tool_Menu_My_Apply_For_Licence.jpg Source: http://www.myfablims.se/wiki/index.php?title=File:Tool_Menu_My_Apply_For_Licence.jpg License: unknown Contributors: AdminFile:Tool_Menu_My_Apply_For_Licence_2.jpg Source: http://www.myfablims.se/wiki/index.php?title=File:Tool_Menu_My_Apply_For_Licence_2.jpg License: unknown Contributors:AdminFile:Tool_Menu_All_Tools.jpg Source: http://www.myfablims.se/wiki/index.php?title=File:Tool_Menu_All_Tools.jpg License: unknown Contributors: AdminFile:Tool_menu_Tool_status.jpg Source: http://www.myfablims.se/wiki/index.php?title=File:Tool_menu_Tool_status.jpg License: unknown Contributors: AdminFile:Tool_change_status.jpg Source: http://www.myfablims.se/wiki/index.php?title=File:Tool_change_status.jpg License: unknown Contributors: AdminFile:Tool_menu_Tool_status_2.jpg Source: http://www.myfablims.se/wiki/index.php?title=File:Tool_menu_Tool_status_2.jpg License: unknown Contributors: AdminFile:Tool_menu_View_Bookings.jpg Source: http://www.myfablims.se/wiki/index.php?title=File:Tool_menu_View_Bookings.jpg License: unknown Contributors: AdminFile:Tool_menu_View_Bookings_My_Bookings.jpg Source: http://www.myfablims.se/wiki/index.php?title=File:Tool_menu_View_Bookings_My_Bookings.jpg License: unknown Contributors: AdminFile:Tool_menu_View_Bookings_All_Bookings.jpg Source: http://www.myfablims.se/wiki/index.php?title=File:Tool_menu_View_Bookings_All_Bookings.jpg License: unknown Contributors: AdminFile:Tool_menu_View_Bookings_Booking_Overview.jpg Source: http://www.myfablims.se/wiki/index.php?title=File:Tool_menu_View_Bookings_Booking_Overview.jpg License: unknown Contributors: AdminFile:Tool_bookingoverview.jpg Source: http://www.myfablims.se/wiki/index.php?title=File:Tool_bookingoverview.jpg License: unknown Contributors: AdminFile:Tool_menu_View_Batch_Batch_List.jpg Source: http://www.myfablims.se/wiki/index.php?title=File:Tool_menu_View_Batch_Batch_List.jpg License: unknown Contributors: AdminFile:Tool_menu_Batch_Add.jpg Source: http://www.myfablims.se/wiki/index.php?title=File:Tool_menu_Batch_Add.jpg License: unknown Contributors: AdminFile:Tool_menu_Log_Log_Status.jpg Source: http://www.myfablims.se/wiki/index.php?title=File:Tool_menu_Log_Log_Status.jpg License: unknown Contributors: AdminFile:Tool_menu_View_Batch_Log_History_By_Tool.jpg Source: http://www.myfablims.se/wiki/index.php?title=File:Tool_menu_View_Batch_Log_History_By_Tool.jpg License: unknown Contributors: AdminFile:Tool_menu_View_Batch_Log_History_By_Batch.jpg Source: http://www.myfablims.se/wiki/index.php?title=File:Tool_menu_View_Batch_Log_History_By_Batch.jpg License:unknown Contributors: AdminFile:Tool_Menu_Verify_night_shift_booking_2.jpg Source: http://www.myfablims.se/wiki/index.php?title=File:Tool_Menu_Verify_night_shift_booking_2.jpg License: unknown Contributors: AdminFile:Tool_menu_Tool_status_3.jpg Source: http://www.myfablims.se/wiki/index.php?title=File:Tool_menu_Tool_status_3.jpg License: unknown Contributors: AdminFile:User menu My Statistics.jpg Source: http://www.myfablims.se/wiki/index.php?title=File:User_menu_My_Statistics.jpg License: unknown Contributors: AdminFile:User menu Send Message.jpg Source: http://www.myfablims.se/wiki/index.php?title=File:User_menu_Send_Message.jpg License: unknown Contributors: AdminFile:User menu User List.jpg Source: http://www.myfablims.se/wiki/index.php?title=File:User_menu_User_List.jpg License: unknown Contributors: AdminFile:FilterList.png Source: http://www.myfablims.se/wiki/index.php?title=File:FilterList.png License: unknown Contributors: AdminFile:UserList.png Source: http://www.myfablims.se/wiki/index.php?title=File:UserList.png License: unknown Contributors: AdminFile:Advanced menu Role ToolResponsible Licenses By User.jpg Source: http://www.myfablims.se/wiki/index.php?title=File:Advanced_menu_Role_ToolResponsible_Licenses_By_User.jpg License: unknown Contributors: AdminFile:Advanced menu Role ToolResponsible My Tools.jpg Source: http://www.myfablims.se/wiki/index.php?title=File:Advanced_menu_Role_ToolResponsible_My_Tools.jpg License:unknown Contributors: AdminFile:Advanced menu Role ToolResponsible Tool Blocking.jpg Source: http://www.myfablims.se/wiki/index.php?title=File:Advanced_menu_Role_ToolResponsible_Tool_Blocking.jpg License: unknown Contributors: AdminFile:Advanced menu Role ToolResponsible Allow Disallow mail sibject booking cancelled.jpg Source:http://www.myfablims.se/wiki/index.php?title=File:Advanced_menu_Role_ToolResponsible_Allow_Disallow_mail_sibject_booking_cancelled.jpg License: unknown Contributors: AdminFile:Advanced menu Role ToolResponsible Licenses By Tool.jpg Source: http://www.myfablims.se/wiki/index.php?title=File:Advanced_menu_Role_ToolResponsible_Licenses_By_Tool.jpg License: unknown Contributors: AdminFile:Advanced_menu_Role_ToolResponsible_Licenses_Applications_List.jpg Source:http://www.myfablims.se/wiki/index.php?title=File:Advanced_menu_Role_ToolResponsible_Licenses_Applications_List.jpg License: unknown Contributors: AdminFile:Advanced_menu_Role_ToolResponsible_Licenses_Applications_Process_Application.jpg Source:http://www.myfablims.se/wiki/index.php?title=File:Advanced_menu_Role_ToolResponsible_Licenses_Applications_Process_Application.jpg License: unknown Contributors: AdminFile:Advanced menu Role ToolResponsible Manage Instructors By User 1.jpg Source:http://www.myfablims.se/wiki/index.php?title=File:Advanced_menu_Role_ToolResponsible_Manage_Instructors_By_User_1.jpg License: unknown Contributors: AdminFile:Advanced menu Role ToolResponsible Manage Instructors By User 2.jpg Source:http://www.myfablims.se/wiki/index.php?title=File:Advanced_menu_Role_ToolResponsible_Manage_Instructors_By_User_2.jpg License: unknown Contributors: AdminFile:Advanced menu Role ToolResponsible Manage Instructors By Tool 1.jpg Source:http://www.myfablims.se/wiki/index.php?title=File:Advanced_menu_Role_ToolResponsible_Manage_Instructors_By_Tool_1.jpg License: unknown Contributors: AdminFile:Advanced menu Role ToolResponsible Log Fields.jpg Source: http://www.myfablims.se/wiki/index.php?title=File:Advanced_menu_Role_ToolResponsible_Log_Fields.jpg License:unknown Contributors: AdminFile:Advanced menu Role ToolResponsible Log Fields 2.jpg Source: http://www.myfablims.se/wiki/index.php?title=File:Advanced_menu_Role_ToolResponsible_Log_Fields_2.jpg License:unknown Contributors: AdminFile:ManageCourse_List.jpg Source: http://www.myfablims.se/wiki/index.php?title=File:ManageCourse_List.jpg License: unknown Contributors: Admin

Image Sources, Licenses and Contributors 86
File:Courses_add_course.jpg Source: http://www.myfablims.se/wiki/index.php?title=File:Courses_add_course.jpg License: unknown Contributors: AdminFile:Courses courseOccation.jpg Source: http://www.myfablims.se/wiki/index.php?title=File:Courses_courseOccation.jpg License: unknown Contributors: AdminFile:Advanced menu Role Project Manager Add Manage Project Members.jpg Source:http://www.myfablims.se/wiki/index.php?title=File:Advanced_menu_Role_Project_Manager_Add_Manage_Project_Members.jpg License: unknown Contributors: AdminFile:Advanced ManageProjectsByUser.jpg Source: http://www.myfablims.se/wiki/index.php?title=File:Advanced_ManageProjectsByUser.jpg License: unknown Contributors: AdminFile:Advanced menu Role Project Manager Project List 1.jpg Source: http://www.myfablims.se/wiki/index.php?title=File:Advanced_menu_Role_Project_Manager_Project_List_1.jpg License: unknown Contributors: AdminFile:Advanced menu Role Project Manager Project List 2.jpg Source: http://www.myfablims.se/wiki/index.php?title=File:Advanced_menu_Role_Project_Manager_Project_List_2.jpg License: unknown Contributors: AdminFile:Advanced menu Role Project Manager Project List 3.jpg Source: http://www.myfablims.se/wiki/index.php?title=File:Advanced_menu_Role_Project_Manager_Project_List_3.jpg License: unknown Contributors: AdminFile:Advanced menu Role Project Manager New Project.jpg Source: http://www.myfablims.se/wiki/index.php?title=File:Advanced_menu_Role_Project_Manager_New_Project.jpg License:unknown Contributors: AdminFile:Advanced menu Newsletter.jpg Source: http://www.myfablims.se/wiki/index.php?title=File:Advanced_menu_Newsletter.jpg License: unknown Contributors: AdminFile:Advanced menu Internal Info Page.jpg Source: http://www.myfablims.se/wiki/index.php?title=File:Advanced_menu_Internal_Info_Page.jpg License: unknown Contributors: AdminFile:Advanced menu Internal Info Page 2.jpg Source: http://www.myfablims.se/wiki/index.php?title=File:Advanced_menu_Internal_Info_Page_2.jpg License: unknown Contributors: AdminFile:Advanced menu Tool Downtime 1.jpg Source: http://www.myfablims.se/wiki/index.php?title=File:Advanced_menu_Tool_Downtime_1.jpg License: unknown Contributors: AdminFile:Advanced menu Tool Downtime 2.jpg Source: http://www.myfablims.se/wiki/index.php?title=File:Advanced_menu_Tool_Downtime_2.jpg License: unknown Contributors: AdminFile:Advanced menu Tool History.jpg Source: http://www.myfablims.se/wiki/index.php?title=File:Advanced_menu_Tool_History.jpg License: unknown Contributors: AdminFile:Admin Add university.jpg Source: http://www.myfablims.se/wiki/index.php?title=File:Admin_Add_university.jpg License: unknown Contributors: AdminFile:Admin Add department.jpg Source: http://www.myfablims.se/wiki/index.php?title=File:Admin_Add_department.jpg License: unknown Contributors: AdminFile:Admin Add labbgroup.jpg Source: http://www.myfablims.se/wiki/index.php?title=File:Admin_Add_labbgroup.jpg License: unknown Contributors: AdminFile:Admin User NewUser1.jpg Source: http://www.myfablims.se/wiki/index.php?title=File:Admin_User_NewUser1.jpg License: unknown Contributors: AdminFile:Admin User NewUser2.jpg Source: http://www.myfablims.se/wiki/index.php?title=File:Admin_User_NewUser2.jpg License: unknown Contributors: AdminFile:Admin Room area.jpg Source: http://www.myfablims.se/wiki/index.php?title=File:Admin_Room_area.jpg License: unknown Contributors: AdminFile:Admin Processline addnew.jpg Source: http://www.myfablims.se/wiki/index.php?title=File:Admin_Processline_addnew.jpg License: unknown Contributors: AdminFile:Admin Room list.jpg Source: http://www.myfablims.se/wiki/index.php?title=File:Admin_Room_list.jpg License: unknown Contributors: AdminFile:Admin Room closedownlist.jpg Source: http://www.myfablims.se/wiki/index.php?title=File:Admin_Room_closedownlist.jpg License: unknown Contributors: AdminFile:Admin Room closedown.jpg Source: http://www.myfablims.se/wiki/index.php?title=File:Admin_Room_closedown.jpg License: unknown Contributors: AdminFile:Booking areashutdown.jpg Source: http://www.myfablims.se/wiki/index.php?title=File:Booking_areashutdown.jpg License: unknown Contributors: AdminFile:Admin tool list.jpg Source: http://www.myfablims.se/wiki/index.php?title=File:Admin_tool_list.jpg License: unknown Contributors: AdminFile:Admin invoice regenerate.jpg Source: http://www.myfablims.se/wiki/index.php?title=File:Admin_invoice_regenerate.jpg License: unknown Contributors: AdminFile:Admin_invoice_byProject.jpg Source: http://www.myfablims.se/wiki/index.php?title=File:Admin_invoice_byProject.jpg License: unknown Contributors: AdminFile:Admin invoice byTool.jpg Source: http://www.myfablims.se/wiki/index.php?title=File:Admin_invoice_byTool.jpg License: unknown Contributors: AdminFile:Admin_invoice_byUser.jpg Source: http://www.myfablims.se/wiki/index.php?title=File:Admin_invoice_byUser.jpg License: unknown Contributors: AdminFile:Admin invoice simulate 1.jpg Source: http://www.myfablims.se/wiki/index.php?title=File:Admin_invoice_simulate_1.jpg License: unknown Contributors: AdminFile:Admin invoice simulate 2.jpg Source: http://www.myfablims.se/wiki/index.php?title=File:Admin_invoice_simulate_2.jpg License: unknown Contributors: AdminFile:Admin invoice simulate byProject.jpg Source: http://www.myfablims.se/wiki/index.php?title=File:Admin_invoice_simulate_byProject.jpg License: unknown Contributors: AdminFile:Admin invoice simulate byTool.jpg Source: http://www.myfablims.se/wiki/index.php?title=File:Admin_invoice_simulate_byTool.jpg License: unknown Contributors: AdminFile:Admin invoice simulate byUser.jpg Source: http://www.myfablims.se/wiki/index.php?title=File:Admin_invoice_simulate_byUser.jpg License: unknown Contributors: AdminFile:Admin Processline list.jpg Source: http://www.myfablims.se/wiki/index.php?title=File:Admin_Processline_list.jpg License: unknown Contributors: AdminFile:Admin statistics bookingtime group.jpg Source: http://www.myfablims.se/wiki/index.php?title=File:Admin_statistics_bookingtime_group.jpg License: unknown Contributors: AdminFile:Admin statistics logtime group.jpg Source: http://www.myfablims.se/wiki/index.php?title=File:Admin_statistics_logtime_group.jpg License: unknown Contributors: AdminFile:Admin statistics bookingList.jpg Source: http://www.myfablims.se/wiki/index.php?title=File:Admin_statistics_bookingList.jpg License: unknown Contributors: AdminFile:Admin statistics loggingList.jpg Source: http://www.myfablims.se/wiki/index.php?title=File:Admin_statistics_loggingList.jpg License: unknown Contributors: AdminFile:Admin statistics resourcebooking.jpg Source: http://www.myfablims.se/wiki/index.php?title=File:Admin_statistics_resourcebooking.jpg License: unknown Contributors: AdminFile:Admin_bookings_without_log.jpg Source: http://www.myfablims.se/wiki/index.php?title=File:Admin_bookings_without_log.jpg License: unknown Contributors: AdminFile:Systemsetting EmailReceivers.jpg Source: http://www.myfablims.se/wiki/index.php?title=File:Systemsetting_EmailReceivers.jpg License: unknown Contributors: AdminFile:Systemsetting InvoiceSettings.jpg Source: http://www.myfablims.se/wiki/index.php?title=File:Systemsetting_InvoiceSettings.jpg License: unknown Contributors: AdminFile:Systemsetting BookingSettings.jpg Source: http://www.myfablims.se/wiki/index.php?title=File:Systemsetting_BookingSettings.jpg License: unknown Contributors: AdminFile:Systemsetting toolcolumns.jpg Source: http://www.myfablims.se/wiki/index.php?title=File:Systemsetting_toolcolumns.jpg License: unknown Contributors: AdminFile:Systemsetting GeneralSettings.jpg Source: http://www.myfablims.se/wiki/index.php?title=File:Systemsetting_GeneralSettings.jpg License: unknown Contributors: AdminFile:Systemsetting externalpage.jpg Source: http://www.myfablims.se/wiki/index.php?title=File:Systemsetting_externalpage.jpg License: unknown Contributors: AdminFile:Systemsetting NightshiftMessage.jpg Source: http://www.myfablims.se/wiki/index.php?title=File:Systemsetting_NightshiftMessage.jpg License: unknown Contributors: AdminFile:Systemsetting ExternalMailReceivers.jpg Source: http://www.myfablims.se/wiki/index.php?title=File:Systemsetting_ExternalMailReceivers.jpg License: unknown Contributors: AdminFile:Systemsetting AddExternalMailReceiver.jpg Source: http://www.myfablims.se/wiki/index.php?title=File:Systemsetting_AddExternalMailReceiver.jpg License: unknown Contributors:AdminFile:Admin user approveuser 1.jpg Source: http://www.myfablims.se/wiki/index.php?title=File:Admin_user_approveuser_1.jpg License: unknown Contributors: AdminFile:Admin_user_approveuser_1.jpg Source: http://www.myfablims.se/wiki/index.php?title=File:Admin_user_approveuser_1.jpg License: unknown Contributors: AdminFile:Admin_user_approveuser_2.jpg Source: http://www.myfablims.se/wiki/index.php?title=File:Admin_user_approveuser_2.jpg License: unknown Contributors: AdminFile:Info chemical list.jpg Source: http://www.myfablims.se/wiki/index.php?title=File:Info_chemical_list.jpg License: unknown Contributors: AdminFile:Info generaldocuments list.jpg Source: http://www.myfablims.se/wiki/index.php?title=File:Info_generaldocuments_list.jpg License: unknown Contributors: AdminFile:Info generaldocuments add.jpg Source: http://www.myfablims.se/wiki/index.php?title=File:Info_generaldocuments_add.jpg License: unknown Contributors: AdminFile:Info tooldocument list.jpg Source: http://www.myfablims.se/wiki/index.php?title=File:Info_tooldocument_list.jpg License: unknown Contributors: AdminFile:Info tooldocument add.jpg Source: http://www.myfablims.se/wiki/index.php?title=File:Info_tooldocument_add.jpg License: unknown Contributors: Admin


