Download - Mobile Care Monitoring - .NET Framework
Mobile Care Monitoring
Getting started

2
MCM Overview
Welcome to Mobile Care Monitoring (MCM). This guide aims to get you
started on the two core components to our software solution: The Care App
(for care delivery) and Monitor (for care planning and monitoring). In
addition to the Care App and Monitor; MCM also features an Activities App
and Relatives Gateway, both of which are covered in separate guides.
Care App
The Care App is used by all staff who are delivering & need
to evidence care provided to residents/service users. The
Care app runs on devices that have been ‘enrolled’ to your
organisation. Care staff can get going with the Care App
quickly and with minimal set up.
Monitor
Monitor is the part of the system used to manage homes,
residents and staff. Care planning staff will set up planned
care, assessments, care plans, and report and monitor care
delivery in Monitor. Monitor is a website interface used on
laptops, tablets and desktop computers. It will need Chrome
or Safari (if you are Monitor using on an apple device) to
work effectively. Monitor is your starting place to get going,
but the Care App is usually the quickest bit to start using on
a day-to-day basis.

3
How to use this guide to get started
This guide covers the basics of getting started with MCM. There are some
things you’ll need to do before you can get going. Here are our suggested
steps to getting started, you can refer to the subsequent user guides to help
with each step of the way.
Get Monitor links set up in Chrome/Safari on your computers, laptops and tablets ready for you and your team staff to use.
If you get stuck in Monitor look out for the help content for each page or use the “intercom” to chat to a support representative. In Monitor, set up some
Worker records for the people at your home who can help you set up the basics. Don’t forget to give these people permissions to manage staff and service users (read the crib sheet for User Access Rights).
Import all your care staff in Monitor. Once imported, they will be ready to use the Care App It’s a good idea to practice setting up staff manually, why not set up some nursing staff or seniors that will need access to Monitor to do care planning? Don’t forget to set their user access rights.
Import or set up Service User records and enter some file information into Monitor.
Make sure your devices are charged up, connected to the Wi-Fi, enrolled for use and ready to connect and log on to the Care App.
You can choose to stop here, or if you are more confident and want to do more before training occurs, then have a look over the next few steps.
Grab a device or two, log into the Care App and get someone (such as the activities coordinator) to take some nice profile shots of your residents.
Pop back into Monitor and allocate the photos to the resident profiles.
Pause, take a breath. You are now set up ready for training on the Care App / Monitor.

4
Set up your browser to use Monitor
Ready to get going?
To make sure we can support you and that you have the best user experience, you’ll need to be
using the right internet browser. We support the use of the latest Chrome browser or for Apple
users Safari. Windows user? Need help to get the right browser? Download Chrome from here
https://www.google.com/chrome/browser/desktop/index.html
To use Monitor (the bit for care planning, management and setting stuff up) then you need to log
in at this website https://care.personcentredsoftware.com/mcm
Top tips:
1) Create the login page as a bookmark
2) Add a link to your desktop...that way it will be dead easy to
find it next time.
3) Once added to your desktop, then drag the desktop link to
your taskbar for easy access no matter what you are doing.
Where to log in?
Go to the Monitor website
www.monitor.personcentredsoftware.com/mcm
Tip: don’t forget to create bookmarks and links to find the site
easily Enter your MCM login email address & password to
access the system.
What do I use to log in?
If you completed MCM order, your login email is the email you gave us and your default
password. Other staff in your organisation who’ve been imported will have been issued an email
address for their login and a default password of 123456. Otherwise speak to your organisation
admin or whoever set you up as a user.

5
Success?
You’ll see your picture and username in the top right once
you’ve successfully logged in. Now you're all set and ready
to go!
It’s not working!
Staff members must have appropriate access to log in. If they do not have rights, they will not be
able to log on. The login process will tell you if your email address and password combination
are not valid. If they’re a correct combination but you still can’t log on, you need your access
rights changed by a senior member of staff.
Forgotten your password?
At the login page there is a Forgotten Password link,
but this will only work if you have been registered with
a real email address that you have access to (as the
system will send a reset link there for you). Otherwise,
you’ll need to speak to someone in your organisation
that can manage staff records. They’ll be able to reset
your password.

6
Further assistance
Where to find some help (Monitor)
Need some help?
• During office hours the best way to contact our support team is
via the “Tech support chat”. Click on the button at the top of the
Monitor application
• For “help pages” click on the button at the top of the page in
Monitor will show you help content relating to the page you are currently using!
• You can raise a support request from within Monitor and we will get back to you as soon as
possible
• In the page footer there are links to the news articles. The news articles inform you about
updated to the MCM product, such as new features and enhancements
Creating support requests
Find the top menu, hover over Service and you can:
• Create a support request or view open
requests you’ve logged before. When
creating a new support request, please
write a brief description and then
provide information to help us to
understand the issue.
Open requests
Keep an eye out for the number shown next to Open requests. This means there have been
updates from our support team. Click on Open requests to see the communications we have
sent. This might be to seek more information or to update you on progress.
Help pages
When you click on the help button
on any page, a screen will expand
out with the help content for that
page.
Still stuck? Give us a call on
01483 357657 and choose the
option 1 for the support team.

7
Adding Staff / Worker records
Importing staff
When you’re starting out, you can bulk import the staff records by clicking on
‘Import workers’ and following the on-screen instructions to validate and import
the staff data. Each member of staff will require an email address which will be
used as their login email.
Tip: The email doesn't necessarily have to be a real email address (if you don’t have corporate
email addresses), if you need to create pretend email addresses, we suggest using something
easy to remember and standard across the board like
[email protected] (e.g. [email protected])
Of course, if staff have real email address for your organisation, it’s best to use that!
Note: When staff records have been imported, they will automatically be set up with user
accounts with the default password of 123456. Remind staff to change passwords once logged
in to the Care App or Monitor.
Adding new staff records
New staff records can be created by clicking on the ‘Add new worker’ button in
a staff community. Enter the basic details (Gender, Title, Forenames,
Surname, Date of birth and a login email address) and then click on ‘Save’ to
create the record.
Creating user accounts
Complete the file information, being sure click on ‘Create
user’, to set the worker up with a Care App and Monitor
account.
When creating a user, you will be prompted to confirm the login email and
allocate a password.
It is recommended that a default password is allocated to each user and
that they then use the change password process on the care app or within
Monitor to ensure that only they know the password. You must also choose
their normal role.
Don’t forget to save the file when you have created their account.
Users will now have access to the Care App for the locations & communities that the community
they are in has been given access to.
8
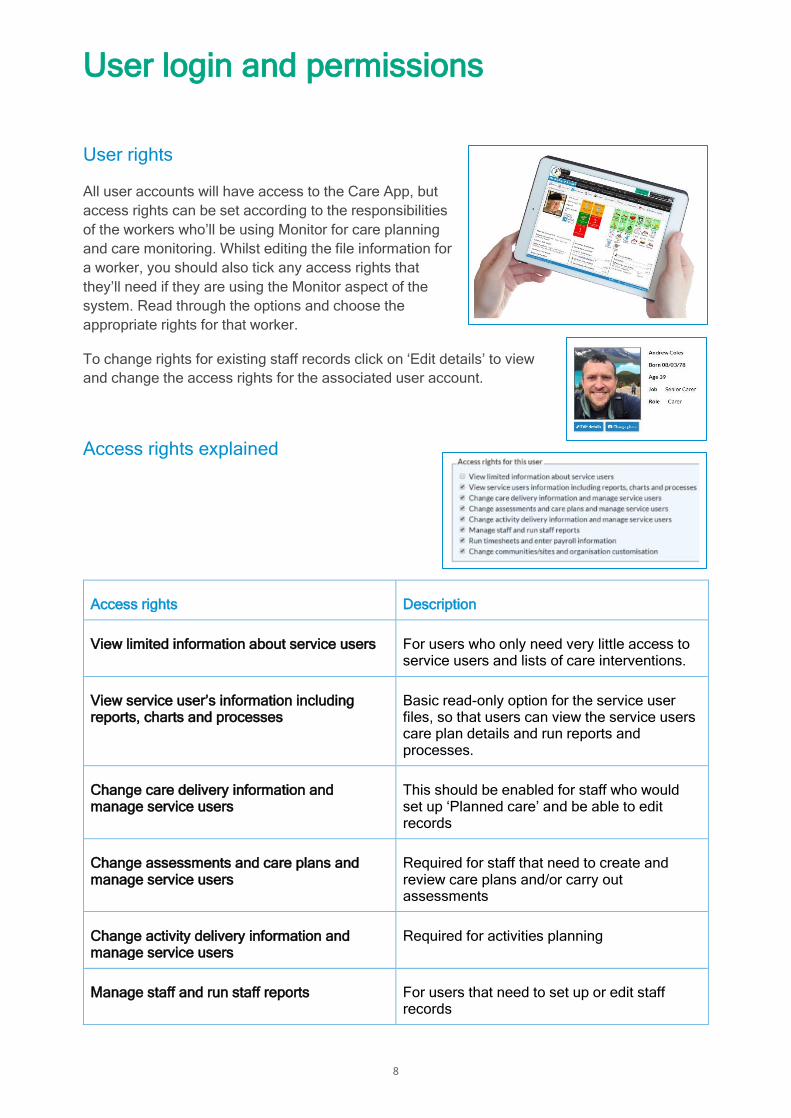
User login and permissions
User rights All user accounts will have access to the Care App, but
access rights can be set according to the responsibilities
of the workers who’ll be using Monitor for care planning
and care monitoring. Whilst editing the file information for
a worker, you should also tick any access rights that
they’ll need if they are using the Monitor aspect of the
system. Read through the options and choose the
appropriate rights for that worker.
To change rights for existing staff records click on ‘Edit details’ to view
and change the access rights for the associated user account.
Access rights explained
Access rights Description
View limited information about service users For users who only need very little access to service users and lists of care interventions.
View service user’s information including reports, charts and processes
Basic read-only option for the service user files, so that users can view the service users care plan details and run reports and processes.
Change care delivery information and manage service users
This should be enabled for staff who would set up ‘Planned care’ and be able to edit records
Change assessments and care plans and manage service users
Required for staff that need to create and review care plans and/or carry out assessments
Change activity delivery information and manage service users
Required for activities planning
Manage staff and run staff reports For users that need to set up or edit staff records

9
Run timesheets and enter payroll information Where MCM is capturing data for timesheet or payroll data, admin staff will need this to set up any payroll data and run the necessary reports.
Change communities/sites and organisation customisation
For organisation administrators who’ll be responsible for setting up any new communities or changing customisation options, such as Master Actions.
Adding Service user records / File information
Bulk import of Service user records
Navigate to the right Service User community and click on the ’Import
service users’ button then follow the on-screen instructions to create
records in bulk.
Adding new arrivals
To add new individual Service User record, click on ‘Add new service
user’, then complete the basic file information and select the required
community and save to create the record.
Note:
A person can be added to more than one
community.
For example, you may have set up a
‘Service Users’ community which all
residents belong to as well as a
community they live in, such as ‘First
floor’. This can help with reporting and
system usage. The communities they will
be put in are highlighted blue.

10
Get personal
Once you’ve saved the file, please add
some more details to the file information.
Some things to remember:
• Suspended is only ticked when a
person is not in the home for a
sustained period of time.
• Height is in centimetres.
• Risks to be aware of should be
concise and will scroll across the
screen on the care app.
• Personal belongings entered here are
more for sentimental items or things
that they always like to have around
(not the full list of possessions).
• This isn't the full care plan or full risk
assessment! It is designed to be a
personalised profile for quick access
and reference.
• Click ‘Save’ once you’re done.

11
Enrolling devices for the Care App
Device enrolment
When you purchase devices through Person Centred Software, we will
have installed the Care App and enrolled the devices to your organisation.
If you are purchasing your own devices you’ll need to go through some
steps to get the Care App set up. Only devices that are enrolled to your
organisation will be able to use the Care App.
How to install the Care App
Search for “MCM Care Delivery” on the App Store for Apple devices or for
Android devices, use the Google Play store. Download the app. Open it up
and you’ll be able enrol the device for use within your organisation.
Enrolment process
Open the MCM Care Delivery app on your device and follow the steps below. You’ll need to be
an organisation admin to be able to do this.
1. Tap on ‘Press to start work’
2. Tap on ‘Change site’ on
the log in screen. This is
deliberately small since
staff do not need to use it.
3. Type in your login email
and password then press
‘Authenticate’.
4. Enter the Serial number
(found on the back of the iPods,
or by dialling *#06# on Samsung
devices and create a device
name, chose the organisation
and location (home) you wish to
enrol the device to. Then tap on
‘update’ to continue.
5. Once the update has
been done tap on the
‘home’ symbol in the top
right of the screen.
6. You’ll return to the login
screen ready to begin.

12
Logging onto the Care App
Ready to begin using the Care App? Once you’ve enrolled the devices to your location and home, staff will be
ready to use the device to record care or take photos. Open the MCM app
on your enrolled device, tap ‘Press to start work’
1. Check the location at the
top, then tap on ‘choose
your name’.
2. Select your name from the
list which appears at the
bottom of the screen.
They’re ordered
alphabetically by surname.
3. Note: if your name isn't
showing, first try tapping
the refresh button in the
top right a couple of times.
This is most common if a
new device has been
enrolled, or where a new
staff record has just been
added into MCM. If that
doesn’t resolve the issue,
then it might be that you
are a worker in Monitor but
haven't been set up as a
user.
4. Then press the blue
‘Done’ button or tap in the
password field below the
name field.
5. Enter your password in
the box below where
your name now
appears.
6. Select the communities
that you are working in
(you can select one or
many)
7. Scroll down the screen
and tap on ‘Start work’.
8. After a short moment of
time, the residents home
page will be loaded.
Note: In the main ‘Monitor’ application, when editing a
worker record; if you see ‘Create user’, this means that they
have yet to be given access to the system and won’t be able
to logon.

13
Adding Service user photos
Now let’s make them look their best! You’re going to want to add residents’ photos to their records. It’s going to
make the screen much prettier and make it a whole lot easier to navigate
around the system both in Monitor and on the Care App
The Care App is the best way to get a snap of your
residents
Go and grab one of your devices with the Care App installed, log into
the device and you can start using the device to take photos of your
residents. You’ll be doing this for activities, wounds and other
photos. Make sure you’ve got consent to take the pictures first!
Where did that picture go?
When you take a photo using the Care App, so that
your pictures are kept secure they are not saved
directly on the device but are automatically uploaded
to Monitor.
In Monitor Navigate to the Location home page
(represented by small picture of the house).
You’ll then see New pictures that have been taken
with the Care App ready to use!

14
Click on the tiny button and choose to ‘Make a person’s
profile picture’, then click on the name of the resident.
Change photo
You can also set Staff or Service Users photos by clicking on the
‘Change photo’ button next to their profile picture.
From the ‘Change photo option’ you can:
• Allocate photo from the photo stream
• Copy and paste an image
• Select an image from your computer’s library

15
Next stages
You’re all set up! What’s next?
Wait a minute, take a breath
Good to see that you have come this far, let’s take a minute to review what
we have covered before you continue.
Following these guides, you will have achieved a lot already!
To maximise your training day, you should have:
✓ Set up Service User records and basic file information.
✓ Set up Staff records and created the user accounts for those who require access to the
Care App
✓ Given the correct permissions to users that require access to Monitor
✓ Know how to get help from Support and from help documentation
✓ Set up your devices so that staff can logon and charged them up ready to go
✓ If you felt brave, you may also have put pictures on the residents and staff
What next?
If you have training booked, we look forward to meeting you. Please make sure your team
members are assigned to the training sessions they need.
Have a look through the next few pages of this document to familiarise yourself with the general
navigation around MCM.
Put up the posters we have sent you to promote MCM is coming soon! If you haven't’ received
any, please contact support.
Spread the word around your home, it really will benefit everyone!

16
Finding your way
Communities and General navigation
Select blue notification tiles to
highlight Service User
records that have raised the
alert or that require some
actions
The ‘Community’ selection is
used to navigate to locations
and communities for Service
Users and Staff
In the spotlight?
Highlighted service user
based on the notifications
selected are shown with
yellow name badges.
Click on their picture to open
their records
Easy navigation
You can switch between service
users from the ‘currently viewing’
bar The service user list shows a
filter symbol next to their name
when the records match the
selected filter type But you can
always jump to anyone in the
same community if you like!
Home sweet home
Takes you back to the community
home page.

17
Service user record navigation
To change the personal / file information (including their height)
The service user record features: Personal / File information, Completed (green)
and planned actions (white), Responsive warning tiles for ‘watches’ (such as fluid & bowels),
Informative Assessment, Care plan and documentation tiles.
Use the tiles to navigate to
areas of the care plan. Or
you can use the quick links in
the menu.
Informative Tiles
The various tiles in the Service User record will inform you if things need to be done, whilst
providing a way of navigating a person’s record. The red tiles indicate something needs to be
done or a risk. Click on the information to take you to the relevant area. Here is an example:
Assessments due for review
have turned the tile red
Click on the number to show
the assessment tools that
need to be completed
Green tile and a tick, now the
assessments are all up to
date

18
Need support?
Create a support request in Monitor or start a Tech Chat


