
MPM IIElectronic Seed Monitor
User Guide & Operator’s Manual
This is the downloadable version of the manual, a partial download may not contain all pertinent information. Make sure to read all chapters regarding safe operation. Due to ongoing upgrades specifications may change without notice, contact a Monosem Rep for current information. Content © 2008 Monosem Inc.

General information 1
Key Functions 2
LCD Functions 3 - 4
Monitor Operation 5 - 6
Programming 7 - 10
Warnings and Alarms 11 - 12
Machine Operations 13 - 17
Troubleshooting 18
Replacement Parts 19 - 20
TABLE OF CONTENTS - MPM II
This is the downloadable version of the manual, a partial download may not contain all pertinent information. Make sure to read all chapters regarding safe operation. Due to ongoing upgrades specifications may change without notice, contact a Monosem Rep for current information. Content © 2008 Monosem Inc.
1
MPM II Electronic Seed Monitor
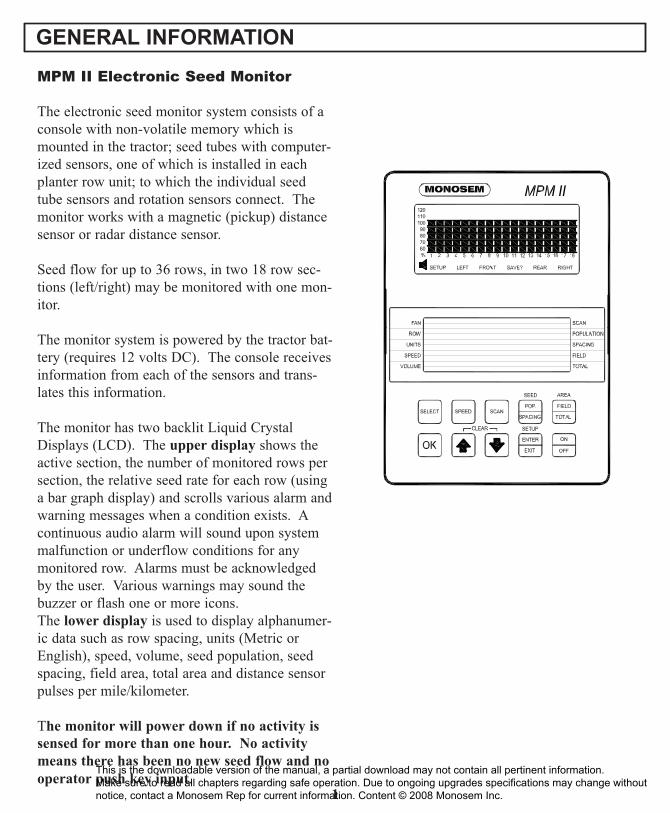
The electronic seed monitor system consists of aconsole with non-volatile memory which ismounted in the tractor; seed tubes with computer-ized sensors, one of which is installed in eachplanter row unit; to which the individual seedtube sensors and rotation sensors connect. Themonitor works with a magnetic (pickup) distancesensor or radar distance sensor.
Seed flow for up to 36 rows, in two 18 row sec-tions (left/right) may be monitored with one mon-itor.
The monitor system is powered by the tractor bat-tery (requires 12 volts DC). The console receivesinformation from each of the sensors and trans-lates this information.
The monitor has two backlit Liquid CrystalDisplays (LCD). The upper display shows theactive section, the number of monitored rows persection, the relative seed rate for each row (usinga bar graph display) and scrolls various alarm andwarning messages when a condition exists. Acontinuous audio alarm will sound upon systemmalfunction or underflow conditions for anymonitored row. Alarms must be acknowledgedby the user. Various warnings may sound thebuzzer or flash one or more icons. The lower display is used to display alphanumer-ic data such as row spacing, units (Metric orEnglish), speed, volume, seed population, seedspacing, field area, total area and distance sensorpulses per mile/kilometer.
The monitor will power down if no activity issensed for more than one hour. No activitymeans there has been no new seed flow and nooperator push key input.
GENERAL INFORMATION
This is the downloadable version of the manual, a partial download may not contain all pertinent information. Make sure to read all chapters regarding safe operation. Due to ongoing upgrades specifications may change without notice, contact a Monosem Rep for current information. Content © 2008 Monosem Inc.
Push keys allow the user to select or change theoperating mode, the active displays or the currentconfiguration. Depending on the operating modeor the current display selected, some keys arevalid while others are not. Each key press if validis acknowledged by a short beep and its action istaken. If the key press has no action associated,the key press is considered invalid and the userwill not get any feedback.
SELECTSelects the application mode (left/right) at thebeginning of installation setupSelects the active section(s) (left, right, orleft/right) in the normal mode.Does not have an affect on a system that is con-figured to monitor only one section.While programming the monitor, the key willselect the digit to change
SPEEDImmediately displays the current ground speed.
SCAN•If the current average population or averagespacing is displayed, this key sequentially dis-plays the seed population/spacing on each row.•If the display shows functions other than theaverage seed population or spacing, pressingSCAN will sequentially display speed, averageseed population and average seed spacing.•Pressing a second time freezes the display on thecurrent row.•Pressing a third time restarts the sequential dis-play.
SEED POPULATION / SEED SPACINGImmediately displays the average seed POPULA-TION and the average seed SPACING of allactive rows.Each press alternates between seed spacing andseed population.
AREA FIELD / AREA TOTALImmediately displays the field and total areaplanted since the field / total area was lastcleared.Each press alternates between field area and totalarea.
OKEnds and saves the new setup during installation.Acknowledges and silences alarms in the opera-tion mode
UP ARROW AND DOWN ARROWScrolls sequentially through the display optionson the lower LCD display.Freezes on the current row in the scan mode.Scrolls sequentially through the rows when thepopulation scan is frozen.Used to enter programmable values in the pro-gramming mode.The Up and Down arrow keys can be pressed atthe same time to start the CLEAR function.
SETUP ENTER / SETUP EXITEnters and exits the programming mode.
ON / OFFPowers the unit on and off.
KEY FUNCTIONS
2
This is the downloadable version of the manual, a partial download may not contain all pertinent information. Make sure to read all chapters regarding safe operation. Due to ongoing upgrades specifications may change without notice, contact a Monosem Rep for current information. Content © 2008 Monosem Inc.
LCD FUNCTIONS
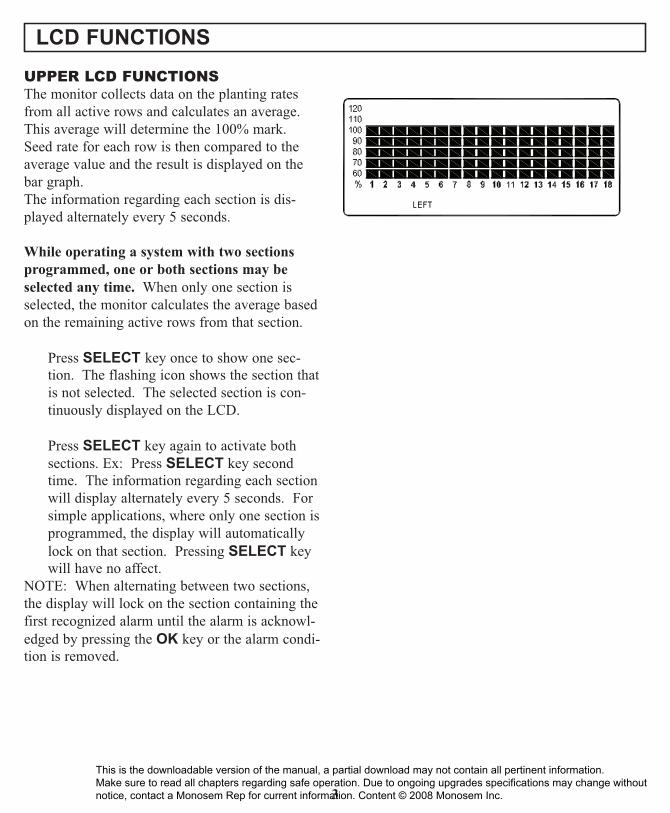
UPPER LCD FUNCTIONSThe monitor collects data on the planting ratesfrom all active rows and calculates an average.This average will determine the 100% mark.Seed rate for each row is then compared to theaverage value and the result is displayed on thebar graph.The information regarding each section is dis-played alternately every 5 seconds.
While operating a system with two sectionsprogrammed, one or both sections may beselected any time. When only one section isselected, the monitor calculates the average basedon the remaining active rows from that section.
Press SELECT key once to show one sec-tion. The flashing icon shows the section thatis not selected. The selected section is con-tinuously displayed on the LCD.
Press SELECT key again to activate bothsections. Ex: Press SELECT key secondtime. The information regarding each sectionwill display alternately every 5 seconds. Forsimple applications, where only one section isprogrammed, the display will automaticallylock on that section. Pressing SELECT keywill have no affect.
NOTE: When alternating between two sections,the display will lock on the section containing thefirst recognized alarm until the alarm is acknowl-edged by pressing the OK key or the alarm condi-tion is removed.
3
This is the downloadable version of the manual, a partial download may not contain all pertinent information. Make sure to read all chapters regarding safe operation. Due to ongoing upgrades specifications may change without notice, contact a Monosem Rep for current information. Content © 2008 Monosem Inc.

LOWER LCD FUNCTIONSThe UP and DOWN arrow keys will sequentiallychange what is being displayed on the lowerLCD. Pressing the UP or DOWN arrow keyswill move the arrow head icon (on the left andright hand side of the display) to another item.For example, if the arrow icon is pointing toSPEED, ground speed will be displayed on theLCD. Pressing the UP arrow key will move theicon to the display will change to display all theicons used to represent the current (English orMetric) measurement system.
The shortcut keys, SPEED, SEED POPULA-TION/SPACING and AREA FIELD/TOTALallow direct access to their respective displays.For example, no matter what is currently beingdisplayed on the lower LCD, pressing theSPEED key will change the display to the cur-rent speed. Pressing the SEED POPULA-TION/SPACING or AREA FIELD/TOTAL keyswill alternate between the two functions assignedto that key.
Pressing the SCAN key while displaying seedspacing or population will cause a sequential dis-play of each individual row. Pressing the SCANkey a second time will freeze the display on thecurrently displayed row. Pressing SCAN keywill restart the automatic advancing of the scanfunction.
Pressing the SCAN key while displaying speedwill cause a sequential display of speed, averageplanter population and average seed spacing.Pressing the SCAN key a second time will freezethe display on the currently displayed reading.
LCD FUNCTIONS
4
This is the downloadable version of the manual, a partial download may not contain all pertinent information. Make sure to read all chapters regarding safe operation. Due to ongoing upgrades specifications may change without notice, contact a Monosem Rep for current information. Content © 2008 Monosem Inc.
ROW SPACINGPress the arrow keys to ROW SPACING to dis-play the current spacing between rows in inchesor centimeters. The ROW SPACING icons turnon, displaying a 3 digit, one decimal place format.In the acre counter mode, this function displaysthe implement width in feet or meters, using a 3digit, no decimal places format.
UNITSPress the arrow keys to UNITS to display all theicons from the currently selected English orMetric measurement system. For the English system, the icons are: INCH, MPH, FT, ACRE, and MILE. For the Metric system, the icons are: M, KM/H, and Ha
SPEEDPress the SPEED key to display the currentspeed in MPH or KM/H, using a 3 digit, one deci-mal place format.
VOLUMEPress the arrow keys to VOLUME to display thepresently selected audio volume. The SPEAKER icon turns on.
SCANPress the SCAN key to display the seed spacingor seed population pf each individual row.Pressing the SCAN key while displaying anyother function will cause the monitor to sequen-tially display speed, average seed population andaverage seed spacing.Pressing the SCAN key a second time will freezethe display.Pressing the SCAN key a third time restarts thesequential display. The UP and DOWN arrowkeys can be used to change the current display.
SEED POPULATION/ SEED SPACINGEach SEED POP/SPACING key press alter-nates between seed population and seed spacing.SEED POPULATION displays the averagenumber of seeds or the row average number ofseeds per acre or seeds per hectare for all theactive rows. The average is displayed using a 6digit, no decimal places format. The AVERAGEPOPULATION icon will turn on. When in thescan mode, the scan arrow and SCAN ROWPOPULATION will appear. The ROW numbericon and the current row will be displayed on theright in the 1000’s using 3 digits, one decimalplace (e.g. 32.9 means 32,900). When in scanfreeze mode, the scan arrow and ROW POPU-LATION will turn on (scan arrow may be flash-ing). The UP and DOWN keys may be used tolock on the desired row.
5
MONITOR OPERATION
This is the downloadable version of the manual, a partial download may not contain all pertinent information. Make sure to read all chapters regarding safe operation. Due to ongoing upgrades specifications may change without notice, contact a Monosem Rep for current information. Content © 2008 Monosem Inc.
SEED SPACINGdisplays the average distance or the row averagedistance between seeds for all active rows ininches per seed or centimeters per seed, using a 3digit, one decimal place format. When the aver-age is displayed the AVERAGE SPACING iconsare turned on. When in the scan mode, the scanarrow and SCAN ROW SPACINGS icon willappear. The ROW number icon and the currentrow will be displayed on the left and the spacingwill be displayed on the right . The display willsequence to the next row every 5 seconds. Whenin scan freeze mode, the scan arrow and SPACING will turn on (scan arrow may be usedto lock on the desired row.)
FIELD AREA/TOTAL AREAEach AREA FIELD/TOTAL key press alternatesbetween field area and total area.
FIELD AREAdisplays the total number of acres or hectares,using a 6 digit, one decimal place format.
NOTE: When FIELD AREA is selected, the UPand DOWN key must be held slightly longerthan normal so the monitor will not mistake thisaction with a CLEAR, which consists of the UPand DOWN arrow keys pressed simultaneously.A beep will sound when the function activates.
TOTAL AREAdisplays the total number of acres or hectares,using a 6 digit, one decimal place format. Thetotal area counter updates every time the fieldarea counter increments. Clearing the total areacounter will also clear the field area counter.
6
MONITOR OPERATION
This is the downloadable version of the manual, a partial download may not contain all pertinent information. Make sure to read all chapters regarding safe operation. Due to ongoing upgrades specifications may change without notice, contact a Monosem Rep for current information. Content © 2008 Monosem Inc.
CHANGING THE AUDIO VOLUME1. To enter the programming mode, press andhold the SETUP key. The monitor will emit sev-eral short beeps, followed by a long beep. On thelower LCD, the SETUP icon turns on and thearrow head icon will flash, indicating that theuser can select an item to program.NOTE: The monitor must be in a programmablefunction (row spacing, units, seed, volume, orarea) to enter setup. The monitor will not entersetup in seed population or seed spacing.
2. Press the UP or DOWN arrows to move theflashing arrow to VOLUME. As the arrow iconmoves, the lower LCD will display the currentsetting of the item selected.
3. Press OK and the flashing arrow becomes solidand the beeper will sound.NOTE: The lower LCD will display the currentvolume and the SPEAKER icon is turned on.Settings are from 0 to 7.
Use the UP or DOWN arrow keys to change thesetting. With every UP arrow key push, the beeper willincrement by on step between the minimum andthe maximum. If the maximum level (7) isreached the volume rolls over to the minimumlevel (0). Pressing the DOWN arrow key lowers the vol-ume until the minimum level (0), at which pointthe volume rolls over to the maximum level (7).
4. exit, see EXIT
UNITS (Metric or English) 1. To enter the programming mode, press andhold the SETUP key. The monitor will emit sev-eral short beeps, followed by a long beep. On thelower LCD, the SETUP icon turns on and thearrow head icon will flash, indicating that theuser can select an item to program.NOTE: The monitor must be in a programmablefunction (row spacing, units, seed, volume, orarea) to enter setup. The monitor will not entersetup in seed population or seed spacing.
2. Press the UP or DOWN arrows to move theflashing arrow to UNITS. As the arrow iconmoves, the lower LCD will display the currentsetting of the item selected.
3. Press OK and the flashing arrow becomessolid and the beeper will sound.NOTE: The lower LCD will alternately displayall Metric icons or all English icons, indicatingthe Metric or English mode respectively
Use the UP or DOWN arrow keys to change thesetting.
4. exit, see EXIT
PROGRAMMING
7
This is the downloadable version of the manual, a partial download may not contain all pertinent information. Make sure to read all chapters regarding safe operation. Due to ongoing upgrades specifications may change without notice, contact a Monosem Rep for current information. Content © 2008 Monosem Inc.
ROW SPACING1. To enter the programming mode, press andhold the SETUP key. The monitor will emit sev-eral short beeps, followed by a long beep. On thelower LCD, the SETUP icon turns on and thearrow head icon will flash, indicating that the usercan select an item to program.NOTE: The monitor must be in a programmablefunction (row spacing, units, seed, volume, orarea) to enter setup. The monitor will not entersetup in seed population or seed spacing.
2. Press the UP or DOWN arrows to move theflashing arrow to ROW SPACING. As thearrow icon moves, the lower LCD will display thecurrent setting of the item selected.
3. Press OK and the flashing arrow becomessolid and the beeper will sound.NOTE: The lower LCD will display the currentrow spacing (in inches or centimeters) and ROWSPACING icon is turned on
The least significant digit of the displayed valuewill be blinking.Use the UP or DOWN arrow keys to change thethis value.Once this digit is correct, press the MODESELECT key and the blinking digit will move tothe next significant digit, where the process canbe repeated.
4. exit, see EXIT
CLEARING TOTAL AREA1. To enter the programming mode, press andhold the SETUP key. The monitor will emit sev-eral short beeps, followed by a long beep. On thelower LCD, the SETUP icon turns on and thearrow head icon will flash, indicating that the usercan select an item to program.NOTE: The monitor must be in a programmablefunction (row spacing, units, seed, volume, orarea) to enter setup. The monitor will not entersetup in seed population or seed spacing.
2. Press the UP or DOWN arrows to move theflashing arrow to TOTAL AREA. As the arrowicon moves, the lower LCD will display the cur-rent setting of the item selected.
3. Press OK and the flashing arrow becomessolid and the beeper will sound. The lower LCD will display the total area and theACRE or HA icon turns on.With the flashing arrow on TOTAL AREA, pressthe OK key.To reset the counter, press the UP and DOWNarrow keys at the same time and hold them downfor a short period of time to clear the data. TheCLEAR? Icon will be displayed and the monitorwill beep several times. When the data is actuallycleared, the monitor will emit a long beep, andthe field area is reset to zeros. After the longbeep, the previous recorded total area is notretrievable. Once cleared, the user may notchoose to exit programming mode without savingas described in EXIT
PROGRAMMING
8
This is the downloadable version of the manual, a partial download may not contain all pertinent information. Make sure to read all chapters regarding safe operation. Due to ongoing upgrades specifications may change without notice, contact a Monosem Rep for current information. Content © 2008 Monosem Inc.
SPEEDTo enter the programming mode, press and holdthe SETUP key. The monitor will emit severalshort beeps, followed by a long beep. On thelower LCD, the SETUP icon turns on and thearrow head icon will flash, indicating that theuser can select an item to program.NOTE: The monitor must be in a programmablefunction (row spacing, units, seed, volume, orarea) to enter setup. The monitor will not entersetup in seed population or seed spacing.
Press the UP or DOWN arrows to move theflashing arrow to SPEED. As the arrow iconmoves, the lower LCD will display the currentsetting of the item selected.
Press OK and the flashing arrow becomes solidand the beeper will sound. The speed constant isused to record how many pulses are generated permile (or kilometer) from the ground speed sensor.The lower LCD will display the current pulsesper mile (or kilometer), using a 6 digit, no deci-mal place format. The PULSES per MILE (orPULSES per KM) icons are turned on.
NOTE: It is highly recommended that a fieldcalibration be done to establish the PPM(Pulses per mile) number on a new machineinstallation. Several factors can affect this valuesuch as wheel slip on the magnetic distance sen-sor, mounting angle and height on the radar dis-tance\ce sensor, etc. IT IS NOT UNCOMMONFOR THE MPH ON THE MONITOR TO VARYSLIGHTLY FROM THE TRACTORSPEEDOMETER. Adjusting the PPM in themonitor to make the MPH agree can cause seri-ous errors in acre / hectare counts an populationreadings. Do field checks to verify populationsand seed spacing.
NOTE: On a new system installation, the moni-tor will default to 500 PPM. This will have to bechanged to obtain accurate readings from themonitor.
FIELD TESTIn field conditions:
•Measure 330 feet (1/16 mile) or 100 meters,(depending on your unit of measure).•Pull the tractor up to the starting line.•Press the UP and DOWN arrows at the sametime and hold them down until the CLEAR?icon is displayed and the monitor beeps sev-eral times. When the data is actually cleared,the monitor will emit a long beep and thenumber of pulses is cleared.•Drive the tractor for 330 feet (1/16 mile) or100 meters and STOP
The monitor will count the number of pulses anddisplay them.
PROGRAMMING
9
This is the downloadable version of the manual, a partial download may not contain all pertinent information. Make sure to read all chapters regarding safe operation. Due to ongoing upgrades specifications may change without notice, contact a Monosem Rep for current information. Content © 2008 Monosem Inc.
EXITTo exit WITHOUT SAVING
press and release the OK key. The monitor willrestore the lower LCD to show the setting of theitem, and the arrow icon will flash, allowing theuser to select another item to program.
To exit and SAVEpress and hold the OK key. The monitor willemit several short beeps and SAVE? icon isturned on. After a short time a long beep isheard, and the lower LCD will display the word
DONE. Release the OK key. If the OK key is released BEFORE the wordDONE is displayed, the changes WILL NOT BESAVED. The word DONE MUST be displayedin order for the save to have occurred.
NOTE: The programming mode may be exited atany time, by pressing the SETUP key. Pressingthis key will return the monitor to its normaloperation. All items changed and saved willcome into affect immediately. Any itemschanged, but not saved will revert to the originalprogrammed value.
PROGRAMMING
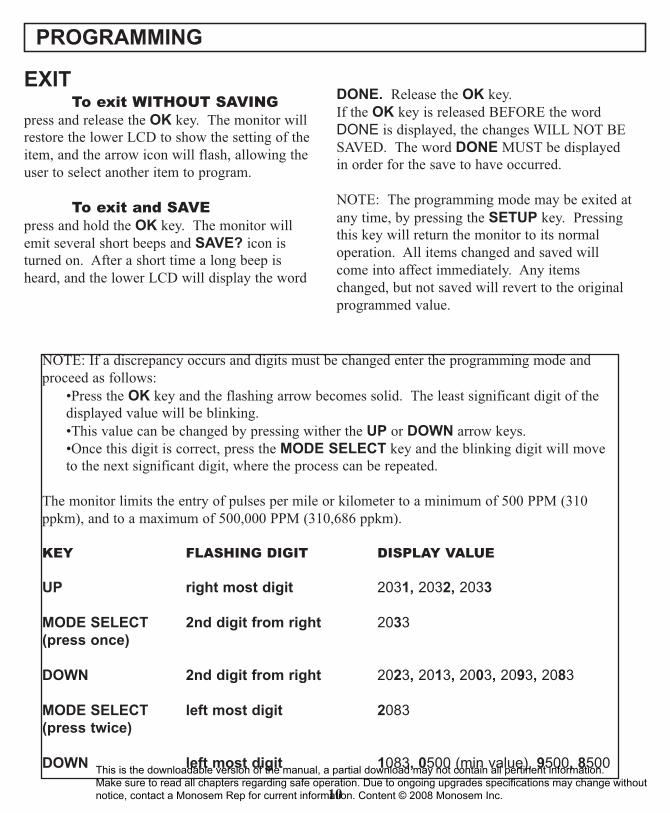
NOTE: If a discrepancy occurs and digits must be changed enter the programming mode andproceed as follows:
•Press the OK key and the flashing arrow becomes solid. The least significant digit of thedisplayed value will be blinking.•This value can be changed by pressing wither the UP or DOWN arrow keys.•Once this digit is correct, press the MODE SELECT key and the blinking digit will moveto the next significant digit, where the process can be repeated.
The monitor limits the entry of pulses per mile or kilometer to a minimum of 500 PPM (310ppkm), and to a maximum of 500,000 PPM (310,686 ppkm).
KEY FLASHING DIGIT DISPLAY VALUE
UP right most digit 2031, 2032, 2033
MODE SELECT 2nd digit from right 2033(press once)
DOWN 2nd digit from right 2023, 2013, 2003, 2093, 2083
MODE SELECT left most digit 2083(press twice)
DOWN left most digit 1083, 0500 (min value), 9500, 8500
10
This is the downloadable version of the manual, a partial download may not contain all pertinent information. Make sure to read all chapters regarding safe operation. Due to ongoing upgrades specifications may change without notice, contact a Monosem Rep for current information. Content © 2008 Monosem Inc.

SYSTEM ALARMS A system alarm is entered when the monitordetects a faulty sensor or one of several other com-munication faults.
The corresponding row number starts flashing andthe beeper sounds. All segments on the correspon-ding bar graph are turned off. Pushing the OK keyto acknowledge the alarm will turn the beeper off.The row number will continue to flash until thealarm condition is removed. If the monitor detectsa faulty sensor and there is no planting activitypresent, the monitor will scroll “CHECK CONNECTION”
If the distance sensor is detected as faulty, themonitor will display either PICKUP or RADAR,depending on the type of sensor installed, and theaudible alarm will sound. The user can push theOK key to acknowledge the alarm. When the dis-tance sensor is faulty, the monitor will change to abar graph only mode where the rows are still dis-played relative to each other. No area relatedinformation (speed, field acres, total acres, seedspacing or seed population) will be accumulated ordisplayed.
UNDER FLOW ALARMSIf the seed rate for one or more rows is less than55% of the calculated average, the corresponding60% segment will stay on, the corresponding rownumber starts flashing and the alarm sounds.Pushing the OK key to acknowledge the alarm willturn the alarm off. The 60% segment of the bargraph remains on and the row number continues toflash until the alarm condition is corrected.
NOTE: All alarms present within a short timebefore planting stops, are frozen on the serene andthe text LOW or FAIL will display on the LCD. Ifthe underflow is between 0%-10%, this warrants aFAIL condition. If the underflow is between 10%-55%, a LOW condition is generated. If multiplerows have an underflow condition, FAILwill display if any one or more rows is between0%-10%. This allows the user to identify and fixthe problem rows.
NOTE: This warning will not trigger unless aminimum time of continuous planting has passed.
NOTE: If all the rows show a seed rate of zero,the condition will not generate an alarm. It will beassumed the planter has stopped. The row num-bers and the bottom 60% segment will remain onfor all selected rows.
MULTIPLE ALARMSIf more than one alarm condition occurs at thesame time, pushing the OK key will acknowledgeall alarms that are currently displayed. For exam-ple, if one row on the left and one row on the rightis alarming; pushing the OK key will onlyacknowledge one of them. However, if there aretwo alarms on the lift, both alarms would beacknowledged with one push of the OK key.
WARNINGS AND ALARMS
11
This is the downloadable version of the manual, a partial download may not contain all pertinent information. Make sure to read all chapters regarding safe operation. Due to ongoing upgrades specifications may change without notice, contact a Monosem Rep for current information. Content © 2008 Monosem Inc.
SECTION NOT SELECTED WARNINGIf the monitor was programmed for two sectionsand only one is currently selected for the display(by pressing the SELECT key), the icon of thedisabled section will flash for a period of 1minute, then turn off at each power up. If seedflow is sensed in the disabled section, the icon forthat section (left or right) will begin to flash.
SEED PLANTING STOPPED WARNINGWhen the monitor detects no seed flow on allrows, the monitor will emit 3 short beeps to alertthe user. This warning will occur each time theplanter is stopped, each time the planter is raisedat the end of a row or if the mechanical drive failswhile planting.
NOTE: This warning will not trigger unless aminimum time of continuous planting has passed.
SEED COUNTING SENSOR IN CALIBRATION WARNINGAll seed counting sensors run a self calibrationsequence on power up. While in calibration thebottom segment of each corresponding bar graphwill flash if the monitor detects movement orplanting activity. If the monitor does not detectthis, the message WAIT CALIBRATION will bescrolled.
SEED COUNTING SENSOR TOODIRTY WARNINGAfter the seed counting sensors end their internalself calibration, the monitor may detect one ormore sensors are either too dirty or blocked. Ifthe monitor detects planting or movement, thecorresponding bar graph remains flashing. Themonitor will display CLEAN SENSORS on theLCD if no movement or planting is detected,prompting the user to clean the tubes. If the tubesare dirty, they will still show seed flow with lessaccuracy. If the tubes are blocked the user willget an alarm as soon as planting starts. The cor-responding bar graph will remain flashing untilthe problem is corrected and the monitor is pow-ered down and then powered back up.
LOW BATTERY WARNINGThe monitor is constantly monitoring its inputvoltage to quickly detect low power conditions.If the monitor detects that the input voltage hasdropped below 10.5V, it will display LOWPOWER on the LCD, provided that the monitordoes not detect planting.
NOTE: After the alarms have been acknowl-edged and if the alarm condition is still present,the LCD will continue to display the alarm condi-tion.
WARNINGS AND ALARMS
12
This is the downloadable version of the manual, a partial download may not contain all pertinent information. Make sure to read all chapters regarding safe operation. Due to ongoing upgrades specifications may change without notice, contact a Monosem Rep for current information. Content © 2008 Monosem Inc.
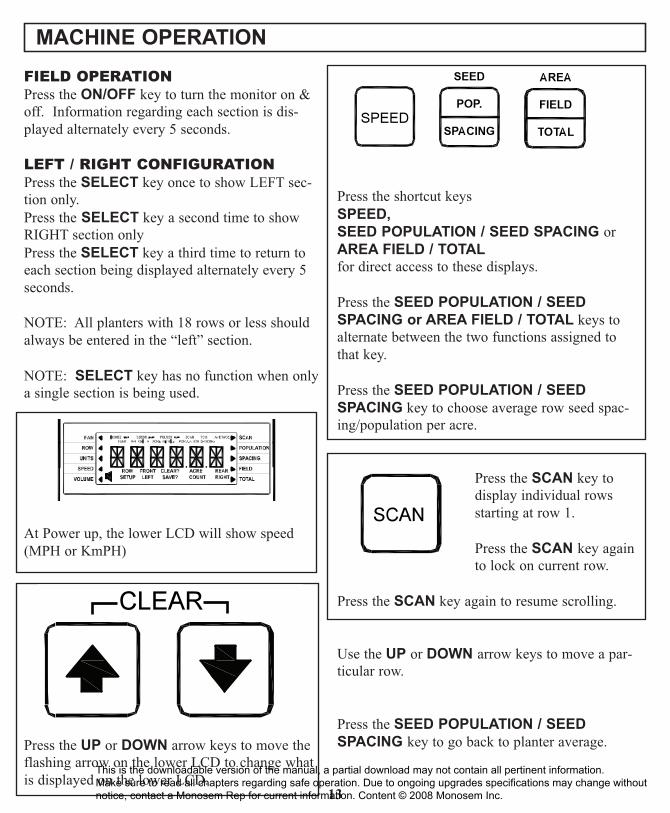
FIELD OPERATIONPress the ON/OFF key to turn the monitor on &off. Information regarding each section is dis-played alternately every 5 seconds.
LEFT / RIGHT CONFIGURATIONPress the SELECT key once to show LEFT sec-tion only.Press the SELECT key a second time to showRIGHT section onlyPress the SELECT key a third time to return toeach section being displayed alternately every 5seconds.
NOTE: All planters with 18 rows or less shouldalways be entered in the “left” section.
NOTE: SELECT key has no function when onlya single section is being used.
At Power up, the lower LCD will show speed(MPH or KmPH)
Press the UP or DOWN arrow keys to move theflashing arrow on the lower LCD to change whatis displayed on the lower LCD.
Press the shortcut keys SPEED, SEED POPULATION / SEED SPACING orAREA FIELD / TOTALfor direct access to these displays.
Press the SEED POPULATION / SEEDSPACING or AREA FIELD / TOTAL keys toalternate between the two functions assigned tothat key.
Press the SEED POPULATION / SEEDSPACING key to choose average row seed spac-ing/population per acre.
Press the SCAN key todisplay individual rowsstarting at row 1.
Press the SCAN key againto lock on current row.
Press the SCAN key again to resume scrolling.
Use the UP or DOWN arrow keys to move a par-ticular row.
Press the SEED POPULATION / SEEDSPACING key to go back to planter average.
MACHINE OPERATION
CLEAR
SPEED
SEED
POP.
SPACING
AREA
FIELD
TOTAL
SPE D
SCAN
13
This is the downloadable version of the manual, a partial download may not contain all pertinent information. Make sure to read all chapters regarding safe operation. Due to ongoing upgrades specifications may change without notice, contact a Monosem Rep for current information. Content © 2008 Monosem Inc.
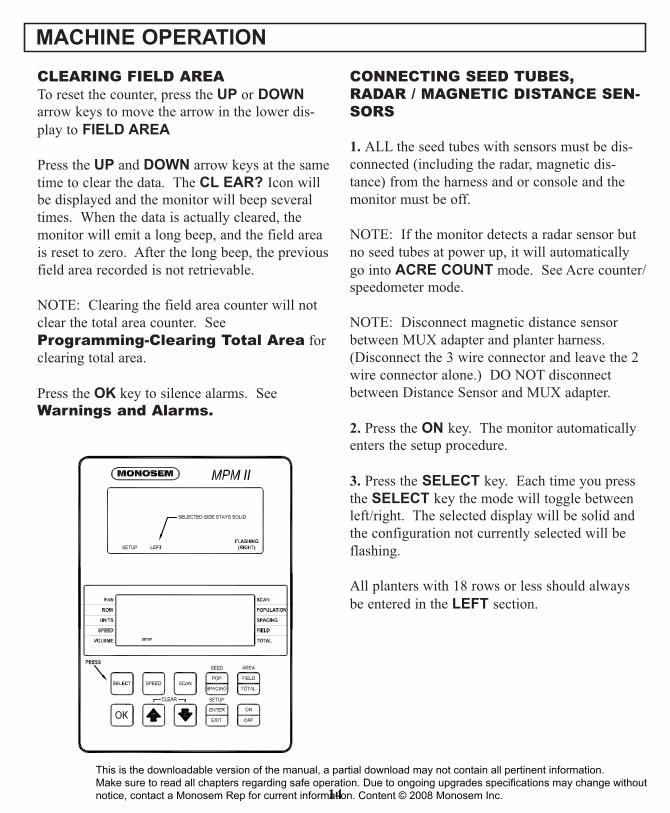
CLEARING FIELD AREATo reset the counter, press the UP or DOWNarrow keys to move the arrow in the lower dis-play to FIELD AREA
Press the UP and DOWN arrow keys at the sametime to clear the data. The CL EAR? Icon willbe displayed and the monitor will beep severaltimes. When the data is actually cleared, themonitor will emit a long beep, and the field areais reset to zero. After the long beep, the previousfield area recorded is not retrievable.
NOTE: Clearing the field area counter will notclear the total area counter. SeeProgramming-Clearing Total Area forclearing total area.
Press the OK key to silence alarms. SeeWarnings and Alarms.
CONNECTING SEED TUBES,RADAR / MAGNETIC DISTANCE SEN-SORS
1. ALL the seed tubes with sensors must be dis-connected (including the radar, magnetic dis-tance) from the harness and or console and themonitor must be off.
NOTE: If the monitor detects a radar sensor butno seed tubes at power up, it will automaticallygo into ACRE COUNT mode. See Acre counter/speedometer mode.
NOTE: Disconnect magnetic distance sensorbetween MUX adapter and planter harness.(Disconnect the 3 wire connector and leave the 2wire connector alone.) DO NOT disconnectbetween Distance Sensor and MUX adapter.
2. Press the ON key. The monitor automaticallyenters the setup procedure.
3. Press the SELECT key. Each time you pressthe SELECT key the mode will toggle betweenleft/right. The selected display will be solid andthe configuration not currently selected will beflashing.
All planters with 18 rows or less should alwaysbe entered in the LEFT section.
MACHINE OPERATION
14
This is the downloadable version of the manual, a partial download may not contain all pertinent information. Make sure to read all chapters regarding safe operation. Due to ongoing upgrades specifications may change without notice, contact a Monosem Rep for current information. Content © 2008 Monosem Inc.

4. Press and hold the OK keyto confirm the selection.During confirmation, the dis-play will alternate betweenNEW and SYS? The alarmwill sound four short beeps fol-lowed by one long beep. Atthis point your selection hasbeen saved and row numberswill appear flashing on theupper display.
5. Determine which row youwant as number one and plugthe seed tube w/ sensor into theharness.
Continue plugging in sensors. Row 1 first, Row 2 second andso on up to 18 rows. When asensor is plugged in, the corre-sponding row number on theLCD display will stay solid, themonitor will chirp twice andthe LED (Light EmittingDiode) on the seed tube sensorwill turn on for approximately30 seconds to show connectionis made
MACHINE OPERATION
15
This is the downloadable version of the manual, a partial download may not contain all pertinent information. Make sure to read all chapters regarding safe operation. Due to ongoing upgrades specifications may change without notice, contact a Monosem Rep for current information. Content © 2008 Monosem Inc.
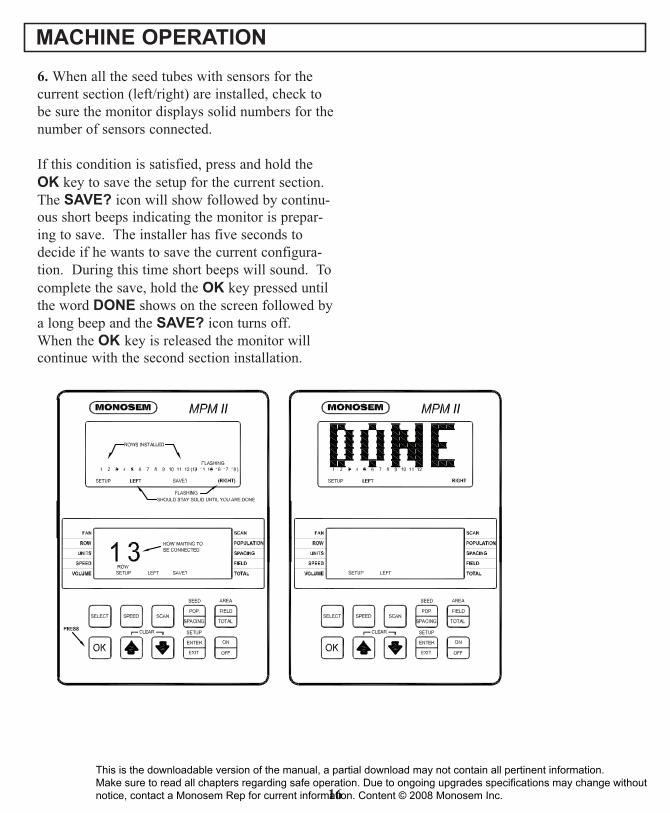
6. When all the seed tubes with sensors for thecurrent section (left/right) are installed, check tobe sure the monitor displays solid numbers for thenumber of sensors connected.
If this condition is satisfied, press and hold theOK key to save the setup for the current section.The SAVE? icon will show followed by continu-ous short beeps indicating the monitor is prepar-ing to save. The installer has five seconds todecide if he wants to save the current configura-tion. During this time short beeps will sound. Tocomplete the save, hold the OK key pressed untilthe word DONE shows on the screen followed bya long beep and the SAVE? icon turns off.When the OK key is released the monitor willcontinue with the second section installation.
MACHINE OPERATION
16
This is the downloadable version of the manual, a partial download may not contain all pertinent information. Make sure to read all chapters regarding safe operation. Due to ongoing upgrades specifications may change without notice, contact a Monosem Rep for current information. Content © 2008 Monosem Inc.
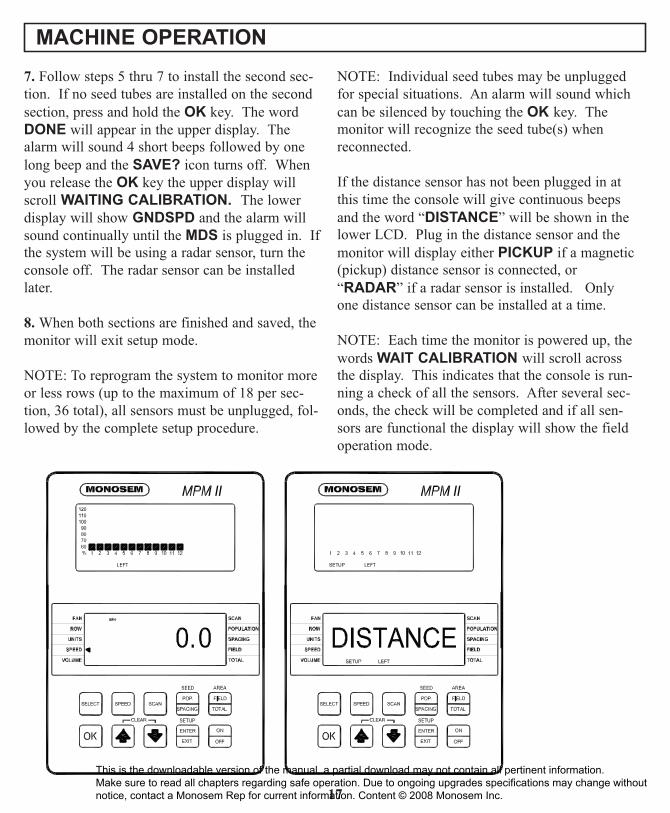
7. Follow steps 5 thru 7 to install the second sec-tion. If no seed tubes are installed on the secondsection, press and hold the OK key. The wordDONE will appear in the upper display. Thealarm will sound 4 short beeps followed by onelong beep and the SAVE? icon turns off. Whenyou release the OK key the upper display willscroll WAITING CALIBRATION. The lowerdisplay will show GNDSPD and the alarm willsound continually until the MDS is plugged in. Ifthe system will be using a radar sensor, turn theconsole off. The radar sensor can be installedlater.
8. When both sections are finished and saved, themonitor will exit setup mode.
NOTE: To reprogram the system to monitor moreor less rows (up to the maximum of 18 per sec-tion, 36 total), all sensors must be unplugged, fol-lowed by the complete setup procedure.
NOTE: Individual seed tubes may be unpluggedfor special situations. An alarm will sound whichcan be silenced by touching the OK key. Themonitor will recognize the seed tube(s) whenreconnected.
If the distance sensor has not been plugged in atthis time the console will give continuous beepsand the word “DISTANCE” will be shown in thelower LCD. Plug in the distance sensor and themonitor will display either PICKUP if a magnetic(pickup) distance sensor is connected, or“RADAR” if a radar sensor is installed. Onlyone distance sensor can be installed at a time.
NOTE: Each time the monitor is powered up, thewords WAIT CALIBRATION will scroll acrossthe display. This indicates that the console is run-ning a check of all the sensors. After several sec-onds, the check will be completed and if all sen-sors are functional the display will show the fieldoperation mode.
MACHINE OPERATION
17
This is the downloadable version of the manual, a partial download may not contain all pertinent information. Make sure to read all chapters regarding safe operation. Due to ongoing upgrades specifications may change without notice, contact a Monosem Rep for current information. Content © 2008 Monosem Inc.
PROBLEM: Faulty monitor values being displayed(such as speed, area, etc)
Incorrect monitor settings. - Change settings toproperly correspond to the system.The radar / magnetic distance sensor is faulty.-Replace sensor.The radar sensor was improperly mounted. -Properly mount sensor.
PROBLEM: MPH readings at idle are erroneous.(MPM II with radar distance sensor only.)
Radar gun is not located in a stable location. - Relocate to more stable location.
PROBLEM: Single Sensor communicationalarm comes on (alarm on with no bar graph and ablinking row number on a single row
Faulty seed tube sensor. -Replace Sensor.Break in the harness just before the seed tubesensor. -Inspect for break in harness and repair. Ifbreak can’t be found, replace harness section.The connector is dirty or corroded.-Clean con-nector.
PROBLEM: Sensor communication alarmscome on for all sensors (alarm on with no bar graphsand blinking row numbers on all rows.)
The monitor is faulty. -Replace monitorBreak in the harness just after the monitor. -Inspect for break in harness and repair. If thebreak can’t be found, replace harness section.Connector is dirty or corroded. -Clean connec-tor.
PROBLEM: Sensor communication alarmscome on for some sensors (alarm on with no bargraphs and blinking row numbers on all rows.)
Break in the harness. -Inspect for break in har-ness and repair. If break can’t be found, replaceharness section corresponding with the alarmingsensors.Connector is dirty or corroded -Clean connector.
PROBLEM: The alarm "Under planting" or "noplanting" sounds on a single sensor while planting.(Alarm on with a single bar graph segment on and ablinking row number on a single row.)
Seed tube sensor is blocked.-Clean sensor.Faulty seed tube sensor. - Replace sensor.
PROBLEM: Seed tube sensor dirty or blockedwarning comes on (after calibration, bar graph keepsblinking for a single row.)
Seed tube is dirty. -Clean sensor.Faulty seed tube sensor. -Replace sensor.
PROBLEM: LED on the seed tube sensor will notcome on.
Faulty seed tube sensor. - Replace sensor.Connector is dirty or corroded -Clean connector.Break in the harness just before the sensor. -Repair harness.
PROBLEM: System low error message Pinched wire on harness. - Repair or replace har-ness.
PROBLEM: COP error message appearsInternal console error. -Press OK. If this does-n’t help, reprogram the monitor. If still malfunc-tioning, send in for service.
PROBLEM: Monitor not reading population. Radar is possibly not working. - Turn console onand unplug radar wire. Look for radar on errormessage. If faulty replace radar.
18
TROUBLESHOOTING
This is the downloadable version of the manual, a partial download may not contain all pertinent information. Make sure to read all chapters regarding safe operation. Due to ongoing upgrades specifications may change without notice, contact a Monosem Rep for current information. Content © 2008 Monosem Inc.
REPLACEMENT PARTS
19
This is the downloadable version of the manual, a partial download may not contain all pertinent information. Make sure to read all chapters regarding safe operation. Due to ongoing upgrades specifications may change without notice, contact a Monosem Rep for current information. Content © 2008 Monosem Inc.
REPLACEMENT PARTS
20
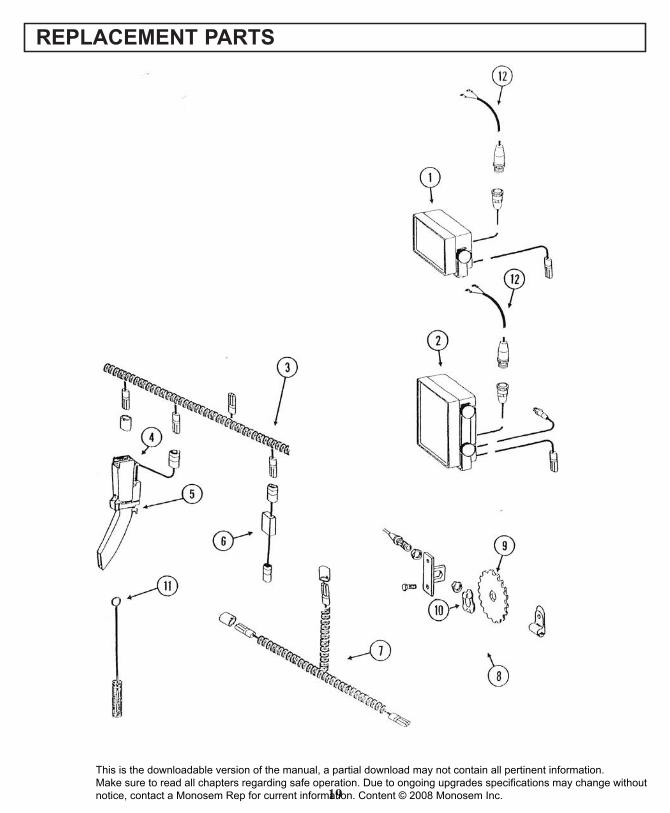
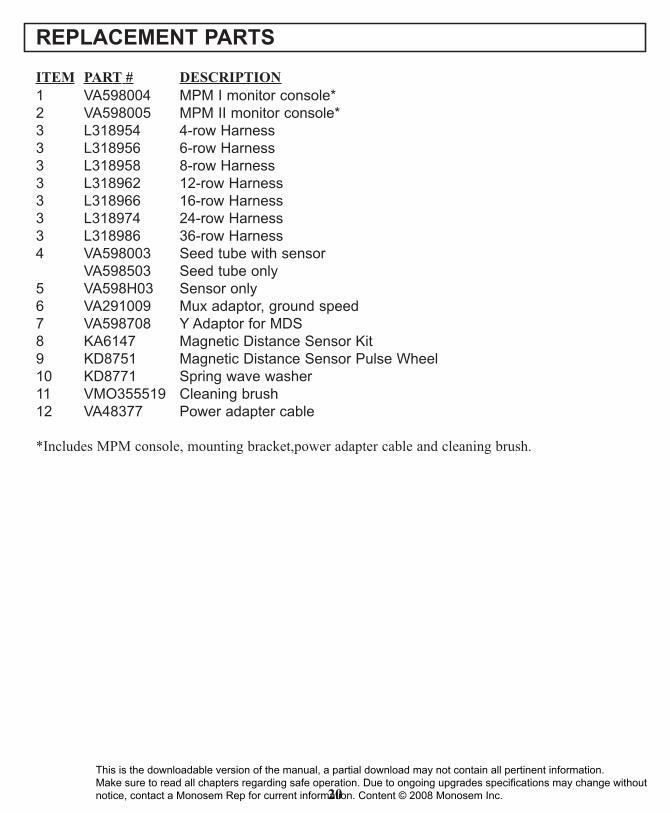
ITEM PART # DESCRIPTION1 VA598004 MPM I monitor console*2 VA598005 MPM II monitor console*3 L318954 4-row Harness3 L318956 6-row Harness3 L318958 8-row Harness3 L318962 12-row Harness3 L318966 16-row Harness3 L318974 24-row Harness3 L318986 36-row Harness4 VA598003 Seed tube with sensor
VA598503 Seed tube only5 VA598H03 Sensor only6 VA291009 Mux adaptor, ground speed7 VA598708 Y Adaptor for MDS8 KA6147 Magnetic Distance Sensor Kit9 KD8751 Magnetic Distance Sensor Pulse Wheel10 KD8771 Spring wave washer11 VMO355519 Cleaning brush12 VA48377 Power adapter cable
*Includes MPM console, mounting bracket,power adapter cable and cleaning brush.
This is the downloadable version of the manual, a partial download may not contain all pertinent information. Make sure to read all chapters regarding safe operation. Due to ongoing upgrades specifications may change without notice, contact a Monosem Rep for current information. Content © 2008 Monosem Inc.

17135 W. 116th St. Lenexa, KS 66219Phone (913) 438-1700 Fax (913) 438-5455www.monosemplt.com
Inc.
30 Years of Research and Innovation in every planter.
Precision Planting Counts.
This is the downloadable version of the manual, a partial download may not contain all pertinent information. Make sure to read all chapters regarding safe operation. Due to ongoing upgrades specifications may change without notice, contact a Monosem Rep for current information. Content © 2008 Monosem Inc.


