
Netzsch DSC Training Notebook
Lab Manager: Dr. Perry CheungMSE Fee-For-Service Facility
Materials Science and EngineeringUniversity of California, Riverside
November 1, 2018 (rev. 1.2)1

Before you begin… Receive a user name and temporary password for Faces scheduling Identify your ENGR username and Password from Systems
If you don’t have an ENGR account, send me the following: Full name
Principal Investigator (PI)
UCR Net ID
Coordinate a time with the lab manager for training
Schedule a 2 hour block on Faces for your training
2
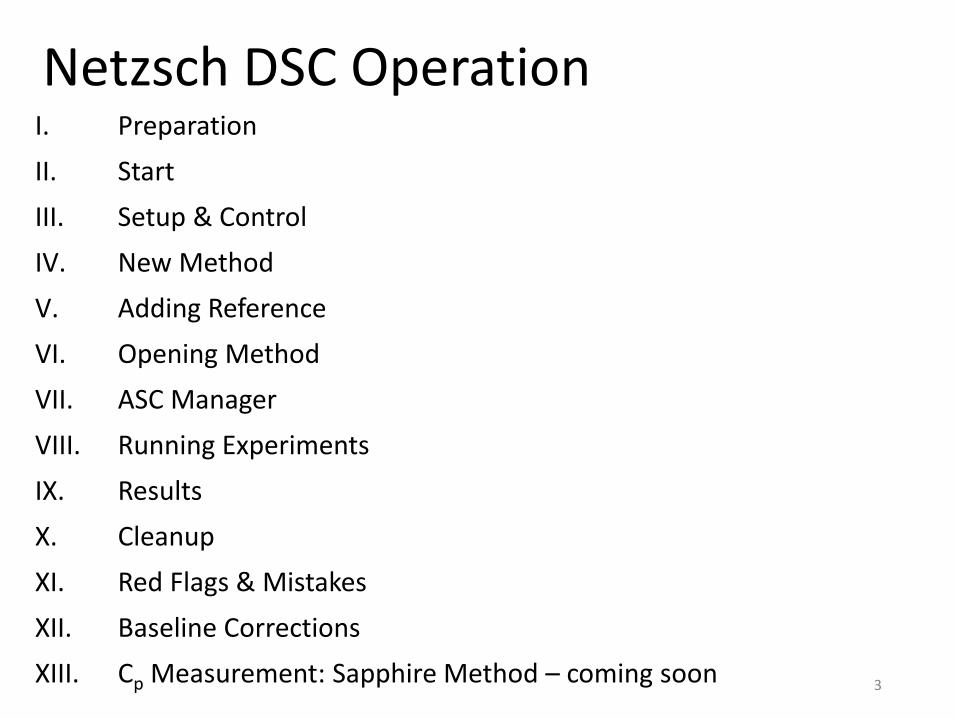
Netzsch DSC OperationI. PreparationII. StartIII. Setup & ControlIV. New MethodV. Adding ReferenceVI. Opening MethodVII. ASC ManagerVIII. Running ExperimentsIX. ResultsX. CleanupXI. Red Flags & MistakesXII. Baseline CorrectionsXIII. Cp Measurement: Sapphire Method – coming soon 3

I. Preparation – 1/31. Prior to running a DSC test, it is important to perform the following checks to
plan for an efficient run and avoid damage to DSCI. Acceptable Calibrated Pans
a) Aluminum Concavus Pans with pierced lid – 5 mm diameter, 30/40 µL
II. Acceptable Calibrated Gas environmentsa) 100% Nitrogen = Purge 2: N2 60 mL/min + Protection: N2 40 mL/minb) Air (80% Nitrogen + 20% Oxygen) = Purge 1: Air 20 mL/min + Protection: N2 20 mL/min
III. Acceptable Calibrated Heating Ratesa) Nitrogen: 5 K/min, 10 K/min, 20 K/min, 30 K/min, <see Lab Manager for different rates>b) Air: 2.5 K/min, 20 K/min <see Lab Manager for different rates>
2. Sign in on the Sign-In Sheet
3. Prepare your Reference Sample and Samples using the Sealing Press
4
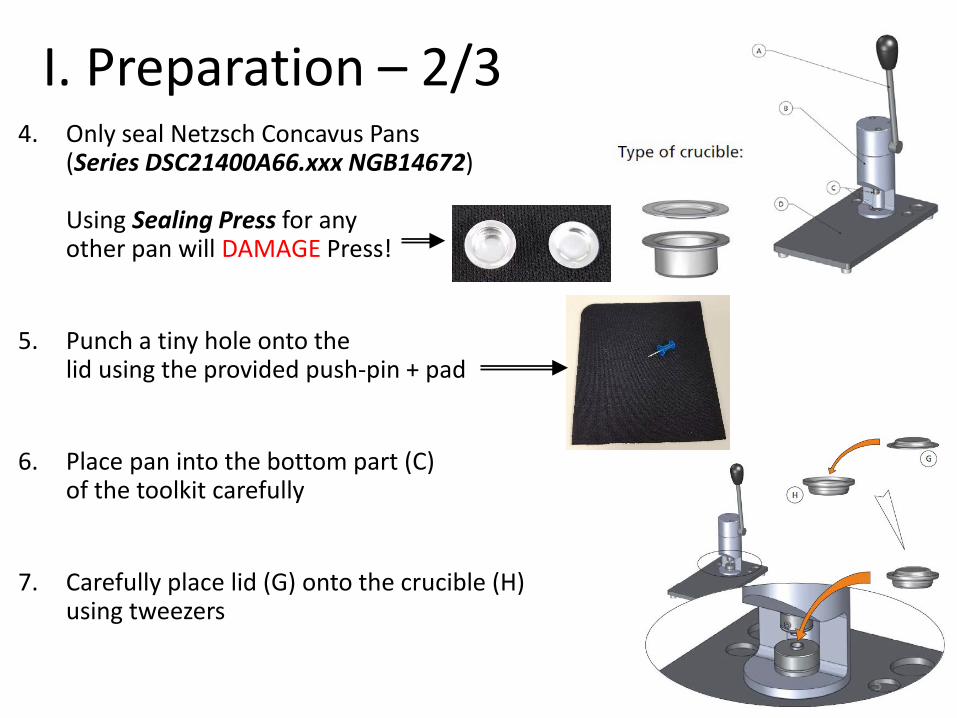
I. Preparation – 2/34. Only seal Netzsch Concavus Pans
(Series DSC21400A66.xxx NGB14672)
Using Sealing Press for any other pan will DAMAGE Press!
5. Punch a tiny hole onto the lid using the provided push-pin + pad
6. Place pan into the bottom part (C)of the toolkit carefully
7. Carefully place lid (G) onto the crucible (H) using tweezers
5
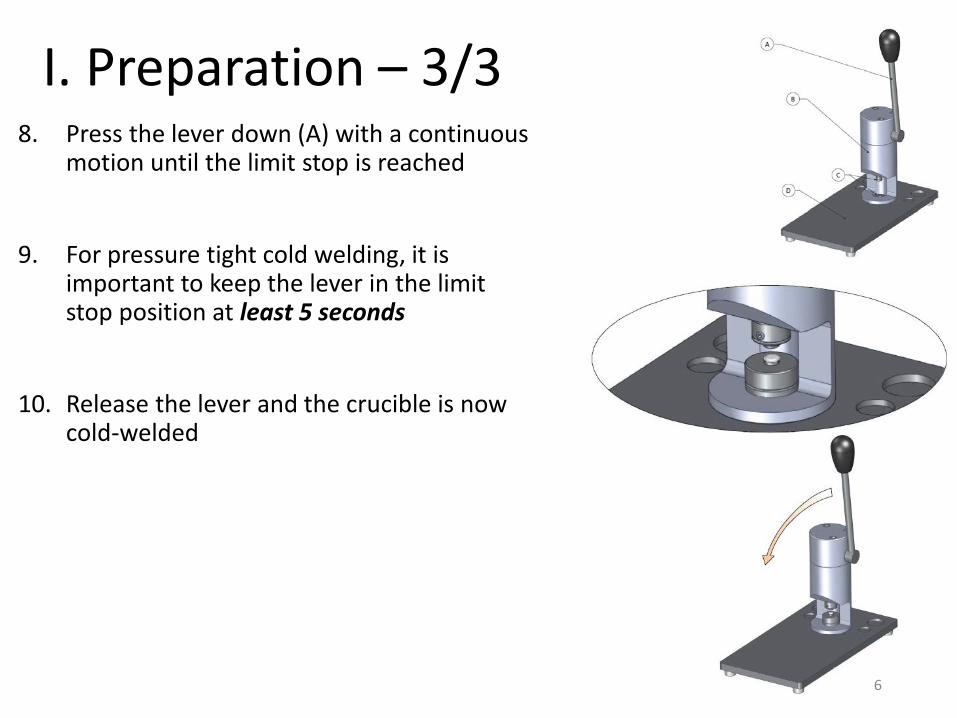
I. Preparation – 3/38. Press the lever down (A) with a continuous
motion until the limit stop is reached
9. For pressure tight cold welding, it is important to keep the lever in the limitstop position at least 5 seconds
10. Release the lever and the crucible is now cold-welded
6
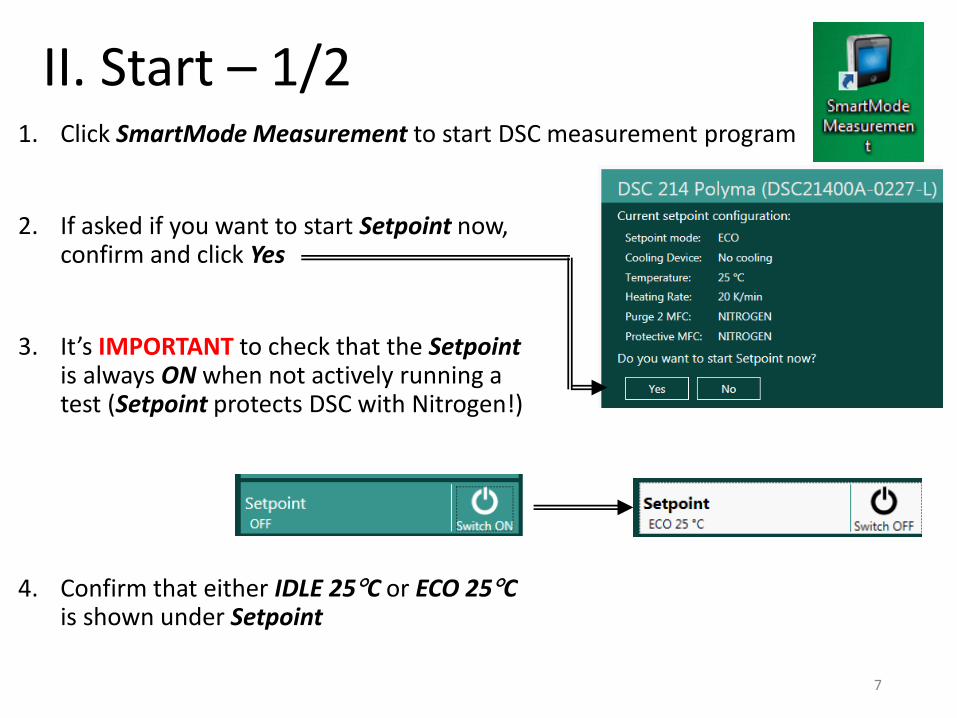
II. Start – 1/21. Click SmartMode Measurement to start DSC measurement program
2. If asked if you want to start Setpoint now, confirm and click Yes
3. It’s IMPORTANT to check that the Setpointis always ON when not actively running a test (Setpoint protects DSC with Nitrogen!)
4. Confirm that either IDLE 25°C or ECO 25°C is shown under Setpoint
7

5. Click on Setpoint
6. Confirm that the following settings for Idle mode and Eco mode match what is shown on the right
7. If they values are the same,proceed to III. Setup & Control
8. If the values are different, proceed to change them back to what is shown on the right and click Apply
II. Start – 2/2
8
10
Settings are for DSC only!

III. Setup & Control – 1/41. Click on Setup & Control
2. Click on Signals to activate the pop-up window showing the Temperature and Gas Flow signals
3. Click on the Back button to return to main menu
4. Click on ASC Manual Controlto bring up the menu to control the Auto Sample Controller
9

4. Review the different commands available below
10
• Insert sample from position: Select sample from position in dropdown to insert into furnace
• Clear the “Sample In” flag:ONLY use this if there is NOsample in furnace, to correct this “error”
• Remove sample from the furnace: Use this to remove the current sample from the furnace and place back into original sample position
Condition: No sample in the furnace
Condition: Sample in the furnace
III. Setup & Control – 2/4
10

4. Review the different commands available below
11
• Insert reference from position: Select reference from position in dropdown to insert into furnace
• Clear the “Reference In” flag: ONLY use this if there is NO sample in furnace, to correct this “error”
• Remove reference from the furnace: Use this to remove the current reference from the furnace and place back into original reference position
Condition: No reference in the furnace
Condition: Reference in the furnace
III. Setup & Control – 3/4
11

III. Setup & Control – 4/44. Review the different commands available below
12
• Open the furnace: Click to open the furnace
• Close the furnace: Click to close the furnace
Condition: Furnace is closed
Condition: Furnace is open

IV. New Method – 1/91. Click on New next to User Methods
2. Confirm settings below are accurate or acceptable:3. Crucible = Concavus Pan Al,
pierced lid (… 610°C)
4. Automatic cooling = ON
5. O.I.T. = OFF(unless Oxidative Induction Time test is desired)
6. Click Modify start criteria
13
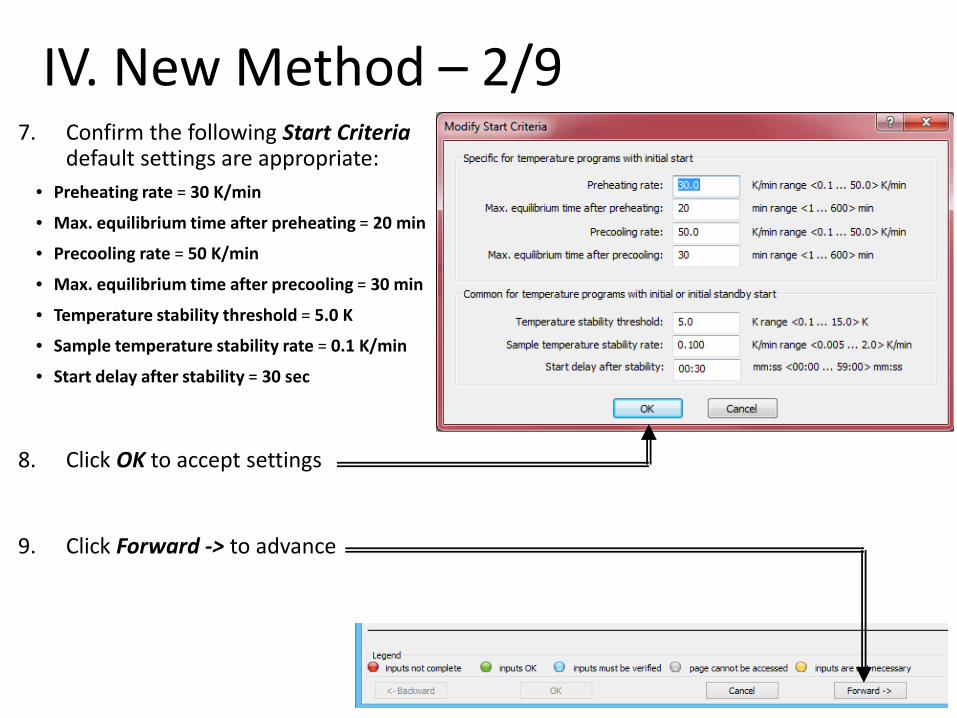
IV. New Method – 2/97. Confirm the following Start Criteria
default settings are appropriate:• Preheating rate = 30 K/min
• Max. equilibrium time after preheating = 20 min
• Precooling rate = 50 K/min
• Max. equilibrium time after precooling = 30 min
• Temperature stability threshold = 5.0 K
• Sample temperature stability rate = 0.1 K/min
• Start delay after stability = 30 sec
8. Click OK to accept settings
9. Click Forward -> to advance
14
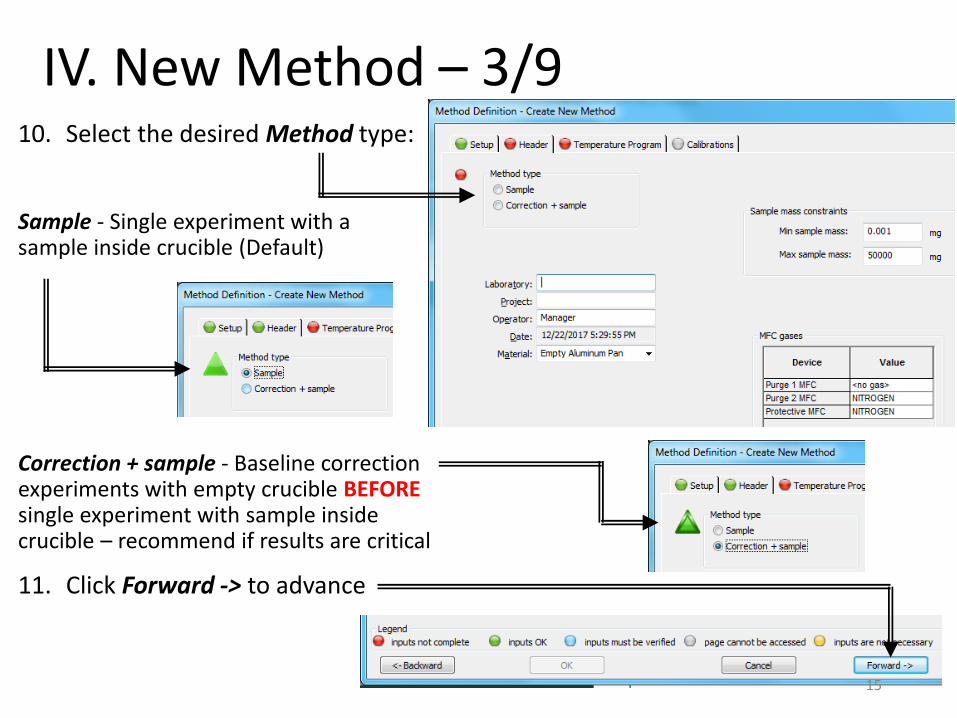
IV. New Method – 3/910. Select the desired Method type:
Sample - Single experiment with a sample inside crucible (Default)
Correction + sample - Baseline correction experiments with empty crucible BEFOREsingle experiment with sample inside crucible – recommend if results are critical
11. Click Forward -> to advance
15
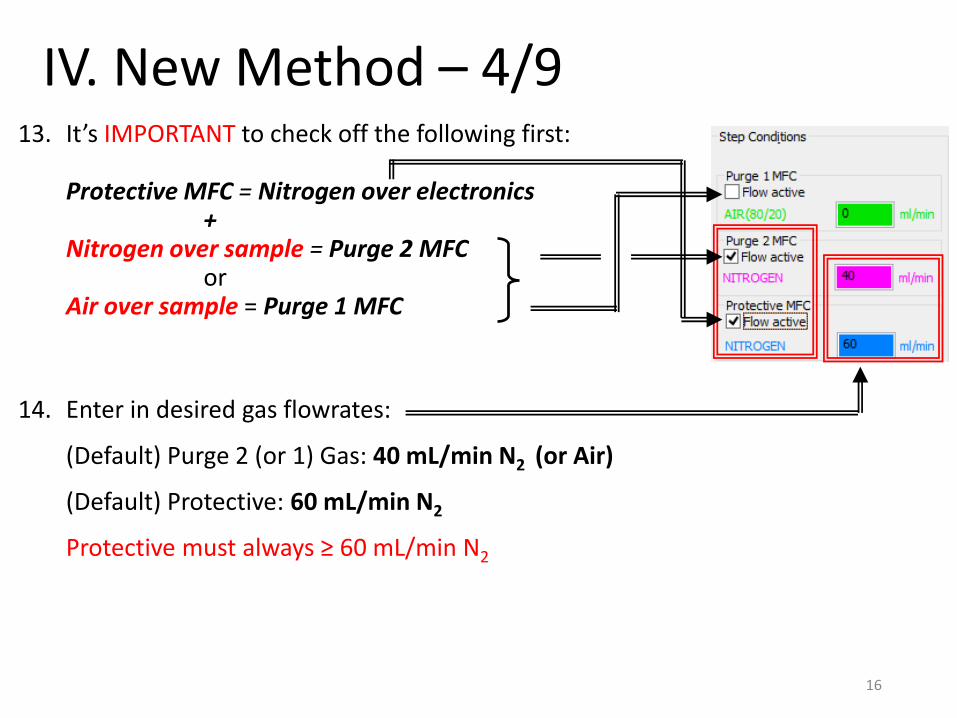
IV. New Method – 4/913. It’s IMPORTANT to check off the following first:
Protective MFC = Nitrogen over electronics+
Nitrogen over sample = Purge 2 MFC or
Air over sample = Purge 1 MFC
14. Enter in desired gas flowrates:
(Default) Purge 2 (or 1) Gas: 40 mL/min N2 (or Air)
(Default) Protective: 60 mL/min N2
Protective must always ≥ 60 mL/min N2
16

15. Build Temperature Program with desired Step Categories
For NEW USERS AND TRAINING PURPOSES ONLY!
Go ahead and create the new method below with the following temperature profile
16. Select desired Step Categories and click Add
IV. New Method – 5/9Te
mpe
ratu
re (°
C)
Time (min)
30 °C
150 °C
30 °C
2 min
30 °C/min 30 °C/min
4 min 4 min
17

17. Add Initial stepa) Input Start temperature
Recommended temp = 25 – 30°C
18. Add Dynamic stepa) Input End temperature
b) Input Heating Rate or Cooling RateNote: Heating Rate MUST be equal to calibrated rates
c) Input Acquisition rate (default values will be automatically inserted)
19. Add Isothermal stepa) Input Isothermal time
b) Input Acquisition rate(default values will be automatically inserted)
IV. New Method – 6/9
18

20. Add Final step (Auto filled)a) Input Emergency Reset Temp
(default values will be automatically inserted)
NOTE: DO NOT ENTER 60, JUST LET IT AUTO FILL!
21. Your desired Temperature Program details can be reviewed in table
IV. New Method – 7/9
Type of Step Temp Heat/Cooling Rate Time for Step Acquisition Rate
Purge 2 N2Gas Flowrate
Protective Gas Flowrate
Air Purge Gas Flowrate
19
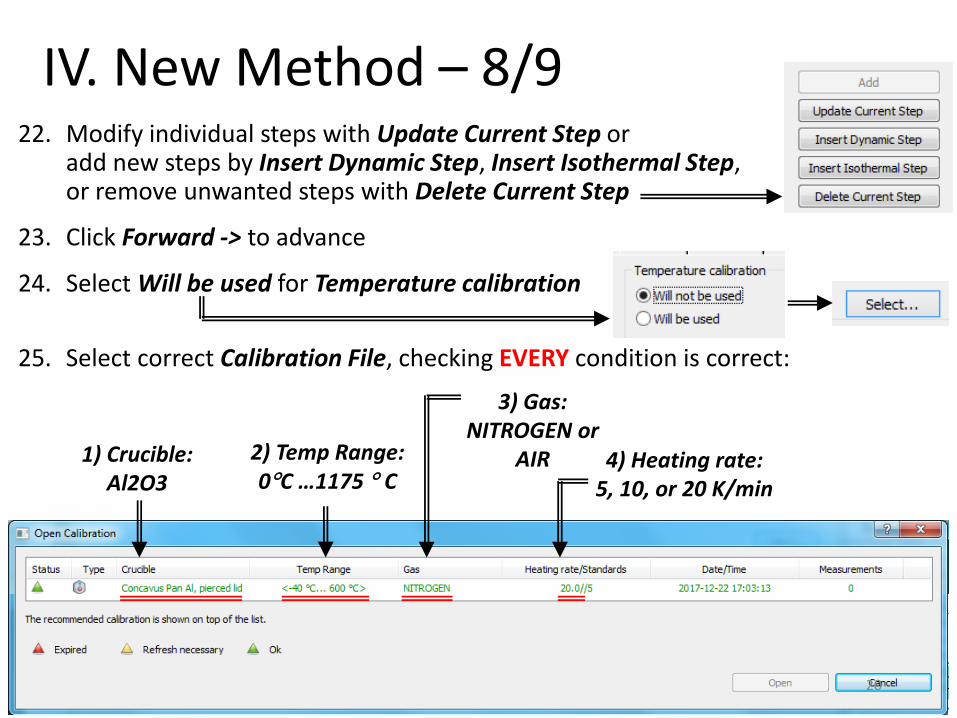
22. Modify individual steps with Update Current Step oradd new steps by Insert Dynamic Step, Insert Isothermal Step, or remove unwanted steps with Delete Current Step
23. Click Forward -> to advance
24. Select Will be used for Temperature calibration
25. Select correct Calibration File, checking EVERY condition is correct:
IV. New Method – 8/9
1) Crucible:Al2O3
3) Gas: NITROGEN or
AIR 4) Heating rate:5, 10, or 20 K/min
2) Temp Range: 0°C …1175 ° C
20

26. Repeat for Heat flow,Tau-R, and BeFlat calibration
27. Click Forward -> to advance
28. Click Save As… to save Method into desired folder under Methods
29. Create a New Folder withyour user name if youare a new user
30. Click Save
IV. New Method – 9/9
21
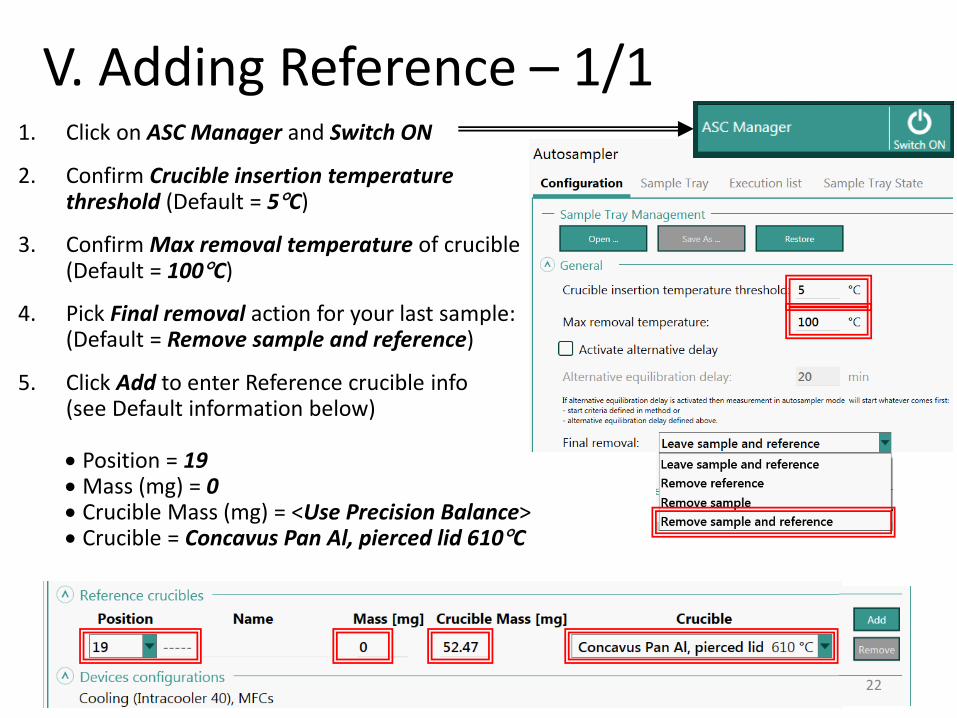
1. Click on ASC Manager and Switch ON
2. Confirm Crucible insertion temperature threshold (Default = 5°C)
3. Confirm Max removal temperature of crucible (Default = 100°C)
4. Pick Final removal action for your last sample:(Default = Remove sample and reference)
5. Click Add to enter Reference crucible info (see Default information below)
• Position = 19• Mass (mg) = 0• Crucible Mass (mg) = <Use Precision Balance>• Crucible = Concavus Pan Al, pierced lid 610°C
V. Adding Reference – 1/1
22

1. Click User Methods if desired method already exists
2. Select desired method under Methods Folder:C:\Netzsch\Proteus70\Methods\”PI NAME”\”YOUR FOLDER”
3. Enter Required Information such as:
Sample IDSample NameFile Name
4. Enter Operator Name with your User Name for reference
5. Click on Folder Icon to store data in your designated folder (IMPORTANT)
6. Choose your PI Name and User Data Folderby clicking on “data”
or create New Folderand enter PI Name and Username
VI. Opening Method – 1/3
23
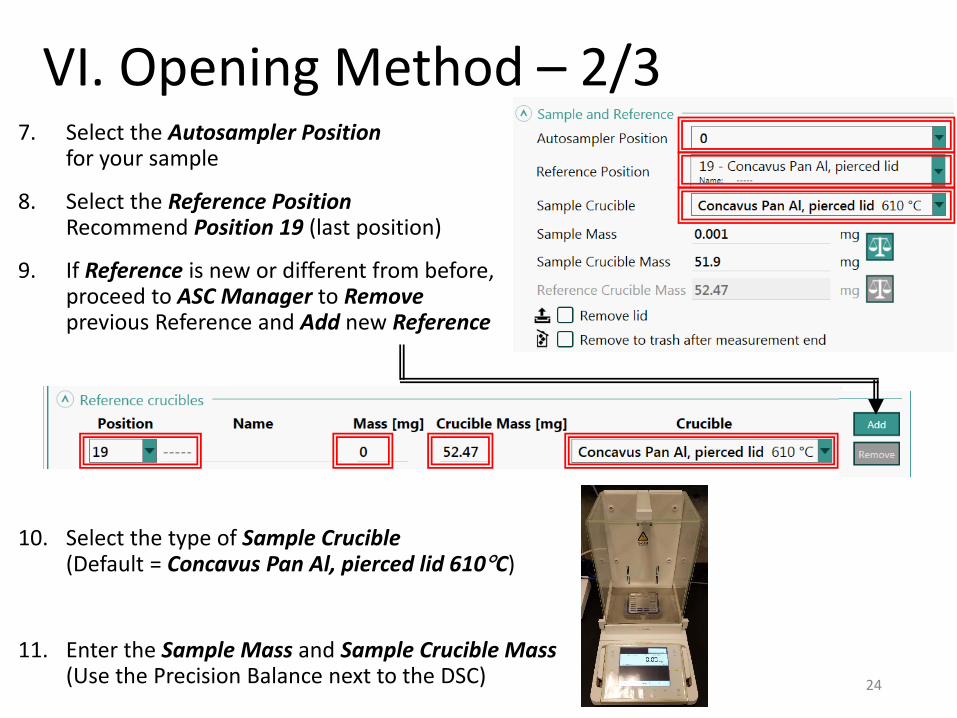
7. Select the Autosampler Positionfor your sample
8. Select the Reference PositionRecommend Position 19 (last position)
9. If Reference is new or different from before, proceed to ASC Manager to Removeprevious Reference and Add new Reference
10. Select the type of Sample Crucible(Default = Concavus Pan Al, pierced lid 610°C)
11. Enter the Sample Mass and Sample Crucible Mass(Use the Precision Balance next to the DSC)
VI. Opening Method – 2/3
24
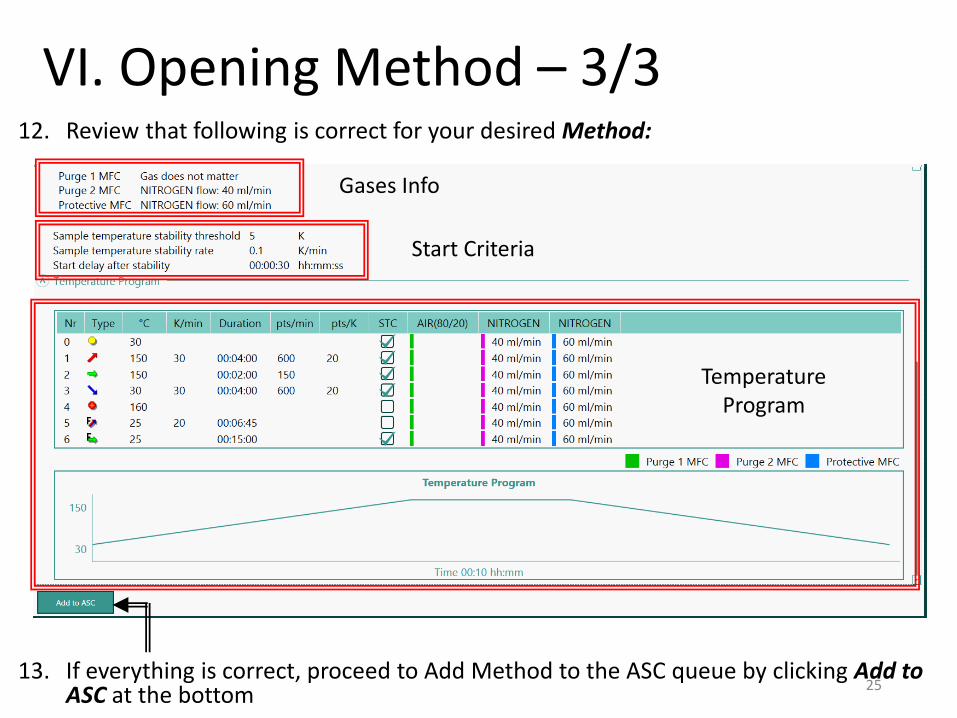
12. Review that following is correct for your desired Method:
13. If everything is correct, proceed to Add Method to the ASC queue by clicking Add to ASC at the bottom
Gases Info
Start Criteria
Temperature Program
VI. Opening Method – 3/3
25

1. Click on ASC Manager and Switch ON if not already ON
2. Click on Sample Tray tab under ASC Manager to review the Positions and status
3. Click on Execution list tab to review the order of experiments scheduled
4. Click Sample Tray State to review details of experiments scheduled
VII. ASC Manager – 1/1
Defined
Done
Done (analysis failed)
Failed
Measurement Active
Reference
26

1. Review ASC Manager settings and confirm all is correct
2. Click Start when ready
3. Proceed to review the notes described here. IMPORTANT!
4. Check if the conditions of the furnace are correct BEFORE proceeding
E.g. “Not correct sample in the furnace. Remove it first”
VIII. Running Experiments – 1/3
Things to consider:
• Is the furnace open or closed?
• Is the correct sample in?
• Is the correct reference in?27

5. Correct ALL issues before proceeding using the various buttons on the left
• click to “open” or “close” furnace to check what is inside…
• click ONLY IF there is NO sample in the furnace
• click ONLY IF there is NO reference in the furnace
• click to “remove” the current sample
• click to “remove” the current reference
6. After all flags and conditions are corrected, click OK to begin experiments
7. Follow any instructions or additional prompts that may appear
VIII. Running Experiments – 2/3
28
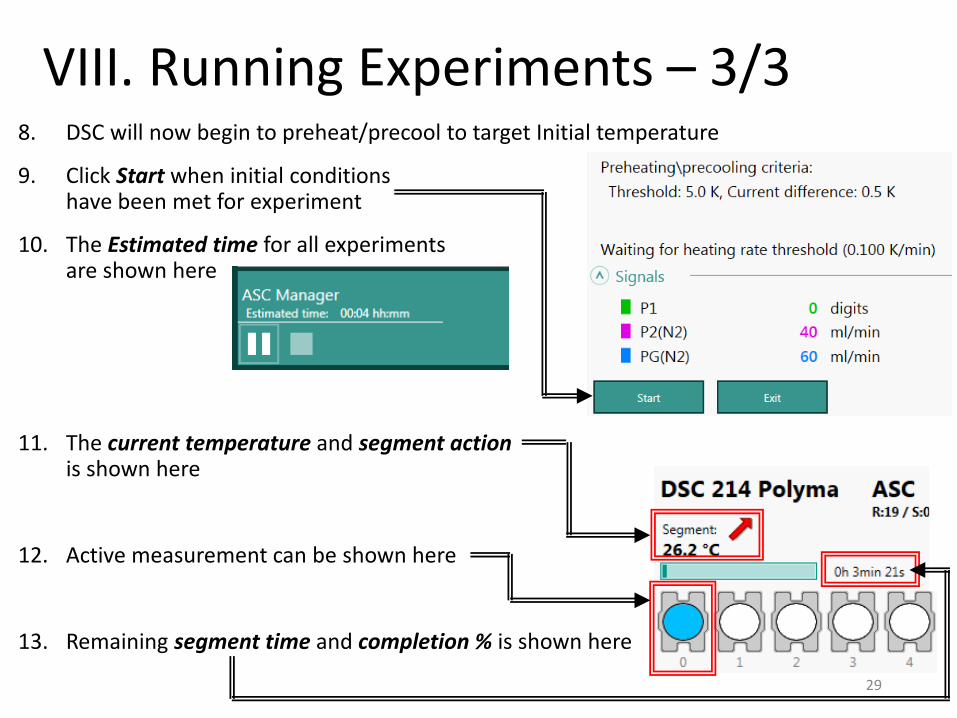
8. DSC will now begin to preheat/precool to target Initial temperature
9. Click Start when initial conditions have been met for experiment
10. The Estimated time for all experiments are shown here
11. The current temperature and segment actionis shown here
12. Active measurement can be shown here
13. Remaining segment time and completion % is shown here
VIII. Running Experiments – 3/3
29
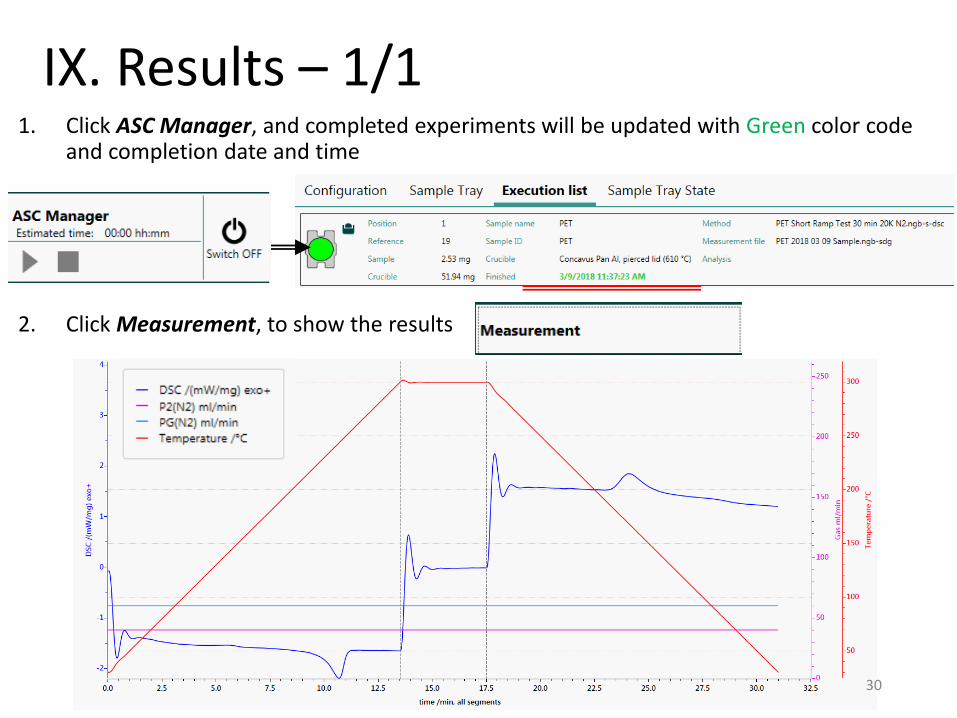
1. Click ASC Manager, and completed experiments will be updated with Green color code and completion date and time
2. Click Measurement, to show the results
IX. Results – 1/1
30
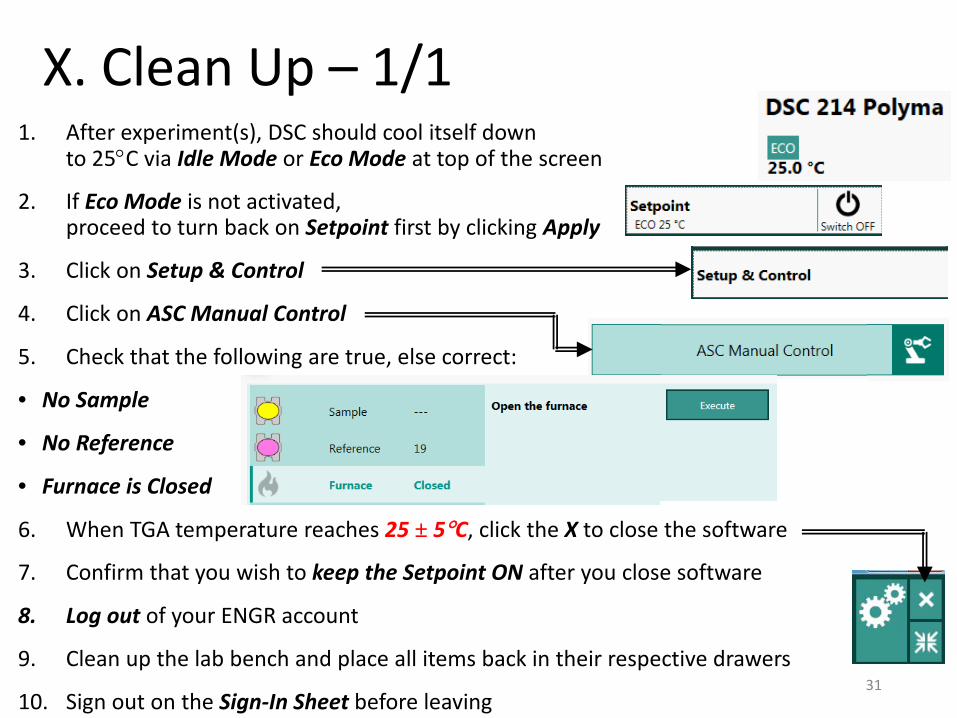
1. After experiment(s), DSC should cool itself down to 25°C via Idle Mode or Eco Mode at top of the screen
2. If Eco Mode is not activated, proceed to turn back on Setpoint first by clicking Apply
3. Click on Setup & Control
4. Click on ASC Manual Control
5. Check that the following are true, else correct:
• No Sample
• No Reference
• Furnace is Closed
6. When TGA temperature reaches 25 ± 5°C, click the X to close the software
7. Confirm that you wish to keep the Setpoint ON after you close software
8. Log out of your ENGR account
9. Clean up the lab bench and place all items back in their respective drawers
10. Sign out on the Sign-In Sheet before leaving
X. Clean Up – 1/1
31
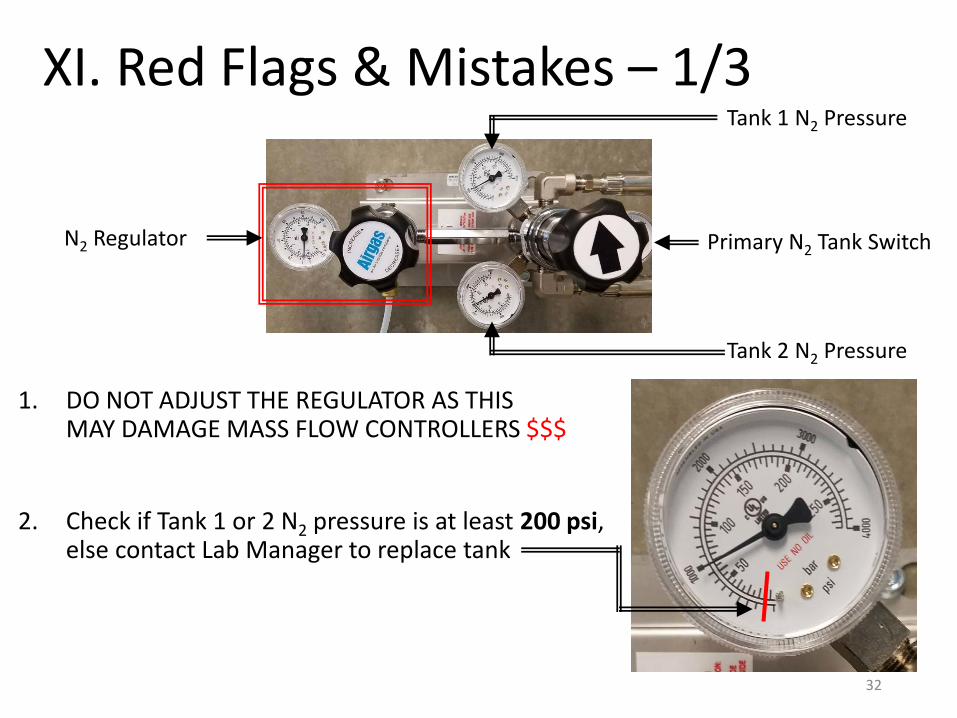
1. DO NOT ADJUST THE REGULATOR AS THIS MAY DAMAGE MASS FLOW CONTROLLERS $$$
2. Check if Tank 1 or 2 N2 pressure is at least 200 psi, else contact Lab Manager to replace tank
XI. Red Flags & Mistakes – 1/3Tank 1 N2 Pressure
Tank 2 N2 Pressure
Primary N2 Tank SwitchN2 Regulator
32
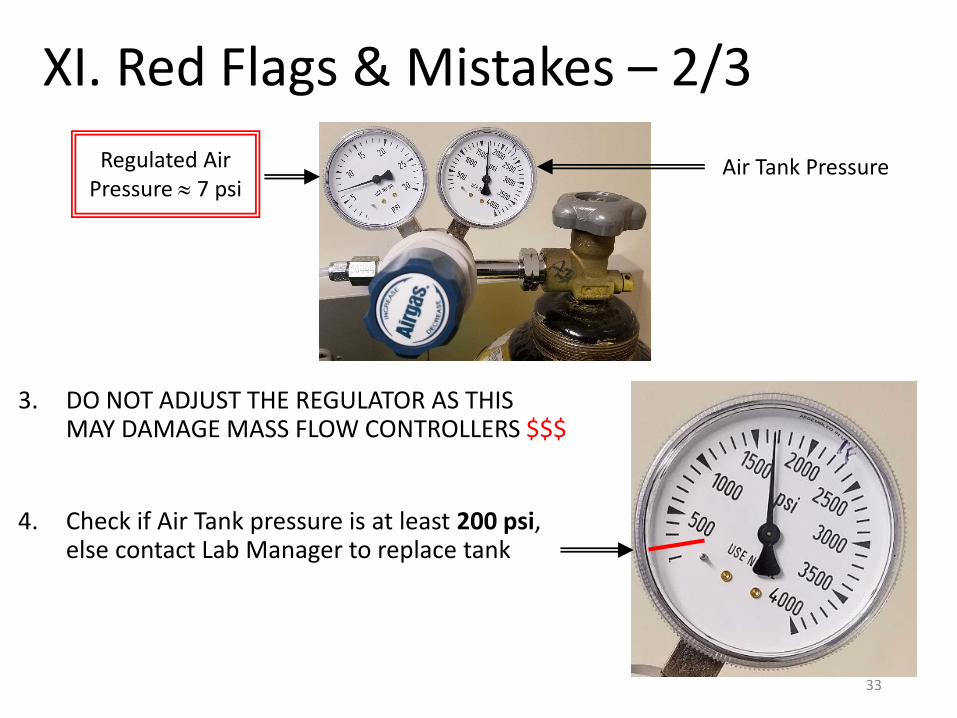
3. DO NOT ADJUST THE REGULATOR AS THIS MAY DAMAGE MASS FLOW CONTROLLERS $$$
4. Check if Air Tank pressure is at least 200 psi, else contact Lab Manager to replace tank
XI. Red Flags & Mistakes – 2/3Air Tank PressureRegulated Air
Pressure ≈ 7 psi
33

5. Remove any trace of sample on outside and underneath crucible, as it will contaminate the DSC sample chamber $$$
6. Avoid over-filling the crucible in case the sample boils and bubbles over contaminating the DSC sample chamber $$$
7. If ASC sample changer makes a noise while switching samples, report to Lab Manager immediately!
XI. Red Flags & Mistakes – 3/3DSC sample
chamber
34

XII. Baseline Corrections – 1/6The following are modifications to perform a baseline correction
1. Click on New next to User Methods
2. Select the Method type = Correction + sample
3. Click Forward -> to advance
4. Complete the same Temperature Program as before…
5. Click Forward -> to advance 35

6. Select the same Temperature , Heat flow, and Tau-R calibrations as before…
7. The TG BeFlat calibration will be missing (that’s OK)Click Forward -> to advance
8. Proceed to Save the file as before…
XII. Baseline Corrections – 2/6
36

9. Click User Methods and select your Correction + sample method
10. You will have to perform a baseline measurement first (unless you have already ran it)
11. Select the position of your Empty Pan
12. Select the position of your Reference Pan
13. Add to ASC at the bottom
XII. Baseline Corrections – 3/6
37

14. Ensure your next measurement is a Baseline measurement
15. Click Start to perform the Baseline measurement…
16. Proceed to review the notes and correct all issues as before… Click OK
XII. Baseline Corrections – 4/6
38

17. Click User Methods again
18. You can now createa File Name for yoursample
19. Notice that Measure baseline + sample is now available
20. The new sample position is also updated to the next positionautomatically
21. Add to ASC at the bottom
XII. Baseline Corrections – 5/6
39

22. Ensure your next measurement is a sample measurement
23. Click Start to perform the sample measurement…
24. Proceed to review the notes and correct all issues as before… Click OK
XII. Baseline Corrections – 6/6
4040
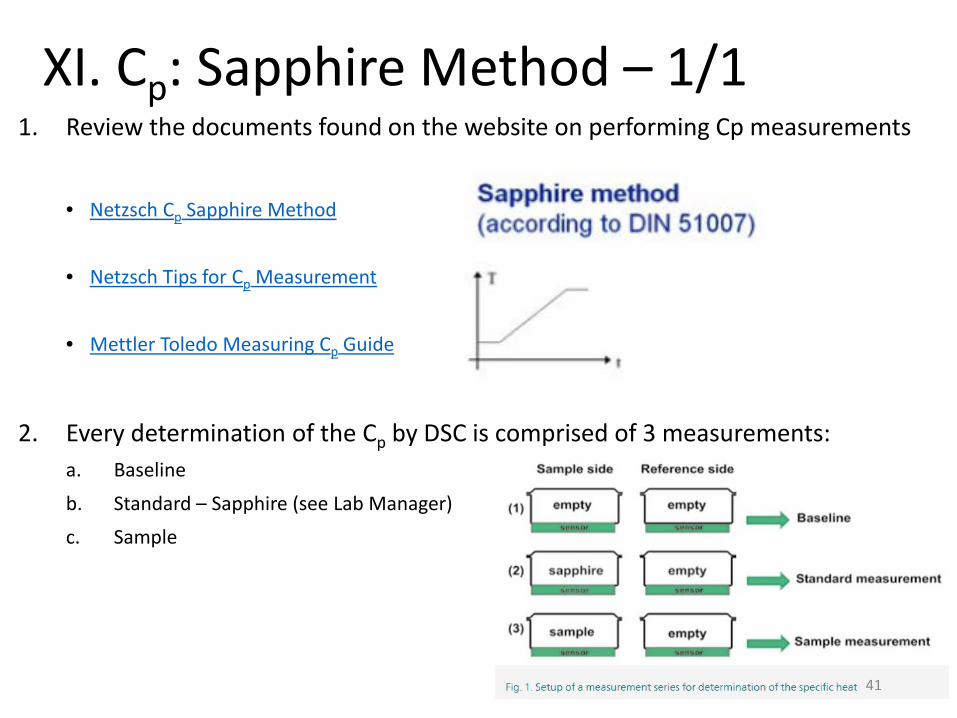
1. Review the documents found on the website on performing Cp measurements
• Netzsch Cp Sapphire Method
• Netzsch Tips for Cp Measurement
• Mettler Toledo Measuring Cp Guide
2. Every determination of the Cp by DSC is comprised of 3 measurements:a. Baseline
b. Standard – Sapphire (see Lab Manager)c. Sample
XI. Cp: Sapphire Method – 1/1
41


