1
No. 4125 (12V/220V only - Euro-Connector) No. 4127 (12V/220V only - GB-Connector)
No. 4129 (12V/110V only – US/Japan-Connector)
Dear Customer, thank you for purchasing this LRP product. Please read these instructions carefully in order to gain maximum performance.
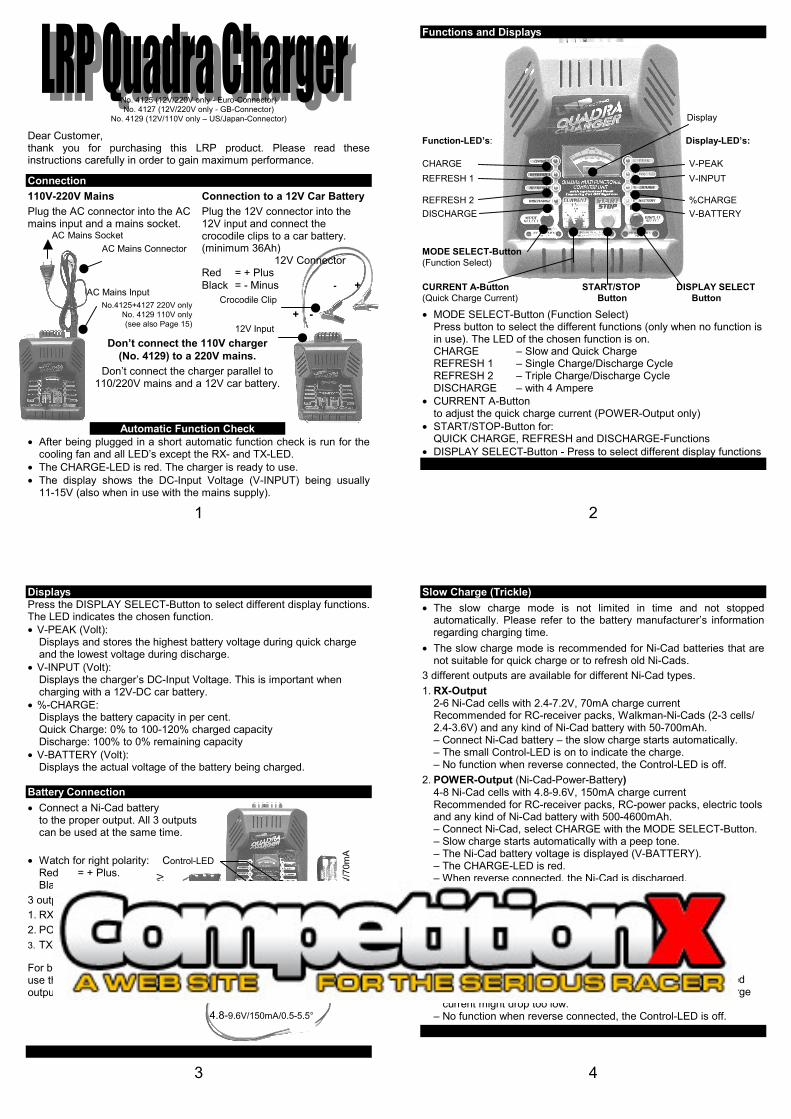
Connection 110V-220V Mains Plug the AC connector into the AC mains input and a mains socket. AC Mains Socket AC Mains Connector AC Mains Input
No.4125+4127 220V only No. 4129 110V only (see also Page 15)
Connection to a 12V Car Battery Plug the 12V connector into the 12V input and connect the crocodile clips to a car battery. (minimum 36Ah) 12V Connector Red = + Plus Black = - Minus - + Crocodile Clip + - 12V Input
Don’t connect the 110V charger (No. 4129) to a 220V mains.
Don’t connect the charger parallel to 110/220V mains and a 12V car battery.
Automatic Function Check • After being plugged in a short automatic function check is run for the
cooling fan and all LED’s except the RX- and TX-LED. • The CHARGE-LED is red. The charger is ready to use. • The display shows the DC-Input Voltage (V-INPUT) being usually
11-15V (also when in use with the mains supply).
2
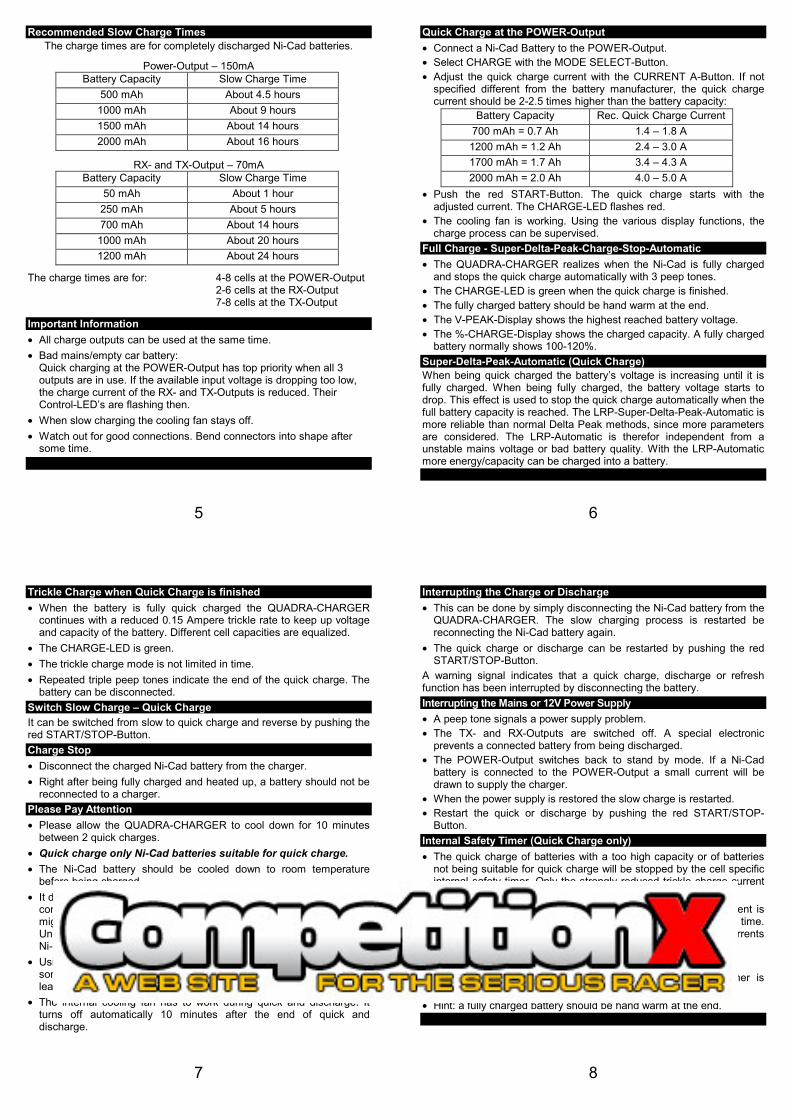
Functions and Displays Display Function-LED’s: Display-LED’s: CHARGE V-PEAK REFRESH 1 V-INPUT REFRESH 2 %CHARGE DISCHARGE V-BATTERY
MODE SELECT-Button (Function Select) CURRENT A-Button START/STOP DISPLAY SELECT (Quick Charge Current) Button Button
• MODE SELECT-Button (Function Select) Press button to select the different functions (only when no function is in use). The LED of the chosen function is on. CHARGE – Slow and Quick Charge REFRESH 1 – Single Charge/Discharge Cycle REFRESH 2 – Triple Charge/Discharge Cycle DISCHARGE – with 4 Ampere
• CURRENT A-Button to adjust the quick charge current (POWER-Output only)
• START/STOP-Button for: QUICK CHARGE, REFRESH and DISCHARGE-Functions
• DISPLAY SELECT-Button - Press to select different display functions
3
2.4-
7.2V
70
mA
8.4-
9.6V
/70m
A
Displays Press the DISPLAY SELECT-Button to select different display functions. The LED indicates the chosen function. • V-PEAK (Volt):
Displays and stores the highest battery voltage during quick charge and the lowest voltage during discharge.
• V-INPUT (Volt): Displays the charger’s DC-Input Voltage. This is important when charging with a 12V-DC car battery.
• %-CHARGE: Displays the battery capacity in per cent. Quick Charge: 0% to 100-120% charged capacity Discharge: 100% to 0% remaining capacity
• V-BATTERY (Volt): Displays the actual voltage of the battery being charged.
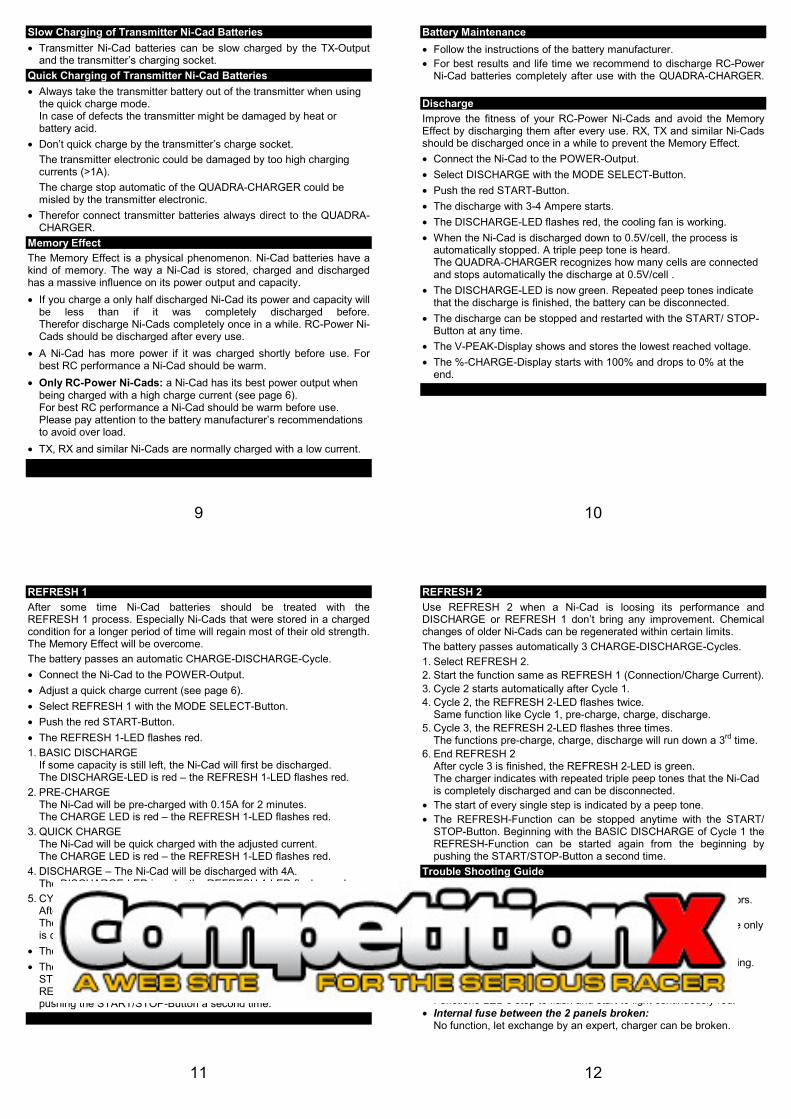
Battery Connection •
Connect a Ni-Cad battery to the proper output. All 3 outputs can be used at the same time.
• Watch for right polarity: Control-LED Red = + Plus. Black = - Minus
3 outputs are available: 1. RX-Output 2. POWER-Output RX-Output - + - + 3. TX-Output POWER-Output - + TX-Output
For best results use the proper output (see pages 4/5).
4.8-9.6V/150mA/0.5-5.5°
4
Slow Charge (Trickle) • The slow charge mode is not limited in time and not stopped
automatically. Please refer to the battery manufacturer’s information regarding charging time.
• The slow charge mode is recommended for Ni-Cad batteries that are not suitable for quick charge or to refresh old Ni-Cads.
3 different outputs are available for different Ni-Cad types. 1. RX-Output
2-6 Ni-Cad cells with 2.4-7.2V, 70mA charge current Recommended for RC-receiver packs, Walkman-Ni-Cads (2-3 cells/ 2.4-3.6V) and any kind of Ni-Cad battery with 50-700mAh. – Connect Ni-Cad battery – the slow charge starts automatically. – The small Control-LED is on to indicate the charge. – No function when reverse connected, the Control-LED is off.
2. POWER-Output (Ni-Cad-Power-Battery) 4-8 Ni-Cad cells with 4.8-9.6V, 150mA charge current Recommended for RC-receiver packs, RC-power packs, electric tools and any kind of Ni-Cad battery with 500-4600mAh. – Connect Ni-Cad, select CHARGE with the MODE SELECT-Button. – Slow charge starts automatically with a peep tone. – The Ni-Cad battery voltage is displayed (V-BATTERY). – The CHARGE-LED is red. – When reverse connected, the Ni-Cad is discharged.
3. TX—Output 7-8 Ni-Cad cells with 8.4-9.6V, 70mA charge current Recommended for RC-transmitter packs and any kind of Ni-Cad battery with 500-1100mAh. – Connect Ni-Cad battery – the slow charge starts automatically. – The small Control-LED is on to indicate the charge. – The TX-Output is mainly for the use with the mains supply. – When used with a 12V car battery be sure that it is fully charged to have a as high as possible input voltage. Otherwise the charge current might drop too low. – No function when reverse connected, the Control-LED is off.
5
Recommended Slow Charge Times The charge times are for completely discharged Ni-Cad batteries.
Power-Output – 150mA Battery Capacity Slow Charge Time
500 mAh About 4.5 hours 1000 mAh About 9 hours 1500 mAh About 14 hours 2000 mAh About 16 hours
RX- and TX-Output – 70mA Battery Capacity Slow Charge Time
50 mAh About 1 hour 250 mAh About 5 hours 700 mAh About 14 hours 1000 mAh About 20 hours 1200 mAh About 24 hours
The charge times are for: 4-8 cells at the POWER-Output 2-6 cells at the RX-Output 7-8 cells at the TX-Output
Important Information • All charge outputs can be used at the same time. • Bad mains/empty car battery:
Quick charging at the POWER-Output has top priority when all 3 outputs are in use. If the available input voltage is dropping too low, the charge current of the RX- and TX-Outputs is reduced. Their Control-LED’s are flashing then.
• When slow charging the cooling fan stays off. • Watch out for good connections. Bend connectors into shape after
some time.
6
Quick Charge at the POWER-Output • Connect a Ni-Cad Battery to the POWER-Output. • Select CHARGE with the MODE SELECT-Button. • Adjust the quick charge current with the CURRENT A-Button. If not
specified different from the battery manufacturer, the quick charge current should be 2-2.5 times higher than the battery capacity:
Battery Capacity Rec. Quick Charge Current 700 mAh = 0.7 Ah 1.4 – 1.8 A 1200 mAh = 1.2 Ah 2.4 – 3.0 A 1700 mAh = 1.7 Ah 3.4 – 4.3 A 2000 mAh = 2.0 Ah 4.0 – 5.0 A
• Push the red START-Button. The quick charge starts with the adjusted current. The CHARGE-LED flashes red.
• The cooling fan is working. Using the various display functions, the charge process can be supervised.
Full Charge - Super-Delta-Peak-Charge-Stop-Automatic • The QUADRA-CHARGER realizes when the Ni-Cad is fully charged
and stops the quick charge automatically with 3 peep tones. • The CHARGE-LED is green when the quick charge is finished. • The fully charged battery should be hand warm at the end. • The V-PEAK-Display shows the highest reached battery voltage. • The %-CHARGE-Display shows the charged capacity. A fully charged
battery normally shows 100-120%. Super-Delta-Peak-Automatic (Quick Charge) When being quick charged the battery’s voltage is increasing until it is fully charged. When being fully charged, the battery voltage starts to drop. This effect is used to stop the quick charge automatically when the full battery capacity is reached. The LRP-Super-Delta-Peak-Automatic is more reliable than normal Delta Peak methods, since more parameters are considered. The LRP-Automatic is therefor independent from a unstable mains voltage or bad battery quality. With the LRP-Automatic more energy/capacity can be charged into a battery.
7
Trickle Charge when Quick Charge is finished • When the battery is fully quick charged the QUADRA-CHARGER
continues with a reduced 0.15 Ampere trickle rate to keep up voltage and capacity of the battery. Different cell capacities are equalized.
• The CHARGE-LED is green. • The trickle charge mode is not limited in time. • Repeated triple peep tones indicate the end of the quick charge. The
battery can be disconnected. Switch Slow Charge – Quick Charge It can be switched from slow to quick charge and reverse by pushing the red START/STOP-Button. Charge Stop • Disconnect the charged Ni-Cad battery from the charger. • Right after being fully charged and heated up, a battery should not be
reconnected to a charger. Please Pay Attention • Please allow the QUADRA-CHARGER to cool down for 10 minutes
between 2 quick charges. • Quick charge only Ni-Cad batteries suitable for quick charge. • The Ni-Cad battery should be cooled down to room temperature
before being charged. • It does not matter if the Ni-Cad battery is partly charged already when
connected to the QUADRA-CHARGER. Only the %-CHARGE Display might be misled a little in the beginning. Under all circumstances the QUADRA-CHARGER realizes when the Ni-Cad battery is fully charged and shuts off automatically.
• Using a 12V car battery, its state of charge should be controlled after some time. The voltage shown on the V-INPUT-Display should be at least 11.5V.
• The internal cooling fan has to work during quick and discharge. It turns off automatically 10 minutes after the end of quick and discharge.
8
Interrupting the Charge or Discharge • This can be done by simply disconnecting the Ni-Cad battery from the
QUADRA-CHARGER. The slow charging process is restarted be reconnecting the Ni-Cad battery again.
• The quick charge or discharge can be restarted by pushing the red START/STOP-Button.
A warning signal indicates that a quick charge, discharge or refresh function has been interrupted by disconnecting the battery. Interrupting the Mains or 12V Power Supply • A peep tone signals a power supply problem. • The TX- and RX-Outputs are switched off. A special electronic
prevents a connected battery from being discharged. • The POWER-Output switches back to stand by mode. If a Ni-Cad
battery is connected to the POWER-Output a small current will be drawn to supply the charger.
• When the power supply is restored the slow charge is restarted. • Restart the quick or discharge by pushing the red START/STOP-
Button. Internal Safety Timer (Quick Charge only) • The quick charge of batteries with a too high capacity or of batteries
not being suitable for quick charge will be stopped by the cell specific internal safety timer. Only the strongly reduced trickle charge current will continue.
• The safety timer will also be activated if the quick charge current is adjusted too low. Then the battery will not be fully charged in time. Therefor adjust the recommended quick charge currents (see page 6).
• The CHARGE-LED is red when the safety timer is activated. • Normally the quick charge is finished before the safety timer is
activated, therefor this has absolutely no negative influence. • Hint: a fully charged battery should be hand warm at the end.
9
Slow Charging of Transmitter Ni-Cad Batteries • Transmitter Ni-Cad batteries can be slow charged by the TX-Output
and the transmitter’s charging socket. Quick Charging of Transmitter Ni-Cad Batteries • Always take the transmitter battery out of the transmitter when using
the quick charge mode. In case of defects the transmitter might be damaged by heat or battery acid.
• Don’t quick charge by the transmitter’s charge socket.
The transmitter electronic could be damaged by too high charging currents (>1A).
The charge stop automatic of the QUADRA-CHARGER could be misled by the transmitter electronic.
• Therefor connect transmitter batteries always direct to the QUADRA-CHARGER.
Memory Effect The Memory Effect is a physical phenomenon. Ni-Cad batteries have a kind of memory. The way a Ni-Cad is stored, charged and discharged has a massive influence on its power output and capacity. • If you charge a only half discharged Ni-Cad its power and capacity will
be less than if it was completely discharged before. Therefor discharge Ni-Cads completely once in a while. RC-Power Ni-Cads should be discharged after every use.
• A Ni-Cad has more power if it was charged shortly before use. For best RC performance a Ni-Cad should be warm.
• Only RC-Power Ni-Cads: a Ni-Cad has its best power output when being charged with a high charge current (see page 6). For best RC performance a Ni-Cad should be warm before use. Please pay attention to the battery manufacturer’s recommendations to avoid over load.
• TX, RX and similar Ni-Cads are normally charged with a low current.
10
Battery Maintenance • Follow the instructions of the battery manufacturer. • For best results and life time we recommend to discharge RC-Power
Ni-Cad batteries completely after use with the QUADRA-CHARGER.
Discharge Improve the fitness of your RC-Power Ni-Cads and avoid the Memory Effect by discharging them after every use. RX, TX and similar Ni-Cads should be discharged once in a while to prevent the Memory Effect. • Connect the Ni-Cad to the POWER-Output. • Select DISCHARGE with the MODE SELECT-Button. • Push the red START-Button. • The discharge with 3-4 Ampere starts. • The DISCHARGE-LED flashes red, the cooling fan is working. • When the Ni-Cad is discharged down to 0.5V/cell, the process is
automatically stopped. A triple peep tone is heard. The QUADRA-CHARGER recognizes how many cells are connected and stops automatically the discharge at 0.5V/cell .
• The DISCHARGE-LED is now green. Repeated peep tones indicate that the discharge is finished, the battery can be disconnected.
• The discharge can be stopped and restarted with the START/ STOP-Button at any time.
• The V-PEAK-Display shows and stores the lowest reached voltage. • The %-CHARGE-Display starts with 100% and drops to 0% at the
end.
11
REFRESH 1 After some time Ni-Cad batteries should be treated with the REFRESH 1 process. Especially Ni-Cads that were stored in a charged condition for a longer period of time will regain most of their old strength. The Memory Effect will be overcome. The battery passes an automatic CHARGE-DISCHARGE-Cycle. • Connect the Ni-Cad to the POWER-Output. • Adjust a quick charge current (see page 6). • Select REFRESH 1 with the MODE SELECT-Button. • Push the red START-Button. • The REFRESH 1-LED flashes red. 1. BASIC DISCHARGE
If some capacity is still left, the Ni-Cad will first be discharged. The DISCHARGE-LED is red – the REFRESH 1-LED flashes red.
2. PRE-CHARGE The Ni-Cad will be pre-charged with 0.15A for 2 minutes. The CHARGE LED is red – the REFRESH 1-LED flashes red.
3. QUICK CHARGE The Ni-Cad will be quick charged with the adjusted current. The CHARGE LED is red – the REFRESH 1-LED flashes red.
4. DISCHARGE – The Ni-Cad will be discharged with 4A. The DISCHARGE-LED is red – the REFRESH 1-LED flashes red.
5. CYCLE-END After the complete cycle is finished, the REFRESH 1-LED is green. The charger indicates with repeated triple peep tones that the Ni-Cad is completely discharged and can be disconnected.
• The start of every single step is indicated by a peep tone. • The REFRESH-Function can be stopped anytime with the START/
STOP-Button. Beginning with the BASIC DISCHARGE the REFRESH-Function can be started again from the beginning by pushing the START/STOP-Button a second time.
12
REFRESH 2 Use REFRESH 2 when a Ni-Cad is loosing its performance and DISCHARGE or REFRESH 1 don’t bring any improvement. Chemical changes of older Ni-Cads can be regenerated within certain limits. The battery passes automatically 3 CHARGE-DISCHARGE-Cycles. 1. Select REFRESH 2. 2. Start the function same as REFRESH 1 (Connection/Charge Current). 3. Cycle 2 starts automatically after Cycle 1. 4. Cycle 2, the REFRESH 2-LED flashes twice.
Same function like Cycle 1, pre-charge, charge, discharge. 5. Cycle 3, the REFRESH 2-LED flashes three times.
The functions pre-charge, charge, discharge will run down a 3rd time. 6. End REFRESH 2
After cycle 3 is finished, the REFRESH 2-LED is green. The charger indicates with repeated triple peep tones that the Ni-Cad is completely discharged and can be disconnected.
• The start of every single step is indicated by a peep tone. • The REFRESH-Function can be stopped anytime with the START/
STOP-Button. Beginning with the BASIC DISCHARGE of Cycle 1 the REFRESH-Function can be started again from the beginning by pushing the START/STOP-Button a second time.
Trouble Shooting Guide • Short Circuit at the POWER-Output:
Charger peeps, makes noises – unplug, use only isolated connectors. • Reverse Polarity at the POWER-Output:
No function, the LED’s are not flashing - unplug immediately, use only polarity proof connectors. Displays: V-Battery = 0, V-PEAK = 0, V-Input = 11-15V.
• Mains or 12V supply interrupted: Function-LED’s are not flashing. Displays: V-Battery = 0, %-Charge = 0, V-Input < 10V.
• Temperature Protection activated: Functions-LED’s stop to flash and start to light continuously red.
• Internal fuse between the 2 panels broken: No function, let exchange by an expert, charger can be broken.
13
Technical Data
AC-Input Voltage 200/240V AC 50/60Hz (No. 4125/4127) 105/125V AC 50/60Hz (No. 4129)
Power Input Stand By 3W max. Input 90W
DC-Input Voltage 12V DC (11.5-13.8V) Current Input Max. 6A
Car Battery 12V, min. 36Ah Suitable for Rechargeable Nickel-Cadmium
(Ni-Cad) Batteries Internal Fuse 5 x 20 mm, 6.3 AT
(only use identical type for exchange) Temperature Protection Double Short Circuit Protection Electronic Shut Off Reverse Polarity Protection Electronic Shut Off POWER-Output Voltage 4.8 – 9.6V (4-8 Cells) Suitable Capacities 250 – 5000mAh Slow Charge Current (Trickle) 0.15 Ampere Quick Charge Current 0.5 – 5.5 Ampere Super Pulse Charge Stop Automatic Super-Delta-Peak Security Timer (Quick Charge only)
Protection when charging batteries being not suitable for quick charge (60 minutes)
RX-Output Voltage 2.4 – 7.2V (2-6 Cells) Suitable Capacities 250-1200mAh Slow Charge Current (Trickle) 0.07 Ampere (70mA) TX-Output Voltage 8.4 – 9.6V (7-8 Cells) Suitable Capacities 250-1200mAh Slow Charge Current (Trickle) 0.07 Ampere (70mA)
14
Adjustable Quick Charge Currents
Cells Voltage
(V) Capacity(mAh)
Charge Current
(A) Typical Use
Use only Ni-Cad Batteries 4 4.8 250-3800 0.5-4.0 Rx-/Receiver Pack, Power Pack 5 6.0 250-4200 0.5-4.5 Rx-/Receiver Pack, Power Pack 6 7.2 250-5000 0.5-5.5 Racing-Pack for Cars, Boat 7 8.4 250-4600 0.5-5.0 Racing-Pack for Cars, Boat, Plane 8 9.6 250-2100 0.5-3.0 Tx-/Transmitter Pack, Boat, Plane
If not told different by the battery manufacturer, the quick charge current should be 2-2.5 times higher than the battery capacity (see page 6). Attention • Charge only rechargeable Ni-Cad batteries. Don’t charge any
other battery types. Other battery types might get over charged and damaged.
• Quick charge only Ni-Cad batteries suitable for quick charge. Other batteries might get damaged by quick charge.
• The Ni-Cad should be at room temperature before being charged. • Only charge Ni-Cad batteries with 2-8 cells of the identical type
(manufacturer, capacity, voltage) together in one pack. • In case the complete battery pack or single cells get far too hot, stop
the charging process. •
Make sure that all connections are correct and can handle 6A. • Never charge 2 battery packs parallel. • Follow the instructions of the battery manufacturer. • Due the super pulse charge current, the Ni-Cad battery can make
a buzzing noise when being charged. This is absolutely normal and doesn’t hurt.
15
Safety Instructions • Don’t open the case when connected to a mains – Danger to Life • Not suitable for children under 14 years. • Please allow the QUADRA-CHARGER to cool down for 10 minutes
between 2 quick charges. • For quick charge take batteries out of their device. • Never charge batteries being in devices that are switched on. • Always observe the charging process. • Disconnect the QUADRA-CHARGER from the 110/220/240V mains
or 12V supply when the charging process is finished. Don’t leave the charger connected to the mains or car battery when not observed.
• Don’t bring the QUADRA-CHARGER in touch with water. • Never cover the cooling openings. Allow sufficient air ventilation. Use
the charger only on a hard and temperature resistant surface. Never place the charger on carpets or blankets.
• Use only in a horizontal position. • The cooling fan must work during quick charge and discharge. A
broken or blocked fan leads to defects caused by over temperature. • Connect batteries only to sockets belonging together. Don’t cross
connect any sockets not belonging together. Short circuits cause danger.
• When using a 12V car battery, make sure that the Ni-Cad doesn’t get in electrical contact with metal car parts (motor/bonnet/fender).
• New chargers might smell a little in the first hours of use. Mains Connection (see Product Sticker) 1. QUADRA-CHARGER No. 4125 (Europe) + No. 4127 (GB)
These versions are only suitable for 200-240V mains and 12V. They do not work properly when connected to 110V.
2. QUADRA-CHARGER No. 4129 (USA + Japan) This version is only suitable for 105-125V mains and 12V. Never connect to 220V since over voltage causes danger.
16
Repair and Warranty LRP electronic, Wilhelm-Enssle-Str. 134, D-73630 Remshalden, Germany
Tel: Int+49 - 7181 4098-0, Fax: Int+49 - 7181 4098-30 In case of problems contact your hobby shop or LRP-importer. Hobby shops are not authorized to replace chargers thought to be defective. LRP guarantees this charger to be free from defects for 90 days from the original date of purchase verified by sales receipt. Warranty is only accepted if claimed by the customer and if the original sales receipt is included. Chargers sent in for repair that operate perfectly will be charged with a service fee. Unfortunately we can’t give any cost estimates in advance. This warranty doesn’t cover: suitability for specific operation, incorrect installation, components worn by use, application of reverse or improper voltage, shipping, tampering, misuse like any soldering inside the unit, poor installation, replacing/cutting of wires and connectors, connection to electrical components not mentioned in the instructions, mechanical damage, and immersion of water. Our warranty liability shall be limited to repairing the unit to our original specifications. Because we have no control on the installation or use of this product, in no case shall our liability exceed the original cost of this unit. We can't accept any liability for any damage resulting from using this product. By the act of installing or operating this charger, the user accepts all resulting liability.
In case of repair or warranty claims, please fill out and send in
Name :
Street:
Post Code + City:
Phone:
Problem:
Warranty Claim: ���� Yes ���� No Date of Purchase: __________________________________ Important: Original Sales Receipt has to be included Herewith I appoint LRP electronic or their service agents to repair the enclosed charger. I accept above warranty conditions.
Signature

17


![Campion Trail Sitemap [vertFINAL]...4126 1128 2128 3128 4128 1129 2129 3129 4129 1121 2121 3121 4121 1124 2124 3124 4124 1125 2125 3125 4125 1127 2127 3127 4127 1131 2131 3131 4131](https://cdn.vdocument.in/doc/165x107/5e75793b85027955774ef41f/campion-trail-sitemap-vertfinal-4126-1128-2128-3128-4128-1129-2129-3129-4129.jpg)
![Untitled-2 [suntracbatteries.com]suntracbatteries.com/suntrac.pdf · capacity 12v 20ah 12v 40ah 12v 60ah 12v b40ah 12v b60ah 12v b80ah 12v biooah 12v 80ah 12v iooah 12v 130ah 12v](https://cdn.vdocument.in/doc/165x107/603efb7aa12c32391f5484d1/untitled-2-capacity-12v-20ah-12v-40ah-12v-60ah-12v-b40ah-12v-b60ah-12v-b80ah.jpg)


