Optimised Leucite-reinforced Feldspathic Metal Ceramic
Instructions for Use
2
3 VINTAGE PRO
Indications
Contraindications
Notes on Use
4 Notes
Precautions and Warnings
Storage
5 Physical Properties
Firing Temperature / Firing Degree
6 System Components
7 - 8 Framework Design and Preparation
Design
Preparation
Framework Design for a Porcelain Margin
9 Opaques – General Remarks
Paste Opaque / Powder Opaque
10 Application of the Opaques
Base Opaque
Shade Opaque
11 Layering Systems
Standardised Layering with Opal Porcelains
Customised Layering with Opal Porcelains
Standardised Layering with Incisal Porcelains without Opalescence
12 - 16 Standardised Layering with Opal Porcelains
Opaque Dentin / Body / Opal Translucent / Opal Incisal
Corrections after Firing
2nd Body / Opal Incisal Firing
Contouring and Preparation for Glaze Firing
Glaze Firing / Finishing
17 - 18 Layering of Margin Porcelains
Margin Porcelain – 1st Firing
Margin Porcelain – 2nd Firing
19 Customised Application of the Opaques
Base Opaque
Shade Opaque
20 - 25 Customised Layering with Opal Porcelains
Opaque Dentin / Body / Opal Translucent / Opal Effect / Opal Incisal
Corrections after Firing
2nd Body / Opal Incisal Firing
Contouring and Preparation for Glaze Firing
Glaze Firing / Finishing
26 - 27 Combination Chart
28 Correction Porcelains / Gum Porcelains
Corrections with ADD-ON
Corrections of Margin Porcelain with CPM/CPM Fine
Gum Porcelains
29 Firing Schedule
30 - 31 Troubleshooting
Contents
3
VINTAGE PRO
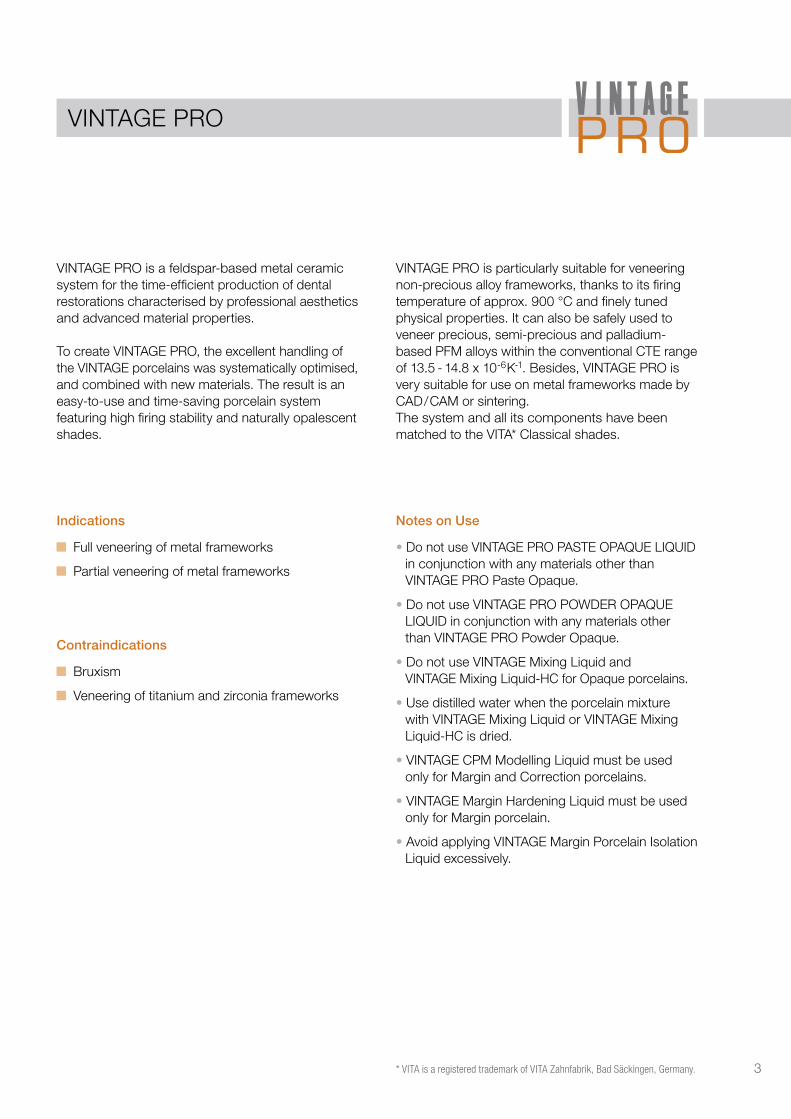
VINTAGE PRO is a feldspar-based metal ceramic system for the time-efficient production of dental restorations characterised by professional aesthetics and advanced material properties.
To create VINTAGE PRO, the excellent handling of the VINTAGE porcelains was systematically optimised, and combined with new materials. The result is an easy-to-use and time-saving porcelain system featuring high firing stability and naturally opalescent shades.
VINTAGE PRO is particularly suitable for veneering non-precious alloy frameworks, thanks to its firing temperature of approx. 900 °C and finely tuned physical properties. It can also be safely used to veneer precious, semi-precious and palladium-based PFM alloys within the conventional CTE range of 13.5 - 14.8 x 10⁻⁶K-1. Besides, VINTAGE PRO is very suitable for use on metal frameworks made by CAD/CAM or sintering.The system and all its components have been matched to the VITA* Classical shades.
Bruxism
Veneering of titanium and zirconia frameworks
* VITA is a registered trademark of VITA Zahnfabrik, Bad Säckingen, Germany.
Full veneering of metal frameworks
Partial veneering of metal frameworks
Indications
Contraindications
• Do not use VINTAGE PRO PASTE OPAQUE LIQUID in conjunction with any materials other than VINTAGE PRO Paste Opaque.
• Do not use VINTAGE PRO POWDER OPAQUE LIQUID in conjunction with any materials other than VINTAGE PRO Powder Opaque.
• Do not use VINTAGE Mixing Liquid and VINTAGE Mixing Liquid-HC for Opaque porcelains.
• Use distilled water when the porcelain mixture with VINTAGE Mixing Liquid or VINTAGE Mixing Liquid-HC is dried.
• VINTAGE CPM Modelling Liquid must be used only for Margin and Correction porcelains.
• VINTAGE Margin Hardening Liquid must be used only for Margin porcelain.
• Avoid applying VINTAGE Margin Porcelain Isolation Liquid excessively.
Notes on Use

4
For VINTAGE PRO porcelains
• If any inflammation or other allergic reactions occur on the operator while using this product, immediately discontinue use and seek medical advice.
• Avoid contact with skin or eyes. In case of accidental contact with eyes, immediately flush the eyes with plenty of water and seek medical advice.
• Use local dust extractor or mask etc, while grinding or polishing this product to avoid harmful influence of dust on the human body.
• Wear protective glasses etc, while grinding or polishing this product to avoid damage to the eyes.
• Tightly close the bottle cap after each use.
• Follow the instructions for use of each dental material, instrument or equipment to be used in conjunction with VINTAGE PRO porcelains.
• Use this product within the expiration date indicated on the package and container. Example:
01:2016-1070673
EN Instructions for use GE Gebrauchsanleitung FR Mode d’emploi NL Gebruiksaanwijzing ES Instrucciones de uso IT Istruzioni per l‘uso
SHOFU DENTAL CORPORATION1225 Stone Drive, San Marcos, California 92078-4059, USA
SHOFU DENTAL ASIA-PACIFIC PTE.LTD.10 Science Park Road, #03-12, The Alpha, Science Park II, Singapore 117684
SHOFU DENTAL TRADING (SHANGHAI) CO.,LTD.No. 645 Jiye Road, Sheshan Industrial Park, Songjiang, Shanghai 201602, China
SHOFU INC.11 Kamitakamatsu-cho, Fukuine, Higashiyama-ku, Kyoto 605-0983, Japanwww.shofu.com
Manufacturer
SHOFU DENTAL GmbHAm Brüll 17, 40878 Ratingen, Germany
EN
ES
DE
IT
FRNL
RU Инструкция по применению PL Instrukcja obsugi RO Instrucţiuni de utilizare SV Bruksanvisning EL Οδηγίες χρήσης PT Instruções de uso
PLRO
RU
SVELPT
VINTAGE PROEN Metal Bond Porcelain
VINTAGE PRO is a metal bond porcelain system indicated for veneering of precious, semi-precious and non-precious alloys as well as palladium-based alloys with a CTE range of 13.5 to 14.8 x 10⁻⁶ K-1. VINTAGE PRO is also suitable for metal frameworks made with CAD / CAM and electroforming / sintering. The shade system includes VITA* classical shades with a variety of effect shades to reproduce a wide range of shade.INDICATIONS FOR USEBuild-up porcelain for the fabrication of metal bonded ceramic restorations.PRECAUTIONS & WARNINGS1. Ifanyinflammationorotherallergicreactionsoccurontheoperatorwhileusingthisproduct,immediatelydiscontinueuse
and seek medical advice.2. Avoidcontactwithskinoreyes.Incaseofaccidentalcontactwitheyes,immediatelyflushtheeyeswithplentyofwater
and seek medical advice.3. Uselocaldustextractorormask,etcwhilegrindingorpolishingthisproducttoavoidharmfulinfluenceofdustonthe
human body.4. Wear protective glasses etc while grinding or polishing this product to avoid damage to eyes. 5. Tightly close the bottle cap after each use. 6. Follow the instructions for use of each dental material, instrument or equipment to be used in conjunction with this product.7. Donotusethisproductforanypurposesotherthanspecificallyoutlinedintheseinstructionsforuse.8. Use this product within the expiration date indicated on the package and container.
(Example YYYY-MM-DD→Year-Month-Dateoftheexpirationdate)9. This product is intended for use by dental professionals only.DIRCTIONS FOR USERefer to the separate user’s manual or detailed instructions for use.
• UseVINTAGEPROinconjunctionwithalloyshavingcoefficientofthermalexpansionof13.5to14.8×10 -6K-1. • Thefiringconditionsmayvaryduetothedifferentdesignsandoperatingvoltagesoftheporcelainfurnaces.Itisessentialtocarryouttestfiringsbeforeusingtheporcelainforactualrestorations.
• ApplythefirstOpaquelayer(wash)inathinlayerandfire.• ThesecondlayerofOpaquemustbeappliedevenlyinasufficientthicknesstomaskthecoloroftheunderlyingmetal
coping. • MixOpaquepastessufficientlywellwithaplasticspatulabeforeuse.• Opaque porcelains must be mixed with dedicated VINTAGE PRO Opaque mixing liquids only. Do not mix with other
VINTAGE mixing liquids.• When Opaque porcelain is applied generously, set longer drying time at the furnace entrance and preheating time in order
to burn the liquid components thoroughly. • Select the powders based on the combination chart and build up the restoration.• TheBodybuild-upshouldbedonetothefinalanatomicalshapeofthetoothinordertoensuretheexactdimensionforthe
Enamel porcelain. • When large amount of porcelain is built up, set longer drying time at the furnace entrance in order to avoid explosion of
the porcelain from the inside resulting from remaining liquid components. • Enamelporcelainshouldbebuiltupslightlyoversizedinconsiderationoffiringshrinkage.• When the area requiring an additional build-up is dry, wet the area with water by using a brush. • Use distilled water or VINTAGE MARGIN HARDENING LIQUID for Margin porcelains. • Use distilled water or VINTAGE CPM MODELLING LIQUID for ADD-ON porcelains; ADD-ON B and ADD-ON T. Do not
use VINTAGE MIXING LIQUID or MIXING LIQUID HC for these porcelains since they affect the shade of the restoration.
STORAGEStoreatroomtemperature(1-30ºC/34-86ºF).Avoiddirectsunlight.CAUTION: US Federal law restricts this device to sale by or on the order of a dental professional.
* VITA is a registered trademark of VITA Zahnfabrik H. Rauter GmbH & Co.KG, Bad Säckingen, Germany
READ CAREFULLY BEFORE USE
DE MetallkeramiksystemVINTAGE PRO ist ein Metallkeramiksystem zur Verblendung von Edelmetall-, Halbedelmetall- und Nichtedelmetall-Legierungen sowie palladiumbasierten Legierungen mit einem WAK-Bereich von 13,5 bis 14,8 x 10⁻⁶ K-1. VINTAGE PRO eignet sich auch für mit CAD/CAM und Galvanotechnik/Sintern hergestellte Metallgerüste. Das Farbsystem umfasst VITA* Classical Farben und eine Reihe von Effektfarben zur Reproduktion eines breiten Farbspektrums.INDIKATIONENVerblendkeramik zur Herstellung metallkeramischer Restaurationen.VORSICHTSMASSNAHMEN UND WARNHINWEISE1. Falls beim Anwender dieses Produkts Entzündungen oder andere allergische Reaktionen auftreten, sofort den Gebrauch
einstellen und ärztlichen Rat einholen.2. Kontakt mit Haut oder Augen vermeiden. Bei versehentlichem Augenkontakt die Augen sofort mit reichlich Wasser spülen
und ärztlichen Rat einholen.3. Zum Schutz vor gesundheitsschädlichen Stäuben beim Beschleifen oder Polieren des Produkts lokale Staubabsaugung,
Staubmaske o.Ä. verwenden.4. Zur Vermeidung von Augenschäden beim Beschleifen oder Polieren des Produkts eine Schutzbrille o.Ä. tragen.5. Den Behälter nach jedem Gebrauch wieder fest verschließen.6. Bei allen zusammen mit dem Produkt verwendeten dentalen Materialien, Instrumenten oder Geräten die
Gebrauchsanleitung beachten.7. Das Produkt ausschließlich für die in diesem Beipackzettel genannten Aufgaben verwenden.8. Das Produkt nur bis zu dem auf Packung und Behälter angegebenen Verfallsdatum benutzen.
(Beispiel JJJJ-MM-TT→Haltbarkeitbis:Jahr-Monat-Tag)9. Das Produkt ist nur für den dentalen Gebrauch vorgesehen.GEBRAUCHSANLEITUNGBitte separates Anwenderhandbuch oder detaillierte Verarbeitungsanleitung beachten.
• VINTAGEPRObeiLegierungenmiteinemWärmeausdehnungskoeffizientenvon13,5bis14,8x10 -6 K-1 verwenden.• DieBrennbedingungenkönnenjenachTypundBetriebsspannungdesKeramikofensvariieren.Vorderdefinitiven
Anwendung der Keramik sollten unbedingt Testbrände durchgeführt werden.• DieersteSchichtOpaker(Wash)dünnauftragenundbrennen.• Die zweite Schicht Opaker muss gleichmäßig in einer zur Abdeckung der Farbe des Metallgerüsts ausreichenden Stärke
aufgetragen werden.• Die Opaker-Pasten vor Gebrauch mit einem Kunststoffspatel korrekt anmischen.• DieOpaker-MassendürfennurmitdenzugehörigenVINTAGEPROOpaqueAnmischflüssigkeitengemischtwerden.KeineanderenVINTAGEAnmischflüssigkeitenverwenden.
• Beim Auftrag größerer Mengen Opaker eine längere Trockenzeit an der Ofenöffnung und eine längere Vorwärmzeit wählen,umdieflüssigenKomponentengründlichzutrocknen.
• Die Pulver gemäß der Kombinationstabelle und dem Restaurationsaufbau wählen.• DerAufbauderBody-MassensollteentsprechendderdefinitivenanatomischenZahnformerfolgen,umdiekorrekte
Dimension für die Enamel-Massen sicherzustellen.• Beim Aufbau größerer Mengen eine längere Trockenzeit an der Ofenöffnung wählen, um eine Explosion der Keramik von innenwegenverbliebenerflüssigerKomponentenzuvermeiden.
• Die Enamel-Massen sollten zum Ausgleich des Brennschwunds leicht überdimensioniert aufgetragen werden.• Trockene Flächen, die einen zusätzlichen Materialauftrag benötigen, mit Wasser bepinseln.• Für Margin-Massen destilliertes Wasser oder VINTAGE MARGIN HARDENING LIQUID verwenden.• Für ADD-ON Massen, ADD-ON B und ADD-ON T, destilliertes Wasser oder VINTAGE CPM MODELLING LIQUID
verwenden. Kein VINTAGE MIXING LIQUID oder MIXING LIQUID HC verwenden, da dies die Farbe der Restauration ändert.
LAGERUNGBei Zimmertemperatur (1-30°C)lagern.VordirekterSonneneinstrahlungschützen.* VITA ist eine eingetragene Marke der VITA Zahnfabrik H. Rauter GmbH & Co.KG, Bad Säckingen, Deutschland.
VOR GEBRAUCH SORGFÄLTIG DURCHLESEN
UNI-LAYEROPAQUE
METAL
OPAL ENAMELBODY
OPAQUE
METALCERVICAL
TRANSLUCENTINCISALBODY
OPAQUE
CERVICALMETAL
Shade A1 A2 A3 A3.5 A4 rootA B1 B2 B3 B4 C1 C2 C3 C4 D2 D3 D4Base Opaque BASE
Shade Opaque A1O A2O A3O A3.5O A4O rootAO B1O B2O B3O B4O C1O C2O C3O C4O D2O D3O D4O
Cervical – – A3B:2AC:1
A3.5B:1AC:1
A4B:1AC:1 AC – – B3B:1
BC:1 BC – C2B:2CC:1
C3B:1CC:1 CC D2B:1
DC:1D3B:1DC:1
DC:2BC:1
Body A1B A2B A3B A3.5B A4B rootAB B1B B2B B3B B4B C1B C2B C3B C4B D2B D3B D4B
Opal OPAL57 OPAL58 OPAL59 OPAL59:1OPAL60:1 OPAL60 OPAL60 OPAL57 OPAL58 OPAL59 OPAL60 OPAL58 OPAL58 OPAL59 OPAL60 OPAL58 OPAL59 OPAL59
Incisal 58 58 59 59 60 60 57 58 59 60 58 58 59 60 59 60 59Translucent T
1. LAYERING DIAGRAM (VINTAGE MP)■Uni-layer technique
2. COMBINATION CHART
■2-layer technique ■3-layer technique
Type of fi ring Coefficient of thermal expansion (25 - 500 °C) Glass transition point
Base Opaque 2nd fi ring 11.5 x 10⁻⁶K-1 598 °C4th fi ring
Shade Opaque 2nd fi ring 12.4 x 10⁻⁶K-1 594 °C4th fi ring
Margin 2nd fi ring 13.0 x 10⁻⁶K-1 594 °C4th fi ringCervicalOpaque DentinBodyEnamelTranslucentUni-LayerGum
2nd fi ring
13.0 x 10⁻⁶K-1 580 °C
4th fi ring
Correction 2nd fi ring 11.0 x 10⁻⁶K-1 585 °C4th fi ring
3. FIRING SCHEDULE
4. PHYSICAL PROPERTIES
Drying time Heat rate Schedule Holding time(PASTE / POWDER)
Base Opaque5 to 7 min. 50 to 60 °C/min
500°C 940°C-960°C 2 min.2 min.
Shade Opaque 5 to 7 min. 50 to 60 °C/min500°C 920°C-940°C 1-2 min.
1 to 2 min.
Margin 5 to 7 min. 50 to 60 °C/min650°C 920°C-940°C
–
Body 5 to 7 min. 50 to 60 °C/min650°C 920°C-940°C 0-0.5 min.
0 to 0.5 min.
Correction ADD-ON B, ADD-ON T First fi ring 5 to 7 min. 50 to 60 °C/min
650°C 850°C-870°C–
ADD-ON B, ADD-ON TGlazing 5 to 7 min. 50 to 60 °C/min
650°C 850°C-870°C–
CPM, CPM FINE 5 to 7 min. 50 to 60 °C/min650°C 870°C-880°C
–
Self-glazing 5 to 7 min. 50 to 60 °C/min650°C 900°C-920°C
–
Vacuum fi ring (1.3 – 8.0 kPa) Atomospheric fi ring
FR Métallo-céramiqueVINTAGE PRO est un système céramique pour restaurations sur armatures en métaux non précieux, semi-précieux et précieux(ycomprislesalliagesàbasepalladium)dontleCETsesitueentre13.5et14.8x10 -6 K-1. VINTAGE PRO convient également aux armatures métalliques réalisées par CAD / CAM ou électroformage / frittage. Le teintier reprend les teintes du VITA*classique,additionnéd’unevariétéd’effets,afind’offrirunepalettedespluscomplètes.INDICATIONSCéramique pour restaurations sur armature métallique.PRECAUTIONS & AVERTISSEMENTS1. Encasd’inflammationouderéactionallergique,l’opérateurdevracessertoutemanipulationduproduitetconsulterun
médecin.2. Eviter le contact avec la peau ou les yeux. En cas de contact oculaire accidentel rincer copieusement les yeux à l’eau et
consulter un médecin.3. Utiliseruneaspirationlocale,unmasquedeprotection,etc.lorsdugrattageetdupolissagepourévitertouteinfluence
néfaste des poussières sur l’organisme.4. Porter des lunettes de protection, etc. lors du grattage et du polissage pour éviter tout dommage oculaire.5. Refermersoigneusementlesflaconsaprèsutilisation.6. Respecter le mode d’emploi de chaque matériau, instrument ou équipement utilisé en association avec ce produit.7. Nepasutiliserceproduitàunautreusagequeceluispécifiédansleprésentmoded’emploi.8. Utiliser le produit avant la date d’expiration indiquée sur l’étiquette et l’emballage.
(Exemple AAAA-MM-JJ→Année-Mois-Jourd’expiration)9. L’utilisation de ce produit est exclusivement réservée aux professionnels dentaires.MODE D’EMPLOISe référer au manuel d’utilisation détaillé.
• UtiliserVINTAGEPROavecdesalliagesprésentantuncoefficientd’expansionthermiqueentre13.5et14.8×10 -6K-1.• Les conditions de cuisson peuvent varier selon les fours et les voltages de courant. Il est essentiel de procéder à des
tests préalables avant production.• Appliquerlapremièrecouched’opaque(lait)enfinecoucheetcuire.• La seconde couche d’opaque doit s’appliquer uniformément et posséder assez d’épaisseur pour masquer la teinte de
l’armature.• Bien mélanger les pâtes opaques avec une spatule plastique avant utilisation.• Les opaques doivent impérativement être mixés avec les liquides dédiés VINTAGE PRO Opaque. Ne jamais se servir
d’autre liquide de mélange VINTAGE.• En cas d’application généreuse d’opaque, prévoir d’allonger le temps de séchage à l’entrée du four et d’augmenter la duréedepréchauffageafind’éliminercomplètementlesélémentsliquides.
• Sélectionner les poudres en se basant sur le tableau des combinaisons et procéder au montage de la restauration.• Ladentinesemontejusqu’àlaformeanatomiquefinaledeladentafindefaciliterlamiseenplacedelacouched’émail
avec précision.• Lorsquelemontagecéramiqueestimportant,prévoiruntempsdeséchagepluslongàl’entréedufourafind’éviterune
possible explosion de la céramique due à un reste d’éléments liquides.• La poudre émail doit être montée légèrement surdimensionnée en fonction du retrait à la cuisson. • Sicertaineszonessèchesdemandentuncomplémentdemontage,leshumidifieràl’eauavecunpinceau.• Utiliser de l’eau distillée ou le liquide VINTAGE MARGIN HARDENING LIQUID pour les céramiques Margin. • Utiliser de l’eau distillée ou le liquide VINTAGE CPM MODELLING LIQUID pour les céramiques ADD-ON, ADD-ON B
et ADD-ON T. Ne jamais utiliser les liquides VINTAGE MIXING LIQUID ou MIXING LIQUID HC pour ces poudres car ils affectent la teinte des restaurations.
STOCKAGEConserver à température ambiante (1-30 °C).Eviterlalumièresolairedirecte.* VITA est une marque déposée de VITA Zahnfabrik H. Rauter GmbH & Co.KG, Bad Säckingen, Germany
A LIRE ATTENTIVEMENT AVANT UTILISATION
E
YYYY-MM-DD = Year-Month-Date of the expiration
For VINTAGE liquids
• Do not handle VINTAGE liquids or their mixture with porcelains with bare hands. VINTAGE liquids should not come in contact with patient’s eyes or skin. In case of accidental contact with skin, immediately blot with alcohol moistened cotton ball. In case of contact with eyes, immediately flush the eyes with plenty of water and seek medical advice.
• If any inflammation or other allergic reactions occur on either the patient or operator, immediately discontinue use and seek medical advice.
• Avoid any source of ignition since VINTAGE liquids are flammable.
• Use VINTAGE liquids in well ventilated areas (several appropriate ventilations per hour are recommended).
• Do not leave VINTAGE liquids in areas of high temperature, such as near the heater etc. Avoid direct sunlight.
• Tightly close the cap after each dispensing.
VINTAGE PRO porcelains
• Store at room temperature (1-30 °C / 34-86 °F).
• Avoid direct sunlight.
VINTAGE liquids
• Tightly close the cap and store at room temperature.
• Keep away from direct sunlight and any source of ignition.
• Store VINTAGE Margin Porcelain Isolation Liquid horizontally. When you store it vertically, always keep the cap facing upward. The liquid might leak when placing it in an opposite way for a long period.
Notes
Precautions and Warnings
Storage
For all items
• Do not use for any purposes other than specifically outlined in each instructions for use.
• All VINTAGE PRO items are intended for use by dental professionals only.

5
Physical Properties
For test firing, preferably mix T-Glass porcelain with VINTAGE Mixing Liquid-HC and place the specimen on a platinum foil.If the specimen looks clear and slightly shiny, the firing schedule has been correct (Fig. 1). If it looks dull and inhomogeneous, the correct firing degree has not been reached (Fig. 2). In this case, increase the firing temperature in steps of 5 °C to come closer to the correct value. If the final temperature is too high, the specimen shows a high shine and lacks any sharp edges.
When firing dental porcelains, the results depend not only on the design of the porcelain furnace, but also to a great extent on the type and size of the workpiece, the individual firing schedule and the framework design. Additional factors influencing the correct firing degree include:
Predrying temperature / preheating temperature and time
Temperature increase per minute
Ideal final temperature
Holding time of the ideal firing temperature
Level and duration of the vacuum
Position of the object to be fired in the furnace
Firing tray (light or dark honeycomb tray)
Firing Temperature / Firing Degree
Hint: To finetune the firing parameters of your porcelain furnace, it is advisable to carry out test firings before using the porcelains for actual restorations!
Fig. 1 Fig. 2
VINTAGE PRO CTE [x 10-6K-1]
(25-500 °C)2nd firing
CTE [x 10-6K-1] (25-500 °C)
4th firing
TGGlass transition temperature (°C)
Base Opaque Powder 11.5 11.5 598
Shade Opaque Powder 12.4 12.4 594
Base Opaque Paste 11.5 11.5 598
Shade Opaque Paste 12.4 12.4 594
Margin 13.0 13.0 594
Cervical, Body, Opaque Dentin, Opal, Incisal, Opal Effect, Enamel Effect, Color Effect, Gum 13.0 13.0 580
ADD-ON / Correction 11.0 11.0 585
VINTAGE PRO porcelain complies with ISO 6872:2015 (Type I, Class 1 ceramic) and ISO 9693-1:2012. VINTAGE PRO porcelain meets the requirements of the standards: flexural strength of ≥ 50 MPa, chemical solubility of < 100 µg/cm2 and debonding / crack initiation strength ≥ 25 MPa.

6
System Components
Paste Opaque / Powder Opaque - 21 shades
Opaque Dentin - 18 shades
Body - 20 shades
Margin - 12 shades
Opaque Modifier - 7 shades
Margin Effect - 7 shades
Cervical - 4 shades
Opaque porcelains designed to mask metal frameworks; available as pastes and powders
High-opacity dentine-coloured porcelains designed for use in areas requiring low layer thicknesses
Dentine-coloured, fluorescent porcelains designed to reproduce the dentine shade selected
Porcelains for the creation of shoulders showing higher opacity and fluorescence than the dentine (Body) porcelains
Opaque, intense shades designed to individualise the opaques; also available as pastes and powders
Intense shades designed to individualise the Margin porcelains
Porcelains designed to intensify the shades of cervical areas by mixing with the dentine (Body) porcelains
Opal - 6 shades
Gum - 6 shades
Liquids
Correction - 4 shades
Incisal - 4 shadesOpal Effect - 9 shades
Enamel Effect - 13 shades Color Effect - 11 shades
Opalescent Incisal porcelains designed to reproduce the dynamic light-optical characteristics of natural enamel
Special shades designed to reproduce gingival areas of porcelain restorations
Special porcelains designed for the correction of Body, Translucent or Margin porcelains after glaze firing
Non-opalescent Incisal porcelains without any dynamic characteristics
Opalescent Incisal and Translucent porcelains showing various colour nuances
Non-opalescent, Translucent Effect porcelains showing various colour nuances and transparencies
Intense shades designed for individualisation by mixing with Body or Opaque Dentin porcelains
VINTAGE PRO PASTE OPAQUE LIQUID
Mixing liquid for use with VINTAGE PRO Paste Opaque, to adjust the pasty consistency
VINTAGE PRO POWDER OPAQUE LIQUID / LIQUID-L *
Mixing liquid for use with VINTAGE PRO Powder Opaque. Opaque Liquid-L provides a longer working time and pasty consistency.
VINTAGE Mixing Liquid Standard mixing liquid for use with all VINTAGE layered porcelains. The plasticity and stackability of porcelains mixed with this liquid will be lower, compared to VINTAGE Mixing Liquid-HC.
VINTAGE MARGIN Porcelain Isolation Liquid Isolation liquid available in a convenient dosing pen, helps to properly separate porcelain from models and dies
VINTAGE Margin Hardening Liquid Mixing liquid for VINTAGE Margin porcelains with hardening effects after drying
* VINTAGE PRO POWDER OPAQUE LIQUID-L is not available in Europe!
VINTAGE Mixing Liquid-HCMixing liquid for use with all VINTAGE layered porcelains. For remixing, VINTAGE Mixing Liquid or distilled water should be used.
VINTAGE CPM Modelling LiquidMixing liquid for VINTAGE PRO ADD-ON and CPM porcelains
7
Proper metal framework design is an important factor contributing to a strong bond between porcelain and alloy. Special care should be taken to create a reduced anatomical tooth shape with a supporting design in the cusp and incisal edge areas. In this way, occlusal stresses will not be borne directly by the porcelain, but transmitted to the framework.A uniform porcelain layer thickness of no more than 2.0 mm will reduce the risk of high stress development. Undersized metal frameworks will lead to increased shrinkage. Oversized frameworks will not adequately support the porcelain build-up.
Design
Preparation
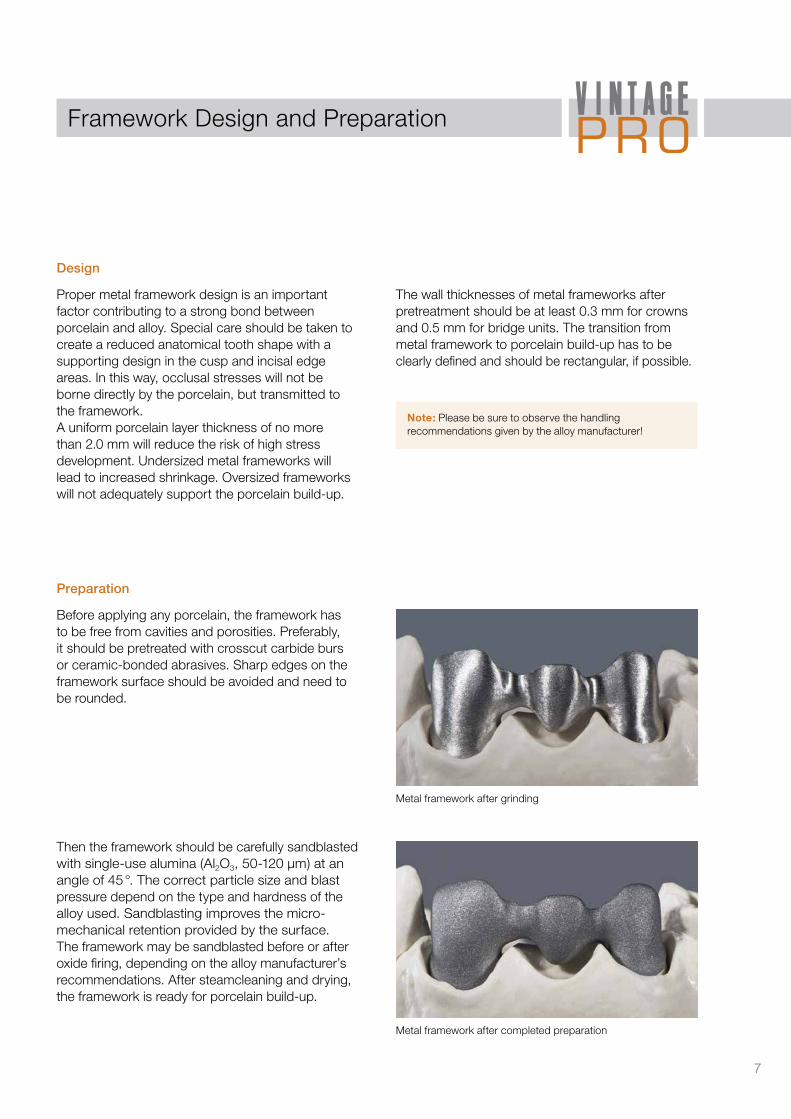
Before applying any porcelain, the framework has to be free from cavities and porosities. Preferably, it should be pretreated with crosscut carbide burs or ceramic-bonded abrasives. Sharp edges on the framework surface should be avoided and need to be rounded.
Then the framework should be carefully sandblasted with single-use alumina (Al2O3, 50-120 µm) at an angle of 45 °. The correct particle size and blast pressure depend on the type and hardness of the alloy used. Sandblasting improves the micro-mechanical retention provided by the surface. The framework may be sandblasted before or after oxide firing, depending on the alloy manufacturer’s recommendations. After steamcleaning and drying, the framework is ready for porcelain build-up.
The wall thicknesses of metal frameworks after pretreatment should be at least 0.3 mm for crowns and 0.5 mm for bridge units. The transition from metal framework to porcelain build-up has to be clearly defined and should be rectangular, if possible.
Metal framework after grinding
Metal framework after completed preparation
Framework Design and Preparation
Note: Please be sure to observe the handling recommendations given by the alloy manufacturer!

8
When creating a porcelain margin, make sure that the framework supports the porcelain on the tooth stump. Reduce the framework down to the inner edge of the chamfer or shoulder preparation. It is especially important to adequately reduce the framework in the interdental spaces, in order to optimally integrate the restoration in the aesthetically relevant areas and to avoid any shadow zones. Any metal edges produced by this reduction process need to be rounded and thin. The porcelain margin must be uniformly supported by the metal framework.
Then the framework should be carefully sandblasted with single-use alumina (Al2O3, 50-120 µm) at an angle of 45 °. The correct particle size and blast pressure depend on the type and hardness of the alloy used. Sandblasting improves the micro-mechanical retention provided by the surface.
The framework may be sandblasted before or after oxide firing, depending on the alloy manufacturer’s recommendations. After steamcleaning and drying, the framework is ready for porcelain build-up.
Framework Design for a Porcelain Margin
The framework before oxide firing
The framework after oxide firing
Correct framework design Incorrect framework design
Framework Design and Preparation
9
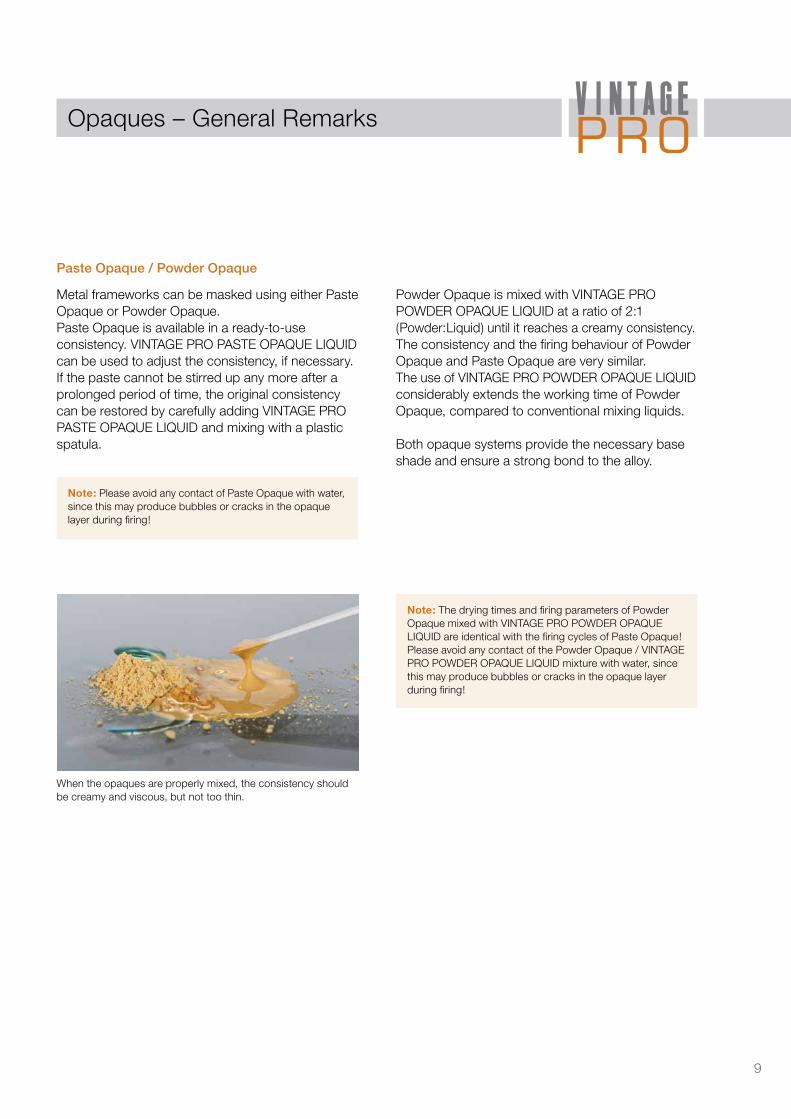
Opaques – General Remarks
When the opaques are properly mixed, the consistency should be creamy and viscous, but not too thin.
Paste Opaque / Powder Opaque
Metal frameworks can be masked using either Paste Opaque or Powder Opaque.Paste Opaque is available in a ready-to-use consistency. VINTAGE PRO PASTE OPAQUE LIQUID can be used to adjust the consistency, if necessary. If the paste cannot be stirred up any more after a prolonged period of time, the original consistency can be restored by carefully adding VINTAGE PRO PASTE OPAQUE LIQUID and mixing with a plastic spatula.
Powder Opaque is mixed with VINTAGE PRO POWDER OPAQUE LIQUID at a ratio of 2:1 (Powder:Liquid) until it reaches a creamy consistency. The consistency and the firing behaviour of Powder Opaque and Paste Opaque are very similar. The use of VINTAGE PRO POWDER OPAQUE LIQUID considerably extends the working time of Powder Opaque, compared to conventional mixing liquids.
Both opaque systems provide the necessary base shade and ensure a strong bond to the alloy.
Note: Please avoid any contact of Paste Opaque with water, since this may produce bubbles or cracks in the opaque layer during firing!
Note: The drying times and firing parameters of Powder Opaque mixed with VINTAGE PRO POWDER OPAQUE LIQUID are identical with the firing cycles of Paste Opaque!Please avoid any contact of the Powder Opaque / VINTAGE PRO POWDER OPAQUE LIQUID mixture with water, since this may produce bubbles or cracks in the opaque layer during firing!

10
Base Opaque is applied using a ball-ended instrument or a brush. The framework is masked only approx. 30 % with Base Opaque and then fired.
Shade Opaque is applied in a sufficient thickness, using a ball-ended instrument or a brush.
After firing, VINTAGE PRO Opaque should have a non-transparent, silky-matt surface. The framework should be completely masked by the opaque.
Application of the Opaques
Base Opaque
Shade Opaque
Thanks to its fine particle structure and orange-golden colour, Base Opaque provides a pleasant warm hue and excellent bond strengths, especially when applied to non-precious alloys.Carefully mix Base Opaque Paste or Powder with a clean spatula until it reaches the desired consistency. After mixing Base Opaque, dispense an adequate
As a second opaque layer, apply the Shade Opaque material matching the tooth shade determined. Mix Shade Opaque Powder with VINTAGE PRO Powder Opaque Liquid until it reaches a creamy consistency to mask the surface to be veneered, using a ball-ended instrument or a brush.
amount of the dedicated mixing liquid next to it onto the mixing slab, so that you can wet your brush or instrument.Apply Base Opaque in a thin wash layer. The framework should be masked only approx. 30 %. Then fire the framework in accordance with the parameters of the 1st opaque firing.
Alternatively, apply Shade Opaque Paste in the same way after firing Base Opaque and perform the 2nd opaque firing in accordance with the respective parameters.
Note: After firing and cooling, the metal framework covered with Base Opaque or Shade Opaque should be thoroughly cleaned with a steam cleaner and dried with oil-free compressed air. Subsequently, touch the framework only with tweezers or clamps!
11
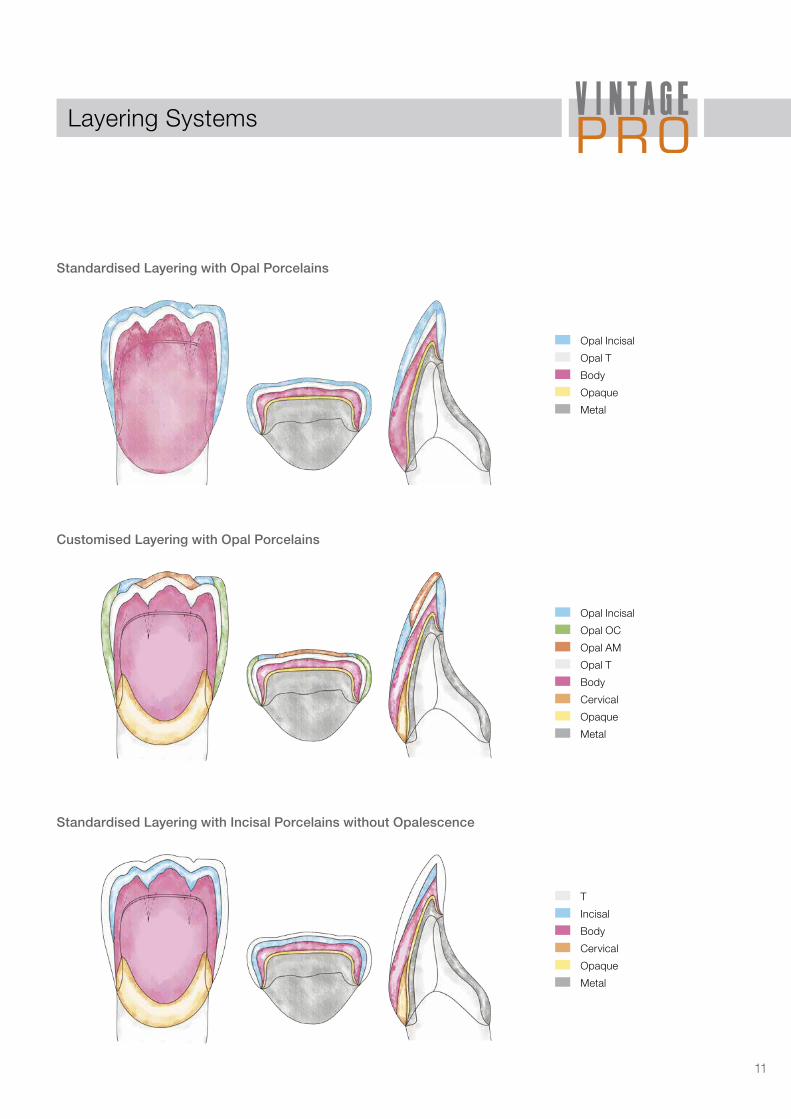
Layering Systems
Standardised Layering with Opal Porcelains
Customised Layering with Opal Porcelains
Standardised Layering with Incisal Porcelains without Opalescence
Opal Incisal
Opal T
Body
Opaque
Metal
Opal Incisal
Opal OC
Opal AM
Opal T
Body
Cervical
Opaque
Metal
T
Incisal
Body
Cervical
Opaque
Metal
12
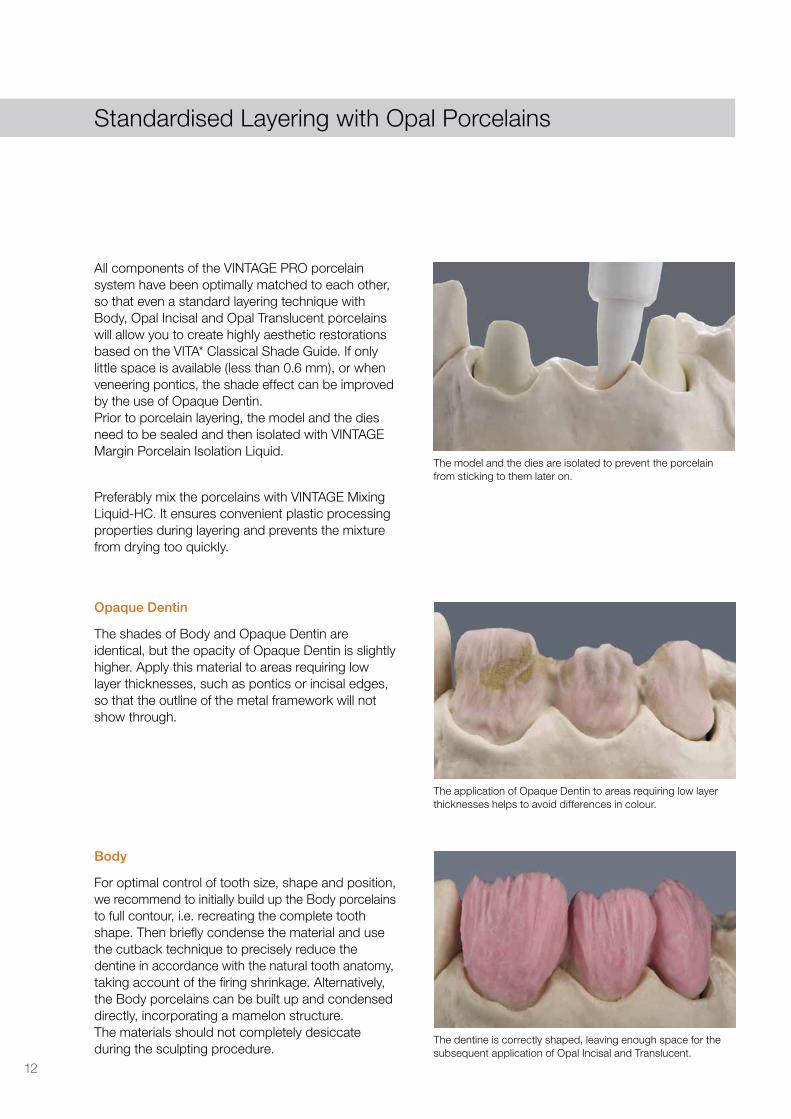
Standardised Layering with Opal Porcelains
All components of the VINTAGE PRO porcelain system have been optimally matched to each other, so that even a standard layering technique with Body, Opal Incisal and Opal Translucent porcelains will allow you to create highly aesthetic restorations based on the VITA* Classical Shade Guide. If only little space is available (less than 0.6 mm), or when veneering pontics, the shade effect can be improved by the use of Opaque Dentin.Prior to porcelain layering, the model and the dies need to be sealed and then isolated with VINTAGE Margin Porcelain Isolation Liquid.
Preferably mix the porcelains with VINTAGE Mixing Liquid-HC. It ensures convenient plastic processing properties during layering and prevents the mixture from drying too quickly.
The model and the dies are isolated to prevent the porcelain from sticking to them later on.
The application of Opaque Dentin to areas requiring low layer thicknesses helps to avoid differences in colour.
The dentine is correctly shaped, leaving enough space for the subsequent application of Opal Incisal and Translucent.
Opaque Dentin
Body
The shades of Body and Opaque Dentin are identical, but the opacity of Opaque Dentin is slightly higher. Apply this material to areas requiring low layer thicknesses, such as pontics or incisal edges, so that the outline of the metal framework will not show through.
For optimal control of tooth size, shape and position, we recommend to initially build up the Body porcelains to full contour, i.e. recreating the complete tooth shape. Then briefly condense the material and use the cutback technique to precisely reduce the dentine in accordance with the natural tooth anatomy, taking account of the firing shrinkage. Alternatively, the Body porcelains can be built up and condensed directly, incorporating a mamelon structure. The materials should not completely desiccate during the sculpting procedure.

13
Before applying Opal T and Incisal, the Body porcelain should be carefully moistened using a brush, to ensure a uniform moisture level.
A translucent layer between Body and Opal Incisal supports the natural light diffusion.
Proper separation in the interdental area down to the opaque leads to controlled shrinkage during the 1st body firing.
Opal Incisal is added to the reduced areas, first to the vestibular aspect, then to the palatal aspect.
Opal Translucent
Opal Incisal
First add the opalescent and translucent Opal T porcelain to the mamelon areas and marginal ridges of the prepared dentine as an intermediate layer to support light diffusion.
Then apply Opal Incisal in several portions to complete the tooth anatomy. Take care not to change the shape and position of the dentine during this step. The Opal Incisal material applied should be slightly oversized to compensate for the firing shrinkage and obtain the desired tooth shape after firing.
After removing the restoration from the model, use Opaque Dentin or Body and Opal Incisal to complete the contact points. Slightly condense the material and suck off the liquid; this helps to reduce the firing shrinkage and to optimise the brilliance of the porcelain.
14
Standardised Layering with Opal Porcelains
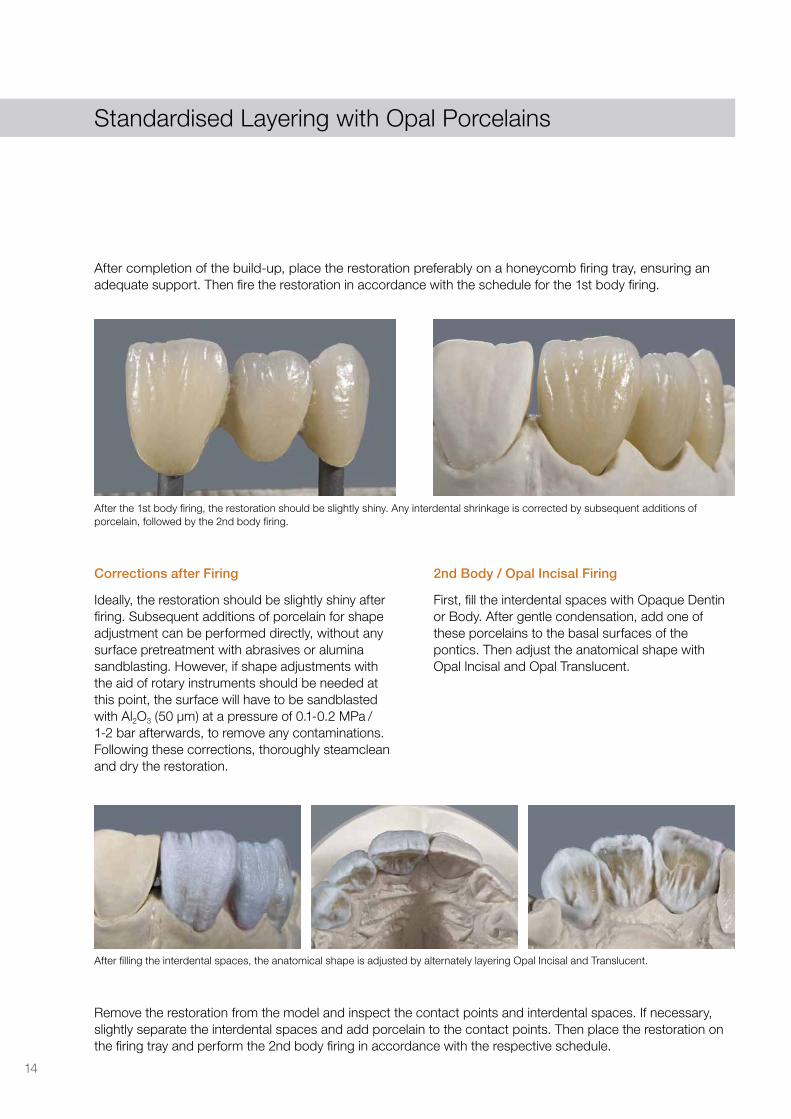
After completion of the build-up, place the restoration preferably on a honeycomb firing tray, ensuring an adequate support. Then fire the restoration in accordance with the schedule for the 1st body firing.
After the 1st body firing, the restoration should be slightly shiny. Any interdental shrinkage is corrected by subsequent additions of porcelain, followed by the 2nd body firing.
Corrections after Firing 2nd Body / Opal Incisal Firing
Ideally, the restoration should be slightly shiny after firing. Subsequent additions of porcelain for shape adjustment can be performed directly, without any surface pretreatment with abrasives or alumina sandblasting. However, if shape adjustments with the aid of rotary instruments should be needed at this point, the surface will have to be sandblasted with Al2O3 (50 µm) at a pressure of 0.1-0.2 MPa / 1-2 bar afterwards, to remove any contaminations. Following these corrections, thoroughly steamclean and dry the restoration.
First, fill the interdental spaces with Opaque Dentin or Body. After gentle condensation, add one of these porcelains to the basal surfaces of the pontics. Then adjust the anatomical shape with Opal Incisal and Opal Translucent.
Remove the restoration from the model and inspect the contact points and interdental spaces. If necessary, slightly separate the interdental spaces and add porcelain to the contact points. Then place the restoration on the firing tray and perform the 2nd body firing in accordance with the respective schedule.
After filling the interdental spaces, the anatomical shape is adjusted by alternately layering Opal Incisal and Translucent.

15
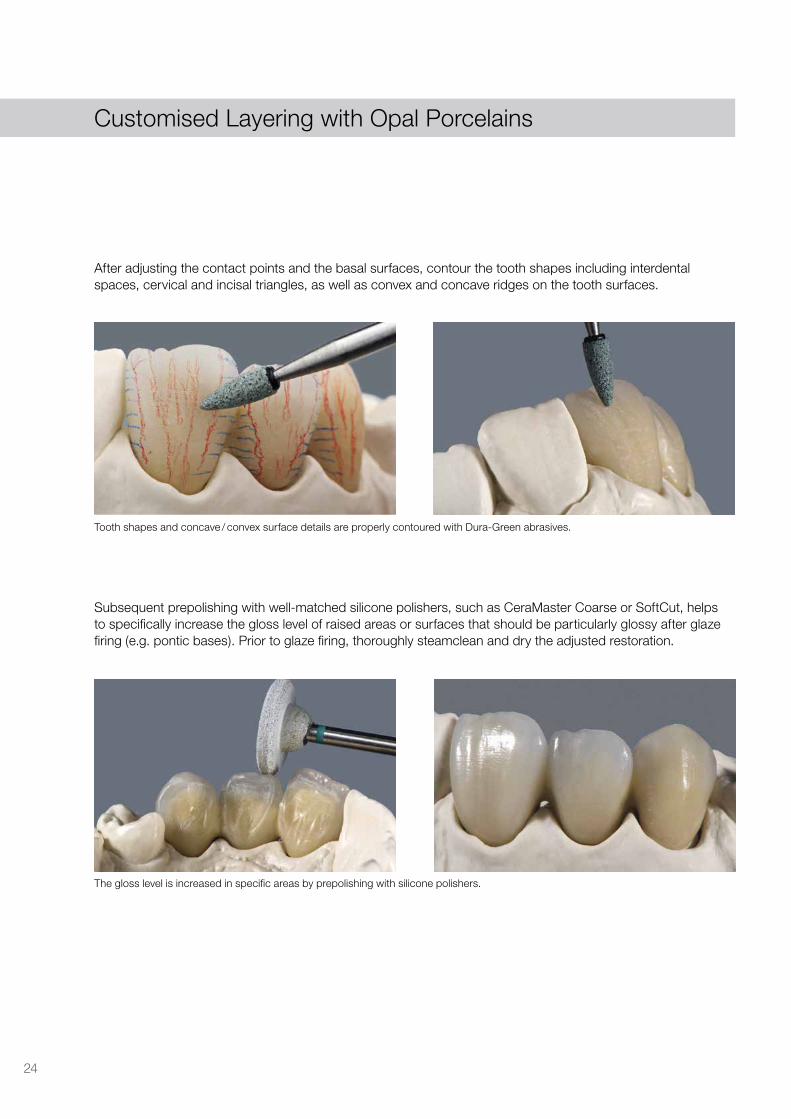
After adjusting the contact points and the basal surfaces, contour the tooth shapes including interdental spaces, cervical and incisal triangles, as well as convex and concave ridges on the tooth surfaces.
Subsequent prepolishing with well-matched silicone polishers, such as CeraMaster Coarse or SoftCut, helps to specifically increase the gloss level of raised areas or surfaces that should be particularly glossy after glaze firing (e.g. pontic bases). Prior to glaze firing, thoroughly steamclean and dry the adjusted restoration.
Tooth shapes and concave / convex surface details are properly contoured with Dura-Green abrasives.
The gloss level is increased in specific areas by prepolishing with silicone polishers.
The restoration has been accurately contoured.
Restoration placed on the model after the 2nd body firing.
Contouring and Preparation for Glaze Firing
For shape correction or contouring after firing, we recommend the use of silicon carbide abrasives, such as Dura-Green or Dura-Green DIA. Alternatively, medium-grit diamond instruments can be used.
16
Standardised Layering with Opal Porcelains
The creation of colour accents or minor shade modifications with VINTAGE Art Porcelain Stains is followed by the glaze firing in accordance with the respective firing schedule.
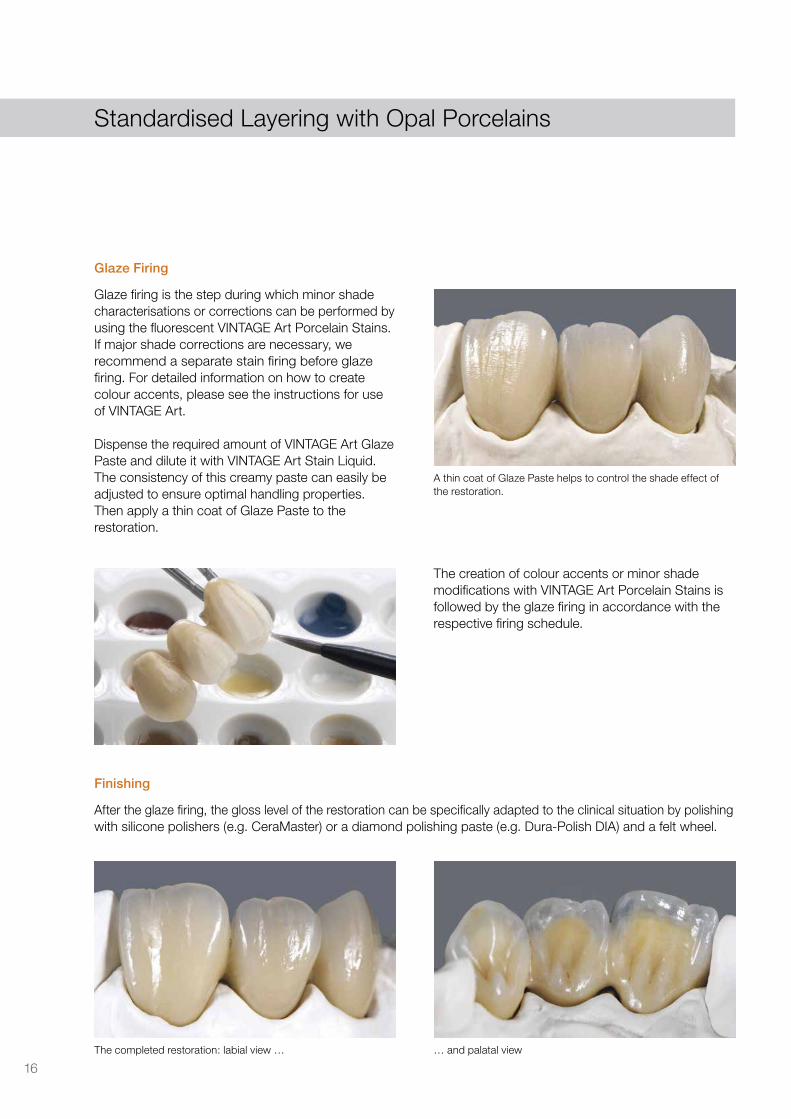
A thin coat of Glaze Paste helps to control the shade effect of the restoration.
The completed restoration: labial view … … and palatal view
Glaze Firing
Finishing
Glaze firing is the step during which minor shade characterisations or corrections can be performed by using the fluorescent VINTAGE Art Porcelain Stains. If major shade corrections are necessary, we recommend a separate stain firing before glaze firing. For detailed information on how to create colour accents, please see the instructions for use of VINTAGE Art.
Dispense the required amount of VINTAGE Art Glaze Paste and dilute it with VINTAGE Art Stain Liquid. The consistency of this creamy paste can easily be adjusted to ensure optimal handling properties. Then apply a thin coat of Glaze Paste to the restoration.
After the glaze firing, the gloss level of the restoration can be specifically adapted to the clinical situation by polishing with silicone polishers (e.g. CeraMaster) or a diamond polishing paste (e.g. Dura-Polish DIA) and a felt wheel.

17
Layering of Margin Porcelains
The sealed stone die is isolated with VINTAGE Margin Porcelain Isolation Liquid.
The Margin porcelain is adapted with a dry brush before firing.
After firing, it may be necessary to adjust the porcelain margin by eliminating any imperfections.
Margin Porcelain – 1st Firing
Porcelain margins transmit light where the tooth stump and the gingiva meet. VINTAGE PRO Margin is characterised by high plasticity and fluorescence, in contrast to the other porcelains of this system. Low shrinkage and excellent edge stability ensure an outstanding accuracy of fit.Before applying any Margin porcelain, conventionally seal the stone dies and isolate them with VINTAGE Margin Porcelain Isolation Liquid. Apply this liquid to the die shoulder in one or two layers with the Isolation Pen and leave it undisturbed for approx. 30 seconds. Remove any excess material by gentle airblowing.
Mix the Margin porcelain you wish to use with distilled water or VINTAGE Margin Hardening Liquid until it reaches a plastic, doughy consistency. For detailed information on how to use VINTAGE Margin Hardening Liquid, please see the separate instructions for use.Apply the Margin porcelain to the cervical areas, using a brush or an instrument, and preferably condense it by slight vibration. Then dry the material with a hairdryer to evaporate some moisture. Check whether the framework can be separated from the die. Replace it on the die and remove any excess porcelain with a dry brush.
Carefully separate the framework from the die, making sure that no porcelain particles remain on the internal surfaces of the restoration and any excess material has been removed. Then perform the 1st margin firing.
Note: If VINTAGE Margin Porcelain Isolation Liquid is applied too thickly and remains on the internal surface of the restoration, the restoration may turn black during firing.
Note: The shades of VINTAGE PRO Margin can be customised by adding Margin Effect porcelains.
Before applying any additional porcelain, thoroughly clean the restoration with a steam cleaner and dry it with oil-free compressed air.
18
Layering of Margin Porcelains
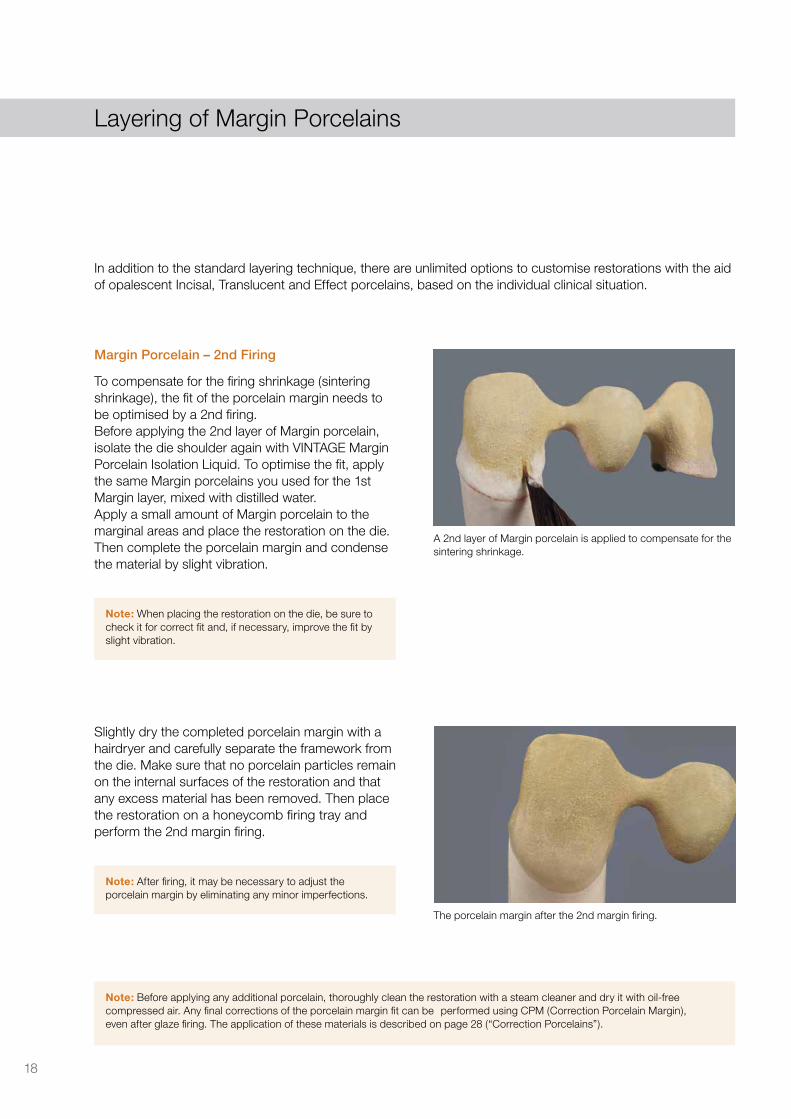
A 2nd layer of Margin porcelain is applied to compensate for the sintering shrinkage.
The porcelain margin after the 2nd margin firing.
Margin Porcelain – 2nd Firing
To compensate for the firing shrinkage (sintering shrinkage), the fit of the porcelain margin needs to be optimised by a 2nd firing.Before applying the 2nd layer of Margin porcelain, isolate the die shoulder again with VINTAGE Margin Porcelain Isolation Liquid. To optimise the fit, apply the same Margin porcelains you used for the 1st Margin layer, mixed with distilled water.Apply a small amount of Margin porcelain to the marginal areas and place the restoration on the die. Then complete the porcelain margin and condense the material by slight vibration.
Slightly dry the completed porcelain margin with a hairdryer and carefully separate the framework from the die. Make sure that no porcelain particles remain on the internal surfaces of the restoration and that any excess material has been removed. Then place the restoration on a honeycomb firing tray and perform the 2nd margin firing.
Note: When placing the restoration on the die, be sure to check it for correct fit and, if necessary, improve the fit by slight vibration.
Note: After firing, it may be necessary to adjust the porcelain margin by eliminating any minor imperfections.
Note: Before applying any additional porcelain, thoroughly clean the restoration with a steam cleaner and dry it with oil-free compressed air. Any final corrections of the porcelain margin fit can be performed using CPM (Correction Porcelain Margin), even after glaze firing. The application of these materials is described on page 28 (“Correction Porcelains”).
In addition to the standard layering technique, there are unlimited options to customise restorations with the aid of opalescent Incisal, Translucent and Effect porcelains, based on the individual clinical situation.

19
Customised Application of the Opaques
Frameworks masked with Base Opaque.
When applying Shade Opaque, initially leave out all the areas you wish to customise (e.g. incisal, cervical or occlusal areas).
Base Opaque
Shade Opaque
Thanks to its fine particle structure and orange- golden colour, Base Opaque provides a pleasant warm hue and excellent bond strength, especially when applied to non-precious alloys.Carefully mix Base Opaque Paste or Powder with a clean spatula until it reaches the desired consistency. After mixing Base Opaque, dispense an adequate amount of the dedicated mixing liquid next to it onto the mixing slab, so that you can wet your brush or instrument.Apply Base Opaque in a thin wash layer. Then fire the framework in accordance with the parameters of the 1st opaque firing.
As a second opaque layer, apply the Shade Opaque material matching the tooth shade determined. Mix Shade Opaque Powder with VINTAGE PRO Powder Opaque Liquid until it reaches a creamy consistency and evenly apply the mixture in a sufficient thickness to mask the surface to be veneered, using a brush or a ball-ended instrument. Alternatively, apply Shade Opaque Paste in the same way after firing Base Opaque. In both cases, leave out all the areas you wish to customise with Opaque Modifiers.
Opaque Modifiers can be used pure or mixed with Shade Opaque. Use these intense shades to complete the areas you left out and perform the 2nd opaque firing in accordance with the respective parameters.
Customised Shade Opaque before and after the 2nd opaque firing.
Note: After firing and cooling, the metal framework covered with Base Opaque or Shade Opaque should be thoroughly cleaned with a steam cleaner and dried with oil-free compressed air. Subsequently, touch the framework only with tweezers or clamps!

20
Customised Layering with Opal Porcelains
The model and the dies are isolated to prevent the porcelain from sticking to them later on.
The application of Opaque Dentin to areas requiring low layer thicknesses helps to avoid differences in colour.
The dentine is correctly shaped, leaving enough space for the subsequent application of Opal Incisal, Translucent and Effect.
Opaque Dentin
Body
The shades of Body and Opaque Dentin are identical, but the opacity of Opaque Dentin is slightly higher. Apply this material to areas requiring low layer thicknesses, such as pontics or incisal edges, so that the outline of the metal framework will not show through.
For optimal control of the tooth size, shape and position, we recommend an initial build-up of the Body porcelains to full contour, i.e. recreating the complete tooth shape. Then briefly condense the material and use the cutback technique to precisely reduce the dentine in accordance with the natural tooth anatomy, taking account of the firing shrinkage. Alternatively, the Body porcelains can be built up and condensed directly, incorporating a mamelon structure. The materials should not completely desiccate during the sculpting procedure.
Prior to porcelain layering, the model and the dies need to be sealed and then isolated with VINTAGE Margin Porcelain Isolation Liquid.
Preferably mix the porcelains with VINTAGE Mixing Liquid-HC. It ensures convenient plastic processing properties during layering and prevents the mixture from drying too quickly.
In addition to the standard layering technique, there are unlimited options to customise restorations with the aid of opalescent Incisal, Translucent and Effect porcelains, based on the individual clinical situation.
21
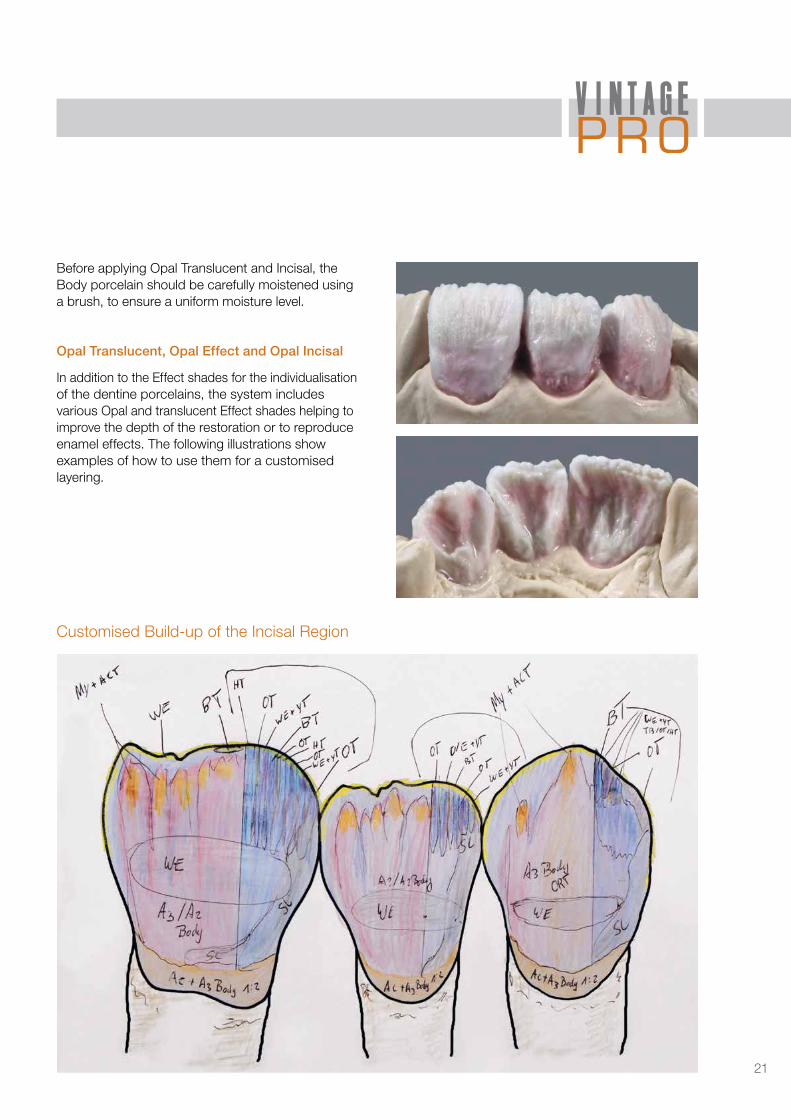
Opal Translucent, Opal Effect and Opal Incisal
In addition to the Effect shades for the individualisation of the dentine porcelains, the system includes various Opal and translucent Effect shades helping to improve the depth of the restoration or to reproduce enamel effects. The following illustrations show examples of how to use them for a customised layering.
Customised Build-up of the Incisal Region
Before applying Opal Translucent and Incisal, the Body porcelain should be carefully moistened using a brush, to ensure a uniform moisture level.

22
Customised Layering with Opal Porcelains
The anatomical shape is adjusted by alternately layering Opal Incisal and Translucent. The material applied should be slightly oversized to compensate for the firing shrinkage and to obtain the desired tooth shape after firing.
After removing the restoration from the model, use Opaque Dentin or Body and Opal Incisal to complete the contact points. Slightly condense the material and suck off the liquid; this helps to reduce the firing shrinkage and to optimise the brilliance of the porcelain.
Proper separation in the interdental area down to the Opaque leads to controlled shrinkage during the 1st body firing.
After the 1st body firing, the restoration should be slightly shiny. Any interdental shrinkage is corrected by subsequent additions of porcelain, followed by the 2nd body firing.
After completion of the build-up, place the restoration preferably on a honeycomb firing tray, ensuring an adequate support. Then fire the restoration in accordance with the schedule for the 1st body firing.
23
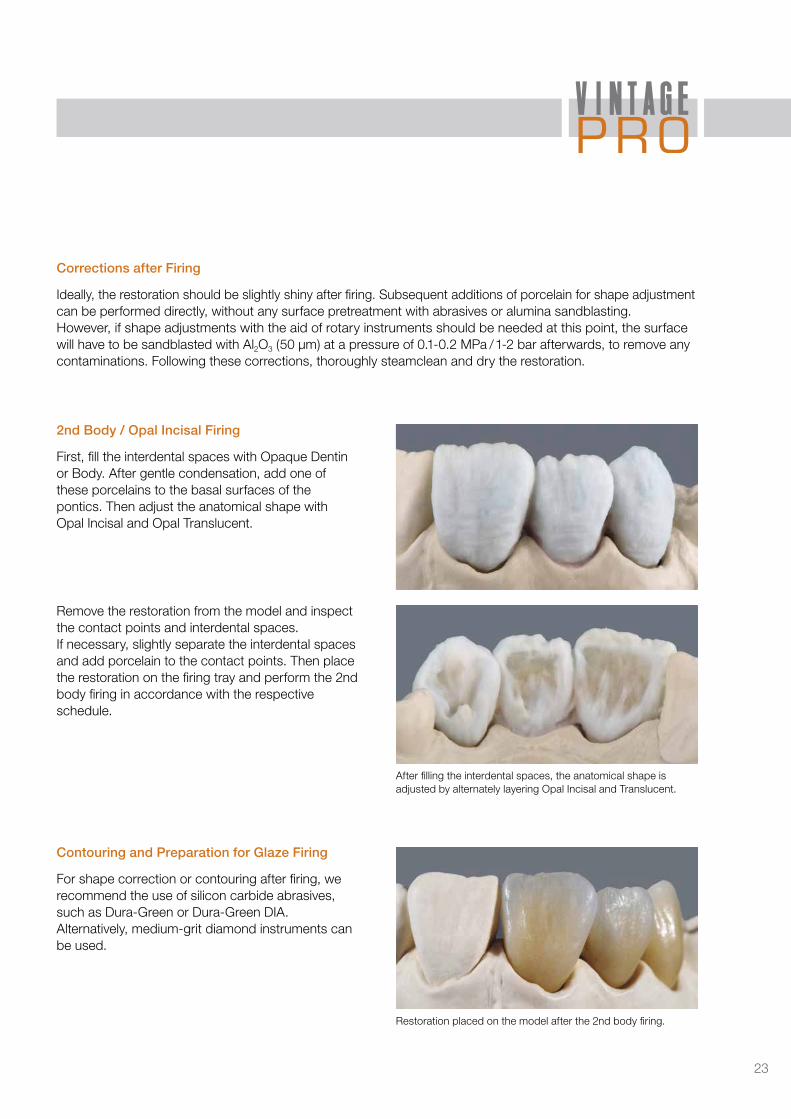
After filling the interdental spaces, the anatomical shape is adjusted by alternately layering Opal Incisal and Translucent.
Restoration placed on the model after the 2nd body firing.
Corrections after Firing
2nd Body / Opal Incisal Firing
Contouring and Preparation for Glaze Firing
Ideally, the restoration should be slightly shiny after firing. Subsequent additions of porcelain for shape adjustment can be performed directly, without any surface pretreatment with abrasives or alumina sandblasting. However, if shape adjustments with the aid of rotary instruments should be needed at this point, the surface will have to be sandblasted with Al2O3 (50 µm) at a pressure of 0.1-0.2 MPa /1-2 bar afterwards, to remove any contaminations. Following these corrections, thoroughly steamclean and dry the restoration.
First, fill the interdental spaces with Opaque Dentin or Body. After gentle condensation, add one of these porcelains to the basal surfaces of the pontics. Then adjust the anatomical shape with Opal Incisal and Opal Translucent.
Remove the restoration from the model and inspect the contact points and interdental spaces. If necessary, slightly separate the interdental spaces and add porcelain to the contact points. Then place the restoration on the firing tray and perform the 2nd body firing in accordance with the respective schedule.
For shape correction or contouring after firing, we recommend the use of silicon carbide abrasives, such as Dura-Green or Dura-Green DIA. Alternatively, medium-grit diamond instruments can be used.
24
Customised Layering with Opal Porcelains
Subsequent prepolishing with well-matched silicone polishers, such as CeraMaster Coarse or SoftCut, helps to specifically increase the gloss level of raised areas or surfaces that should be particularly glossy after glaze firing (e.g. pontic bases). Prior to glaze firing, thoroughly steamclean and dry the adjusted restoration.
After adjusting the contact points and the basal surfaces, contour the tooth shapes including interdental spaces, cervical and incisal triangles, as well as convex and concave ridges on the tooth surfaces.
Tooth shapes and concave / convex surface details are properly contoured with Dura-Green abrasives.
The gloss level is increased in specific areas by prepolishing with silicone polishers.

25
The creation of colour accents or minor shade modifications with VINTAGE Art Porcelain Stains is followed by the glaze firing in accordance with the respective firing schedule.
Finishing
Glaze Firing
After the glaze firing, the gloss level of the restoration can be specifically adapted to the clinical situation by polishing with silicone polishers (e.g. CeraMaster) or a diamond polishing paste (e.g. Dura-Polish DIA) and a felt wheel.
Glaze firing is the step during which minor shade characterisations or corrections can be performed using the fluorescent VINTAGE Art Porcelain Stains. If major shade corrections are necessary, we recommend a separate stain firing before glaze firing. For detailed information on how to create colour accents, please see the instructions for use of VINTAGE Art.
Dispense the required amount of VINTAGE Art Glaze Paste and dilute it with VINTAGE Art Stain Liquid. The consistency of this creamy paste can easily be adjusted to ensure optimal handling properties. Then apply a thin coat of Glaze Paste to the restoration.
26
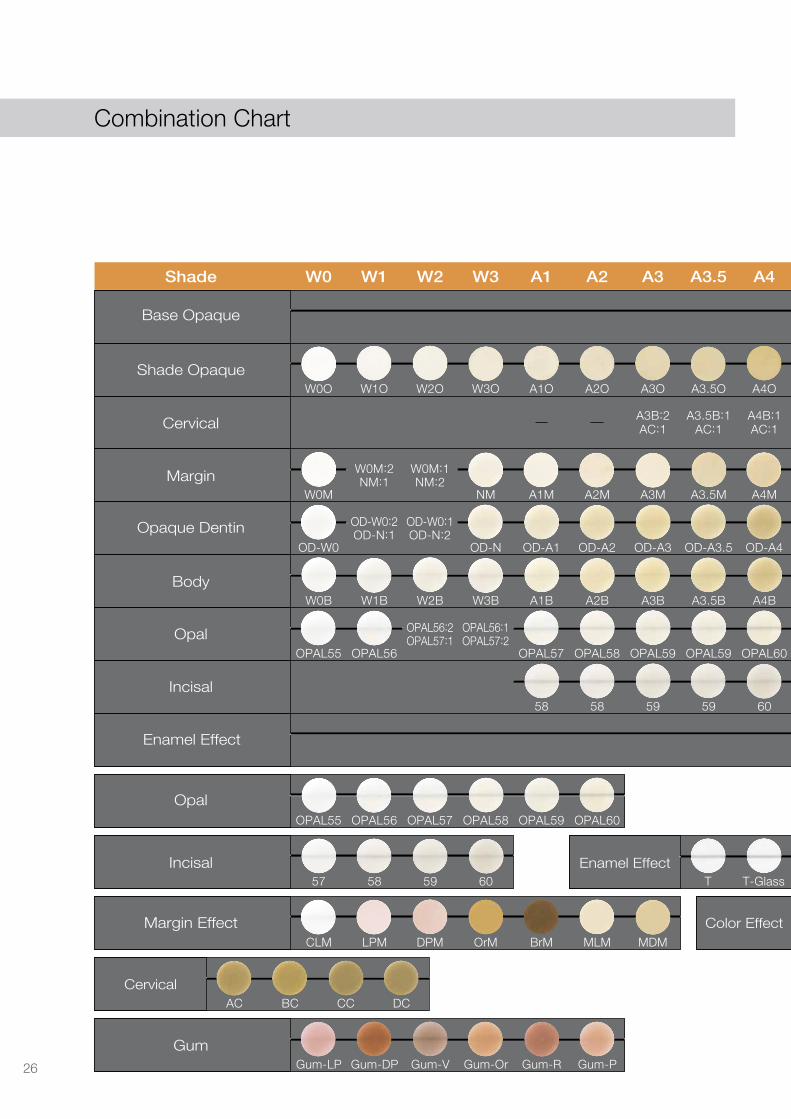
Combination Chart
Base Opaque
Shade Opaque
Cervical
Margin
Body
Opaque Dentin
Opal
Opal
Incisal
Margin Effect
Gum
Opal Effect
Enamel Effect
Color Effect
CervicalOpaqueModifier
Correction
Incisal
Enamel Effect
Shade W0
BASE
T
W1 W2 W3 A1 A2 A3 A3.5 A4 B1 B2 B3 B4 C1 C2 C3 C4 D2 D3 D4
W0O W1O W2O W3O A1O A2O A3O A3.5O A4O B1O B2O B3O B4O C1O C2O C3O C4O
BC CC
D2O D3O D4O
W0MNM:1
NM:1NM:2
W0M:2 W0M:1
NM A1M A2M A3M A3.5M A4MB2M:1
NM:1C2M:1
C2M:1C4M:1
NM:1D3M:1
D3M:1B4M:1
B2M:1B4M:1
B2M B4M C2M C4M D3M
W0B W1B W2B W3B A1B A2B A3B A3.5B A4B
A3B:2 B3B:1BC:1AC:1 AC:1 AC:1
A3.5B:1 A4B:1 C2B:2CC:1 CC:1
C3B:1DC:1D2B:1
DC:1D3B:1
DC:2BC:1
B1B B2B B3B B4B C1B C2B C3B C4B D2B D3B D4B
58 58 59 59 60 57 58 59 60
57
CLM
58 59 60
LPM
Gum-LP Gum-DP Gum-V Gum-Or Gum-R Gum-P
AC BC CC DC
ADD-ON B ADD-ON T CPM FINE CPM
DPM OrM BrM MLM MDM
T
W O Br Y
OM-G OM-O OM-Br OM-Y OM-BG OM-LP OM-DP
Bl G MP MY MIv RED RED-L
T-Glass BT PT GT YT OT BG WT AC-T BC-T CC-T DC-T
58 58 59 60 58 59 60
OD-W0
OPAL55 OPAL56
OPAL55 OPAL56
OPAL57:1 OPAL57:2OPAL56:2 OPAL56:1
OPAL57 OPAL58 OPAL59
OPAL57 OPAL58 OPAL59
OPAL59 OPAL60
OPAL60 OPAL T OPAL SL OPAL MI OPAL WB OPAL WE OPAL OC OPAL AM-R OPAL AM-Y OPAL AM-V
OPAL57 OPAL58 OPAL59 OPAL60 OPAL58 OPAL58 OPAL59 OPAL60 OPAL58 OPAL59 OPAL60
OD-N:1OD-W0:2 OD-W0:1
OD-N:2OD-N OD-A1 OD-A2 OD-A3 OD-A3.5 OD-A4 OD-B1 OD-B2 OD-B3 OD-B4 OD-C1 OD-C2 OD-C3 OD-C4 OD-D2 OD-D3 OD-D4

27
Base Opaque
Shade Opaque
Cervical
Margin
Body
Opaque Dentin
Opal
Opal
Incisal
Margin Effect
Gum
Opal Effect
Enamel Effect
Color Effect
CervicalOpaqueModifier
Correction
Incisal
Enamel Effect
Shade W0
BASE
T
W1 W2 W3 A1 A2 A3 A3.5 A4 B1 B2 B3 B4 C1 C2 C3 C4 D2 D3 D4
W0O W1O W2O W3O A1O A2O A3O A3.5O A4O B1O B2O B3O B4O C1O C2O C3O C4O
BC CC
D2O D3O D4O
W0MNM:1
NM:1NM:2
W0M:2 W0M:1
NM A1M A2M A3M A3.5M A4MB2M:1
NM:1C2M:1
C2M:1C4M:1
NM:1D3M:1
D3M:1B4M:1
B2M:1B4M:1
B2M B4M C2M C4M D3M
W0B W1B W2B W3B A1B A2B A3B A3.5B A4B
A3B:2 B3B:1BC:1AC:1 AC:1 AC:1
A3.5B:1 A4B:1 C2B:2CC:1 CC:1
C3B:1DC:1D2B:1
DC:1D3B:1
DC:2BC:1
B1B B2B B3B B4B C1B C2B C3B C4B D2B D3B D4B
58 58 59 59 60 57 58 59 60
57
CLM
58 59 60
LPM
Gum-LP Gum-DP Gum-V Gum-Or Gum-R Gum-P
AC BC CC DC
ADD-ON B ADD-ON T CPM FINE CPM
DPM OrM BrM MLM MDM
T
W O Br Y
OM-G OM-O OM-Br OM-Y OM-BG OM-LP OM-DP
Bl G MP MY MIv RED RED-L
T-Glass BT PT GT YT OT BG WT AC-T BC-T CC-T DC-T
58 58 59 60 58 59 60
OD-W0
OPAL55 OPAL56
OPAL55 OPAL56
OPAL57:1 OPAL57:2OPAL56:2 OPAL56:1
OPAL57 OPAL58 OPAL59
OPAL57 OPAL58 OPAL59
OPAL59 OPAL60
OPAL60 OPAL T OPAL SL OPAL MI OPAL WB OPAL WE OPAL OC OPAL AM-R OPAL AM-Y OPAL AM-V
OPAL57 OPAL58 OPAL59 OPAL60 OPAL58 OPAL58 OPAL59 OPAL60 OPAL58 OPAL59 OPAL60
OD-N:1OD-W0:2 OD-W0:1
OD-N:2OD-N OD-A1 OD-A2 OD-A3 OD-A3.5 OD-A4 OD-B1 OD-B2 OD-B3 OD-B4 OD-C1 OD-C2 OD-C3 OD-C4 OD-D2 OD-D3 OD-D4
28
Correction Porcelains / Gum Porcelains
Corrections with ADD-ON
Corrections of Margin Porcelain with CPM / CPM Fine
Gum Porcelains
Before or after the completion of a restoration, minor shape corrections or adjustments might be necessary. For this purpose, the VINTAGE PRO porcelain system includes correction porcelains, which can be applied after the glaze firing to meet a variety of requirements:
VINTAGE PRO ADD-ON B / ADD-ON T
VINTAGE PRO CPM / CPM Fine
ADD-ON correction porcelains are available in the shades B (A3B) and T (Translucent) and may be added to contact points or pontic surfaces, for example. Their firing temperature is approx. 30 °C lower than that of the standard porcelains of the VINTAGE PRO system.
Use CPM and CPM Fine porcelains to correct the fit of a porcelain margin after the glaze firing. CPM is designed for small margin corrections, CPM Fine for very fine corrections. Mix these two porcelains exclusively with CPM Modelling Liquid until they reach a pasty consistency.
Apply the mixed CPM correction porcelain to the edge area of the porcelain margin and gently press the restoration onto the isolated die. Remove any excess material, smooth the porcelain with a dry
For gingiva reproduction, the VINTAGE PRO porcelain system includes Gum porcelains in six different shades and two Opaque Modifiers in the shades OM-LP (Light Pink) und OM-DP (Dark Pink).
The firing temperatures of the Opaque Modifiers and the Gum porcelains are identical with those of the VINTAGE PRO Opaques and standard porcelains, respectively.
Apply a slightly oversized amount of mixed ADD-ON porcelain and smooth it with a dry brush. Then fire the restoration under vacuum in accordance with the Correction / ADD-ON firing schedule.
After firing, smooth the porcelain by polishing with CeraMaster silicone polishers, followed by Dura- Polish DIA diamond polishing paste on a small felt wheel.
brush, and slightly dry it with a hairdryer. Carefully separate the restoration from the die, making sure that no excess porcelain remains on the internal surfaces. Then fire the restoration under vacuum in accordance with the Correction / ADD-ON schedule.
After firing, smooth the porcelain by polishing with CeraMaster silicone polishers, followed by Dura-Polish DIA diamond polishing paste on a small felt wheel.
Note: Mix ADD-ON porcelains exclusively with distilled water or CPM Modelling Liquid. Do not use any other mixing liquids, because they will change the shade of the material during the correction firing.
29
Firing Schedule
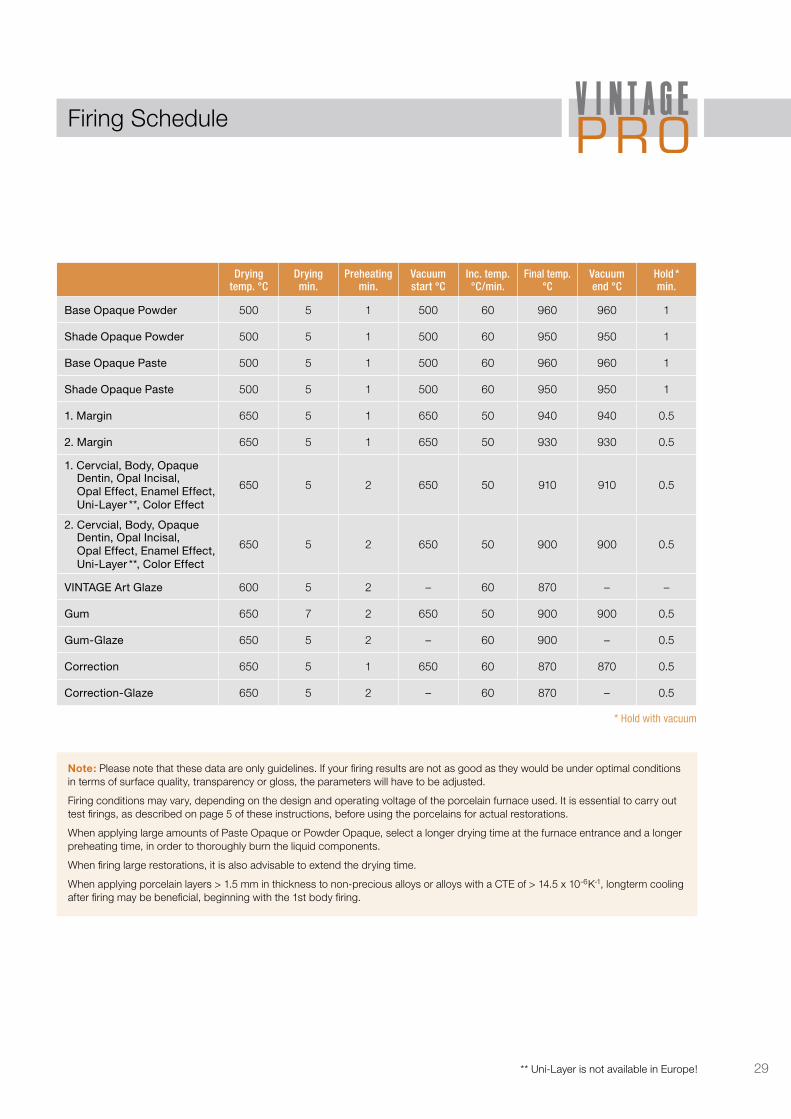
Note: Please note that these data are only guidelines. If your firing results are not as good as they would be under optimal conditions in terms of surface quality, transparency or gloss, the parameters will have to be adjusted.
Firing conditions may vary, depending on the design and operating voltage of the porcelain furnace used. It is essential to carry out test firings, as described on page 5 of these instructions, before using the porcelains for actual restorations.
When applying large amounts of Paste Opaque or Powder Opaque, select a longer drying time at the furnace entrance and a longer preheating time, in order to thoroughly burn the liquid components.
When firing large restorations, it is also advisable to extend the drying time.
When applying porcelain layers > 1.5 mm in thickness to non-precious alloys or alloys with a CTE of > 14.5 x 10⁻⁶K-1, longterm cooling after firing may be beneficial, beginning with the 1st body firing.
Dryingtemp. °C
Dryingmin.
Preheatingmin.
Vacuumstart °C
Inc. temp.°C/min.
Final temp.°C
Vacuum end °C
Hold *min.
Base Opaque Powder 500 5 1 500 60 960 960 1
Shade Opaque Powder 500 5 1 500 60 950 950 1
Base Opaque Paste 500 5 1 500 60 960 960 1
Shade Opaque Paste 500 5 1 500 60 950 950 1
1. Margin 650 5 1 650 50 940 940 0.5
2. Margin 650 5 1 650 50 930 930 0.5
1. Cervcial, Body, Opaque Dentin, Opal Incisal, Opal Effect, Enamel Effect, Uni-Layer **, Color Effect
650 5 2 650 50 910 910 0.5
2. Cervcial, Body, Opaque Dentin, Opal Incisal, Opal Effect, Enamel Effect, Uni-Layer **, Color Effect
650 5 2 650 50 900 900 0.5
VINTAGE Art Glaze 600 5 2 – 60 870 – –
Gum 650 7 2 650 50 900 900 0.5
Gum-Glaze 650 5 2 – 60 900 – 0.5
Correction 650 5 1 650 60 870 870 0.5
Correction-Glaze 650 5 2 – 60 870 – 0.5
* Hold with vacuum
** Uni-Layer is not available in Europe!

30
Troubleshooting
Problem Cause Solution Note
Bubbles Occurrence of porosities in metal frame
If the porosities are large, remake the frame. If the porosities are small, grind off the surface.
If the metal frame has porosities where Opaque porcelain cannot be applied, the porosities will become small holes on the opaque layer. The air included in the holes gets heated and expands resulting in creating air bubbles.
The pastes incorporate water
When adjusting the paste viscosity, dilute with VINTAGE PRO Paste Opaque Liquid. In the case of applying Opaque porcelain with a brush, thoroughly remove excess water in advance from the brush.
VINTAGE PRO Paste Opaque Liquid incorporates organic components and its drying temperature and time are different from water.
Drying time is too short A minimum of 5 minutes drying time should be set.
VINTAGE PRO Opaque Liquids incorporate organic components.
Drying temperature is too high
Follow the drying time specifically outlined in this manual. When using a furnace with its thermocouple being mounted on the side of the drying table, drying temperature should be lowered by around 100 °C than prescribed drying temperature in this manual.
• Firing temperature varies depending on the furnace to be used. Visually check the firing conditions of the furnace before actual firing.
• Check the opaque applied surface after firing. In the case where convex parts are observed, correct them to avoid creating bubbles caused by additional firing and glaze firing.
Ununiform mixture or paste Mix well until getting a uniform mixture or paste.
Mix gently to avoid air bubbles.
Reuse of the dried paste
Use new paste If the paste is dried on the mixing pad, air is entrapped into the paste and the air expands to become air bubbles when fired.
Inadequate vacuum of the furnace
Check the setting of the firing program. Check the vacuum of the furnace.
If firing with inadequate vacuum, air bubbles remain in the interface between the metal frame and Opaque porcelain.Then the air bubbles expand while firing Body porcelain.
Opaque layer is raised Porcelain was not built up soon after pretreatment of the metal frame
Apply and fire Opaque porcelain immediately after metal surface treatment.
Build up porcelain immediately after the metal treatment to avoid weakened bonding strength.
Inadequate setting of the firing schedules
Check the drying temperature and time.
If the drying temperature is too high and the drying time is too long, fusing tends to start with the incisal area, resulting in lifting.
Cracks on the surface Opaque layer is not uniform or is too thick
Build up uniformly If the thickness of opaque layer is not uniform, cracks occur on the surface of opaque.
Drying time is too short Lengthen the drying time
Uneven shade after firing The paste incorporates water
When adjusting the viscosity, dilute with VINTAGE PRO Paste Opaque Liquid or VINTAGE PRO Powder Opaque Liquid. In the case of applying Opaque porcelain with a brush, thoroughly remove excess water in advance from the brush.
Luster on the surface after firing
Drying temperature is too high
Lower the drying temperature.
Yellow discolouration Affected by the components of the alloy
Check the metal composition If the alloy contains silver, select the one whose silver containing rate is 30 % or lower.
Dark shade Opaque layer is too thin Thicken the opaque layer
Paste Opaque / Powder Opaque
31
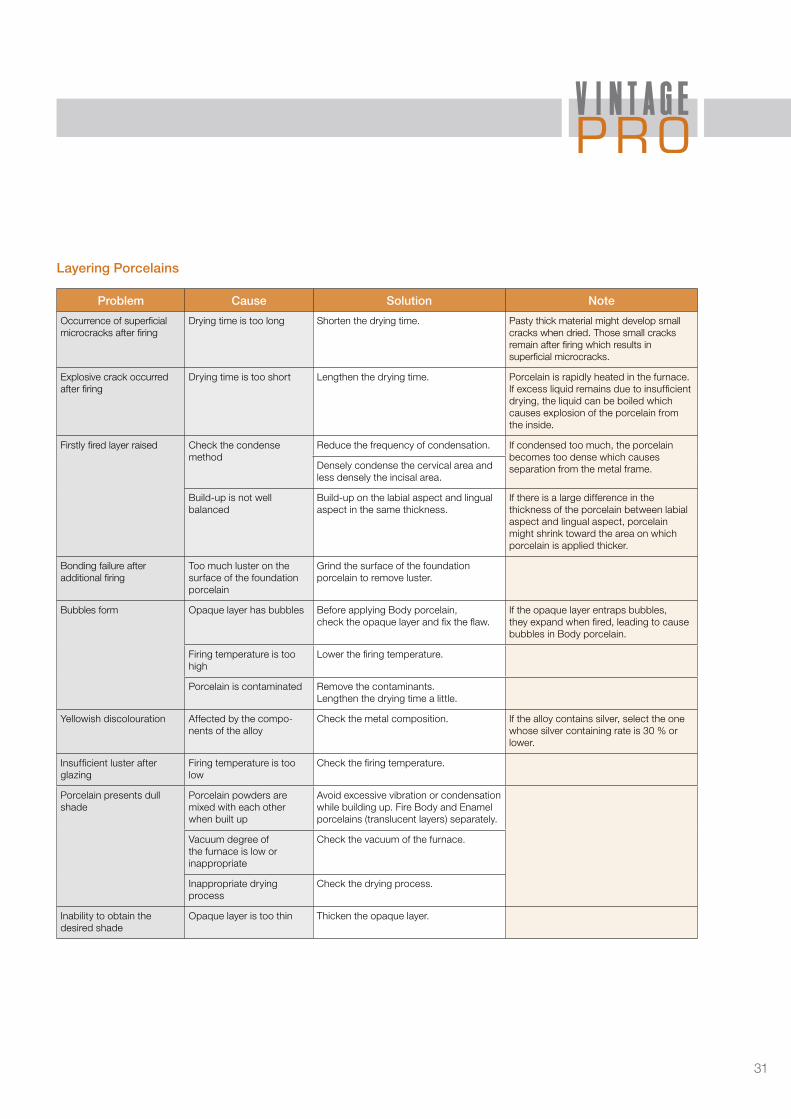
Problem Cause Solution Note
Occurrence of superficial microcracks after firing
Drying time is too long Shorten the drying time. Pasty thick material might develop small cracks when dried. Those small cracks remain after firing which results in superficial microcracks.
Explosive crack occurred after firing
Drying time is too short Lengthen the drying time. Porcelain is rapidly heated in the furnace. If excess liquid remains due to insufficient drying, the liquid can be boiled which causes explosion of the porcelain from the inside.
Firstly fired layer raised Check the condense method
Reduce the frequency of condensation. If condensed too much, the porcelain becomes too dense which causes separation from the metal frame.Densely condense the cervical area and
less densely the incisal area.
Build-up is not well balanced
Build-up on the labial aspect and lingual aspect in the same thickness.
If there is a large difference in the thickness of the porcelain between labial aspect and lingual aspect, porcelain might shrink toward the area on which porcelain is applied thicker.
Bonding failure after additional firing
Too much luster on the surface of the foundation porcelain
Grind the surface of the foundation porcelain to remove luster.
Bubbles form Opaque layer has bubbles Before applying Body porcelain, check the opaque layer and fix the flaw.
If the opaque layer entraps bubbles, they expand when fired, leading to cause bubbles in Body porcelain.
Firing temperature is too high
Lower the firing temperature.
Porcelain is contaminated Remove the contaminants.Lengthen the drying time a little.
Yellowish discolouration Affected by the compo-nents of the alloy
Check the metal composition. If the alloy contains silver, select the one whose silver containing rate is 30 % or lower.
Insufficient luster after glazing
Firing temperature is too low
Check the firing temperature.
Porcelain presents dull shade
Porcelain powders are mixed with each other when built up
Avoid excessive vibration or condensation while building up. Fire Body and Enamel porcelains (translucent layers) separately.
Vacuum degree of the furnace is low or inappropriate
Check the vacuum of the furnace.
Inappropriate drying process
Check the drying process.
Inability to obtain the desired shade
Opaque layer is too thin Thicken the opaque layer.
Layering Porcelains
6299
02 ·
08/2
017
Photos courtesy of
German Bär, MDT
Yekaterina Nazarenus, DT
You will find further information on our website at www.shofu.de


