
OptionsShower rail range Shower rails
Shower rail kit – OPN6001 & OPN6002
The adjustable height head is supplied with universal fixings intended to secure it to a suitable wall.!
Mount the template to the wall in the required position ensuring
vertical alignment using a spirit level to facilitate if necessary. Carefully
mark the two fixing holes, depending on the rail length selected. Check
the intended position for the rail assembly before removing the template,
then drill and prepare the fixing points, using the fixings provided, if
suitable.
1
The minimum distance from the top fixing to the ceiling is detailed on
the template. If there is coving or an alternative obstruction then this
distance must still be accounted for.
!
Fix the top wall bracket to the appropriate position using the screws
provided if suitable ensuring that the arrow on the bracket is facing
upwards. Insert the nut into the slot above the screw hole and push
fully home.
2
Fix the bottom wall bracket to the appropriate position using the
screws provided if suitable ensuring that the arrow on the bracket is
facing downwards. Insert the nut into the slot below the screw hole
and push fully home.
3
Before mounting the rail to the wall ensure that both the hose
restraint and the handset holder are positioned. Carefully slide the
handset holder onto the rail in the correct orientation, with the finger
grips pointing downwards. Slide the gel hanger onto the rail under the
handset holder.
4
Offer the assembly up to both the wall brackets before pushing it
home. Insert the fixing bolt into the rail end cap and secure it to
top bracket using a 4mm Allen key. Repeat for the bottom bracket.
5
Attach the shower hose, ensuring the hose washer is correctly fitted and flush the system through
for a few seconds.6
Turn off the shower and pass the hose through the gel hanger/hose
restraint.7
Shower rail kit – OPN6003
Drill and prepare 2 holes between 550mm (minimum) and 805mm (maximum) apart using the
fixings provided, if suitable.1
Ensuring the handset holder is in the correct orientation, with the widest
part of the cradle uppermost, carefully slide the handset holder onto the
rail. Slide the gel hanger onto the rail under the handset holder.
2
Current water supply regulations state that the handset should not be allowed to pass a point 25mm
above the spill over level of the bath or shower tray. If this cannot be achieved, the hose must be
passed through the gel hook which has also been designed to be utilised as a hose restraint.
3
The top rail bracket can be adjusted to suit existing screw holes in the finished wall by sliding the
bracket up or down the rail to suit the required position.!
Fix the top rail bracket into position using the screws provided, if
suitable.4
Slide the rail assembly up through the top rail fixing bracket
and temporarily support whilst fixing the bottom bracket.5
Fix the bottom bracket to the wall using the screws
provided, if suitable.6
Ensuring the rail cut out aligns with the guide on the
rail bracket, slide the rail assembly into position and
lock into place.
7
if the rail needs to be removed at any stage, insert the
special tool provided into the rear of the bottom rail bracket
to disengage the rail locking tab. Carefully ease the rail up
and away from the fixing bracket.
!
Pass the hose through the gel hook.8
Current water supply regulations state that the handset should not be
allowed to pass a point 25mm above the spill over level of the bath or
shower tray. If this cannot be achieved, the hose must be passed
through the gel hook which has also been designed to be utilised as
a hose restraint.
!
OptionsShower rail range Shower rail with 3 spray handset
Important information
This product must be installed by a competent person in accordance with the relevant current Water
Supply Regulations.
The Aqualisa Options range of accessories are supplied complete with a 2 year guarantee.
In the event of any product problems, please contact the Aqualisa Customer Helpline on
01959 560010.
!
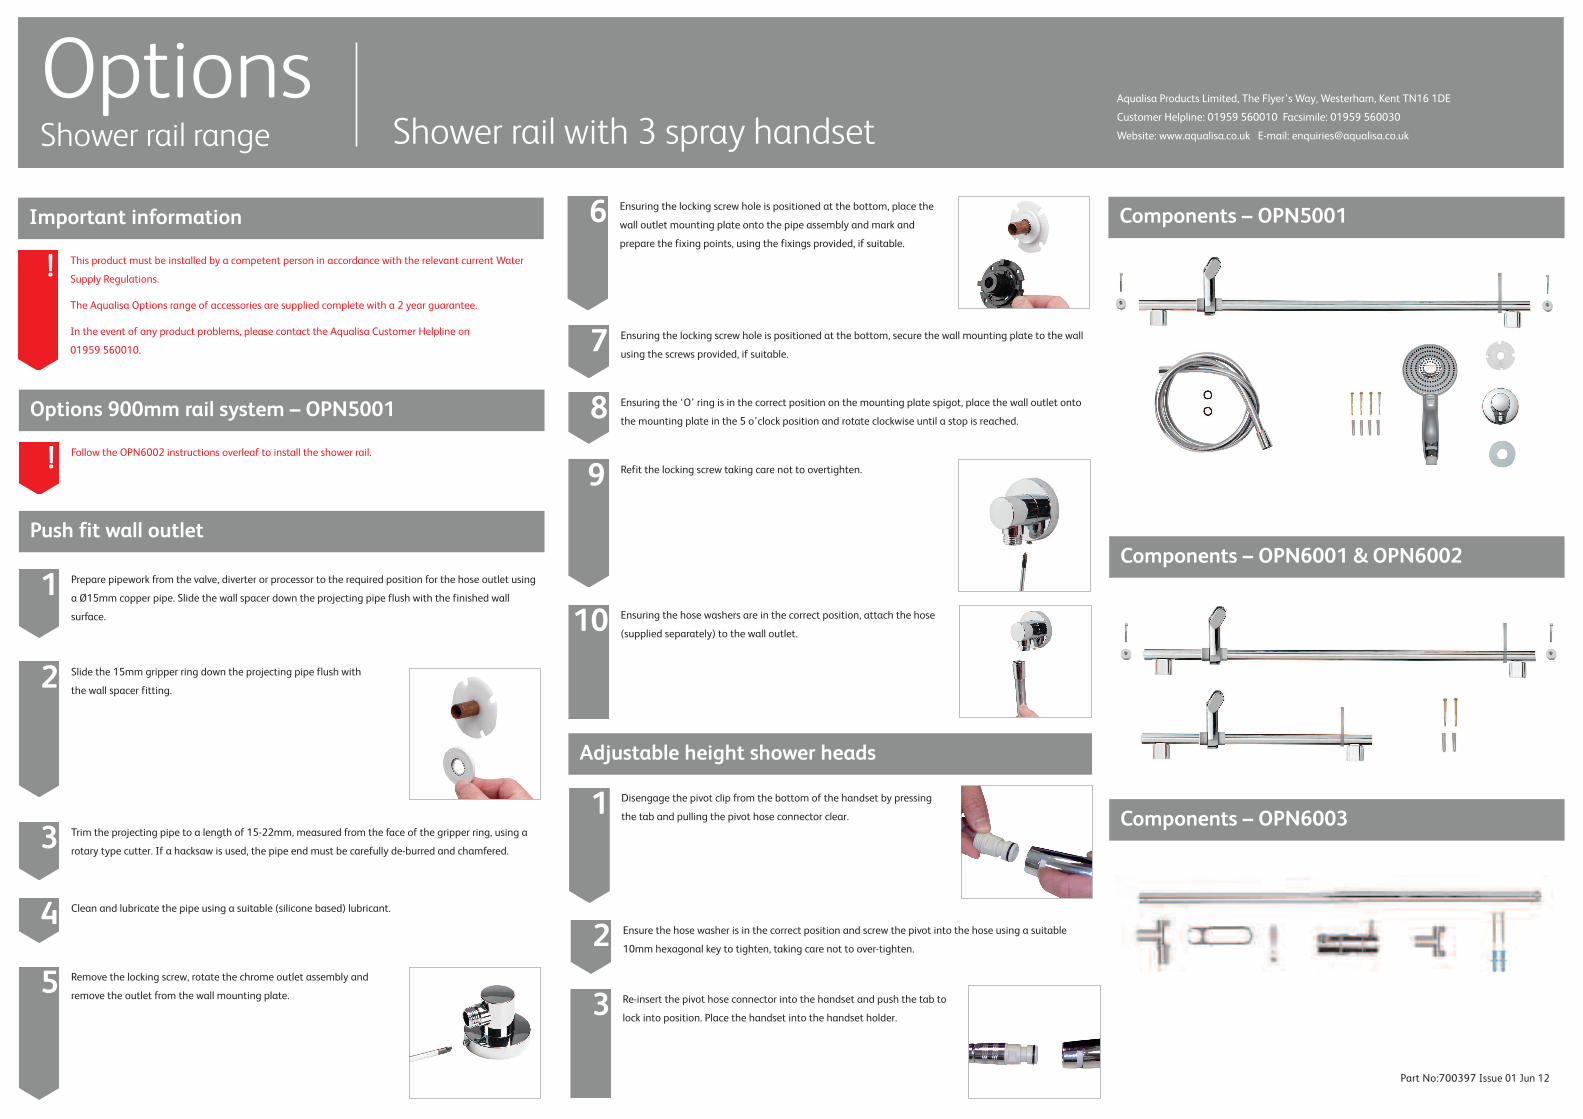
Push fit wall outlet
Prepare pipework from the valve, diverter or processor to the required position for the hose outlet using
a Ø15mm copper pipe. Slide the wall spacer down the projecting pipe flush with the finished wall
surface.
1
Slide the 15mm gripper ring down the projecting pipe flush with
the wall spacer fitting.2
Trim the projecting pipe to a length of 15-22mm, measured from the face of the gripper ring, using a
rotary type cutter. If a hacksaw is used, the pipe end must be carefully de-burred and chamfered.3
Clean and lubricate the pipe using a suitable (silicone based) lubricant.4
Remove the locking screw, rotate the chrome outlet assembly and
remove the outlet from the wall mounting plate.5
Ensuring the locking screw hole is positioned at the bottom, place the
wall outlet mounting plate onto the pipe assembly and mark and
prepare the fixing points, using the fixings provided, if suitable.
6
Ensuring the locking screw hole is positioned at the bottom, secure the wall mounting plate to the wall
using the screws provided, if suitable.7
Ensuring the ‘O’ ring is in the correct position on the mounting plate spigot, place the wall outlet onto
the mounting plate in the 5 o’clock position and rotate clockwise until a stop is reached.8
Refit the locking screw taking care not to overtighten.9
Ensuring the hose washers are in the correct position, attach the hose
(supplied separately) to the wall outlet.10
Part No:700397 Issue 01 Jun 12
Aqualisa Products Limited, The Flyer’s Way, Westerham, Kent TN16 1DE
Customer Helpline: 01959 560010 Facsimile: 01959 560030
Website: www.aqualisa.co.uk E-mail: [email protected]
Components – OPN5001
Components – OPN6001 & OPN6002
Options 900mm rail system – OPN5001
Follow the OPN6002 instructions overleaf to install the shower rail.!
Components – OPN6003Disengage the pivot clip from the bottom of the handset by pressing
the tab and pulling the pivot hose connector clear.1
Ensure the hose washer is in the correct position and screw the pivot into the hose using a suitable
10mm hexagonal key to tighten, taking care not to over-tighten.2
Re-insert the pivot hose connector into the handset and push the tab to
lock into position. Place the handset into the handset holder.3
Adjustable height shower heads


