Download - PC_861_AdministratorGuide.pdf

Informatica® PowerCenter® (Version 8.6.1)
Administrator Guide

Informatica PowerCenter Administrator Guide
Version 8.6.1 January 2009
Copyright (c) 1998–2009 Informatica Corporation. All rights reserved.
This software and documentation contain proprietary information of Informatica Corporation and are provided under a license agreement containing restrictions on use and disclosure and are also protected by copyright law. Reverse engineering of the software is prohibited. No part of this document may be reproduced or transmitted in any form, by any means (electronic, photocopying, recording or otherwise) without prior consent of Informatica Corporation. This Software may be protected by U.S. and/or international Patents and other Patents Pending.
Use, duplication, or disclosure of the Software by the U.S. Government is subject to the restrictions set forth in the applicable software license agreement and as provided in DFARS 227.7202-1(a) and 227.7702-3(a) (1995), DFARS 252.227-7013(c)(1)(ii) (OCT 1988), FAR 12.212(a) (1995), FAR 52.227-19, or FAR 52.227-14 (ALT III), as applicable.
The information in this product or documentation is subject to change without notice. If you find any problems in this product or documentation, please report them to us in writing.
Informatica, PowerCenter, PowerCenterRT, PowerCenter Connect, PowerCenter Data Analyzer, PowerExchange, PowerMart, Metadata Manager, Informatica Data Quality, Informatica Data Explorer, Informatica B2B Data Exchange and Informatica On Demand are trademarks or registered trademarks of Informatica Corporation in the United States and in jurisdictions throughout the world. All other company and product names may be trade names or trademarks of their respective owners.
Portions of this software and/or documentation are subject to copyright held by third parties, including without limitation: Copyright DataDirect Technologies. All rights reserved. Copyright © 2007 Adobe Systems Incorporated. All rights reserved. Copyright © Sun Microsystems. All rights reserved. Copyright © RSA Security Inc. All Rights Reserved. Copyright © Ordinal Technology Corp. All rights reserved. Copyright © Platon Data Technology GmbH. All rights reserved. Copyright © Melissa Data Corporation. All rights reserved. Copyright © Aandacht c.v. All rights reserved. Copyright 1996-2007 ComponentSource®. All rights reserved. Copyright Genivia, Inc. All rights reserved. Copyright 2007 Isomorphic Software. All rights reserved. Copyright © Meta Integration Technology, Inc. All rights reserved. Copyright © Microsoft. All rights reserved. Copyright © Oracle. All rights reserved. Copyright © AKS-Labs. All rights reserved. Copyright © Quovadx, Inc. All rights reserved. Copyright © SAP. All rights reserved. Copyright 2003, 2007 Instantiations, Inc. All rights reserved. Copyright © Intalio. All rights reserved.
This product includes software developed by the Apache Software Foundation (http://www.apache.org/), software copyright 2004-2005 Open Symphony (all rights reserved) and other software which is licensed under the Apache License, Version 2.0 (the “License”). You may obtain a copy of the License at http://www.apache.org/licenses/LICENSE-2.0. Unless required by applicable law or agreed to in writing, software distributed under the License is distributed on an “AS IS” BASIS, WITHOUT WARRANTIES OR CONDITIONS OF ANY KIND, either express or implied. See the License for the specific language governing permissions and limitations under the License.
This product includes software which was developed by Mozilla (http://www.mozilla.org/), software copyright The JBoss Group, LLC, all rights reserved; software copyright, Red Hat Middleware, LLC, all rights reserved; software copyright © 1999-2006 by Bruno Lowagie and Paulo Soares and other software which is licensed under the GNU Lesser General Public License Agreement, which may be found at http://www.gnu.org/licenses/lgpl.html. The materials are provided free of charge by Informatica, “as-is”, without warranty of any kind, either express or implied, including but not limited to the implied warranties of merchantability and fitness for a particular purpose.
The product includes ACE(TM) and TAO(TM) software copyrighted by Douglas C. Schmidt and his research group at Washington University, University of California, Irvine, and Vanderbilt University, Copyright (c) 1993-2006, all rights reserved.
This product includes software copyright (c) 2003-2007, Terence Parr. All rights reserved. Your right to use such materials is set forth in the license which may be found at http://www.antlr.org/license.html. The materials are provided free of charge by Informatica, “as-is”, without warranty of any kind, either express or implied, including but not limited to the implied warranties of merchantability and fitness for a particular purpose.
This product includes software developed by the OpenSSL Project for use in the OpenSSL Toolkit (copyright The OpenSSL Project. All Rights Reserved) and redistribution of this software is subject to terms available at http://www.openssl.org.
This product includes Curl software which is Copyright 1996-2007, Daniel Stenberg, <[email protected]>. All Rights Reserved. Permissions and limitations regarding this software are subject to terms available at http://curl.haxx.se/docs/copyright.html. Permission to use, copy, modify, and distribute this software for any purpose with or without fee is hereby granted, provided that the above copyright notice and this permission notice appear in all copies.
The product includes software copyright 2001-2005 (C) MetaStuff, Ltd. All Rights Reserved. Permissions and limitations regarding this software are subject to terms available at http://www.dom4j.org/license.html.
The product includes software copyright (c) 2004-2007, The Dojo Foundation. All Rights Reserved. Permissions and limitations regarding this software are subject to terms available at http://svn.dojotoolkit.org/dojo/trunk/LICENSE.
This product includes ICU software which is copyright (c) 1995-2003 International Business Machines Corporation and others. All rights reserved. Permissions and limitations regarding this software are subject to terms available at http://www-306.ibm.com/software/globalization/icu/license.jsp
This product includes software copyright (C) 1996-2006 Per Bothner. All rights reserved. Your right to use such materials is set forth in the license which may be found at http://www.gnu.org/software/kawa/Software-License.html.
This product includes OSSP UUID software which is Copyright (c) 2002 Ralf S. Engelschall, Copyright (c) 2002 The OSSP Project Copyright (c) 2002 Cable & Wireless Deutschland. Permissions and limitations regarding this software are subject to terms available at http://www.opensource.org/licenses/mit-license.php.
This product includes software developed by Boost (http://www.boost.org/) or under the Boost software license. Permissions and limitations regarding this software are subject to terms available at http://www.boost.org/LICENSE_1_0.txt.
This product includes software copyright © 1997-2007 University of Cambridge. Permissions and limitations regarding this software are subject to terms available at http://www.pcre.org/license.txt.
This product includes software copyright (c) 2007 The Eclipse Foundation. All Rights Reserved. Permissions and limitations regarding this software are subject to terms available at http://www.eclipse.org/org/documents/epl-v10.php.
The product includes the zlib library copyright (c) 1995-2005 Jean-loup Gailly and Mark Adler.
This product includes software licensed under the terms at http://www.tcl.tk/software/tcltk/license.html.
This product includes software licensed under the terms at http://www.bosrup.com/web/overlib/?License.
This product includes software licensed under the terms at http://www.stlport.org/doc/license.html.
This product includes software licensed under the Academic Free License (http://www.opensource.org/licenses/afl-3.0.php). This product includes software copyright © 2003-2006 Joe WaInes, 2006-2007 XStream Committers. All rights reserved. Permissions and limitations regarding this software are subject to terms available at http://xstream.codehaus.org/license.html. This product includes software developed by the Indiana University Extreme! Lab. For further information please visit http://www.extreme.indiana.edu/.
This Software is protected by U.S. Patent Numbers 6,208,990; 6,044,374; 6,014,670; 6,032,158; 5,794,246; 6,339,775; 6,850,947; 6,895,471; 7,254,590 and other U.S. Patents Pending.
DISCLAIMER: Informatica Corporation provides this documentation “as is” without warranty of any kind, either express or implied, including, but not limited to, the implied warranties of non-infringement, merchantability, or use for a particular purpose. Informatica Corporation does not warrant that this software or documentation is error free. The information provided in this software or documentation may include technical inaccuracies or typographical errors. The information in this software and documentation is subject to change at any time without notice.
Part Number: PC-ADG-86100-0003

Table of Contents
Preface . . . . . . . . . . . . . . . . . . . . . . . . . . . . . . . . . . . . . . . . . . . . . . . . . . . . . . . . . . . . xviiInformatica Resources . . . . . . . . . . . . . . . . . . . . . . . . . . . . . . . . . . . . . . . . . . . . . . . . . . . xvii
Informatica Customer Portal . . . . . . . . . . . . . . . . . . . . . . . . . . . . . . . . . . . . . . . . . . . xvii
Informatica Documentation . . . . . . . . . . . . . . . . . . . . . . . . . . . . . . . . . . . . . . . . . . . . xvii
Informatica Web Site . . . . . . . . . . . . . . . . . . . . . . . . . . . . . . . . . . . . . . . . . . . . . . . . . xvii
Informatica How-To Library . . . . . . . . . . . . . . . . . . . . . . . . . . . . . . . . . . . . . . . . . . . xvii
Informatica Knowledge Base . . . . . . . . . . . . . . . . . . . . . . . . . . . . . . . . . . . . . . . . . . . xviii
Informatica Global Customer Support . . . . . . . . . . . . . . . . . . . . . . . . . . . . . . . . . . . . xviii
Chapter 1: Understanding Domains . . . . . . . . . . . . . . . . . . . . . . . . . . . . . . . . . . . . . . . 1Overview . . . . . . . . . . . . . . . . . . . . . . . . . . . . . . . . . . . . . . . . . . . . . . . . . . . . . . . . . . . . . . 1
Nodes . . . . . . . . . . . . . . . . . . . . . . . . . . . . . . . . . . . . . . . . . . . . . . . . . . . . . . . . . . . . . . . . . 2
Gateway Nodes . . . . . . . . . . . . . . . . . . . . . . . . . . . . . . . . . . . . . . . . . . . . . . . . . . . . . . . 2
Worker Nodes . . . . . . . . . . . . . . . . . . . . . . . . . . . . . . . . . . . . . . . . . . . . . . . . . . . . . . . . 2
Service Manager . . . . . . . . . . . . . . . . . . . . . . . . . . . . . . . . . . . . . . . . . . . . . . . . . . . . . . . . . 2
Application Services . . . . . . . . . . . . . . . . . . . . . . . . . . . . . . . . . . . . . . . . . . . . . . . . . . . . . . 4
Integration Service . . . . . . . . . . . . . . . . . . . . . . . . . . . . . . . . . . . . . . . . . . . . . . . . . . . . 5
Repository Service . . . . . . . . . . . . . . . . . . . . . . . . . . . . . . . . . . . . . . . . . . . . . . . . . . . . . 5
Reporting Service . . . . . . . . . . . . . . . . . . . . . . . . . . . . . . . . . . . . . . . . . . . . . . . . . . . . . 5
Metadata Manager Service . . . . . . . . . . . . . . . . . . . . . . . . . . . . . . . . . . . . . . . . . . . . . . . 6
SAP BW Service . . . . . . . . . . . . . . . . . . . . . . . . . . . . . . . . . . . . . . . . . . . . . . . . . . . . . . 6
Web Services Hub . . . . . . . . . . . . . . . . . . . . . . . . . . . . . . . . . . . . . . . . . . . . . . . . . . . . . 6
Reference Table Manager Service . . . . . . . . . . . . . . . . . . . . . . . . . . . . . . . . . . . . . . . . . . 6
Security . . . . . . . . . . . . . . . . . . . . . . . . . . . . . . . . . . . . . . . . . . . . . . . . . . . . . . . . . . . . . . . 6
Encryption . . . . . . . . . . . . . . . . . . . . . . . . . . . . . . . . . . . . . . . . . . . . . . . . . . . . . . . . . . 6
Authentication . . . . . . . . . . . . . . . . . . . . . . . . . . . . . . . . . . . . . . . . . . . . . . . . . . . . . . . 7
Authorization . . . . . . . . . . . . . . . . . . . . . . . . . . . . . . . . . . . . . . . . . . . . . . . . . . . . . . . . 7
High Availability . . . . . . . . . . . . . . . . . . . . . . . . . . . . . . . . . . . . . . . . . . . . . . . . . . . . . . . . . 8
Mixed-Version Domains . . . . . . . . . . . . . . . . . . . . . . . . . . . . . . . . . . . . . . . . . . . . . . . . . . . 8
Chapter 2: Using the Administration Console . . . . . . . . . . . . . . . . . . . . . . . . . . . . . . 11Overview . . . . . . . . . . . . . . . . . . . . . . . . . . . . . . . . . . . . . . . . . . . . . . . . . . . . . . . . . . . . . 11
Logging In . . . . . . . . . . . . . . . . . . . . . . . . . . . . . . . . . . . . . . . . . . . . . . . . . . . . . . . . . . . . 11
Managing Your Account . . . . . . . . . . . . . . . . . . . . . . . . . . . . . . . . . . . . . . . . . . . . . . . . . . . 12
Configuring HTTPS . . . . . . . . . . . . . . . . . . . . . . . . . . . . . . . . . . . . . . . . . . . . . . . . . . . . . 13
Creating a Keystore File . . . . . . . . . . . . . . . . . . . . . . . . . . . . . . . . . . . . . . . . . . . . . . . . 14
Configuring HTTPS Using infasetup . . . . . . . . . . . . . . . . . . . . . . . . . . . . . . . . . . . . . . 14
Domain Page . . . . . . . . . . . . . . . . . . . . . . . . . . . . . . . . . . . . . . . . . . . . . . . . . . . . . . . . . . . 14
Domain Tab . . . . . . . . . . . . . . . . . . . . . . . . . . . . . . . . . . . . . . . . . . . . . . . . . . . . . . . . 15
Logs Tab . . . . . . . . . . . . . . . . . . . . . . . . . . . . . . . . . . . . . . . . . . . . . . . . . . . . . . . . . . . 16
Permissions Tab . . . . . . . . . . . . . . . . . . . . . . . . . . . . . . . . . . . . . . . . . . . . . . . . . . . . . 17
Reports Tab . . . . . . . . . . . . . . . . . . . . . . . . . . . . . . . . . . . . . . . . . . . . . . . . . . . . . . . . 17
i i i
Diagnostics Tab . . . . . . . . . . . . . . . . . . . . . . . . . . . . . . . . . . . . . . . . . . . . . . . . . . . . . 17
Upgrade Tab . . . . . . . . . . . . . . . . . . . . . . . . . . . . . . . . . . . . . . . . . . . . . . . . . . . . . . . . 18
Manage Account Tab . . . . . . . . . . . . . . . . . . . . . . . . . . . . . . . . . . . . . . . . . . . . . . . . . . 18
Using the Navigator . . . . . . . . . . . . . . . . . . . . . . . . . . . . . . . . . . . . . . . . . . . . . . . . . . 19
Domain . . . . . . . . . . . . . . . . . . . . . . . . . . . . . . . . . . . . . . . . . . . . . . . . . . . . . . . . . . . 19
Folders . . . . . . . . . . . . . . . . . . . . . . . . . . . . . . . . . . . . . . . . . . . . . . . . . . . . . . . . . . . . 20
Application Services . . . . . . . . . . . . . . . . . . . . . . . . . . . . . . . . . . . . . . . . . . . . . . . . . . 20
Grids . . . . . . . . . . . . . . . . . . . . . . . . . . . . . . . . . . . . . . . . . . . . . . . . . . . . . . . . . . . . . 25
Licenses . . . . . . . . . . . . . . . . . . . . . . . . . . . . . . . . . . . . . . . . . . . . . . . . . . . . . . . . . . . 25
Security Page . . . . . . . . . . . . . . . . . . . . . . . . . . . . . . . . . . . . . . . . . . . . . . . . . . . . . . . . . . . 25
Search Section . . . . . . . . . . . . . . . . . . . . . . . . . . . . . . . . . . . . . . . . . . . . . . . . . . . . . . . 26
Using the Navigator . . . . . . . . . . . . . . . . . . . . . . . . . . . . . . . . . . . . . . . . . . . . . . . . . . 27
Groups . . . . . . . . . . . . . . . . . . . . . . . . . . . . . . . . . . . . . . . . . . . . . . . . . . . . . . . . . . . . 28
Users . . . . . . . . . . . . . . . . . . . . . . . . . . . . . . . . . . . . . . . . . . . . . . . . . . . . . . . . . . . . . 29
Roles . . . . . . . . . . . . . . . . . . . . . . . . . . . . . . . . . . . . . . . . . . . . . . . . . . . . . . . . . . . . . 30
Keyboard Shortcuts . . . . . . . . . . . . . . . . . . . . . . . . . . . . . . . . . . . . . . . . . . . . . . . . . . . . . . 30
Chapter 3: Managing the Domain . . . . . . . . . . . . . . . . . . . . . . . . . . . . . . . . . . . . . . . . 31Overview . . . . . . . . . . . . . . . . . . . . . . . . . . . . . . . . . . . . . . . . . . . . . . . . . . . . . . . . . . . . . 31
Managing Alerts . . . . . . . . . . . . . . . . . . . . . . . . . . . . . . . . . . . . . . . . . . . . . . . . . . . . . . . . 32
Configuring SMTP Settings . . . . . . . . . . . . . . . . . . . . . . . . . . . . . . . . . . . . . . . . . . . . . 32
Subscribing to Alerts . . . . . . . . . . . . . . . . . . . . . . . . . . . . . . . . . . . . . . . . . . . . . . . . . . 33
Viewing Alerts . . . . . . . . . . . . . . . . . . . . . . . . . . . . . . . . . . . . . . . . . . . . . . . . . . . . . . 33
Managing Folders . . . . . . . . . . . . . . . . . . . . . . . . . . . . . . . . . . . . . . . . . . . . . . . . . . . . . . . 33
Creating a Folder . . . . . . . . . . . . . . . . . . . . . . . . . . . . . . . . . . . . . . . . . . . . . . . . . . . . 34
Moving Objects to a Folder . . . . . . . . . . . . . . . . . . . . . . . . . . . . . . . . . . . . . . . . . . . . . 34
Removing a Folder . . . . . . . . . . . . . . . . . . . . . . . . . . . . . . . . . . . . . . . . . . . . . . . . . . . 35
Managing Permissions . . . . . . . . . . . . . . . . . . . . . . . . . . . . . . . . . . . . . . . . . . . . . . . . . . . . 35
Inherited and Object Permissions . . . . . . . . . . . . . . . . . . . . . . . . . . . . . . . . . . . . . . . . . 35
Steps to Assign Permissions . . . . . . . . . . . . . . . . . . . . . . . . . . . . . . . . . . . . . . . . . . . . . 36
Managing Application Services . . . . . . . . . . . . . . . . . . . . . . . . . . . . . . . . . . . . . . . . . . . . . . 37
Enabling and Disabling Services and Service Processes . . . . . . . . . . . . . . . . . . . . . . . . . . 37
Configuring Restart for Service Processes . . . . . . . . . . . . . . . . . . . . . . . . . . . . . . . . . . . 39
Removing Application Services . . . . . . . . . . . . . . . . . . . . . . . . . . . . . . . . . . . . . . . . . . . 39
Troubleshooting Application Services . . . . . . . . . . . . . . . . . . . . . . . . . . . . . . . . . . . . . . 39
Managing Nodes . . . . . . . . . . . . . . . . . . . . . . . . . . . . . . . . . . . . . . . . . . . . . . . . . . . . . . . . 39
Defining and Adding Nodes . . . . . . . . . . . . . . . . . . . . . . . . . . . . . . . . . . . . . . . . . . . . . 40
Configuring Node Properties . . . . . . . . . . . . . . . . . . . . . . . . . . . . . . . . . . . . . . . . . . . . 41
Viewing Processes on the Node . . . . . . . . . . . . . . . . . . . . . . . . . . . . . . . . . . . . . . . . . . 43
Shutting Down and Restarting the Node . . . . . . . . . . . . . . . . . . . . . . . . . . . . . . . . . . . 43
Removing a Node . . . . . . . . . . . . . . . . . . . . . . . . . . . . . . . . . . . . . . . . . . . . . . . . . . . . 44
Managing the Gateway . . . . . . . . . . . . . . . . . . . . . . . . . . . . . . . . . . . . . . . . . . . . . . . . . . . 44
Managing a Mixed-Version Domain . . . . . . . . . . . . . . . . . . . . . . . . . . . . . . . . . . . . . . . . . . 45
Upgrading Application Services Versions . . . . . . . . . . . . . . . . . . . . . . . . . . . . . . . . . . . . 46
Configuring Services and Repository Domains . . . . . . . . . . . . . . . . . . . . . . . . . . . . . . . 46
Shutting Down a Domain . . . . . . . . . . . . . . . . . . . . . . . . . . . . . . . . . . . . . . . . . . . . . . . . . 47
iv Table of Contents

Managing the Domain Configuration . . . . . . . . . . . . . . . . . . . . . . . . . . . . . . . . . . . . . . . . . 47
Domain Configuration Database . . . . . . . . . . . . . . . . . . . . . . . . . . . . . . . . . . . . . . . . . 48
Backing Up the Domain Configuration . . . . . . . . . . . . . . . . . . . . . . . . . . . . . . . . . . . . 48
Restoring the Domain Configuration . . . . . . . . . . . . . . . . . . . . . . . . . . . . . . . . . . . . . . 49
Migrating the Domain Configuration . . . . . . . . . . . . . . . . . . . . . . . . . . . . . . . . . . . . . . 49
Updating the Domain Configuration Database Connection . . . . . . . . . . . . . . . . . . . . . . 51
Custom Properties . . . . . . . . . . . . . . . . . . . . . . . . . . . . . . . . . . . . . . . . . . . . . . . . . . . . 51
Domain Properties Reference . . . . . . . . . . . . . . . . . . . . . . . . . . . . . . . . . . . . . . . . . . . . . . . 51
General Properties . . . . . . . . . . . . . . . . . . . . . . . . . . . . . . . . . . . . . . . . . . . . . . . . . . . . 52
Database Properties . . . . . . . . . . . . . . . . . . . . . . . . . . . . . . . . . . . . . . . . . . . . . . . . . . . 52
Log and Gateway Configuration . . . . . . . . . . . . . . . . . . . . . . . . . . . . . . . . . . . . . . . . . . 52
Service Level Management . . . . . . . . . . . . . . . . . . . . . . . . . . . . . . . . . . . . . . . . . . . . . . 53
SMTP Configuration . . . . . . . . . . . . . . . . . . . . . . . . . . . . . . . . . . . . . . . . . . . . . . . . . . 53
Chapter 4: Managing Users and Groups . . . . . . . . . . . . . . . . . . . . . . . . . . . . . . . . . . 55Overview . . . . . . . . . . . . . . . . . . . . . . . . . . . . . . . . . . . . . . . . . . . . . . . . . . . . . . . . . . . . . 55
Understanding User Accounts . . . . . . . . . . . . . . . . . . . . . . . . . . . . . . . . . . . . . . . . . . . . . . 56
Default Administrator . . . . . . . . . . . . . . . . . . . . . . . . . . . . . . . . . . . . . . . . . . . . . . . . . 56
Domain Administrator . . . . . . . . . . . . . . . . . . . . . . . . . . . . . . . . . . . . . . . . . . . . . . . . 56
Application Administrator . . . . . . . . . . . . . . . . . . . . . . . . . . . . . . . . . . . . . . . . . . . . . . 56
User . . . . . . . . . . . . . . . . . . . . . . . . . . . . . . . . . . . . . . . . . . . . . . . . . . . . . . . . . . . . . . 57
Understanding Authentication and Security Domains . . . . . . . . . . . . . . . . . . . . . . . . . . . . . 57
Native Authentication . . . . . . . . . . . . . . . . . . . . . . . . . . . . . . . . . . . . . . . . . . . . . . . . . 57
LDAP Authentication . . . . . . . . . . . . . . . . . . . . . . . . . . . . . . . . . . . . . . . . . . . . . . . . . 58
Setting Up LDAP Authentication . . . . . . . . . . . . . . . . . . . . . . . . . . . . . . . . . . . . . . . . . . . . 58
Step 1. Set Up the Connection to the LDAP Server . . . . . . . . . . . . . . . . . . . . . . . . . . . . 59
Step 2. Configure Security Domains . . . . . . . . . . . . . . . . . . . . . . . . . . . . . . . . . . . . . . . 60
Step 3. Schedule the Synchronization Times . . . . . . . . . . . . . . . . . . . . . . . . . . . . . . . . . 62
Deleting an LDAP Security Domain . . . . . . . . . . . . . . . . . . . . . . . . . . . . . . . . . . . . . . . 62
Using a Self-Signed SSL Certificate . . . . . . . . . . . . . . . . . . . . . . . . . . . . . . . . . . . . . . . 62
Using Nested Groups in the LDAP Directory Service . . . . . . . . . . . . . . . . . . . . . . . . . . 63
Managing Users . . . . . . . . . . . . . . . . . . . . . . . . . . . . . . . . . . . . . . . . . . . . . . . . . . . . . . . . . 63
Adding Native Users . . . . . . . . . . . . . . . . . . . . . . . . . . . . . . . . . . . . . . . . . . . . . . . . . . 63
Editing General Properties of Native Users . . . . . . . . . . . . . . . . . . . . . . . . . . . . . . . . . . 64
Assigning Users to Native Groups . . . . . . . . . . . . . . . . . . . . . . . . . . . . . . . . . . . . . . . . . 65
Enabling and Disabling User Accounts . . . . . . . . . . . . . . . . . . . . . . . . . . . . . . . . . . . . . 65
Deleting Native Users . . . . . . . . . . . . . . . . . . . . . . . . . . . . . . . . . . . . . . . . . . . . . . . . . 65
Managing Groups . . . . . . . . . . . . . . . . . . . . . . . . . . . . . . . . . . . . . . . . . . . . . . . . . . . . . . . 66
Adding a Native Group . . . . . . . . . . . . . . . . . . . . . . . . . . . . . . . . . . . . . . . . . . . . . . . . 66
Editing Properties of a Native Group . . . . . . . . . . . . . . . . . . . . . . . . . . . . . . . . . . . . . . 67
Moving a Native Group to Another Native Group . . . . . . . . . . . . . . . . . . . . . . . . . . . . . 67
Deleting a Native Group . . . . . . . . . . . . . . . . . . . . . . . . . . . . . . . . . . . . . . . . . . . . . . . 67
Managing Operating System Profiles . . . . . . . . . . . . . . . . . . . . . . . . . . . . . . . . . . . . . . . . . 67
Steps to Configure an Operating System Profile . . . . . . . . . . . . . . . . . . . . . . . . . . . . . . 68
Create Operating System Profiles . . . . . . . . . . . . . . . . . . . . . . . . . . . . . . . . . . . . . . . . . 68
Properties of Operating System Profiles . . . . . . . . . . . . . . . . . . . . . . . . . . . . . . . . . . . . 68
Table of Contents v

Permissions on Operating System Profiles . . . . . . . . . . . . . . . . . . . . . . . . . . . . . . . . . . . 69
Chapter 5: Managing Privileges and Roles . . . . . . . . . . . . . . . . . . . . . . . . . . . . . . . . 71Overview . . . . . . . . . . . . . . . . . . . . . . . . . . . . . . . . . . . . . . . . . . . . . . . . . . . . . . . . . . . . . 71
Privileges . . . . . . . . . . . . . . . . . . . . . . . . . . . . . . . . . . . . . . . . . . . . . . . . . . . . . . . . . . 71
Roles . . . . . . . . . . . . . . . . . . . . . . . . . . . . . . . . . . . . . . . . . . . . . . . . . . . . . . . . . . . . . 72
Permissions . . . . . . . . . . . . . . . . . . . . . . . . . . . . . . . . . . . . . . . . . . . . . . . . . . . . . . . . . 73
Domain Privileges . . . . . . . . . . . . . . . . . . . . . . . . . . . . . . . . . . . . . . . . . . . . . . . . . . . . . . . 73
Tools Privilege Group . . . . . . . . . . . . . . . . . . . . . . . . . . . . . . . . . . . . . . . . . . . . . . . . . 74
Security Administration Privilege Group . . . . . . . . . . . . . . . . . . . . . . . . . . . . . . . . . . . . 74
Domain Administration Privilege Group . . . . . . . . . . . . . . . . . . . . . . . . . . . . . . . . . . . . 75
Repository Service Privileges . . . . . . . . . . . . . . . . . . . . . . . . . . . . . . . . . . . . . . . . . . . . . . . 77
Tools Privilege Group . . . . . . . . . . . . . . . . . . . . . . . . . . . . . . . . . . . . . . . . . . . . . . . . . 78
Folders Privilege Group . . . . . . . . . . . . . . . . . . . . . . . . . . . . . . . . . . . . . . . . . . . . . . . . 79
Design Objects Privilege Group . . . . . . . . . . . . . . . . . . . . . . . . . . . . . . . . . . . . . . . . . . 79
Sources and Targets Privilege Group . . . . . . . . . . . . . . . . . . . . . . . . . . . . . . . . . . . . . . . 80
Run-time Objects Privilege Group . . . . . . . . . . . . . . . . . . . . . . . . . . . . . . . . . . . . . . . . 82
Global Objects Privilege Group . . . . . . . . . . . . . . . . . . . . . . . . . . . . . . . . . . . . . . . . . . 83
Metadata Manager Service Privileges . . . . . . . . . . . . . . . . . . . . . . . . . . . . . . . . . . . . . . . . . . 84
Catalog Privilege Group . . . . . . . . . . . . . . . . . . . . . . . . . . . . . . . . . . . . . . . . . . . . . . . . 86
Load Privilege Group . . . . . . . . . . . . . . . . . . . . . . . . . . . . . . . . . . . . . . . . . . . . . . . . . . 87
Reporting Service Privileges . . . . . . . . . . . . . . . . . . . . . . . . . . . . . . . . . . . . . . . . . . . . . . . . 88
Administration Privilege Group . . . . . . . . . . . . . . . . . . . . . . . . . . . . . . . . . . . . . . . . . . 89
Alerts Privilege Group . . . . . . . . . . . . . . . . . . . . . . . . . . . . . . . . . . . . . . . . . . . . . . . . . 90
Communication Privilege Group . . . . . . . . . . . . . . . . . . . . . . . . . . . . . . . . . . . . . . . . . 90
Content Directory Privilege Group . . . . . . . . . . . . . . . . . . . . . . . . . . . . . . . . . . . . . . . . 91
Dashboards Privilege Group . . . . . . . . . . . . . . . . . . . . . . . . . . . . . . . . . . . . . . . . . . . . . 91
Indicators Privilege Group . . . . . . . . . . . . . . . . . . . . . . . . . . . . . . . . . . . . . . . . . . . . . . 92
Manage Account Privilege Group . . . . . . . . . . . . . . . . . . . . . . . . . . . . . . . . . . . . . . . . . 92
Reports Privilege Group . . . . . . . . . . . . . . . . . . . . . . . . . . . . . . . . . . . . . . . . . . . . . . . . 92
Reference Table Manager Service Privileges . . . . . . . . . . . . . . . . . . . . . . . . . . . . . . . . . . . . . 93
Browse Privilege Group . . . . . . . . . . . . . . . . . . . . . . . . . . . . . . . . . . . . . . . . . . . . . . . . 94
Managing Roles . . . . . . . . . . . . . . . . . . . . . . . . . . . . . . . . . . . . . . . . . . . . . . . . . . . . . . . . . 94
System-Defined Roles . . . . . . . . . . . . . . . . . . . . . . . . . . . . . . . . . . . . . . . . . . . . . . . . . 95
Custom Roles . . . . . . . . . . . . . . . . . . . . . . . . . . . . . . . . . . . . . . . . . . . . . . . . . . . . . . . 96
Managing Custom Roles . . . . . . . . . . . . . . . . . . . . . . . . . . . . . . . . . . . . . . . . . . . . . . . 96
Assigning Privileges and Roles to Users and Groups . . . . . . . . . . . . . . . . . . . . . . . . . . . . . . . 98
Inherited Privileges . . . . . . . . . . . . . . . . . . . . . . . . . . . . . . . . . . . . . . . . . . . . . . . . . . . 98
Steps to Assign Privileges and Roles to Users and Groups . . . . . . . . . . . . . . . . . . . . . . . . 99
Viewing Users with Privileges for a Service . . . . . . . . . . . . . . . . . . . . . . . . . . . . . . . . . . . . 100
Troubleshooting . . . . . . . . . . . . . . . . . . . . . . . . . . . . . . . . . . . . . . . . . . . . . . . . . . . . . . . 100
Chapter 6: Managing High Availability . . . . . . . . . . . . . . . . . . . . . . . . . . . . . . . . . . . 103Overview . . . . . . . . . . . . . . . . . . . . . . . . . . . . . . . . . . . . . . . . . . . . . . . . . . . . . . . . . . . . 103
Example . . . . . . . . . . . . . . . . . . . . . . . . . . . . . . . . . . . . . . . . . . . . . . . . . . . . . . . . . . 104
Resilience . . . . . . . . . . . . . . . . . . . . . . . . . . . . . . . . . . . . . . . . . . . . . . . . . . . . . . . . . 104
vi Table of Contents

Restart and Failover . . . . . . . . . . . . . . . . . . . . . . . . . . . . . . . . . . . . . . . . . . . . . . . . . . 105
Recovery . . . . . . . . . . . . . . . . . . . . . . . . . . . . . . . . . . . . . . . . . . . . . . . . . . . . . . . . . . 105
High Availability in the Base Product . . . . . . . . . . . . . . . . . . . . . . . . . . . . . . . . . . . . . . . . 106
Internal PowerCenter Resilience . . . . . . . . . . . . . . . . . . . . . . . . . . . . . . . . . . . . . . . . . 106
Repository Service Resilience to Repository Database . . . . . . . . . . . . . . . . . . . . . . . . . 106
Restart Services . . . . . . . . . . . . . . . . . . . . . . . . . . . . . . . . . . . . . . . . . . . . . . . . . . . . . 106
Manual Workflow and Session Recovery . . . . . . . . . . . . . . . . . . . . . . . . . . . . . . . . . . . 107
Multiple Gateway Nodes . . . . . . . . . . . . . . . . . . . . . . . . . . . . . . . . . . . . . . . . . . . . . . 107
Achieving High Availability . . . . . . . . . . . . . . . . . . . . . . . . . . . . . . . . . . . . . . . . . . . . . . . 107
Configuring PowerCenter Internal Components for High Availability . . . . . . . . . . . . . 107
Using Highly Available External Systems . . . . . . . . . . . . . . . . . . . . . . . . . . . . . . . . . . 109
Rules and Guidelines . . . . . . . . . . . . . . . . . . . . . . . . . . . . . . . . . . . . . . . . . . . . . . . . . 109
Managing Resilience . . . . . . . . . . . . . . . . . . . . . . . . . . . . . . . . . . . . . . . . . . . . . . . . . . . . 110
Configuring Service Resilience for the Domain . . . . . . . . . . . . . . . . . . . . . . . . . . . . . . 110
Configuring Application Service Resilience . . . . . . . . . . . . . . . . . . . . . . . . . . . . . . . . . 110
Understanding PowerCenter Client Resilience . . . . . . . . . . . . . . . . . . . . . . . . . . . . . . . 110
Configuring Command Line Program Resilience . . . . . . . . . . . . . . . . . . . . . . . . . . . . . 111
Example . . . . . . . . . . . . . . . . . . . . . . . . . . . . . . . . . . . . . . . . . . . . . . . . . . . . . . . . . . 111
Managing High Availability for the Repository Service . . . . . . . . . . . . . . . . . . . . . . . . . . . . 112
Resilience . . . . . . . . . . . . . . . . . . . . . . . . . . . . . . . . . . . . . . . . . . . . . . . . . . . . . . . . . 112
Restart and Failover . . . . . . . . . . . . . . . . . . . . . . . . . . . . . . . . . . . . . . . . . . . . . . . . . . 113
Recovery . . . . . . . . . . . . . . . . . . . . . . . . . . . . . . . . . . . . . . . . . . . . . . . . . . . . . . . . . . 113
Managing High Availability for the Integration Service . . . . . . . . . . . . . . . . . . . . . . . . . . . 113
Resilience . . . . . . . . . . . . . . . . . . . . . . . . . . . . . . . . . . . . . . . . . . . . . . . . . . . . . . . . . 113
Restart and Failover . . . . . . . . . . . . . . . . . . . . . . . . . . . . . . . . . . . . . . . . . . . . . . . . . . 114
Recovery . . . . . . . . . . . . . . . . . . . . . . . . . . . . . . . . . . . . . . . . . . . . . . . . . . . . . . . . . . 117
Troubleshooting . . . . . . . . . . . . . . . . . . . . . . . . . . . . . . . . . . . . . . . . . . . . . . . . . . . . . . . 118
Chapter 7: Creating and Configuring the Repository Service . . . . . . . . . . . . . . . . . 121Overview . . . . . . . . . . . . . . . . . . . . . . . . . . . . . . . . . . . . . . . . . . . . . . . . . . . . . . . . . . . . 121
Creating a Database for the Repository . . . . . . . . . . . . . . . . . . . . . . . . . . . . . . . . . . . . . . . 122
Creating the Repository Service . . . . . . . . . . . . . . . . . . . . . . . . . . . . . . . . . . . . . . . . . . . . 122
Before You Begin . . . . . . . . . . . . . . . . . . . . . . . . . . . . . . . . . . . . . . . . . . . . . . . . . . . . 122
Creating a Repository Service . . . . . . . . . . . . . . . . . . . . . . . . . . . . . . . . . . . . . . . . . . . 122
Database Connect Strings . . . . . . . . . . . . . . . . . . . . . . . . . . . . . . . . . . . . . . . . . . . . . 124
Configuring Repository Service Properties . . . . . . . . . . . . . . . . . . . . . . . . . . . . . . . . . . . . 124
Version . . . . . . . . . . . . . . . . . . . . . . . . . . . . . . . . . . . . . . . . . . . . . . . . . . . . . . . . . . . 125
Node Assignments . . . . . . . . . . . . . . . . . . . . . . . . . . . . . . . . . . . . . . . . . . . . . . . . . . . 125
General Properties . . . . . . . . . . . . . . . . . . . . . . . . . . . . . . . . . . . . . . . . . . . . . . . . . . . 125
Database Properties . . . . . . . . . . . . . . . . . . . . . . . . . . . . . . . . . . . . . . . . . . . . . . . . . . 125
Advanced Properties . . . . . . . . . . . . . . . . . . . . . . . . . . . . . . . . . . . . . . . . . . . . . . . . . 127
Custom Properties . . . . . . . . . . . . . . . . . . . . . . . . . . . . . . . . . . . . . . . . . . . . . . . . . . . 128
Configuring Repository Service Process Properties . . . . . . . . . . . . . . . . . . . . . . . . . . . . . . . 128
Custom Properties . . . . . . . . . . . . . . . . . . . . . . . . . . . . . . . . . . . . . . . . . . . . . . . . . . . 128
Environment Variables . . . . . . . . . . . . . . . . . . . . . . . . . . . . . . . . . . . . . . . . . . . . . . . 128
Table of Contents vii

Chapter 8: Managing the Repository . . . . . . . . . . . . . . . . . . . . . . . . . . . . . . . . . . . . 129Overview . . . . . . . . . . . . . . . . . . . . . . . . . . . . . . . . . . . . . . . . . . . . . . . . . . . . . . . . . . . . 129
Enabling and Disabling the Repository Service . . . . . . . . . . . . . . . . . . . . . . . . . . . . . . . . . 130
Enabling and Disabling a Repository Service . . . . . . . . . . . . . . . . . . . . . . . . . . . . . . . . 130
Enabling and Disabling Service Processes . . . . . . . . . . . . . . . . . . . . . . . . . . . . . . . . . . 131
Running in Exclusive Mode . . . . . . . . . . . . . . . . . . . . . . . . . . . . . . . . . . . . . . . . . . . . . . . 131
Creating and Deleting Repository Content . . . . . . . . . . . . . . . . . . . . . . . . . . . . . . . . . . . . 133
Creating Repository Content . . . . . . . . . . . . . . . . . . . . . . . . . . . . . . . . . . . . . . . . . . . 133
Deleting Repository Content . . . . . . . . . . . . . . . . . . . . . . . . . . . . . . . . . . . . . . . . . . . 133
Enabling Version Control . . . . . . . . . . . . . . . . . . . . . . . . . . . . . . . . . . . . . . . . . . . . . . . . 134
Managing a Repository Domain . . . . . . . . . . . . . . . . . . . . . . . . . . . . . . . . . . . . . . . . . . . . 134
Prerequisites for a Repository Domain . . . . . . . . . . . . . . . . . . . . . . . . . . . . . . . . . . . . 135
Steps for Building a Repository Domain . . . . . . . . . . . . . . . . . . . . . . . . . . . . . . . . . . . 135
Promoting a Local Repository to a Global Repository . . . . . . . . . . . . . . . . . . . . . . . . . 135
Registering a Local Repository . . . . . . . . . . . . . . . . . . . . . . . . . . . . . . . . . . . . . . . . . . 136
Viewing Registered Local and Global Repositories . . . . . . . . . . . . . . . . . . . . . . . . . . . . 137
Moving Local and Global Repositories . . . . . . . . . . . . . . . . . . . . . . . . . . . . . . . . . . . . 137
Managing User Connections and Locks . . . . . . . . . . . . . . . . . . . . . . . . . . . . . . . . . . . . . . . 138
Viewing Locks . . . . . . . . . . . . . . . . . . . . . . . . . . . . . . . . . . . . . . . . . . . . . . . . . . . . . 138
Viewing User Connections . . . . . . . . . . . . . . . . . . . . . . . . . . . . . . . . . . . . . . . . . . . . . 138
Closing User Connections and Releasing Locks . . . . . . . . . . . . . . . . . . . . . . . . . . . . . . 139
Sending Repository Notifications . . . . . . . . . . . . . . . . . . . . . . . . . . . . . . . . . . . . . . . . . . . 140
Backing Up and Restoring the Repository . . . . . . . . . . . . . . . . . . . . . . . . . . . . . . . . . . . . . 140
Backing Up a Repository . . . . . . . . . . . . . . . . . . . . . . . . . . . . . . . . . . . . . . . . . . . . . . 140
Viewing a List of Backup Files . . . . . . . . . . . . . . . . . . . . . . . . . . . . . . . . . . . . . . . . . . 141
Restoring a Repository . . . . . . . . . . . . . . . . . . . . . . . . . . . . . . . . . . . . . . . . . . . . . . . . 141
Copying Content from Another Repository . . . . . . . . . . . . . . . . . . . . . . . . . . . . . . . . . . . . 142
Registering and Unregistering Repository Plug-ins . . . . . . . . . . . . . . . . . . . . . . . . . . . . . . . 143
Registering a Repository Plug-in . . . . . . . . . . . . . . . . . . . . . . . . . . . . . . . . . . . . . . . . 143
Unregistering a Repository Plug-in . . . . . . . . . . . . . . . . . . . . . . . . . . . . . . . . . . . . . . . 143
Creating an Audit Trail . . . . . . . . . . . . . . . . . . . . . . . . . . . . . . . . . . . . . . . . . . . . . . . . . . 144
Tuning Repository Performance . . . . . . . . . . . . . . . . . . . . . . . . . . . . . . . . . . . . . . . . . . . . 144
Updating Repository Statistics . . . . . . . . . . . . . . . . . . . . . . . . . . . . . . . . . . . . . . . . . . 144
Increasing Repository Copy, Backup, and Restore Performance . . . . . . . . . . . . . . . . . . . 144
Configuring Data Lineage . . . . . . . . . . . . . . . . . . . . . . . . . . . . . . . . . . . . . . . . . . . . . . . . 145
Chapter 9: Creating and Configuring the Integration Service . . . . . . . . . . . . . . . . . 147Overview . . . . . . . . . . . . . . . . . . . . . . . . . . . . . . . . . . . . . . . . . . . . . . . . . . . . . . . . . . . . 147
Creating an Integration Service . . . . . . . . . . . . . . . . . . . . . . . . . . . . . . . . . . . . . . . . . . . . 148
Enabling and Disabling the Integration Service . . . . . . . . . . . . . . . . . . . . . . . . . . . . . . . . . 150
Enabling and Disabling an Integration Service Process . . . . . . . . . . . . . . . . . . . . . . . . . 150
Enabling and Disabling the Integration Service . . . . . . . . . . . . . . . . . . . . . . . . . . . . . . 150
Running in Normal and Safe Mode . . . . . . . . . . . . . . . . . . . . . . . . . . . . . . . . . . . . . . . . . 151
Normal Mode . . . . . . . . . . . . . . . . . . . . . . . . . . . . . . . . . . . . . . . . . . . . . . . . . . . . . . 151
Safe Mode . . . . . . . . . . . . . . . . . . . . . . . . . . . . . . . . . . . . . . . . . . . . . . . . . . . . . . . . . 152
viii Table of Contents

Running the Integration Service in Safe Mode . . . . . . . . . . . . . . . . . . . . . . . . . . . . . . 152
Steps to Configure the Operating Mode . . . . . . . . . . . . . . . . . . . . . . . . . . . . . . . . . . . 154
Configuring the Integration Service Properties . . . . . . . . . . . . . . . . . . . . . . . . . . . . . . . . . 154
Version . . . . . . . . . . . . . . . . . . . . . . . . . . . . . . . . . . . . . . . . . . . . . . . . . . . . . . . . . . . 155
Grid and Node Assignments . . . . . . . . . . . . . . . . . . . . . . . . . . . . . . . . . . . . . . . . . . . . 155
General Properties . . . . . . . . . . . . . . . . . . . . . . . . . . . . . . . . . . . . . . . . . . . . . . . . . . . 156
Advanced Properties . . . . . . . . . . . . . . . . . . . . . . . . . . . . . . . . . . . . . . . . . . . . . . . . . 157
Compatibility and Database Properties . . . . . . . . . . . . . . . . . . . . . . . . . . . . . . . . . . . . 158
Configuration Properties . . . . . . . . . . . . . . . . . . . . . . . . . . . . . . . . . . . . . . . . . . . . . . 160
HTTP Proxy Properties . . . . . . . . . . . . . . . . . . . . . . . . . . . . . . . . . . . . . . . . . . . . . . . 161
Using Operating System Profiles . . . . . . . . . . . . . . . . . . . . . . . . . . . . . . . . . . . . . . . . . . . . 162
Operating System Profile Components . . . . . . . . . . . . . . . . . . . . . . . . . . . . . . . . . . . . 162
Configuring Operating System Profiles . . . . . . . . . . . . . . . . . . . . . . . . . . . . . . . . . . . . 162
Troubleshooting Operating System Profiles . . . . . . . . . . . . . . . . . . . . . . . . . . . . . . . . . 163
Configuring the Associated Repository . . . . . . . . . . . . . . . . . . . . . . . . . . . . . . . . . . . . . . . 163
Configuring the Integration Service Processes . . . . . . . . . . . . . . . . . . . . . . . . . . . . . . . . . . 164
Code Pages . . . . . . . . . . . . . . . . . . . . . . . . . . . . . . . . . . . . . . . . . . . . . . . . . . . . . . . . 164
Directories for Integration Service Files . . . . . . . . . . . . . . . . . . . . . . . . . . . . . . . . . . . 164
Directories for Java Components . . . . . . . . . . . . . . . . . . . . . . . . . . . . . . . . . . . . . . . . 166
Custom Properties . . . . . . . . . . . . . . . . . . . . . . . . . . . . . . . . . . . . . . . . . . . . . . . . . . . 167
Environment Variables . . . . . . . . . . . . . . . . . . . . . . . . . . . . . . . . . . . . . . . . . . . . . . . 167
Chapter 10: Integration Service Architecture . . . . . . . . . . . . . . . . . . . . . . . . . . . . . 169Overview . . . . . . . . . . . . . . . . . . . . . . . . . . . . . . . . . . . . . . . . . . . . . . . . . . . . . . . . . . . . 169
Integration Service Connectivity . . . . . . . . . . . . . . . . . . . . . . . . . . . . . . . . . . . . . . . . . . . 170
Integration Service Process . . . . . . . . . . . . . . . . . . . . . . . . . . . . . . . . . . . . . . . . . . . . . . . . 171
Managing Workflow Scheduling . . . . . . . . . . . . . . . . . . . . . . . . . . . . . . . . . . . . . . . . . 171
Locking and Reading the Workflow . . . . . . . . . . . . . . . . . . . . . . . . . . . . . . . . . . . . . . 171
Reading the Parameter File . . . . . . . . . . . . . . . . . . . . . . . . . . . . . . . . . . . . . . . . . . . . 172
Creating the Workflow Log . . . . . . . . . . . . . . . . . . . . . . . . . . . . . . . . . . . . . . . . . . . . 172
Running Workflow Tasks . . . . . . . . . . . . . . . . . . . . . . . . . . . . . . . . . . . . . . . . . . . . . . 172
Running Workflows Across the Nodes in a Grid . . . . . . . . . . . . . . . . . . . . . . . . . . . . . 172
Starting the DTM Process . . . . . . . . . . . . . . . . . . . . . . . . . . . . . . . . . . . . . . . . . . . . . 172
Writing Historical Information to the Repository . . . . . . . . . . . . . . . . . . . . . . . . . . . . 172
Sending Post-Session Email . . . . . . . . . . . . . . . . . . . . . . . . . . . . . . . . . . . . . . . . . . . . 172
Load Balancer . . . . . . . . . . . . . . . . . . . . . . . . . . . . . . . . . . . . . . . . . . . . . . . . . . . . . . . . . 173
Dispatch Process . . . . . . . . . . . . . . . . . . . . . . . . . . . . . . . . . . . . . . . . . . . . . . . . . . . . 173
Resources . . . . . . . . . . . . . . . . . . . . . . . . . . . . . . . . . . . . . . . . . . . . . . . . . . . . . . . . . 174
Resource Provision Thresholds . . . . . . . . . . . . . . . . . . . . . . . . . . . . . . . . . . . . . . . . . . 174
Dispatch Mode . . . . . . . . . . . . . . . . . . . . . . . . . . . . . . . . . . . . . . . . . . . . . . . . . . . . . 174
Service Levels . . . . . . . . . . . . . . . . . . . . . . . . . . . . . . . . . . . . . . . . . . . . . . . . . . . . . . 175
Data Transformation Manager (DTM) Process . . . . . . . . . . . . . . . . . . . . . . . . . . . . . . . . . 175
Reading the Session Information . . . . . . . . . . . . . . . . . . . . . . . . . . . . . . . . . . . . . . . . 176
Performing Pushdown Optimization . . . . . . . . . . . . . . . . . . . . . . . . . . . . . . . . . . . . . . 176
Creating Dynamic Partitions . . . . . . . . . . . . . . . . . . . . . . . . . . . . . . . . . . . . . . . . . . . 176
Forming Partition Groups . . . . . . . . . . . . . . . . . . . . . . . . . . . . . . . . . . . . . . . . . . . . . 176
Table of Contents ix

Expanding Variables and Parameters . . . . . . . . . . . . . . . . . . . . . . . . . . . . . . . . . . . . . . 176
Creating the Session Log . . . . . . . . . . . . . . . . . . . . . . . . . . . . . . . . . . . . . . . . . . . . . . 176
Validating Code Pages . . . . . . . . . . . . . . . . . . . . . . . . . . . . . . . . . . . . . . . . . . . . . . . . 176
Verifying Connection Object Permissions . . . . . . . . . . . . . . . . . . . . . . . . . . . . . . . . . . 176
Starting Worker DTM Processes . . . . . . . . . . . . . . . . . . . . . . . . . . . . . . . . . . . . . . . . . 177
Running Pre-Session Operations . . . . . . . . . . . . . . . . . . . . . . . . . . . . . . . . . . . . . . . . 177
Running the Processing Threads . . . . . . . . . . . . . . . . . . . . . . . . . . . . . . . . . . . . . . . . . 177
Running Post-Session Operations . . . . . . . . . . . . . . . . . . . . . . . . . . . . . . . . . . . . . . . . 177
Sending Post-Session Email . . . . . . . . . . . . . . . . . . . . . . . . . . . . . . . . . . . . . . . . . . . . 177
Processing Threads . . . . . . . . . . . . . . . . . . . . . . . . . . . . . . . . . . . . . . . . . . . . . . . . . . . . . 177
Thread Types . . . . . . . . . . . . . . . . . . . . . . . . . . . . . . . . . . . . . . . . . . . . . . . . . . . . . . 178
Pipeline Partitioning . . . . . . . . . . . . . . . . . . . . . . . . . . . . . . . . . . . . . . . . . . . . . . . . . 179
DTM Processing . . . . . . . . . . . . . . . . . . . . . . . . . . . . . . . . . . . . . . . . . . . . . . . . . . . . . . . 180
Reading Source Data . . . . . . . . . . . . . . . . . . . . . . . . . . . . . . . . . . . . . . . . . . . . . . . . . 180
Blocking Data . . . . . . . . . . . . . . . . . . . . . . . . . . . . . . . . . . . . . . . . . . . . . . . . . . . . . . 180
Block Processing . . . . . . . . . . . . . . . . . . . . . . . . . . . . . . . . . . . . . . . . . . . . . . . . . . . . 181
Grids . . . . . . . . . . . . . . . . . . . . . . . . . . . . . . . . . . . . . . . . . . . . . . . . . . . . . . . . . . . . . . . 181
Running a Workflow on a Grid . . . . . . . . . . . . . . . . . . . . . . . . . . . . . . . . . . . . . . . . . 181
Running a Session on a Grid . . . . . . . . . . . . . . . . . . . . . . . . . . . . . . . . . . . . . . . . . . . 182
System Resources . . . . . . . . . . . . . . . . . . . . . . . . . . . . . . . . . . . . . . . . . . . . . . . . . . . . . . . 183
CPU Usage . . . . . . . . . . . . . . . . . . . . . . . . . . . . . . . . . . . . . . . . . . . . . . . . . . . . . . . . 183
DTM Buffer Memory . . . . . . . . . . . . . . . . . . . . . . . . . . . . . . . . . . . . . . . . . . . . . . . . 183
Cache Memory . . . . . . . . . . . . . . . . . . . . . . . . . . . . . . . . . . . . . . . . . . . . . . . . . . . . . 183
Code Pages and Data Movement Modes . . . . . . . . . . . . . . . . . . . . . . . . . . . . . . . . . . . . . . 184
ASCII Data Movement Mode . . . . . . . . . . . . . . . . . . . . . . . . . . . . . . . . . . . . . . . . . . . 184
Unicode Data Movement Mode . . . . . . . . . . . . . . . . . . . . . . . . . . . . . . . . . . . . . . . . . 184
Output Files and Caches . . . . . . . . . . . . . . . . . . . . . . . . . . . . . . . . . . . . . . . . . . . . . . . . . 185
Workflow Log . . . . . . . . . . . . . . . . . . . . . . . . . . . . . . . . . . . . . . . . . . . . . . . . . . . . . . 186
Session Log . . . . . . . . . . . . . . . . . . . . . . . . . . . . . . . . . . . . . . . . . . . . . . . . . . . . . . . . 186
Session Details . . . . . . . . . . . . . . . . . . . . . . . . . . . . . . . . . . . . . . . . . . . . . . . . . . . . . 186
Performance Detail File . . . . . . . . . . . . . . . . . . . . . . . . . . . . . . . . . . . . . . . . . . . . . . . 186
Reject Files . . . . . . . . . . . . . . . . . . . . . . . . . . . . . . . . . . . . . . . . . . . . . . . . . . . . . . . . 186
Row Error Logs . . . . . . . . . . . . . . . . . . . . . . . . . . . . . . . . . . . . . . . . . . . . . . . . . . . . . 187
Recovery Tables Files . . . . . . . . . . . . . . . . . . . . . . . . . . . . . . . . . . . . . . . . . . . . . . . . . 187
Control File . . . . . . . . . . . . . . . . . . . . . . . . . . . . . . . . . . . . . . . . . . . . . . . . . . . . . . . 187
Email . . . . . . . . . . . . . . . . . . . . . . . . . . . . . . . . . . . . . . . . . . . . . . . . . . . . . . . . . . . . 187
Indicator File . . . . . . . . . . . . . . . . . . . . . . . . . . . . . . . . . . . . . . . . . . . . . . . . . . . . . . 187
Output File . . . . . . . . . . . . . . . . . . . . . . . . . . . . . . . . . . . . . . . . . . . . . . . . . . . . . . . . 187
Cache Files . . . . . . . . . . . . . . . . . . . . . . . . . . . . . . . . . . . . . . . . . . . . . . . . . . . . . . . . 188
Chapter 11: Creating and Configuring the Metadata Manager Service . . . . . . . . . . 189Overview . . . . . . . . . . . . . . . . . . . . . . . . . . . . . . . . . . . . . . . . . . . . . . . . . . . . . . . . . . . . 189
Steps to Configure a Metadata Manager Service . . . . . . . . . . . . . . . . . . . . . . . . . . . . . 190
Creating a Metadata Manager Service . . . . . . . . . . . . . . . . . . . . . . . . . . . . . . . . . . . . . . . . 191
Database Connect Strings . . . . . . . . . . . . . . . . . . . . . . . . . . . . . . . . . . . . . . . . . . . . . 192
Overriding the Repository Database Code Page . . . . . . . . . . . . . . . . . . . . . . . . . . . . . . 193
x Table of Contents

Creating and Deleting Repository Content . . . . . . . . . . . . . . . . . . . . . . . . . . . . . . . . . . . . 193
Creating the Metadata Manager Repository . . . . . . . . . . . . . . . . . . . . . . . . . . . . . . . . . 194
Restoring the PowerCenter Repository . . . . . . . . . . . . . . . . . . . . . . . . . . . . . . . . . . . . 194
Deleting the Metadata Manager Repository . . . . . . . . . . . . . . . . . . . . . . . . . . . . . . . . . 194
Enabling and Disabling the Metadata Manager Service . . . . . . . . . . . . . . . . . . . . . . . . . . . 195
Configuring the Metadata Manager Service . . . . . . . . . . . . . . . . . . . . . . . . . . . . . . . . . . . . 195
Node Assignments . . . . . . . . . . . . . . . . . . . . . . . . . . . . . . . . . . . . . . . . . . . . . . . . . . . 196
General Properties . . . . . . . . . . . . . . . . . . . . . . . . . . . . . . . . . . . . . . . . . . . . . . . . . . . 196
Database Properties . . . . . . . . . . . . . . . . . . . . . . . . . . . . . . . . . . . . . . . . . . . . . . . . . . 197
Configuration Properties . . . . . . . . . . . . . . . . . . . . . . . . . . . . . . . . . . . . . . . . . . . . . . 197
Connection Pool Properties . . . . . . . . . . . . . . . . . . . . . . . . . . . . . . . . . . . . . . . . . . . . 198
Advanced Properties . . . . . . . . . . . . . . . . . . . . . . . . . . . . . . . . . . . . . . . . . . . . . . . . . 198
Configuring the Associated Integration Service . . . . . . . . . . . . . . . . . . . . . . . . . . . . . . . . . 199
Privileges for the Associated Integration Service User . . . . . . . . . . . . . . . . . . . . . . . . . . 200
Configuring the Associated Reference Table Manager Service . . . . . . . . . . . . . . . . . . . . . . . 201
Chapter 12: Creating the Reporting Service . . . . . . . . . . . . . . . . . . . . . . . . . . . . . . 203Overview . . . . . . . . . . . . . . . . . . . . . . . . . . . . . . . . . . . . . . . . . . . . . . . . . . . . . . . . . . . . 203
PowerCenter Repository Reports . . . . . . . . . . . . . . . . . . . . . . . . . . . . . . . . . . . . . . . . 204
Metadata Manager Repository Reports . . . . . . . . . . . . . . . . . . . . . . . . . . . . . . . . . . . . 204
Data Profiling Reports . . . . . . . . . . . . . . . . . . . . . . . . . . . . . . . . . . . . . . . . . . . . . . . . 204
Other Reporting Sources . . . . . . . . . . . . . . . . . . . . . . . . . . . . . . . . . . . . . . . . . . . . . . 205
Data Analyzer Repository . . . . . . . . . . . . . . . . . . . . . . . . . . . . . . . . . . . . . . . . . . . . . 205
Creating the Reporting Service . . . . . . . . . . . . . . . . . . . . . . . . . . . . . . . . . . . . . . . . . . . . . 205
Managing the Reporting Service . . . . . . . . . . . . . . . . . . . . . . . . . . . . . . . . . . . . . . . . . . . . 208
Configuring the Edit Mode . . . . . . . . . . . . . . . . . . . . . . . . . . . . . . . . . . . . . . . . . . . . 208
Enabling and Disabling a Reporting Service . . . . . . . . . . . . . . . . . . . . . . . . . . . . . . . . 209
Creating Contents in the Data Analyzer Repository . . . . . . . . . . . . . . . . . . . . . . . . . . . 209
Backing Up Contents of the Data Analyzer Repository . . . . . . . . . . . . . . . . . . . . . . . . 209
Restoring Contents to the Data Analyzer Repository . . . . . . . . . . . . . . . . . . . . . . . . . . 210
Deleting Contents from the Data Analyzer Repository . . . . . . . . . . . . . . . . . . . . . . . . . 210
Upgrading Contents of the Data Analyzer Repository . . . . . . . . . . . . . . . . . . . . . . . . . 210
Upgrading Users and Groups in the Data Analyzer Repository . . . . . . . . . . . . . . . . . . . 210
Viewing Last Activity Logs . . . . . . . . . . . . . . . . . . . . . . . . . . . . . . . . . . . . . . . . . . . . . 211
Configuring the Reporting Service . . . . . . . . . . . . . . . . . . . . . . . . . . . . . . . . . . . . . . . . . . 211
Node Assignments . . . . . . . . . . . . . . . . . . . . . . . . . . . . . . . . . . . . . . . . . . . . . . . . . . . 211
General Properties . . . . . . . . . . . . . . . . . . . . . . . . . . . . . . . . . . . . . . . . . . . . . . . . . . . 211
Data Source Properties . . . . . . . . . . . . . . . . . . . . . . . . . . . . . . . . . . . . . . . . . . . . . . . 212
Repository Properties . . . . . . . . . . . . . . . . . . . . . . . . . . . . . . . . . . . . . . . . . . . . . . . . 213
Lineage Properties . . . . . . . . . . . . . . . . . . . . . . . . . . . . . . . . . . . . . . . . . . . . . . . . . . . 213
Advanced Properties . . . . . . . . . . . . . . . . . . . . . . . . . . . . . . . . . . . . . . . . . . . . . . . . . 214
Granting Users Access to Reports . . . . . . . . . . . . . . . . . . . . . . . . . . . . . . . . . . . . . . . . . . . 214
Chapter 13: Managing the Grid . . . . . . . . . . . . . . . . . . . . . . . . . . . . . . . . . . . . . . . . . 215Overview . . . . . . . . . . . . . . . . . . . . . . . . . . . . . . . . . . . . . . . . . . . . . . . . . . . . . . . . . . . . 215
Configuring the Grid . . . . . . . . . . . . . . . . . . . . . . . . . . . . . . . . . . . . . . . . . . . . . . . . . . . . 216
Table of Contents xi
Configuring the Integration Service . . . . . . . . . . . . . . . . . . . . . . . . . . . . . . . . . . . . . . . . . 216
Configuring the Integration Service to Run on a Grid . . . . . . . . . . . . . . . . . . . . . . . . . 216
Configuring the Service Processes . . . . . . . . . . . . . . . . . . . . . . . . . . . . . . . . . . . . . . . . 216
Configuring Resources . . . . . . . . . . . . . . . . . . . . . . . . . . . . . . . . . . . . . . . . . . . . . . . . . . . 217
Viewing Resources in a Domain . . . . . . . . . . . . . . . . . . . . . . . . . . . . . . . . . . . . . . . . . 218
Assigning Connection Resources . . . . . . . . . . . . . . . . . . . . . . . . . . . . . . . . . . . . . . . . 218
Defining Custom and File/Directory Resources . . . . . . . . . . . . . . . . . . . . . . . . . . . . . . 219
Chapter 14: Configuring the Load Balancer . . . . . . . . . . . . . . . . . . . . . . . . . . . . . . 221Overview . . . . . . . . . . . . . . . . . . . . . . . . . . . . . . . . . . . . . . . . . . . . . . . . . . . . . . . . . . . . 221
Configuring the Dispatch Mode . . . . . . . . . . . . . . . . . . . . . . . . . . . . . . . . . . . . . . . . . . . . 222
Round-Robin Dispatch Mode . . . . . . . . . . . . . . . . . . . . . . . . . . . . . . . . . . . . . . . . . . 222
Metric-Based Dispatch Mode . . . . . . . . . . . . . . . . . . . . . . . . . . . . . . . . . . . . . . . . . . . 223
Adaptive Dispatch Mode . . . . . . . . . . . . . . . . . . . . . . . . . . . . . . . . . . . . . . . . . . . . . . 223
Creating Service Levels . . . . . . . . . . . . . . . . . . . . . . . . . . . . . . . . . . . . . . . . . . . . . . . . . . 223
Configuring Resources . . . . . . . . . . . . . . . . . . . . . . . . . . . . . . . . . . . . . . . . . . . . . . . . . . . 224
Calculating the CPU Profile . . . . . . . . . . . . . . . . . . . . . . . . . . . . . . . . . . . . . . . . . . . . . . . 225
Defining Resource Provision Thresholds . . . . . . . . . . . . . . . . . . . . . . . . . . . . . . . . . . . . . . 225
Chapter 15: Creating and Configuring the SAP BW Service . . . . . . . . . . . . . . . . . . 227Overview . . . . . . . . . . . . . . . . . . . . . . . . . . . . . . . . . . . . . . . . . . . . . . . . . . . . . . . . . . . . 227
Load Balancing for the SAP NetWeaver BI System and the SAP BW Service . . . . . . . . . 228
Creating the SAP BW Service . . . . . . . . . . . . . . . . . . . . . . . . . . . . . . . . . . . . . . . . . . . . . . 228
Enabling and Disabling the SAP BW Service . . . . . . . . . . . . . . . . . . . . . . . . . . . . . . . . . . . 229
Configuring the SAP BW Service Properties . . . . . . . . . . . . . . . . . . . . . . . . . . . . . . . . . . . 230
Configuring the Associated Integration Service . . . . . . . . . . . . . . . . . . . . . . . . . . . . . . . . . 230
Configuring the SAP BW Service Processes . . . . . . . . . . . . . . . . . . . . . . . . . . . . . . . . . . . . 231
Viewing Log Events . . . . . . . . . . . . . . . . . . . . . . . . . . . . . . . . . . . . . . . . . . . . . . . . . . . . . 231
Chapter 16: Creating and Configuring the Web Services Hub . . . . . . . . . . . . . . . . 233Overview . . . . . . . . . . . . . . . . . . . . . . . . . . . . . . . . . . . . . . . . . . . . . . . . . . . . . . . . . . . . 233
Creating a Web Services Hub . . . . . . . . . . . . . . . . . . . . . . . . . . . . . . . . . . . . . . . . . . . . . . 234
Enabling and Disabling the Web Services Hub . . . . . . . . . . . . . . . . . . . . . . . . . . . . . . . . . 236
Configuring the Web Services Hub Properties . . . . . . . . . . . . . . . . . . . . . . . . . . . . . . . . . . 236
Version . . . . . . . . . . . . . . . . . . . . . . . . . . . . . . . . . . . . . . . . . . . . . . . . . . . . . . . . . . . 237
Node Assignments . . . . . . . . . . . . . . . . . . . . . . . . . . . . . . . . . . . . . . . . . . . . . . . . . . . 237
General Properties . . . . . . . . . . . . . . . . . . . . . . . . . . . . . . . . . . . . . . . . . . . . . . . . . . . 237
Advanced Properties . . . . . . . . . . . . . . . . . . . . . . . . . . . . . . . . . . . . . . . . . . . . . . . . . 238
Configuring the Associated Repository . . . . . . . . . . . . . . . . . . . . . . . . . . . . . . . . . . . . . . . 239
Adding an Associated Repository . . . . . . . . . . . . . . . . . . . . . . . . . . . . . . . . . . . . . . . . 239
Editing an Associated Repository . . . . . . . . . . . . . . . . . . . . . . . . . . . . . . . . . . . . . . . . 240
Setting Permissions for the Web Services Hub . . . . . . . . . . . . . . . . . . . . . . . . . . . . . . . . . . 240
Chapter 17: Creating the Reference Table Manager Service . . . . . . . . . . . . . . . . . . 241Overview . . . . . . . . . . . . . . . . . . . . . . . . . . . . . . . . . . . . . . . . . . . . . . . . . . . . . . . . . . . . 241
xii Table of Contents
Creating the Reference Table Manager Service . . . . . . . . . . . . . . . . . . . . . . . . . . . . . . . . . . 242
Creating and Deleting Repository Content . . . . . . . . . . . . . . . . . . . . . . . . . . . . . . . . . . . . 243
Creating the Reference Table Manager Repository Content . . . . . . . . . . . . . . . . . . . . . 243
Deleting the Reference Table Manager Repository Content . . . . . . . . . . . . . . . . . . . . . 243
Enabling and Disabling the Reference Table Manager Service . . . . . . . . . . . . . . . . . . . . . . . 243
Configuring the Reference Table Manager Service . . . . . . . . . . . . . . . . . . . . . . . . . . . . . . . 244
General Properties . . . . . . . . . . . . . . . . . . . . . . . . . . . . . . . . . . . . . . . . . . . . . . . . . . . 245
Database Properties . . . . . . . . . . . . . . . . . . . . . . . . . . . . . . . . . . . . . . . . . . . . . . . . . . 245
Configuration Properties . . . . . . . . . . . . . . . . . . . . . . . . . . . . . . . . . . . . . . . . . . . . . . 245
Connection Pool Properties . . . . . . . . . . . . . . . . . . . . . . . . . . . . . . . . . . . . . . . . . . . . 246
Advanced Properties . . . . . . . . . . . . . . . . . . . . . . . . . . . . . . . . . . . . . . . . . . . . . . . . . 246
Chapter 18: Managing Licenses . . . . . . . . . . . . . . . . . . . . . . . . . . . . . . . . . . . . . . . . 247Overview . . . . . . . . . . . . . . . . . . . . . . . . . . . . . . . . . . . . . . . . . . . . . . . . . . . . . . . . . . . . 247
License Validation . . . . . . . . . . . . . . . . . . . . . . . . . . . . . . . . . . . . . . . . . . . . . . . . . . . 248
Licensing Log Events . . . . . . . . . . . . . . . . . . . . . . . . . . . . . . . . . . . . . . . . . . . . . . . . . 248
License Management Tasks . . . . . . . . . . . . . . . . . . . . . . . . . . . . . . . . . . . . . . . . . . . . 248
Types of License Keys . . . . . . . . . . . . . . . . . . . . . . . . . . . . . . . . . . . . . . . . . . . . . . . . . . . 249
Original Keys . . . . . . . . . . . . . . . . . . . . . . . . . . . . . . . . . . . . . . . . . . . . . . . . . . . . . . 249
Incremental Keys . . . . . . . . . . . . . . . . . . . . . . . . . . . . . . . . . . . . . . . . . . . . . . . . . . . . 249
Creating a License Object . . . . . . . . . . . . . . . . . . . . . . . . . . . . . . . . . . . . . . . . . . . . . . . . 250
Assigning a License to a Service . . . . . . . . . . . . . . . . . . . . . . . . . . . . . . . . . . . . . . . . . . . . 250
Rules and Guidelines . . . . . . . . . . . . . . . . . . . . . . . . . . . . . . . . . . . . . . . . . . . . . . . . . 251
Unassigning a License from a Service . . . . . . . . . . . . . . . . . . . . . . . . . . . . . . . . . . . . . . . . 251
Updating a License . . . . . . . . . . . . . . . . . . . . . . . . . . . . . . . . . . . . . . . . . . . . . . . . . . . . . 251
Removing a License . . . . . . . . . . . . . . . . . . . . . . . . . . . . . . . . . . . . . . . . . . . . . . . . . . . . . 252
Viewing License Details . . . . . . . . . . . . . . . . . . . . . . . . . . . . . . . . . . . . . . . . . . . . . . . . . . 253
General Properties . . . . . . . . . . . . . . . . . . . . . . . . . . . . . . . . . . . . . . . . . . . . . . . . . . . 253
Supported Platforms . . . . . . . . . . . . . . . . . . . . . . . . . . . . . . . . . . . . . . . . . . . . . . . . . 254
Repositories . . . . . . . . . . . . . . . . . . . . . . . . . . . . . . . . . . . . . . . . . . . . . . . . . . . . . . . 254
PowerCenter Options . . . . . . . . . . . . . . . . . . . . . . . . . . . . . . . . . . . . . . . . . . . . . . . . 254
Connections . . . . . . . . . . . . . . . . . . . . . . . . . . . . . . . . . . . . . . . . . . . . . . . . . . . . . . . 254
Metadata Exchange Options . . . . . . . . . . . . . . . . . . . . . . . . . . . . . . . . . . . . . . . . . . . . 254
Chapter 19: Managing Logs . . . . . . . . . . . . . . . . . . . . . . . . . . . . . . . . . . . . . . . . . . . 255Overview . . . . . . . . . . . . . . . . . . . . . . . . . . . . . . . . . . . . . . . . . . . . . . . . . . . . . . . . . . . . 255
Log Manager Architecture . . . . . . . . . . . . . . . . . . . . . . . . . . . . . . . . . . . . . . . . . . . . . . . . 256
Log Manager Recovery . . . . . . . . . . . . . . . . . . . . . . . . . . . . . . . . . . . . . . . . . . . . . . . 256
Troubleshooting the Log Manager . . . . . . . . . . . . . . . . . . . . . . . . . . . . . . . . . . . . . . . 257
Configuring the Log Location . . . . . . . . . . . . . . . . . . . . . . . . . . . . . . . . . . . . . . . . . . . . . 257
Configuring Log Management . . . . . . . . . . . . . . . . . . . . . . . . . . . . . . . . . . . . . . . . . . . . . 258
Purging Log Events . . . . . . . . . . . . . . . . . . . . . . . . . . . . . . . . . . . . . . . . . . . . . . . . . . 258
Exporting Log Events . . . . . . . . . . . . . . . . . . . . . . . . . . . . . . . . . . . . . . . . . . . . . . . . 259
Configuring the Time Zone . . . . . . . . . . . . . . . . . . . . . . . . . . . . . . . . . . . . . . . . . . . . 260
Steps to Configure Log Management Properties . . . . . . . . . . . . . . . . . . . . . . . . . . . . . 260
Using the Log Viewer . . . . . . . . . . . . . . . . . . . . . . . . . . . . . . . . . . . . . . . . . . . . . . . . . . . 260
Table of Contents xiii

Viewing Log Events . . . . . . . . . . . . . . . . . . . . . . . . . . . . . . . . . . . . . . . . . . . . . . . . . . 261
Searching Log Event Results . . . . . . . . . . . . . . . . . . . . . . . . . . . . . . . . . . . . . . . . . . . 262
Configuring Log Viewer Columns . . . . . . . . . . . . . . . . . . . . . . . . . . . . . . . . . . . . . . . 263
Saving Log Events . . . . . . . . . . . . . . . . . . . . . . . . . . . . . . . . . . . . . . . . . . . . . . . . . . . 263
Viewing Administration Console Log Errors . . . . . . . . . . . . . . . . . . . . . . . . . . . . . . . . 264
Understanding Log Events . . . . . . . . . . . . . . . . . . . . . . . . . . . . . . . . . . . . . . . . . . . . . . . . 264
Log Event Components . . . . . . . . . . . . . . . . . . . . . . . . . . . . . . . . . . . . . . . . . . . . . . . 264
Domain Log Events . . . . . . . . . . . . . . . . . . . . . . . . . . . . . . . . . . . . . . . . . . . . . . . . . . 265
Repository Service Log Events . . . . . . . . . . . . . . . . . . . . . . . . . . . . . . . . . . . . . . . . . . 265
Reporting Service Log Events . . . . . . . . . . . . . . . . . . . . . . . . . . . . . . . . . . . . . . . . . . . 266
Metadata Manager Service Log Events . . . . . . . . . . . . . . . . . . . . . . . . . . . . . . . . . . . . 266
Integration Service Log Events . . . . . . . . . . . . . . . . . . . . . . . . . . . . . . . . . . . . . . . . . . 266
SAP BW Service Log Events . . . . . . . . . . . . . . . . . . . . . . . . . . . . . . . . . . . . . . . . . . . . 266
Web Services Hub Log Events . . . . . . . . . . . . . . . . . . . . . . . . . . . . . . . . . . . . . . . . . . 267
Chapter 20: Running Domain Reports . . . . . . . . . . . . . . . . . . . . . . . . . . . . . . . . . . . 269Overview . . . . . . . . . . . . . . . . . . . . . . . . . . . . . . . . . . . . . . . . . . . . . . . . . . . . . . . . . . . . 269
User Domain Audit Report . . . . . . . . . . . . . . . . . . . . . . . . . . . . . . . . . . . . . . . . . . . . . . . 270
License Usage Report . . . . . . . . . . . . . . . . . . . . . . . . . . . . . . . . . . . . . . . . . . . . . . . . . . . . 270
CPU Usage . . . . . . . . . . . . . . . . . . . . . . . . . . . . . . . . . . . . . . . . . . . . . . . . . . . . . . . . 271
Repository Service Usage . . . . . . . . . . . . . . . . . . . . . . . . . . . . . . . . . . . . . . . . . . . . . . 273
Source/Target Connectivity Usage . . . . . . . . . . . . . . . . . . . . . . . . . . . . . . . . . . . . . . . 274
Running the License Usage Report . . . . . . . . . . . . . . . . . . . . . . . . . . . . . . . . . . . . . . . 274
License Management Report . . . . . . . . . . . . . . . . . . . . . . . . . . . . . . . . . . . . . . . . . . . . . . 275
General Properties . . . . . . . . . . . . . . . . . . . . . . . . . . . . . . . . . . . . . . . . . . . . . . . . . . . 275
License Usage . . . . . . . . . . . . . . . . . . . . . . . . . . . . . . . . . . . . . . . . . . . . . . . . . . . . . . 276
Node Configuration . . . . . . . . . . . . . . . . . . . . . . . . . . . . . . . . . . . . . . . . . . . . . . . . . 276
Licensed Options . . . . . . . . . . . . . . . . . . . . . . . . . . . . . . . . . . . . . . . . . . . . . . . . . . . 277
Running the License Management Report . . . . . . . . . . . . . . . . . . . . . . . . . . . . . . . . . . 277
Sending an Email Report . . . . . . . . . . . . . . . . . . . . . . . . . . . . . . . . . . . . . . . . . . . . . . 277
Web Services Report . . . . . . . . . . . . . . . . . . . . . . . . . . . . . . . . . . . . . . . . . . . . . . . . . . . . 278
Understanding the Web Services Report . . . . . . . . . . . . . . . . . . . . . . . . . . . . . . . . . . . 278
Run-time Statistics . . . . . . . . . . . . . . . . . . . . . . . . . . . . . . . . . . . . . . . . . . . . . . . . . . 280
Service Statistics . . . . . . . . . . . . . . . . . . . . . . . . . . . . . . . . . . . . . . . . . . . . . . . . . . . . 280
Run-time Analysis . . . . . . . . . . . . . . . . . . . . . . . . . . . . . . . . . . . . . . . . . . . . . . . . . . . 281
Historical Statistics . . . . . . . . . . . . . . . . . . . . . . . . . . . . . . . . . . . . . . . . . . . . . . . . . . 282
Complete Historical Statistics . . . . . . . . . . . . . . . . . . . . . . . . . . . . . . . . . . . . . . . . . . 283
Running the Web Services Report . . . . . . . . . . . . . . . . . . . . . . . . . . . . . . . . . . . . . . . 283
Running the Web Services Report for a Secure Web Services Hub . . . . . . . . . . . . . . . . 284
Chapter 21: Node Diagnostics . . . . . . . . . . . . . . . . . . . . . . . . . . . . . . . . . . . . . . . . . 287Overview . . . . . . . . . . . . . . . . . . . . . . . . . . . . . . . . . . . . . . . . . . . . . . . . . . . . . . . . . . . . 287
Generating and Uploading Node Diagnostics . . . . . . . . . . . . . . . . . . . . . . . . . . . . . . . . . . 288
Logging in to the Informatica Customer Portal . . . . . . . . . . . . . . . . . . . . . . . . . . . . . . 288
Maintaining Security . . . . . . . . . . . . . . . . . . . . . . . . . . . . . . . . . . . . . . . . . . . . . . . . . 288
Generating Node Diagnostics . . . . . . . . . . . . . . . . . . . . . . . . . . . . . . . . . . . . . . . . . . . 289
xiv Table of Contents

Generating Node Diagnostics on a Secure Node . . . . . . . . . . . . . . . . . . . . . . . . . . . . . 289
Uploading Node Diagnostics . . . . . . . . . . . . . . . . . . . . . . . . . . . . . . . . . . . . . . . . . . . 289
Analyzing Node Diagnostics . . . . . . . . . . . . . . . . . . . . . . . . . . . . . . . . . . . . . . . . . . . . . . . 290
Identify Bug Fixes . . . . . . . . . . . . . . . . . . . . . . . . . . . . . . . . . . . . . . . . . . . . . . . . . . . 291
Identify Recommendations . . . . . . . . . . . . . . . . . . . . . . . . . . . . . . . . . . . . . . . . . . . . 291
Chapter 22: Understanding Globalization . . . . . . . . . . . . . . . . . . . . . . . . . . . . . . . . 293Overview . . . . . . . . . . . . . . . . . . . . . . . . . . . . . . . . . . . . . . . . . . . . . . . . . . . . . . . . . . . . 293
Unicode . . . . . . . . . . . . . . . . . . . . . . . . . . . . . . . . . . . . . . . . . . . . . . . . . . . . . . . . . . 294
Working with a Unicode PowerCenter Repository . . . . . . . . . . . . . . . . . . . . . . . . . . . . 294
Locales . . . . . . . . . . . . . . . . . . . . . . . . . . . . . . . . . . . . . . . . . . . . . . . . . . . . . . . . . . . . . . 295
System Locale . . . . . . . . . . . . . . . . . . . . . . . . . . . . . . . . . . . . . . . . . . . . . . . . . . . . . . 295
User Locale . . . . . . . . . . . . . . . . . . . . . . . . . . . . . . . . . . . . . . . . . . . . . . . . . . . . . . . . 296
Input Locale . . . . . . . . . . . . . . . . . . . . . . . . . . . . . . . . . . . . . . . . . . . . . . . . . . . . . . . 296
Data Movement Modes . . . . . . . . . . . . . . . . . . . . . . . . . . . . . . . . . . . . . . . . . . . . . . . . . . 296
Character Data Movement Modes . . . . . . . . . . . . . . . . . . . . . . . . . . . . . . . . . . . . . . . 296
Changing Data Movement Modes . . . . . . . . . . . . . . . . . . . . . . . . . . . . . . . . . . . . . . . 297
Code Page Overview . . . . . . . . . . . . . . . . . . . . . . . . . . . . . . . . . . . . . . . . . . . . . . . . . . . . 298
UNIX Code Pages . . . . . . . . . . . . . . . . . . . . . . . . . . . . . . . . . . . . . . . . . . . . . . . . . . . 298
Windows Code Pages . . . . . . . . . . . . . . . . . . . . . . . . . . . . . . . . . . . . . . . . . . . . . . . . . 299
Choosing a Code Page . . . . . . . . . . . . . . . . . . . . . . . . . . . . . . . . . . . . . . . . . . . . . . . . 299
Code Page Compatibility . . . . . . . . . . . . . . . . . . . . . . . . . . . . . . . . . . . . . . . . . . . . . . . . . 299
PowerCenter Domain Configuration Database Code Page . . . . . . . . . . . . . . . . . . . . . . 301
Administration Console Code Page . . . . . . . . . . . . . . . . . . . . . . . . . . . . . . . . . . . . . . 301
PowerCenter Client Code Page . . . . . . . . . . . . . . . . . . . . . . . . . . . . . . . . . . . . . . . . . . 301
Integration Service Process Code Page . . . . . . . . . . . . . . . . . . . . . . . . . . . . . . . . . . . . 301
PowerCenter Repository Code Page . . . . . . . . . . . . . . . . . . . . . . . . . . . . . . . . . . . . . . 302
Metadata Manager Repository Code Page . . . . . . . . . . . . . . . . . . . . . . . . . . . . . . . . . . 302
Source Code Page . . . . . . . . . . . . . . . . . . . . . . . . . . . . . . . . . . . . . . . . . . . . . . . . . . . 302
Target Code Page . . . . . . . . . . . . . . . . . . . . . . . . . . . . . . . . . . . . . . . . . . . . . . . . . . . 303
Command Line Program Code Pages . . . . . . . . . . . . . . . . . . . . . . . . . . . . . . . . . . . . . 303
Code Page Compatibility Summary . . . . . . . . . . . . . . . . . . . . . . . . . . . . . . . . . . . . . . 304
PowerCenter Code Page Validation . . . . . . . . . . . . . . . . . . . . . . . . . . . . . . . . . . . . . . . . . . 305
Relaxed Code Page Validation . . . . . . . . . . . . . . . . . . . . . . . . . . . . . . . . . . . . . . . . . . . . . 306
Configuring the Integration Service . . . . . . . . . . . . . . . . . . . . . . . . . . . . . . . . . . . . . . 307
Selecting Compatible Source and Target Code Pages . . . . . . . . . . . . . . . . . . . . . . . . . . 307
Troubleshooting for Code Page Relaxation . . . . . . . . . . . . . . . . . . . . . . . . . . . . . . . . . 307
PowerCenter Code Page Conversion . . . . . . . . . . . . . . . . . . . . . . . . . . . . . . . . . . . . . . . . . 308
Choosing Characters for Repository Metadata . . . . . . . . . . . . . . . . . . . . . . . . . . . . . . . 308
Case Study: Processing ISO 8859-1 Data . . . . . . . . . . . . . . . . . . . . . . . . . . . . . . . . . . . . . 309
The ISO 8859-1 Environment . . . . . . . . . . . . . . . . . . . . . . . . . . . . . . . . . . . . . . . . . . 309
Configuring the ISO 8859-1 Environment . . . . . . . . . . . . . . . . . . . . . . . . . . . . . . . . . 309
Case Study: Processing Unicode UTF-8 Data . . . . . . . . . . . . . . . . . . . . . . . . . . . . . . . . . . 311
The UTF-8 Environment . . . . . . . . . . . . . . . . . . . . . . . . . . . . . . . . . . . . . . . . . . . . . . 311
Configuring the UTF-8 Environment . . . . . . . . . . . . . . . . . . . . . . . . . . . . . . . . . . . . . 312
Table of Contents xv
Appendix A: Code Pages . . . . . . . . . . . . . . . . . . . . . . . . . . . . . . . . . . . . . . . . . . . . . 315Supported Code Pages for Application Services . . . . . . . . . . . . . . . . . . . . . . . . . . . . . . . . . 315
Supported Code Pages for Sources and Targets . . . . . . . . . . . . . . . . . . . . . . . . . . . . . . . . . 316
Appendix B: Command Line Privileges and Permissions . . . . . . . . . . . . . . . . . . . . 325infacmd Commands . . . . . . . . . . . . . . . . . . . . . . . . . . . . . . . . . . . . . . . . . . . . . . . . . . . . . 325
pmcmd Commands . . . . . . . . . . . . . . . . . . . . . . . . . . . . . . . . . . . . . . . . . . . . . . . . . . . . . 332
pmrep Commands . . . . . . . . . . . . . . . . . . . . . . . . . . . . . . . . . . . . . . . . . . . . . . . . . . . . . . 333
Appendix C: Custom Roles . . . . . . . . . . . . . . . . . . . . . . . . . . . . . . . . . . . . . . . . . . . . 339Repository Service Custom Roles . . . . . . . . . . . . . . . . . . . . . . . . . . . . . . . . . . . . . . . . . . . 339
Metadata Manager Service Custom Roles . . . . . . . . . . . . . . . . . . . . . . . . . . . . . . . . . . . . . 340
Reporting Service Custom Roles . . . . . . . . . . . . . . . . . . . . . . . . . . . . . . . . . . . . . . . . . . . . 341
Index . . . . . . . . . . . . . . . . . . . . . . . . . . . . . . . . . . . . . . . . . . . . . . . . . . . . . . . . . . . . . 345
xvi Table of Contents

Preface
The PowerCenter Administrator Guide is written for PowerCenter users. It contains information you need to manage the domain and PowerCenter security. The PowerCenter Administrator Guide assumes you have basic working knowledge of PowerCenter.
Informatica Resources
Informatica Customer PortalAs an Informatica customer, you can access the Informatica Customer Portal site at http://my.informatica.com. The site contains product information, user group information, newsletters, access to the Informatica customer support case management system (ATLAS), the Informatica How-To Library, the Informatica Knowledge Base, Informatica Documentation Center, and access to the Informatica user community.
Informatica DocumentationThe Informatica Documentation team takes every effort to create accurate, usable documentation. If you have questions, comments, or ideas about this documentation, contact the Informatica Documentation team through email at [email protected]. We will use your feedback to improve our documentation. Let us know if we can contact you regarding your comments.
Informatica Web SiteYou can access the Informatica corporate web site at http://www.informatica.com. The site contains information about Informatica, its background, upcoming events, and sales offices. You will also find product and partner information. The services area of the site includes important information about technical support, training and education, and implementation services.
Informatica How-To LibraryAs an Informatica customer, you can access the Informatica How-To Library at http://my.informatica.com. The How-To Library is a collection of resources to help you learn more about Informatica products and features. It includes articles and interactive demonstrations that provide solutions to common problems, compare features and behaviors, and guide you through performing specific real-world tasks.
xvii
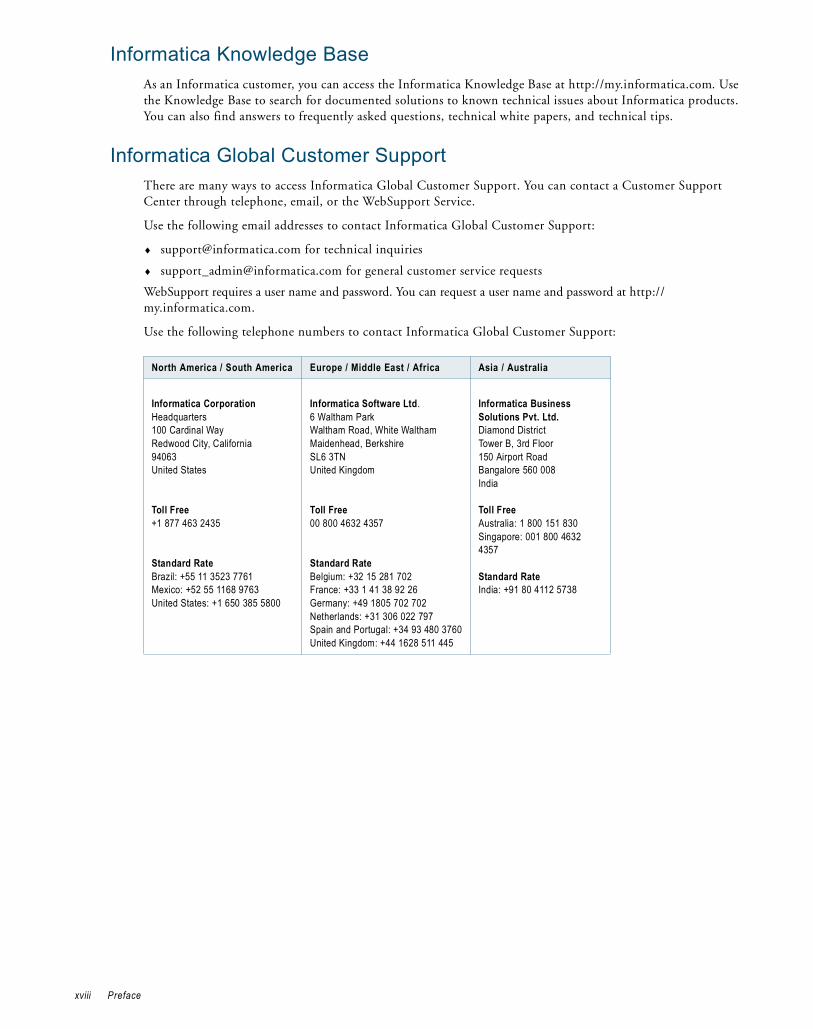
Informatica Knowledge BaseAs an Informatica customer, you can access the Informatica Knowledge Base at http://my.informatica.com. Use the Knowledge Base to search for documented solutions to known technical issues about Informatica products. You can also find answers to frequently asked questions, technical white papers, and technical tips.
Informatica Global Customer SupportThere are many ways to access Informatica Global Customer Support. You can contact a Customer Support Center through telephone, email, or the WebSupport Service.
Use the following email addresses to contact Informatica Global Customer Support:
♦ [email protected] for technical inquiries
♦ [email protected] for general customer service requests
WebSupport requires a user name and password. You can request a user name and password at http://my.informatica.com.
Use the following telephone numbers to contact Informatica Global Customer Support:
North America / South America Europe / Middle East / Africa Asia / Australia
Informatica Corporation Headquarters100 Cardinal WayRedwood City, California 94063United States
Toll Free +1 877 463 2435
Standard RateBrazil: +55 11 3523 7761 Mexico: +52 55 1168 9763 United States: +1 650 385 5800
Informatica Software Ltd.6 Waltham ParkWaltham Road, White WalthamMaidenhead, BerkshireSL6 3TNUnited Kingdom
Toll Free 00 800 4632 4357
Standard RateBelgium: +32 15 281 702France: +33 1 41 38 92 26Germany: +49 1805 702 702Netherlands: +31 306 022 797Spain and Portugal: +34 93 480 3760United Kingdom: +44 1628 511 445
Informatica Business Solutions Pvt. Ltd.Diamond DistrictTower B, 3rd Floor150 Airport RoadBangalore 560 008India
Toll Free Australia: 1 800 151 830Singapore: 001 800 4632 4357
Standard RateIndia: +91 80 4112 5738
xviii Preface
C H A P T E R 1
Understanding Domains
This chapter includes the following topics:
♦ Overview, 1
♦ Nodes, 2
♦ Service Manager, 2
♦ Application Services, 4
♦ Security, 6
♦ High Availability, 8
♦ Mixed-Version Domains, 8
OverviewPowerCenter has a service-oriented architecture that provides the ability to scale services and share resources across multiple machines. High availability functionality helps minimize service downtime due to unexpected failures or scheduled maintenance in the PowerCenter environment.
The PowerCenter domain is the fundamental administrative unit in PowerCenter. The domain supports the administration of the distributed services. A domain is a collection of nodes and services that you can group in folders based on administration ownership. A domain can run a single version of application services or multiple versions of application services. A domain that can run multiple versions of application services is called a mixed-version domain. For more information about mixed-version domains, see “Mixed-Version Domains” on page 8.
A node is the logical representation of a machine in a domain. One node in the domain acts as a gateway to receive service requests from clients and route them to the appropriate service and node. Services and processes run on nodes in a domain. The availability of a service or process on a node depends on how you configure the service and the node. For more information, see “Nodes” on page 2.
Services for the domain include the Service Manager and a set of application services:
♦ Service Manager. A service that manages all domain operations. It runs the application services and performs domain functions on each node in the domain. Some domain functions include authentication, authorization, and logging. For more information, see “Service Manager” on page 2.
♦ Application services. Services that represent PowerCenter server-based functionality, such as the Repository Service and the Integration Service. The application services that run on a node depend on the way you configure the services. In mixed-version domain, multiple versions of application services can run in the same domain. For more information, see “Application Services” on page 4.
1

The Service Manager and application services control PowerCenter security. The Service Manager manages users and groups that can log in to PowerCenter applications and authenticates the users who log in to PowerCenter applications. The Service Manager and application services authorize user requests from PowerCenter applications. For more information, see “Security” on page 6.
The PowerCenter Administration Console consolidates the administrative tasks for domain objects such as services, nodes, licenses, and grids and for users, groups, and roles. You manage the domain and the security of the domain through the Administration Console.
To use the SSL protocol to transfer data securely between the Administration Console and the Service Manager, configure HTTPS for all nodes on the domain. You can configure HTTPS when you install PowerCenter or using infasetup commands. The Administration Console uses the HTTPS port to communicate with the Service Manager. The gateway and worker node port numbers you configure for communication with the Service Manager remain the same. Application services and PowerCenter Client applications communicate with the Service Manager using the gateway or worker node port.
If you have the high availability option, you can scale services and eliminate single points of failure for services. Services can continue running despite temporary network or hardware failures.
NodesWhen you install PowerCenter Services on a machine, you add the machine to the domain as a node. You can add multiple nodes to a domain. Each node in the domain runs a Service Manager that manages domain operations on that node. The operations that the Service Manager performs depend on the type of node. A node can be a gateway node or a worker node. A node can run one version of an application service or multiple versions. You can subscribe to alerts to receive notification about node events such as node failure or a master gateway election. You can also generate and upload node diagnostics to the Configuration Support Manager and review information such as available EBFs and Informatica recommendations.
Gateway NodesA gateway node is any node you configure to serve as a gateway for the domain. One node acts as the gateway at any given time. That node is called the master gateway. A gateway node can run application services, and it can serve as a master gateway node. The master gateway node is the entry point to the domain.
The Service Manager on the master gateway node performs all domain operations on the master gateway node. The Service Managers running on other gateway nodes perform limited domain operations on those nodes.
You can configure more than one node to serve as a gateway. If the master gateway node becomes unavailable, the Service Manager on other gateway nodes elect another master gateway node. If you configure one node to serve as the gateway and the node becomes unavailable, the domain cannot accept service requests.
Worker NodesA worker node is any node not configured to serve as a gateway. A worker node can run application services, but it cannot serve as a gateway. The Service Manager performs limited domain operations on a worker node.
Service ManagerThe Service Manager is a service that manages all domain operations. It runs within Informatica Services. It runs as a service on Windows and as a daemon on UNIX. When you start Informatica Services, you start the Service Manager. The Service Manager runs on each node. If the Service Manager is not running, the node is not available.
2 Chapter 1: Understanding Domains
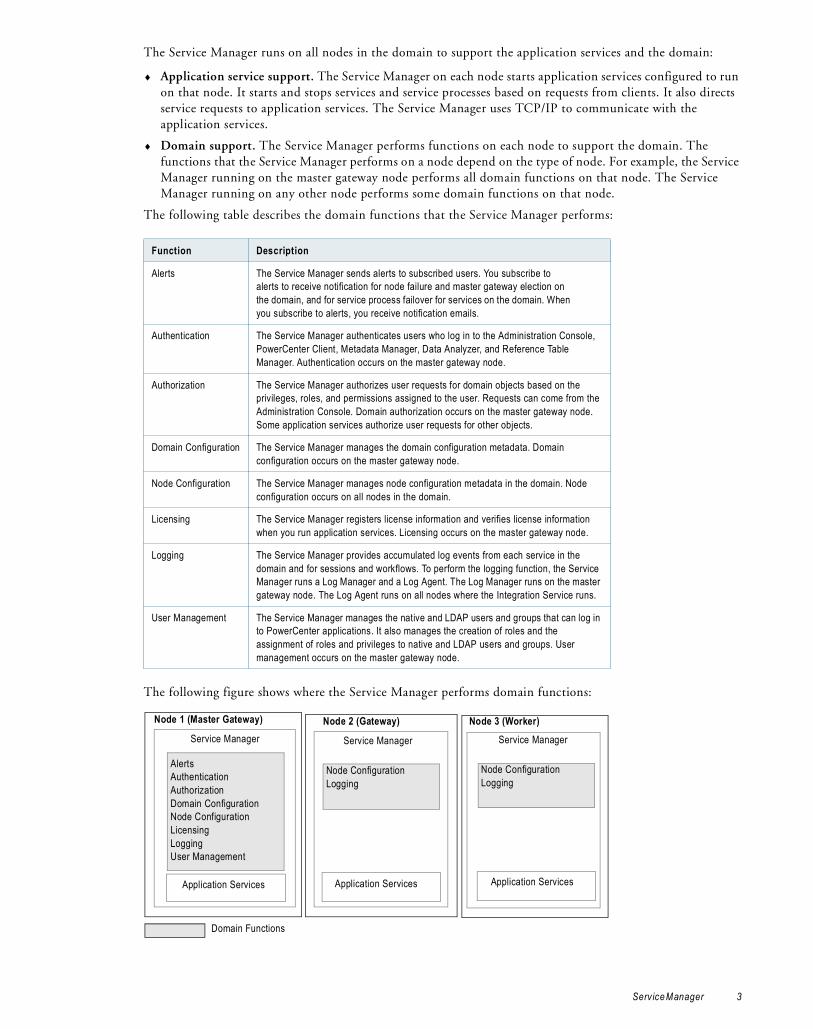
The Service Manager runs on all nodes in the domain to support the application services and the domain:
♦ Application service support. The Service Manager on each node starts application services configured to run on that node. It starts and stops services and service processes based on requests from clients. It also directs service requests to application services. The Service Manager uses TCP/IP to communicate with the application services.
♦ Domain support. The Service Manager performs functions on each node to support the domain. The functions that the Service Manager performs on a node depend on the type of node. For example, the Service Manager running on the master gateway node performs all domain functions on that node. The Service Manager running on any other node performs some domain functions on that node.
The following table describes the domain functions that the Service Manager performs:
The following figure shows where the Service Manager performs domain functions:
Function Description
Alerts The Service Manager sends alerts to subscribed users. You subscribe to alerts to receive notification for node failure and master gateway election on the domain, and for service process failover for services on the domain. When you subscribe to alerts, you receive notification emails.
Authentication The Service Manager authenticates users who log in to the Administration Console, PowerCenter Client, Metadata Manager, Data Analyzer, and Reference Table Manager. Authentication occurs on the master gateway node.
Authorization The Service Manager authorizes user requests for domain objects based on the privileges, roles, and permissions assigned to the user. Requests can come from the Administration Console. Domain authorization occurs on the master gateway node. Some application services authorize user requests for other objects.
Domain Configuration The Service Manager manages the domain configuration metadata. Domain configuration occurs on the master gateway node.
Node Configuration The Service Manager manages node configuration metadata in the domain. Node configuration occurs on all nodes in the domain.
Licensing The Service Manager registers license information and verifies license information when you run application services. Licensing occurs on the master gateway node.
Logging The Service Manager provides accumulated log events from each service in the domain and for sessions and workflows. To perform the logging function, the Service Manager runs a Log Manager and a Log Agent. The Log Manager runs on the master gateway node. The Log Agent runs on all nodes where the Integration Service runs.
User Management The Service Manager manages the native and LDAP users and groups that can log in to PowerCenter applications. It also manages the creation of roles and the assignment of roles and privileges to native and LDAP users and groups. User management occurs on the master gateway node.
Node 1 (Master Gateway)
Application Services
Domain Functions
Service Manager
AlertsAuthenticationAuthorizationDomain ConfigurationNode ConfigurationLicensingLoggingUser Management
Node 2 (Gateway)
Application Services
Service Manager
Node ConfigurationLogging
Node 3 (Worker)
Application Services
Service Manager
Node ConfigurationLogging
Service Manager 3

Application ServicesApplication services represent PowerCenter server-based functionality. Application services include the Repository Service, Integration Service, Reporting Service, Metadata Manager Service, Web Services Hub, SAP BW Service, and Reference Table Manager Service. When you configure an application service, you designate the node where it runs.
You can also create a grid to run on multiple nodes and assign an Integration Service to run on a grid. When you run a workflow on the grid, the Integration Service distributes workflow tasks across nodes of the grid.
When you install PowerCenter Services, the installation program installs the following application services:
♦ Integration Service
♦ Repository Service
♦ Reporting Service
♦ Metadata Manager Service
♦ SAP BW Service
♦ Web Services Hub
♦ Reference Table Manager Service
When you configure an application service, you designate a node to run the service process. When a service process runs, the Service Manager assigns a port number from the port numbers assigned to the node.
The service process is the runtime representation of a service running on a node. The service type determines how many service processes can run at a time. For example, the Integration Service can run multiple service processes at a time when you run it on a grid.
If you have the high availability option, you can run a service on multiple nodes. Designate the primary node to run the service. All other nodes are backup nodes for the service. If the primary node is not available, the service runs on a backup node. You can subscribe to alerts to receive notification in the event of a service process failover.
If you do not have the high availability option, configure a service to run on one node. If you assign multiple nodes, the service will not start.
The following figure shows how you can configure services to run on multiple nodes:
The following figure shows how you can configure services to run on multiple nodes if you have the high availability option:
Repository Service
Domain Functions
Node 2 (Gateway)
Service Manager
Integration Service
Domain Functions
Node 1 (Worker)
Service Manager
Application Services
4 Chapter 1: Understanding Domains
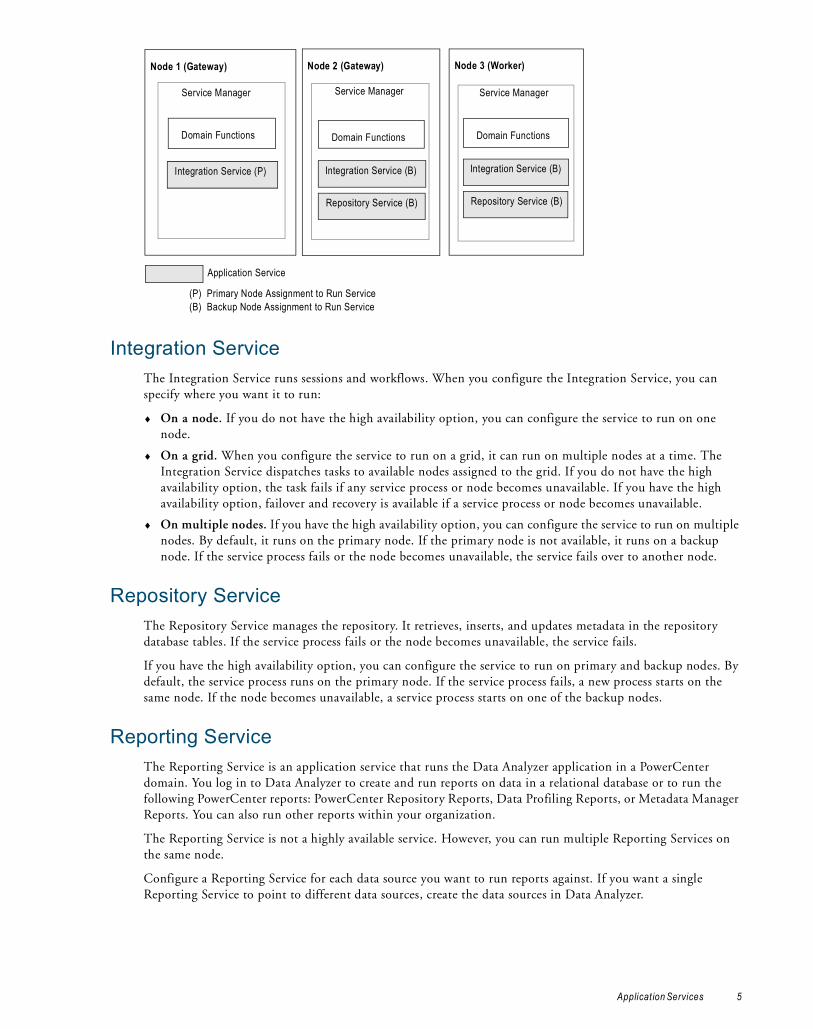
Integration ServiceThe Integration Service runs sessions and workflows. When you configure the Integration Service, you can specify where you want it to run:
♦ On a node. If you do not have the high availability option, you can configure the service to run on one node.
♦ On a grid. When you configure the service to run on a grid, it can run on multiple nodes at a time. The Integration Service dispatches tasks to available nodes assigned to the grid. If you do not have the high availability option, the task fails if any service process or node becomes unavailable. If you have the high availability option, failover and recovery is available if a service process or node becomes unavailable.
♦ On multiple nodes. If you have the high availability option, you can configure the service to run on multiple nodes. By default, it runs on the primary node. If the primary node is not available, it runs on a backup node. If the service process fails or the node becomes unavailable, the service fails over to another node.
Repository ServiceThe Repository Service manages the repository. It retrieves, inserts, and updates metadata in the repository database tables. If the service process fails or the node becomes unavailable, the service fails.
If you have the high availability option, you can configure the service to run on primary and backup nodes. By default, the service process runs on the primary node. If the service process fails, a new process starts on the same node. If the node becomes unavailable, a service process starts on one of the backup nodes.
Reporting ServiceThe Reporting Service is an application service that runs the Data Analyzer application in a PowerCenter domain. You log in to Data Analyzer to create and run reports on data in a relational database or to run the following PowerCenter reports: PowerCenter Repository Reports, Data Profiling Reports, or Metadata Manager Reports. You can also run other reports within your organization.
The Reporting Service is not a highly available service. However, you can run multiple Reporting Services on the same node.
Configure a Reporting Service for each data source you want to run reports against. If you want a single Reporting Service to point to different data sources, create the data sources in Data Analyzer.
Node 2 (Gateway)
Service Manager
Integration Service (B)
Repository Service (B)
Application Service
(P) Primary Node Assignment to Run Service(B) Backup Node Assignment to Run Service
Node 3 (Worker)
Service Manager
Integration Service (B)
Repository Service (B)
Node 1 (Gateway)
Service Manager
Integration Service (P)
Domain Functions Domain Functions Domain Functions
Applicat ion Services 5

Metadata Manager ServiceThe Metadata Manager Service is an application service that runs the Metadata Manager application and manages connections between the Metadata Manager components.
Use Metadata Manager to browse and analyze metadata from disparate source repositories. You can load, browse, and analyze metadata from application, business intelligence, data integration, data modelling, and relational metadata sources.
You can configure the Metadata Manager Service to run on only one node. The Metadata Manager Service is not a highly available service. However, you can run multiple Metadata Manager Services on the same node.
SAP BW ServiceThe SAP BW Service listens for RFC requests from SAP NetWeaver BI and initiates workflows to extract from or load to SAP NetWeaver BI. The SAP BW Service is not highly available. You can configure it to run on one node.
Web Services HubThe Web Services Hub receives requests from web service clients and exposes PowerCenter workflows as services. The Web Services Hub does not run an associated service process. It runs within the Service Manager.
Reference Table Manager ServiceThe Reference Table Manager Service is an application service that runs the Reference Table Manager application in a PowerCenter domain. Use the Reference Table Manager application to manage reference tables that contain reference data.
The Reference Table Manager Service is not highly available. You can configure it to run on one node.
SecurityThe Service Manager, Repository Service, Metadata Manager Service, Reporting Service, and Reference Table Manager Service control security in PowerCenter applications. PowerCenter applications include the Administration Console, PowerCenter Client, Metadata Manager, Data Analyzer, and Reference Table Manager.
The Service Manager and application services control security by performing the following functions:
♦ Encryption. When you log in to a PowerCenter Client application, PowerCenter encrypts the password.
♦ Authentication. When you log in to a PowerCenter application, the Service Manager authenticates your user account based on your user name and password or on your user authentication token.
♦ Authorization. When you request an object in a PowerCenter application, the Service Manager, Repository Service, Metadata Manager Service, Reporting Service, or Reference Table Manager Service authorizes the request based on your privileges, roles, and permissions.
EncryptionPowerCenter encrypts passwords sent from PowerCenter Client applications to the Service Manager. PowerCenter uses AES encryption with multiple 128-bit keys to encrypt passwords and stores the encrypted passwords in the domain configuration database. Configure HTTPS to encrypt passwords sent to the Service Manager from the Administration Console, Metadata Manager, Data Analyzer, Web Services Hub, and Reference Table Manager.
6 Chapter 1: Understanding Domains
AuthenticationThe Service Manager authenticates users who log in to the following PowerCenter applications: Administration Console, PowerCenter Client, Metadata Manager, Data Analyzer, and Reference Table Manager.
The first time you log in to an application, you enter a user name, password, and security domain. A security domain is a collection of user accounts and groups in a PowerCenter domain.
The security domain that you select determines the authentication method that the Service Manager uses to authenticate your user account:
♦ Native. When you log in to an application as a native user, the Service Manager authenticates your user name and password against the user accounts in the domain configuration database.
♦ Lightweight Directory Access Protocol (LDAP). When you log in to an application as an LDAP user, the Service Manager passes your user name and password to the external LDAP directory service for authentication.
If there is no match, you cannot access the application.
Single Sign-OnAfter you log in to a PowerCenter application, the Service Manager allows you to launch another application or to access multiple repositories in the PowerCenter Client. You do not need to log in to the additional application or repository.
When the Service Manager authenticates your user account for the first time, it creates an encrypted authentication token for your account and returns the authentication token to the application. The authentication token contains your user name, security domain, and an expiration time. The Service Manager periodically renews the authentication token before the expiration time.
When you launch one application from another one, the application passes the authentication token to the next application. The next application sends the authentication token to the Service Manager for user authentication.
When you access multiple repositories in the PowerCenter Client, the PowerCenter Client sends the authentication token to the Service Manager for user authentication.
AuthorizationThe Service Manager authorizes user requests for domain objects. Requests can come from the Administration Console. The Repository Service, Metadata Manager Service, and Reporting Service authorize user requests for other objects.
When you use the Administration Console to create native users and groups or to import LDAP users and groups, the Service Manager stores the users and groups in the domain configuration database and copies the list of users and groups into the following repositories:
♦ PowerCenter repository
♦ PowerCenter repository for Metadata Manager
♦ Data Analyzer repository
♦ Reference Table Manager repository
The Service Manager synchronizes the list of users and groups in these repositories with the list of users and groups in the domain configuration database when the following events occur:
♦ You restart the Repository Service, Metadata Manager Service, Reporting Service, or Reference Table Manager Service.
♦ You add or remove additional native users or groups.
♦ The Service Manager synchronizes the list of LDAP users and groups in the domain configuration database with the list of users and groups in the LDAP directory service.
Security 7
The Repository Service, Metadata Manager Service, Reporting Service, and Reference Table Manager Service use the list of users and groups in these repositories when you complete the following tasks:
♦ Assign privileges and roles. When you assign privileges and roles to users and groups for the application service in the Administration Console, the Service Manager sends the privilege and role assignments to the application service. The application service stores the privilege and role assignments with the list of users and groups in the appropriate repository.
♦ Assign permissions. When you assign permissions to users and groups in the PowerCenter Client, Metadata Manager, or Data Analyzer, the application service stores the permission assignments with the list of users and groups in the appropriate repository.
When you request an object in the PowerCenter Client, Metadata Manager, Data Analyzer, or Reference Table Manager, the appropriate application service authorizes your request. For example, if you try to edit a mapping in the PowerCenter Designer, the Repository Service authorizes your request based on your privilege, role, and permission assignments stored in the PowerCenter repository.
High AvailabilityHigh availability is a PowerCenter option that eliminates a single point of failure in a domain and provides minimal service interruption in the event of failure. High availability consists of the following components:
♦ Resilience. The ability of PowerCenter services to tolerate transient network failures until either the resilience timeout expires or the external system failure is fixed.
♦ Failover. The migration of a service or task to another node when the node running the service process becomes unavailable.
♦ Recovery. The automatic completion of tasks after a service is interrupted. Automatic recovery is available for Integration Service and Repository Service tasks. You can also manually recover Integration Service workflows and sessions. Manual recovery is not part of high availability.
Mixed-Version DomainsA mixed-version domain allows you to run multiple version of an application service within the same domain.
In a mixed-version domain, the Service Manager on each node is the same version as the PowerCenter domain. In a mixed-version domain, an application service can run on a node that is configured to run the service version. A service version is the version of an application service. The Service Manager on each nodes starts application services for each service version that is configured to run on the node.
One or more nodes in the domain can be configured to run multiple application service versions. Each node in a domain must have the current version of PowerCenter installed. A node that runs multiple service versions must have separate installation directories for the current and previous PowerCenter version. You can configure
8 Chapter 1: Understanding Domains
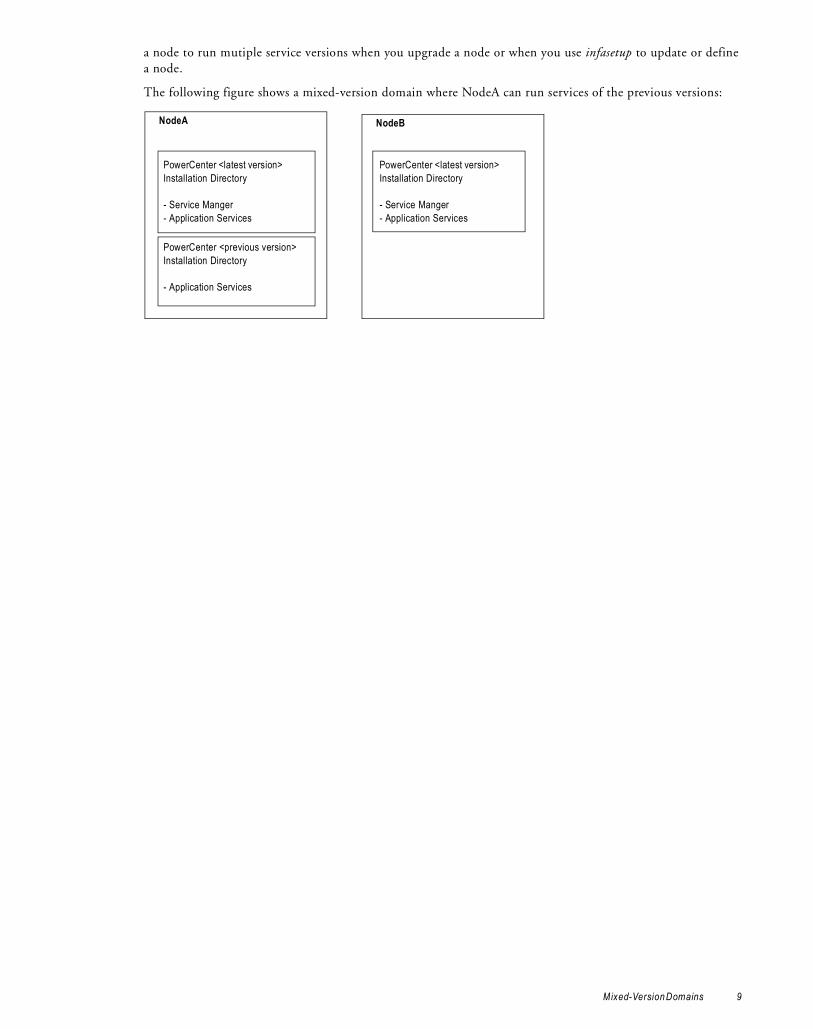
a node to run mutiple service versions when you upgrade a node or when you use infasetup to update or define a node.
The following figure shows a mixed-version domain where NodeA can run services of the previous versions:
PowerCenter <latest version> Installation Directory
- Service Manger- Application Services
PowerCenter <previous version> Installation Directory
- Application Services
NodeA
PowerCenter <latest version> Installation Directory
- Service Manger- Application Services
NodeB
Mixed-Version Domains 9

10 Chapter 1: Understanding Domains

C H A P T E R 2
Using the Administration Console
This chapter includes the following topics:
♦ Overview, 11
♦ Logging In, 11
♦ Managing Your Account, 12
♦ Configuring HTTPS, 13
♦ Domain Page, 14
♦ Security Page, 25
♦ Keyboard Shortcuts, 30
OverviewThe PowerCenter Administration Console is the administration tool you use to administer the PowerCenter domain and PowerCenter security. Use the Administration Console to perform the following tasks:
♦ Domain administrative tasks. Manage logs, domain objects, user permissions, and domain reports. Generate and upload node diagnostics. Domain objects include services, nodes, grids, folders, and licenses.
♦ Security administrative tasks. Manage users, groups, roles, and privileges.
This chapter explains how to log in to the Administration Console and describes how to navigate within the browser-based tool.
Logging InYou must have a user account to log in to the Administration Console.
To log in to the Administration Console:
1. Open Microsoft Internet Explorer or Mozilla Firefox.
2. In the Address field, enter the following URL for the Administration Console login page:
http://<host>:<port>/adminconsole
11

In the URL, <host>:<port> represents the host name and port number of any gateway node. If you are not using the Internet Explorer Enhanced Security Configuration, you can enter the following URL, and the browser is directed to the full URL for the login page:
http://<host>:<port>
If you configure HTTPS for the Administration Console, the URL redirects to the following HTTPS enabled site:
https://<host>:<https port>/adminconsole
If the node is configured for HTTPS with a keystore that uses a self-signed certificate, a warning message appears. To enter the site, accept the certificate.
The Informatica PowerCenter Administration Console login page appears.
3. Enter the user name and password.
4. Select Native or the name of a specific security domain.
The Security Domain field appears when the PowerCenter domain contains an LDAP security domain. If you do not know the security domain that your user account belongs to, contact the PowerCenter domain administrator.
5. Click Login.
If you have the Administrator role for the domain, the PowerCenter Administration Assistant appears.
6. Click Don’t show this dialog again if you do not want to view the Administration Assistant the next time you log in.
7. Select the administration component you want to use or the documentation you want to read.
8. If this is the first time you log in with the user name and password provided by the domain administrator, change your password to maintain security.
Managing Your AccountUse the Manage Account tab to change your password and set your preferences for the options displayed in the Administration Console. The Manage Account tab includes the following sections:
♦ Change Password. Change your password. If someone else created your user account, change your password the first time you log in to the Administration Console. Click Apply after entering the old and new passwords and confirming the new password.
Note: This section is available only for native user accounts. If you have an LDAP user account, you cannot change your password.
♦ User Preferences. The settings you select in the User Preferences section determine the options displayed in the Administration Console when you log in. Your preferences do not affect the options displayed when another user logs in to the Administration Console.
Warning: The user password associated with a node is used by the Service Manager to authenticate that node in the domain. If you change a user password that is associated with a node, the Service Manager updates the nodes associated with that user. Nodes that are not running cannot be updated. You must run the infasetup UpdateGatewayNode or UpdateWorkerNode command to change the password for the non-running nodes.
The following figure shows the Manage Account tab:
12 Chapter 2: Using the Administration Console

In the User Preferences area, configure the following Administration Console settings for your user account:
Configuring HTTPSTo use the SSL protocol to transfer data securely between the Administration Console and the Service Manager, configure HTTPS for all nodes on the domain. You can configure HTTPS when you install PowerCenter or using infasetup commands.
To configure HTTPS for a node, define the following information:
♦ HTTPS port. The port used by the node for communication between the Administration Console and the Service Manager. When you configure an HTTPS port, the gateway or worker node port does not change. Application services and PowerCenter Client applications communicate with the Service Manager using the gateway or worker node port.
♦ Keystore file name and location. A file that includes private or public key pairs and associated certificates. You can create the keystore file when you install PowerCenter or you can create a keystore file with a keytool. You can use a self-signed certificate or a certificate signed by a certificate authority.
♦ Keystore password. A plain-text password for the keystore file.
After you configure the node to use HTTPS, the Administration Console URL redirects to the following HTTPS enabled site:
https://<host>:<https port>/adminconsole
When the node is enabled for HTTPS with a self-signed certificate, a warning message appears when you access to the Administration Console web browser. To enter the site, accept the certificate.
Option Description
Subscribe for Alerts Subscribes you to domain and service alerts. You must have a valid email address configured for your user account. Default is No.
Show Custom Properties Displays custom properties in the right pane when you click an object in the Navigator. You use custom properties to configure PowerCenter behavior for special cases or to improve performance. Hide the custom properties to avoid inadvertently changing the values. Use custom properties only if Informatica Global Customer Support instructs you to.
Show Upgrade Options Displays the Upgrade tab that appears next to the Manage Account tab if you have the privileges to upgrade PowerCenter. Show the Upgrade tab to upgrade servers and repository content.
Show Tooltips in the Overview Dashboards and Properties
Displays tooltips in the Overview and Properties tabs of the Administration Console.
Overview Grid Refresh Time Controls the interval at which the overview grid refreshes when you select the Overview tab for a domain or folder. Default is 30 seconds.
Configuring HTTPS 13

The HTTPS port and keystore file location you configure appear in the Node Properties.
Note: If you configure HTTPS for the Administration Console on a domain that runs on 64-bit AIX, Internet Explorer requires TLS 1.0. To enable TLS 1.0, click Tools > Internet Options > Advanced. The TLS 1.0 setting is listed below the Security heading.
Creating a Keystore FileYou can create the keystore file when you install PowerCenter or you can create a keystore file with a keytool. keytool is a utility that generates and stores private or public key pairs and associated certificates in a file called a “keystore.” When you generate a public or private key pair, keytool wraps the public key into a self-signed certificate. You can use the self-signed certificate or use a certificate signed by a certificate authority.
Locate keytool in one of the following directories:
♦ %JAVA_HOME%\jre\bin
♦ java/bin directory of the PowerCenter Installation Directory
For more information about using keytool, see the documentation on the Sun web site:
http://java.sun.com/j2se/1.3/docs/tooldocs/win32/keytool.html
Configuring HTTPS Using infasetupTo configure HTTPS for the Administration Console use one of the following infasetup commands:
♦ To enable HTTPS support for a worker node, use the infasetup UpdateWorkerNode command.
♦ To enable HTTPS support for a gateway node, use the infasetup UpdateGatewayNode command.
♦ To create a new worker or gateway node with HTTPS support, use the infasetup DefineDomain, DefineGatewayNode, or DefineWorkerNode commands.
♦ To remove the HTTPS configuration on a node, redefine the node using the infasetup DefineGatewayNode or DefineWorkerNode command. When you define the node, exclude the HTTPS options.
After you run the UpdateWorkerNode or UpdateGatewayNode command, delete the following directory and then restart Informatica Services:
<PowerCenter installation directory>\server\tomcat\webapps\adminconsole
Domain PageYou administer the PowerCenter domain on the Domain page of the Administration Console. Click the Configure Domain icon to view the Domain page.
The Domain page includes tabs that you use to perform domain management tasks. The components that appear depend on the tab that you select. Use these tabs to perform tasks such as viewing log events or configuring service properties.
The Domain page has the following tabs:
♦ Domain. View and edit the properties of the domain and objects within the domain. For more information, see “Domain Tab” on page 15.
♦ Logs. View log events for the domain and services within the domain. For more information, see “Logs Tab” on page 16.
♦ Permissions. Manage user permissions on the Permissions tab. For more information, see “Permissions Tab” on page 17.
♦ Reports. Run a User Domain Audit Report, License Usage Report, Web Services Report, or License Management Report. For more information, see “Reports Tab” on page 17.
14 Chapter 2: Using the Administration Console

♦ Diagnostics. Manage the node diagnostics in the domain. For more information, see “Diagnostics Tab” on page 17.
♦ Upgrade. Upgrade repositories and servers. For more information, see “Upgrade Tab” on page 18.
♦ Manage Account. Manage your user profile. On this tab, you can change your user password and update your user profile. For more information, see “Manage Account Tab” on page 18.
The following figure shows the Domain page:
Domain TabUse the Domain tab to view information about a domain and to manage objects within the domain. The Domain tab appears by default when you access the Domain page.
The Domain tab has the following components:
♦ Create menu. Create an object in the domain. You can create folders, grids, licenses, and application services.
♦ Filter button. Filter the application services that appear in the Navigator. This button appears when you run a mixed-version domain with application services of previous service versions.
♦ Remove button. Remove an object from the domain.
♦ Move button. Move an object to a folder.
♦ Navigator. The Navigator appears in the left pane of the Domain tab and displays domain objects.
♦ Right pane. The right pane displays properties and options based on the object selected in the Navigator and the tab selected in the right pane.
The following figure shows the components of the Domain tab:
Configure Domain
Tabs
Domain Page 15
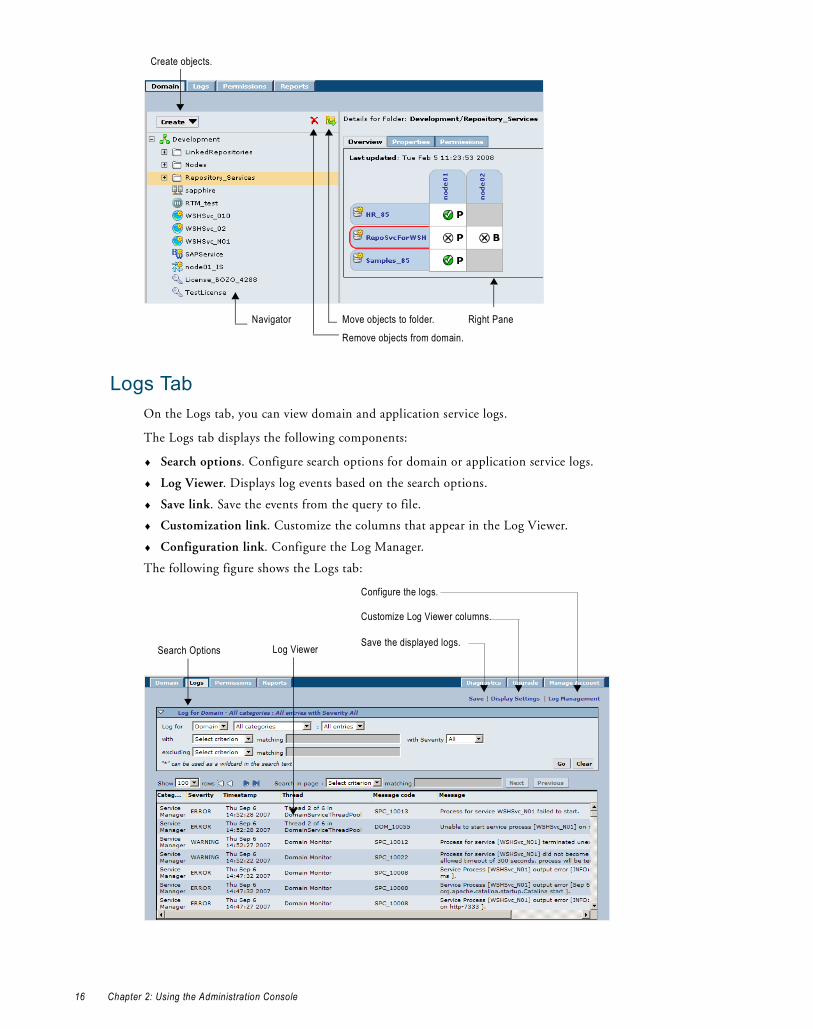
Logs TabOn the Logs tab, you can view domain and application service logs.
The Logs tab displays the following components:
♦ Search options. Configure search options for domain or application service logs.
♦ Log Viewer. Displays log events based on the search options.
♦ Save link. Save the events from the query to file.
♦ Customization link. Customize the columns that appear in the Log Viewer.
♦ Configuration link. Configure the Log Manager.
The following figure shows the Logs tab:
Create objects.
Navigator
Remove objects from domain.
Move objects to folder. Right Pane
Customize Log Viewer columns.
Save the displayed logs.
Configure the logs.
Search Options Log Viewer
16 Chapter 2: Using the Administration Console

Permissions TabYou can assign permissions on domain objects to users and groups on the Permissions tab.
The following figure shows the Permissions tab:
You can also assign permissions on domain objects to users and groups by navigating to a domain object on the Domain tab.
Reports TabYou can run the following domain reports from the Reports tab:
♦ User Domain Audit Report. Run a report to monitor user activity in the domain. You run the report based on a user name and time period.
♦ License Usage Report. Run a report to monitor the usage of logical CPUs and Repository Services. You run the report for a time period.
♦ Web Services Report. Run a report to analyze the performance of web services running on a Web Services Hub. You run the report for a time interval.
♦ License Management Report. Run a report to monitor the number of software options purchased for a license and the number of times a license exceeds usage limits. You run the report for a license.
The following figure shows the Reports tab:
Diagnostics TabYou can generate node diagnostics and upload it to the Configuration Support Manager from the Diagnostics tab. In the Configuration Support Manager, you can diagnose issues with your Informatica environment and get information that can help you reduce risk of unplanned outage.
The Diagnostics tab consists of the following components:
♦ Navigator. The Navigator appears in the left pane and displays the currently running nodes available in the domain.
♦ Right pane. The right pane displays properties and options based on the object selected in the Navigator.
The following figure shows the Diagnostics tab:
Domain Page 17
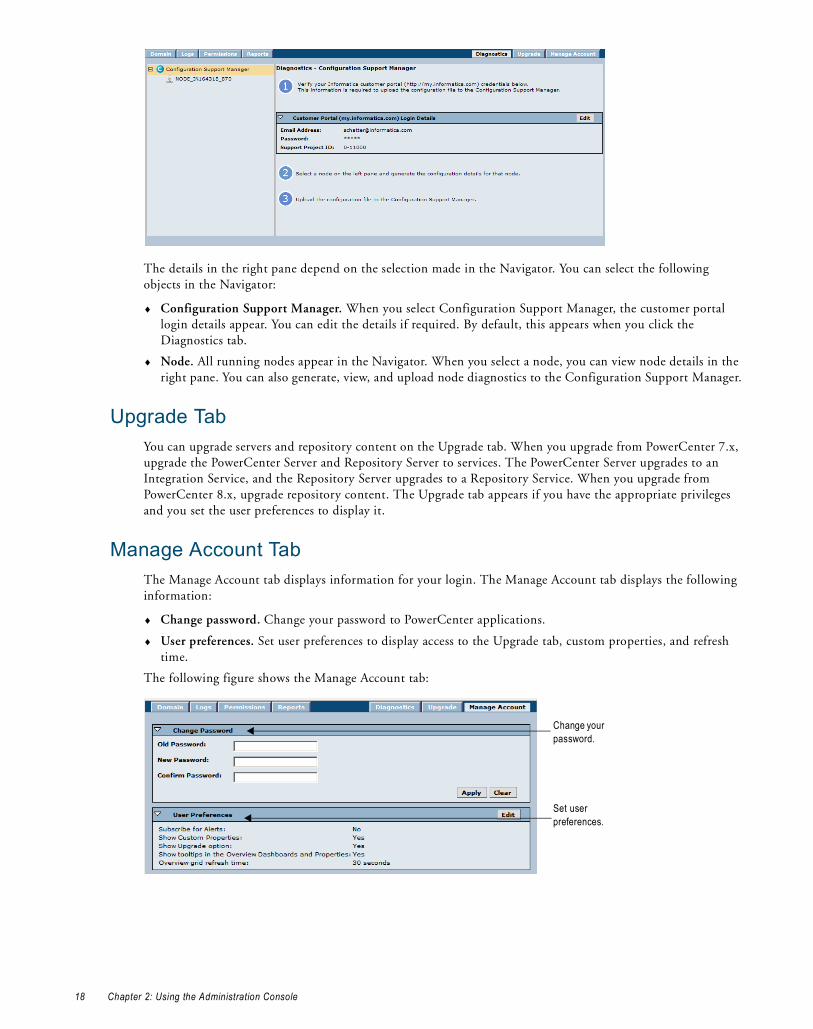
The details in the right pane depend on the selection made in the Navigator. You can select the following objects in the Navigator:
♦ Configuration Support Manager. When you select Configuration Support Manager, the customer portal login details appear. You can edit the details if required. By default, this appears when you click the Diagnostics tab.
♦ Node. All running nodes appear in the Navigator. When you select a node, you can view node details in the right pane. You can also generate, view, and upload node diagnostics to the Configuration Support Manager.
Upgrade TabYou can upgrade servers and repository content on the Upgrade tab. When you upgrade from PowerCenter 7.x, upgrade the PowerCenter Server and Repository Server to services. The PowerCenter Server upgrades to an Integration Service, and the Repository Server upgrades to a Repository Service. When you upgrade from PowerCenter 8.x, upgrade repository content. The Upgrade tab appears if you have the appropriate privileges and you set the user preferences to display it.
Manage Account TabThe Manage Account tab displays information for your login. The Manage Account tab displays the following information:
♦ Change password. Change your password to PowerCenter applications.
♦ User preferences. Set user preferences to display access to the Upgrade tab, custom properties, and refresh time.
The following figure shows the Manage Account tab:
Change your password.
Set user preferences.
18 Chapter 2: Using the Administration Console
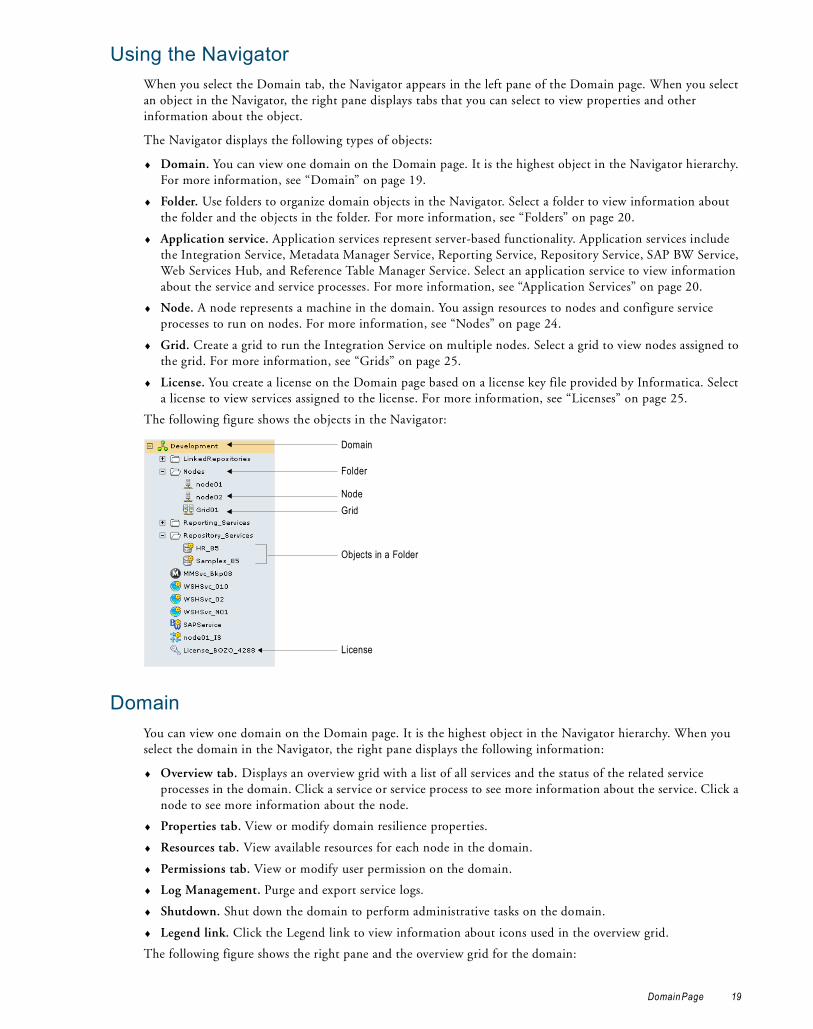
Using the NavigatorWhen you select the Domain tab, the Navigator appears in the left pane of the Domain page. When you select an object in the Navigator, the right pane displays tabs that you can select to view properties and other information about the object.
The Navigator displays the following types of objects:
♦ Domain. You can view one domain on the Domain page. It is the highest object in the Navigator hierarchy. For more information, see “Domain” on page 19.
♦ Folder. Use folders to organize domain objects in the Navigator. Select a folder to view information about the folder and the objects in the folder. For more information, see “Folders” on page 20.
♦ Application service. Application services represent server-based functionality. Application services include the Integration Service, Metadata Manager Service, Reporting Service, Repository Service, SAP BW Service, Web Services Hub, and Reference Table Manager Service. Select an application service to view information about the service and service processes. For more information, see “Application Services” on page 20.
♦ Node. A node represents a machine in the domain. You assign resources to nodes and configure service processes to run on nodes. For more information, see “Nodes” on page 24.
♦ Grid. Create a grid to run the Integration Service on multiple nodes. Select a grid to view nodes assigned to the grid. For more information, see “Grids” on page 25.
♦ License. You create a license on the Domain page based on a license key file provided by Informatica. Select a license to view services assigned to the license. For more information, see “Licenses” on page 25.
The following figure shows the objects in the Navigator:
DomainYou can view one domain on the Domain page. It is the highest object in the Navigator hierarchy. When you select the domain in the Navigator, the right pane displays the following information:
♦ Overview tab. Displays an overview grid with a list of all services and the status of the related service processes in the domain. Click a service or service process to see more information about the service. Click a node to see more information about the node.
♦ Properties tab. View or modify domain resilience properties.
♦ Resources tab. View available resources for each node in the domain.
♦ Permissions tab. View or modify user permission on the domain.
♦ Log Management. Purge and export service logs.
♦ Shutdown. Shut down the domain to perform administrative tasks on the domain.
♦ Legend link. Click the Legend link to view information about icons used in the overview grid.
The following figure shows the right pane and the overview grid for the domain:
Domain
Objects in a Folder
Node
License
Folder
Grid
Domain Page 19

FoldersYou can use folders in the domain to organize objects and to manage security. Folders can contain nodes, services, grids, licenses, and other folders.
When you select a folder in the Navigator, the Navigator opens to display the objects in the folder. The right pane displays the following information:
♦ Overview tab. Displays services in the folder and the nodes where the service processes run.
♦ Properties tab. Displays the name and description of the folder.
♦ Permissions tab. View or modify user permission on the folder.
Application ServicesApplication services are a group of services that represent PowerCenter server-based functionality. You can access properties for Integration Services, Metadata Manager Services, Reporting Services, Repository Services, SAP BW Services, Web Services Hub, and the Reference Table Manager Services on the Domain page.
Integration ServiceThe Integration Service is an application service that runs data integration sessions and workflows. Select an Integration Service in the Navigator to access information about the service.
When you select an Integration Service in the Navigator, the right pane displays the following information:
♦ Service and service processes status. View the status of the service and the service process for each node.
♦ Properties tab. View or modify Integration Service properties.
♦ Associated Repository tab. View the Repository Service associated with the Integration Service.
♦ Processes tab. View or modify the service process properties on each assigned node.
♦ Permissions tab. View or modify user permission on the Integration Service.
♦ Logs tab. View log events for the service. When you click the Integration Service Logs tab, the Log Viewer displays Integration Service log events for the last hour.
20 Chapter 2: Using the Administration Console

The following figure shows the right pane for an Integration Service:
Repository ServiceThe Repository Service is an application service that manages the repository. It retrieves, inserts, and updates metadata in the repository database tables. Select a Repository Service in the Navigator to access information about the service.
When you select a Repository Service in the Navigator, the right pane displays the following information:
♦ Service and service process status. View the status of the service and the service process for each node. The service status also displays the operating mode for the Repository Service. The right pane also displays a message if the repository has no content or requires upgrade.
♦ Actions list. Manage the contents of the repository and perform other administrative tasks.
♦ Properties tab. Manage general and advanced properties, node assignments, and database properties.
♦ Processes tab. View and edit service process properties on each assigned node.
♦ Connections tab. View and terminate repository connections repository.
♦ Locks tab. View the object locks in the repository.
♦ Plug-ins tab. View and manage registered plug-ins.
♦ Permissions tab. View or modify user permission on the Repository Service.
♦ Logs tab. View log events for the service. When you click the Repository Service Logs tab, the Log Viewer displays Repository Service log events for the last hour.
♦ Upgrade Services tab. Upgrade the service version of the Repository Service and its dependent services. The Upgrade Services tab appears if you have the appropriate privileges and the Repository Service is not the current service version.
The following figure shows the right pane for a Repository Service:
Reporting ServiceThe Reporting Service is an application service that runs the Data Analyzer application in a PowerCenter domain. You log in to Data Analyzer to create and run reports on data in a relational database or to run the following PowerCenter reports: PowerCenter Repository Reports, Data Profiling Reports, or Metadata Manager Reports. You can also run other reports within your organization.
Domain Page 21
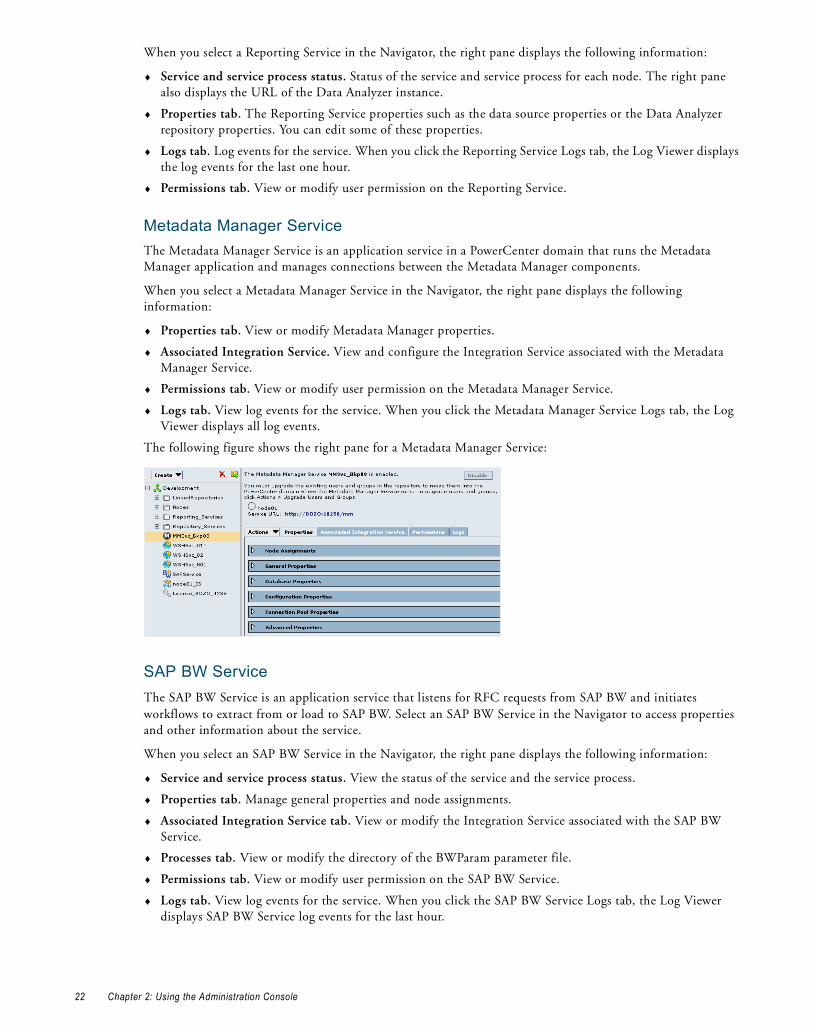
When you select a Reporting Service in the Navigator, the right pane displays the following information:
♦ Service and service process status. Status of the service and service process for each node. The right pane also displays the URL of the Data Analyzer instance.
♦ Properties tab. The Reporting Service properties such as the data source properties or the Data Analyzer repository properties. You can edit some of these properties.
♦ Logs tab. Log events for the service. When you click the Reporting Service Logs tab, the Log Viewer displays the log events for the last one hour.
♦ Permissions tab. View or modify user permission on the Reporting Service.
Metadata Manager ServiceThe Metadata Manager Service is an application service in a PowerCenter domain that runs the Metadata Manager application and manages connections between the Metadata Manager components.
When you select a Metadata Manager Service in the Navigator, the right pane displays the following information:
♦ Properties tab. View or modify Metadata Manager properties.
♦ Associated Integration Service. View and configure the Integration Service associated with the Metadata Manager Service.
♦ Permissions tab. View or modify user permission on the Metadata Manager Service.
♦ Logs tab. View log events for the service. When you click the Metadata Manager Service Logs tab, the Log Viewer displays all log events.
The following figure shows the right pane for a Metadata Manager Service:
SAP BW ServiceThe SAP BW Service is an application service that listens for RFC requests from SAP BW and initiates workflows to extract from or load to SAP BW. Select an SAP BW Service in the Navigator to access properties and other information about the service.
When you select an SAP BW Service in the Navigator, the right pane displays the following information:
♦ Service and service process status. View the status of the service and the service process.
♦ Properties tab. Manage general properties and node assignments.
♦ Associated Integration Service tab. View or modify the Integration Service associated with the SAP BW Service.
♦ Processes tab. View or modify the directory of the BWParam parameter file.
♦ Permissions tab. View or modify user permission on the SAP BW Service.
♦ Logs tab. View log events for the service. When you click the SAP BW Service Logs tab, the Log Viewer displays SAP BW Service log events for the last hour.
22 Chapter 2: Using the Administration Console

The following figure shows the right pane for an SAP BW Service:
Web Services HubThe Web Services Hub is a web service gateway for external clients. It processes SOAP requests from web service clients that want to access PowerCenter functionality through web services. Web service clients access the Integration Service and Repository Service through the Web Services Hub.
When you select a Web Services Hub in the Navigator, the right pane displays the following information:
♦ Properties tab. View or modify Web Services Hub properties.
♦ Associated Repository tab. View the Repository Services associated with the Web Services Hub.
♦ Permissions tab. View or modify user permission on the Web Services Hub.
♦ Logs tab. View log events for the service. When you click the Web Services Hub Logs tab, the Log Viewer displays Integration Service log events for the last hour.
The following figure shows the right pane for a Web Services Hub:
Reference Table Manager ServiceThe Reference Table Manager Service is an application service that runs the Reference Table Manager application in a PowerCenter domain. Use the Reference Table Manager application to manage reference data. Create reference tables to establish relationships between values in the source and target systems during data migration.
When you select a Reference Table Manager Service in the Navigator, the right pane displays the following information:
♦ Properties tab. View or modify Reference Table Manager properties.
♦ Permissions tab. View or modify user permission on the Reference Table Manager Service.
Domain Page 23
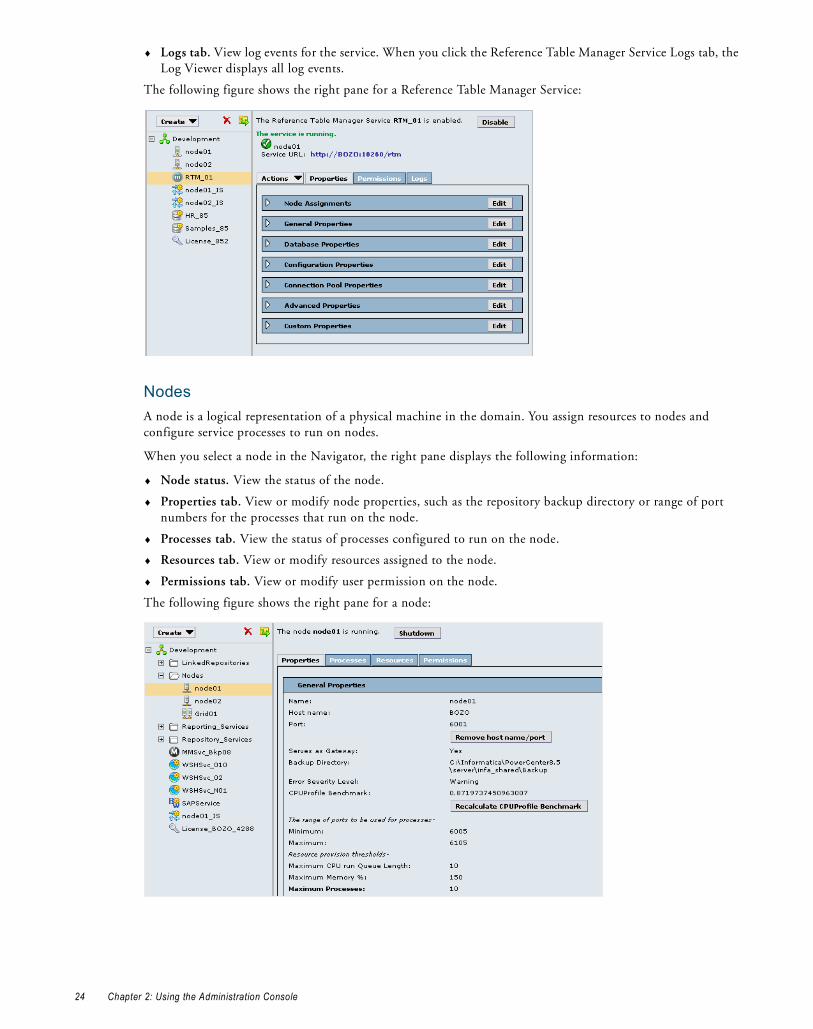
♦ Logs tab. View log events for the service. When you click the Reference Table Manager Service Logs tab, the Log Viewer displays all log events.
The following figure shows the right pane for a Reference Table Manager Service:
NodesA node is a logical representation of a physical machine in the domain. You assign resources to nodes and configure service processes to run on nodes.
When you select a node in the Navigator, the right pane displays the following information:
♦ Node status. View the status of the node.
♦ Properties tab. View or modify node properties, such as the repository backup directory or range of port numbers for the processes that run on the node.
♦ Processes tab. View the status of processes configured to run on the node.
♦ Resources tab. View or modify resources assigned to the node.
♦ Permissions tab. View or modify user permission on the node.
The following figure shows the right pane for a node:
24 Chapter 2: Using the Administration Console
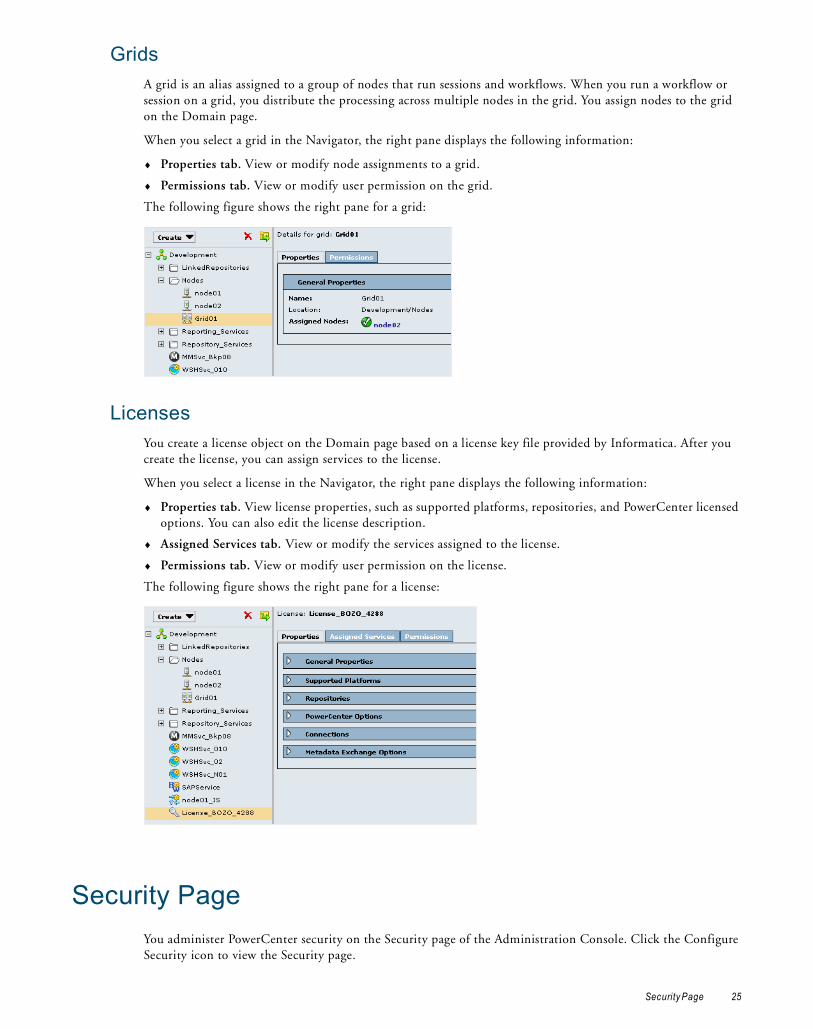
GridsA grid is an alias assigned to a group of nodes that run sessions and workflows. When you run a workflow or session on a grid, you distribute the processing across multiple nodes in the grid. You assign nodes to the grid on the Domain page.
When you select a grid in the Navigator, the right pane displays the following information:
♦ Properties tab. View or modify node assignments to a grid.
♦ Permissions tab. View or modify user permission on the grid.
The following figure shows the right pane for a grid:
LicensesYou create a license object on the Domain page based on a license key file provided by Informatica. After you create the license, you can assign services to the license.
When you select a license in the Navigator, the right pane displays the following information:
♦ Properties tab. View license properties, such as supported platforms, repositories, and PowerCenter licensed options. You can also edit the license description.
♦ Assigned Services tab. View or modify the services assigned to the license.
♦ Permissions tab. View or modify user permission on the license.
The following figure shows the right pane for a license:
Security PageYou administer PowerCenter security on the Security page of the Administration Console. Click the Configure Security icon to view the Security page.
Security Page 25

The Security page has the following components:
♦ Create and Delete buttons. Create or delete a group, user, or role.
♦ LDAP Configuration icon. Configure a connection to a Lightweight Directory Access Protocol (LDAP) directory service and import LDAP users and groups.
♦ Configure Operating System Profiles icon. Create, edit, and delete operating system profiles.
♦ View Users that Have Privileges for a Service icon. View users that have privileges for the domain, Repository Service, Metadata Manager Service, Reporting Service, and Reference Table Manager Service.
♦ Search section. Search for users, groups, or roles by name.
♦ Navigator. The Navigator appears in the left pane and display groups, users, and roles.
♦ Right pane. The right pane displays properties and options based on the object selected in the Navigator and the tab selected in the right pane.
The following figure shows the Security page:
Search SectionUse the Search section to search for users, groups, and roles by name. Search is not case sensitive. For example, searching for “Ad” returns all objects that have “Ad” and “ad” anywhere in the name.
Configure security.
Create groups, users, or roles.
Delete groups, users, or roles.
Navigator Right Pane
Configure LDAP connectivity.
Search Section
Configure operating system profiles.
View users that have privileges for a service.
26 Chapter 2: Using the Administration Console
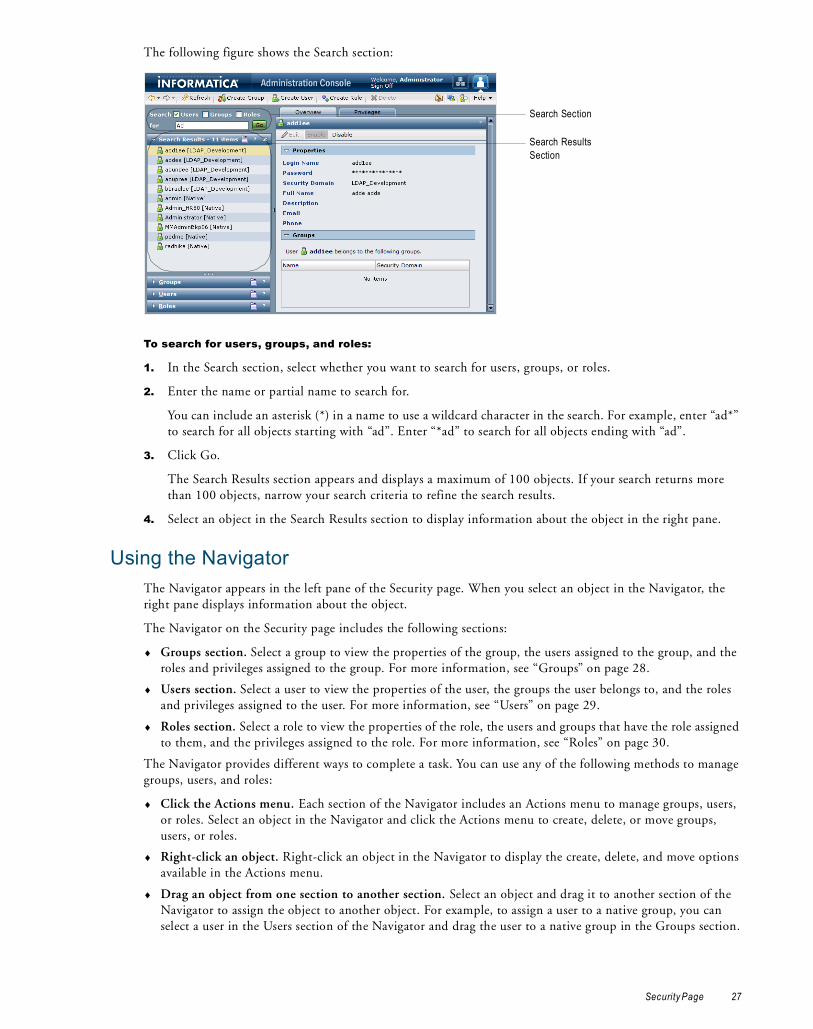
The following figure shows the Search section:
To search for users, groups, and roles:
1. In the Search section, select whether you want to search for users, groups, or roles.
2. Enter the name or partial name to search for.
You can include an asterisk (*) in a name to use a wildcard character in the search. For example, enter “ad*” to search for all objects starting with “ad”. Enter “*ad” to search for all objects ending with “ad”.
3. Click Go.
The Search Results section appears and displays a maximum of 100 objects. If your search returns more than 100 objects, narrow your search criteria to refine the search results.
4. Select an object in the Search Results section to display information about the object in the right pane.
Using the NavigatorThe Navigator appears in the left pane of the Security page. When you select an object in the Navigator, the right pane displays information about the object.
The Navigator on the Security page includes the following sections:
♦ Groups section. Select a group to view the properties of the group, the users assigned to the group, and the roles and privileges assigned to the group. For more information, see “Groups” on page 28.
♦ Users section. Select a user to view the properties of the user, the groups the user belongs to, and the roles and privileges assigned to the user. For more information, see “Users” on page 29.
♦ Roles section. Select a role to view the properties of the role, the users and groups that have the role assigned to them, and the privileges assigned to the role. For more information, see “Roles” on page 30.
The Navigator provides different ways to complete a task. You can use any of the following methods to manage groups, users, and roles:
♦ Click the Actions menu. Each section of the Navigator includes an Actions menu to manage groups, users, or roles. Select an object in the Navigator and click the Actions menu to create, delete, or move groups, users, or roles.
♦ Right-click an object. Right-click an object in the Navigator to display the create, delete, and move options available in the Actions menu.
♦ Drag an object from one section to another section. Select an object and drag it to another section of the Navigator to assign the object to another object. For example, to assign a user to a native group, you can select a user in the Users section of the Navigator and drag the user to a native group in the Groups section.
Search Results Section
Search Section
Security Page 27

♦ Drag multiple users or roles from the right pane to the Navigator. Select multiple users or roles in the right pane and drag them to the Navigator to assign the objects to another object. For example, to assign multiple users to a native group, you can select the Native folder in the Users section of the Navigator to display all native users in the right pane. Use the Ctrl or Shift keys to select multiple users and drag the selected users to a native group in the Groups section of the Navigator.
♦ Use keyboard shortcuts. Use keyboard shortcuts to move to different sections of the Navigator.
The following figure shows the Groups, Users, and Roles sections of the Navigator:
GroupsA group is a collection of users and groups that can have the same privileges, roles, and permissions.
The Groups section of the Navigator organizes groups into security domain folders. A security domain is a collection of user accounts and groups in a PowerCenter domain. Native authentication uses the Native security domain which contains the users and groups created and managed in the Administration Console. LDAP authentication uses LDAP security domains which contain users and groups imported from the LDAP directory service.
When you select a security domain folder in the Groups section of the Navigator, the right pane displays all groups belonging to the security domain. Right-click a group and select Navigate to Item to display the group details in the right pane.
When you select a group in the Navigator, the right pane displays the following tabs:
♦ Overview. Displays general properties of the group and users assigned to the group.
♦ Privileges. Displays the privileges and roles assigned to the group for the domain, Repository Service, Metadata Manager Service, Reporting Service, and Reference Table Manager Service.
The following figure shows the right pane for a group:
Actions menu
28 Chapter 2: Using the Administration Console

UsersA user with an account in the PowerCenter domain can log in to the following PowerCenter applications:
♦ Administration Console
♦ PowerCenter Client
♦ Metadata Manager
♦ Data Analyzer
♦ Reference Table Manager
The Users section of the Navigator organizes users into security domain folders. A security domain is a collection of user accounts and groups in a PowerCenter domain. Native authentication uses the Native security domain which contains the users and groups created and managed in the Administration Console. LDAP authentication uses LDAP security domains which contain users and groups imported from the LDAP directory service.
When you select a security domain folder in the Users section of the Navigator, the right pane displays all users belonging to the security domain. Right-click a user and select Navigate to Item to display the user details in the right pane.
When you select a user in the Navigator, the right pane displays the following tabs:
♦ Overview. Displays general properties of the user and all groups to which the user belongs.
♦ Privileges. Displays the privileges and roles assigned to the user for the domain, Repository Service, Metadata Manager Service, Reporting Service, and Reference Table Manager Service.
The following figure shows the right pane for a user:
Security Page 29

RolesA role is a collection of privileges that you assign to a user or group. Privileges determine the actions that users can perform in PowerCenter applications. You assign a role to users and groups for the domain, Repository Service, Metadata Manager Service, Reporting Service, or Reference Table Manager Service.
The Roles section of the Navigator organizes roles into the following folders:
♦ System-defined Roles. Contains roles that you cannot edit or delete. The Administrator role is a system-defined role.
♦ Custom Roles. Contains roles that you can create, edit, and delete. The Administration Console includes some custom roles that you can edit and assign to users and groups.
When you select a folder in the Roles section of the Navigator, the right pane displays all roles belonging to the folder. Right-click a role and select Navigate to Item to display the role details in the right pane.
When you select a role in the Navigator, the right pane displays the following tabs:
♦ Overview. Displays general properties of the role and the users and groups that have the role assigned for the domain, Repository Service, Metadata Manager Service, Reporting Service, and Reference table Manager Service.
♦ Privileges. Displays the privileges assigned to the role for the domain, Repository Service, Metadata Manager Service, Reporting Service, and Reference Table Manager Service.
The following figure shows the right pane for a role:
Keyboard ShortcutsUse the following keyboard shortcuts to navigate to different components in the Administration Console.
The following table lists the keyboard shortcuts for the Administration Console:
Shortcut Task
Shift+Alt+C Navigate to the Security page from the Domain page.
Shift+Alt+A Navigate to the Domain page from the Security page.
Shift+Alt+G On the Security page, move to the Groups section of the Navigator.
Shift+Alt+U On the Security page, move to the Users section of the Navigator.
Shift+Alt+R On the Security page, move to the Roles section of the Navigator.
30 Chapter 2: Using the Administration Console

C H A P T E R 3
Managing the Domain
This chapter includes the following topics:
♦ Overview, 31
♦ Managing Alerts, 32
♦ Managing Folders, 33
♦ Managing Permissions, 35
♦ Managing Application Services, 37
♦ Managing Nodes, 39
♦ Managing the Gateway, 44
♦ Managing a Mixed-Version Domain, 45
♦ Shutting Down a Domain, 47
♦ Managing the Domain Configuration, 47
♦ Domain Properties Reference, 51
OverviewA PowerCenter domain is a collection of nodes and services that define the PowerCenter environment. To manage the domain, you manage the nodes and services within the domain. Use the Administration Console to perform the following tasks:
♦ Manage alerts. Configure, enable, and disable domain and service alerts for users. For more information, see “Managing Alerts” on page 32.
♦ Manage folders. Create folders to organize domain objects and manage security by setting permission on folders. For more information, see “Managing Folders” on page 33.
♦ Manage permissions. Assign permission to users and groups on the domain, folders, nodes, grids, licenses, and application services. For more information, see “Managing Permissions” on page 35.
♦ Manage application services. Enable, disable, and remove application services. Enable, disable, and restart service processes. For more information, see “Managing Application Services” on page 37.
♦ Manage nodes. Configure node properties, such as the backup directory and resources, and shut down nodes. For more information, see “Managing Nodes” on page 39.
♦ Configure gateway nodes. Configure nodes to serve as a gateway. For more information, see “Managing the Gateway” on page 44.
31
♦ Shut down the domain. Shut down the domain to perform administrative tasks on the domain. For more information, see “Shutting Down a Domain” on page 47.
♦ Manage domain configuration. Back up the domain configuration on a regular basis. You may need to restore the domain configuration from a backup to migrate the configuration to another database user account. You may also need to reset the database information for the domain configuration if it changes. For more information, see “Managing the Domain Configuration” on page 47.
All nodes and services that need to be managed through a single interface must be in the same domain. You cannot access two PowerCenter domains in the same PowerCenter Administration Console window. You can share metadata between domains when you register or unregister a local repository in the local PowerCenter domain with a global repository in another PowerCenter domain.
Managing AlertsAlerts provide users with domain and service alerts. Domain alerts provide notification about node failure and master gateway election. Service alerts provide notification about service process failover. To use the alerts, complete the following tasks:
♦ Configure the SMTP settings for the outgoing email server.
♦ Subscribe to alerts.
After you configure the SMTP settings, users can subscribe to domain and service alerts.
Configuring SMTP SettingsYou configure the SMTP settings for the outgoing mail server to enable alerts. Configure SMTP settings on the domain Properties tab.
To configure SMTP settings for the domain:
1. On the Domain tab, click Properties.
The Properties tab appears.
2. In the SMTP Configuration area, click Edit.
3. Enter the following settings:
4. Click OK.
Option Description
Server Host Name SMTP outbound mail server host name. For example, enter the Microsoft Exchange Server for Microsoft Outlook.
Port Port used by the outgoing mail server. Enter any valid port number up to 65535. Default is 25.
User Name User name for authentication upon sending if required by the outbound mail server.
Password User password for authentication upon sending if required by the outbound mail server.
Sender Email Address
Email address the Service Manager uses in the From field when sending notification emails. If you leave this field blank, the Service Manager uses the default “Administrator@<host name>” as the sender.
32 Chapter 3: Managing the Domain

Subscribing to AlertsAfter you complete the SMTP configuration, you can subscribe to alerts.
To subscribe to alerts:
1. Verify that the domain administrator has entered a valid email address for your user account on the Security page.
If an invalid email address is entered or the SMTP configuration is invalid, the Service Manager cannot deliver the alert notification.
2. On the Domain page, click the Manage Account tab.
3. Click Edit in the User Preferences area.
4. Select Subscribe for Alerts.
5. Click OK.
The Service Manager sends alert notification emails based on your domain privileges and permissions.
The following table lists the alert types and events for notification emails:
Viewing AlertsWhen you subscribe to alerts, you can receive domain and service notification emails for certain events. When a domain or service event occurs that triggers a notification, you can track the alert status in the following ways:
♦ The Service Manager sends an alert notification email to all subscribers with the appropriate privilege and permission on the domain or service.
♦ The Log Manager logs alert notification delivery success or failure in the domain or service log.
For example, the Service Manager sends the following notification email to all alert subscribers with the appropriate privilege and permission on the service that failed:
From: Administrator@<database host>To: Jon SmithSubject: Alert message of type [Service] for object [HR_811].The service process on node [node01] for service [HR_811] terminated unexpectedly.
In addition, the Log Manager writes the following message to the service log:
ALERT_10009 Alert message [service process failover] of type [service] for object [HR_811] was successfully sent.
You can review the domain or service logs for undeliverable alert notification emails. In the domain log, filter by Alerts as the category. In the service logs, search on the message code ALERT. When the Service Manager cannot send an alert notification email, the following message appears in the related domain or service log:
ALERT_10004: Unable to send alert of type [alert type] for object [object name], alert message [alert message], with error [error].
Managing FoldersUse folders in the domain to organize objects and to manage security. Folders can contain nodes, services, grids, licenses, and other folders. You might want to use folders to group services by type. For example, you can create
Alert Type Event
Domain Node FailureMaster Gateway Election
Service Service Process Failover
Managing Folders 33
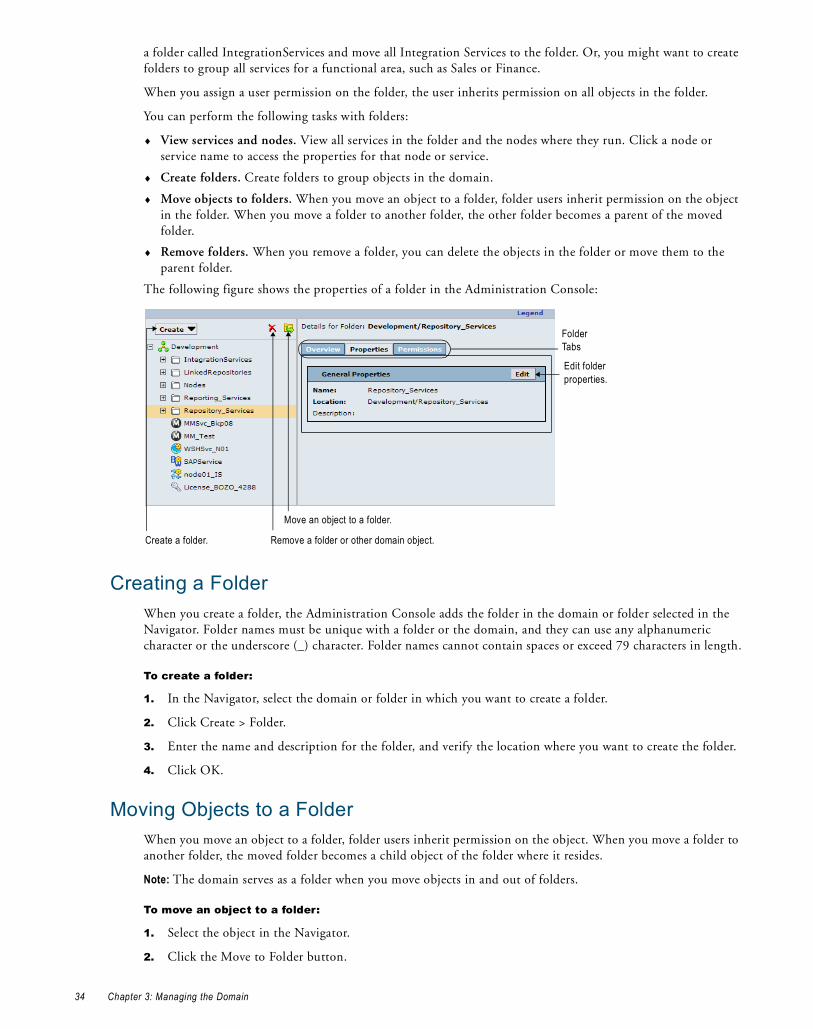
a folder called IntegrationServices and move all Integration Services to the folder. Or, you might want to create folders to group all services for a functional area, such as Sales or Finance.
When you assign a user permission on the folder, the user inherits permission on all objects in the folder.
You can perform the following tasks with folders:
♦ View services and nodes. View all services in the folder and the nodes where they run. Click a node or service name to access the properties for that node or service.
♦ Create folders. Create folders to group objects in the domain.
♦ Move objects to folders. When you move an object to a folder, folder users inherit permission on the object in the folder. When you move a folder to another folder, the other folder becomes a parent of the moved folder.
♦ Remove folders. When you remove a folder, you can delete the objects in the folder or move them to the parent folder.
The following figure shows the properties of a folder in the Administration Console:
Creating a FolderWhen you create a folder, the Administration Console adds the folder in the domain or folder selected in the Navigator. Folder names must be unique with a folder or the domain, and they can use any alphanumeric character or the underscore (_) character. Folder names cannot contain spaces or exceed 79 characters in length.
To create a folder:
1. In the Navigator, select the domain or folder in which you want to create a folder.
2. Click Create > Folder.
3. Enter the name and description for the folder, and verify the location where you want to create the folder.
4. Click OK.
Moving Objects to a FolderWhen you move an object to a folder, folder users inherit permission on the object. When you move a folder to another folder, the moved folder becomes a child object of the folder where it resides.
Note: The domain serves as a folder when you move objects in and out of folders.
To move an object to a folder:
1. Select the object in the Navigator.
2. Click the Move to Folder button.
Remove a folder or other domain object.
Move an object to a folder.
Create a folder.
Folder Tabs
Edit folder properties.
34 Chapter 3: Managing the Domain

3. In the Move to Folder window, select a folder, and click OK.
Removing a Folder When you remove a folder, you can delete the objects in the folder or move them to the parent folder.
To remove a folder:
1. Select the folder in the Navigator.
2. Click the Remove button.
3. In the Remove Folder window, choose whether to move the folder contents to the parent folder or delete the contents.
You can delete the contents only if you have the appropriate privileges and permissions on all objects in the folder.
4. Choose to wait until all processes complete or to abort all processes.
5. Click OK.
Managing PermissionsYou manage user security within the domain with privileges and permissions. Privileges determine the actions that users can perform on domain objects. Permissions define the level of access a user has to a domain object. Domain objects include the domain, folders, nodes, grids, licenses, and application services.
Even if a user has the domain privilege to perform certain actions, the user may also require permission to perform the action on a particular object. For example, a user has the Manage Services domain privilege which grants the user the ability to edit application services. However, the user also must have permission on the application service. A user with the Manage Services domain privilege and permission on the Development Repository Service but not on the Production Repository Service can edit the Development Repository Service but not the Production Repository Service.
To log in to the Administration Console, a user must have permission on at least one domain object and have the Access Administration Console domain privilege. If a user has the Access Administration Console privilege and permission on an object, but does not have the domain privilege that grants the ability to modify the object type, then the user can view the object. For example, if a user has permission on a node, but does not have the Manage Nodes and Grids privilege, the user can view the node properties but cannot configure, shut down, or remove the node.
If a user does not have permission on a selected object in the Navigator, the right pane displays a message indicating that permission on the object is denied.
Note: If a Repository Service is running in exclusive mode, you cannot assign permissions to newly created users until you run the Repository Service in normal mode.
Inherited and Object PermissionsUsers and groups can have the following types of permissions in a domain:
♦ Object permissions. When users and groups have permission on an object, they can perform administrative tasks on that object if they also have the appropriate privilege.
♦ Inherited permissions. When users have permission on a domain or a folder, they inherit permission on all objects in the domain or the folder. When groups have permission on a domain object, all subgroups and users belonging to the group inherit permission on the domain object. When users are assigned the Administrator role for the domain, they inherit all permissions on all objects in the domain. You cannot revoke inherited permissions.
Managing Permissions 35
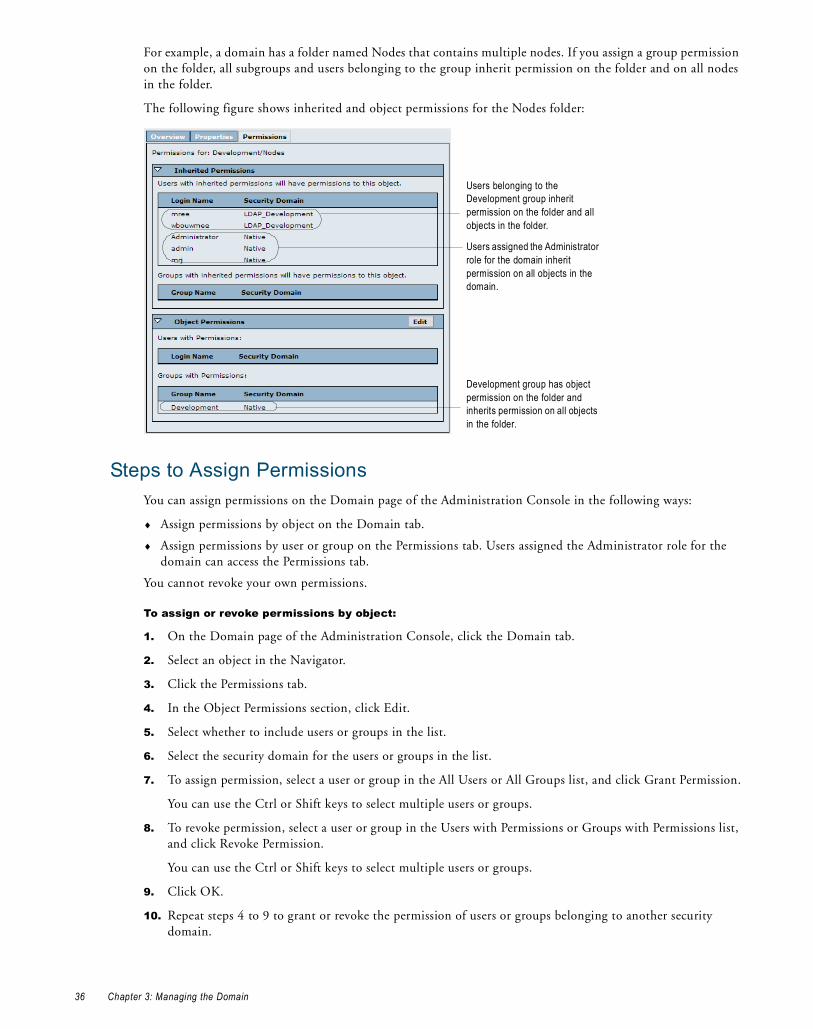
For example, a domain has a folder named Nodes that contains multiple nodes. If you assign a group permission on the folder, all subgroups and users belonging to the group inherit permission on the folder and on all nodes in the folder.
The following figure shows inherited and object permissions for the Nodes folder:
Steps to Assign PermissionsYou can assign permissions on the Domain page of the Administration Console in the following ways:
♦ Assign permissions by object on the Domain tab.
♦ Assign permissions by user or group on the Permissions tab. Users assigned the Administrator role for the domain can access the Permissions tab.
You cannot revoke your own permissions.
To assign or revoke permissions by object:
1. On the Domain page of the Administration Console, click the Domain tab.
2. Select an object in the Navigator.
3. Click the Permissions tab.
4. In the Object Permissions section, click Edit.
5. Select whether to include users or groups in the list.
6. Select the security domain for the users or groups in the list.
7. To assign permission, select a user or group in the All Users or All Groups list, and click Grant Permission.
You can use the Ctrl or Shift keys to select multiple users or groups.
8. To revoke permission, select a user or group in the Users with Permissions or Groups with Permissions list, and click Revoke Permission.
You can use the Ctrl or Shift keys to select multiple users or groups.
9. Click OK.
10. Repeat steps 4 to 9 to grant or revoke the permission of users or groups belonging to another security domain.
Users belonging to the Development group inherit permission on the folder and all objects in the folder.
Users assigned the Administrator role for the domain inherit permission on all objects in the domain.
Development group has object permission on the folder and inherits permission on all objects in the folder.
36 Chapter 3: Managing the Domain
To assign or revoke permissions by user or group:
1. On the Domain page of the Administration Console, click the Permissions tab.
2. Select whether to include users or groups in the list.
3. Select the security domain for the users or groups in the list.
4. Click the Go button.
5. Click the Set Permissions button for a user or group.
The Edit User Permissions or Edit Group Permissions dialog box appears.
6. To grant permission on an object, select an object in the All objects in Domain list, and click Add.
7. To revoke permission on an object, select an object in the Permissions granted to list, and click Remove.
8. Repeat steps 6 to 7 to edit the permission for multiple objects.
9. Click OK.
Managing Application ServicesYou can perform the following common administration tasks for application services:
♦ Enable and disable services and service processes.
♦ Configure the domain to restart service processes.
♦ Remove an application service.
♦ Troubleshoot an application service.
Enabling and Disabling Services and Service ProcessesYou can enable and disable application services and service processes in the Administration Console.
You enable services and service processes to run the service. When you enable a service, the service starts running. The status of the associated service processes depends on the service configuration and whether the processes are enabled. For example, you enable a service configured to run on multiple nodes. The service starts the service process on the primary node if it is enabled. All other enabled nodes are on standby. Disabled nodes are stopped.
You can disable a service to prevent it from running or to perform a management task, such as changing the data movement mode for an Integration Service. You might want to disable the service process on a node if you need to shut down the node for maintenance. When you disable a service, all associated service processes stop, but they remain enabled.
When you disable a service or service process, you can also choose the disable mode:
♦ Complete. Allows all processes to complete before disabling.
♦ Abort. Aborts all processes before disabling.
♦ Stop. Stops all running workflows. Available for the Integration Service.
Managing Applicat ion Services 37
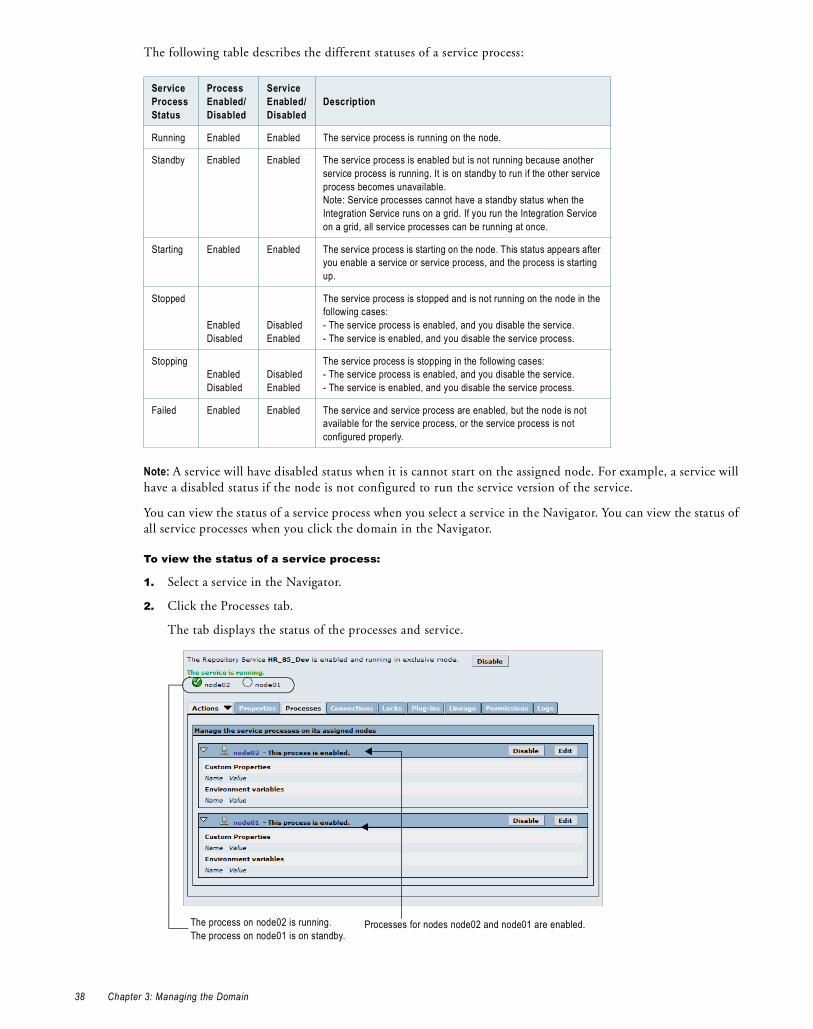
The following table describes the different statuses of a service process:
Note: A service will have disabled status when it is cannot start on the assigned node. For example, a service will have a disabled status if the node is not configured to run the service version of the service.
You can view the status of a service process when you select a service in the Navigator. You can view the status of all service processes when you click the domain in the Navigator.
To view the status of a service process:
1. Select a service in the Navigator.
2. Click the Processes tab.
The tab displays the status of the processes and service.
Service Process Status
Process Enabled/ Disabled
Service Enabled/ Disabled
Description
Running Enabled Enabled The service process is running on the node.
Standby Enabled Enabled The service process is enabled but is not running because another service process is running. It is on standby to run if the other service process becomes unavailable.Note: Service processes cannot have a standby status when the Integration Service runs on a grid. If you run the Integration Service on a grid, all service processes can be running at once.
Starting Enabled Enabled The service process is starting on the node. This status appears after you enable a service or service process, and the process is starting up.
Stopped
EnabledDisabled
DisabledEnabled
The service process is stopped and is not running on the node in the following cases:- The service process is enabled, and you disable the service.- The service is enabled, and you disable the service process.
StoppingEnabled Disabled
DisabledEnabled
The service process is stopping in the following cases:- The service process is enabled, and you disable the service. - The service is enabled, and you disable the service process.
Failed Enabled Enabled The service and service process are enabled, but the node is not available for the service process, or the service process is not configured properly.
Processes for nodes node02 and node01 are enabled.The process on node02 is running.The process on node01 is on standby.
38 Chapter 3: Managing the Domain
Configuring Restart for Service ProcessesIf you have high availability and an application service process becomes unavailable while a node is running, the domain tries to restart the process based on the restart options configured in the domain properties.
To configure restart properties:
1. Select the domain in the Navigator.
2. Click the Properties tab.
3. Configure the following restart properties:
Removing Application ServicesYou can remove an application service using the Administration Console. Before removing an application service, you must disable it.
To remove an application service:
1. In the Navigator, select the application service.
2. In the warning message that appears, click Yes to stop other services that depend on the application service.
3. Click the Remove button.
4. Choose to wait until all processes complete or abort all processes, and the click OK.
Troubleshooting Application ServicesI think that a service is using incorrect environment variable values. How can I find out which environment variable values are used by a service.Set the error severity level for the node to debug. When the service starts on the node, the Domain log will display the environment variables that the service is using.
Managing NodesA node is a logical representation of a physical machine in the domain. When you install PowerCenter, you define at least one node that serves as the gateway for the domain. You can define other nodes using the installation program or infasetup command line program.
After you define a node, you must add the node to the domain. When you add a node to the domain, the node appears in the Navigator, and you can edit its properties. Use the Domain tab of the Administration Console to manage nodes, including configuring node properties and removing nodes from a domain.
Domain Property Description
Maximum Restart Attempts Number of times within a specified period that the domain attempts to restart an application service process when it fails. The value must be greater than or equal to 1. Default is 3.
Within Restart Period (sec) Maximum period of time that the domain spends attempting to restart an application service process when it fails. If a service fails to start after the specified number of attempts within this period of time, the service does not restart. Default is 900.
Managing Nodes 39

You perform the following tasks to manage a node:
♦ Define the node and add it to the domain. Adds the node to the domain and enables the domain to communicate with the node. After you add a node to a domain, you can start the node. For more information, see “Defining and Adding Nodes” on page 40.
♦ Configure properties. Configure node properties, such as the repository backup directory and ports used to run processes. For more information, see “Configuring Node Properties” on page 41.
♦ View processes. View the processes configured to run on the node and their status. Before you remove or shut down a node, verify that all running processes are stopped. For more information, see “Viewing Processes on the Node” on page 43.
♦ Shut down the node. Shut down the node if you need to perform maintenance on the machine or to ensure that domain configuration changes take effect. For more information, see “Shutting Down and Restarting the Node” on page 43.
♦ Remove a node. Remove a node from the domain if you no longer need the node. For more information, see “Removing a Node” on page 44.
♦ Define resources. When the Integration Service runs on a grid, you can configure it to check the resources available on each node. Assign connection resources and define custom and file/directory resources on a node. For more information, see “Configuring Resources” on page 217.
♦ Edit permissions. View inherited permissions for the node and manage the object permissions for the node. For more information, see “Managing Permissions” on page 35.
Defining and Adding NodesYou must define a node and add it to the domain so that you can start the node. When you install PowerCenter, you define at least one node that serves as the gateway for the domain. You can define other nodes. The other nodes can be gateway nodes or worker nodes.
A master gateway node receives service requests from clients and routes them to the appropriate service and node. You can define one or more gateway nodes.
A worker node can run application services but cannot serve as a gateway.
When you define a node, you specify the host name and port number for the machine that hosts the node. You also specify the node name. The Administration Console uses the node name to identify the node. To define a node that supports mutiple service versions, use infasetup to specify the previous PowerCenter installation directory.
Use either of the following programs to define a node:
♦ The PowerCenter installation program. Run the installation program on each machine you want to define as a node.
♦ infasetup command line program. Run the infasetup DefineGatewayNode or DefineWorkerNode command on each machine you want to serve as a gateway or worker node.
When you define a node, the installation program or infasetup creates the nodemeta.xml file, which is the node configuration file for the node. A gateway node uses information in the nodemeta.xml file to connect to the domain configuration database. A worker node uses the information in nodemeta.xml to connect to the domain. The nodemeta.xml file is stored in the \server\config directory on each node.
After you define a node, you must add it to the domain. When you add a node to the domain, the node appears in the Navigator. You can add a node to the domain using the Administration Console or the infacmd AddDomainNode command.
If you add a node that supports mutiple service versions to a single-version domain, the domain becomes a mixed-version domain.
40 Chapter 3: Managing the Domain
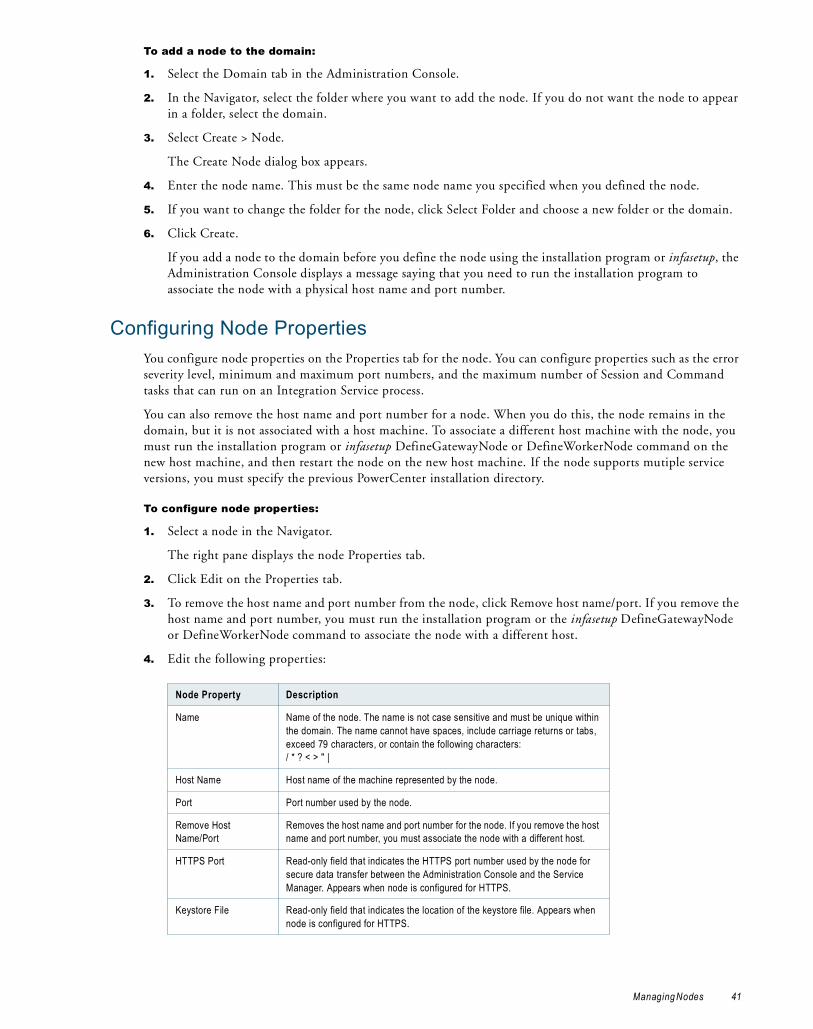
To add a node to the domain:
1. Select the Domain tab in the Administration Console.
2. In the Navigator, select the folder where you want to add the node. If you do not want the node to appear in a folder, select the domain.
3. Select Create > Node.
The Create Node dialog box appears.
4. Enter the node name. This must be the same node name you specified when you defined the node.
5. If you want to change the folder for the node, click Select Folder and choose a new folder or the domain.
6. Click Create.
If you add a node to the domain before you define the node using the installation program or infasetup, the Administration Console displays a message saying that you need to run the installation program to associate the node with a physical host name and port number.
Configuring Node PropertiesYou configure node properties on the Properties tab for the node. You can configure properties such as the error severity level, minimum and maximum port numbers, and the maximum number of Session and Command tasks that can run on an Integration Service process.
You can also remove the host name and port number for a node. When you do this, the node remains in the domain, but it is not associated with a host machine. To associate a different host machine with the node, you must run the installation program or infasetup DefineGatewayNode or DefineWorkerNode command on the new host machine, and then restart the node on the new host machine. If the node supports mutiple service versions, you must specify the previous PowerCenter installation directory.
To configure node properties:
1. Select a node in the Navigator.
The right pane displays the node Properties tab.
2. Click Edit on the Properties tab.
3. To remove the host name and port number from the node, click Remove host name/port. If you remove the host name and port number, you must run the installation program or the infasetup DefineGatewayNode or DefineWorkerNode command to associate the node with a different host.
4. Edit the following properties:
Node Property Description
Name Name of the node. The name is not case sensitive and must be unique within the domain. The name cannot have spaces, include carriage returns or tabs, exceed 79 characters, or contain the following characters: / * ? < > " |
Host Name Host name of the machine represented by the node.
Port Port number used by the node.
Remove Host Name/Port
Removes the host name and port number for the node. If you remove the host name and port number, you must associate the node with a different host.
HTTPS Port Read-only field that indicates the HTTPS port number used by the node for secure data transfer between the Administration Console and the Service Manager. Appears when node is configured for HTTPS.
Keystore File Read-only field that indicates the location of the keystore file. Appears when node is configured for HTTPS.
Managing Nodes 41
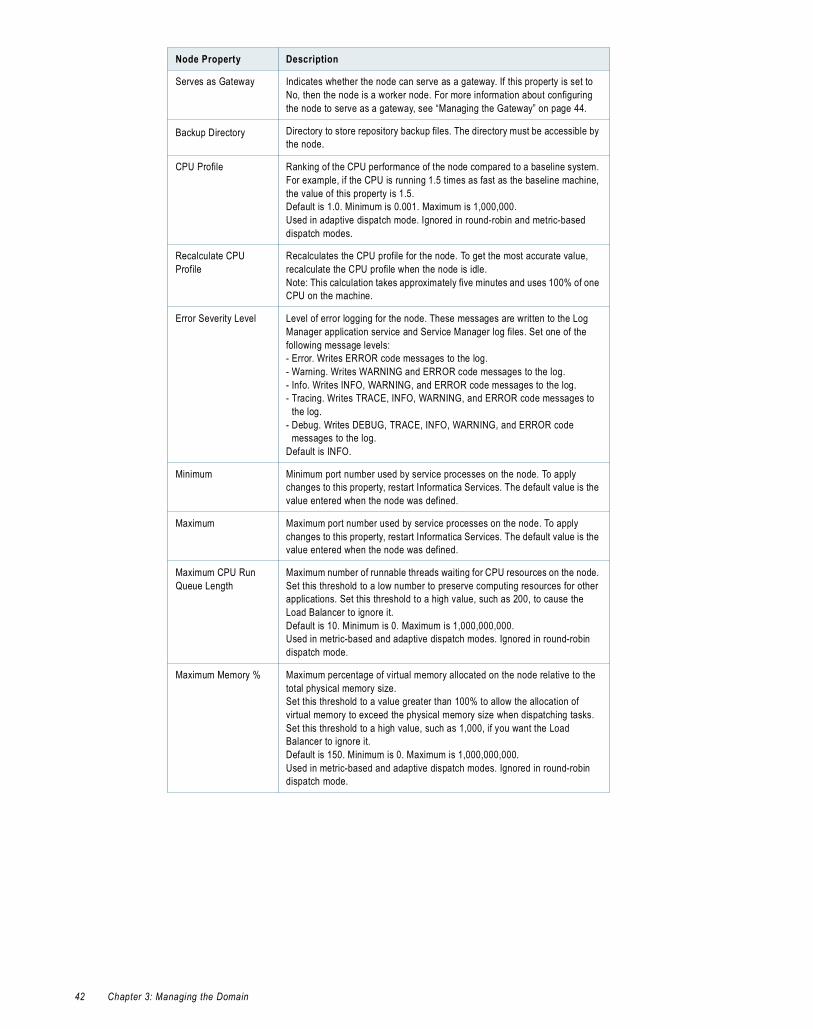
Serves as Gateway Indicates whether the node can serve as a gateway. If this property is set to No, then the node is a worker node. For more information about configuring the node to serve as a gateway, see “Managing the Gateway” on page 44.
Backup Directory Directory to store repository backup files. The directory must be accessible by the node.
CPU Profile Ranking of the CPU performance of the node compared to a baseline system. For example, if the CPU is running 1.5 times as fast as the baseline machine, the value of this property is 1.5.Default is 1.0. Minimum is 0.001. Maximum is 1,000,000.Used in adaptive dispatch mode. Ignored in round-robin and metric-based dispatch modes.
Recalculate CPU Profile
Recalculates the CPU profile for the node. To get the most accurate value, recalculate the CPU profile when the node is idle.Note: This calculation takes approximately five minutes and uses 100% of one CPU on the machine.
Error Severity Level Level of error logging for the node. These messages are written to the Log Manager application service and Service Manager log files. Set one of the following message levels:- Error. Writes ERROR code messages to the log.- Warning. Writes WARNING and ERROR code messages to the log.- Info. Writes INFO, WARNING, and ERROR code messages to the log.- Tracing. Writes TRACE, INFO, WARNING, and ERROR code messages to
the log.- Debug. Writes DEBUG, TRACE, INFO, WARNING, and ERROR code
messages to the log.Default is INFO.
Minimum Minimum port number used by service processes on the node. To apply changes to this property, restart Informatica Services. The default value is the value entered when the node was defined.
Maximum Maximum port number used by service processes on the node. To apply changes to this property, restart Informatica Services. The default value is the value entered when the node was defined.
Maximum CPU Run Queue Length
Maximum number of runnable threads waiting for CPU resources on the node. Set this threshold to a low number to preserve computing resources for other applications. Set this threshold to a high value, such as 200, to cause the Load Balancer to ignore it.Default is 10. Minimum is 0. Maximum is 1,000,000,000.Used in metric-based and adaptive dispatch modes. Ignored in round-robin dispatch mode.
Maximum Memory % Maximum percentage of virtual memory allocated on the node relative to the total physical memory size.Set this threshold to a value greater than 100% to allow the allocation of virtual memory to exceed the physical memory size when dispatching tasks. Set this threshold to a high value, such as 1,000, if you want the Load Balancer to ignore it.Default is 150. Minimum is 0. Maximum is 1,000,000,000.Used in metric-based and adaptive dispatch modes. Ignored in round-robin dispatch mode.
Node Property Description
42 Chapter 3: Managing the Domain

5. Click OK.
RELATED TOPICS:♦ Defining Resource Provision Thresholds, 225
Viewing Processes on the NodeYou can view the status of all processes configured to run on a node. Before you shut down or remove a node, you can view the status of each process to determine which processes you need to disable.
To view processes on a node:
1. Select a node in the Navigator.
2. Click the Processes tab.
The tab displays the status of each process configured to run on the node.
Shutting Down and Restarting the NodeSome administrative tasks may require you to shut down a node. For example, you might need to perform maintenance or benchmarking on a machine. You might also need to shut down and restart a node for some configuration changes to take effect. For example, if you change the shared directory for the Log Manager or domain, you must shut down the node and restart it to update the configuration files.
You can shut down a node from the Administration Console or from the operating system. When you shut down a node, you stop Informatica Services and abort all processes running on the node.
To restart a node, start Informatica Services on the node.
Note: To avoid loss of data or metadata when you shut down a node, disable all running processes in complete mode.
To shut down a node from the Administration Console:
1. Select the node in the Navigator.
2. Click Shutdown in the right pane.
The Administration Console displays the list of service processes running on that node.
Maximum Processes The maximum number of running processes allowed for each Integration Service process that runs on the node. The Integration Service uses this threshold differently depending on the session and Integration Service configuration.If the Session on Grid property is disabled for the session and the IgnoreResourceRequirements property is enabled for the Integration Service that runs the session, this threshold specifies the maximum number of running Session or Command tasks allowed for each Integration Service process running on the node.If the Session on Grid property is enabled for the session, or if the Session on Grid and IgnoreResourceRequirements properties are both disabled, this threshold specifies the maximum number of running Session and Command tasks allowed for each Integration Service process running on the node.Set this threshold to a high number, such as 200, to cause the Load Balancer to ignore it. To prevent the Load Balancer from dispatching tasks to this node, set this threshold to 0.Default is 10. Minimum is 0. Maximum is 1,000,000,000.Used in all dispatch modes.
PowerCenter <version> Installation Directory
Installation directory on the node. If the node can run mutiple service versions, the node properties display more than one installation directory. This is a read-only field.
Node Property Description
Managing Nodes 43
3. Click Yes to stop all processes.
-or-
Click No to cancel the operation.
To start or stop the node on Windows:
1. From the Start Menu, click Administrative Tools > Services.
2. Double-click Informatica Services.
3. If the Service Manager service is running, click Stop.
-or-
If the Service Manager service is stopped, click Start.
To start or stop the node on UNIX:
1. At the command prompt, switch to the directory where the infaservice executable is located.
By default, infaservice resides in the server/tomcat/bin directory in the PowerCenter Services installation directory.
2. At the command prompt, type the following command to start or stop the Service Manager:
infaservice [startup | shutdown]
Note: If you use a softlink to specify the location of infaservice, you must set the INFA_HOME environment variable to the location of the PowerCenter Services installation directory.
Removing a NodeWhen you remove a node from a domain, it is no longer visible in the Navigator. If the node is running when you remove it, the node shuts down and all service processes are aborted.
Note: To avoid loss of data or metadata when you remove a node, disable all running processes in complete mode.
To remove a node:
1. Select the node in the Navigator.
2. Click the Remove button.
3. In the warning message that appears, click OK.
Managing the GatewayOne gateway node in the domain serves as the master gateway node for the domain. The Service Manager on the master gateway node accepts service requests and manages the domain and services in the domain.
When you install PowerCenter, you create one gateway node. After installation, you can create additional gateway nodes. You might want to create additional gateway nodes as backups. If you have one gateway node and it becomes unavailable, the domain cannot accept service requests. If you have multiple gateway nodes and the master gateway node becomes unavailable, the Service Managers on the other gateway nodes elect a new master gateway node. The new master gateway node accepts service requests. Only one gateway node can be the master gateway node at any given time. You must have at least one node configured as a gateway node at all times. Otherwise, the domain is inoperable.
You can configure a worker node to serve as a gateway node. The worker node must be running when you configure it to serve as a gateway node.
44 Chapter 3: Managing the Domain
Note: You can also run the infasetup DefineGatewayNode command to create a gateway node. If you configure a worker node to serve as a gateway node, you must specify the log directory. If you have multiple gateway nodes, configure all gateway nodes to write log files to the same directory on a shared disk.
After you configure the gateway node, the Service Manager on the master gateway node writes the domain configuration database connection to the nodemeta.xml file of the new gateway node.
If you configure a master gateway node to serve as a worker node, you must restart the node to make the Service Managers elect a new master gateway node. If you do not restart the node, the node continues as the master gateway node until you restart the node or the node becomes unavailable.
To configure a gateway node:
1. In the Navigator, select the domain.
2. Select the Properties tab.
3. Click Edit in the Log and Gateway Configuration section.
4. Select the check box next to the worker node that you want to configure to serve as a gateway node.
You can select multiple nodes to serve as gateway nodes.
5. Configure the directory path for the log files.
If you have multiple gateway nodes, configure all gateway nodes to point to the same location for log files.
6. Click OK.
Managing a Mixed-Version DomainA mixed-version domain is a domain that can run multiple application service versions. A domain is a mixed-version domain when one or more nodes in the domain are configured to run multiple service versions. In a mixed-version domain, the Service Manager on each node starts application services for each service version that is configured to run on the node.
In a PowerCenter 8.6.1 mixed-version domain, you can create and run 8.6.1 services and some 8.6 services. In a mixed-version domain, you can create and run PowerCenter 8.6 versions of the following application services:
♦ Repository Service
♦ Integration Service
♦ Web Services Hub
You can configure previous service versions to run on nodes that are configured to run multiple service versions.
Mixed-version domains provide the capability to manage services of a different service version within the same domain. Use the mixed-version functionality in the following situations:
♦ Use one domain to incrementally test the upgrade of development and test services.
♦ Use one domain to manage services for departments within your company that are not using the same service version.
When you upgrade services, a Repository Service and all its dependent services are upgraded to the latest version. Other services in the domain do not get upgraded to the latest version.
Use the filter button to view an application service of a particular service version. By default, all service versions of application services appear in the Navigator.
To filter the services that appear in the Navigator:
1. Click the filter button in the Navigator.
The Filter Navigator dialog box appears.
Managing a Mixed-Version Domain 45

2. Select the service version that you want to view.
3. Click OK to apply the filter.
A description of the filter setting appears in the Navigator.
Note: The filter setting applies for the current Administration Console session. The filter setting does not persist the next time you log in.
Upgrading Application Services VersionsTo upgrade a set of application services to the latest version, select the upgrade service option for the Repository Service. When you upgrade the service version of the Repository Service, all dependent services are upgraded.
Use the following rules and guidelines when you upgrade services:
♦ Upgrade the service version of a Repository Service for global repositories before you upgrade a Repository Service for a local repository.
♦ If you have a local or global repository in another domain, upgrade the service version for that repository in the domain where the Repository Service runs.
Use the following procedure to upgrade services:
1. Disable the Repository Service and all its dependent services.
2. Select the Repository Service in the Navigator.
3. Select the Upgrade Services tab.
A list of dependent services displays.
4. Click Continue to upgrade the service version of the Repository Service and its dependent services.
A list of upgraded services appears.
5. Click OK to continue.
6. Enable the Repository Service.
If you have a global repository and a local repository, enable the Repository Service for the global repository first.
7. Enable all the dependent services.
Note: When you upgrade services, the value of $PMRootDir does not change. You can update the $PMRootDir in the Integration Service process properties.
Troubleshooting
This service will not be upgraded as it exists in different domain.Upgrade the service version of the service and its dependent services in the domain where the service runs.
Configuring Services and Repository DomainsWhen you run services in a mixed-version domain, verify that services and domains that work together are of the same version.
Use the following rules and guidelines when you configure services in a mixed-version domain:
♦ All nodes in a grid must be configured to run the service version of the Integration Service.
♦ Configure each service to run nodes that are configured to run the service version of that service.
♦ Associate services with services that are of the same service version.
Use the following rules and guidelines when you configure a repository domain in a mixed-version domain:
♦ Local and global repositories must be of the same service version.
46 Chapter 3: Managing the Domain
♦ Local and global repositories must run in domains that are of the same domain version.
Shutting Down a DomainYou may need to shut down a domain to perform administrative tasks on the domain. For example, you need to shut down a domain to back up and restore a domain configuration. When you shut down a domain, the Service Manager on the master gateway node stops all application services and Informatica Services in the domain. After you shut down the domain, restart Informatica Services on each node in the domain.
When you shut down a domain, any processes running on nodes in the domain are aborted. Before you shut down a domain, verify that all processes, including workflows, have completed and no users are logged in to repositories in the domain.
Note: To avoid a possible loss of data or metadata and allow the currently running processes to complete, you can shut down each node from the Administration Console or from the operating system.
To shut down and restart a domain:
1. In the Navigator, select the domain.
2. Click Shutdown in the right pane.
The Shutdown dialog box lists the running processes on the nodes in the domain.
3. Click Yes.
The Shutdown dialog box shows a warning message.
4. Click Yes.
The Service Manager on the master gateway node shuts down the application services and Informatica Services on each node in the domain.
5. Restart Informatica Services on the gateway and worker nodes in the domain to restart the domain.
Managing the Domain ConfigurationThe Service Manager on the master gateway node manages the domain configuration. The domain configuration is a set of metadata tables stored in a relational database that is accessible by all gateway nodes in the domain. Each time you make a change to the domain, the Service Manager writes the change to the domain configuration. For example, when you add a node to the domain, the Service Manager adds the node information to the domain configuration. The gateway nodes use a JDBC connection to access the domain configuration database.
You can perform the following domain configuration management tasks:
♦ Back up the domain configuration. Back up the domain configuration on a regular basis. You may need to restore the domain configuration from a backup if the domain configuration in the database becomes corrupt. For more information, see “Backing Up the Domain Configuration” on page 48.
♦ Restore the domain configuration. You may need to restore the domain configuration if you migrate the domain configuration to another database user account. Or, you may need to restore the backup domain configuration to a database user account. For more information, see “Restoring the Domain Configuration” on page 49.
♦ Migrate the domain configuration. You may need to migrate the domain configuration to another database user account. For more information, see “Migrating the Domain Configuration” on page 49.
Shutt ing Down a Domain 47

♦ Configure the connection to the domain configuration database. Each gateway node must have access to the domain configuration database. You configure the database connection when you create a domain. If you change the database connection information or migrate the domain configuration to a new database, you must update the database connection information for each gateway node. For more information, see “Updating the Domain Configuration Database Connection” on page 51.
♦ Configure custom properties. Configure domain properties that are unique to your PowerCenter environment or that apply in special cases. Use custom properties only if Informatica Global Customer Support instructs you to do so. For more information, see “Custom Properties” on page 51.
Domain Configuration DatabaseThe domain configuration database consists of the following tables:
♦ PCSF_CPU_USAGE_SUMMARY. Stores the number of CPUs used by each application service each day. Run the License Report to analyze CPU usage information stored in this table.
♦ PCSF_DOMAIN. Stores the domain metadata, such as names, host names, and port numbers of nodes in the domain. The Service Manager on the master gateway node determines nodes that are eligible to exist in the domain based on the list of nodes that it tracks in this table. The Service Manager looks up host names and port numbers of worker nodes in this table to assign tasks to the worker nodes in the domain.
♦ PCSF_DOMAIN_GROUP_PRIVILEGE. Stores the privileges and roles assigned to groups for the domain. The Service Manager authorizes user requests for domain objects in the Administration Console based on this table.
♦ PCSF_DOMAIN_USER_PRIVILEGE. Stores the privileges and roles assigned to users for the domain. The Service Manager authorizes user requests for domain objects in the Administration Console based on this table.
♦ PCSF_GROUP. Stores native and LDAP group information. The Service Manager determines user and group relationships based on this table.
♦ PCSF_MASTER_ELECTION. Stores information that allows the Service Managers on the other gateway nodes to elect the master gateway node.
♦ PCSF_MASTER_ELECT_LOCK. Stores the lock information about the master gateway node. Ensures that only one master gateway node exists at any time.
♦ PCSF_REPO_USAGE_SUMMARY. Stores the number of Repository Services running in the domain each day. Run the License Report to analyze Repository Service usage information stored in this table.
♦ PCSF_ROLE. Stores the privileges assigned to roles for the domain, Repository Service, Metadata Manager Service, Reporting Service, and Reference Table Manager Service. The Service Manager determines which privileges users and groups inherit from assigned roles based on this table.
♦ PCSF_RUN_LOG. Stores the location of workflow and session log binary files. The Log Manager retrieves the location of the files from this table. The Workflow Monitor and infacmd commands request the location of the workflow and session log binary files from the Log Manager.
♦ PCSF_SOURCE_AND_TARGET USAGE. Stores information about the source and target systems used in PowerCenter workflows.
♦ PCSF_USER. Stores native and LDAP user information. The Service Manager authenticates users who log in to the Administration Console, PowerCenter Client, Metadata Manager, and Data Analyzer based on this table.
Backing Up the Domain ConfigurationBack up the domain configuration on a regular basis. You may need to restore the domain configuration from a backup file if the domain configuration in the database becomes corrupt.
Run the infasetup BackupDomain command to back up the domain configuration to an XML file.
48 Chapter 3: Managing the Domain

Restoring the Domain ConfigurationYou can restore domain configuration from a backup file. You may need to restore the domain configuration if the domain configuration in the database becomes inconsistent or if you want to migrate the domain configuration to another database.
PowerCenter restores the domain configuration from the current version. If you have a backup file from an earlier version of PowerCenter, you must use the earlier version to restore the domain configuration.
You can restore the domain configuration to the same or a different database user account. If you restore the domain configuration to a database user account with existing domain configuration, you must configure the command to overwrite the existing domain configuration. If you do not configure the command to overwrite the existing domain configuration, the command fails.
Each node in a domain has a host name and port number. When you restore the domain configuration, you can disassociate the host names and port numbers for all nodes in the domain. You might do this if you want to run the nodes on different machines. After you restore the domain configuration, you can assign new host names and port numbers to the nodes. Run the infasetup DefineGatewayNode or DefineWorkerNode command to assign a new host name and port number to a node.
If you restore the domain configuration to another database, you must reset the database connections for all gateway nodes. For more information, see “Updating the Domain Configuration Database Connection” on page 51.
Warning: You lose all data in the PCSF_CPU_USAGE_SUMMARY, PCSF_REPO_USAGE_SUMMARY, and PCSF_RUN_LOG tables when you restore the domain configuration.
Complete the following tasks to restore the domain:
1. Disable the application services. Disable the application services in complete mode to ensure that you do not abort any running service process. You must disable the application services to ensure that no service process is running when you shut down the domain.
2. Shut down the domain. You must shut down the domain to ensure that no change to the domain occurs while you are restoring the domain.
3. Run the infasetup RestoreDomain command to restore the domain configuration to a database. The RestoreDomain command restores the domain configuration in the backup XML file to the specified database user account.
4. Assign new host names and port numbers to the nodes in the domain if you disassociated the previous host names and port numbers when you restored the domain configuration. Run the infasetup DefineGatewayNode or DefineWorkerNode command to assign a new host name and port number to a node.
5. Reset the database connections for all gateway nodes if you restored the domain configuration to another database. All gateway nodes must have a valid connection to the domain configuration database.
Migrating the Domain ConfigurationYou can migrate the domain configuration to another database user account. You may need to migrate the domain configuration if you no longer support the existing database user account. For example, if your company requires all departments to migrate to a new database type, you must migrate the domain configuration.
Complete the following steps to migrate the domain configuration:
1. Shut down all application services in the domain.
2. Shut down the domain.
3. Back up the domain configuration.
4. Create the database user account where you want to restore the domain configuration.
5. Restore the domain configuration backup to the database user account.
Managing the Domain Configuration 49

6. Update the database connection for each gateway node.
7. Start all nodes in the domain.
8. Enable all application services in the domain.
Warning: You lose all data in the PCSF_CPU_USAGE_SUMMARY, PCSF_REPO_USAGE_SUMMARY, PCSSF_SOURCE_AND_TARGET_USAGE, and PCSF_RUN_LOG tables when you restore the domain configuration.
Step 1. Shut Down All Application ServicesYou must disable all application services to disable all service processes. If you do not disable an application service and a user starts running a service process while you are backing up and restoring the domain, the service process changes may be lost and data may become corrupt.
Tip: Shut down the application services in complete mode to ensure that you do not abort any running service processes.
Shut down the application services in the following order:
1. Reference Table Manager Services
2. Web Services Hub
3. SAP BW Services
4. Metadata Manager Services
5. Integration Services
6. Repository Services
7. Reporting Services
Step 2. Shut Down the DomainYou must shut down the domain to ensure that users do not modify the domain while you are migrating the domain configuration. For example, if the domain is running when you are backing up the domain configuration, users can create new services and objects. Also, if you do not shut down the domain and you restore the domain configuration to a different database, the domain becomes inoperative. The connections between the gateway nodes and the domain configuration database become invalid. The gateway nodes shut down because they cannot connect to the domain configuration database. A domain is inoperative if it has no running gateway node.
Step 3. Back Up the Domain ConfigurationRun the infasetup BackupDomain command to back up the domain configuration to an XML file.
Step 4. Create a Database User AccountCreate a database user account if you want to restore the domain configuration to a new database user account.
Step 5. Restore the Domain ConfigurationRun the infasetup RestoreDomain command to restore the domain configuration to a database. The RestoreDomain command restores the domain configuration in the backup XML file to the specified database user account.
Step 6. Update the Database ConnectionIf you restore the domain configuration to a different database user account, you must update the database connection information for each gateway node in the domain. Gateway nodes must have a connection to the domain configuration database to retrieve and update domain configuration.
50 Chapter 3: Managing the Domain
Step 7. Start All Nodes in the DomainStart all nodes in the domain. You must start the nodes to enable services to run.
To update the database connection:
1. Shut down the gateway node that you want to update.
2. Run the infasetup UpdateGatewayNode command to update the gateway node.
3. Start the gateway node.
4. Repeat this process for each gateway node.
Step 8. Enable All Application ServicesEnable all application services that you previously shut down. Application services must be enabled to run service processes.
Updating the Domain Configuration Database ConnectionAll gateway nodes must have a connection to the domain configuration database to retrieve and update domain configuration. When you create a gateway node or configure a node to serve as a gateway, you specify the database connection, including the database user name and password. If you migrate the domain configuration to a different database or change the database user name or password, you must update the database connection for each gateway node. For example, as part of a security policy, your company may require you to change the password for the domain configuration database every three months.
To update the node with the new database connection information, complete the following steps:
1. Shut down the gateway node.
2. Run the infasetup UpdateGatewayNode command.
If you change the user or password, you must update the node.
To update the node after you change the user or password, complete the following steps:
1. Shut down the gateway node.
2. Run the infasetup UpdateGatewayNode command.
If you change the host name or port number, you must redefine the node.
To redefine the node after you change the host name or port number, complete the following steps:
1. Shut down the gateway node.
2. In the Administration Console, remove the host name or port number from the node properties.
3. Run the infasetup DefineGatewayNode command.
Custom PropertiesCustom properties include properties that are unique to your PowerCenter environment or that apply in special cases. A domain has no custom properties when you initially create it. Use custom properties only if Informatica Global Customer Support instructs you to.
Domain Properties ReferenceUse the Administration Console to configure the following domain properties:
Domain Properties Reference 51

♦ General properties. Configure general properties, such as service resilience and dispatch mode. For more information, see “General Properties” on page 52.
♦ Database properties. View the database properties, such as database name and database host. For more information, see “Database Properties” on page 52.
♦ Log and gateway configuration. Configure a node to serve as gateway and specify the location to write log events. For more information, see “Log and Gateway Configuration” on page 52.
♦ Service level management. Create and configure service levels. For more information, see “Service Level Management” on page 53.
♦ SMTP configuration. Configure the SMTP settings for the outgoing mail server to enable alerts. For more information, see “SMTP Configuration” on page 53.
♦ Custom properties. Configure custom properties that are unique to your PowerCenter environment or that apply in special cases. A domain has no custom properties when you initially create it. Use custom properties only if Informatica Global Customer Support instructs you to.
To view and update properties, select the Domain in the Navigator. The Properties tab for the domain appears.
General PropertiesYou can configure general properties for the domain, such as service resilience and load balancing.
The following table describes the General Properties area:
Database PropertiesYou can view the database properties for the domain, such as database name and database host.
The following table describes the Database Properties area:
Log and Gateway ConfigurationYou can configure a node to serve as gateway for a domain and specify the directory where the Service Manager on this node writes the log event files.
Property Description
Name Name of the PowerCenter domain.
Resilience Timeout
Amount of time client attempts to connect or reconnect to a service.
Limit on Resilience Timeouts
The amount of time a service waits for a client to connect or reconnect to the service.
Maximum Restart Attempts
Number of times the domain attempts to restart an application service process. Must be 1 or more.
Restart Period Maximum period of time the domain spends attempting to restart an application service process.
Dispatch Mode Mode used by Load Balancer to dispatch tasks to nodes in a grid.
Property Description
Database Type Type of database that stores the domain configuration metadata.
Database Host Name of the machine hosting the database.
Database Port Port number used by the database.
Database Name Name of the database.
Database User Account for the database containing the domain configuration information.
52 Chapter 3: Managing the Domain
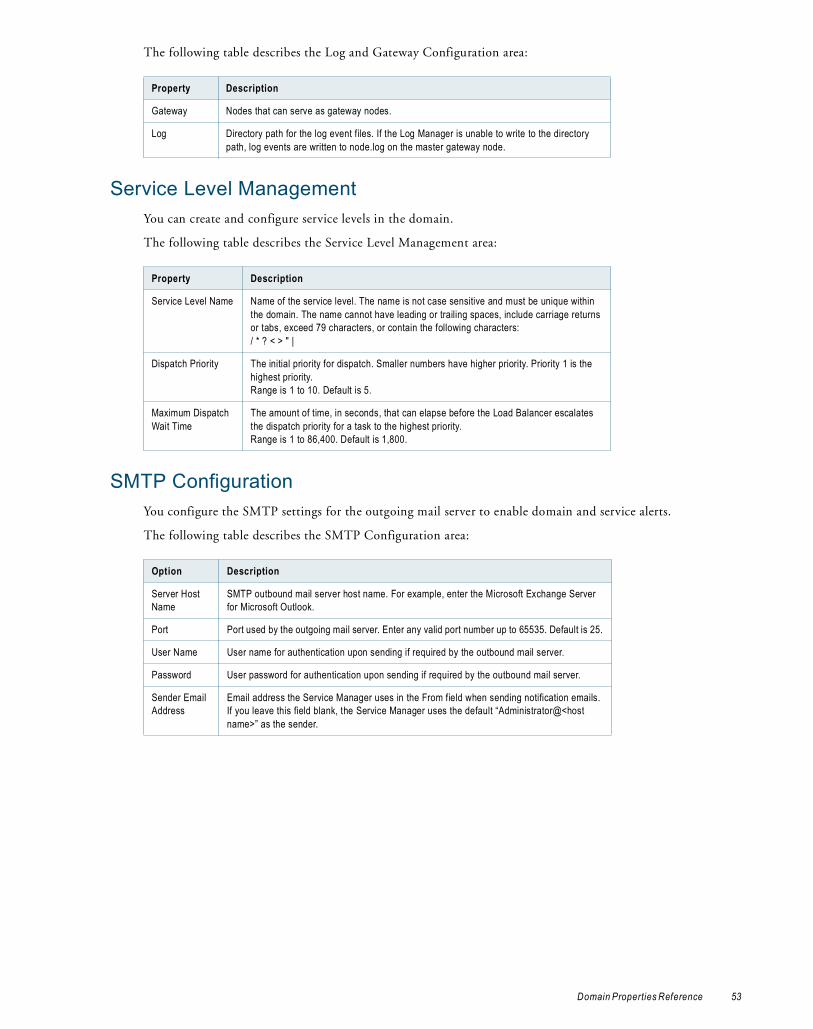
The following table describes the Log and Gateway Configuration area:
Service Level ManagementYou can create and configure service levels in the domain.
The following table describes the Service Level Management area:
SMTP ConfigurationYou configure the SMTP settings for the outgoing mail server to enable domain and service alerts.
The following table describes the SMTP Configuration area:
Property Description
Gateway Nodes that can serve as gateway nodes.
Log Directory path for the log event files. If the Log Manager is unable to write to the directory path, log events are written to node.log on the master gateway node.
Property Description
Service Level Name Name of the service level. The name is not case sensitive and must be unique within the domain. The name cannot have leading or trailing spaces, include carriage returns or tabs, exceed 79 characters, or contain the following characters:/ * ? < > " |
Dispatch Priority The initial priority for dispatch. Smaller numbers have higher priority. Priority 1 is the highest priority.Range is 1 to 10. Default is 5.
Maximum Dispatch Wait Time
The amount of time, in seconds, that can elapse before the Load Balancer escalates the dispatch priority for a task to the highest priority.Range is 1 to 86,400. Default is 1,800.
Option Description
Server Host Name
SMTP outbound mail server host name. For example, enter the Microsoft Exchange Server for Microsoft Outlook.
Port Port used by the outgoing mail server. Enter any valid port number up to 65535. Default is 25.
User Name User name for authentication upon sending if required by the outbound mail server.
Password User password for authentication upon sending if required by the outbound mail server.
Sender Email Address
Email address the Service Manager uses in the From field when sending notification emails. If you leave this field blank, the Service Manager uses the default “Administrator@<host name>” as the sender.
Domain Properties Reference 53

54 Chapter 3: Managing the Domain
C H A P T E R 4
Managing Users and Groups
This chapter includes the following topics:
♦ Overview, 55
♦ Understanding User Accounts, 56
♦ Understanding Authentication and Security Domains, 57
♦ Setting Up LDAP Authentication, 58
♦ Managing Users, 63
♦ Managing Groups, 66
♦ Managing Operating System Profiles, 67
OverviewTo access the services and objects in the PowerCenter domain and to use the PowerCenter applications, you must have a user account. The tasks you can perform depend on the type of user account you have.
When you install PowerCenter, a default administrator user account is created. Use the default administrator account to initially log in to the PowerCenter domain and create PowerCenter services, domain objects, and other user accounts. When you log in to the PowerCenter domain after installation, change the password to ensure security for the PowerCenter domain and applications.
User account management in PowerCenter involves the following key components:
♦ Users. You can set up different types of user accounts in the PowerCenter domain. Users can perform tasks based on the roles, privileges, and permissions assigned to them.
For more information, see “Understanding User Accounts” on page 56 and “Managing Users” on page 63.
♦ Authentication. When a user logs in to PowerCenter, the Service Manager authenticates the user account in the PowerCenter domain and verifies that the user can use the PowerCenter applications. The PowerCenter domain can use native or LDAP authentication to authenticate users. The Service Manager organizes PowerCenter user accounts and groups by security domain. It authenticates users based on the security domain the user belongs to.
For more information, see “Understanding Authentication and Security Domains” on page 57.
♦ Groups. You can set up groups of users and assign different roles, privileges, and permissions to each group. The roles, privileges, and permissions assigned to the group determines the tasks that users in the group can perform within the PowerCenter domain.
For more information, see “Managing Groups” on page 66.
55
♦ Privileges and roles. Privileges determine the actions that users can perform in PowerCenter applications. A role is a collection of privileges that you can assign to users and groups. You assign roles or privileges to users and groups for the domain and for each application service in the domain.
For more information, see “Managing Privileges and Roles” on page 71.
♦ Operating system profiles. If you run the Integration Service on UNIX, you can configure the Integration Service to use operating system profiles when running workflows. You can create and manage operating system profiles on the Security page of the Administration Console.
For more information, see “Managing Operating System Profiles” on page 67.
Understanding User AccountsA PowerCenter domain can have the following types of accounts:
♦ Default administrator
♦ Domain administrator
♦ Application administrator
♦ User
Default AdministratorThe default administrator is created during installation. The user name for the default administrator is Administrator. The password for the default administrator is Administrator.
The default administrator has administrator permissions and privileges on the domain and all application services. The default administrator can perform the following tasks:
♦ Create, configure, and manage all objects in the domain, including nodes, application services, and administrator and user accounts.
♦ Configure and manage all objects and user accounts created by other domain administrators and application administrators.
♦ Log in to any PowerCenter repository, Metadata Manager application, and Data Analyzer application.
The default administrator is a user account in the native security domain. You cannot create a default administrator. You cannot disable or modify the user name or privileges of the default administrator. You can change the default administrator password.
Domain AdministratorA domain administrator can create and manage objects in the domain, including user accounts, nodes, grids, licenses, and application services.
The domain administrator can log in to the Administration Console and create and configure Repository Services, Metadata Manager Services, or Reporting Services in the domain. However, by default, the domain administrator cannot log in to the PowerCenter repository or the Metadata Manager and Data Analyzer applications. The default administrator or a domain administrator must explicitly give a domain administrator full permissions and privileges to the application services so that they can log in and perform administrative tasks in the PowerCenter Client and the Metadata Manager and Data Analyzer applications.
To create a domain administrator, assign a user the Administrator role for a domain.
Application AdministratorAn application administrator can create and manage objects in an application. However, the application administrator does not have permissions or privileges on the domain. The application administrator cannot log
56 Chapter 4: Managing Users and Groups
in to the Administration Console to manage the service for the application for which it has administrator privileges.
To limit administrator privileges and keep PowerCenter applications secure, create a separate administrator account for each application.
You can set up the following application administrators:
♦ Repository administrator. Has full permissions and privileges on all objects in a PowerCenter repository. The repository administrator can log in to the PowerCenter Client to manage the repository objects and perform all tasks in the PowerCenter Client. The repository administrator can also perform all tasks in the pmrep and pmcmd command line programs.
To create a repository administrator, assign a user the Administrator role for a Repository Service.
♦ Metadata Manager administrator. Has full permissions and privileges on the Metadata Manager application. The Metadata Manager administrator can log in to the Metadata Manager application to create and manage Metadata Manager objects and perform all tasks in the application.
To create a Metadata Manager administrator, assign a user the Administrator role for a Metadata Manager Service.
♦ Data Analyzer administrator. Has full permissions and privileges on the Data Analyzer application. The Data Analyzer administrator can log in to the Data Analyzer application to create and manage Data Analyzer objects and perform all tasks in the application.
To create a Data Analyzer administrator, assign a user the Administrator role for a Reporting Service.
User A user with an account in the PowerCenter domain can perform tasks in the PowerCenter applications.
Typically, the default administrator or a domain administrator creates and manages user accounts and assigns roles, permissions, and privileges in the PowerCenter domain. However, any user with the required domain privileges and permissions can create a user account and assign roles, permissions, and privileges.
Users can perform tasks in PowerCenter based on the privileges and permissions assigned to them.
Understanding Authentication and Security Domains When a user logs in to PowerCenter, the Service Manager authenticates the user account in the PowerCenter domain and verifies that the user can use the PowerCenter applications. PowerCenter uses native and LDAP authentication to authenticate users logging in to the PowerCenter domain.
You can use more than one type of authentication in a PowerCenter domain. By default, the PowerCenter domain uses native authentication. You can configure the PowerCenter domain to use LDAP authentication in addition to native authentication.
The Service Manager organizes PowerCenter user accounts and groups by security domains. A security domain is a collection of user accounts and groups in a PowerCenter domain. The Service Manager stores user account information for each security domain in the domain configuration database.
The authentication method used by a PowerCenter domain determines the security domains available in a PowerCenter domain. A PowerCenter domain can have more than one security domain. The Service Manager authenticates users based on their security domain.
Native AuthenticationFor native authentication, the Service Manager stores all user account information and performs all user authentication within the PowerCenter domain. When a user logs in, the Service Manager uses the native security domain to authenticate the user name and password.
Understanding Authenticat ion and Security Domains 57

By default, the PowerCenter domain contains a native security domain. The native security domain is created at installation and cannot be deleted. A PowerCenter domain can have only one native security domain. You create and maintain user accounts of the native security domain in the Administration Console. The Service Manager stores details of the user accounts, including passwords and groups, in the domain configuration database.
LDAP AuthenticationTo enable PowerCenter to use LDAP authentication, you must set up a connection to an LDAP directory service and specify the users and groups that can have access to the PowerCenter domain. If the LDAP server uses the SSL protocol, you must also specify the location of the SSL certificate.
After you set up the connection to an LDAP directory service, you can import the user account information from the LDAP directory service into an LDAP security domain. Set a filter to specify the user accounts to be included in an LDAP security domain. A PowerCenter domain can have multiple LDAP security domains. When a user logs in, the Service Manager authenticates the user name and password against the LDAP directory service.
You can set up LDAP security domains in addition to the native security domain. For example, you use the Administration Console to create users and groups in the native security domain. If you also have users in an LDAP directory service who use PowerCenter applications, you can import the users and groups from the LDAP directory service and create an LDAP security domain. When users log in to PowerCenter applications, the Service Manager authenticates them based on their security domain.
Note: The Service Manager requires that LDAP users log in to a PowerCenter application using a password even though an LDAP directory service may allow a blank password for anonymous mode.
Setting Up LDAP AuthenticationIf you have user accounts in an enterprise LDAP directory service that you want to give access to the PowerCenter applications, you can configure the PowerCenter domain to use LDAP authentication. Create an LDAP security domain and set up a filter to specify the users and groups in the LDAP directory service who can access PowerCenter and be included in the security domain.
The Service Manager imports the users and groups from the LDAP directory service into an LDAP security domain. You can set up a schedule for the Service Manager to periodically synchronize the list of users and groups in the LDAP security domain with the list of users and groups in the LDAP directory service. During synchronization, the Service Manager imports new users and groups from the LDAP directory service and deletes any user or group that no longer exists in the LDAP directory service.
When a user in an LDAP security domain logs in to a PowerCenter repository or application, the Service Manager passes the user account name and password to the LDAP directory service for authentication. If the LDAP server uses SSL security protocol, the Service Manager sends the user account name and password to the LDAP directory service using the appropriate SSL certificates.
You can use the following LDAP directory services for LDAP authentication:
♦ Microsoft Active Directory Service
♦ Sun Java System Directory Service
♦ Novell e-Directory Service
♦ IBM Tivoli Directory Service
♦ Open LDAP Directory Service
You create and manage LDAP users and groups in the LDAP directory service.
You can assign roles, privileges, and permissions to users and groups in an LDAP security domain. You can assign LDAP user accounts to native groups to organize them based on their roles in the PowerCenter domain.
58 Chapter 4: Managing Users and Groups
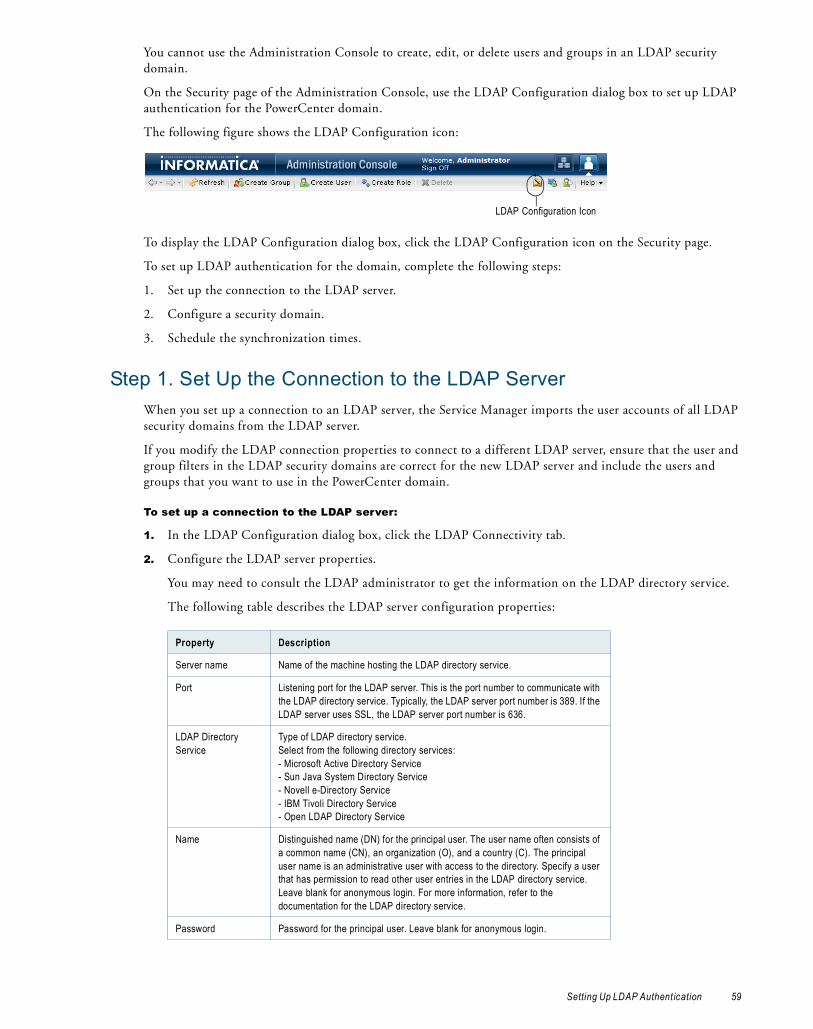
You cannot use the Administration Console to create, edit, or delete users and groups in an LDAP security domain.
On the Security page of the Administration Console, use the LDAP Configuration dialog box to set up LDAP authentication for the PowerCenter domain.
The following figure shows the LDAP Configuration icon:
To display the LDAP Configuration dialog box, click the LDAP Configuration icon on the Security page.
To set up LDAP authentication for the domain, complete the following steps:
1. Set up the connection to the LDAP server.
2. Configure a security domain.
3. Schedule the synchronization times.
Step 1. Set Up the Connection to the LDAP ServerWhen you set up a connection to an LDAP server, the Service Manager imports the user accounts of all LDAP security domains from the LDAP server.
If you modify the LDAP connection properties to connect to a different LDAP server, ensure that the user and group filters in the LDAP security domains are correct for the new LDAP server and include the users and groups that you want to use in the PowerCenter domain.
To set up a connection to the LDAP server:
1. In the LDAP Configuration dialog box, click the LDAP Connectivity tab.
2. Configure the LDAP server properties.
You may need to consult the LDAP administrator to get the information on the LDAP directory service.
The following table describes the LDAP server configuration properties:
Property Description
Server name Name of the machine hosting the LDAP directory service.
Port Listening port for the LDAP server. This is the port number to communicate with the LDAP directory service. Typically, the LDAP server port number is 389. If the LDAP server uses SSL, the LDAP server port number is 636.
LDAP Directory Service
Type of LDAP directory service. Select from the following directory services:- Microsoft Active Directory Service- Sun Java System Directory Service- Novell e-Directory Service- IBM Tivoli Directory Service- Open LDAP Directory Service
Name Distinguished name (DN) for the principal user. The user name often consists of a common name (CN), an organization (O), and a country (C). The principal user name is an administrative user with access to the directory. Specify a user that has permission to read other user entries in the LDAP directory service. Leave blank for anonymous login. For more information, refer to the documentation for the LDAP directory service.
Password Password for the principal user. Leave blank for anonymous login.
LDAP Configuration Icon
Setting Up LDAP Authentication 59

3. Click Test Connection to verify that the connection configuration is correct.
Step 2. Configure Security DomainsCreate a security domain for each set of user accounts and groups you want to import from the LDAP server. Set up search bases and filters to define the set of user accounts and groups to include in a security domain. The Service Manager uses the user search bases and filters to import user accounts and the group search bases and filters to import groups. The Service Manager imports groups and the list of users that belong to the groups. It imports the groups that are included in the group filter and the user accounts that are included in the user filter.
The names of users and groups to be imported from the LDAP directory service must conform to the same rules as the names of native users and groups. The Service Manager does not import LDAP users or groups if names do not conform to the rules of native user and group names.
When you set up the LDAP directory service, you can use different attributes for the unique ID (UID). The Service Manager requires a particular UID to identify users in each LDAP directory service. Before you configure the security domain, verify that the LDAP directory service uses the required UID.
The following table provides the required UID for each LDAP directory service:
The Service Manager does not import the LDAP attribute that indicates that a user account is enabled or disabled. You must enable or disable an LDAP user account in the Administration Console. The status of the user account in the LDAP directory service affects user authentication in the PowerCenter applications. For example, a user account is enabled in the PowerCenter domain but disabled in the LDAP directory service. If the LDAP directory service allows disabled user accounts to log in, then the user can log in to PowerCenter applications. If the LDAP directory service does not allow disabled user accounts to log in, then the user cannot log in to PowerCenter applications.
Use SSL Certificate Indicates that the LDAP directory service uses Secure Socket Layer (SSL) protocol.
Trust LDAP Certificate
Determines whether PowerCenter can trust the SSL certificate of the LDAP server. If selected, PowerCenter connects to the LDAP server without verifying the SSL certificate. If not selected, PowerCenter verifies that the SSL certificate is signed by a certificate authority before connecting to the LDAP server.To enable PowerCenter to recognize a self-signed certificate as valid, specify the truststore file and password to use.
Group Membership Attribute
Name of the attribute that contains group membership information for a user. This is the attribute in the LDAP group object that contains the DNs of the users or groups who are members of a group. For example, member or memberof.
Maximum Size Maximum number of groups and user accounts to import into a security domain. For example, if the value is set to 100, you can import a maximum of 100 groups and 100 user accounts into the security domain.If the number of user and groups to be imported exceeds the value for this property, the Service Manager generates an error message and does not import any user. Set this property to a higher value if you have a large number of users and groups to import.Default is 1000.
LDAP Directory Service UID
IBMTivoliDirectory uid
Microsoft Active Directory sAMAccountName
NovellE uid
OpenLDAP uid
SunJavaSystemDirectory uid
Property Description
60 Chapter 4: Managing Users and Groups
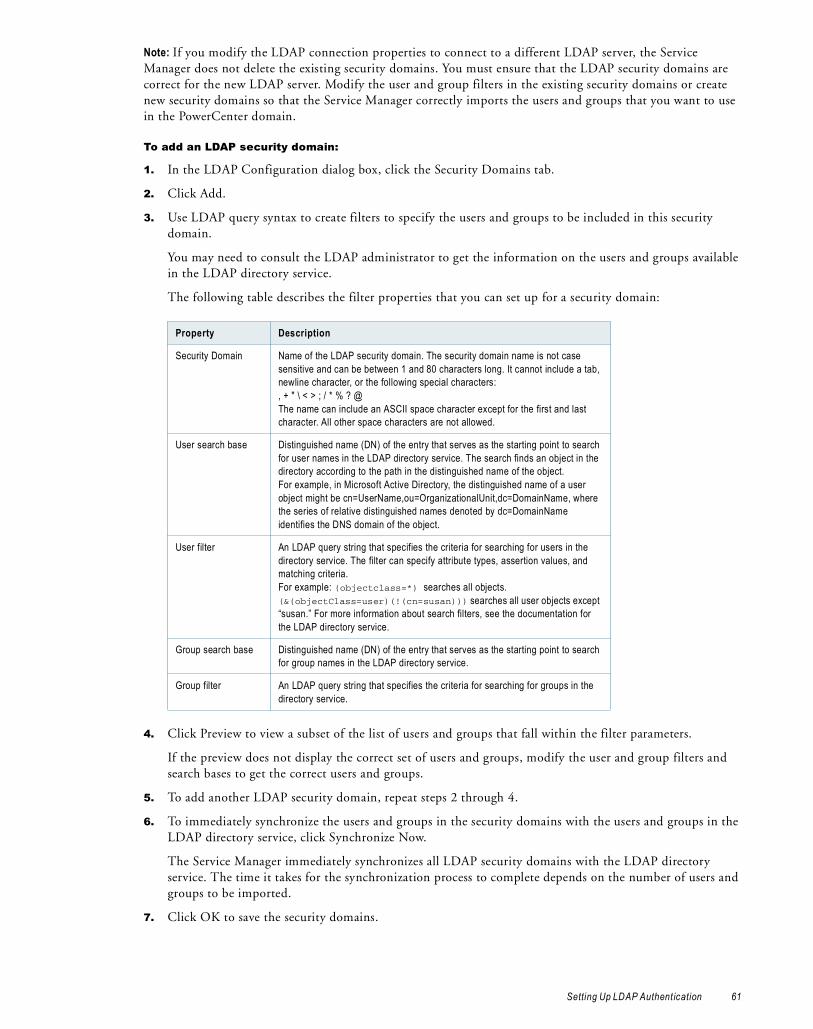
Note: If you modify the LDAP connection properties to connect to a different LDAP server, the Service Manager does not delete the existing security domains. You must ensure that the LDAP security domains are correct for the new LDAP server. Modify the user and group filters in the existing security domains or create new security domains so that the Service Manager correctly imports the users and groups that you want to use in the PowerCenter domain.
To add an LDAP security domain:
1. In the LDAP Configuration dialog box, click the Security Domains tab.
2. Click Add.
3. Use LDAP query syntax to create filters to specify the users and groups to be included in this security domain.
You may need to consult the LDAP administrator to get the information on the users and groups available in the LDAP directory service.
The following table describes the filter properties that you can set up for a security domain:
4. Click Preview to view a subset of the list of users and groups that fall within the filter parameters.
If the preview does not display the correct set of users and groups, modify the user and group filters and search bases to get the correct users and groups.
5. To add another LDAP security domain, repeat steps 2 through 4.
6. To immediately synchronize the users and groups in the security domains with the users and groups in the LDAP directory service, click Synchronize Now.
The Service Manager immediately synchronizes all LDAP security domains with the LDAP directory service. The time it takes for the synchronization process to complete depends on the number of users and groups to be imported.
7. Click OK to save the security domains.
Property Description
Security Domain Name of the LDAP security domain. The security domain name is not case sensitive and can be between 1 and 80 characters long. It cannot include a tab, newline character, or the following special characters: , + " \ < > ; / * % ? @The name can include an ASCII space character except for the first and last character. All other space characters are not allowed.
User search base Distinguished name (DN) of the entry that serves as the starting point to search for user names in the LDAP directory service. The search finds an object in the directory according to the path in the distinguished name of the object. For example, in Microsoft Active Directory, the distinguished name of a user object might be cn=UserName,ou=OrganizationalUnit,dc=DomainName, where the series of relative distinguished names denoted by dc=DomainName identifies the DNS domain of the object.
User filter An LDAP query string that specifies the criteria for searching for users in the directory service. The filter can specify attribute types, assertion values, and matching criteria. For example: (objectclass=*) searches all objects. (&(objectClass=user)(!(cn=susan))) searches all user objects except “susan.” For more information about search filters, see the documentation for the LDAP directory service.
Group search base Distinguished name (DN) of the entry that serves as the starting point to search for group names in the LDAP directory service.
Group filter An LDAP query string that specifies the criteria for searching for groups in the directory service.
Setting Up LDAP Authentication 61
Step 3. Schedule the Synchronization TimesBy default, the Service Manager does not have a scheduled time to synchronize with the LDAP directory service. To ensure that the list of users and groups in the LDAP security domains is accurate, create a schedule for the Service Manager the synchronize the users and groups.
You can schedule the time of day when the Service Manager synchronizes the list of users and groups in the LDAP security domains with the LDAP directory service. The Service Manager synchronizes the LDAP security domains with the LDAP directory service every day during the times you set.
Note: During synchronization, the Service Manager locks the user account it synchronizes. Users might not be able to log in to the Administration Console and PowerCenter applications. If users are logged in to the Administration Console when synchronization starts, they might not be able to perform tasks. The duration of the synchronization process depends on the number of users and groups to be synchronized. To avoid usage disruption, synchronize the security domains during times when most users are not logged in.
To schedule the synchronization times:
1. On the LDAP Configuration dialog box, click the Schedule tab.
2. Click the Add button (+) to add a new time.
The synchronization schedule uses a 24-hour time format.
You can add as many synchronization times in the day as you require. If the list of users and groups in the LDAP directory service changes often, you can schedule the Service Manager to synchronize several times a day.
3. To immediately synchronize the users and groups in the security domains with the users and groups in the LDAP directory service, click Synchronize Now.
4. Click OK to save the synchronization schedule.
Deleting an LDAP Security DomainTo permanently prohibit users in an LDAP security domain from accessing PowerCenter applications, you can delete the LDAP security domain. When you delete an LDAP security domain, the Service Manager deletes all user accounts and groups in the LDAP security domain from the domain configuration database.
To remove a security domain:
1. In the LDAP Configuration dialog box, click the Security Domains tab.
The LDAP Configuration dialog box displays the list of security domains.
2. To ensure that you are deleting the correct security domain, click the security domain name to view the filter used to import the users and groups and verify that it is the security domain you want to delete.
3. Click the Delete button next to a security domain to delete the security domain.
4. Click OK to confirm that you want to delete the security domain.
Using a Self-Signed SSL CertificateYou can connect to an LDAP server that uses an SSL certificate signed by a certificate authority (CA). By default, PowerCenter does not connect to an LDAP server that uses a self-signed certificate.
To use a self-signed certificate, import the self-signed certificate into a truststore file and use the INFA_JAVA_OPTS environment variable to specify the truststore file and password to use:
setenv INFA_JAVA_OPTS -Djavax.net.ssl.trustStore=<TrustStoreFile> -Djavax.net.ssl.trustStorePassword=<TrustStorePassword>
On Windows, configure INFA_JAVA_OPTS as a system variable.
62 Chapter 4: Managing Users and Groups
Restart the Integration Service for the change to take effect. PowerCenter uses the truststore file to verify the SSL certificate.
keytool is a key and certificate management utility that allows you to generate and administer keys and certificates for use with the SSL security protocol. You can use keytool to create a truststore file or to import a certificate to an existing truststore file. You can find the keytool utility in the following directory:
<PowerCenterClientDir>\CMD_Utilities\PC\java\bin
For more information about using keytool, see the documentation on the Sun web site:
http://java.sun.com/j2se/1.4.2/docs/tooldocs/windows/keytool.html
Using Nested Groups in the LDAP Directory ServiceAn LDAP security domain can contain nested LDAP groups. PowerCenter can import nested groups that are created in the following manner:
♦ Create the groups under the same organizational units (OU).
♦ Set the relationship between the groups.
For example, you want to create a nested grouping where GroupB is a member of GroupA and GroupD is a member of GroupC. First, create GroupA, GroupB, GroupC, and GroupD within the same OU. Then edit GroupA and add GroupB as a member. Edit GroupC and add GroupD as a member.
You cannot import nested LDAP groups into an LDAP security domain that are created in a different way.
Managing UsersYou can create, edit, and delete users in the native security domain. You cannot delete or modify the properties of user accounts in the LDAP security domains. You cannot modify the user assignments to LDAP groups.
You can assign roles, permissions, and privileges to a user account in the native security domain or an LDAP security domain. The roles, permissions, and privileges assigned to the user determines the tasks the user can perform within the PowerCenter domain.
Adding Native UsersAdd, edit, or delete native users on the Security page.
Managing Users 63
To add a native user:
1. On the Security page, click Create User.
2. Enter the following details for the new user:
3. Click OK to save the user account.
After you create a user account, the right pane displays the properties of the user account and the groups that the user is assigned to.
Editing General Properties of Native UsersYou cannot change the login name of a native user. You can change the password and other details for a native user account.
To edit the general properties of a native user:
1. In the Users section of the Navigator, select a native user account and click Edit.
2. To change the password, select Change Password.
The Security page clears the Password and Confirm Password fields.
3. Enter a new password and confirm.
4. Modify the full name, description, email, and phone as necessary.
5. Click OK to save the changes.
Property Description
Login Name Login name for the user account. The login name for a user account must be unique within the security domain to which it belongs. The login name is not case sensitive and can be between 1 and 80 characters long. It cannot include a tab, newline character, or the following special characters: , + " \ < > ; / * % ? The name can include an ASCII space character except for the first and last character. All other space characters are not allowed.Note: Data Analyzer uses the user account name and security domain in the format UserName@SecurityDomain to determine the length of the user login name. The combination of the user name, @ symbol, and security domain cannot exceed 80 characters.
Password Password for the user account. The password can be between 1 and 80 characters long.
Confirm Password Enter the password again to confirm. You must retype the password. Do not copy and paste the password.
Full Name Full name for the user account. The full name cannot include the following special characters:< > “Note: In Data Analyzer, the full name property is equivalent to three separate properties named first name, middle name, and last name. For more information, see the Data Analyzer Administrator Guide.
Description Description of the user account. The description cannot include the following special characters:< > “
Email Email address for the user. The email address cannot include the following special characters:< > “Enter the email address in the format UserName@Domain.
Phone Telephone number for the user. The telephone number cannot include the following special characters:< > “
64 Chapter 4: Managing Users and Groups
Assigning Users to Native GroupsYou can assign native or LDAP user accounts to native groups. You cannot change the assignment of LDAP user accounts to LDAP groups.
To assign users to a native group:
1. In the Users section of the Navigator, select a native or LDAP user account and click Edit.
2. Click the Groups tab.
3. To assign a user to a group, select a group name in the All Groups column and click Add.
If nested groups do not display in the All Groups column, expand each group to show all nested groups.
You can assign a user to more than group. Use the Ctrl or Shift keys to select multiple groups at the same time.
4. To remove a user from a group, select a group in the Assigned Groups column and click Remove.
5. Click OK to save the group assignments.
Enabling and Disabling User AccountsUsers with active accounts can log in and perform PowerCenter tasks based on their permissions and privileges. If you do not want users to access PowerCenter temporarily, you can disable their accounts. You can enable or disable user accounts in the native or an LDAP security domain. When you disable a user account, the user cannot log in to the PowerCenter applications.
To disable a user account, select a user account in the Users section of the Navigator and click Disable. When you select a disabled user account, the Security page displays a message that the user account is disabled. When a user account is disabled, the Enable button is available. To enable the user account, click Enable.
The Security page displays different icons for enabled and disabled user accounts.
You cannot disable the default administrator account.
Note: When the Service Manager imports a user account from the LDAP directory service, it does not import the LDAP attribute that indicates that a user account is enabled or disabled. The Service Manager imports all user accounts as enabled user accounts. You must disable an LDAP user account in the Administration Console if you do not want the user to access PowerCenter. During subsequent synchronization with the LDAP server, the user account retains the enabled or disabled status set in the Administration Console.
Deleting Native UsersTo delete a native user account, select the user account in the Users section of the Navigator and click Delete. Or, right-click the user account name and select Delete User. Confirm that you want to delete the user account.
You cannot delete the default administrator account. When you log in to the Administration Console, you cannot delete your user account.
Deleting Users of PowerCenter RepositoriesWhen you delete a user who owns objects in the PowerCenter repository, you remove any ownership that the user has over folders, connection objects, deployment groups, labels, or queries. After you delete a user, the default administrator becomes the owner of all objects owned by the deleted user.
When you view the history of a versioned object previously owned by a deleted user, the name of the deleted user appears prefixed by the word deleted.
Managing Users 65

Deleting Users of Data AnalyzerWhen you delete a user, Data Analyzer deletes the alerts, alert email accounts, and personal folders and dashboards associated with the user.
Data Analyzer deletes reports that a user subscribes to based on the security profile of the report. Data Analyzer keeps a security profile for each user who subscribes to the report. A report that uses user-based security uses the security profile of the user who accesses the report. A report that uses provider-based security uses the security profile of the user who owns the report.
When you delete a user, Data Analyzer does not delete any report in the public folder owned by the user. Data Analyzer can run a report with user-based security even if the report owner does not exist. However, Data Analyzer cannot determine the security profile for a report with provider-based security if the report owner does not exist. Therefore, before you delete a user, make sure that the reports with provider-based security that you want other users to run have a new owner.
For example, you want to delete UserA who has a report in the public folder with provider-based security. Create or select a user with the same security profile as UserA. Identify all the reports with provider-based security in the public folder owned by UserA. Then have the other user with the same security profile log in and save those reports to the public folder, with provider-based security and the same report name. This ensures that after you delete the user, the reports stay in the public folder with the same security.
Managing GroupsYou can create, edit, and delete groups in the native security domain. You cannot delete or modify the properties of group accounts in the LDAP security domains.
You can assign roles, permissions, and privileges to a group in the native or an LDAP security domain. The roles, permissions, and privileges assigned to the group determines the tasks that users in the group can perform within the PowerCenter domain.
Adding a Native GroupAdd, edit, or remove native groups on the Security page.
A native group can contain native or LDAP user accounts or other native groups. You can create multiple levels of native groups. For example, the Finance group contains the AccountsPayable group which contains the OfficeSupplies group. The Finance group is the parent group of the AccountsPayable group and the AccountsPayable group is the parent group of the OfficeSupplies group. Each group can contain other native groups.
To add a native group:
1. On the Security page, click Create Group.
2. Enter the following information for the group:
Property Description
Name Name of the group. The group name is not case sensitive and can be between 1 and 80 characters long. It cannot include a tab, newline character, or the following special characters: , + " \ < > ; / * % ?The name can include an ASCII space character except for the first and last character. All other space characters are not allowed.
66 Chapter 4: Managing Users and Groups
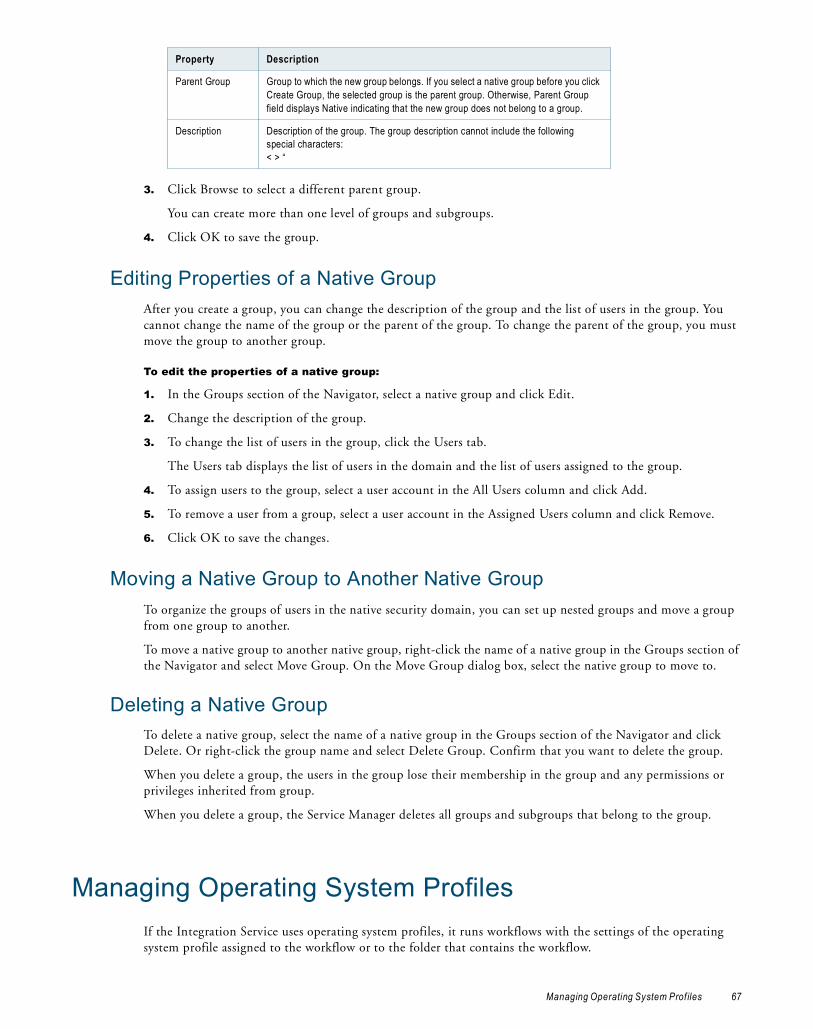
3. Click Browse to select a different parent group.
You can create more than one level of groups and subgroups.
4. Click OK to save the group.
Editing Properties of a Native GroupAfter you create a group, you can change the description of the group and the list of users in the group. You cannot change the name of the group or the parent of the group. To change the parent of the group, you must move the group to another group.
To edit the properties of a native group:
1. In the Groups section of the Navigator, select a native group and click Edit.
2. Change the description of the group.
3. To change the list of users in the group, click the Users tab.
The Users tab displays the list of users in the domain and the list of users assigned to the group.
4. To assign users to the group, select a user account in the All Users column and click Add.
5. To remove a user from a group, select a user account in the Assigned Users column and click Remove.
6. Click OK to save the changes.
Moving a Native Group to Another Native GroupTo organize the groups of users in the native security domain, you can set up nested groups and move a group from one group to another.
To move a native group to another native group, right-click the name of a native group in the Groups section of the Navigator and select Move Group. On the Move Group dialog box, select the native group to move to.
Deleting a Native GroupTo delete a native group, select the name of a native group in the Groups section of the Navigator and click Delete. Or right-click the group name and select Delete Group. Confirm that you want to delete the group.
When you delete a group, the users in the group lose their membership in the group and any permissions or privileges inherited from group.
When you delete a group, the Service Manager deletes all groups and subgroups that belong to the group.
Managing Operating System ProfilesIf the Integration Service uses operating system profiles, it runs workflows with the settings of the operating system profile assigned to the workflow or to the folder that contains the workflow.
Parent Group Group to which the new group belongs. If you select a native group before you click Create Group, the selected group is the parent group. Otherwise, Parent Group field displays Native indicating that the new group does not belong to a group.
Description Description of the group. The group description cannot include the following special characters:< > “
Property Description
Managing Operating System Profiles 67

Click the Configure Operating System Profiles icon on the Security page to access the Configure Operating System Profiles dialog box.
The following figure shows the Configure Operating System Profiles icon:
You can create, edit, delete, and assign permissions to operating system profiles in the Configure Operating System Profiles dialog box.
Steps to Configure an Operating System ProfileComplete the following steps to configure an operating system profile:
1. Create an operating system profile.
2. Configure the service process variables and environment variables in the operating system profile properties.
3. Assign permissions on operating system profiles.
Create Operating System ProfilesCreate operating system profiles if the Integration Service uses operating system profiles.
The following table describes the fields you configure to create an operating system profile:
You cannot edit the name or the system user name after you create an operating system profile. If you do not want to use the operating system user specified in the operating system profile, delete the operating system profile. After you delete an operating system profile, assign a new operating system profile to repository folders that the operating system profile was assigned to.
Properties of Operating System ProfilesAfter you create an operating system profile, configure the operating system profile properties. To edit the properties of an operating system profile, select the profile in the Configure Operating System Profile dialog box and then click Edit.
Field Description
Name Name of the operating system profile. The operating system profile name can be up to 80 characters. It cannot include spaces or the following special characters: \ / : * ? " < > | [ ] = + ; ,
System User Name Name of an operating system user that exists on the machines where the Integration Service runs. The Integration Service runs workflows using the system access of the system user defined for the operating system profile.
$PMRootDir Root directory accessible by the node. This is the root directory for other service process variables. It cannot include the following special characters:* ? < > “ | ,
Configure Operating System Profiles.
68 Chapter 4: Managing Users and Groups
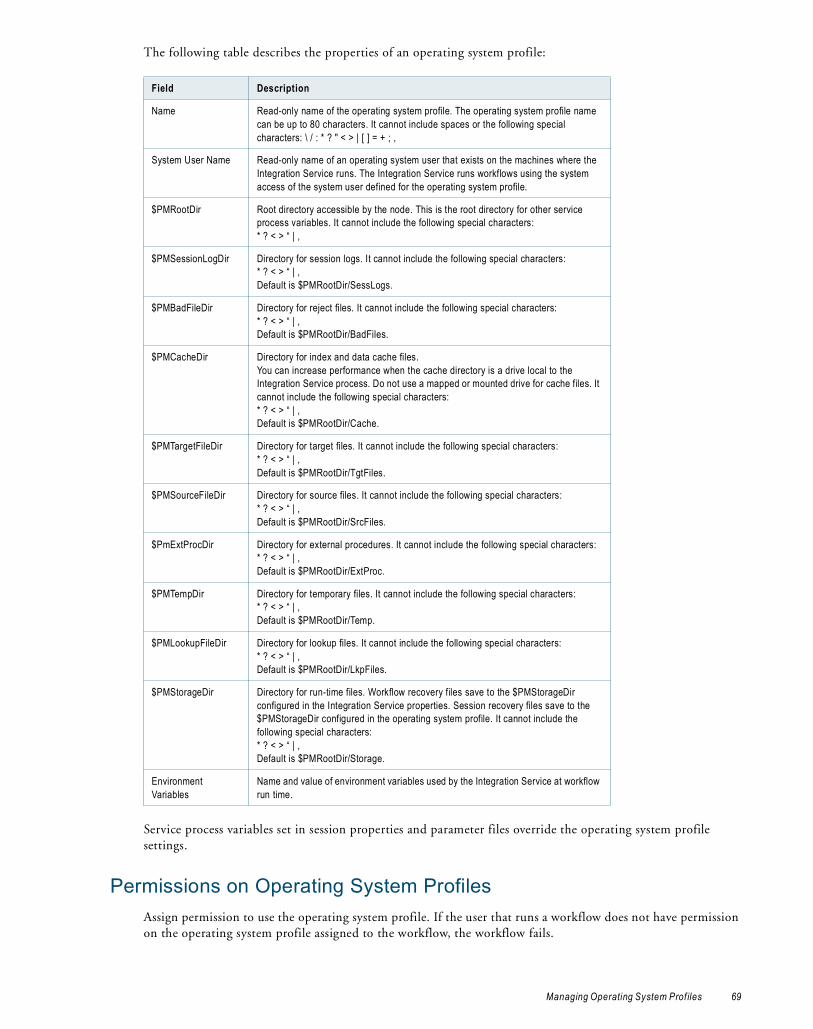
The following table describes the properties of an operating system profile:
Service process variables set in session properties and parameter files override the operating system profile settings.
Permissions on Operating System ProfilesAssign permission to use the operating system profile. If the user that runs a workflow does not have permission on the operating system profile assigned to the workflow, the workflow fails.
Field Description
Name Read-only name of the operating system profile. The operating system profile name can be up to 80 characters. It cannot include spaces or the following special characters: \ / : * ? " < > | [ ] = + ; ,
System User Name Read-only name of an operating system user that exists on the machines where the Integration Service runs. The Integration Service runs workflows using the system access of the system user defined for the operating system profile.
$PMRootDir Root directory accessible by the node. This is the root directory for other service process variables. It cannot include the following special characters:* ? < > “ | ,
$PMSessionLogDir Directory for session logs. It cannot include the following special characters:* ? < > “ | ,Default is $PMRootDir/SessLogs.
$PMBadFileDir Directory for reject files. It cannot include the following special characters:* ? < > “ | ,Default is $PMRootDir/BadFiles.
$PMCacheDir Directory for index and data cache files. You can increase performance when the cache directory is a drive local to the Integration Service process. Do not use a mapped or mounted drive for cache files. It cannot include the following special characters:* ? < > “ | ,Default is $PMRootDir/Cache.
$PMTargetFileDir Directory for target files. It cannot include the following special characters:* ? < > “ | ,Default is $PMRootDir/TgtFiles.
$PMSourceFileDir Directory for source files. It cannot include the following special characters:* ? < > “ | ,Default is $PMRootDir/SrcFiles.
$PmExtProcDir Directory for external procedures. It cannot include the following special characters:* ? < > “ | ,Default is $PMRootDir/ExtProc.
$PMTempDir Directory for temporary files. It cannot include the following special characters:* ? < > “ | ,Default is $PMRootDir/Temp.
$PMLookupFileDir Directory for lookup files. It cannot include the following special characters:* ? < > “ | ,Default is $PMRootDir/LkpFiles.
$PMStorageDir Directory for run-time files. Workflow recovery files save to the $PMStorageDir configured in the Integration Service properties. Session recovery files save to the $PMStorageDir configured in the operating system profile. It cannot include the following special characters:* ? < > “ | ,Default is $PMRootDir/Storage.
Environment Variables
Name and value of environment variables used by the Integration Service at workflow run time.
Managing Operating System Profiles 69
Users inherit permissions on the operating system profile if they belong to a group that has permissions on the operating system profile. Users that have the Administrator role inherit permission on all operating system profiles. The Permissions tab of the operating system profile shows a list of all users with permissions on the operating system profile.
Click edit on the Permissions tab to edit permissions on the operating system profile. To add permissions on operating system profiles, select a user or group from the All Users and Groups area and click the right arrow. To remove permissions on operating system profiles, select a user or group from the Users and Groups with Permissions area and click the left arrow.
To create an operating system profile:
1. Click the Configure Operating System Profiles icon on the Security page of the Administration Console.
The Configure Operating System Profiles dialog box appears.
2. Click Create Profile.
3. Enter the User Name, System User Name, and $PMRootDir.
4. Click OK.
After you create the profile, you must configure properties.
5. Click the operating system profile you want to configure.
6. Select the Properties tab and click Edit.
7. Edit the properties and click OK.
8. Select the Permissions tab.
A list of all the users with permission on the operating system profile appears.
9. Click Edit.
10. Edit the permission and click OK.
70 Chapter 4: Managing Users and Groups
C H A P T E R 5
Managing Privileges and Roles
This chapter includes the following topics:
♦ Overview, 71
♦ Domain Privileges, 73
♦ Repository Service Privileges, 77
♦ Metadata Manager Service Privileges, 84
♦ Reporting Service Privileges, 88
♦ Reference Table Manager Service Privileges, 93
♦ Managing Roles, 94
♦ Assigning Privileges and Roles to Users and Groups, 98
♦ Viewing Users with Privileges for a Service, 100
♦ Troubleshooting, 100
OverviewYou manage user security with privileges, roles, and permissions.
PrivilegesPrivileges determine the actions that users can perform in PowerCenter applications. PowerCenter includes the following privileges:
♦ Domain privileges. Determine actions on the domain that users can perform using the Administration Console and the infacmd and pmrep command line programs. For more information, see “Domain Privileges” on page 73.
♦ Repository Service privileges. Determine PowerCenter repository actions that users can perform using the Repository Manager, Designer, Workflow Manager, Workflow Monitor, and the pmrep and pmcmd command line programs. For more information, see “Repository Service Privileges” on page 77.
♦ Metadata Manager Service privileges. Determine actions that users can perform using Metadata Manager. For more information, see “Metadata Manager Service Privileges” on page 84.
♦ Reporting Service privileges. Determine reporting actions that users can perform using Data Analyzer. For more information, see “Reporting Service Privileges” on page 88.
♦ Reference Table Manager Service privileges. Determine actions that users can perform using Reference Table Manager. For more information, see “Reference Table Manager Service Privileges” on page 93.
71
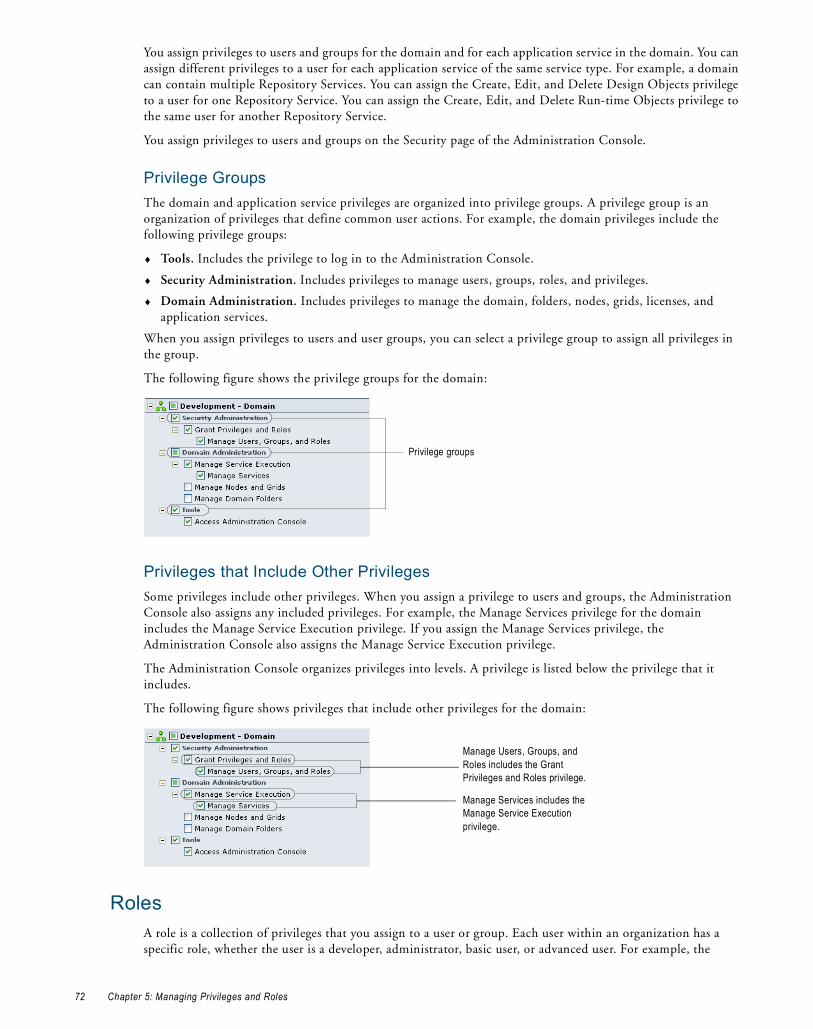
You assign privileges to users and groups for the domain and for each application service in the domain. You can assign different privileges to a user for each application service of the same service type. For example, a domain can contain multiple Repository Services. You can assign the Create, Edit, and Delete Design Objects privilege to a user for one Repository Service. You can assign the Create, Edit, and Delete Run-time Objects privilege to the same user for another Repository Service.
You assign privileges to users and groups on the Security page of the Administration Console.
Privilege GroupsThe domain and application service privileges are organized into privilege groups. A privilege group is an organization of privileges that define common user actions. For example, the domain privileges include the following privilege groups:
♦ Tools. Includes the privilege to log in to the Administration Console.
♦ Security Administration. Includes privileges to manage users, groups, roles, and privileges.
♦ Domain Administration. Includes privileges to manage the domain, folders, nodes, grids, licenses, and application services.
When you assign privileges to users and user groups, you can select a privilege group to assign all privileges in the group.
The following figure shows the privilege groups for the domain:
Privileges that Include Other PrivilegesSome privileges include other privileges. When you assign a privilege to users and groups, the Administration Console also assigns any included privileges. For example, the Manage Services privilege for the domain includes the Manage Service Execution privilege. If you assign the Manage Services privilege, the Administration Console also assigns the Manage Service Execution privilege.
The Administration Console organizes privileges into levels. A privilege is listed below the privilege that it includes.
The following figure shows privileges that include other privileges for the domain:
RolesA role is a collection of privileges that you assign to a user or group. Each user within an organization has a specific role, whether the user is a developer, administrator, basic user, or advanced user. For example, the
Privilege groups
Manage Users, Groups, and Roles includes the Grant Privileges and Roles privilege.
Manage Services includes the Manage Service Execution privilege.
72 Chapter 5: Managing Privileges and Roles
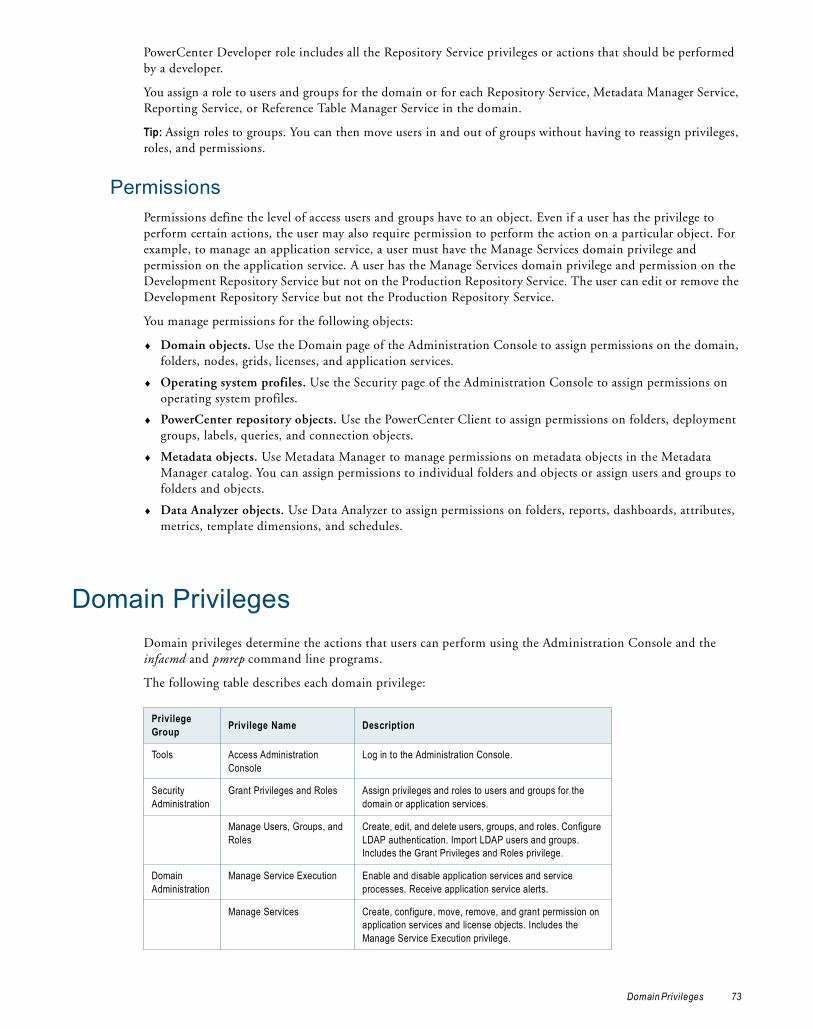
PowerCenter Developer role includes all the Repository Service privileges or actions that should be performed by a developer.
You assign a role to users and groups for the domain or for each Repository Service, Metadata Manager Service, Reporting Service, or Reference Table Manager Service in the domain.
Tip: Assign roles to groups. You can then move users in and out of groups without having to reassign privileges, roles, and permissions.
PermissionsPermissions define the level of access users and groups have to an object. Even if a user has the privilege to perform certain actions, the user may also require permission to perform the action on a particular object. For example, to manage an application service, a user must have the Manage Services domain privilege and permission on the application service. A user has the Manage Services domain privilege and permission on the Development Repository Service but not on the Production Repository Service. The user can edit or remove the Development Repository Service but not the Production Repository Service.
You manage permissions for the following objects:
♦ Domain objects. Use the Domain page of the Administration Console to assign permissions on the domain, folders, nodes, grids, licenses, and application services.
♦ Operating system profiles. Use the Security page of the Administration Console to assign permissions on operating system profiles.
♦ PowerCenter repository objects. Use the PowerCenter Client to assign permissions on folders, deployment groups, labels, queries, and connection objects.
♦ Metadata objects. Use Metadata Manager to manage permissions on metadata objects in the Metadata Manager catalog. You can assign permissions to individual folders and objects or assign users and groups to folders and objects.
♦ Data Analyzer objects. Use Data Analyzer to assign permissions on folders, reports, dashboards, attributes, metrics, template dimensions, and schedules.
Domain PrivilegesDomain privileges determine the actions that users can perform using the Administration Console and the infacmd and pmrep command line programs.
The following table describes each domain privilege:
Privilege Group Privilege Name Description
Tools Access Administration Console
Log in to the Administration Console.
Security Administration
Grant Privileges and Roles Assign privileges and roles to users and groups for the domain or application services.
Manage Users, Groups, and Roles
Create, edit, and delete users, groups, and roles. Configure LDAP authentication. Import LDAP users and groups. Includes the Grant Privileges and Roles privilege.
Domain Administration
Manage Service Execution Enable and disable application services and service processes. Receive application service alerts.
Manage Services Create, configure, move, remove, and grant permission on application services and license objects. Includes the Manage Service Execution privilege.
Domain Privileges 73

Tools Privilege GroupThe privilege in the domain Tools group determines which users can access the Administration Console.
The following table lists the actions that users can perform for the privilege in the Tools group:
The Access Administration Console privilege is required for all users completing tasks in the Administration Console. If users have the Access Administration Console privilege and permission on a domain object but not the privilege to manage the object type, then they can view the object. For example, a user has the Access Administration Console privilege and permission on an application service. The user does not have the Manage Services privilege. The user can log in to the Administration Console and view the application service properties but cannot configure or remove the application service.
The Access Administration Console privilege is not required to run infacmd commands.
Security Administration Privilege GroupPrivileges in the Security Administration privilege group and domain object permissions determine the security management tasks users can complete.
Some security management tasks are determined by the Administrator role, not by privileges or permissions. A user assigned the Administrator role for the domain can complete the following tasks:
♦ Create operating system profiles.
♦ Grant permission on operating system profiles.
♦ Delete operating system profiles.
The following table lists the privileges and permissions required to administer domain security:
Note: To complete security management tasks in the Administration Console, users must also have the Access Administration Console privilege.
Manage Nodes and Grids Create, configure, move, remove, shut down, and grant permission on nodes and grids.
Manage Domain Folders Create, edit, move, remove, and grant permission on folders.
Privilege Permission On... Grants Users the Ability To...
Access Administration Console At least one domain object
- Log in to the Administration Console.- Manage their own user account in the
Administration Console.
Privilege Permission On... Grants Users the Ability To...
Grant Privileges and Roles
DomainRepository ServiceMetadata Manager ServiceReporting ServiceReference Table Manager Service
- Assign privileges and roles to users and groups for the domain or application service.
- Edit and remove the privileges and roles assigned to users and groups.
Manage Users, Groups, and Roles (includes Grant Privileges and Roles privilege)
n/a - Configure LDAP authentication for the domain.
- Create, edit, and delete users, groups, and roles.
- Import LDAP users and groups.
Operating system profile Edit operating system profile properties.
Privilege Group Privilege Name Description
74 Chapter 5: Managing Privileges and Roles
Domain Administration Privilege GroupPrivileges in the Domain Administration privilege group and domain object permissions determine the domain management tasks users can complete.
Some domain management tasks are determined by the Administrator role, not by privileges or permissions. A user assigned the Administrator role for the domain can complete the following tasks:
♦ Configure domain properties.
♦ Create services using the Configuration Assistant.
♦ Grant permission on domain objects using the Permissions tab.
♦ Grant permission on the domain.
♦ Purge and export domain log events.
♦ Receive domain alerts.
♦ Run the User Domain Audit Report and the License Report.
♦ Shut down the domain.
♦ Upgrade PowerCenter using the Upgrade Wizard. Users must also set their user preferences to display the Upgrade tab.
♦ View the PowerCenter Administration Assistant.
♦ Upgrade the service version of application services.
The following table lists the privileges and permissions required to administer the domain:
Privilege Permission On... Grants Users the Ability To...
n/a Domain View domain properties and log events.
n/a Folder View folder properties.
n/a Application service View application service properties and log events.
n/a License object View license object properties.
n/a Grid View grid properties.
n/a Node View node properties.
n/a Web Services Hub Run a Web Services Report.
Manage Service Execution
Application service - Enable and disable application services and service processes. To enable and disable a Metadata Manager Service, users must also have permission on the associated Integration Service and Repository Service.
- Purge and export application service log events.- Receive application service alerts.
Manage Services (includes Manage Service Execution privilege)
Domain - Upgrade the users and groups for a Repository Service, Metadata Manager Service, or Reporting Service. Users must also have the Manage Users, Groups, and Roles privilege.
Domain or parent folder Create license objects.
Domain or parent folder, node or grid where application service runs, license object, and any associated application service
Create application services.
Application service - Configure application services.- Grant permission on application services.
Original and destination folders Move application services or license objects from one folder to another.
Domain Privileges 75

Domain or parent folder and application service
Remove application services.
Integration Service Run the Integration Service in safe mode.
Metadata Manager Service - Create and delete Metadata Manager repository content.
- Upgrade the content of the Metadata Manager Service.
Metadata Manager ServiceRepository Service
Restore the PowerCenter repository for Metadata Manager.
Reference Table Manager Service
Create, delete, and upgrade the content of the Reference Table Manager repository.
Reporting Service - Back up, restore, and upgrade the content of the Data Analyzer repository.
- Create and delete the content of the Data Analyzer repository.
Repository Service - Back up, restore, and upgrade the repository.- Configure data lineage for the repository.- Copy content from another repository.- Close user connections and release repository
locks.- Create and delete repository content.- Create, edit, and delete reusable metadata
extensions in the PowerCenter Repository Manager.
- Enable version control for the repository.- Manage a repository domain.- Perform an advanced purge of object versions at
the repository level in the PowerCenter Repository Manager.
- Register and unregister repository plug-ins.- Run the repository in exclusive mode.- Send repository notifications to users.- Update repository statistics.
License object - Edit license objects.- Grant permission on license objects.
License object and application service
Assign a license to an application service.
Domain or parent folder and license object
Remove license objects.
Manage Nodes and Grids
Domain or parent folder Create nodes.
Domain or parent folder and nodes assigned to the grid
Create grids.
Node or grid - Configure and shut down nodes and grids.- Grant permission on nodes and grids.
Original and destination folders Move nodes and grids from one folder to another.
Domain or parent folder and node or grid
Remove nodes and grids.
Manage Domain Folders
Domain or parent folder Create folders.
Folder - Edit folders.- Grant permission on folders.
Privilege Permission On... Grants Users the Ability To...
76 Chapter 5: Managing Privileges and Roles
Note: To complete domain management tasks in the Administration Console, users must also have the Access Administration Console privilege.
Repository Service PrivilegesRepository Service privileges determine PowerCenter repository actions that users can perform using the Repository Manager, Designer, Workflow Manager, Workflow Monitor, and the pmrep and pmcmd command line programs.
The following table describes each Repository Service privilege:
Original and destination folders Move folders from one parent folder to another.
Domain or parent folder and folder being removed
Remove folders.
Privilege Group Privilege Name Description
Tools Access Designer Connect to the repository using the Designer.
Access Repository Manager Connect to the repository using the Repository Manager. Run pmrep commands.
Access Workflow Manager Connect to the repository using the Workflow Manager.
Access Workflow Monitor Connect to the repository and Integration Service using the Workflow Monitor.
Folders Create Create repository folders.
Copy Copy folders within a repository or to another repository.
Manage Versions In a versioned repository, change the status of folders and perform an advanced purge of object versions at the folder level.
Design Objects
Create, Edit, and Delete Create, edit, and delete business components, mapping parameters and variables, mappings, mapplets, transformations, and user-defined functions.
Manage Versions In a versioned repository, change the status, recover, and purge design object versions. Check in and undo checkouts made by other users. Includes the Create, Edit, and Delete privilege.
Sources and Targets
Create, Edit, and Delete Create, edit, and delete cubes, dimensions, source definitions, and target definitions.
Manage Versions In a versioned repository, change the status, recover, and purge versions of source and target objects. Check in and undo checkouts made by other users. Includes the Create, Edit, and Delete privilege.
Run-time Objects
Create, Edit, and Delete Create, edit, and delete session configuration objects, tasks, workflows, and worklets.
Manage Versions In a versioned repository, change the status, recover, and purge run-time object versions. Check in and undo checkouts made by other users. Includes the Create, Edit, and Delete privilege.
Monitor Monitor workflows and tasks in the Workflow Monitor.
Privilege Permission On... Grants Users the Ability To...
Repository Service Privileges 77
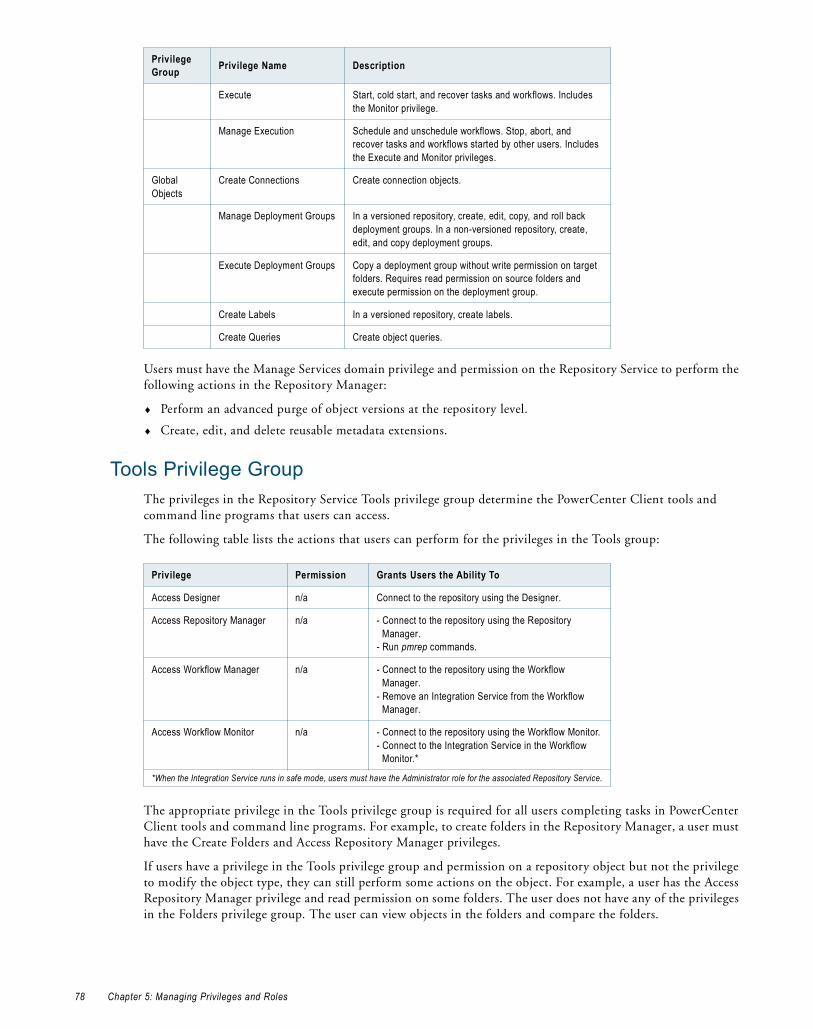
Users must have the Manage Services domain privilege and permission on the Repository Service to perform the following actions in the Repository Manager:
♦ Perform an advanced purge of object versions at the repository level.
♦ Create, edit, and delete reusable metadata extensions.
Tools Privilege GroupThe privileges in the Repository Service Tools privilege group determine the PowerCenter Client tools and command line programs that users can access.
The following table lists the actions that users can perform for the privileges in the Tools group:
The appropriate privilege in the Tools privilege group is required for all users completing tasks in PowerCenter Client tools and command line programs. For example, to create folders in the Repository Manager, a user must have the Create Folders and Access Repository Manager privileges.
If users have a privilege in the Tools privilege group and permission on a repository object but not the privilege to modify the object type, they can still perform some actions on the object. For example, a user has the Access Repository Manager privilege and read permission on some folders. The user does not have any of the privileges in the Folders privilege group. The user can view objects in the folders and compare the folders.
Execute Start, cold start, and recover tasks and workflows. Includes the Monitor privilege.
Manage Execution Schedule and unschedule workflows. Stop, abort, and recover tasks and workflows started by other users. Includes the Execute and Monitor privileges.
Global Objects
Create Connections Create connection objects.
Manage Deployment Groups In a versioned repository, create, edit, copy, and roll back deployment groups. In a non-versioned repository, create, edit, and copy deployment groups.
Execute Deployment Groups Copy a deployment group without write permission on target folders. Requires read permission on source folders and execute permission on the deployment group.
Create Labels In a versioned repository, create labels.
Create Queries Create object queries.
Privilege Permission Grants Users the Ability To
Access Designer n/a Connect to the repository using the Designer.
Access Repository Manager n/a - Connect to the repository using the Repository Manager.
- Run pmrep commands.
Access Workflow Manager n/a - Connect to the repository using the Workflow Manager.
- Remove an Integration Service from the Workflow Manager.
Access Workflow Monitor n/a - Connect to the repository using the Workflow Monitor.- Connect to the Integration Service in the Workflow
Monitor.*
*When the Integration Service runs in safe mode, users must have the Administrator role for the associated Repository Service.
Privilege Group Privilege Name Description
78 Chapter 5: Managing Privileges and Roles

Folders Privilege GroupFolder management tasks are determined by privileges in the Folders privilege group, repository object permissions, and domain object permissions. Users complete folder management tasks in the Repository Manager and with the pmrep command line program.
Some folder management tasks are determined by folder ownership and the Administrator role, not by privileges or permissions. The folder owner or a user assigned the Administrator role for the Repository Service can complete the following folder management tasks:
♦ Assign operating system profiles to folders if the Integration Service uses operating system profiles. Requires permission on the operating system profile.
♦ Change the folder owner.
♦ Configure folder permissions.
♦ Delete the folder.
♦ Designate the folder to be shared.
♦ Edit the folder name and description.
The following table lists the privileges and permissions required to manage folders:
Note: To perform actions on folders, users must also have the Access Repository Manager privilege.
Design Objects Privilege GroupPrivileges in the Design Objects privilege group and repository object permissions determine tasks users can complete on the following design objects:
♦ Business components
♦ Mapping parameters and variables
♦ Mappings
♦ Mapplets
♦ Transformations
♦ User-defined functions
Privilege Permission Grants Users the Ability To
n/a Read on folder - Compare folders.- View objects in folders.
Create n/a Create folders.
Copy Read on folder Copy folders within the same repository or to another repository. Users must also have the Create Folders privilege in the destination repository.
Manage Versions Read and Write on folder - Change the status of folders.- Perform an advanced purge of object versions at the
folder level.
Repository Service Privileges 79

The following table lists the privileges and permissions required to manage design objects:
Note: To perform actions on design objects, users must also have the appropriate privilege in the Tools privilege group.
Sources and Targets Privilege GroupPrivileges in the Sources and Targets privilege group and repository object permissions determine tasks users can complete on the following source and target objects:
Privilege Permission Grants Users the Ability To
n/a Read on folder - Compare design objects.- Copy design objects as an image.- Export design objects.- Generate code for Custom transformation and
external procedures.- Receive repository notification messages.- Run data lineage on design objects. Users must
also have the View Lineage privilege for the Metadata Manager Service and read permission on the metadata objects in the Metadata Manager catalog.
- Search for design objects.- View design objects, design object dependencies,
and design object history.
n/a Read on shared folderRead and Write on destination folder
Create shortcuts.
Create, Edit, and Delete
Read on original folderRead and Write on destination folder
- Copy design objects from one folder to another.- Copy design objects to another repository. Users
must also have the Create, Edit, and Delete Design Objects privilege in the destination repository.
Read and Write on folder - Change comments for a versioned design object.- Check in and undo a checkout of design objects
checked out by their own user account.- Check out design objects.- Copy and paste design objects in the same folder.- Create, edit, and delete data profiles and launch
the Profile Manager. Users must also have the Create, Edit, and Delete Run-time Objects privilege.
- Create, edit, and delete design objects.- Generate and clean SAP ABAP programs.- Generate business content integration mappings.
Users must also have the Create, Edit, and Delete Sources and Targets privilege.
- Import design objects using the Designer. Users must also have the Create, Edit, and Delete Sources and Targets privilege.
- Import design objects using the Repository Manager. Users must also have the Create, Edit, and Delete Run-time Objects and Create, Edit, and Delete Sources and Targets privileges.
- Revert to a previous design object version.- Validate mappings, mapplets, and user-defined
functions.
Manage Versions(includes Create, Edit, and Delete privilege)
Read and Write on folder - Change the status of design objects.- Check in and undo checkouts of design objects
checked out by other users.- Purge versions of design objects.- Recover deleted design objects.
80 Chapter 5: Managing Privileges and Roles
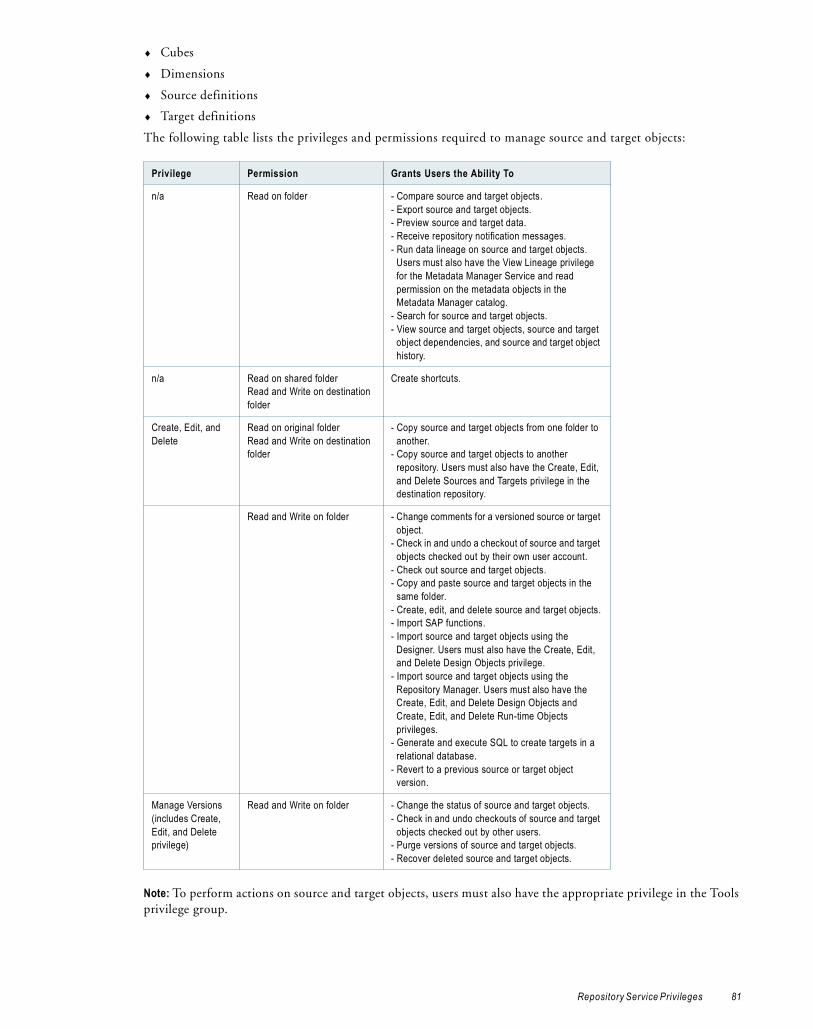
♦ Cubes
♦ Dimensions
♦ Source definitions
♦ Target definitions
The following table lists the privileges and permissions required to manage source and target objects:
Note: To perform actions on source and target objects, users must also have the appropriate privilege in the Tools privilege group.
Privilege Permission Grants Users the Ability To
n/a Read on folder - Compare source and target objects.- Export source and target objects.- Preview source and target data.- Receive repository notification messages.- Run data lineage on source and target objects.
Users must also have the View Lineage privilege for the Metadata Manager Service and read permission on the metadata objects in the Metadata Manager catalog.
- Search for source and target objects.- View source and target objects, source and target
object dependencies, and source and target object history.
n/a Read on shared folderRead and Write on destination folder
Create shortcuts.
Create, Edit, and Delete
Read on original folderRead and Write on destination folder
- Copy source and target objects from one folder to another.
- Copy source and target objects to another repository. Users must also have the Create, Edit, and Delete Sources and Targets privilege in the destination repository.
Read and Write on folder - Change comments for a versioned source or target object.
- Check in and undo a checkout of source and target objects checked out by their own user account.
- Check out source and target objects.- Copy and paste source and target objects in the
same folder.- Create, edit, and delete source and target objects.- Import SAP functions.- Import source and target objects using the
Designer. Users must also have the Create, Edit, and Delete Design Objects privilege.
- Import source and target objects using the Repository Manager. Users must also have the Create, Edit, and Delete Design Objects and Create, Edit, and Delete Run-time Objects privileges.
- Generate and execute SQL to create targets in a relational database.
- Revert to a previous source or target object version.
Manage Versions(includes Create, Edit, and Delete privilege)
Read and Write on folder - Change the status of source and target objects.- Check in and undo checkouts of source and target
objects checked out by other users.- Purge versions of source and target objects.- Recover deleted source and target objects.
Repository Service Privileges 81
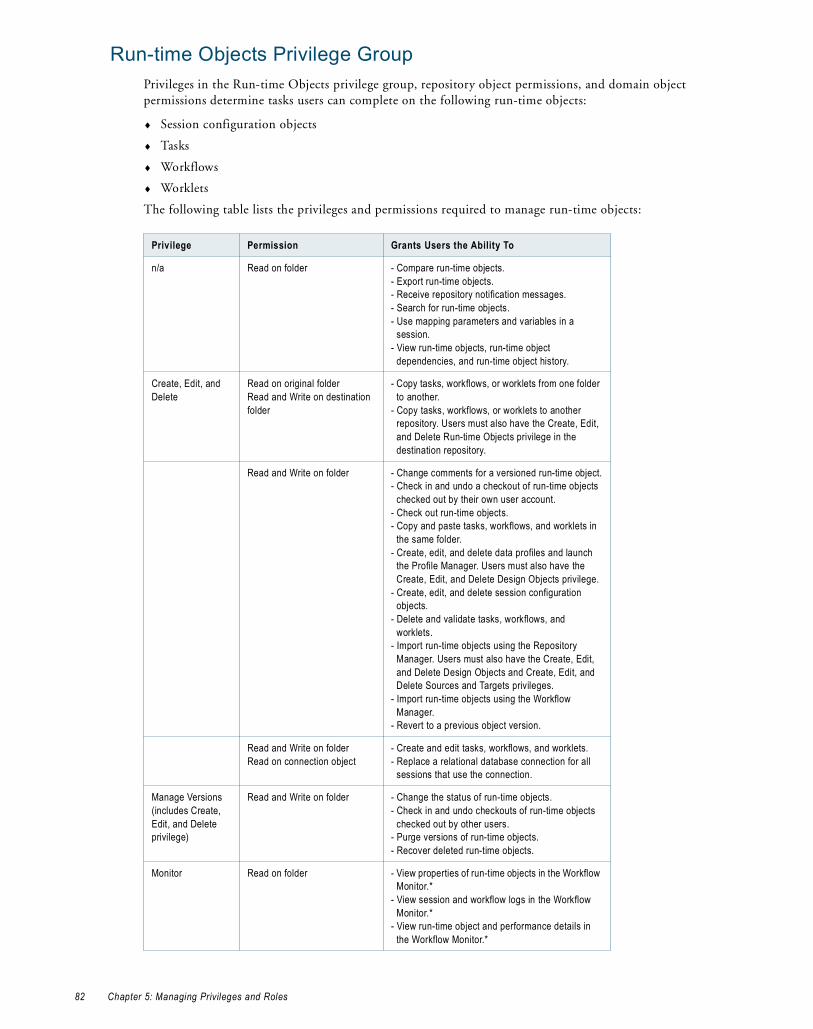
Run-time Objects Privilege GroupPrivileges in the Run-time Objects privilege group, repository object permissions, and domain object permissions determine tasks users can complete on the following run-time objects:
♦ Session configuration objects
♦ Tasks
♦ Workflows
♦ Worklets
The following table lists the privileges and permissions required to manage run-time objects:
Privilege Permission Grants Users the Ability To
n/a Read on folder - Compare run-time objects. - Export run-time objects.- Receive repository notification messages.- Search for run-time objects.- Use mapping parameters and variables in a
session.- View run-time objects, run-time object
dependencies, and run-time object history.
Create, Edit, and Delete
Read on original folderRead and Write on destination folder
- Copy tasks, workflows, or worklets from one folder to another.
- Copy tasks, workflows, or worklets to another repository. Users must also have the Create, Edit, and Delete Run-time Objects privilege in the destination repository.
Read and Write on folder - Change comments for a versioned run-time object.- Check in and undo a checkout of run-time objects
checked out by their own user account.- Check out run-time objects.- Copy and paste tasks, workflows, and worklets in
the same folder.- Create, edit, and delete data profiles and launch
the Profile Manager. Users must also have the Create, Edit, and Delete Design Objects privilege.
- Create, edit, and delete session configuration objects.
- Delete and validate tasks, workflows, and worklets.
- Import run-time objects using the Repository Manager. Users must also have the Create, Edit, and Delete Design Objects and Create, Edit, and Delete Sources and Targets privileges.
- Import run-time objects using the Workflow Manager.
- Revert to a previous object version.
Read and Write on folderRead on connection object
- Create and edit tasks, workflows, and worklets.- Replace a relational database connection for all
sessions that use the connection.
Manage Versions(includes Create, Edit, and Delete privilege)
Read and Write on folder - Change the status of run-time objects.- Check in and undo checkouts of run-time objects
checked out by other users.- Purge versions of run-time objects.- Recover deleted run-time objects.
Monitor Read on folder - View properties of run-time objects in the Workflow Monitor.*
- View session and workflow logs in the Workflow Monitor.*
- View run-time object and performance details in the Workflow Monitor.*
82 Chapter 5: Managing Privileges and Roles

Note: To perform actions on run-time objects, users must also have the appropriate privilege in the Tools privilege group.
Global Objects Privilege GroupPrivileges in the Global Objects privilege group and repository object permissions determine the tasks users can complete on the following global objects:
♦ Connection objects
♦ Deployment groups
♦ Labels
♦ Queries
n/a Read and Execute on folder Stop and abort tasks and workflows started by their own user account.*
Execute(includes Monitor privilege)
Read and Execute on folder Assign an Integration Service to a workflow.
Read, Write, and Execute on folderRead and Execute on connection object
Debug a mapping by creating a debug session instance or by using an existing reusable session. Users must also have the Create, Edit, and Delete Run-time Objects privilege.*
Read and Execute on folderRead and Execute on connection object
Debug a mapping by using an existing non-reusable session.*
Read and Execute on folderRead and Execute on connection objectPermission on operating system profile**
- Start, cold start, and restart tasks and workflows.* - Recover tasks and workflows started by their own
user account.*
Manage Execution (includes Execute and Monitor privileges)
Read and Execute on folder Truncate workflow and session log entries.
Read and Execute on folder - Assign an Integration Service to a workflow.- Stop and abort tasks and workflows started by
other users.*- Stop and abort tasks that were recovered
automatically.*- Unschedule workflows.*
Read and Execute on folderRead and Execute on connection objectPermission on operating system profile**
- Recover tasks and workflows started by other users.*
- Recover tasks that were recovered automatically.*
Read, Write, and Execute on folderRead and Execute on connection objectPermission on operating system profile**
- Create and edit a reusable scheduler from the Workflows > Schedulers menu.*
- Edit a non-reusable scheduler from the workflow properties.*
- Edit a reusable scheduler from the workflow properties. Users must also have the Create, Edit, and Delete Run-time Objects privilege.*
*When the Integration Service runs in safe mode, users must have the Administrator role for the associated Repository Service.**If the Integration Service uses operating system profiles, users must have permission on the operating system profile.
Privilege Permission Grants Users the Ability To
Repository Service Privileges 83

Some global object tasks are determined by global object ownership and the Administrator role, not by privileges or permissions. The global object owner or a user assigned the Administrator role for the Repository Service can complete the following global object tasks:
♦ Configure global object permissions.
♦ Change the global object owner.
♦ Delete the global object.
The following table lists the privileges and permissions required to manage global objects:
Note: To perform actions on global objects, users must also have the appropriate privilege in the Tools privilege group.
Metadata Manager Service PrivilegesMetadata Manager Service privileges determine the Metadata Manager actions that users can perform using Metadata Manager.
Privilege Permission Grants Users the Ability To
n/a Read on connection object View connection objects.
n/a Read on deployment group View deployment groups.
n/a Read on label View labels.
n/a Read on query View object queries.
n/a Read and Write on connection object Edit connection objects.
n/a Read and Write on label Edit and lock labels.
n/a Read and Write on query Edit and validate object queries.
n/a Read and Execute on query Run object queries.
n/a Read on folderRead and Execute on label
Apply labels and remove label references.
Create Connections n/a Create and copy connection objects.
Manage Deployment Groups
n/a Create deployment groups.
Read and Write on deployment group - Edit deployment groups.- Remove objects from a deployment
group.
Read on original folderRead and Write on deployment group
Add objects to a deployment group.
Read on original folderRead and Write on destination folderRead and Execute on deployment group
Copy deployment groups.
Read and Write on destination folder Roll back deployment groups.
Execute Deployment Groups
Read on original folderExecute on deployment group
Copy deployment groups.
Create Labels n/a Create labels.
Create Queries n/a Create object queries.
84 Chapter 5: Managing Privileges and Roles

The following table describes each Metadata Manager Service privilege:
Privilege Group Privilege Name Description
Catalog Share Shortcuts Share a folder that contains a shortcut.
View Lineage Run lineage analysis on metadata objects in the catalog.
View Reports View Metadata Manager reports in Data Analyzer.
View Profile Results View profiling information for metadata objects in the catalog from a relational source.
View Catalog View metadata catalog objects.
View Relationships View relationships for metadata objects, categories, and business terms.
Manage Relationships Create, edit, and delete relationships for custom metadata objects, categories, and business terms.
View Comments View comments for metadata objects, categories, and business terms.
Post Comments Add comments for metadata objects, categories, and business terms.
Delete Comments Delete comments for metadata objects, categories, and business terms.
View Links View links for metadata objects, categories, and business terms.
Manage Links Create, edit, and delete links for metadata objects, categories, and business terms.
View Glossary View business glossaries in the Business Glossary view.
Manage Glossary Create, edit, and delete a business glossary, including categories and business terms. Import and export a business glossary.
Manage Objects Create, edit, and delete metadata objects in the catalog.
Load View Resource View resources and resource properties.
Load Resource Load metadata for a resource into the Metadata Manager warehouse.
Manage Schedules Create and edit schedules, and add schedules to resources.
Purge Metadata Remove metadata for a resource from the Metadata Manager warehouse.
Manage Resource Create, edit, and delete resources.
Model View Model Open models and classes, and view model and class properties. View relationships and attributes for classes.
Manage Model Create, edit, and delete custom models. Add attributes to packaged models.
Export/Import Models Import and export custom models and modified packaged models.
Security Manage Catalog Permissions Assign users and groups permissions on metadata objects and edit permissions on metadata objects in the catalog.
Metadata Manager Service Privileges 85
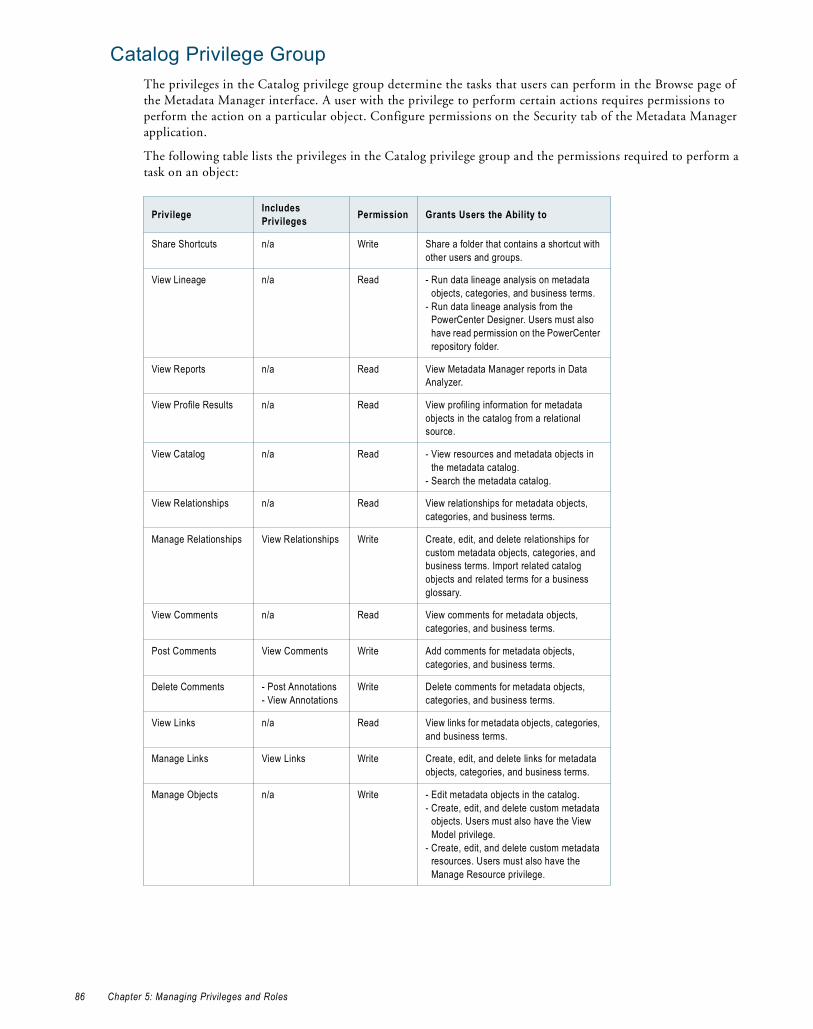
Catalog Privilege GroupThe privileges in the Catalog privilege group determine the tasks that users can perform in the Browse page of the Metadata Manager interface. A user with the privilege to perform certain actions requires permissions to perform the action on a particular object. Configure permissions on the Security tab of the Metadata Manager application.
The following table lists the privileges in the Catalog privilege group and the permissions required to perform a task on an object:
Privilege Includes Privileges Permission Grants Users the Ability to
Share Shortcuts n/a Write Share a folder that contains a shortcut with other users and groups.
View Lineage n/a Read - Run data lineage analysis on metadata objects, categories, and business terms.
- Run data lineage analysis from the PowerCenter Designer. Users must also have read permission on the PowerCenter repository folder.
View Reports n/a Read View Metadata Manager reports in Data Analyzer.
View Profile Results n/a Read View profiling information for metadata objects in the catalog from a relational source.
View Catalog n/a Read - View resources and metadata objects in the metadata catalog.
- Search the metadata catalog.
View Relationships n/a Read View relationships for metadata objects, categories, and business terms.
Manage Relationships View Relationships Write Create, edit, and delete relationships for custom metadata objects, categories, and business terms. Import related catalog objects and related terms for a business glossary.
View Comments n/a Read View comments for metadata objects, categories, and business terms.
Post Comments View Comments Write Add comments for metadata objects, categories, and business terms.
Delete Comments - Post Annotations- View Annotations
Write Delete comments for metadata objects, categories, and business terms.
View Links n/a Read View links for metadata objects, categories, and business terms.
Manage Links View Links Write Create, edit, and delete links for metadata objects, categories, and business terms.
Manage Objects n/a Write - Edit metadata objects in the catalog.- Create, edit, and delete custom metadata
objects. Users must also have the View Model privilege.
- Create, edit, and delete custom metadata resources. Users must also have the Manage Resource privilege.
86 Chapter 5: Managing Privileges and Roles

Load Privilege GroupThe privileges in the Load privilege group determine the tasks users can perform in the Load page of the Metadata Manager interface. You cannot configure permissions on resources.
The following table lists the privileges required to manage an instance of a resource in the Metadata Manager warehouse:
Model Privilege GroupThe privileges in the Model privilege group determine the tasks users can perform in the Model page of the Metadata Manager interface. You cannot configure permissions on a model.
The following table lists the privileges required to manage models:
Security Privilege GroupThe privilege in the Security privilege group determines the tasks users can perform on the Security page of the Metadata Manager interface.
View Glossary n/a Read - View business glossaries in the Business Glossary view.
- Search business glossaries.
Manage Glossary View Glossary Write Create, edit, and delete a business glossary, including categories and business terms. Import and export a business glossary.
Privilege Includes Privileges Permission Grants Users the Ability to
View Resource n/a n/a - View resources and resource properties in the Metadata Manager warehouse.
- Download Metadata Manager agent installer.
Load Resource View Resource n/a - Load metadata for a resource into the Metadata Manager warehouse.
- Configure search indexing for resources.
Manage Schedules View Resource n/a Create and edit schedules, and add schedules to resources.
Purge Metadata View Resource n/a Remove metadata for a resource from the Metadata Manager warehouse.
Manage Resource - Purge Metadata- View Resource
n/a Create, edit, and delete resources.
Privilege Includes Privileges Permission Grants Users the Ability to
View Model n/a n/a Open models and classes, and view model and class properties. View relationships and attributes for classes.
Manage Model View Model n/a Create, edit, and delete custom models. Add attributes to packaged models.
Export/Import Models View Model n/a Import and export custom models and modified packaged models.
Privilege Includes Privileges Permission Grants Users the Ability to
Metadata Manager Service Privileges 87

By default, the Manage Catalog Permissions privilege in the Security privilege group is assigned to the Administrator, or a user with the Administrator role on the Metadata Manager service. You can assign the Manage Catalog Permissions privilege to other users.
The following table lists the privilege required to manage Metadata Manager security:
Reporting Service PrivilegesReporting Service privileges determine the actions that users can perform using Data Analyzer.
The following table describes each Reporting Service privilege:
Privilege Includes Privileges Permission Grants Users the Ability to
Manage Catalog Permissions
n/a Full control - Assign users and groups permissions on resources, metadata objects, categories, and business terms.
- Edit permissions on resources, metadata objects, categories, and business terms.
Privilege Group Privilege Name Description
Administration Maintain Schema Create, edit, and delete schema tables.
Export/Import XML Files Export and import metadata as XML files.
Manage User Access Manage user and group properties in Data Analyzer. Set data restrictions for users and groups.
Set Up Schedules and Tasks Create and manage schedules and tasks.
Manage System Properties Manage system settings and properties.
Set Up Query Limits Access query governing settings.
Configure Real-Time Message Streams
Add, edit, and remove real-time message streams.
Alerts Receive Alerts Receive and view triggered alerts.
Create Real-time Alerts Create an alert for a real-time report.
Set Up Delivery Option Configure alert delivery options.
Communication Print Print reports and dashboards.
Email Object Links Send links to reports or dashboards in an email.
Email Object Contents Send the contents of a report or dashboard in an email.
Export Export reports and dashboards.
Export to Excel or CSV Export reports to Excel or comma-separated values files.
Export to Pivot Table Export reports to Excel pivot tables.
View Discussions Read discussions.
Add Discussions Add messages to discussions.
Manage Discussions Delete messages from discussions.
Give Feedback Create feedback messages.
Content Directory Access Content Directory Access folders and content on the Find tab.
88 Chapter 5: Managing Privileges and Roles
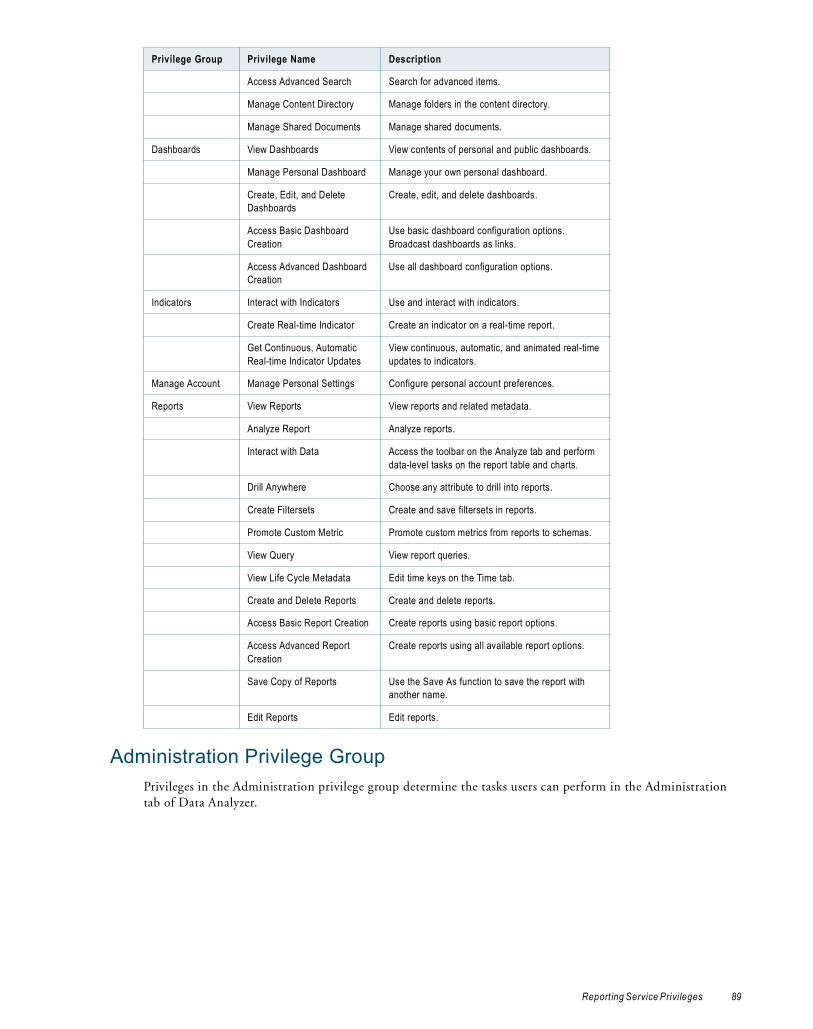
Administration Privilege GroupPrivileges in the Administration privilege group determine the tasks users can perform in the Administration tab of Data Analyzer.
Access Advanced Search Search for advanced items.
Manage Content Directory Manage folders in the content directory.
Manage Shared Documents Manage shared documents.
Dashboards View Dashboards View contents of personal and public dashboards.
Manage Personal Dashboard Manage your own personal dashboard.
Create, Edit, and Delete Dashboards
Create, edit, and delete dashboards.
Access Basic Dashboard Creation
Use basic dashboard configuration options. Broadcast dashboards as links.
Access Advanced Dashboard Creation
Use all dashboard configuration options.
Indicators Interact with Indicators Use and interact with indicators.
Create Real-time Indicator Create an indicator on a real-time report.
Get Continuous, Automatic Real-time Indicator Updates
View continuous, automatic, and animated real-time updates to indicators.
Manage Account Manage Personal Settings Configure personal account preferences.
Reports View Reports View reports and related metadata.
Analyze Report Analyze reports.
Interact with Data Access the toolbar on the Analyze tab and perform data-level tasks on the report table and charts.
Drill Anywhere Choose any attribute to drill into reports.
Create Filtersets Create and save filtersets in reports.
Promote Custom Metric Promote custom metrics from reports to schemas.
View Query View report queries.
View Life Cycle Metadata Edit time keys on the Time tab.
Create and Delete Reports Create and delete reports.
Access Basic Report Creation Create reports using basic report options.
Access Advanced Report Creation
Create reports using all available report options.
Save Copy of Reports Use the Save As function to save the report with another name.
Edit Reports Edit reports.
Privilege Group Privilege Name Description
Report ing Service Privileges 89
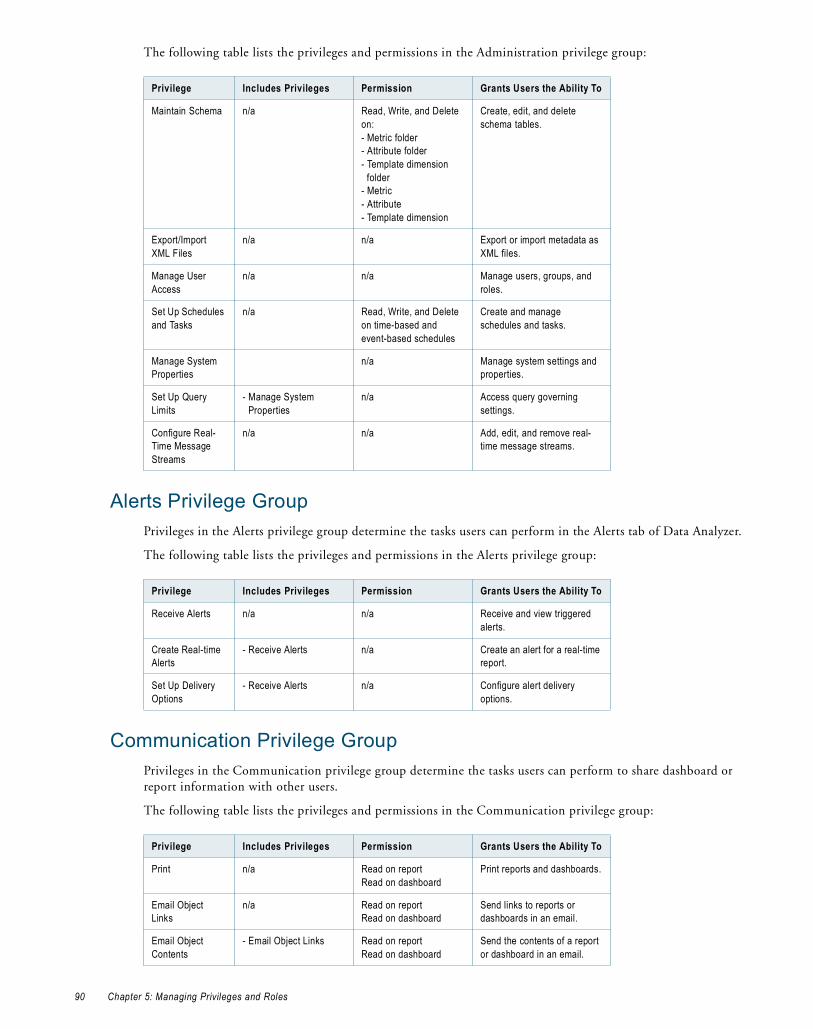
The following table lists the privileges and permissions in the Administration privilege group:
Alerts Privilege GroupPrivileges in the Alerts privilege group determine the tasks users can perform in the Alerts tab of Data Analyzer.
The following table lists the privileges and permissions in the Alerts privilege group:
Communication Privilege GroupPrivileges in the Communication privilege group determine the tasks users can perform to share dashboard or report information with other users.
The following table lists the privileges and permissions in the Communication privilege group:
Privilege Includes Privileges Permission Grants Users the Ability To
Maintain Schema n/a Read, Write, and Delete on:- Metric folder- Attribute folder- Template dimension
folder- Metric- Attribute- Template dimension
Create, edit, and delete schema tables.
Export/Import XML Files
n/a n/a Export or import metadata as XML files.
Manage User Access
n/a n/a Manage users, groups, and roles.
Set Up Schedules and Tasks
n/a Read, Write, and Delete on time-based and event-based schedules
Create and manage schedules and tasks.
Manage System Properties
n/a Manage system settings and properties.
Set Up Query Limits
- Manage System Properties
n/a Access query governing settings.
Configure Real-Time Message Streams
n/a n/a Add, edit, and remove real-time message streams.
Privilege Includes Privileges Permission Grants Users the Ability To
Receive Alerts n/a n/a Receive and view triggered alerts.
Create Real-time Alerts
- Receive Alerts n/a Create an alert for a real-time report.
Set Up Delivery Options
- Receive Alerts n/a Configure alert delivery options.
Privilege Includes Privileges Permission Grants Users the Ability To
Print n/a Read on reportRead on dashboard
Print reports and dashboards.
Email Object Links
n/a Read on reportRead on dashboard
Send links to reports or dashboards in an email.
Email Object Contents
- Email Object Links Read on reportRead on dashboard
Send the contents of a report or dashboard in an email.
90 Chapter 5: Managing Privileges and Roles
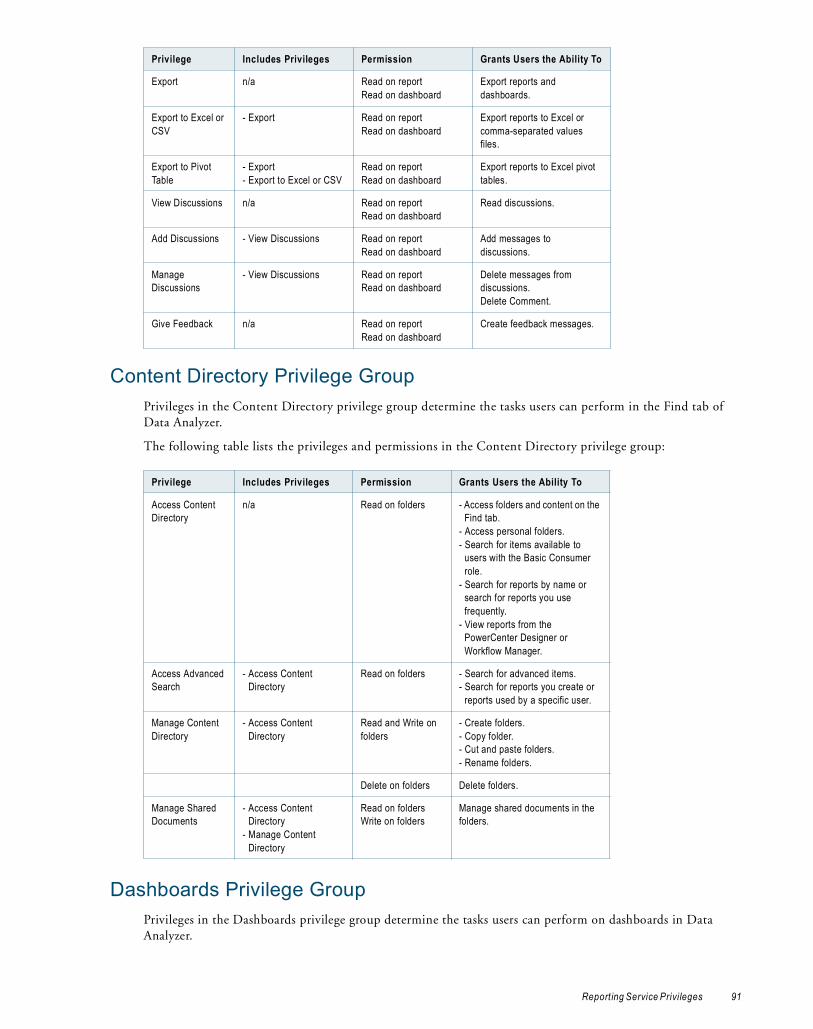
Content Directory Privilege GroupPrivileges in the Content Directory privilege group determine the tasks users can perform in the Find tab of Data Analyzer.
The following table lists the privileges and permissions in the Content Directory privilege group:
Dashboards Privilege GroupPrivileges in the Dashboards privilege group determine the tasks users can perform on dashboards in Data Analyzer.
Export n/a Read on reportRead on dashboard
Export reports and dashboards.
Export to Excel or CSV
- Export Read on reportRead on dashboard
Export reports to Excel or comma-separated values files.
Export to Pivot Table
- Export- Export to Excel or CSV
Read on reportRead on dashboard
Export reports to Excel pivot tables.
View Discussions n/a Read on reportRead on dashboard
Read discussions.
Add Discussions - View Discussions Read on reportRead on dashboard
Add messages to discussions.
Manage Discussions
- View Discussions Read on reportRead on dashboard
Delete messages from discussions.Delete Comment.
Give Feedback n/a Read on reportRead on dashboard
Create feedback messages.
Privilege Includes Privileges Permission Grants Users the Ability To
Access Content Directory
n/a Read on folders - Access folders and content on the Find tab.
- Access personal folders.- Search for items available to
users with the Basic Consumer role.
- Search for reports by name or search for reports you use frequently.
- View reports from the PowerCenter Designer or Workflow Manager.
Access Advanced Search
- Access Content Directory
Read on folders - Search for advanced items.- Search for reports you create or
reports used by a specific user.
Manage Content Directory
- Access Content Directory
Read and Write on folders
- Create folders.- Copy folder.- Cut and paste folders.- Rename folders.
Delete on folders Delete folders.
Manage Shared Documents
- Access Content Directory
- Manage Content Directory
Read on foldersWrite on folders
Manage shared documents in the folders.
Privilege Includes Privileges Permission Grants Users the Ability To
Report ing Service Privileges 91

The following table lists the privileges and permissions in the Dashboards privilege group:
Indicators Privilege GroupPrivileges in the Indicators privilege group determine the tasks users can perform with indicators.
The following table lists the privileges and permissions in the Indicators privilege group:
Manage Account Privilege GroupThe privilege in the Manage Account privilege group determines the task users can perform in the Manage Account tab of Data Analyzer.
The following table lists the privilege and permission in the Manage Account privilege group:
Reports Privilege GroupPrivileges in the Reports privilege group determine the tasks users can perform with reports in Data Analyzer.
Privilege Includes Privileges Permission Grants Users the Ability To
View Dashboards n/a Read on dashboards View contents of personal dashboards and public dashboards.
Manage Personal Dashboard
- View Dashboards Read and Write on dashboards
Manage your own personal dashboard.
Create, Edit, and Delete Dashboards
- View Dashboards Read and Write on dashboards
- Create dashboards.- Edit dashboards.
Delete on dashboards Delete dashboards.
Access Basic Dashboard Creation
- View Dashboards- Create, Edit, and
Delete Dashboards
Read and Write on dashboards
- Use basic dashboard configuration options.
- Broadcast dashboards as links.
Access Advanced Dashboard Creation
- View Dashboards- Create, Edit, and
Delete Dashboards- Access Basic
Dashboard Creation
Read and Write on dashboards
Use all dashboard configuration options.
Privilege Includes Privileges Permission Grants Users the Ability To
Interact with Indicators
n/a Read on reportWrite on dashboard
Use and interact with indicators.
Create Real-time Indicator
n/a Read and Write on reportWrite on dashboard
- Create an indicator on a real-time report.
- Create gauge indicator.
Get Continuous, Automatic Real-time Indicator Updates
n/a Read on report View continuous, automatic, and animated real-time updates to indicators.
Privilege Includes Privileges Permission Grants Users the Ability To
Manage Personal Settings
n/a n/a Configure personal account preferences.
92 Chapter 5: Managing Privileges and Roles
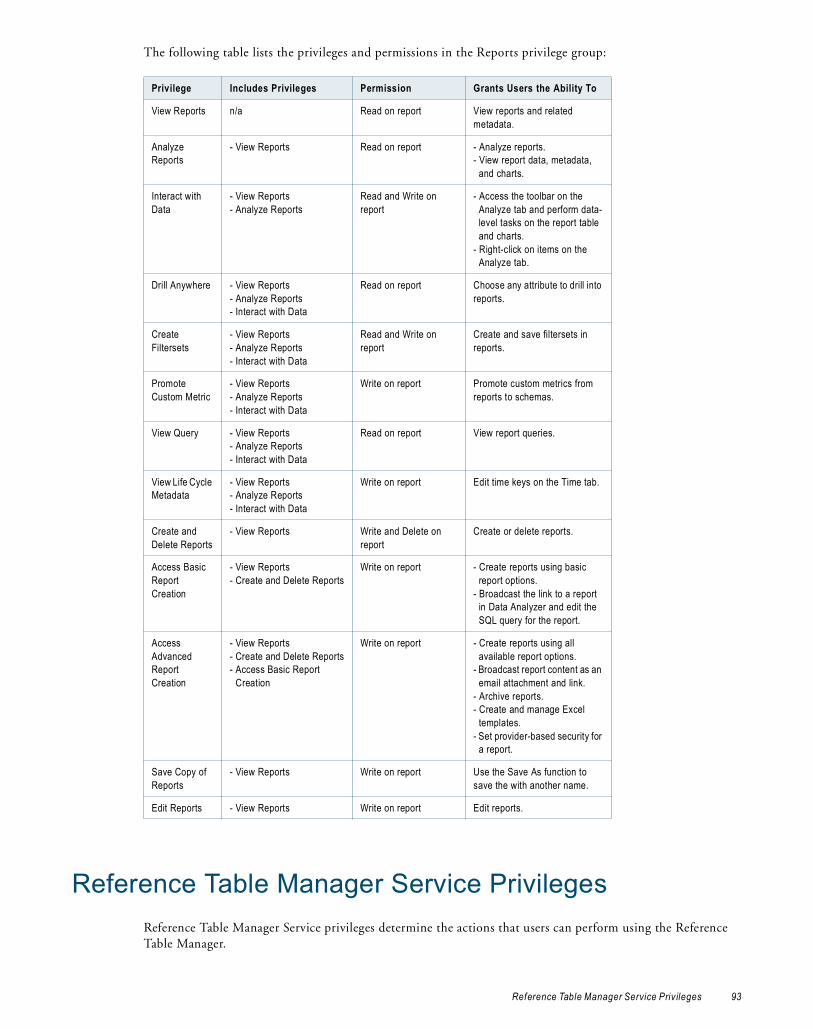
The following table lists the privileges and permissions in the Reports privilege group:
Reference Table Manager Service PrivilegesReference Table Manager Service privileges determine the actions that users can perform using the Reference Table Manager.
Privilege Includes Privileges Permission Grants Users the Ability To
View Reports n/a Read on report View reports and related metadata.
Analyze Reports
- View Reports Read on report - Analyze reports.- View report data, metadata,
and charts.
Interact with Data
- View Reports- Analyze Reports
Read and Write on report
- Access the toolbar on the Analyze tab and perform data-level tasks on the report table and charts.
- Right-click on items on the Analyze tab.
Drill Anywhere - View Reports- Analyze Reports- Interact with Data
Read on report Choose any attribute to drill into reports.
Create Filtersets
- View Reports- Analyze Reports- Interact with Data
Read and Write on report
Create and save filtersets in reports.
Promote Custom Metric
- View Reports- Analyze Reports- Interact with Data
Write on report Promote custom metrics from reports to schemas.
View Query - View Reports- Analyze Reports- Interact with Data
Read on report View report queries.
View Life Cycle Metadata
- View Reports- Analyze Reports- Interact with Data
Write on report Edit time keys on the Time tab.
Create and Delete Reports
- View Reports Write and Delete on report
Create or delete reports.
Access Basic Report Creation
- View Reports- Create and Delete Reports
Write on report - Create reports using basic report options.
- Broadcast the link to a report in Data Analyzer and edit the SQL query for the report.
Access Advanced Report Creation
- View Reports- Create and Delete Reports- Access Basic Report
Creation
Write on report - Create reports using all available report options.
- Broadcast report content as an email attachment and link.
- Archive reports.- Create and manage Excel
templates.- Set provider-based security for
a report.
Save Copy of Reports
- View Reports Write on report Use the Save As function to save the with another name.
Edit Reports - View Reports Write on report Edit reports.
Reference Table Manager Service Privileges 93
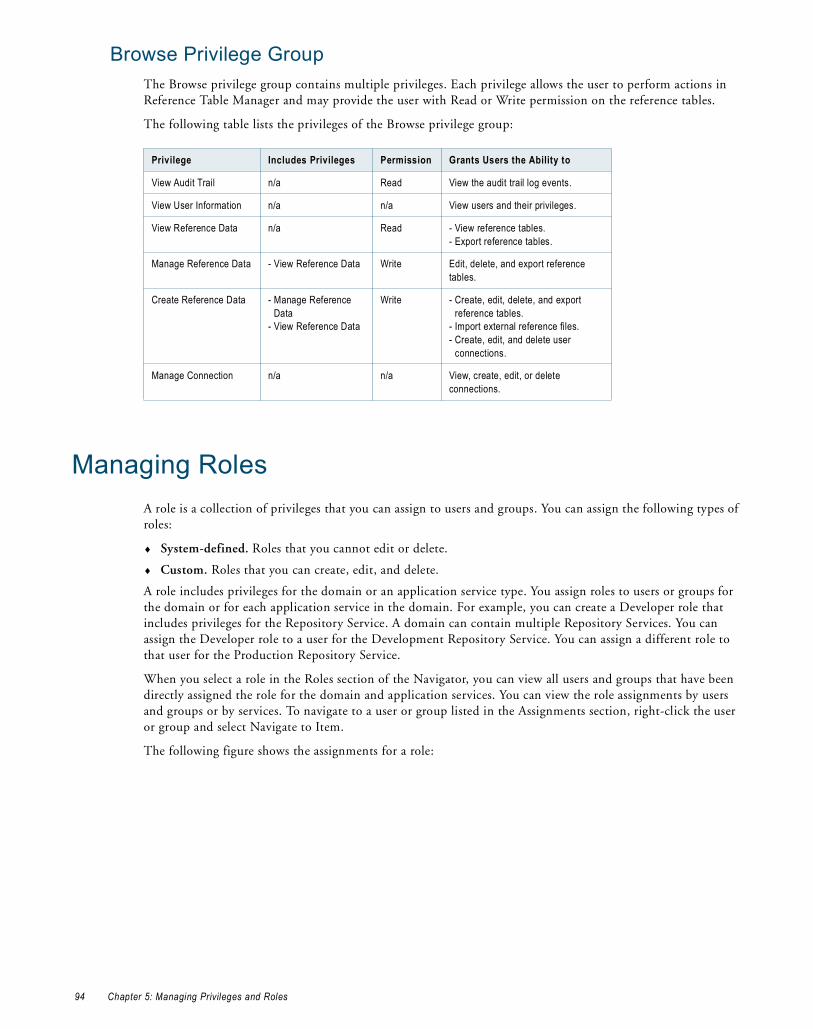
Browse Privilege GroupThe Browse privilege group contains multiple privileges. Each privilege allows the user to perform actions in Reference Table Manager and may provide the user with Read or Write permission on the reference tables.
The following table lists the privileges of the Browse privilege group:
Managing RolesA role is a collection of privileges that you can assign to users and groups. You can assign the following types of roles:
♦ System-defined. Roles that you cannot edit or delete.
♦ Custom. Roles that you can create, edit, and delete.
A role includes privileges for the domain or an application service type. You assign roles to users or groups for the domain or for each application service in the domain. For example, you can create a Developer role that includes privileges for the Repository Service. A domain can contain multiple Repository Services. You can assign the Developer role to a user for the Development Repository Service. You can assign a different role to that user for the Production Repository Service.
When you select a role in the Roles section of the Navigator, you can view all users and groups that have been directly assigned the role for the domain and application services. You can view the role assignments by users and groups or by services. To navigate to a user or group listed in the Assignments section, right-click the user or group and select Navigate to Item.
The following figure shows the assignments for a role:
Privilege Includes Privileges Permission Grants Users the Ability to
View Audit Trail n/a Read View the audit trail log events.
View User Information n/a n/a View users and their privileges.
View Reference Data n/a Read - View reference tables.- Export reference tables.
Manage Reference Data - View Reference Data Write Edit, delete, and export reference tables.
Create Reference Data - Manage Reference Data
- View Reference Data
Write - Create, edit, delete, and export reference tables.
- Import external reference files.- Create, edit, and delete user
connections.
Manage Connection n/a n/a View, create, edit, or delete connections.
94 Chapter 5: Managing Privileges and Roles

You can search for system-defined and custom roles.
System-Defined RolesA system-defined role is a role that you cannot edit or delete. The Administrator role is a system-defined role.
When you assign the Administrator role to a user or group for the domain, Repository Service, Metadata Manager Service, Reporting Service, or Reference Table Manager Service, the user or group is granted all privileges for the service and granted full permissions on all objects managed by the service.
Administrator Role for the Domain or Repository ServiceWhen you assign the Administrator role to a user or group for the domain or Repository Service, the user or group can complete some tasks that are determined by the Administrator role, not by privileges or permissions.
You can assign a user or group all privileges for the domain or Repository Service and then grant the user or group full permissions on all domain or PowerCenter repository objects. However, this user or group cannot complete the tasks determined by the Administrator role.
For example, a user assigned the Administrator role for the domain can configure domain properties in the Administration Console. A user assigned all domain privileges and permission on the domain cannot configure domain properties.
View the assignments by users and groups or by services.
Managing Roles 95
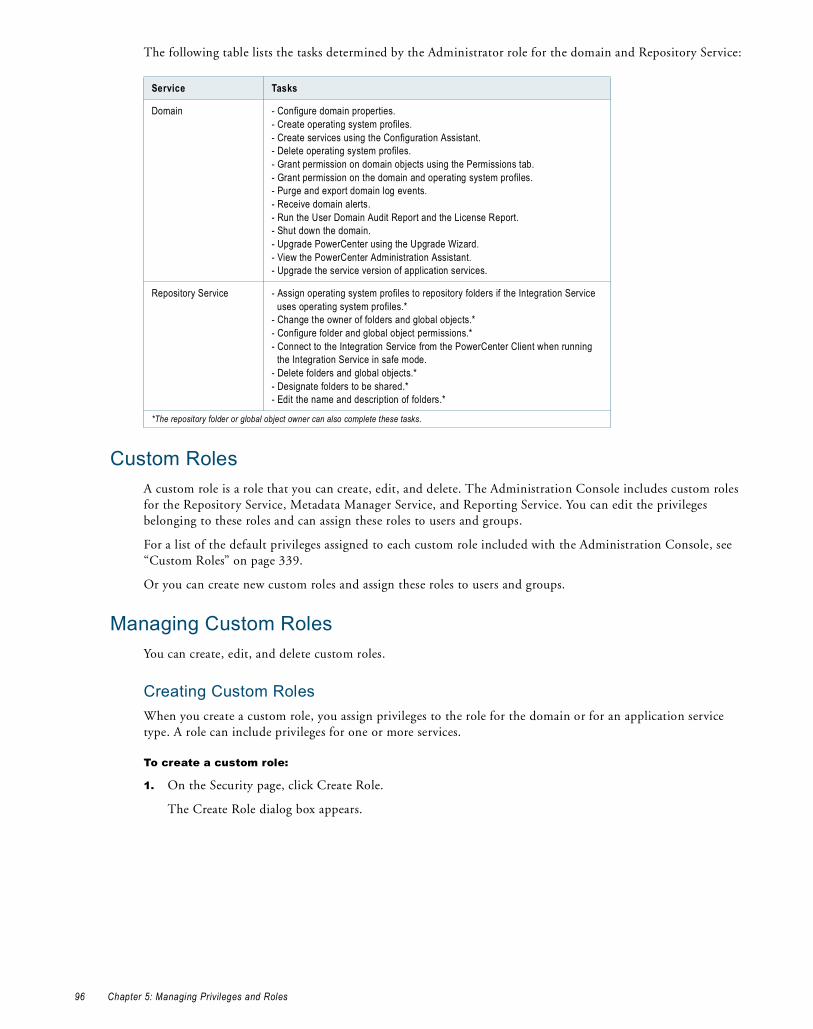
The following table lists the tasks determined by the Administrator role for the domain and Repository Service:
Custom RolesA custom role is a role that you can create, edit, and delete. The Administration Console includes custom roles for the Repository Service, Metadata Manager Service, and Reporting Service. You can edit the privileges belonging to these roles and can assign these roles to users and groups.
For a list of the default privileges assigned to each custom role included with the Administration Console, see “Custom Roles” on page 339.
Or you can create new custom roles and assign these roles to users and groups.
Managing Custom RolesYou can create, edit, and delete custom roles.
Creating Custom RolesWhen you create a custom role, you assign privileges to the role for the domain or for an application service type. A role can include privileges for one or more services.
To create a custom role:
1. On the Security page, click Create Role.
The Create Role dialog box appears.
Service Tasks
Domain - Configure domain properties.- Create operating system profiles.- Create services using the Configuration Assistant.- Delete operating system profiles.- Grant permission on domain objects using the Permissions tab.- Grant permission on the domain and operating system profiles.- Purge and export domain log events.- Receive domain alerts.- Run the User Domain Audit Report and the License Report.- Shut down the domain.- Upgrade PowerCenter using the Upgrade Wizard.- View the PowerCenter Administration Assistant.- Upgrade the service version of application services.
Repository Service - Assign operating system profiles to repository folders if the Integration Service uses operating system profiles.*
- Change the owner of folders and global objects.*- Configure folder and global object permissions.*- Connect to the Integration Service from the PowerCenter Client when running
the Integration Service in safe mode.- Delete folders and global objects.*- Designate folders to be shared.*- Edit the name and description of folders.*
*The repository folder or global object owner can also complete these tasks.
96 Chapter 5: Managing Privileges and Roles
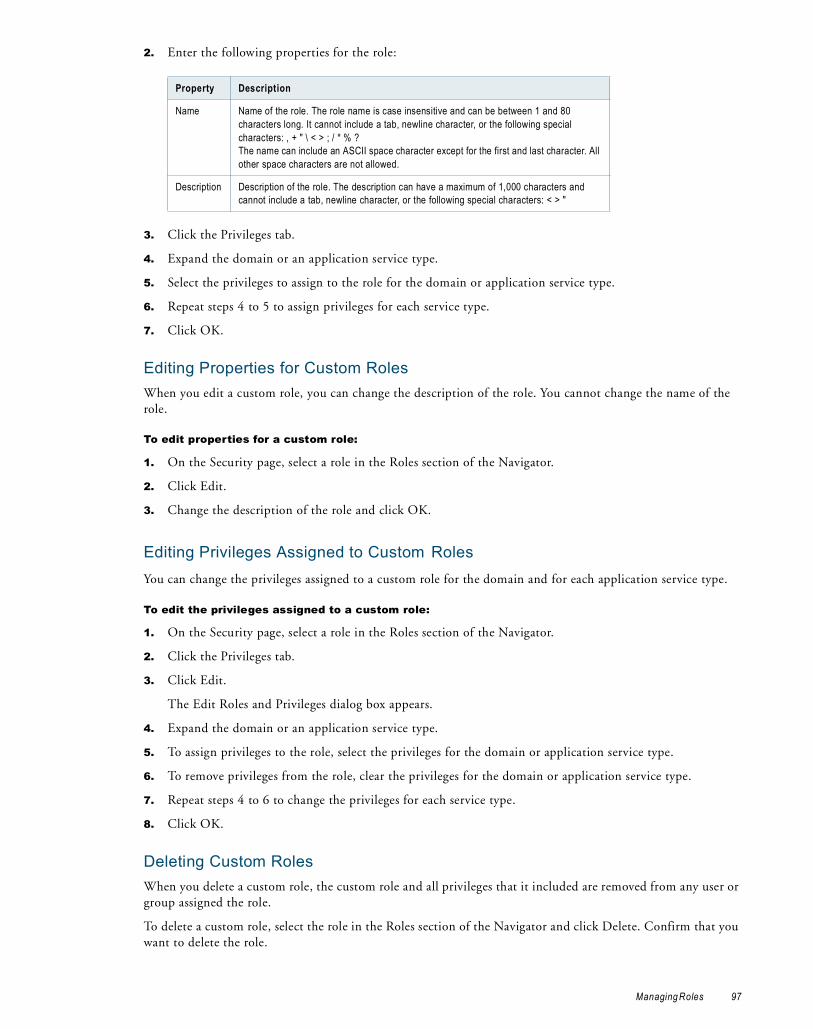
2. Enter the following properties for the role:
3. Click the Privileges tab.
4. Expand the domain or an application service type.
5. Select the privileges to assign to the role for the domain or application service type.
6. Repeat steps 4 to 5 to assign privileges for each service type.
7. Click OK.
Editing Properties for Custom RolesWhen you edit a custom role, you can change the description of the role. You cannot change the name of the role.
To edit properties for a custom role:
1. On the Security page, select a role in the Roles section of the Navigator.
2. Click Edit.
3. Change the description of the role and click OK.
Editing Privileges Assigned to Custom RolesYou can change the privileges assigned to a custom role for the domain and for each application service type.
To edit the privileges assigned to a custom role:
1. On the Security page, select a role in the Roles section of the Navigator.
2. Click the Privileges tab.
3. Click Edit.
The Edit Roles and Privileges dialog box appears.
4. Expand the domain or an application service type.
5. To assign privileges to the role, select the privileges for the domain or application service type.
6. To remove privileges from the role, clear the privileges for the domain or application service type.
7. Repeat steps 4 to 6 to change the privileges for each service type.
8. Click OK.
Deleting Custom RolesWhen you delete a custom role, the custom role and all privileges that it included are removed from any user or group assigned the role.
To delete a custom role, select the role in the Roles section of the Navigator and click Delete. Confirm that you want to delete the role.
Property Description
Name Name of the role. The role name is case insensitive and can be between 1 and 80 characters long. It cannot include a tab, newline character, or the following special characters: , + " \ < > ; / * % ?The name can include an ASCII space character except for the first and last character. All other space characters are not allowed.
Description Description of the role. The description can have a maximum of 1,000 characters and cannot include a tab, newline character, or the following special characters: < > "
Managing Roles 97
Assigning Privileges and Roles to Users and GroupsYou determine the actions that users can perform by assigning the following items to users and groups:
♦ Privileges. A privilege determines the actions that users can perform in the Administration Console, PowerCenter Client, Metadata Manager, or Data Analyzer.
♦ Roles. A role is a collection of privileges. When you assign a role to a user or group, you assign the collection of privileges belonging to the role.
Use the following rules and guidelines when you assign privileges and roles to users and groups:
♦ You assign privileges and roles to users and groups for the domain and for each Repository Service, Metadata Manager Service, Reporting Service, and Reference Table Manager Service that is running in the domain.
If an application service is disabled, if an application service contents, users, or groups have not been upgraded, or if a Repository Service is running in exclusive mode, you cannot assign privileges and roles to users and groups for the application service.
♦ You can assign different privileges and roles to a user or group for each application service of the same service type.
♦ A role can include privileges for the domain and multiple application service types. When you assign the role to a user or group for one application service, only privileges for that application service type are assigned to the user or group.
If you change the privileges or roles assigned to a user that is currently logged in to a PowerCenter application, the changed privileges or roles take affect the next time the user logs in.
Note: You cannot edit the privileges or roles assigned to the default Administrator user account.
Inherited PrivilegesA user or group can inherit privileges from the following objects:
♦ Group. When you assign privileges to a group, all subgroups and users belonging to the group inherit the privileges.
♦ Role. When you assign a role to a user, the user inherits the privileges belonging to the role. When you assign a role to a group, the group and all subgroups and users belonging to the group inherit the privileges belonging to the role. The subgroups and users do not inherit the role.
You cannot revoke privileges inherited from a group or role. You can assign additional privileges to a user or group that are not inherited from a group or role.
The Privileges tab for a user or group displays all the roles and privileges assigned to the user or group for the domain and for each application service. Expand the domain or application service to view the roles and privileges assigned for the domain or service. Click the following items to display additional information about the assigned roles and privileges:
♦ Name of an assigned role. Displays the role details in the right pane.
♦ Information icon for an assigned role. Highlights all privileges inherited with that role.
Privileges that are inherited from a role or group display an inheritance icon. The tooltip for an inherited privilege displays which role or group the user inherited the privilege from.
The following figure shows privileges that a user inherited from roles or groups:
98 Chapter 5: Managing Privileges and Roles

Steps to Assign Privileges and Roles to Users and GroupsYou can assign privileges and roles to users and groups in the following ways:
♦ Navigate to a user or group and edit the privilege and role assignments.
♦ Drag roles to a user or group.
To assign privileges and roles by navigating to a user or group:
1. On the Security page, select a user or group in the Navigator.
2. Click the Privileges tab.
3. Click Edit.
The Edit Roles and Privileges dialog box appears.
4. To assign roles, expand the domain or an application service on the Roles tab.
5. To grant roles, select the roles to assign to the user or group for the domain or application service.
You can select any role that includes privileges for the selected domain or application service type.
6. To revoke roles, clear the roles assigned to the user or group.
7. Repeat steps 4 to 6 to assign roles for another service.
8. To assign privileges, click the Privileges tab.
9. Expand the domain or an application service.
10. To grant privileges, select the privileges to assign to the user or group for the domain or application service.
11. To revoke privileges, clear the privileges assigned to the user or group.
You cannot revoke privileges inherited from a role or group.
12. Repeat steps 9 to 11 to assign privileges for another service.
13. Click OK.
To assign roles by dragging a role to a user or group:
1. In the Roles section of the Navigator, select the folder containing the roles you want to assign.
2. In the right pane, select the role you want to assign.
Click the information icon to highlight privileges inherited with this role.
Inheritance icon. These privileges are inherited from a role or group.
Click the role name to navigate to the role details.
Assigning Privileges and Roles to Users and Groups 99

You can use the Ctrl or Shift keys to select multiple roles.
3. Drag the selected roles to a user or group in the Users or Groups sections of the Navigator.
The Assign Roles dialog box appears.
4. Select the domain or application services to which you want to assign the role.
5. Click OK.
Viewing Users with Privileges for a ServiceYou can view all users that have privileges for the domain or an application service. For example, you might want to view all users that have privileges on the Development Repository Service.
To view users with privileges for a service:
1. On the Security page, click the View Users that Have Privileges for a Service icon.
The Services dialog box appears.
2. Select the domain or an application service.
The right pane displays all users that have privileges for the domain or application service.
3. Right-click a user name and select Navigate to Item to navigate to the user.
TroubleshootingI cannot assign privileges or roles to users for an existing application service.You cannot assign privileges and roles to users and groups for an existing Repository Service, Metadata Manager Service, or Reporting Service in the following situations:
♦ The application service is disabled.
♦ The application service contents, users, or groups have not been upgraded.
♦ The Repository Service is running in exclusive mode.
I cannot assign privileges to a user for an enabled Reporting Service.Data Analyzer uses the user account name and security domain name in the format UserName@SecurityDomain to determine the length of the user login name. You cannot assign privileges or roles to a user for a Reporting Service when the combination of the user name, @ symbol, and security domain name exceeds 80 characters.
I removed a privilege from a group. Why do some users in the group still have that privilege?You can use any of the following methods to assign privileges to a user:
♦ Assign a privilege directly to a user.
♦ Assign a privilege to a role, and then assign the role to a user.
♦ Assign a privilege to a group that the user belongs to.
If you remove a privilege from a group, users that belong to that group can be directly assigned the privilege or can inherit the privilege from an assigned role.
100 Chapter 5: Managing Privileges and Roles
I am assigned all domain privileges and permission on all domain objects, but I cannot complete all tasks in the Administration Console.Some Administration Console tasks are determined by the Administrator role, not by privileges or permissions. You can be assigned all privileges for the domain and granted full permissions on all domain objects. However, you cannot complete the tasks determined by the Administrator role.
I am assigned the Administrator role for an application service, but I cannot configure the application service in the Administration Console.When you have the Administrator role for the Repository Service, Metadata Manager Service, or Reporting Service, you are an application administrator. An application administrator has full permissions and privileges in the PowerCenter Client, Metadata Manager, or Data Analyzer application.
However, an application administrator does not have permissions or privileges on the PowerCenter domain. An application administrator cannot log in to the Administration Console to manage the service for the application for which it has administrator privileges.
To manage an application service in the Administration Console, you must have the appropriate domain privileges and permissions.
I am assigned the Administrator role for the Repository Service, but I cannot use the Repository Manager to perform an advanced purge of objects or to create reusable metadata extensions.You must have the Manage Services domain privilege and permission on the Repository Service in the Administration Console to perform the following actions in the Repository Manager:
♦ Perform an advanced purge of object versions at the repository level.
♦ Create, edit, and delete reusable metadata extensions.
My privileges indicate that I should be able to edit objects in the application, but I cannot edit any metadata.You might not have the required object permissions in the application. Even if you have the privilege to perform certain actions, you may also require permission to perform the action on a particular object.
I cannot use pmrep to connect to a new Repository Service running in exclusive mode.The Service Manager might not have synchronized the list of users and groups in the PowerCenter repository with the list in the domain configuration database. To synchronize the list of users and groups, restart the Repository Service.
I am assigned all privileges in the Folders privilege group for the Repository Service and have read, write, and execute permission on a folder. However, I cannot configure the permissions for the folder.Only the folder owner or a user assigned the Administrator role for the Repository Service can complete the following folder management tasks:
♦ Assign operating system profiles to folders if the Integration Service uses operating system profiles. Requires permission on the operating system profile.
♦ Change the folder owner.
♦ Configure folder permissions.
♦ Delete the folder.
♦ Designate the folder to be shared.
♦ Edit the folder name and description.
Troubleshooting 101

102 Chapter 5: Managing Privileges and Roles
C H A P T E R 6
Managing High Availability
This chapter includes the following topics:
♦ Overview, 103
♦ High Availability in the Base Product, 106
♦ Achieving High Availability, 107
♦ Managing Resilience, 110
♦ Managing High Availability for the Repository Service, 112
♦ Managing High Availability for the Integration Service, 113
♦ Troubleshooting, 118
OverviewThe term high availability refers to the uninterrupted availability of computer system resources. In PowerCenter, high availability eliminates a single point of failure in a domain and provides minimal service interruption in the event of failure. When you configure high availability for a domain, the domain can continue running despite temporary network, hardware, or service failures.
The following high availability components make services highly available in a PowerCenter domain:
♦ Resilience. The ability of a PowerCenter domain to tolerate temporary connection failures until either the resilience timeout expires or the failure is fixed. For more information, see “Resilience” on page 104.
♦ Restart and failover. The restart of a service or task or the migration to a backup node after the service becomes unavailable on the primary node. For more information, see “Restart and Failover” on page 105.
♦ Recovery. The completion of operations after a service is interrupted. After a service process restarts or fails over, it restores the service state and recovers operations. For more information, see “Recovery” on page 105.
When you plan a highly available PowerCenter environment, consider the differences between internal PowerCenter components and systems that are external to PowerCenter. Internal PowerCenter components include Service Manager, application services, the PowerCenter Client, and command line programs. External systems include the network, hardware, database management systems, FTP servers, message queues, and shared storage.
If you have the high availability option, you can achieve full high availability of internal components. You can achieve high availability with external components based on the availability of those components. If you do not have the high availability option, you can achieve some high availability of internal components.
103

ExampleWhile you are fetching a mapping into the Designer workspace, the Repository Service becomes unavailable, and the request fails. The Repository Service fails over to another node because it cannot restart on the same node.
The Designer is resilient to temporary failures and tries to establish a connection to the Repository Service. The Repository Service starts within the resilience timeout period, and the Designer reestablishes the connection.
After the Designer reestablishes the connection, the Repository Service recovers from the failed operation and fetches the mapping into the Designer workspace.
ResilienceResilience is the ability of PowerCenter service clients to tolerate temporary network failures until the timeout period expires or the system failure is resolved. Clients that are resilient to a temporary failure can maintain connection to a service for the duration of the timeout.
All clients within PowerCenter are resilient to service failures. A client of a service can be any PowerCenter Client tool or PowerCenter service that depends on the service. For example, the Integration Service is a client of the Repository Service. If the Repository Service becomes unavailable, the Integration Service tries to reestablish the connection. If the Repository Service becomes available within the timeout period, the Integration Service is able to connect. If the Repository Service is not available within the timeout period, the request fails.
PowerCenter services may also be resilient to temporary failures of external systems, such as database systems, FTP servers, and message queue sources. For this type of resilience to work, the external systems must be highly available. You need the high availability option or the real-time option to configure resilience to external system failures.
Internal ResilienceInternal resilience occurs within the PowerCenter environment among PowerCenter services, the PowerCenter Client tools, and other client applications such as pmrep and pmcmd. You can configure internal resilience at the following levels:
♦ Domain. You configure service connection resilience at the domain level in the general properties for the domain. The domain resilience timeout determines how long services attempt to connect as clients to application services or the Service Manager. The domain resilience properties are the default values for all services in the domain.
♦ Service. You can also configure service connection resilience in the advanced properties for an application service. When you configure connection resilience for an application service, you override the resilience values from the domain settings.
♦ Gateway. The master gateway node maintains a connection to the domain configuration database. If the domain configuration database becomes unavailable, the master gateway node tries to reconnect. The resilience timeout period depends on user activity and the number of gateway nodes:
− Single gateway node. If the domain has one gateway node, the gateway node tries to reconnect until a user or service tries to perform a domain operation. When a user tries to perform a domain operation, the master gateway node shuts down.
− Multiple gateway nodes. If the domain has multiple gateway nodes and the master gateway node cannot reconnect, then the master gateway node shuts down. If a user tries to perform a domain operation while the master gateway node is trying to connect, the master gateway node shuts down. If another gateway node is available, the domain elects a new master gateway node. The domain tries to connect to the domain configuration database with each gateway node. If none of the gateway nodes can connect, the domain shuts down and all domain operations fail.
104 Chapter 6: Managing High Availability
External ResilienceServices in the domain can also be resilient to the temporary unavailability of systems that are external to PowerCenter, such as FTP servers and database management systems.
You can configure the following types of external resilience for application services:
♦ Database connection resilience for Integration Service. The Integration Service depends on external database systems to run sessions and workflows. If a database is temporarily unavailable, the Integration Service attempts to connect for a specified amount of time. The Integration Service is resilient when connecting to a database when a session starts, when the Integration Services fetches data from a relational source or uncached lookup, or it writes data to a relational target.
The Integration Service is resilient if the database supports resilience. You configure the connection retry period in the relational connection object for a database.
♦ Database connection resilience for Repository Service. The Repository Service can be resilient to temporary unavailability of the repository database system. A client request to the Repository Service does not necessarily fail if the database system becomes temporarily unavailable. The Repository Service tries to reestablish connections to the database system and complete the interrupted request. You configure the repository database resilience timeout in the database properties of a Repository Service.
♦ Database connection resilience for master gateway node. The master gateway node can be resilient to temporary unavailability of the domain configuration database. The master gateway node maintains a connection to the domain configuration database. If the domain configuration database becomes unavailable, the master gateway node tries to reconnect. The timeout period depends on whether the domain has one or multiple gateway nodes.
♦ FTP connection resilience. If a connection is lost while the Integration Service is transferring files to or from an FTP server, the Integration Service tries to reconnect for the amount of time configured in the FTP connection object. The Integration Service is resilient to interruptions if the FTP server supports resilience.
♦ Client connection resilience. You can configure connection resilience for Integration Service clients that are external applications using C/Java LMAPI. You configure this type of resilience in the Application connection object.
Restart and FailoverIf a service process becomes unavailable, the Service Manager can restart the process or fail it over to a backup node based on the availability of the node. When a service process restarts or fails over, the service restores the state of operation and begins recovery from the point of interruption.
You can configure backup nodes for services if you have the high availability option. If you configure an application service to run on primary and backup nodes, one service process can run at a time. The following situations describe restart and failover for an application service:
♦ If the primary node running the service process becomes unavailable, the service fails over to a backup node. The primary node might be unavailable if it shuts down or if the connection to the node becomes unavailable.
♦ If the primary node running the service process is available, the domain tries to restart the process based on the restart options configured in the domain properties. If the process does not restart, the Service Manager may mark the process as failed. The service then fails over to a backup node and starts another process. If the Service Manager marks the process as failed, the administrator must enable the process after addressing any configuration problem.
If a service process fails over to a backup node, it does not fail back to the primary node when the node becomes available. You can disable the service process on the backup node to cause it to fail back to the primary node.
RecoveryRecovery is the completion of operations after an interrupted service is restored. When a service recovers, it restores the state of operation and continues processing the job from the point of interruption.
Overview 105

The state of operation for a service contains information about the service process. The PowerCenter services include the following states of operation:
♦ Service Manager. The Service Manager for each node in the domain maintains the state of service processes running on that node. If the master gateway shuts down, the newly elected master gateway collects the state information from each node to restore the state of the domain.
♦ Repository Service. The Repository Service maintains the state of operation in the repository. This includes information about repository locks, requests in progress, and connected clients.
♦ Integration Service. The Integration Service maintains the state of operation in the shared storage configured for the service. This includes information about scheduled, running, and completed tasks for the service. The Integration Service maintains session and workflow state of operation based on the recovery strategy you configure for the session and workflow.
High Availability in the Base ProductPowerCenter provides some high availability functionality that does not require the high availability option. The base product provides the following high availability functionality:
♦ Internal PowerCenter resilience. The Service Manager, application services, PowerCenter Client, and command line programs are resilient to temporary unavailability of other PowerCenter internal components.
♦ Repository database resilience. The Repository Service is resilient to temporary unavailability of the repository database.
♦ Restart services. The Service Manager can restart application services after a failure.
♦ Manual recovery of workflows and sessions. You can manually recover workflows and sessions.
♦ Multiple gateway nodes. You can configure multiple nodes as gateway.
Note: You must have the high availability option for failover and automatic recovery.
Internal PowerCenter ResilienceInternal PowerCenter components are resilient to temporary unavailability of other PowerCenter components. PowerCenter components include the Service Manager, application services, the PowerCenter Client, and command line programs. You can configure the resilience timeout and the limit on resilience timeout for the domain, application services, and command line programs.
The PowerCenter Client is resilient to temporary unavailability of the application services. For example, temporary network failure can cause the Integration Service to be unavailable to the PowerCenter Client. The PowerCenter Client tries to reconnect to the Integration Service during the resilience timeout period.
Repository Service Resilience to Repository DatabaseThe Repository Service is resilient to temporary unavailability of the repository database. If the repository database becomes unavailable, the Repository Service tries to reconnect within the database connection timeout period. If the database becomes available and the Repository Service reconnects, the Repository Service can continue processing repository requests. You configure the database connection timeout in the Repository Service database properties.
Restart ServicesIf an application service process fails, the Service Manager restarts the process on the same node.
On Windows, you can configure Informatica Services to restart when the Service Manager fails or the operating system starts.
106 Chapter 6: Managing High Availability
The Integration Service cannot automatically recover failed operations without the high availability option.
Manual Workflow and Session RecoveryYou can manually recover a workflow and all tasks in the workflow without the high availability option. To recover a workflow, you must configure the workflow for recovery. When you configure a workflow for recovery, the Integration Service stores the state of operation that it uses to begin processing from the point of interruption.
You can manually recover a session without the high availability option. To recover a session, you must configure the recovery strategy for the session. If you have the high availability option, the Integration Service can automatically recover workflows.
Multiple Gateway NodesYou can define multiple gateway nodes to achieve some resilience between the domain and the master gateway node without the high availability option. If you have multiple gateway nodes and the master gateway node becomes unavailable, the Service Managers on the other gateway nodes elect another master gateway node to accept service requests. Without the high availability option, you cannot configure an application service to run on a multiple nodes. Therefore, application services running on the master gateway node will not fail over when another master gateway node is elected.
If you have one gateway node and it becomes unavailable, the domain cannot accept service requests. If none of the gateway nodes can connect, the domain shuts down and all domain operations fail.
Achieving High AvailabilityYou can achieve different degrees of availability depending on factors that are internal and external to the PowerCenter environment. For example, you can achieve a greater degree of availability when you configure more than one node to serve as a gateway and when you configure backup nodes for application services.
Consider internal components and external systems when you are designing a highly available PowerCenter environment:
♦ Internal components. Configure nodes and services for high availability.
♦ External systems. Use highly available external systems for hardware, shared storage, database systems, networks, message queues, and FTP servers.
Note: The Metadata Manager Service, Reporting Service, Web Services Hub, and SAP BW Service are not highly available.
Configuring PowerCenter Internal Components for High AvailabilityPowerCenter internal components include the Service Manager, nodes, and all services within the PowerCenter environment. You can configure nodes and services to enhance availability:
♦ Configure more than one gateway. You can configure multiple nodes in a domain to serve as the gateway. Only one node serves as the gateway at any given time. That node is called the master gateway. If the master gateway becomes unavailable, the Service Manager elects another master gateway node. If you configure only one gateway node, the gateway is a single point of failure. If the gateway node becomes unavailable, the Service Manager cannot accept service requests.
♦ Configure application services to run on multiple nodes. You can configure the application services to run on multiple nodes in a domain. A service is available if at least one designated node is available.
♦ Configure access to shared storage. You need to configure access to shared storage when you configure multiple gateway nodes and multiple backup nodes for the Integration Service. When you configure more
Achieving High Availability 107

than one gateway node, each gateway node must have access to the domain configuration database. When you configure the Integration Service to run on more than one node, each node must have access to the run-time files used to process a session or workflow.
When you design a highly available PowerCenter environment, you can configure the nodes and services to minimize failover or to optimize performance:
♦ Minimize service failover. Configure two nodes as gateway. Configure different primary nodes for each application service.
♦ Optimize performance. Configure gateway nodes on machines that are dedicated to serve as a gateway. Configure backup nodes for the Integration Service and the Repository Service.
Minimizing Service FailoverTo minimize service failover in a domain with two nodes, configure the Integration Service and Repository Service to run on opposite primary nodes. Configure one node as the primary node for the Integration Service, and configure the other node as the primary node for the Repository Service.
The following figure shows a configuration in which both nodes are gateways and the Integration Service and Repository Service are configured to run on opposite primary nodes:
Optimizing PerformanceTo optimize performance in a domain, configure gateway operations and applications services to run on separate nodes. Configure the Integration Service and the Repository Service to run on multiple worker nodes. When you separate the gateway operations from the application services, the application services do not interfere with gateway operations when they consume a high level of CPUs.
The following figure shows a configuration with two gateway nodes and multiple backup nodes for the Integration Service and Repository Service:
Node 2 (Gateway)
Service Manager
Application Service
(P) Primary Node Assignment to Run Service(B) Backup Node Assignment to Run Service
Node 1 (Gateway)
Service Manager
Integration Service (P)
Repository Service (B)
Integration Service (B)
Repository Service (P)
Service Manager
108 Chapter 6: Managing High Availability

Using Highly Available External SystemsPowerCenter depends on external systems such as file systems and databases for repositories, sources, and targets. To optimize PowerCenter availability, ensure that external systems are also highly available. Use the following rules and guidelines to configure external systems:
♦ Use a highly available database management system for the repository and domain configuration database. Follow the guidelines of the database system when you plan redundant components and backup and restore policies.
♦ Use highly available versions of other external systems, such as source and target database systems, message queues, and FTP servers.
♦ Use a highly available clustered file system for the shared storage used by services in the domain. You can use clustered file systems for the shared files used by the Integration Service.
♦ Make the network highly available by configuring redundant components such as routers, cables, and network adapter cards.
Rules and Guidelines Use the following rules and guidelines when you set up high availability for the PowerCenter environment:
♦ Install and configure PowerCenter services on multiple nodes.
♦ For each node, configure Informatica Services to restart if it terminates unexpectedly.
♦ In the Administration Console, configure at least two nodes to serve as gateway nodes.
♦ Configure the Repository Services to run on at least two nodes.
♦ Configure the Integration Services to run on multiple nodes. Configure primary and backup nodes or a grid. If you configure the Integration Services to run on a grid, make resources available to more than one node.
♦ Use highly available database management systems for the repository databases associated with Repository Services and the domain configuration database.
♦ Use a clustered file system.
Tip: To perform maintenance on a node without service interruption, disable the service process on the node so that the service will fail over to a backup node.
Node 3 (Worker)
Service Manager
Integration Service (P)
Repository Service (B)
Application Service(P) Primary Node Assignment to Run Service(B) Backup Node Assignment to Run Service
Node n (Worker)
Service Manager
Integration Service (B)
Repository Service (P)
Node 1 (Gateway)
Service Manager
Node 2 (Gateway)
Service Manager
Achieving High Availability 109

Managing ResilienceResilience is the ability of PowerCenter Service clients to tolerate temporary network failures until the resilience timeout period expires or the external system failure is fixed. A client of a service can be any PowerCenter Client or PowerCenter service that depends on the service. Clients that are resilient to a temporary failure can try to reconnect to a service for the duration of the timeout.
For example, the Integration Service is a client of the Repository Service. If the Repository Service becomes unavailable, the Integration Service tries to reestablish the connection. If the Repository Service becomes available within the timeout period, the Integration Service is able to connect. If the Repository Service is not available within the timeout period, the request fails.
You can configure the following resilience properties for the domain, application services, and command line programs:
♦ Resilience timeout. The amount of time a client attempts to connect or reconnect to a service. A limit on resilience timeouts can override the timeout.
♦ Limit on resilience timeout. The amount of time a service waits for a client to connect or reconnect to the service. This limit can override the client resilience timeouts configured for a connecting client. This is available for the domain and application services.
Configuring Service Resilience for the DomainThe domain resilience timeout determines how long services attempt to connect as clients to other services. The default value is 30 seconds.
The limit on resilience timeout is the maximum amount of time that a service allows another service to connect as a client. This limit overrides the resilience timeout for the connecting service if the resilience timeout is a greater value. The default value is 180 seconds.
You can configure resilience properties for each service or you can configure each service to use the domain values.
Configuring Application Service Resilience When an application service connects to another service in the domain, the connecting service is a client of the other service. When an application service connects to another application service, the resilience timeout is determined by one of the following values:
♦ Configured value. You can configure the resilience timeout for the service in the service properties. To disable resilience for a service, set the resilience timeout to 0. The default is 180 seconds.
♦ Domain resilience timeout. To use the resilience timeout configured for the domain, set the service resilience timeout to blank.
♦ Limit on timeout. If the limit on resilience timeout for the service is smaller than the resilience timeout for the connecting client, the client uses the limit as the resilience timeout. To use the limit on resilience timeout configured for the domain, set the service limit to blank. The default is 180 seconds.
You configure the resilience timeout and resilience timeout limits for the Integration Service and the Repository Service in the advanced properties for the service. You configure the resilience timeout for the SAP BW Service in the general properties for the service. The property for the SAP BW Service is called the retry period.
Note: A client cannot be resilient to service interruptions if you disable the service in the Administration Console. If you disable the service process, the client is resilient to the interruption in service.
Understanding PowerCenter Client ResiliencePowerCenter Client resilience timeout determines the amount of time the PowerCenter Client tries to connect or reconnect to the Repository Service or the Integration Service. The PowerCenter Client resilience timeout is 180 seconds and is not configurable. This resilience timeout is bound by the service limit on resilience timeout.
110 Chapter 6: Managing High Availability

If you perform a PowerCenter Client action that requires connection to the repository while the PowerCenter Client is trying to reestablish the connection, the PowerCenter Client prompts you to try the operation again after the PowerCenter Client reestablishes the connection. If the PowerCenter Client is unable to reestablish the connection during the resilience timeout period, the PowerCenter Client prompts you to reconnect to the repository manually.
Configuring Command Line Program Resilience When you use a command line program to connect to the domain or an application service, the resilience timeout is determined by one of the following values:
♦ Command line option. You can determine the resilience timeout for command line programs by using a command line option, -timeout or -t, each time you run a command.
♦ Environment variable. If you do not use the timeout option in the command line syntax, the command line program uses the value of the environment variable INFA_CLIENT_RESILIENCE_TIMEOUT that is configured on the client machine.
♦ Default value. If you do not use the command line option or the environment variable, the command line program uses the default resilience timeout of 180 seconds.
♦ Limit on timeout. If the limit on resilience timeout for the service is smaller than the command line resilience timeout, the command line program uses the limit as the resilience timeout.
Note: PowerCenter does not provide resilience for a repository client when the Repository Service is running in exclusive mode.
ExampleFigure 6-1 shows some sample connections and resilience configurations in a domain:
Figure 6-1. Resilience Timeout in a Domain
The following table describes the resilience timeout and the limits shown in Figure 6-1 on page 111:
Connect From Connect To Description
A Integration Service Repository Service The Integration Service can spend up to 30 seconds to connect to the Repository Service, based on the domain resilience timeout. It is not bound by the Repository Service limit on resilience timeout of 60 seconds.
B pmcmd Integration Service pmcmd is bound by the Integration Service limit on resilience timeout of 180 seconds, and it cannot use the 200 second resilience timeout configured in INFA_CLIENT_RESILIENCE_TIMEOUT.
DOMAINTimeout = 30Limit = 180default settings
INTEGRATION SERVICETimeout = <blank>Limit = <blank>uses domain settings
pmcmdTimeout = 200from environment variable
A
B
DNODE A NODE B
REPOSITORY SERVICETimeout = 60Limit = 60overrides default settings
POWERCENTER CLIENTTimeout = 180not configurable
C
Managing Resilience 111

Managing High Availability for the Repository ServiceHigh availability for the Repository Service includes the following behavior:
♦ Resilience. The Repository Service is resilient to temporary unavailability of other services and the repository database. Repository Service clients are resilient to connections with the Repository Service.
♦ Restart and failover. If the Repository Service fails, the Service Manager can restart the service or fail it over to another node, based on node availability.
♦ Recovery. After restart or failover, the Repository Service can recover operations from the point of interruption.
ResilienceThe Repository Service is resilient to temporary unavailability of other services. Services can be unavailable because of network failure or because a service process fails. The Repository Service is also resilient to temporary unavailability of the repository database. This can occur because of network failure or because the repository database system becomes unavailable.
Repository Service clients are resilient to temporary unavailability of the Repository Service. A Repository Service client is any PowerCenter Client or PowerCenter service that depends on the Repository Service. For example, the Integration Service is a Repository Service client because it depends on the Repository Service for a connection to the repository.
You can configure the Repository Service to be resilient to temporary unavailability of the repository database. The repository database may become unavailable because of network failure or because the repository database system becomes unavailable. If the repository database becomes unavailable, the Repository Service tries to reconnect to the repository database within the period specified by the database connection timeout configured in the Repository Service properties.
Tip: If the repository database system has high availability features, set the database connection timeout to allow the repository database system enough time to become available before the Repository Service tries to reconnect to it. Test the database system features that you plan to use to determine the optimum database connection timeout.
You can configure some Repository Service clients to be resilient to connections with the Repository Service. You configure the resilience timeout and the limit on resilience timeout for the Repository Service in the advanced properties when you create the Repository Service. PowerCenter Client resilience timeout is 180 seconds and is not configurable.
C PowerCenter Client Repository Service The PowerCenter Client is bound by the Repository Service limit on resilience timeout of 60 seconds. It cannot use the default resilience timeout of 180 seconds.
D Node A Node B Node A can spend up to 30 seconds to connect to Node B. The Service Manager on Node A uses the domain configuration for resilience timeout. The Service Manager on Node B uses the domain configuration for limit on resilience timeout.
Connect From Connect To Description
112 Chapter 6: Managing High Availability

Restart and FailoverIf the Repository Service process fails, the Service Manager can restart the process on the same node. If the node is not available, the Repository Service process fails over to the backup node. The Repository Service process fails over to a backup node in the following situations:
♦ The Repository Service process fails and the primary node is not available.
♦ The Repository Service process is running on a node that fails.
♦ You disable the Repository Service process.
After failover, Repository Service clients synchronize and connect to the Repository Service process without loss of service.
You may want to disable a Repository Service process to shut down a node for maintenance. If you disable a Repository Service process in complete or abort mode, the Repository Service process fails over to another node.
RecoveryThe Repository Service maintains the state of operation in the repository. This includes information about repository locks, requests in progress, and connected clients. After a Repository Service restarts or fails over, it restores the state of operation from the repository and recovers operations from the point of interruption.
The Repository Service performs the following tasks to recover operations:
♦ Obtains locks on repository objects, such as mappings and sessions
♦ Reconnects to clients, such as the Designer and the Integration Service
♦ Completes requests in progress, such as saving a mapping
♦ Sends outstanding notifications about metadata changes, such as workflow schedule changes
Managing High Availability for the Integration ServiceHigh availability for the Integration Service includes the following behavior:
♦ Resilience. An Integration Service process is resilient to connections with Integration Service clients and with external components.
♦ Restart and failover. If the Integration Service process becomes unavailable, the Service Manager can restart the process or fail it over to another node.
♦ Recovery. When the Integration Service restarts or fails over a service process, it can automatically recover interrupted workflows that are configured for recovery.
ResilienceThe Integration Service is resilient to temporary unavailability of other services, Integration Service clients, and external components such databases and FTP servers. If the Integration Service loses connectivity to other services and Integration Service clients within the Integration Service resilience timeout period. The Integration Service tries to reconnect to external components within the resilience timeout for the database or FTP connection object.
Note: You must have the high availability option for resilience when the Integration Service loses connection to an external component. All other Integration Service resilience is part of the base product.
Service and Client ResilienceIntegration Service clients are resilient to temporary unavailability of the Integration Service. This can occur because of network failure or because an Integration Service process fails. Integration Service clients include the
Managing High Availability for the Integration Service 113
PowerCenter Client, the Service Manager, the Web Services Hub, and pmcmd. Integration Service clients also include applications developed using LMAPI.
You configure the resilience timeout and the limit on resilience timeout in the Integration Service advanced properties.
External Component ResilienceAn Integration Service process is resilient to temporary unavailability of external components. External components can be temporarily unavailable because of network failure or the component experiences a failure. If the Integration Service process loses connection to an external component, it tries to reconnect to the component within the retry period for the connection object.
If the Integration Service loses the connection when it transfers files to or from an FTP server, the Integration Service tries to reconnect for the amount of time configured in the FTP connection object. The Integration Service is resilient to interruptions if the FTP server supports resilience.
If the Integration Service loses the connection when it connects or retrieves data from a database for sources or Lookup transformations, it attempts to reconnect for the amount of time configured in the database connection object. If a connection is lost when the Integration Service writes data to a target database, it attempts to reconnect for the amount of time configured in the database connection object.
For example, you configure a retry period of 180 for a database connection object. If Integration Service connectivity to a database fails during the initial connection to the database, or connectivity fails when the Integration Service reads data from the database, it attempts to reconnect for 180 seconds. If it cannot reconnect to the database and you configure the workflow for automatic recovery, the Integration Service recovers the session. Otherwise, the session fails.
You can configure the retry period when you create or edit the database or FTP server connection object.
Restart and FailoverIf an Integration Service process becomes unavailable, the Service Manager tries to restart it or fails it over to another node based on the shutdown mode, the service configuration, and the operating mode for the service. Restart and failover behavior is different for services that run on a single node, primary and backup nodes, or on a grid.
When Service Manager fails over the Integration Service, the behavior of completed tasks depends on the following situations:
♦ If a completed task reported a completed status to the Integration Service process prior to the Integration Service failure, the task will not restart.
♦ If a completed task did not report a completed status to the Integration Service process prior to the Integration Service failure, the task will restart.
114 Chapter 6: Managing High Availability

Running on a Single NodeThe following table describes the failover behavior for an Integration Service if only one service process is running:
Source of Shutdown Restart and Failover Behavior
Service Process If the service process shuts down unexpectedly, the Service Manager tries to restart the service process. If it cannot restart the process, the process stops or fails.
When you restart the process, the Integration Service restores the state of operation for the service and restores workflow schedules, service requests, and workflows.
The failover and recovery behavior of the Integration Service after a service process fails depends on the operating mode:- Normal. When you restart the process, the workflow fails over on the same node. The
Integration Service can recover the workflow based on the workflow state and recovery strategy. If the workflow is configured for recovery, the Integration Service restores the state of operation for the workflow and recovers the workflow from the point of interruption. The Integration Service performs failover and recovers the schedules, requests, and workflows.
- Safe. When you restart the process, the workflow does not fail over and the Integration Service does not recover the workflow. It performs failover and recovers the schedules, requests, and workflows when you enable the service in normal mode.
Service When the Integration Service becomes unavailable, you must enable the service and start the service processes. You can manually recover workflows and sessions based on the state and the configured recovery strategy.
The workflows that run after you start the service processes depend on the operating mode:- Normal. Workflows configured to run continuously or on initialization will start. You must
reschedule all other workflows.- Safe. Scheduled workflows do not start. You must enable the service in normal mode for
the scheduled workflows to run.
Node When the node becomes unavailable, the restart and failover behavior is the same as restart and failover for the service process, based on the operating mode.
Managing High Availability for the Integration Service 115

Running on a Primary NodeThe following table describes the failover behavior for an Integration Service configured to run on primary and backup nodes:
Source of Shutdown Restart and Failover Behavior
Service Process When you disable the service process on a primary node, the service process fails over to a backup node. When the service process on a primary node shuts down unexpectedly, the Service Manager tries to restart the service process before failing it over to a backup node.After the service process fails over to a backup node, the Integration Service restores the state of operation for the service and restores workflow schedules, service requests, and workflows.The failover and recovery behavior of the Integration Service after a service process fails depends on the operating mode:- Normal. The Integration Service can recover the workflow based on the workflow state
and recovery strategy. If the workflow was configured for recovery, the Integration Service restores the state of operation for the workflow and recovers the workflow from the point of interruption. The Integration Service performs failover and recovers the schedules, requests, and workflows.
- Safe. The Integration Service does not run scheduled workflows and it disables schedule failover, automatic workflow recovery, workflow failover, and client request recovery. It performs failover and recovers the schedules, requests, and workflows when you enable the service in normal mode.
Service When the Integration Service becomes unavailable, you must enable the service and start the service processes. You can manually recover workflows and sessions based on the state and the configured recovery strategy. Workflows configured to run continuously or on initialization will start. You must reschedule all other workflows.The workflows that run after you start the service processes depend on the operating mode:- Normal. Workflows configured to run continuously or on initialization will start. You must
reschedule all other workflows.- Safe. Scheduled workflows do not start. You must enable the service in normal mode to
run the scheduled workflows.
Node When the node becomes unavailable, the failover behavior is the same as the failover for the service process, based on the operating mode.
116 Chapter 6: Managing High Availability
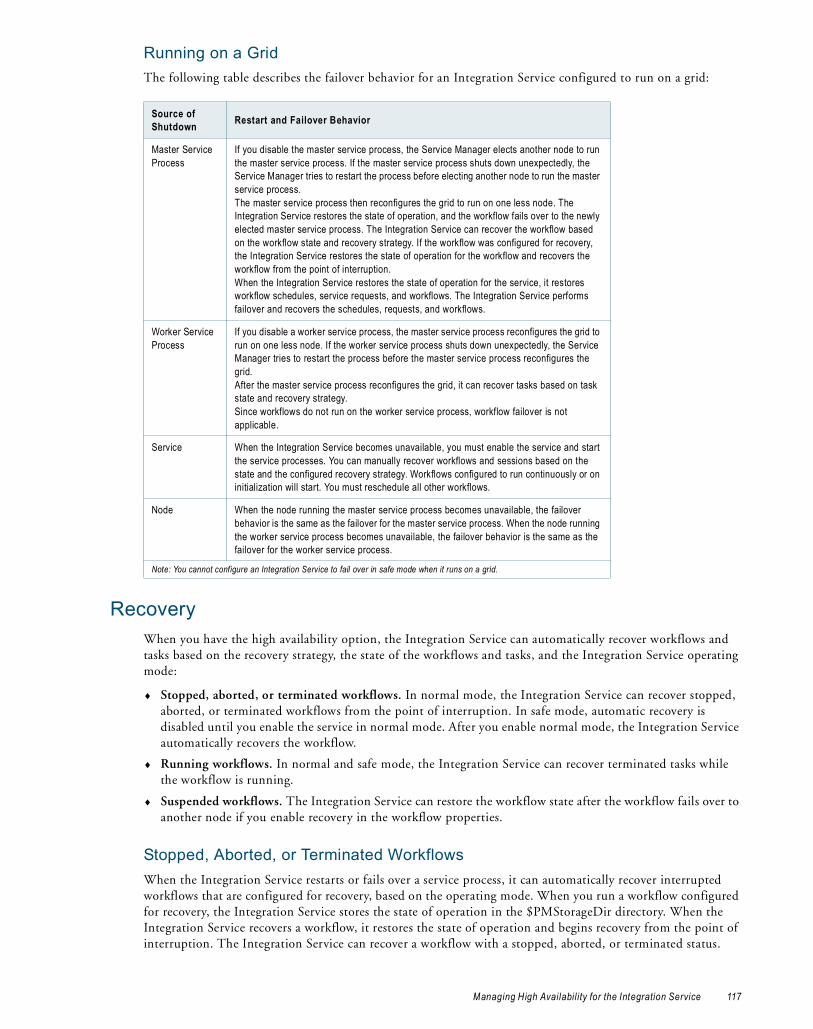
Running on a GridThe following table describes the failover behavior for an Integration Service configured to run on a grid:
Recovery
When you have the high availability option, the Integration Service can automatically recover workflows and tasks based on the recovery strategy, the state of the workflows and tasks, and the Integration Service operating mode:
♦ Stopped, aborted, or terminated workflows. In normal mode, the Integration Service can recover stopped, aborted, or terminated workflows from the point of interruption. In safe mode, automatic recovery is disabled until you enable the service in normal mode. After you enable normal mode, the Integration Service automatically recovers the workflow.
♦ Running workflows. In normal and safe mode, the Integration Service can recover terminated tasks while the workflow is running.
♦ Suspended workflows. The Integration Service can restore the workflow state after the workflow fails over to another node if you enable recovery in the workflow properties.
Stopped, Aborted, or Terminated WorkflowsWhen the Integration Service restarts or fails over a service process, it can automatically recover interrupted workflows that are configured for recovery, based on the operating mode. When you run a workflow configured for recovery, the Integration Service stores the state of operation in the $PMStorageDir directory. When the Integration Service recovers a workflow, it restores the state of operation and begins recovery from the point of interruption. The Integration Service can recover a workflow with a stopped, aborted, or terminated status.
Source of Shutdown Restart and Failover Behavior
Master Service Process
If you disable the master service process, the Service Manager elects another node to run the master service process. If the master service process shuts down unexpectedly, the Service Manager tries to restart the process before electing another node to run the master service process.The master service process then reconfigures the grid to run on one less node. The Integration Service restores the state of operation, and the workflow fails over to the newly elected master service process. The Integration Service can recover the workflow based on the workflow state and recovery strategy. If the workflow was configured for recovery, the Integration Service restores the state of operation for the workflow and recovers the workflow from the point of interruption. When the Integration Service restores the state of operation for the service, it restores workflow schedules, service requests, and workflows. The Integration Service performs failover and recovers the schedules, requests, and workflows.
Worker Service Process
If you disable a worker service process, the master service process reconfigures the grid to run on one less node. If the worker service process shuts down unexpectedly, the Service Manager tries to restart the process before the master service process reconfigures the grid.After the master service process reconfigures the grid, it can recover tasks based on task state and recovery strategy.Since workflows do not run on the worker service process, workflow failover is not applicable.
Service When the Integration Service becomes unavailable, you must enable the service and start the service processes. You can manually recover workflows and sessions based on the state and the configured recovery strategy. Workflows configured to run continuously or on initialization will start. You must reschedule all other workflows.
Node When the node running the master service process becomes unavailable, the failover behavior is the same as the failover for the master service process. When the node running the worker service process becomes unavailable, the failover behavior is the same as the failover for the worker service process.
Note: You cannot configure an Integration Service to fail over in safe mode when it runs on a grid.
Managing High Availability for the Integration Service 117
In normal mode, the Integration Service can automatically recover the workflow. In safe mode, the Integration Service does not recover the workflow until you enable the service in normal mode
When the Integration Service recovers a workflow that failed over, it begins recovery at the point of interruption. The Integration Service can recover a task with a stopped, aborted, or terminated status according to the recovery strategy for the task. The Integration Service behavior for task recovery does not depend on the operating mode.
Note: The Integration Service does not automatically recover a workflow or task that you stop or abort through the Workflow Monitor or pmcmd.
Running WorkflowsYou can configure automatic task recovery in the workflow properties. When you configure automatic task recovery, the Integration Service can recover terminated tasks while the workflow is running. You can also configure the number of times for the Integration Service to attempt recovery. If the Integration Service cannot recover the task in the configured number of times for recovery, the task and the workflow are terminated.
The Integration Service behavior for task recovery does not depend on the operating mode.
Suspended WorkflowsIf a service process shuts down while a workflow is suspended, the Integration Service marks the workflow as terminated. It fails the workflow over to another node, and changes the workflow state to terminated. The Integration Service does not recover any workflow task. You can fix the errors that caused the workflow to suspend, and recover the workflow.
TroubleshootingThe solutions to the following situations might help you with high availability.
In the Designer, I tried using various resilience timeouts for connecting to the repository, but I cannot make my repository resilient on a Sybase database.The Sybase database may have leftover locks that prevent resilience. The locks from a previously terminated connection are held for a period of time up to the limit set in an operating system parameter called the TCP KeepAlive timeout. These locks must be released to achieve database resilience. To correct the problem, use a lower TCP KeepAlive timeout on the machine hosting the Sybase database.
I am not sure where to look for status information regarding client connections to the repository.In PowerCenter Client applications such as the Designer and the Workflow Manager, an error message appears if the connection cannot be established during the timeout period. Detailed information about the connection failure appears in the Output window. If you are using pmrep, the connection error information appears at the command line. If the Integration Service cannot establish a connection to the repository, the error appears in the Integration Service log, the workflow log, and the session log.
I entered the wrong connection string for an Oracle database. Now I cannot enable the Repository Service even though I edited the Repository Service properties to use the right connection string.You need to wait for the database resilience timeout to expire before you can enable the Repository Service with the updated connection string.
I have the high availability option, but my FTP server is not resilient when the network connection fails.The FTP server is an external system. To achieve high availability for FTP transmissions, you must use a highly available FTP server. For example, Microsoft IIS 6.0 does not natively support the restart of file uploads or file downloads. File restarts must be managed by the client connecting to the IIS server. If the transfer of a file to or
118 Chapter 6: Managing High Availability

from the IIS 6.0 server is interrupted and then reestablished within the client resilience timeout period, the transfer does not necessarily continue as expected. If the write process is more than half complete, the target file may be rejected.
I have the high availability option, but the PowerCenter domain is not resilient when machines are connected through a network switch.If you are using a network switch to connect machines in the domain, use the auto-select option for the switch.
Troubleshooting 119

120 Chapter 6: Managing High Availability
C H A P T E R 7
Creating and Configuring the Repository Service
This chapter includes the following topics:
♦ Overview, 121
♦ Creating a Database for the Repository, 122
♦ Creating the Repository Service, 122
♦ Configuring Repository Service Properties, 124
♦ Configuring Repository Service Process Properties, 128
OverviewA PowerCenter repository is a collection of database tables containing metadata. A Repository Service manages the repository. It performs all metadata transactions between the repository database and repository clients.
Create a Repository Service to manage the metadata in repository database tables. Each Repository Service manages a single repository. You need to create a unique Repository Service for each repository in a PowerCenter domain.
Creating and configuring a Repository Service involves the following tasks:
♦ Create a database for the repository tables. Before you can create the repository tables, you need to create a database to store the tables. If you create a Repository Service for an existing repository, you do not need to create a new database. You can use the existing database, as long as it meets the minimum requirements for a repository database. For more information, see “Creating a Database for the Repository” on page 122.
♦ Create the Repository Service. Create the Repository Service to manage the repository. When you create a Repository Service, you can choose to create the repository tables. If you do not create the repository tables, you can create them later or you can associate the Repository Service with an existing repository. For more information, see “Creating the Repository Service” on page 122.
♦ Configure the Repository Service. After you create a Repository Service, you can configure its properties. You can configure properties such as the error severity level or maximum user connections. For more information, see “Configuring Repository Service Properties” on page 124.
In a mixed-version domain, you can create more than one service version of the Repository Service. When you create the Repository Service you can assign it to nodes that are configured to the run the service version. The dependent services of a Repository Service must be of the same service version.
121
Creating a Database for the RepositoryBefore you can manage a repository with a Repository Service, you need a database to hold the repository database tables. You can create the repository on any supported database system.
Use the database management system client to create the database. The repository database name must be unique. If you create a repository in a database with an existing repository, the create operation fails. You must delete the existing repository in the target database before creating the new repository.
Note: When you create, restore, or upgrade a Sybase repository, set allow nulls by default to TRUE at the database level. Setting this option changes the default null type of the column to null in compliance with the SQL standard.
To protect the repository and improve performance, do not create the repository on an overloaded machine. The machine running the repository database system must have a network connection to the node that runs the Repository Service.
Tip: You can optimize repository performance on IBM DB2 EEE databases when you store a PowerCenter repository in a single-node tablespace. When setting up an IBM DB2 EEE database, the database administrator must define the database on a single node.
Creating the Repository ServiceUse the PowerCenter Administration Console to create a Repository Service.
Before You BeginBefore you create a Repository Service, complete the following tasks:
♦ Determine repository requirements. Determine whether the repository needs to be version-enabled and whether it is a local, global, or standalone repository.
♦ Verify license. Verify that you have a valid license to run application services. Although you can create a Repository Service without a license, you need a license to run the service. In addition, you need a license to configure some options related to version control and high availability.
♦ Determine code page. Determine the code page to use for the repository. The Repository Service uses the character set encoded in the repository code page when writing data to the repository. The repository code page must be compatible with the code pages for the PowerCenter Client and all application services in the PowerCenter domain.
Tip: After you create the Repository Service, you cannot change the code page in the Repository Service properties. To change the repository code page after you create the Repository Service, back up the repository and restore it to a new Repository Service. When you create the new Repository Service, you can specify a compatible code page.
Creating a Repository ServiceTo create a Repository Service:
1. In the Navigator of the Administration Console, select the folder where you want to create the Repository Service.
Note: If you do not select a folder, you can move the Repository Service into a folder after you create it.
2. Click Create > Repository Service.
The Create New Repository Service dialog box appears.
122 Chapter 7: Creating and Configuring the Repository Service
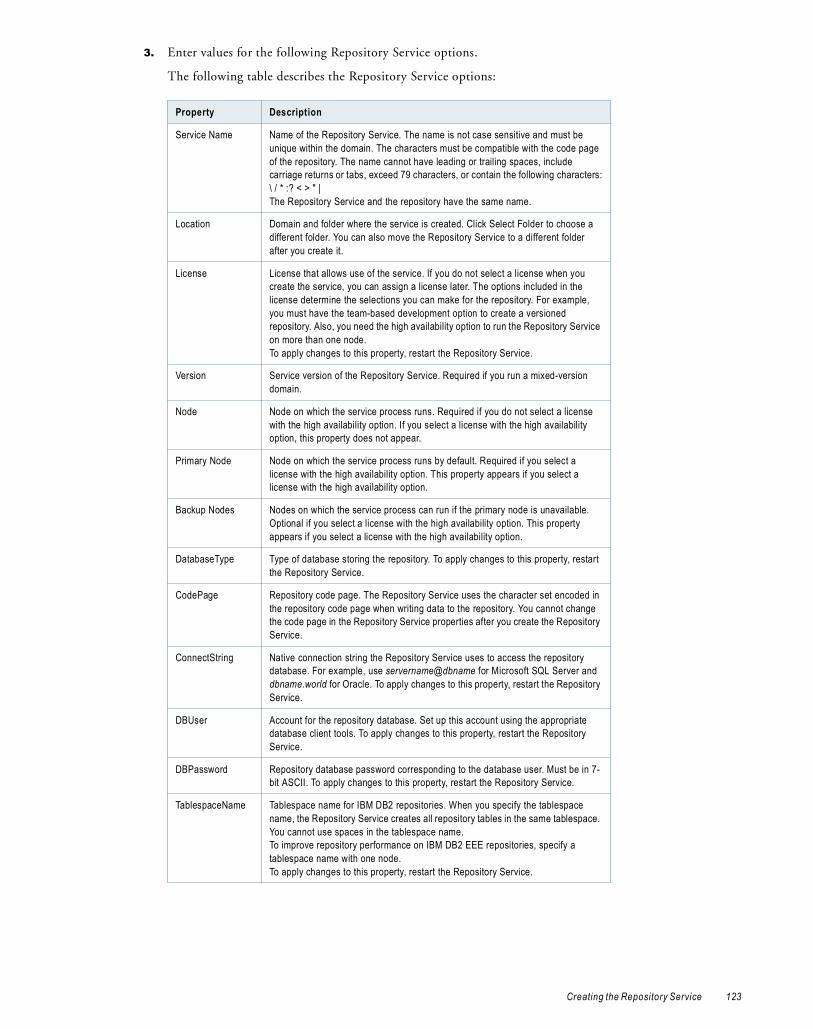
3. Enter values for the following Repository Service options.
The following table describes the Repository Service options:
Property Description
Service Name Name of the Repository Service. The name is not case sensitive and must be unique within the domain. The characters must be compatible with the code page of the repository. The name cannot have leading or trailing spaces, include carriage returns or tabs, exceed 79 characters, or contain the following characters:\ / * :? < > " |The Repository Service and the repository have the same name.
Location Domain and folder where the service is created. Click Select Folder to choose a different folder. You can also move the Repository Service to a different folder after you create it.
License License that allows use of the service. If you do not select a license when you create the service, you can assign a license later. The options included in the license determine the selections you can make for the repository. For example, you must have the team-based development option to create a versioned repository. Also, you need the high availability option to run the Repository Service on more than one node. To apply changes to this property, restart the Repository Service.
Version Service version of the Repository Service. Required if you run a mixed-version domain.
Node Node on which the service process runs. Required if you do not select a license with the high availability option. If you select a license with the high availability option, this property does not appear.
Primary Node Node on which the service process runs by default. Required if you select a license with the high availability option. This property appears if you select a license with the high availability option.
Backup Nodes Nodes on which the service process can run if the primary node is unavailable. Optional if you select a license with the high availability option. This property appears if you select a license with the high availability option.
DatabaseType Type of database storing the repository. To apply changes to this property, restart the Repository Service.
CodePage Repository code page. The Repository Service uses the character set encoded in the repository code page when writing data to the repository. You cannot change the code page in the Repository Service properties after you create the Repository Service.
ConnectString Native connection string the Repository Service uses to access the repository database. For example, use servername@dbname for Microsoft SQL Server and dbname.world for Oracle. To apply changes to this property, restart the Repository Service.
DBUser Account for the repository database. Set up this account using the appropriate database client tools. To apply changes to this property, restart the Repository Service.
DBPassword Repository database password corresponding to the database user. Must be in 7-bit ASCII. To apply changes to this property, restart the Repository Service.
TablespaceName Tablespace name for IBM DB2 repositories. When you specify the tablespace name, the Repository Service creates all repository tables in the same tablespace. You cannot use spaces in the tablespace name.To improve repository performance on IBM DB2 EEE repositories, specify a tablespace name with one node. To apply changes to this property, restart the Repository Service.
Creating the Repository Service 123

4. If you create a Repository Service for a repository with existing content and the repository existed in a different PowerCenter domain, verify that users and groups with privileges for the Repository Service exist in the current domain.
The Service Manager periodically synchronizes the list of users and groups in the repository with the users and groups in the domain configuration database. During synchronization, users and groups that do not exist in the current domain are deleted from the repository. You can use infacmd to export users and groups from the source domain and import them into the target domain.
5. Click OK.
Database Connect StringsWhen you create a database connection, specify a connect string for that connection. The Repository Service uses native connectivity to communicate with the repository database.
The following table lists the native connect string syntax for each supported database:
Configuring Repository Service PropertiesAfter you create a Repository Service, you can configure it. Use the Administration Console to configure the following types of Repository Service properties:
♦ General properties. Configure general properties, such as the operating mode. For more information, see “General Properties” on page 125.
♦ Version. If you run a mixed-version domain, select the service version. You can also upgrade the service version of the Repository Service and its dependent services. For more information, see “Version” on page 125.
♦ Node assignments. If you have the high availability option, configure the primary and backup nodes to run the service. For more information, see “Node Assignments” on page 125.
Creation Mode Creates or omits new repository content.Select one of the following options:- Create new repository content. Select if no content exists in the database.
Optionally, choose to create a global repository, enable version control, or both. If you do not select these options during service creation, you can select them later. However, if you select the options during service creation, you cannot later convert the repository to a local repository or to a non-versioned repository. The option to enable version control appears if you select a license with the high availability option.
- Do not create repository content. Select if content exists in the database or if you plan to create the repository content later.
Enable the Repository Service
Enables the service. When you select this option, the service starts running when it is created. Otherwise, you need to click the Enable button to run the service. You need a valid license to run a Repository Service.
Database Connect String Syntax Example
IBM DB2 dbname mydatabase
Microsoft SQL Server servername@dbname sqlserver@mydatabase
Oracle dbname.world (same as TNSNAMES entry) oracle.world
Sybase servername@dbname sambrown@mydatabase
Property Description
124 Chapter 7: Creating and Configuring the Repository Service

♦ Database properties. Configure repository database properties, such as the database user name, password, and connection string. For more information, see “Database Properties” on page 125.
♦ Advanced properties. Configure advanced repository properties, such as the maximum connections and locks on the repository. For more information, see “Advanced Properties” on page 127.
♦ Custom properties. Configure repository properties that are unique to your PowerCenter environment or that apply in special cases. Use custom properties only if Informatica Global Customer Support instructs you to do so. For more information, see “Custom Properties” on page 128.
To view and update properties, select the Repository Service in the Navigator. The Properties tab for the service appears.
VersionIn a mixed-version domain, when you create a Repository Service you select the service version. If the service is of a previous services version, the Upgrade button appears next to the version number. You can select the upgrade button to upgrade the service version of the Repository Service and its dependent services. For more information about upgrading the service version, see “Upgrading Application Services Versions” on page 46.
Node AssignmentsIf you have the high availability option, you can designate primary and backup nodes to run the service. By default, the service runs on the primary node. If the node becomes unavailable, the service fails over to a backup node.
General PropertiesYou can configure some of the general properties when you create the service.
The following table describes the general properties:
Database PropertiesDatabase properties provide information about the database that stores the repository metadata. You specify the database properties when you create the Repository Service. After you create a repository, you may need to modify some of these properties. For example, you might need to change the database user name and password, or you might want to adjust the database connection timeout.
Property Description
OperatingMode Mode in which the Repository Service is running. Values are Normal and Exclusive. Run the Repository Service in exclusive mode to perform some administrative tasks, such as promoting a local repository to a global repository or enabling version control. To apply changes to this property, restart the Repository Service.
SecurityAuditTrail Tracks changes made to users, groups, privileges, and permissions. The Log Manager tracks the changes. For more information, see “Creating an Audit Trail” on page 144.
GlobalRepository Creates a global repository. If the repository is a global repository, you cannot revert back to a local repository. To promote a local repository to a global repository, the Repository Service must be running in exclusive mode.
EnableVersionControl Creates a versioned repository. After you enable a repository for version control, you cannot disable the version control. To enable a repository for version control, you must run the Repository Service in exclusive mode. This property appears if you have the team-based development option.
License License that allows you to run the Repository Service.
Configuring Repository Service Properties 125

The following table describes the database properties:
Property Description
DatabaseType Type of database storing the repository. To apply changes to this property, restart the Repository Service.
CodePage Repository code page. The Repository Service uses the character set encoded in the repository code page when writing data to the repository. You cannot change the code page in the Repository Service properties after you create the Repository Service.This is a read-only field.
ConnectString Native connection string the Repository Service uses to access the database containing the repository. For example, use servername@dbname for Microsoft SQL Server and dbname.world for Oracle. For more information, see “Database Connect Strings” on page 124. To apply changes to this property, restart the Repository Service.
TablespaceName Tablespace name for IBM DB2 repositories. When you specify the tablespace name, the Repository Service creates all repository tables in the same tablespace. You cannot use spaces in the tablespace name.You cannot change the tablespace name in the repository database properties after you create the service. If you create a Repository Service with the wrong tablespace name, delete the Repository Service and create a new one with the correct tablespace name.To improve repository performance on IBM DB2 EEE repositories, specify a tablespace name with one node. To apply changes to this property, restart the Repository Service.
Optimize Database Schema Enables optimization of repository database schema when you create repository contents or back up and restore an IBM DB2 or Microsoft SQL Server repository. When you enable this option, the Repository Service creates repository tables using Varchar(2000) columns instead of CLOB columns wherever possible. Using Varchar columns improves repository performance because it reduces disk input and output and because the database buffer cache can cache Varchar columns.To use this option, the repository database must meet the following page size requirements:- IBM DB2: Database page size 4 KB or greater. At least one temporary
tablespace with page size 16 KB or greater.- Microsoft SQL Server: Database page size 8 KB or greater.Default is disabled.
DBUser Account for the database containing the repository. Set up this account using the appropriate database client tools. To apply changes to this property, restart the Repository Service.
DBPassword Repository database password corresponding to the database user. Must be in 7-bit ASCII. To apply changes to this property, restart the Repository Service.
DatabaseConnectionTimeout Period of time that the Repository Service attempts to establish or reestablish a connection to the database system. Default is 180 seconds.
DatabaseArrayOperationSize Number of rows to fetch each time an array database operation is issued, such as insert or fetch. Default is 100. To apply changes to this property, restart the Repository Service.
DatabasePoolSize Maximum number of connections to the repository database that the Repository Service can establish. If the Repository Service tries to establish more connections than specified for DatabasePoolSize, it times out the connection attempt after the number of seconds specified for DatabaseConnectionTimeout. Default is 500. Minimum is 20.
Table Owner Name Name of the owner of the repository tables for a DB2 repository. Note: You can use this option for DB2 databases only.
126 Chapter 7: Creating and Configuring the Repository Service
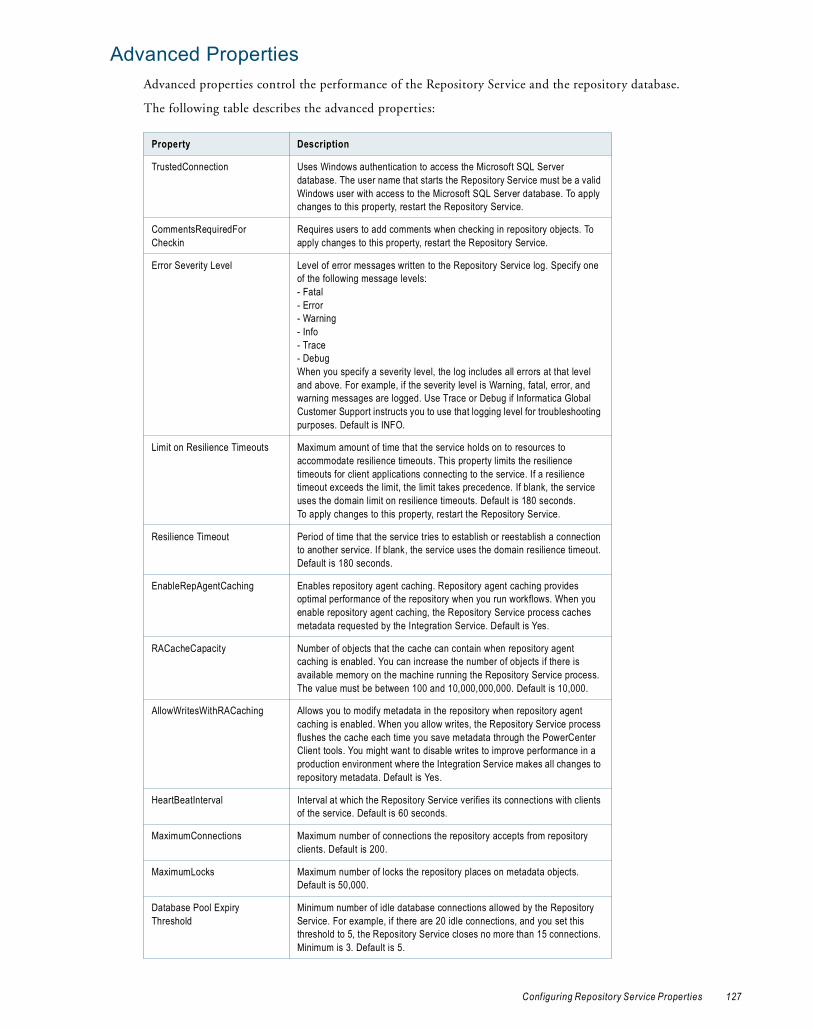
Advanced PropertiesAdvanced properties control the performance of the Repository Service and the repository database.
The following table describes the advanced properties:
Property Description
TrustedConnection Uses Windows authentication to access the Microsoft SQL Server database. The user name that starts the Repository Service must be a valid Windows user with access to the Microsoft SQL Server database. To apply changes to this property, restart the Repository Service.
CommentsRequiredFor Checkin
Requires users to add comments when checking in repository objects. To apply changes to this property, restart the Repository Service.
Error Severity Level Level of error messages written to the Repository Service log. Specify one of the following message levels:- Fatal- Error- Warning- Info- Trace- DebugWhen you specify a severity level, the log includes all errors at that level and above. For example, if the severity level is Warning, fatal, error, and warning messages are logged. Use Trace or Debug if Informatica Global Customer Support instructs you to use that logging level for troubleshooting purposes. Default is INFO.
Limit on Resilience Timeouts Maximum amount of time that the service holds on to resources to accommodate resilience timeouts. This property limits the resilience timeouts for client applications connecting to the service. If a resilience timeout exceeds the limit, the limit takes precedence. If blank, the service uses the domain limit on resilience timeouts. Default is 180 seconds.To apply changes to this property, restart the Repository Service.
Resilience Timeout Period of time that the service tries to establish or reestablish a connection to another service. If blank, the service uses the domain resilience timeout. Default is 180 seconds.
EnableRepAgentCaching Enables repository agent caching. Repository agent caching provides optimal performance of the repository when you run workflows. When you enable repository agent caching, the Repository Service process caches metadata requested by the Integration Service. Default is Yes.
RACacheCapacity Number of objects that the cache can contain when repository agent caching is enabled. You can increase the number of objects if there is available memory on the machine running the Repository Service process. The value must be between 100 and 10,000,000,000. Default is 10,000.
AllowWritesWithRACaching Allows you to modify metadata in the repository when repository agent caching is enabled. When you allow writes, the Repository Service process flushes the cache each time you save metadata through the PowerCenter Client tools. You might want to disable writes to improve performance in a production environment where the Integration Service makes all changes to repository metadata. Default is Yes.
HeartBeatInterval Interval at which the Repository Service verifies its connections with clients of the service. Default is 60 seconds.
MaximumConnections Maximum number of connections the repository accepts from repository clients. Default is 200.
MaximumLocks Maximum number of locks the repository places on metadata objects. Default is 50,000.
Database Pool Expiry Threshold
Minimum number of idle database connections allowed by the Repository Service. For example, if there are 20 idle connections, and you set this threshold to 5, the Repository Service closes no more than 15 connections. Minimum is 3. Default is 5.
Configuring Repository Service Properties 127

Custom PropertiesCustom properties include properties that are unique to your PowerCenter environment or that apply in special cases. A Repository Service does not have custom properties when you initially create it. Use custom properties only if Informatica Global Customer Support instructs you to.
Configuring Repository Service Process PropertiesUse the Administration Console to configure the following types of Repository Service process properties:
♦ Custom properties. Configure Repository Service process properties that are unique to your PowerCenter environment or that apply in special cases.
♦ Environment variables. Configure environment variables for each Repository Service process.
To view and update properties, select a Repository Service in the Navigator and click the Processes tab.
Custom PropertiesCustom properties include properties that are unique to your PowerCenter environment or that apply in special cases. A Repository Service process does not have custom properties when you initially create it. Use custom properties only if Informatica Global Customer Support instructs you to.
Environment VariablesThe database client path on a node is controlled by an environment variable. Set the database client path environment variable for the Repository Service process if the Repository Service process requires a different database client than another Repository Service process that is running on the same node. For example, the service version of each Repository Service running on the node requires a different database client version. You can configure each Repository Service process to use a different value for the database client environment variable.
The database client code page on a node is usually controlled by an environment variable. For example, Oracle uses NLS_LANG, and IBM DB2 uses DB2CODEPAGE. All Integration Services and Repository Services that run on this node use the same environment variable. You can configure a Repository Service process to use a different value for the database client code page environment variable than the value set for the node.
You can configure the code page environment variable for a Repository Service process when the Repository Service process requires a different database client code page than the Integration Service process running on the same node.
For example, the Integration Service reads from and writes to databases using the UTF-8 code page. The Integration Service requires that the code page environment variable be set to UTF-8. However, you have a Shift-JIS repository that requires that the code page environment variable be set to Shift-JIS. Set the environment variable on the node to UTF-8. Then add the environment variable to the Repository Service process properties and set the value to Shift-JIS.
Database Pool Expiry Timeout Interval, in seconds, at which the Repository Service checks for idle database connections. If a connection is idle for a period of time greater than this value, the Repository Service can close the connection. Minimum is 300. Maximum is 2,592,000 (30 days). Default is 3,600 (1 hour).
Preserve MX Data Preserves MX data for old versions of mappings. When disabled, the Repository Service deletes MX data for old versions of mappings when you check in a new version. Default is disabled.
Property Description
128 Chapter 7: Creating and Configuring the Repository Service

C H A P T E R 8
Managing the Repository
This chapter includes the following topics:
♦ Overview, 129
♦ Enabling and Disabling the Repository Service, 130
♦ Running in Exclusive Mode, 131
♦ Creating and Deleting Repository Content, 133
♦ Enabling Version Control, 134
♦ Managing a Repository Domain, 134
♦ Managing User Connections and Locks, 138
♦ Sending Repository Notifications, 140
♦ Backing Up and Restoring the Repository, 140
♦ Copying Content from Another Repository, 142
♦ Registering and Unregistering Repository Plug-ins, 143
♦ Creating an Audit Trail, 144
♦ Tuning Repository Performance, 144
♦ Configuring Data Lineage, 145
OverviewYou use the Administration Console to manage Repository Services and repository content. A Repository Service manages a single repository.
You can use the Administration Console to complete the following repository-related tasks:
♦ Enable and disable a Repository Service or service process.
♦ Change the operating mode of a Repository Service.
♦ Create and delete repository content.
♦ Back up, copy, restore, and delete a repository.
♦ Promote a local repository to a global repository.
♦ Register and unregister a local repository.
♦ Manage user connections and locks.
♦ Send repository notification messages.
129

♦ Manage repository plug-ins.
♦ Configure Data Lineage.
♦ Configure permissions on the Repository Service.
♦ Upgrade a repository and upgrade a Repository Server to a Repository Service.
♦ Upgrade a Repository Service and its dependent services to the latest service version.
Enabling and Disabling the Repository ServiceWhen you enable a Repository Service, a service process starts on a node designated to run the service. The service is available to perform repository transactions. If you have the high availability option, the service can fail over to another node if the current node becomes unavailable. If you disable the Repository Service, the service cannot run on any node until you reenable the service.
When you enable a service process, the service process is available to run, but it may not start. For example, if you have the high availability option and you configure a Repository Service to run on a primary node and two backup nodes, you enable Repository Service processes on all three nodes. A single process runs at any given time, and the other processes maintain standby status. If you disable a Repository Service process, the Repository Service cannot run on the particular node of the service process. The Repository Service continues to run on another node that is designated to run the service, as long as the node is available.
Enabling and Disabling a Repository ServiceYou can enable the Repository Service when you initially create it, or you can enable it after you create it. You need to enable the Repository Service to perform the following tasks in the Administration Console:
♦ Assign privileges and roles to users and groups for the Repository Service.
♦ Create or delete content.
♦ Back up or restore content.
♦ Upgrade content.
♦ Copy content from another repository.
♦ Register or unregister a local repository with a global repository.
♦ Promote a local repository to a global repository.
♦ Register plug-ins.
♦ Manage user connections and locks.
♦ Send repository notifications.
You must disable the Repository Service to run it in it exclusive mode.
Note: Before you disable a Repository Service, verify that all users are disconnected from the repository. You can send a repository notification to inform users that you are disabling the service.
To enable a Repository Service:
1. Select the Repository Service in the Navigator.
2. Click Enable.
The status indicator at the top of the right pane indicates when the service starts running.
To disable a Repository Service:
1. Select the Repository Service in the Navigator.
2. Click Disable.
130 Chapter 8: Managing the Repository

The Disable Repository Service dialog box appears.
3. Select to abort all service processes immediately or to allow services processes to complete.
4. Click OK.
Enabling and Disabling Service ProcessesA service process is the physical representation of a service running on a node. The process for a Repository Service is the pmrepagent process. At any given time, only one service process is running for the service in the domain.
When you create a Repository Service, service processes are enabled by default on the designated nodes, even if you do not enable the service. You disable and reenable service processes on the Processes tab. You may want to disable a service process to perform maintenance on the node or to tune performance.
If you have the high availability option, you can configure the service to run on multiple nodes. At any given time, a single process is running for the Repository Service. The service continues to be available as long as one of the designated nodes for the service is available. With the high availability option, disabling a service process does not disable the service if the service is configured to run on multiple nodes. Disabling a service process that is running causes the service to fail over to another node.
To enable a Repository Service process:
1. In the Navigator, select the Repository Service associated with the service process you want to enable.
2. Click the Processes tab.
3. Click Enable for a node to enable the service process on the node.
To disable a Repository Service process:
1. In the Navigator, select the Repository Service associated with the service process you want to disable.
2. Click the Processes tab.
3. Click Disable for the service process.
4. In the dialog box that appears, select to abort service processes immediately or allow service processes to complete.
5. Click OK.
Running in Exclusive ModeYou can run the Repository Service in normal or exclusive operating mode. When you run the Repository Service in normal mode, you allow multiple users to access the repository to update content. When you run the Repository Service in exclusive mode, you allow only one user to access the repository. Set the operating mode to exclusive to perform administrative tasks that require a single user to access the repository and update the configuration. If a Repository Service has no content associated with it or if a Repository Service has content that has not been upgraded, the Repository Service runs in exclusive mode only.
When the Repository Service runs in exclusive mode, it accepts connection requests from the Administration Console and pmrep.
Run a Repository Service in exclusive mode to perform the following administrative tasks:
♦ Delete repository content. Delete the repository database tables for the repository. For more information, see “Deleting Repository Content” on page 133.
Running in Exclusive Mode 131
♦ Enable version control. If you have the team-based development option, you can enable version control for the repository. A versioned repository can store multiple versions of an object. For more information, see “Enabling Version Control” on page 134.
♦ Promote a repository. Promote a local repository to a global repository to build a repository domain. For more information, see “Promoting a Local Repository to a Global Repository” on page 135.
♦ Register a local repository. Register a local repository with a global repository to create a repository domain. For more information, see “Registering a Local Repository” on page 136.
♦ Register a plug-in. Register or unregister a repository plug-in that extends PowerCenter functionality. For more information, see “Registering and Unregistering Repository Plug-ins” on page 143.
♦ Upgrade the repository. Upgrade a Repository Agent configuration file to a Repository Service, or upgrade the repository metadata.
Before running a Repository Service in exclusive mode, verify that all users are disconnected from the repository. You must stop and restart the Repository Service to change the operating mode.
When you run a Repository Service in exclusive mode, repository agent caching is disabled, and you cannot assign privileges and roles to users and groups for the Repository Service.
Note: You cannot use pmrep to log in to a new Repository Service running in exclusive mode if the Service Manager has not yet synchronized the list of users and groups in the repository with the list in the domain configuration database. To synchronize the list of users and groups, restart the Repository Service.
To run a Repository Service in exclusive mode:
1. In the Navigator, select the Repository Service.
2. On the Properties tab, click Edit in the general properties.
3. Select Exclusive as the operating mode.
4. Click OK.
The Administration Console prompts you to restart the Repository Service.
5. Verify that you have notified users to disconnect from the repository, and click Yes if you want to log out users who are still connected.
A warning message appears.
6. Choose to allow processes to complete or abort all processes, and then click OK.
The Repository Service stops and then restarts. The service status at the top of the right pane indicates when the service has restarted. The Disable button for the service appears when the service is enabled and running.
Note: PowerCenter does not provide resilience for a repository client when the Repository Service is running in exclusive mode.
To return the operating mode to normal:
1. In the Navigator, select the Repository Service.
2. On the Properties tab, click Edit in the general properties.
3. Select Normal as the operating mode.
4. Click OK.
The Administration Console prompts you to restart the Repository Service.
Note: You can also use the infacmd UpdateRepositoryService command to change the operating mode.
132 Chapter 8: Managing the Repository

Creating and Deleting Repository ContentRepository content are repository tables in the database. You can create or delete repository content for a Repository Service.
Creating Repository ContentYou can create repository content for a Repository Service if you did not create content when you created the service or if you deleted the repository content. You cannot create content for a Repository Service that already includes content.
To create content after creating a Repository Service:
1. In the Navigator, select a Repository Service that has no content associated with it.
2. In the Actions list, select Create Contents.
The page displays the options to create content.
3. Optionally, choose to create a global repository.
Select this option if you are certain you want to create a global repository. You can promote a local repository to a global repository at any time, but you cannot convert a global repository to a local repository.
4. Optionally, enable version control.
You must have the team-based development option to enable version control. Enable version control if you are certain you want to use a versioned repository. You can convert a non-versioned repository to a versioned repository at any time, but you cannot convert a versioned repository to a non-versioned repository.
5. Click OK.
Deleting Repository ContentDelete repository content when you want to delete all metadata and repository database tables from the repository. When you delete repository content, you also delete all privileges and roles assigned to users for the Repository Service.
You might delete the repository content if the metadata is obsolete. Deleting repository content is an irreversible action. If the repository contains information that you might need later, back up the repository before you delete it.
To delete a global repository, you must unregister all local repositories. Also, you must run the Repository Service in exclusive mode to delete repository content.
Note: You can also use the pmrep Delete command to delete repository content.
To delete repository content:
1. In the Navigator, select the repository from which you want to delete the content.
2. Change the operating mode of the Repository Service to exclusive.
3. In the Actions list, select Delete Contents.
4. Enter your user name, password, and security domain.
The Security Domain field appears when the PowerCenter domain contains an LDAP security domain.
5. If the repository is a global repository, choose to unregister local repositories when you delete the content.
Creating and Deleting Repository Content 133

The delete operation does not proceed if it cannot unregister the local repositories. For example, if a Repository Service for one of the local repositories is running in exclusive mode, you may need to unregister that repository before you attempt to delete the global repository.
6. Click OK.
The activity log displays the results of the delete operation.
Enabling Version ControlIf you have the team-based development option, you can enable version control for a new or existing repository. A versioned repository can store multiple versions of objects. If you enable version control, you can maintain multiple versions of an object, control development of the object, and track changes. You can also use labels and deployment groups to associate groups of objects and copy them from one repository to another. After you enable version control for a repository, you cannot disable it.
When you enable version control for a repository, the repository assigns all versioned objects version number 1, and each object has an active status.
You must run the Repository Service in exclusive mode to enable version control for the repository.
To enable version control for a repository:
1. Ensure that all users disconnect from the repository.
2. In the Administration Console, change the operating mode of the Repository Service to exclusive.
3. Enable the Repository Service.
4. Select the Repository Service in the Navigator.
5. In the general properties, click Edit.
6. Select EnableVersionControl.
7. Click OK.
The Repository Authentication dialog box appears.
8. Enter your user name, password, and security domain.
The Security Domain field appears when the PowerCenter domain contains an LDAP security domain.
9. Change the operating mode of the Repository Service to normal.
The repository is now versioned.
Managing a Repository DomainA repository domain is a group of linked repositories that consists of one global repository and one or more local repositories. You connect repositories in a repository domain to share data and metadata between repositories. When working in a repository domain, you can complete the following tasks:
♦ Promote metadata from a local repository to a global repository, making it accessible to all local repositories in the repository domain.
♦ Copy objects from or create shortcuts to metadata in the global repository.
♦ Copy objects from the local repository to the global repository.
134 Chapter 8: Managing the Repository
Note: A repository domain is distinct from a PowerCenter domain, which is the primary unit of administration in the PowerCenter environment.
Prerequisites for a Repository DomainBefore building a repository domain, verify that you have the following required elements:
♦ A licensed copy of PowerCenter to create the global repository.
♦ A license for each local repository you want to create.
♦ A database created and configured for each repository.
♦ A Repository Service created and configured to manage each repository.
A Repository Service accesses the repository faster if the Repository Service process runs on the machine where the repository database resides.
♦ Network connections between the Repository Services and Integration Services.
♦ Compatible repository code pages.
To register a local repository, the code page of the global repository must be a subset of each local repository code page in the repository domain. To copy objects from the local repository to the global repository, the code pages of the local and global repository must be compatible.
Steps for Building a Repository DomainUse the following steps as a guideline to connect separate repositories into a repository domain:
1. Create a repository and configure it as a global repository. You can specify that a repository is the global repository when you create the Repository Service. Alternatively, you can promote an existing local repository to a global repository.
2. Register local repositories with the global repository. After a local repository is registered, you can connect to the global repository from the local repository and you can connect to the local repository from the global repository.
3. Create user accounts for users performing cross-repository work. A user who needs to connect to multiple repositories must have privileges for each Repository Service.
When the global and local repositories exist in different PowerCenter domains, the user must have an identical user name, password, and security domain in each PowerCenter domain. Although the user name, password, and security domain must be the same, the user can be a member of different user groups and can have a different set of privileges for each Repository Service.
4. Configure the user account used to access the repository associated with the Integration Service. To run a session that uses a global shortcut, the Integration Service must access the repository in which the mapping is saved and the global repository with the shortcut information. You enable this behavior by configuring the user account used to access the repository associated with the Integration Service. This user account must have privileges for both of the following:
♦ The local Repository Service with which the Integration Service is associated
♦ The global Repository Service in the domain
Promoting a Local Repository to a Global RepositoryYou can promote an existing repository to a global repository. After you promote a repository to a global repository, you cannot change it to a local or standalone repository. After you promote a repository, you can register local repositories to create a repository domain.
When registering local repositories with a global repository, the global and local repository code pages must be compatible. Before promoting a repository to a global repository, make sure the repository code page is compatible with each local repository you plan to register.
Managing a Repository Domain 135

To promote a repository to a global repository, you need to change the operating mode of the Repository Service to exclusive. If users are connected to the repository, have them disconnect before you run the repository in exclusive mode.
To promote a repository:
1. In the Administration Console, select the Repository Service for the repository you want to promote.
2. If the Repository Service is running in normal mode, change the operating mode to exclusive.
3. If the Repository Service is not enabled, click Enable.
4. In the general properties for the service, click Edit.
5. Select GlobalRepository, and click OK.
The Repository Authentication dialog box appears.
6. Enter your user name, password, and security domain.
The Security Domain field appears when the PowerCenter domain contains an LDAP security domain.
7. Click OK.
After you promote a local repository, the value of the GlobalRepository property is true in the general properties for the Repository Service.
Registering a Local RepositoryYou can register local repositories with a global repository to create a repository domain.When you register a local repository, the code pages of the local and global repositories must be compatible. You can copy objects from the local repository to the global repository and create shortcuts. You can also copy objects from the global repository to the local repository.
If you unregister a repository from the global repository and register it again, the Repository Service reestablishes global shortcuts. For example, if you create a copy of the global repository and delete the original, you can register all local repositories with the copy of the global repository. The Repository Service reestablishes all global shortcuts unless you delete objects from the copied repository.
A separate Repository Service manages each repository. For example, if a repository domain has three local repositories and one global repository, it must have four Repository Services. The Repository Services and repository databases do not need to run on the same machine. However, you improve performance for repository transactions if the Repository Service process runs on the same machine where the repository database resides.
You can move a registered local or global repository to a different Repository Service in the repository domain or to a different PowerCenter domain.
To register or unregister a local repository:
1. In the Navigator, select the Repository Service associated with the local repository.
2. If the Repository Service is running in normal mode, change the operating mode to exclusive.
3. If the Repository Service is not enabled, click Enable.
4. To register a local repository, click Actions and select Register Local Repository. Continue to the next step.
-or-
To unregister a local repository, click Actions and select Unregister Local Repository. Skip to step 10.
5. Select the PowerCenter domain of the Repository Service for the global repository.
If the Repository Service is in a PowerCenter domain that does not appear in the list of PowerCenter domains, click Manage Domain List to update the list.
The Manage List of Domains dialog box appears.
136 Chapter 8: Managing the Repository
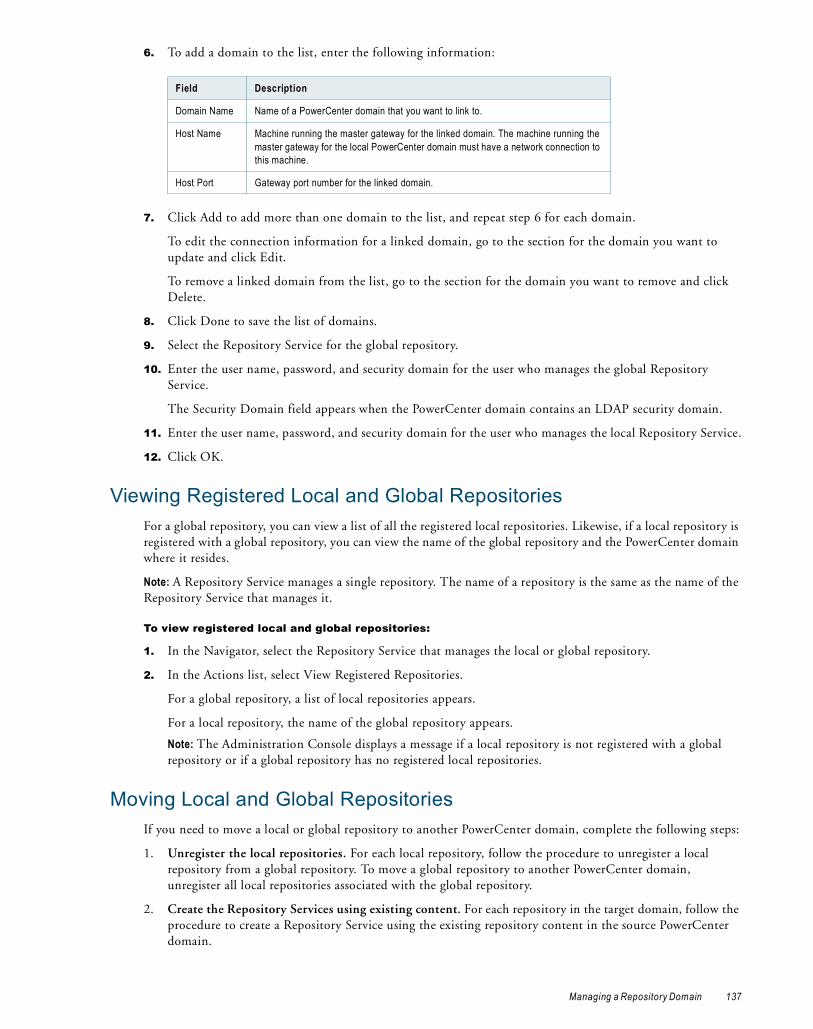
6. To add a domain to the list, enter the following information:
7. Click Add to add more than one domain to the list, and repeat step 6 for each domain.
To edit the connection information for a linked domain, go to the section for the domain you want to update and click Edit.
To remove a linked domain from the list, go to the section for the domain you want to remove and click Delete.
8. Click Done to save the list of domains.
9. Select the Repository Service for the global repository.
10. Enter the user name, password, and security domain for the user who manages the global Repository Service.
The Security Domain field appears when the PowerCenter domain contains an LDAP security domain.
11. Enter the user name, password, and security domain for the user who manages the local Repository Service.
12. Click OK.
Viewing Registered Local and Global RepositoriesFor a global repository, you can view a list of all the registered local repositories. Likewise, if a local repository is registered with a global repository, you can view the name of the global repository and the PowerCenter domain where it resides.
Note: A Repository Service manages a single repository. The name of a repository is the same as the name of the Repository Service that manages it.
To view registered local and global repositories:
1. In the Navigator, select the Repository Service that manages the local or global repository.
2. In the Actions list, select View Registered Repositories.
For a global repository, a list of local repositories appears.
For a local repository, the name of the global repository appears.
Note: The Administration Console displays a message if a local repository is not registered with a global repository or if a global repository has no registered local repositories.
Moving Local and Global RepositoriesIf you need to move a local or global repository to another PowerCenter domain, complete the following steps:
1. Unregister the local repositories. For each local repository, follow the procedure to unregister a local repository from a global repository. To move a global repository to another PowerCenter domain, unregister all local repositories associated with the global repository.
2. Create the Repository Services using existing content. For each repository in the target domain, follow the procedure to create a Repository Service using the existing repository content in the source PowerCenter domain.
Field Description
Domain Name Name of a PowerCenter domain that you want to link to.
Host Name Machine running the master gateway for the linked domain. The machine running the master gateway for the local PowerCenter domain must have a network connection to this machine.
Host Port Gateway port number for the linked domain.
Managing a Repository Domain 137

Verify that users and groups with privileges for the source Repository Service exist in the target domain. The Service Manager periodically synchronizes the list of users and groups in the repository with the users and groups in the domain configuration database. During synchronization, users and groups that do not exist in the target domain are deleted from the repository.
You can use infacmd to export users and groups from the source domain and import them into the target domain.
3. Register the local repositories. For each local repository in the target PowerCenter domain, follow the procedure to register a local repository with a global repository.
Managing User Connections and LocksYou can use the Administration Console to manage user connections and locks. In the Administration Console, you can perform the following tasks:
♦ View locks. View object locks and lock type.
♦ View user connections. View all user connections in the repository.
♦ Close connections and release locks. Terminate residual connections and locks. When you close a connection, you release all locks associated with that connection.
Viewing LocksYou can view locks and identify residual locks in the Administration Console.
To show all repository locks:
1. In the Navigator, select the Repository Service with the locks you want to view.
2. Click the Locks tab.
The following table describes the object lock information:
Viewing User ConnectionsYou can view user connection details in the Administration Console. You might want to view user connections to verify all users are disconnected before you disable the Repository Service.
Column Name Description
User User name locking the object.
Connection ID Identification number assigned to the repository connection.
Folder Folder in which the locked object is saved.
Object Type Type of object, such as folder, version, mapping, or source.
Object Name Name of the locked object.
Lock Type Type of lock: in-use, write-intent, or execute.
Lock Time Time the lock was created.
Host Name Name of the machine locking the object.
Application Application locking the object: Designer, Workflow Manager, or Repository Manager.
138 Chapter 8: Managing the Repository

To view user connections in the Administration Console:
1. In the Navigator, select the Repository Service with the user connections you want to view.
2. Click the Connections tab.
The following table describes the user connection information:
Closing User Connections and Releasing LocksSometimes, the Repository Service does not immediately disconnect a user from the repository. The repository has a residual connection when the repository client or machine is shut down but the connection remains in the repository. This can happen in the following situations:
♦ Network problems occur.
♦ A PowerCenter Client, Integration Service, Repository Service, or database machine shuts down improperly.
A residual repository connection also retains all repository locks associated with the connection. If an object or folder is locked when one of these events occurs, the repository does not release the lock. This is called a residual lock.
If a system or network problem causes a repository client to lose connectivity to the repository, the Repository Service detects and closes the residual connection. When the Repository Service closes the connection, it also releases all repository locks associated with the connection.
An Integration Service may have multiple connections open to the repository. If you close one Integration Service connection to the repository, you close all connections for that service.
Warning: Closing an active connection can cause repository inconsistencies. Close residual connections only.
To close a connection and release locks:
1. In the Navigator, select the Repository Service with the connection you want to close.
Note: To terminate a connection associated with a residual lock, first view the repository object locks to identify the connection ID number associated with the residual lock. Make a note of the connection ID number. You use this number to determine which user connection to close. Then, verify the user is not connected to the repository.
2. Click the Connections tab.
3. Click the Remove button for the user connection you want to close, or click the End All User Connections button to close all connections.
The Repository Authentication dialog box appears.
4. Enter a user name, password, and security domain.
Property Description
User User name associated with the connection.
Connection ID Identification number assigned to the repository connection.
Application Repository client associated with the connection.
Host Name Name of the machine running the application.
Host Address TCP/IP address of the machine associated with the connection.
Host Port Port number of the machine hosting the repository client used to communicate with the repository.
Login Time Time when the user connected to the repository.
Last Active Time Time of the last metadata transaction between the repository client and the repository.
Managing User Connections and Locks 139
You can enter the login information associated with a particular connection, or you can enter the login information for the user who manages the Repository Service.
The Security Domain field appears when the PowerCenter domain contains an LDAP security domain.
The Repository Service closes connections and releases all locks associated with the connections.
Sending Repository NotificationsYou create and send notification messages to all users connected to a repository.
You might want to send a message to notify users of scheduled repository maintenance or other tasks that require you to disable a Repository Service or run it in exclusive mode. For example, you might send a notification message to ask users to disconnect before you promote a local repository to a global repository.
To send a repository notification message:
1. Select the Repository Service in the Navigator.
2. In the Actions list, select Notify Users.
The Notify Users for <Repository> window appears.
3. Enter the message text.
4. Click OK.
The Repository Service sends the notification message to the PowerCenter Client users. A message box informs users that the notification was received. The message text appears on the Notifications tab of the PowerCenter Client Output window.
Backing Up and Restoring the RepositoryRegularly back up repositories to prevent data loss due to hardware or software problems. When you back up a repository, the Repository Service saves the repository in a binary file, including the repository objects, connection information, and code page information. If you need to recover the repository, you can restore the content of the repository from this binary file.
If you back up a repository that has operating system profiles assigned to folders, the Repository Service does not back up the folder assignments. After you restore the repository, you must assign the operating system profiles to the folders.
Before you back up a repository and restore it in a different domain, verify that users and groups with privileges for the source Repository Service exist in the target domain. The Service Manager periodically synchronizes the list of users and groups in the repository with the users and groups in the domain configuration database. During synchronization, users and groups that do not exist in the target domain are deleted from the repository.
You can use infacmd to export users and groups from the source domain and import them into the target domain.
Backing Up a RepositoryWhen you back up a repository, the Repository Service stores the file in the backup location you specify for the node. You specify the backup location when you set up the node. View the general properties of the node to determine the path of the backup directory. The Repository Service uses the extension .rep for all repository backup files.
140 Chapter 8: Managing the Repository
To back up a repository:
1. In the Navigator, select the Repository Service for the repository you want to back up.
2. In the Actions list, select Back Up Contents.
3. Enter your user name, password, and security domain.
The Security Domain field appears when the PowerCenter domain contains an LDAP security domain.
4. Enter a file name and description for the repository backup file.
Use an easily distinguishable name for the file. For example, if the name of the repository is DEVELOPMENT, and the backup occurs on May 7, you might name the file DEVELOPMENTMay07.rep. If you do not include the .rep extension, the Repository Service appends that extension to the file name.
5. If you use the same file name that you used for a previous backup file, select whether or not to replace the existing file with the new backup file.
To overwrite an existing repository backup file, select Replace Existing File. If you specify a file name that already exists in the repository backup directory and you do not choose to replace the existing file, the Repository Service does not back up the repository.
6. Choose to skip or back up workflow and session logs, deployment group history, and MX data. You might want to skip these operations to increase performance when you restore the repository.
7. Click OK.
The results of the backup operation appear in the activity log.
Viewing a List of Backup FilesYou can view the backup files you create for a repository in the backup directory where they are saved. You can also view a list of existing backup files in the Administration Console. If you back up a repository through pmrep, you must provide a file extension of .rep to view it in the Administration Console.
To view the list of backup files:
1. In the Navigator, select the Repository Service for a repository that has been backed up.
2. In the Actions list, select View Backup Files.
A list of the backup files appears.
Restoring a RepositoryYou can restore metadata from a repository binary backup file. When you restore a repository, you must have a database available for the repository. You can restore the repository in a database that has a compatible code page with the original database.
If a repository exists at the target database location, you must delete it before you restore a repository backup file.
PowerCenter restores repositories from the current version. If you have a backup file from an earlier version of PowerCenter or PowerMart, you must use the earlier version to restore the repository.
Verify that the repository license includes the license keys necessary to restore the repository backup file. For example, you must have the team-based development option to restore a versioned repository.
Note: If you want to create, restore, or upgrade a Sybase ASE repository, set allow nulls by default to TRUE at the database level. Setting this option changes the default null type of the column to null in compliance with the SQL standard.
Backing Up and Restoring the Repository 141
To restore a repository:
1. In the Navigator, select the Repository Service that manages the repository content you want to restore.
2. In the Actions list, select Restore Contents.
The Restore Contents options appear.
3. Select a backup file to restore.
4. Select whether or not to restore the repository as new.
When you restore a repository as new, the Repository Service restores the repository with a new repository ID and deletes the log event files.
Note: When you copy repository content, you create the repository as new.
5. Optionally, choose to skip workflow and session logs, deployment group history, and MX data. Skipping the data improves performance.
6. Click OK.
The activity log indicates whether the restore operation succeeded or failed.
Note: When you restore a global repository, the repository becomes a standalone repository. After restoring the repository, you need to promote it to a global repository.
Copying Content from Another RepositoryCopy content into a repository when no content exists for the repository and you want to use the content from a different repository. Copying repository content provides a quick way to copy the metadata that you want to use as a basis for a new repository. You can copy repository content to preserve the original repository before upgrading. You can also copy repository content when you need to move a repository from development into production.
To copy repository content, you must create the Repository Service for the target repository. When you create the Repository Service, set the creation mode to create the Repository Service without content. Also, you must select a code page that is compatible with the original repository. Alternatively, you can delete the content from a Repository Service that already has content associated with it.
If a repository exists in the target database, the copy operation fails. You must back up the existing repository and delete it from the target database before copying the repository content.
Note: If you copy repository content to a Sybase database, set allow nulls by default to TRUE at the database level. Setting this option changes the default null type of a column to null in compliance with the SQL standard.
To copy content from another repository:
1. In the Navigator, select the Repository Service to which you want to add copied content.
You cannot copy content to a repository that already contains content. If necessary, back up and delete existing repository content before copying in the new content.
2. In the Actions list, select Copy Contents From.
The page displays the options for the Copy Contents From operation.
3. Select the name of the Repository Service.
The source Repository Service and the Repository Service to which you want to add copied content must be in the same domain and it must be of the same service version.
4. Enter a user name, password, and security domain for the user who manages the repository from which you want to copy content.
142 Chapter 8: Managing the Repository

The Security Domain field appears when the PowerCenter domain contains an LDAP security domain.
5. To skip workflow and session logs, deployment group history, and MX data, select the check boxes in the advanced options. Skipping this data can increase performance.
6. Click OK.
The activity log displays the results of the copy operation.
Registering and Unregistering Repository Plug-insUse the Administration Console to register and remove repository plug-ins. Repository plug-ins are third-party or other Informatica applications that extend PowerCenter functionality by introducing new repository metadata.
For installation issues specific to the plug-in, consult the plug-in documentation.
Registering a Repository Plug-inRegister a repository plug-in to add its functionality to the repository. You can also update an existing repository plug-in.
To register a plug-in:
1. Run the Repository Service in exclusive mode.
2. In the Navigator, select the Repository Service to which you want to add the plug-in.
3. Click the Plug-ins tab.
4. Click the link to register a Repository Service plug-in.
5. On the Register Plugin for <Repository Service> page, click the Browse button to locate the plug-in file.
6. If the plug-in was registered previously and you want to overwrite the registration, select the check box to update the existing plug-in registration. For example, you might select this option when you upgrade a plug-in to the latest version.
7. Enter your user name, password, and security domain.
The Security Domain field appears when the PowerCenter domain contains an LDAP security domain.
8. Click OK.
The Repository Service registers the plug-in with the repository. The results of the registration operation appear in the activity log.
9. Run the Repository Service in normal mode.
Unregistering a Repository Plug-inTo unregister a repository plug-in, the Repository Service must be running in exclusive mode. Verify that all users are disconnected from the repository before you unregister a plug-in.
The list of registered plug-ins for a Repository Service appears on the Plug-ins tab.
If the Repository Service is not running in exclusive mode, the Remove buttons for plug-ins are disabled.
To unregister a plug-in:
1. Run the Repository Service service for the plug-in in exclusive mode.
2. In the Navigator, select the Repository Service from which you want to remove the plug-in.
Registering and Unregistering Repository Plug-ins 143

3. Click the Plug-ins tab.
The list of registered plug-ins appears.
4. Click the Remove button for the plug-in you want to unregister.
5. Enter your user name, password, and security domain.
The Security Domain field appears when the PowerCenter domain contains an LDAP security domain.
6. Click OK.
7. Run the Repository Service in normal mode.
Creating an Audit TrailYou can track changes to users, groups, and permissions on repository objects by selecting the SecurityAuditTrail configuration option in the Repository Service properties in the PowerCenter Administration Console. When you enable the audit trail, the Repository Service logs security changes to the Repository Service log. The audit trail logs the following operations:
♦ Changing the owner or permissions for a folder or connection object.
♦ Adding or removing a user or group.
The audit trail does not log the following operations:
♦ Changing your own password.
♦ Changing the owner or permissions for a deployment group, label, or query.
Tuning Repository PerformancePowerCenter includes features that allow you improve the performance of the repository. You can update statistics and skip information when you copy, back up, or restore the repository.
Updating Repository StatisticsThe PowerCenter repository has more than 170 tables, and almost all tables use at least one index to speed up queries. Most databases keep and use column distribution statistics to determine which index to use to execute SQL queries optimally. Database servers do not update these statistics continuously.
In frequently used repositories, these statistics can quickly become outdated, and SQL query optimizers may not choose the best query plan. In large repositories, choosing a sub-optimal query plan can have a negative impact on performance. Over time, repository operations gradually become slower.
PowerCenter identifies and updates the statistics of all repository tables and indexes when you copy, upgrade, and restore repositories. You can also update statistics using the pmrep UpdateStatistics command.
Increasing Repository Copy, Backup, and Restore PerformanceLarge repositories may contain a lot of log and history information that slows down repository performance. You have the option to skip the information that is not essential to the function of the repository. When you back up, restore, or copy a repository, you can choose to skip the following types of information:
♦ Workflow and session logs
♦ Deploy group history
144 Chapter 8: Managing the Repository

♦ MX data
By skipping this information, you reduce the time it takes to copy, back up, or restore a repository.
You can also skip this information when you use the pmrep commands.
Note: You can optimize repository performance for repositories on IBM DB2 EEE.
Configuring Data LineageYou can access data lineage analysis for a PowerCenter repository from the PowerCenter Designer. Before you access data lineage from the Designer, you must configure the Metadata Manager Service name and the Metadata Manager resource for the PowerCenter Repository Service.
You configure the Metadata Manager Service name and the Metadata Manager resource name on the Lineage tab for a Repository Service. To configure the Metadata Manager information, select the Repository Service in the Navigator, click the Lineage tab, and configure the Metadata Manager Service name and resource name.
Before you configure data lineage for a PowerCenter repository, complete the following tasks:
♦ Make sure Metadata Manager is running. Create a Metadata Manager Service in the Administration Console or verify that an enabled Metadata Manager Service exists in the domain that contains the Repository Service for the PowerCenter repository.
♦ Load the PowerCenter repository metadata. Create a resource for the PowerCenter repository in Metadata Manager and load the PowerCenter repository metadata into the Metadata Manager warehouse.
Configuring Data Lineage 145

146 Chapter 8: Managing the Repository
C H A P T E R 9
Creating and Configuring the Integration Service
This chapter includes the following topics:
♦ Overview, 147
♦ Creating an Integration Service, 148
♦ Enabling and Disabling the Integration Service, 150
♦ Running in Normal and Safe Mode, 151
♦ Configuring the Integration Service Properties, 154
♦ Using Operating System Profiles, 162
♦ Configuring the Associated Repository, 163
♦ Configuring the Integration Service Processes, 164
OverviewThe Integration Service is an application service that runs sessions and workflows. You install the Integration Service when you install PowerCenter Services. After you install the PowerCenter Services, you can use the Administration Console to manage the Integration Service.
You can use the Administration Console to complete the following Integration Service tasks:
♦ Create an Integration Service. You can create an Integration Service to replace an existing Integration Service or to use multiple Integration Services. For more information, see “Creating an Integration Service” on page 148.
♦ Enable or disable the Integration Service. You enable the Integration Service to run sessions and workflows. You might disable the Integration Service to prevent users from running sessions and workflows while performing maintenance on the machine or modifying the repository. For more information, see “Enabling and Disabling the Integration Service” on page 150.
♦ Configure normal or safe mode. Configure the Integration Service to run in normal or safe mode. For more information, see “Running in Normal and Safe Mode” on page 151.
♦ Configure the Integration Service properties. You might need to configure the Integration Service properties to change behavior of the Integration Service. For more information, see “Configuring the Integration Service Properties” on page 154.
147

♦ Configure the associated repository. You must associate a repository with an Integration Service. The Integration Service uses the mappings in the repository to run sessions and workflows. For more information, see “Configuring the Associated Repository” on page 163.
♦ Configure the Integration Service processes. Configure service process properties for each node, such as the code page and service process variables. For more information, see “Configuring the Integration Service Processes” on page 164.
♦ Configure permissions on the Integration Service. For more information, see “Managing Permissions” on page 35.
♦ Remove an Integration Service. You may need to remove an Integration Service if it becomes obsolete. Use the Administration Console to remove an Integration Service. For more information, see “Removing Application Services” on page 39.
Creating an Integration ServiceYou can create an Integration Service when you install PowerCenter. However, you may need to create an additional Integration Service to replace an existing one or create multiple Integration Services.
You must assign a repository to the Integration Service. You can assign the repository when you create the Integration Service or after you create the Integration Service. You must assign a repository before you can run the Integration Service. The repository that you assign to the Integration Service is called the associated repository. The Integration Service retrieves metadata, such as workflows and mappings, from the associated repository.
After you create an Integration Service, you must assign a code page for each Integration Service process. The code page for each Integration Service process must be a subset of the code page of the associated repository. You must select the associated repository before you can select the code page for an Integration Service process. The Repository Service must be enabled to set up a code page for an Integration Service process.
In a mixed-version domain, you can create more than one service version of the Integration Service. When you create the Integration Service you can assign it to nodes that are configured to the run the service version. When you assign an associated repository, the Repository Service must be of the same service version as the Integration Service.
Note: If you configure an Integration Service to run on a node that is unavailable, you must start the node and configure $PMRootDir for the service process before you run workflows with the Integration Service.
To create an Integration Service:
1. In the Administration Console, click Create > Integration Service.
The Create New Integration Service dialog box appears.
2. Enter values for the following Integration Service options.
The following table describes the Integration Service options:
Property Description
Service Name Name of the Integration Service. The name is not case sensitive and must be unique within the domain. The characters must be compatible with the code page of the associated repository. The name cannot have leading or trailing spaces, include carriage returns or tabs, exceed 79 characters, or contain the following characters:/ * ? < > " |
Location Domain in which the Integration Service is created.This is a read-only field.
148 Chapter 9: Creating and Configuring the Integration Service
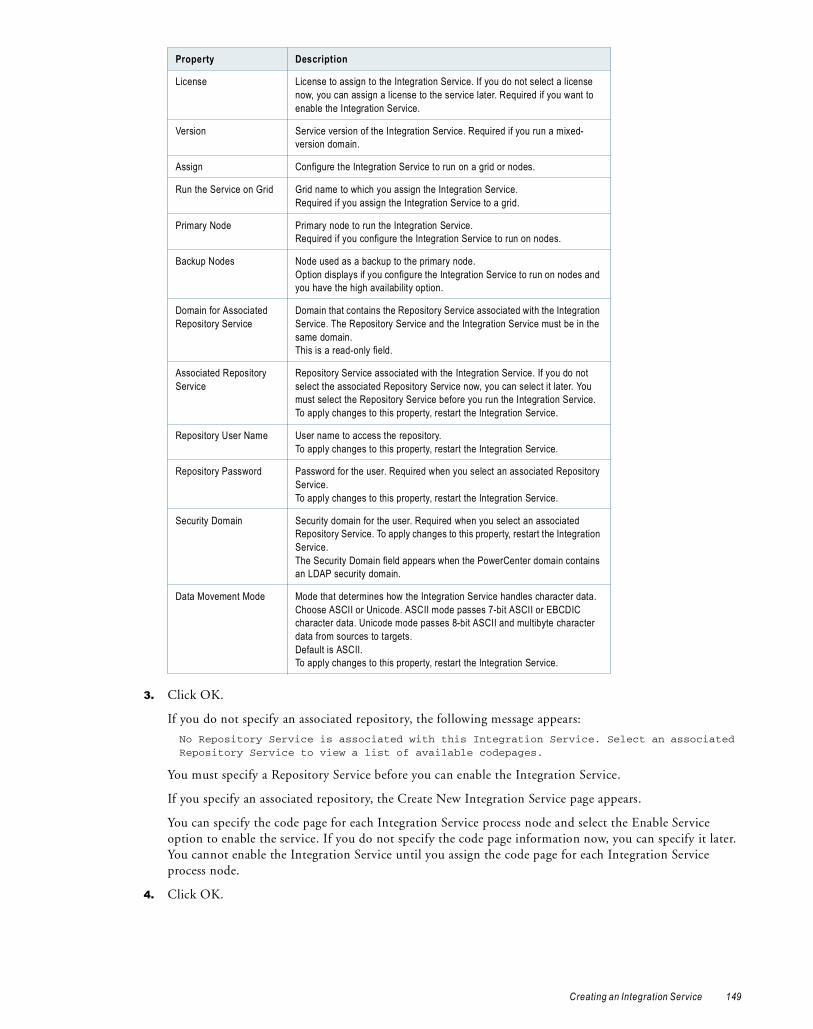
3. Click OK.
If you do not specify an associated repository, the following message appears:
No Repository Service is associated with this Integration Service. Select an associated Repository Service to view a list of available codepages.
You must specify a Repository Service before you can enable the Integration Service.
If you specify an associated repository, the Create New Integration Service page appears.
You can specify the code page for each Integration Service process node and select the Enable Service option to enable the service. If you do not specify the code page information now, you can specify it later. You cannot enable the Integration Service until you assign the code page for each Integration Service process node.
4. Click OK.
License License to assign to the Integration Service. If you do not select a license now, you can assign a license to the service later. Required if you want to enable the Integration Service.
Version Service version of the Integration Service. Required if you run a mixed-version domain.
Assign Configure the Integration Service to run on a grid or nodes.
Run the Service on Grid Grid name to which you assign the Integration Service.Required if you assign the Integration Service to a grid.
Primary Node Primary node to run the Integration Service.Required if you configure the Integration Service to run on nodes.
Backup Nodes Node used as a backup to the primary node. Option displays if you configure the Integration Service to run on nodes and you have the high availability option.
Domain for Associated Repository Service
Domain that contains the Repository Service associated with the Integration Service. The Repository Service and the Integration Service must be in the same domain.This is a read-only field.
Associated Repository Service
Repository Service associated with the Integration Service. If you do not select the associated Repository Service now, you can select it later. You must select the Repository Service before you run the Integration Service.To apply changes to this property, restart the Integration Service.
Repository User Name User name to access the repository. To apply changes to this property, restart the Integration Service.
Repository Password Password for the user. Required when you select an associated Repository Service.To apply changes to this property, restart the Integration Service.
Security Domain Security domain for the user. Required when you select an associated Repository Service. To apply changes to this property, restart the Integration Service.The Security Domain field appears when the PowerCenter domain contains an LDAP security domain.
Data Movement Mode Mode that determines how the Integration Service handles character data. Choose ASCII or Unicode. ASCII mode passes 7-bit ASCII or EBCDIC character data. Unicode mode passes 8-bit ASCII and multibyte character data from sources to targets. Default is ASCII.To apply changes to this property, restart the Integration Service.
Property Description
Creating an Integration Service 149
Enabling and Disabling the Integration ServiceYou can enable and disable an Integration Service process or the entire Integration Service. If you run the Integration Service on a grid or with the high availability option, you have one Integration Service process configured for each node. For a grid, the Integration Service runs all enabled Integration Service processes. With high availability, the Integration Service runs the Integration Service process on the primary node.
Enabling and Disabling an Integration Service ProcessUse the Administration Console to enable and disable a service process running the Integration Service. Each service process runs on one node. You must enable the Integration Service process if you want the node to perform Integration Service tasks. You may want to disable the service process on a node to perform maintenance on that node or to enable safe mode for the Integration Service.
When you disable an Integration Service process, you must choose the mode to disable it in. You can choose one of the following options:
♦ Complete. Allows the sessions and workflows to run to completion before disabling the service process.
♦ Stop. Stops all sessions and workflows and then disables the service process.
♦ Abort. Attempts to stop all sessions and workflows before aborting them and disabling the service process.
To enable or disable an Integration Service process:
1. In the Navigator of the Administration Console, select the Integration Service.
2. Click the Processes tab.
If you configure the Integration Service to run on a grid or on multiple nodes, the Processes tab displays one area for each node.
3. To enable a service process, click Enable for the applicable node.
4. To disable a service process, click Disable for the applicable node.
The Disable Integration Service window appears.
5. Choose the disable mode and click OK.
Enabling and Disabling the Integration ServiceUse the Administration Console to enable and disable an Integration Service. You may want to disable an Integration Service if you need to perform maintenance or if you want temporarily restrict users from using the service. You can enable a disabled Integration Service to make it available again.
If you disable the Integration Service, you disable all service processes enabled to run the Integration Service and shut down the Integration Service. If you are running an Integration Service on a grid, you disable all service processes on the grid.
When you disable the Integration Service, you must choose what to do if a process or workflow is running. You must choose one of the following options:
♦ Complete. Allows the sessions and workflows to run to completion before shutting down the service.
♦ Stop. Stops all sessions and workflows and then shuts down the service.
♦ Abort. Attempts to stop all sessions and workflows before aborting them and shutting down the service.
When you enable the Integration Service, the service starts. The associated Repository Service must be started before you can enable the Integration Service. If you try to enable an Integration Service and the associated Repository Service is not running, the following error appears:
The Service Manager could not start the service due to the following error: [DOM_10076] Unable to enable service [<Integration Service] because of dependent services [<Repository Service>] are not initialized.
150 Chapter 9: Creating and Configuring the Integration Service

If the Integration Service is unable to start, the Service Manager keeps trying to start the service until it reaches the maximum restart attempts defined in the domain properties. For example, if you try to start the Integration Service without specifying the code page for each Integration Service process, the domain tries to start the service. The service does not start without specifying a valid code page for each Integration Service process. The domain keeps trying to start the service until it reaches the maximum number of attempts.
If the service is enabled but fails to start after reaching the maximum number of attempts, the following message appears:
The Integration Service <service name> is enabled. The service did not start. Please check the logs for more information.
To resolve the problem, review the logs for this Integration Service to determine the reason for failure and fix the problem. After you fix the problem, you must disable and re-enable the Integration Service to start it.
To enable the Integration Service, select the Integration Service in the Navigator, and then click Enable.
To disable an Integration Service:
1. In the Navigator of the Administration Console, select the Integration Service.
2. Click Disable.
The Disable Integration Service window appears.
3. Choose the disable mode and click OK.
Running in Normal and Safe ModeYou can run the Integration Service in normal or safe operating mode. Normal mode provides full access to users with permissions and privileges to use an Integration Service. Safe mode limits user access to the Integration Service and workflow activity during environment migration or Integration Service maintenance activities.
Run the Integration Service in normal mode during daily Integration Service operations. In normal mode, users with workflow privileges can run workflows and get session and workflow information for workflows assigned to the Integration Service.
You can configure the Integration Service to run in safe mode or to fail over in safe mode. When you enable the Integration Service to run in safe mode or when the Integration Service fails over in safe mode, it limits access and workflow activity to allow administrators to perform migration or maintenance activities.
Run the Integration Service in safe mode to control which workflows an Integration Service runs and which users can run workflows during migration and maintenance activities. Run in safe mode to verify a production environment, manage workflow schedules, or maintain an Integration Service. In safe mode, users that have the Administrator role for the associated Repository Service can run workflows and get information about sessions and workflows assigned to the Integration Service.
Normal ModeWhen you enable an Integration Service to run in normal mode, the Integration Service begins running scheduled workflows. It also completes workflow failover for any workflows that failed while in safe mode, recovers client requests, and recovers any workflows configured for automatic recovery that failed in safe mode.
Users with workflow privileges can run workflows and get session and workflow information for workflows assigned to the Integration Service.
When you change the operating mode from safe to normal, the Integration Service begins running scheduled workflows and completes workflow failover and workflow recovery for any workflows configured for automatic recovery. You can use the Administration Console to view the log events about the scheduled workflows that started, the workflows that failed over, and the workflows recovered by the Integration Service.
Running in Normal and Safe Mode 151

Safe ModeIn safe mode, the Integration Service limits access to the Integration Service and limits workflow activity. You can configure the Integration Service to run in safe mode or to fail over in safe mode:
♦ Enable in safe mode. Enable the Integration Service in safe mode to perform migration or maintenance activities. When you enable the Integration Service in safe mode, you limit access to the Integration Service.
When you enable an Integration Service in safe mode, you can choose to have the Integration Service complete, abort, or stop running workflows. In addition, the operating mode on failover also changes to safe.
♦ Fail over in safe mode. Configure the Integration Service process to fail over in safe mode during migration or maintenance activities. When the Integration Service process fails over to a backup node, it restarts in safe mode and limits workflow activity and access to the Integration Service. The Integration Service restores the state of operations for any workflows that were running when the service process failed over, but does not fail over or automatically recover the workflows. You can manually recover the workflow.
After the Integration Service fails over in safe mode during normal operations, you can correct the error that caused the Integration Service process to fail over and restart the service in normal mode.
The behavior of the Integration Service when it fails over in safe mode is the same as when you enable the Integration Service in safe mode. All scheduled workflows, including workflows scheduled to run continuously or start on service initialization, do not run. The Integration Service does not fail over schedules or workflows, does not automatically recover workflows, and does not recover client requests.
Running the Integration Service in Safe ModeThis section describes the specific migration and maintenance activities that you can complete when you run an Integration Service in safe mode, the workflow tasks that you can complete in the Workflow Manager and Workflow Monitor, the behavior of the Integration Service in safe mode, and the privileges required to run and monitor workflows in safe mode.
Performing Migration or MaintenanceYou might want to run an Integration Service in safe mode for the following reasons:
♦ Test a development environment. Run the Integration Service in safe mode to test a development environment before migrating to production. You can run workflows that contain session and command tasks to test the environment. Run the Integration Service in safe mode to limit access to the Integration Service when you run the test sessions and command tasks.
♦ Manage workflow schedules. During migration, you can unschedule workflows that only run in a development environment. For example, you may have workflows intended to run only in the development environment. You can enable the Integration Service in safe mode, unschedule the workflow, and then enable the Integration Service in normal mode. After you enable the service in normal mode, the workflows that you unscheduled do not run.
♦ Troubleshoot the Integration Service. Configure the Integration Service to fail over in safe mode and troubleshoot errors when you migrate or test a production environment configured for high availability. After the Integration Service fails over in safe mode, you can correct the error that caused the Integration Service to fail over.
♦ Perform maintenance on the Integration Service. When you perform maintenance on an Integration Service, you can limit the users who can run workflows using an Integration Service. You can enable the Integration Service in safe mode, change Integration Service properties, and verify the Integration Service functionality before allowing other users to run workflows. For example, you can use safe mode to test changes to the paths for Integration Service files for Integration Service processes.
152 Chapter 9: Creating and Configuring the Integration Service
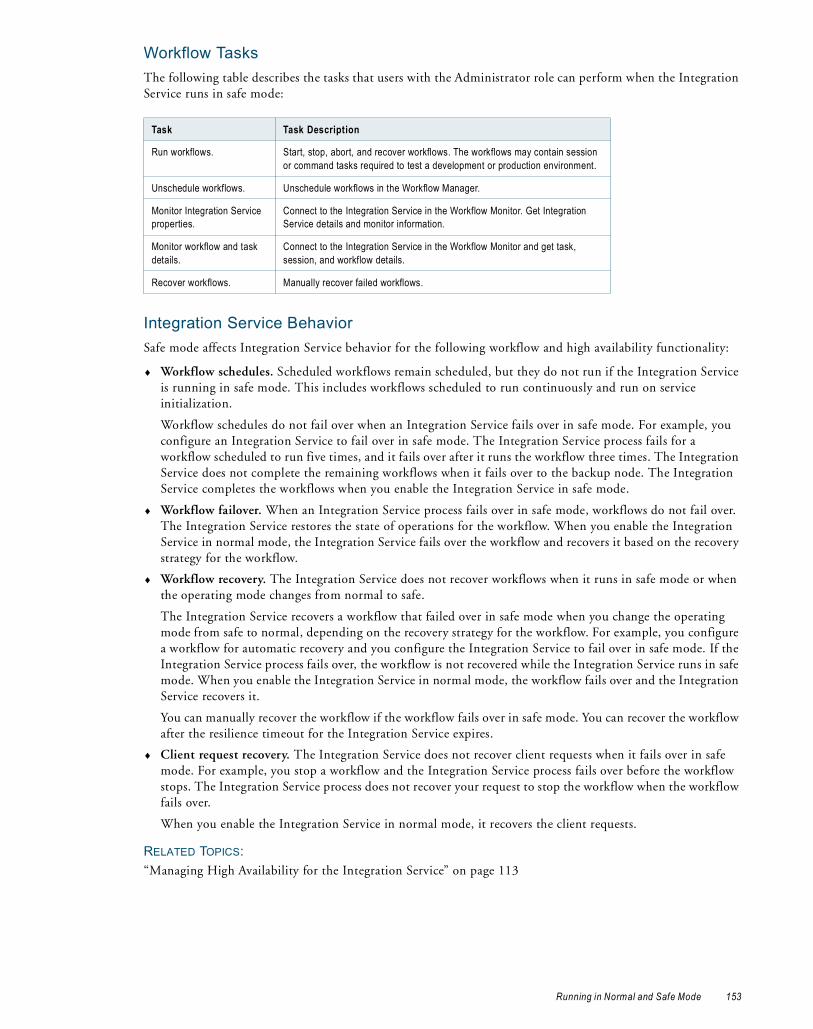
Workflow TasksThe following table describes the tasks that users with the Administrator role can perform when the Integration Service runs in safe mode:
Integration Service BehaviorSafe mode affects Integration Service behavior for the following workflow and high availability functionality:
♦ Workflow schedules. Scheduled workflows remain scheduled, but they do not run if the Integration Service is running in safe mode. This includes workflows scheduled to run continuously and run on service initialization.
Workflow schedules do not fail over when an Integration Service fails over in safe mode. For example, you configure an Integration Service to fail over in safe mode. The Integration Service process fails for a workflow scheduled to run five times, and it fails over after it runs the workflow three times. The Integration Service does not complete the remaining workflows when it fails over to the backup node. The Integration Service completes the workflows when you enable the Integration Service in safe mode.
♦ Workflow failover. When an Integration Service process fails over in safe mode, workflows do not fail over. The Integration Service restores the state of operations for the workflow. When you enable the Integration Service in normal mode, the Integration Service fails over the workflow and recovers it based on the recovery strategy for the workflow.
♦ Workflow recovery. The Integration Service does not recover workflows when it runs in safe mode or when the operating mode changes from normal to safe.
The Integration Service recovers a workflow that failed over in safe mode when you change the operating mode from safe to normal, depending on the recovery strategy for the workflow. For example, you configure a workflow for automatic recovery and you configure the Integration Service to fail over in safe mode. If the Integration Service process fails over, the workflow is not recovered while the Integration Service runs in safe mode. When you enable the Integration Service in normal mode, the workflow fails over and the Integration Service recovers it.
You can manually recover the workflow if the workflow fails over in safe mode. You can recover the workflow after the resilience timeout for the Integration Service expires.
♦ Client request recovery. The Integration Service does not recover client requests when it fails over in safe mode. For example, you stop a workflow and the Integration Service process fails over before the workflow stops. The Integration Service process does not recover your request to stop the workflow when the workflow fails over.
When you enable the Integration Service in normal mode, it recovers the client requests.
RELATED TOPICS:“Managing High Availability for the Integration Service” on page 113
Task Task Description
Run workflows. Start, stop, abort, and recover workflows. The workflows may contain session or command tasks required to test a development or production environment.
Unschedule workflows. Unschedule workflows in the Workflow Manager.
Monitor Integration Service properties.
Connect to the Integration Service in the Workflow Monitor. Get Integration Service details and monitor information.
Monitor workflow and task details.
Connect to the Integration Service in the Workflow Monitor and get task, session, and workflow details.
Recover workflows. Manually recover failed workflows.
Running in Normal and Safe Mode 153

Steps to Configure the Operating ModeYou can use the Administration Console to configure the Integration Service to run in safe mode, run in normal mode, or run in safe or normal mode on failover. To configure the operating mode on failover, you must have the high availability option.
Note: When you change the operating mode on fail over from safe to normal, the change takes effect immediately.
To configure an Integration Service to run in safe mode:
1. On the Domain tab, select the Integration Service in the Navigator.
2. On the Properties tab, click Edit under Operating Mode Configuration.
3. Select Safe for the operating mode.
The following message appears:
Changing OperatingMode to Safe will also set OperatingModeOnFailover to Safe.
4. Click OK.
5. Click OK under Operating Mode Configuration.
The Restart Integration Service window displays the following message:
Changing the OperatingMode from normal to safe requires the Integration Service to be restarted. Restart service now?
6. Click Yes.
7. Choose to allow processes to complete or choose to stop or abort all processes, and then click OK.
The Integration Service stops and then restarts in safe mode. The service status at the top of the right pane indicates when the service has restarted. The Disable button for the service appears when the service is enabled and running.
To configure an Integration Service to run in normal mode:
1. On the Domain tab, select the Integration Service in the Navigator.
2. On the Properties tab, click Edit under Operating Mode Configuration.
3. Select Normal as the operating mode.
4. Click OK.
The Integration Service operating mode changes to normal.
To configure an Integration Service to run in safe mode on failover:
1. On the Domain tab, select the Integration Service in the Navigator.
2. On the Properties tab, click Edit under Operating Mode Configuration.
3. Select Safe as the operating mode on failover.
4. Click OK.
Configuring the Integration Service PropertiesUse the Administration Console to configure the following Integration Service properties:
♦ Version. If you run a mixed-version domain, select the service version. For more information, see “Version” on page 155.
154 Chapter 9: Creating and Configuring the Integration Service
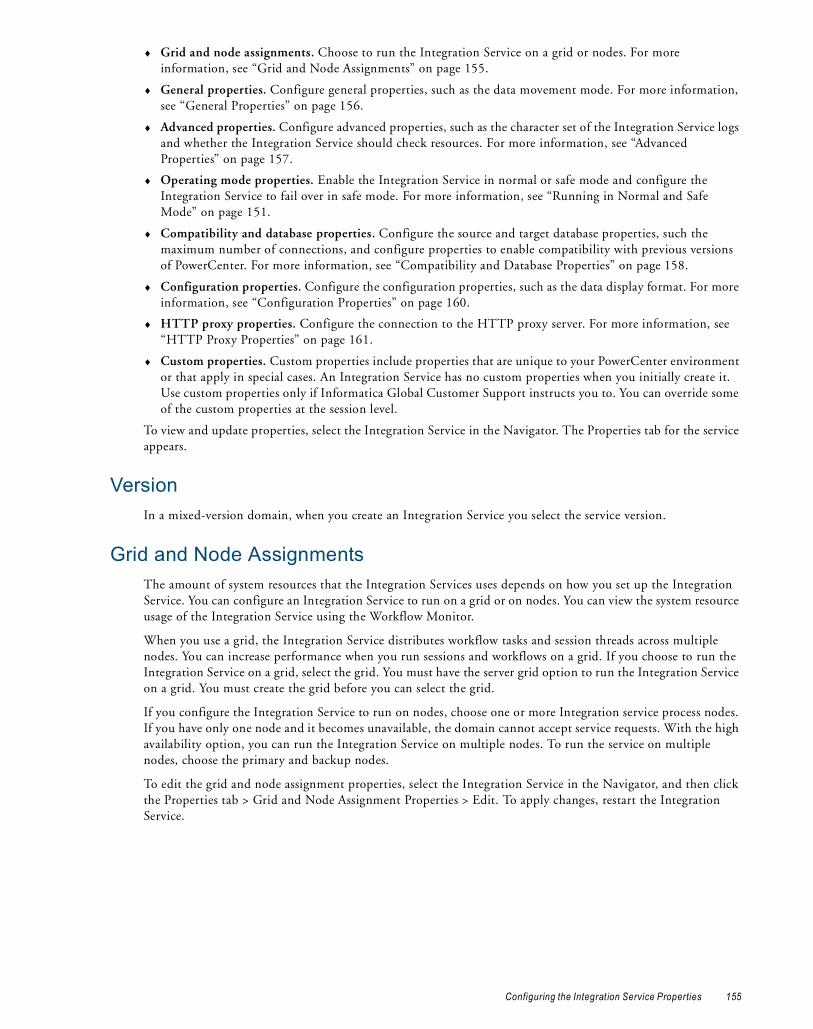
♦ Grid and node assignments. Choose to run the Integration Service on a grid or nodes. For more information, see “Grid and Node Assignments” on page 155.
♦ General properties. Configure general properties, such as the data movement mode. For more information, see “General Properties” on page 156.
♦ Advanced properties. Configure advanced properties, such as the character set of the Integration Service logs and whether the Integration Service should check resources. For more information, see “Advanced Properties” on page 157.
♦ Operating mode properties. Enable the Integration Service in normal or safe mode and configure the Integration Service to fail over in safe mode. For more information, see “Running in Normal and Safe Mode” on page 151.
♦ Compatibility and database properties. Configure the source and target database properties, such the maximum number of connections, and configure properties to enable compatibility with previous versions of PowerCenter. For more information, see “Compatibility and Database Properties” on page 158.
♦ Configuration properties. Configure the configuration properties, such as the data display format. For more information, see “Configuration Properties” on page 160.
♦ HTTP proxy properties. Configure the connection to the HTTP proxy server. For more information, see “HTTP Proxy Properties” on page 161.
♦ Custom properties. Custom properties include properties that are unique to your PowerCenter environment or that apply in special cases. An Integration Service has no custom properties when you initially create it. Use custom properties only if Informatica Global Customer Support instructs you to. You can override some of the custom properties at the session level.
To view and update properties, select the Integration Service in the Navigator. The Properties tab for the service appears.
VersionIn a mixed-version domain, when you create an Integration Service you select the service version.
Grid and Node AssignmentsThe amount of system resources that the Integration Services uses depends on how you set up the Integration Service. You can configure an Integration Service to run on a grid or on nodes. You can view the system resource usage of the Integration Service using the Workflow Monitor.
When you use a grid, the Integration Service distributes workflow tasks and session threads across multiple nodes. You can increase performance when you run sessions and workflows on a grid. If you choose to run the Integration Service on a grid, select the grid. You must have the server grid option to run the Integration Service on a grid. You must create the grid before you can select the grid.
If you configure the Integration Service to run on nodes, choose one or more Integration service process nodes. If you have only one node and it becomes unavailable, the domain cannot accept service requests. With the high availability option, you can run the Integration Service on multiple nodes. To run the service on multiple nodes, choose the primary and backup nodes.
To edit the grid and node assignment properties, select the Integration Service in the Navigator, and then click the Properties tab > Grid and Node Assignment Properties > Edit. To apply changes, restart the Integration Service.
Configuring the Integrat ion Service Properties 155
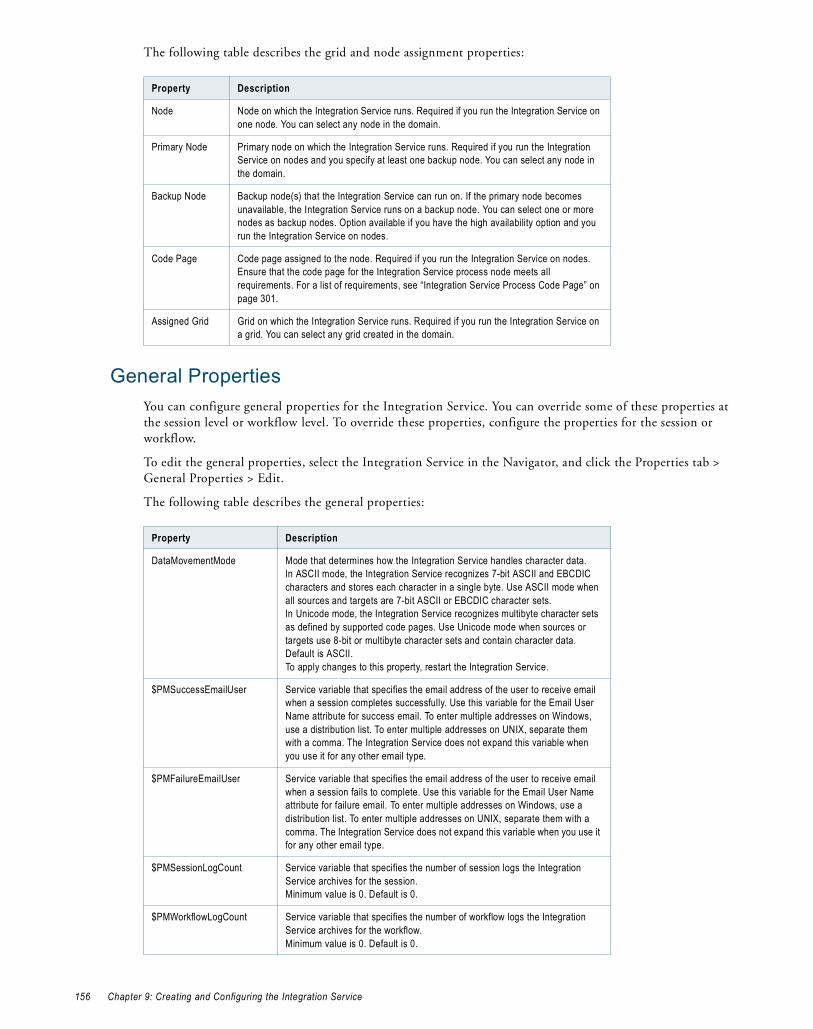
The following table describes the grid and node assignment properties:
General PropertiesYou can configure general properties for the Integration Service. You can override some of these properties at the session level or workflow level. To override these properties, configure the properties for the session or workflow.
To edit the general properties, select the Integration Service in the Navigator, and click the Properties tab > General Properties > Edit.
The following table describes the general properties:
Property Description
Node Node on which the Integration Service runs. Required if you run the Integration Service on one node. You can select any node in the domain.
Primary Node Primary node on which the Integration Service runs. Required if you run the Integration Service on nodes and you specify at least one backup node. You can select any node in the domain.
Backup Node Backup node(s) that the Integration Service can run on. If the primary node becomes unavailable, the Integration Service runs on a backup node. You can select one or more nodes as backup nodes. Option available if you have the high availability option and you run the Integration Service on nodes.
Code Page Code page assigned to the node. Required if you run the Integration Service on nodes. Ensure that the code page for the Integration Service process node meets all requirements. For a list of requirements, see “Integration Service Process Code Page” on page 301.
Assigned Grid Grid on which the Integration Service runs. Required if you run the Integration Service on a grid. You can select any grid created in the domain.
Property Description
DataMovementMode Mode that determines how the Integration Service handles character data.In ASCII mode, the Integration Service recognizes 7-bit ASCII and EBCDIC characters and stores each character in a single byte. Use ASCII mode when all sources and targets are 7-bit ASCII or EBCDIC character sets.In Unicode mode, the Integration Service recognizes multibyte character sets as defined by supported code pages. Use Unicode mode when sources or targets use 8-bit or multibyte character sets and contain character data.Default is ASCII. To apply changes to this property, restart the Integration Service.
$PMSuccessEmailUser Service variable that specifies the email address of the user to receive email when a session completes successfully. Use this variable for the Email User Name attribute for success email. To enter multiple addresses on Windows, use a distribution list. To enter multiple addresses on UNIX, separate them with a comma. The Integration Service does not expand this variable when you use it for any other email type.
$PMFailureEmailUser Service variable that specifies the email address of the user to receive email when a session fails to complete. Use this variable for the Email User Name attribute for failure email. To enter multiple addresses on Windows, use a distribution list. To enter multiple addresses on UNIX, separate them with a comma. The Integration Service does not expand this variable when you use it for any other email type.
$PMSessionLogCount Service variable that specifies the number of session logs the Integration Service archives for the session.Minimum value is 0. Default is 0.
$PMWorkflowLogCount Service variable that specifies the number of workflow logs the Integration Service archives for the workflow. Minimum value is 0. Default is 0.
156 Chapter 9: Creating and Configuring the Integration Service
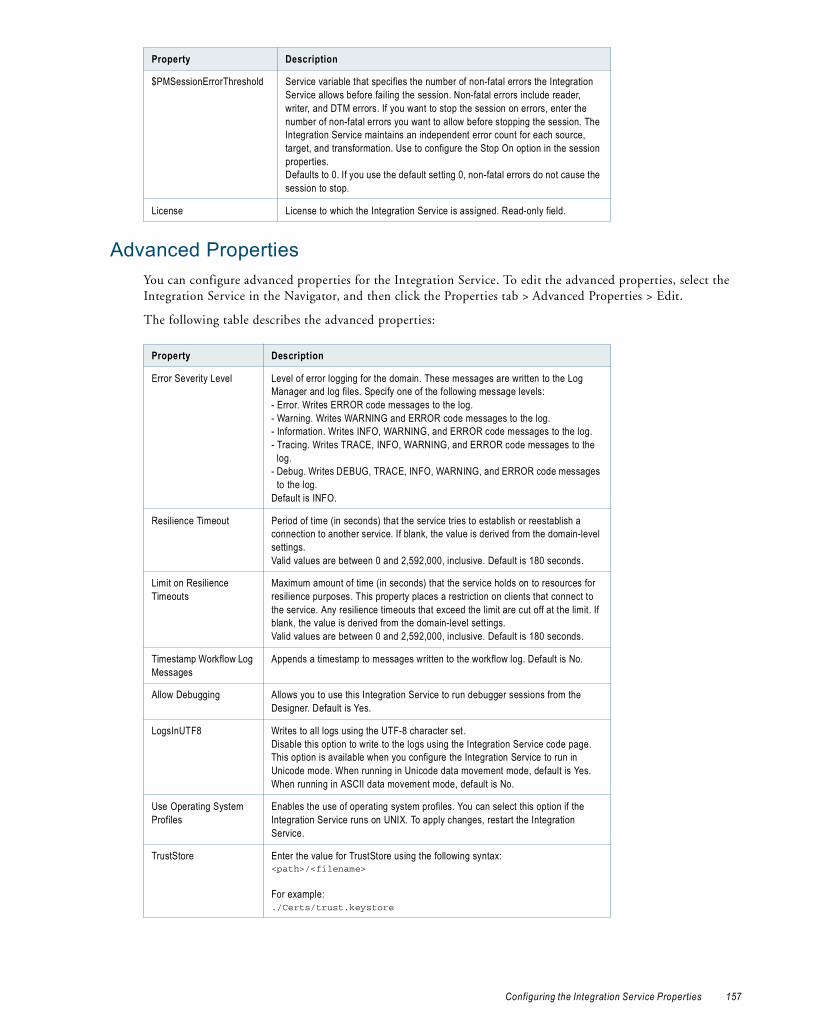
Advanced PropertiesYou can configure advanced properties for the Integration Service. To edit the advanced properties, select the Integration Service in the Navigator, and then click the Properties tab > Advanced Properties > Edit.
The following table describes the advanced properties:
$PMSessionErrorThreshold Service variable that specifies the number of non-fatal errors the Integration Service allows before failing the session. Non-fatal errors include reader, writer, and DTM errors. If you want to stop the session on errors, enter the number of non-fatal errors you want to allow before stopping the session. The Integration Service maintains an independent error count for each source, target, and transformation. Use to configure the Stop On option in the session properties.Defaults to 0. If you use the default setting 0, non-fatal errors do not cause the session to stop.
License License to which the Integration Service is assigned. Read-only field.
Property Description
Error Severity Level Level of error logging for the domain. These messages are written to the Log Manager and log files. Specify one of the following message levels:- Error. Writes ERROR code messages to the log.- Warning. Writes WARNING and ERROR code messages to the log.- Information. Writes INFO, WARNING, and ERROR code messages to the log.- Tracing. Writes TRACE, INFO, WARNING, and ERROR code messages to the
log.- Debug. Writes DEBUG, TRACE, INFO, WARNING, and ERROR code messages
to the log.Default is INFO.
Resilience Timeout Period of time (in seconds) that the service tries to establish or reestablish a connection to another service. If blank, the value is derived from the domain-level settings. Valid values are between 0 and 2,592,000, inclusive. Default is 180 seconds.
Limit on Resilience Timeouts
Maximum amount of time (in seconds) that the service holds on to resources for resilience purposes. This property places a restriction on clients that connect to the service. Any resilience timeouts that exceed the limit are cut off at the limit. If blank, the value is derived from the domain-level settings.Valid values are between 0 and 2,592,000, inclusive. Default is 180 seconds.
Timestamp Workflow Log Messages
Appends a timestamp to messages written to the workflow log. Default is No.
Allow Debugging Allows you to use this Integration Service to run debugger sessions from the Designer. Default is Yes.
LogsInUTF8 Writes to all logs using the UTF-8 character set. Disable this option to write to the logs using the Integration Service code page.This option is available when you configure the Integration Service to run in Unicode mode. When running in Unicode data movement mode, default is Yes. When running in ASCII data movement mode, default is No.
Use Operating System Profiles
Enables the use of operating system profiles. You can select this option if the Integration Service runs on UNIX. To apply changes, restart the Integration Service.
TrustStore Enter the value for TrustStore using the following syntax:<path>/<filename>
For example: ./Certs/trust.keystore
Property Description
Configuring the Integrat ion Service Properties 157

Compatibility and Database PropertiesYou can configure properties to reinstate previous PowerCenter behavior or to configure database behavior. To edit the compatibility and database properties, select the Integration Service in the Navigator, and then click the Properties tab > Compatibility and Database Properties > Edit.
ClientStore Enter the value for ClientStore using the following syntax:<path>/<filename>
For example: ./Certs/client.keystore
JCEProvider Enter the JCEProvider class name to support NTLM authentication.
For example:com.unix.crypto.provider.UnixJCE.
IgnoreResourceRequirements
Ignores task resource requirements when distributing tasks across the nodes of a grid. Used when the Integration Service runs on a grid. Ignored when the Integration Service runs on a node.Enable this option to cause the Load Balancer to ignore task resource requirements. It distributes tasks to available nodes whether or not the nodes have the resources required to run the tasks.Disable this option to cause the Load Balancer to match task resource requirements with node resource availability when distributing tasks. It distributes tasks to nodes that have the required resources.Default is Yes.
Run sessions impacted by dependency updates
Runs sessions that are impacted by dependency updates. By default, the Integration Service does not run impacted sessions. When you modify a dependent object, the parent object can become invalid. The PowerCenter client marks a session with a warning if the session is impacted. At run time, the Integration Service fails the session if it detects errors.
Persist Run-time Statistics to Repository
Level of run-time information stored in the repository. Specify one of the following levels:- None. Integration Service does not store any session or workflow run-time
information in the repository. - Normal. Integration Service stores workflow details, task details, session
statistics, and source and target statistics in the repository. Default is Normal.- Verbose. Integration Service stores workflow details, task details, session
statistics, source and target statistics, partition details, and performance details in the repository.
To store session performance details in the repository, you must also configure the session to collect performance details and write them to the repository.The Workflow Monitor shows run-time statistics stored in the repository.
Flush Session Recovery Data
Flushes session recovery data for the recovery file from the operating system buffer to the disk. For real-time sessions, the Integration Service flushes the recovery data after each flush latency interval. For all other sessions, the Integration Service flushes the recovery data after each commit interval or user-defined commit. Use this property to prevent data loss if the Integration Service is not able to write recovery data for the recovery file to the disk.Specify one of the following levels:- Auto. Integration Service flushes recovery data for all real-time sessions with a
JMS or WebSphere MQ source and a non-relational target.- Yes. Integration Service flushes recovery data for all sessions.- No. Integration Service does not flush recovery data. Select this option if you
have highly available external systems or if you need to optimize performance.Required if you enable session recovery.Default is Auto.Note: If you select Yes or Auto, you might impact performance.
Property Description
158 Chapter 9: Creating and Configuring the Integration Service

The following table describes the compatibility and database properties:
Property Description
PMServer3XCompatibility Handles Aggregator transformations as it did in version 3.5. The Integration Service treats null values as zeros in aggregate calculations and performs aggregate calculations before flagging records for insert, update, delete, or reject in Update Strategy expressions. Disable this option to treat null values as NULL and perform aggregate calculations based on the Update Strategy transformation.This overrides both Aggregate treat nulls as zero and Aggregate treat rows as insert. Default is No.
JoinerSourceOrder6xCompatibility Processes master and detail pipelines sequentially as it did in versions prior to 7.0. The Integration Service processes all data from the master pipeline before it processes the detail pipeline. When the target load order group contains multiple Joiner transformations, the Integration Service processes the detail pipelines sequentially.The Integration Service fails sessions when the mapping meets any of the following conditions:- The mapping contains a multiple input group transformation, such as
the Custom transformation. Multiple input group transformations require the Integration Service to read sources concurrently.
- You configure any Joiner transformation with transaction level transformation scope.
Disable this option to process the master and detail pipelines concurrently.Default is No.
AggregateTreatNullAsZero Treats null values as zero in Aggregator transformations. Disable this option to treat null values as NULL in aggregate calculations.Default is No.
AggregateTreatRowAsInsert When enabled, the Integration Service ignores the update strategy of rows when it performs aggregate calculations. This option ignores sorted input option of the Aggregator transformation. When disabled, the Integration Service uses the update strategy of rows when it performs aggregate calculations. Default is No.
DateHandling40Compatibility Handles dates as in version 4.0. Disable this option to handle dates as defined in the current version of PowerCenter. Date handling significantly improved in version 4.5. Enable this option to revert to version 4.0 behavior.Default is No.
TreatCHARasCHARonRead If you have PowerExchange for PeopleSoft, use this option for PeopleSoft sources on Oracle. You cannot, however, use it for PeopleSoft lookup tables on Oracle or PeopleSoft sources on Microsoft SQL Server.
Max Lookup SP DB Connections Maximum number of connections to a lookup or stored procedure database when you start a session.If the number of connections needed exceeds this value, session threads must share connections. This can result in decreased performance. If blank, the Integration Service allows an unlimited number of connections to the lookup or stored procedure database.If the Integration Service allows an unlimited number of connections, but the database user does not have permission for the number of connections required by the session, the session fails.Minimum value is 0. Default is 0.
Max Sybase Connections Maximum number of connections to a Sybase ASE database when you start a session. If the number of connections required by the session is greater than this value, the session fails. Minimum value is 100. Maximum value is 2147483647. Default is 100.
Configuring the Integrat ion Service Properties 159
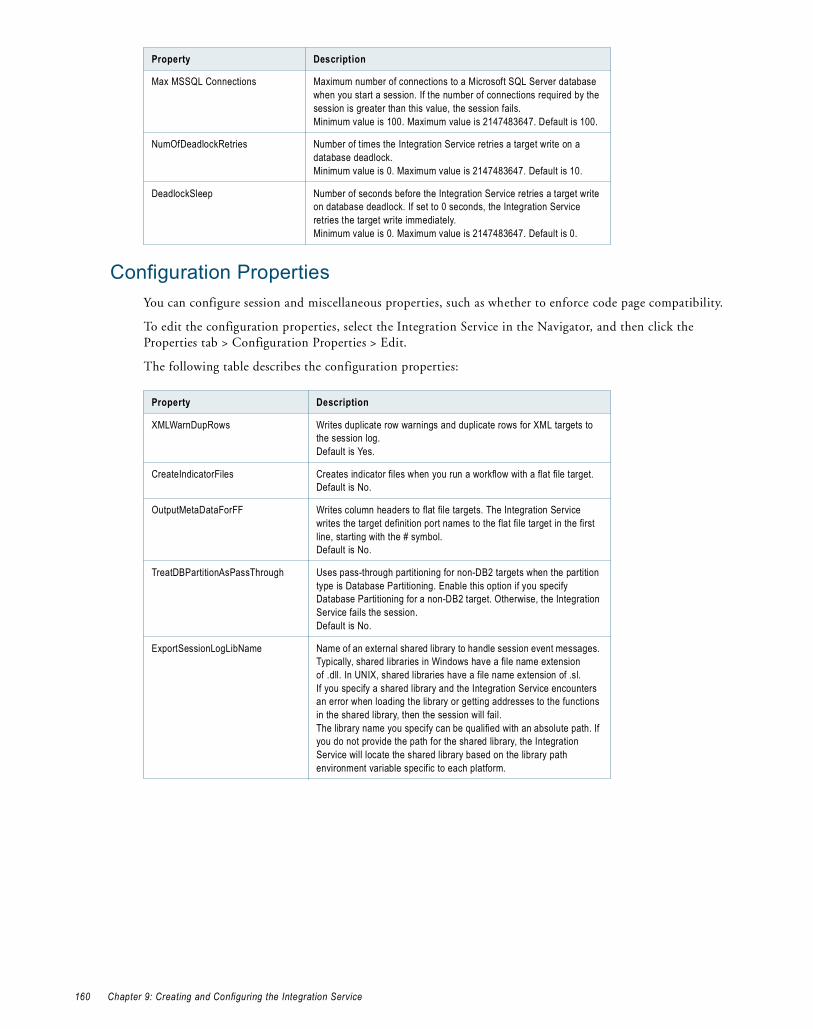
Configuration PropertiesYou can configure session and miscellaneous properties, such as whether to enforce code page compatibility.
To edit the configuration properties, select the Integration Service in the Navigator, and then click the Properties tab > Configuration Properties > Edit.
The following table describes the configuration properties:
Max MSSQL Connections Maximum number of connections to a Microsoft SQL Server database when you start a session. If the number of connections required by the session is greater than this value, the session fails. Minimum value is 100. Maximum value is 2147483647. Default is 100.
NumOfDeadlockRetries Number of times the Integration Service retries a target write on a database deadlock. Minimum value is 0. Maximum value is 2147483647. Default is 10.
DeadlockSleep Number of seconds before the Integration Service retries a target write on database deadlock. If set to 0 seconds, the Integration Service retries the target write immediately.Minimum value is 0. Maximum value is 2147483647. Default is 0.
Property Description
XMLWarnDupRows Writes duplicate row warnings and duplicate rows for XML targets to the session log. Default is Yes.
CreateIndicatorFiles Creates indicator files when you run a workflow with a flat file target.Default is No.
OutputMetaDataForFF Writes column headers to flat file targets. The Integration Service writes the target definition port names to the flat file target in the first line, starting with the # symbol. Default is No.
TreatDBPartitionAsPassThrough Uses pass-through partitioning for non-DB2 targets when the partition type is Database Partitioning. Enable this option if you specify Database Partitioning for a non-DB2 target. Otherwise, the Integration Service fails the session.Default is No.
ExportSessionLogLibName Name of an external shared library to handle session event messages. Typically, shared libraries in Windows have a file name extension of .dll. In UNIX, shared libraries have a file name extension of .sl.If you specify a shared library and the Integration Service encounters an error when loading the library or getting addresses to the functions in the shared library, then the session will fail.The library name you specify can be qualified with an absolute path. If you do not provide the path for the shared library, the Integration Service will locate the shared library based on the library path environment variable specific to each platform.
Property Description
160 Chapter 9: Creating and Configuring the Integration Service

HTTP Proxy PropertiesYou can configure properties for the HTTP proxy server for Web Services and the HTTP transformation.
To edit the HTTP proxy properties, select the Integration Service in the Navigator, and click the Properties tab > HTTP Proxy Properties > Edit.
The following table describes the HTTP proxy properties:
TreatNullInComparisonOperatorsAs Determines how the Integration Service evaluates null values in comparison operations. Specify one of the following options:- Null. The Integration Service evaluates null values as NULL in
comparison expressions. If either operand is NULL, the result is NULL.
- High. The Integration Service evaluates null values as greater than non-null values in comparison expressions. If both operands are NULL, the Integration Service evaluates them as equal. When you choose High, comparison expressions never result in NULL.
- Low. The Integration Service evaluates null values as less than non-null values in comparison expressions. If both operands are NULL, the Integration Service treats them as equal. When you choose Low, comparison expressions never result in NULL.
Default is NULL.
WriterWaitTimeOut In target-based commit mode, the amount of time in seconds the writer remains idle before it issues a commit when the following conditions are true:- The Integration Service has written data to the target.- The Integration Service has not issued a commit.The Integration Service may commit to the target before or after the configured commit interval.Minimum value is 60. Maximum value is 2147483647. Default is 60. If you configure the timeout to be 0 or a negative number, the Integration Service defaults to 60 seconds.
MSExchangeProfile Microsoft Exchange profile used by the Service Start Account to send post-session email. The Service Start Account must be set up as a Domain account to use this feature.
DateDisplayFormat Date format the Integration Service uses in log entries. The Integration Service validates the date format you enter. If the date display format is invalid, the Integration Service uses the default date display format. Default is DY MON DD HH24:MI:SS YYYY.
ValidateDataCodePages Enforces data code page compatibility. Disable this option to lift restrictions for source and target data code page selection, stored procedure and lookup database code page selection, and session sort order selection. The Integration Service performs data code page validation in Unicode data movement mode only. Option available if you run the Integration Service in Unicode data movement mode. Option disabled if you run the Integration Service in ASCII data movement mode.Default is Yes.
Property Description
HttpProxyServer Name of the HTTP proxy server.
HttpProxyPort Port number of the HTTP proxy server. This must be a number.
HttpProxyUser Authenticated user name for the HTTP proxy server. This is required if the proxy server requires authentication.
Property Description
Configuring the Integrat ion Service Properties 161

Using Operating System ProfilesBy default, the Integration Service process runs all workflows using the permissions of the operating system user that starts Informatica Services. The Integration Service writes output files to a single shared location specified in the $PMRootDir service process variable.
When you configure the Integration Service to use operating system profiles, the Integration Service process runs workflows with the permission of the operating system user you define in the operating system profile. The operating system profile contains the operating system user name, service process variables, and environment variables. The operating system user must have access to the directories you configure in the profile and the directories the Integration Service accesses at run time. You can use operating system profiles for an Integration Service that runs on UNIX.
To use an operating system profile, assign the profile to a repository folder or assign the profile to a workflow when you start a workflow. You must have permission on the operating system profile to assign it to a folder or workflow. For example, you assign operating system profile Sales to workflow A. The user that runs workflow A must also have permissions to use operating system profile Sales. The Integration Service stores the output files for workflow A in a location specified in the $PMRootDir service process variable that the profile can access.
To manage permissions for operating system profiles, go to the Security page of the Administration Console.
Operating System Profile ComponentsConfigure the following components in an operating system profile:
♦ Operating system user name. Configure the operating system user that the Integration Service uses to run workflows.
♦ Service process variables. Configure service process variables in the operating system profile to specify different output file locations based on the profile assigned to the workflow.
♦ Environment variables. Configure environment variables that the Integration Services uses at run time.
♦ Permissions. Configure permissions for users to use operating system profiles.
Configuring Operating System ProfilesTo use operating system profiles to run workflows, complete the following steps:
1. Enable operating system profiles in the Integration Service properties.
2. Set umask to 000 on every node configured to run the Integration Service. To apply changes, restart Informatica Services.
3. Configure pmimpprocess on every node configured to run the Integration Service. pmimpprocess is a tool that the DTM process, command tasks, and parameter files use to switch between operating system users.
4. Create the operating system profiles on the Security page of the Administration Console.
5. Assign permissions on operating system profiles to users or groups.
6. You can assign operating system profiles to repository folders or to a workflow.
HttpProxyPassword
Password for the authenticated user. This is required if the proxy server requires authentication.
HttpProxyDomain Domain for authentication.
Property Description
162 Chapter 9: Creating and Configuring the Integration Service

To configure pmimpprocess:
1. At the command prompt, switch to the following directory:
<PowerCenter installation directory>/server/bin
2. Enter the following information at the command line to log in as the administrator user:
su <administrator user name>
For example, if the administrator user name is root enter the following command:
su root
3. Enter the following commands to set the owner and group to the administrator user:
chown <administrator user name> pmimpprocesschgrp <administrator user name> pmimpprocess
4. Enter the following commands to set the setuid bit:
chmod +g pmimpprocesschmod +s pmimpprocess
Troubleshooting Operating System ProfilesAfter I selected Use Operating System Profiles, the Integration Service failed to start.The Integration Service will not start if operating system profiles is enabled on Windows or a grid that includes a Windows node. You can enable operating system profiles on Integration Services that run on UNIX.
or
pmimpprocess was not configured. To use operating system profiles, you must set the owner and group of pmimpprocess to administrator and enable the setuid bit for pmimpprocess.
Configuring the Associated RepositoryWhen you create the Integration Service, you specify the repository associated with the Integration Service. However, you may need to change the repository connection information. For example, you need to update the connection information if the repository is moved to a new database. You may need to choose a different repository when you move from a development repository to a production repository.
When you update or choose a new repository, you must specify the Repository Service and the user account used to access the repository. The Administration Console lists the Repository Services defined in the same domain as the Integration Service.
To edit the associated repository properties, select the Integration Service in the Domain tab of the Administration Console, and then click the Properties tab > Associated Repository Properties > Edit.
The following table describes the associated repository properties:
Property Description
Domain for Associated Repository Service
Domain that contains the Repository Service associated with the Integration Service. The Repository Service and the Integration Service must be in the same domain.This is a read-only field.
Associated Repository Service
Repository Service name to which the Integration Service connects. To apply changes to this property, restart the Integration Service.
Repository User Name User name to access the repository. To apply changes to this property, restart the Integration Service.
Configuring the Associated Repository 163
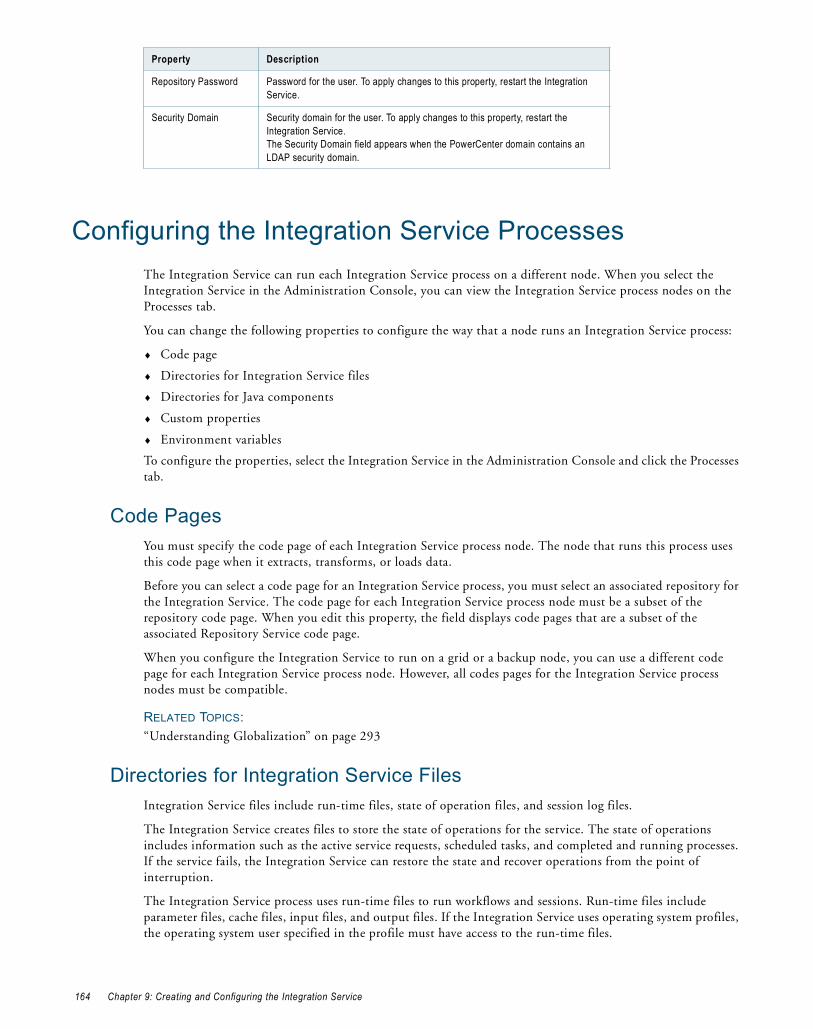
Configuring the Integration Service ProcessesThe Integration Service can run each Integration Service process on a different node. When you select the Integration Service in the Administration Console, you can view the Integration Service process nodes on the Processes tab.
You can change the following properties to configure the way that a node runs an Integration Service process:
♦ Code page
♦ Directories for Integration Service files
♦ Directories for Java components
♦ Custom properties
♦ Environment variables
To configure the properties, select the Integration Service in the Administration Console and click the Processes tab.
Code PagesYou must specify the code page of each Integration Service process node. The node that runs this process uses this code page when it extracts, transforms, or loads data.
Before you can select a code page for an Integration Service process, you must select an associated repository for the Integration Service. The code page for each Integration Service process node must be a subset of the repository code page. When you edit this property, the field displays code pages that are a subset of the associated Repository Service code page.
When you configure the Integration Service to run on a grid or a backup node, you can use a different code page for each Integration Service process node. However, all codes pages for the Integration Service process nodes must be compatible.
RELATED TOPICS:“Understanding Globalization” on page 293
Directories for Integration Service FilesIntegration Service files include run-time files, state of operation files, and session log files.
The Integration Service creates files to store the state of operations for the service. The state of operations includes information such as the active service requests, scheduled tasks, and completed and running processes. If the service fails, the Integration Service can restore the state and recover operations from the point of interruption.
The Integration Service process uses run-time files to run workflows and sessions. Run-time files include parameter files, cache files, input files, and output files. If the Integration Service uses operating system profiles, the operating system user specified in the profile must have access to the run-time files.
Repository Password Password for the user. To apply changes to this property, restart the Integration Service.
Security Domain Security domain for the user. To apply changes to this property, restart the Integration Service. The Security Domain field appears when the PowerCenter domain contains an LDAP security domain.
Property Description
164 Chapter 9: Creating and Configuring the Integration Service
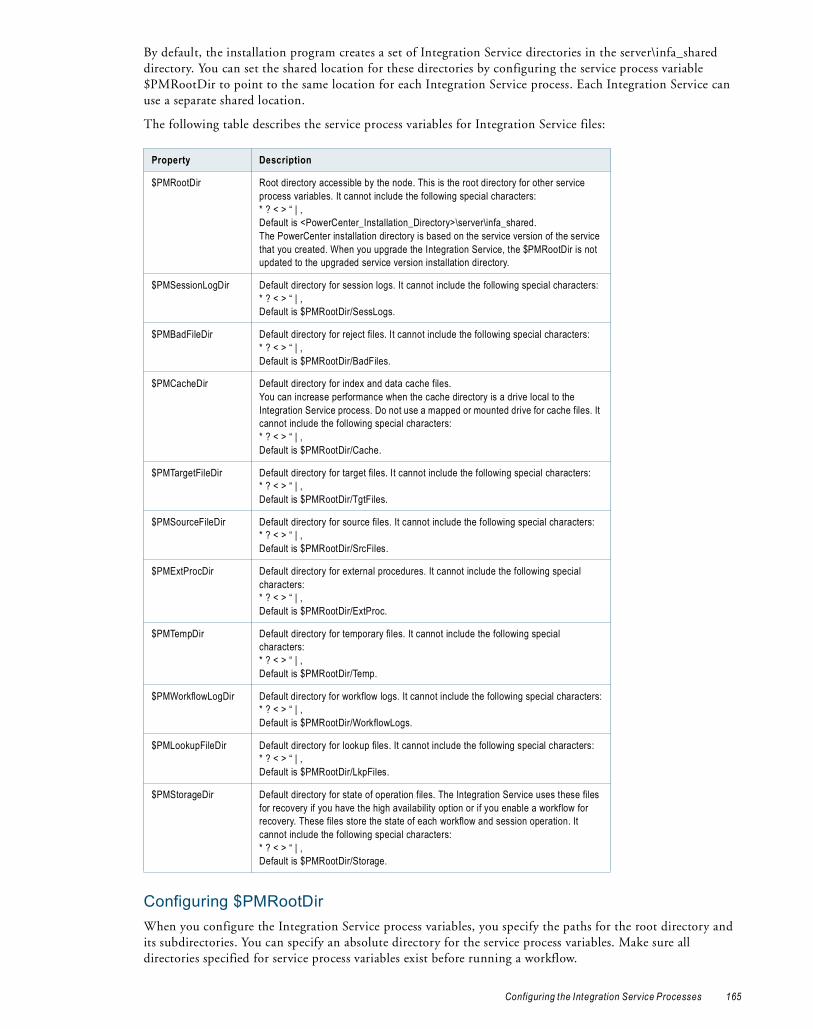
By default, the installation program creates a set of Integration Service directories in the server\infa_shared directory. You can set the shared location for these directories by configuring the service process variable $PMRootDir to point to the same location for each Integration Service process. Each Integration Service can use a separate shared location.
The following table describes the service process variables for Integration Service files:
Configuring $PMRootDirWhen you configure the Integration Service process variables, you specify the paths for the root directory and its subdirectories. You can specify an absolute directory for the service process variables. Make sure all directories specified for service process variables exist before running a workflow.
Property Description
$PMRootDir Root directory accessible by the node. This is the root directory for other service process variables. It cannot include the following special characters:* ? < > “ | ,Default is <PowerCenter_Installation_Directory>\server\infa_shared.The PowerCenter installation directory is based on the service version of the service that you created. When you upgrade the Integration Service, the $PMRootDir is not updated to the upgraded service version installation directory.
$PMSessionLogDir Default directory for session logs. It cannot include the following special characters:* ? < > “ | ,Default is $PMRootDir/SessLogs.
$PMBadFileDir Default directory for reject files. It cannot include the following special characters:* ? < > “ | ,Default is $PMRootDir/BadFiles.
$PMCacheDir Default directory for index and data cache files. You can increase performance when the cache directory is a drive local to the Integration Service process. Do not use a mapped or mounted drive for cache files. It cannot include the following special characters:* ? < > “ | ,Default is $PMRootDir/Cache.
$PMTargetFileDir Default directory for target files. It cannot include the following special characters:* ? < > “ | ,Default is $PMRootDir/TgtFiles.
$PMSourceFileDir Default directory for source files. It cannot include the following special characters:* ? < > “ | ,Default is $PMRootDir/SrcFiles.
$PMExtProcDir Default directory for external procedures. It cannot include the following special characters:* ? < > “ | ,Default is $PMRootDir/ExtProc.
$PMTempDir Default directory for temporary files. It cannot include the following special characters:* ? < > “ | ,Default is $PMRootDir/Temp.
$PMWorkflowLogDir Default directory for workflow logs. It cannot include the following special characters:* ? < > “ | ,Default is $PMRootDir/WorkflowLogs.
$PMLookupFileDir Default directory for lookup files. It cannot include the following special characters:* ? < > “ | ,Default is $PMRootDir/LkpFiles.
$PMStorageDir Default directory for state of operation files. The Integration Service uses these files for recovery if you have the high availability option or if you enable a workflow for recovery. These files store the state of each workflow and session operation. It cannot include the following special characters:* ? < > “ | ,Default is $PMRootDir/Storage.
Configuring the Integration Service Processes 165
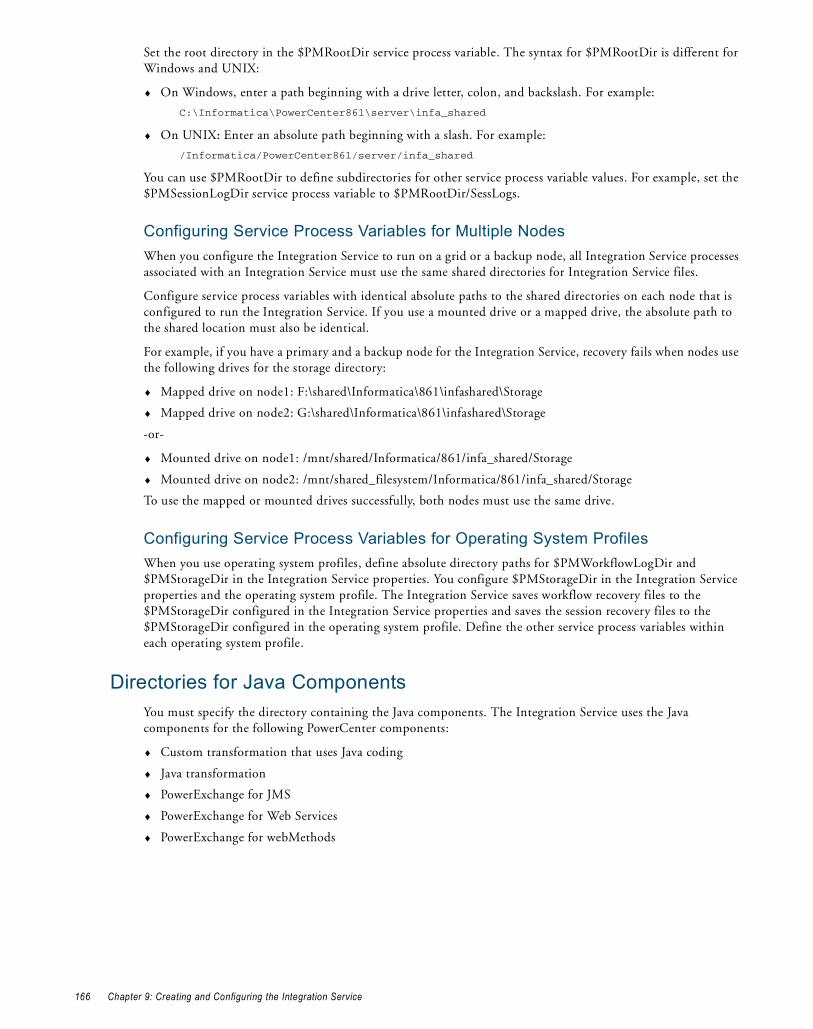
Set the root directory in the $PMRootDir service process variable. The syntax for $PMRootDir is different for Windows and UNIX:
♦ On Windows, enter a path beginning with a drive letter, colon, and backslash. For example:
C:\Informatica\PowerCenter861\server\infa_shared
♦ On UNIX: Enter an absolute path beginning with a slash. For example:
/Informatica/PowerCenter861/server/infa_shared
You can use $PMRootDir to define subdirectories for other service process variable values. For example, set the $PMSessionLogDir service process variable to $PMRootDir/SessLogs.
Configuring Service Process Variables for Multiple NodesWhen you configure the Integration Service to run on a grid or a backup node, all Integration Service processes associated with an Integration Service must use the same shared directories for Integration Service files.
Configure service process variables with identical absolute paths to the shared directories on each node that is configured to run the Integration Service. If you use a mounted drive or a mapped drive, the absolute path to the shared location must also be identical.
For example, if you have a primary and a backup node for the Integration Service, recovery fails when nodes use the following drives for the storage directory:
♦ Mapped drive on node1: F:\shared\Informatica\861\infashared\Storage
♦ Mapped drive on node2: G:\shared\Informatica\861\infashared\Storage
-or-
♦ Mounted drive on node1: /mnt/shared/Informatica/861/infa_shared/Storage
♦ Mounted drive on node2: /mnt/shared_filesystem/Informatica/861/infa_shared/Storage
To use the mapped or mounted drives successfully, both nodes must use the same drive.
Configuring Service Process Variables for Operating System ProfilesWhen you use operating system profiles, define absolute directory paths for $PMWorkflowLogDir and $PMStorageDir in the Integration Service properties. You configure $PMStorageDir in the Integration Service properties and the operating system profile. The Integration Service saves workflow recovery files to the $PMStorageDir configured in the Integration Service properties and saves the session recovery files to the $PMStorageDir configured in the operating system profile. Define the other service process variables within each operating system profile.
Directories for Java ComponentsYou must specify the directory containing the Java components. The Integration Service uses the Java components for the following PowerCenter components:
♦ Custom transformation that uses Java coding
♦ Java transformation
♦ PowerExchange for JMS
♦ PowerExchange for Web Services
♦ PowerExchange for webMethods
166 Chapter 9: Creating and Configuring the Integration Service

The following table describes the directories for Java Components:
Custom PropertiesIf required, you can also configure custom properties for each node assigned to the Integration Service. Custom properties include properties that are unique to your PowerCenter environment or that apply in special cases. An Integration Service process has no custom properties when you initially create it. Use custom properties only if Informatica Global Customer Support instructs you to.
Environment VariablesThe database client path on a node is controlled by an environment variable. Set the database client path environment variable for the Integration Service process if the Integration Service process requires a different database client than another Integration Service process that is running on the same node. For example, the service version of each Integration Service running on the node requires a different database client version. You can configure each Integration Service process to use a different value for the database client environment variable.
The database client code page on a node is usually controlled by an environment variable. For example, Oracle uses NLS_LANG, and IBM DB2 uses DB2CODEPAGE. All Integration Services and Repository Services that run on this node use the same environment variable. You can configure an Integration Service process to use a different value for the database client code page environment variable than the value set for the node.
You might want to configure the code page environment variable for an Integration Service process for the following reasons:
♦ An Integration Service and Repository Service running on the node require different database client code pages. For example, you have a Shift-JIS repository that requires that the code page environment variable be set to Shift-JIS. However, the Integration Service reads from and writes to databases using the UTF-8 code page. The Integration Service requires that the code page environment variable be set to UTF-8.
Set the environment variable on the node to Shift-JIS Then add the environment variable to the Integration Service process properties and set the value to UTF-8.
♦ Multiple Integration Services running on the node use different data movement modes. For example, you have one Integration Service running in Unicode mode and another running in ASCII mode on the same node. The Integration Service running in Unicode mode requires that the code page environment variable be set to UTF-8. For optimal performance, the Integration Service running in ASCII mode requires that the code page environment variable be set to 7-bit ASCII.
Set the environment variable on the node to UTF-8. Then add the environment variable to the properties of the Integration Service process running in ASCII mode and set the value to 7-bit ASCII.
If the Integration Service uses operating system profiles, environment variables configured in the operating system profile override the environment variables set in the general properties for the Integration Service process.
Property Description
Java SDK ClassPath Java SDK classpath. You can set the classpath to any JAR files you need to run a session that require java components. The Integration Service appends the values you set to the system CLASSPATH. For more information, see “Directories for Java Components” on page 166.
Java SDK Minimum Memory
Minimum amount of memory the Java SDK uses during a session.If the session fails due to a lack of memory, you may want to increase this value.Default is 32 MB.
Java SDK Maximum Memory
Maximum amount of memory the Java SDK uses during a session.If the session fails due to a lack of memory, you may want to increase this value.Default is 64 MB.
Configuring the Integration Service Processes 167

168 Chapter 9: Creating and Configuring the Integration Service

C H A P T E R 1 0
Integration Service Architecture
This chapter includes the following topics:
♦ Overview, 169
♦ Integration Service Connectivity, 170
♦ Integration Service Process, 171
♦ Load Balancer, 173
♦ Data Transformation Manager (DTM) Process, 175
♦ Processing Threads, 177
♦ DTM Processing, 180
♦ Grids, 181
♦ System Resources, 183
♦ Code Pages and Data Movement Modes, 184
♦ Output Files and Caches, 185
OverviewThe Integration Service moves data from sources to targets based on workflow and mapping metadata stored in a repository. When a workflow starts, the Integration Service retrieves mapping, workflow, and session metadata from the repository. It extracts data from the mapping sources and stores the data in memory while it applies the transformation rules configured in the mapping. The Integration Service loads the transformed data into one or more targets.
The following figure shows the processing path between the Integration Service, repository, source, and target:
Source Integration Service
Repository
Source Data Transformed Data
Instructions from Metadata
Target
169
To move data from sources to targets, the Integration Service uses the following components:
♦ Integration Service process. The Integration Service starts one or more Integration Service processes to run and monitor workflows. When you run a workflow, the Integration Service process starts and locks the workflow, runs the workflow tasks, and starts the process to run sessions. For more information, see “Integration Service Process” on page 171.
♦ Load Balancer. The Integration Service uses the Load Balancer to dispatch tasks. The Load Balancer dispatches tasks to achieve optimal performance. It may dispatch tasks to a single node or across the nodes in a grid. For more information, see “Load Balancer” on page 173.
♦ Data Transformation Manager (DTM) process. The Integration Service starts a DTM process to run each Session and Command task within a workflow. The DTM process performs session validations, creates threads to initialize the session, read, write, and transform data, and handles pre- and post- session operations. For more information, see “Data Transformation Manager (DTM) Process” on page 175.
The Integration Service can achieve high performance using symmetric multi-processing systems. It can start and run multiple tasks concurrently. It can also concurrently process partitions within a single session. When you create multiple partitions within a session, the Integration Service creates multiple database connections to a single source and extracts a separate range of data for each connection. It also transforms and loads the data in parallel. For more information, see “Processing Threads” on page 177.
You can create an Integration Service on any machine where you installed the PowerCenter Services. You can configure the Integration Service using the Administration Console or the pmcmd command line program.
Integration Service ConnectivityThe Integration Service connects to the following PowerCenter components:
♦ PowerCenter Client
♦ Repository Service
♦ Source and target databases
The Integration Service is a repository client. It connects to the Repository Service to retrieve workflow and mapping metadata from the repository database. When the Integration Service process requests a repository connection, the request is routed through the master gateway, which sends back Repository Service information to the Integration Service process. The Integration Service process connects to the Repository Service. The Repository Service connects to the repository and performs repository metadata transactions for the client application.
The Workflow Manager communicates with the Integration Service process over a TCP/IP connection. The Workflow Manager communicates with the Integration Service process each time you schedule or edit a workflow, display workflow details, and request workflow and session logs. Use the connection information defined for the domain to access the Integration Service from the Workflow Manager.
The Integration Service process connects to the source or target database using ODBC or native drivers. The Integration Service process maintains a database connection pool for stored procedures or lookup databases in a workflow. The Integration Service process allows an unlimited number of connections to lookup or stored procedure databases. If a database user does not have permission for the number of connections a session requires, the session fails. You can optionally set a parameter to limit the database connections. For a session, the Integration Service process holds the connection as long as it needs to read data from source tables or write data to target tables.
170 Chapter 10: Integration Service Architecture

The following table summarizes the software you need to connect the Integration Service to the platform components, source databases, and target databases:
Integration Service ProcessThe Integration Service starts an Integration Service process to run and monitor workflows. The Integration Service process is also known as the pmserver process. The Integration Service process accepts requests from the PowerCenter Client and from pmcmd. It performs the following tasks:
♦ Manages workflow scheduling.
♦ Locks and reads the workflow.
♦ Reads the parameter file.
♦ Creates the workflow log.
♦ Runs workflow tasks and evaluates the conditional links connecting tasks.
♦ Starts the DTM process or processes to run the session.
♦ Writes historical run information to the repository.
♦ Sends post-session email in the event of a DTM failure.
Managing Workflow SchedulingThe Integration Service process manages workflow scheduling in the following situations:
♦ When you start the Integration Service. When you start the Integration Service, it queries the repository for a list of workflows configured to run on it.
♦ When you save a workflow. When you save a workflow assigned to an Integration Service to the repository, the Integration Service process adds the workflow to or removes the workflow from the schedule queue.
Locking and Reading the WorkflowWhen the Integration Service process starts a workflow, it requests an execute lock on the workflow from the repository. The execute lock allows the Integration Service process to run the workflow and prevents you from starting the workflow again until it completes. If the workflow is already locked, the Integration Service process cannot start the workflow. A workflow may be locked if it is already running.
The Integration Service process also reads the workflow from the repository at workflow run time. The Integration Service process reads all links and tasks in the workflow except sessions and worklet instances. The Integration Service process reads session instance information from the repository. The DTM retrieves the session and mapping from the repository at session run time. The Integration Service process reads worklets from the repository when the worklet starts.
Integration Service Connection Connectivity Requirement
PowerCenter Client TCP/IP
Other Integration Service Processes TCP/IP
Repository Service TCP/IP
Source and target databases Native database drivers or ODBC
Note: Both the Windows and UNIX versions of the Integration Service can use ODBC drivers to connect to databases. Use native drivers to improve performance.
Integration Service Process 171
Reading the Parameter FileWhen the workflow starts, the Integration Service process checks the workflow properties for use of a parameter file. If the workflow uses a parameter file, the Integration Service process reads the parameter file and expands the variable values for the workflow and any worklets invoked by the workflow.
The parameter file can also contain mapping parameters and variables and session parameters for sessions in the workflow, as well as service and service process variables for the service process that runs the workflow. When starting the DTM, the Integration Service process passes the parameter file name to the DTM.
Creating the Workflow LogThe Integration Service process creates a log for the workflow. The workflow log contains a history of the workflow run, including initialization, workflow task status, and error messages. You can use information in the workflow log in conjunction with the Integration Service log and session log to troubleshoot system, workflow, or session problems.
Running Workflow TasksThe Integration Service process runs workflow tasks according to the conditional links connecting the tasks. Links define the order of execution for workflow tasks. When a task in the workflow completes, the Integration Service process evaluates the completed task according to specified conditions, such as success or failure. Based on the result of the evaluation, the Integration Service process runs successive links and tasks.
Running Workflows Across the Nodes in a GridWhen you run an Integration Service on a grid, the service processes run workflow tasks across the nodes of the grid. The domain designates one service process as the master service process. The master service process monitors the worker service processes running on separate nodes. The worker service processes run workflows across the nodes in a grid.
Starting the DTM ProcessWhen the workflow reaches a session, the Integration Service process starts the DTM process. The Integration Service process provides the DTM process with session and parameter file information that allows the DTM to retrieve the session and mapping metadata from the repository. When you run a session on a grid, the worker service process starts multiple DTM processes that run groups of session threads.
When you use operating system profiles, the Integration Services starts the DTM process with the system user account you specify in the operating system profile.
Writing Historical Information to the RepositoryThe Integration Service process monitors the status of workflow tasks during the workflow run. When workflow tasks start or finish, the Integration Service process writes historical run information to the repository. Historical run information for tasks includes start and completion times and completion status. Historical run information for sessions also includes source read statistics, target load statistics, and number of errors. You can view this information using the Workflow Monitor.
Sending Post-Session EmailThe Integration Service process sends post-session email if the DTM terminates abnormally. The DTM sends post-session email in all other cases.
172 Chapter 10: Integration Service Architecture
Load BalancerThe Load Balancer is a component of the Integration Service that dispatches tasks to achieve optimal performance and scalability. When you run a workflow, the Load Balancer dispatches the Session, Command, and predefined Event-Wait tasks within the workflow. The Load Balancer matches task requirements with resource availability to identify the best node to run a task. It dispatches the task to an Integration Service process running on the node. It may dispatch tasks to a single node or across nodes.
The Load Balancer dispatches tasks in the order it receives them. When the Load Balancer needs to dispatch more Session and Command tasks than the Integration Service can run, it places the tasks it cannot run in a queue. When nodes become available, the Load Balancer dispatches tasks from the queue in the order determined by the workflow service level.
The following concepts describe Load Balancer functionality:
♦ Dispatch process. The Load Balancer performs several steps to dispatch tasks. For more information, see “Dispatch Process” on page 173.
♦ Resources. The Load Balancer can use PowerCenter resources to determine if it can dispatch a task to a node. For more information, see “Resources” on page 174.
♦ Resource provision thresholds. The Load Balancer uses resource provision thresholds to determine whether it can start additional tasks on a node. For more information, see “Resource Provision Thresholds” on page 174.
♦ Dispatch mode. The dispatch mode determines how the Load Balancer selects nodes for dispatch. For more information, see “Dispatch Mode” on page 174.
♦ Service levels. When multiple tasks are waiting in the dispatch queue, the Load Balancer uses service levels to determine the order in which to dispatch tasks from the queue. For more information, see “Service Levels” on page 175.
Dispatch ProcessThe Load Balancer uses different criteria to dispatch tasks depending on whether the Integration Service runs on a node or a grid.
Dispatching Tasks on a NodeWhen the Integration Service runs on a node, the Load Balancer performs the following steps to dispatch a task:
1. The Load Balancer checks resource provision thresholds on the node. If dispatching the task causes any threshold to be exceeded, the Load Balancer places the task in the dispatch queue, and it dispatches the task later.
The Load Balancer checks different thresholds depending on the dispatch mode.
2. The Load Balancer dispatches all tasks to the node that runs the master Integration Service process.
Dispatching Tasks Across a GridWhen the Integration Service runs on a grid, the Load Balancer performs the following steps to determine on which node to run a task:
1. The Load Balancer verifies which nodes are currently running and enabled.
2. If you configure the Integration Service to check resource requirements, the Load Balancer identifies nodes that have the PowerCenter resources required by the tasks in the workflow.
3. The Load Balancer verifies that the resource provision thresholds on each candidate node are not exceeded. If dispatching the task causes a threshold to be exceeded, the Load Balancer places the task in the dispatch queue, and it dispatches the task later.
The Load Balancer checks thresholds based on the dispatch mode.
Load Balancer 173
4. The Load Balancer selects a node based on the dispatch mode.
ResourcesYou can configure the Integration Service to check the resources available on each node and match them with the resources required to run the task. If you configure the Integration Service to run on a grid and to check resources, the Load Balancer dispatches a task to a node where the required PowerCenter resources are available. For example, if a session uses an SAP source, the Load Balancer dispatches the session only to nodes where the SAP client is installed. If no available node has the required resources, the Integration Service fails the task.
You configure the Integration Service to check resources in the Administration Console.
You define resources available to a node in the Administration Console. You assign resources required by a task in the task properties.
The Integration Service writes resource requirements and availability information in the workflow log.
Resource Provision ThresholdsThe Load Balancer uses resource provision thresholds to determine the maximum load acceptable for a node. The Load Balancer can dispatch a task to a node when dispatching the task does not cause the resource provision thresholds to be exceeded.
The Load Balancer checks the following thresholds:
♦ Maximum CPU Run Queue Length. The maximum number of runnable threads waiting for CPU resources on the node. The Load Balancer excludes the node if the maximum number of waiting threads is exceeded.
The Load Balancer checks this threshold in metric-based and adaptive dispatch modes.
♦ Maximum Memory %. The maximum percentage of virtual memory allocated on the node relative to the total physical memory size. The Load Balancer excludes the node if dispatching the task causes this threshold to be exceeded.
The Load Balancer checks this threshold in metric-based and adaptive dispatch modes.
♦ Maximum Processes. The maximum number of running processes allowed for each Integration Service process that runs on the node. The Load Balancer excludes the node if dispatching the task causes this threshold to be exceeded.
The Load Balancer checks this threshold in all dispatch modes.
If all nodes in the grid have reached the resource provision thresholds before any PowerCenter task has been dispatched, the Load Balancer dispatches tasks one at a time to ensure that PowerCenter tasks are still executed.
You define resource provision thresholds in the node properties in the Administration Console.
RELATED TOPICS:♦ Defining Resource Provision Thresholds, 225
Dispatch ModeThe dispatch mode determines how the Load Balancer selects nodes to distribute workflow tasks. The Load Balancer uses the following dispatch modes:
♦ Round-robin. The Load Balancer dispatches tasks to available nodes in a round-robin fashion. It checks the Maximum Processes threshold on each available node and excludes a node if dispatching a task causes the threshold to be exceeded. This mode is the least compute-intensive and is useful when the load on the grid is even and the tasks to dispatch have similar computing requirements.
♦ Metric-based. The Load Balancer evaluates nodes in a round-robin fashion. It checks all resource provision thresholds on each available node and excludes a node if dispatching a task causes the thresholds to be exceeded. The Load Balancer continues to evaluate nodes until it finds a node that can accept the task. This mode prevents overloading nodes when tasks have uneven computing requirements.
174 Chapter 10: Integration Service Architecture
♦ Adaptive. The Load Balancer ranks nodes according to current CPU availability. It checks all resource provision thresholds on each available node and excludes a node if dispatching a task causes the thresholds to be exceeded. This mode prevents overloading nodes and ensures the best performance on a grid that is not heavily loaded.
When the Load Balancer runs in metric-based or adaptive mode, it uses task statistics to determine whether a task can run on a node. The Load Balancer averages statistics from the last three runs of the task to estimate the computing resources required to run the task. If no statistics exist in the repository, the Load Balancer uses default values.
In adaptive dispatch mode, the Load Balancer can use the CPU profile for the node to identify the node with the most computing resources.
You configure the dispatch mode in the domain properties in the Administration Console.
Service LevelsService levels establish priority among tasks that are waiting to be dispatched. When the Load Balancer has more Session and Command tasks to dispatch than the Integration Service can run at the time, the Load Balancer places the tasks in the dispatch queue. When nodes become available, the Load Balancer dispatches tasks from the queue. The Load Balancer uses service levels to determine the order in which to dispatch tasks from the queue.
Each service level has the following properties:
♦ Name. Name of the service level.
♦ Dispatch priority. A number that establishes the task priority in the dispatch queue. The Load Balancer dispatches tasks with high priority before it dispatches tasks with low priority. When multiple tasks in the queue have the same dispatch priority, the Load Balancer dispatches the tasks in the order it receives them.
♦ Maximum dispatch wait time. The amount of time a task can wait in the dispatch queue before the Load Balancer changes its dispatch priority to the maximum priority. This ensures that no task waits forever in the dispatch queue.
You create and edit service levels in the domain properties in the Administration Console. You assign service levels to workflows in the workflow properties in the Workflow Manager.
Data Transformation Manager (DTM) ProcessThe Integration Service process starts the DTM process to run a session. The DTM process is also known as the pmdtm process. The DTM is the process associated with the session task. The DTM process performs the following tasks:
♦ Retrieves and validates session information from the repository.
♦ Performs pushdown optimization when the session is configured for pushdown optimization.
♦ Adds partitions to the session when the session is configured for dynamic partitioning.
♦ Forms partition groups when the session is configured to run on a grid.
♦ Expands the service process variables, session parameters, and mapping variables and parameters.
♦ Creates the session log.
♦ Validates source and target code pages.
♦ Verifies connection object permissions.
♦ Runs pre-session shell commands, stored procedures, and SQL.
♦ Sends a request to start worker DTM processes on other nodes when the session is configured to run on a grid.
♦ Creates and runs mapping, reader, writer, and transformation threads to extract, transform, and load data.
Data Transformation Manager (DTM) Process 175
♦ Runs post-session stored procedures, SQL, and shell commands.
♦ Sends post-session email.
Note: If you use operating system profiles, the Integration Service runs the DTM process as the operating system user you specify in the operating system profile.
Reading the Session InformationThe Integration Service process provides the DTM with session instance information when it starts the DTM. The DTM retrieves the mapping and session metadata from the repository and validates it.
Performing Pushdown OptimizationIf the session is configured for pushdown optimization, the DTM runs a SQL statement to push transformation logic to the source or target database.
Creating Dynamic PartitionsThe DTM adds partitions to the session if you configure the session for dynamic partitioning. The DTM scales the number of session partitions based on factors such as source database partitions or the number of nodes in a grid.
Forming Partition GroupsIf you run a session on a grid, the DTM forms partition groups. A partition group is a group of reader, writer, and transformation threads that runs in a single DTM process. The DTM process forms partition groups and distributes them to worker DTM processes running on nodes in the grid.
Expanding Variables and ParametersIf the workflow uses a parameter file, the Integration Service process sends the parameter file to the DTM when it starts the DTM. The DTM creates and expands session-level, Integration Service-level, and mapping-level variables and parameters.
Creating the Session LogThe DTM creates logs for the session. The session log contains a complete history of the session run, including initialization, transformation, status, and error messages. You can use information in the session log in conjunction with the Integration Service log and the workflow log to troubleshoot system or session problems.
Validating Code PagesThe Integration Service processes data internally using the UCS-2 character set. When you disable data code page validation, the Integration Service verifies that the source query, target query, lookup database query, and stored procedure call text convert from the source, target, lookup, or stored procedure data code page to the UCS-2 character set without loss of data in conversion. If the Integration Service encounters an error when converting data, it writes an error message to the session log.
Verifying Connection Object PermissionsAfter validating the session code pages, the DTM verifies permissions for connection objects used in the session. The DTM verifies that the user who started or scheduled the workflow has execute permissions for connection objects associated with the session.
176 Chapter 10: Integration Service Architecture

Starting Worker DTM ProcessesThe DTM sends a request to the Integration Service process to start worker DTM processes on other nodes when the session is configured to run on a grid.
Running Pre-Session OperationsAfter verifying connection object permissions, the DTM runs pre-session shell commands. The DTM then runs pre-session stored procedures and SQL commands.
Running the Processing ThreadsAfter initializing the session, the DTM uses reader, transformation, and writer threads to extract, transform, and load data. The number of threads the DTM uses to run the session depends on the number of partitions configured for the session.
Running Post-Session OperationsAfter the DTM runs the processing threads, it runs post-session SQL commands and stored procedures. The DTM then runs post-session shell commands.
Sending Post-Session EmailWhen the session finishes, the DTM composes and sends email that reports session completion or failure. If the DTM terminates abnormally, the Integration Service process sends post-session email.
Processing ThreadsThe DTM allocates process memory for the session and divides it into buffers. This is also known as buffer memory. The default memory allocation is 12,000,000 bytes. The DTM uses multiple threads to process data in a session. The main DTM thread is called the master thread.
The master thread creates and manages other threads. The master thread for a session can create mapping, pre-session, post-session, reader, transformation, and writer threads.
For each target load order group in a mapping, the master thread can create several threads. The types of threads depend on the session properties and the transformations in the mapping. The number of threads depends on the partitioning information for each target load order group in the mapping.
The following figure shows the threads the master thread creates for a simple mapping that contains one target load order group:
The mapping contains a single partition. In this case, the master thread creates one reader, one transformation, and one writer thread to process the data. The reader thread controls how the Integration Service process extracts source data and passes it to the source qualifier, the transformation thread controls how the Integration Service process handles the data, and the writer thread controls how the Integration Service process loads data to the target.
1 Reader Thread 1 Writer Thread1 Transformation Thread
Processing Threads 177
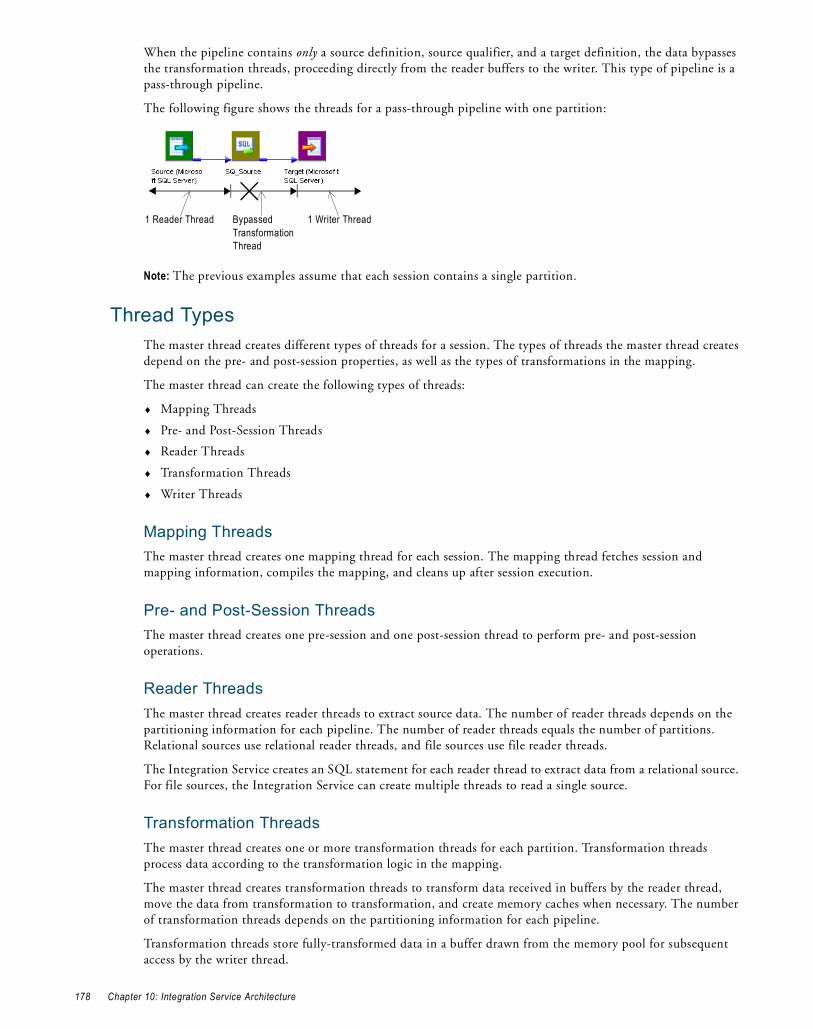
When the pipeline contains only a source definition, source qualifier, and a target definition, the data bypasses the transformation threads, proceeding directly from the reader buffers to the writer. This type of pipeline is a pass-through pipeline.
The following figure shows the threads for a pass-through pipeline with one partition:
Note: The previous examples assume that each session contains a single partition.
Thread TypesThe master thread creates different types of threads for a session. The types of threads the master thread creates depend on the pre- and post-session properties, as well as the types of transformations in the mapping.
The master thread can create the following types of threads:
♦ Mapping Threads
♦ Pre- and Post-Session Threads
♦ Reader Threads
♦ Transformation Threads
♦ Writer Threads
Mapping ThreadsThe master thread creates one mapping thread for each session. The mapping thread fetches session and mapping information, compiles the mapping, and cleans up after session execution.
Pre- and Post-Session ThreadsThe master thread creates one pre-session and one post-session thread to perform pre- and post-session operations.
Reader ThreadsThe master thread creates reader threads to extract source data. The number of reader threads depends on the partitioning information for each pipeline. The number of reader threads equals the number of partitions. Relational sources use relational reader threads, and file sources use file reader threads.
The Integration Service creates an SQL statement for each reader thread to extract data from a relational source. For file sources, the Integration Service can create multiple threads to read a single source.
Transformation ThreadsThe master thread creates one or more transformation threads for each partition. Transformation threads process data according to the transformation logic in the mapping.
The master thread creates transformation threads to transform data received in buffers by the reader thread, move the data from transformation to transformation, and create memory caches when necessary. The number of transformation threads depends on the partitioning information for each pipeline.
Transformation threads store fully-transformed data in a buffer drawn from the memory pool for subsequent access by the writer thread.
1 Reader Thread 1 Writer ThreadBypassed Transformation Thread
178 Chapter 10: Integration Service Architecture
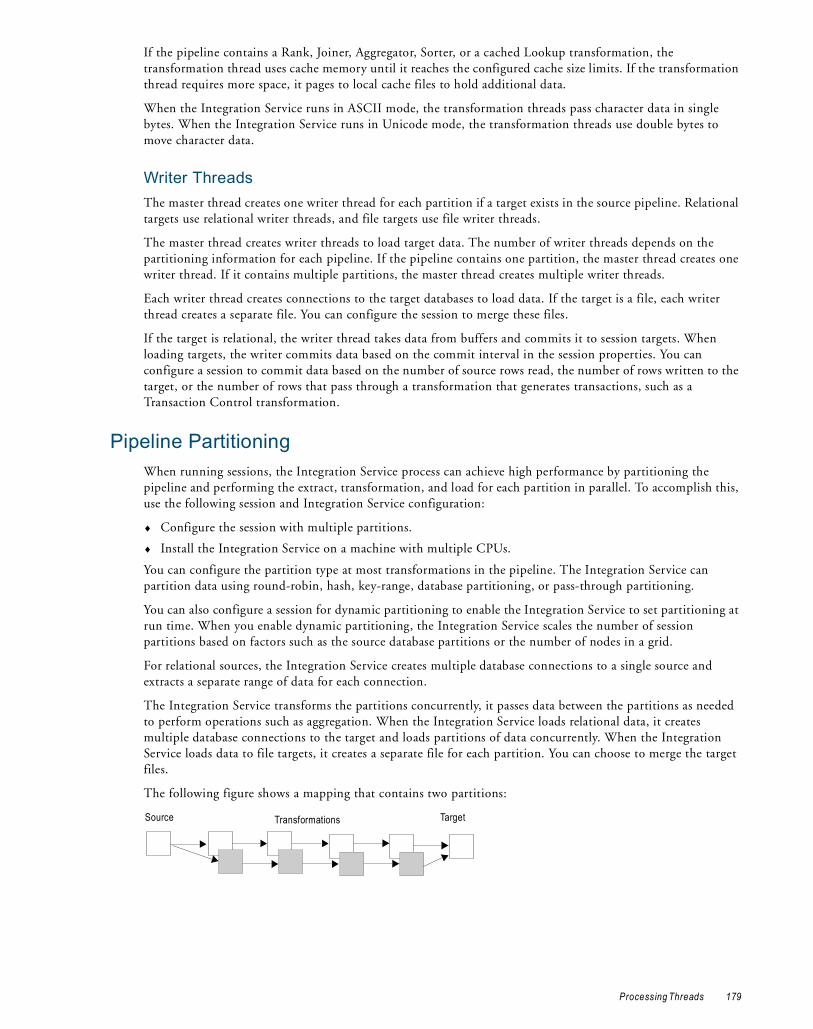
If the pipeline contains a Rank, Joiner, Aggregator, Sorter, or a cached Lookup transformation, the transformation thread uses cache memory until it reaches the configured cache size limits. If the transformation thread requires more space, it pages to local cache files to hold additional data.
When the Integration Service runs in ASCII mode, the transformation threads pass character data in single bytes. When the Integration Service runs in Unicode mode, the transformation threads use double bytes to move character data.
Writer ThreadsThe master thread creates one writer thread for each partition if a target exists in the source pipeline. Relational targets use relational writer threads, and file targets use file writer threads.
The master thread creates writer threads to load target data. The number of writer threads depends on the partitioning information for each pipeline. If the pipeline contains one partition, the master thread creates one writer thread. If it contains multiple partitions, the master thread creates multiple writer threads.
Each writer thread creates connections to the target databases to load data. If the target is a file, each writer thread creates a separate file. You can configure the session to merge these files.
If the target is relational, the writer thread takes data from buffers and commits it to session targets. When loading targets, the writer commits data based on the commit interval in the session properties. You can configure a session to commit data based on the number of source rows read, the number of rows written to the target, or the number of rows that pass through a transformation that generates transactions, such as a Transaction Control transformation.
Pipeline PartitioningWhen running sessions, the Integration Service process can achieve high performance by partitioning the pipeline and performing the extract, transformation, and load for each partition in parallel. To accomplish this, use the following session and Integration Service configuration:
♦ Configure the session with multiple partitions.
♦ Install the Integration Service on a machine with multiple CPUs.
You can configure the partition type at most transformations in the pipeline. The Integration Service can partition data using round-robin, hash, key-range, database partitioning, or pass-through partitioning.
You can also configure a session for dynamic partitioning to enable the Integration Service to set partitioning at run time. When you enable dynamic partitioning, the Integration Service scales the number of session partitions based on factors such as the source database partitions or the number of nodes in a grid.
For relational sources, the Integration Service creates multiple database connections to a single source and extracts a separate range of data for each connection.
The Integration Service transforms the partitions concurrently, it passes data between the partitions as needed to perform operations such as aggregation. When the Integration Service loads relational data, it creates multiple database connections to the target and loads partitions of data concurrently. When the Integration Service loads data to file targets, it creates a separate file for each partition. You can choose to merge the target files.
The following figure shows a mapping that contains two partitions:
Source TargetTransformations
Processing Threads 179
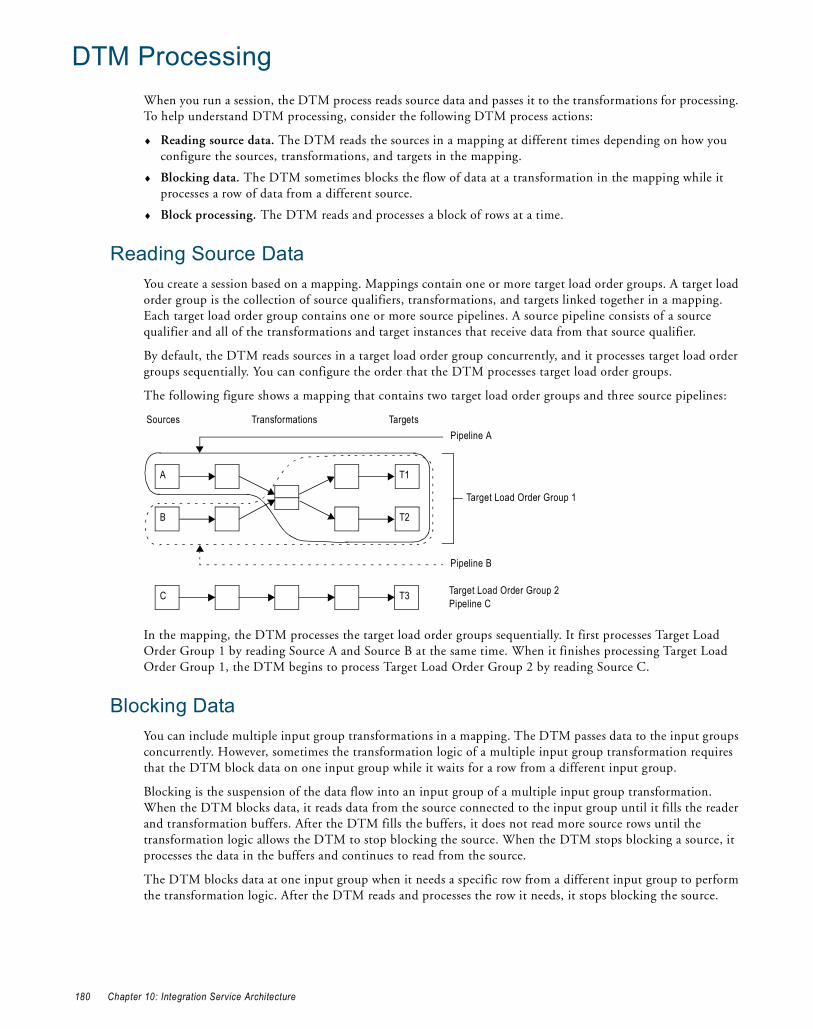
DTM ProcessingWhen you run a session, the DTM process reads source data and passes it to the transformations for processing. To help understand DTM processing, consider the following DTM process actions:
♦ Reading source data. The DTM reads the sources in a mapping at different times depending on how you configure the sources, transformations, and targets in the mapping.
♦ Blocking data. The DTM sometimes blocks the flow of data at a transformation in the mapping while it processes a row of data from a different source.
♦ Block processing. The DTM reads and processes a block of rows at a time.
Reading Source DataYou create a session based on a mapping. Mappings contain one or more target load order groups. A target load order group is the collection of source qualifiers, transformations, and targets linked together in a mapping. Each target load order group contains one or more source pipelines. A source pipeline consists of a source qualifier and all of the transformations and target instances that receive data from that source qualifier.
By default, the DTM reads sources in a target load order group concurrently, and it processes target load order groups sequentially. You can configure the order that the DTM processes target load order groups.
The following figure shows a mapping that contains two target load order groups and three source pipelines:
In the mapping, the DTM processes the target load order groups sequentially. It first processes Target Load Order Group 1 by reading Source A and Source B at the same time. When it finishes processing Target Load Order Group 1, the DTM begins to process Target Load Order Group 2 by reading Source C.
Blocking DataYou can include multiple input group transformations in a mapping. The DTM passes data to the input groups concurrently. However, sometimes the transformation logic of a multiple input group transformation requires that the DTM block data on one input group while it waits for a row from a different input group.
Blocking is the suspension of the data flow into an input group of a multiple input group transformation. When the DTM blocks data, it reads data from the source connected to the input group until it fills the reader and transformation buffers. After the DTM fills the buffers, it does not read more source rows until the transformation logic allows the DTM to stop blocking the source. When the DTM stops blocking a source, it processes the data in the buffers and continues to read from the source.
The DTM blocks data at one input group when it needs a specific row from a different input group to perform the transformation logic. After the DTM reads and processes the row it needs, it stops blocking the source.
Sources Transformations TargetsPipeline A
T1A
Target Load Order Group 2Pipeline C
T3C
B T2
Pipeline B
Target Load Order Group 1
180 Chapter 10: Integration Service Architecture
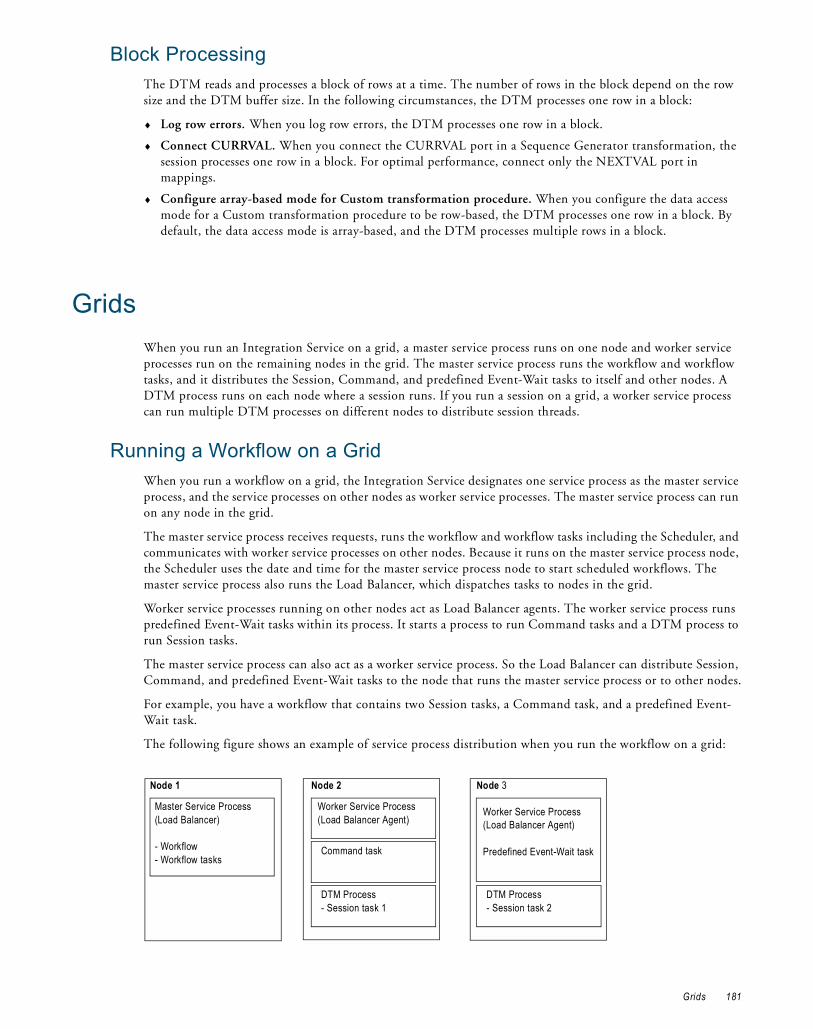
Block ProcessingThe DTM reads and processes a block of rows at a time. The number of rows in the block depend on the row size and the DTM buffer size. In the following circumstances, the DTM processes one row in a block:
♦ Log row errors. When you log row errors, the DTM processes one row in a block.
♦ Connect CURRVAL. When you connect the CURRVAL port in a Sequence Generator transformation, the session processes one row in a block. For optimal performance, connect only the NEXTVAL port in mappings.
♦ Configure array-based mode for Custom transformation procedure. When you configure the data access mode for a Custom transformation procedure to be row-based, the DTM processes one row in a block. By default, the data access mode is array-based, and the DTM processes multiple rows in a block.
GridsWhen you run an Integration Service on a grid, a master service process runs on one node and worker service processes run on the remaining nodes in the grid. The master service process runs the workflow and workflow tasks, and it distributes the Session, Command, and predefined Event-Wait tasks to itself and other nodes. A DTM process runs on each node where a session runs. If you run a session on a grid, a worker service process can run multiple DTM processes on different nodes to distribute session threads.
Running a Workflow on a GridWhen you run a workflow on a grid, the Integration Service designates one service process as the master service process, and the service processes on other nodes as worker service processes. The master service process can run on any node in the grid.
The master service process receives requests, runs the workflow and workflow tasks including the Scheduler, and communicates with worker service processes on other nodes. Because it runs on the master service process node, the Scheduler uses the date and time for the master service process node to start scheduled workflows. The master service process also runs the Load Balancer, which dispatches tasks to nodes in the grid.
Worker service processes running on other nodes act as Load Balancer agents. The worker service process runs predefined Event-Wait tasks within its process. It starts a process to run Command tasks and a DTM process to run Session tasks.
The master service process can also act as a worker service process. So the Load Balancer can distribute Session, Command, and predefined Event-Wait tasks to the node that runs the master service process or to other nodes.
For example, you have a workflow that contains two Session tasks, a Command task, and a predefined Event-Wait task.
The following figure shows an example of service process distribution when you run the workflow on a grid:
Node 2Node 1
Master Service Process(Load Balancer)
- Workflow- Workflow tasks
DTM Process- Session task 1
Node 3
Worker Service Process(Load Balancer Agent)
DTM Process- Session task 2
Command task
Worker Service Process(Load Balancer Agent)
Predefined Event-Wait task
Grids 181
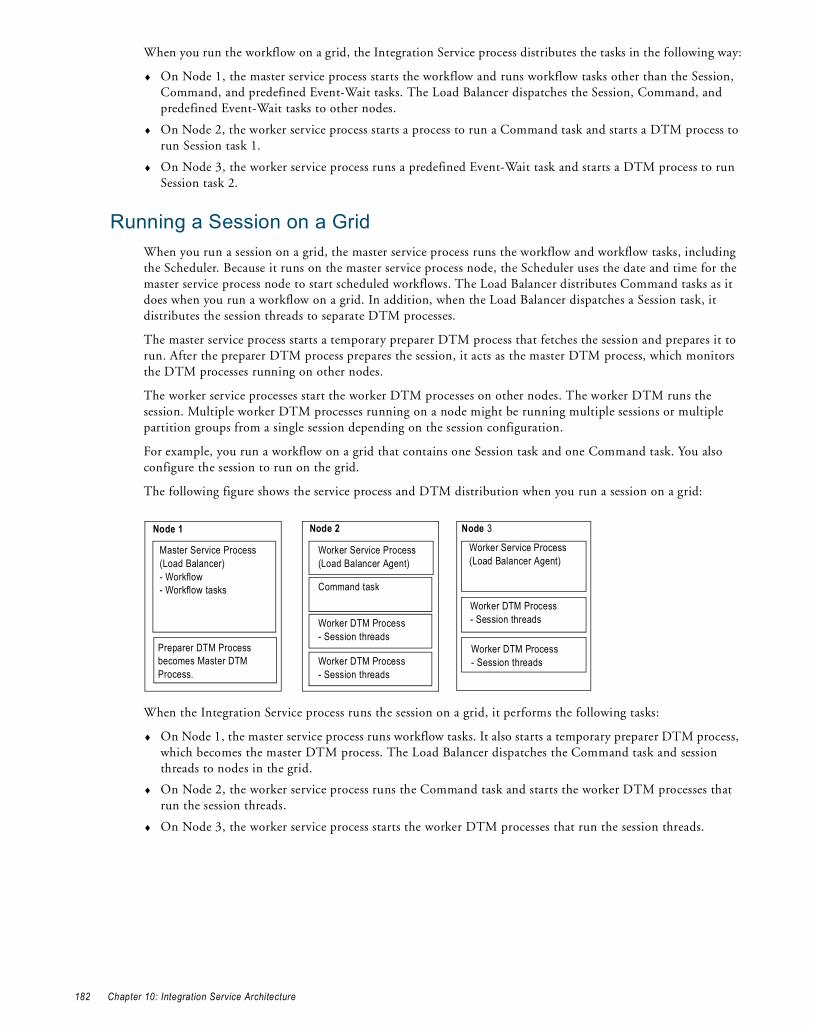
When you run the workflow on a grid, the Integration Service process distributes the tasks in the following way:
♦ On Node 1, the master service process starts the workflow and runs workflow tasks other than the Session, Command, and predefined Event-Wait tasks. The Load Balancer dispatches the Session, Command, and predefined Event-Wait tasks to other nodes.
♦ On Node 2, the worker service process starts a process to run a Command task and starts a DTM process to run Session task 1.
♦ On Node 3, the worker service process runs a predefined Event-Wait task and starts a DTM process to run Session task 2.
Running a Session on a GridWhen you run a session on a grid, the master service process runs the workflow and workflow tasks, including the Scheduler. Because it runs on the master service process node, the Scheduler uses the date and time for the master service process node to start scheduled workflows. The Load Balancer distributes Command tasks as it does when you run a workflow on a grid. In addition, when the Load Balancer dispatches a Session task, it distributes the session threads to separate DTM processes.
The master service process starts a temporary preparer DTM process that fetches the session and prepares it to run. After the preparer DTM process prepares the session, it acts as the master DTM process, which monitors the DTM processes running on other nodes.
The worker service processes start the worker DTM processes on other nodes. The worker DTM runs the session. Multiple worker DTM processes running on a node might be running multiple sessions or multiple partition groups from a single session depending on the session configuration.
For example, you run a workflow on a grid that contains one Session task and one Command task. You also configure the session to run on the grid.
The following figure shows the service process and DTM distribution when you run a session on a grid:
When the Integration Service process runs the session on a grid, it performs the following tasks:
♦ On Node 1, the master service process runs workflow tasks. It also starts a temporary preparer DTM process, which becomes the master DTM process. The Load Balancer dispatches the Command task and session threads to nodes in the grid.
♦ On Node 2, the worker service process runs the Command task and starts the worker DTM processes that run the session threads.
♦ On Node 3, the worker service process starts the worker DTM processes that run the session threads.
Node 2
Worker Service Process(Load Balancer Agent)
Node 1
Master Service Process(Load Balancer)- Workflow- Workflow tasks
Preparer DTM Process becomes Master DTM Process.
Node 3
Worker DTM Process- Session threads
Worker DTM Process- Session threads
Worker Service Process(Load Balancer Agent)
Command task
Worker DTM Process- Session threads
Worker DTM Process- Session threads
182 Chapter 10: Integration Service Architecture

System ResourcesTo allocate system resources for read, transformation, and write processing, you should understand how the Integration Service allocates and uses system resources. The Integration Service uses the following system resources:
♦ CPU usage
♦ DTM buffer memory
♦ Cache memory
CPU UsageThe Integration Service process performs read, transformation, and write processing for a pipeline in parallel. It can process multiple partitions of a pipeline within a session, and it can process multiple sessions in parallel.
If you have a symmetric multi-processing (SMP) platform, you can use multiple CPUs to concurrently process session data or partitions of data. This provides increased performance, as true parallelism is achieved. On a single processor platform, these tasks share the CPU, so there is no parallelism.
The Integration Service process can use multiple CPUs to process a session that contains multiple partitions. The number of CPUs used depends on factors such as the number of partitions, the number of threads, the number of available CPUs, and amount or resources required to process the mapping.
DTM Buffer MemoryThe Integration Service process launches the DTM. The DTM allocates buffer memory to the session based on the DTM Buffer Size setting in the session properties. By default, the Integration Service determines the size of the buffer memory. However, you may want to configure the buffer memory and buffer block size manually.
The DTM divides the memory into buffer blocks as configured in the Buffer Block Size setting in the session properties. The reader, transformation, and writer threads use buffer blocks to move data from sources and to targets.
You can sometimes improve session performance by increasing buffer memory when you run a session handling a large volume of character data and the Integration Service runs in Unicode mode. In Unicode mode, the Integration Service uses double bytes to move characters, so increasing buffer memory might improve session performance.
If the DTM cannot allocate the configured amount of buffer memory for the session, the session cannot initialize. Informatica recommends you allocate no more than 1 GB for DTM buffer memory.
Cache MemoryThe DTM process creates in-memory index and data caches to temporarily store data used by the following transformations:
♦ Aggregator transformation (without sorted input)
♦ Rank transformation
♦ Joiner transformation
♦ Lookup transformation (with caching enabled)
You can configure memory size for the index and data cache in the transformation properties. By default, the Integration Service determines the amount of memory to allocate for caches. However, you can manually configure a cache size for the data and index caches.
By default, the DTM creates cache files in the directory configured for the $PMCacheDir service process variable. If the DTM requires more space than it allocates, it pages to local index and data files.
System Resources 183
The DTM process also creates an in-memory cache to store data for the Sorter transformations and XML targets. You configure the memory size for the cache in the transformation properties. By default, the Integration Service determines the cache size for the Sorter transformation and XML target at run time. The Integration Service allocates a minimum value of 16,777,216 bytes for the Sorter transformation cache and 10,485,760 bytes for the XML target. The DTM creates cache files in the directory configured for the $PMTempDir service process variable. If the DTM requires more cache space than it allocates, it pages to local cache files.
When processing large amounts of data, the DTM may create multiple index and data files. The session does not fail if it runs out of cache memory and pages to the cache files. It does fail, however, if the local directory for cache files runs out of disk space.
After the session completes, the DTM releases memory used by the index and data caches and deletes any index and data files. However, if the session is configured to perform incremental aggregation or if a Lookup transformation is configured for a persistent lookup cache, the DTM saves all index and data cache information to disk for the next session run.
Code Pages and Data Movement ModesYou can configure PowerCenter to move single byte and multibyte data. The Integration Service can move data in either ASCII or Unicode data movement mode. These modes determine how the Integration Service handles character data. You choose the data movement mode in the Integration Service configuration settings. If you want to move multibyte data, choose Unicode data movement mode. To ensure that characters are not lost during conversion from one code page to another, you must also choose the appropriate code pages for your connections.
ASCII Data Movement ModeUse ASCII data movement mode when all sources and targets are 7-bit ASCII or EBCDIC character sets. In ASCII mode, the Integration Service recognizes 7-bit ASCII and EBCDIC characters and stores each character in a single byte. When the Integration Service runs in ASCII mode, it does not validate session code pages. It reads all character data as ASCII characters and does not perform code page conversions. It also treats all numerics as U.S. Standard and all dates as binary data.
You can also use ASCII data movement mode when sources and targets are 8-bit ASCII.
Unicode Data Movement ModeUse Unicode data movement mode when sources or targets use 8-bit or multibyte character sets and contain character data. In Unicode mode, the Integration Service recognizes multibyte character sets as defined by supported code pages.
If you configure the Integration Service to validate data code pages, the Integration Service validates source and target code page compatibility when you run a session. If you configure the Integration Service for relaxed data code page validation, the Integration Service lifts source and target compatibility restrictions.
The Integration Service converts data from the source character set to UCS-2 before processing, processes the data, and then converts the UCS-2 data to the target code page character set before loading the data. The Integration Service allots two bytes for each character when moving data through a mapping. It also treats all numerics as U.S. Standard and all dates as binary data.
The Integration Service code page must be a subset of the repository code page.
184 Chapter 10: Integration Service Architecture
Output Files and CachesThe Integration Service process generates output files when you run workflows and sessions. By default, the Integration Service logs status and error messages to log event files. Log event files are binary files that the Log Manager uses to display log events. During each session, the Integration Service also creates a reject file. Depending on transformation cache settings and target types, the Integration Service may create additional files as well.
The Integration Service stores output files and caches based on the service process variable settings. Generate output files and caches in a specified directory by setting service process variables in the session or workflow properties, Integration Service properties, a parameter file, or an operating system profile.
If you define service process variables in more than one place, the Integration Service reviews the precedence of each setting to determine which service process variable setting to use:
1. Integration Service process properties. Service process variables set in the Integration Service process properties contain the default setting.
2. Operating system profile. Service process variables set in an operating system profile override service process variables set in the Integration Service properties. If you use operating system profiles, the Integration Service saves workflow recovery files to the $PMStorageDir configured in the Integration Service process properties. The Integration Service saves session recovery files to the $PMStorageDir configured in the operating system profile.
3. Parameter file. Service process variables set in parameter files override service process variables set in the Integration Service process properties or an operating system profile.
4. Session or workflow properties. Service process variables set in the session or workflow properties override service process variables set in the Integration Service properties, a parameter file, or an operating system profile.
For example, if you set the $PMSessionLogFile in the operating system profile and in the session properties, the Integration Service uses the location specified in the session properties.
The Integration Service creates the following output files:
♦ Workflow log
♦ Session log
♦ Session details file
♦ Performance details file
♦ Reject files
♦ Row error logs
♦ Recovery tables and files
♦ Control file
♦ Post-session email
♦ Output file
♦ Cache files
When the Integration Service process on UNIX creates any file other than a recovery file, it sets the file permissions according to the umask of the shell that starts the Integration Service process. For example, when the umask of the shell that starts the Integration Service process is 022, the Integration Service process creates files with rw-r--r-- permissions. To change the file permissions, you must change the umask of the shell that starts the Integration Service process and then restart it.
The Integration Service process on UNIX creates recovery files with rw------- permissions.
The Integration Service process on Windows creates files with read and write permissions.
Output Files and Caches 185

Workflow LogThe Integration Service process creates a workflow log for each workflow it runs. It writes information in the workflow log such as initialization of processes, workflow task run information, errors encountered, and workflow run summary. Workflow log error messages are categorized into severity levels. You can configure the Integration Service to suppress writing messages to the workflow log file. You can view workflow logs from the Workflow Monitor. You can also configure the workflow to write events to a log file in a specified directory.
As with Integration Service logs and session logs, the Integration Service process enters a code number into the workflow log file message along with message text.
Session LogThe Integration Service process creates a session log for each session it runs. It writes information in the session log such as initialization of processes, session validation, creation of SQL commands for reader and writer threads, errors encountered, and load summary. The amount of detail in the session log depends on the tracing level that you set. You can view the session log from the Workflow Monitor. You can also configure the session to write the log information to a log file in a specified directory.
As with Integration Service logs and workflow logs, the Integration Service process enters a code number along with message text.
Session Details When you run a session, the Workflow Manager creates session details that provide load statistics for each target in the mapping. You can monitor session details during the session or after the session completes. Session details include information such as table name, number of rows written or rejected, and read and write throughput. To view session details, double-click the session in the Workflow Monitor.
Performance Detail FileThe Integration Service process generates performance details for session runs. The Integration Service process writes the performance details to a file. The file stores performance details for the last session run.
You can review a performance details file to determine where session performance can be improved. Performance details provide transformation-by-transformation information on the flow of data through the session.
You can also view performance details in the Workflow Monitor if you configure the session to collect performance details.
Reject FilesBy default, the Integration Service process creates a reject file for each target in the session. The reject file contains rows of data that the writer does not write to targets.
The writer may reject a row in the following circumstances:
♦ It is flagged for reject by an Update Strategy or Custom transformation.
♦ It violates a database constraint such as primary key constraint.
♦ A field in the row was truncated or overflowed, and the target database is configured to reject truncated or overflowed data.
By default, the Integration Service process saves the reject file in the directory entered for the service process variable $PMBadFileDir in the Workflow Manager, and names the reject file target_table_name.bad.
Note: If you enable row error logging, the Integration Service process does not create a reject file.
186 Chapter 10: Integration Service Architecture
Row Error LogsWhen you configure a session, you can choose to log row errors in a central location. When a row error occurs, the Integration Service process logs error information that allows you to determine the cause and source of the error. The Integration Service process logs information such as source name, row ID, current row data, transformation, timestamp, error code, error message, repository name, folder name, session name, and mapping information.
When you enable flat file logging, by default, the Integration Service process saves the file in the directory entered for the service process variable $PMBadFileDir.
Recovery Tables FilesThe Integration Service process creates recovery tables on the target database system when it runs a session enabled for recovery. When you run a session in recovery mode, the Integration Service process uses information in the recovery tables to complete the session.
When the Integration Service process performs recovery, it restores the state of operations to recover the workflow from the point of interruption. The workflow state of operations includes information such as active service requests, completed and running status, workflow variable values, running workflows and sessions, and workflow schedules.
Control FileWhen you run a session that uses an external loader, the Integration Service process creates a control file and a target flat file. The control file contains information about the target flat file such as data format and loading instructions for the external loader. The control file has an extension of .ctl. The Integration Service process creates the control file and the target flat file in the Integration Service variable directory, $PMTargetFileDir, by default.
EmailYou can compose and send email messages by creating an Email task in the Workflow Designer or Task Developer. You can place the Email task in a workflow, or you can associate it with a session. The Email task allows you to automatically communicate information about a workflow or session run to designated recipients.
Email tasks in the workflow send email depending on the conditional links connected to the task. For post-session email, you can create two different messages, one to be sent if the session completes successfully, the other if the session fails. You can also use variables to generate information about the session name, status, and total rows loaded.
Indicator FileIf you use a flat file as a target, you can configure the Integration Service to create an indicator file for target row type information. For each target row, the indicator file contains a number to indicate whether the row was marked for insert, update, delete, or reject. The Integration Service process names this file target_name.ind and stores it in the Integration Service variable directory, $PMTargetFileDir, by default.
Output FileIf the session writes to a target file, the Integration Service process creates the target file based on a file target definition. By default, the Integration Service process names the target file based on the target definition name. If a mapping contains multiple instances of the same target, the Integration Service process names the target files based on the target instance name.
The Integration Service process creates this file in the Integration Service variable directory, $PMTargetFileDir, by default.
Output Files and Caches 187
Cache FilesWhen the Integration Service process creates memory cache, it also creates cache files. The Integration Service process creates cache files for the following mapping objects:
♦ Aggregator transformation
♦ Joiner transformation
♦ Rank transformation
♦ Lookup transformation
♦ Sorter transformation
♦ XML target
By default, the DTM creates the index and data files for Aggregator, Rank, Joiner, and Lookup transformations and XML targets in the directory configured for the $PMCacheDir service process variable. The Integration Service process names the index file PM*.idx, and the data file PM*.dat. The Integration Service process creates the cache file for a Sorter transformation in the $PMTempDir service process variable directory.
Incremental Aggregation FilesIf the session performs incremental aggregation, the Integration Service process saves index and data cache information to disk when the session finished. The next time the session runs, the Integration Service process uses this historical information to perform the incremental aggregation. By default, the DTM creates the index and data files in the directory configured for the $PMCacheDir service process variable. The Integration Service process names the index file PMAGG*.dat and the data file PMAGG*.idx.
Persistent Lookup Cache If a session uses a Lookup transformation, you can configure the transformation to use a persistent lookup cache. With this option selected, the Integration Service process saves the lookup cache to disk the first time it runs the session, and then uses this lookup cache during subsequent session runs. By default, the DTM creates the index and data files in the directory configured for the $PMCacheDir service process variable. If you do not name the files in the transformation properties, these files are named PMLKUP*.idx and PMLKUP*.dat.
188 Chapter 10: Integration Service Architecture

C H A P T E R 1 1
Creating and Configuring the Metadata Manager Service
This chapter includes the following topics:
♦ Overview, 189
♦ Creating a Metadata Manager Service, 191
♦ Creating and Deleting Repository Content, 193
♦ Enabling and Disabling the Metadata Manager Service, 195
♦ Configuring the Metadata Manager Service, 195
♦ Configuring the Associated Integration Service, 199
♦ Configuring the Associated Reference Table Manager Service, 201
OverviewThe Metadata Manager Service is an application service that runs the Metadata Manager application in a PowerCenter domain. The Metadata Manager application manages access to metadata in the Metadata Manager repository. Create a Metadata Manager Service in the domain to access the Metadata Manager application.
The following figure shows the Metadata Manager components managed by the Metadata Manager Service on a node in a PowerCenter domain:
The Metadata Manager Service manages the following components:
Metadata Manager Service
Metadata Manager Application
Metadata Manager Repository
Integration Service
Repository Service
Metadata Manager Warehouse
Metadata Sources
PowerCenter Repository
Models
189
♦ Metadata Manager application. The Metadata Manager application is a web-based application. Use Metadata Manager to browse and analyze metadata from disparate source repositories. You can load, browse, and analyze metadata from application, business intelligence, data integration, data modelling, and relational metadata sources.
♦ PowerCenter repository for Metadata Manager. Contains the metadata objects used by the Integration Service to load metadata into the Metadata Manager warehouse. The metadata objects include sources, targets, sessions, and workflows.
♦ Repository Service. Manages connections to the PowerCenter repository for Metadata Manager.
♦ Integration Service. Runs the workflows in the PowerCenter repository to read from metadata sources and load metadata into the Metadata Manager warehouse.
♦ Metadata Manager repository. Contains the Metadata Manager warehouse and models. The Metadata Manager warehouse is centralized metadata warehouse that stores the metadata from metadata sources. Models define the metadata that Metadata Manager extracts from metadata sources.
♦ Metadata sources. The application, business intelligence, data integration, data modeling, and database management sources that Metadata Manager extracts metadata from.
Steps to Configure a Metadata Manager ServiceYou can create and configure a Metadata Manager Service and the related components in the Administration Console or the Configuration Assistant. For more information about the Configuration Assistant, see the PowerCenter Configuration Guide.
To create and configure the Metadata Manager Service in the Administration Console, complete the following steps:
1. Set up the Metadata Manager repository database. Set up a database for the Metadata Manager repository. You supply the database information when you create the Metadata Manager Service.
2. Create a Repository Service and Integration Service (Optional). You can use an existing Repository Service and Integration Service, or you can create them. If want to create the application services to use with Metadata Manager, create the services in the following order:
♦ Repository Service. Create a Repository Service but do not create contents. Start the Repository Service in exclusive mode.
♦ Integration Service. Create the Integration Service. The service will not start because the Repository Service does not have content. You enable the Integration Service after you create and configure the Metadata Manager Service.
3. Create the Metadata Manager Service. Use the Administration Console to create the Metadata Manager Service. For more information, see “Creating a Metadata Manager Service” on page 191.
4. Create repository contents. Create contents for the Metadata Manager repository and PowerCenter repository. For more information, see “Creating and Deleting Repository Content” on page 193.
5. Enable the Metadata Manager Service. Enable the Metadata Manager Service in the domain. For more information, see “Enabling and Disabling the Metadata Manager Service” on page 195.
6. Configure the Metadata Manager Service. Configure the properties for the Metadata Manager Service. For more information, see “Configuring the Metadata Manager Service” on page 195 and “Configuring the Associated Integration Service” on page 199.
7. Enable the Integration Service. Enable the associated Integration Service for the Metadata Manager Service.
8. Create and configure a Reference Table Manager Service (Optional). Create a Reference Table Manager Service to view reference tables for business terms in a Metadata Manager business glossary. Configure the associated Reference Table Manager Service for Metadata Manager. For more information about creating and configuring a Reference Table Manager Service, see “Creating the Reference Table Manager Service” on page 241 and “Configuring the Associated Reference Table Manager Service” on page 201.
190 Chapter 11: Creating and Configuring the Metadata Manager Service

9. Create a Reporting Service (Optional). To run reports on the Metadata Manager repository, create a Reporting Service. After you create the Reporting Service, you can log in to Data Analyzer and run reports against the Metadata Manager repository. For more information, see “Creating the Reporting Service” on page 203.
10. Create or assign users. Create users and assign them privileges for the Metadata Manager Service, or assign existing users privileges for the Metadata Manager Service. For more information, see “Managing Users and Groups” on page 55.
Note: You can only use a Metadata Manager Service and the associated Metadata Manager repository in one PowerCenter domain. After you create the Metadata Manager Service and Metadata Manager repository in one domain, you cannot create a second Metadata Manager Service to use the same Metadata Manager repository. You also cannot back up and restore the repository to use with a different Metadata Manager Service in a different domain.
Creating a Metadata Manager ServiceUse the PowerCenter Administration Console to create the Metadata Manager Service. After you create the Metadata Manager Service, create the Metadata Manager repository contents and PowerCenter repository contents to enable the service.
The following table describes the properties you configure for the Metadata Manager Service:
Property Description
Service Name Name of the Metadata Manager Service. The name is not case sensitive and must be unique within the domain. The name cannot contain spaces, include carriage returns or tabs, exceed 79 characters, or contain the following characters: \ / * :? < > " |
Location Domain and folder where the service is created. Click Select Folder to choose a different folder. You can move the Metadata Manager Service after you create it.
License License object that allows use of the service.To apply changes to this property, restart the Metadata Manager Service.
Node Setup Node in the PowerCenter domain that the Metadata Manager Service runs on.
Associated Integration Service
Integration Service used by Metadata Manage to load metadata into the Metadata Manager warehouse.
Repository User Name
User account for the PowerCenter repository. Use the repository user account you configured for the Repository Service. For a list of the required privileges for this user, see “Privileges for the Associated Integration Service User” on page 200.
Repository Password
Password for the PowerCenter repository user.
Security Domain Security domain that contains the user account you configured for the Repository Service.
Database Type Type of database for the Metadata Manager repository. To apply changes to this property, restart the Metadata Manager Service.
CodePage Metadata Manager repository code page. The Metadata Manager Service and Metadata Manager application use the character set encoded in the repository code page when writing data to the Metadata Manager repository.Note: The Metadata Manager repository code page, the code page on the machine where the associated Integration Service runs, and the code page for any database management, PowerCenter, and Data Analyzer resources you want to load into the Metadata Manager warehouse must be the same.
Creating a Metadata Manager Service 191

To create a Metadata Manager Service:
1. In the Administration Console, click Create > Metadata Manager Service.
The Create New Metadata Manager Service page appears.
2. Enter values for the Metadata Manager Service properties.
3. Click OK.
The following message appears:
The Metadata Manager Service was created successfully.
4. Click Close.
Database Connect StringsWhen you create a database connection, specify a connect string for that connection. The Metadata Manager Service uses the connect string to create a connection object to the Metadata Manager repository database in the PowerCenter repository.
ConnectString Native connect string to the Metadata Manager repository database. The Metadata Manager Service uses the connect string to create a connection object to the Metadata Manager repository in the PowerCenter repository.To apply changes to this property, restart the Metadata Manager Service.
DBUser User account for the Metadata Manager repository database. Set up this account using the appropriate database client tools. To apply changes to this property, restart the Metadata Manager Service.
DBPassword Password for the Metadata Manager repository database user. Must be in 7-bit ASCII. To apply changes to this property, restart the Metadata Manager Service.
Tablespace Name Tablespace name for Metadata Manager repositories on IBM DB2. When you specify the tablespace name, the Metadata Manager Service creates all repository tables in the same tablespace. You cannot use spaces in the tablespace name. To improve repository performance on IBM DB2 EEE repositories, specify a tablespace name with one node.To apply changes to this property, restart the Metadata Manager Service.
Database Hostname Host name for the Metadata Manager repository database.
Database Port Port number for the Metadata Manager repository database.
SID/Service Name Indicates whether the Database Name property contains an Oracle full service name or SID.
Database Name Full service name or SID for Oracle databases. Service name for IBM DB2 databases. Database name for Microsoft SQL Server or Sybase ASE databases.
Additional JDBC Parameters
Additional JDBC options.
Port Number Port number the Metadata Manager application runs on. Default is 10250. If you configure HTTPS, make sure that the port number one less than the HTTPS port is also available. For example, if you configure 10255 for the HTTPS port number, you must make sure 10254 is also available. Metadata Manager uses port 10254 for HTTP.
URLScheme Indicates the security protocol that you configure for the Metadata Manager application: HTTP or HTTPS.
Keystore File Keystore file that contains the keys and certificates required if you use the SSL security protocol with the Metadata Manager application. Appears if you select the HTTPS URL scheme.
Property Description
192 Chapter 11: Creating and Configuring the Metadata Manager Service

The following table lists the native connect string syntax for each supported database:
Overriding the Repository Database Code PageYou can override the default database code page for the Metadata Manager repository database when you create or configure the Metadata Manager Service. Override the code page if the Metadata Manager repository contains characters that the database code page does not support.
To override the code page, add the CODEPAGEOVERRIDE parameter to the Additional JDBC Options property. Specify a code page that is compatible with the default repository database code page.
For example, use the following parameter to override the default Shift-JIS code page with MS932:
CODEPAGEOVERRIDE=MS932;
Creating and Deleting Repository ContentYou can use the Metadata Manager Service page to create and delete contents for the following repositories used by Metadata Manager:
♦ Metadata Manager repository. Create the Metadata Manager warehouse tables and import models for metadata sources into the Metadata Manager repository.
♦ PowerCenter repository. Restore a repository backup file packaged with PowerCenter to the PowerCenter repository database. The repository backup file includes the metadata objects used by Metadata Manager to load metadata into the Metadata Manager warehouse. When you restore the repository, the Service Manager creates a folder named Metadata Load in the PowerCenter repository. The Metadata Load folder contains the metadata objects, including sources, targets, sessions, and workflows.
The tasks you complete depend on whether the Metadata Manager repository contains contents or if the PowerCenter repository contains the PowerCenter objects for Metadata Manager.
The following table describes the tasks you must complete for each repository:
Database Connect String Syntax Example
IBM DB2 dbname mydatabase
Microsoft SQL Server servername@dbname sqlserver@mydatabase
Oracle dbname.world (same as TNSNAMES entry) oracle.world
Sybase servername@dbname sambrown@mydatabase
Repository Condition Action
Metadata Manager repository
Does not have content. Create the Metadata Manager repository.
Has content. No action.
PowerCenter repository
Does not have content. Restore the PowerCenter repository if the Repository Service runs in exclusive mode.
Has content. No action if the PowerCenter repository has the objects required for Metadata Manager in the Metadata Load folder. The Service Manager imports the required objects from an XML file when you enable the service.
Creating and Deleting Repository Content 193

Creating the Metadata Manager RepositoryWhen you create the Metadata Manager repository, you create the Metadata Manager warehouse tables and import models for metadata sources.
To create the Metadata Manager repository:
1. In the Navigator, select the Metadata Manager Service for which the Metadata Manager repository has no content.
2. Click Actions > Create Contents.
The page displays the option to create content.
3. Optionally, choose to restore the PowerCenter repository. You can restore the repository if the Repository Service runs in exclusive mode and the repository does not contain contents.
4. Click OK.
The activity log displays the results of the create contents operation.
Restoring the PowerCenter Repository Restore the repository backup file for the PowerCenter repository to create the objects used by Metadata Manager in the PowerCenter repository database.
To restore the PowerCenter repository:
1. In the Navigator, select the Metadata Manager Service for which the PowerCenter repository has no contents.
2. Click Actions > Restore PowerCenter Repository.
3. Optionally, choose to restart the Repository Service in normal mode.
4. Click OK.
The activity log displays the results of the restore repository operation.
Deleting the Metadata Manager Repository Delete Metadata Manager repository content when you want to delete all metadata and repository database tables from the repository. Delete the repository content if the metadata is obsolete. If the repository contains information that you want to save, back up the repository before you delete it. Use the database client or the Metadata Manager repository backup utility to back up the database before you delete contents.
To delete the Metadata Manager repository content:
1. In the Navigator, select the Metadata Manager Service for which you want to delete Metadata Manager repository content.
2. Click Actions > Delete Contents.
3. Enter the user name and password for the database account.
4. Click OK.
The activity log displays the results of the delete contents operation.
194 Chapter 11: Creating and Configuring the Metadata Manager Service

Enabling and Disabling the Metadata Manager ServiceUse the Administration Console to enable and disable the Metadata Manager Service. Disable a Metadata Manager Service to perform maintenance or to temporarily restrict users from accessing Metadata Manager. When you disable the Metadata Manager Service, you also stop Metadata Manager. You can enable a disabled Metadata Manager Service to make Metadata Manager available again.
When you disable the Metadata Manager Service, you must choose the mode to disable it in. Choose one of the following options:
♦ Complete. Waits for all Metadata Manager processes to complete and then disables the Metadata Manager Service.
♦ Abort. Aborts all Metadata Manager processes immediately and disables the Metadata Manager Service.
When you enable the Metadata Manager Service, the Service Manager starts the Metadata Manager application on the node where the Metadata Manager Service runs. If the PowerCenter repository does not contain the Metadata Load folder, the Administration Console imports the metadata objects required by Metadata Manager into the PowerCenter repository.
Note: The Repository Service for Metadata Manager must be enabled and running before you can enable the Metadata Manager Service.
To enable or disable the Metadata Manager Service:
1. In the Navigator of the Administration Console, select the Metadata Manager Service.
When a Metadata Manager Service is running, the Disable button is available.
2. To disable the service, click Disable.
The Disable Metadata Manager window appears.
3. Choose the disable mode and click OK.
The Service Manager disables the Metadata Manager Service and stops Metadata Manager. When a service is disabled, the Enable button is available.
4. To enable the service, click Enable.
Configuring the Metadata Manager ServiceAfter you create a Metadata Manager Service, you can configure it. After you configure Metadata Manager Service properties, you must disable and enable the Metadata Manager Service for the changes to take effect.
Use the Administration Console to configure the following types of Metadata Manager Service properties:
♦ General properties. General properties for the Metadata Manager Service include port numbers for the Metadata Manager application and the Metadata Manager Agent, the Metadata Manager file location, and the license object assigned to the Metadata Manager Service. For more information, see “General Properties” on page 196.
♦ Database properties. Database properties for the Metadata Manager repository. For more information, see “Database Properties” on page 197.
♦ Configuration properties. Configuration properties for the Metadata Manager Service include the HTTP security protocol and keystore file, and maximum concurrent and queued requests to the Metadata Manager application. For more information, see “Configuration Properties” on page 197.
♦ Connection pool properties. Metadata Manager maintains a connection pool for connections to the Metadata Manager repository. Connection pool properties include the number of active available connections to the Metadata Manager repository database and the amount of time that Metadata Manager
Enabling and Disabling the Metadata Manager Service 195
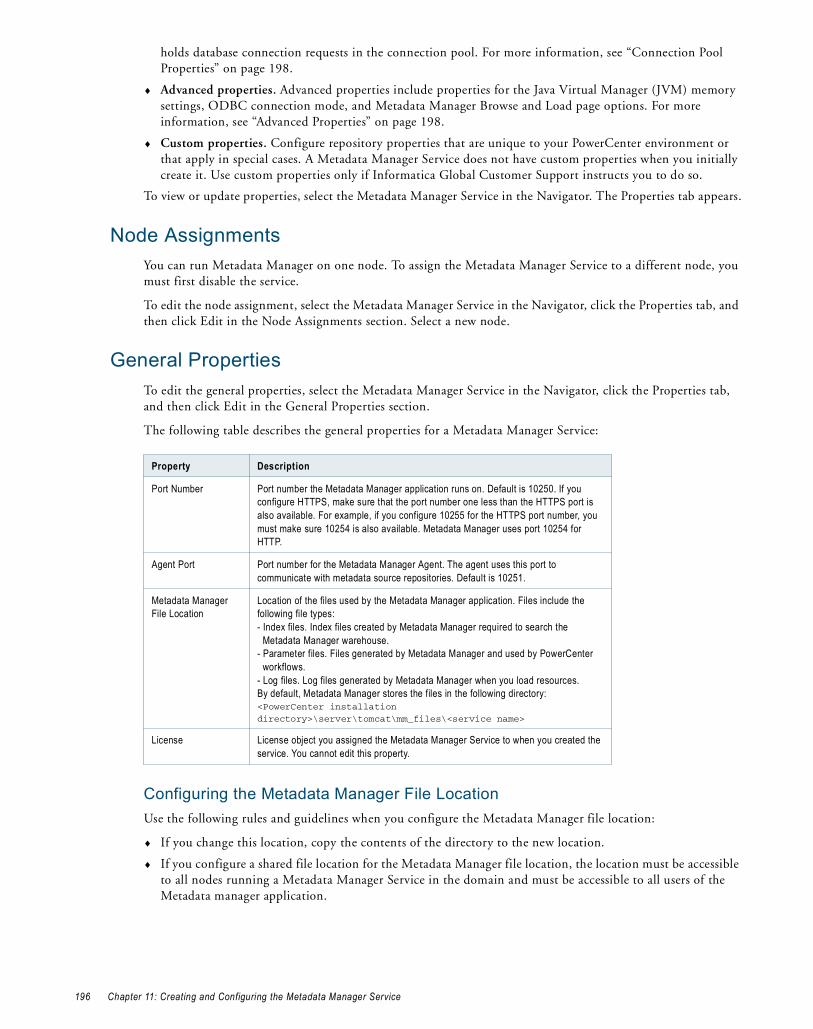
holds database connection requests in the connection pool. For more information, see “Connection Pool Properties” on page 198.
♦ Advanced properties. Advanced properties include properties for the Java Virtual Manager (JVM) memory settings, ODBC connection mode, and Metadata Manager Browse and Load page options. For more information, see “Advanced Properties” on page 198.
♦ Custom properties. Configure repository properties that are unique to your PowerCenter environment or that apply in special cases. A Metadata Manager Service does not have custom properties when you initially create it. Use custom properties only if Informatica Global Customer Support instructs you to do so.
To view or update properties, select the Metadata Manager Service in the Navigator. The Properties tab appears.
Node AssignmentsYou can run Metadata Manager on one node. To assign the Metadata Manager Service to a different node, you must first disable the service.
To edit the node assignment, select the Metadata Manager Service in the Navigator, click the Properties tab, and then click Edit in the Node Assignments section. Select a new node.
General PropertiesTo edit the general properties, select the Metadata Manager Service in the Navigator, click the Properties tab, and then click Edit in the General Properties section.
The following table describes the general properties for a Metadata Manager Service:
Configuring the Metadata Manager File LocationUse the following rules and guidelines when you configure the Metadata Manager file location:
♦ If you change this location, copy the contents of the directory to the new location.
♦ If you configure a shared file location for the Metadata Manager file location, the location must be accessible to all nodes running a Metadata Manager Service in the domain and must be accessible to all users of the Metadata manager application.
Property Description
Port Number Port number the Metadata Manager application runs on. Default is 10250. If you configure HTTPS, make sure that the port number one less than the HTTPS port is also available. For example, if you configure 10255 for the HTTPS port number, you must make sure 10254 is also available. Metadata Manager uses port 10254 for HTTP.
Agent Port Port number for the Metadata Manager Agent. The agent uses this port to communicate with metadata source repositories. Default is 10251.
Metadata Manager File Location
Location of the files used by the Metadata Manager application. Files include the following file types:- Index files. Index files created by Metadata Manager required to search the
Metadata Manager warehouse.- Parameter files. Files generated by Metadata Manager and used by PowerCenter
workflows.- Log files. Log files generated by Metadata Manager when you load resources.By default, Metadata Manager stores the files in the following directory:<PowerCenter installation directory>\server\tomcat\mm_files\<service name>
License License object you assigned the Metadata Manager Service to when you created the service. You cannot edit this property.
196 Chapter 11: Creating and Configuring the Metadata Manager Service

Database PropertiesTo edit the Metadata Manager repository database properties, select the Metadata Manager Service in the Navigator, click the Properties tab, and then click Edit in the Database Properties section.
The following table describes the database properties for a Metadata Manager repository database:
Configuration PropertiesTo edit the database properties, select the Metadata Manager Service in the Navigator, click the Properties tab, and then click Edit in the Configuration Properties section.
Property Description
Database Type Type of database for the Metadata Manager repository. To apply changes to this property, restart the Metadata Manager Service.
CodePage Metadata Manager repository code page. The Metadata Manager Service and Metadata Manager use the character set encoded in the repository code page when writing data to the Metadata Manager repository. To apply changes to this property, restart the Metadata Manager Service.Note: The Metadata Manager repository code page, the code page on the machine where the associated Integration Service runs, and the code page for any database management, PowerCenter, and Data Analyzer resources you want to load into the Metadata Manager warehouse must be the same.
ConnectString Native connect string to the Metadata Manager repository database. The Metadata Manager Service uses the connection string to create a target connection to the Metadata Manager repository in the PowerCenter repository.To apply changes to this property, restart the Metadata Manager Service.Note: If you set the ODBC Connection Mode property to True, use the ODBC connection name for the connect string.
DBUser User account for the Metadata Manager repository database. Set up this account using the appropriate database client tools. To apply changes to this property, restart the Metadata Manager Service.
DBPassword Password for the Metadata Manager repository database user. Must be in 7-bit ASCII. To apply changes to this property, restart the Metadata Manager Service.
Tablespace Name Tablespace name for the Metadata Manager repository on IBM DB2. When you specify the tablespace name, the Metadata Manager Service creates all repository tables in the same tablespace. You cannot use spaces in the tablespace name. To apply changes to this property, restart the Metadata Manager Service.To improve repository performance on IBM DB2 EEE repositories, specify a tablespace name with one node.
Database Hostname Host name for the Metadata Manager repository database. To apply changes to this property, restart the Metadata Manager Service.
Database Port Port number for the Metadata Manager repository database. To apply changes to this property, restart the Metadata Manager Service.
SID/Service Name Indicates whether the Database Name property contains an Oracle full service name or an SID.
Database Name Full service name or SID for Oracle databases. Service name for IBM DB2 databases. Database name for Microsoft SQL Server or Sybase ASE databases. To apply changes to this property, restart the Metadata Manager Service.
Additional JDBC Parameters
Additional JDBC options. For example, you can use this option to specify the location of a backup server if you are using a database server that is highly available such as Oracle RAC.
Configuring the Metadata Manager Service 197
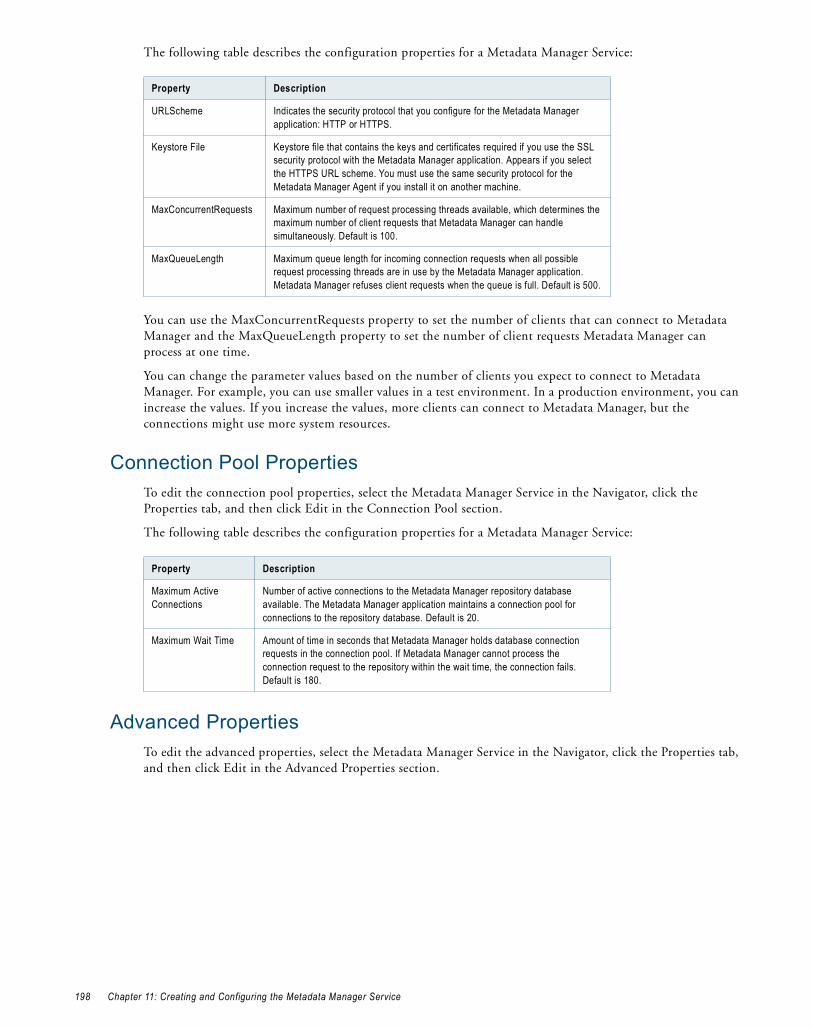
The following table describes the configuration properties for a Metadata Manager Service:
You can use the MaxConcurrentRequests property to set the number of clients that can connect to Metadata Manager and the MaxQueueLength property to set the number of client requests Metadata Manager can process at one time.
You can change the parameter values based on the number of clients you expect to connect to Metadata Manager. For example, you can use smaller values in a test environment. In a production environment, you can increase the values. If you increase the values, more clients can connect to Metadata Manager, but the connections might use more system resources.
Connection Pool PropertiesTo edit the connection pool properties, select the Metadata Manager Service in the Navigator, click the Properties tab, and then click Edit in the Connection Pool section.
The following table describes the configuration properties for a Metadata Manager Service:
Advanced PropertiesTo edit the advanced properties, select the Metadata Manager Service in the Navigator, click the Properties tab, and then click Edit in the Advanced Properties section.
Property Description
URLScheme Indicates the security protocol that you configure for the Metadata Manager application: HTTP or HTTPS.
Keystore File Keystore file that contains the keys and certificates required if you use the SSL security protocol with the Metadata Manager application. Appears if you select the HTTPS URL scheme. You must use the same security protocol for the Metadata Manager Agent if you install it on another machine.
MaxConcurrentRequests Maximum number of request processing threads available, which determines the maximum number of client requests that Metadata Manager can handle simultaneously. Default is 100.
MaxQueueLength Maximum queue length for incoming connection requests when all possible request processing threads are in use by the Metadata Manager application. Metadata Manager refuses client requests when the queue is full. Default is 500.
Property Description
Maximum Active Connections
Number of active connections to the Metadata Manager repository database available. The Metadata Manager application maintains a connection pool for connections to the repository database. Default is 20.
Maximum Wait Time Amount of time in seconds that Metadata Manager holds database connection requests in the connection pool. If Metadata Manager cannot process the connection request to the repository within the wait time, the connection fails. Default is 180.
198 Chapter 11: Creating and Configuring the Metadata Manager Service

The following table describes the advanced properties for a Metadata Manager Service:
Configuring the Associated Integration ServiceYou can configure or remove the Integration Service that Metadata Manager uses to load metadata into the Metadata Manager warehouse. If you remove the Integration Service, configure another Integration Service to enable the Metadata Manager Service.
To edit the associated Integration Service properties, select the Metadata Manager Service in the Administration Console, click Associated Services, and configure the associated Integration Service. To apply changes, restart the Metadata Manager Service.
Property Description
Max Heap Size Amount of RAM in megabytes allocated to the Java Virtual Manager (JVM) that runs Metadata Manager. Use this property to increase the performance of Metadata Manager. Default is 512.For example, you can use this value to increase the performance of Metadata Manager during indexing.
Maximum Catalog Child Objects
Number of child objects that appear in the Metadata Manager metadata catalog for any parent object. The child objects can include folders, logical groups, and metadata objects. Use this option to limit the number of child objects that appear in the metadata catalog for any parent object.Default is 100.
Error Severity Level Level of error messages written to the Metadata Manager Service log. Specify one of the following message levels:- Fatal- Error- Warning- Info- Trace- DebugWhen you specify a severity level, the log includes all errors at that level and above. For example, if the severity level is Warning, fatal, error, and warning messages are logged. Use Trace or Debug if Informatica Global Customer Support instructs you to use that logging level for troubleshooting purposes. Default is ERROR.
Max Concurrent Resource Load
Maximum number of resources that Metadata Manager can load simultaneously. If a resource load fails but can be resumed, Metadata Manager keeps the resource load in the queue until the timeout interval is exceeded.Default is 3.
Timeout Interval Amount of time in minutes that Metadata Manager holds a failed resource load in the load queue. If you do not resume a failed load within the timeout period, Metadata Manager removes the resource from the load queue.Default is 30.
ODBC Connection Mode Connection mode the Integration Service uses to connect to metadata sources and the Metadata Manager repository when loading resources. You can select one of the following options:- True. The Integration Service uses ODBC.- False. The Integration Service uses native connectivity.You must set this property to True if the Integration Service runs on a UNIX machine and you want to extract metadata from to load metadata to a Microsoft SQL Server database or if you use a Microsoft SQL Server database for the Metadata Manager repository.
Configuring the Associated Integration Service 199

The following table describes the associated Integration Service properties:
Privileges for the Associated Integration Service UserThe PowerCenter repository user for the associated Integration Service must be able to perform the following tasks:
♦ Restore the PowerCenter repository.
♦ Import and export PowerCenter repository objects.
♦ Create, edit, and delete connection objects in the PowerCenter repository.
♦ Create folders in the PowerCenter repository.
♦ Load metadata into the Metadata Manager warehouse.
To perform these tasks, the user must have the required privileges and permissions for the domain, Repository Service, and Metadata Manager Service.
The following table lists the required privileges and permissions that the PowerCenter repository user for the associated Integration Service must have:
In the PowerCenter repository, the user who creates a folder or connection object is the owner of the object. Only the object owner or a user assigned the Administrator role for the Repository Service can delete repository folders and connection objects. If you change the associated Integration Service user, you must assign this user as the owner of the following repository objects in the PowerCenter Client:
♦ All connection objects created by the Metadata Manager Service
♦ The Metadata Load folder and all profiling folders created by the Metadata Manager Service
Property Description
Associated Integration Service Name of the Integration Service you want to use with Metadata Manager.
Repository User Name Name of the PowerCenter repository user that has the required privileges.
Repository Password Password for the PowerCenter repository user.
Security Domain Security domain for the PowerCenter repository user.The Security Domain field appears when the PowerCenter domain contains an LDAP security domain.
Service Privileges Permissions
Domain - Access Administration Console- Manage Services
Permission on Repository Service
Repository Service - Access Repository Manager- Create Folders- Create, Edit, and Delete Design Objects- Create, Edit, and Delete Sources and Targets- Create, Edit, and Delete Run-time Objects- Manage Run-time Object Execution- Create Connections
- Read, Write, and Execute on on all connection objects created by the Metadata Manager Service
- Read, Write, and Execute on the Metadata Load folder and all folders created to extract profiling data from the Metadata Manager source
Metadata Manager Service
Load Resource n/a
200 Chapter 11: Creating and Configuring the Metadata Manager Service

Configuring the Associated Reference Table Manager Service
You can use the Reference Table Manager to view reference tables for a business term in the Metadata Manager business glossary. Configure the Reference Table Manager Service that Metadata Manager uses to display reference tables.
To edit the associated Reference Table Manager Service property, select the Metadata Manager Service in the Administration Console, click Associated Services, and configure the associated Reference Table Manager Service name. To apply changes, restart the Metadata Manager Service.
For more information about using reference tables with Metadata Manager, see the Metadata Manager Business Glossary Guide.
Configuring the Associated Reference Table Manager Service 201

202 Chapter 11: Creating and Configuring the Metadata Manager Service
C H A P T E R 1 2
Creating the Reporting Service
This chapter includes the following topics:
♦ Overview, 203
♦ Creating the Reporting Service, 205
♦ Managing the Reporting Service, 208
♦ Configuring the Reporting Service, 211
♦ Granting Users Access to Reports, 214
OverviewThe Reporting Service is an application service that runs the Data Analyzer application in a PowerCenter domain. Create and enable a Reporting Service on the Domain page of the PowerCenter Administration Console.
When you create a Reporting Service, choose the data source to report against:
♦ PowerCenter repository. Choose the associated PowerCenter Repository Service and specify the PowerCenter repository details to run PowerCenter Repository Reports.
♦ Metadata Manager warehouse. Choose the associated Metadata Manager Service and specify the Metadata Manager warehouse details to run Metadata Manager Reports.
♦ Data Profiling warehouse. Choose the Data Profiling option and specify the data profiling warehouse details to run Data Profiling Reports.
♦ Other reporting sources. Choose the Other Reporting Sources option and specify the data warehouse details to run custom reports.
Data Analyzer stores metadata for schemas, metrics and attributes, queries, reports, user profiles, and other objects in the Data Analyzer repository. When you create a Reporting Service, specify the Data Analyzer repository details. The Reporting Service configures the Data Analyzer repository with the metadata corresponding to the selected data source.
You can create multiple Reporting Services on the same node. Specify a data source for each Reporting Service. To use multiple data sources with a single Reporting Service, create additional data sources in Data Analyzer. After you create the data sources, follow the instructions in the Data Analyzer Schema Designer Guide to import table definitions and create metrics and attributes for the reports.
When you enable the Reporting Service, the Administration Console starts Data Analyzer. Click the URL on the right pane to access Data Analyzer.
203
The name of the Reporting Service is the name of the Data Analyzer instance and the context path for the Data Analyzer URL. The Data Analyzer context path can include only alphanumeric characters, hyphens (-), and underscores (_). If the name of the Reporting Service includes any other character, PowerCenter replaces the invalid characters with an underscore and the Unicode value of the character. For example, if the name of the Reporting Service is ReportingService#3, the context path of the Data Analyzer URL is the Reporting Service name with the # character replaced with _35. For example:
http://<HostName>:<PortNumber>/ReportingService_353
PowerCenter Repository ReportsWhen you choose the PowerCenter repository as a data source, you can run the PowerCenter Repository Reports from Data Analyzer.
PowerCenter Repository Reports are prepackaged dashboards and reports that allow you to analyze the following types of PowerCenter repository metadata:
♦ Source and target metadata. Includes shortcuts, descriptions, and corresponding database names and field-level attributes.
♦ Transformation metadata in mappings and mapplets. Includes port-level details for each transformation.
♦ Mapping and mapplet metadata. Includes the targets, transformations, and dependencies for each mapping.
♦ Workflow and worklet metadata. Includes schedules, instances, events, and variables.
♦ Session metadata. Includes session execution details and metadata extensions defined for each session.
♦ Change management metadata. Includes versions of sources, targets, labels, and label properties.
♦ Operational metadata. Includes run-time statistics.
For a list of all reports included in the PowerCenter Repository Reports, see the PowerCenter Repository Reports Reference.
Metadata Manager Repository ReportsWhen you choose the Metadata Manager warehouse as a data source, you can run the Metadata Manager Repository Reports from Data Analyzer.
Metadata Manager is the PowerCenter metadata management and analysis tool.
For a list of all Metadata Manager Repository Reports, see the Metadata Manager Reports Reference.
Data Profiling ReportsWhen you choose the Data Profiling warehouse as a data source, you can run the Data Profiling reports from Data Analyzer.
Use the Data Profiling dashboard to access the Data Profiling reports. Data Analyzer provides the following types of reports:
♦ Composite reports. Display a set of sub-reports and the associated metadata. The sub-reports can be a multiple report types in Data Analyzer.
♦ Metadata reports. Display basic metadata about a data profile. The Metadata reports provide the source-level and column-level functions in a data profile, and historic statistics on previous runs of the same data profile.
♦ Summary reports. Display data profile results for source-level and column-level functions in a data profile.
For a list of all Data Profiling reports, see the PowerCenter Data Profiling Guide.
204 Chapter 12: Creating the Reporting Service

Other Reporting SourcesWhen you choose other warehouses as data sources, you can run other reports from Data Analyzer. Create the reports in Data Analyzer and save them in the Data Analyzer repository.
Data Analyzer RepositoryWhen you run reports for any data source, Data Analyzer uses the metadata in the Data Analyzer repository to determine the location from which to retrieve the data for the report and how to present the report.
Use the database management system client to create the Data Analyzer repository database. When you create the Reporting Service, specify the database details and select the application service or data warehouse for which you want to run the reports. When you enable the Reporting Service, PowerCenter imports the metadata for schemas, metrics and attributes, queries, reports, user profiles, and other objects to the repository tables.
Note: If you create a Reporting Service for another reporting source, you need to create or import the metadata for the data source manually. For more information about creating and importing objects to the repository, see the Data Analyzer Administrator Guide.
Creating the Reporting ServiceBefore you create a Reporting Service, complete the following tasks:
♦ Create the Data Analyzer repository. Create a database for the Data Analyzer repository. If you create a Reporting Service for an existing Data Analyzer repository, you can use the existing database. When you enable a Reporting Service that uses an existing Data Analyzer repository, PowerCenter does not import the metadata for the prepackaged reports.
♦ Create Repository Services and Metadata Manager Services. To create a Reporting Service for the Repository Service or Metadata Manager Service, create the application service in the domain and enable it.
To create a Reporting Service:
1. In the Navigator of the Administration Console, select the domain where you want to create the Reporting Service.
2. Click Create > Reporting Service.
The Create Reporting Service dialog box appears.
3. Enter the general properties for the Reporting Service.
The following table describes the Reporting Service properties:
Property Description
Service Name Name of the Reporting Service. The name is not case sensitive and must be unique within the domain.
Location Domain and folder where the service is created. Click Select Folder to choose a different folder. You can move the Reporting Service after you create it.
License License that allows the use of the service. Select from the list of licenses available in the domain.
Installation Node Node on which the service process runs. Since the Reporting Service is not highly available, it can run on one node.
Enable HTTP on port
The TCP port that the Reporting Service uses. Enter a value between 1 and 65535.Default value is 16080.
Creating the Reporting Service 205
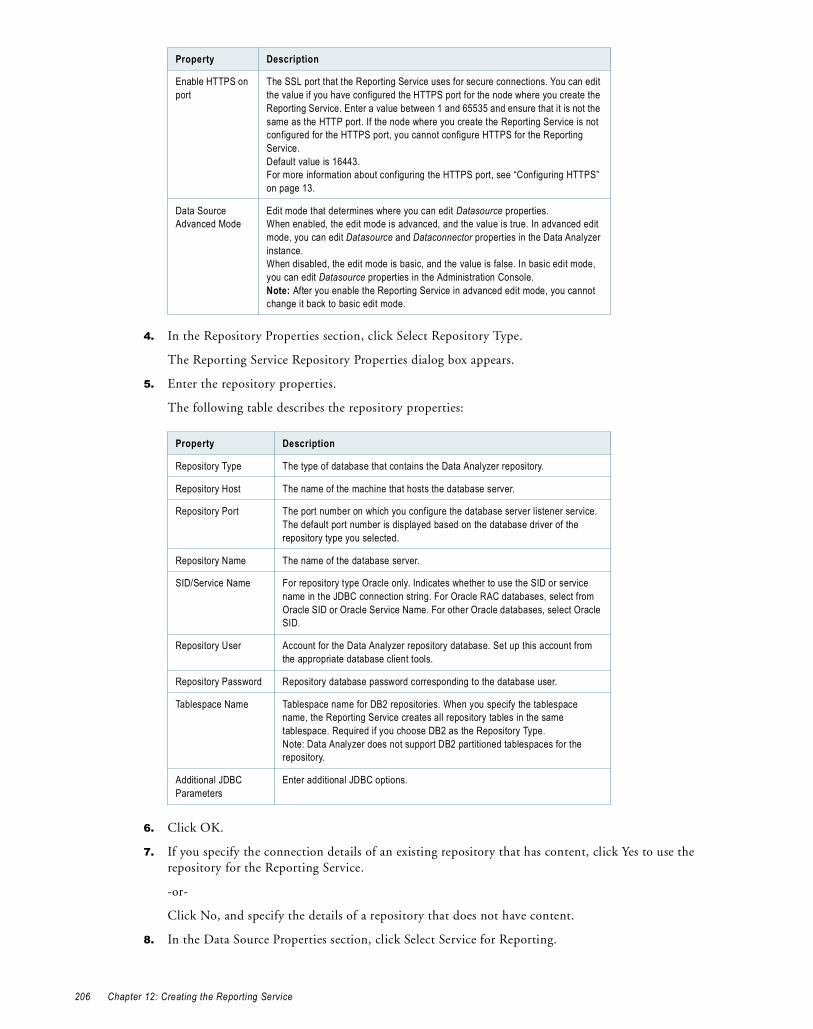
4. In the Repository Properties section, click Select Repository Type.
The Reporting Service Repository Properties dialog box appears.
5. Enter the repository properties.
The following table describes the repository properties:
6. Click OK.
7. If you specify the connection details of an existing repository that has content, click Yes to use the repository for the Reporting Service.
-or-
Click No, and specify the details of a repository that does not have content.
8. In the Data Source Properties section, click Select Service for Reporting.
Enable HTTPS on port
The SSL port that the Reporting Service uses for secure connections. You can edit the value if you have configured the HTTPS port for the node where you create the Reporting Service. Enter a value between 1 and 65535 and ensure that it is not the same as the HTTP port. If the node where you create the Reporting Service is not configured for the HTTPS port, you cannot configure HTTPS for the Reporting Service. Default value is 16443.For more information about configuring the HTTPS port, see “Configuring HTTPS” on page 13.
Data Source Advanced Mode
Edit mode that determines where you can edit Datasource properties. When enabled, the edit mode is advanced, and the value is true. In advanced edit mode, you can edit Datasource and Dataconnector properties in the Data Analyzer instance.When disabled, the edit mode is basic, and the value is false. In basic edit mode, you can edit Datasource properties in the Administration Console.Note: After you enable the Reporting Service in advanced edit mode, you cannot change it back to basic edit mode.
Property Description
Repository Type The type of database that contains the Data Analyzer repository.
Repository Host The name of the machine that hosts the database server.
Repository Port The port number on which you configure the database server listener service. The default port number is displayed based on the database driver of the repository type you selected.
Repository Name The name of the database server.
SID/Service Name For repository type Oracle only. Indicates whether to use the SID or service name in the JDBC connection string. For Oracle RAC databases, select from Oracle SID or Oracle Service Name. For other Oracle databases, select Oracle SID.
Repository User Account for the Data Analyzer repository database. Set up this account from the appropriate database client tools.
Repository Password Repository database password corresponding to the database user.
Tablespace Name Tablespace name for DB2 repositories. When you specify the tablespace name, the Reporting Service creates all repository tables in the same tablespace. Required if you choose DB2 as the Repository Type.Note: Data Analyzer does not support DB2 partitioned tablespaces for the repository.
Additional JDBC Parameters
Enter additional JDBC options.
Property Description
206 Chapter 12: Creating the Reporting Service
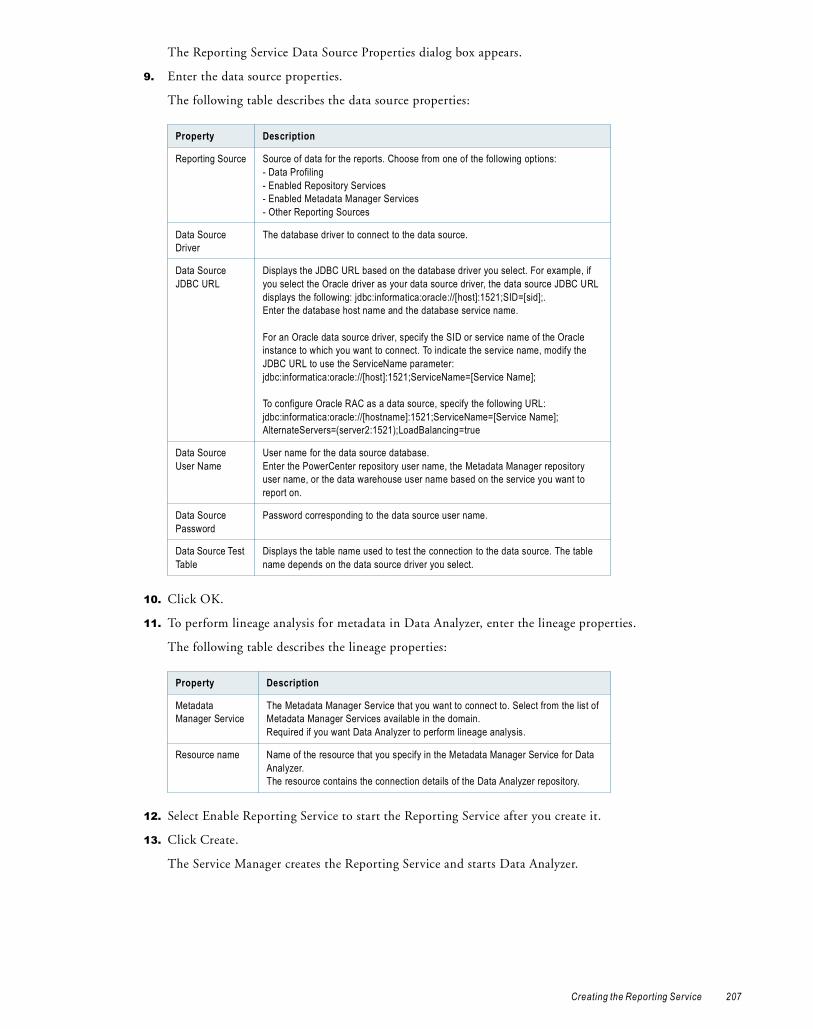
The Reporting Service Data Source Properties dialog box appears.
9. Enter the data source properties.
The following table describes the data source properties:
10. Click OK.
11. To perform lineage analysis for metadata in Data Analyzer, enter the lineage properties.
The following table describes the lineage properties:
12. Select Enable Reporting Service to start the Reporting Service after you create it.
13. Click Create.
The Service Manager creates the Reporting Service and starts Data Analyzer.
Property Description
Reporting Source Source of data for the reports. Choose from one of the following options:- Data Profiling- Enabled Repository Services- Enabled Metadata Manager Services- Other Reporting Sources
Data Source Driver
The database driver to connect to the data source.
Data Source JDBC URL
Displays the JDBC URL based on the database driver you select. For example, if you select the Oracle driver as your data source driver, the data source JDBC URL displays the following: jdbc:informatica:oracle://[host]:1521;SID=[sid];. Enter the database host name and the database service name.
For an Oracle data source driver, specify the SID or service name of the Oracle instance to which you want to connect. To indicate the service name, modify the JDBC URL to use the ServiceName parameter: jdbc:informatica:oracle://[host]:1521;ServiceName=[Service Name];
To configure Oracle RAC as a data source, specify the following URL:jdbc:informatica:oracle://[hostname]:1521;ServiceName=[Service Name]; AlternateServers=(server2:1521);LoadBalancing=true
Data Source User Name
User name for the data source database. Enter the PowerCenter repository user name, the Metadata Manager repository user name, or the data warehouse user name based on the service you want to report on.
Data Source Password
Password corresponding to the data source user name.
Data Source Test Table
Displays the table name used to test the connection to the data source. The table name depends on the data source driver you select.
Property Description
Metadata Manager Service
The Metadata Manager Service that you want to connect to. Select from the list of Metadata Manager Services available in the domain.Required if you want Data Analyzer to perform lineage analysis.
Resource name Name of the resource that you specify in the Metadata Manager Service for Data Analyzer.The resource contains the connection details of the Data Analyzer repository.
Creating the Reporting Service 207

Managing the Reporting ServiceUse the Administration Console to manage the Reporting Service and the Data Analyzer repository content.
You can use the Administration Console to complete the following tasks:
♦ Configure the edit mode.
♦ Enable and disable a Reporting Service.
♦ Create contents in the repository.
♦ Back up contents of the repository.
♦ Restore contents to the repository.
♦ Delete contents from the repository.
♦ Upgrade contents of the repository.
♦ Upgrade users and groups in the repository.
♦ View last activity logs.
♦ Configure permissions for the Reporting Service.
Note: You must disable the Reporting Service in the Administration Console to perform tasks related to repository content.
Configuring the Edit ModeTo configure the edit mode for Datasource, set the edit mode to basic or advanced mode.
The following table describes the properties of basic and advanced mode in the Data Analyzer instance:
Basic ModeWhen you configure the edit mode to be basic, you can manage Datasource in the Administration Console. Datasource and Dataconnector properties are read-only in the Data Analyzer instance. You can edit the Primary Time Dimension Property of the data source. By default, the edit mode is basic.
Advanced ModeWhen you configure the edit mode to be advanced, you can manage Datasource and Dataconnector in the Data Analyzer instance. You cannot return to the basic edit mode after you select the advanced edit mode. Dataconnector has a primary data source that can be configured to JDBC, Web Service, or XML data source types.
Function Basic Mode Advanced Mode
DatasourceEdit Administration Console configured properties
No Yes
Enable/disable Yes Yes
Dataconnector
Activate/deactivate Yes Yes
Edit user/group assignment No Yes
Edit Primary Data Source No Yes
Edit Primary Time Dimension Yes Yes
Add Schema Mappings No Yes
208 Chapter 12: Creating the Reporting Service

Enabling and Disabling a Reporting ServiceWhen you enable a Reporting Service, the Administration Console starts Data Analyzer on the node designated to run the service. Click the URL in the right pane to open Data Analyzer in a browser window and run the reports.
You can also launch Data Analyzer from the PowerCenter Client tools, from Metadata Manager, or by accessing the Data Analyzer URL from a browser.
You can enable the Reporting Service in one of the following ways:
♦ Select the Enable Reporting Service option when you create a Reporting Service.
♦ Click the Enable button in the right pane of the Administration Console.
The status indicator at the top of the right pane indicates when the service has started running.
You can disable a Reporting Service by selecting the Reporting Service and clicking Disable. Before you disable a Reporting Service, ensure that all users are disconnected from Data Analyzer.
Creating Contents in the Data Analyzer RepositoryYou can create content for the Data Analyzer repository after you create the Reporting Service. You cannot create content for a repository that already includes content. In addition, you cannot enable a Reporting Service that manages a repository without content.
The database account you use to connect to the database must have the privileges to create and drop tables and indexes and to select, insert, update, or delete data from the tables.
Note: If you choose to enable the Reporting Service when you create a Reporting Service, PowerCenter creates the repository content when it creates the Reporting Service.
To create content in the Data Analyzer repository:
1. In the Navigator, select the Reporting Service that manages the repository for which you want to create content.
2. In the Actions list, select Create Contents.
3. Select the Administrator of the Reporting Service from the list.
4. Click OK.
The activity log indicates the status of the content creation action.
5. Enable the Reporting Service after you create the repository content.
Backing Up Contents of the Data Analyzer RepositoryTo prevent data loss due to hardware or software problems, back up the contents of the Data Analyzer repository.
When you back up a repository, the Reporting Service saves the repository to a binary file, including the repository objects, connection information, and code page information. If you need to recover the repository, you can restore the content of the repository from the backup file.
To back up the content of the Data Analyzer repository:
1. In the Navigator, select the Reporting Service that manages the repository content you want to back up.
2. In the Actions list, select Back up Contents.
3. Enter a file name for the repository backup file.
4. To overwrite an existing file, select Replace existing file.
5. Click OK.
Managing the Reporting Service 209
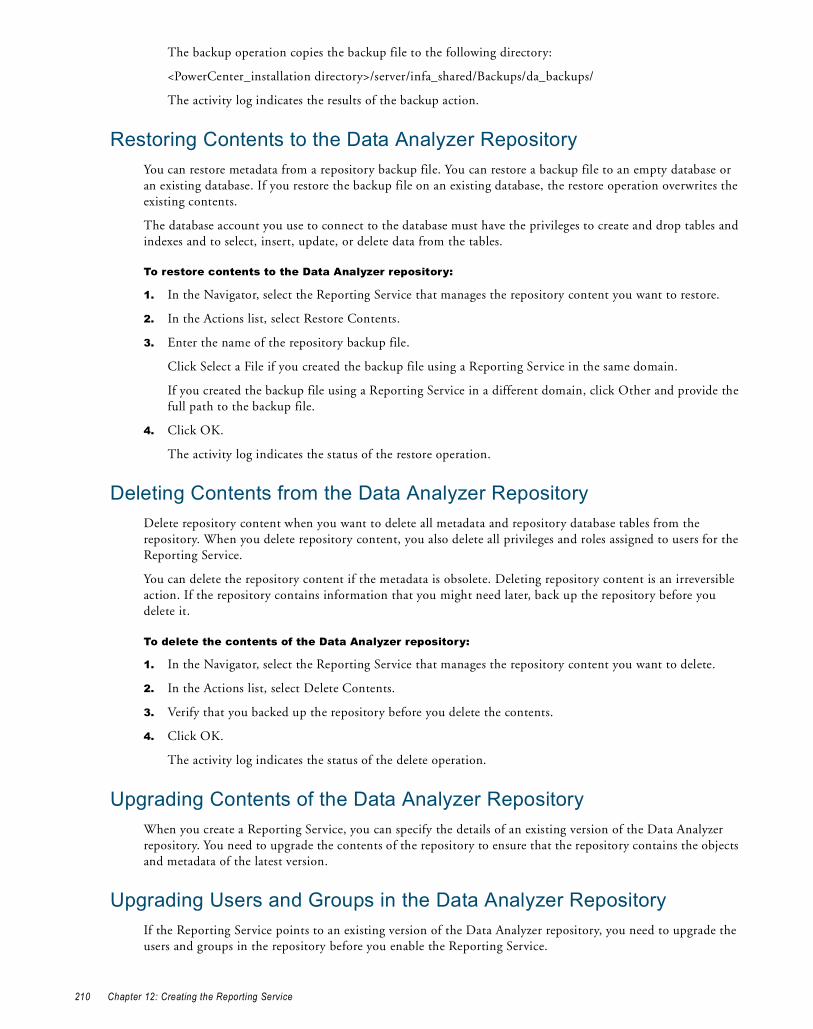
The backup operation copies the backup file to the following directory:
<PowerCenter_installation directory>/server/infa_shared/Backups/da_backups/
The activity log indicates the results of the backup action.
Restoring Contents to the Data Analyzer RepositoryYou can restore metadata from a repository backup file. You can restore a backup file to an empty database or an existing database. If you restore the backup file on an existing database, the restore operation overwrites the existing contents.
The database account you use to connect to the database must have the privileges to create and drop tables and indexes and to select, insert, update, or delete data from the tables.
To restore contents to the Data Analyzer repository:
1. In the Navigator, select the Reporting Service that manages the repository content you want to restore.
2. In the Actions list, select Restore Contents.
3. Enter the name of the repository backup file.
Click Select a File if you created the backup file using a Reporting Service in the same domain.
If you created the backup file using a Reporting Service in a different domain, click Other and provide the full path to the backup file.
4. Click OK.
The activity log indicates the status of the restore operation.
Deleting Contents from the Data Analyzer RepositoryDelete repository content when you want to delete all metadata and repository database tables from the repository. When you delete repository content, you also delete all privileges and roles assigned to users for the Reporting Service.
You can delete the repository content if the metadata is obsolete. Deleting repository content is an irreversible action. If the repository contains information that you might need later, back up the repository before you delete it.
To delete the contents of the Data Analyzer repository:
1. In the Navigator, select the Reporting Service that manages the repository content you want to delete.
2. In the Actions list, select Delete Contents.
3. Verify that you backed up the repository before you delete the contents.
4. Click OK.
The activity log indicates the status of the delete operation.
Upgrading Contents of the Data Analyzer RepositoryWhen you create a Reporting Service, you can specify the details of an existing version of the Data Analyzer repository. You need to upgrade the contents of the repository to ensure that the repository contains the objects and metadata of the latest version.
Upgrading Users and Groups in the Data Analyzer RepositoryIf the Reporting Service points to an existing version of the Data Analyzer repository, you need to upgrade the users and groups in the repository before you enable the Reporting Service.
210 Chapter 12: Creating the Reporting Service
Viewing Last Activity LogsYou can view the status of the activities that you perform on the Data Analyzer repository contents. The activity logs contain the status of the last activity that you performed on the Data Analyzer repository.
To view the last activity logs:
1. In the Navigator, select the Reporting Service for which you want to view the last activity log.
2. In the Actions list, select Last Activity Logs.
The activity status displays in the right pane. You can choose to save or view an activity log file.
3. Click Save.
4. Click Close to return to the Reporting Service Properties pane.
Configuring the Reporting ServiceAfter you create a Reporting Service, you can configure it. Use the Administration Console to view or edit the following Reporting Service properties:
♦ Node Assignment. Configure the Reporting Service on a different node in the same domain.
♦ General Properties. Configure the general properties of the Reporting Service that include the Data Analyzer license key used, TCP port where the Reporting Service runs, and SSL port if you have specified it.
♦ Data Source Properties. Configure the data source database properties, such as the data source driver, the JDBC URL, and the data source database user account and password.
♦ Repository Properties. Configure the Data Analyzer repository database properties, such as the repository database user account and password.
♦ Lineage Properties. Configure the data lineage properties such as the Metadata Manager Service for lineage and the resource name.
♦ Advanced Properties. Connect to Data Analyzer to configure the advanced properties.
To view and update properties, select the Reporting Service in the Navigator. The Properties tab for the service appears. Click Edit corresponding to the property you want to edit.
Node AssignmentsYou can move a Reporting Service to another node in the domain. PowerCenter disables the Reporting Service on the original node and enables it in the new node. You can see the Reporting Service on both the nodes, but it runs only on the new node.
Click Edit in the right pane and from the Node list, select the node to which you want to move the Reporting Service.
Note: If you move the Reporting Service to another node, you must reapply the custom color schemes to the Reporting Service. PowerCenter does not copy the color schemes to the Reporting Service on the new node, but retains them on the original node.
General PropertiesYou can view and edit the general properties after you create the Reporting Service.
Click Edit in the right pane to edit the general properties.
Configuring the Reporting Service 211
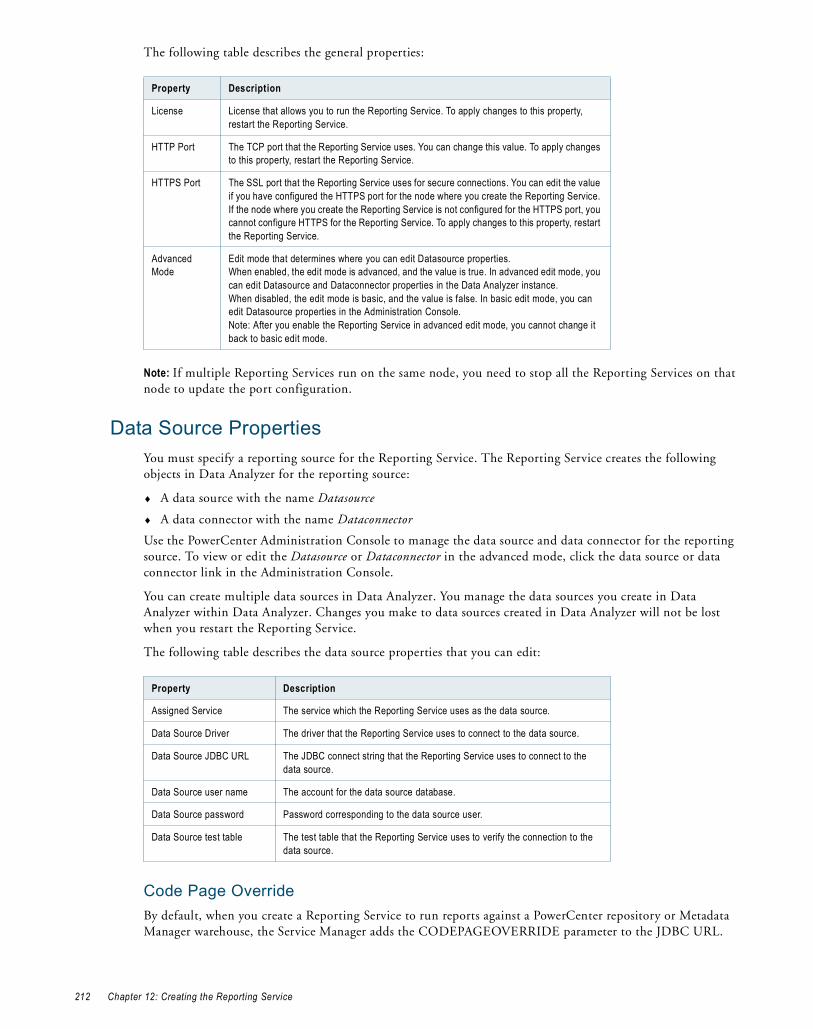
The following table describes the general properties:
Note: If multiple Reporting Services run on the same node, you need to stop all the Reporting Services on that node to update the port configuration.
Data Source PropertiesYou must specify a reporting source for the Reporting Service. The Reporting Service creates the following objects in Data Analyzer for the reporting source:
♦ A data source with the name Datasource
♦ A data connector with the name Dataconnector
Use the PowerCenter Administration Console to manage the data source and data connector for the reporting source. To view or edit the Datasource or Dataconnector in the advanced mode, click the data source or data connector link in the Administration Console.
You can create multiple data sources in Data Analyzer. You manage the data sources you create in Data Analyzer within Data Analyzer. Changes you make to data sources created in Data Analyzer will not be lost when you restart the Reporting Service.
The following table describes the data source properties that you can edit:
Code Page OverrideBy default, when you create a Reporting Service to run reports against a PowerCenter repository or Metadata Manager warehouse, the Service Manager adds the CODEPAGEOVERRIDE parameter to the JDBC URL.
Property Description
License License that allows you to run the Reporting Service. To apply changes to this property, restart the Reporting Service.
HTTP Port The TCP port that the Reporting Service uses. You can change this value. To apply changes to this property, restart the Reporting Service.
HTTPS Port The SSL port that the Reporting Service uses for secure connections. You can edit the value if you have configured the HTTPS port for the node where you create the Reporting Service. If the node where you create the Reporting Service is not configured for the HTTPS port, you cannot configure HTTPS for the Reporting Service. To apply changes to this property, restart the Reporting Service.
Advanced Mode
Edit mode that determines where you can edit Datasource properties. When enabled, the edit mode is advanced, and the value is true. In advanced edit mode, you can edit Datasource and Dataconnector properties in the Data Analyzer instance.When disabled, the edit mode is basic, and the value is false. In basic edit mode, you can edit Datasource properties in the Administration Console.Note: After you enable the Reporting Service in advanced edit mode, you cannot change it back to basic edit mode.
Property Description
Assigned Service The service which the Reporting Service uses as the data source.
Data Source Driver The driver that the Reporting Service uses to connect to the data source.
Data Source JDBC URL The JDBC connect string that the Reporting Service uses to connect to the data source.
Data Source user name The account for the data source database.
Data Source password Password corresponding to the data source user.
Data Source test table The test table that the Reporting Service uses to verify the connection to the data source.
212 Chapter 12: Creating the Reporting Service

The Service Manager sets the parameter to a code page that the Reporting Service uses to read data in the PowerCenter repository or Metadata Manager warehouse.
If you use a PowerCenter repository or Metadata Manager as a reporting data source and the reports do not display correctly, verify that code page set in the JDBC URL for the Reporting Service matches the code page for the PowerCenter Service or Metadata Manager Service.
Repository PropertiesRepository properties provide information about the database that stores the Data Analyzer repository metadata. Specify the database properties when you create the Reporting Service. After you create a Reporting Service, you can modify some of these properties.
Note: If you edit a repository property or restart the system that hosts the repository database, you need to restart the Reporting Service.
Click Edit in the right pane to edit the repository properties.
The following table describes the repository properties that you can edit:
Lineage PropertiesData Analyzer requires lineage properties to connect to the Metadata Manager Service and perform data lineage.
You can access the data lineage for Data Analyzer reports, attributes, and metrics. Use data lineage to understand the origin of the data, how the data is transformed, and where the data is used.
Click edit in the right pane to edit the lineage properties.
The following table describes the lineage properties that you can edit:
Property Description
Database driver The JDBC driver that the Reporting Service uses to connect to the Data Analyzer repository database. To apply changes to this property, restart the Reporting Service.
Database host Name of the machine that hosts the database server. To apply changes to this property, restart the Reporting Service.
Database port The port number on which you have configured the database server listener service. To apply changes to this property, restart the Reporting Service.
Database name The name of the database service. To apply changes to this property, restart the Reporting Service.
Database user Account for the Data Analyzer repository database. To apply changes to this property, restart the Reporting Service.
Database password
Data Analyzer repository database password corresponding to the database user. To apply changes to this property, restart the Reporting Service.
Tablespace Name
Tablespace name for DB2 repositories. When you specify the tablespace name, the Reporting Service creates all repository tables in the same tablespace. To apply changes to this property, restart the Reporting Service.
Property Description
Metadata Manager Service
Name of the Metadata Manager Service to which you want to connect to perform data lineage.
Resource Name Name of the resource you specify in the Metadata Manager Service for Data Analyzer.
Configuring the Reporting Service 213

Advanced PropertiesAdvanced Properties contains the link Reporting Service Advanced Properties. Click the link to connect to the Administration tab in Data Analyzer and edit the following properties:
♦ Schema Design
♦ XML Export/Import
♦ System Management
♦ Real-time Configuration
♦ Scheduling
♦ Access Management
For more information about advanced properties, see the Data Analyzer Administrator Guide.
Granting Users Access to ReportsLimit access to Data Analyzer to secure information in the Data Analyzer repository and data sources. To access Data Analyzer, each user needs an account to perform tasks and access data. Users can perform tasks based on their privileges.
You can grant access to users through the following components:
♦ User accounts. Create users in the PowerCenter domain. Use the Security page of Administration Console to create users.
♦ Privileges and roles. You assign privileges and roles to users and groups for a Reporting Service. Use the Security page of the Administration Console to assign privileges and roles to a user.
♦ Permissions. You assign Data Analyzer permissions in Data Analyzer.
214 Chapter 12: Creating the Reporting Service

C H A P T E R 1 3
Managing the Grid
This chapter includes the following topics:
♦ Overview, 215
♦ Configuring the Grid, 216
♦ Configuring the Integration Service, 216
♦ Configuring Resources, 217
OverviewA grid is an alias assigned to a group of nodes that run sessions and workflows. When you run a workflow on a grid, you improve scalability and performance by distributing Session and Command tasks to service processes running on nodes in the grid. When you run a session on a grid, you improve scalability and performance by distributing session threads to multiple DTM processes running on nodes in the grid.
To run a workflow or session on a grid, you assign resources to nodes, create and configure the grid, and configure the Integration Service to run on a grid.
The following figure shows an Integration Service configured to run on a grid:
To manage a grid, complete the following tasks:
♦ Create a grid and assign nodes to the grid. You create a grid and assign nodes to the grid. For more information, see “Configuring the Grid” on page 216.
♦ Configure the Integration Service to run on a grid. You configure the Integration Service to run on a grid, and you configure the service processes for the nodes in the grid. For more information, see “Configuring the Integration Service” on page 216.
Node 1
Node 3
Integration Service
GridNode 2
(Resource)
Assign resources to nodes.
Create a grid and assign nodes to it.
Configure the Integration Service to run on a grid.
215

♦ Assign resources to nodes. You assign resources to a node to allow the Integration Service to match the resources required to run a task or session thread with the resources available on a node. For more information, see “Configuring Resources” on page 217.
After you configure the grid and Integration Service, you configure a workflow to run on the Integration Service assigned to a grid.
Configuring the GridTo configure a grid, create the grid and assign nodes to the grid. You can assign a node to more than one grid.
To create a grid:
1. In the PowerCenter Administration Console, select Create > Grid.
The Create Grid window appears.
2. Enter a name for the grid.
3. Select nodes to assign to the grid.
Ensure that each node in the grid uses the same operating system. A grid can contain nodes that support a single service version or multiple service versions.
Note: If an existing node in a grid is updated to no longer support the same service versions as other nodes in the grid, the Integration Service that is assigned to the grid will not be editable. To edit the Integration Service, update the node assignment on the grid so that the grid contains nodes that support either a single service version or multiple service versions.
Configuring the Integration ServiceTo configure the Integration Service, you assign the grid to the Integration Service and configure the service process for each node in the grid. If the Integration Service uses operating system profiles, all nodes on the grid must run on UNIX. In a mixed-version domain, all nodes on the grid must be configured to run the service version of the Integration Service.
Configuring the Integration Service to Run on a GridYou configure the Integration Service by assigning the grid to the Integration Service.
To assign the grid to an Integration Service:
1. In the PowerCenter Administration Console, select the Integration Service Properties tab.
2. Edit the grid and node assignments, and select Grid.
3. Select the grid you want to assign to the Integration Service.
Configuring the Service ProcessesWhen you run a session or a workflow on a grid, a service process runs on each node in the grid. Each service process running on a node must be compatible or configured the same. It must also have access to the directories and input files used by the Integration Service.
To ensure consistent results, complete the following tasks:
216 Chapter 13: Managing the Grid
♦ Verify the shared storage location. Verify that the shared storage location is accessible to each node in the grid. If the Integration Service uses operating system profiles, the operating system user must have access to the shared storage location.
♦ Configure the service process. Configure $PMRootDir to the shared location on each node in the grid. Configure service process variables with identical absolute paths to the shared directories on each node in the grid. If the Integration Service uses operating system profiles, the service process variables you define in the operating system profile override the service process variable setting for every node. The operating system user must have access to the $PMRootDir configured in the operating system profile on every node in the grid.
To configure the service processes:
1. Select the Integration Service in the Navigator.
2. Click the Processes tab.
The tab displays the service process for each node assigned to the grid.
3. Configure $PMRootDir to point to the shared location.
4. Configure the following service process settings for each node in the grid:
♦ Code pages. For accurate data movement and transformation, verify that the code pages are compatible for each service process. Use the same code page for each node where possible.
♦ Service process variables. Configure the service process variables the same for each service process. For example, the setting for $PMCacheDir must be identical on each node in the grid.
♦ Directories for Java components. Point to the same Java directory to ensure that java components are available to objects that access Java, such as Custom transformations that use Java coding.
Configuring ResourcesPowerCenter resources are the database connections, files, directories, node names, and operating system types required by a task. You can configure the Integration Service to check resources. When you do this, the Load Balancer matches the resources available to nodes in the grid with the resources required by the workflow. It dispatches tasks in the workflow to nodes where the required resources are available. If the Integration Service is not configured to run on a grid, the Load Balancer ignores resource requirements.
For example, if a session uses a parameter file, it must run on a node that has access to the file. You create a resource for the parameter file and make it available to one or more nodes. When you configure the session, you assign the parameter file resource as a required resource. The Load Balancer dispatches the Session task to a node that has the parameter file resource. If no node has the parameter file resource available, the session fails.
Resources for a node can be predefined or user-defined. PowerCenter creates predefined resources during installation. Predefined resources include the connections available on a node, node name, and operating system type. When you create a node, all connection resources are available by default. Disable the connection resources that are not available on the node. For example, if the node does not have Oracle client libraries, disable the Oracle Application connections. If the Load Balancer dispatches a task to a node where the required resources are not available, the task fails. You cannot disable or remove node name or operating system type resources.
User-defined resources include file/directory and custom resources. Use file/directory resources for parameter files or file server directories. Use custom resources for any other resources available to the node, such as database client version.
Configuring Resources 217
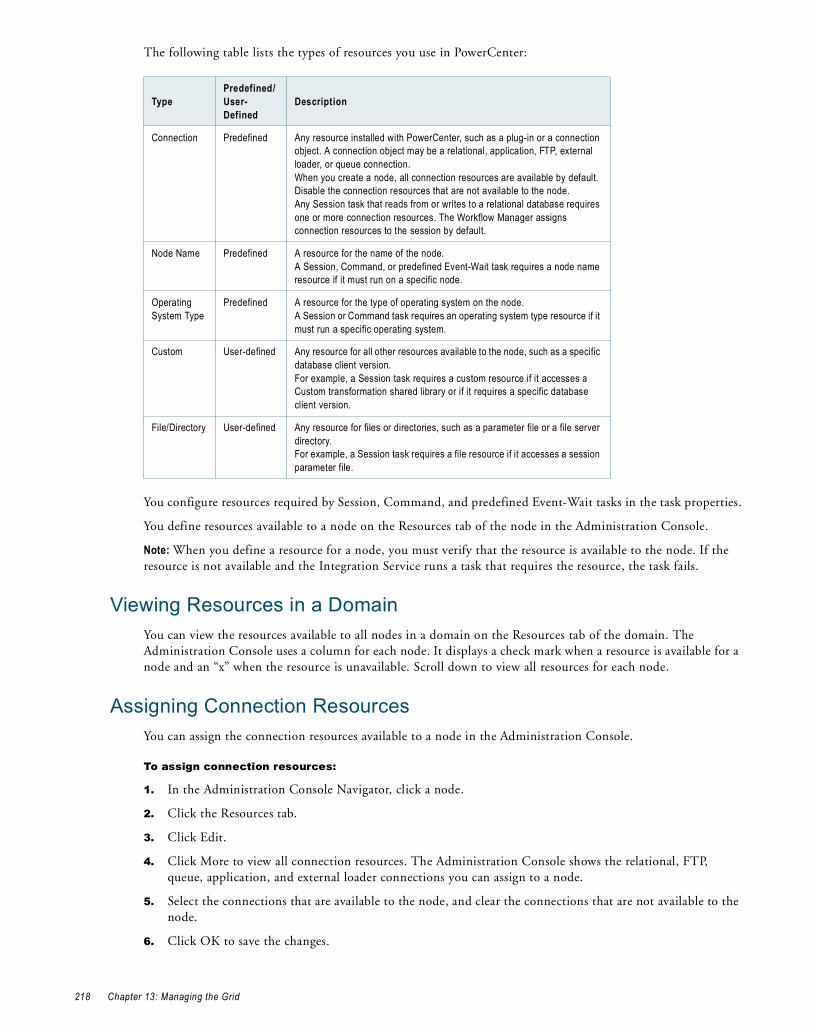
The following table lists the types of resources you use in PowerCenter:
You configure resources required by Session, Command, and predefined Event-Wait tasks in the task properties.
You define resources available to a node on the Resources tab of the node in the Administration Console.
Note: When you define a resource for a node, you must verify that the resource is available to the node. If the resource is not available and the Integration Service runs a task that requires the resource, the task fails.
Viewing Resources in a DomainYou can view the resources available to all nodes in a domain on the Resources tab of the domain. The Administration Console uses a column for each node. It displays a check mark when a resource is available for a node and an “x” when the resource is unavailable. Scroll down to view all resources for each node.
Assigning Connection ResourcesYou can assign the connection resources available to a node in the Administration Console.
To assign connection resources:
1. In the Administration Console Navigator, click a node.
2. Click the Resources tab.
3. Click Edit.
4. Click More to view all connection resources. The Administration Console shows the relational, FTP, queue, application, and external loader connections you can assign to a node.
5. Select the connections that are available to the node, and clear the connections that are not available to the node.
6. Click OK to save the changes.
TypePredefined/User-Defined
Description
Connection Predefined Any resource installed with PowerCenter, such as a plug-in or a connection object. A connection object may be a relational, application, FTP, external loader, or queue connection.When you create a node, all connection resources are available by default. Disable the connection resources that are not available to the node.Any Session task that reads from or writes to a relational database requires one or more connection resources. The Workflow Manager assigns connection resources to the session by default.
Node Name Predefined A resource for the name of the node. A Session, Command, or predefined Event-Wait task requires a node name resource if it must run on a specific node.
Operating System Type
Predefined A resource for the type of operating system on the node. A Session or Command task requires an operating system type resource if it must run a specific operating system.
Custom User-defined Any resource for all other resources available to the node, such as a specific database client version.For example, a Session task requires a custom resource if it accesses a Custom transformation shared library or if it requires a specific database client version.
File/Directory User-defined Any resource for files or directories, such as a parameter file or a file server directory.For example, a Session task requires a file resource if it accesses a session parameter file.
218 Chapter 13: Managing the Grid
Defining Custom and File/Directory ResourcesYou can define custom and file/directory resources available to a node in the Administration Console. When you define a custom or file/directory resource, you assign a resource name. The resource name is a logical name that you create to identify the resource.
You assign the resource to a task or mapping object instance using this name. To coordinate resource usage, you may want to use a naming convention for file/directory and custom resources.
To define a custom or file/directory resource:
1. In the Administration Console Navigator, click a node.
2. Click the Resources tab.
3. Click Add for either the Custom or File/Directory resources.
4. Enter a name for the resource in the Create Custom Resource or Create File/Directory Resource window.
The name cannot have spaces, include carriage returns or tabs, exceed 79 characters, or contain the following characters: \ / * ? < > " | $
5. Click OK.
To remove a custom or file/directory resource, click the Remove button for the resource you want to remove.
Resource Naming ConventionsUsing resources with PowerCenter requires coordination and communication between the domain administrator and the workflow developer. The domain administrator defines resources available to nodes. The workflow developer assigns resources required by Session, Command, and predefined Event-Wait tasks. To coordinate resource usage, you can use a naming convention for file/directory and custom resources.
Use the following naming convention:
resourcetype_description
For example, multiple nodes in a grid contain a session parameter file called sales1.txt. Create a file resource for it named sessionparamfile_sales1 on each node that contains the file. A workflow developer creates a session that uses the parameter file and assigns the sessionparamfile_sales1 file resource to the session.
When the Integration Service runs the workflow on the grid, the Load Balancer distributes the session assigned the sessionparamfile_sales1 resource to nodes that have the resource defined.
Configuring Resources 219

220 Chapter 13: Managing the Grid

C H A P T E R 1 4
Configuring the Load Balancer
This chapter includes the following topics:
♦ Overview, 221
♦ Configuring the Dispatch Mode, 222
♦ Creating Service Levels, 223
♦ Configuring Resources, 224
♦ Calculating the CPU Profile, 225
♦ Defining Resource Provision Thresholds, 225
OverviewThe Load Balancer is a component of the Integration Service that dispatches tasks to Integration Service processes running on nodes in a grid. It matches task requirements with resource availability to identify the best Integration Service process to run a task. It can dispatch tasks on a single node or across nodes.
You can configure Load Balancer settings for the domain and for nodes in the domain. The settings you configure for the domain apply to all Integration Services in the domain.
You configure the following settings for the domain to determine how the Load Balancer dispatches tasks:
♦ Dispatch mode. The dispatch mode determines how the Load Balancer dispatches tasks. You can configure the Load Balancer to dispatch tasks in a simple round-robin fashion, in a round-robin fashion using node load metrics, or to the node with the most available computing resources. For more information, see “Configuring the Dispatch Mode” on page 222.
♦ Service level. Service levels establish dispatch priority among tasks that are waiting to be dispatched. You can create different service levels that a workflow developer can assign to workflows. For more information, see “Creating Service Levels” on page 223.
You configure the following Load Balancer settings for each node:
♦ Resources. When the Integration Service runs on a grid, the Load Balancer can compare the PowerCenter resources required by a task with the resources available on each node. The Load Balancer dispatches tasks to nodes that have the required resources. You assign required resources in the task properties. You configure available resources using the Administration Console or infacmd. For more information, see “Configuring Resources” on page 224.
♦ CPU profile. In adaptive dispatch mode, the Load Balancer uses the CPU profile to rank the computing throughput of each CPU and bus architecture in a grid. It uses this value to ensure that more powerful nodes get precedence for dispatch. For more information, see “Calculating the CPU Profile” on page 225.
221
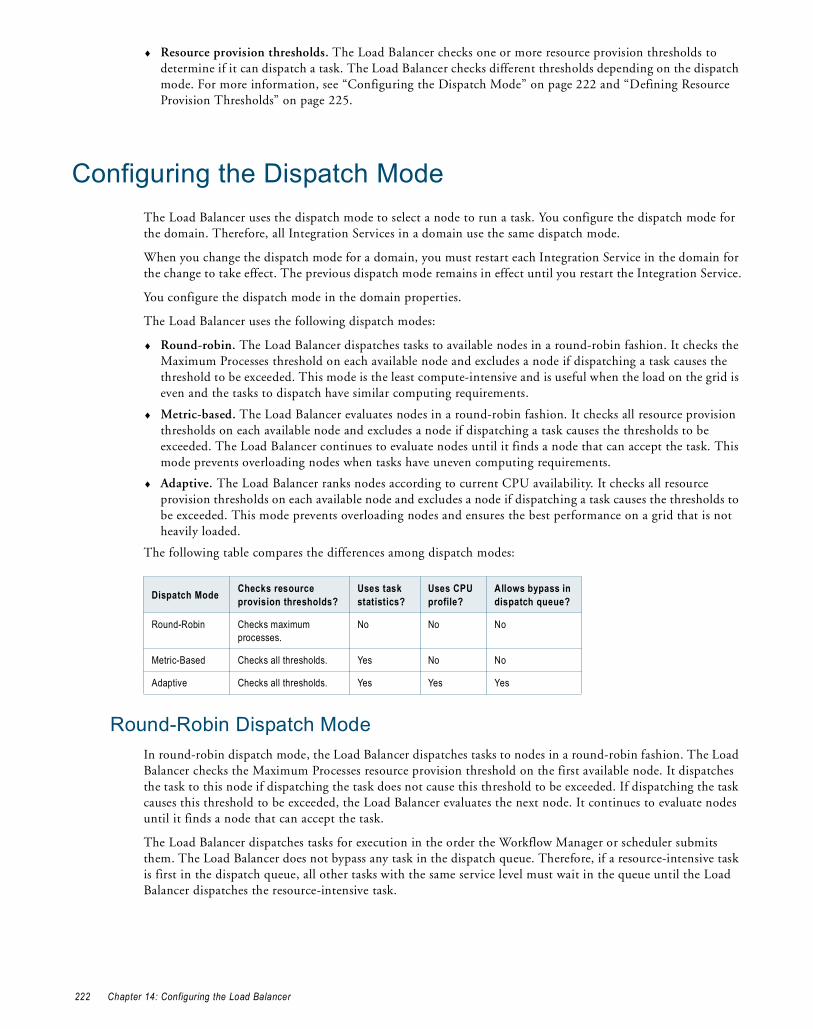
♦ Resource provision thresholds. The Load Balancer checks one or more resource provision thresholds to determine if it can dispatch a task. The Load Balancer checks different thresholds depending on the dispatch mode. For more information, see “Configuring the Dispatch Mode” on page 222 and “Defining Resource Provision Thresholds” on page 225.
Configuring the Dispatch ModeThe Load Balancer uses the dispatch mode to select a node to run a task. You configure the dispatch mode for the domain. Therefore, all Integration Services in a domain use the same dispatch mode.
When you change the dispatch mode for a domain, you must restart each Integration Service in the domain for the change to take effect. The previous dispatch mode remains in effect until you restart the Integration Service.
You configure the dispatch mode in the domain properties.
The Load Balancer uses the following dispatch modes:
♦ Round-robin. The Load Balancer dispatches tasks to available nodes in a round-robin fashion. It checks the Maximum Processes threshold on each available node and excludes a node if dispatching a task causes the threshold to be exceeded. This mode is the least compute-intensive and is useful when the load on the grid is even and the tasks to dispatch have similar computing requirements.
♦ Metric-based. The Load Balancer evaluates nodes in a round-robin fashion. It checks all resource provision thresholds on each available node and excludes a node if dispatching a task causes the thresholds to be exceeded. The Load Balancer continues to evaluate nodes until it finds a node that can accept the task. This mode prevents overloading nodes when tasks have uneven computing requirements.
♦ Adaptive. The Load Balancer ranks nodes according to current CPU availability. It checks all resource provision thresholds on each available node and excludes a node if dispatching a task causes the thresholds to be exceeded. This mode prevents overloading nodes and ensures the best performance on a grid that is not heavily loaded.
The following table compares the differences among dispatch modes:
Round-Robin Dispatch ModeIn round-robin dispatch mode, the Load Balancer dispatches tasks to nodes in a round-robin fashion. The Load Balancer checks the Maximum Processes resource provision threshold on the first available node. It dispatches the task to this node if dispatching the task does not cause this threshold to be exceeded. If dispatching the task causes this threshold to be exceeded, the Load Balancer evaluates the next node. It continues to evaluate nodes until it finds a node that can accept the task.
The Load Balancer dispatches tasks for execution in the order the Workflow Manager or scheduler submits them. The Load Balancer does not bypass any task in the dispatch queue. Therefore, if a resource-intensive task is first in the dispatch queue, all other tasks with the same service level must wait in the queue until the Load Balancer dispatches the resource-intensive task.
Dispatch Mode Checks resource provision thresholds?
Uses task statistics?
Uses CPU profile?
Allows bypass in dispatch queue?
Round-Robin Checks maximum processes.
No No No
Metric-Based Checks all thresholds. Yes No No
Adaptive Checks all thresholds. Yes Yes Yes
222 Chapter 14: Configuring the Load Balancer

Metric-Based Dispatch ModeIn metric-based dispatch mode, the Load Balancer evaluates nodes in a round-robin fashion until it finds a node that can accept the task. The Load Balancer checks the resource provision thresholds on the first available node. It dispatches the task to this node if dispatching the task causes none of the thresholds to be exceeded. If dispatching the task causes any threshold to be exceeded, or if the node is out of free swap space, the Load Balancer evaluates the next node. It continues to evaluate nodes until it finds a node that can accept the task.
To determine whether a task can run on a particular node, the Load Balancer collects and stores statistics from the last three runs of the task. It compares these statistics with the resource provision thresholds defined for the node. If no statistics exist in the repository, the Load Balancer uses the following default values:
♦ 40 MB memory
♦ 15% CPU
The Load Balancer dispatches tasks for execution in the order the Workflow Manager or scheduler submits them. The Load Balancer does not bypass any tasks in the dispatch queue. Therefore, if a resource intensive task is first in the dispatch queue, all other tasks with the same service level must wait in the queue until the Load Balancer dispatches the resource intensive task.
Adaptive Dispatch ModeIn adaptive dispatch mode, the Load Balancer evaluates the computing resources on all available nodes. It identifies the node with the most available CPU and checks the resource provision thresholds on the node. It dispatches the task if doing so does not cause any threshold to be exceeded. The Load Balancer does not dispatch a task to a node that is out of free swap space.
In adaptive dispatch mode, the Load Balancer can use the CPU profile to rank nodes according to the amount of computing resources on the node.
To identify the best node to run a task, the Load Balancer also collects and stores statistics from the last three runs of the task and compares them with node load metrics. If no statistics exist in the repository, the Load Balancer uses the following default values:
♦ 40 MB memory
♦ 15% CPU
In adaptive dispatch mode, the order in which the Load Balancer dispatches tasks from the dispatch queue depends on the task requirements and dispatch priority. For example, if multiple tasks with the same service level are waiting in the dispatch queue and adequate computing resources are not available to run a resource intensive task, the Load Balancer reserves a node for the resource intensive task and keeps dispatching less intensive tasks to other nodes.
Creating Service LevelsService levels establish priorities among tasks that are waiting to be dispatched. When the Load Balancer has more tasks to dispatch than the Integration Service can run at the time, the Load Balancer places those tasks in the dispatch queue. When multiple tasks are waiting in the dispatch queue, the Load Balancer uses service levels to determine the order in which to dispatch tasks from the queue.
Service levels are domain properties. Therefore, you can use the same service levels for all repositories in a domain. You create and edit service levels in the domain properties or using infacmd.
Each service level you create has the following properties:
♦ Name. Name of the service level.
♦ Dispatch priority. A number that establishes the priority for dispatch. The Load Balancer dispatches high priority tasks before it dispatches low priority tasks. Dispatch priority 1 is the highest priority.
Creating Service Levels 223

♦ Maximum dispatch wait time. The amount of time the Load Balancer waits before it changes the dispatch priority for a task to the highest priority. This ensures that no task waits forever in the dispatch queue.
When you create a service level, a workflow developer can assign it to a workflow in the Workflow Manager. All tasks in a workflow have the same service level. The Load Balancer uses service levels to dispatch tasks from the dispatch queue. For example, you create two service levels:
♦ Service level “Low” has dispatch priority 10 and maximum dispatch wait time 7,200 seconds.
♦ Service level “High” has dispatch priority 2 and maximum dispatch wait time 1,800 seconds.
When multiple tasks are in the dispatch queue, the Load Balancer dispatches tasks with service level High before tasks with service level Low because service level High has a higher dispatch priority. If a task with service level Low waits in the dispatch queue for two hours, the Load Balancer changes its dispatch priority to the maximum priority so that the task does not remain in the dispatch queue indefinitely.
The Administration Console provides a default service level, “Default,” that is set to dispatch priority 5 and maximum dispatch wait time 1,800 seconds. You can update the default service level, but you cannot delete it.
When you remove a service level, the Workflow Manager does not update tasks that use the service level. If a workflow service level does not exist in the domain, the Load Balancer dispatches the tasks with the default service level.
To create a service level:
1. In the Navigator of the Administration Console, select the domain.
2. Select the domain.
3. Click the Properties tab.
4. In the Service Level Management area, click Add.
5. Enter values for the following service level properties.
The following table describes the service level properties:
6. Click OK.
7. To remove a service level, click the Remove button for the service level you want to remove.
Configuring ResourcesWhen you configure the Integration Service to run on a grid and to check resource requirements, the Load Balancer dispatches tasks to nodes based on the resources available on each node. You configure the Integration Service to check available resources in the Integration Service properties in the Administration Console.
You assign resources required by a task in the task properties in the Workflow Manager.
Property Description
Service Level Name Name of the service level. The name is not case sensitive and must be unique within the domain.The name cannot have leading or trailing spaces, include carriage returns or tabs, exceed 79 characters, or contain the following characters: / * ? < > " |
Dispatch Priority The initial priority for dispatch. Smaller numbers have higher priority. Priority 1 is the highest priority.Range is 1 to 10. Default is 5.
Maximum Dispatch Wait Time
The amount of time, in seconds, that can elapse before the Load Balancer escalates the dispatch priority for a task to the highest priority.Range is 1 to 86,400. Default is 1,800.
224 Chapter 14: Configuring the Load Balancer
You define the resources available to each node in the Administration Console. Define the following types of resources:
♦ Connection. Any resource installed with PowerCenter, such as a plug-in or a connection object. When you create a node, all connection resources are available by default. Disable the connection resources that are not available to the node.
♦ File/Directory. A user-defined resource that defines files or directories available to the node, such as parameter files or file server directories.
♦ Custom. A user-defined resource that identifies any other resources available to the node. For example, you may use a custom resource to identify a specific database client version.
Enable and disable available resources on the Resources tab for the node in the Administration Console or using infacmd.
Calculating the CPU ProfileIn adaptive dispatch mode, the Load Balancer uses the CPU profile to rank the computing throughput of each CPU and bus architecture in a grid. This ensures that nodes with higher processing power get precedence for dispatch. This value is not used in round-robin or metric-based dispatch modes.
The CPU profile is an index of the processing power of a node compared to a baseline system. The baseline system is a Pentium 2.4 GHz computer running Windows 2000. For example, if a SPARC 480 MHz computer is 0.28 times as fast as the baseline computer, the CPU profile for the SPARC computer should be set to 0.28.
You calculate and edit the CPU profile in the node properties or using infacmd.
By default, the CPU profile is set to 1.0. To calculate the CPU profile for a node, click Recalculate CPU Profile. To get the most accurate value, calculate the CPU profile when the node is idle.
Note: This calculation takes approximately five minutes and uses 100% of one CPU on the machine.
You can also edit the node properties and update the value manually.
Defining Resource Provision ThresholdsThe Load Balancer dispatches tasks to Integration Service processes running on a node. It can continue to dispatch tasks to a node as long as the resource provision thresholds defined for the node are not exceeded. When the Load Balancer has more Session and Command tasks to dispatch than the Integration Service can run at the time, the Load Balancer places the tasks in the dispatch queue. It dispatches tasks from the queue when an Integration Service process becomes available.
You can define the following resource provision thresholds for each node in a domain:
♦ Maximum CPU run queue length. The maximum number of runnable threads waiting for CPU resources on the node. The Load Balancer does not count threads that are waiting on disk or network I/Os. If you set this threshold to 2 on a 4-CPU node that has four threads running and two runnable threads waiting, the Load Balancer does not dispatch new tasks to this node.
This threshold limits context switching overhead. You can set this threshold to a low value to preserve computing resources for other applications. If you want the Load Balancer to ignore this threshold, set it to a high number such as 200. The default value is 10.
The Load Balancer uses this threshold in metric-based and adaptive dispatch modes.
♦ Maximum memory %. The maximum percentage of virtual memory allocated on the node relative to the total physical memory size. If you set this threshold to 120% on a node, and virtual memory usage on the node is above 120%, the Load Balancer does not dispatch new tasks to the node.
Calculating the CPU Profile 225
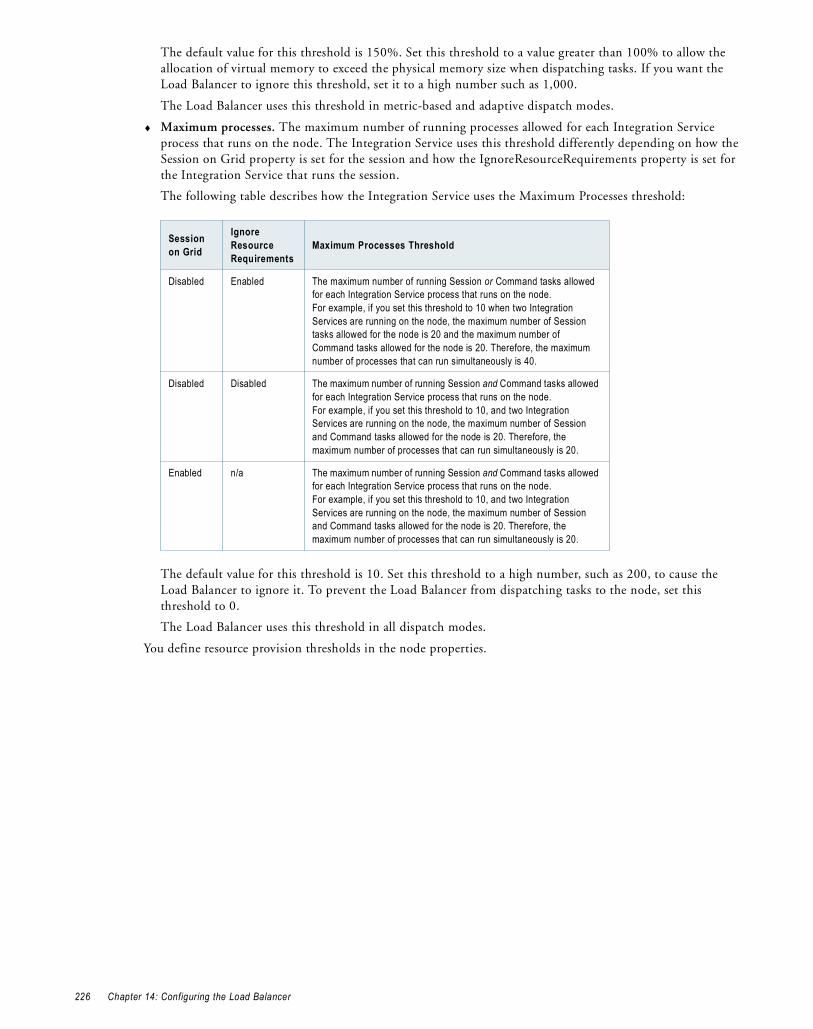
The default value for this threshold is 150%. Set this threshold to a value greater than 100% to allow the allocation of virtual memory to exceed the physical memory size when dispatching tasks. If you want the Load Balancer to ignore this threshold, set it to a high number such as 1,000.
The Load Balancer uses this threshold in metric-based and adaptive dispatch modes.
♦ Maximum processes. The maximum number of running processes allowed for each Integration Service process that runs on the node. The Integration Service uses this threshold differently depending on how the Session on Grid property is set for the session and how the IgnoreResourceRequirements property is set for the Integration Service that runs the session.
The following table describes how the Integration Service uses the Maximum Processes threshold:
The default value for this threshold is 10. Set this threshold to a high number, such as 200, to cause the Load Balancer to ignore it. To prevent the Load Balancer from dispatching tasks to the node, set this threshold to 0.
The Load Balancer uses this threshold in all dispatch modes.
You define resource provision thresholds in the node properties.
Session on Grid
Ignore Resource Requirements
Maximum Processes Threshold
Disabled Enabled The maximum number of running Session or Command tasks allowed for each Integration Service process that runs on the node.For example, if you set this threshold to 10 when two Integration Services are running on the node, the maximum number of Session tasks allowed for the node is 20 and the maximum number of Command tasks allowed for the node is 20. Therefore, the maximum number of processes that can run simultaneously is 40.
Disabled Disabled The maximum number of running Session and Command tasks allowed for each Integration Service process that runs on the node.For example, if you set this threshold to 10, and two Integration Services are running on the node, the maximum number of Session and Command tasks allowed for the node is 20. Therefore, the maximum number of processes that can run simultaneously is 20.
Enabled n/a The maximum number of running Session and Command tasks allowed for each Integration Service process that runs on the node.For example, if you set this threshold to 10, and two Integration Services are running on the node, the maximum number of Session and Command tasks allowed for the node is 20. Therefore, the maximum number of processes that can run simultaneously is 20.
226 Chapter 14: Configuring the Load Balancer

C H A P T E R 1 5
Creating and Configuring the SAP BW Service
This chapter includes the following topics:
♦ Overview, 227
♦ Creating the SAP BW Service, 228
♦ Enabling and Disabling the SAP BW Service, 229
♦ Configuring the SAP BW Service Properties, 230
♦ Configuring the Associated Integration Service, 230
♦ Configuring the SAP BW Service Processes, 231
♦ Viewing Log Events, 231
OverviewIf you are using PowerExchange for SAP NetWeaver BI, use the Administration Console to manage the SAP BW Service. The SAP BW Service is an application service that performs the following tasks:
♦ Listens for RFC requests from SAP NetWeaver BI.
♦ Initiates workflows to extract from or load to SAP NetWeaver BI.
♦ Sends log events to the PowerCenter Log Manager.
Use the Administration Console to complete the following SAP BW Service tasks:
♦ Create the SAP BW Service. For more information, see “Creating the SAP BW Service” on page 228.
♦ Enable and disable the SAP BW Service. For more information, see “Enabling and Disabling the SAP BW Service” on page 229.
♦ Configure the SAP BW Service properties. For more information, see “Configuring the SAP BW Service Properties” on page 230.
♦ Configure the associated Integration Service. For more information, see “Configuring the Associated Integration Service” on page 230.
♦ Configure the SAP BW Service processes. For more information, see “Configuring the SAP BW Service Processes” on page 231.
♦ Configure permissions on the SAP BW Service.
227

♦ View log events. View messages that the SAP BW Service sends to the PowerCenter Log Manager. For more information, see “Viewing Log Events” on page 231.
Load Balancing for the SAP NetWeaver BI System and the SAP BW Service
You can configure the SAP NetWeaver BI system to use load balancing. To support an SAP NetWeaver BI system configured for load balancing, the SAP BW Service records the host name and system number of the SAP NetWeaver BI server requesting data from PowerCenter. It passes this information to the Integration Service. The Integration Service uses this information to load data to the same SAP NetWeaver BI server that made the request. For more information about configuring the SAP NetWeaver BI system to use load balancing, see the SAP NetWeaver BI documentation.
You can also configure the SAP BW Service in PowerCenter to use load balancing. If the load on the SAP BW Service becomes too high, you can create multiple instances of the SAP BW Service to balance the load. To run multiple SAP BW Services configured for load balancing, create each service with a unique name but use the same values for all other parameters. The services can run on the same node or on different nodes. The SAP NetWeaver BI server distributes data to the multiple SAP BW Services in a round-robin fashion.
Creating the SAP BW ServiceUse the Administration Console to create the SAP BW Service.
To create the SAP BW Service:
1. In the Administration Console, click Create > SAP BW Service.
The Create New SAP BW Service window appears.
2. Configure the SAP BW Service options.
The following table describes the information to enter in the Create New SAP BW Service window:
Property Description
Service Name Name of the SAP BW Service. The name is not case sensitive and must be unique within the domain. The characters must be compatible with the code page of the associated repository. The name cannot have leading or trailing spaces, include carriage returns or tabs, exceed 79 characters, or contain the following characters: \ / * ? < > " |
Location Name of the domain and folder in which the SAP BW Service is created. The Administration Console creates the SAP BW Service in the domain where you are connected. Click Select Folder to select a new folder in the domain.
License PowerCenter license.
Node Setup Node on which this service runs.
Domain for Associated Integration Service
Domain that contains the Integration Service associated with the SAP BW Service.
Associated Integration Service
Integration Service associated with the SAP BW Service.
Repository User Name
Account used to access the repository.
Repository Password
Password for the user.
228 Chapter 15: Creating and Configuring the SAP BW Service
3. Click OK.
A message informs you that the SAP BW Service was successfully created.
4. Click Close.
The SAP BW Service properties window appears.
Enabling and Disabling the SAP BW ServiceUse the Administration Console to enable and disable the SAP BW Service. You might disable the SAP BW Service if you need to perform maintenance on the machine. Enable the disabled SAP BW Service to make it available again.
Before you enable the SAP BW Service, you must define PowerCenter as a logical system in SAP NetWeaver BI.
When you enable the SAP BW Service, the service starts. If the service cannot start, the domain tries to restart the service based on the restart options configured in the domain properties.
If the service is enabled but fails to start after reaching the maximum number of attempts, the following message appears:
The SAP BW Service <service name> is enabled. The service did not start. Please check the logs for more information.
You can review the logs for this SAP BW Service to determine the reason for failure and fix the problem. After you fix the problem, disable and re-enable the SAP BW Service to start it.
When you enable the SAP BW Service, it attempts to connect to the associated Integration Service. If the Integration Service is not enabled and the SAP BW Service cannot connect to it, the SAP BW Service still starts successfully. When the SAP BW Service receives a request from SAP NetWeaver BI to start a PowerCenter workflow, the service attempts to connect to the associated Integration Service again. If it cannot connect, the SAP BW Service returns the following message to the SAP NetWeaver BI system:
The SAP BW Service could not find Integration Service <service name> in domain <domain name>.
To resolve this problem, verify that the Integration Service is enabled and that the domain name and Integration Service name entered in the 3rd Party Selection tab of the InfoPackage are valid. Then restart the process chain in the SAP NetWeaver BI system.
When you disable the SAP BW Service, choose one of the following options:
♦ Complete. Disables the SAP BW Service after all service processes complete.
♦ Abort. Aborts all processes immediately and then disables the SAP BW Service. You might want to choose abort if a service process is hanging.
To enable the SAP BW Service:
1. In the Navigator of the Administration Console, select the SAP BW Service.
2. Click Enable.
Security Domain Security domain for the user. Appears when the PowerCenter domain contains an LDAP security domain.
SAP Destination R Type
Type R DEST entry in the saprfc.ini file created for the SAP BW Service.
Property Description
Enabling and Disabling the SAP BW Service 229
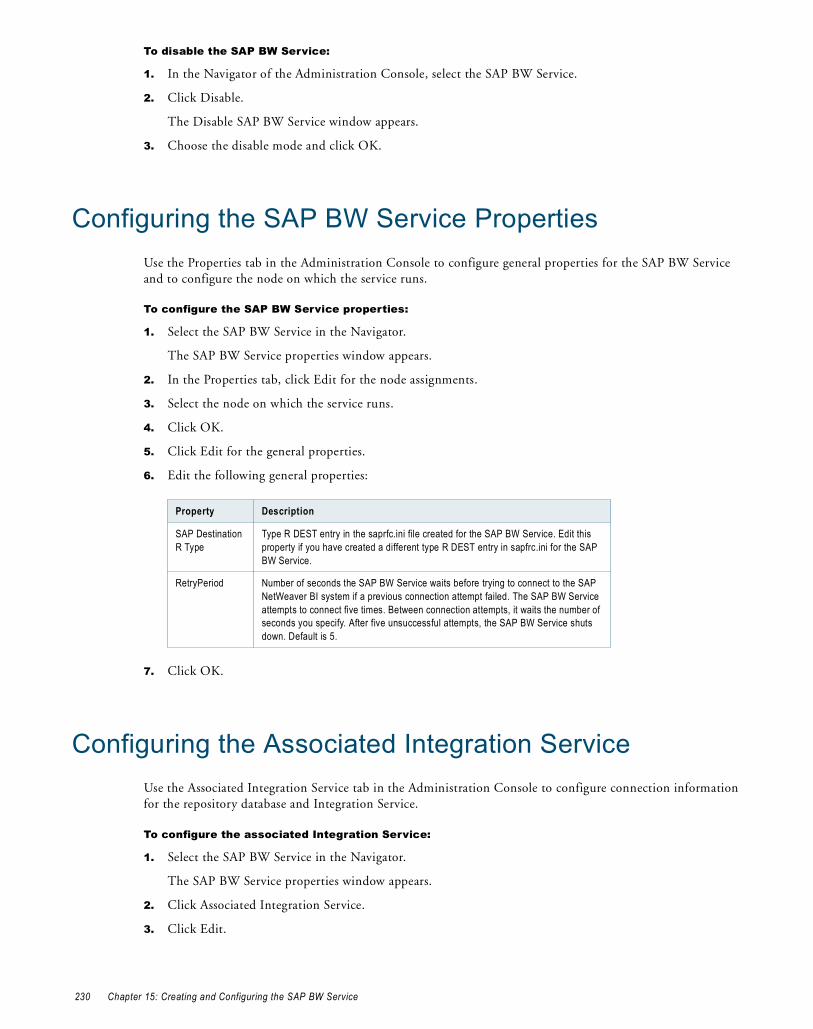
To disable the SAP BW Service:
1. In the Navigator of the Administration Console, select the SAP BW Service.
2. Click Disable.
The Disable SAP BW Service window appears.
3. Choose the disable mode and click OK.
Configuring the SAP BW Service PropertiesUse the Properties tab in the Administration Console to configure general properties for the SAP BW Service and to configure the node on which the service runs.
To configure the SAP BW Service properties:
1. Select the SAP BW Service in the Navigator.
The SAP BW Service properties window appears.
2. In the Properties tab, click Edit for the node assignments.
3. Select the node on which the service runs.
4. Click OK.
5. Click Edit for the general properties.
6. Edit the following general properties:
7. Click OK.
Configuring the Associated Integration ServiceUse the Associated Integration Service tab in the Administration Console to configure connection information for the repository database and Integration Service.
To configure the associated Integration Service:
1. Select the SAP BW Service in the Navigator.
The SAP BW Service properties window appears.
2. Click Associated Integration Service.
3. Click Edit.
Property Description
SAP Destination R Type
Type R DEST entry in the saprfc.ini file created for the SAP BW Service. Edit this property if you have created a different type R DEST entry in sapfrc.ini for the SAP BW Service.
RetryPeriod Number of seconds the SAP BW Service waits before trying to connect to the SAP NetWeaver BI system if a previous connection attempt failed. The SAP BW Service attempts to connect five times. Between connection attempts, it waits the number of seconds you specify. After five unsuccessful attempts, the SAP BW Service shuts down. Default is 5.
230 Chapter 15: Creating and Configuring the SAP BW Service
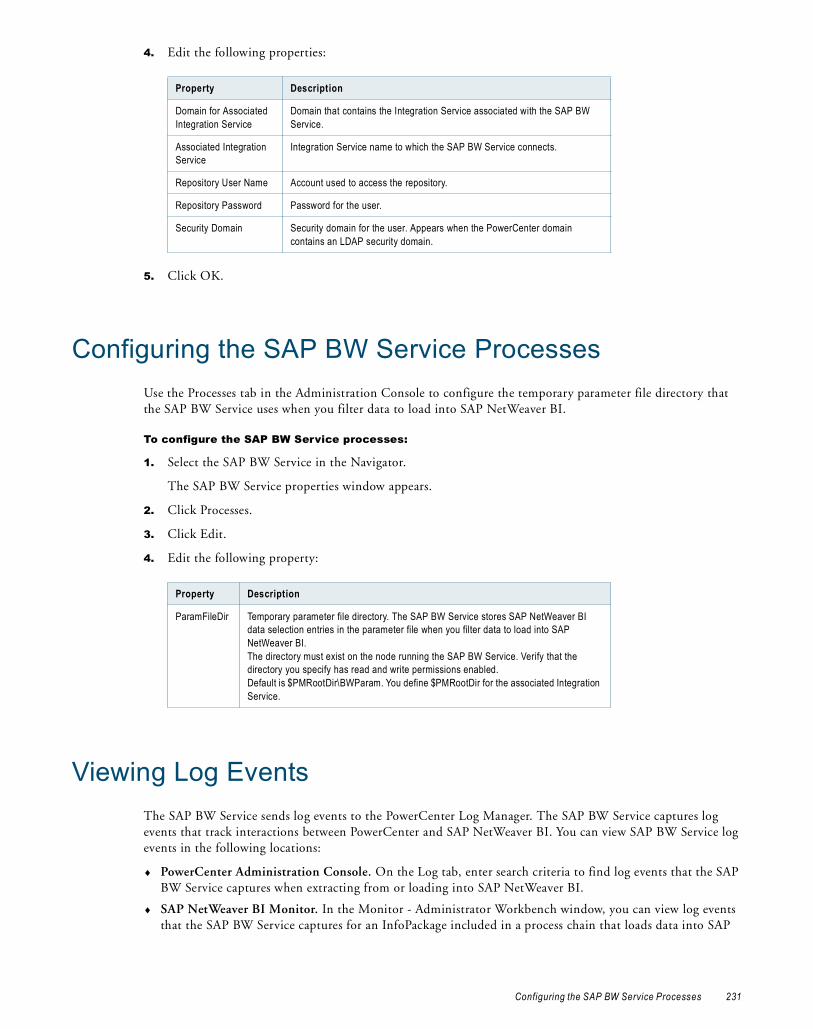
4. Edit the following properties:
5. Click OK.
Configuring the SAP BW Service ProcessesUse the Processes tab in the Administration Console to configure the temporary parameter file directory that the SAP BW Service uses when you filter data to load into SAP NetWeaver BI.
To configure the SAP BW Service processes:
1. Select the SAP BW Service in the Navigator.
The SAP BW Service properties window appears.
2. Click Processes.
3. Click Edit.
4. Edit the following property:
Viewing Log EventsThe SAP BW Service sends log events to the PowerCenter Log Manager. The SAP BW Service captures log events that track interactions between PowerCenter and SAP NetWeaver BI. You can view SAP BW Service log events in the following locations:
♦ PowerCenter Administration Console. On the Log tab, enter search criteria to find log events that the SAP BW Service captures when extracting from or loading into SAP NetWeaver BI.
♦ SAP NetWeaver BI Monitor. In the Monitor - Administrator Workbench window, you can view log events that the SAP BW Service captures for an InfoPackage included in a process chain that loads data into SAP
Property Description
Domain for Associated Integration Service
Domain that contains the Integration Service associated with the SAP BW Service.
Associated Integration Service
Integration Service name to which the SAP BW Service connects.
Repository User Name Account used to access the repository.
Repository Password Password for the user.
Security Domain Security domain for the user. Appears when the PowerCenter domain contains an LDAP security domain.
Property Description
ParamFileDir Temporary parameter file directory. The SAP BW Service stores SAP NetWeaver BI data selection entries in the parameter file when you filter data to load into SAP NetWeaver BI.The directory must exist on the node running the SAP BW Service. Verify that the directory you specify has read and write permissions enabled.Default is $PMRootDir\BWParam. You define $PMRootDir for the associated Integration Service.
Configuring the SAP BW Service Processes 231

NetWeaver BI. SAP NetWeaver BI pulls the messages from the SAP BW Service and displays them in the monitor. The SAP BW Service must be running to view the messages in the SAP NetWeaver BI Monitor.
To view log events about how the Integration Service processes an SAP NetWeaver BI workflow, view the session or workflow log.
232 Chapter 15: Creating and Configuring the SAP BW Service
C H A P T E R 1 6
Creating and Configuring the Web Services Hub
This chapter includes the following topics:
♦ Overview, 233
♦ Creating a Web Services Hub, 234
♦ Enabling and Disabling the Web Services Hub, 236
♦ Configuring the Web Services Hub Properties, 236
♦ Configuring the Associated Repository, 239
♦ Setting Permissions for the Web Services Hub, 240
OverviewThe Web Services Hub Service is an application service in the PowerCenter domain that exposes PowerCenter functionality to external clients through web services. It receives requests from web service clients and passes them to the Integration Service or Repository Service. The Integration Service or Repository Service processes the requests and sends a response to the Web Services Hub. The Web Services Hub sends the response back to the web service client.
You can use the Administration Console to complete the following tasks related to the Web Services Hub:
♦ Create a Web Services Hub. You can create multiple Web Services Hub Services in a domain. For more information, see “Creating a Web Services Hub” on page 234.
♦ Enable or disable the Web Services Hub. You must enable the Web Services Hub to run web service workflows. You can disable the Web Services Hub to prevent external clients from accessing the web services while performing maintenance on the machine or modifying the repository. For more information, see “Enabling and Disabling the Web Services Hub” on page 236.
♦ Configure the Web Services Hub properties. You can configure Web Services Hub properties such as the length of time a session can remain idle before time out and the character encoding to use for the service. For more information, see “Configuring the Web Services Hub Properties” on page 236.
♦ Configure the associated repository. You must associate a repository with a Web Services Hub. The Web Services Hub exposes the web-enabled workflows in the associated repository. For more information, see “Configuring the Associated Repository” on page 239.
233

♦ Set permissions for the Web Services Hub. You can identify the users and groups that have permissions on the Web Services Hub service. For more information, see “Setting Permissions for the Web Services Hub” on page 240.
♦ View the logs for the Web Services Hub. You can view the event logs for the Web Services Hub in the Log Viewer. For more information, see “Using the Log Viewer” on page 260.
♦ Remove a Web Services Hub. You can remove a Web Services Hub if it becomes obsolete. For more information, see “Removing Application Services” on page 39.
Creating a Web Services HubCreate a Web Services Hub to run web service workflows so that external clients can access PowerCenter functionality as web services.
You must associate a repository with the Web Services Hub before you run it. You can assign the repository when you create the Web Services Hub or after you create the Web Services Hub. The repository that you assign to the Web Services Hub is called the associated repository. The Web Services Hub runs web enabled workflows from the associated repository.
By default, the Web Services Hub has the same code page as the node on which it runs. When you associate a repository with the Web Services Hub, the code page of the Web Services Hub must be a subset of the code page of the associated repository.
In a mixed-version domain, you can create more than one service version of the Web Services Hub. When you create the Web Services Hub, you can assign it to a node that is configured to the run the service version. When you assign an associated Repository Service, the Repository Service must be the same service version as the Web Services Hub.
If the domain contains multiple nodes and you create a secure Web Services Hub, you must generate the SSL certificate for the Web Services Hub on a gateway node and import the certificate into the certificate file of the same gateway node. For more information, see “Running the Web Services Report for a Secure Web Services Hub” on page 284.
To create a Web Services Hub:
1. In the Navigator of the Administration Console, click Create > Web Services Hub.
The Create New Web Services Hub page appears.
2. Configure the Web Services Hub.
The following table describes the options for creating a Web Services Hub:
Property Description
Service Name Name of the Web Services Hub. The name is not case sensitive and must be unique within the domain. The characters must be compatible with the code page of the associated repository. The service name cannot exceed 79 characters. It cannot contain leading or trailing spaces, carriage returns or tabs, or any of the following characters:+ , % \ / ? “ < > * |
Location Domain folder in which the Web Services Hub is created. Click Select Folder to select the folder where you want to create it in the domain.
License License to assign to the Web Services Hub. If you do not select a license now, you can assign a license to the service later. Required before you can enable the Web Services Hub.
Version Service version of the Web Services Hub. Required if you run a mixed-version domain.
234 Chapter 16: Creating and Configuring the Web Services Hub

3. Click Create.
After you create the Web Services Hub, the Administration Console displays the URL for the Web Services Hub Console. If you run the Web Services Hub on HTTP and HTTPS, the Administration Console displays the URL for both.
If you configure a logical URL for an external load balancer to route requests to the Web Services Hub, the Administration Console also displays the URL.
Click the service URL to start the Web Services Hub Console from the Administration Console. If the Web Services Hub is not enabled, you cannot connect to the Web Services Hub Console.
Node Node on which the Web Services Hub runs. A Web Services Hub runs on a single node. A node can run more than one Web Services Hub.
Domain for Associated Repository Service
Domain that contains the Repository Service associated with the Web Services Hub. The Repository Service and the Web Services Hub must be in the same domain.
Associated Repository Service
Repository Service to which the Web Services Hub connects. The repository must be enabled before you can associate it with a Web Services Hub. If you do not select an associated repository when you create a Web Services Hub, you can add an associated repository later.
Repository User Name User name to access the repository.
Repository Password Password for the user.
Security Domain Security domain for the user. Appears when the PowerCenter domain contains an LDAP security domain.
URLScheme Indicates the security protocol that you configure for the Web Services Hub: - HTTP. Run the Web Services Hub on HTTP only.- HTTPS. Run the Web Services Hub on HTTPS only.- HTTP and HTTPS. Run the Web Services Hub in HTTP and HTTPS
modes.
HubHostName Name of the machine hosting the Web Services Hub.
HubPortNumber (http) Port number for the Web Services Hub on HTTP. Required if you choose to run the Web Services Hub on HTTP.Default is 7333.
HubPortNumber (https) Port number for the Web Services Hub on HTTPS. Appears when the URL scheme selected includes HTTPS. Required if you choose to run the Web Services Hub on HTTPS. Default is 7343.
KeystoreFile Path and file name of the keystore file that contains the keys and certificates required if you use the SSL security protocol with the Web Services Hub. Required if you run the Web Services Hub on HTTPS.
KeystorePass Password for the keystore file. The value of this property must match the password you set for the keystore file. If this property is empty, the Web Services Hub assumes that the password for the keystore file is the default password changeit.
InternalHostName Host name on which the Web Services Hub listens for connections from the Integration Service. If not specified, the default is the Web Services Hub host name.Note: If the host machine has more than one network card that results in multiple IP addresses for the host machine, set the value of InternalHostName to the internal IP address.
InternalPortNumber Port number on which the Web Services Hub listens for connections from the Integration Service. Default is 15555.
Property Description
Creating a Web Services Hub 235

Enabling and Disabling the Web Services HubUse the Administration Console to enable or disable a Web Services Hub. You can disable a Web Services Hub to perform maintenance or to temporarily restrict users from accessing web services. Enable a disabled Web Services Hub to make it available again.
All Repository Services associated with the Web Services Hub must be running before you run the Web Services Hub. If any of the associated Repository Services are not running, the Web Services Hub does not start.
If you enable the service but it fails to start, review the logs for the Web Services Hub to determine the reason for the failure. After you resolve the problem, you must disable and then enable the Web Services Hub to start it again.
When you disable an Web Services Hub, you must choose the mode to disable it in. You can choose one of the following options:
♦ Stop. Stops all web enabled workflows and disables the Web Services Hub.
♦ Abort. Aborts all web-enabled workflows immediately and disables the Web Services Hub.
To disable or enable a Web Services Hub:
1. In the Navigator of the Administration Console, select the Web Services Hub.
When a Web Services Hub is running, the Disable button is available.
2. To disable the service, click Disable.
The Disable Web Services Hub window appears.
3. Choose the disable mode and click OK.
The Service Manager disables the Web Services Hub. When a service is disabled, the Enable button is available.
4. To enable the service, click Enable.
Configuring the Web Services Hub PropertiesThe Web Services Hub properties are grouped into the following categories:
♦ Version. In a mixed-version domain, select the service version of the Web Services Hub. For more information, see “Version” on page 237.
♦ Node assignments. Select the node on which the Web Services Hub runs. For more information, see “Node Assignments” on page 237.
♦ General properties. Configure general properties such as host name and port number. For more information, see “General Properties” on page 237.
♦ Advanced properties. Configure advanced properties such as the level of errors written to the Web Services Hub logs. For more information, see “Advanced Properties” on page 238.
♦ Custom properties. Include properties that are unique to your PowerCenter environment or that apply in special cases. A Web Services Hub does not have custom properties when you create it. Create custom properties only in special circumstances and only on advice from Informatica Global Customer Support.
To view or update properties, select the Web Services Hub in the Navigator and click the Properties tab.
The Properties tab displays the categories of Web Services Hub properties in separate sections.
236 Chapter 16: Creating and Configuring the Web Services Hub

VersionWhen you create a Web Services Hub in a mixed-version domain, you select the service version.
Node AssignmentsSelect the node on which to run the Web Services Hub. You can run multiple Web Services Hub on the same node.
Disable the Web Services Hub before you assign it to another node. To edit the node assignment, select the Web Services Hub in the Navigator, click the Properties tab, and then click Edit in the Node Assignments section. Select a new node.
When you change the node assignment for a Web Services Hub, the host name for the web services running on the Web Services Hub changes. You must update any element of the client application that includes the host name. For example, you must regenerate the WSDL for the web service to update the host name in the endpoint URL. You must also regenerate the client proxy classes to update the host name.
When you change the node assignment for a Web Services Hub, the host name for the web services running on the Web Services Hub changes. This changes the endpoint location (soap:address location) in the WSDL. You must update any client application that accesses the web services through the Web Services Hub assigned to a new node.
General PropertiesTo edit the general properties, select the Web Services Hub in the Navigator, click the Properties tab, and then click Edit in the General Properties section.
Note: You must disable and then enable the Web Service Hub before changes to the general properties can take effect.
The following table describes the general properties for a Web Services Hub:
Property Description
HubHostName Name of the machine hosting the Web Services Hub. Default is the name of the machine where the Web Services Hub is running. To apply changes to this property, restart the Web Services Hub.
HubPortNumber (http) Port number for the Web Services Hub running on HTTP. Required if you run the Web Services Hub on HTTP. Default is 7333. To apply changes to this property, restart the Web Services Hub.
HubPortNumber (https)
Port number for the Web Services Hub running on HTTPS. Required if you run the Web Services Hub on HTTPS. Default is 7343. To apply changes to this property, restart the Web Services Hub.
CharacterEncoding Character encoding for the Web Services Hub. Default is UTF-8. To apply changes to this property, restart the Web Services Hub.
URLScheme Indicates the security protocol that you configure for the Web Services Hub: - HTTP. Run the Web Services Hub on HTTP only.- HTTPS. Run the Web Services Hub on HTTPS only.- HTTP and HTTPS. Run the Web Services Hub in HTTP and HTTPS modes.If you run the Web Services Hub on HTTPS, you must provide information on the keystore file. To apply changes to this property, restart the Web Services Hub.
InternalHostName Host name on which the Web Services Hub listens for connections from the Integration Service. To apply changes to this property, restart the Web Services Hub.
InternalPortNumber Port number on which the Web Services Hub listens for connections from the Integration Service. Default is 15555. To apply changes to this property, restart the Web Services Hub.
Configuring the Web Services Hub Properties 237
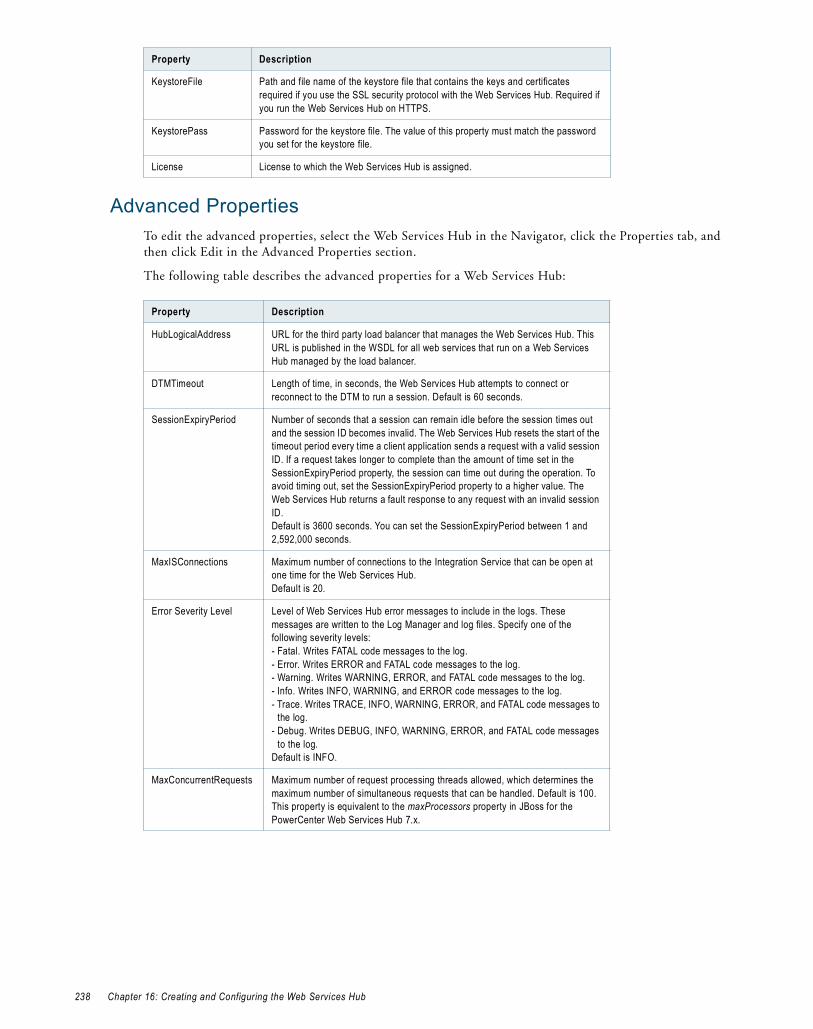
Advanced PropertiesTo edit the advanced properties, select the Web Services Hub in the Navigator, click the Properties tab, and then click Edit in the Advanced Properties section.
The following table describes the advanced properties for a Web Services Hub:
KeystoreFile Path and file name of the keystore file that contains the keys and certificates required if you use the SSL security protocol with the Web Services Hub. Required if you run the Web Services Hub on HTTPS.
KeystorePass Password for the keystore file. The value of this property must match the password you set for the keystore file.
License License to which the Web Services Hub is assigned.
Property Description
HubLogicalAddress URL for the third party load balancer that manages the Web Services Hub. This URL is published in the WSDL for all web services that run on a Web Services Hub managed by the load balancer.
DTMTimeout Length of time, in seconds, the Web Services Hub attempts to connect or reconnect to the DTM to run a session. Default is 60 seconds.
SessionExpiryPeriod Number of seconds that a session can remain idle before the session times out and the session ID becomes invalid. The Web Services Hub resets the start of the timeout period every time a client application sends a request with a valid session ID. If a request takes longer to complete than the amount of time set in the SessionExpiryPeriod property, the session can time out during the operation. To avoid timing out, set the SessionExpiryPeriod property to a higher value. The Web Services Hub returns a fault response to any request with an invalid session ID.Default is 3600 seconds. You can set the SessionExpiryPeriod between 1 and 2,592,000 seconds.
MaxISConnections Maximum number of connections to the Integration Service that can be open at one time for the Web Services Hub.Default is 20.
Error Severity Level Level of Web Services Hub error messages to include in the logs. These messages are written to the Log Manager and log files. Specify one of the following severity levels:- Fatal. Writes FATAL code messages to the log.- Error. Writes ERROR and FATAL code messages to the log.- Warning. Writes WARNING, ERROR, and FATAL code messages to the log.- Info. Writes INFO, WARNING, and ERROR code messages to the log.- Trace. Writes TRACE, INFO, WARNING, ERROR, and FATAL code messages to
the log.- Debug. Writes DEBUG, INFO, WARNING, ERROR, and FATAL code messages
to the log.Default is INFO.
MaxConcurrentRequests Maximum number of request processing threads allowed, which determines the maximum number of simultaneous requests that can be handled. Default is 100. This property is equivalent to the maxProcessors property in JBoss for the PowerCenter Web Services Hub 7.x.
Property Description
238 Chapter 16: Creating and Configuring the Web Services Hub

Use the MaxConcurrentRequests property to set the number of clients that can connect to the Web Services Hub and the MaxQueueLength property to set the number of client requests the Web Services Hub can process at one time.
You can change the parameter values based on the number of clients you expect to connect to the Web Services Hub. In a test environment, set the parameters to smaller values. In a production environment, set the parameters to larger values. If you increase the values, more clients can connect to the Web Services Hub, but the connections use more system resources.
Configuring the Associated RepositoryTo expose web services through the Web Services Hub, you must associate the Web Services Hub with a repository. The code page of the Web Services Hub must be a subset of the code page of the associated repository.
When you associate a repository with a Web Services Hub, you specify the Repository Service and the user name and password used to connect to the repository. The Repository Service that you associate with a Web Services Hub must be in the same domain as the Web Services Hub.
You can associate more than one repository with a Web Services Hub. When you associate more than one repository with a Web Services Hub, the Web Services Hub can run web services located in any of the associated repositories.
You can associate more than one Web Services Hub with a repository. When you associate more than one Web Services Hub with a repository, multiple Web Services Hub Services can provide the same web services. Different Web Services Hub Services can run separate instances of a web service. You can use an external load balancer to manage the Web Services Hub Services.
The Repository Services you associate with the Web Services Hub do not have to be running when you start the Web Services Hub. After you start the Web Services Hub, it periodically checks whether the Repository Services have started. The Repository Service must be running before the Web Services Hub can run a web service workflow in the repository.
Adding an Associated RepositoryIf you associate multiple repositories with a Web Services Hub, external clients can access web services from different repositories through the same Web Services Hub.
To add an associated repository:
1. On the Navigator of the Administration Console, select the Web Services Hub.
2. Click the Associated Repository tab.
3. Click Add.
The Select Repository section appears.
MaxQueueLength Maximum queue length for incoming connection requests when all possible request processing threads are in use. Any request received when the queue is full is rejected. Default is 5000.This property is equivalent to the acceptCount property in JBoss for the PowerCenter Web Services Hub 7.x.
MaxStatsHistory Number of days that PowerCenter keeps statistical information in the history file. PowerCenter keeps a history file that contains information regarding the Web Services Hub activities. The number of days you set in this property determines the number of days available for which you can display historical statistics in the Web Services Report page of the Administration Console.
Property Description
Configuring the Associated Repository 239

4. Enter the properties for the associated repository.
5. Click OK to save the associated repository properties.
Editing an Associated RepositoryIf you want to change the repository that associated with the Web Services Hub, edit the properties of the associated repository.
To edit an associated repository:
1. On the Navigator of the Administration Console, select the Web Services Hub.
2. Click the Associated Repository tab.
3. In the section for the repository you want to edit, click Edit.
The Associated Repository Properties window appears.
4. Edit the properties for the associated repository.
5. Click OK to save the changes to the associated repository properties.
Setting Permissions for the Web Services HubOn the Permissions tab, you can view or set permissions for the Web Services Hub.
To set permissions on a Web Services Hub, select the Web Services Hub in the Navigator and click the Permissions tab. The Permissions tab displays the users and groups with inherited permission on the Web Services Hub and allows you to edit the list of users and groups with permissions on the object.
If you are a domain administrator or a user with the appropriate privileges, you can grant or revoke permissions to the Web Services Hub for any user or group in the domain.
The Web Services Hub Console does not require authentication. You do not need to log in when you start the Web Services Hub Console. On the Web Services Hub Console, you can view the properties and the WSDL of any web service. You can test any web service running on the Web Services Hub. However, when you test a protected service you must run the login operation before you run the web service.
Property Description
Associated Repository Service
Name of the Repository Service to which the Web Services Hub connects. To apply changes to this property, restart the Web Services Hub.
Repository User Name User name to access the repository.
Repository Password Password for the user.
Security Domain Security domain for the user. Appears when the PowerCenter domain contains an LDAP security domain.
240 Chapter 16: Creating and Configuring the Web Services Hub

C H A P T E R 1 7
Creating the Reference Table Manager Service
This chapter includes the following topics:
♦ Overview, 241
♦ Creating the Reference Table Manager Service, 242
♦ Creating and Deleting Repository Content, 243
♦ Enabling and Disabling the Reference Table Manager Service, 243
♦ Configuring the Reference Table Manager Service, 244
OverviewThe Reference Table Manager Service is an application service that runs the Reference Table Manager application in a PowerCenter domain. The Reference Table Manager application manages access to metadata in the Reference Table Manager repository.
Before you create the Reference Table Manager Service you must set up a database for the Reference Table Manager repository. You need to provide the database information when you create the Reference Table Manager Service.
You can use the PowerCenter Administration Console to complete the following tasks related to the Reference Table Manager Service:
1. Create the Reference Table Manager Service. Create the Reference Table Manager Service in the PowerCenter Administration Console. For more information, see “Creating the Reference Table Manager Service” on page 242.
2. Create repository contents. Create contents for the Reference Table Manager repository. For more information, see “Creating and Deleting Repository Content” on page 243.
3. Enable the Reference Table Manager Service. Enable the Reference Table Manager Service in the PowerCenter domain. For more information, see “Enabling and Disabling the Reference Table Manager Service” on page 243.
4. Configure the Reference Table Manager Service. Configure the properties for the Reference Table Manager Service. For more information, see “Configuring the Reference Table Manager Service” on page 244.
After you create and configure the Reference Table Manager Service, you can assign privileges to users for the Reference Table Manager Service.
241

Creating the Reference Table Manager ServiceUse the PowerCenter Administration Console to create the Reference Table Manager Service. You must create the Reference Table Manager repository contents before you enable the service.
To create a Reference Table Manager Service:
1. In the Administration Console, click Create > Reference Table Manager Service.
The Create New Reference Table Manager Service page appears.
2. Enter the Reference Table Manager Service properties.
The following table describes the properties you configure for the Reference Table Manager Service:
3. Click OK, and then click Close.
Property Description
Service Name Name of the Reference Table Manager Service. The name is not case sensitive and must be unique within the domain. The name cannot contain spaces, include carriage returns or tabs, exceed 79 characters, or contain the following characters: \ / * :? < > " |
Location Domain and folder where the service is created. Click Select Folder to choose a different folder. You can move the Reference Table Manager Service after you create it.
License License object that allows use of the service.
Node Setup Node on which the Reference Table Manager Service runs.
Database Type Type of database for the Reference Table Manager repository: IBM DB2, Microsoft SQL Server, or Oracle.
DBUser User account for the Reference Table Manager repository database. Set up this account using the appropriate database client tools.
DBPassword Password for the Reference Table Manager repository database user. Must be in 7-bit ASCII.
Tablespace Name Tablespace name for Reference Table Manager repositories on IBM DB2.
Database Hostname
Host name for the Reference Table Manager repository database.
Database Port Port number for the Reference Table Manager repository database.
Database Name Service name for Oracle or IBM DB2 databases. Database name for Microsoft SQL Server.
Additional JDBC Parameters
Additional JDBC options.
Port Number Port number the Reference Table Manager application runs on. Default is 10260.
URLScheme Indicates the security protocol that you configure for the Reference Table Manager application: HTTP or HTTPS.
Keystore File Keystore file that contains the keys and certificates required if you use the SSL security protocol with the Reference Table Manager application. You must specify the keystore file if you select the HTTPS URL scheme.
242 Chapter 17: Creating the Reference Table Manager Service
Creating and Deleting Repository ContentYou can use the Reference Table Manager Service page to create and delete contents for the Reference Table Manager repository. You must create repository contents before you enable the Reference Table Manager Service.
Creating the Reference Table Manager Repository ContentWhen you create the Reference Table Manager repository, you create the Reference Table Manager repository database tables.
To create the Reference Table Manager repository:
1. In the Navigator, select the Reference Table Manager Service for which you want to create Reference Table Manager repository content.
2. Click Actions > Create Contents.
3. Enter the user name and password for the Reference Table Manager repository database.
4. Click OK.
The activity log displays the results of the create contents operation.
Deleting the Reference Table Manager Repository ContentDelete the Reference Table Manager repository content when you want to delete all metadata and database connection information from the repository.
To delete the Reference Table Manager repository content:
1. In the Navigator, select the Reference Table Manager Service for which you want to delete Reference Table Manager repository content.
2. Click Actions > Delete Contents.
3. Enter the user name and password for the Reference Table Manager repository database.
4. Click OK.
The activity log displays the results of the delete contents operation.
Enabling and Disabling the Reference Table Manager Service
Use the Administration Console to enable and disable the Reference Table Manager Service. Disable a Reference Table Manager Service to perform maintenance or to restrict users from accessing Reference Table Manager.
When you disable the Reference Table Manager Service, you also stop the Reference Table Manager. Enable a Reference Table Manager Service to make the Reference Table Manager available again.
When you disable the Reference Table Manager Service, choose one of the following options:
♦ Complete. Waits for all Reference Table Manager processes to complete and then disables the Reference Table Manager Service.
♦ Abort. Aborts all Reference Table Manager processes immediately and disables the Reference Table Manager Service.
Creating and Deleting Repository Content 243
When you enable the Reference Table Manager Service, the Service Manager starts the Reference Table Manager application on the node where the Reference Table Manager Service runs.
To enable a Reference Table Manager Service:
1. Select the Reference Table Manager Service in the Navigator of the Administration Console.
2. Click Enable.
The status indicator at the top of the right pane indicates when the service starts running.
To disable a Reference Table Manager Service:
1. Select the Reference Table Manager Service in the Navigator of the Administration Console.
2. Click Disable to disable the service.
The Disable Reference Table Manager window appears.
3. Select a disable mode.
4. Click OK.
The Service Manager disables the Reference Table Manager Service and stops Reference Table Manager. When a service is disabled, the Enable button is available.
Configuring the Reference Table Manager ServiceAfter you create a Reference Table Manager Service, use the Administration Console to configure the following Reference Table Manager Service properties:
♦ Node assignments. Specify the node on which Reference Table Manager runs. To edit the node assignment click the Properties tab, and then click Edit in the Node Assignments section.
♦ General properties. Configure general properties that include the port numbers for the Reference Table Manager application and the license object assigned to the Reference Table Manager Service. For more information, see “General Properties” on page 245.
♦ Database properties. Configure database properties. For more information, see “Database Properties” on page 245.
♦ Configuration properties. Specify configuration properties, such as HTTP security protocol, and maximum concurrent and queued requests to the Reference Table Manager application. For more information, see “Configuration Properties” on page 245.
♦ Connection pool properties. Configure the connection pool properties, such as the number of active available connections to the Reference Table Manager repository database and the amount of time that Reference Table Manager holds database connection requests in the connection pool. For more information, see “Connection Pool Properties” on page 246.
♦ Advanced properties. Configure advanced properties that include properties for the Java Virtual Manager (JVM) memory settings and error severity level. For more information, see “Advanced Properties” on page 246.
♦ Custom Properties. Specify properties that are unique to your PowerCenter environment or that apply in special cases. A Reference Table Manager does not have custom properties when you create it. Use custom properties only if the Informatica Global Customer Support instructs you to.
To view or update properties, select the Reference Table Manager Service in the Navigator. The Properties tab appears.
244 Chapter 17: Creating the Reference Table Manager Service
General PropertiesTo edit the general properties, select the Reference Table Manager Service in the Navigator, click the Properties tab, and then click Edit in the General Properties section.
The following table describes the general properties for a Reference Table Manager Service:
Database PropertiesTo edit the Reference Table Manager repository database properties, select the Reference Table Manager Service in the Navigator, click the Properties tab, and then click Edit in the Database Properties section.
The following table describes the database properties for a Reference Table Manager repository database:
Configuration PropertiesTo edit the configuration properties, select the Reference Table Manager Service in the Navigator, click the Properties tab, and then click Edit in the Configuration Properties section.
Property Description
Port Number Port number the Reference Table Manager application runs on. Default is 10260.
License License that you assigned to the Reference Table Manager Service when you created the service. Read-only field.
Property Description
Database Type Database type for the Reference Table Manager repository. To apply changes to this property, restart the Reference Table Manager Service.
DBUser User account for the Reference Table Manager repository database. Set up this account using the appropriate database client tools. To apply changes to this property, restart the Reference Table Manager Service.
DBPassword Password for the Reference Table Manager repository database user. Must be in 7-bit ASCII. To apply changes to this property, restart the Reference Table Manager Service.
Tablespace Name
Tablespace name for the Reference Table Manager repository on IBM DB2. When you specify the tablespace name, the Reference Table Manager Service creates all repository tables in the same tablespace. You cannot use spaces in the tablespace name. To apply changes to this property, restart the Reference Table Manager Service.To improve repository performance on IBM DB2 EEE repositories, specify a tablespace name with one node.
Database Hostname
Host name for the Reference Table Manager repository database. To apply changes to this property, restart the Reference Table Manager Service.
Database Port Port number for the Reference Table Manager repository database. To apply changes to this property, restart the Reference Table Manager Service.
Database Name The service name for IBM DB2, the database name for Microsoft SQL Server, or the SID for Oracle. To apply changes to this property, restart the Reference Table Manager Service.
Additional JDBC Parameters
Additional JDBC options. Use this option to specify character encoding or the location of a backup server if you are using a database server that is highly available such as Oracle RAC.
Configuring the Reference Table Manager Service 245

The following table describes the configuration properties for a Reference Table Manager Service:
Connection Pool PropertiesTo edit the connection pool properties, select the Reference Table Manager Service in the Navigator, click the Properties tab, and then click Edit in the Connection Pool section.
The following table describes the configuration properties for a Reference Table Manager Service:
Advanced PropertiesTo edit the advanced properties, select the Reference Table Manager Service in the Navigator, click the Properties tab, and then click Edit in the Advanced Properties section.
The following table describes the advanced properties for a Reference Table Manager Service:
Property Description
URLScheme Indicates the security protocol that you configure for the Reference Table Manager application: HTTP or HTTPS.
Keystore File Keystore file that contains the keys and certificates required if you use the SSL security protocol with the Reference Table Manager application.
MaxConcurrentRequests Maximum number of request processing threads available, which determines the maximum number of client requests that Reference Table Manager can handle simultaneously. Default is 100.
MaxQueueLength Maximum queue length for incoming connection requests when all possible request processing threads are in use by the Reference Table Manager application. Reference Table Manager refuses client requests when the queue is full. Default is 500.
Property Description
Maximum Active Connections
Number of active connections available to the Reference Table Manager repository database. The Reference Table Manager application maintains a connection pool for connections to the repository database. Default is 20.
Maximum Wait Time
Amount of time in seconds that the Reference Table Manager holds repository database connection requests in the connection pool. If the Reference Table Manager cannot process the connection request to the repository within the wait time, the connection fails. Default is 180.
Property Description
Max Heap Size Amount of RAM in megabytes allocated to the Java Virtual Manager (JVM) that runs Reference Table Manager. Use this property to increase the performance of Reference Table Manager. Default is 512.
Error Severity Level
Level of error messages written to the Reference Table Manager Service log. Specify one of the following message levels:- Fatal- Error- Warning- Info- Trace- DebugDefault is ERROR.
246 Chapter 17: Creating the Reference Table Manager Service
C H A P T E R 1 8
Managing Licenses
This chapter includes the following topics:
♦ Overview, 247
♦ Types of License Keys, 249
♦ Creating a License Object, 250
♦ Assigning a License to a Service, 250
♦ Unassigning a License from a Service, 251
♦ Updating a License, 251
♦ Removing a License, 252
♦ Viewing License Details, 253
OverviewThe Service Manager on the master gateway node manages PowerCenter licenses.
A PowerCenter license enables you to perform the following tasks:
♦ Run application services. Application services include the Repository Service, Integration Service, Reporting Service, Metadata Manager Service, SAP BW Service, Web Services Hub, and Reference Table Manager Service.
♦ Use PowerCenter features. Features include connectivity, Metadata Exchange options, and other options, such as session on grid and high availability.
When you install PowerCenter, the installation program creates a license object in the domain based on the license key you used to install PowerCenter.
You assign a license object to each application service to enable the service. For example, you must assign a license to the Integration Service before you can use the Integration Service to run a workflow.
You can create additional license objects in the domain. You may have multiple license objects that fulfill the requirements specified in your contract. For example, you may have two license objects, where each object allows you to run services on a different operating system. You might also use multiple license objects if you want the same domain to manage different projects. You may want to use a different set of PowerCenter features for each project.
247

License ValidationThe Service Manager validates application service processes when they start. The Service Manager validates the following information for each service process:
♦ Product version. Verifies that you are running the appropriate version of the application service.
♦ Platform. Verifies that the application service is running on a licensed operating system.
♦ Expiration date. Verifies that the license is not expired. If the license expires, no application service assigned to the license can start. You must assign a valid license to the application services to start them.
♦ PowerCenter Options. Determines the options that the application service has permission to use. For example, the Service Manager verifies if the Integration Service can use the Session on Grid option.
♦ Connectivity. Verifies connections that the application service has permission to use. For example, the Service Manager verifies that PowerCenter can connect to a IBM DB2 database.
♦ Metadata Exchange options. Determines the Metadata Exchange options that are available for use. For example, the Service Manager verifies that you have access to the Metadata Exchange for Business Objects Designer.
Licensing Log EventsThe Service Manager generates log events and writes them to the Log Manager. It generates log events for the following actions:
♦ You create or delete a license.
♦ You apply an incremental license key to a license.
♦ You assign an application service to a license.
♦ You unassign a license from an application service.
♦ The license expires.
♦ The Service Manager encounters an error, such as a validation error.
The log events include the user name and the time associated with the event.
You must have permission on the domain to view the logs for Licensing events. The Licensing events appear in the domain logs.
License Management TasksYou can perform the following tasks to manage the licenses:
♦ Create the license in the Administration Console. You use a license key to create a license in the Administration Console. For more information, see “Creating a License Object” on page 250.
♦ Assign a license to each application service. Assign a license to each application service to enable the service. For more information, see “Assigning a License to a Service” on page 250.
♦ Unassign a license from an application service. Unassign a license from an application service if you want to discontinue the service or migrate the service from a development environment to a production environment. After you unassign a license from a service, you cannot enable the service until you assign another valid license to it. For more information, see “Unassigning a License from a Service” on page 251.
♦ Update the license. Update the license to add PowerCenter options to the existing license. For more information, see “Updating a License” on page 251.
♦ Remove the license. Remove a license if it is obsolete. For more information, see “Removing a License” on page 252.
♦ Configure user permissions on a license. For more information, see “Managing Permissions” on page 35.
♦ View license details. You may need to review the licenses to determine details, such as expiration date and the maximum number of licensed CPUs. You may want to review these details to ensure you are in
248 Chapter 18: Managing Licenses
compliance with the license. Use the Administration Console to determine the details for each license. For more information, see “Viewing License Details” on page 253.
♦ Monitor license usage. You can monitor the usage of logical CPUs and Repository Services in the License Report. For more information, see “License Usage Report” on page 270.
♦ Monitor licensed options. You can monitor the number of software options purchased for a license and the number of times a license exceeds usage limits. For more information, see “License Management Report” on page 275.
You can perform all of these tasks in the Administration Console or by using infacmd commands.
Types of License KeysInformatica provides license keys in license files. The license key is encrypted. When you create the license from the license key file, the Service Manager decrypts the license key and enables the purchased PowerCenter options.
You create a license from a license key file. You apply license keys to the license to enable additional PowerCenter options. PowerCenter uses the following types of license keys:
♦ Original keys. Informatica generates an original key based on your contract. Informatica may provide multiple original keys depending on your contract.
♦ Incremental keys. Informatica generates incremental keys based on updates to an existing license, such as an extended license period or an additional option.
Original KeysOriginal keys identify the contract, product, and licensed features. Licensed features include the PowerCenter edition, deployment type, number of authorized CPUs, and authorized PowerCenter options and connectivity. You use the original keys to install PowerCenter and create licenses for services. You must have a license key to install PowerCenter. The installation program creates a license object for the domain in the Administration Console. You can use other original keys to create more licenses in the same domain. You use a different original license key for each license object.
Incremental KeysYou use incremental license keys to update an existing license. You add an incremental key to an existing license to add or remove options, such as PowerCenter options, connectivity, and Metadata Exchange options. For example, if an existing license does not allow high availability, you can add an incremental key with the high availability option to the existing license.
The Service Manager updates the license expiration date if the expiration date of an incremental key is later than the expiration date of an original key. The Service Manager uses the latest expiration date. A license object can have different expiration dates for options in the license. For example, the IBM DB2 relational connectivity option may expire on 12/01/2006, and the session on grid option may expire on 04/01/06.
The Service Manager validates the incremental key against the original key used to create the license. An error appears if the keys are not compatible.
Types of License Keys 249
Creating a License ObjectYou can create a license object in a domain and assign the license to application services. You can create the license in the Administration Console using a license key file. The license key file contains an encrypted original key. You use the original key to create the license.
You can also use the infacmd AddLicense command to add a license to the domain.
Use the following guidelines to create a license:
♦ Use a valid license key file. The license key file must contain an original license key.
♦ You cannot use the same license key file for multiple licenses. Each license must have a unique original key.
♦ Enter a unique name for each license. You create a name for the license when you create the license. The name must be unique among all objects in the domain.
♦ Put the license key file in a location that is accessible by the Administration Console machine. When you create the license object, you must specify the location of the license key file.
After you create the license, you can change the description. To change the description of a license, select the license in Navigator of the Administration Console, and then click Edit.
To create a license:
1. In the Administration Console, click Create > License.
The Create License window appears.
2. Enter the following options:
If you try to create a license using an incremental key, the following message appears:
The requested operation could not be performed due to the following error: An original key must be added before an incremental key can be applied.
You must use an original key to create a license.
3. Click Create.
Assigning a License to a ServiceAssign a license to an application service before you can enable the service. When you assign a license to a service, the Service Manager updates the license metadata. You can also use the infacmd AssignLicense command to assign a license to a service.
To assign a license to a service:
1. Select the license in the Navigator of the Administration Console.
2. Click the Assigned Services tab.
3. Click Edit.
Option Description
Name Name of the license. The name is not case sensitive and must be unique within the domain. The name cannot have leading or trailing spaces, include carriage returns or tabs, exceed 79 characters, or contain the following characters: / * ? < > " |
Description Description of the license.
Location Domain in which you create the license. Read-only field.
License File File containing the original key. Click Browse to locate the file.
250 Chapter 18: Managing Licenses

The Assigned Services tab shows the unassigned and assigned services.
4. Select the services in the Unassigned Services list, and click Assign.
Use Ctrl-click to select multiple services.
-or-
Use Shift-click to select a range of services.
5. Click OK.
Rules and GuidelinesUse the following rules and guidelines when you assign licenses:
♦ You can assign licenses to disabled services.
♦ If you want to assign a license to a service that has a license assigned to it, you must first unassign the existing license from the service.
♦ To start a service with backup nodes, you must assign it to a license with high availability.
♦ To restart a service automatically, you must assign the service to a license with high availability.
Unassigning a License from a ServiceYou might need to unassign a license from a service if the service becomes obsolete or you want to discontinue a service. You might want to discontinue a service if you are using more CPUs than you are licensed to use.
You can use the Administration Console or the infacmd UnassignLicense command to unassign a license from a service.
You must disable a service before you can unassign a license from it. After you unassign the license from the service, you cannot enable the service. You must assign a valid license to the service to reenable it.
You must disable the service before you can unassign the license. If you try to unassign a license from an enabled service, the following message appears:
Cannot remove service <service name> as it is running.
To unassign a license from a service:
1. Select the license in the Navigator of the Administration Console.
2. Click Assigned Services.
3. Click Edit.
The Assigned Services tab shows the unassigned and assigned services.
4. Select the service in the Assigned Services list, and then click Unassign.
5. Click OK.
Updating a LicenseYou can use an incremental key to update an existing license. When you add an incremental key to a license, the Service Manager adds or removes licensed options and updates the license expiration date.
You can also use the infacmd UpdateLicense command to add an incremental key to an existing license.
Unassigning a License from a Service 251

Use the following guidelines to update a license:
♦ Ensure the license key file is accessible by the Administration Console machine. When you update the license object, you must specify the location of the license key file.
♦ The incremental key must be compatible with the original key. An error appears if the keys are not compatible.
The Service Manager validates the incremental key against the original key based on the following information:
♦ Serial number
♦ Deployment type
♦ Distributor
♦ PowerCenter edition
♦ PowerCenter version
For more information about these properties, see Table 18-1 on page 253.
To update a license:
1. Select a license in the Navigator.
2. Click Properties.
3. In the General Properties section, click Add to update the license with an incremental key.
4. Select the license file that contains the incremental keys.
5. Click Add.
6. In the General Properties area of the Properties tab, click Edit to edit the description of the license.
7. Click OK.
Removing a LicenseYou can remove a license from a domain using the Administration Console or the infacmd RemoveLicense command.
Before you remove a license, disable all services assigned to the license. If you do not disable the services, all running service processes abort when you remove the license. When you remove a license, the Service Manager unassigns the license from each assigned service and removes the license from the domain. To reenable a service, assign another license to it.
If you remove a license, you can still view License Usage logs in the Log Viewer for this license, but you cannot run the License Report on this license.
Note: You cannot remove License Usage logs from the Log Viewer.
To remove a license from the domain:
1. Select the license in the Navigator of the Administration Console.
2. Click the Delete button.
252 Chapter 18: Managing Licenses

Viewing License DetailsYou can view license details using the Administration Console or the infacmd ShowLicense command. The license details are based on all license keys applied to the license. The Service Manager updates the existing license details when you add a new incremental key to the license.
You might review license details to determine PowerCenter options that are available for use. You may also review the license details and License Usage logs when monitoring PowerCenter licenses. For example, you can determine the number of CPUs your company is licensed to use for each operating system.
To view license details, select the license in the Navigator.
The Administration Console displays the license properties in the following sections:
♦ General Properties. Shows license attributes, such as the license object name, description, and expiration date. For more information, see “General Properties” on page 253.
♦ Supported Platforms. Shows the operating systems and how many CPUs are supported for each operating system. For more information, see “Supported Platforms” on page 254.
♦ Repositories. Shows the maximum number of license repositories. For more information, see “Repositories” on page 254.
♦ PowerCenter Options. Shows all licensed PowerCenter options, such as session on grid, high availability, and pushdown optimization. For more information, see “PowerCenter Options” on page 254.
♦ Connections. Shows all licensed connections. The license enables you to use connections, such as DB2 and Oracle database connections. For more information, see “Connections” on page 254.
♦ Metadata Exchange Options. Shows a list of all licensed Metadata Exchange options, such as Metadata Exchange for Business Objects Designer. For more information, see “Metadata Exchange Options” on page 254.
You can also run the License Report to monitor licenses. For more information, see “License Usage Report” on page 270.
General PropertiesYou can use the general properties to view high-level information about the license. Use this license information when you audit the licensing usage.
The general properties for the license appear in the General Properties section of the Properties tab.
Figure 18-1 describes the general properties for a license:
Table 18-1. General Properties for a License
Property Description
Name Name of the license.
Description Description of the license.
Location Path to the license in the Navigator.
Edition PowerCenter edition.
Software Version Version of PowerCenter.
Distributed By Distributor of the PowerCenter product.
Issued On Date when the license is issued to the customer.
Expires On Date when the license expires.
Validity Period Period for which the license is valid.
Viewing License Details 253
You can also use the license event logs to view audit summary reports. You must have permission on the domain to view the logs for license events.
Supported PlatformsYou assign a license to each service. The service can run on any operating system supported by the license. One PowerCenter license can support multiple operating system platforms.
The supported platforms for the license appear in the Supported Platforms section of the Properties tab.
The following table describes the supported platform properties for a license:
RepositoriesThe maximum number of active repositories for the license appear in the Repositories section of the Properties tab.
PowerCenter OptionsThe license enables you to use PowerCenter options such as data cleansing, data federation, and pushdown optimization.
The options for the license appear in the PowerCenter Options section of the Properties tab.
ConnectionsThe license enables you to use connections, such as DB2 and Oracle database connections. The license also enables you to use PowerExchange products, such as PowerExchange for Web Services.
The connections for the license appear in the Connections section of the Properties tab.
Metadata Exchange OptionsThe license enables you to use Metadata Exchange options such as Metadata Exchange for Business Objects Designer and Metadata Exchange for Microstrategy.
The Metadata Exchange options for the license appear in the Metadata Exchange Options section of the Properties tab.
Serial Number Serial number of the license. The serial number identifies the customer or project. If the customer has multiple PowerCenter installations, there is a separate serial number for each project. The original and incremental keys for a license have the same serial number.
Deployment Level Level of deployment. Values are ‘Development’ and ‘Production.’
Property Description
Description Name of the supported operating system.
Logical CPUs Number of CPUs you can run on the operating system.
Issued On Date on which the license was issued for this option.
Expires Date on which the license expires for this option.
Table 18-1. General Properties for a License
Property Description
254 Chapter 18: Managing Licenses
C H A P T E R 1 9
Managing Logs
This chapter includes the following topics:
♦ Overview, 255
♦ Log Manager Architecture, 256
♦ Configuring the Log Location, 257
♦ Configuring Log Management, 258
♦ Using the Log Viewer, 260
♦ Understanding Log Events, 264
OverviewThe Service Manager provides accumulated log events from each service in the domain and for sessions and workflows. To perform the logging function, the Service Manager runs a Log Manager and a Log Agent.
The Log Manager runs on the master gateway node. It collects and processes log events for Service Manager domain operations and application services. The log events contain operational and error messages for a domain. The Service Manager and the application services send log events to the Log Manager. When the Log Manager receives log events, it generates log event files. You can view service log events in the Administration Console based on criteria you provide.
The Log Agent runs on the nodes to collect and process log events for session and workflows. Log events for workflows include information about tasks performed by the Integration Service, workflow processing, and workflow errors. Log events for sessions include information about the tasks performed by the Integration Service, session errors, and load summary and transformation statistics for the session. You can view log events for the last workflow run with the Log Events window in the Workflow Monitor.
Log event files are binary files that the Administration Console Log Viewer uses to display log events. When you view log events in the Administration Console, the Log Manager uses the log event files to display the log events for the domain or application service. For more information about how the Log Manager generates log event files, see “Log Manager Architecture” on page 256.
You can use the Administration Console to perform the following tasks with the Log Manager:
♦ Configure the log location. Configure the node that runs the Log Manager, the directory path for log event files, purge options, and time zone for log events. For more information, see “Configuring the Log Location” on page 257.
♦ Configure log management. Configure the Log Manager to purge logs or purge logs manually. Export log events to XML, text, or binary files. Configure the time zone for the time stamp in the log event files. For more information, see “Configuring Log Management” on page 258.
255
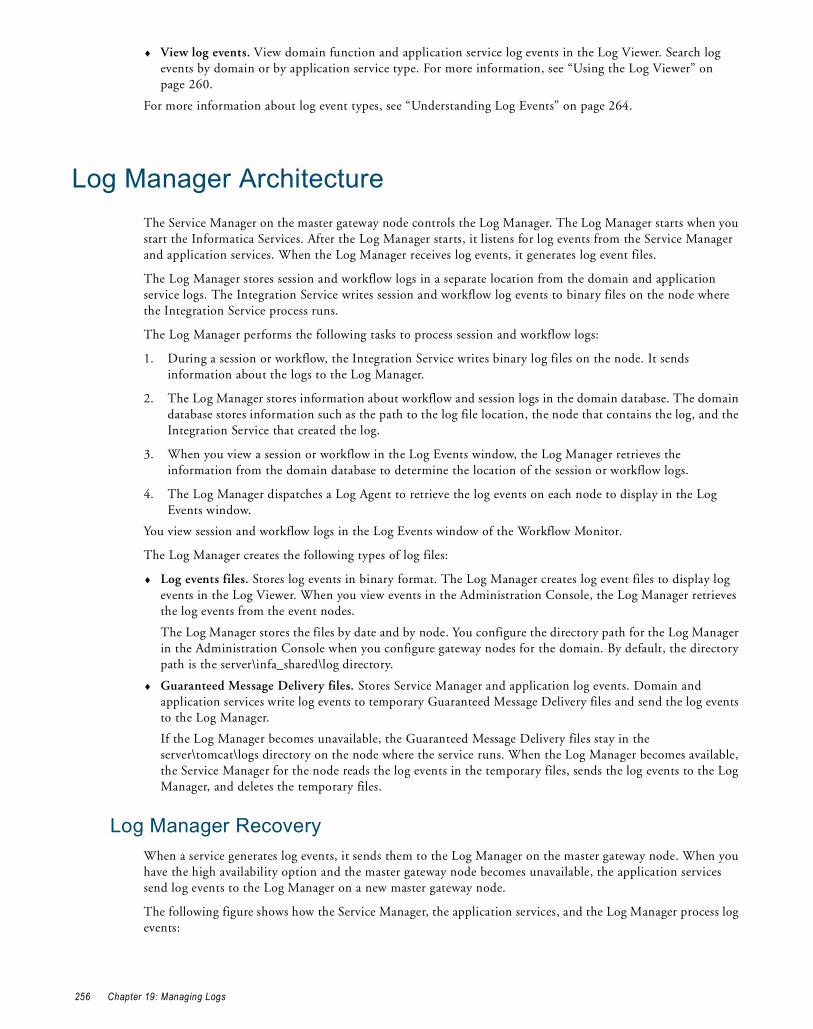
♦ View log events. View domain function and application service log events in the Log Viewer. Search log events by domain or by application service type. For more information, see “Using the Log Viewer” on page 260.
For more information about log event types, see “Understanding Log Events” on page 264.
Log Manager ArchitectureThe Service Manager on the master gateway node controls the Log Manager. The Log Manager starts when you start the Informatica Services. After the Log Manager starts, it listens for log events from the Service Manager and application services. When the Log Manager receives log events, it generates log event files.
The Log Manager stores session and workflow logs in a separate location from the domain and application service logs. The Integration Service writes session and workflow log events to binary files on the node where the Integration Service process runs.
The Log Manager performs the following tasks to process session and workflow logs:
1. During a session or workflow, the Integration Service writes binary log files on the node. It sends information about the logs to the Log Manager.
2. The Log Manager stores information about workflow and session logs in the domain database. The domain database stores information such as the path to the log file location, the node that contains the log, and the Integration Service that created the log.
3. When you view a session or workflow in the Log Events window, the Log Manager retrieves the information from the domain database to determine the location of the session or workflow logs.
4. The Log Manager dispatches a Log Agent to retrieve the log events on each node to display in the Log Events window.
You view session and workflow logs in the Log Events window of the Workflow Monitor.
The Log Manager creates the following types of log files:
♦ Log events files. Stores log events in binary format. The Log Manager creates log event files to display log events in the Log Viewer. When you view events in the Administration Console, the Log Manager retrieves the log events from the event nodes.
The Log Manager stores the files by date and by node. You configure the directory path for the Log Manager in the Administration Console when you configure gateway nodes for the domain. By default, the directory path is the server\infa_shared\log directory.
♦ Guaranteed Message Delivery files. Stores Service Manager and application log events. Domain and application services write log events to temporary Guaranteed Message Delivery files and send the log events to the Log Manager.
If the Log Manager becomes unavailable, the Guaranteed Message Delivery files stay in the server\tomcat\logs directory on the node where the service runs. When the Log Manager becomes available, the Service Manager for the node reads the log events in the temporary files, sends the log events to the Log Manager, and deletes the temporary files.
Log Manager RecoveryWhen a service generates log events, it sends them to the Log Manager on the master gateway node. When you have the high availability option and the master gateway node becomes unavailable, the application services send log events to the Log Manager on a new master gateway node.
The following figure shows how the Service Manager, the application services, and the Log Manager process log events:
256 Chapter 19: Managing Logs
The Service Manager, the application services, and the Log Manager perform the following tasks:
1. An application service process writes log events to a Guaranteed Message Delivery file.
2. The application service process sends the log events to the Service Manager on the gateway node for the domain.
3. The Log Manager processes the log events and writes log event files. The application service process deletes the temporary file.
4. If the Log Manager is unavailable, the Guaranteed Message Delivery files stay on the node running the service process. The Service Manager for the node sends the log events in the Guaranteed Message Delivery files when the Log Manager becomes available, and the Log Manager writes log event files.
Troubleshooting the Log ManagerDomain and application services write log events to Service Manager log files when the Log Manager cannot process log events. The Service Manager log files are located in the server\tomcat\logs directory. The Service Manager log files include catalina.out, localhost_<date>.txt, and node.log. Services write log events to different log files depending on the type of error.
Use the Service Manager log files to troubleshoot issues when the Log Manager cannot process log events. You will also need to use these files to troubleshoot issues when you contact Informatica Global Customer Support.
Note: You can troubleshoot a PowerCenter installation by reviewing the log files generated during installation. You can use the installation summary log file to find out which components failed during installation.
Configuring the Log LocationThe Service Manager on the master gateway node writes domain and application log event files to the log file directory. When you configure a node to serve as a gateway, you must configure the directory where the Service Manager on this node writes the log event files. Each gateway node must have access to the directory path.
You configure the log location in the Log and Gateway Configuration area on the Properties tab for the Domain. Configure a directory location that is accessible to the gateway node. Store the logs on a shared disk when you have more than one gateway node. If the Log Manager is unable to write to the directory path, it writes log events to node.log on the master gateway node.
When you configure the log location, the Administration Console validates the directory as you update the configuration. If the directory is invalid, the update fails. The Log Manager verifies that the log directory has read/write permissions on startup. Log files might contain inconsistencies if the log directory is not shared in a highly available environment.
If you have multiple PowerCenter domains, you must configure a different directory path for the Log Manager in each domain. Multiple domains cannot use the same shared directory path.
Node 1 (Gateway)Node 2
server/tomcat/logs - GMD file - GMD file - GMD file
Log Manager directory1
2
3
4
4 4
Configuring the Log Location 257
Note: When you change the directory path, you must restart Informatica Services on the node you changed.
Configuring Log Management The Service Manager and the application services continually send log events to the Log Manager. As a result, the directory location for the logs can grow to contain a large number of log events.
You can purge logs events periodically to manage the amount of log events stored by the Log Manager. You can export logs before you purge them to keep a backup of the log events.
You can perform the following tasks on the Log Management tab for the domain:
♦ Purge log events. Configure the Log Manager to purge logs after a certain number of days or when the directory containing the log event files reaches a maximum size. You can also manually purge log events. For more information, see “Purging Log Events” on page 258.
♦ Export log events. You can export log events to XML, text, or binary files. For more information, see “Exporting Log Events” on page 259.
♦ Set time zone. Configure the time zone for the time stamp in the log event files. For more information, see “Configuring the Time Zone” on page 260.
Purging Log Events You can automatically or manually purge log events. The Service Manager purges log events from the log directory according to the purge properties you configure in the Administration Console Log Management tab. You can manually purge log events to override the automatic purge properties.
Purging Log Events Automatically The Service Manager purges log events from the log directory according to the purge properties. The default value for preserving logs is 30 days and the default maximum size for log event files is 200 MB.
When the number of days or the size of the log directory exceeds the limit, the Log Manager deletes the log event files, starting with the oldest log events. The Log Manager periodically verifies the purge options and purges log events. The Log Manager does not purge session and workflow log files.
Purging Log Events ManuallyYou can purge log events for the domain or application services. When you purge log events, the Log Manager removes the log event files from the log directory. The Log Manager does not remove log event files currently being written to the logs.
Optionally, you can use the infacmd PurgeLog command to purge log events.
The following table lists the purge log options:
Option Description
Log Type Application service for which to purge log events. You can purge Domain, Service, or all log events.
Service Type When you purge Service, you can purge all application service types, Repository Service, Reporting Service, Integration Service, SAP NetWeaver BI, or Web Services Hub.
Purge Entries Date range of log events you want to purge. You can select the following options:- All Entries. Purges all log events.- Before Date. Purges log events that occurred before this date.Use the yyyy-mm-dd format when you enter a date. Optionally, you can use the calendar to choose the date. To use the calendar, click the date field.
258 Chapter 19: Managing Logs

Exporting Log EventsYou can export domain and application log events in XML, text, or binary format. When you export log events, you can choose the sort order of the exported log events. The Log Manager does not delete the log events when you export them. The Administration Console prompts you to save or open the exported log events file.
Note: If the PowerCenter domain is configured for HTTPS, you must use the Mozilla Firefox browser to export log events.
Optionally, you can use the infacmd GetLog command to retrieve log events.
The format you choose to export log events depends on how you plan to use the exported log events file:
♦ XML file. Use XML format if you want to analyze the log events in an external tool that uses XML or if you want to use XML tools, such as XSLT.
♦ Text file. Use a text file if you want to analyze the log events in a text editor.
♦ Binary file. Use binary format to back up the log events in binary format. You might need to use this format to send log events to Informatica Global Customer Support.
The following table lists the export log options:
XML FormatWhen you export log events to an XML file, the Log Manager exports each log event as a separate element in the XML file. The following example shows an excerpt from a log events XML file:
<log xmlns:xsd="http://www.w3.org/2001/XMLSchema" xmlns:common="http://www.informatica.com/pcsf/common" xmlns:metadata="http://www.informatica.com/pcsf/metadata" xmlns:domainservice="http://www.informatica.com/pcsf/domainservice" xmlns:logservice="http://www.informatica.com/pcsf/logservice" xmlns:xsi="http://www.w3.org/2001/XMLSchema-instance"><logEvent xsi:type="logservice:LogEvent" objVersion="1.0.0" timestamp="1129098642698" severity="3" messageCode="AUTHEN_USER_LOGIN_SUCCEEDED" message="User Admin successfully logged in." user="Admin" stacktrace="" service="authenticationservice" serviceType="PCSF" clientNode="sapphire" pid="0" threadName="http-8080-Processor24" context="" /> <logEvent xsi:type="logservice:LogEvent" objVersion="1.0.0" timestamp="1129098517000" severity="3" messageCode="LM_36854" message="Connected to node [garnet] on outbound connection [id = 2]." user="" stacktrace="" service="Copper" serviceType="IS" clientNode="sapphire" pid="4484" threadName="4528" context="" />
Text FormatWhen you export log events to a text file, the Log Manager exports the log events in Information and Content Exchange (ICE) Protocol. The following example shows an excerpt from a log events text file:
Option Log Type Description
Service Type Service Type of application service for which to export log events. You can export log events for Repository Service, Integration Service, Metadata Manager Service, Reporting Service, XSAP SAP BW Service, or Web Services Hub. You can also export log events for all service types.
Export Entries Domain,Service
Date range of log events you want to export. You can select the following options:- All Entries. Exports all log events.- Before Date. Exports log events that occurred before this date.Use the yyyy-mm-dd format when you enter a date. Optionally, you can use the calendar to choose the date. To use the calendar, click the date field.
Export logs in descending chronological order
Domain,Service
Exports log events starting with the most recent log events.
Configuring Log Management 259
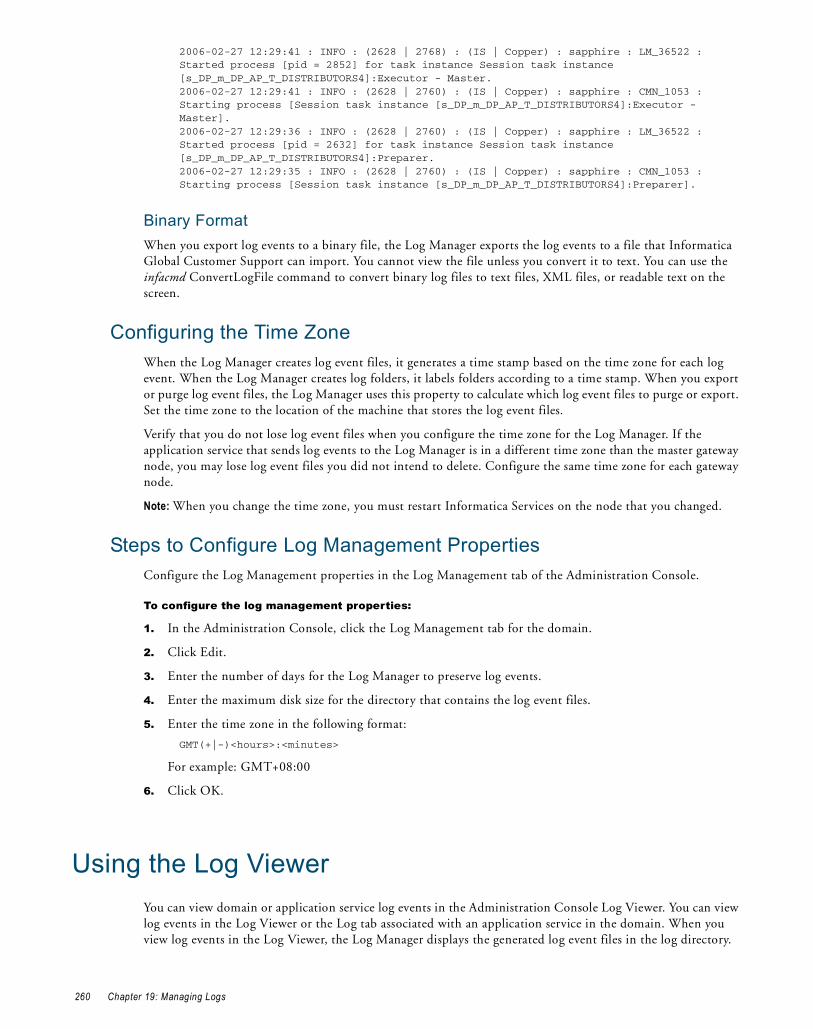
2006-02-27 12:29:41 : INFO : (2628 | 2768) : (IS | Copper) : sapphire : LM_36522 : Started process [pid = 2852] for task instance Session task instance [s_DP_m_DP_AP_T_DISTRIBUTORS4]:Executor - Master.2006-02-27 12:29:41 : INFO : (2628 | 2760) : (IS | Copper) : sapphire : CMN_1053 : Starting process [Session task instance [s_DP_m_DP_AP_T_DISTRIBUTORS4]:Executor - Master].2006-02-27 12:29:36 : INFO : (2628 | 2760) : (IS | Copper) : sapphire : LM_36522 : Started process [pid = 2632] for task instance Session task instance [s_DP_m_DP_AP_T_DISTRIBUTORS4]:Preparer.2006-02-27 12:29:35 : INFO : (2628 | 2760) : (IS | Copper) : sapphire : CMN_1053 : Starting process [Session task instance [s_DP_m_DP_AP_T_DISTRIBUTORS4]:Preparer].
Binary FormatWhen you export log events to a binary file, the Log Manager exports the log events to a file that Informatica Global Customer Support can import. You cannot view the file unless you convert it to text. You can use the infacmd ConvertLogFile command to convert binary log files to text files, XML files, or readable text on the screen.
Configuring the Time ZoneWhen the Log Manager creates log event files, it generates a time stamp based on the time zone for each log event. When the Log Manager creates log folders, it labels folders according to a time stamp. When you export or purge log event files, the Log Manager uses this property to calculate which log event files to purge or export. Set the time zone to the location of the machine that stores the log event files.
Verify that you do not lose log event files when you configure the time zone for the Log Manager. If the application service that sends log events to the Log Manager is in a different time zone than the master gateway node, you may lose log event files you did not intend to delete. Configure the same time zone for each gateway node.
Note: When you change the time zone, you must restart Informatica Services on the node that you changed.
Steps to Configure Log Management PropertiesConfigure the Log Management properties in the Log Management tab of the Administration Console.
To configure the log management properties:
1. In the Administration Console, click the Log Management tab for the domain.
2. Click Edit.
3. Enter the number of days for the Log Manager to preserve log events.
4. Enter the maximum disk size for the directory that contains the log event files.
5. Enter the time zone in the following format:
GMT(+|-)<hours>:<minutes>
For example: GMT+08:00
6. Click OK.
Using the Log ViewerYou can view domain or application service log events in the Administration Console Log Viewer. You can view log events in the Log Viewer or the Log tab associated with an application service in the domain. When you view log events in the Log Viewer, the Log Manager displays the generated log event files in the log directory.
260 Chapter 19: Managing Logs

You can use the Log Viewer to perform the following tasks:
♦ View log events, log event details, and Administration Console operational errors. View log events for the domain or for an application service. Use the query options to select the log events for the domain or application service you want to view.
♦ Search log event results. After you display the log events, you can search for log events that match search criteria you configure. For more information, see “Searching Log Event Results” on page 262.
♦ Configure columns. Configure the columns you want the Log Viewer to display. For more information, see “Configuring Log Viewer Columns” on page 263.
♦ Save log events. You can save log events in XML, text, and binary format. For more information, see “Saving Log Events” on page 263.
Viewing Log EventsTo view log events, you need to configure the query options in the Logs tab of the Administration Console. You can configure the log type, application service type or domain function category, application service name, the date range, and the severity level for the log events you want to view. The available options depend on whether you choose to view domain or application service log events. You can configure additional search options, including query parameters to include or exclude from the results.
After you search for log events, you can view the log events, configure the amount of log events you want to view on each page in the Log Viewer, and navigate through the pages of log event results. You can also view more information about a log event by clicking on the log event in the search results. On AIX and Linux, if the Log Manager receives an internal error message from the Integration Service, it writes a stack trace to the log event window.
You can view logs to get more information about errors you receive while working in the Administration Console. When an error message appears in the Administration Console, the error provides a link to the Log Viewer.
To view log events:
1. Click the Logs tab in the Administration Console.
The Log Viewer appears.
2. Expand the Query Options area if it does not display.
3. In the Query Options area, select Domain or Service for the log type.
4. Configure the query options to view log events.
The following table lists the query options:
Log Type Option Description
Service Service Type Type of service log events you want to view. You can choose a single application service type or all application service types.
Domain Category Category of domain service you want to view. You can choose a single domain service or all services for the domain.
Service Service Name Name of the application service for which you want to view log events. You can choose a single application service name or all application services.
Using the Log Viewer 261
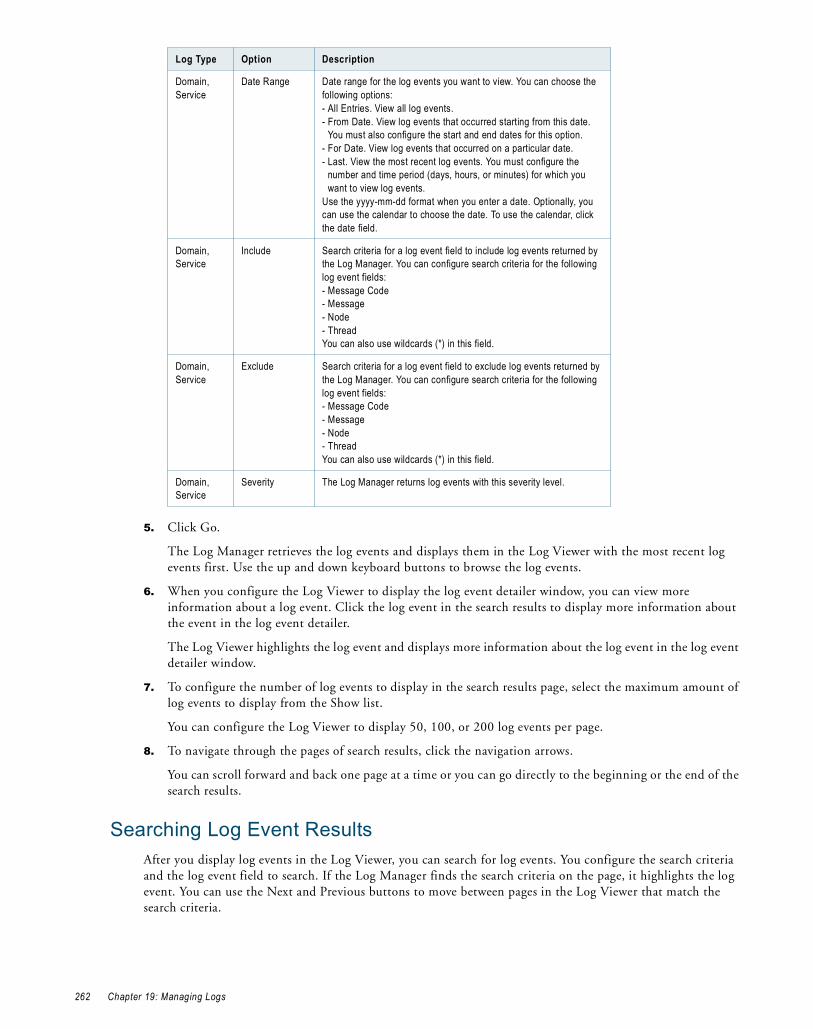
5. Click Go.
The Log Manager retrieves the log events and displays them in the Log Viewer with the most recent log events first. Use the up and down keyboard buttons to browse the log events.
6. When you configure the Log Viewer to display the log event detailer window, you can view more information about a log event. Click the log event in the search results to display more information about the event in the log event detailer.
The Log Viewer highlights the log event and displays more information about the log event in the log event detailer window.
7. To configure the number of log events to display in the search results page, select the maximum amount of log events to display from the Show list.
You can configure the Log Viewer to display 50, 100, or 200 log events per page.
8. To navigate through the pages of search results, click the navigation arrows.
You can scroll forward and back one page at a time or you can go directly to the beginning or the end of the search results.
Searching Log Event ResultsAfter you display log events in the Log Viewer, you can search for log events. You configure the search criteria and the log event field to search. If the Log Manager finds the search criteria on the page, it highlights the log event. You can use the Next and Previous buttons to move between pages in the Log Viewer that match the search criteria.
Domain,Service
Date Range Date range for the log events you want to view. You can choose the following options:- All Entries. View all log events.- From Date. View log events that occurred starting from this date.
You must also configure the start and end dates for this option.- For Date. View log events that occurred on a particular date.- Last. View the most recent log events. You must configure the
number and time period (days, hours, or minutes) for which you want to view log events.
Use the yyyy-mm-dd format when you enter a date. Optionally, you can use the calendar to choose the date. To use the calendar, click the date field.
Domain,Service
Include Search criteria for a log event field to include log events returned by the Log Manager. You can configure search criteria for the following log event fields:- Message Code- Message- Node- ThreadYou can also use wildcards (*) in this field.
Domain,Service
Exclude Search criteria for a log event field to exclude log events returned by the Log Manager. You can configure search criteria for the following log event fields:- Message Code- Message- Node- ThreadYou can also use wildcards (*) in this field.
Domain,Service
Severity The Log Manager returns log events with this severity level.
Log Type Option Description
262 Chapter 19: Managing Logs

To search log event results on the current page:
1. Select the log event field you want to search.
2. Enter the search criteria.
You can use wildcards (*) for the search criteria.
3. Click Next.
The Log Viewer highlights the log events that match the search criteria.
4. To view the next page in the Log Viewer that contains log events that match the search criteria, click Next.
5. Click Previous to move to the previous page in the search results that contains log events that match the search criteria.
Configuring Log Viewer ColumnsYou can configure the columns to display when you view log events. Click the Display Settings link in the Logs tab of the Administration Console to display the Display Setting tab and configure the Log Viewer columns.
You can configure the Log Viewer to display the following columns:
♦ Message
♦ MessageCode
♦ ProcessID
♦ Node
♦ Thread
♦ Time stamp
♦ Severity
Note: Service Name or Category always appear depending on the query options you choose. For example, when you display a service type, the service name always appears in the Log Viewer.
You can also configure the Log Viewer to display more details about selected log events. The information displays in the log event detailer below the search results.
To configure the columns for the Log Viewer:
1. In the Log Viewer, click the Display Settings link.
The Display Settings tab appears.
2. To add a column, select the name of the field you want to add in the right column and click Add.
3. To remove a column, select the name of the field in the left column and click the Remove button.
4. Optionally, choose to display detail information about selected log events below the search results. The log events detailer window does not appear by default.
5. Click OK.
The Log Manager updates the Log Viewer configuration and updates the Log Viewer with the added or removed columns.
Saving Log EventsWhen you view log events in the Log Viewer, you can save the log events to an XML, text, or binary file. When you save log events, the Log Manager saves the events from the most recent search. You can use the Save link in the Logs tab in the Administration Console to save log events to a file.
Note: If the PowerCenter domain is configured for HTTPS, you must use the Mozilla Firefox browser to save log events.
Using the Log Viewer 263
Viewing Administration Console Log ErrorsIf you receive an error while starting, updating, or removing services in the Administration Console, the error message at the top of the Administration Console provides a link to the Log Viewer. Click the link in the error message to access detail information about the error in the Log Viewer.
Understanding Log EventsThe Service Manager and application services send log events to the Log Manager. The Log Manager generates log events for each service type. To view the log events in the Log Viewer, you must configure the type of log events you want to search for in the Log Viewer.
You can view the following log event types in the Log Viewer:
♦ Domain log events. Log events generated from the Service Manager functions. For more information, see “Domain Log Events” on page 265.
♦ Repository Service log events. Log events from each Repository Service running in the domain. For more information, see “Repository Service Log Events” on page 265.
♦ Reporting Service log events. Log events from each Reporting Service running in the domain. For more information, see “Reporting Service Log Events” on page 266.
♦ Integration Service log events. Log events about each Integration Service running in the domain. For more information, see “Integration Service Log Events” on page 266.
♦ Metadata Manager Service log events. Log events about each Metadata Manager Service running in the domain. For more information, see “Metadata Manager Service Log Events” on page 266.
♦ SAP BW Service log events. Log events about the interaction between the PowerCenter and the SAP NetWeaver BI system. For more information, see “SAP BW Service Log Events” on page 266.
♦ Web Services Hub log events. Log events about the interaction between applications and the Web Services Hub. For more information, see “Web Services Hub Log Events” on page 267.
Log Event ComponentsThe Log Manager uses a common format to store and display log events. You can use the components of the log events to troubleshoot PowerCenter.
Each log event contains the following components:
♦ Service name or category. The Log Viewer categorizes events by service type or domain category based on the type of service you view. If you view Service Logs, the Log Viewer groups service names. When you view domain logs, the Log Viewer displays the domain categories in the log.
♦ Message. Message text for the log event. Use the message text to get more information about the log event. Some log events contain embedded log event in the message texts. For example, the following log events contains an embedded log event:
Client application [PmDTM], connection [59]: recv failed.
In this log event, the following log event is the embedded log event:
[PmDTM], connection [59]: recv failed.
When the Log Manager displays the log event, the Log Manager displays the severity level for the embedded log event.
♦ Message code. Log event code. You can use the message code to get more information about the log event in the PowerCenter Message Reference.
264 Chapter 19: Managing Logs
♦ ProcessID. The process identification number for the Windows or UNIX service process that generated the log event. You can use the process identification number to identify log events from a process when an application service runs multiple processes on the same node.
♦ Node. Name of the node running the process that generated the log event.
♦ Thread. Identification number or name of a thread started by a Repository Service process or name of a thread started by an Integration Service process.
♦ Time stamp. Date and time the log event occurred.
♦ Severity. The severity level for the log event. When you view log events, you can configure the Log Viewer to display only log events for a severity level.
Domain Log EventsDomain log events are log events generated from the domain functions the Service Manager performs. Use the domain log events to view information about the domain and troubleshoot issues. You can use the domain log events to troubleshoot issues related to the startup and initialization of nodes and application services for the domain.
Domain log events include log events from the following functions:
♦ Authentication. Log events from authentication of user requests from the Administration Console, PowerCenter Client, Metadata Manager, and Data Analyzer.
♦ Authorization. Log events that occur when the Service Manager authorizes user requests for services. Requests can come from the Administration Console.
♦ Domain Configuration. Log events that occur when the Service Manager manages the domain configuration metadata.
♦ Node Configuration. Log events that occur as the Service Manager manages node configuration metadata in the domain.
♦ Licensing. Log events that occur when the Service Manager registers license information.
♦ License Usage. Log events that occur when the Service Manager verifies license information from application services.
♦ Log Manager. Log events from the Log Manager. The Log Manager runs on the master gateway node. It collects and processes log events for Service Manager domain operations and application services.
♦ Log Agent. Log events from the Log Agent. The Log Agent runs on all nodes that process workflows and sessions in the domain. It collects and processes log events from workflows and sessions.
♦ User Management. Log events that occur when the Service Manager manages users, groups, roles, and privileges.
♦ Service Manager. Log events from the Service Manager and signal exceptions from DTM processes. The Service Manager manages all domain operations. If the error severity level of a node is set to Debug, when a service starts the log events include the environment variables used by the service.
Repository Service Log EventsThe Repository Service log events contain information about each Repository Service running in the domain.
Repository Service log events contain the following information:
♦ Repository connections. Log events for connections to the repository from PowerCenter client applications, including user name and the host name and port number for the client application.
♦ Repository objects. Log events for repository objects locked, fetched, inserted, or updated by the Repository Service.
♦ Repository Service processes. Log events about Repository Service processes, including starting and stopping the Repository Service and information about repository databases used by the Repository Service processes. Also includes repository operating mode, the nodes where the Repository Service process runs, initialization information, and internal functions used.
Understanding Log Events 265
♦ Repository operations. Log events for repository operations, including creating, deleting, restoring, and upgrading repository content, copying repository contents, and registering and unregistering local repositories.
♦ Licensing. Log events about Repository Service license verification.
♦ Security audit trails. Log events for changes to users, groups, and permissions. To include security audit trails in the Repository Service log events, you must enable the SecurityAuditTrail general property for the Repository Service in the Administration Console.
Reporting Service Log EventsThe Reporting Service log events contain information about each Reporting Service running in the domain.
Reporting Service log events contain the following information:
♦ Reporting Service processes. Log events about starting and stopping the Reporting Service.
♦ Repository operations. Log events for the Data Analyzer repository operations. This includes information on creating, deleting, backing up, restoring, and upgrading the repository content, and upgrading users and groups.
♦ Licensing. Log events about Reporting Service license verification.
♦ Configuration. Log events about the configuration of the Reporting Service.
Metadata Manager Service Log EventsThe Metadata Manager Service log events contain information about each Metadata Manager Service running in the domain.
Metadata Manager Service log events contain the following information:
♦ Repository operations. Log events for accessing metadata in the Metadata Manager repository.
♦ Configuration. Log events about the configuration of the Metadata Manager Service.
♦ Run-time processes. Log events for running a Metadata Manager Service, such as missing native library files.
♦ Integration Service log events. Session and workflow status for sessions and workflows that use an Integration Service process to load data to the Metadata Manager warehouse or to extract source metadata.
To view log events about how the Integration Service processes a PowerCenter workflow to load data into the Metadata Manager warehouse, you must view the session or workflow log.
Integration Service Log EventsThe Integration Service log events contain information about each Integration Service running in the domain.
Integration Service log events contain the following information:
♦ Integration Service processes. Log events about the Integration Service processes, including service ports, code page, operating mode, service name, and the associated repository and Repository Service status.
♦ Licensing. Log events for license verification for the Integration Service by the Service Manager.
SAP BW Service Log EventsThe SAP BW Service log events contain information about the interaction between PowerCenter and the SAP NetWeaver BI system.
SAP NetWeaver BI log events contain the following log events for an SAP BW Service:
♦ SAP NetWeaver BI system log events. Requests from the SAP NetWeaver BI system to start a workflow and status information from the ZPMSENDSTATUS ABAP program in the process chain.
266 Chapter 19: Managing Logs
♦ Integration Service log events. Session and workflow status for sessions and workflows that use an Integration Service process to load data to or extract data from SAP NetWeaver BI.
To view log events about how the Integration Service processes an SAP NetWeaver BI workflow, you must view the session or workflow log.
Web Services Hub Log EventsThe Web Services Hub log events contain information about the interaction between applications and the Web Services Hub.
Web Services Hub log events contain the following log events:
♦ Web Services processes. Log events about web service processes, including starting and stopping Web Services Hub, web services requests, the status of the requests, and error messages for web service calls. Log events include information about which service workflows are fetched from the repository.
♦ Integration Service log events. Workflow and session status for service workflows including invalid workflow errors.
Understanding Log Events 267

268 Chapter 19: Managing Logs

C H A P T E R 2 0
Running Domain Reports
This chapter includes the following topics:
♦ Overview, 269
♦ User Domain Audit Report, 270
♦ License Usage Report, 270
♦ License Management Report, 275
♦ Web Services Report, 278
OverviewYou can run the following domain reports from the Reports tab in the Administration Console:
♦ User Domain Audit Report. Monitors user activity in the domain. The User Domain Audit Report displays all domain and security management tasks a user has completed for a specific period of time. For more information, see “User Domain Audit Report” on page 270.
♦ License Usage Report. Monitors license usage information. The License Usage Report displays the number of logical CPUs used to run application services in the domain and displays the number of Repository Services in the domain. For more information, see “License Usage Report” on page 270.
♦ License Management Report. Monitors the number of software options purchased for a license and the number of times a license exceeds usage limits. The License Management Report displays the license usage information such as CPU and repository usage and the node configuration details. For more information, see “License Management Report” on page 275.
♦ Web Services Report. Monitors activities of the web services running on a Web Services Hub. The Web Services Report displays run-time information such as the number of successful or failed requests and average service time. You can also view historical statistics for a specific period of time. For more information, see “Web Services Report” on page 278.
Note: If the master gateway node runs on a UNIX machine and the UNIX machine does not have a graphics display server, you must install X Virtual Frame Buffer on the UNIX machine to view the report charts in the License Report or the Web Services Report. If you have multiple gateway nodes running on UNIX machines, install X Virtual Frame Buffer on each UNIX machine.
269

User Domain Audit ReportYou can monitor user activity in the domain by running the User Domain Audit Report. The User Domain Audit Report displays all domain and security management tasks a user has completed for a specified time period. You can monitor user activity to determine when a user created, updated, or removed services, nodes, users, groups, or roles.
The Service Manager writes log events when the domain needs to authorize an action. The domain writes a log event each time a user performs one of the following domain actions:
♦ Adds, updates, or removes an application service.
♦ Enables or disables a service process.
♦ Starts, stops, enables, or disables a service.
♦ Adds, updates, removes, or shuts down a node.
♦ Modifies the domain properties.
♦ Moves a folder in the domain.
♦ Assigns permissions on domain objects to users or groups.
The domain writes a log event each time a user performs one of the following security actions:
♦ Adds, updates, or removes a user, group, role, or operating system profile.
♦ Adds or removes an LDAP security domain.
♦ Assigns roles or privileges to a user or group.
To run the User Domain Audit Report:
1. Click the Reports tab in the Administration Console.
2. Click the User Domain Audit Report link.
3. Select a time period.
You can choose the following options:
♦ Last. View the most recent log events. You must specify the number of days or months for which you want to view log events.
♦ From Date. View log events that occurred between two specified dates. You must specify the start and end dates for this option. Use the yyyy-mm-dd format when you enter a date.
4. Select the security domain for the user for which you want to view the report.
5. Select the user.
6. Click the Go button to run the report.
License Usage ReportThe license specifies the number of authorized PowerCenter repositories and logical central processing units (CPUs) that you can use at any given time. A logical CPU is a CPU thread. For example, if a CPU is dual-threaded, then it has two logical CPUs.
You can monitor the usage of logical CPUs, Repository Services, and source and target databases in the License Usage Report. You can monitor license usage information when you start a data integration project. If you are using most of your licensed logical CPUs or Repository Services and you want to start a new data integration project, you can get a new license to increase the number of authorized logical CPUs or Repository Services.
270 Chapter 20: Running Domain Reports
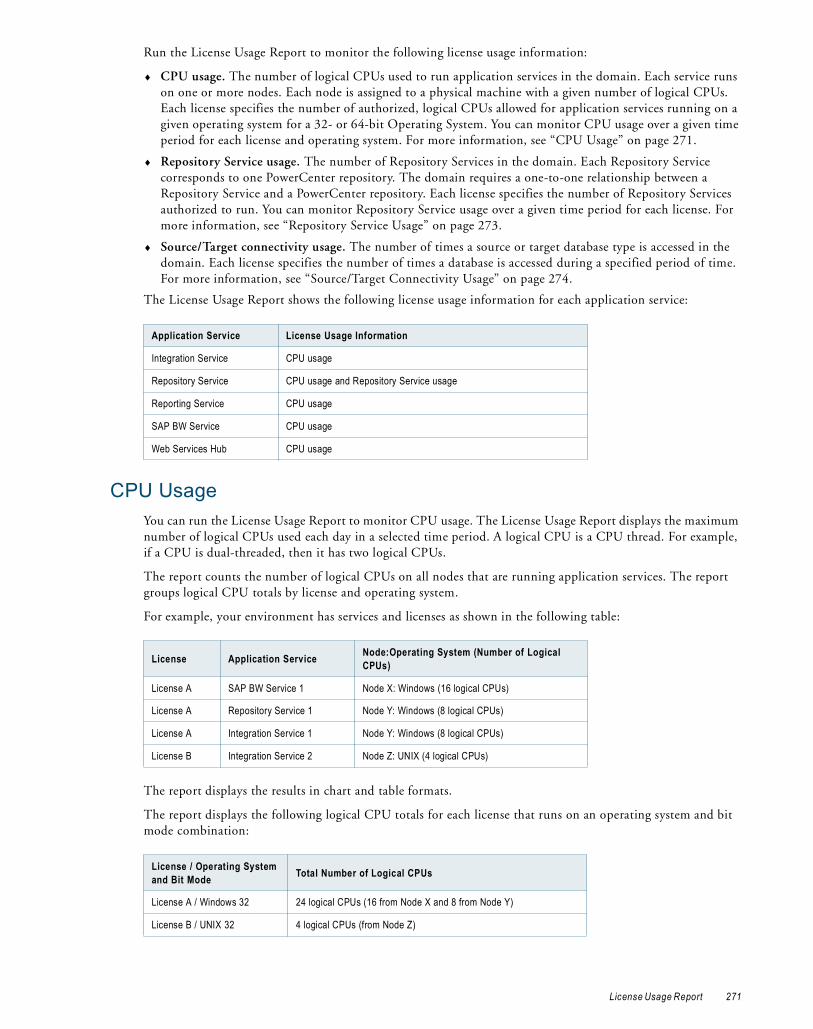
Run the License Usage Report to monitor the following license usage information:
♦ CPU usage. The number of logical CPUs used to run application services in the domain. Each service runs on one or more nodes. Each node is assigned to a physical machine with a given number of logical CPUs. Each license specifies the number of authorized, logical CPUs allowed for application services running on a given operating system for a 32- or 64-bit Operating System. You can monitor CPU usage over a given time period for each license and operating system. For more information, see “CPU Usage” on page 271.
♦ Repository Service usage. The number of Repository Services in the domain. Each Repository Service corresponds to one PowerCenter repository. The domain requires a one-to-one relationship between a Repository Service and a PowerCenter repository. Each license specifies the number of Repository Services authorized to run. You can monitor Repository Service usage over a given time period for each license. For more information, see “Repository Service Usage” on page 273.
♦ Source/Target connectivity usage. The number of times a source or target database type is accessed in the domain. Each license specifies the number of times a database is accessed during a specified period of time. For more information, see “Source/Target Connectivity Usage” on page 274.
The License Usage Report shows the following license usage information for each application service:
CPU UsageYou can run the License Usage Report to monitor CPU usage. The License Usage Report displays the maximum number of logical CPUs used each day in a selected time period. A logical CPU is a CPU thread. For example, if a CPU is dual-threaded, then it has two logical CPUs.
The report counts the number of logical CPUs on all nodes that are running application services. The report groups logical CPU totals by license and operating system.
For example, your environment has services and licenses as shown in the following table:
The report displays the results in chart and table formats.
The report displays the following logical CPU totals for each license that runs on an operating system and bit mode combination:
Application Service License Usage Information
Integration Service CPU usage
Repository Service CPU usage and Repository Service usage
Reporting Service CPU usage
SAP BW Service CPU usage
Web Services Hub CPU usage
License Application Service Node:Operating System (Number of Logical CPUs)
License A SAP BW Service 1 Node X: Windows (16 logical CPUs)
License A Repository Service 1 Node Y: Windows (8 logical CPUs)
License A Integration Service 1 Node Y: Windows (8 logical CPUs)
License B Integration Service 2 Node Z: UNIX (4 logical CPUs)
License / Operating System and Bit Mode Total Number of Logical CPUs
License A / Windows 32 24 logical CPUs (16 from Node X and 8 from Node Y)
License B / UNIX 32 4 logical CPUs (from Node Z)
License Usage Report 271
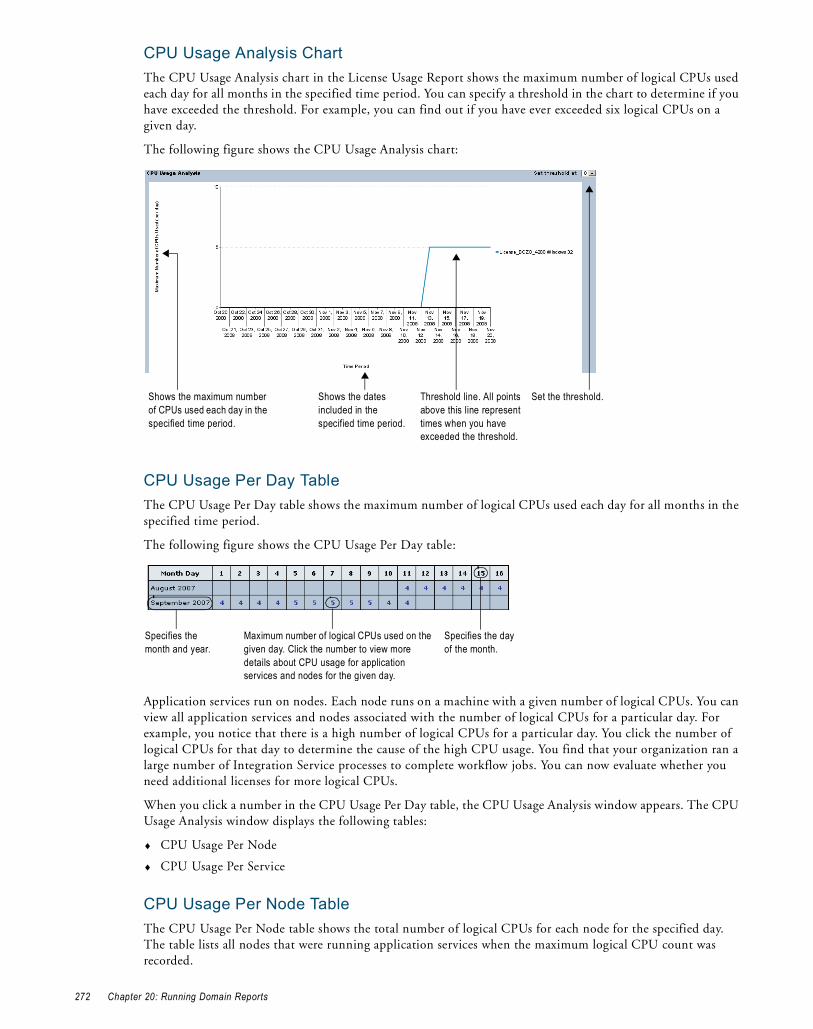
CPU Usage Analysis ChartThe CPU Usage Analysis chart in the License Usage Report shows the maximum number of logical CPUs used each day for all months in the specified time period. You can specify a threshold in the chart to determine if you have exceeded the threshold. For example, you can find out if you have ever exceeded six logical CPUs on a given day.
The following figure shows the CPU Usage Analysis chart:
CPU Usage Per Day TableThe CPU Usage Per Day table shows the maximum number of logical CPUs used each day for all months in the specified time period.
The following figure shows the CPU Usage Per Day table:
Application services run on nodes. Each node runs on a machine with a given number of logical CPUs. You can view all application services and nodes associated with the number of logical CPUs for a particular day. For example, you notice that there is a high number of logical CPUs for a particular day. You click the number of logical CPUs for that day to determine the cause of the high CPU usage. You find that your organization ran a large number of Integration Service processes to complete workflow jobs. You can now evaluate whether you need additional licenses for more logical CPUs.
When you click a number in the CPU Usage Per Day table, the CPU Usage Analysis window appears. The CPU Usage Analysis window displays the following tables:
♦ CPU Usage Per Node
♦ CPU Usage Per Service
CPU Usage Per Node TableThe CPU Usage Per Node table shows the total number of logical CPUs for each node for the specified day. The table lists all nodes that were running application services when the maximum logical CPU count was recorded.
Threshold line. All points above this line represent times when you have exceeded the threshold.
Shows the maximum number of CPUs used each day in the specified time period.
Shows the dates included in the specified time period.
Set the threshold.
Specifies the month and year.
Maximum number of logical CPUs used on the given day. Click the number to view more details about CPU usage for application services and nodes for the given day.
Specifies the day of the month.
272 Chapter 20: Running Domain Reports

CPU Usage Per Service TableThe CPU Usage Per Service table shows the total number of logical CPUs for each application service for the specified day. The table lists all application services that were running when the maximum logical CPU count was recorded. If an application service is not running when the count is recorded, the application service does not appear in the table for that day.
All application services, except the Integration Service, run on a single node. The number of logical CPUs for these services represents the number of logical CPUs on the machine running the node.
An Integration Service can run on one or more nodes. If you have the server grid or session on grid option, the Integration Service can run on multiple nodes. The number of logical CPUs for an Integration Service represents the total number of CPUs for all nodes running the Integration Service processes.
Note: The sum of all logical CPUs for the application services in this table may not add up to the maximum number of CPUs specified in the CPU Usage Analysis table. If multiple application services run on the same node, each application service displays a CPU total in this table.
Repository Service UsageYou can run the License Usage Report to monitor Repository Service usage. The License Usage Report displays the maximum number of Repository Services for each day in a selected time period. The report displays a separate number of Repository Services for each license.
The report calculates the total number of Repository Services assigned to a given license. For example, there are two Integration Services that run workflows for Repository A. The domain also contains an SAP BW Service associated with Repository B. Repository A and Repository B are assigned to the same license. The License Usage Report calculates two Repository Services for the license.
The report displays the results in chart and table formats.
Repository Service Usage Analysis ChartThe Repository Service Usage Analysis chart in the License Usage Report shows the maximum number of Repository Services used each day for all months in the specified time period. You can specify a threshold in the chart to determine if you have exceeded the threshold. For example, you can find out if you have ever exceeded three Repository Services on a given day.
The following figure shows the Repository Service Usage Analysis chart:
Threshold line. All points above this line represent times when you have exceeded the threshold.
Shows the maximum number of Repository Services used each day in the specified time period.
Shows the dates included in the specified time period.
Set the threshold.
License Usage Report 273

Repository Service Usage Analysis TableThe Repository Service Usage Analysis table shows the maximum number of Repository Services used each day for all months in the specified time period.
The following figure shows the Repository Service Usage Analysis table:
When you click a daily maximum in the Repository Service Usage Analysis table, the Repository Service Usage Analysis window appears.
The Repository Service Usage Analysis window shows the node to which each Repository Service is assigned on the specified day. The table lists all nodes that were running Repository Services when the maximum Repository Service count was recorded. If a Repository Service is not running when the count is recorded, the Repository Service does not appear in the table for that day.
Source/Target Connectivity UsageYou can run the License Usage Report to monitor the usage of the source and target database types. The License Usage Report displays the number of times you accessed a database type during a specified period of time. You connect to a source or target database each time you run a session.
The License Usage Report calculates the number of times you accessed each database type since the domain is created. The report displays results in a table format.
Source/Target Usage Analysis TableThe Source/Target Usage Analysis table shows the number of times a database type was accessed during a specified time period.
The Source/Target Usage Analysis table displays the following information:
♦ Database Type. Type of database.
♦ Times Accessed. Number of times the database type was accessed during a specified period of time. The number displayed is the cumulative result since the domain is created.
♦ Last Access. Date when the source and target database were last accessed.
Running the License Usage ReportThe License Usage Report displays the maximum number of logical CPUs and Repository Services used each day in a selected time period. When you run the report, you must specify the time period and the licenses for which you want to view results. You can run the report to view information on one or all licenses in the domain.
The following figure shows how to specify the time period and licenses for the License Usage Report:
Run the License Usage Report from the Reports tab in the Administration Console.
Specifies the month and year.
Maximum number of Repository Services used on the given day. Click the number to view the Repository Services and the nodes to which the Repository Services are assigned for that day.
Specifies the day of the month.
274 Chapter 20: Running Domain Reports
To run the License Usage Report:
1. Click the Reports tab in the Administration Console.
2. Click License Usage Report.
The License Usage Report appears.
3. Select a time period and the licenses for which you want to view the report.
Select Last to view the most recent log events for the last X days or months. Select From Date to view log events between a from date and a to date. Use the yyyy-mm-dd format when you enter the dates.
4. Click the Go button to run the report.
License Management ReportYou can monitor the list of software options purchased for a license and the number of times a license exceeds usage limits.The License Management Report displays the general properties, CPU and repository usage, node configuration details, and the options purchased for a license.
You can send the license information as a PDF in an email to Informatica or save it as a PDF on your local machine.
Run the License Management Report to monitor the following license usage information:
♦ General Properties. General properties for a license.
♦ License Usage. Includes CPU Usage and Repository Usage. Shows the number of logical CPUs used to run application services on an operating system for a license. Shows the number of Repository Services in the domain for a license.
♦ Node Configuration. The number of nodes assigned to a machine for a license. Shows the number of logical CPUs and the number of application services running on a given operating system.
♦ Licensed Options. The list of PowerCenter and other Informatica options purchased for a license.
General PropertiesUse the general properties to view high-level information about the license. Use this license information when you monitor the license usage.
The following table describes the general properties for a license:
Property Description
Name Name of the license.
Description Description of the license.
Location Path to the license in the Navigator.
Edition PowerCenter edition.
Software Version Version of PowerCenter.
Distributed By Distributor of the PowerCenter product.
Issued On Date when the license is issued to the customer.
Expires On Date when the license expires.
Validity Period Period for which the license is valid.
License Management Report 275

RELATED TOPICS:♦ Viewing License Details, 253
License UsageView the details for the number of logical CPUs used to run application services on an operating system. View the number of Repository Services on a domain for a license. Use this license usage information to monitor the number of days when CPU or repository usage exceeded license limits.
The following table describes the CPU usage information in the License Management Report:
The following table describes the repository usage information in the License Management Report:
Node ConfigurationFor each license, view details for the nodes assigned to a machine. You can view the number of logical CPUs and the number of application services running on a given operating system for each node.
The following table describes the node configuration information in the License Management Report:
Serial Number Serial number of the license. The serial number identifies the customer or project. If the customer has multiple PowerCenter installations, there is a separate serial number for each project. The original and incremental keys for a license have the same serial number.
Deployment Level Level of deployment. Values are ‘Development’ and ‘Production.’
Operating System/BitMode
Operating System and Bit Mode for the license. Indicates whether the license is installed on a 32- or 64-bit operating system.
CPU Usage Description
Platforms Operating systems on which the logical CPUs run application services.
Licensed Use Number of CPUs licensed.
Current Usage Maximum number of CPUs used that day.
Peak Usage Maximum number of CPUs that were used in a twelve month period.
Peak Usage Date Date when the maximum number of CPUs were used.
Number of days exceeded license limits
Number of days that the CPU usage exceeded license limits.
Repository Usage Description
Licensed Use Number of repositories licensed.
Current Usage Maximum number of repositories used that day.
Peak Usage Maximum number of repositories that were used in a twelve month period.
Peak Usage Date Date when the maximum number of repositories were used.
Number of days exceeded license limits
Number of days that the repository usage exceeded license limits.
Node Configuration Description
Node Name Name of the node or nodes assigned to a machine for a license.
Host Name Host name of the machine.
Operating System Operating system of the host machine.
Property Description
276 Chapter 20: Running Domain Reports

Licensed OptionsView the details for the licensed options. You can view the description and status of each option, the date on which the option was purchased, and the date on which the option expires.
Running the License Management ReportRun the License Management Report from the Reports tab in the Administration Console.
To run the License Management Report:
1. Click the Reports tab in the Administration Console.
2. Click License Management Report.
3. Select the license for which you want to view the report.
4. Click the Go button to run the report.
The License Management Report appears.
Note: Optionally, you can save the License Management Report as a PDF to view its details. In the License Management Report, click Save.
Sending an Email ReportSend the License Management Report as a PDF in an email to Informatica. You can configure the To Email and other options in the Send License Management Report window.
Before you send the license information in an email, you must configure the SMTP settings for the outgoing mail server in the domain. You must configure the User Name and Password options in the SMTP settings.
The following table describes the options in the Send License Management Report window:
To send the License Management Report in an email:
1. In the License Management Report, click Email.
The Send License Management Report window appears.
2. Configure the options in the email body.
3. Click Ok.
IP Address IP address of the node.
Logical CPUs Logical CPUs used to run application services in the domain.
Service Names Application services running on an operating system for a node.
Email Options Description
To Email Email address of the recipient. Default is [email protected].
Subject Subject field of the email message. You cannot configure the subject.
Customer Name Name of the customer.
Request ID Identifies the project for which the license was purchased.
License Serial Number Serial number of the license. You cannot configure this option.
Contact Name Name of the customer to contact for a follow up.
Contact Phone Number Phone number of the customer.
Contact Email Email address of the customer.
Node Configuration Description
License Management Report 277

RELATED TOPICS:♦ SMTP Configuration, 53
Web Services ReportTo analyze the performance of web services running on a Web Services Hub, you can run a report for the Web Services Hub or for a web service running on the Web Services Hub.
The Web Services Report provides run-time and historical information on the web service requests handled by the Web Services Hub. The report displays aggregated information for all web services in the Web Services Hub and information for each web service running on the Web Services Hub. The Web Services Report also provides historical information and can display the information graphically.
Understanding the Web Services ReportYou can run the Web Services Report for a time interval that you choose. The Web Services Hub collects information on web services activities and caches 24 hours of information for use in the Web Services Report. It also writes the information to a history file.
Time IntervalBy default, the Web Services Report displays activity information for a five-minute interval. You can select one of the following time intervals to display activity information for a web service or Web Services Hub:
♦ 5 seconds
♦ 1 minute
♦ 5 minutes
♦ 1 hour
♦ 24 hours
The Web Services Report displays activity information for the interval ending at the time you run the report. For example, if you run the Web Services Report at 8:05 a.m. for an interval of one hour, the Web Services Report displays the Web Services Hub activity from 7:05 a.m. and 8:05 a.m.
CachingThe Web Services Hub caches 24 hours of activity data. The cache is reinitialized every time the Web Services Hub is restarted. The Web Services Report displays statistics from the cache for the time interval that you run the report.
History FileThe Web Services Hub writes the cached activity data to a history file. The Web Services Hub stores data in the history file for the number of days that you set in the MaxStatsHistory property of the Web Services Hub. For example, if the value of the MaxStatsHistory property is 5, the Web Services Hub keeps five days of data in the history file.
Contents of the Web Services ReportThe Web Services Hub report contains the following sections:
♦ Run-time Statistics. Displays a summary of the Web Services Hub activities and provides information about the web services included in the query selection. For more information, see “Run-time Statistics” on page 280.
278 Chapter 20: Running Domain Reports

♦ Service Statistics. Displays when you click the name of a web service listed in the Run-time Statistics section. Lists run-time information for the selected web service. For more information, see “Service Statistics” on page 280.
♦ Run-time Analysis. Available only when you run a report for all web services in the Web Services Hub. Provides information on the list of web services that matches the criteria you specify. For more information, see “Run-time Analysis” on page 281.
♦ Historical Statistics. Displays information for a selected date if information is available in the history file. For more information, see “Historical Statistics” on page 282.
♦ Complete Historical Statistics. Available if you display historical statistics in table format. Displays additional historical information for the selected date and time. For more information, see “Complete Historical Statistics” on page 283.
For ease of analysis, the Web Services Report presents activity data in different sections of the report. You can view the same information in different context. The Web Services Report displays the information for one web service or for all web services in a Web Services Hub.
The following table lists the activity data that the Web Services Report displays in more than one section of the report:
Statistic Description
Avg. No. of Service Partitions
Average number of partitions allocated for a web service session during the interval. For example, during an interval of one hour, eight partitions are allocated for a web service in the first half hour and no partition is allocated to the web service in the second half hour. The average number of web service partitions allocated during the interval is four.
Percent Partitions in Use
A partition is in use when requests are being processed on the partition. The percentage of partitions in use is the percentage of partitions used during an interval. For example, eight partitions are allocated for a web service during a one hour interval. If four partitions are in use during the whole interval, then the percentage of partitions in use is 50%. If four partitions are in use in the first half hour and no partition is in use in the second half hour, then the percentage of partitions in use is 25%.
Avg. No. of Run Instances
Average number of workflow instances running for a web service during the interval. For example, during an interval of one hour, eight instances of a web service run in the first half hour and no instance of the web service runs in the second half hour. The average number of web service instances during the interval is four.
Average Service Time
The average time to process a request, starting from the time the Web Services Hub receives the request from the web service client to the time the Web Services Hub sends the response to the client. For example, the Web Services Hub processes two requests during an interval of one hour. One request takes 200 milliseconds to process and the other request takes 600 milliseconds. The average service time during the one hour interval is 400 milliseconds. The average service time is displayed in seconds.
Avg DTM Time The average time for the Integration Service to process a request during the selected interval, starting from the time the Integration Service receives the request from the Web Services Hub to the time the Integration Service sends a response back to the Web Services Hub. For example, the Integration Service processes three requests during an interval of one hour. One request takes 200 milliseconds to process, the second request takes 300 milliseconds, and the third request takes 150 milliseconds. The average DTM time during the one hour interval is 216.6 milliseconds. The average DTM time is displayed in seconds.
Web Services Report 279

Run-time StatisticsThe Run-time Statistics section provides the following summary information for the Web Services Hub for the selected time interval:
For each of the web services included in the report, the Run-time Statistics section provides the following information for the selected time interval:
Service StatisticsWhen you click the name of a web service in the Run-time Statistics section, the Web Services Report displays the Service Statistics window.
Run-time Statistics Section Property Description
Web Services Hub Summary
Successful messages Number of requests that the Web Services Hub processed successfully.
Failed messages Number of fault responses generated by web services in the Web Services Hub. The fault responses could be due to any error.
Total messages Total number of requests that the Web Services Hub received.
Last server restart time Date and time when the Web Services Hub was last started.
Average service time (s) Average time it takes to process a service request received by the Web Services Hub.
PowerCenter Statistics Avg. No. of Service Partitions
Average number of partitions allocated for all web services in the Web Services Hub.
Percent partitions in use Percentage of web service partitions that are in use for all web services in the Web Services Hub.
Avg. No. of Run Instances
Average number of instances running for all web services in the Web Services Hub.
Property Description
Service name Name of the web service for which the information is displayed.
No. of Successful Requests Number of requests received by the web service that the Web Services Hub processed successfully.
No. of Fault Responses Number of fault responses generated by the web services in the Web Services Hub.
Avg Service Time(s) Average time it takes to process a service request received by the web service.
Avg. No. of Service Partitions Average number of session partitions allocated for the web service.
Avg. No. of Run Instances Average number of instances of the web service running during the interval.
Top 10 Client IP Addresses The list of client IP addresses and the longest time taken by the web service to process a request from the client. The client IP addresses are listed in the order of longest to shortest service times. Use the Click here link to display the list of IP addresses and service times.
280 Chapter 20: Running Domain Reports
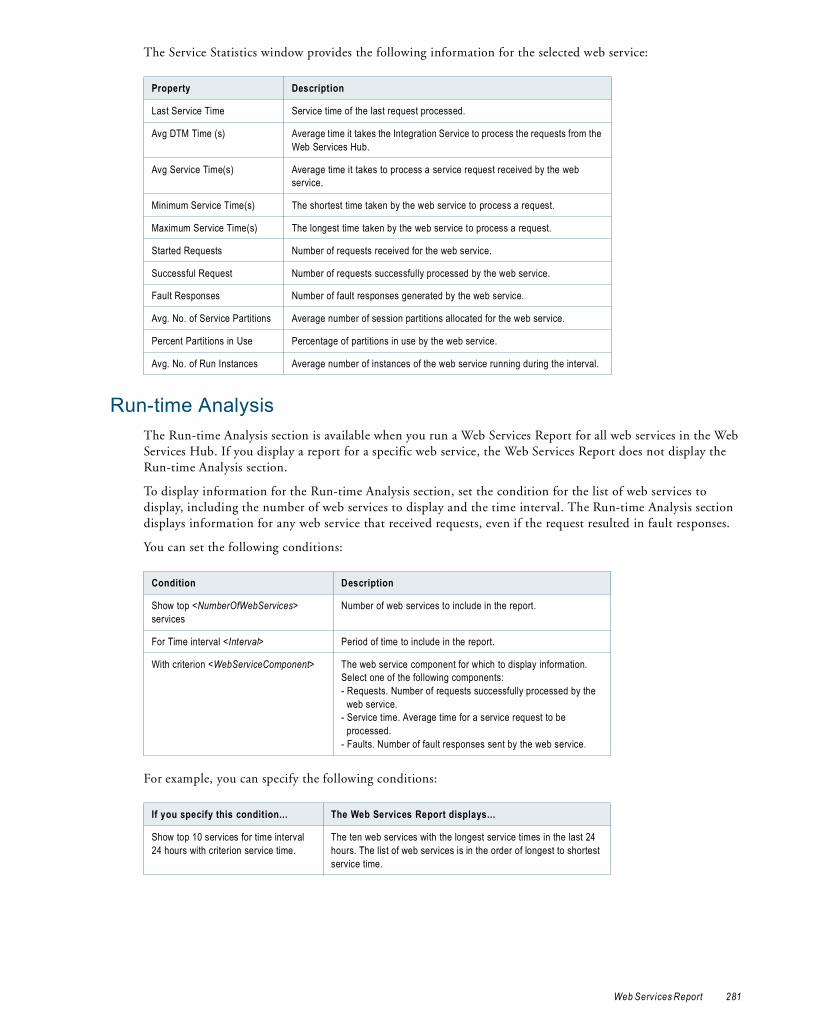
The Service Statistics window provides the following information for the selected web service:
Run-time AnalysisThe Run-time Analysis section is available when you run a Web Services Report for all web services in the Web Services Hub. If you display a report for a specific web service, the Web Services Report does not display the Run-time Analysis section.
To display information for the Run-time Analysis section, set the condition for the list of web services to display, including the number of web services to display and the time interval. The Run-time Analysis section displays information for any web service that received requests, even if the request resulted in fault responses.
You can set the following conditions:
For example, you can specify the following conditions:
Property Description
Last Service Time Service time of the last request processed.
Avg DTM Time (s) Average time it takes the Integration Service to process the requests from the Web Services Hub.
Avg Service Time(s) Average time it takes to process a service request received by the web service.
Minimum Service Time(s) The shortest time taken by the web service to process a request.
Maximum Service Time(s) The longest time taken by the web service to process a request.
Started Requests Number of requests received for the web service.
Successful Request Number of requests successfully processed by the web service.
Fault Responses Number of fault responses generated by the web service.
Avg. No. of Service Partitions Average number of session partitions allocated for the web service.
Percent Partitions in Use Percentage of partitions in use by the web service.
Avg. No. of Run Instances Average number of instances of the web service running during the interval.
Condition Description
Show top <NumberOfWebServices> services
Number of web services to include in the report.
For Time interval <Interval> Period of time to include in the report.
With criterion <WebServiceComponent> The web service component for which to display information. Select one of the following components:- Requests. Number of requests successfully processed by the
web service. - Service time. Average time for a service request to be
processed.- Faults. Number of fault responses sent by the web service.
If you specify this condition... The Web Services Report displays...
Show top 10 services for time interval 24 hours with criterion service time.
The ten web services with the longest service times in the last 24 hours. The list of web services is in the order of longest to shortest service time.
Web Services Report 281

The Run-time Analysis section provides the following information for all web services that meet the specified conditions:
Historical StatisticsIn the Historical Statistics section, you can display historical statistics for a specific day. To display historical statistics, set the following options:
You can display information in table or graph format. The information displayed depends on the format that you select:
♦ Graph format. The graph displays data for the date selected. The graph displays the data available for the average service time for each hour of the day. The Web Services Report displays the available data for each web service in a different color. The graph does not display the average service time if it is less than one second.
Show top 5 services for time interval 1 hour with criterion requests.
The five web services which processed the most number of requests successfully in the last hour. The list of web services is in the order of most to least number of successful requests.
Show top 10 services for time interval 1 hour with criterion faults.
The ten web services with the most fault responses in the last hour. The list of web services is in the order of most to least number of fault requests.
Property Description
Service name Name of the web service for which the information is displayed. When you click the name of a web service, the Web Services Report displays the Service Statistics window.
No. of Successful Requests Number of requests successfully processed by the web service.
No. of Fault Responses Number of fault responses sent by the web service.
Avg. Service Time(s) Average time it takes to process a service request received by the web service.
Avg. No. of Service Partitions Average number of session partitions allocated for the web service.
Option Description
Day <Date> Date for which you want to display information on Web Services Hub activities. The number of days available depends on the value of the MaxStatsHistory property of the Web Services Hub. If you select a date on which for which there is no web service activity in the history file, the Web Services Report displays a message that there is no archive information to display.
Show <Format> The format in which to display the activity information. You can select from graph or table format.
Set threshold at <ThresholdValue>
Level of service time at which the graph will display a horizontal line. You can use the threshold level for any purpose and set it based on your requirements for analysis. You can set the threshold level up to the maximum value of service time displayed in the graph.Available if you display historical statistics in graph format.
If you specify this condition... The Web Services Report displays...
282 Chapter 20: Running Domain Reports

♦ Table format. The table displays data from the Web Services Hub history file for a specific date. The following table displays the following information for the Web Services Hub:
Complete Historical StatisticsThe Complete Historical Statistics section is available if you display historical statistics in table format. When you click the name of a web service in the historical statistics table, the Web Services Report displays the Complete Historical Statistics window. The Complete Historical Statistics window provides more details about the activity of the selected web service for a one hour interval.
The Complete Historical Statistics window provides the following information for the selected web service for the time interval shown:
Running the Web Services ReportRun the Web Services Report from the Reports tab in the Administration Console.
Property Description
Time Time of the event.
Service name Name of the web service for which the information is displayed. When you click the name of a web service, the Web Services Report displays the Service Statistics window.
No. of Successful Requests Number of requests successfully processed by the web service.
No. of Faults Number of fault responses sent by the web service.
Avg. Service Time (s) Average time it takes to process a service request received by the web service.
Max Service Time (s) The largest amount of time taken by the web service to process a request.
Min Service Time (s) The smallest amount of time taken by the web service to process a request.
Avg. No. of Service Partitions Average number of session partitions allocated for the web service.
Percent Partitions in Use Percentage of partitions in use by the web service.
Avg no of Run Instances Average number of instances running for the web service.
Property Description
Time Time of the event.
No. of Started Requests Number of requests received for the web service.
No. of Successful Requests Number of requests successfully processed by the web service.
No. of Fault Responses Number of requests received for the web service that could not be processed and generated fault responses.
Average Service Time (s) Average time it takes to process a service request received by the web service.
Minimum Service Time (s) The smallest amount of time taken by the web service to process a request.
Maximum Service Time (s) The largest amount of time taken by the web service to process a request.
Avg DTM Time (s) Average time it takes the Integration Service to process the requests from the Web Services Hub.
Avg. No. of Service Partitions Average number of session partitions allocated for the web service.
Percent Partitions in Use Percentage of partitions in use by the web service.
Avg. No. of Run Instances. Average number of instances running for the web service.
Web Services Report 283

Before you run the Web Services Report for a Web Services Hub, verify that the Web Services Hub is enabled. You cannot run the Web Services Report for a disabled Web Services Hub.
To run the Web Services Report:
1. In the Administration Console, click the Reports tab.
2. Click Web Services Report.
3. In the Query section of the Web Services Report page, select the Web Services Hub for which to run the report.
4. Select the web service for which to run the report.
To generate a report that aggregates information for all the web services in the Web Services Hub, select All.
5. Click the Go button to generate the report.
The Web Services Report page expands to display the web service activity for the selected Web Services Hub or web service.
6. In the Run-time Statistics section, select the time interval for which to display the run time information for the selected Web Services Hub or web service.
7. Click the name of a web service to display the run-time statistics for the web service.
8. In the Run-time Analysis section, select the criteria for the web services to be included in the run-time analysis report and click the Go button.
9. In the Historical Statistics section, select the date and format to display historical data and click the Go button.
The Web Services Report displays statistics for the date you select in the format you select. If the history file does not contain data for the date you select, the Web Services Report displays the message that there is no data available.
10. Click the name of a web service to display additional historical statistics for the web service.
Running the Web Services Report for a Secure Web Services HubTo run a Web Services Hub on HTTPS, you must have an SSL certificate file for authentication of message transfers. When you create a Web Services Hub to run on HTTPS, you must specify the location of the keystore file that contains the certificate for the Web Services Hub. To run the Web Services Report in the Administration Console for a secure Web Services Hub, you must import the SSL certificate into the Java certificate file. The Java certificate file is named cacerts and is located in the /lib/security directory of the Java directory. The Administration Console uses the cacerts certificate file to determine whether to trust an SSL certificate.
In a domain that contains multiple nodes, the node where you generate the SSL certificate affects how you access the Web Services Report for a secure Web Services Hub.
Use the following rules and guidelines to run the Web Services Report for a secure Web Services Hub in a domain with multiple nodes:
♦ For each secure Web Services Hub running in a domain, generate an SSL certificate and import it to a Java certificate file.
♦ The Administration Console searches for SSL certificates in the certificate file of a gateway node. The SSL certificate for a Web Services Hub running on worker node must be generated on a gateway node and imported into the certificate file of the same gateway node.
♦ To view the Web Services Report for a secure Web Services Hub, log in to the Administration Console from the gateway node that has the certificate file containing the SSL certificate of the Web Services Hub for which you want to view reports.
♦ If a secure Web Services Hub runs on a worker node, the SSL certificate must be generated and imported into the certificate file of the gateway node. If a secure Web Services Hub runs on a gateway and a worker
284 Chapter 20: Running Domain Reports

node, the SSL certificate of both nodes must be generated and imported into the certificate file of the gateway node. To view reports for the secure Web Services Hub, log in to Administration Console from the gateway node.
♦ If the domain has two gateway nodes and a secure Web Services Hub runs on each gateway node, access to the Web Services Reports depends on where the SSL certificate is located.
For example, gateway node GWN01 runs Web Services Hub WSH01 and gateway node GWN02 runs Web Services Hub WSH02. You can view the reports for the Web Services Hubs based on the location of the SSL certificates:
− If the SSL certificate for WSH01 is in the certificate file of GWN01 but not GWN02, you can view the reports for WSH01 if you log in to the Administration Console through GWN01. You cannot view the reports for WSH01 if you log in to the Administration Console through GWN02. If GWN01 fails, you cannot view reports for WSH01.
− If the SSL certificate for WSH01 is in the certificate files of GWN01 and GWN02, you can view the reports for WSH01 if you log in to the Administration Console through GWN01 or GWN02. If GWN01 fails, you can view the reports for WSH01 if you log in to the Administration Console through GWN02.
♦ To ensure successful failover when a gateway node fails, generate and import the SSL certificates of all Web Services Hubs in the domain into the certificates files of all gateway nodes in the domain.
Web Services Report 285

286 Chapter 20: Running Domain Reports
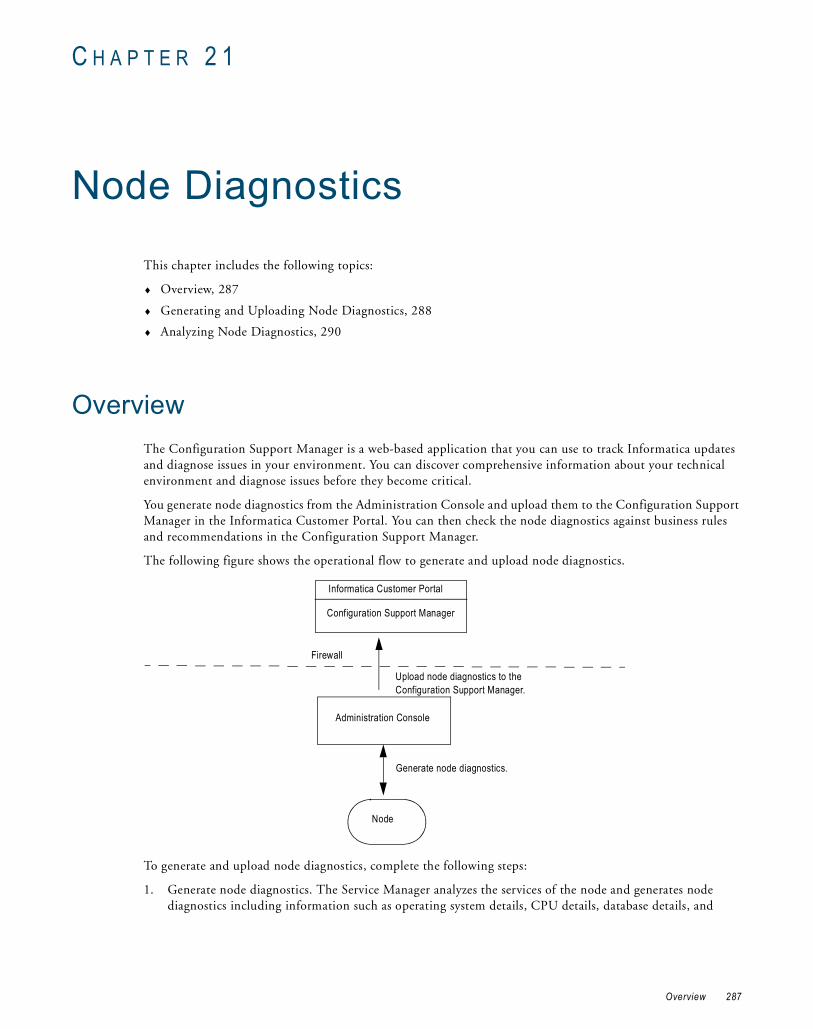
C H A P T E R 2 1
Node Diagnostics
This chapter includes the following topics:
♦ Overview, 287
♦ Generating and Uploading Node Diagnostics, 288
♦ Analyzing Node Diagnostics, 290
OverviewThe Configuration Support Manager is a web-based application that you can use to track Informatica updates and diagnose issues in your environment. You can discover comprehensive information about your technical environment and diagnose issues before they become critical.
You generate node diagnostics from the Administration Console and upload them to the Configuration Support Manager in the Informatica Customer Portal. You can then check the node diagnostics against business rules and recommendations in the Configuration Support Manager.
The following figure shows the operational flow to generate and upload node diagnostics.
To generate and upload node diagnostics, complete the following steps:
1. Generate node diagnostics. The Service Manager analyzes the services of the node and generates node diagnostics including information such as operating system details, CPU details, database details, and
Configuration Support Manager
Administration Console
Firewall
Node
Generate node diagnostics.
Upload node diagnostics to the Configuration Support Manager.
Informatica Customer Portal
Overview 287
patches. For more information about generating node diagnostics, see “Generating Node Diagnostics” on page 289.
2. Log in to the Informatica Customer Portal. For more information about logging into the Informatica Customer Portal, see “Logging in to the Informatica Customer Portal” on page 288.
3. Upload node diagnostics to the Configuration Support Manager, a diagnostic web application outside the firewall. The Configuration Support Manager is a part of the Informatica Customer Portal. The Service Manager connects to the Configuration Support Manager through the HTTPS protocol and uploads the node diagnostics. For more information about uploading node diagnostics, see “Uploading Node Diagnostics” on page 289.
4. Review the node diagnostics in the Configuration Support Manager to find troubleshooting information for your environment.
Generating and Uploading Node DiagnosticsYou can generate node diagnostics in the Administration Console and upload them to the Configuration Support Manager in the Informatica Customer Portal.
Logging in to the Informatica Customer PortalYou must log in to the customer portal to upload node diagnostics to the Configuration Support Manager. The login credentials are not specific to a user. The same credentials are applicable for all users who have access to the Administration Console. Register at http://my.informatica.com if you do not have the customer portal login details. You need to enter these details once unless there is a change in credentials. Alternatively, you can enter the customer portal details each time you upload node diagnostics to the Configuration Support Manager. You can generate node diagnostics without entering the login details.
To enter the customer portal login details:
1. Click the Diagnostics tab in the Administration Console.
2. Click Edit in the right pane.
3. Enter the following customer portal login details:
4. Click OK.
Maintaining Security To ensure login security, you must properly log out of the Configuration Support Manager and the Node Diagnostics Upload page of the Administration Console.
♦ To log out of the Configuration Support Manager, click the logout link.
♦ To log out of the Upload page, click Close Window.
Warning: If you close these windows through the web browser close button, you will remain logged in to the Configuration Support Manager. Other users will be able to access the Configuration Support Manager without proper credentials.
Field Description
Email Address Email address with which you registered your customer portal account.
Password Password of your customer portal account.
Support Project ID Unique ID assigned to your support project.
288 Chapter 21: Node Diagnostics
Generating Node DiagnosticsThe Administration Console generates node diagnostics as an XML file that contains details about services, logs, environment variables, operating system parameters, system information, and database clients. Node diagnostics of worker nodes do not include domain metadata information. They contain only the node metadata information. The node diagnostics is generated at INFA_HOME/server/csm/output with the name csmagent<host name>.xml. You can upload this file to the Configuration Support Manager and perform thorough diagnostics of your environment. You can also download the generated file to your system. After you generate node diagnostics for the fist time, you can regenerate or upload them.
To generate node diagnostics:
1. Click the Diagnostics tab in the Administration Console.
2. Select the node from the Navigator.
3. Click Generate Configuration Diagnostics.
The node diagnostics and the time stamp of the generated file appear.
To download node diagnostics to your local drive:
1. Click the file name of the generated node diagnostics.
2. Specify a download location for the file.
3. Click Save.
To regenerate node diagnostics:
Click Regenerate Configuration Diagnostics to generate node diagnostics at any time.
Generating Node Diagnostics on a Secure NodeTo generate diagnostics on a node that is enabled for HTTPS, you must have an SSL certificate file for authentication of message transfers. Import the SSL certificate into the Java certificate file. The Java certificate file is named cacerts and is located in the /lib/security directory of the Java directory. The Administration Console uses the cacerts certificate file to determine whether to trust an SSL certificate.
Use the following rules and guidelines to generate node diagnostics on a secure node:
♦ For each node that is enabled for HTTPS, generate an SSL certificate and import it into the Java certificate file of the node.
♦ If the domain has one gateway node, import the certificate of each worker node into the certificate file of the gateway node.
♦ If the domain has more than one gateway node, import the certificate of each worker node into each gateway node, and import the certificate of each gateway node into all gateway nodes.
RELATED TOPICS:♦ “Configuring HTTPS” on page 13
Uploading Node DiagnosticsYou can upload node diagnostics to the Configuration Support Manager through the Administration Console. You must also ensure that you enter the customer portal login details before you upload node diagnostics.
When you upload, you can overwrite an existing configuration or save the configuration as a new entry in the Configuration Support Manager. Create a new configuration the first time you upload the node diagnostics. Update an existing configuration to view the latest diagnostics of an existing configuration. To compare current and previous node configurations of an existing configuration, upload the current node diagnostics as a new configuration.
Generating and Uploading Node Diagnostics 289
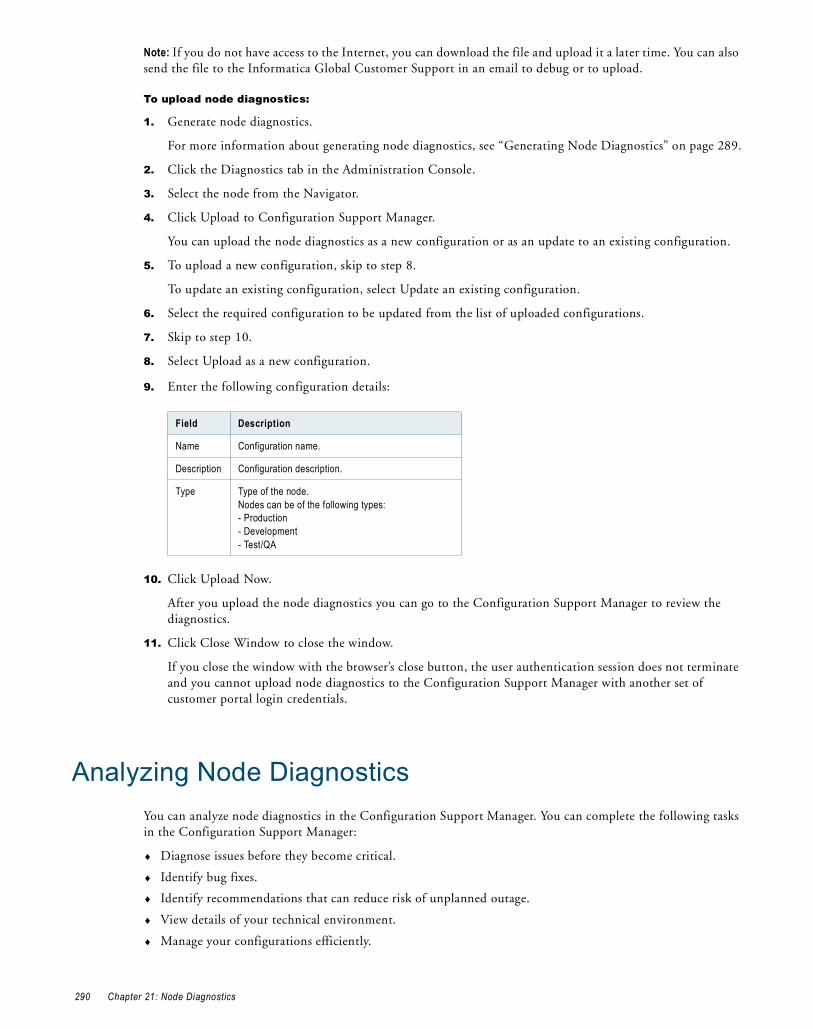
Note: If you do not have access to the Internet, you can download the file and upload it a later time. You can also send the file to the Informatica Global Customer Support in an email to debug or to upload.
To upload node diagnostics:
1. Generate node diagnostics.
For more information about generating node diagnostics, see “Generating Node Diagnostics” on page 289.
2. Click the Diagnostics tab in the Administration Console.
3. Select the node from the Navigator.
4. Click Upload to Configuration Support Manager.
You can upload the node diagnostics as a new configuration or as an update to an existing configuration.
5. To upload a new configuration, skip to step 8.
To update an existing configuration, select Update an existing configuration.
6. Select the required configuration to be updated from the list of uploaded configurations.
7. Skip to step 10.
8. Select Upload as a new configuration.
9. Enter the following configuration details:
10. Click Upload Now.
After you upload the node diagnostics you can go to the Configuration Support Manager to review the diagnostics.
11. Click Close Window to close the window.
If you close the window with the browser’s close button, the user authentication session does not terminate and you cannot upload node diagnostics to the Configuration Support Manager with another set of customer portal login credentials.
Analyzing Node DiagnosticsYou can analyze node diagnostics in the Configuration Support Manager. You can complete the following tasks in the Configuration Support Manager:
♦ Diagnose issues before they become critical.
♦ Identify bug fixes.
♦ Identify recommendations that can reduce risk of unplanned outage.
♦ View details of your technical environment.
♦ Manage your configurations efficiently.
Field Description
Name Configuration name.
Description Configuration description.
Type Type of the node.Nodes can be of the following types:- Production- Development- Test/QA
290 Chapter 21: Node Diagnostics
♦ Subscribe to proactive alerts through email and RSS.
♦ Perform advanced diagnostics with compare configuration.
Identify Bug FixesYou can use the Configuration Support Manager to resolve issues encountered during operations. To expedite resolution of support issues, you can generate and upload node diagnostics to the Configuration Support Manager. You can analyze node diagnostics in the Configuration Support Manager and find a solution to your issue.
For example, when you run a Sorter session that processes a large volume of data, you notice that there is some data loss. You generate node diagnostics and upload them to the Configuration Support Manager. When you review the diagnostics for bug fix alerts, you see that a bug fix, EBF178626, is available for this. You apply EBF178626, and run the session again. All data is successfully loaded.
Identify RecommendationsYou can use the Configuration Support Manager to avoid issues in your environment. You can troubleshoot issues that arise after you make changes to the node properties by comparing different node diagnostics in the Configuration Support Manager. You can also use the Configuration Support Manager to identify recommendations or updates that may help you improve the performance of the node.
For example, you upgrade the node memory to handle a higher volume of data. You generate node diagnostics and upload them to the Configuration Support Manager. When you review the diagnostics for operating system warnings, you find the recommendation to increase the total swap memory of the node to twice that of the node memory for optimal performance. You increase swap space as suggested in the Configuration Support Manager and avoid performance degradation.
Tip: Regularly upload node diagnostics to the Configuration Support Manager and review node diagnostics to maintain your environment efficiently.
Analyzing Node Diagnostics 291

292 Chapter 21: Node Diagnostics

C H A P T E R 2 2
Understanding Globalization
This chapter includes the following topics:
♦ Overview, 293
♦ Locales, 295
♦ Data Movement Modes, 296
♦ Code Page Overview, 298
♦ Code Page Compatibility, 299
♦ PowerCenter Code Page Validation, 305
♦ Relaxed Code Page Validation, 306
♦ PowerCenter Code Page Conversion, 308
♦ Case Study: Processing ISO 8859-1 Data, 309
♦ Case Study: Processing Unicode UTF-8 Data, 311
OverviewPowerCenter can process data in different languages. Some languages require single-byte data, while other languages require multibyte data. To process data correctly in PowerCenter, you must set up the following items:
♦ Locale. PowerCenter requires that the locale settings on machines that access PowerCenter applications are compatible with code pages in the domain. You may need to change the locale settings. The locale specifies the language, territory, encoding of character set, and collation order. For more information about locales, see “Locales” on page 295.
♦ Data movement mode. The Integration Service can process single-byte or multibyte data and write it to targets. When you install PowerCenter, you must decide if you want the Integration Service to process single-byte data or multibyte data. Use the ASCII data movement mode to process single-byte data. Use the Unicode data movement mode for multibyte data. For more information about data movement modes, see “Data Movement Modes” on page 296.
♦ Code pages. Code pages contain the encoding to specify characters in a set of one or more languages. You select a code page based on the type of character data you want to process. To ensure accurate data movement, you must ensure compatibility among code pages for PowerCenter and environment components. You use code pages to distinguish between US-ASCII (7-bit ASCII), ISO 8859-1 (8-bit ASCII), and multibyte characters.
293
To ensure data passes accurately through your environment, the following components must work together:
♦ Domain configuration database code page
♦ Administration Console locale settings and code page
♦ Integration Service data movement mode
♦ Code page for each Integration Service process
♦ PowerCenter Client code page
♦ PowerCenter repository code page
♦ Source and target database code pages
♦ Metadata Manager repository code page
You can configure the Integration Service for relaxed code page validation. Relaxed validation removes restrictions on source and target code pages.
This chapter provides case studies that show how to configure your environment to process the following types of data:
♦ ISO 8859-1 multibyte data
♦ UTF-8 multibyte data
UnicodeThe Unicode Standard is the work of the Unicode Consortium, an international body that promotes the interchange of data in all languages. The Unicode Standard is designed to support any language, no matter how many bytes each character in that language may require. Currently, it supports all common languages and provides limited support for other less common languages. The Unicode Consortium is continually enhancing the Unicode Standard with new character encodings. For more information about the Unicode Standard, see http://www.unicode.org.
The Unicode Standard includes multiple character sets. PowerCenter uses the following Unicode standards:
♦ UCS-2 (Universal Character Set, double-byte). A character set in which each character uses two bytes.
♦ UTF-8 (Unicode Transformation Format). An encoding format in which each character can use between one to four bytes.
♦ UTF-16 (Unicode Transformation Format). An encoding format in which each character uses two or four bytes.
♦ UTF-32 (Unicode Transformation Format). An encoding format in which each character uses four bytes.
♦ GB18030. A Unicode encoding format defined by the Chinese government in which each character can use between one to four bytes.
PowerCenter is a Unicode application. The PowerCenter Client and Integration Service use UCS-2 internally. The PowerCenter Client converts user input from any language to UCS-2 and converts it from UCS-2 before writing to the repository. The Integration Service converts source data to UCS-2 before processing and converts it from UCS-2 after processing. The repository and Integration Service support UTF-8. You can use PowerCenter to process data in any language.
Working with a Unicode PowerCenter RepositoryThe PowerCenter repository code page is the code page of the data in the repository. You choose the repository code page when you create or upgrade a PowerCenter repository. When the repository database code page is UTF-8, you can create a repository using the UTF-8 code page.
The PowerCenter domain configuration database uses the UTF-8 code page. If you need to store metadata in multiple languages, such as Chinese, Japanese, and Arabic, you must use the UTF-8 code page for all services in that domain.
294 Chapter 22: Understanding Globalization

The Service Manager synchronizes the list of users in the domain with the list of users and groups in each application service. If a user in the domain has characters that the code page of the application services does not recognize, characters do not convert correctly and inconsistencies occur.
Use the following guidelines when you use UTF-8 as the PowerCenter repository code page:
♦ The repository database code page must be UTF-8.
♦ The repository code page must be a superset of the PowerCenter Client and Integration Service process code pages.
♦ You can input any character in the UCS-2 character set. For example, you can store German, Chinese, and English metadata in a UTF-8 enabled repository.
♦ Install languages and fonts on the PowerCenter Client machine. If you are using a UTF-8 repository, you may want to enable the PowerCenter Client machines to display multiple languages. By default, the PowerCenter Clients display text in the language set in the system locale. Use the Regional Options tool in the Control Panel to add language groups to the PowerCenter Client machines.
♦ You can use the Windows Input Method Editor (IME) to enter multibyte characters from any language without having to run the version of Windows specific for that language.
♦ Choose a code page for an Integration Service process that can process all repository metadata correctly. The code page of the Integration Service process must be a subset of the repository code page. If the Integration Service has multiple service processes, ensure that the code pages for all Integration Service processes are subsets of the repository code page. If you are running the Integration Service process on Windows, the code page for the Integration Service process must be the same as the code page for the system or user locale. If you are running the Integration Service process on UNIX, use the UTF-8 code page for the Integration Service process.
LocalesEvery machine has a locale. A locale is a set of preferences related to the user environment, including the input language, keyboard layout, how data is sorted, and the format for currency and dates. PowerCenter uses locale settings on each machine.
You can set the following locale settings on Windows:
♦ System locale. Determines the language, code pages, and associated bitmap font files that are used as defaults for the system.
♦ User locale. Determines the default formats to display date, time, currency, and number formats.
♦ Input locale. Describes the input method, such as the keyboard, of the system language.
For more information about configuring the locale settings on Windows, consult the Windows documentation.
System LocaleThe system locale is also referred to as the system default locale. It determines which ANSI and OEM code pages, as well as bitmap font files, are used as defaults for the system. The system locale contains the language setting, which determines the language in which text appears in the user interface, including in dialog boxes and error messages. A message catalog file defines the language in which messages display. By default, the machine uses the language specified for the system locale for all processes, unless you override the language for a specific process.
The system locale is already set on your system and you may not need to change settings to run PowerCenter. If you do need to configure the system locale, you configure the locale on a Windows machine in the Regional Options dialog box. On UNIX, you specify the locale in the LANG environment variable.
Locales 295

User LocaleThe user locale displays date, time, currency, and number formats for each user. You can specify different user locales on a single machine. Create a user locale if you are working with data on a machine that is in a different language than the operating system. For example, you might be an English user working in Hong Kong on a Chinese operating system. You can set English as the user locale to use English standards in your work in Hong Kong. When you create a new user account, the machine uses a default user locale. You can change this default setting once the account is created.
Input LocaleAn input locale specifies the keyboard layout of a particular language. You can set an input locale on a Windows machine to type characters of a specific language.
You can use the Windows Input Method Editor (IME) to enter multibyte characters from any language without having to run the version of Windows specific for that language. For example, if you are working on an English operating system and need to enter text in Chinese, you can use IME to set the input locale to Chinese without having to install the Chinese version of Windows. You might want to use an input method editor to enter multibyte characters into a repository that uses UTF-8.
Data Movement ModesThe data movement mode is an Integration Service option you choose based on the type of data you want to move, single-byte or multibyte data. The data movement mode you select depends the following factors:
♦ Requirements to store single-byte or multibyte metadata in the repository
♦ Requirements to access source data containing single-byte or multibyte character data
♦ Future needs for single-byte and multibyte data
The data movement mode affects how the Integration Service enforces session code page relationships and code page validation. It can also affect performance. Applications can process single-byte characters faster than multibyte characters.
Character Data Movement ModesThe Integration Service runs in the following modes:
♦ ASCII (American Standard Code for Information Interchange). The US-ASCII code page contains a set of 7-bit ASCII characters and is a subset of other character sets. When the Integration Service runs in ASCII data movement mode, each character requires one byte.
♦ Unicode. The universal character-encoding standard that supports all languages. When the Integration Service runs in Unicode data movement mode, it allots up to two bytes for each character. Run the Integration Service in Unicode mode when the source contains multibyte data.
Tip: You can also use ASCII or Unicode data movement mode if the source has 8-bit ASCII data. The Integration Service allots an extra byte when processing data in Unicode data movement mode. To increase performance, use the ASCII data movement mode. For example, if the source contains characters from the ISO 8859-1 code page, use the ASCII data movement.
The data movement you choose affects the requirements for code pages. Ensure the code pages are compatible.
ASCII Data Movement ModeIn ASCII mode, the Integration Service processes single-byte characters and does not perform code page conversions. When you run the Integration Service in ASCII mode, it does not enforce session code page relationships.
296 Chapter 22: Understanding Globalization
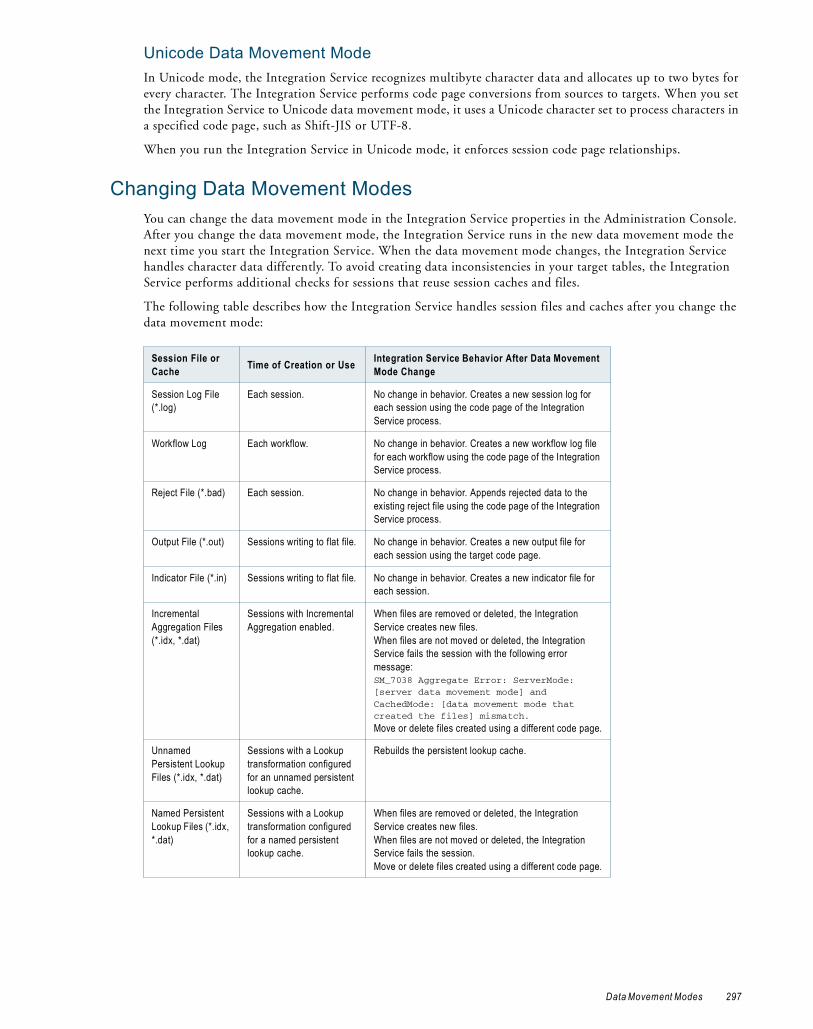
Unicode Data Movement ModeIn Unicode mode, the Integration Service recognizes multibyte character data and allocates up to two bytes for every character. The Integration Service performs code page conversions from sources to targets. When you set the Integration Service to Unicode data movement mode, it uses a Unicode character set to process characters in a specified code page, such as Shift-JIS or UTF-8.
When you run the Integration Service in Unicode mode, it enforces session code page relationships.
Changing Data Movement ModesYou can change the data movement mode in the Integration Service properties in the Administration Console. After you change the data movement mode, the Integration Service runs in the new data movement mode the next time you start the Integration Service. When the data movement mode changes, the Integration Service handles character data differently. To avoid creating data inconsistencies in your target tables, the Integration Service performs additional checks for sessions that reuse session caches and files.
The following table describes how the Integration Service handles session files and caches after you change the data movement mode:
Session File or Cache Time of Creation or Use Integration Service Behavior After Data Movement
Mode Change
Session Log File (*.log)
Each session. No change in behavior. Creates a new session log for each session using the code page of the Integration Service process.
Workflow Log Each workflow. No change in behavior. Creates a new workflow log file for each workflow using the code page of the Integration Service process.
Reject File (*.bad) Each session. No change in behavior. Appends rejected data to the existing reject file using the code page of the Integration Service process.
Output File (*.out) Sessions writing to flat file. No change in behavior. Creates a new output file for each session using the target code page.
Indicator File (*.in) Sessions writing to flat file. No change in behavior. Creates a new indicator file for each session.
Incremental Aggregation Files (*.idx, *.dat)
Sessions with Incremental Aggregation enabled.
When files are removed or deleted, the Integration Service creates new files.When files are not moved or deleted, the Integration Service fails the session with the following error message: SM_7038 Aggregate Error: ServerMode: [server data movement mode] and CachedMode: [data movement mode that created the files] mismatch.
Move or delete files created using a different code page.
Unnamed Persistent Lookup Files (*.idx, *.dat)
Sessions with a Lookup transformation configured for an unnamed persistent lookup cache.
Rebuilds the persistent lookup cache.
Named Persistent Lookup Files (*.idx, *.dat)
Sessions with a Lookup transformation configured for a named persistent lookup cache.
When files are removed or deleted, the Integration Service creates new files.When files are not moved or deleted, the Integration Service fails the session.Move or delete files created using a different code page.
Data Movement Modes 297

Code Page OverviewA code page contains the encoding to specify characters in a set of one or more languages. An encoding is the assignment of a number to a character in the character set. You use code pages to identify data that might be in different languages. For example, if you create a mapping to process Japanese data, you must select a Japanese code page for the source data.
When you choose a code page, the program or application for which you set the code page refers to a specific set of data that describes the characters the application recognizes. This influences the way that application stores, receives, and sends character data.
Most machines use one of the following code pages:
♦ US-ASCII (7-bit ASCII)
♦ MS Latin1 (MS 1252) for Windows operating systems
♦ Latin1 (ISO 8859-1) for UNIX operating systems
♦ IBM EBCDIC US English (IBM037) for mainframe systems
The US-ASCII code page contains all 7-bit ASCII characters and is the most basic of all code pages with support for United States English. The US-ASCII code page is not compatible with any other code page. When you install either the PowerCenter Client, Integration Service, or repository on a US-ASCII system, you must install all components on US-ASCII systems and run the Integration Service in ASCII mode.
MS Latin1 and Latin1 both support English and most Western European languages and are compatible with each other. When you install the PowerCenter Client, Integration Service, or repository on a system using one of these code pages, you can install the rest of the components on any machine using the MS Latin1 or Latin1 code pages.
You can use the IBM EBCDIC code page for the Integration Service process when you install it on a mainframe system. You cannot install the PowerCenter Client or repository on mainframe systems, so you cannot use the IBM EBCDIC code page for PowerCenter Client or repository installations.
UNIX Code PagesIn the United States, most UNIX operating systems have more than one code page installed and use the ASCII code page by default. If you want to run PowerCenter in an ASCII-only environment, you can use the ASCII code page and run the Integration Service in ASCII mode.
UNIX systems allow you to change the code page by changing the LANG, LC_CTYPE or LC_ALL environment variable. For example, you want to change the code page an HP-UX machine uses. Use the following command in the C shell to view your environment:
locale
This results in the following output, in which “C” implies “ASCII”:
LANG="C"LC_CTYPE="C"LC_NUMERIC="C"LC_TIME="C"LC_ALL="C"
To change the language to English and require the system to use the Latin1 code page, you can use the following command:
setenv LANG en_US.iso88591
When you check the locale again, it has been changed to use Latin1 (ISO 8859-1):
LANG="en_US.iso88591"LC_CTYPE="en_US.iso88591"LC_NUMERIC="en_US.iso88591"LC_TIME="en_US.iso88591"LC_ALL="en_US.iso88591"
298 Chapter 22: Understanding Globalization
For more information about changing the locale or code page of a UNIX system, see the UNIX documentation.
Windows Code PagesThe Windows operating system is based on Unicode, but does not display the code page used by the operating system in the environment settings. However, you can make an educated guess based on the country in which you purchased the system and the language the system uses.
If you purchase Windows in the United States and use English as an input and display language, your operating system code page is MS Latin1 (MS1252) by default. However, if you install additional display or input languages from the Windows installation CD and use those languages, the operating system might use a different code page.
For more information about the default code page for your Windows system, contact Microsoft.
Choosing a Code PageChoose code pages based on the character data you use in mappings. Character data can be represented by character modes based on the character size. Character size is the storage space a character requires in the database. Different character sizes can be defined as follows:
♦ Single-byte. A character represented as a unique number between 0 and 255. One byte is eight bits. ASCII characters are single-byte characters.
♦ Double-byte. A character two bytes or 16 bits in size represented as a unique number 256 or greater. Many Asian languages, such as Chinese, have double-byte characters.
♦ Multibyte. A character two or more bytes in size is represented as a unique number 256 or greater. Many Asian languages, such as Chinese, have multibyte characters.
Code Page CompatibilityCompatibility between code pages is essential for accurate data movement when the Integration Service runs in the Unicode data movement mode.
A code page can be compatible with another code page, or it can be a subset or a superset of another:
♦ Compatible. Two code pages are compatible when the characters encoded in the two code pages are virtually identical. For example, JapanEUC and JIPSE code pages contain identical characters and are compatible with each other. The repository and Integration Service process can each use one of these code pages and can pass data back and forth without data loss.
♦ Superset. A code page is a superset of another code page when it contains all the characters encoded in the other code page and additional characters not encoded in the other code page. For example, MS Latin1 is a superset of US-ASCII because it contains all characters in the US-ASCII code page.
Note: Informatica considers a code page to be a superset of itself and all other compatible code pages.
♦ Subset. A code page is a subset of another code page when all characters in the code page are also encoded in the other code page. For example, US-ASCII is a subset of MS Latin1 because all characters in the US-ASCII code page are also encoded in the MS Latin1 code page.
For accurate data movement, the target code page must be a superset of the source code page. If the target code page is not a superset of the source code page, the Integration Service may not process all characters, resulting in incorrect or missing data. For example, Latin1 is a superset of US-ASCII. If you select Latin1 as the source code page and US-ASCII as the target code page, you might lose character data if the source contains characters that are not included in US-ASCII.
When you install or upgrade an Integration Service to run in Unicode mode, you must ensure code page compatibility among the PowerCenter domain configuration database, Administration Console, PowerCenter
Code Page Compatibility 299
Clients, Integration Service process nodes, the PowerCenter repository, the Metadata Manager repository, and the machines hosting pmrep and pmcmd. In Unicode mode, the Integration Service enforces code page compatibility between the PowerCenter Client and the repository, and between the Integration Service process and the repository. In addition, when you run the Integration Service in Unicode mode, code pages associated with sessions must have the appropriate relationships:
♦ For each source in the session, the source code page must be a subset of the target code page. The Integration Service does not require code page compatibility between the source and the Integration Service process or between the Integration Service process and the target.
♦ If the session contains a Lookup or Stored Procedure transformation, the database or file code page must be a subset of the target that receives data from the Lookup or Stored Procedure transformation and a superset of the source that provides data to the Lookup or Stored Procedure transformation.
♦ If the session contains an External Procedure or Custom transformation, the procedure must pass data in a code page that is a subset of the target code page for targets that receive data from the External Procedure or Custom transformation.
PowerCenter uses code pages for the following components:
♦ PowerCenter domain configuration database. The domain configuration database must be compatible with the code pages of the PowerCenter repository and Metadata Manager repository. For more information, see “PowerCenter Domain Configuration Database Code Page” on page 301.
♦ Administration Console. You can enter data in any language in the Administration Console. For more information, see “Administration Console Code Page” on page 301.
♦ PowerCenter Client. You can enter metadata in any language in the PowerCenter Client. The PowerCenter Client includes the Designer, Workflow Manager, Repository Manager, and Workflow Monitor. For more information, see “PowerCenter Client Code Page” on page 301.
♦ Integration Service process. The Integration Service can move data in ASCII mode and Unicode mode. The default data movement mode is ASCII, which passes 7-bit ASCII or 8-bit ASCII character data. To pass multibyte character data from sources to targets, use the Unicode data movement mode. When you run the Integration Service in Unicode mode, it uses up to three bytes for each character to move data and performs additional checks at the session level to ensure data integrity. For more information, see “Integration Service Process Code Page” on page 301.
♦ PowerCenter repository. The PowerCenter repository can store data in any language. You can use the UTF-8 code page for the PowerCenter repository to store multibyte data in the repository. The code page for the repository is the same as the database code page. For more information, see “PowerCenter Repository Code Page” on page 302.
♦ Metadata Manager repository. The Metadata Manager repository can store data in any language. You can use the UTF-8 code page for the Metadata Manager repository to store multibyte data in the repository. The code page for the repository is the same as the database code page. For more information, see “Metadata Manager Repository Code Page” on page 302.
♦ Sources and targets. The sources and targets store data in one or more languages. You use code pages to specify the type of characters in the sources and targets. For more information, see “Source Code Page” on page 302 and “Target Code Page” on page 303.
♦ PowerCenter command line programs. You must also ensure that the code page for pmrep is a subset of the PowerCenter repository code page and the code page for pmcmd is a subset of the Integration Service process code page. For more information, see “Command Line Program Code Pages” on page 303.
Most database servers use two code pages, a client code page to receive data from client applications and a server code page to store the data. When the database server is running, it converts data between the two code pages if they are different. In this type of database configuration, the Integration Service process interacts with the database client code page. Thus, code pages used by the Integration Service process, such as the repository, source, or target code pages, must be identical to the database client code page. The database client code page is usually identical to the operating system code page on which the Integration Service process runs. The database client code page is a subset of the database server code page.
For more information about specific database client and server code pages, see your database documentation.
300 Chapter 22: Understanding Globalization

Note: The Reporting Service does not require that you specify a code page for the data that is stored in the Data Analyzer repository. The Administration Console writes domain, user, and group information to the Reporting Service. However, DataDirect drivers perform the required data conversions.
PowerCenter Domain Configuration Database Code PageThe domain configuration database must be compatible with the code pages of the PowerCenter repository and Metadata Manager repository.
The Service Manager synchronizes the list of users in the domain with the list of users and groups in each application service. If a user name in the domain has characters that the code page of the application service does not recognize, characters do not convert correctly and inconsistencies occur.
Administration Console Code PageThe Administration Console can run on any node in a PowerCenter domain. The Administration Console code page is the code page of the operating system of the node. Each node in the domain must use the same code page.
The Administration Console code page must be:
♦ A subset of the PowerCenter repository code page
♦ A subset of the Metadata Manager repository code page
PowerCenter Client Code PageThe PowerCenter Client code page is the code page of the operating system of the PowerCenter Client. To communicate with the PowerCenter repository, the PowerCenter Client code page must be a subset of the PowerCenter repository code page.
Integration Service Process Code PageThe code page of an Integration Service process is the code page of the node that runs the Integration Service process. Define the code page for each Integration Service process in the Administration Console on the Processes tab.
However, on UNIX, you can change the code page of the Integration Service process by changing the LANG, LC_CTYPE or LC_ALL environment variable for the user that starts the process.
The code page of the Integration Service process must be:
♦ A subset of the PowerCenter repository code page
♦ A superset of the machine hosting pmcmd or a superset of the code page specified in the INFA_CODEPAGENAME environment variable
The code pages of all Integration Service processes must be compatible with each other. For example, you can use MS Windows Latin1 for a node on Windows and ISO-8859-1 for a node on UNIX.
Integration Services configured for Unicode mode validate code pages when you start a session to ensure accurate data movement. It uses session code pages to convert character data. When the Integration Service runs in ASCII mode, it does not validate session code pages. It reads all character data as ASCII characters and does not perform code page conversions.
Each code page has associated sort orders. When you configure a session, you can select one of the sort orders associated with the code page of the Integration Service process. When you run the Integration Service in Unicode mode, it uses the selected session sort order to sort character data. When you run the Integration Service in ASCII mode, it sorts all character data using a binary sort order.
If you run the Integration Service in the United States on Windows, consider using MS Windows Latin1 (ANSI) as the code page of the Integration Service process.
Code Page Compatibility 301
If you run the Integration Service in the United States on UNIX, consider using ISO 8859-1 as the code page for the Integration Service process.
If you use pmcmd to communicate with the Integration Service, the code page of the operating system hosting pmcmd must be identical to the code page of the Integration Service process.
The Integration Service generates the names of session log files, reject files, caches and cache files, and performance detail files based on the code page of the Integration Service process.
PowerCenter Repository Code PageThe PowerCenter repository code page is the code page of the data in the repository. The Repository Service uses the repository code page to save metadata in and retrieve metadata from the repository database. Choose the repository code page when you create or upgrade a repository. When the repository database code page is UTF-8, you can create a repository using UTF-8 as its code page.
The PowerCenter repository code page must be:
♦ Compatible with the domain configuration database code page
♦ A superset of the Administration Console code page
♦ A superset of the PowerCenter Client code page
♦ A superset of the code page for the Integration Service process
♦ A superset of the machine hosting pmrep or a superset of the code page specified in the INFA_CODEPAGENAME environment variable
A global repository code page must be a subset of the local repository code page if you want to create shortcuts in the local repository that reference an object in a global repository.
If you copy objects from one repository to another repository, the code page for the target repository must be a superset of the code page for the source repository.
Metadata Manager Repository Code PageThe Metadata Manager repository code page is the code page of the data in the repository. The Metadata Manager Service uses the Metadata Manager repository code page to save metadata to and retrieve metadata from the repository database. The Administration Console writes user and group information to the Metadata Manager Service. The Administration Console also writes domain information in the repository database. The Integration Service process writes metadata to the repository database. Choose the repository code page when you create or upgrade a Metadata Manager repository. When the repository database code page is UTF-8, you can create a repository using UTF-8 as its code page.
The Metadata Manager repository code page must be:
♦ Compatible with the domain configuration database code page
♦ A superset of the Administration Console code page
♦ A subset of the PowerCenter repository code page
♦ A superset of the code page for the Integration Service process
Source Code PageThe source code page depends on the type of source:
♦ Flat files and VSAM files. The code page of the data in the file. When you configure the flat file or COBOL source definition, choose a code page that matches the code page of the data in the file.
♦ XML files. The Integration Service converts XML to Unicode when it parses an XML source. When you create an XML source definition, the Designer assigns a default code page. You cannot change the code page.
♦ Relational databases. The code page of the database client. When you configure the relational connection in the Workflow Manager, choose a code page that is compatible with the code page of the database client. If
302 Chapter 22: Understanding Globalization
you set a database environment variable to specify the language for the database, ensure the code page for the connection is compatible with the language set for the variable. For example, if you set the NLS_LANG environment variable for an Oracle database, ensure that the code page of the Oracle connection is identical to the value set in the NLS_LANG variable. If you do not use compatible code pages, sessions may hang, data may become inconsistent, or you might receive a database error, such as:
ORA-00911: Invalid character specified.
Regardless of the type of source, the source code page must be a subset of the code page of transformations and targets that receive data from the source. The source code page does not need to be a subset of transformations or targets that do not receive data from the source.
Note: Select IBM EBCDIC as the source database connection code page only if you access EBCDIC data, such as data from a mainframe extract file.
Target Code PageThe target code page depends on the type of target:
♦ Flat files. When you configure the flat file target definition, choose a code page that matches the code page of the data in the flat file.
♦ XML files. Configure the XML target code page after you create the XML target definition. The XML Wizard assigns a default code page to the XML target. The Designer does not apply the code page that appears in the XML schema.
♦ Relational databases. When you configure the relational connection in the Workflow Manager, choose a code page that is compatible with the code page of the database client. If you set a database environment variable to specify the language for the database, ensure the code page for the connection is compatible with the language set for the variable. For example, if you set the NLS_LANG environment variable for an Oracle database, ensure that the code page of the Oracle connection is compatible with the value set in the NLS_LANG variable. If you do not use compatible code pages, sessions may hang or you might receive a database error, such as:
ORA-00911: Invalid character specified.
The target code page must be a superset of the code page of transformations and sources that provide data to the target. The target code page does not need to be a superset of transformations or sources that do not provide data to the target.
The Integration Service creates session indicator files, session output files, and external loader control and data files using the target flat file code page.
Note: Select IBM EBCDIC as the target database connection code page only if you access EBCDIC data, such as data from a mainframe extract file.
Command Line Program Code PagesThe pmcmd and pmrep command line programs require code page compatibility. pmcmd and pmrep use code pages when sending commands in Unicode. Other command line programs do not require code pages.
The code page compatibility for pmcmd and pmrep depends on whether you configured the code page environment variable INFA_CODEPAGENAME for pmcmd or pmrep. You can set this variable for either command line program or for both.
If you did not set this variable for a command line program, ensure the following requirements are met:
♦ If you did not set the variable for pmcmd, then the code page of the machine hosting pmcmd must be a subset of the code page for the Integration Service process.
♦ If you did not set the variable for pmrep, then the code page of the machine hosting pmrep must be a subset of the PowerCenter repository code page.
Code Page Compatibility 303

If you set the code page environment variable INFA_CODEPAGENAME for pmcmd or pmrep, ensure the following requirements are met:
♦ If you set INFA_CODEPAGENAME for pmcmd, the code page defined for the variable must be a subset of the code page for the Integration Service process.
♦ If you set INFA_CODEPAGENAME for pmrep, the code page defined for the variable must be a subset of the PowerCenter repository code page.
♦ If you run pmcmd and pmrep from the same machine and you set the INFA_CODEPAGENAME variable, the code page defined for the variable must be subsets of the code pages for the Integration Service process and the repository.
If the code pages are not compatible, the Integration Service process may not fetch the workflow, session, or task from the repository.
Code Page Compatibility SummaryThe following figure shows code page compatibility in the PowerCenter environment:
The following table summarizes code page compatibility between sources, targets, repositories, Administration Console PowerCenter Client, and Integration Service process:
Component Code Page Code Page Compatibility
Source (including relational, flat file, and XML file)
Subset of target.Subset of lookup data.Subset of stored procedures.Subset of External Procedure or Custom transformation procedure code page.
Target (including relational, XML files, and flat files)
Superset of source.Superset of lookup data.Superset of stored procedures.Superset of External Procedure or Custom transformation procedure code page.Integration Service process creates external loader data and control files using the target flat file code page.
Subset Superset
External Procedure and Custom Transformation Procedure Data
Integration Service
Administration Console
Metadata Manager Repository
PowerCenter Repository
Sources
Lookup and Stored Procedure Databases
Targets
pmrepPowerCenter Client
pmcmd
PowerCenter Domain Configuration Database
Compatible Compatible
304 Chapter 22: Understanding Globalization
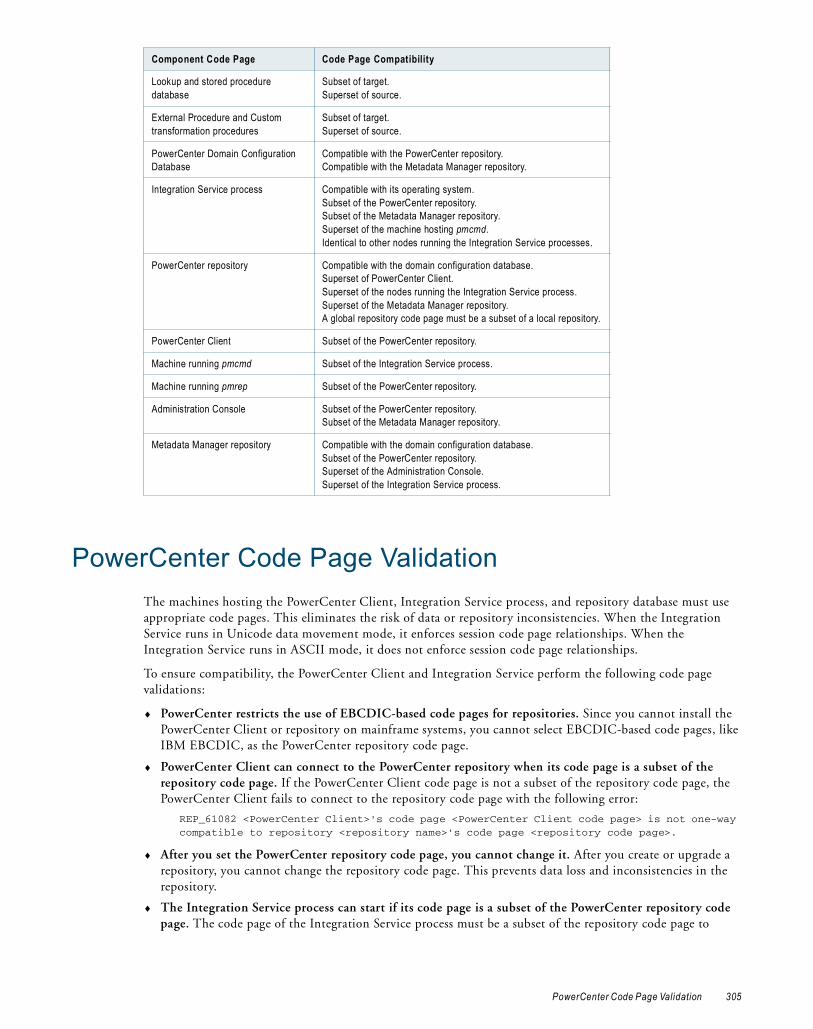
PowerCenter Code Page ValidationThe machines hosting the PowerCenter Client, Integration Service process, and repository database must use appropriate code pages. This eliminates the risk of data or repository inconsistencies. When the Integration Service runs in Unicode data movement mode, it enforces session code page relationships. When the Integration Service runs in ASCII mode, it does not enforce session code page relationships.
To ensure compatibility, the PowerCenter Client and Integration Service perform the following code page validations:
♦ PowerCenter restricts the use of EBCDIC-based code pages for repositories. Since you cannot install the PowerCenter Client or repository on mainframe systems, you cannot select EBCDIC-based code pages, like IBM EBCDIC, as the PowerCenter repository code page.
♦ PowerCenter Client can connect to the PowerCenter repository when its code page is a subset of the repository code page. If the PowerCenter Client code page is not a subset of the repository code page, the PowerCenter Client fails to connect to the repository code page with the following error:
REP_61082 <PowerCenter Client>'s code page <PowerCenter Client code page> is not one-way compatible to repository <repository name>'s code page <repository code page>.
♦ After you set the PowerCenter repository code page, you cannot change it. After you create or upgrade a repository, you cannot change the repository code page. This prevents data loss and inconsistencies in the repository.
♦ The Integration Service process can start if its code page is a subset of the PowerCenter repository code page. The code page of the Integration Service process must be a subset of the repository code page to
Lookup and stored procedure database
Subset of target.Superset of source.
External Procedure and Custom transformation procedures
Subset of target.Superset of source.
PowerCenter Domain Configuration Database
Compatible with the PowerCenter repository.Compatible with the Metadata Manager repository.
Integration Service process Compatible with its operating system.Subset of the PowerCenter repository.Subset of the Metadata Manager repository.Superset of the machine hosting pmcmd.Identical to other nodes running the Integration Service processes.
PowerCenter repository Compatible with the domain configuration database.Superset of PowerCenter Client.Superset of the nodes running the Integration Service process.Superset of the Metadata Manager repository.A global repository code page must be a subset of a local repository.
PowerCenter Client Subset of the PowerCenter repository.
Machine running pmcmd Subset of the Integration Service process.
Machine running pmrep Subset of the PowerCenter repository.
Administration Console Subset of the PowerCenter repository. Subset of the Metadata Manager repository.
Metadata Manager repository Compatible with the domain configuration database.Subset of the PowerCenter repository. Superset of the Administration Console. Superset of the Integration Service process.
Component Code Page Code Page Compatibility
PowerCenter Code Page Validation 305

prevent data loss or inconsistencies. If it is not a subset of the repository code page, the Integration Service writes the following message to the log files:
REP_61082 <Integration Service>'s code page <Integration Service code page> is not one-way compatible to repository <repository name>'s code page <repository code page>.
♦ When in Unicode data movement mode, the Integration Service starts workflows with the appropriate source and target code page relationships for each session. When the Integration Service runs in Unicode mode, the code page for every source in a session must be a subset of the target code page. This prevents data loss during a session.
If the source and target code pages do not have the appropriate relationships with each other, the Integration Service fails the session and writes the following message to the session log:
TM_6227 Error: Code page incompatible in session <session name>. <Additional details>.
♦ The Workflow Manager validates source, target, lookup, and stored procedure code page relationships for each session. The Workflow Manager checks code page relationships when you save a session, regardless of the Integration Service data movement mode. If you configure a session with invalid source, target, lookup, or stored procedure code page relationships, the Workflow Manager issues a warning similar to the following when you save the session:
CMN_1933 Code page <code page name> for data from file or connection associated with transformation <name of source, target, or transformation> needs to be one-way compatible with code page <code page name> for transformation <source or target or transformation name>.
If you want to run the session in ASCII mode, you can save the session as configured. If you want to run the session in Unicode mode, edit the session to use appropriate code pages.
Relaxed Code Page ValidationYour environment may require you to process data from different sources using character sets from different languages. For example, you may need to process data from English and Japanese sources using the same repository, or you may want to extract source data encoded in a Unicode encoding such as UTF-8. You can configure the Integration Service for relaxed code page validation. Relaxed code page validation enables you to process data using sources and targets with incompatible code pages.
Although relaxed code page validation removes source and target code page restrictions, it still enforces code page compatibility between the Integration Service and repository.
Note: Relaxed code page validation does not safeguard against possible data inconsistencies when you move data between two incompatible code pages. You must verify that the characters the Integration Service reads from the source are included in the target code page.
PowerCenter removes the following restrictions when you relax code page validation:
♦ Source and target code pages. You can use any code page supported by PowerCenter for your source and target data.
♦ Session sort order. You can use any sort order supported by PowerCenter when you configure a session.
When you run a session with relaxed code page validation, the Integration Service writes the following message to the session log:
TM_6185 WARNING! Data code page validation is disabled in this session.
When you relax code page validation, the Integration Service writes descriptions of the database connection code pages to the session log.
The following text shows sample code page messages in the session log:
TM_6187 Repository code page: [MS Windows Latin 1 (ANSI), superset of Latin 1]WRT_8222 Target file [$PMTargetFileDir\passthru.out] code page: [MS Windows Traditional Chinese, superset of Big 5]
306 Chapter 22: Understanding Globalization
WRT_8221 Target database connection [Japanese Oracle] code page: [MS Windows Japanese, superset of Shift-JIS]TM_6189 Source database connection [Japanese Oracle] code page: [MS Windows Japanese, superset of Shift-JIS]CMN_1716 Lookup [LKP_sjis_lookup] uses database connection [Japanese Oracle] in code page [MS Windows Japanese, superset of Shift-JIS]CMN_1717 Stored procedure [J_SP_INCREMENT] uses database connection [Japanese Oracle] in code page [MS Windows Japanese, superset of Shift-JIS]
If the Integration Service cannot correctly convert data, it writes an error message to the session log.
Configuring the Integration ServiceTo configure the Integration Service for code page relaxation, complete the following tasks in the Administration Console:
♦ Disable code page validation. Disable the ValidateDataCodePages option in the Integration Service properties.
♦ Configure the Integration Service for Unicode data movement mode. Select Unicode for the Data Movement Mode option in the Integration Service properties.
♦ Configure the Integration Service to write to the logs using the UTF-8 character set. If you configure sessions or workflows to write to log files, enable the LogsInUTF8 option in the Integration Service properties. The Integration Service writes all logs in UTF8 when you enable the LogsInUTF8 option. The Integration Service writes to the Log Manager in UTF-8 by default.
Selecting Compatible Source and Target Code PagesAlthough PowerCenter allows you to use any supported code page, there are risks associated with using incompatible code pages for sources and targets. If your target code page is not a superset of your source code page, you risk inconsistencies in the target data because the source data may contain characters not encoded in the target code page.
When the Integration Service reads characters that are not included in the target code page, you risk transformation errors, inconsistent data, or failed sessions.
Note: If you relax code page validation, it is your responsibility to ensure that data converts from the source to target properly.
Troubleshooting for Code Page RelaxationThe Integration Service failed a session and wrote the following message to the session log:
TM_6188 Session sort order <sort order name> is incompatible with the Integration Service's code page <code page name>.
Cause: The specified sort order is incompatible with the Integration Service code page.
Action: If you want to validate code pages, select a sort order compatible with the Integration Service code page. If you want to relax code page validation, configure the Integration Service to relax code page validation in Unicode data movement mode.
I tried to view the session or workflow log, but it contains garbage characters.Cause: The Integration Service is not configured to write session or workflow logs using the UTF-8
character set.
Action: Enable the LogsInUTF8 option in the Integration Service properties.
Relaxed Code Page Validation 307

PowerCenter Code Page ConversionWhen in data movement mode is set to Unicode, the PowerCenter Client accepts input in any language and converts it to UCS-2. The Integration Service converts source data to UCS-2 before processing and converts the processed data from UCS-2 to the target code page before loading.
When you run a session, the Integration Service converts source, target, and lookup queries from the PowerCenter repository code page to the source, target, or lookup code page. The Integration Service also converts the name and call text of stored procedures from the repository code page to the stored procedure database code page.
At run time, the Integration Service verifies that it can convert the following queries and procedure text from the PowerCenter repository code page without data loss:
♦ Source query. Must convert to source database code page.
♦ Lookup query. Must convert to lookup database code page.
♦ Target SQL query. Must convert to target database code page.
♦ Name and call text of stored procedures. Must convert to stored procedure database code page.
Choosing Characters for Repository MetadataYou can use any character in the PowerCenter repository code page when inputting repository metadata. If the repository uses UTF-8, you can input any Unicode character. For example, you can store German, Japanese, and English metadata in a UTF-8 enabled repository. However, you must ensure that the Integration Service can successfully perform SQL transactions with source, target, lookup, and stored procedure databases. You must also ensure that the Integration Service can read from source and lookup files and write to target and lookup files. Therefore, when you run a session, you must ensure that the repository metadata characters are encoded in the source, target, lookup, and stored procedure code pages.
ExampleThe Integration Service, repository, and PowerCenter Client use the ISO 8859-1 Latin1 code page, and the source database contains Japanese data encoded using the Shift-JIS code page. Each code page contains characters not encoded in the other. Using characters other than 7-bit ASCII for the repository and source database metadata can cause the sessions to fail or load no rows to the target in the following situations:
♦ You create a mapping that contains a string literal with characters specific to the German language range of ISO 8859-1 in a query. The source database may reject the query or return inconsistent results.
♦ You use the PowerCenter Client to generate SQL queries containing characters specific to the German language range of ISO 8859-1. The source database cannot convert the German-specific characters from the ISO 8859-1 code page into the Shift-JIS code page.
♦ The source database has a table name that contains Japanese characters. The Designer cannot convert the Japanese characters from the source database code page to the PowerCenter Client code page. Instead, the Designer imports the Japanese characters as question marks (?), changing the name of the table. The Repository Service saves the source table name in the repository as question marks. If the Integration Service sends a query to the source database using the changed table name, the source database cannot find the correct table, and returns no rows or an error to the Integration Service, causing the session to fail.
Because the US-ASCII code page is a subset of both the ISO 8859-1 and Shift-JIS code pages, you can avoid these data inconsistencies if you use 7-bit ASCII characters for all of your metadata.
308 Chapter 22: Understanding Globalization

Case Study: Processing ISO 8859-1 DataThis case study describes how you might set up an environment to process ISO 8859-1 multibyte data. You might want to configure your environment this way if you need to process data from different Western European languages with character sets contained in the ISO 8859-1 code page. This example describes an environment that processes English and German language data.
For this case study, the ISO 8859-1 environment consists of the following elements:
♦ The Integration Service on a UNIX system
♦ PowerCenter Client on a Windows system, purchased in the United States
♦ The repository stored on an Oracle database on UNIX
♦ A source database containing English language data
♦ Another source database containing German and English language data
♦ A target database containing German and English language data
♦ A lookup database containing English language data
The ISO 8859-1 EnvironmentThe data environment must process English and German character data.
The following figure shows the ISO 8859-1 data environment:
Configuring the ISO 8859-1 EnvironmentUse the following guidelines when you configure an environment similar to this case study for ISO 8859-1 data processing:
1. Verify code page compatibility between the repository database client and the database server.
2. Verify code page compatibility between the PowerCenter Client and the repository, and between the Integration Service process and the repository.
3. Set the Integration Service data movement mode to ASCII.
4. Verify session code page compatibility.
5. Verify lookup and stored procedure database code page compatibility.
Integration Service process on UNIX- Configure ASCII data movement mode- Set code page to ISO 8859-1
Repository Database(Oracle on UNIXUTF-8 code page)PowerCenter Client
(Windows: MS WindowsLatin 1 code page)
Sources(English dataISO 8859-1 code page)
Sources (German and English dataISO 8859-1)
External Procedures(English data ISO 8859-1 code page)
Lookup Database(English dataISO 8859-1 code page) Targets (English and
German dataISO 8859-1 code page)
Case Study: Processing ISO 8859-1 Data 309
6. Verify External Procedure or Custom transformation procedure code page compatibility.
7. Configure session sort order.
Step 1. Verify Repository Database Client and Server CompatibilityThe database client and server hosting the PowerCenter repository must be able to communicate without data loss.
The repository resides in an Oracle database. Use NLS_LANG to set the locale (language, territory, and character set) you want the database client and server to use with your login:
NLS_LANG = LANGUAGE_TERRITORY.CHARACTERSET
By default, Oracle configures NLS_LANG for the U.S. English language, the U.S. territory, and the 7-bit ASCII character set:
NLS_LANG = AMERICAN_AMERICA.US7ASCII
Change the default configuration to write ISO 8859-1 data to the repository using the Oracle WE8ISO8859P1 code page. For example:
NLS_LANG = AMERICAN_AMERICA.WE8ISO8859P1
For more information about verifying and changing the repository database code page, see your database documentation.
Step 2. Verify PowerCenter Code Page CompatibilityThe Integration Service and PowerCenter Client code pages must be subsets of the PowerCenter repository code page. Because the PowerCenter Client and Integration Service each use the system code pages of the machines they are installed on, you must verify that the system code pages are subsets of the repository code page.
In this case, the PowerCenter Client on Windows systems were purchased in the United States. Thus the system code pages for the PowerCenter Client machines are set to MS Windows Latin1 by default. To verify system input and display languages, open the Regional Options dialog box from the Windows Control Panel. For systems purchased in the United States, the Regional Settings and Input Locale must be configured for English (United States).
The Integration Service is installed on a UNIX machine. The default code page for UNIX operating systems is ASCII. In this environment, change the UNIX system code page to ISO 8859-1 Western European so that it is a subset of the repository code page.
Step 3. Configure the Integration Service for ASCII Data Movement ModeConfigure the Integration Service to process ISO 8859-1 data. In the Administration Console, set the Data Movement Mode to ASCII for the Integration Service.
Step 4. Verify Session Code Page CompatibilityWhen you run a workflow in ASCII data movement mode, the Integration Service enforces source and target code page relationships. To guarantee accurate data conversion, the source code page must be a subset of the target code page.
In this case, the environment contains source databases containing German and English data. When you configure a source database connection in the Workflow Manager, the code page for the connection must be identical to the source database code page and must be a subset of the target code page. Since both the MS Windows Latin1 and the ISO 8859-1 Western European code pages contain German characters, you would most likely use one of these code pages for source database connections.
Because the target code page must be a superset of the source code page, use either MS Windows Latin1, ISO 8859-1 Western European, or UTF-8 for target database connection or flat file code pages. To ensure data consistency, the configured target code page must match the target database or flat file system code page.
310 Chapter 22: Understanding Globalization

If you configure the Integration Service for relaxed code page validation, the Integration Service removes restrictions on source and target code page compatibility. You can select any supported code page for source and target data. However, you must ensure that the targets only receive character data encoded in the target code page.
Step 5. Verify Lookup and Stored Procedure Database Code Page CompatibilityLookup and stored procedure database code pages must be supersets of the source code pages and subsets of the target code pages. In this case, all lookup and stored procedure database connections must use a code page compatible with the ISO 8859-1 Western European or MS Windows Latin1 code pages.
Step 6. Verify External Procedure or Custom Transformation Procedure CompatibilityExternal Procedure and Custom transformation procedures must be able to process character data from the source code pages, and they must pass characters that are compatible in the target code pages. In this case, all data processed by the External Procedure or Custom transformations must be in the ISO 8859-1 Western European or MS Windows Latin1 code pages.
Step 7. Configure Session Sort OrderWhen you run the Integration Service in ASCII mode, it uses a binary sort order for all sessions. In the session properties, the Workflow Manager lists all sort orders associated with the Integration Service code page. You can select a sort order for the session.
Case Study: Processing Unicode UTF-8 DataThis case study describes how you might set up an environment that processes Unicode UTF-8 multibyte data. You might want to configure your environment this way if you need to process data from Western European, Middle Eastern, Asian, or any other language with characters encoded in the UTF-8 character set. This example describes an environment that processes German and Japanese language data.
For this case study, the UTF-8 environment consists of the following elements:
♦ The Integration Service on a UNIX machine
♦ The PowerCenter Clients on Windows systems
♦ The repository stored on an Oracle database on UNIX
♦ A source database contains German language data
♦ A source database contains German and Japanese language data
♦ A target database contains German and Japanese language data
♦ A lookup database contains German language data
The UTF-8 EnvironmentThe data environment must process German and Japanese character data.
Case Study: Processing Unicode UTF-8 Data 311
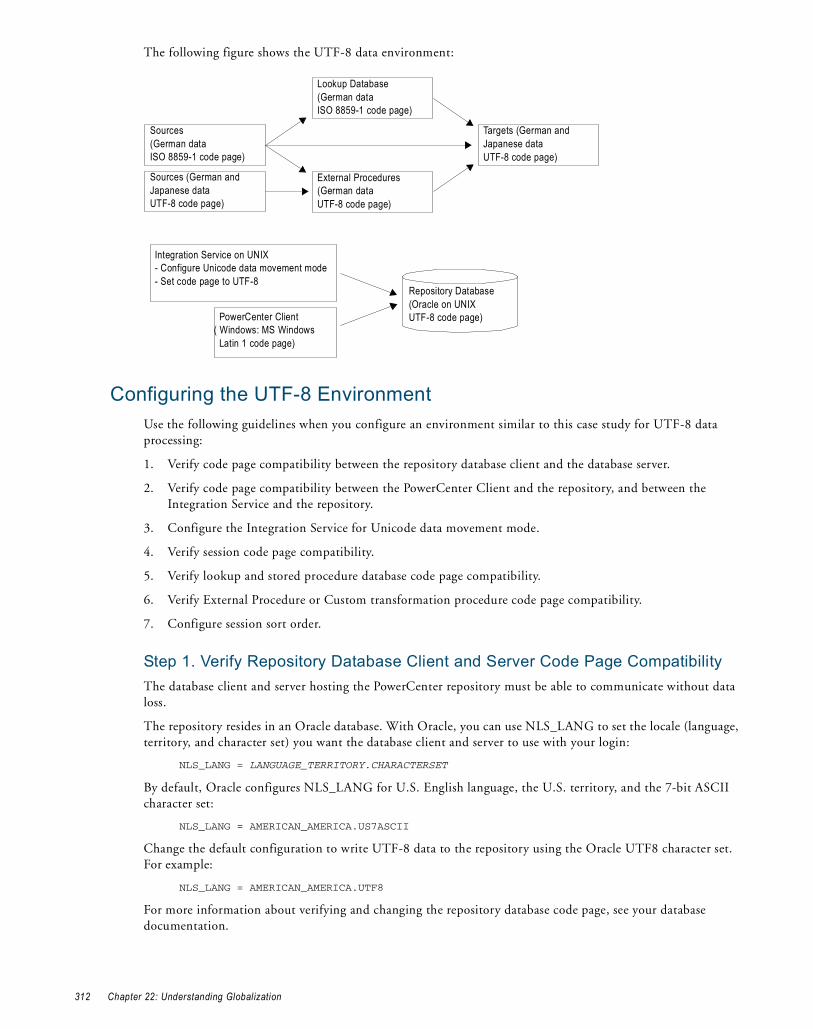
The following figure shows the UTF-8 data environment:
Configuring the UTF-8 EnvironmentUse the following guidelines when you configure an environment similar to this case study for UTF-8 data processing:
1. Verify code page compatibility between the repository database client and the database server.
2. Verify code page compatibility between the PowerCenter Client and the repository, and between the Integration Service and the repository.
3. Configure the Integration Service for Unicode data movement mode.
4. Verify session code page compatibility.
5. Verify lookup and stored procedure database code page compatibility.
6. Verify External Procedure or Custom transformation procedure code page compatibility.
7. Configure session sort order.
Step 1. Verify Repository Database Client and Server Code Page CompatibilityThe database client and server hosting the PowerCenter repository must be able to communicate without data loss.
The repository resides in an Oracle database. With Oracle, you can use NLS_LANG to set the locale (language, territory, and character set) you want the database client and server to use with your login:
NLS_LANG = LANGUAGE_TERRITORY.CHARACTERSET
By default, Oracle configures NLS_LANG for U.S. English language, the U.S. territory, and the 7-bit ASCII character set:
NLS_LANG = AMERICAN_AMERICA.US7ASCII
Change the default configuration to write UTF-8 data to the repository using the Oracle UTF8 character set. For example:
NLS_LANG = AMERICAN_AMERICA.UTF8
For more information about verifying and changing the repository database code page, see your database documentation.
Sources(German dataISO 8859-1 code page)
Integration Service on UNIX- Configure Unicode data movement mode- Set code page to UTF-8
Repository Database(Oracle on UNIXUTF-8 code page) PowerCenter Client
( Windows: MS Windows Latin 1 code page)
Sources (German andJapanese dataUTF-8 code page)
Lookup Database(German dataISO 8859-1 code page)
External Procedures(German dataUTF-8 code page)
Targets (German andJapanese dataUTF-8 code page)
312 Chapter 22: Understanding Globalization
Step 2. Verify PowerCenter Code Page CompatibilityThe Integration Service and PowerCenter Client code pages must be subsets of the PowerCenter repository code page. Because the PowerCenter Client and Integration Service each use the system code pages of the machines they are installed on, you must verify that the system code pages are subsets of the repository code page.
In this case, the PowerCenter Client on Windows systems were purchased in Switzerland. Thus, the system code pages for the PowerCenter Client machines are set to MS Windows Latin1 by default. To verify system input and display languages, open the Regional Options dialog box from the Windows Control Panel.
The Integration Service is installed on a UNIX machine. The default code page for UNIX operating systems is ASCII. In this environment, the UNIX system character set must be changed to UTF-8.
Step 3. Configure the Integration Service for Unicode Data Movement ModeYou must configure the Integration Service to process UTF-8 data. In the Administration Console, set the Data Movement Mode to Unicode for the Integration Service. The Integration Service allots an extra byte for each character when processing multibyte data.
Step 4. Verify Session Code Page CompatibilityWhen you run a workflow in Unicode data movement mode, the Integration Service enforces source and target code page relationships. To guarantee accurate data conversion, the source code page must be a subset of the target code page.
In this case, the environment contains a source database containing German and Japanese data. When you configure a source database connection in the Workflow Manager, the code page for the connection must be identical to the source database code page. You can use any code page for the source database.
Because the target code page must be a superset of the source code pages, you must use UTF-8 for the target database connections or flat files. To ensure data consistency, the configured target code page must match the target database or flat file system code page.
If you configure the Integration Service for relaxed code page validation, the Integration Service removes restrictions on source and target code page compatibility. You can select any supported code page for source and target data. However, you must ensure that the targets only receive character data encoded in the target code page.
Step 5. Verify Lookup and Stored Procedure Database Code Page CompatibilityLookup and stored procedure database code pages must be supersets of the source code pages and subsets of the target code pages. In this case, all lookup and stored procedure database connections must use a code page compatible with UTF-8.
Step 6. Verify External Procedure or Custom Transformation Procedure CompatibilityExternal Procedure and Custom transformation procedures must be able to process character data from the source code pages, and they must pass characters that are compatible in the target code pages.
In this case, the External Procedure or Custom transformations must be able to process the German and Japanese data from the sources. However, the Integration Service passes data to procedures in UCS-2. Therefore, all data processed by the External Procedure or Custom transformations must be in the UCS-2 character set.
Step 7. Configure Session Sort OrderWhen you run the Integration Service in Unicode mode, it sorts session data using the sort order configured for the session. By default, sessions are configured for a binary sort order.
To sort German and Japanese data when the Integration Service uses UTF-8, you most likely want to use the default binary sort order.
Case Study: Processing Unicode UTF-8 Data 313

314 Chapter 22: Understanding Globalization

A P P E N D I X A
Code Pages
This appendix includes the following topics:
♦ Supported Code Pages for Application Services, 315
♦ Supported Code Pages for Sources and Targets, 316
Supported Code Pages for Application ServicesPowerCenter supports code pages for internationalization. PowerCenter uses International Components for Unicode (ICU) for its globalization support. For a list of code page aliases in ICU, see http://demo.icu-project.org/icu-bin/convexp.
The following table lists the name, description, and ID for supported code pages for the Repository Service, the Metadata Manager Service, and for each Integration Service process. When you assign an application service code page in the Administration Console, you select the code page description.
Name Description ID
IBM037 IBM EBCDIC US English 2028
IBM1047 IBM EBCDIC US English IBM1047 1047
IBM273 IBM EBCDIC German 2030
IBM280 IBM EBCDIC Italian 2035
IBM285 IBM EBCDIC UK English 2038
IBM297 IBM EBCDIC French 2040
IBM500 IBM EBCDIC International Latin-1 2044
IBM930 IBM EBCDIC Japanese 930
IBM935 IBM EBCDIC Simplified Chinese 935
IBM937 IBM EBCDIC Traditional Chinese 937
IBM939 IBM EBCDIC Japanese CP939 939
ISO-8859-10 ISO 8859-10 Latin 6 (Nordic) 13
ISO-8859-15 ISO 8859-15 Latin 9 (Western European) 201
ISO-8859-2 ISO 8859-2 Eastern European 5
ISO-8859-3 ISO 8859-3 Southeast European 6
315
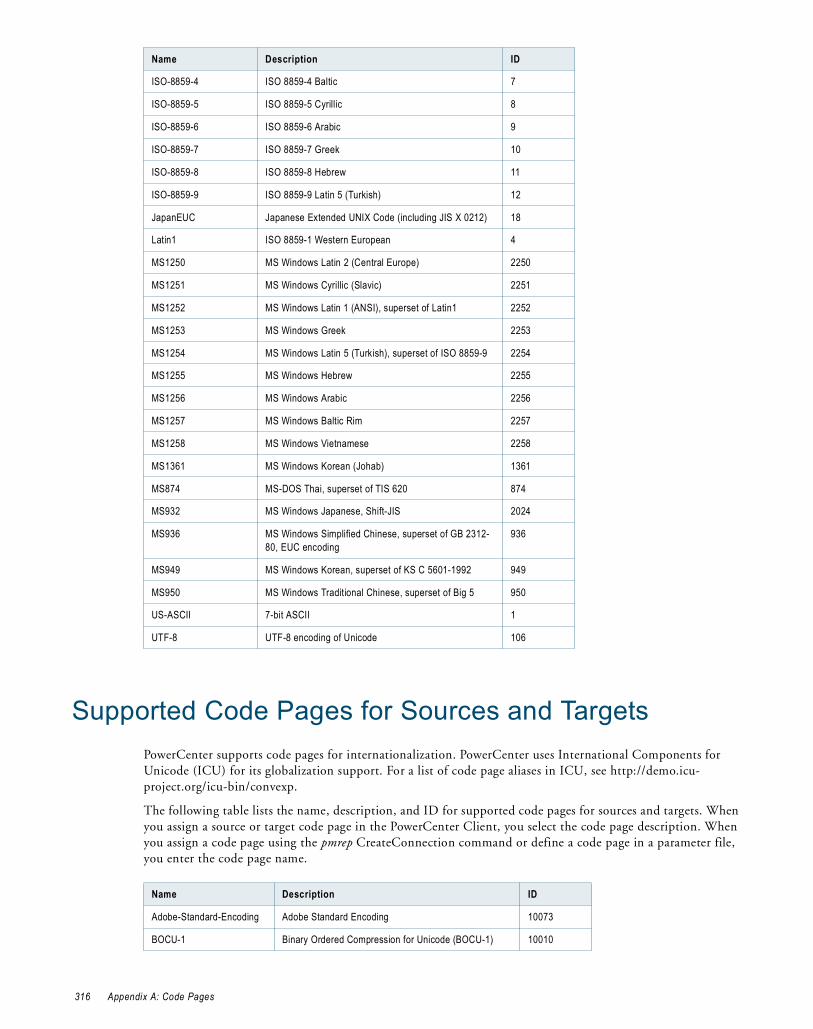
Supported Code Pages for Sources and TargetsPowerCenter supports code pages for internationalization. PowerCenter uses International Components for Unicode (ICU) for its globalization support. For a list of code page aliases in ICU, see http://demo.icu-project.org/icu-bin/convexp.
The following table lists the name, description, and ID for supported code pages for sources and targets. When you assign a source or target code page in the PowerCenter Client, you select the code page description. When you assign a code page using the pmrep CreateConnection command or define a code page in a parameter file, you enter the code page name.
ISO-8859-4 ISO 8859-4 Baltic 7
ISO-8859-5 ISO 8859-5 Cyrillic 8
ISO-8859-6 ISO 8859-6 Arabic 9
ISO-8859-7 ISO 8859-7 Greek 10
ISO-8859-8 ISO 8859-8 Hebrew 11
ISO-8859-9 ISO 8859-9 Latin 5 (Turkish) 12
JapanEUC Japanese Extended UNIX Code (including JIS X 0212) 18
Latin1 ISO 8859-1 Western European 4
MS1250 MS Windows Latin 2 (Central Europe) 2250
MS1251 MS Windows Cyrillic (Slavic) 2251
MS1252 MS Windows Latin 1 (ANSI), superset of Latin1 2252
MS1253 MS Windows Greek 2253
MS1254 MS Windows Latin 5 (Turkish), superset of ISO 8859-9 2254
MS1255 MS Windows Hebrew 2255
MS1256 MS Windows Arabic 2256
MS1257 MS Windows Baltic Rim 2257
MS1258 MS Windows Vietnamese 2258
MS1361 MS Windows Korean (Johab) 1361
MS874 MS-DOS Thai, superset of TIS 620 874
MS932 MS Windows Japanese, Shift-JIS 2024
MS936 MS Windows Simplified Chinese, superset of GB 2312-80, EUC encoding
936
MS949 MS Windows Korean, superset of KS C 5601-1992 949
MS950 MS Windows Traditional Chinese, superset of Big 5 950
US-ASCII 7-bit ASCII 1
UTF-8 UTF-8 encoding of Unicode 106
Name Description ID
Adobe-Standard-Encoding Adobe Standard Encoding 10073
BOCU-1 Binary Ordered Compression for Unicode (BOCU-1) 10010
Name Description ID
316 Appendix A: Code Pages
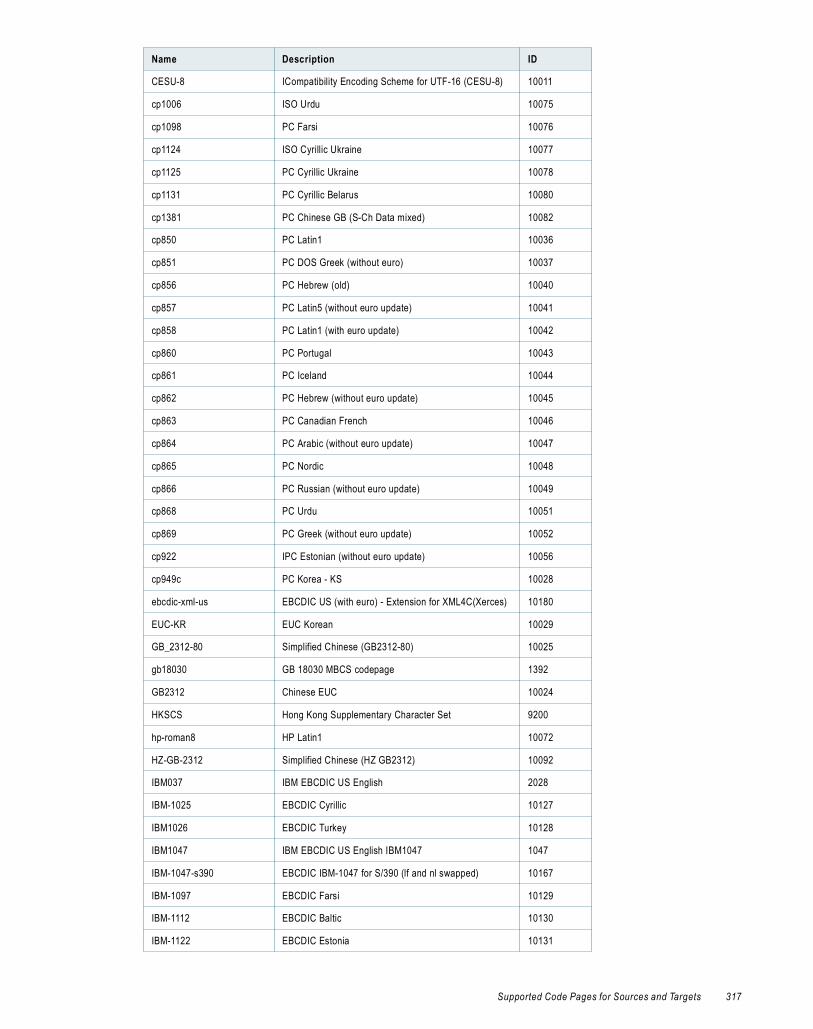
CESU-8 ICompatibility Encoding Scheme for UTF-16 (CESU-8) 10011
cp1006 ISO Urdu 10075
cp1098 PC Farsi 10076
cp1124 ISO Cyrillic Ukraine 10077
cp1125 PC Cyrillic Ukraine 10078
cp1131 PC Cyrillic Belarus 10080
cp1381 PC Chinese GB (S-Ch Data mixed) 10082
cp850 PC Latin1 10036
cp851 PC DOS Greek (without euro) 10037
cp856 PC Hebrew (old) 10040
cp857 PC Latin5 (without euro update) 10041
cp858 PC Latin1 (with euro update) 10042
cp860 PC Portugal 10043
cp861 PC Iceland 10044
cp862 PC Hebrew (without euro update) 10045
cp863 PC Canadian French 10046
cp864 PC Arabic (without euro update) 10047
cp865 PC Nordic 10048
cp866 PC Russian (without euro update) 10049
cp868 PC Urdu 10051
cp869 PC Greek (without euro update) 10052
cp922 IPC Estonian (without euro update) 10056
cp949c PC Korea - KS 10028
ebcdic-xml-us EBCDIC US (with euro) - Extension for XML4C(Xerces) 10180
EUC-KR EUC Korean 10029
GB_2312-80 Simplified Chinese (GB2312-80) 10025
gb18030 GB 18030 MBCS codepage 1392
GB2312 Chinese EUC 10024
HKSCS Hong Kong Supplementary Character Set 9200
hp-roman8 HP Latin1 10072
HZ-GB-2312 Simplified Chinese (HZ GB2312) 10092
IBM037 IBM EBCDIC US English 2028
IBM-1025 EBCDIC Cyrillic 10127
IBM1026 EBCDIC Turkey 10128
IBM1047 IBM EBCDIC US English IBM1047 1047
IBM-1047-s390 EBCDIC IBM-1047 for S/390 (lf and nl swapped) 10167
IBM-1097 EBCDIC Farsi 10129
IBM-1112 EBCDIC Baltic 10130
IBM-1122 EBCDIC Estonia 10131
Name Description ID
Supported Code Pages for Sources and Targets 317

IBM-1123 EBCDIC Cyrillic Ukraine 10132
IBM-1129 ISO Vietnamese 10079
IBM-1130 EBCDIC Vietnamese 10133
IBM-1132 EBCDIC Lao 10134
IBM-1133 ISO Lao 10081
IBM-1137 EBCDIC Devanagari 10163
IBM-1140 EBCDIC US (with euro update) 10135
IBM-1140-s390 EBCDIC IBM-1140 for S/390 (lf and nl swapped) 10168
IBM-1141 EBCDIC Germany, Austria (with euro update) 10136
IBM-1142 EBCDIC Denmark, Norway (with euro update) 10137
IBM-1142-s390 EBCDIC IBM-1142 for S/390 (lf and nl swapped) 10169
IBM-1143 EBCDIC Finland, Sweden (with euro update) 10138
IBM-1143-s390 EBCDIC IBM-1143 for S/390 (lf and nl swapped) 10170
IBM-1144 EBCDIC Italy (with euro update) 10139
IBM-1144-s390 EBCDIC IBM-1144 for S/390 (lf and nl swapped) 10171
IBM-1145 EBCDIC Spain, Latin America (with euro update) 10140
IBM-1145-s390 EBCDIC IBM-1145 for S/390 (lf and nl swapped) 10172
IBM-1146 EBCDIC UK, Ireland (with euro update) 10141
IBM-1146-s390 EBCDIC IBM-1146 for S/390 (lf and nl swapped) 10173
IBM-1147 EBCDIC French (with euro update) 10142
IBM-1147-s390 EBCDIC IBM-1147 for S/390 (lf and nl swapped) 10174
IBM-1147-s390 EBCDIC IBM-1147 for S/390 (lf and nl swapped) 10174
IBM-1148 EBCDIC International Latin1 (with euro update) 10143
IBM-1148-s390 EBCDIC IBM-1148 for S/390 (lf and nl swapped) 10175
IBM-1149 EBCDIC Iceland (with euro update) 10144
IBM-1149-s390 IEBCDIC IBM-1149 for S/390 (lf and nl swapped) 10176
IBM-1153 EBCDIC Latin2 (with euro update) 10145
IBM-1153-s390 EBCDIC IBM-1153 for S/390 (lf and nl swapped) 10177
IBM-1154 EBCDIC Cyrillic Multilingual (with euro update) 10146
IBM-1155 EBCDIC Turkey (with euro update) 10147
IBM-1156 EBCDIC Baltic Multilingual (with euro update) 10148
IBM-1157 EBCDIC Estonia (with euro update) 10149
IBM-1158 EBCDIC Cyrillic Ukraine (with euro update) 10150
IBM1159 IBM EBCDIC Taiwan, Traditional Chinese 11001
IBM-1160 EBCDIC Thai (with euro update) 10151
IBM-1162 Thai (with euro update) 10033
IBM-1164 EBCDIC Vietnamese (with euro update) 10152
IBM-1250 MS Windows Latin2 (without euro update) 10058
IBM-1251 MS Windows Cyrillic (without euro update) 10059
Name Description ID
318 Appendix A: Code Pages

IBM-1255 MS Windows Hebrew (without euro update) 10060
IBM-1256 MS Windows Arabic (without euro update) 10062
IBM-1257 MS Windows Baltic (without euro update) 10064
IBM-1258 MS Windows Vietnamese (without euro update) 10066
IBM-12712 EBCDIC Hebrew (updated with euro and new sheqel, control characters)
10161
IBM-12712-s390 EBCDIC IBM-12712 for S/390 (lf and nl swapped) 10178
IBM-1277 Adobe Latin1 Encoding 10074
IBM13121 IBM EBCDIC Korean Extended CP13121 11002
IBM13124 IBM EBCDIC Simplified Chinese CP13124 11003
IBM-1363 PC Korean KSC MBCS Extended (with \ <-> Won mapping)
10032
IBM-1364 EBCDIC Korean Extended (SBCS IBM-13121 combined with DBCS IBM-4930)
10153
IBM-1371 EBCDIC Taiwan Extended (SBCS IBM-1159 combined with DBCS IBM-9027)
10154
IBM-1373 Taiwan Big-5 (with euro update) 10019
IBM-1375 MS Taiwan Big-5 with HKSCS extensions 10022
IBM-1386 PC Chinese GBK (IBM-1386) 10023
IBM-1388 EBCDIC Chinese GB (S-Ch DBCS-Host Data) 10155
IBM-1390 EBCDIC Japanese Katakana (with euro) 10156
IBM-1399 EBCDIC Japanese Latin-Kanji (with euro) 10157
IBM-16684 EBCDIC Japanese Extended (DBCS IBM-1390 combined with DBCS IBM-1399)
10158
IBM-16804 EBCDIC Arabic (with euro update) 10162
IBM-16804-s390 EBCDIC IBM-16804 for S/390 (lf and nl swapped) 10179
IBM-25546 ISO-2022 encoding for Korean (extension 1) 10089
IBM273 IBM EBCDIC German 2030
IBM277 EBCDIC Denmark, Norway 10115
IBM278 EBCDIC Finland, Sweden 10116
IBM280 IBM EBCDIC Italian 2035
IBM284 EBCDIC Spain, Latin America 10117
IBM285 IBM EBCDIC UK English 2038
IBM290 EBCDIC Japanese Katakana SBCS 10118
IBM297 IBM EBCDIC French 2040
IBM-33722 Japanese EUC (with \ <-> Yen mapping) 10017
IBM367 IBM367 10012
IBM-37-s390 EBCDIC IBM-37 for S/390 (lf and nl swapped) 10166
IBM420 EBCDIC Arabic 10119
IBM424 EBCDIC Hebrew (updated with new sheqel, control characters)
10120
IBM437 PC United States 10035
Name Description ID
Supported Code Pages for Sources and Targets 319

IBM-4899 EBCDIC Hebrew (with euro) 10159
IBM-4909 ISO Greek (with euro update) 10057
IBM4933 IBM Simplified Chinese CP4933 11004
IBM-4971 EBCDIC Greek (with euro update) 10160
IBM500 IBM EBCDIC International Latin-1 2044
IBM-5050 Japanese EUC (Packed Format) 10018
IBM-5123 EBCDIC Japanese Latin (with euro update) 10164
IBM-5351 MS Windows Hebrew (older version) 10061
IBM-5352 MS Windows Arabic (older version) 10063
IBM-5353 MS Windows Baltic (older version) 10065
IBM-803 EBCDIC Hebrew 10121
IBM833 IBM EBCDIC Korean CP833 833
IBM834 IBM EBCDIC Korean CP834 834
IBM835 IBM Taiwan, Traditional Chinese CP835 11005
IBM836 IBM EBCDIC Simplified Chinese Extended 11006
IBM837 IBM Simplified Chinese CP837 11007
IBM-838 EBCDIC Thai 10122
IBM-8482 EBCDIC Japanese Katakana SBCS (with euro update) 10165
IBM852 PC Latin2 (without euro update) 10038
IBM855 PC Cyrillic (without euro update) 10039
IBM-867 PC Hebrew (with euro update) 10050
IBM870 EBCDIC Latin2 10123
IBM871 EBCDIC Iceland 10124
IBM-874 PC Thai (without euro update) 10034
IBM-875 EBCDIC Greek 10125
IBM-901 PC Baltic (with euro update) 10054
IBM-902 PC Estonian (with euro update) 10055
IBM918 EBCDIC Urdu 10126
IBM930 IBM EBCDIC Japanese 930
IBM933 IBM EBCDIC Korean CP933 933
IBM935 IBM EBCDIC Simplified Chinese 935
IBM937 IBM EBCDIC Traditional Chinese 937
IBM939 IBM EBCDIC Japanese CP939 939
IBM-942 PC Japanese SJIS-78 syntax (IBM-942) 10015
IBM-943 PC Japanese SJIS-90 (IBM-943) 10016
IBM-949 PC Korea - KS (default) 10027
IBM-950 Taiwan Big-5 (without euro update) 10020
IBM-964 EUC Taiwan 10026
IBM-971 EUC Korean (DBCS-only) 10030
Name Description ID
320 Appendix A: Code Pages
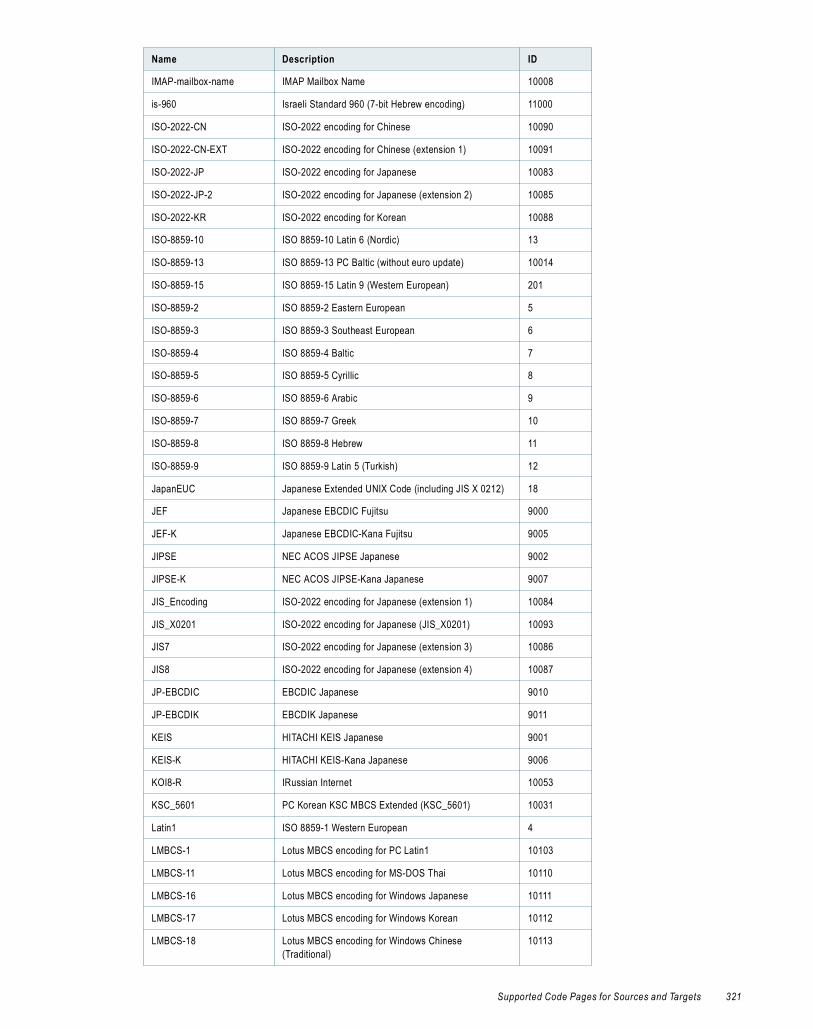
IMAP-mailbox-name IMAP Mailbox Name 10008
is-960 Israeli Standard 960 (7-bit Hebrew encoding) 11000
ISO-2022-CN ISO-2022 encoding for Chinese 10090
ISO-2022-CN-EXT ISO-2022 encoding for Chinese (extension 1) 10091
ISO-2022-JP ISO-2022 encoding for Japanese 10083
ISO-2022-JP-2 ISO-2022 encoding for Japanese (extension 2) 10085
ISO-2022-KR ISO-2022 encoding for Korean 10088
ISO-8859-10 ISO 8859-10 Latin 6 (Nordic) 13
ISO-8859-13 ISO 8859-13 PC Baltic (without euro update) 10014
ISO-8859-15 ISO 8859-15 Latin 9 (Western European) 201
ISO-8859-2 ISO 8859-2 Eastern European 5
ISO-8859-3 ISO 8859-3 Southeast European 6
ISO-8859-4 ISO 8859-4 Baltic 7
ISO-8859-5 ISO 8859-5 Cyrillic 8
ISO-8859-6 ISO 8859-6 Arabic 9
ISO-8859-7 ISO 8859-7 Greek 10
ISO-8859-8 ISO 8859-8 Hebrew 11
ISO-8859-9 ISO 8859-9 Latin 5 (Turkish) 12
JapanEUC Japanese Extended UNIX Code (including JIS X 0212) 18
JEF Japanese EBCDIC Fujitsu 9000
JEF-K Japanese EBCDIC-Kana Fujitsu 9005
JIPSE NEC ACOS JIPSE Japanese 9002
JIPSE-K NEC ACOS JIPSE-Kana Japanese 9007
JIS_Encoding ISO-2022 encoding for Japanese (extension 1) 10084
JIS_X0201 ISO-2022 encoding for Japanese (JIS_X0201) 10093
JIS7 ISO-2022 encoding for Japanese (extension 3) 10086
JIS8 ISO-2022 encoding for Japanese (extension 4) 10087
JP-EBCDIC EBCDIC Japanese 9010
JP-EBCDIK EBCDIK Japanese 9011
KEIS HITACHI KEIS Japanese 9001
KEIS-K HITACHI KEIS-Kana Japanese 9006
KOI8-R IRussian Internet 10053
KSC_5601 PC Korean KSC MBCS Extended (KSC_5601) 10031
Latin1 ISO 8859-1 Western European 4
LMBCS-1 Lotus MBCS encoding for PC Latin1 10103
LMBCS-11 Lotus MBCS encoding for MS-DOS Thai 10110
LMBCS-16 Lotus MBCS encoding for Windows Japanese 10111
LMBCS-17 Lotus MBCS encoding for Windows Korean 10112
LMBCS-18 Lotus MBCS encoding for Windows Chinese (Traditional)
10113
Name Description ID
Supported Code Pages for Sources and Targets 321
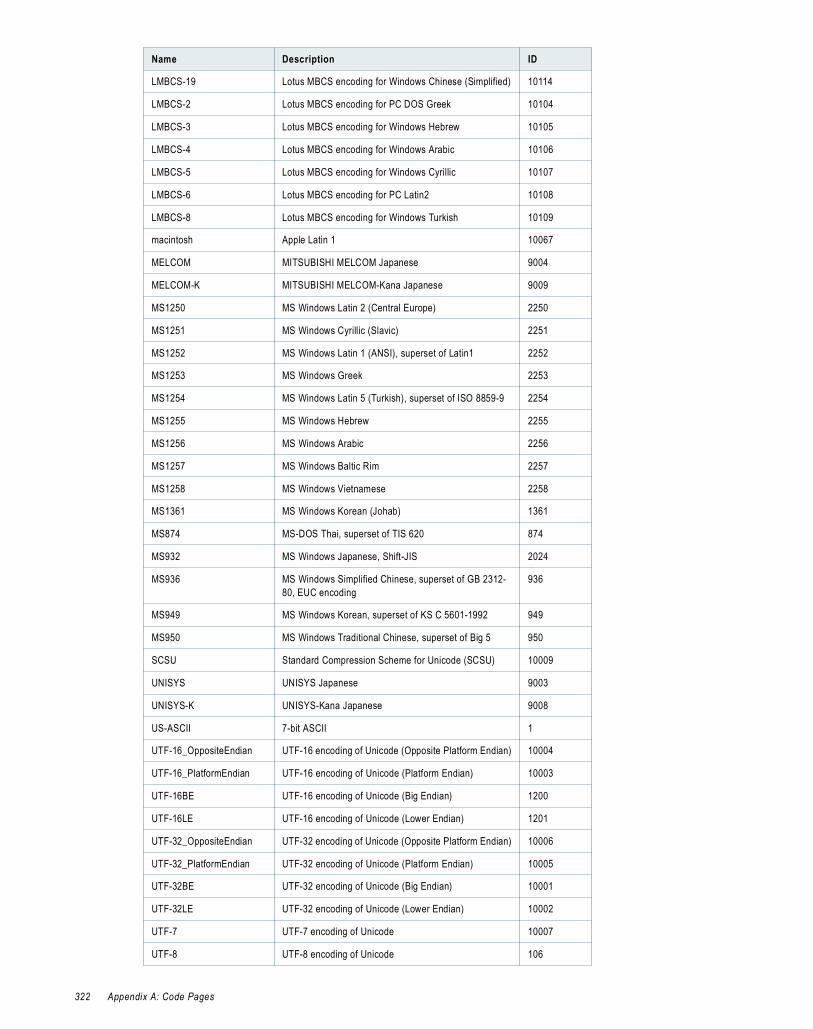
LMBCS-19 Lotus MBCS encoding for Windows Chinese (Simplified) 10114
LMBCS-2 Lotus MBCS encoding for PC DOS Greek 10104
LMBCS-3 Lotus MBCS encoding for Windows Hebrew 10105
LMBCS-4 Lotus MBCS encoding for Windows Arabic 10106
LMBCS-5 Lotus MBCS encoding for Windows Cyrillic 10107
LMBCS-6 Lotus MBCS encoding for PC Latin2 10108
LMBCS-8 Lotus MBCS encoding for Windows Turkish 10109
macintosh Apple Latin 1 10067
MELCOM MITSUBISHI MELCOM Japanese 9004
MELCOM-K MITSUBISHI MELCOM-Kana Japanese 9009
MS1250 MS Windows Latin 2 (Central Europe) 2250
MS1251 MS Windows Cyrillic (Slavic) 2251
MS1252 MS Windows Latin 1 (ANSI), superset of Latin1 2252
MS1253 MS Windows Greek 2253
MS1254 MS Windows Latin 5 (Turkish), superset of ISO 8859-9 2254
MS1255 MS Windows Hebrew 2255
MS1256 MS Windows Arabic 2256
MS1257 MS Windows Baltic Rim 2257
MS1258 MS Windows Vietnamese 2258
MS1361 MS Windows Korean (Johab) 1361
MS874 MS-DOS Thai, superset of TIS 620 874
MS932 MS Windows Japanese, Shift-JIS 2024
MS936 MS Windows Simplified Chinese, superset of GB 2312-80, EUC encoding
936
MS949 MS Windows Korean, superset of KS C 5601-1992 949
MS950 MS Windows Traditional Chinese, superset of Big 5 950
SCSU Standard Compression Scheme for Unicode (SCSU) 10009
UNISYS UNISYS Japanese 9003
UNISYS-K UNISYS-Kana Japanese 9008
US-ASCII 7-bit ASCII 1
UTF-16_OppositeEndian UTF-16 encoding of Unicode (Opposite Platform Endian) 10004
UTF-16_PlatformEndian UTF-16 encoding of Unicode (Platform Endian) 10003
UTF-16BE UTF-16 encoding of Unicode (Big Endian) 1200
UTF-16LE UTF-16 encoding of Unicode (Lower Endian) 1201
UTF-32_OppositeEndian UTF-32 encoding of Unicode (Opposite Platform Endian) 10006
UTF-32_PlatformEndian UTF-32 encoding of Unicode (Platform Endian) 10005
UTF-32BE UTF-32 encoding of Unicode (Big Endian) 10001
UTF-32LE UTF-32 encoding of Unicode (Lower Endian) 10002
UTF-7 UTF-7 encoding of Unicode 10007
UTF-8 UTF-8 encoding of Unicode 106
Name Description ID
322 Appendix A: Code Pages
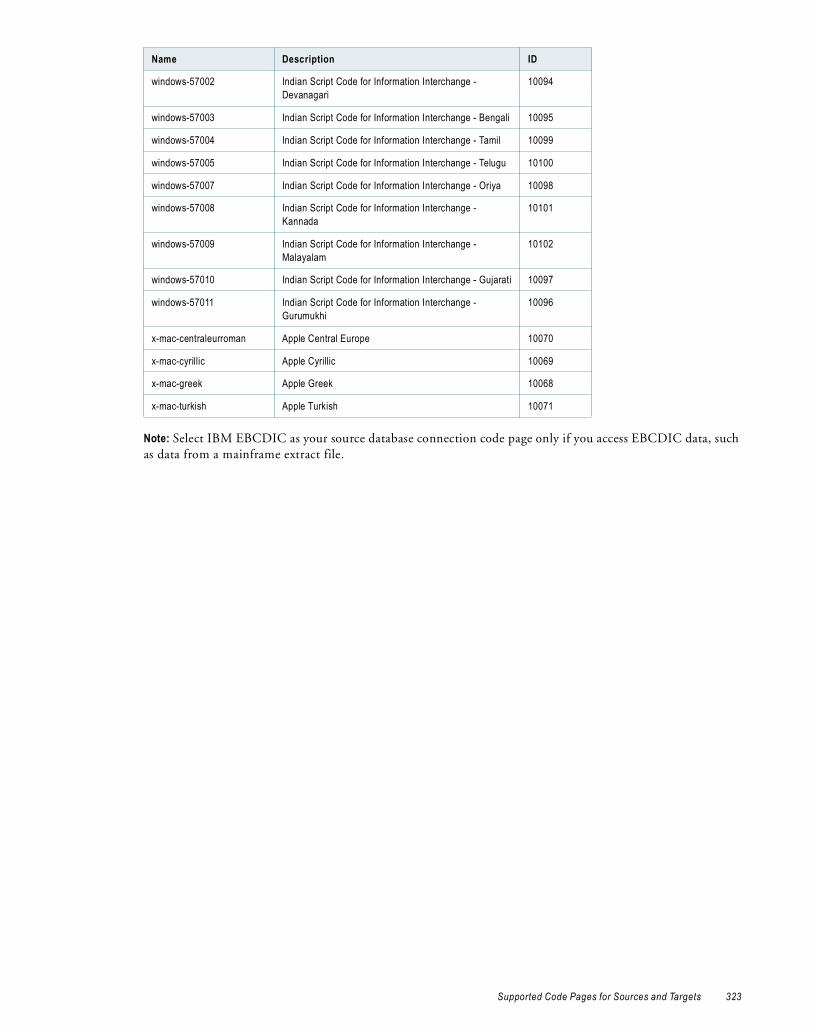
Note: Select IBM EBCDIC as your source database connection code page only if you access EBCDIC data, such as data from a mainframe extract file.
windows-57002 Indian Script Code for Information Interchange - Devanagari
10094
windows-57003 Indian Script Code for Information Interchange - Bengali 10095
windows-57004 Indian Script Code for Information Interchange - Tamil 10099
windows-57005 Indian Script Code for Information Interchange - Telugu 10100
windows-57007 Indian Script Code for Information Interchange - Oriya 10098
windows-57008 Indian Script Code for Information Interchange - Kannada
10101
windows-57009 Indian Script Code for Information Interchange - Malayalam
10102
windows-57010 Indian Script Code for Information Interchange - Gujarati 10097
windows-57011 Indian Script Code for Information Interchange - Gurumukhi
10096
x-mac-centraleurroman Apple Central Europe 10070
x-mac-cyrillic Apple Cyrillic 10069
x-mac-greek Apple Greek 10068
x-mac-turkish Apple Turkish 10071
Name Description ID
Supported Code Pages for Sources and Targets 323

324 Appendix A: Code Pages
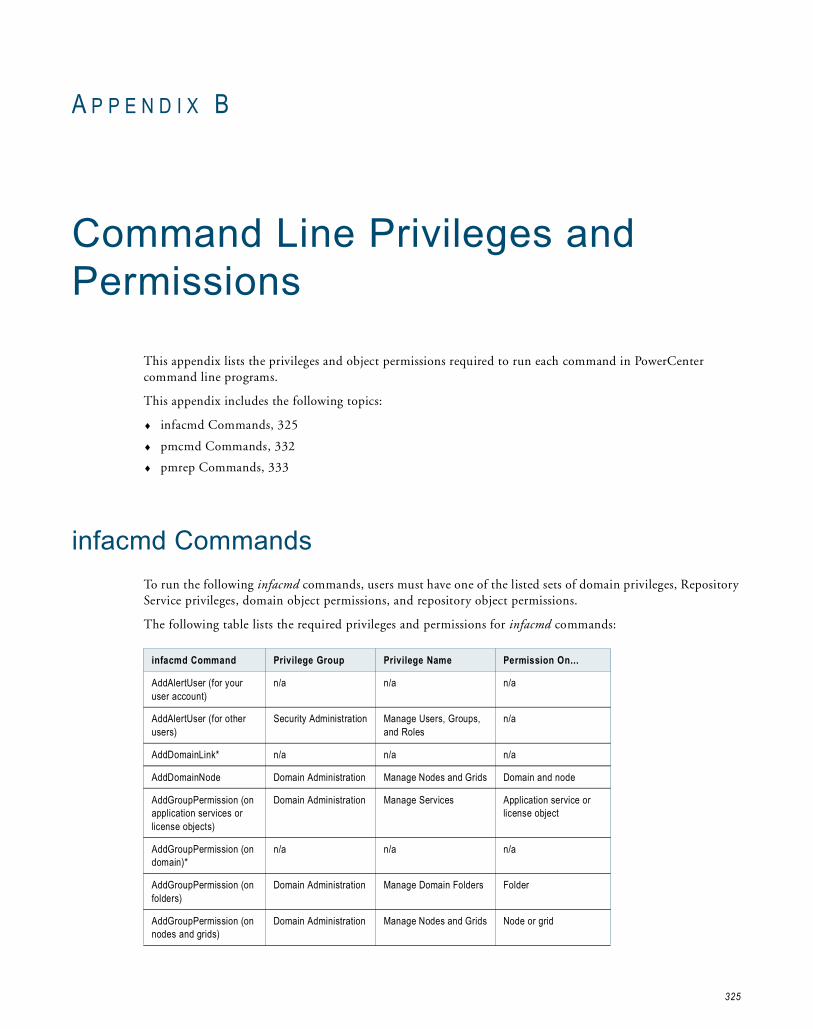
A P P E N D I X B
Command Line Privileges and Permissions
This appendix lists the privileges and object permissions required to run each command in PowerCenter command line programs.
This appendix includes the following topics:
♦ infacmd Commands, 325
♦ pmcmd Commands, 332
♦ pmrep Commands, 333
infacmd CommandsTo run the following infacmd commands, users must have one of the listed sets of domain privileges, Repository Service privileges, domain object permissions, and repository object permissions.
The following table lists the required privileges and permissions for infacmd commands:
infacmd Command Privilege Group Privilege Name Permission On...
AddAlertUser (for your user account)
n/a n/a n/a
AddAlertUser (for other users)
Security Administration Manage Users, Groups, and Roles
n/a
AddDomainLink* n/a n/a n/a
AddDomainNode Domain Administration Manage Nodes and Grids Domain and node
AddGroupPermission (on application services or license objects)
Domain Administration Manage Services Application service or license object
AddGroupPermission (on domain)*
n/a n/a n/a
AddGroupPermission (on folders)
Domain Administration Manage Domain Folders Folder
AddGroupPermission (on nodes and grids)
Domain Administration Manage Nodes and Grids Node or grid
325

AddGroupPermission (on operating system profiles)*
n/a n/a n/a
AddGroupPrivilege Security Administration Grant Privileges and Roles
Domain, Repository Service, Metadata Manager Service, Reporting Service, or Reference Table Manager Service
AddLicense Domain Administration Manage Services Domain or parent folder
AddNodeResource Domain Administration Manage Nodes and Grids Node
AddRolePrivilege Security Administration Manage Users, Groups, and Roles
n/a
AddServiceLevel* n/a n/a n/a
AddUserPermission (on application services or license objects)
Domain Administration Manage Services Application service or license object
AddUserPermission (on domain)*
n/a n/a n/a
AddUserPermission (on folders)
Domain Administration Manage Domain Folders Folder
AddUserPermission (on nodes or grids)
Domain Administration Manage Nodes and Grids Node or grid
AddUserPermission (on operating system profiles)*
n/a n/a n/a
AddUserPrivilege Security Administration Grant Privileges and Roles
Domain, Repository Service, Metadata Manager Service, Reporting Service, or Reference Table Manager Service
AddUserToGroup Security Administration Manage Users, Groups, and Roles
n/a
AssignedToLicense Domain Administration Manage Services License object and application service
AssignISTOMMService Domain Administration Manage Services Metadata Manager Service
AssignLicense Domain Administration Manage Services License object and application service
AssignRoleToGroup Security Administration Grant Privileges and Roles
Domain, Repository Service, Metadata Manager Service, Reporting Service, or Reference Table Manager Service
AssignRoleToUser Security Administration Grant Privileges and Roles
Domain, Repository Service, Metadata Manager Service, Reporting Service, or Reference Table Manager Service
AssignRSToWSHubService
Domain Administration Manage Services Repository Service and Web Services Hub
infacmd Command Privilege Group Privilege Name Permission On...
326 Appendix B: Command Line Privileges and Permissions
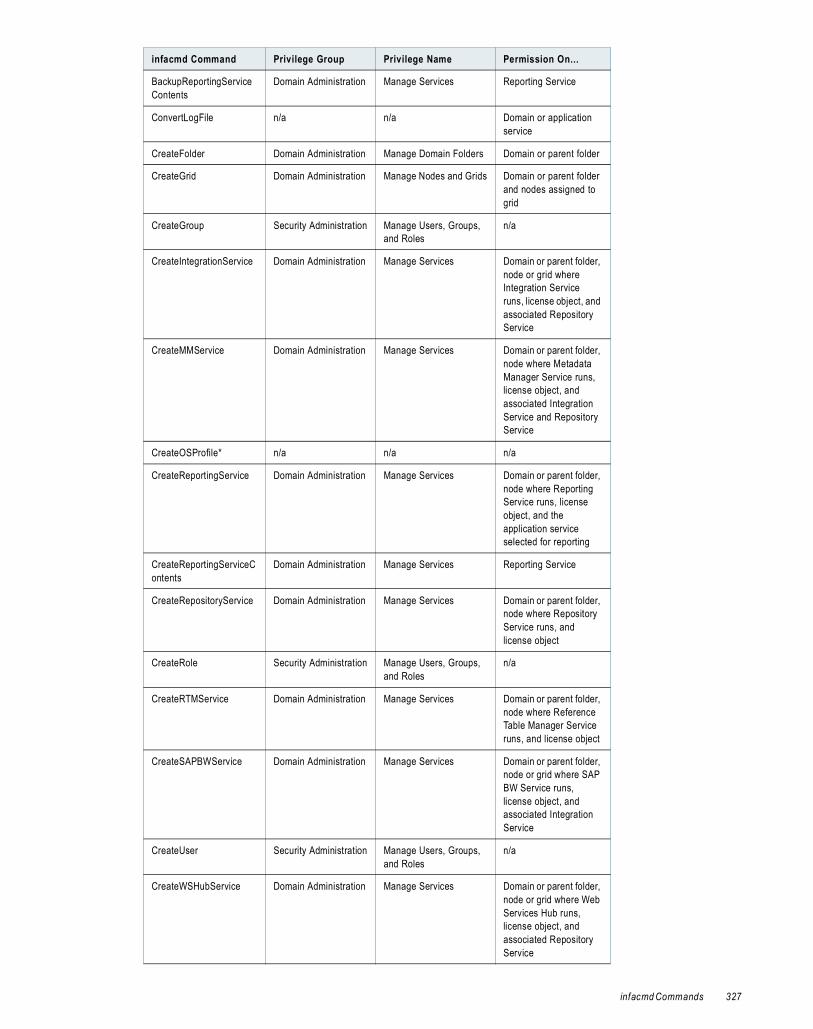
BackupReportingServiceContents
Domain Administration Manage Services Reporting Service
ConvertLogFile n/a n/a Domain or application service
CreateFolder Domain Administration Manage Domain Folders Domain or parent folder
CreateGrid Domain Administration Manage Nodes and Grids Domain or parent folder and nodes assigned to grid
CreateGroup Security Administration Manage Users, Groups, and Roles
n/a
CreateIntegrationService Domain Administration Manage Services Domain or parent folder, node or grid where Integration Service runs, license object, and associated Repository Service
CreateMMService Domain Administration Manage Services Domain or parent folder, node where Metadata Manager Service runs, license object, and associated Integration Service and Repository Service
CreateOSProfile* n/a n/a n/a
CreateReportingService Domain Administration Manage Services Domain or parent folder, node where Reporting Service runs, license object, and the application service selected for reporting
CreateReportingServiceContents
Domain Administration Manage Services Reporting Service
CreateRepositoryService Domain Administration Manage Services Domain or parent folder, node where Repository Service runs, and license object
CreateRole Security Administration Manage Users, Groups, and Roles
n/a
CreateRTMService Domain Administration Manage Services Domain or parent folder, node where Reference Table Manager Service runs, and license object
CreateSAPBWService Domain Administration Manage Services Domain or parent folder, node or grid where SAP BW Service runs, license object, and associated Integration Service
CreateUser Security Administration Manage Users, Groups, and Roles
n/a
CreateWSHubService Domain Administration Manage Services Domain or parent folder, node or grid where Web Services Hub runs, license object, and associated Repository Service
infacmd Command Privilege Group Privilege Name Permission On...
infacmd Commands 327
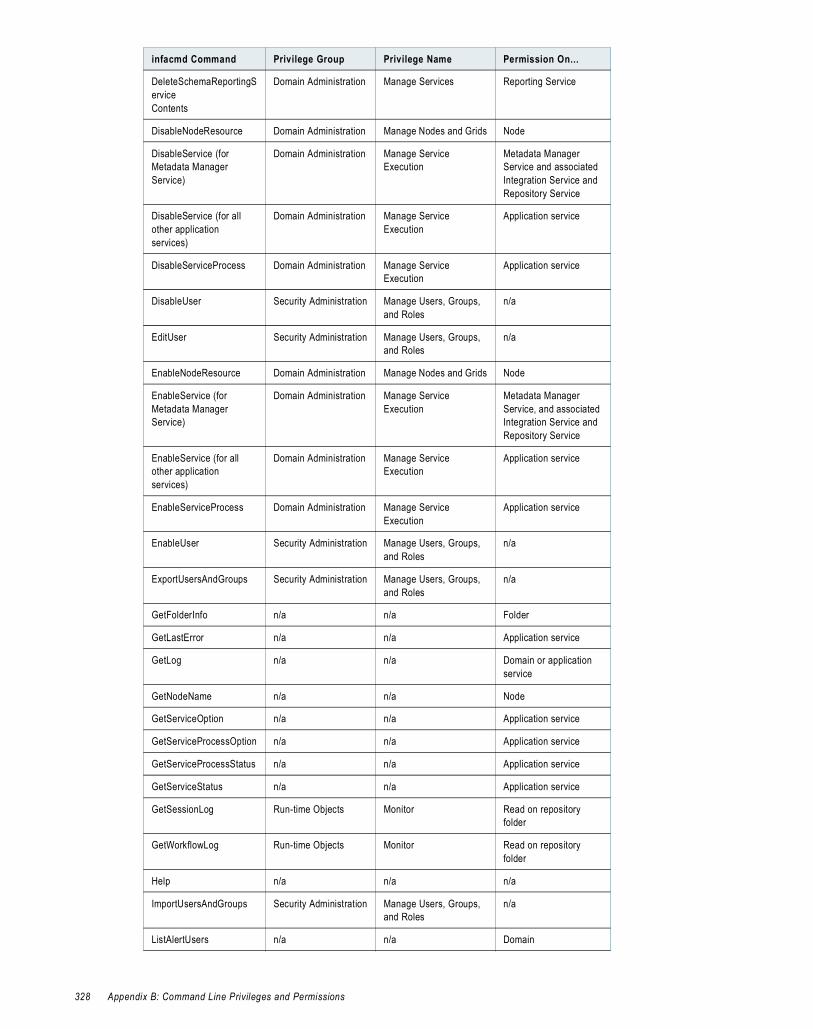
DeleteSchemaReportingService Contents
Domain Administration Manage Services Reporting Service
DisableNodeResource Domain Administration Manage Nodes and Grids Node
DisableService (for Metadata Manager Service)
Domain Administration Manage Service Execution
Metadata Manager Service and associated Integration Service and Repository Service
DisableService (for all other application services)
Domain Administration Manage Service Execution
Application service
DisableServiceProcess Domain Administration Manage Service Execution
Application service
DisableUser Security Administration Manage Users, Groups, and Roles
n/a
EditUser Security Administration Manage Users, Groups, and Roles
n/a
EnableNodeResource Domain Administration Manage Nodes and Grids Node
EnableService (for Metadata Manager Service)
Domain Administration Manage Service Execution
Metadata Manager Service, and associated Integration Service and Repository Service
EnableService (for all other application services)
Domain Administration Manage Service Execution
Application service
EnableServiceProcess Domain Administration Manage Service Execution
Application service
EnableUser Security Administration Manage Users, Groups, and Roles
n/a
ExportUsersAndGroups Security Administration Manage Users, Groups, and Roles
n/a
GetFolderInfo n/a n/a Folder
GetLastError n/a n/a Application service
GetLog n/a n/a Domain or application service
GetNodeName n/a n/a Node
GetServiceOption n/a n/a Application service
GetServiceProcessOption n/a n/a Application service
GetServiceProcessStatus n/a n/a Application service
GetServiceStatus n/a n/a Application service
GetSessionLog Run-time Objects Monitor Read on repository folder
GetWorkflowLog Run-time Objects Monitor Read on repository folder
Help n/a n/a n/a
ImportUsersAndGroups Security Administration Manage Users, Groups, and Roles
n/a
ListAlertUsers n/a n/a Domain
infacmd Command Privilege Group Privilege Name Permission On...
328 Appendix B: Command Line Privileges and Permissions

ListAllGroups n/a n/a n/a
ListAllRoles n/a n/a n/a
ListAllUsers n/a n/a n/a
ListDomainLinks n/a n/a Domain
ListDomainOptions n/a n/a Domain
ListFolders n/a n/a Folders
ListGridNodes n/a n/a Grid
ListGroupPrivilege Security Administration Grant Privileges and Roles
Domain, Repository Service, Metadata Manager Service, Reporting Service, or Reference Table Manager Service
ListLDAPConnectivity Security Administration Manage Users, Groups, and Roles
n/a
ListLicenses n/a n/a License objects
ListNodeOptions n/a n/a Node
ListNodes n/a n/a n/a
ListNodeResources n/a n/a Node
ListRepositoryLDAPConfiguration
n/a n/a Domain
ListRolePrivileges n/a n/a n/a
ListSecurityDomains Security Administration Manage Users, Groups, and Roles
n/a
ListServiceLevels n/a n/a Domain
ListServiceNodes n/a n/a Application service
ListServicePrivileges n/a n/a n/a
ListServices n/a n/a n/a
ListSMTPOptions n/a n/a Domain
ListUserPrivilege Security Administration Grant Privileges and Roles
Domain, Repository Service, Metadata Manager Service, Reporting Service, or Reference Table Manager Service
MigrateReportingServiceContents
Domain Administration and Security Administration
Manage Services and Manage Users, Groups, and Roles
Domain
MoveFolder Domain Administration Manage Domain Folders Original and destination folders
MoveObject (for application services or license objects)
Domain Administration Manage Services Original and destination folders
MoveObject (for nodes or grids)
Domain Administration Manage Nodes and Grids Original and destination folders
Ping n/a n/a n/a
PurgeLog* n/a n/a n/a
infacmd Command Privilege Group Privilege Name Permission On...
infacmd Commands 329
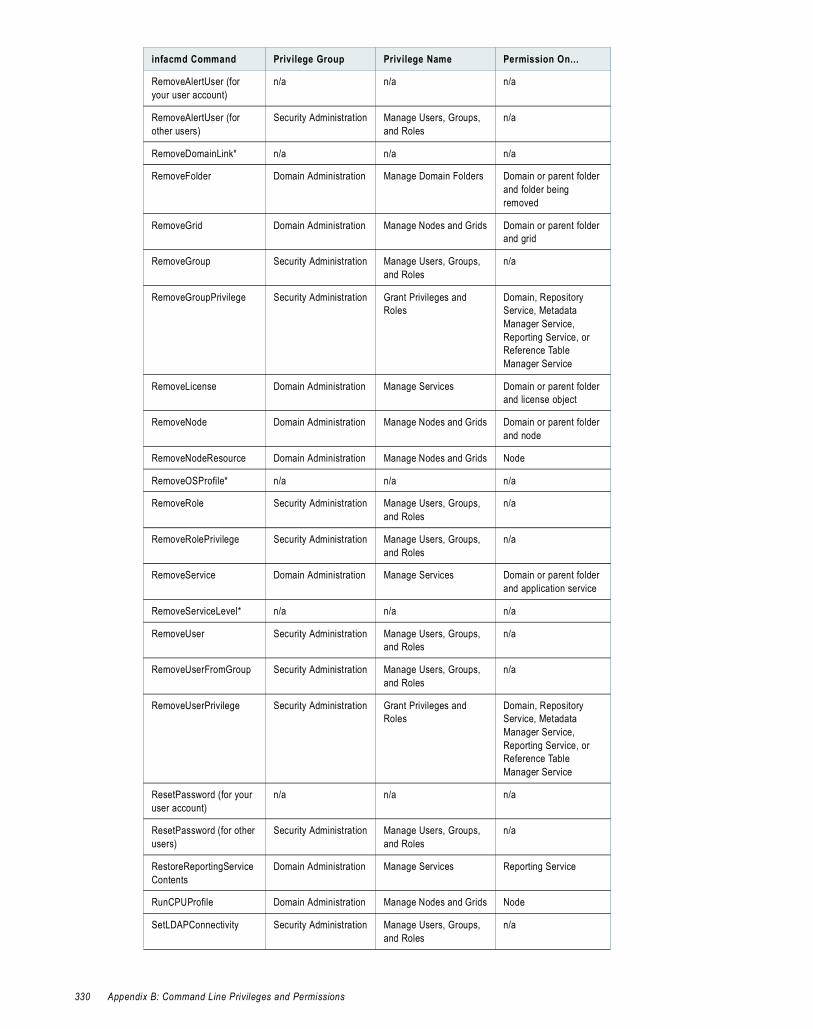
RemoveAlertUser (for your user account)
n/a n/a n/a
RemoveAlertUser (for other users)
Security Administration Manage Users, Groups, and Roles
n/a
RemoveDomainLink* n/a n/a n/a
RemoveFolder Domain Administration Manage Domain Folders Domain or parent folder and folder being removed
RemoveGrid Domain Administration Manage Nodes and Grids Domain or parent folder and grid
RemoveGroup Security Administration Manage Users, Groups, and Roles
n/a
RemoveGroupPrivilege Security Administration Grant Privileges and Roles
Domain, Repository Service, Metadata Manager Service, Reporting Service, or Reference Table Manager Service
RemoveLicense Domain Administration Manage Services Domain or parent folder and license object
RemoveNode Domain Administration Manage Nodes and Grids Domain or parent folder and node
RemoveNodeResource Domain Administration Manage Nodes and Grids Node
RemoveOSProfile* n/a n/a n/a
RemoveRole Security Administration Manage Users, Groups, and Roles
n/a
RemoveRolePrivilege Security Administration Manage Users, Groups, and Roles
n/a
RemoveService Domain Administration Manage Services Domain or parent folder and application service
RemoveServiceLevel* n/a n/a n/a
RemoveUser Security Administration Manage Users, Groups, and Roles
n/a
RemoveUserFromGroup Security Administration Manage Users, Groups, and Roles
n/a
RemoveUserPrivilege Security Administration Grant Privileges and Roles
Domain, Repository Service, Metadata Manager Service, Reporting Service, or Reference Table Manager Service
ResetPassword (for your user account)
n/a n/a n/a
ResetPassword (for other users)
Security Administration Manage Users, Groups, and Roles
n/a
RestoreReportingServiceContents
Domain Administration Manage Services Reporting Service
RunCPUProfile Domain Administration Manage Nodes and Grids Node
SetLDAPConnectivity Security Administration Manage Users, Groups, and Roles
n/a
infacmd Command Privilege Group Privilege Name Permission On...
330 Appendix B: Command Line Privileges and Permissions
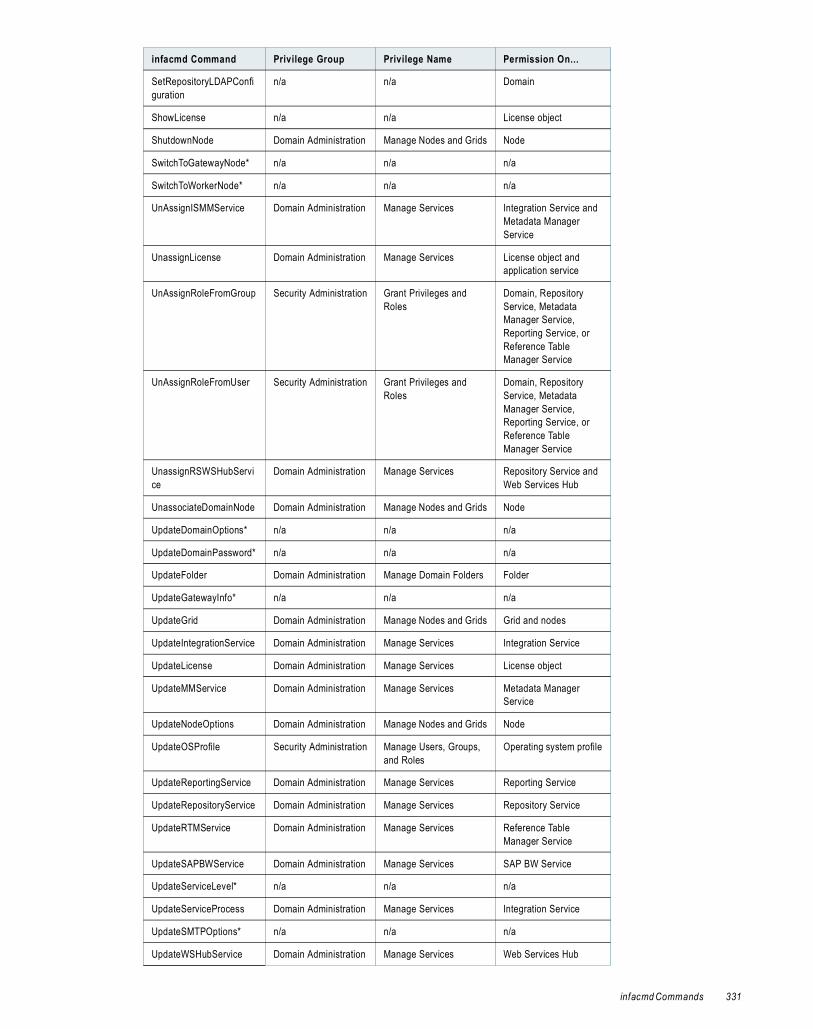
SetRepositoryLDAPConfiguration
n/a n/a Domain
ShowLicense n/a n/a License object
ShutdownNode Domain Administration Manage Nodes and Grids Node
SwitchToGatewayNode* n/a n/a n/a
SwitchToWorkerNode* n/a n/a n/a
UnAssignISMMService Domain Administration Manage Services Integration Service and Metadata Manager Service
UnassignLicense Domain Administration Manage Services License object and application service
UnAssignRoleFromGroup Security Administration Grant Privileges and Roles
Domain, Repository Service, Metadata Manager Service, Reporting Service, or Reference Table Manager Service
UnAssignRoleFromUser Security Administration Grant Privileges and Roles
Domain, Repository Service, Metadata Manager Service, Reporting Service, or Reference Table Manager Service
UnassignRSWSHubService
Domain Administration Manage Services Repository Service and Web Services Hub
UnassociateDomainNode Domain Administration Manage Nodes and Grids Node
UpdateDomainOptions* n/a n/a n/a
UpdateDomainPassword* n/a n/a n/a
UpdateFolder Domain Administration Manage Domain Folders Folder
UpdateGatewayInfo* n/a n/a n/a
UpdateGrid Domain Administration Manage Nodes and Grids Grid and nodes
UpdateIntegrationService Domain Administration Manage Services Integration Service
UpdateLicense Domain Administration Manage Services License object
UpdateMMService Domain Administration Manage Services Metadata Manager Service
UpdateNodeOptions Domain Administration Manage Nodes and Grids Node
UpdateOSProfile Security Administration Manage Users, Groups, and Roles
Operating system profile
UpdateReportingService Domain Administration Manage Services Reporting Service
UpdateRepositoryService Domain Administration Manage Services Repository Service
UpdateRTMService Domain Administration Manage Services Reference Table Manager Service
UpdateSAPBWService Domain Administration Manage Services SAP BW Service
UpdateServiceLevel* n/a n/a n/a
UpdateServiceProcess Domain Administration Manage Services Integration Service
UpdateSMTPOptions* n/a n/a n/a
UpdateWSHubService Domain Administration Manage Services Web Services Hub
infacmd Command Privilege Group Privilege Name Permission On...
infacmd Commands 331

pmcmd CommandsTo run the following pmcmd commands, users must have the listed sets of Repository Service privileges and repository object permissions.
The following table lists the required privileges and permissions for pmcmd commands:
UpgradeReportingServiceContents
Domain Administration Manage Services Reporting Service
*Users assigned the Administrator role for the domain can run these commands.
pmcmd Command Privilege Group Privilege Name Permission
aborttask (started by own user account)*
n/a n/a Read and Execute on folder
aborttask (started by other users)*
Run-time Objects Manage Execution Read and Execute on folder
abortworkflow (started by own user account)*
n/a n/a Read and Execute on folder
abortworkflow (started by other users)*
Run-time Objects Manage Execution Read and Execute on folder
connect n/a n/a n/a
disconnect n/a n/a n/a
exit n/a n/a n/a
getrunningsessionsdetails* Run-time Objects Monitor n/a
getservicedetails* Run-time Objects Monitor Read on folder
getserviceproperties n/a n/a n/a
getsessionstatistics* Run-time Objects Monitor Read on folder
gettaskdetails* Run-time Objects Monitor Read on folder
getworkflowdetails* Run-time Objects Monitor Read on folder
getworkflowfailedtasks* Run-time Objects Monitor Read on folder
help n/a n/a n/a
pingservice n/a n/a n/a
recoverworkflow (started by own user account)*
Run-time Objects Execute Read and Execute on folderRead and Execute on connection objectPermission on operating system profile**
recoverworkflow (started by other users)*
Run-time Objects Manage Execution Read and Execute on folderRead and Execute on connection objectPermission on operating system profile**
scheduleworkflow* Run-time Objects Manage Execution Read and Execute on folderRead and Execute on connection objectPermission on operating system profile**
infacmd Command Privilege Group Privilege Name Permission On...
332 Appendix B: Command Line Privileges and Permissions
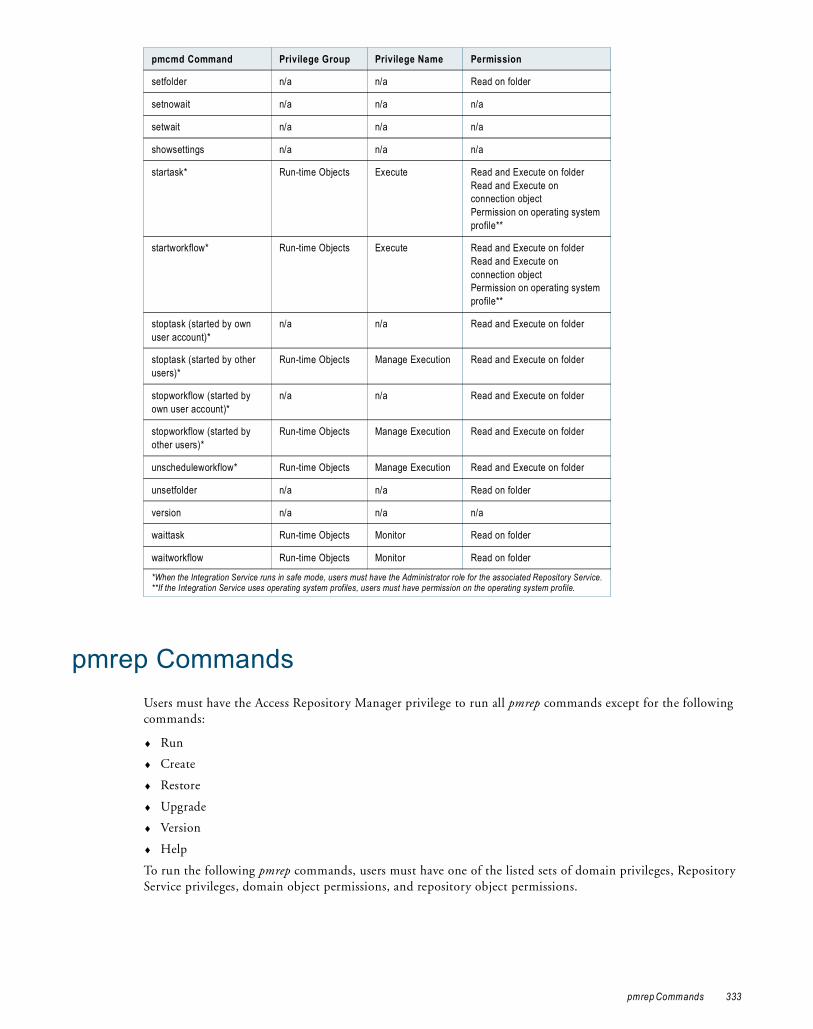
pmrep CommandsUsers must have the Access Repository Manager privilege to run all pmrep commands except for the following commands:
♦ Run
♦ Create
♦ Restore
♦ Upgrade
♦ Version
♦ Help
To run the following pmrep commands, users must have one of the listed sets of domain privileges, Repository Service privileges, domain object permissions, and repository object permissions.
setfolder n/a n/a Read on folder
setnowait n/a n/a n/a
setwait n/a n/a n/a
showsettings n/a n/a n/a
startask* Run-time Objects Execute Read and Execute on folderRead and Execute on connection objectPermission on operating system profile**
startworkflow* Run-time Objects Execute Read and Execute on folderRead and Execute on connection objectPermission on operating system profile**
stoptask (started by own user account)*
n/a n/a Read and Execute on folder
stoptask (started by other users)*
Run-time Objects Manage Execution Read and Execute on folder
stopworkflow (started by own user account)*
n/a n/a Read and Execute on folder
stopworkflow (started by other users)*
Run-time Objects Manage Execution Read and Execute on folder
unscheduleworkflow* Run-time Objects Manage Execution Read and Execute on folder
unsetfolder n/a n/a Read on folder
version n/a n/a n/a
waittask Run-time Objects Monitor Read on folder
waitworkflow Run-time Objects Monitor Read on folder
*When the Integration Service runs in safe mode, users must have the Administrator role for the associated Repository Service.**If the Integration Service uses operating system profiles, users must have permission on the operating system profile.
pmcmd Command Privilege Group Privilege Name Permission
pmrep Commands 333

The following table lists the required privileges and permissions for pmrep commands:
pmrep Command Privilege Group Privilege Name Permission
AddToDeploymentGroup Global Objects Manage Deployment Groups
Read on original folderRead and Write on deployment group
ApplyLabel n/a n/a Read on folderRead and Execute on label
AssignPermission* n/a n/a n/a
BackUp Domain Administration
Manage Services Permission on Repository Service
ChangeOwner* n/a n/a n/a
CheckIn (for your own checkouts)
Design Objects Create, Edit, and Delete
Read and Write on folder
Sources and Targets Create, Edit, and Delete
Read and Write on folder
Run-time Objects Create, Edit, and Delete
Read and Write on folder
CheckIn (for others’ checkouts)
Design Objects Manage Versions Read and Write on folder
Sources and Targets Manage Versions Read and Write on folder
Run-time Objects Manage Versions Read and Write on folder
CleanUp n/a n/a n/a
ClearDeploymentGroup Global Objects Manage Deployment Groups
Read and Write on deployment group
Connect n/a n/a n/a
Create Domain Administration
Manage Services Permission on Repository Service
CreateConnection Global Objects Create Connections n/a
CreateDeploymentGroup Global Objects Manage Deployment Groups
n/a
CreateFolder Folders Create n/a
CreateLabel Global Objects Create Labels n/a
Delete Domain Administration
Manage Services Permission on Repository Service
DeleteConnection* n/a n/a n/a
DeleteDeploymentGroup* n/a n/a n/a
DeleteFolder* n/a n/a n/a
DeleteLabel* n/a n/a n/a
DeleteObject Design Objects Create, Edit, and Delete
Read and Write on folder
Sources and Targets Create, Edit, and Delete
Read and Write on folder
Run-time Objects Create, Edit, and Delete
Read and Write on folder
334 Appendix B: Command Line Privileges and Permissions
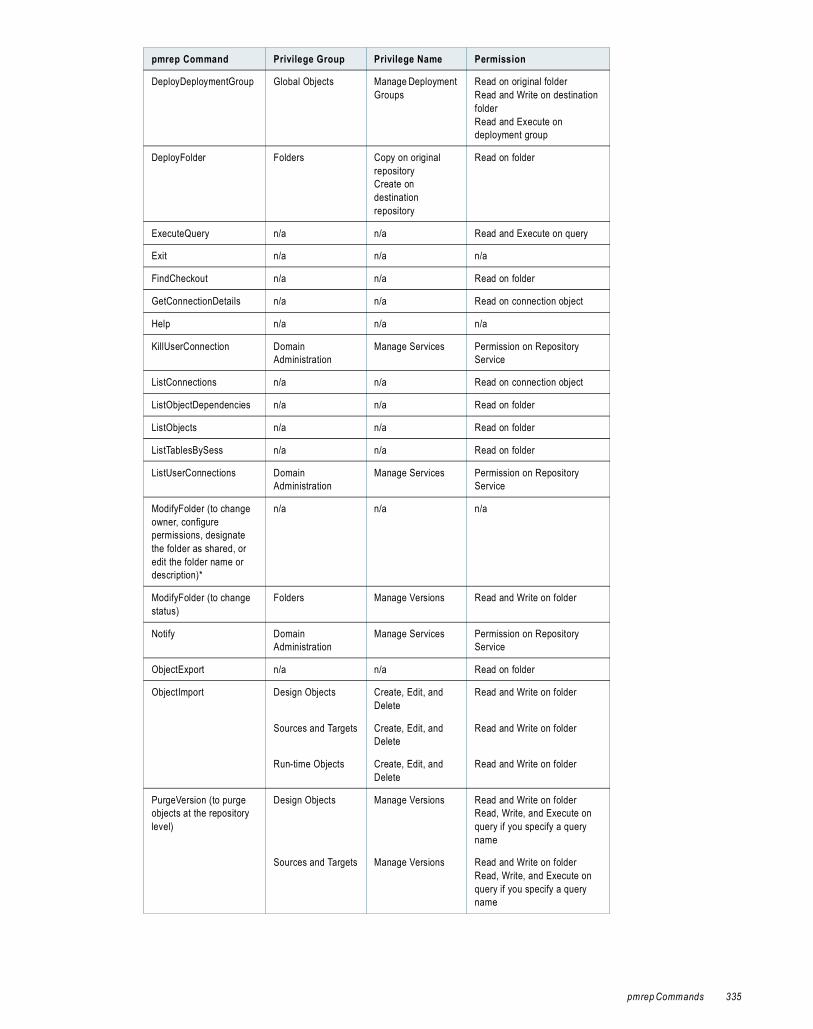
DeployDeploymentGroup Global Objects Manage Deployment Groups
Read on original folderRead and Write on destination folderRead and Execute on deployment group
DeployFolder Folders Copy on original repositoryCreate on destination repository
Read on folder
ExecuteQuery n/a n/a Read and Execute on query
Exit n/a n/a n/a
FindCheckout n/a n/a Read on folder
GetConnectionDetails n/a n/a Read on connection object
Help n/a n/a n/a
KillUserConnection Domain Administration
Manage Services Permission on Repository Service
ListConnections n/a n/a Read on connection object
ListObjectDependencies n/a n/a Read on folder
ListObjects n/a n/a Read on folder
ListTablesBySess n/a n/a Read on folder
ListUserConnections Domain Administration
Manage Services Permission on Repository Service
ModifyFolder (to change owner, configure permissions, designate the folder as shared, or edit the folder name or description)*
n/a n/a n/a
ModifyFolder (to change status)
Folders Manage Versions Read and Write on folder
Notify Domain Administration
Manage Services Permission on Repository Service
ObjectExport n/a n/a Read on folder
ObjectImport Design Objects Create, Edit, and Delete
Read and Write on folder
Sources and Targets Create, Edit, and Delete
Read and Write on folder
Run-time Objects Create, Edit, and Delete
Read and Write on folder
PurgeVersion (to purge objects at the repository level)
Design Objects Manage Versions Read and Write on folderRead, Write, and Execute on query if you specify a query name
Sources and Targets Manage Versions Read and Write on folderRead, Write, and Execute on query if you specify a query name
pmrep Command Privilege Group Privilege Name Permission
pmrep Commands 335

Run-time Objects Manage Versions Read and Write on folderRead, Write, and Execute on query if you specify a query name
Domain Administration
Manage Services Permission on Repository Service
PurgeVersion (to purge objects at the folder level)
Design Objects Manage Versions Read and Write on folderRead, Write, and Execute on query if you specify a query name
Sources and Targets Manage Versions Read and Write on folderRead, Write, and Execute on query if you specify a query name
Run-time Objects Manage Versions Read and Write on folderRead, Write, and Execute on query if you specify a query name
Folders Manage Versions Read and Write on folder
Register Domain Administration
Manage Services Permission on Repository Service
RegisterPlugin Domain Administration
Manage Services Permission on Repository Service
Restore Domain Administration
Manage Services Permission on Repository Service
RollbackDeployment Global Objects Manage Deployment Groups
Read and Write on destination folder
Run n/a n/a n/a
ShowConnectionInfo n/a n/a n/a
SwitchConnection Run-time Objects Create, Edit, and Delete
Read and Write on folderRead on connection object
TruncateLog Run-time Objects Manage Execution Read and Execute on folder
UndoCheckout (for your own checkouts)
Design Objects Create, Edit, and Delete
Read and Write on folder
Sources and Targets Create, Edit, and Delete
Read and Write on folder
Run-time Objects Create, Edit, and Delete
Read and Write on folder
UndoCheckout (for others’ checkouts)
Design Objects Manage Versions Read and Write on folder
Sources and Targets Manage Versions Read and Write on folder
Run-time Objects Manage Versions Read and Write on folder
Unregister Domain Administration
Manage Services Permission on Repository Service
UnregisterPlugin Domain Administration
Manage Services Permission on Repository Service
UpdateConnection n/a n/a Read and Write on connection object
UpdateEmailAddr Run-time Objects Create, Edit, and Delete
Read and Write on folder
pmrep Command Privilege Group Privilege Name Permission
336 Appendix B: Command Line Privileges and Permissions
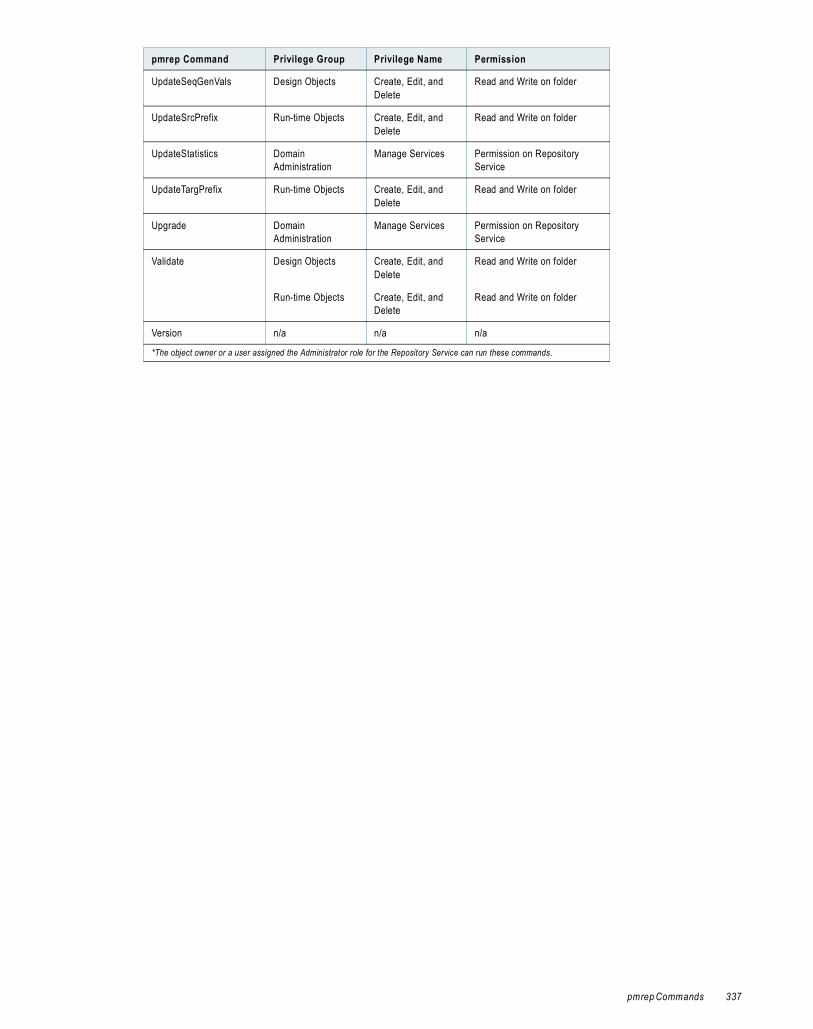
UpdateSeqGenVals Design Objects Create, Edit, and Delete
Read and Write on folder
UpdateSrcPrefix Run-time Objects Create, Edit, and Delete
Read and Write on folder
UpdateStatistics Domain Administration
Manage Services Permission on Repository Service
UpdateTargPrefix Run-time Objects Create, Edit, and Delete
Read and Write on folder
Upgrade Domain Administration
Manage Services Permission on Repository Service
Validate Design Objects Create, Edit, and Delete
Read and Write on folder
Run-time Objects Create, Edit, and Delete
Read and Write on folder
Version n/a n/a n/a
*The object owner or a user assigned the Administrator role for the Repository Service can run these commands.
pmrep Command Privilege Group Privilege Name Permission
pmrep Commands 337

338 Appendix B: Command Line Privileges and Permissions

A P P E N D I X C
Custom Roles
This appendix lists the default privileges assigned to each Repository Service, Metadata Manager Service, and Reporting Service custom role.
This appendix includes the following topics:
♦ Repository Service Custom Roles, 339
♦ Metadata Manager Service Custom Roles, 340
♦ Reporting Service Custom Roles, 341
Repository Service Custom RolesThe following table lists the default privileges assigned to each Repository Service custom role:
Custom Role Privilege Group Privilege Name
PowerCenter Connection Administrator
Tools - Access Workflow Manager
Global Objects - Create Connections
PowerCenter Developer Tools - Access Designer- Access Workflow Manager- Access Workflow Monitor
Design Objects - Create, Edit, and Delete- Manage Versions
Sources and Targets - Create, Edit, and Delete- Manage Versions
Run-time Objects - Create, Edit, and Delete- Execute- Manage Versions- Monitor
PowerCenterOperator Tools - Access Workflow Monitor
Run-time Objects - Execute- Manage Execution- Monitor
PowerCenter Repository Folder Administrator
Tools - Access Repository Manager
339

Metadata Manager Service Custom RolesThe following table lists the default privileges assigned to each Metadata Manager Service custom role:
Folders - Copy- Create- Manage Versions
Global Objects - Manage Deployment Groups- Execute Deployment Groups- Create Labels- Create Queries
Custom Role Privilege Group Privilege Name
Metadata Manager Advanced User Catalog - Share Shortcuts- View Lineage- View Reports- View Profile Results- View Relationships- Manage Relationships- View Comments- Post Comments- Delete Comments- View Links- Manage Links- Manage Objects
Load - View Resource- Load Resource- Manage Schedules- Purge Metadata- Manage Resource
Model - View Model- Manage Model- Export/Import Models
Security - Manage Catalog Permissions
Metadata Manager Basic User Catalog - View Lineage- View Relationships- View Comments- View Links
Model - View Model
Metadata Manager Intermediate User
Catalog - View Lineage- View Reports- View Profile Results- View Relationships- View Comments- Post Comments- Delete Comments- View Links- Manage Links
Load - View Resource- Load Resource
Model - View Model
Custom Role Privilege Group Privilege Name
340 Appendix C: Custom Roles

Reporting Service Custom RolesThe following table lists the default privileges assigned to each Reporting Service custom role:
Custom Role Privilege Group Privilege Name
Reporting Service Advanced Consumer Administration - Maintain Schema- Export/Import XML Files- Manage User Access- Set Up Schedules and Tasks- Manage System Properties- Set Up Query Limits- Configure Real-time Message
Streams
Alerts - Receive Alerts- Create Real-time Alerts- Set up Delivery Options
Communication - Print- Email Object Links- Email Object Contents- Export- Export to Excel or CSV- Export to Pivot Table- View Discussions- Add Discussions- Manage Discussions- Give Feedback
Content Directory - Access Content Directory- Access Advanced Search- Manage Content Directory- Manage Advanced Search
Dashboard - View Dashboards- Manage Personal Dashboards
Indicators - Interact with Indicators- Create Real-time Indicators- Get Continuous, Automatic Real-time
Indicator Updates
Manage Accounts - Manage Personal Settings
Reports - View Reports- Analyze Reports- Interact with Data- Drill Anywhere- Create Filtersets- Promote Custom Metric- View Query- View Life Cycle Metadata- Create and Delete Reports- Access Basic Report Creation- Access Advanced Report Creation- Save Copy of Reports- Edit Reports
Reporting Service Advanced Provider Administration - Maintain Schema
Alerts - Receive Alerts- Create Real-time Alerts- Set Up Delivery Options
Reporting Service Custom Roles 341
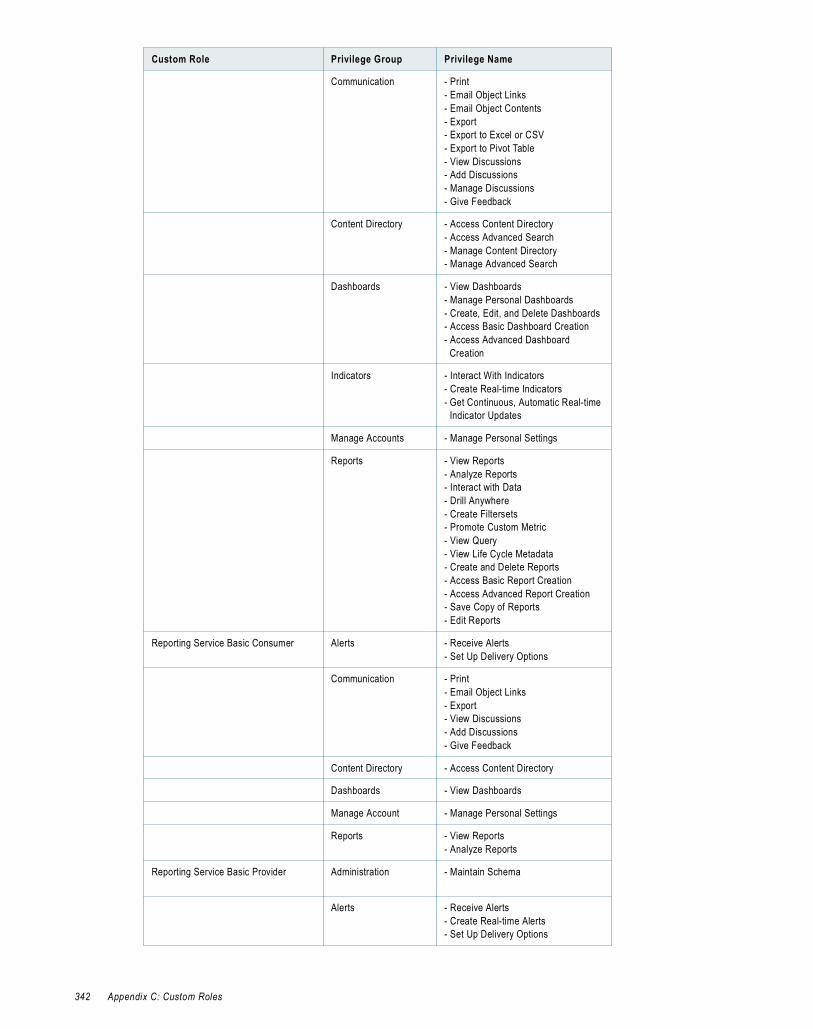
Communication - Print- Email Object Links- Email Object Contents- Export- Export to Excel or CSV- Export to Pivot Table- View Discussions- Add Discussions- Manage Discussions- Give Feedback
Content Directory - Access Content Directory- Access Advanced Search- Manage Content Directory- Manage Advanced Search
Dashboards - View Dashboards- Manage Personal Dashboards- Create, Edit, and Delete Dashboards- Access Basic Dashboard Creation- Access Advanced Dashboard
Creation
Indicators - Interact With Indicators- Create Real-time Indicators- Get Continuous, Automatic Real-time
Indicator Updates
Manage Accounts - Manage Personal Settings
Reports - View Reports- Analyze Reports- Interact with Data- Drill Anywhere- Create Filtersets- Promote Custom Metric- View Query- View Life Cycle Metadata- Create and Delete Reports- Access Basic Report Creation- Access Advanced Report Creation- Save Copy of Reports- Edit Reports
Reporting Service Basic Consumer Alerts - Receive Alerts- Set Up Delivery Options
Communication - Print- Email Object Links- Export- View Discussions- Add Discussions- Give Feedback
Content Directory - Access Content Directory
Dashboards - View Dashboards
Manage Account - Manage Personal Settings
Reports - View Reports- Analyze Reports
Reporting Service Basic Provider Administration - Maintain Schema
Alerts - Receive Alerts- Create Real-time Alerts- Set Up Delivery Options
Custom Role Privilege Group Privilege Name
342 Appendix C: Custom Roles

Communication - Print- Email Object Links- Email Object Contents- Export- Export To Excel or CSV- Export To Pivot Table- View Discussions- Add Discussions- Manage Discussions- Give Feedback
Content Directory - Access Content Directory- Access Advanced Search- Manage Content Directory- Manage Advanced Search
Dashboards - View Dashboards- Manage Personal Dashboards- Create, Edit, and Delete Dashboards- Access Basic Dashboard Creation
Indicators - Interact with Indicators- Create Real-time Indicators- Get Continuous, Automatic Real-time
Indicator Updates
Manage Accounts - Manage Personal Settings
Reports - View Reports- Analyze Reports- Interact with Data- Drill Anywhere- Create Filtersets- Promote Custom Metric- View Query- View Life Cycle Metadata- Create and Delete Reports- Access Basic Report Creation- Access Advanced Report Creation- Save Copy of Reports- Edit Reports
Reporting Service Intermediate Consumer
Alerts - Receive Alerts- Set Up Delivery Options
Communication - Print- Email Object Links- Export- Export to Excel or CSV- Export to Pivot Table- View Discussions- Add Discussions- Manage Discussions- Give Feedback
Content Directory - Access Content Directory
Dashboards - View Dashboards- Manage Personal Dashboards
Indicators - Interact with Indicators- Get Continuous, Automatic Real-time
Indicator Updates
Manage Accounts - Manage Personal Settings
Custom Role Privilege Group Privilege Name
Reporting Service Custom Roles 343

Reports - View Reports- Analyze Reports- Interact with Data- View Life Cycle Metadata- Save Copy of Reports
Reporting Service Read Only Consumer Reports - View Reports
Reporting Service Schema Designer Administration - Maintain Schema- Set Up Schedules and Tasks- Configure Real-time Message
Streams
Alerts - Receive Alerts- Create Real-time Alerts- Set Up Delivery Options
Communication - Print- Email Object Links- Email Object Contents- Export- Export to Excel or CSV- Export to Pivot Table- View Discussions- Add Discussions- Manage Discussions- Give Feedback
Content Directory - Access Content Directory- Access Advanced Search- Manage Content Directory- Manage Advanced Search
Dashboards - View Dashboards- Manage Personal Dashboards- Create, Edit, and Delete Dashboards
Indicators - Interact with Indicators- Create Real-time Indicators- Get Continuous, Automatic Real-time
Indicator Updates
Manage Accounts - Manage Personal Settings
Reports - View Reports- Analyze Reports- Interact with Data- Drill Anywhere- Create Filtersets- Promote Custom Metric- View Query- View Life Cycle Metadata- Create and Delete Reports- Access Basic Report Creation- Access Advanced Report Creation- Save Copy of Reports- Edit Reports
Custom Role Privilege Group Privilege Name
344 Appendix C: Custom Roles

I N D E X
AAbort
option to disable Integration Service 150option to disable Integration Service process 150option to disable the Web Services Hub 236
activity dataWeb Services Report 279
adaptive dispatch modedescription 222overview 174
Additional JDBC Parametersdescription 197
Administration Consolecode page 301Domain page 14Domain tab 15, 19HTTPS, configuring 13keyboard shortcuts 30log errors, viewing 264logging in 11Logs tab 16logs, viewing 260Manage Account tab 18Navigator 19, 27overview 11, 31Permissions tab 17reports 269Reports tab 17repositories, backing up 140repositories, restoring 141repository notifications, sending 140SAP BW Service, configuring 228searching 26Security page 25service process, enabling and disabling 37services, enabling and disabling 37tabs, viewing 14tasks for Web Services Hub 233Upgrade tab 18
Administratorrole 95
administratorsapplication 56default 56domain 56
advanced propertiesIntegration Service 157Metadata Manager Service 198Reference Table Manager Service 246
Repository Service 127Web Services Hub 236, 238
agent portdescription 196
AggregateTreatNullsAsZerooption 159option override 159
AggregateTreatRowsAsInsertoption 159option override 159
Aggregator transformationcaches 183, 188treating nulls as zero 159treating rows as insert 159
alertsconfiguring 32description 3managing 32notification email 33subscribing to 33tracking 33viewing 33
AllowWritesWithRACaching (property)description 127
anonymous loginLDAP directory service 58
application service processdisabling 37enabling 37failed status 37port assignment 4standby status 37status 37stopped status 37
application servicesauthorization 7description 4disabling 37enabling 37licenses, assigning 250licenses, unassigning 251overview 20Reference Table Manager Service 23removing 39resilience, configuring 110user synchronization 7Web Services Hub 23
application sourcescode page 302
345

application targetscode page 303
ASCII modeSee also Unicode modeASCII data movement mode, setting 156overview 184, 296
associated repositoryWeb Services Hub, adding to 239Web Services Hub, editing for 240
associated Repository Servicenew Integration Service 149Web Services Hub 235, 240
audit trailscreating 144
authenticationdescription 57LDAP 7, 58log events 265native 7, 57Service Manager 7
authorizationapplication services 7log events 265Metadata Manager Service 7Reporting Service 7Repository Service 7Service Manager 3, 7
auto-selectnetwork high availability 119
Average Service Time (property)Web Services Report 279
Avg DTM Time (property)Web Services Report 279
Avg. No. of Run Instances (property)Web Services Report 279
Avg. No. of Service Partitions (property)Web Services Report 279
Bbacking up
domain configuration database 48list of backup files 141performance 144repositories 140
backup directorynode property 42
backup nodelicense requirement 156new Integration Service 149node assignment, configuring 156
BackupDomain commanddescription 48
baseline systemCPU profile 225
basic dispatch modeoverview 174
binaryexporting logs in 259
blockingdescription 180
blocking source dataIntegration Service handling 180
Browse privilege groupdescription 86
buffer memorySee also PowerCenter Advanced Workflow Guidebuffer blocks 183DTM process 183
Ccache files
directory 165overview 188permissions 185
cachesSee also PowerCenter Advanced Workflow Guidedefault directory 188memory 183memory usage 183overview 185transformation 188
case studyprocessing ISO 8859-1 data 309processing Unicode UTF-8 data 311
catalina.outtroubleshooting 257
categorydomain log events 265
certificatekeystore file 235, 238
character data movement modesSee data movement modes
character data setsSee also PowerCenter Designer Guidehandling options for Microsoft SQL Server and PeopleSoft on
Oracle 159character encoding
Web Services Hub 237character sizes
double byte 299multibyte 299single byte 299
classpathsJava SDK 167
ClientStoreoption 158
clustered file systemshigh availability 109
Code Page (property)Integration Service process 164Repository Service 123
code page relaxationcompatible code pages, selecting 307configuring the Integration Service 307data inconsistencies 306overview 306troubleshooting 307
code page validationoverview 305relaxed validation 306
346 Index

code pagesAdministration Console 301application sources 302application targets 303choosing 299compatibility diagram 304compatibility overview 299conversion 308Custom transformation 305data movement modes 184descriptions 316domain configuration database 301External Procedure transformation 305flat file sources 302flat file targets 303for Integration Service process 164global repository 135ID 316Integration Service process 301, 315lookup database 305Metadata Manager Service 302names 316overview 298pmcmd 302PowerCenter Client 301relational sources 302relational targets 303relationships 305relaxed validation for sources and targets 306repository 122, 135, 302, 315repository, Web Services Hub 234sort order overview 301sources 302, 316stored procedure database 305supported code pages 315, 316targets 303, 316UNIX 298validation 176, 305validation for sources and targets 161Windows 299
command line programsprivileges 325resilience, configuring 111
CommentsRequiredForCheckin (property)description 127
compatibilitybetween code pages 299between source and target code pages 307
compatibility propertiesIntegration Service 158
compatibledefined for code page compatibility 299
Completeoption to disable Integration Service 150option to disable Integration Service process 150
complete history statisticsWeb Services Report 283
configuration propertiesIntegration Service 160Reference Table Manager Service 245
connect stringexamples 124, 193repository database 126
syntax 124, 193connection objects
privileges 83connection pool properties
Reference Table Manager Service 246connection resources
assigning 218connection timeout
high availability 104connections
See user connectionsconnectivity
See also PowerCenter Configuration Guideconnect string examples 124, 193overview 170
control fileoverview 187permissions 185
CPUlogical 271
CPU profilecomputing 225description 225node property 42
CPU usagecalculation 271description 271Integration Service 183
CPU Usage Analysis chartdescription 272
CPU Usage Per Day tabledescription 272
CPU Usage Per Node tabledescription 272
CPU Usage Per Service tabledescription 273
CreateIndicatorFilesoption 160
custom metricsSee also Data Analyzer User Guideprivilege to promote 89, 93
custom propertiesdomain 51, 52Integration Service 155Integration Service process 167Repository Service 128Repository Service process 128Web Services Hub 236
custom resourcesdefining 219naming conventions 219
custom rolesassigning to users and groups 98creating 96deleting 97description 94, 96editing 97Metadata Manager Service 340privileges, assigning 97Reporting Service 341Repository Service 339
Custom transformationdirectory for Java components 166
Index 347
DData Analyzer
administrator 56Data Profiling reports 204Metadata Manager Repository Reports 204repository 205
data cachesmemory usage 183
data handlingsetting up prior version compatibility 159
data lineageSee also PowerCenter Designer GuideRepository Service, configuring 145
data movement modeSee also ASCII modeSee also Unicode modeASCII 296changing 297description 296effect on session files and caches 297for Integration Service 149option 156overview 184, 296setting 156Unicode 297
data sourcesSee also Data Analyzer Administrator Guide
databasedomain configuration 48Reporting Service 205repositories, creating for 122
database array operation sizedescription 126
database clientenvironment variables 128, 167
database connection timeoutdescription 126
database connectionsresilience 114updating for domain configuration 51
Database Hostnamedescription 197
Database Namedescription 197
Database Pool Expiry Threshold (property)description 127
Database Pool Expiry Timeout (property)description 128
Database Pool Size (property)description 126
Database Portdescription 197
database propertiesdomain 52Reference Table Manager Service 245
database resiliencedomain configuration 105Integration Service 105Lookup transformation 105repository 105, 112sources 105targets 105
DateDisplayFormatoption 161
DateHandling40Compatibilityoption 159
datesdefault format for logs 161
DB2See IBM DB2
deadlock retriessetting number 160
DeadlockSleepoption 160
Debugerror severity level 157, 238
Debuggerrunning 157
default administratordescription 56modifying 56passwords, changing 56
deployment groupsprivileges 83
design objectsdescription 79privileges 79
Design Objects privilege groupdescription 79
directoriescache files 165external procedure files 165for Java components 166lookup files 165recovery files 165reject files 165root directory 165session log files 165source files 165target files 165temporary files 165workflow log files 165
disable modeservices and service processes 37
disablingIntegration Service 150Integration Service process 150Metadata Manager Service 195Reference Table Manager Service 243Reporting Service 208, 209Web Services Hub 236
dispatch modeadaptive 222configuring 222Load Balancer 174metric-based 222round-robin 222
dispatch priorityconfiguring 223
dispatch queueoverview 173service levels, creating 223
dispatch wait timeconfiguring 223
348 Index

domainSee also PowerCenter domainsSee also repository domainsadministration privileges 75administrator 56Administrator role 95associated repository for Web Services Hub 235custom properties 52database properties 52general properties 52log and gateway configuration 52log event categories 265metadata, sharing 134permissions 35privileges 73reports 269resilience 110Resilience Timeout (property) 52resources, viewing 218restarting 47security administration privileges 74shutting down 47SMTP configuration 53user activity, monitoring 270, 275user synchronization 7users with privileges 100
Domain Administration privilege groupdescription 75
domain administratordescription 56
domain alertsSee alerts
domain configurationdescription 47log events 265migrating 49
domain configuration databasebacking up 48code page 301connection for gateway node 51description 48migrating 49PCSF_CPU_USAGE_SUMMARY 48PCSF_DOMAIN 48PCSF_DOMAIN_GROUP_PRIVILEGE 48PCSF_DOMAIN_USER_PRIVILEGE 48PCSF_GROUP 48PCSF_MASTER_ELECT_LOCK 48PCSF_MASTER_ELECTION 48PCSF_REPO_USAGE_SUMMARY 48PCSF_ROLE 48PCSF_RUN_LOG 48PCSF_SOURCE_AND_TARGET_USAGE 48PCSF_USER 48restoring 49tables 48updating 51
domain configuration database requirementsSee also PowerCenter Installation Guide
Domain pageAdministration Console 14Navigator 19
domain permissionsassigning 36inherited 35managing 35object 35
domain reportsCPU usage 270License Management Report 275License Usage Report 270Repository Service usage 270running 269source/target connectivity usage 270User Domain Audit Report 270Web Services Report 278
Domain tabAdministration Console 15, 19Navigator 15
DTM (Data Transformation Manager)buffer memory 183distribution on grids 182master DTM 182post-session email 172preparer DTM 182process 175worker DTM 182
DTM timeoutWeb Services Hub 238
EEnableRepAgentCaching (property)
description 127enabling
Integration Service 151Integration Service process 150Metadata Manager Service 195Reference Table Manager Service 243Reporting Service 208, 209Web Services Hub 236
encodingWeb Services Hub 237
environment variablesdatabase client 128, 167Integration Service process 167LANG_C 298LC_ALL 298LC_CTYPE 298NLS_LANG 310, 312Repository Service process 128troubleshooting 39
Errorseverity level 157, 238
error logsmessages 186
Error Severity Level (property)Integration Service 157Metadata Manager Service 199Repository Service 127Web Services Hub 238
exclusive modeSee operating mode
Index 349

execute lockworkflows 171
ExportSessionLogLibNameoption 160
external procedure filesdirectory 165
external resiliencedescription 105
Ffailover
Integration Service 114Repository Service 113safe mode 153services 105
file/directory resourcesdefining 219naming conventions 219
filtering dataSAP NetWeaver BI, parameter file location 231
flat filesexporting logs 259output files 187source code page 302target code page 303
foldersAdministration Console 33creating 34managing 33objects, moving 34operating system profile, assigning 140overview 20privileges 79removing 35
Folders privilege groupdescription 79
FTPachieving high availability 118connection resilience 105server resilience 113
FTP connectionsresilience 114
Ggateway
managing 44resilience 104
gateway nodeconfiguring 44description 2log directory 45logging 256
GB18030description 294
general propertiesdomain 52Integration Service 156Integration Service process 165license 253Metadata Manager Service 196
monitor license usage 275Reference Table Manager Service 245Repository Service 125Web Services Hub 236, 237
global objectsprivileges 83
Global Objects privilege groupdescription 83
global repositoriesSee also PowerCenter Repository Guidecode page 135creating 135creating from local repositories 135moving to another PowerCenter domain 137
globalizationoverview 293
GMD filesSee Guaranteed Message Delivery files
graphics display serverrequirement 269
gridAdministration Console tabs 25assigning to an Integration Service 216configuring 216creating 216description 181, 215DTM processes, distributing 182for new Integration Service 149license requirement 155operating system profile 216permissions 216service processes, distributing 181sessions and workflows, running 181
grid assignment propertiesIntegration Service 155
group descriptioninvalid characters 67
groups See also native groupsSee also LDAP groupsinvalid characters 66managing 66overview 28parent group 67privileges, assigning 98roles, assigning 98synchronization 7valid name 66
Guaranteed Message Delivery filesLog Manager 256
Hheartbeat interval
description 127high availability
backup nodes 107base product 106clustered file systems 109description 8, 103environment, configuring 107example configurations 107
350 Index

external connection timeout 104external systems 107, 109Informatica Services 107Integration Service 113licensed option 155, 156multiple gateways 107recovery 105recovery in base product 106, 107Repository Service 112Repository Service failover 113Repository Service recovery 113Repository Service resilience 112Repository Service restart 113resilience 104, 110resilience in base product 106restart in base product 106rules and guidelines 109SAP BW services 107TCP KeepAlive timeout 118Web Services Hub 107
high availability optionservice processes, configuring 131
host nameWeb Services Hub 235, 237
host port numberWeb Services Hub 235, 237
HTTP proxydomain setting 162password setting 162port setting 161server setting 161user setting 161
HTTP proxy propertiesIntegration Service 161
HTTP proxy serverusage 161
HttpProxyDomainoption 162
HttpProxyPasswordoption 162
HttpProxyPortoption 161
HttpProxyServeroption 161
HttpProxyUseroption 161
HTTPSconfiguring 13keystore file 13, 235, 238keystore password 235, 238port for Administration Console 13SSL protocol for Administration Console 13
Hub Logical Address (property)Web Services Hub 238
IIBM DB2
connect string example 124, 193repository database schema, optimizing 126
IBM Tivoli Directory ServiceLDAP authentication 58
IgnoreResourceRequirementsoption 158
IME (Windows Input Method Editor)input locales 296
incremental aggregationSee also PowerCenter Advanced Workflow Guidefiles 188
incremental keyslicenses 249
index cachesmemory usage 183
indicator filesdescription 187session output 187
infacmdpermissions by command 325privileges by command 325
Informatica Servicesrestart 106
Information and Content Exchange (ICE)log files 259
Information error severity leveldescription 157, 238
inherited permissiondescription 35
inherited privilegesdescription 98
input localesconfiguring 296IME (Windows Input Method Editor) 296
Integration ServiceAdministration Console tabs 20advanced properties 157architecture 169assign to grid 149, 216assign to node 149associated repository 163blocking data 180clients 113code pages, validating 176compatibility and database properties 158configuration properties 160configuring for Metadata Manager 199connectivity overview 170creating 148custom properties 155data movement mode 149, 156data movement modes 184data, processing 180date display format 161disable process with Abort option 150disable process with Stop option 150disable with Abort option 150disable with Complete option 150disable with Stop option 150disabling 150enabling 151export session log lib name, configuring 160fail over in safe mode 152failover 114failover, on grid 117for Metadata Manager 190general properties 156
Index 351
grid and node assignment properties 155high availability 113HTTP proxy properties 161log events 266logs in UTF-8 157logs, creating 176name 148normal operating mode 151operating mode 151output files 187performance 127performance details 186permissions 35post-session email 172process 171properties, configuring 154recovery 106, 117Repository Service, associating 148resilience 113resilience period 157resilience timeout 157resilience to database 105resource requirements 158restart 114safe mode, running in 152safe operating mode 152session recovery 117shared storage 164sources, reading 180state of operations 106, 117system resources 183version 155workflow recovery 117workflows, scheduling 171
Integration Service process$PMBadFileDir 165$PMCacheDir 165$PMExtProcDir 165$PMLookupFileDir 165$PMRootDir 165$PMSessionLogDir 165$PMSourceFileDir 165$PMStorageDir 165$PMTargetFileDir 165$PMTempDir 165$PMWorkflowLogDir 165code page 164, 301code pages, specifying 164custom properties 167disable with Complete option 150disabling 150enabling 150environment variables 167general properties 165Java component directories 166supported code pages 315
Integration Service process nodeslicense requirement 155
internal host nameWeb Services Hub 235, 237
internal port numberWeb Services Hub 235, 237
internal resiliencedescription 104
JJava
configuring for JMS 166configuring for PowerExchange for Web Services 166configuring for webMethods 166
Java componentsdirectories, managing 166
Java SDKclass path 167maximum memory 167minimum memory 167
Java SDK Class Pathoption 167
Java SDK Maximum Memoryoption 167
Java SDK Minimum Memoryoption 167
Java transformationdirectory for Java components 166
JCEProvideroption 158
JDBCSee also Data Analyzer Schema Designer Guide
Joiner transformationcaches 183, 188setting up for prior version compatibility 159
JoinerSourceOrder6xCompatibilityoption 159
Kkeyboard shortcuts
Administration Console 30Navigator 30
keystore fileMetadata Manager 198Web Services Hub 235, 238
keystore passwordWeb Services Hub 235, 238
Llabels
privileges 83LANG_C environment variable
setting locale in UNIX 298LC_ALL environment variable
setting locale in UNIX 298LDAP authentication
description 7, 58directory services 58nested groups 63self-signed SSL certificate 62setting up 58synchronization times 62
LDAP directory serviceanonymous login 58
352 Index

nested groups 63LDAP groups
See also groupsimporting 58managing 66
LDAP security domainsconfiguring 60deleting 62
LDAP serverconnecting to 59
LDAP usersSee also usersassigning to groups 65enabling 65importing 58managing 63
licenseAdministration Console tabs 25assigning to a service 250creating 250details, viewing 253for new Integration Service 149general properties 253keys 249license file 250log events 265, 266managing 248node configuration 276removing 252unassigning from a service 251updating 251validation 248Web Services Hub 234, 238
license keysincremental 249, 251original 249
License Management Reportlicensed options 277running 275, 277Sending an email report 277
License Reportdescription 271
license usageCPU usage 276License Usage Report 274log events 265monitoring 270repository usage 276
License Usage ReportCPU usage 271license 274Repository Service usage 271, 273running 274time period 274
licensed optionshigh availability 155, 156License Management Report 277server grid 155
licensinglog events 266managing 248
licensing logslog events 248
Limit on Resilience Timeouts (property)description 127
linked domainmultiple domains 32, 136
LMAPIresilience 105
Load Balancerassigning priorities to tasks 175, 223configuring to check resources 158, 174, 224CPU profile, computing 225defining resource provision thresholds 225dispatch mode 174dispatch mode, configuring 222dispatch queue 173dispatching tasks in a grid 173dispatching tasks on a single node 173overview 173resource provision thresholds 174resources 174, 217service levels 175service levels, creating 223settings, configuring 221
load balancingSAP BW Service 228support for SAP NetWeaver BI system 228
Load privilege groupdescription 87
LoadManagerAllowDebuggingoption 157
local repositoriesSee also PowerCenter Repository Guidecode page 135moving to another PowerCenter domain 137promoting 135registering 136
localesoverview 295
localhost_<date>.txttroubleshooting 257
locksmanaging 138viewing 138
Log Agentlog events 265
log and gateway configurationdomain 52
log directoryfor gateway node 45location, configuring 257
log errorsAdministration Console 264
log event detailerdescription 263
log event filesdescription 256exporting 259purging 258
log eventsauthentication 265authorization 265code 264components 264description 256
Index 353

details, viewing 261domain 265domain configuration 265domain function categories 264exporting 259exporting with Mozilla Firefox 259licensing 265, 266licensing logs 248licensing usage 265Log Agent 265Log Manager 265message 264message code 264node 265node configuration 265Repository Service 265saving 263saving to different file formats 259saving with Mozilla Firefox 263searching 262security audit trail 266Service Manager 265service name 264severity levels 265thread 265time zone 260timestamps 265user management 265viewing 260Web Services Hub 267
Log Managerarchitecture 256catalina.out 257configuring 260directory location, configuring 257domain log events 265Integration Service log events 266log event components 264log events 265log events, exporting 259log events, purging 258log events, saving 263log events, searching 262logs, viewing 260message 264message code 264node 265node.log 257ProcessID 265purge properties 258recovery 256Repository Service log events 265SAP NetWeaver BI log events 266security audit trail 266service name 264severity levels 265thread 265time zone 260timestamp 265troubleshooting 257using 255
Log Viewercolumns, configuring 263
error message link 264log event detailer 263log event details, viewing 261log events, saving 263log events, searching 262
logical CPUdescription 271
logsSee also log eventscomponents 264configuring 257domain 265error severity level 157exporting 259in UTF-8 157Integration Service 266location 257purging 258Repository Service 265SAP BW Service 266saving 263searching 262session 186viewing 260workflow 186
Logs tabAdministration Console 16
LogsInUTF8option 157
lookup cachesSee also PowerCenter Advanced Workflow GuideSee also PowerCenter Transformation Guidepersistent 188
lookup databasescode pages 305
lookup filesdirectory 165
Lookup transformationcaches 183, 188database resilience 105
MManage Account tab
Administration Console 18Overview Grid Refresh Time 13password, changing 12Show Custom Properties (property) 13Show Tooltips in the Overview Dashboards and Properties
(property) 13Show Upgrade Options (property) 13Subscribe for Alerts 13user preferences 12
Manage Listlinked domains, adding 136
mapping threadsdescription 178
master gatewayresilience to domain configuration database 105
master gateway nodedescription 2
354 Index

master service processdescription 181
master threaddescription 177
Max Concurrent Resource Loaddescription, Metadata Manager Service 199
Max Heap Sizedescription, Metadata Manager Service 199
Max Lookup SP DB Connectionsoption 159
Max MSSQL Connectionsoption 160
Max Sybase Connectionsoption 159
MaxConcurrentRequestsadvanced Web Services Hub property 238description, Metadata Manager Service 198
Maximum Active Connectionsdescription, Metadata Manager Service 198
Maximum Catalog Child Objectsdescription 199
maximum connectionsdescription 127
Maximum CPU Run Queue Lengthnode property 42, 225
maximum dispatch wait timeconfiguring 223
maximum locksdescription 127
Maximum Memory Percentnode property 42, 225
Maximum Processesnode property 43, 226
Maximum Restart Attempts (property)PowerCenter domain 39
Maximum Wait Timedescription, Metadata Manager Service 198
MaxISConnectionsWeb Services Hub 238
MaxQueueLengthadvanced Web Services Hub property 239description, Metadata Manager Service 198
MaxStatsHistoryadvanced Web Services Hub property 239
memoryDTM buffer 183maximum for Java SDK 167Metadata Manager 199minimum for Java SDK 167
message codeLog Manager 264
metadataadding to repository 308choosing characters 308sharing between domains 134
Metadata Manageradministrator 56components 189configuring Integration Service 199configuring Reference Table Manager Service 201repository 190starting 195user for Integration Service 200
Metadata Manager File Location (property)description 196
Metadata Manager repositorycontent, creating 194content, deleting 194creating 190
Metadata Manager Serviceadvanced properties 198authorization 7code page 302components 189configuring 195creating 191custom roles 340description 189disabling 195enabling 195general properties 196log events 266privileges 84properties 195steps to create 190user synchronization 7users with privileges 100
Metadata Manager Service privilegesBrowse privilege group 86Load privilege group 87Model privilege group 87Security privilege group 87
metric-based dispatch modedescription 222
Microsoft Active Directory ServiceLDAP authentication 58
Microsoft SQL Serverconnect string syntax 124, 193repository database schema, optimizing 126setting Char handling options 159
migratedomain configuration 49
mixed-version domainapplication service, configuring 46application services, filtering 45application services, upgrading service version 46description 1Integration Service, assigning to grid 216repository content, copying 142repository domain, configuring 46supported services 45
modeSee data movement mode
Model privilege groupdescription 87
monitor license usagegeneral properties 275
MSExchangeProfileoption 161
multibyte dataentering in PowerCenter Client 296
Index 355

Nnative authentication
description 7, 57native connect string
See connect stringnative groups
See also groupsadding 66deleting 67editing 67managing 66moving to another group 67users, assigning 65
native security domaindescription 57
native usersSee also usersadding 63assigning to groups 65deleting 65editing 64enabling 65managing 63passwords 63
NavigatorDomain page 19Domain tab 15keyboard shortcuts 30Security page 27
nested groupsLDAP authentication 63LDAP directory service 63
networkhigh availability 119
NLS_LANGsetting locale 310, 312
node assignmentIntegration Service 155Web Services Hub 236, 237
node configurationlicense 276log events 265
node configuration filelocation 40
node diagnosticsanalyzing 290downloading 289generating 289
node propertiesbackup directory 42configuring 39, 41CPU Profile 42maximum CPU run queue length 42, 225maximum memory percent 42, 225maximum processes 43, 226
node.logtroubleshooting 257
nodemeta.xmlfor gateway node 45location 40
nodesadding to Administration Console 40
Administration Console tabs 24configuring 41defining 40description 1, 2gateway 2, 44host name and port number, removing 41Log Manager 265managing 39node assignment, configuring 156port number 41properties 39removing 44resources, viewing 218restarting 43shutting down 43starting 43Web Services Hub 235worker 2
normal modeSee also operating modeconfiguring for Integration Service 154Integration Service 151
notificationssending 140
Novell e-Directory ServiceLDAP authentication 58
null valuesIntegration Service, configuring 159
NumOfDeadlockRetriesoption 160
Oobject permission
description 35object queries
privileges 83ODBC Connection Mode
description 199Open LDAP Directory Service
LDAP authentication 58operating mode
configuring for Integration Service 154effect on resilience 111, 132Integration Service 151normal mode for Integration Service 151Repository Service 131safe mode for Integration Service 151
operating system profileSee also PowerCenter Repository Guideconfiguration 162creating 68deleting 67editing 68folders, assigning to 140grid 216overview 162permissions 69pmimpprocess 162properties 68troubleshooting 163
356 Index
Oracleconnect string syntax 124, 193setting locale with NLS_LANG 310, 312
original keyslicenses 249
output filesoverview 185, 187permissions 185target files 187
OutputMetaDataForFFoption 160
Overview Grid Refresh Timeuser preference 13
Ppage size
minimum for optimizing repository database schema 126parent groups
description 67partitioning
See pipeline partitioningpass-through pipeline
overview 178passwords
changing for default administrator 56changing in Manage Account tab 12native users 63requirements 64Security page 63
PCSF_CPU_USAGE_SUMMARYdomain configuration database 48
PCSF_DOMAINdomain configuration database 48
PCSF_DOMAIN_GROUP_PRIVILEGEdomain configuration database 48
PCSF_DOMAIN_USER_PRIVILEGEdomain configuration database 48
PCSF_GROUPdomain configuration database 48
PCSF_MASTER_ELECT_LOCKdomain configuration database 48
PCSF_MASTER_ELECTIONdomain configuration database 48
PCSF_REPO_USAGE_SUMMARYdomain configuration database 48
PCSF_ROLEdomain configuration database 48
PCSF_RUN_LOGdomain configuration database 48
PCSF_SOURCE_AND_TARGET_USAGEdomain configuration database 48
PCSF_USERdomain configuration database 48
PeopleSoft on Oraclesetting Char handling options 159
Percent Partitions in Use (property)Web Services Report 279
performancedetails 186Integration Service 127repository copy, backup, and restore 144
repository database schema, optimizing 126Repository Service 127
performance detail filespermissions 185
permissionsSee also domain permissionsdescription 73infacmd commands 325Integration Service 35output and log files 185pmcmd commands 332pmrep commands 333recovery files 185Reporting Service 35Repository Service 35working with privileges 73
Permissions tabAdministration Console 17
persistent lookup cachesession output 188
pipeline partitioningSee also PowerCenter Advanced Workflow Guidemultiple CPUs 179overview 179symmetric processing platform 183
plug-insregistering 143unregistering 143
$PMBadFileDiroption 165
$PMCacheDiroption 165
pmcmdpermissions by command 332code page issues 302communicating with Integration Service 302privileges by command 332
$PMExtProcDiroption 165
$PMFailureEmailUseroption 156
pmimpprocessdescription 162
$PMLookupFileDiroption 165
pmreppermissions by command 333privileges by command 333
pmrepagentSee Repository Service process
$PMRootDirdescription 166option 165required syntax 166shared location 166
PMServer3XCompatibilityoption 159
$PMSessionErrorThresholdoption 157
$PMSessionLogCountoption 156
$PMSessionLogDiroption 165
Index 357
$PMSourceFileDiroption 165
$PMStorageDiroption 165
$PMSuccessEmailUseroption 156
$PMTargetFileDiroption 165
$PMTempDiroption 165
$PMWorkflowLogCountoption 156
$PMWorkflowLogDiroption 165
portapplication service 4node 41node maximum 42node minimum 42range for service processes 42
port numberMetadata Manager Agent 196Metadata Manager application 196
post-session emailSee also PowerCenter Workflow Basics GuideMicrosoft Exchange profile, configuring 161overview 187
post-session threadsdescription 178
PowerCenterrepository reports 204
PowerCenter Clientcode page 301multibyte characters, entering 296resilience 110
PowerCenter domainsalerts 32description 1multiple domains 32resilience 104, 110resilience, configuring 110state of operations 106users, managing 63
PowerCenter repositorycontent, creating for Metadata Manager 193data lineage, configuring 145
PowerCenter Repository Reportsinstalling 204
PowerCenter securitydescription 6managing 25privileges 71roles 72
PowerExchange for JMSdirectory for Java components 166
PowerExchange for Web Servicesdirectory for Java components 166
PowerExchange for webMethodsdirectory for Java components 166
Preserve MX Data (property)description 128
pre-session threadsdescription 178
primary nodefor new Integration Service 149node assignment, configuring 156
privilege groupsAdministration 89Alerts 90Browse 86, 94Communication 90Content Directory 91Dashboard 91description 72Design Objects 79Domain Administration 75Folders 79Global Objects 83Indicators 92Load 87Manage Account 92Model 87Reports 92Run-time Objects 82Security 87Security Administration 74Sources and Targets 80Tools 74, 78
privilegesAdministration 89Alerts 90assigning 98command line programs 325Communication 90Content Directory 91Dashboard 91description 71design objects 79domain 73domain administration 75domain tools 74folders 79global objects 83Indicators 92infacmd commands 325inherited 98Manage Account 92Metadata Manager Service 84pmcmd commands 332pmrep commands 333Reporting Service 88Reports 92Repository Service 77Repository Service tools 78run-time objects 82security administration 74sources 80targets 80troubleshooting 100working with permissions 73
process identification numberLog Manager 265
ProcessIDLog Manager 265message code 265
358 Index

provider-based securitySee also Data Analyzer User Guideusers, deleting 66
purge propertiesLog Manager 258
RRA CacheCapacity (property)
description 127Rank transformation
caches 183, 188reader threads
description 178recovery
See also PowerCenter Advanced Workflow Guidebase product 107files, permissions 185high availability 105Integration Service 106, 117PowerExchange for IBM WebSphere MQ 107Repository Service 106, 113safe mode 153workflow and session, manual 107
recovery filesdirectory 165
Reference Table Managerrepository 243
Reference Table Manager repositorycontent, creating 243content, deleting 243creating 243deleting 243
Reference Table Manager Serviceadvanced properties 246application service 23configuration properties 245configuring 244configuring for Metadata Manager 201connection pool properties 246creating 242database properties 245description 241disabling 243enabling 243general properties 245privileges 93properties 244steps to create and configure 241
Reference Table Manager Service privilegesBrowse privilege group 94
registeringlocal repositories 136plug-ins 143
reject filesSee also PowerCenter Workflow Basics Guidedirectory 165overview 186permissions 185
relaxed code page validationSee code page relaxation
repagent cachingdescription 127
Reporting ServiceAdministration Console tabs 21authorization 7configuring 211creating 203, 205custom roles 341database 205disabling 208, 209enabling 208, 209managing 208options 205permissions 35privileges 88properties 211user synchronization 7users with privileges 100using with Metadata Manager 191
Reporting Service privilegesAdministration privilege group 89Alerts privilege group 90Communication privilege group 90Content Directory privilege group 91Dashboard privilege group 91Indicators privilege group 92Manage Account privilege group 92Reports privilege group 92
reportsSee also Data Analyzer User GuideAdministration Console 269Data Profiling Reports 204domain 269License 269Metadata Manager Repository Reports 204User Domain Audit 269Web Services 269
Reports tabAdministration Console 17
repositoriesassociated with Integration Service 163associated with Web Services Hub 239backing up 140backup directory 42code pages 122, 135, 302content, creating 133, 193content, deleting 133, 193database schema, optimizing 126database, creating 122Metadata Manager 190moving 137notifications 140overview of creating 121performance 144persisting run-time statistics 158restoring 141security log file 144supported code pages 315Unicode 294UTF-8 294version control 134
repositoryadministrator 56
Index 359

Data Analyzer 205repository agent cache capacity
description 127repository agent caching
Repository Service 127repository domains
description 134managing 134moving to another PowerCenter domain 137prerequisites 135registered repositories, viewing 137user accounts 135
repository locksmanaging 138releasing 139viewing 138
repository metadatachoosing characters 308
repository notificationssending 140
repository passwordassociated repository for Web Services Hub 240option 164
Repository ServiceAdministration Console tabs 21Administrator role 95advanced properties 127associating with a Web Services Hub 234authorization 7Code Page (property) 123configuring 124creating 121, 122custom roles 339data lineage, configuring 145enabling and disabling 130failover 113for Metadata Manager 190general properties 125high availability 112Integration Service, associating 148log events 265operating mode 131performance 127permissions 35privileges 77properties 124recovery 106, 113repository agent caching 127resilience 112resilience to database 105, 112restart 113service process 131state of operations 106, 113user synchronization 7users with privileges 100version 125
Repository Service processconfiguring 128description 131environment variables 128properties 128
Repository Service usagedescription 271
Repository Service Usage Analysis chartdescription 273
Repository Service Usage Analysis tabledescription 274
repository user nameassociated repository for Web Services Hub 235, 240option 163
repository user passwordassociated repository for Web Services Hub 235
resilienceapplication service configuration 110base product 106command line program configuration 111domain configuration 110domain configuration database 105domain properties 104external 105external components 114external connection timeout 104FTP connections 105gateway 104high availability 104, 110in exclusive mode 111, 132Integration Service 113internal 104LMAPI 105managing 110period for Integration Service 157PowerCenter Client 110repository database 105, 112Repository Service 112services 104services in base product 106TCP KeepAlive timeout 118
Resilience Timeout (property)description 127domain 52option 157
resource provision thresholdsdefining 225description 225overview 174setting for nodes 42
resourcesSee also Metadata Manager Administrator GuideSee also PowerCenter Advanced Workflow Guideconfiguring 217configuring Load Balancer to check 158, 174, 224connection, assigning 218defining custom 219defining file/directory 219defining for nodes 217Load Balancer 174naming conventions 219node 174predefined 217user-defined 217viewing for nodes 218
restartbase product 106configuring for service processes 39Informatica Services, automatic 106Integration Service 114
360 Index

Repository Service 113services 105
restoringdomain configuration database 49PowerCenter repository for Metadata Manager 194repositories 141
rolesSee also custom rolesSee also system-defined rolesAdministrator 95assigning 98custom 96description 72managing 94overview 30troubleshooting 100
root directoryprocess variable 165
round-robin dispatch modedescription 222
row error log filespermissions 185
run-time objectsdescription 82privileges 82
Run-time Objects privilege groupdescription 82
run-time statisticspersisting to the repository 158Web Services Report 280
Ssafe mode
configuring for Integration Service 154Integration Service 152
SAP BW ServiceSee also PowerExchange for SAP NetWeaver User GuideAdministration Console tabs 22associated Integration Service 230creating 228disabling 229enabling 229log events 266log events, viewing 231managing 227SAP Destination R Type (property) 229, 230
SAP BW Service logviewing 231
SAP Destination R Type (property)SAP BW Service 229, 230
SAP NetWeaver BI Monitorlog messages 231
saprfc.iniDEST entry for SAP NetWeaver BI 229, 230
Search sectionAdministration Console 26
securitySee also PowerCenter securityaudit trail, creating 144audit trail, viewing 266privileges 74
Security Administration privilege groupdescription 74
security domainsconfiguring LDAP 60deleting LDAP 62description 57native 57
Security pageAdministration Console 25keyboard shortcuts 30Navigator 27passwords 63
Security privilege groupdescription 87
SecurityAuditTraillogging activities 144
server gridlicensed option 155
service levelsSee also PowerCenter Advanced Workflow Guidecreating and editing 223description 223overview 175
Service Managerauthentication 7authorization 3, 7description 2log events 265single sign-on 7
service namelog events 264Web Services Hub 234
service processdistribution on a grid 181enabling and disabling 37restart, configuring 39viewing status 43
service process variableslist of 165
service variableslist of 156
service versiondescription 8
servicesenabling and disabling 37failover 105resilience 104restart 105
session cachesdescription 185
session logsSee also PowerCenter Workflow Basics Guidecreating 176directory 165overview 186permissions 185session details 186
session outputcache files 188control file 187incremental aggregation files 188indicator file 187performance details 186
Index 361

persistent lookup cache 188post-session email 187reject files 186session logs 186target output file 187
SessionExpiryPeriod (property)Web Services Hub 238
sessionscaches 185DTM buffer memory 183output files 185performance details 186running on a grid 182session details file 186sort order 301
severitylog events 265
shared file systemshigh availability 109
shared libraryconfiguring the Integration Service 160
shared storageIntegration Service 164state of operations 164
shortcutskeyboard 30
Show Custom Properties (property)user preference 13
Show Tooltips in the Overview Dashboards and Properties (property)user preference 13
Show Upgrade Options (property)user preference 13
shutting downdomain 47
SID/Service Namedescription 197
single sign-ondescription 7
SMTP configurationalerts 32domain 53
sort ordercode page 301
source datablocking 180
source databasescode page 302
source filesdirectory 165
source pipelinepass-through 178reading 180target load order groups 180
sourcescode pages 302, 316database resilience 105privileges 80reading 180
Sources and Targets privilege groupdescription 80
SSL certificateLDAP authentication 60, 62
stack tracesviewing 261
state of operationsdomain 106Integration Service 106, 117, 164Repository Service 106, 113shared location 164
statisticsWeb Services Hub 278
Stop optiondisable Integration Service 150disable Integration Service process 150disable the Web Services Hub 236
stoppingdomain 47
stored procedurescode pages 305
Subscribe for Alertsuser preference 13
subsetdefined for code page compatibility 299
Sun Java System Directory ServiceLDAP authentication 58
supersetdefined for code page compatibility 299
Sybase SQL Serverconnect string example 124, 193
symmetric processing platformpipeline partitioning 183
synchronizationLDAP users 58times for LDAP directory service 62users 7
system localesdescription 295
system-defined rolesAdministrator 95assigning to users and groups 98description 94
Ttable owner name
description 126tablespace name
for repository database 126, 213target databases
code page 303target files
directory 165output files 187
target load order groupsmappings 180
targetscode pages 303, 316database resilience 105output files 187privileges 80session details, viewing 186
tasksdispatch priorities, assigning 175, 223dispatching 173
362 Index

TCP KeepAlive timeouthigh availability 118
temporary filesdirectory 165
thread identificationLog Viewer 265
threadscreation 177Log Manager 265mapping 177master 177post-session 177pre-session 177reader 177transformation 177types 178writer 177
time zoneLog Manager 260
timeoutwriter wait timeout 161
Timeout Interval (property)description 199
timestampsLog Manager 265
Tools privilege groupdomain 74Repository Service 78
Tracingerror severity level 157, 238
transformation threadsdescription 178
TreatCHARAsCHAROnReadoption 159
TreatDBPartitionAsPassThroughoption 160
TreatNullInComparisonOperatorsAsoption 161
troubleshootingcatalina.out 257code page relaxation 307environment variables 39localhost_<date>.txt 257node.log 257
TrustedConnection (property)description 127
TrustStoreoption 157
UUCS-2
description 294Unicode
GB18030 294repositories 294UCS-2 294UTF-16 294UTF-32 294UTF-8 294
Unicode modeSee also ASCII mode
code pages 184overview 296Unicode data movement mode, setting 156
UNIXcode pages 298
UNIX environment variablesLANG_C 298LC_ALL 298LC_CTYPE 298
unregisteringlocal repositories 136plug-ins 143
Upgrade tabAdministration Console 18
URL schemeMetadata Manager 198Web Services Hub 235, 237
user accountsSee also userscreated during installation 56default 56enabling 65overview 56
user connectionsclosing 139managing 138viewing 138
user descriptioninvalid characters 64
User Domain Audit Reportrunning 270
user localesdescription 296
user managementlog events 265
user preferenceschanging in Manage Account tab 12configuring 18
user-based securitySee also Data Analyzer User Guideusers, deleting 66
usersassigning to groups 65domain activity, monitoring 270invalid characters 64license activity, monitoring 275managing 63notifications, sending 140overview 29privileges, assigning 98provider-based security 66roles, assigning 98synchronization 7user-based security 66valid name 64
UTF-16description 294
UTF-32description 294
UTF-8description 294repository 302repository code page, Web Services Hub 234
Index 363
writing logs 157
Vvalid name
groups 66user account 64
ValidateDataCodePagesoption 161
validatingcode pages 305licenses 248source and target code pages 161
version controlenabling 134repositories 134
versioned objectsSee also PowerCenter Repository Guide
WWarning
error severity level 157, 238Web Services Hub
See also PowerCenter Web Services Provider Guideadvanced properties 236, 238application service 6, 23associated repository 239associated Repository Service 235, 240associated repository, adding 239associated repository, editing 240associating a Repository Service 234character encoding 237creating 234custom properties 236disable with Abort option 236disable with Stop option 236disabling 236domain for associated repository 235DTM timeout 238enabling 236general properties 236, 237host name 235, 237host port number 235, 237Hub Logical Address (property) 238internal host name 235, 237internal port number 235, 237keystore file 235, 238keystore password 235, 238license 234, 238location 234log events 267MaxISConnections 238node 235node assignment 236, 237password for administrator of associated repository 240properties, configuring 236security domain for administrator of associated repository 240service name 234SessionExpiryPeriod (property) 238statistics 278tasks on Administration Console 233
URL scheme 235, 237user name for administrator of associated repository 240user name for associated repository 235user password for associated repository 235version 234
Web Services Reportactivity data 279Average Service Time (property) 279Avg DTM Time (property) 279Avg. No. of Run Instances (property) 279Avg. No. of Service Partitions (property) 279complete history statistics 283contents 278Percent Partitions in Use (property) 279run-time statistics 280
Windows Input Method Editorsee IME
Within Restart Period (property)PowerCenter domain 39
worker nodeconfiguring as gateway 44description 2
worker service processdescription 181
workflow log filesdirectory 165
workflow logsSee also PowerCenter Workflow Basics Guideappend timestamp 157creation 172overview 186permissions 185
workflow outputemail 187workflow logs 186
workflow schedulessafe mode 153
workflowsexecute lock 171locking 171parameter file 172running on a grid 181
writer threadsdescription 179
writer wait timeoutconfiguring 161
WriterWaitTimeOutoption 161
XX Virtual Frame Buffer
for License Report 269for Web Services Report 269
XMLexporting logs in 259
XMLWarnDupRowsoption 160
364 Index

ZZPMSENDSTATUS
log messages 231
Index 365

366 Index

NOTICES
This Informatica product (the “Software”) includes certain drivers (the “DataDirect Drivers”) from DataDirect Technologies, an operating company of Progress Software Corporation (“DataDirect”) which are subject to the following terms and conditions:
1. THE DATADIRECT DRIVERS ARE PROVIDED “AS IS” WITHOUT WARRANTY OF ANY KIND, EITHER EXPRESSED OR IMPLIED, INCLUDING BUT NOT LIMITED TO, THE IMPLIED WARRANTIES OF MERCHANTABILITY, FITNESS FOR A PARTICULAR PURPOSE AND NON-INFRINGEMENT.
2. IN NO EVENT WILL DATADIRECT OR ITS THIRD PARTY SUPPLIERS BE LIABLE TO THE END-USER CUSTOMER FOR ANY DIRECT, INDIRECT, INCIDENTAL, SPECIAL, CONSEQUENTIAL OR OTHER DAMAGES ARISING OUT OF THE USE OF THE ODBC DRIVERS, WHETHER OR NOT INFORMED OF THE POSSIBILITIES OF DAMAGES IN ADVANCE. THESE LIMITATIONS APPLY TO ALL CAUSES OF ACTION, INCLUDING, WITHOUT LIMITATION, BREACH OF CONTRACT, BREACH OF WARRANTY, NEGLIGENCE, STRICT LIABILITY, MISREPRESENTATION AND OTHER TORTS.


