
Modified Culvert Inventory and Assessment Protocol
United States Department of Agriculture Forest Service Southern Research Station
Center for Aquatic Technology Transfer 1710 Ramble Rd.
Blacksburg, VA 24060-6349
C. Andrew Dolloff, Team Leader
Manual prepared by: Sara Sweeten, Colin Krause, and Craig Roghair
February 2011 (revised July 2012, June 2014)

Purpose & Safety
Purpose This culvert inventory and assessment method is a modified version of the National Inventory and Assessment Procedure (NIAP; Clarkin et al 2003) developed to collect data needed to run coarse filter evaluations of fish passage (Coffman 2005)
References: Clarkin, K., A. Connor, M. J. Furniss, B. Gubernick, M. Love, K. Moynan, and S. W. Musser.
2003. National inventory and assessment procedure for identifying barriers to aquatic organism passage at road-stream crossings. USDA Forest Service, San Dimas Technology and Development Center, San Dimas, Ca.
Coffman, J. S. 2005. Evaluation of a predictive model for upstream fish passage through culverts.
Master’s Thesis, James Madison University, Harrisonburg, VA Harrelson, Cheryl C; Rawlins, C. L.; Potyondy, John P. 1994. Stream channel reference sites: an
illustrated guide to field technique. Gen. Tech. Rep. RM-245. Fort Collins, CO: U.S. Department of Agriculture, Forest Service, Rocky Mountain Forest and Range Experiment Station. 61 p.
Safety Protocols
• All survey crew members must wear a safety vest and hardhat when performing surveys • Felt bottom shoes are required for all survey crew members, regardless of what job you are
assigned • Know the hazards in and around the stream channel (slick rocks, snakes, glass, etc.) • Be aware of cars, ditches, and other road hazards; set out slow cones at each survey site • Hold weekly ‘tailgate safety’ meetings to discuss and remind crew of hazards
2
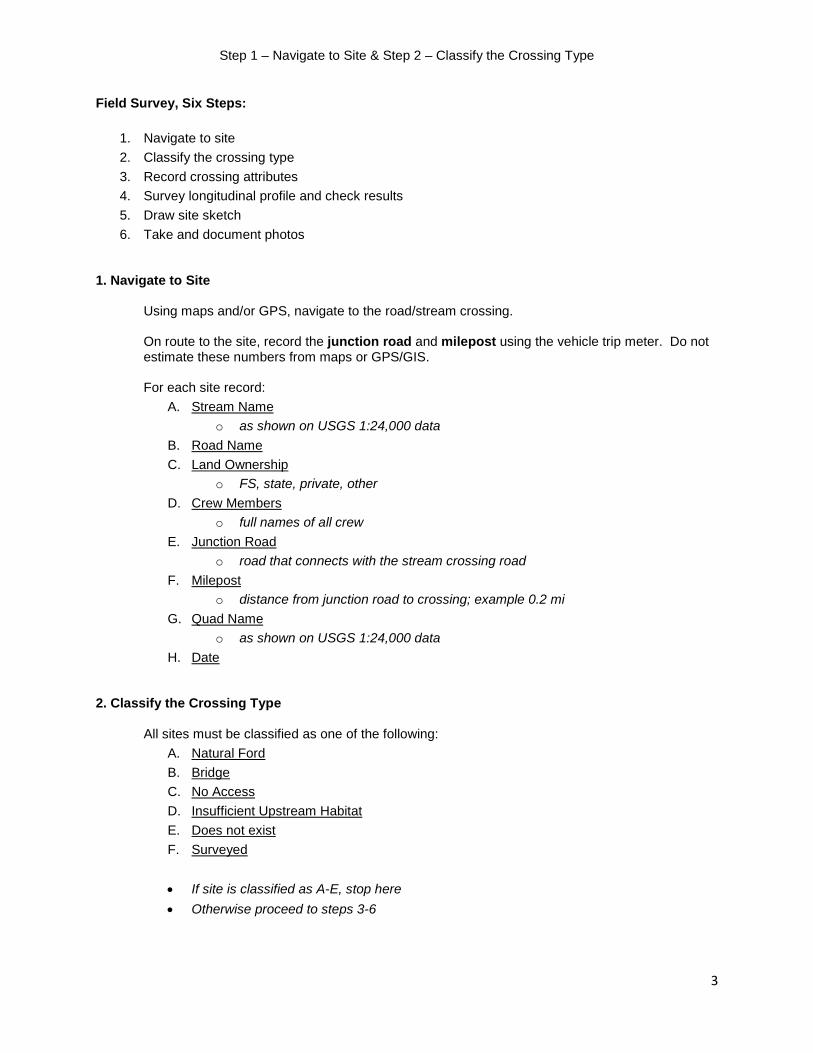
Step 1 – Navigate to Site & Step 2 – Classify the Crossing Type
Field Survey, Six Steps:
1. Navigate to site 2. Classify the crossing type 3. Record crossing attributes 4. Survey longitudinal profile and check results 5. Draw site sketch 6. Take and document photos
1. Navigate to Site
Using maps and/or GPS, navigate to the road/stream crossing. On route to the site, record the junction road and milepost using the vehicle trip meter. Do not estimate these numbers from maps or GPS/GIS. For each site record:
A. Stream Name o as shown on USGS 1:24,000 data
B. Road Name C. Land Ownership
o FS, state, private, other D. Crew Members
o full names of all crew E. Junction Road
o road that connects with the stream crossing road F. Milepost
o distance from junction road to crossing; example 0.2 mi G. Quad Name
o as shown on USGS 1:24,000 data H. Date
2. Classify the Crossing Type
All sites must be classified as one of the following: A. Natural Ford B. Bridge C. No Access D. Insufficient Upstream Habitat E. Does not exist F. Surveyed
• If site is classified as A-E, stop here • Otherwise proceed to steps 3-6
3

Step 2A-E – Crossing Type
2A-E. Crossing Type
A. Natural Ford = no structure present and natural substrate throughout entire crossing
B. Bridge = structure spans over stream and natural substrate is present throughout entire crossing
C. No Access = cannot get to site due to private property, road too busy to safely survey site, etc; must make note in comments with reason for no access
D. Insufficient Upstream Habitat = habitat upstream of crossing unable to support aquatic life E. Does Not Exist = crossing shown on map or GPS due to a road and stream intersecting, but in the real world they do not intersect, thus there is no crossing
4

Step 2A-E – Crossing Type
2A-E continued. Crossing Type
F. Surveyed = complete steps 3-6 if the crossing is a pipe (circular or arch), box, ford, or vented ford with suitable fish habitat
5

Step 3 – Record Crossing Attributes
3. Record Crossing Attributes
A. Flow Condition a. Wet (continuous flow) b. Isolated pools (discontinuous flow) c. Dry (no flow)
B. Pipe Shape
a. Open Bottom Arch o no longitudinal survey; but record pipe height and width
b. Circular c. Box d. Pipe Arch e. Ford f. Vented Ford
C. Pipe Material
a. Corrugated Metal b. Concrete c. Plastic d. Smooth Metal e. Wood f. Unknown
D. Pipe Measurements
a. Pipe Width (ft); example 5.2 ft b. Pipe Height (ft)
E. Continuous Substrate (yes/no)
6

Step 3A – Flow Condition
3A. Flow Condition
a. Wet = continuous flow
b. Isolated pools = discontinuous flow
c. Dry = no flow
7

Step 3B – Pipe Shape
3B. Pipe Shape
a. Open Bottomed Arch = no structure material on channel bottom and natural substrate present throughout entire crossing; considered passable on all filters; (no longitudinal survey, but record height and width measurements)
b. Circular = height and width of pipe are equal
c. Box = square or rectangular shaped
d. Pipe Arch = similar to circular pipe but height and width are not equal
8

Step 3B – Pipe Shape
3B continued. Pipe Shape
e. Ford = can be constructed in various manners including slated (often concrete or wooden), paved, or any method that alters the natural substrate
f. Vented Ford = ford surface with any pipe or culvert underneath; each pipe and the ford itself must be surveyed
9

Step 3C – Pipe Material
3C. Pipe Material
a. Corrugated Metal = can have helical or concentric corrugations; may or may not have rust line, may be made a single piece or multiple plates bolted together
b. Concrete = used in many box and some circular and arch culverts
10

Step 3C – Pipe Material
3C continued. Pipe Material
c. Plastic = made of plastic (PVC or HDPE), may or may not have corrugations
d. Smooth Metal = metal pipe with no corrugations
e. Wood = wood and logs are used to make log stringers, log box culverts, and circular culverts
f. Other = an unknown material or one not listed above; make a note in the comments field about the pipe material
11

Step 3D – Pipe Measurements & Step 3E – Continuous Substrate
3D. Pipe Measurements
a & b. Pipe Width and Height (ft) = the inside height and width of each pipe is measured using a stadia rod or tape measure; measure at the widest and highest point of the pipe; dig down through substrate to pipe if necessary
3E. Continuous Substrate
D. Continuous Substrate = each pipe needs to be checked for continuous substrate; the substrate must fully run the length of the culvert, be wide enough to provide a natural substrate for fish; and be representative of the stream bed Note: if pipe is full of gravel to the point where it is somewhat plugged (i.e. blocking flow & restricting fish passage) it is NOT considered continuous substrate; in this case make a note in the comments
12

Step 4 – Survey Longitudinal Profile and Check Results
4. Survey Longitudinal Profile and Check Results
Survey the following points:
A. BM o bench mark; using marking paint, mark a spot that will not move during the course of the
survey and has a good view of the stream corridor B. P2
o edge of culvert or ford inlet C. P3
o road surface near middle of culvert; mark spot with marking paint that will not move during the course of the survey
D. P4 o edge of culvert or ford outlet
E. P4b o edge of outlet apron, when present place stadia rod at the lowest point on the apron
F. P5 o deepest point within one foot of P4, or within one foot of P4b if an apron is present
G. P6 o tailwater control; take elevation measurement from average lowest spot in the hydraulic
control between outlet pool and riffle Note: If P2 and/or P4 are embedded and substrate in the pipe is discontinuous or doesn’t appear permanent, you must dig down to find the bottom of pipe for elevation reading. If substrate appears permanent, then measure P2 and P4 elevations from top of substrate; no need to dig down.
13

Step 4A-G – Longitudinal Survey Points
4. Longitudinal Survey Points
A. Bench Mark (BM) = initial reference (or starting) point of the survey, mark with paint and place stadia rod on a point that will not move during the survey; examples of locations to mark: road surface, a rock, guardrail, top of the culvert
B. Culvert Inlet (P2) = used for determining culvert slope; if inlet is embedded place stadia rod on top of substrate, otherwise place on corrugation of pipe Note: If P2 is embedded and substrate in the pipe is discontinuous or doesn’t appear permanent, you must dig down to find the bottom of pipe for elevation reading. If substrate appears permanent, then measure P2 elevation from top of substrate; no need to dig down.
B2. Ford Inlet (P2) = used for determining ford slope; place stadia rod on upstream edge of ford at deepest location
C. Road Surface (P3) = used to determine head-water depth for flood capacity as well as road-fill volume calculations; mark with paint and place stadia rod near middle of road close to center of culvert on a spot that will not move during the course of the survey; if working on a wetted ford and can’t use marking paint, mark P3 with a rock by scrapping algae away or on unique spot on ford
14

Step 4A-G – Longitudinal Survey Points
4 continued. Longitudinal Survey Points
D. Culvert Outlet (P4) = used to determine culvert slope and outlet perch; if outlet is embedded place stadia rod on top of substrate, otherwise place on corrugation of pipe Note: If P4 is embedded and substrate in the pipe is discontinuous or doesn’t appear permanent, you must dig down to find the bottom of pipe for elevation reading. If substrate appears permanent, then measure P4 elevation from top of substrate; no need to dig down.
D2. Ford Outlet (P4) = used to determine ford slope and outlet perch; place stadia rod on downstream edge of ford
15

Step 4A-G – Longitudinal Survey Points
4 continued. Longitudinal Survey Points
E. Outlet Apron (P4b) = a hardened surface (often concrete) at the pipe outlet intended to dissipate scouring; not every pipe has an outlet apron; when present place the stadia rod on the average lowest point of the downstream edge of the apron to take an elevation reading
F. Deepest Point within 1ft (P5) = place stadia rod at the lowest streambed elevation within the leaping distance of the fish species (1 ft); if an apron is present place stadia rod within 1 ft of P4b
P5
max pool depth 1 ft
P5 & max pool depth within 1ft 1 ft
16

Step 4A-G – Longitudinal Survey Points
4 continued. Longitudinal Survey Points
G. Tailwater Control (P6) = used to determine perch, residual inlet depth, and residual pool depth; P6 is the hydraulic control between outlet pool and riffle; if there is no outlet pool then there is no tailwater control; when present place stadia rod at the lowest average elevation of the stream bottom
P6
17

Step 4 – Longitudinal Survey Instructions
Survey Set-Up Instructions 1. Using marking paint, mark the bench mark and P3 on surfaces that will not move during the
survey 2. Run measuring tape from just above P2 to below P6; it is preferable to run the tape through the
pipe, however if not possible then tape can be run on road surface 3. Set up level in a safe spot where all the points are visible and where the level will not have to be
moved during the survey 4. Shoot elevations and stations of all points 5. Check that results seem correct by comparing calculated values to what you visually observe at
the crossing (if not, redo survey); calculate backwatered, outlet drop, and pipe slope A. Backwatered Calculations
1. BM Rod Read + 100 = Height of Instrument (HI) 2. HI – P6 Rod Read = P6 Elevation 3. HI – P2 Rod Read = P2 Elevation 4. P6 Elevation – P2 Elevation = Positive or Negative Value
• Positive = Backwatered • Negative = Not Backwatered
B. Outlet Drop Calculations (only when P6 present)
1. HI – P4 Rod Read = P4 Elevation 2. P4 elevation – P6 elevation = Positive or Negative Value
• Positive = Height (ft) Fish Must Jump to Enter Pipe • Negative = No Outlet Drop Present
C. Perch Calculations (only when P6 absent)
1. Hi – P5 Rod Read = P5 Elevation 2. P5 Elevation + Water Depth at P5 = Water Surface (WS) 3. P4 Elevation – WS = Perch
D. Pipe Slope Calculations 1. P2 Elevation – P4 Elevation = Rise 2. P4 Station – P2 Station = Length 3. Rise / Length = Slope 4. Slope X Length = Slope X Length
6. Repeat for each pipe; don’t forget to repeat for ford surface on vented fords 7. Move level to change its elevation for the closing procedure 8. Shoot to bench mark and P3
18

Step 4 – Longitudinal Survey Instructions
9. Check that survey closes (within ±0.02 inches); follow the ‘survey close calculations’ below Survey Close Calculations
1. BM Rod Read + 100 = Height of Instrument (HI) 2. HI - P3 Rod Read = Known Elevation for P3 3. Move Level 4. New P3 Rod Read 5. New P3 Rod Read + Known Elevation for P3 = New HI 6. New BM Rod Read 7. New HI - New BM Rod Read = New Elevation 8. 100 - New Elevation = Error (must be within ±0.02)
10. If survey does not close or results don’t make sense, the survey must be repeated
Notes for multiple pipe, dry stream, and no outlet pool scenarios:
Multiple Pipes • Pipes are counted from left to right when looking downstream • All information for steps 3 and 4 must be collected for each pipe • Check results for each pipe before closing survey • It is possible for multiple pipes to have an individual P6 for each pipe; however, often all
pipes will share one outlet pool and therefore have the same P6 Dry Streams
• Dry streams are surveyed in the same manner as streams with water • Record water depth at P5 = 0 • Make note in comments that stream is dry
No Outlet Pool
• If there is no outlet pool, there will be no P6 • Make note in comments that P6 is not present
No Outlet Pool and a Dry Stream
• If there is no outlet pool, there will no P6 • If stream is dry record water depth at P5 = 0 • Make note in comments that stream is dry and P6 not present
19

Step 5 – Draw Site Sketch
5. Draw Site Sketch
The site sketch must include: A. Crew members (full names) B. Date C. Crossing ID D. Note person who drew sketch E. North arrow F. Direction of flow G. Road name H. Junction road name I. Milepost J. Stream name K. Photo locations L. Location of P points M. Location of benchmark N. Location of level O. Pipe number for multiple pipes (pipe 1 on left looking downstream) P. Outlet apron Q. Debris jams R. Depositional bars S. Tributaries (include name if named) T. Features unique to site (buildings, landmarks, etc.) U. Damages/obstacles inside structure V. Location of riprap or bank armoring W. Any additional comments
20

Step 5 – Draw Site Sketch
5. Site Sketch Incomplete Site Sketch (not acceptable)
Complete Site Sketch
21

Step 6 – Take and Document Photos
6. Take and Document Photos
Photo Requirements: Take a photo of the whole inlet and outlet at each site. Try to include all pipes in photos if possible. Also photograph any unique features of the site.
A. Stadia rod, crew member, and whiteboard must be in each photo B. Identify site with proper site ID on whiteboard C. All pipes should be visible D. Channel should be included E. Get as much of the crossing and stream in the photo as possible F. Whiteboard should be upright, legible, and clear in photo G. Make sure there is no glare on whiteboard H. Check each photo before moving to next site I. Record the photo identifier numbers for images taken
Common Photo Problems:
• Blurriness
• Zoomed in too far
• Zoomed out too far
• Cannot see whiteboard
• Stadia rod not included
• Cannot see all the pipes
• Light reflecting off the whiteboard
• Incorrectly labeled whiteboard
22

Step 4 – Longitudinal Survey Instructions
Coffman Models Filter A Application: strong swimmers and leapers Example: adult brook trout
Filter B Application: moderate swimmers and leapers Examples: adult minnows, age-0 brook trout
Filter C Application: weak swimmers and leapers Examples: darters, sculpins
Source: Coffman, J. S. 2005. Evaluation of a predictive model for upstream fish passage through culverts. Master �s Thesis, James
Moderate Difficult Easy
Difficult Moderate Easy
Difficult Moderate Easy
23


