SmartPost 2015
USERMANUAL

Page 2
Table of Contents
....................................................................................................................................................3Privacy Statement
....................................................................................................................................................5Copyright Notice
....................................................................................................................................................7What is SmartPost
....................................................................................................................................................9Installing SmartPost
................................................................................................................................................ 9System Requirements
................................................................................................................................................ 9Installation
................................................................................................................................................ 12Registration
....................................................................................................................................................14Setup
................................................................................................................................................ 14SmartPost Options
................................................................................................................................................ 15SmartPost Report Setup
................................................................................................................................................ 15Posting Routines
................................................................................................................................................ 17SmartPost Scheduling
.............................................................................................................................................. 17Immediate
.............................................................................................................................................. 18Daily Schedules
.............................................................................................................................................. 18Weekly Schedules
.............................................................................................................................................. 19Monthly Schedules
.............................................................................................................................................. 20Run Once
................................................................................................................................................ 21Analytical Accounting
.............................................................................................................................................. 24Financial
.............................................................................................................................................. 25Sales
.............................................................................................................................................. 27Purchasing
.............................................................................................................................................. 29Inventory
................................................................................................................................................ 30Processing
................................................................................................................................................ 31Preview
....................................................................................................................................................33Enhancements
................................................................................................................................................ 3320.15.0.5
................................................................................................................................................ 3320.15.0.12
................................................................................................................................................ 3320.15.1.2

Page 3
Privacy Statement
SmartPost Help Privacy Statement
eOne Solutions Pty. Ltd. (eOne) is committed to protecting your privacy. This privacy
statement explains data collection and use practices of the SmartPost Online Help (the
“Help”); it does not apply to other online or offline eOne Solutions sites, products or services.
By accessing the Help, you are consenting to the information collection and use practices
described in this privacy statement.
Collecting your personal information
SmartPost Help includes a feature to allow you to submit feedback on the Help. Use of this
feature is optional. When you use this feature, you send eOne an e-mail message that
includes your e-mail address, identification of a specific topic in the Help, an overall rating of
your satisfaction with the topic, and any comments you choose to share with us.
After you submit feedback, we may contact you at the provided e-mail address to confirm
receipt of your feedback message, or in some cases, to obtain further information about the
feedback you provided. Your response to any follow-up messages is optional.
Use of your personal information
eOne collects feedback information to ascertain the accuracy and usefulness of the Help, and
to decide how best to improve the Help in future releases.
eOne may disclose personal information if required to do so by law or in the good faith belief
that such action is necessary to (a) conform to the edicts of the law or comply with legal
process served on eOne Solutions or the Help; (b) protect and defend the rights or property of
eOne and our family of products; or (c) act in urgent circumstances to protect the personal
safety of eOne employees or agents, users of eOne products or services, or members of the
public.
Personal information collected on the Help may be stored and processed in the United States
or any other country in which eOne or its affiliates, subsidiaries or agents maintain facilities,
and by using the Help, you consent to any such transfer of information outside of your
country. eOne abides by the safe harbor framework as set forth by the U.S. Department of
Commerce regarding the collection, use, and retention of data from the European Union.
Control of your personal information
Except as otherwise described in this statement, personal information you provide on the

Page 4
Help will not be shared outside of eOne and its controlled subsidiaries and affiliates without
your permission.
Please be aware that this privacy statement and any choices you make using the Help will not
necessarily apply to personal information you may have provided to eOne in the context of
other, separately operated, eOne products or services.
Contact information
eOne welcomes your comments regarding this privacy statement. If you believe that eOne
has not adhered to this privacy statement, please contact us by e-mail at
[email protected] (with the subject line SmartPost Help Privacy) or via postal
mail at the address provided below, and we will use commercially reasonable efforts to
promptly determine and remedy the problem.
eOne Solutions Documentation
2632 47th Street S
Suite 111
Fargo, ND 58104
USA

Page 5
Copyright Notice
Copyright:
Manual copyright © 2015 eOne Integrated Business Solutions All rights reserved.
Your right to copy this documentation is limited by copyright law and the terms of the software
license agreement. As the software licensee, you may make a reasonable number of copies
or printouts for your own use. Making unauthorized copies, adaptations, compilations, or
derivative works for commercial distribution is prohibited and constitutes a punishable
violation of the law. Unless otherwise noted, all names of companies, products, street
addresses, and persons contained herein are fictitious and are used solely to document the
use of this product.
Trademarks:
All company or product names mentioned are trademarks or registered trademarks of eOne
Integrated Business Solutions or of their respective holders.
Warranty:
eOne Integrated Business Solutions disclaims any warranty regarding the sample code
contained in this documentation, including the warranties of merchantability and fitness for a
particular purpose.
Limitation of liability:
The content of this manual is furnished “as-is” for informational use only, is subject to change
without notice, and should not be construed as a commitment by eOne Integrated Business
Solutions. eOne Integrated Business Solutions assumes no responsibility or liability for any
errors or inaccuracies that may appear in this manual. Neither eOne Integrated Business
Solutions nor anyone else who has been involved in the creation, production or delivery of this
documentation shall be liable for any indirect, incidental, special, exemplary or consequential
damages, including but not limited to any loss of anticipated profit or benefits, resulting from
the use of this documentation or sample code.
License agreement:
Use of this product is covered by a license agreement provided by eOne Integrated Business
Solutions, with the software product. If you have any questions, please call eOne Integrated
Business Solutions at +1 888 319 3663.
Page 6
Intellectual property:
This document does not provide you with any legal rights to any intellectual property in any
eOne Integrated Business Solutions product. You may copy and use this document for your
internal, reference purposes.
Publication date: January 2015

Page 7
What is SmartPost
SmartPost is the tool for everyone that is tired of hitting the post button. It is the set and forget
tool that will look after your Microsoft Dynamics GP posting for you. You decide which batches
you want automatically posted, define the rules for your team and SmartPost does the rest.
Whether you are importing records after hours that you need posted, or you have 30 people
entering batches and people forget to post them, SmartPost will automate that job.
How it WorksFirst you need to set up a posting user and leave them logged into Microsoft
Dynamics GP all the time. This can be on a server or on a machine sitting in the
corner dedicated to your posting robot. This is a bit of a pain, we know, but it is much
better than posting yourself. The robot then watches your defined schedule and when
required grabs all the batches you asked it to find and posts them. The robot follows
all the posting rules of Microsoft Dynamics GP and will post To or Through as well as
ensure approvals and check that the digits are correct. The robot will then generate
posting reports (if you asked for them) and email them to you.
Batches it will PostFinancial
General Entry
Clearing Entry
Budget Transactions
Sales
Sales Transaction Entry
Invoice Entry
Cash Receipts Entry
Transaction Entry
Purchasing
Manual Payment
Payables Transaction Entry
Receivings Transaction Entry
Purchasing Invoice Entry
Returns Transactions Entry
Inventory
Transaction Entry
Transfer Entry
Page 8
Assembly Entry
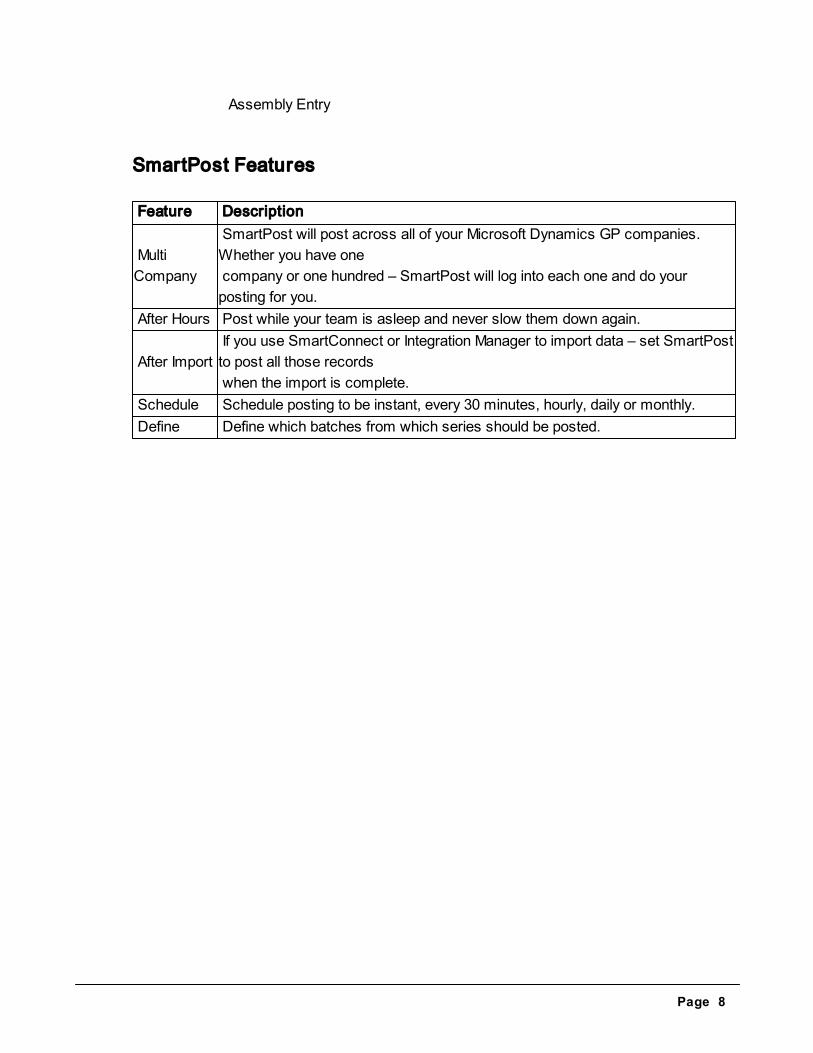
SmartPost Features
Feature Description
Multi
Company
SmartPost will post across all of your Microsoft Dynamics GP companies.
Whether you have one
company or one hundred – SmartPost will log into each one and do your
posting for you.
After Hours Post while your team is asleep and never slow them down again.
After Import
If you use SmartConnect or Integration Manager to import data – set SmartPost
to post all those records
when the import is complete.
Schedule Schedule posting to be instant, every 30 minutes, hourly, daily or monthly.
Define Define which batches from which series should be posted.
Page 9
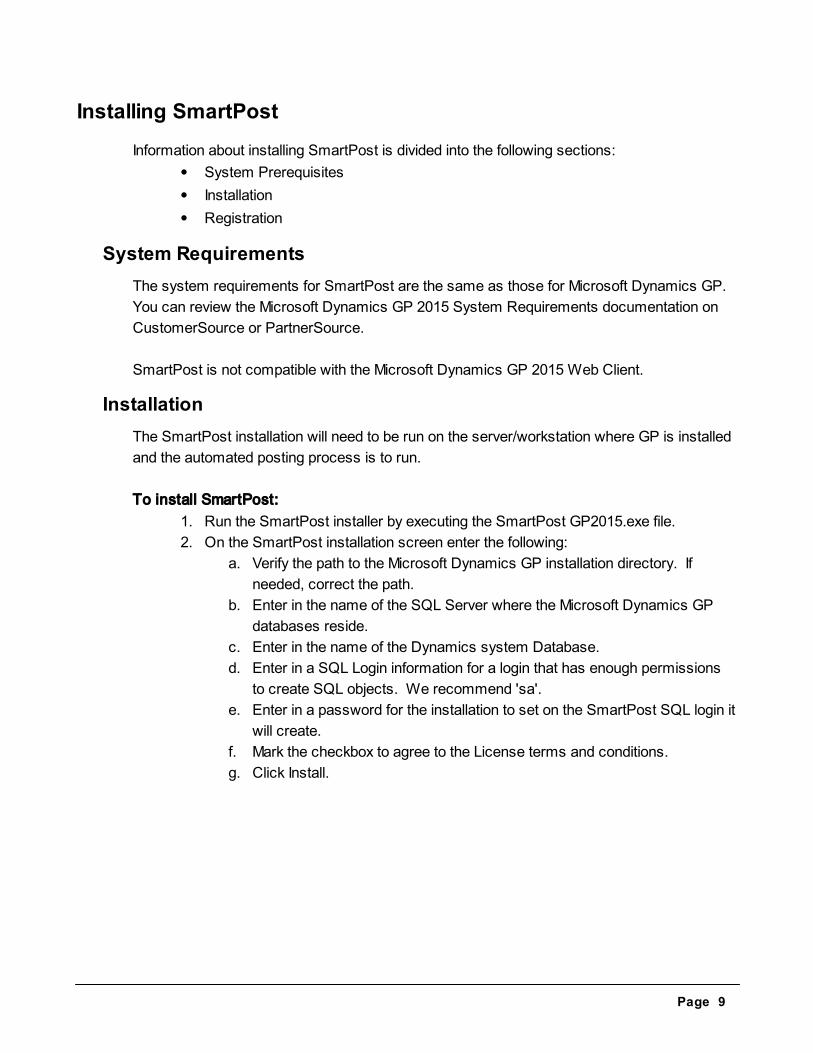
Installing SmartPost
Information about installing SmartPost is divided into the following sections:
System Prerequisites
Installation
Registration
System Requirements
The system requirements for SmartPost are the same as those for Microsoft Dynamics GP.
You can review the Microsoft Dynamics GP 2015 System Requirements documentation on
CustomerSource or PartnerSource.
SmartPost is not compatible with the Microsoft Dynamics GP 2015 Web Client.
Installation
The SmartPost installation will need to be run on the server/workstation where GP is installed
and the automated posting process is to run.
To install SmartPost:
1. Run the SmartPost installer by executing the SmartPost GP2015.exe file.
2. On the SmartPost installation screen enter the following:
a. Verify the path to the Microsoft Dynamics GP installation directory. If
needed, correct the path.
b. Enter in the name of the SQL Server where the Microsoft Dynamics GP
databases reside.
c. Enter in the name of the Dynamics system Database.
d. Enter in a SQL Login information for a login that has enough permissions
to create SQL objects. We recommend 'sa'.
e. Enter in a password for the installation to set on the SmartPost SQL login it
will create.
f. Mark the checkbox to agree to the License terms and conditions.
g. Click Install.

Page 10
3. If prompted, click Yes to allow the SmartPost installation to make changes to the
computer.

Page 11
4. The installation will process for a few seconds.
5. When the installation is done, click Finish.

Page 12
Registration
To Register SmartPost:
1. Open the SmartPost Registration window by going to Microsoft Dynamics GP -
Tools - SmartPost - Registration.
2. Enter in the registration key.

Page 13
3. Click the View License Agreement button.
4. Check the I accept the terms and conditions in the License Agreement checkbox.
5. Click the OK button to close the License Agreement Window.
6. Click OK to save the registration information.

Page 14
Setup
The setup information is divided into the following topics:
SmartPost Options
SmartPost Report Options
Posting Routines
Scheduling
Analytical Accounting
SmartPost Options
To setup the SmartPost Options:
1. Open the SmartPost setup window. Using the Microsoft Dynamics GP interface
go to Microsoft Dynamics GP - Tools - SmartPost - Setup.
2. To enable emails within SmartPost enter a SMTP server (This could be a SMTP
Url or the exchange server).
3. Enter the Username, Password, and Domain for the user that will be used to e-
mail the reports.
4. Service Email Address : The user that all emails in the system will be sent as.
5. Admin Email Address : This is the user that will receive emails if there are anything
that went wrong while posting or trying to post a batch.
6. Report File Path : The path where all batch reports will be created.
7. Set the Analytical Accounting Max Report Time. This is used as a timeout for the
reports if they don't generate in the time given, it will quit trying.

Page 15
8. Do not delete batch reports: Select this flag if you want to keep the batch reports
after they have been emailed to the specified user.
SmartPost Report Setup
To setup the SmartPost Report Options:
1. Open the SmartPost setup window. Using the Microsoft Dynamics GP interface
go to Microsoft Dynamics GP - Tools - SmartPost - Setup.
2. Click on the Report Setup button.
3. Select the Batch Series and Source.
4. Mark the Include AA Report and Include post through AA GL Journal report if
appropriate. Please see the section on the Analytical Accounting Setup for more
information.
5. Select the reports you would like to print and mail when the selected batch type
gets posted.
6. Click Save to save the selection.
Posting Routines
To setup the Posting Routine:
1. Open the Posting Routines window by going to Microsoft Dynamics GP - Tools -
Setup - SmartPost - Posting Routine.

Page 16
2. Enter a Routine name.
3. Select the Batch Series and Source for this routine.
4. Select a search type on the batch number.
5. Enter the what the search type should look for. (For example if i selected "Begins
With" and enter "AA" in the Batch Number field, the routine will find all batches that
begin with "AA")
6. Enter the email address of the person that will receive the reports when this
posting routines posts a batch.
7. Set the Schedule. For more information, see the Scheduling section.
8. The active flag specifies whether the Routine is active or not.
9. Click the Companies button and select all the companies that the routine must find
batches and post.

Page 17
10. Click OK to close the Companies window.
11. Click the Save button to save the routine.
SmartPost Scheduling
SmartPost Routines may be scheduled to run immediately, daily, weekly, monthly, and once
only.
The SmartPost scheduling information has been divided into the following topics:
Immediate
Daily schedules
Weekly schedules
Monthly schedules
Scheduling to run once
Immediate
A Routine scheduled to run immediately will look for batches and as soon as they are found
they will be posted.
To schedule a Routine once:
1. Open the SmartPost Routine setup window by going to Microsoft Dynamics GP -
Tools - Setup - SmartPost - Posting Routine.
2. Select 'Immediate' as the schedule task option.

Page 18
3. Click save to save the Routine changes.
Daily Schedules
A daily schedule sets a Routine to run every x days, at the selected time.
To schedule a Routine to run daily:
1. Open the SmartPost Routine setup window by going to Microsoft Dynamics GP -
Tools - Setup - SmartPost - Posting Routine.
2. Select 'Daily' as the schedule task option.
3. Enter the start time for the routine.
4. Enter the number of days between each run of the Routine.
5. If the routine is to be repeated, setup the following:
a. Mark the Repeat every... checkbox.
b. Select the time in minutes between each run.
c. Select the minutes between the start time and the time before which the
last daily run should start.
6. Click save to save the Routine amendments.
Weekly Schedules
A weekly schedule sets a Routine to run every x weeks, on selected days, at the selected
time.
To schedule a Routine to run weekly:

Page 19
1. Open the SmartPost Routine setup window by going to Microsoft Dynamics GP -
Tools - Setup - SmartPost - Posting Routine.
2. Select 'Weekly' as the schedule task option.
3. Enter the time that the Routine run should start.
4. Enter the number of weeks between each run of the Routine.
5. Select the day(s) of the week where the Routine is to be run.
6. If the Routine is required to be run multiple times each day it is run, mark the
Repeat every... checkbox and enter the minutes between the start time and the
time before which the last daily run should start.
7. Click save to save the Routine amendments.
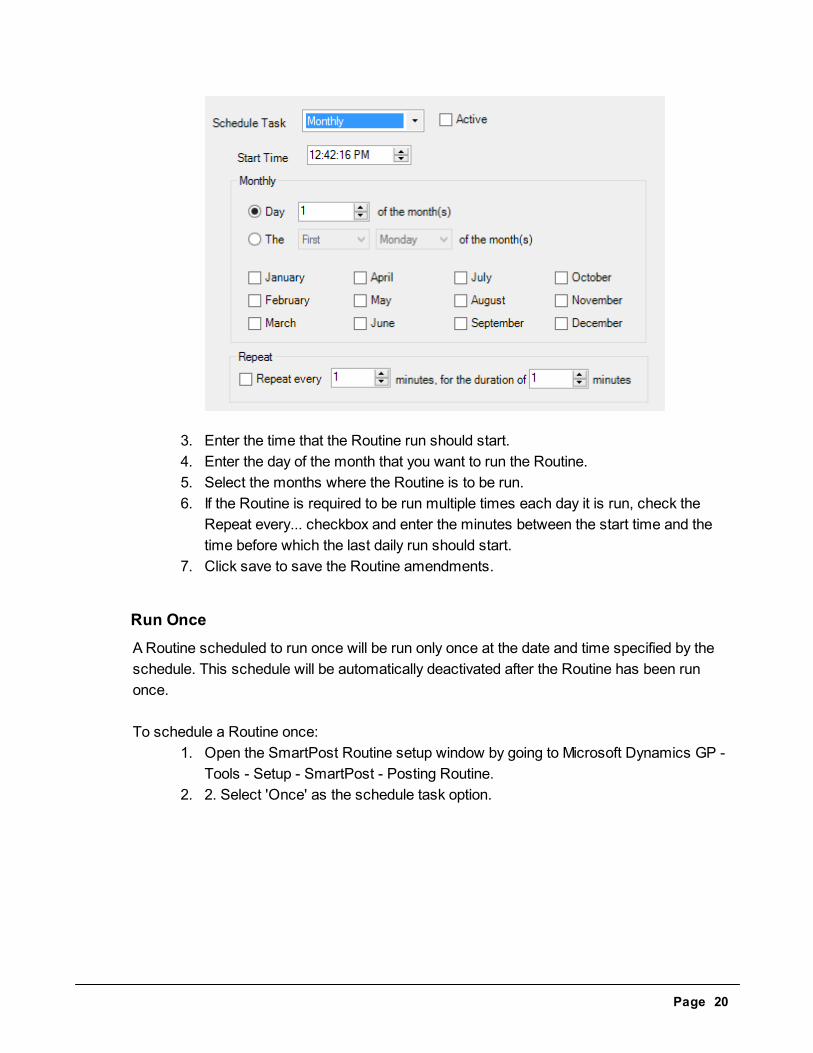
Monthly Schedules
A monthly schedule sets a Routine to run on a certain day of the month for the selected
months, at a specified time.
To schedule a Routine to run monthly:
1. Open the SmartPost Routine setup window by going to Microsoft Dynamics GP -
Tools - Setup - SmartPost - Posting Routine.
2. Select 'Monthly' as the schedule task option.
Page 20
3. Enter the time that the Routine run should start.
4. Enter the day of the month that you want to run the Routine.
5. Select the months where the Routine is to be run.
6. If the Routine is required to be run multiple times each day it is run, check the
Repeat every... checkbox and enter the minutes between the start time and the
time before which the last daily run should start.
7. Click save to save the Routine amendments.
Run Once
A Routine scheduled to run once will be run only once at the date and time specified by the
schedule. This schedule will be automatically deactivated after the Routine has been run
once.
To schedule a Routine once:
1. Open the SmartPost Routine setup window by going to Microsoft Dynamics GP -
Tools - Setup - SmartPost - Posting Routine.
2. 2. Select 'Once' as the schedule task option.

Page 21
3. Enter the time that the Routine should run.
4. Enter the date that that the Routine should run.
5. Click save to save the Routine amendments.
Analytical Accounting
SmartPost require a few manual setups to be completed for AA to work. If AA is installed
these steps need to be followed for each batch series and batch source that SmartPost will
post regardless of whether you want to print and email the AA reports or not.
On the SmartPost Options window we have added a default AA report timeout.
When SmartPost is posting a batch with an AA report, it will wait for the report to print in the
specified folder as setup below. SmartPost will wait for this report to be printed and continue
when it has waited longer than the time specified. (If the time is set to 0, SmartPost will wait
for a default time of 5 min)
Please Note: When you have Post through General Ledger setup in Great Plains you will
need to follow the steps in the Financial section on General Entry.
If you want to print or email AA reports:
1. Open the Report Setup window by going to Microsoft Dynamics GP - Tools -
SmartPost - Setup and click the Report Setup button.
2. Select the Batch Series and Source that you want to print or email the AA reports
for.
3. Select the "Include AA Report" option on the Report Setup window in SmartPost

Page 22
for the desired Batch Series and Source. If you are using the Post Through
General Ledger Files option in the Microsoft Dynamics GP Posting Setup window
and you want it to send the General Ledger report as well as the Sales, Inventory,
or Purchasing report, mark the Include post through AA GL Journal report
checkbox.
4. Below this check box a report name will be displayed. This is the path and name of
the report that we will need to setup in Great Plains Posting Setup.
5. Now we need to change the AA Report Printing Options in the report Setup for
Great Plains. To do this go to Microsoft Dynamics GP - Tools - Setup - Posting -
Posting.
6. Select the series and origin as selected in step 2.
7. Select the file option for this AA report.
8. Change the Type drop down to Html file.

Page 23
9. The file and path selected in the path field of this window MUST be the same name
and path as in step 4.
10. Please follow steps in the following links to make sure you change the correct
reports for each Series.
a. Financial
b. Sales
c. Purchasing
d. Inventory
If you do not want to print or email AA reports:
1. Open the Report Setup window by going to Microsoft Dynamics GP - Tools -
SmartPost - Setup and click the Report Setup button.
2. Select the Batch Series and Source that you don't want to print or email the AA
reports for.
3. De-select the "Include AA Report" option.
4. Now we need to turn of the AA Report Printing Options window in the report Setup
for Great Plains. To do this go to Microsoft Dynamics GP - Tools - Setup - Posting
- Posting.

Page 24
5. Select the series and origin as selected in step 2.
6. De-select the AA report in the scrolling window.
7. Please follow the steps in the following links to make sure you turn off the correct
reports for each Series.
a. Financial
b. Sales
c. Purchasing
d. Inventory
Financial
To setup the Analytical Accounting Posting Reports for the financial series:
1. Open the Great Plains Report Setup window by going to Microsoft Dynamics GP -
Tools - Setup - Posting - Posting.
2. If you are turning off the AA reporting options then de-select the reports below

Page 25
instead of adding the file paths.
3. We will be changing the Series and Origin for the options below to change the
required AA report.
General Entry
1. Select the Series of Financial and the Origin of General Entry.
2. Mark the AA General Posting Journal report.
3. Select the file type checkbox and change the type to Html.
4. The report path needs to be the same as the path in the Report Setup window of
SmartPost and the report name should be GLJournalEntry.htm. (Please note that
this report path and name needs to be exact for SmartPost to pickup the report
and mail it.)
Sales
To setup the Analytical Accounting Posting Reports for the Sales series:
1. Open the Great Plains Report Setup window b going to Microsoft Dynamics GP -
Tools - Setup - Posting - Posting.
2. If you are turning off the AA reporting options then de-select the reports below
instead of adding the file paths.
3. We will be changing the Series and Origin for the options below to change the
required AA report.
Sales Transaction Entry
1. Select the Series of Sales and the Origin of Receivables Sales Entry.
2. Mark the AA Sales Entry Posting Journal report.

Page 26
3. Select the file type checkbox and change the type to Html
4. The report path needs to be the same as the path in the Report Setup window of
SmartPost and the report name should be SOPReceivables.htm. (Please note
that this report path and name needs to be exact for SmartPost to pickup the
report and mail it.)
Cash Receipts Entry
1. Select the Series of Sales and the Origin of Receivables Cash Receipts.
2. Mark the AA Cash Posting Journal.
3. Select the file type checkbox and change the type to Html
4. The report path needs to be the same as the path in the Report Setup window of
SmartPost and the report name should be SOPCashReceipt.htm. (Please note
that this report path and name needs to be exact for SmartPost to pickup the
report and mail it.)
Transaction Entry
1. Select the Series of Sales and the Origin of Receivables Sales Entry.
2. Mark the AA Sales Entry Posting Journal report.

Page 27
3. Select the file type checkbox and change the type to Html
4. The report path needs to be the same as the path in the Report Setup window of
SmartPost and the report name should be SOPReceivables.htm. (Please note
that this report path and name needs to be exact for SmartPost to pickup the
report and mail it.)
Purchasing
To setup the Analytical Accounting Posting Reports for the purchasing series:
1. Open the Great Plains Report Setup window b going to Microsoft Dynamics GP -
Tools - Setup - Posting - Posting.
2. If you are turning off the AA reporting options then de-select the reports below
instead of adding the file paths.
3. We will be changing the Series and Origin for the options below to change the
required AA report.
Manual Payment
1. Select the Series of Purchasing and the Origin of Payment Entry.
2. Mark the AA Payment Entry Posting Journal report.
3. Select the file type checkbox and change the type to Html.
4. The report path needs to be the same as the path in the Report Setup window of
SmartPost and the report name should be POManualPaymanet.htm. (Please note
that this report path and name needs to be exact for SmartPost to pickup the
report and mail it.)
Payables Transaction Entry
1. Select the Series of Purchasing and the Origin of Payables Trx Entry.
2. Mark the AA Trx Entry Posting Journal report.

Page 28
3. Select the file type checkbox and change the type to Html.
4. The report path needs to be the same as the path in the Report Setup window of
SmartPost and the report name should be POPayablesTransaction.htm. (Please
note that this report path and name needs to be exact for SmartPost to pickup the
report and mail it.)
Receiv ings Transaction Entry
1. Select the Series of Purchasing and the Origin of Receivings Trx Entry.
2. Mark the AA Receivings Posting Journal report.
3. Select the file type checkbox and change the type to Html
4. The report path needs to be the same as the path in the Report Setup window of
SmartPost and the report name should be POReceivingsTrx.htm. (Please note
that this report path and name needs to be exact for SmartPost to pickup the
report and mail it.)
Purchasing Invoice Entry
1. Select the Series of Purchasing and the Origin of Purchasing Invoice Entry.
2. Mark the AA Invoice Posting Journal report.
3. Select the file type checkbox and change the type to Html

Page 29
4. The report path needs to be the same as the path in the Report Setup window of
SmartPost and the report name should be POPurchaseInvoice.htm. (Please note
that this report path and name needs to be exact for SmartPost to pickup the
report and mail it.)
Inventory
To setup the Analytical Accounting Posting Reports for the inventory series:
1. Open the Great Plains Report Setup window b going to Microsoft Dynamics GP -
Tools - Setup - Posting - Posting.
2. If you are turning off the AA reporting options then de-select the reports below
instead of adding the file paths.
3. We will be changing the Series and Origin for the options below to change the
required AA report.
Transaction Entry
1. Select the Series of Inventory and the Transaction Entry.
2. Mark the AA Inventory Transaction Journal report.
3. Select the file type checkbox and change the type to Html.
4. The report path needs to be the same as the path in the Report Setup window of
SmartPost and the report name should be IVTransactionEntry.htm. (Please note
that this report path and name needs to be exact for SmartPost to pickup the
report and mail it.)
Transfer Entry
1. Select the Series of Inventory and the Origin of Transfer Entry.
2. Mark the AA Inventory Transfer Journal report.

Page 30
3. Select the file type checkbox and change the type to Html.
4. The report path needs to be the same as the path in the Report Setup window of
SmartPost and the report name should be IVTransferEntry.htm. (Please note that
this report path and name needs to be exact for SmartPost to pickup the report
and mail it.)
Processing
The SmartPost processing window is where the running of routines and posting of batches
occur.
When logged into Microsoft Dynamics GP, the user that you are logged in as, will be the user
that all batched will be posted as.
Please ensure that this user has access to post all batches Setup in your Posting Routines.
To Start the SmartPost Processing:
1. Open the SmartPost Processing window by going to Microsoft Dynamics GP -
Tools - SmartPost - Processing.

Page 31
2. Click on the Start Button.
3. SmartPost will start looking for batches on all companies for all routines setup.
4. Once a batch or batches are found SmartPost will display these batches in the
processing window and start posting them one by one.
5. When you click on the Stop Button and SmartPost is in the process of posting a
batch, it will finish the posting of that batch before the window can be closed or the
Start button becomes available again.
Preview
The preview window can be used to show the batches that are available to post based on the
posting routines that you have setup.
To view the available batches:
1. Open the Preview window by going to Microsoft Dynamics GP - Tools - SmartPost
- Preview.

Page 32
2. Select the Routines, Companies, and dates you want to view the batches for.
3. Click Redisplay.
Page 33
Enhancements
Release 20.15.0.5
Release 20.15.0.12
Release 20.15.1.2
20.15.0.5
This release is a compatibility release to allow SmartPost to be compatible with Microsoft
Dynamics GP 2015. There are no additional enhancements included.
20.15.0.12
Problem Reports Fixed in Build 20.15.0.12
Processing Performance Improvements
20.15.1.2
Problem Reports Fixed in Build 20.15.1.2
Can't remove posting routine
GP says your activity record has been removed after using SmartPost.
HTML output of some GP posting formats have overlapping text
Registration Keys should prevent lowercase characters from being entered
SmartPost creates ACTIVITY records using Activity which would fail under SQL
Binary
SmartPost doesn't take into account Workflow steps
SmartPost fails to create/delete ACTIVITY record if GP USERID has apostrophe
SmartPost Inventory Assembly Entry prompts for report destination when posting
SmartPost not using correct date format when creating ACTIVITY record
SmartPost Setup only allows port numbers from 1 to 100
SmartPost switches company for posting however it shows the original company
on windows
SmartPost uses up all the Dynamics GP user licenses


![RECOMMENDED FOR FULL-TEXT PUBLICATION File Name: … · 2019. 8. 5. · FedEx SmartPost, Inc. Page 6 although it did not “sound like something that [he] would say,” and that he](https://cdn.vdocument.in/doc/165x107/60fd8e23c56e0e7b832db522/recommended-for-full-text-publication-file-name-2019-8-5-fedex-smartpost.jpg)


