STEVE NASH YOUTH BASKETBALL - 89 -
SECTION 12OFFENSIVE/DEFENSIVE CONCEPTS
STEVE NASH YOUTH BASKETBALL - 90 -
12.0 OFFENSIVE/ DEFENSIVE CONCEPTS12.1 – OFFENSIVE CONCEPTS
When teaching young kids offense, some of the most important concepts to remember are that of patience and spacing. When players get the ball, they often start panicking. When this happens, their initial instinct is to do something without thinking. It is important that they slow down, not become over anxious and take the time to make their decisions.
As for spacing, everybody usually wants to be close to the ball. If players are left to figure this concept out on their own it will be 10 players within 2 feet of one basketball. This leaves little or no room for the player with the ball to do much of anything. It is important that players are instructed to space out, which will give them more room to operate. It is a good idea to use the 3-point line, or other floor lines at similar distance, as a reference point. For example you may want to say to them “if your’re confused or don’t know what to do, space out to the 3-point line.”
There are several other ‘rules’ that may be followed depending on the skill level of your athletes:• After every pass a player makes, they must cut or move.• Have the offense make a certain number of passes before a shot can be taken.• Mini, modified games, such as 2-on-2 or 3-on-3 are effective in teaching these concepts.• When a player dribbles towards you, you must cut or get out of the way.• Use the cut the defense gives you.
It is also important to remember that every player should learn to play every position and that offense is not about learning a pattern; it is about learning to use their skills to work together to put the ball in the basket. When players are assigned specific positions, their personal development is consequently limited.
This section will cover the following topics relating to Offensive Concepts: 12.1.1 - Team Offense Rules12.1.2 - Offensive Movement Concepts12.1.3 – Offensive Attack Concepts12.1.4 – Loading and Modifications12.1.5 – Teaching Offense
12.1.1 – Team Offense Rules
In team offense, players must integrate their skills into the flow of the game, while understanding and applying the basic rules of team offense. The following team offensive rules apply at all levels of basketball:
• See the ball – Players should see the ball at all times by using peripheral vision and by turning their head to the ball. • See teammates – Players must keep teammates in view at all times. • Maintain appropriate spacing – Avoid cluster around the ball both on offense and on defense. • Attack the Middle – Players attacking the middle can create better shot angles and passing angles. • Read the defense – Players can react to defense and take advantage of what the defense gives them, forcing defenders to make errors. • Get back on defense – Once a team loses possession, players must get back immediately on defense.
STEVE NASH YOUTH BASKETBALL - 91 -
12.1.2 – Offensive Movement Concepts
Offensive concepts for each of these mini, modified games will now be explained in the following sections. Playing games of 2-on-2 or 3-on-3 are beneficial because they are less congested, and therefore less confusing for players.
NOTE: Do not be overly concerned with offensive sets. It is important that we allow children to be creative and to play, which means having fun.
The Straight Ball CutPlayers on the weak side (the side away from the ball) should always be looking for opportunities to cut to the ball. Players can increase the probability that a cutting lane will be open by: • Using fakes to keep the defender occupied on the weak side. • Moving to stay out of the defender’s line of sight. • Cutting without hesitation and without telegraphing the cut.
The Change of Direction Ball CutThe weak-side offensive player can create a clear cutting lane by cutting in one direction to “freeze” the defender and then changing direction to cut toward the ball. i.e. Starting low and cutting high; starting high and cutting low.
Players can use the change of direction cut effectively by: • Making the initial cut in the direction of the defender is favoring (i.e. cut low and then high if the defender is playing low). • Getting close to the defender before changing directions. This approach makes it difficult for the defender to cut off movement in the new direction.
Give and Go CutThe give and go is a two-player maneuver that encourages passing, movement, spacing and cooperation. The player with the ball passes to a teammate and cuts to the basket. The cut to the basket is a straight cut if the cutting lane is open, or performs a change of direction cut if it’s not open. Receiver looks to return the pass to the cutter.
Cut and Replace (3-on-0)The Cut and Replace concept is a basic movement of the offense. This is a very simple offense that kids will be able to grasp. To illustrate, have 3 players on offense situated with one player at the top and the other two players on the two wings. The rule here is that one of the 3 spots must always be filled (the spots being one at the top and one on either wing).
The player from the top can pass to either wing. When a pass is made player 1 must move. This player can either cut to the basket or exchange away with the opposite wing. If player 1 cuts to the basket, player from the opposite wing must replace him/her at the top. Player 1 then rotates out to the wing. When this happens the spots must be refilled, so players must rotate.
4-ON-4 / 5-0N-5The basic cut and replace offensive movement concepts as described in the 3-on-0 section are taken and used while playing 4-on-4 and 5-on-5.
Give and Go Drill1. Give and Go – Have players in 2 lines, one at the top and one on the wing. The line at the top will have basketballs. The top line begins by passing the ball to the wing. After the pass has been made, this player then cuts towards the basket, gives a target hand and receives the pass back from the wing. On the catch that player then makes a lay-up or shoots. You could also start the drill with the top line being at half court. This line then must take 3 or 4 dribbles, make a pass to the wing and cut to the basket.
STEVE NASH YOUTH BASKETBALL - 92 -
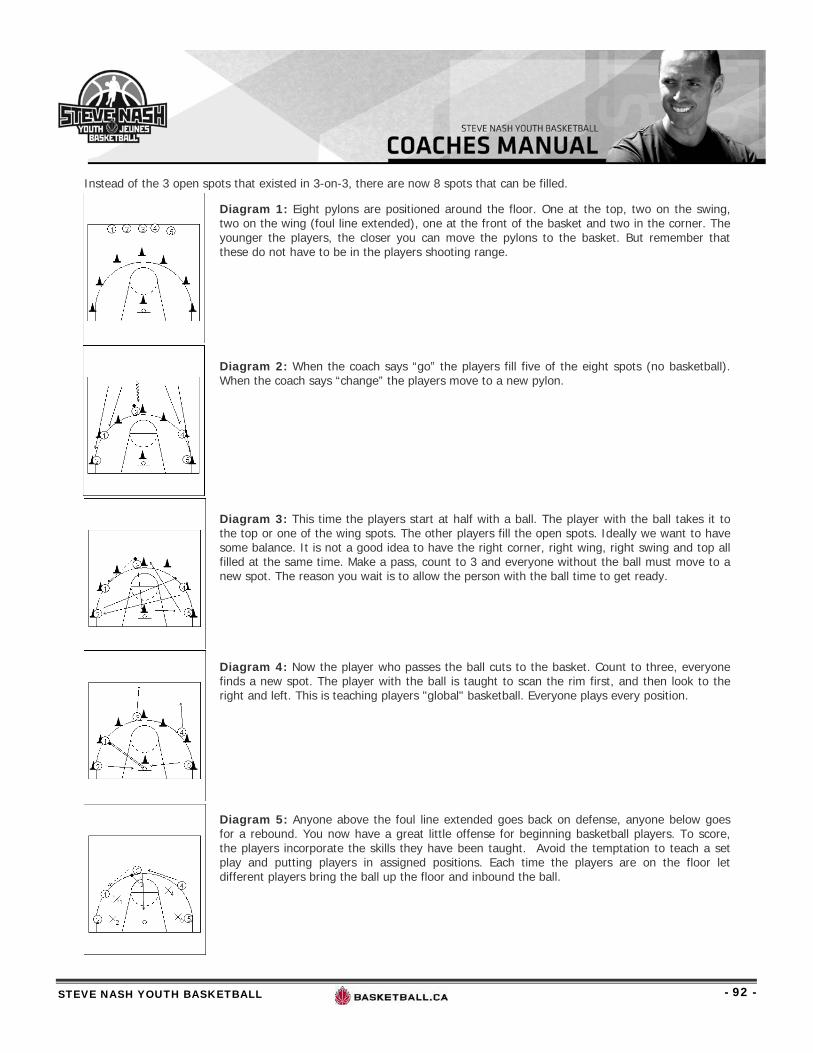
Instead of the 3 open spots that existed in 3-on-3, there are now 8 spots that can be filled.
Diagram 1: Eight pylons are positioned around the floor. One at the top, two on the swing, two on the wing (foul line extended), one at the front of the basket and two in the corner. The younger the players, the closer you can move the pylons to the basket. But remember that these do not have to be in the players shooting range.
Diagram 2: When the coach says “go” the players fill five of the eight spots (no basketball). When the coach says “change” the players move to a new pylon.
Diagram 3: This time the players start at half with a ball. The player with the ball takes it to the top or one of the wing spots. The other players fill the open spots. Ideally we want to have some balance. It is not a good idea to have the right corner, right wing, right swing and top all filled at the same time. Make a pass, count to 3 and everyone without the ball must move to a new spot. The reason you wait is to allow the person with the ball time to get ready.
Diagram 4: Now the player who passes the ball cuts to the basket. Count to three, everyone finds a new spot. The player with the ball is taught to scan the rim first, and then look to the right and left. This is teaching players "global" basketball. Everyone plays every position.
Diagram 5: Anyone above the foul line extended goes back on defense, anyone below goes for a rebound. You now have a great little offense for beginning basketball players. To score, the players incorporate the skills they have been taught. Avoid the temptation to teach a set play and putting players in assigned positions. Each time the players are on the floor let different players bring the ball up the floor and inbound the ball.
STEVE NASH YOUTH BASKETBALL - 93 -
12.1.3 – Offensive Attack Concepts
The acronym used in describing offensive concepts in attack basketball: A – Attack the basketC – Create SpaceT – Teammates
Attack the basket
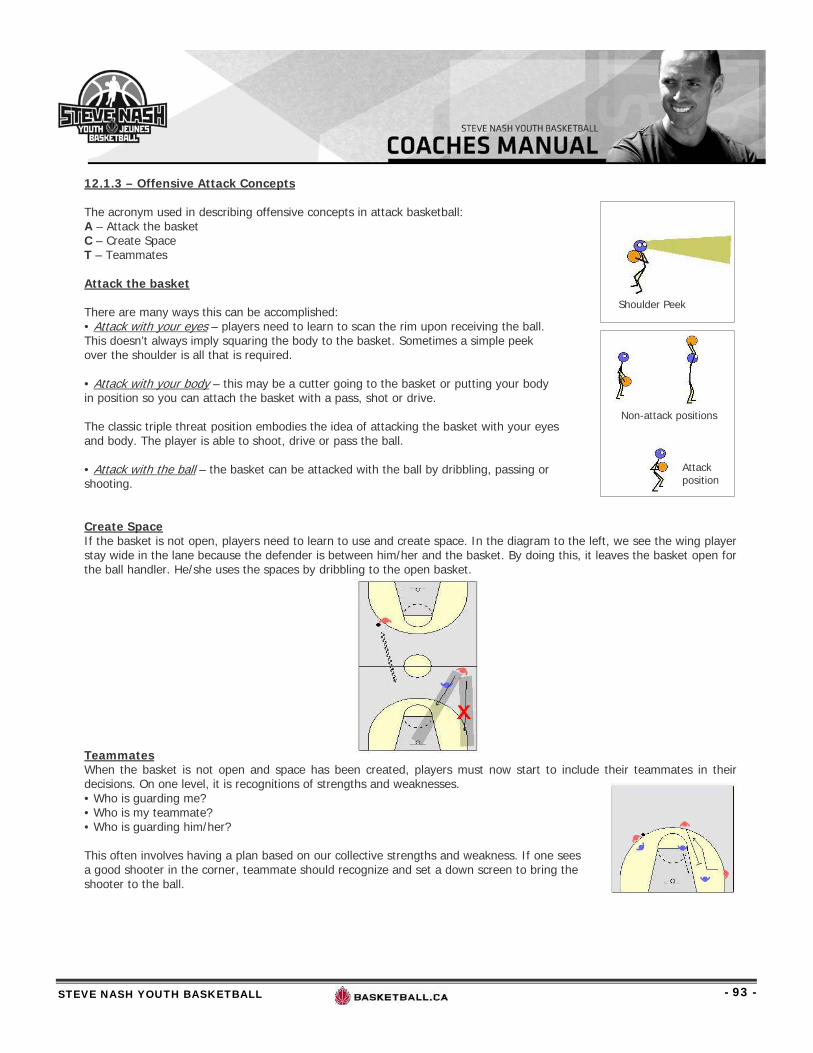
There are many ways this can be accomplished: • Attack with your eyes – players need to learn to scan the rim upon receiving the ball. This doesn’t always imply squaring the body to the basket. Sometimes a simple peek over the shoulder is all that is required.
• Attack with your body – this may be a cutter going to the basket or putting your body in position so you can attach the basket with a pass, shot or drive.
The classic triple threat position embodies the idea of attacking the basket with your eyes and body. The player is able to shoot, drive or pass the ball.
• Attack with the ball – the basket can be attacked with the ball by dribbling, passing or shooting.
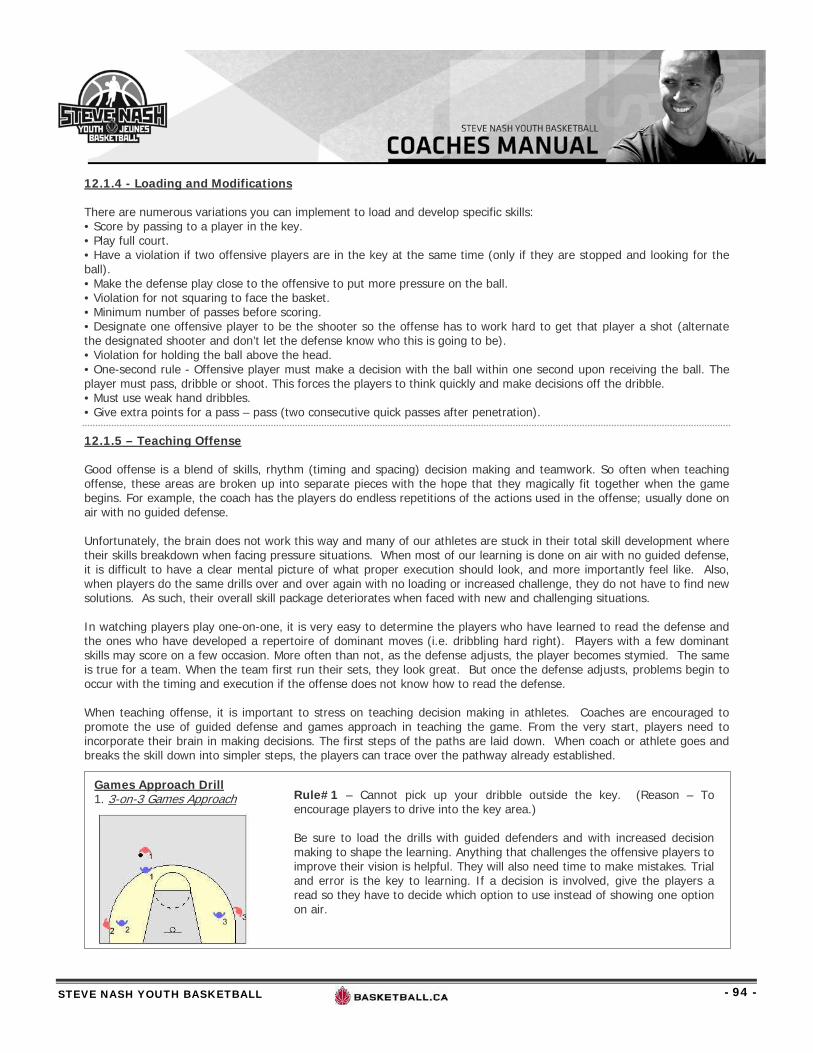
Create SpaceIf the basket is not open, players need to learn to use and create space. In the diagram to the left, we see the wing player stay wide in the lane because the defender is between him/her and the basket. By doing this, it leaves the basket open for the ball handler. He/she uses the spaces by dribbling to the open basket.
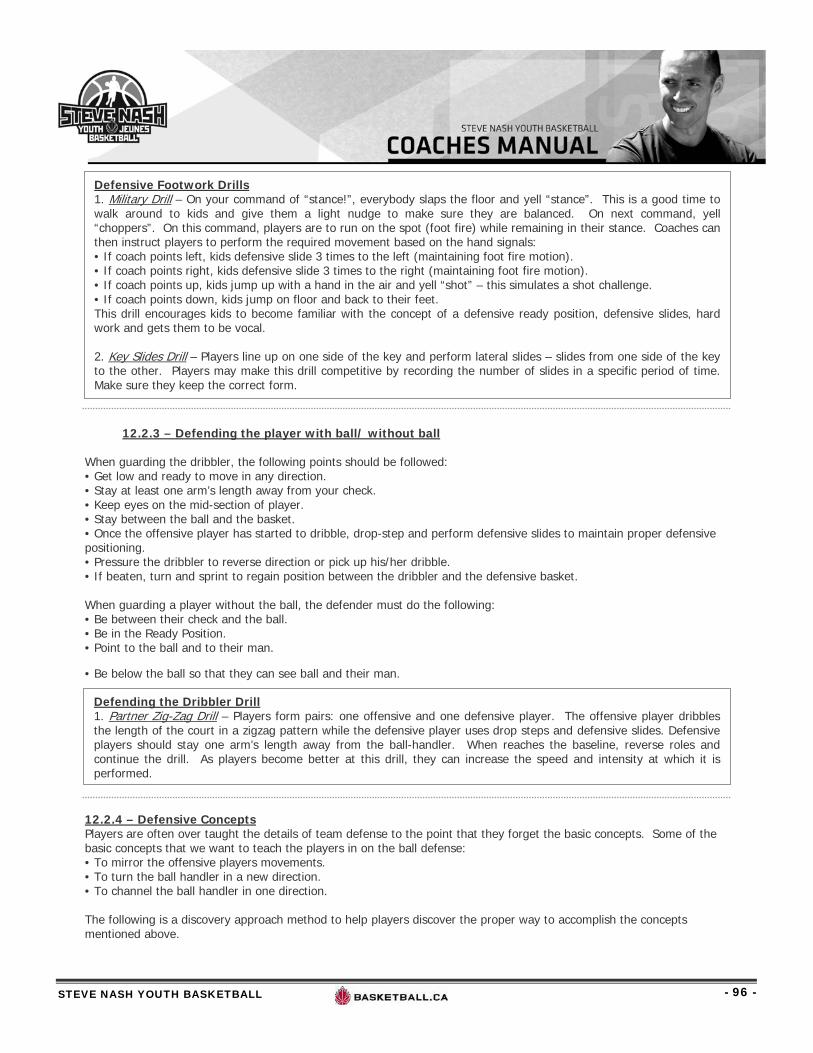
TeammatesWhen the basket is not open and space has been created, players must now start to include their teammates in their decisions. On one level, it is recognitions of strengths and weaknesses. • Who is guarding me? • Who is my teammate? • Who is guarding him/her?
This often involves having a plan based on our collective strengths and weakness. If one sees a good shooter in the corner, teammate should recognize and set a down screen to bring the shooter to the ball.
Shoulder Peek
Non-attack positions
Attack position
STEVE NASH YOUTH BASKETBALL - 94 -
12.1.4 - Loading and Modifications
There are numerous variations you can implement to load and develop specific skills:• Score by passing to a player in the key.• Play full court.• Have a violation if two offensive players are in the key at the same time (only if they are stopped and looking for the ball).• Make the defense play close to the offensive to put more pressure on the ball. • Violation for not squaring to face the basket.• Minimum number of passes before scoring.• Designate one offensive player to be the shooter so the offense has to work hard to get that player a shot (alternate the designated shooter and don’t let the defense know who this is going to be).• Violation for holding the ball above the head.• One-second rule - Offensive player must make a decision with the ball within one second upon receiving the ball. The player must pass, dribble or shoot. This forces the players to think quickly and make decisions off the dribble. • Must use weak hand dribbles.• Give extra points for a pass – pass (two consecutive quick passes after penetration).
12.1.5 – Teaching Offense
Good offense is a blend of skills, rhythm (timing and spacing) decision making and teamwork. So often when teaching offense, these areas are broken up into separate pieces with the hope that they magically fit together when the game begins. For example, the coach has the players do endless repetitions of the actions used in the offense; usually done on air with no guided defense.
Unfortunately, the brain does not work this way and many of our athletes are stuck in their total skill development where their skills breakdown when facing pressure situations. When most of our learning is done on air with no guided defense, it is difficult to have a clear mental picture of what proper execution should look, and more importantly feel like. Also, when players do the same drills over and over again with no loading or increased challenge, they do not have to find new solutions. As such, their overall skill package deteriorates when faced with new and challenging situations.
In watching players play one-on-one, it is very easy to determine the players who have learned to read the defense and the ones who have developed a repertoire of dominant moves (i.e. dribbling hard right). Players with a few dominant skills may score on a few occasion. More often than not, as the defense adjusts, the player becomes stymied. The same is true for a team. When the team first run their sets, they look great. But once the defense adjusts, problems begin to occur with the timing and execution if the offense does not know how to read the defense.
When teaching offense, it is important to stress on teaching decision making in athletes. Coaches are encouraged to promote the use of guided defense and games approach in teaching the game. From the very start, players need to incorporate their brain in making decisions. The first steps of the paths are laid down. When coach or athlete goes and breaks the skill down into simpler steps, the players can trace over the pathway already established.
Games Approach Drill1. 3-on-3 Games Approach Rule#1 – Cannot pick up your dribble outside the key. (Reason – To
encourage players to drive into the key area.)
Be sure to load the drills with guided defenders and with increased decision making to shape the learning. Anything that challenges the offensive players to improve their vision is helpful. They will also need time to make mistakes. Trial and error is the key to learning. If a decision is involved, give the players a read so they have to decide which option to use instead of showing one option on air.

STEVE NASH YOUTH BASKETBALL - 95 -
12.2 – DEFENSIVE CONCEPTS
Successful defense in basketball depends on each player’s learning and executing a set of fundamental skills to defensive play. Any player can be a good defensive player and have the opportunity to be a contributor on the defensive end.
Defense is a choice. There is some technique to becoming a good defensive player, but more importantly than learning technique is learning to consistently work hard. It is important for coaches to make an extra effort to encourage and reinforce the acquisition of defensive skills.
This section will cover the following topics relating to Defensive Concepts: 12.2.1 - Defensive Ready Position 12.2.2 - Defensive Footwork12.2.3 - Defending the player with ball/ without ball12.2.4 - Defensive Concepts12.2.5 - Team Defense12.2.6 – Communications
12.2.1 - Defensive Ready Position
The ready position is the basic body position for defense. It is a balanced defensive stance that provides a strong base and enables players to initiate movement in any direction. Assuming this position enables defensive players to maintain a position between the offensive player and the basket, and react to the offensive player’s movement.
When in a defensive ready position, emphasize the following: • Feet shoulder width apart, slightly staggered. • Weight distributed evenly on balls of both feet. • Bend ankles, knees and hips. • Head upright and looking forward, back fairly straight. • Arms are extended out to side in position to intercept a pass. • Hands are above elbow and below shoulder. • Must be balanced.
12.2.2 – Defensive Footwork
Defensive SlidesThe defensive slide enables players to move laterally while maintaining the ready position. Players should maintain this stance unless they have been beaten, in which case they turn, run to cut off the player with the ball, and then assume the defensive ready position.
When performing defensive slides, emphasize the following: • Point toe in direction of the slide. • Push off the back leg and reach with the front leg while propelling the body with a strong lateral push. • Make sure the feet do not come together or cross – maintain a wide base. • As player slides, make sure they do not bob up and down by keeping the feet close to the floor. The level of their head must remain constant. • When a player is sliding, have the lead hand up in passing lane and the trailing hand down to discourage a cross over. • If a player wishes to change direction while guarding the ball, that player must perform a “drop step” in which the trail leg is dropped back to a 45 degree angle while the lead foot is used to push off into the new direction.
STEVE NASH YOUTH BASKETBALL - 96 -
Defensive Footwork Drills1. Military Drill – On your command of “stance!”, everybody slaps the floor and yell “stance”. This is a good time to walk around to kids and give them a light nudge to make sure they are balanced. On next command, yell “choppers”. On this command, players are to run on the spot (foot fire) while remaining in their stance. Coaches can then instruct players to perform the required movement based on the hand signals: • If coach points left, kids defensive slide 3 times to the left (maintaining foot fire motion). • If coach points right, kids defensive slide 3 times to the right (maintaining foot fire motion). • If coach points up, kids jump up with a hand in the air and yell “shot” – this simulates a shot challenge. • If coach points down, kids jump on floor and back to their feet. This drill encourages kids to become familiar with the concept of a defensive ready position, defensive slides, hard work and gets them to be vocal.
2. Key Slides Drill – Players line up on one side of the key and perform lateral slides – slides from one side of the key to the other. Players may make this drill competitive by recording the number of slides in a specific period of time. Make sure they keep the correct form.
Defending the Dribbler Drill1. Partner Zig-Zag Drill – Players form pairs: one offensive and one defensive player. The offensive player dribbles the length of the court in a zigzag pattern while the defensive player uses drop steps and defensive slides. Defensive players should stay one arm’s length away from the ball-handler. When reaches the baseline, reverse roles and continue the drill. As players become better at this drill, they can increase the speed and intensity at which it is performed.
12.2.3 – Defending the player with ball/ without ball
When guarding the dribbler, the following points should be followed: • Get low and ready to move in any direction. • Stay at least one arm’s length away from your check. • Keep eyes on the mid-section of player. • Stay between the ball and the basket. • Once the offensive player has started to dribble, drop-step and perform defensive slides to maintain proper defensive positioning. • Pressure the dribbler to reverse direction or pick up his/her dribble. • If beaten, turn and sprint to regain position between the dribbler and the defensive basket.
When guarding a player without the ball, the defender must do the following: • Be between their check and the ball. • Be in the Ready Position. • Point to the ball and to their man.
• Be below the ball so that they can see ball and their man.
12.2.4 – Defensive ConceptsPlayers are often over taught the details of team defense to the point that they forget the basic concepts. Some of the basic concepts that we want to teach the players in on the ball defense:• To mirror the offensive players movements. • To turn the ball handler in a new direction.• To channel the ball handler in one direction.
The following is a discovery approach method to help players discover the proper way to accomplish the concepts mentioned above.
STEVE NASH YOUTH BASKETBALL - 97 -
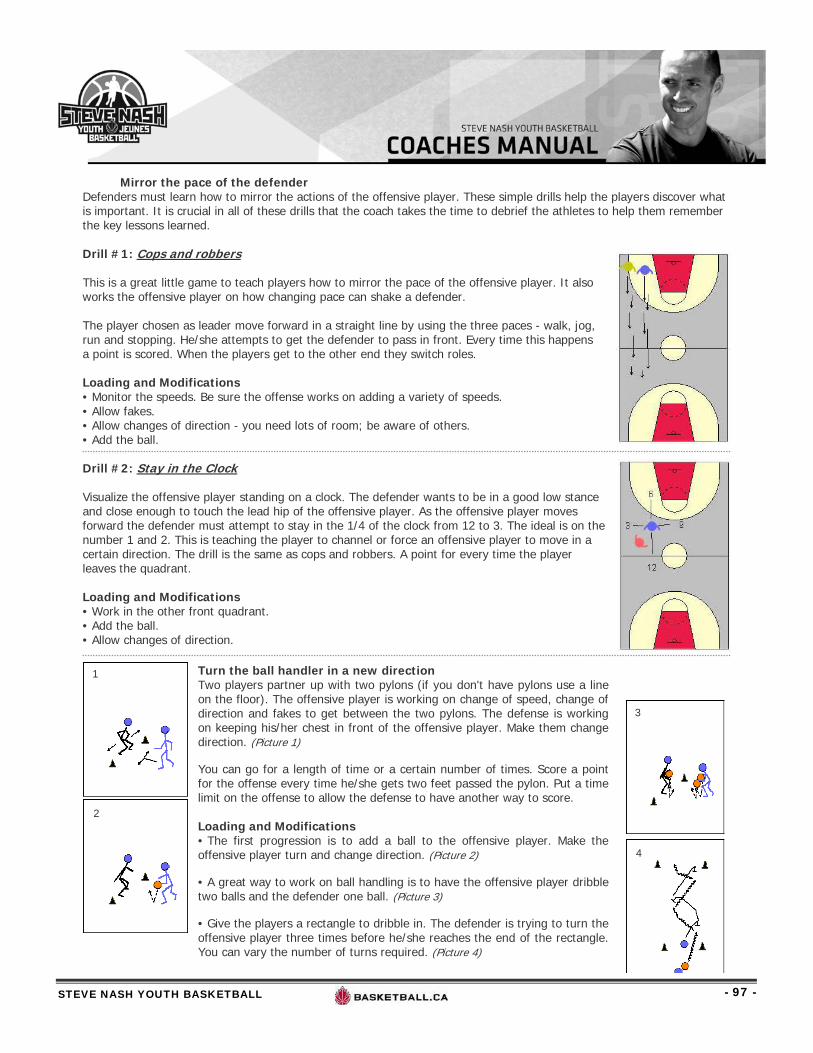
1
2
3
4
Turn the ball handler in a new directionTwo players partner up with two pylons (if you don't have pylons use a line on the floor). The offensive player is working on change of speed, change of direction and fakes to get between the two pylons. The defense is working on keeping his/her chest in front of the offensive player. Make them change direction. (Picture 1)
You can go for a length of time or a certain number of times. Score a point for the offense every time he/she gets two feet passed the pylon. Put a time limit on the offense to allow the defense to have another way to score.
Loading and Modifications• The first progression is to add a ball to the offensive player. Make the offensive player turn and change direction. (Picture 2)
• A great way to work on ball handling is to have the offensive player dribble two balls and the defender one ball. (Picture 3)
• Give the players a rectangle to dribble in. The defender is trying to turn the offensive player three times before he/she reaches the end of the rectangle. You can vary the number of turns required. (Picture 4)
Mirror the pace of the defenderDefenders must learn how to mirror the actions of the offensive player. These simple drills help the players discover what is important. It is crucial in all of these drills that the coach takes the time to debrief the athletes to help them remember the key lessons learned.
Drill #1: Cops and robbers
This is a great little game to teach players how to mirror the pace of the offensive player. It also works the offensive player on how changing pace can shake a defender.
The player chosen as leader move forward in a straight line by using the three paces - walk, jog, run and stopping. He/she attempts to get the defender to pass in front. Every time this happens a point is scored. When the players get to the other end they switch roles.
Loading and Modifications • Monitor the speeds. Be sure the offense works on adding a variety of speeds. • Allow fakes. • Allow changes of direction - you need lots of room; be aware of others.• Add the ball.
Drill #2: Stay in the Clock
Visualize the offensive player standing on a clock. The defender wants to be in a good low stance and close enough to touch the lead hip of the offensive player. As the offensive player moves forward the defender must attempt to stay in the 1/4 of the clock from 12 to 3. The ideal is on the number 1 and 2. This is teaching the player to channel or force an offensive player to move in a certain direction. The drill is the same as cops and robbers. A point for every time the player leaves the quadrant.
Loading and Modifications • Work in the other front quadrant. • Add the ball.• Allow changes of direction.
STEVE NASH YOUTH BASKETBALL - 98 -
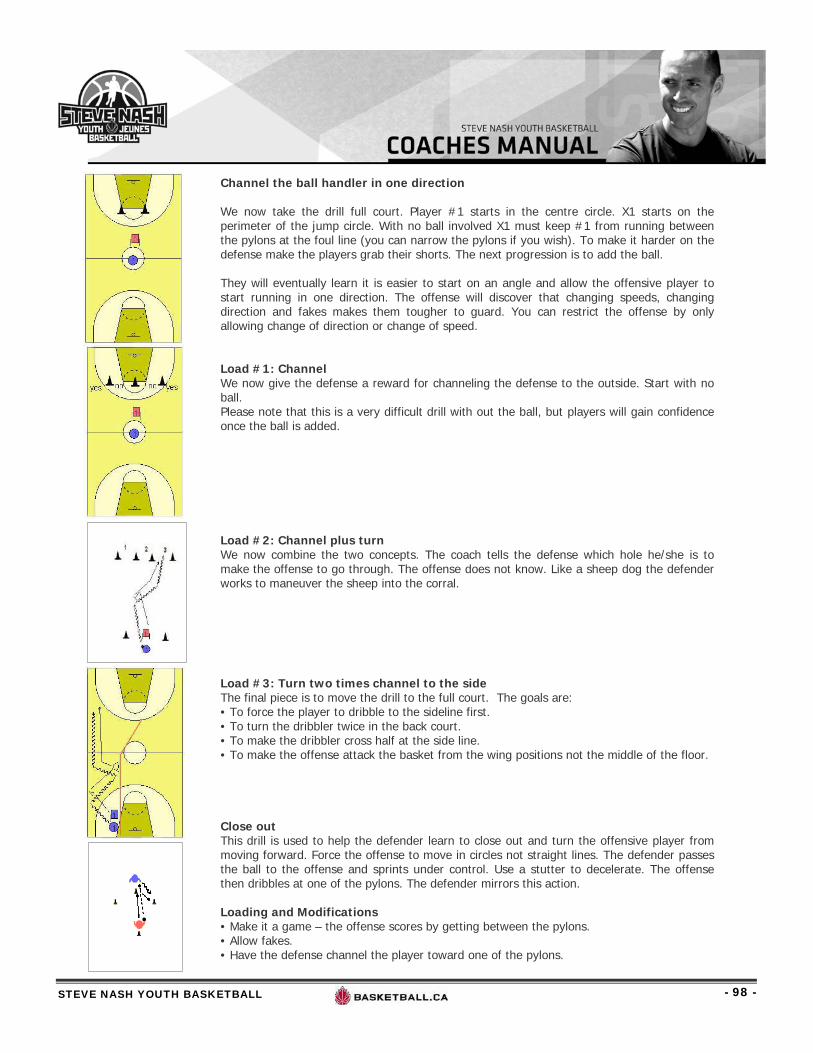
Channel the ball handler in one direction
We now take the drill full court. Player #1 starts in the centre circle. X1 starts on the perimeter of the jump circle. With no ball involved X1 must keep #1 from running between the pylons at the foul line (you can narrow the pylons if you wish). To make it harder on the defense make the players grab their shorts. The next progression is to add the ball.
They will eventually learn it is easier to start on an angle and allow the offensive player to start running in one direction. The offense will discover that changing speeds, changing direction and fakes makes them tougher to guard. You can restrict the offense by only allowing change of direction or change of speed.
Load #1: ChannelWe now give the defense a reward for channeling the defense to the outside. Start with no ball.Please note that this is a very difficult drill with out the ball, but players will gain confidence once the ball is added.
Load #2: Channel plus turnWe now combine the two concepts. The coach tells the defense which hole he/she is to make the offense to go through. The offense does not know. Like a sheep dog the defender works to maneuver the sheep into the corral.
Load #3: Turn two times channel to the side The final piece is to move the drill to the full court. The goals are: • To force the player to dribble to the sideline first. • To turn the dribbler twice in the back court.• To make the dribbler cross half at the side line.• To make the offense attack the basket from the wing positions not the middle of the floor.
Close outThis drill is used to help the defender learn to close out and turn the offensive player from moving forward. Force the offense to move in circles not straight lines. The defender passes the ball to the offense and sprints under control. Use a stutter to decelerate. The offense then dribbles at one of the pylons. The defender mirrors this action.
Loading and Modifications• Make it a game – the offense scores by getting between the pylons. • Allow fakes.• Have the defense channel the player toward one of the pylons.
STEVE NASH YOUTH BASKETBALL - 99 -
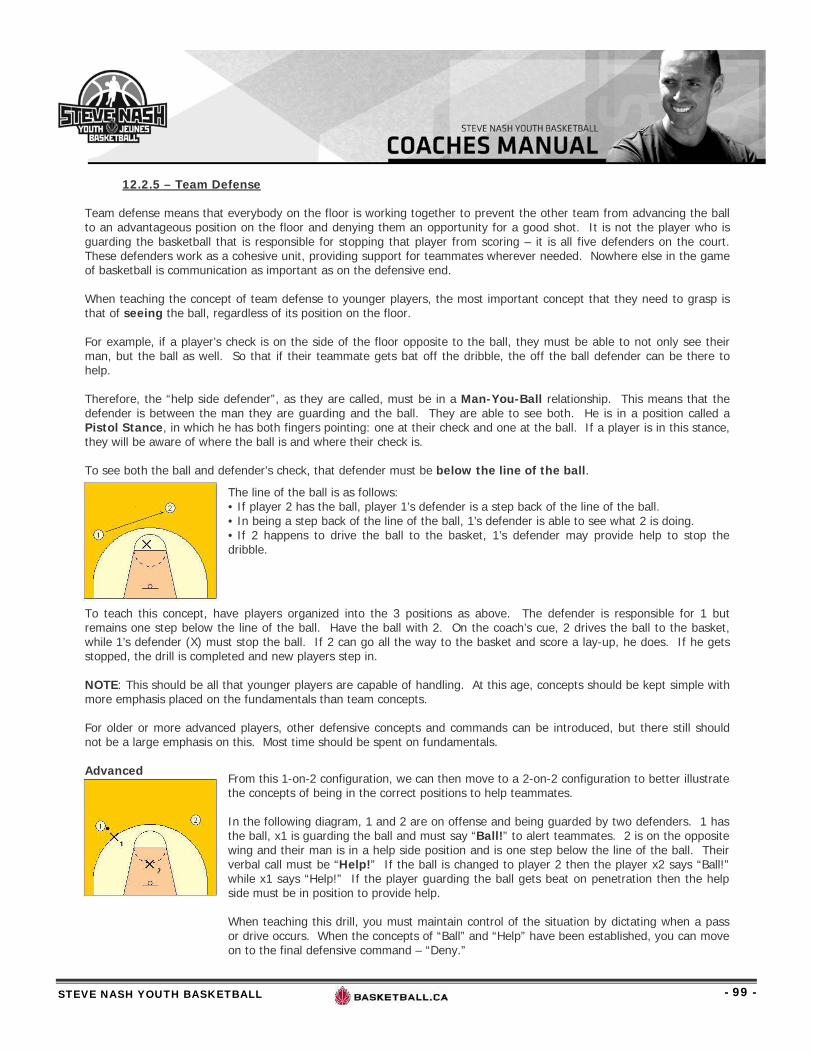
The line of the ball is as follows:• If player 2 has the ball, player 1’s defender is a step back of the line of the ball.• In being a step back of the line of the ball, 1’s defender is able to see what 2 is doing.• If 2 happens to drive the ball to the basket, 1’s defender may provide help to stop the dribble.
From this 1-on-2 configuration, we can then move to a 2-on-2 configuration to better illustrate the concepts of being in the correct positions to help teammates.
In the following diagram, 1 and 2 are on offense and being guarded by two defenders. 1 has the ball, x1 is guarding the ball and must say “Ball!” to alert teammates. 2 is on the opposite wing and their man is in a help side position and is one step below the line of the ball. Their verbal call must be “Help!” If the ball is changed to player 2 then the player x2 says “Ball!”while x1 says “Help!” If the player guarding the ball gets beat on penetration then the help side must be in position to provide help.
When teaching this drill, you must maintain control of the situation by dictating when a pass or drive occurs. When the concepts of “Ball” and “Help” have been established, you can move on to the final defensive command – “Deny.”
12.2.5 – Team Defense
Team defense means that everybody on the floor is working together to prevent the other team from advancing the ball to an advantageous position on the floor and denying them an opportunity for a good shot. It is not the player who is guarding the basketball that is responsible for stopping that player from scoring – it is all five defenders on the court. These defenders work as a cohesive unit, providing support for teammates wherever needed. Nowhere else in the game of basketball is communication as important as on the defensive end.
When teaching the concept of team defense to younger players, the most important concept that they need to grasp is that of seeing the ball, regardless of its position on the floor.
For example, if a player’s check is on the side of the floor opposite to the ball, they must be able to not only see their man, but the ball as well. So that if their teammate gets bat off the dribble, the off the ball defender can be there to help.
Therefore, the “help side defender”, as they are called, must be in a Man-You-Ball relationship. This means that the defender is between the man they are guarding and the ball. They are able to see both. He is in a position called a Pistol Stance, in which he has both fingers pointing: one at their check and one at the ball. If a player is in this stance, they will be aware of where the ball is and where their check is.
To see both the ball and defender’s check, that defender must be below the line of the ball.
To teach this concept, have players organized into the 3 positions as above. The defender is responsible for 1 but remains one step below the line of the ball. Have the ball with 2. On the coach’s cue, 2 drives the ball to the basket, while 1’s defender (X) must stop the ball. If 2 can go all the way to the basket and score a lay-up, he does. If he gets stopped, the drill is completed and new players step in.
NOTE: This should be all that younger players are capable of handling. At this age, concepts should be kept simple with more emphasis placed on the fundamentals than team concepts.
For older or more advanced players, other defensive concepts and commands can be introduced, but there still should not be a large emphasis on this. Most time should be spent on fundamentals.
Advanced
STEVE NASH YOUTH BASKETBALL - 100 -
Deny Drills1. Denial Stance Drill – To practice the denial stance have players line up on the baseline and on the coach’s cue, they will slide up to the free throw line and back to baseline, using perfect denial stance sliding technique. Go back and forth several time, or until technique is adequate.
Now have two players on the wing. Defender 1 is denying the ball from the offensive player, who is going half speed to start, from the wing down to the block. 1 continues to deny the ball 3 times up and down. The defender’s verbal is now “denial.”
To progress in this drill, have the offensive player increase the speed at which they make their cut and this will force the defender to go faster and work harder.
2. 2-on-2 – Have 2 players on each wing, 1 on offense and 1 on defense. We can work on all 3 defensive stances in this drill. These stances are “help”, “ball” and “deny.” The ball begins with the coach at the top of the key.
Rule #1 – If a player is 1 pass away from catching the ball, that player must be denied. If the coach is at the top of the key in the middle of floor, both defenders must yell “deny, deny, deny.” The coach can then dribble the ball to one side of the floor. The defender on this side will then be in a denial stance and yell “deny” while the defender on the other side of the floor will be in a help stance and yell “help”.
Rule #2 – If the defender is guarding a check who is 2 passes away; they must be in a help stance. The coach has the option of dribbling back over to the other side, so that players must change their stance again, or coach can throw the ball to one of the offensive players and they can play 2-on-2.
Key Emphasis:• Getting into the proper stance – help, ball, denial.• Talking loud all the time. This is great for kids as it forces them to talk. Talking is important for two reasons.
1. So they talk to each other to let each know where each other are and what they are doing.2. So that they talk to themselves – if players are talking out loud they are usually concentrating.
• Correct denial stance. Correct help stance – Pistols.
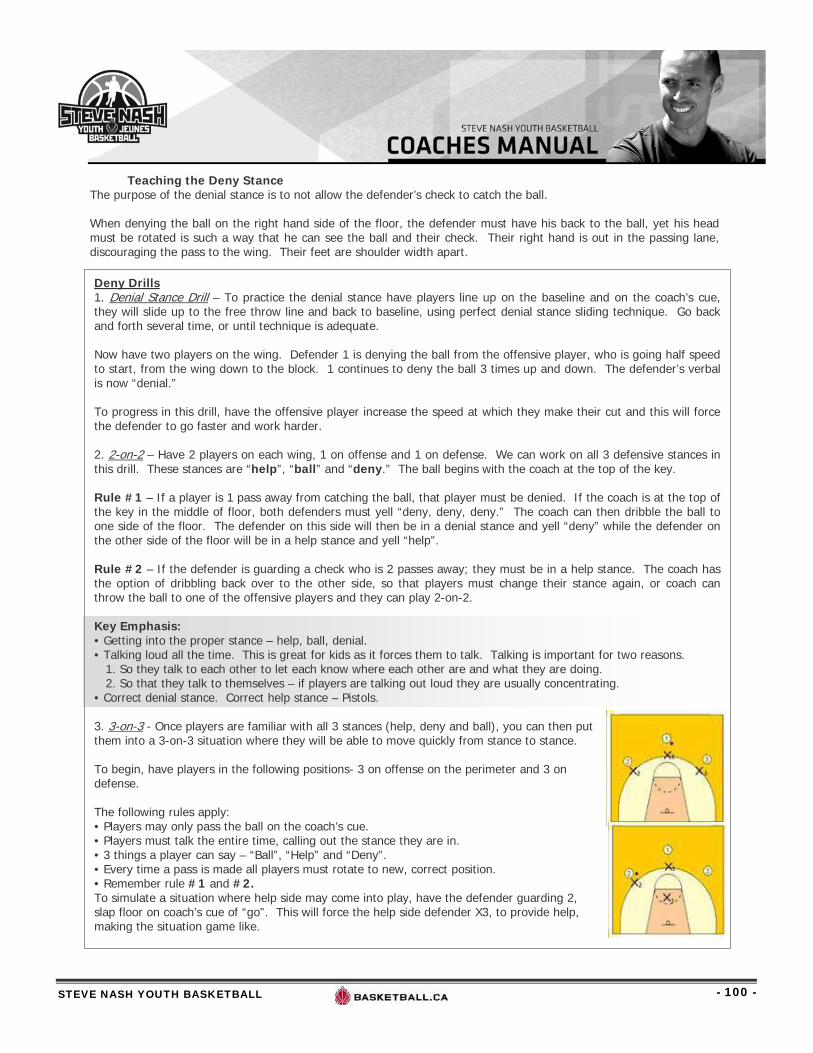
3. 3-on-3 - Once players are familiar with all 3 stances (help, deny and ball), you can then put them into a 3-on-3 situation where they will be able to move quickly from stance to stance.
To begin, have players in the following positions- 3 on offense on the perimeter and 3 on defense.
The following rules apply:• Players may only pass the ball on the coach’s cue.• Players must talk the entire time, calling out the stance they are in.• 3 things a player can say – “Ball”, “Help” and “Deny”.• Every time a pass is made all players must rotate to new, correct position.• Remember rule #1 and #2.To simulate a situation where help side may come into play, have the defender guarding 2, slap floor on coach’s cue of “go”. This will force the help side defender X3, to provide help, making the situation game like.
Teaching the Deny StanceThe purpose of the denial stance is to not allow the defender’s check to catch the ball.
When denying the ball on the right hand side of the floor, the defender must have his back to the ball, yet his head must be rotated is such a way that he can see the ball and their check. Their right hand is out in the passing lane, discouraging the pass to the wing. Their feet are shoulder width apart.
STEVE NASH YOUTH BASKETBALL - 101 -
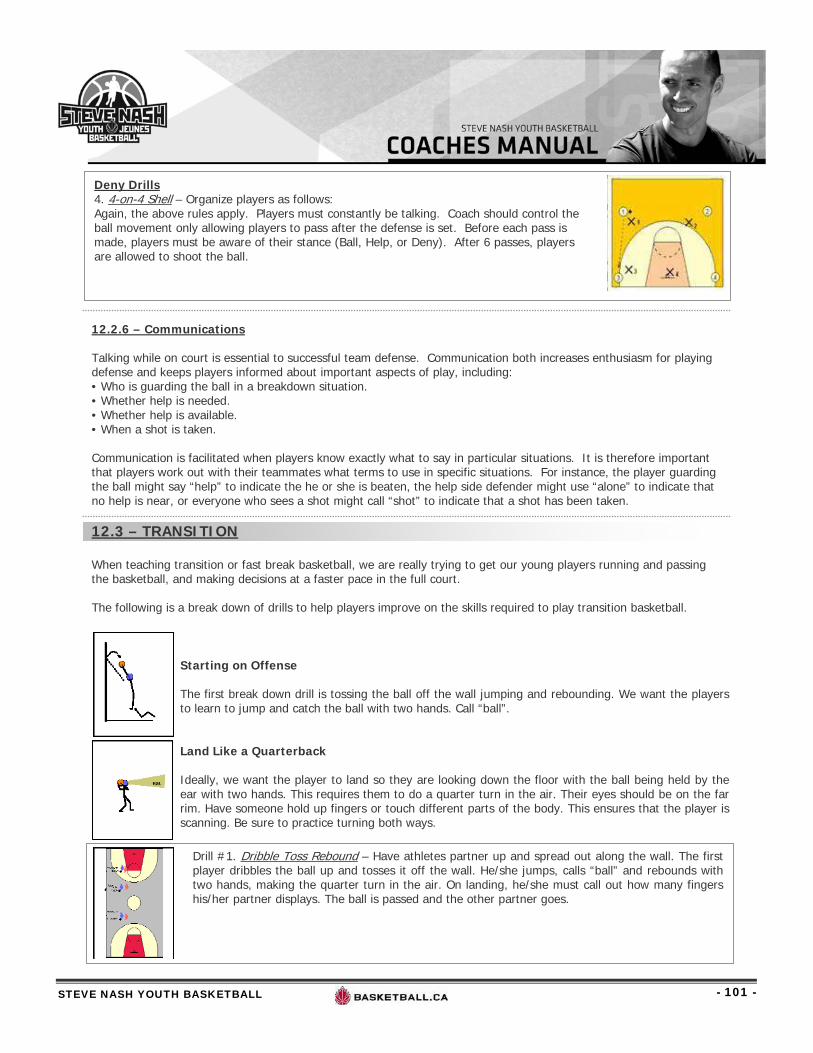
Deny Drills4. 4-on-4 Shell – Organize players as follows: Again, the above rules apply. Players must constantly be talking. Coach should control the ball movement only allowing players to pass after the defense is set. Before each pass is made, players must be aware of their stance (Ball, Help, or Deny). After 6 passes, players are allowed to shoot the ball.
Starting on Offense
The first break down drill is tossing the ball off the wall jumping and rebounding. We want the players to learn to jump and catch the ball with two hands. Call “ball”.
Land Like a Quarterback
Ideally, we want the player to land so they are looking down the floor with the ball being held by the ear with two hands. This requires them to do a quarter turn in the air. Their eyes should be on the far rim. Have someone hold up fingers or touch different parts of the body. This ensures that the player is scanning. Be sure to practice turning both ways.
Drill #1. Dribble Toss Rebound – Have athletes partner up and spread out along the wall. The first player dribbles the ball up and tosses it off the wall. He/she jumps, calls “ball” and rebounds with two hands, making the quarter turn in the air. On landing, he/she must call out how many fingers his/her partner displays. The ball is passed and the other partner goes.
12.2.6 – Communications
Talking while on court is essential to successful team defense. Communication both increases enthusiasm for playing defense and keeps players informed about important aspects of play, including: • Who is guarding the ball in a breakdown situation. • Whether help is needed. • Whether help is available. • When a shot is taken.
Communication is facilitated when players know exactly what to say in particular situations. It is therefore important that players work out with their teammates what terms to use in specific situations. For instance, the player guarding the ball might say “help” to indicate the he or she is beaten, the help side defender might use “alone” to indicate that no help is near, or everyone who sees a shot might call “shot” to indicate that a shot has been taken.
12.3 – TRANSITION
When teaching transition or fast break basketball, we are really trying to get our young players running and passing the basketball, and making decisions at a faster pace in the full court.
The following is a break down of drills to help players improve on the skills required to play transition basketball.
STEVE NASH YOUTH BASKETBALL - 102 -
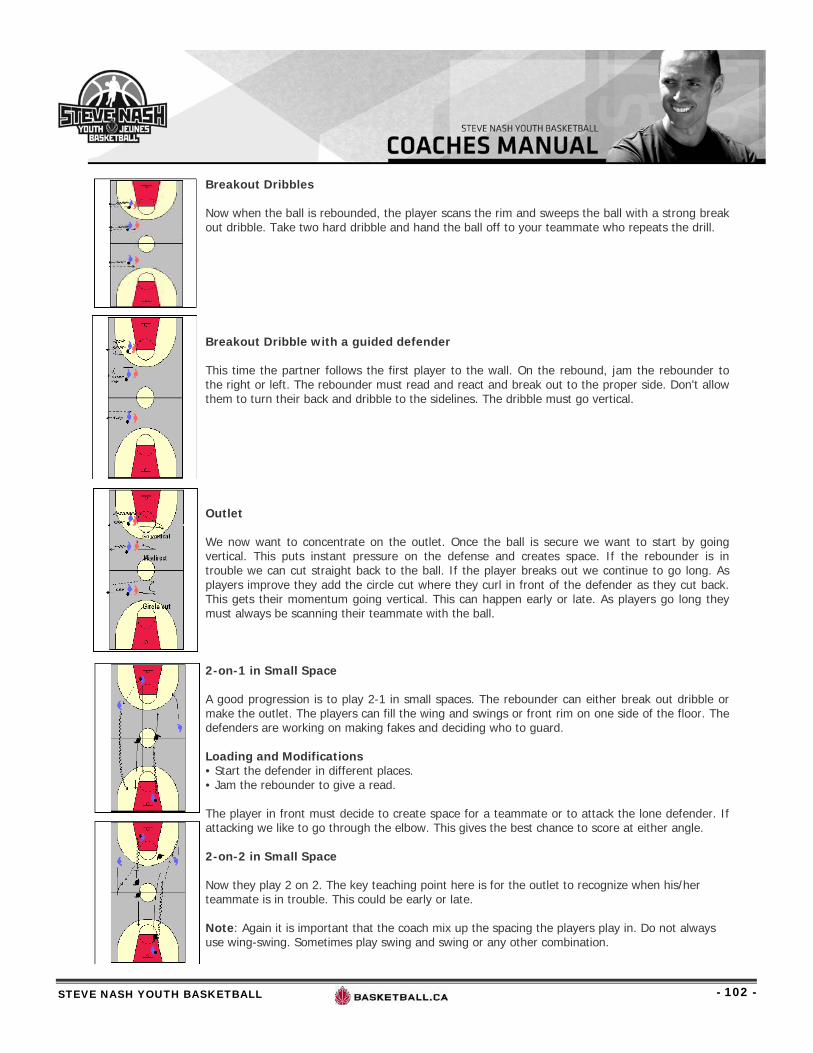
Breakout Dribbles
Now when the ball is rebounded, the player scans the rim and sweeps the ball with a strong break out dribble. Take two hard dribble and hand the ball off to your teammate who repeats the drill.
Breakout Dribble with a guided defender
This time the partner follows the first player to the wall. On the rebound, jam the rebounder to the right or left. The rebounder must read and react and break out to the proper side. Don't allow them to turn their back and dribble to the sidelines. The dribble must go vertical.
Outlet
We now want to concentrate on the outlet. Once the ball is secure we want to start by going vertical. This puts instant pressure on the defense and creates space. If the rebounder is in trouble we can cut straight back to the ball. If the player breaks out we continue to go long. As players improve they add the circle cut where they curl in front of the defender as they cut back. This gets their momentum going vertical. This can happen early or late. As players go long they must always be scanning their teammate with the ball.
2-on-1 in Small Space
A good progression is to play 2-1 in small spaces. The rebounder can either break out dribble ormake the outlet. The players can fill the wing and swings or front rim on one side of the floor. The defenders are working on making fakes and deciding who to guard.
Loading and Modifications• Start the defender in different places.• Jam the rebounder to give a read.
The player in front must decide to create space for a teammate or to attack the lone defender. If attacking we like to go through the elbow. This gives the best chance to score at either angle.
2-on-2 in Small Space
Now they play 2 on 2. The key teaching point here is for the outlet to recognize when his/her teammate is in trouble. This could be early or late.
Note: Again it is important that the coach mix up the spacing the players play in. Do not always use wing-swing. Sometimes play swing and swing or any other combination.
STEVE NASH YOUTH BASKETBALL - 103 -
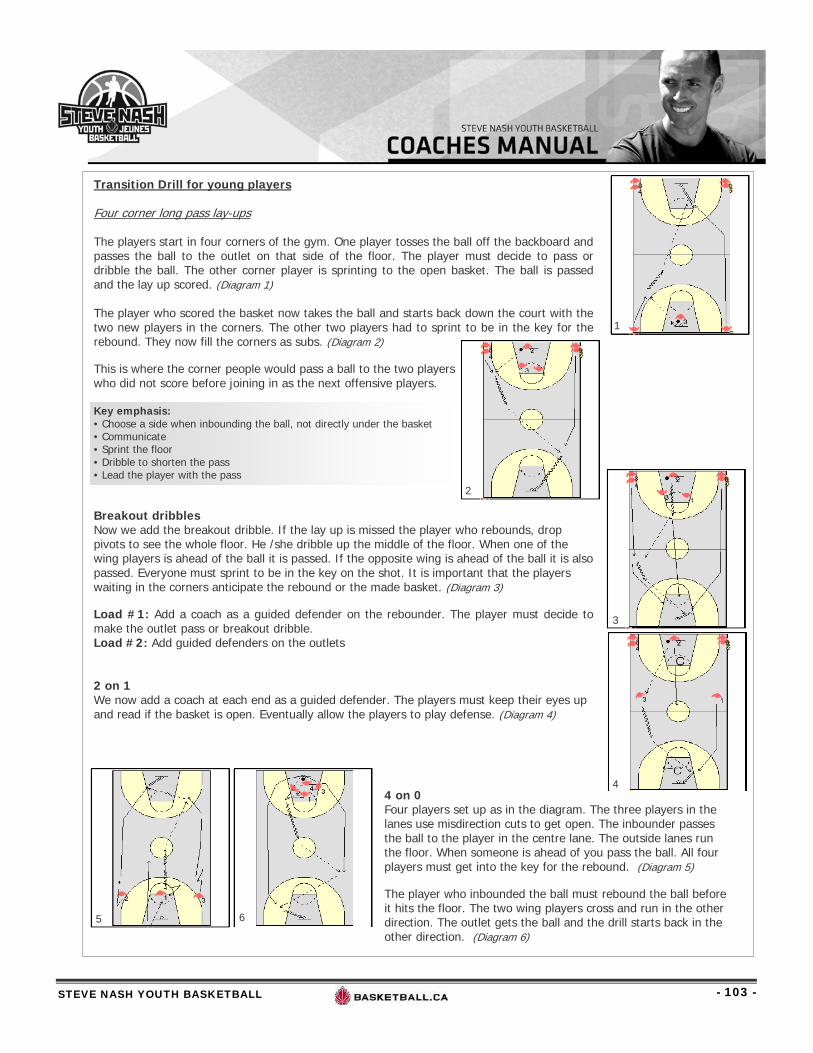
Transition Drill for young players
Four corner long pass lay-ups
The players start in four corners of the gym. One player tosses the ball off the backboard and passes the ball to the outlet on that side of the floor. The player must decide to pass or dribble the ball. The other corner player is sprinting to the open basket. The ball is passed and the lay up scored. (Diagram 1)
The player who scored the basket now takes the ball and starts back down the court with the two new players in the corners. The other two players had to sprint to be in the key for the rebound. They now fill the corners as subs. (Diagram 2)
This is where the corner people would pass a ball to the two players who did not score before joining in as the next offensive players.
Key emphasis: • Choose a side when inbounding the ball, not directly under the basket• Communicate• Sprint the floor• Dribble to shorten the pass• Lead the player with the pass
Breakout dribblesNow we add the breakout dribble. If the lay up is missed the player who rebounds, drop pivots to see the whole floor. He /she dribble up the middle of the floor. When one of the wing players is ahead of the ball it is passed. If the opposite wing is ahead of the ball it is also passed. Everyone must sprint to be in the key on the shot. It is important that the players waiting in the corners anticipate the rebound or the made basket. (Diagram 3)
Load #1: Add a coach as a guided defender on the rebounder. The player must decide to make the outlet pass or breakout dribble. Load #2: Add guided defenders on the outlets
2 on 1We now add a coach at each end as a guided defender. The players must keep their eyes up and read if the basket is open. Eventually allow the players to play defense. (Diagram 4)
4 on 0 Four players set up as in the diagram. The three players in the lanes use misdirection cuts to get open. The inbounder passes the ball to the player in the centre lane. The outside lanes runthe floor. When someone is ahead of you pass the ball. All four players must get into the key for the rebound. (Diagram 5)
The player who inbounded the ball must rebound the ball before it hits the floor. The two wing players cross and run in the other direction. The outlet gets the ball and the drill starts back in the other direction. (Diagram 6)
1
2
3
4
5 6


