
PERFORMANCEMADE
SMARTER
CCOE
Manual do produto 9203Solenóide / driver de alarme
T E M P E R AT U R A | IN T E R FAC E S IN T R Í N S E C A S | IN T E R FAC E D E CO M U N I C AÇ ÃO | M U LT IF U N C I O N A L | IS O L AÇ ÃO | D IS P L AY
No. 9203V106-BRVersão do produto: 9203-003

Communication
Display
I.S. Interface
Isolation
Multifunction
Temperature
6 Product Pillarsto meet your every need
With our innovative, patented technologies, we make signal conditioning smarter and simpler. Our portfolio is composed of six product areas, where we offer a wide range of analog and digital devices covering over a thousand applications in industrial and factory automation. All our products comply with or surpass the highest industry standards, ensuring reliability in even the harshest of environments and have a 5-year warranty for greater peace of mind.
Individually outstanding, unrivalled in combination
Our range of temperature transmitters and sensors provides the highest level of signal integrity from the measurement point to your control system. You can convert industrial process temperature signals to analog, bus or digital communications using a highly reliable point-to-point solution with a fast response time, automatic self-calibration, sensor error detection, low drift, and top EMC performance in any environment.
Our unique range of single devices covering multiple applications is easily deployable as your site standard. Having one variant that applies to a broad range of applications can reduce your installation time and training, and greatly simplify spare parts management at your facilities. Our devices are designed for long-term signal accuracy, low power consumption, immunity to electrical noise and simple programming.
We provide inexpensive, easy-to-use, future-ready communication interfaces that can access your PR installed base of products. The detachable 4501 Local Operator Interface (LOI) allows for local monitoring of process values, device configuration, error detection and signal simulation. The next generation, our 4511 Remote Operator Interface (ROI) does all that and more, adding remote digital communications via Modbus/RTU, while the analog output signals are still available for redundancy.With the 4511 you can further expand connectivity with a PR gateway, which connects via industrial Ethernet, wirelessly through a Wi-Fi router or directly with the devices using our Portable Plant Supervisor (PPS) application. The PPS app is available for iOS, Android and Windows.
Our display range is characterized by its flexibility and stability. The devices meet nearly every demand for display readout of process signals, and have universal input and power supply capabilities. They provide a real-time measurement of your process value no matter the industry, and are engineered to provide a user-friendly and reliable relay of information, even in demanding environments.
We deliver the safest signals by validating our products against the toughest safety standards. Through our commitment to innovation, we have made pioneering achievements in developing I.S. interfaces with SIL 2 Full Assessment that are both efficient and cost-effective. Our comprehensive range of analog and digital intrinsically safe isolation barriers offers multifunctional inputs and outputs, making PR an easy-to-implement site standard. Our backplanes further simplify large installations and provide seamless integration to standard DCS systems.
Our compact, fast, high-quality 6 mm isolators are based on microprocessor technology to provide exceptional performance and EMC-immunity for dedicated applications at a very low total cost of ownership. They can be stacked both vertically and horizontally with no air gap separation between units required.

9203 - Versão do produto 9203-003 3
Solenóide / driver de alarme
9203
ConteúdoAviso . . . . . . . . . . . . . . . . . . . . . . . . . . . . . . . . . . . . . . . . . . . . . . . . . . . . . . . . . . . . . . . . . . . . . . . . . . . . . . . . . . . . . . . . . . . . . . . . . . . 4Identificação de símbolos . . . . . . . . . . . . . . . . . . . . . . . . . . . . . . . . . . . . . . . . . . . . . . . . . . . . . . . . . . . . . . . . . . . . . . . . . . . . . . . . 4Instruções de segurança . . . . . . . . . . . . . . . . . . . . . . . . . . . . . . . . . . . . . . . . . . . . . . . . . . . . . . . . . . . . . . . . . . . . . . . . . . . . . . . . . 4Como desmontar o sistema 9000. . . . . . . . . . . . . . . . . . . . . . . . . . . . . . . . . . . . . . . . . . . . . . . . . . . . . . . . . . . . . . . . . . . . . . . . . 5Recursos avançados . . . . . . . . . . . . . . . . . . . . . . . . . . . . . . . . . . . . . . . . . . . . . . . . . . . . . . . . . . . . . . . . . . . . . . . . . . . . . . . . . . . . . 6Aplicação . . . . . . . . . . . . . . . . . . . . . . . . . . . . . . . . . . . . . . . . . . . . . . . . . . . . . . . . . . . . . . . . . . . . . . . . . . . . . . . . . . . . . . . . . . . . . . . 6Características técnicas . . . . . . . . . . . . . . . . . . . . . . . . . . . . . . . . . . . . . . . . . . . . . . . . . . . . . . . . . . . . . . . . . . . . . . . . . . . . . . . . . . 6Aplicações - 9203Axxx . . . . . . . . . . . . . . . . . . . . . . . . . . . . . . . . . . . . . . . . . . . . . . . . . . . . . . . . . . . . . . . . . . . . . . . . . . . . . . . . . . 7Aplicações - 9203Bxxx . . . . . . . . . . . . . . . . . . . . . . . . . . . . . . . . . . . . . . . . . . . . . . . . . . . . . . . . . . . . . . . . . . . . . . . . . . . . . . . . . . 8Display PR 4511/4501 / programador frontal . . . . . . . . . . . . . . . . . . . . . . . . . . . . . . . . . . . . . . . . . . . . . . . . . . . . . . . . . . . . . 9Como montar / desmontar o PR 4511/4501 . . . . . . . . . . . . . . . . . . . . . . . . . . . . . . . . . . . . . . . . . . . . . . . . . . . . . . . . . . . . . . . 9Código de compra . . . . . . . . . . . . . . . . . . . . . . . . . . . . . . . . . . . . . . . . . . . . . . . . . . . . . . . . . . . . . . . . . . . . . . . . . . . . . . . . . . . . . . . 10Acessórios . . . . . . . . . . . . . . . . . . . . . . . . . . . . . . . . . . . . . . . . . . . . . . . . . . . . . . . . . . . . . . . . . . . . . . . . . . . . . . . . . . . . . . . . . . . . . . 10Especificações elétricas. . . . . . . . . . . . . . . . . . . . . . . . . . . . . . . . . . . . . . . . . . . . . . . . . . . . . . . . . . . . . . . . . . . . . . . . . . . . . . . . . . 10Visualização no 4511/4501 de hardware / erro de software. . . . . . . . . . . . . . . . . . . . . . . . . . . . . . . . . . . . . . . . . . . . . . . . 15Conexões . . . . . . . . . . . . . . . . . . . . . . . . . . . . . . . . . . . . . . . . . . . . . . . . . . . . . . . . . . . . . . . . . . . . . . . . . . . . . . . . . . . . . . . . . . . . . . . 16Diagrama de bloco. . . . . . . . . . . . . . . . . . . . . . . . . . . . . . . . . . . . . . . . . . . . . . . . . . . . . . . . . . . . . . . . . . . . . . . . . . . . . . . . . . . . . . . 17Indicações de erro de sinal sem display frontal. . . . . . . . . . . . . . . . . . . . . . . . . . . . . . . . . . . . . . . . . . . . . . . . . . . . . . . . . . . . . 18Configuração / operando os botões de função . . . . . . . . . . . . . . . . . . . . . . . . . . . . . . . . . . . . . . . . . . . . . . . . . . . . . . . . . . . . . 19Diagrama de encaminhamento . . . . . . . . . . . . . . . . . . . . . . . . . . . . . . . . . . . . . . . . . . . . . . . . . . . . . . . . . . . . . . . . . . . . . . . . . . . 20Diagrama de encaminhamento, configurações avançadas (ADV.SET) . . . . . . . . . . . . . . . . . . . . . . . . . . . . . . . . . . . . . . . . . 21Textos de ajuda na linha 3 do display . . . . . . . . . . . . . . . . . . . . . . . . . . . . . . . . . . . . . . . . . . . . . . . . . . . . . . . . . . . . . . . . . . . . . 22Appendix . . . . . . . . . . . . . . . . . . . . . . . . . . . . . . . . . . . . . . . . . . . . . . . . . . . . . . . . . . . . . . . . . . . . . . . . . . . . . . . . . . . . . . . . . . . . . . . 23
IECEx Installation Drawing . . . . . . . . . . . . . . . . . . . . . . . . . . . . . . . . . . . . . . . . . . . . . . . . . . . . . . . . . . . . . . . . . . . . . . . . . . . . 24ATEX Installation Drawing . . . . . . . . . . . . . . . . . . . . . . . . . . . . . . . . . . . . . . . . . . . . . . . . . . . . . . . . . . . . . . . . . . . . . . . . . . . . 28FM Installation Drawing. . . . . . . . . . . . . . . . . . . . . . . . . . . . . . . . . . . . . . . . . . . . . . . . . . . . . . . . . . . . . . . . . . . . . . . . . . . . . . . 32Desenho de instalaçao INMETRO . . . . . . . . . . . . . . . . . . . . . . . . . . . . . . . . . . . . . . . . . . . . . . . . . . . . . . . . . . . . . . . . . . . . . . 35
História do documento. . . . . . . . . . . . . . . . . . . . . . . . . . . . . . . . . . . . . . . . . . . . . . . . . . . . . . . . . . . . . . . . . . . . . . . . . . . . . . . . . . . 38Safety Manual. . . . . . . . . . . . . . . . . . . . . . . . . . . . . . . . . . . . . . . . . . . . . . . . . . . . . . . . . . . . . . . . . . . . . . . . . . . . . . . . . . . . . . . . . . . 39
4 9203 - Versão do produto 9203-003
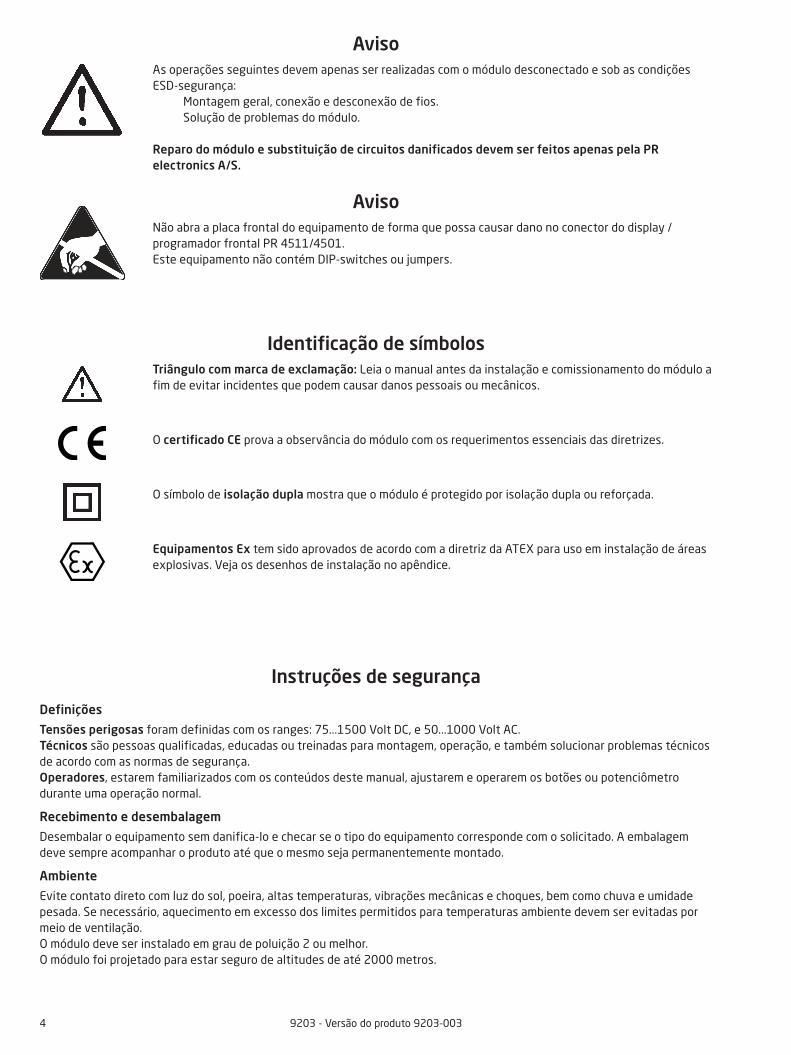
AvisoAs operações seguintes devem apenas ser realizadas com o módulo desconectado e sob as condições ESD-segurança: Montagem geral, conexão e desconexão de fios. Solução de problemas do módulo. Reparo do módulo e substituição de circuitos danificados devem ser feitos apenas pela PR electronics A/S.
AvisoNão abra a placa frontal do equipamento de forma que possa causar dano no conector do display / programador frontal PR 4511/4501.Este equipamento não contém DIP-switches ou jumpers.
Identificação de símbolosTriângulo com marca de exclamação: Leia o manual antes da instalação e comissionamento do módulo a fim de evitar incidentes que podem causar danos pessoais ou mecânicos.
O certificado CE prova a observância do módulo com os requerimentos essenciais das diretrizes.
O símbolo de isolação dupla mostra que o módulo é protegido por isolação dupla ou reforçada.
Equipamentos Ex tem sido aprovados de acordo com a diretriz da ATEX para uso em instalação de áreas explosivas. Veja os desenhos de instalação no apêndice.
Instruções de segurança
Definições
Tensões perigosas foram definidas com os ranges: 75...1500 Volt DC, e 50...1000 Volt AC.Técnicos são pessoas qualificadas, educadas ou treinadas para montagem, operação, e também solucionar problemas técnicos de acordo com as normas de segurança.Operadores, estarem familiarizados com os conteúdos deste manual, ajustarem e operarem os botões ou potenciômetro durante uma operação normal.
Recebimento e desembalagem
Desembalar o equipamento sem danifica-lo e checar se o tipo do equipamento corresponde com o solicitado. A embalagem deve sempre acompanhar o produto até que o mesmo seja permanentemente montado.
Ambiente
Evite contato direto com luz do sol, poeira, altas temperaturas, vibrações mecânicas e choques, bem como chuva e umidade pesada. Se necessário, aquecimento em excesso dos limites permitidos para temperaturas ambiente devem ser evitadas por meio de ventilação.O módulo deve ser instalado em grau de poluição 2 ou melhor.O módulo foi projetado para estar seguro de altitudes de até 2000 metros.

9203 - Versão do produto 9203-003 5
Montagem
Apenas técnicos os quais estão familiarizados com termos técnicos, avisos e instruções contidas no manual e o quais são capazes de segui-lo, devem conectar o módulo.Caso haja alguma dúvida, favor entrar em contato com seu distribuidor local ou, alternativamente,
PR electronics A/Swww.prelectronics.com
O uso de cabos trançados, não é permitido para a fiação da rede, exceto quando os fios estão protegidos com as extremidades do cabo.
Descrições de conexão de entrada / saída e alimentação são mostradas no diagrama de blocos na etiqueta lateral.
O módulo é fornecido com terminais de fiação de campo e devem ser alimentados por uma fonte de alimentação com isolação dupla ou reforçada. um interruptor deve ser facilmente acessado e estar perto do módulo. Este interruptor deve ser marcado como modo de desconexão para o módulo.
Para instalação no trilho de alimentação 9400 a tensão é fornecida pela Unidade de Controle de Tensão 9410.
O ano de fabricação pode ser pego nos dois primeiros dígitos do serial number.
Calibração e ajuste
Durante a calibração e ajustes, a medição e conexão de tensões externas devem ser realizadas de acordo com as especificações do manual. O técnico deve usar ferramentas e instrumentos que são seguros para uso.
Operação normal
Operadores são apenas permitidos a ajustar e operar equipamentos que estão fixados de forma segura no painel, etc., evitando-se assim o risco de ferimentos e danos. Isso significa que não há risco de choque elétrico, e o equipamento é facilmente acessível.
Limpeza
Quando desconectado, o equipamento pode ser limpado com pano umedecido e água destilada.
Responsabilidade
Na medida em que as instruções deste manual não sejam estritamente observadas, o cliente não pode avançar uma demanda contra a PR electronics A/S após o contrato de venda ter sido aceita.
Como desmontar o sistema 9000
Figura 1: Levantando o botão de trava, oequipamento é destacado do trilho DIN.

6 9203 - Versão do produto 9203-003
Recursos avançados
• O 9203Bxxx tem três barreiras Ex incorporadas.• Duas versões de hardware tornam possível escolher ou Baixa (35mA) ou Alta (60mA) corrente de saída.• Configuração e monitoramento através do display frontal (PR 4511/4501).• Seleção de função direta ou invertida para cada canal via PR 4511/4501 e possibilidade de reduzir a corrente de saída de
áreas perigosas para se adequar à aplicação.• Monitoramento opcional da corrente de saída para áreas perigosas através do PR4511/4501.• Alimentação opcional via trilho de tensão e/ou alimentação separada.
Aplicação
• O 9203Bxxx pode ser montado em área segura ou em zona 2 / div. 2 e transmitir sinais para zona 0, 1, 2 e zona 20, 21, 22 incluindo mineração M1 / Classe I/II/III, Div. 1, Gr. A-G. Driver Ex para controle Liga / Desliga de solenoide, alarmes acústicos e LEDs montados em áreas perigosas.
• O 9203Axxx pode ser montado em área segura ou em zona 2 / div. 2 e transmitir sinais para a área não perigosos. Driver para controle Liga / Desliga de solenoide, alarmes acústicos e LEDs montados em áreas perigosas
• Monitoramento de erros internos via status individual de relé e/ou sinal eletrônico coletivo via trilho de tensão.• O 9203 foi fabricado, desenvolvido e certificado para uso em aplicações de SIL 2 cumprindo os requerimentos do IEC
61508.
Características técnicas
• LEDs frontais verde e amarelo/vermelho indicam status de operação e defeito de funcionamento.• Isolação galvânica de 2,6 kVAC entre entrada, saída e alimentação.
Solenóide / driver de alarme 9203
• Drivers universais para solenoides, alarmes acústicos e LEDs
• Auto diagnóstico extendido
• 1 ou 2 canais
• Pode ser alimentado separadamente ou instalado no trilho de alimentação, PR 9400
• SIL 2-certificada através de avaliação completa

54
53
52
51
31
32
33
34
14
13
12
11
44
43
42
41
V+ V+
V+ V+
V-V-
V-V-
9203 - Versão do produto 9203-003 7
Trilho, alimentação +
Trilho, alimentação -
Trilho detensão
Sinal do status do relé
Zona 2 / Cl. 1, div. 2, gr. A-D ou área segura
Canal 2
SolenóideAlarme
Status do equipamento
Status do equipamento
Alimentação +19,2...31,2 VDC
N.C.
Alimentação viatrilho de tensão
Sinais de entrada:
Canal 2
Canal 1
Sinais de saída:
Canal 1
SolenóideAlarme
Sem conexão
Sem conexão
Conexão de tensão:
Aplicações - 9203Axxx
Alimentação -

14
13
12
11
44
43
42
41
V+
V+ V+
V-V-
V-V-
54
53
52
51
31
32
33
34
V+
8 9203 - Versão do produto 9203-003
Aplicações - 9203Bxxx
Zona 0, 1, 2, 20, 21, 22, M1 & Cl. I/II/III, Div. 1
gr. A-G Zona 2 / Cl. 1, div. 2, gr. A-D ou área segura
Trilho detensão
Sinal do status do relé
Channel 2
SolenóideAlarme
Status do equipamento
Status do equipamento
N.C.
Alimentação viatrilho de tensão
Sinais de entrada:
Canal 2
Canal 1
Sinais de saída:
Canal 1
SolenóideAlarme
Sem conexão
Sem conexão
Conexão de tensão:
Trilho, alimentação +
Trilho, alimentação -
Alimentação +19,2...31,2 VDC
Alimentação -
OK
4501
1
3
4
2
3
9203 - Versão do produto 9203-003 9
Display PR 4511/4501 / programador frontal
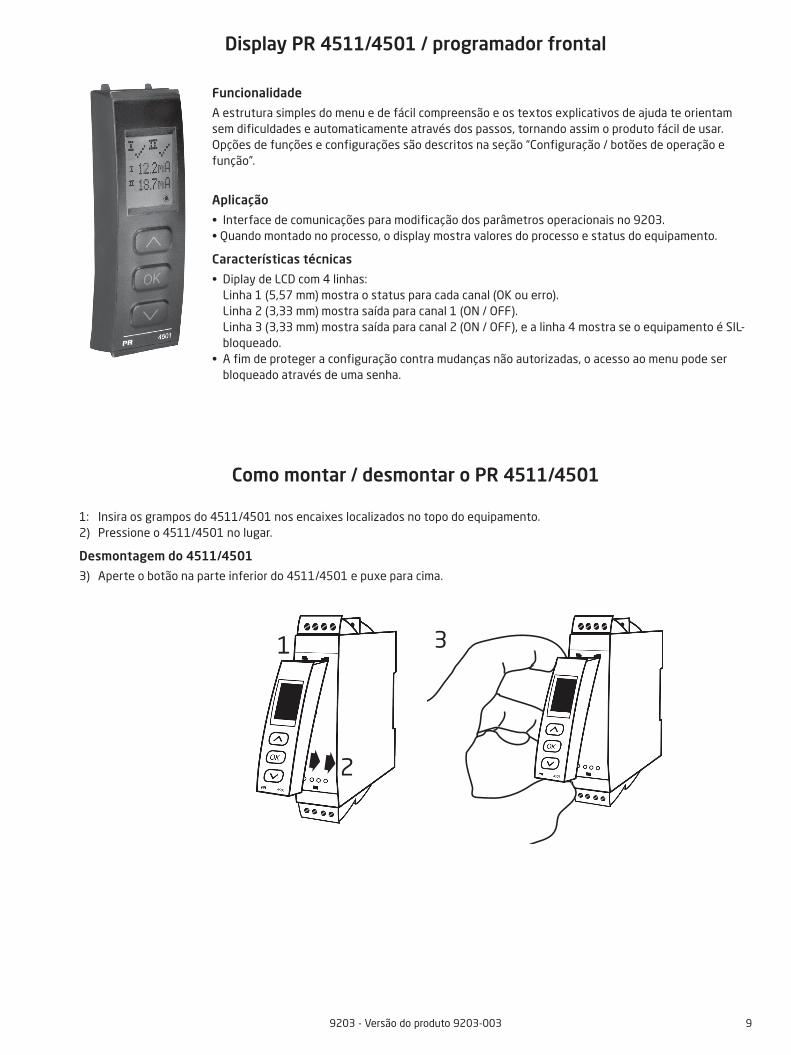
Funcionalidade
A estrutura simples do menu e de fácil compreensão e os textos explicativos de ajuda te orientam sem dificuldades e automaticamente através dos passos, tornando assim o produto fácil de usar. Opções de funções e configurações são descritos na seção “Configuração / botões de operação e função”.
Aplicação
• Interface de comunicações para modificação dos parâmetros operacionais no 9203.• Quando montado no processo, o display mostra valores do processo e status do equipamento.
Características técnicas
• Diplay de LCD com 4 linhas: Linha 1 (5,57 mm) mostra o status para cada canal (OK ou erro). Linha 2 (3,33 mm) mostra saída para canal 1 (ON / OFF). Linha 3 (3,33 mm) mostra saída para canal 2 (ON / OFF), e a linha 4 mostra se o equipamento é SIL-bloqueado.
• A fim de proteger a configuração contra mudanças não autorizadas, o acesso ao menu pode ser bloqueado através de uma senha.
Como montar / desmontar o PR 4511/4501
1: Insira os grampos do 4511/4501 nos encaixes localizados no topo do equipamento.2) Pressione o 4511/4501 no lugar.
Desmontagem do 4511/4501
3) Aperte o botão na parte inferior do 4511/4501 e puxe para cima.

10 9203 - Versão do produto 9203-003
Acessórios
4501 = Display / programador frontal 4511 = Communication enabler 9400 = Trilho de tensão 9404 = Módulo de parada para trilho 9410 = Unidade de controle de alimentação 9421 = Fonte de alimentação 24 V - Ex nA nC
Especificações elétricas
Condições ambientais:Especificações de range . . . . . . . . . . . . . . . . . . . . . . . . . . . . . . . -20°C a +60°CTemperatura de armazenamento . . . . . . . . . . . . . . . . . . . . . . . . . . -20°C a +85°CTemperatura de calibração . . . . . . . . . . . . . . . . . . . . . . . . . . . . . . 20...28°CUmidade de relativa . . . . . . . . . . . . . . . . . . . . . . . . . . . . . . . . . . < 95% RH (non-cond.)Grau de proteção . . . . . . . . . . . . . . . . . . . . . . . . . . . . . . . . . . . . IP20Instalação em grau de poluição 2 e categoria de sobretensão II.
Especificações mecânicas:Dimensões (HxWxD). . . . . . . . . . . . . . . . . . . . . . . . . . . . . . . . . . 109 x 23,5 x 104 mmDimensões (HxWxD) com 4501 / 4511 . . . . . . . . . . . . . . . . . . . . . . 109 x 23,5 x 116 mm / 131 mmPeso (approx.) . . . . . . . . . . . . . . . . . . . . . . . . . . . . . . . . . . . . . 170 gPeso com 4501 / 4511 (approx.) . . . . . . . . . . . . . . . . . . . . . . . . . . 185 g / 270 gTipo de trilho DIN . . . . . . . . . . . . . . . . . . . . . . . . . . . . . . . . . . . DIN EN 60715 - 35 mmTamanho de cabo . . . . . . . . . . . . . . . . . . . . . . . . . . . . . . . . . . . 0,13...2,08 mm2 / AWG 26...14 cabo flexívelTorque de terminal de parafuso . . . . . . . . . . . . . . . . . . . . . . . . . . . 0,5 NmVibração . . . . . . . . . . . . . . . . . . . . . . . . . . . . . . . . . . . . . . . . . IEC 60068-2-6 : 2007 2...13.2 Hz . . . . . . . . . . . . . . . . . . . . . . . . . . . . . . . . . . . . . . ±1 mm 13.2...100 Hz . . . . . . . . . . . . . . . . . . . . . . . . . . . . . . . . . . . . . ±0,7 g
Especificações comuns:Tensão de alimentação . . . . . . . . . . . . . . . . . . . . . . . . . . . . . . . . 19.2...31.2 VDC Fusível . . . . . . . . . . . . . . . . . . . . . . . . . . . . . . . . . . . . . . . . . . 1,25 A SB / 250 VAC
Código de compra
Exemplo : 9203B2B2
Tipo Versão Saída Canais Entrada
9203 Non-Ex / zona 2
Barreira Ex [Ex ia] / zone 2
: A
: B
Corrente baixa : 1 Simples
Duplo
: A
: B
Opto / chave
PNP
NPN
: -
: 1
: 2Corrente alta : 2 Simples : A

9203 - Versão do produto 9203-003 11
A potência necessária máxima é a potência máxima necessária nos terminais 31 e 32.A dissipação de potência máxima é a potência máxima dissipada pelo dispositivo 9000.Se o 9203 for utilizado com o 4511/4501, adicione 40 mW ao dissipação de potência máxima e 70 mW ao potência necessária máxima para cada dispositivo com o 4511/4501.
Tensão de isolação, teste / operação: Entrada / saída / alimentação . . . . . . . . . . . . . . . . . . . . . . . . . . . 2,6 kVAC / 250 VAC Saída 1 a saída 2 . . . . . . . . . . . . . . . . . . . . . . . . . . . . . . . . . . . 1,5 kVAC / 150 VAC reforçado Status do relé para alimentação . . . . . . . . . . . . . . . . . . . . . . . . . . 1,5 kVAC / 150 VAC reforçado Interface de comunicação . . . . . . . . . . . . . . . . . . . . . . . . . . . . . . Communication enabler 4511 / Programador frontal 4501
9203xxx coletor aberto NPN e chave mecânica:Nível de trig BAIXO . . . . . . . . . . . . . . . . . . . . . . . . . . . . . . . . . . ≤ 2,0 VDC Nível de trig ALTO . . . . . . . . . . . . . . . . . . . . . . . . . . . . . . . . . . . ≥ 4,0 VDC Tensão externa máxima . . . . . . . . . . . . . . . . . . . . . . . . . . . . . . . 28 VDC Impedância de entrada . . . . . . . . . . . . . . . . . . . . . . . . . . . . . . . . 3,5 kΩ Saída aberta V . . . . . . . . . . . . . . . . . . . . . . . . . . . . . . . . . . . . . 6,0 VDC
9203xxx coletor aberto PNP:Nível de trig BAIXO . . . . . . . . . . . . . . . . . . . . . . . . . . . . . . . . . . ≤ 8,0 VDC Nível de trig ALTO . . . . . . . . . . . . . . . . . . . . . . . . . . . . . . . . . . . ≥ 10,0 VDC Tensão externa máxima . . . . . . . . . . . . . . . . . . . . . . . . . . . . . . . 28 VDCImpedância de entrada . . . . . . . . . . . . . . . . . . . . . . . . . . . . . . . . 3,5 kΩ Saída aberta V . . . . . . . . . . . . . . . . . . . . . . . . . . . . . . . . . . . . . 6,0 VDC
9203xxx1 PNP com resistor pull-down:Nível de trig BAIXO . . . . . . . . . . . . . . . . . . . . . . . . . . . . . . . . . . ≤ 8,0 VDCNível de trig ALTO . . . . . . . . . . . . . . . . . . . . . . . . . . . . . . . . . . . ≥ 10,0 VDCTensão externa máxima . . . . . . . . . . . . . . . . . . . . . . . . . . . . . . . 28 VDCImpedância de entrada . . . . . . . . . . . . . . . . . . . . . . . . . . . . . . . . 3,5 kΩ
9203xxx2 NPN com resistor pull-up:Nível de trig BAIXO . . . . . . . . . . . . . . . . . . . . . . . . . . . . . . . . . . ≤ 2,0 VDCNível de trig ALTO . . . . . . . . . . . . . . . . . . . . . . . . . . . . . . . . . . . ≥ 4,0 VDCTensão externa máxima . . . . . . . . . . . . . . . . . . . . . . . . . . . . . . . 28 VDCImpedância de entrada . . . . . . . . . . . . . . . . . . . . . . . . . . . . . . . . 3,5 kΩ
Saídas:Ondulação de saída . . . . . . . . . . . . . . . . . . . . . . . . . . . . . . . . . . < 40 mV RMS
Influência de imunidade EMC. . . . . . . . . . . . . . . . . . . . . . . < ±0,5% de spanImunidade EMC extendida:NAMUR NE 21, critério de explosão A . . . . . . . . . . . . . . . . . < ±1% de span
Tipo DescriçãoDissipação de
potência máximaPotência
necessária máxima
9203x1A 1 canal, corrente baixa ≤ 1,1 W ≤ 1,9 W
9203x1A1 1 canal, corrente baixa ≤ 1,1 W ≤ 1,9 W
9203x1A2 1 canal, corrente baixa ≤ 1,1 W ≤ 1,9 W
9203x1B 2 canais, corrente baixa ≤ 2,0 W ≤ 3,1 W
9203x1B1 2 canais, corrente baixa ≤ 2,0 W ≤ 3,1 W
9203x1B2 2 canais, corrente baixa ≤ 2,0 W ≤ 3,1 W
9203x2A 1 canal, corrente alta ≤ 1,7 W ≤ 2,5 W
9203x2A1 1 canal, corrente alta ≤ 1,7 W ≤ 2,5 W
9203x2A2 1 canal, corrente alta ≤ 1,7 W ≤ 2,5 W

262422201816141210
8642
0 10 20 30 35 40
[V]
[mA]
12 9203 - Versão do produto 9203-003
Terminal
9203x1Ax (1 canal) / 9203x1Bx (2 canais)
41-42 / 51-52 41-43 / 51-53 41-44 / 51-54
Vsaída sem carga Mín. 24 V Mín. 24 V Mín. 24 V
Vsaída com carga Mín. 12,5 V Mín. 13,5 V Mín. 14,5 V
Isaída máx. 35 mA 35 mA 35 mA
X41 X44
X41 X43
X41 X42
Terminais:
Cargas de saída

262422201816141210
8642
0 10 20 30 40 50 60 65 70
[V]
[mA]
9203 - Versão do produto 9203-003 13
Terminal
9203x2Ax (1 canal)
41-42 41-43 41-44
Vsaída sem carga Mín. 24 V Mín. 24 V Mín. 24 V
Vsaída com carga Mín. 11,5 V Mín. 9 V Mín. 12,5 V Mín. 10 V Mín. 13,5 V Mín. 11 V
Isaída máx. 50 mA 60 mA 50 mA 60 mA 50 mA 60 mA
X41 X44
X41 X43
X41 X42
Terminais:

14 9203 - Versão do produto 9203-003
Saída relé:Status do relé em área segura: Tensão máxima . . . . . . . . . . . . . . . . . . . . . . . . . . . . . . . . . . . 125 VAC / 110 VDC Corrente máxima. . . . . . . . . . . . . . . . . . . . . . . . . . . . . . . . . . . 0,5 A AC / 0,3 A DC Tensão máxima . . . . . . . . . . . . . . . . . . . . . . . . . . . . . . . . . . . 62,5 VA / 32 W
Determinações das autoridades observados:EMC. . . . . . . . . . . . . . . . . . . . . . . . . . . . . . . . . . . . . . . . . . . . 2014/30/UELVD . . . . . . . . . . . . . . . . . . . . . . . . . . . . . . . . . . . . . . . . . . . . 2014/35/UERoHS . . . . . . . . . . . . . . . . . . . . . . . . . . . . . . . . . . . . . . . . . . . 2011/65/UE
Aprovações:DNV-GL, Ships & Offshore . . . . . . . . . . . . . . . . . . . . . . . . . . . . . . Stand. f. Certific. No. 2.4c UL us, Standard for Safety . . . . . . . . . . . . . . . . . . . . . . . . . . . . . UL 61010-1EAC . . . . . . . . . . . . . . . . . . . . . . . . . . . . . . . . . . . . . . . . . . . . TR-CU 020/2011
Aprovações I.S. / Ex:ATEX 2014/34/UE . . . . . . . . . . . . . . . . . . . . . . . . . . . . . . . . . . . KEMA 07ATEX0147 XIECEx . . . . . . . . . . . . . . . . . . . . . . . . . . . . . . . . . . . . . . . . . . . IECEx KEM 09.0001Xc FM us. . . . . . . . . . . . . . . . . . . . . . . . . . . . . . . . . . . . . . . . . . 3035277-CINMETRO . . . . . . . . . . . . . . . . . . . . . . . . . . . . . . . . . . . . . . . . DEKRA 16.0006 XCCOE . . . . . . . . . . . . . . . . . . . . . . . . . . . . . . . . . . . . . . . . . . . P337349/6EAC Ex TR-CU 012/2011 . . . . . . . . . . . . . . . . . . . . . . . . . . . . . . . RU C-DK.GB08.V.00410
Segurança Funcional:SIL 2 Certificada & Totalmente Avaliada de acordo com IEC 615088

9203 - Versão do produto 9203-003 15
Visualização no 4511/4501 de hardware / erro de software
! Todas as indicações de erro no display piscam uma vez por segundo. O texto de ajuda explica o erro..
Erros afetando ambos os canais são mostrados como erro no canal 1 – e a linha mostrando canal 2 em branco.
Erro de hardware pode ser reiniciado de duas formas. Ou através do passo a passo dos menus (se o outro canal ainda estiver em operação) ou reiniciando a alimentação do equipamento.
Leitura de erro de hardware
Pesquisa de erro Leitura Causa
Teste de comunicação 4511 (4501) / 9203 NO.CO Erro de conexão
Erro EEPROM - checar configuração FL.ERErro de configuração ou incompatibilidade crc,
configuração de recuperação é carregado
Erro de hardware DE.ER Configuração de recuperação inválida
Erro de hardware FC.ER Código inválido de recuperação 4511/4501
Erro EEPROM - checar configuração CO.ER Configuração inválida (CRC ou dados)
Erro de hardware CA.ER Erro de calibração de fábrica
Erro de hardware HW.ER Setup HW - incompatibilidade de configuração
Erro de hardware OC.ERErro de comunicação na saída principal do
controlador
Erro de hardware MS.ER Alimentação principal interna fora do limite
Erro de hardware MI.ER Inicialização principal auto teste falhou
Erro de hardware MC.ER Flash principal ou ram auto teste falhou

16 9203 - Versão do produto 9203-003
Conexões
11 1312 1411 1312 14 11 1312 14 11 1312 14
11 1312 1411 1312 14 11 1312 14 11 1312 14
31 32 343391 92 93 94 95
V-
V+
(6 V)* V- (6 V)*
V+R
V-
V+
(6 V)*- +
R
V-
V+
(6 V)*V-
V+
(6 V)*V-
V+
(6 V)*- +
Cana
l 1Ca
nal 2
Alimentaçãoe status do relé
Conexõestrilho de tensão
N.C.
NC = no connection (sem conexão)
Alim
ent.
-
Alim
ent.
+
Alim
ent.
-
Alim
ent.
+NC
NC
Erro
Entradas - 9203xxx:
PNPNPNChave Entrada PNP
PNPNPNChave Entrada PNP
* 6 V em estado aberto
D externo
D externo
11 1312 1411 1312 14 11 1312 14 11 1312 14
11 1312 1411 1312 14 11 1312 14 11 1312 14
11 1312 1411 1312 14 11 1312 14 11 1312 14
11 1312 1411 1312 14 11 1312 14 11 1312 14
- +
R
V-
V+
R
V-V-
V+
V-
V+R
V-
V+V+
V-
V- V+
V-
V+R
V-
V+V+V-
V- V+
R
V- V+
V- V+
V-
V+
V-
V+R V+
Cana
l 1Ca
nal 2
Cana
l 1Ca
nal 2
Entradas - 9203xxx1:
PNPcom pull-downPNPChave V+ Entrada ativa
PNPcom pull-downPNP
Chave compull-down Entrada ativa
Entradas - 9203xxx2:
NPNNPN
com pull-upChave com
pull-up Entrada ativa
NPNNPN
com pull-upChave compull-down Entrada ativa

9203xxx
31
12
11
91 92 93 94 95
32
34
33
44
43
41
42
14
13
54
53
51
52
NC*NC*
CPU
FLASH
R Ex3
R Ex2
R Ex1
R Ex3
R Ex2
R Ex1 V+
NPN
V+
PNP
V+N
PN
V+
PNP
1
ON
OFF
(6 V)
(6 V)
9203 - Versão do produto 9203-003 17
Diagrama de bloco
Conexões de trilho de tensão
Status de relé N.C.
Status de relé N.C.
Alimentação +24 VDC
Entrada +
Entrada, gnd.
Canal 1
Canal 2
Chav
e
Entrada +
Entrada, gnd.
Chav
e
Saída +
Saída, gnd.
Saída +
Saída, gnd.
Fusível
Fusível
Status do equipamento, Verde
Status canal 1, Amarelo/Vermelho
Status canal 2, Amarelo/Vermelho
* NC = no connection (sem conexão)
Alim
ent.
+
Alim
ent.
-Alimentação -
41 4342 4441 4342 44 41 4342 44
51 5352 5451 5352 54 51 5352 54
Cana
l 1Ca
nal 2
Saídas - 9203xxxx:
LEDAlarme acústicoSolenóide, ON / OFF
LEDAlarme acústicoSolenóide, ON / OFF

18 9203 - Versão do produto 9203-003
Indicações de erro de sinal sem display frontal
Lista de LED e indicação de erro de sinal
Estado LED VerdeCanal 1:
Amarelo /vermelho
Canal 2:Amarelo /vermelho
Status do relé,N.C..
Trilho de tensãostatus de sinal
Módulo OK Piscando Energizado OFF
Sem alimentação OFF OFF OFF Desenergizado ON
Módulo com defeito OFF Vermelho Vermelho Desenergizado ON
Canal 1, saída ON Piscando Amarelo Energizado OFF
Canal 1, saída OFF Piscando OFF Energizado OFF
Canal 2, saída ON Piscando Amarelo Energizado OFF
Canal 2, saída OFF Flashing OFF Energizado OFF

9203 - Versão do produto 9203-003 19
Configuração / operando os botões de funçãoDocumentação para diagrama de encaminhamento.
No geral
Quando configurar o 9203, você será guiado através de todos os parâmetros e você pode escolher os ajustes para colocar na aplicação. Para cara menu há textos de ajuda que são automaticamente mostrados na linha 3 do display.
Configuração pode ser realizada através de 3 botões de função: 1 irá aumentar o valor numérico ou escolher o próximo parâmetro 2 irá diminuir o valor numérico ou escolher o parâmetro anterior 3 irá aceitar o valor escolhido e seguir para o próximo parâmetro
Quando a configuração está completa, o display irá retornar para o estado padrão 1.0. Pressionando e segurando 3 irá retornar para o menu anterior ou retornar para o estado padrão (1.0) sem salvar os valores ou parâmetros alterados.
Se nenhum botão é pressionado por 1 minuto, o display irá retornar para o estado padrão (1.0) sem salvar os valores ou parâmetros alterados.
Mais explicações
Senha de proteção: O acesso à programação pode ser bloqueado atribuindo uma senha. A senha é salva no equipamento a fim de garantir um alto nível de proteção contra modificações não autorizadas na configuração. A senha padrão 2008 permite o acesso a todos os menus de configuração.
Informação de erro de equipamento ou sinal via display frontal 451/4501
O display frontal pode ser configurado para mostrar status de saída, corrente de saída ou número de etiqueta para ambos os canais. No caso de erro de hardware, um texto de ajuda explicando o erro será mostrado.
Funções avançadas
A unidade dá acesso a um número de funções avançadas que podem ser alcançadas respondendo “Yes” no parâmetro “adv.set”.
Display setup: Aqui você pode ajustar o contrate de brilho e luz de fundo. Configuração dos números de TAG com 5 caracteres alfanuméricos. Seleção de leitura funcional na linha 2 e 3 do display – escolha entre leitura de status de saída, corrente de saída ou número de tag. Ao selecionar ”ALT” a leitura alterna entre as opções de exibição.
Password: Aqui você pode escolher uma senha entre 0000 e 9999 a fim de proteger o equipamento contra modificações da configuração não autorizadas. O equipamento é entregado sem uma senha padrão.
Language: No menu “LANG” você pode escolher entre 7 versões de linguagens diferentes de textos de ajuda que irão aparecer no menu. Você pode escolher entre UK, DE, FR, IT, ES, SE e DK.
Nível de Integridade de Segurança (SIL): Veja o manual de segurança para detalhess.

0000PASSW.
Txt 1
0000
9999
NOADV.SET
Txt 2
NO
YES
1212
*1.1
OFF
ON
YESADV.SET
Txt 2
NO
YES
12
DIRCH2.FUN
Txt 7
DIR
INV
12
DIRCH1.FUN
Txt 7
DIR
INV
12
333
3
3
3
*1.0
1
20 9203 - Versão do produto 9203-003
Diagrama de encaminhamento
Se nenhum botão é acionado por 1 minuto, o display irá retornar para o status padrão 1.0 sem salvar as mudanças de configuração.1 Aumenta o valor / escolhe próximo parâmetro2 Diminui o valor / escolhe o parâmetro anterior3 aceita o valor escolhido e procede para o próximo menuSegurar o 3 Volta para o menu anterior / retorna para o menu 1.0 sem salvar.
Para estado padrão 1.0
Continua na páginaDiagrama de encaminhamentoADV.SET
Power up
*1.0 Status padrãoLinha 1 mostra status para canal 1 e canal 2.Linha 2 mostra status de saída para canal 1, corrente de saída ou número de tag.Linha 3 mostra status de saída para canall 2, corrente de saída ou número de tag.Linha 4 indica se o equipamento está bloqueado por SIL.
*1.1 Apenas se houver senha de proteção.
Símbolos da linha 1: = OK. Piscando = erro.Símbolo da linha 2 e 3: ON = canal 1 ON OFF = canal 2 OFFSímbolos da linha 4:Dot estática = bloqueado por SIL.Dot piscando = sem bloqueio SIL. = saída está ativa.
Texto vermelho significa parâmetros de segurança na configuração SIL. Veja o manual de segurança para detalhes.

*1.2
DISPSETUP
Txt 6
DISP, PASS,
LANG, RAIL
3CONTRA
Txt 9
9
0
1212
TAG1TAGNO
Txt 11
9
A
12
9LIGHT
Txt 10
9
0
12
D.OUTDISP
Txt 12
ALT
LOAD
TAG
D.OUT
12
TAG2TAGNO
Txt 11
9
A
12
3 3 333 3
PASSSETUP
Txt 6
YESEN.PASS
Txt 15
YES
NO
12
0000NEW.PAS
Txt 16
9999
0000
12
333
NO
LANGSETUP
Txt 6
UKLANGUA
Txt 17
DE, DK, ES, FR,
IT, SE, UK
12
33
SILSETUP
Txt 6
YESEN.SIL
Txt 14
YES
NO
12
3 LOCKCONFIG
Txt 13
LOCK
OPEN
12
2008NEW.PAS
Txt 1
0000
9999
12
3 3 3 3 LOCKCONFIG
Txt 13
33
NO
9203 - Versão do produto 9203-003 21
Diagrama de encaminhamento, configurações avançadas (ADV.SET)
Para estado padrão 1.0
*1.2 Se a senha foi definida.

22 9203 - Versão do produto 9203-003
Textos de ajuda na linha 3 do display
[01][02][06]
[07]
[09][10][11][12]
[13][14][15][16][17][20][21][22]
Definir a senha corretaEntrar nas configurações avançadas?Entrar nas configurações de linguagemEntrar nas configurações de senhaEntrar nas configurações de displayEntrar nas configurações de SILSelecionar função de canal diretoSelecionar função de canal invertidoAjustar contraste LCDAjustar luz de fundo do LCDEscrever 5 caracteres de tag do canalMostra status de saída no displayMostra carga de saída no displayMostra tag no displayInformação alternada mostrada no displayConfiguração de status SIL (Aberto / Bloqueado)Habilitar configuração de bloqueio SILHabilitar senha de proteção?Configurar nova senhaSelecionar linguagemSem comunicação - checar as conexõesErro EEPROM - checar configuraçãoErro de hardware

Appendix
IECEx installation drawing
ATEX Installation Drawing
FM Installation Drawing
Desenho de Instalaçao INMETRO
Safety Manual
9203 - Versão do produto 9203-003 23

9203QI01LERBAKKEN 10, 8410 RØNDE DENMARK
Revision date:
2015-01-22 Version Revision
V6 R0 Prepared by:
PB Page:
1/4
IECEx Installation drawing For safe installation of 9203 the following must be observed. The module shall only be installed by qualified personnel who are familiar with the national and international laws, directives and standards that apply to this area. Year of manufacture can be taken from the first two digits in the serial number.
For Installation in Zone 2 / Division 2 the following must be observed. The 4501 programming module is to be used solely with PRelectronics modules. It is important that the module is undamaged and has not been altered or modified in any way. Only 4501 modules free of dust and moisture shall be installed.
IECEx Certificate: IECEx KEM 09.0001X Marking 9203Bxxx
Marking 9203Axxx Ex nA nC IIC T4 Gc Standards IEC60079-15:2010, IEC60079-11:2011, IEC60079-0:2011
Type Installation Current Output Channels Input 9203
Non Ex / Zone 2 :A Ex-Barrier / Zone 2 :B
Low current :1
Single :A Double :B
Standard : -
PNP : 1
NPN : 2
High current :2
Single :A
Installation notes. Install in pollution degree 2, overvoltage category II as defined in IEC60664-1 Do not separate connectors when energized and an explosive gas mixture is present. Do not mount or remove modules from the Power Rail when an explosive gas mixture is present. Disconnect power before servicing. The wiring of unused terminals is not allowed. In type of protection [Ex ia Da] the parameters for intrinsic safety for gas group IIB are applicable. For installation in Zone 2, the module shall be installed in an enclosure in type of protection Ex n or Ex e, providing a degree of protection of at least IP54. Cable entry devices and blanking elements shall fulfill the same requirements. For installation on Power Rail in Zone 2, only Power Rail type 9400 supplied by Power Control Unit type 9410 (IECEx Certificate of Conformity IECEx KEM 08.0025X ) is allowed.
[Ex ia Ga] IIC/IIB/IIA Ex nA nC IIC T4 Gc [Ex ia Da] IIIC [Ex ia Ma] I
IECEx Installation Drawing
24 9203 - Versão do produto 9203-003

9203QI01LERBAKKEN 10, 8410 RØNDE DENMARK
Revision date:
2015-01-22 Version Revision
V6 R0 Prepared by:
PB Page:
2/4
9203Bxxx Installation:
Hazardous area Non Hazardous area Zone 0, 1, 2, 20, 21, 22 or Zone 2
Terminal (31,32) Terminal (11,12 and 13,14) Supply: Input: Voltage 19.2 – 31.2 VDC Voltage max 28 VDC Power max. 3.5 W Trig: NPN Low < 2 V, High > 4 V Trig: PNP Low < 8 V, High > 10 V
Terminal (33,34) Status Relay: Non Hazardous location Zone 2 installation Voltage max. 125 VAC / 110 VDC 32 VAC / 32 VDC Power max. 62.5 VA / 32 W 16 VA / 32 W Current max. 0.5 AAC / 0.3 ADC 0.5 AAC / 1 ADC
Supply / Input (terminal 11,12,13,14) (terminal 31,32,33,34) (terminal 91,92,93,94,95) Um: 253V, max. 400Hz
-20 ≤ Ta ≤ 60ºC
44434241
54535251
34333231
14131211
9203B
4501
Power Rail
91 92 93 94 95
9203 - Versão do produto 9203-003 25

9203QI01LERBAKKEN 10, 8410 RØNDE DENMARK
Revision date:
2015-01-22 Version Revision
V6 R0 Prepared by:
PB Page:
3/4
9203B1A, 9203B1B
Terminal 41-42/51-52 Co Lo Lo/Ro
9203B2A Terminal 41-42 Co Lo Lo/Ro
Uo 28V IIC 80nF 4.2mH 54µH/Ω Uo 28V IIC 80nF 2.69mH 44µH/Ω
Io 93 mA IIB 640nF 16.8mH 218µH/Ω Io 115mA IIB 640nF 10.8mH 176µH/Ω
Po 0.65W IIA 2.1µF 32.6mH 436µH/Ω Po 0.81W IIA 2.1µF 20.8mH 353µH/Ω
I 3.76µF 32.6mH 436µH/Ω I 3.76µF 20.8mH 353µH/Ω
9203B1A, 9203B1B Terminal 41-43/51-53 Co Lo Lo/Ro 9203B2A
Terminal 41-43 Co Lo Lo/Ro
Uo 28V IIC 80nF 3.5mH 54µH/Ω Uo 28V IIC
Io 100mA IIB 640nF 14.2mH 218µH/Ω Io 125mA IIB 640nF 9.1mH 163µH/Ω
Po 0.70W IIA 2.1µF 27.6mH 436µH/Ω Po 0.88W IIA 2.1µF 17.6mH 327µH/Ω
I 3.76µF 27.6mH 436µH/Ω I 3.76µF 17.6mH 327µH/Ω
9203B1A,9203B1B Terminal 41-44/51-54 Co Lo Lo/Ro 9203B2A
Terminal 41-44 Co Lo Lo/Ro
Uo 28V IIC 80nF 2.9mH 46µH/Ω Uo 28V IIC
Io 110mA IIB 640nF 11.8mH 184µH/Ω Io 135mA IIB 640nF 7.8mH 150µH/Ω
Po 0.77W IIA 2.1µF 22.8mH 369µH/Ω Po 0.95W IIA 2.1µF 15.1mH 301µH/Ω
I 3.76µF 22.8mH 369µH/Ω I 3.76µF 15.1mH 301µH/Ω
26 9203 - Versão do produto 9203-003

9203QI01LERBAKKEN 10, 8410 RØNDE DENMARK
Revision date:
2015-01-22 Version Revision
V6 R0 Prepared by:
PB Page:
4/4
9203Axxx Installation Non Classified area or Zone 2
Terminal (31,32) Terminal (11,12 and 13,14) Supply: Input: Voltage 19.2 – 31.2 VDC Voltage max 28 VDC Power max. 3.5 W Trig: NPN Low < 2 V, High > 4 V Trig: PNP Low < 8 V, High > 10 V
Terminal (33,34) Status Relay: Non Hazardous location Zone 2 installation Voltage max. 125 VAC / 110 VDC 32 VAC / 32 VDC Power max. 62.5 VA / 32 W 16 VA / 32 W Current max. 0.5 AAC / 0.3 ADC 0.5 AAC / 1 ADC Terminal (41...44 / 51...54)
Umax 28 V Imax 135 mA
Pmax 0.95 W
44434241
54535251
34333231
14131211
9203A
4501
Power Rail
91 92 93 94 95
9203 - Versão do produto 9203-003 27

28 9203 - Versão do produto 9203-003
ATEX Installation Drawing
9203QA01LERBAKKEN 10, 8410 RØNDE DENMARK
Revision date:
2015-01-22
Version Revision V6 R0
Prepared by: PB
Page: 1/4
ATEX Installation drawing For safe installation of 9203 the following must be observed. The module shall only be Installed by qualified personnel who are familiar with the national and international laws, directives and standards that apply to this area. Year of manufacture can be taken from the first two digits in the serial number.
For Installation in Zone 2 / Division 2 the following must be observed. The 4501 programming module is to be used solely with PRelectronics modules. It is important that the module is undamaged and has not been altered or modified in any way. Only 4501 modules free of dust and moisture shall be installed.
ATEX Certificate KEMA 07ATEX 0147 X Marking 9203B
Marking 9203A II 3G Ex nA nC IIC T4 Gc
Standards EN 60079-0 : 2012, EN 60079-11 : 2012, EN 60079-15 : 2010
Type Installation Current Output Channels Input 9203
Non Ex / Zone 2 :A Ex-Barrier / Zone 2 :B
Low current :1
Single :A Double :B
Standard : -
PNP : 1
NPN : 2
High current :2
Single :A
Installation notes.
Install in pollution degree 2, overvoltage category II as defined in EN60664-1 Do not separate connectors when energized and an explosive gas mixture is present. Do not mount or remove modules from the Power Rail when an explosive gas mixture is present. Disconnect power before servicing. The wiring of unused terminals is not allowed. In type of protection [Ex ia Da] the parameters for intrinsic safety for gas group IIB are applicable. For installation in Zone 2, the module shall be installed in an enclosure in type of protection Ex n or Ex e, providing a degree of protection of at least IP54. Cable entry devices and blanking elements shall fulfill the same requirements. For installation on Power Rail in Zone 2, only Power Rail type 9400 supplied by Power Control Unit type 9410 (Type Examination Certificate KEMA 07ATEX0152 X) is allowed.
II (1) G [Ex ia Ga] IIC/IIB/IIA II 3G Ex nA nC IIC T4 Gc I (1) D [Ex ia Da] IIIC I (M1) [Ex ia Ma] I

9203 - Versão do produto 9203-003 29
9203QA01LERBAKKEN 10, 8410 RØNDE DENMARK
Revision date:
2015-01-22
Version Revision V6 R0
Prepared by: PB
Page: 2/4
9203Bxxx Installation:
Terminal (31,32) Terminal (11,12 and 13,14)
Supply: Input: Voltage 19.2 – 31.2 VDC Voltage max 28VDC Power max. 3.5 W Trig: NPN Low < 2V, High > 4V Trig: PNP Low < 8V, High > 10V
Terminal (33,34) Status Relay: Non Hazardous location Zone 2 installation Voltage max. 125 VAC / 110 VDC 32 VAC / 32 VDC Power max. 62.5 VA / 32 W 16 VA / 32 W Current max. 0.5 AAC / 0.3 ADC 0.5 AAC / 1 ADC
Non Hazardous Area or Zone 2
Hazardous area Zone 0,1,2, 20, 21, 22
Supply / Input (terminal 11,12,13,14) (terminal 31,32,33,34) (terminal 91,92,93,94,95) Um: 253V, max. 400Hz
-20 ≤ Ta ≤ 60ºC
44434241
54535251
34333231
14131211
9203B
4501
Power Rail
91 92 93 94 95

30 9203 - Versão do produto 9203-003
9203QA01LERBAKKEN 10, 8410 RØNDE DENMARK
Revision date:
2015-01-22
Version Revision V6 R0
Prepared by: PB
Page: 3/4
9203B1A, 9203B1B
Terminal 41-42/51-52 Co Lo Lo/Ro
9203B2A Terminal 41-42 Co Lo Lo/Ro
Uo 28V IIC 80nF 4.2mH 54µH/Ω Uo 28V IIC 80nF 2.69mH 44µH/Ω
Io 93 mA IIB 640nF 16.8mH 218µH/Ω Io 115mA IIB 640nF 10.8mH 176µH/Ω
Po 0.65W IIA 2.1µF 32.6mH 436µH/Ω Po 0.81W IIA 2.1µF 20.8mH 353µH/Ω
I 3.76µF 32.6mH 436µH/Ω I 3.76µF 20.8mH 353µH/Ω
9203B1A, 9203B1B
Terminal 41-43/51-53 Co Lo Lo/Ro 9203B2A
Terminal 41-43 Co Lo Lo/Ro
Uo 28V IIC 80nF 3.5mH 54µH/Ω Uo 28V IIC
Io 100mA IIB 640nF 14.2mH 218µH/Ω Io 125mA IIB 640nF 9.1mH 163µH/Ω
Po 0.70W IIA 2.1µF 27.6mH 436µH/Ω Po 0.88W IIA 2.1µF 17.6mH 327µH/Ω
I 3.76µF 27.6mH 436µH/Ω I 3.76µF 17.6mH 327µH/Ω
9203B1A, 9203B1B
Terminal 41-44/51-54 Co Lo Lo/Ro 9203B2A
Terminal 41-44 Co Lo Lo/Ro
Uo 28V IIC 80nF 2.9mH 46µH/Ω Uo 28V IIC
Io 110mA IIB 640nF 11.8mH 184µH/Ω Io 135mA IIB 640nF 7.8mH 150µH/Ω
Po 0.77W IIA 2.1µF 22.8mH 369µH/Ω Po 0.95W IIA 2.1µF 15.1mH 301µH/Ω
I 3.76µF 22.8mH 369µH/Ω I 3.76µF 15.1mH 301µH/Ω

9203 - Versão do produto 9203-003 31
9203QA01LERBAKKEN 10, 8410 RØNDE DENMARK
Revision date:
2015-01-22
Version Revision V6 R0
Prepared by: PB
Page: 4/4
9203Axxx Installation: Non Classified area or Zone 2
Terminal (31,32) Terminal (11,12 and 13,14) Supply: Input: Voltage 19.2 – 31.2 VDC Voltage max 28VDC Power max. 3.5 W Trig: NPN Low < 2V, High > 4V Trig: PNP Low < 8V, High > 10V
Terminal (33,34) Status Relay: Non Hazardous location Zone 2 installation Voltage max. 125 VAC / 110 VDC 32 VAC / 32 VDC Power max. 62.5 VA / 32 W 16 VA / 32 W Current max. 0.5 AAC / 0.3 ADC 0.5 AAC / 1 ADC
Terminal (41..44 / 51..54) Umax 28 V Imax 135 mA
Pmax 0.95 W
44434241
54535251
34333231
14131211
9203A
4501
Power Rail
91 92 93 94 95

9203QF01LERBAKKEN 10, 8410 RØNDE DENMARK
Revision date:
2015-01-22 Version Revision
V6R0 Prepared by:
PB Page: 1/3
FM Installation drawing For safe installation of 9203 the following must be observed. The module shall only be installed by qualified personnel who are familiar with the national and international laws, directives and standards that apply to this area. Year of manufacture can be taken from the first two digits in the serial number.
For Installation in Zone 2 / Division 2 the following must be observed. The 4501 programming module is to be used solely with PRelectronics modules. It is important that the module is undamaged and has not been altered or modified in any way. Only 4501 modules free of dust and moisture shall be installed.
c-FM-us Certificate 3035277
Installation notes: The installation and wiring shall be in accordance with the Canadian Electrical Code for Canada and National Electrical Code NFPA 70, Article 500 or 505 for installation in USA. The module must be supplied from a Power Supply having double or reinforced insulation. The use of stranded wires is not permitted for mains wiring except when wires are fitted with cable ends. For installation on the 9400 Power Rail the power must be supplied from Power Control Module Unit 9410. Install in pollution degree 2, overvoltage category II. The module must be installed in an enclosure suitable for the environment for which it is used. For installation in Zone 2 or Division 2, the module must be installed in a suitable outer enclosure according to the regulations in the CEC for Canada or NEC for USA. The module is galvanically isolated and does not require grounding. Use 60 / 75 ºC copper conductors with wire size AWG: (26-14). The maximum internal Power dissipation for adjacent modules is assumed to be max. 2W each.Warning: Substitution of components may impair intrinsic safety and / or suitability for Div. 2 / Zone 2. Warning: To prevent ignition of explosive atmospheres, disconnect power before servicing and do not separate connectors when energized and an explosive gas mixture is present. Warning: Do not mount or remove modules from the Power Rail when an explosive gas mixture is present.
Type Installation Current Output Channels Input 9203
Non Ex / Zone 2 :A Ex-Barrier / Zone 2 :B
Low current :1
Single :A Double :B
Standard : -
PNP : 1
NPN : 2
High current :2
Single :A
FM Installation Drawing
32 9203 - Versão do produto 9203-003

9203QF01LERBAKKEN 10, 8410 RØNDE DENMARK
Revision date:
2015-01-22 Version Revision
V6R0 Prepared by:
PB Page: 2/3
9203Bxxx Installation:
Terminal (31,32) Terminal (11,12 and 13,14) Supply: Input: Voltage 19.2 – 31.2 VDC Voltage max 28 VDC Power max. 3.5 W Trig: NPN Low < 2 V, High > 4 V Trig: PNP Low < 8 V, High > 10 V
Terminal (33,34) Status Relay: Non Hazardous location: Division 2 or Zone 2 installation: Voltage max. 125 VAC / 110 VDC 32 VAC / 32VDC Power max. 62.5 VA / 32 W 16 VA / 32 W Current max. 0.5 AAC / 0.3 ADC 0.5 AAC / 1 ADC
Non Hazardous Area or Class I, Division 2, Group A,B,C,D T4 or Class I, Zone 2 Group IIC T4
-20 ≤ Ta ≤ 60ºC
44434241
54535251
34333231
14131211
9203
4501
Power Rail
91 92 93 94 95Supply / Input (terminal 11,12,13,14) (terminal 31,32,33,34) (terminal 91,92,93,94,95) Um: 253V, max. 400Hz
Hazardous area Class I/II/III, Division 1, Group A,B,C,D,E,F,G or Class I, Zone 0/1 Group IIC, [AEx ia] IIC or or Class I, Zone 0/1 Group IIC, [Ex ia] IIC
Simple Apparatus or Intrinsically safe apparatus with entity parameters: Vmax (Ui) ≥ Vt (Uo) Imax (Ii) ≥ It (Io) Pi ≥ Pt(Po) Ca(Co) ≥ Ccable + Ci La(Lo) ≥ Lcable + Li
9203 - Versão do produto 9203-003 33

9203QF01LERBAKKEN 10, 8410 RØNDE DENMARK
Revision date:
2015-01-22 Version Revision
V6R0 Prepared by:
PB Page: 3/3
Uo/Voc 28 V IIC or A,B 80 nF 4.2 mH 54 μH/Ω Uo/Voc 28 V IIC or A,B 80 nF 2.69 mH 44 μH/ΩIo/Isc 93 mA IIB or C,E,F 640 nF 16.8 mH 218 μH/Ω Io/Isc 115 mA IIB or C,E,F 640 nF 10.8 mH 176 μH/Ω
Po 0.65 W IIA or D,G 2.1 μF 32.6 mH 436 μH/Ω Po 0.81 W IIA or D,G 2.1 μF 20.8 mH 353 μH/Ω
Uo/Voc 28 V IIC or A,B 80 nF 3.5 mH 50 μH/Ω Uo/Voc 28 V IIC or A,BIo/Isc 100 mA IIB or C,E,F 640 nF 14.2 mH 201 μH/Ω Io/Isc 125 mA IIB or C,E,F 640 nF 9.1 mH 163 μH/Ω
Po 0.70 W IIA or D,G 2.1 μF 27.6 mH 402 μH/Ω Po 0.88 W IIA or D,G 2.1 μF 17.6 mH 327 μH/Ω
Uo/Voc 28 V IIC or A,B 80 nF 2.9 mH 46 μH/Ω Uo/Voc 28 V IIC or A,BIo/Isc 110 mA IIB or C,E,F 640 nF 11.8 mH 184 μH/Ω Io/Isc 135 mA IIB or C,E,F 640 nF 7.8 mH 150 μH/Ω
Po 0.77 W IIA or D,G 2.1 μF 22.8 mH 369 μH/Ω Po 0.95 W IIA or D,G 2.1 μF 15.1 mH 301 μH/Ω
Module 9203B2A Terminal 41-44
Co/Ca Lo/La Lo/Ro or La/Ra
Module 9203B1A & 9203B1B Terminal 41-44 / 51-54
Co/Ca Lo/La Lo/Ro or La/Ra
Module 9203B2A Terminal 41-43
Co/Ca Lo/La Lo/Ro or La/Ra
Module 9203B1A & 9203B1B Terminal 41-43 / 51-53
Co/Ca Lo/La Lo/Ro or La/Ra
Module 9203B2A Terminal 41-42
Co/Ca Lo/La Lo/Ro or La/Ra
Module 9203B1A & 9203B1B Terminal 41-42 / 51-52
Co/Ca Lo/La Lo/Ro or La/Ra
44434241
54535251
34333231
14131211
9203A
4501
Power Rail
91 92 93 94 95
9203Axxx Installation: Non Classified area or Zone 2 or Division 2
Terminal (31,32) Terminal (11,12 and 13,14) Supply: Input: Voltage 19.2 – 31.2 VDC Voltage max 28 VDC Power max. 3.5 W Trig: NPN Low < 2 V, High > 4 V Trig: PNP Low < 8 V, High > 10 V
Terminal (33,34) Status Relay: Non Hazardous location Zone 2 installation Voltage max. 125 VAC / 110 VDC 32 VAC / 32 VDC Power max. 62.5 VA / 32 W 16 VA / 32 W Current max. 0.5 AAC / 0.3 ADC 0.5 AAC / 1 ADC
34 9203 - Versão do produto 9203-003

9203QB01 LERBAKKEN 10, 8410 RØNDE DENMARK
Revision date:
2016-02-10 Version Revision
V7 R0 Prepared by:
PB Page:
1/3
INMETRO Desenhos para Instalação
Para instalação segura do 9203B o manual seguinte deve ser observado. O módulo deve ser instalado somente por profissionais qualificados que estão familiarizados com as leis nacionais e internacionais, diretrizes e normas que se aplicam a esta área. Ano de fabricação pode ser obtido a partir dos dois primeiros dígitos do número de série.
4501 Para a instalação na Zona 2 o seguinte deve ser observado. O módulo de programação de 4501, deve ser utilizado apenas com os módulos PRelectronics. É importante que o módulo esteja intacto e não tenha sido alterado ou modificado de qualquer maneira. Apenas os módulos 4501 livres de poeira e umidade devem ser instalados.
INMETRO Certificado ………… DEKRA 16.0006X Marcas 9203Bxxx
Normas: ABNT NBR IEC 60079-0:2013, ABNT NBR IEC60079-11:2013,
ABNT NBR IEC60079-15:2012
Tipo Instalação Saída Canais Entrada 9203
Barreira Ex / Zona 2 :B
Corrente baixa :1
Simples :A Duplo :B
Estandarte : -
PNP : 1
NPN : 2
Corrente alta :2
Simples :A
Notas de instalação: Instalação em grau de poluição 2, categoria de sobretensão II conforme definido no IEC 60664-1. Os circuitos não intrinsecamente seguros só pode ser connectado para sobretensão limitado ao categoria I/II como definido na IEC 60664-1 Não separe conectores quando energizado ou quando uma mistura de gás explosivo estiver presente. Não monte ou remova módulos do trilho de alimentação quando uma mistura de gás explosivo estiver presente. Para o grupo I (minas), aplicam-se os parâmetros do grupo IIA. Desligue a alimentação antes da manutenção. A fiação de terminais sem uso não é permitida. A fonte de Loop e terminais de entrada de corrente para o mesmo canal não deve ser aplicada ao mesmo tempo. Em tipo de proteção [Ex ia Da] os parâmetros para a segurança intrínseca para grupo de gás IIB são aplicáveis. Para a instalação em Zona 2, o módulo deve ser instalado em um invólucro conformidade com o tipo de proteção ‘Ex n’ ou ‘Ex e’, fornecendo no mínimo grau de proteçao IP54. Dispositivos de entrada de cabo e elementos de vedação devem cumprir com os mesmos requisitos. Para a instalação de trilho de energia na Zona 2, apenas o trilho de alimentação Rail 9400 fornecido pela Unidade de Controle de Potência 9410 é permitido.
[Ex ia Ga] IIC/IIB/IIA Ex nA nC IIC T4 Gc [Ex ia Da] IIIC [Ex ia Ma] I
Desenho de instalaçao INMETRO
9203 - Versão do produto 9203-003 35

9203QB01 LERBAKKEN 10, 8410 RØNDE DENMARK
Revision date:
2016-02-10 Version Revision
V7 R0 Prepared by:
PB Page:
2/3
Terminal (31,32) Terminais (11,12 e 13,14) Fonte: Entrada: Voltagem 19,2 – 31,2 VDC Voltagem máx. 28,VDC Potência máx. 3,5 W Gatilho: NPN Baixo < 2,V, Alto > 4,V Gatilho: PNP Baixo < 8,V, Alto > 10,V
Terminais (33,34) Relê de Estado: Área de não classificada Instalação Zona 2 Voltagem máx. 125 VAC / 110 VDC 32 VAC / 32 VDC Potência máx. 62,5 VA / 32 W 16 VA / 32 W Corrente máx. 0,5 AAC / 0,3 ADC 0,5 AAC / 1 ADC
Fonte / Entrada (terminais 11,12,13,14) (terminais 31,32,33,34) (terminais 91,92,93,94,95) Um: 253 V, máx. 400 Hz
-20 ≤ Ta ≤ 60ºC
44434241
54535251
34333231
14131211
9203
4501
91 92 93 94 95TRILHO DE ENERGIA
Área de classificada Zona 0, 1, 2, 20, 21 e 22
Área de não classificada ou Zona 2
36 9203 - Versão do produto 9203-003

9203QB01 LERBAKKEN 10, 8410 RØNDE DENMARK
Revision date:
2016-02-10 Version Revision
V7 R0 Prepared by:
PB Page:
3/3
9203B1A, 9203B1B Terminais 41-42/51-
52 Co Lo Lo/Ro
9203B2A Terminais 41-42 Co Lo Lo/Ro
Uo 28V IIC 80nF 4.2mH 54µH/Ω Uo 28V IIC 80nF 2.69mH 44µH/Ω
Io 93 mA IIB 640nF 16.8mH 218µH/Ω Io 115mA IIB 640nF 10.8mH 176µH/Ω
Po 0.65W IIA 2.1µF 32.6mH 436µH/Ω Po 0.81W IIA 2.1µF 20.8mH 353µH/Ω
9203B1A, 9203B1B Terminais 41-43/51-
53 Co Lo Lo/Ro
9203B2A Terminais 41-43 Co Lo Lo/Ro
Uo 28V IIC 80nF 3.5mH 50µH/Ω Uo 28V IIC
Io 100mA IIB 640nF 14.2mH 201µH/Ω Io 125mA IIB 640nF 9.1mH 163µH/Ω
Po 0.70W IIA 2.1µF 27.6mH 402µH/Ω Po 0.88W IIA 2.1µF 17.6mH 327µH/Ω
9203B1A,9203B1B Terminais 41-44/51-
54 Co Lo Lo/Ro
9203B2A Terminais 41-44 Co Lo Lo/Ro
Uo 28V IIC 80nF 2.9mH 46µH/Ω Uo 28V IIC
Io 110mA IIB 640nF 11.8mH 184µH/Ω Io 135mA IIB 640nF 7.8mH 150µH/Ω
Po 0.77W IIA 2.1µF 22.8mH 369µH/Ω Po 0.95W IIA 2.1µF 15.1mH 301µH/Ω
9203 - Versão do produto 9203-003 37

38 9203 - Versão do produto 9203-003
História do documentoA lista a seguir fornece notas sobre as revisões deste documento.
ID de rev. Data Notas106 1707 Especificações para máx. potência necessária dicionada Novo certificado e desenho de instalação INMETRO
Todos os clientes poderão declarar uma reclamação através do telefone 0XX19-3429-7890 ou email [email protected] ou pelo site: http://technosupply.com.br/suporte-tecnico

Version No. V5R0
SAFETY MANUAL
SOLENOID / ALARM DRIVER
9203
This safety manual is valid for the following product versions:
9203-001
9203-002
9203-003


Version No. V5R0 1
9203 Solenoid / Alarm Driver Safety Manual
1. Observed standards .......................................................................................................... 22. Acronyms and abbreviations ......................................................................................... 23. Purpose of the product .................................................................................................... 34. Assumptions and restrictions for use of the product ......................................... 3
4.1 Basic safety specifications ................................................................................. 34.2 Associated equipment .......................................................................................... 3
4.2.1 Safety output ............................................................................................ 34.2.2 Safety input ............................................................................................... 3
4.3 Failure rates .............................................................................................................. 34.4 Safe parameterisation ........................................................................................... 44.5 Installation in hazardous areas ......................................................................... 4
5. Functional specification of the safety functions .................................................. 46. Functional specification of the non-safety functions ........................................ 47. Safety parameters ............................................................................................................. 48. Hardware and software configuration....................................................................... 59. Failure category .................................................................................................................. 510. Periodic proof test procedure ....................................................................................... 511. Procedures to repair or replace the product ........................................................... 512. Maintenance ......................................................................................................................... 513. Documentation for routing diagram ........................................................................... 6
13.1 In general ................................................................................................................... 613.2 Further explanations ............................................................................................. 6
13.2.1 Password protection ............................................................................... 613.4 Advanced functions ............................................................................................... 6
13.4.1 Display setup ............................................................................................. 713.4.2 Password ..................................................................................................... 713.4.3 Language .................................................................................................... 713.4.4 Power rail .................................................................................................... 713.4.5 Safety integrity level ............................................................................. 7
14 Safe parameterisation - user responsibility ............................................................ 814.1 Safety-related configuration parameters ...................................................... 814.2 Verification procedure .......................................................................................... 8
14.2.1 If no password is set .............................................................................. 814.2.2 If password is set..................................................................................... 9
14.3 Functional test......................................................................................................... 915. Fault reaction and restart condition........................................................................... 916 User interface ...................................................................................................................... 10
16.1 Scrolling help texts in display line 3 ............................................................... 1016.3 Routing diagram - Advanced settings (ADV.SET) ...................................... 12
17 Connections diagram ........................................................................................................ 13
0. CONTENTS

2 Version No. V5R0
Safety Manual 9203 Solenoid / Alarm Driver
1. Observed standards
2. Acronyms and abbreviations
Acronym / Abbreviation Designation Description
Element
Term defined by IEC 61508 as “part of a subsystem comprising a single component or any group of components that performs one or more element safety functions”
PFD Probability of
Failure on Demand This is the likelihood of dangerous safety function failures occurring on demand.
PFHProbability of dan-gerous Failure per
Hour
The term “Probability” is misleading, as IEC 61508 defines a Rate.
SFF Safe Failure
Fraction
Safe Failure Fraction summarises the fraction of failures which lead to a safe state and the fraction of failures which will be detected by diagnostic measures and lead to a defined safety action.
SIFSafety Integrity
Function
Function that provides fault detection (to ensure the necessary safety integrity for the safety functions)
SIL Safety Integrity
Level
The international standard IEC 61508 specifies four discrete safety integrity levels (SIL 1 to SIL 4). Each level corresponds to a specific probability range regarding the failure of a safety function.
Standard Description
IEC 61508Functional Safety of electrical / electronic / programmable electronic safety-related systems
IEC 61508-2:2000
Part 2: Requirements for electrical / electronic / programmable electronic safety-related systems
IEC 61508-3:1998
Part 3: Software requirements
IEC 61326-3-1:2008
Immunity requirements for safety-related systems

Version No. V5R0 3
9203 Solenoid / Alarm Driver Safety Manual
3. Purpose of the product
The 9203Bxxx can be mounted in the safe area or in zone 2 / div. 2 and transmit signals to zone 0, 1, 2 and zone 20, 21, 22 including M1 mining / Class I/II/III, Div. 1, Gr. A-G. Ex driver for the control of ON / OFF solenoids, acustic alarms and LEDs mounted in the hazardous area.The 9203Axxx can be mounted in the safe area or zone 2 / div. 2 and transmit signals to non-hazardous area. Driver for the control of ON / OFF solenoids, acustic alarms and LEDs mounted in safe area.The 9203 is controlled by an NPN/PNP signal or a switch signal.Monitoring of internal error events via the individual status relay and/or a collective electronic signal via the power rail.The 9203 has been designed, developed and certified for use in SIL 2 applications according to the requirements of IEC 61508.
4. Assumptions and restrictions for use of the product
4.1 Basic safety specifications
Operational temperature range ......... -20...+60°C Storage temperature range................. -20...+85°C Power supply type, min. ....................... Double or reinforced Supply voltage ......................................... 19.2...31.2 VDC Mounting area .......................................... Zone 2 / Division 2 or safe area Mounting environment ......................... Pollution degree 2 or better
4.2 Associated equipment
4.2.1 Safety output
The safety output shall be connected to the equipment with a minimum load of 10 KΩ
4.2.2 Safety input
The safety input signal frequency shall not be higher than 20 Hz, and the pulse length shall not be shorter than 25 ms.
4.3 Failure rates
The basic failure rates from the Siemens standard SN 29500 are used as the failure rate database.Failure rates are constant, wear-out mechanisms are not included.External power supply failure rates are not included.

4 Version No. V5R0
Safety Manual 9203 Solenoid / Alarm Driver
4.4 Safe parameterisation
The user is responsible for verifying the correctness of the configuration parameters. (See section 14 Safe parameterisation - user responsibility). Manual override may not be used for safety applications.
4.5 Installation in hazardous areas
The IECex Installation drawing, ATEX Installation drawing, INMETRO Installation drawing and FM Installation drawing shall be followed if the products are installed in hazardous areas.
5. Functional specification of the safety functions
Driver for the control of ON / OFF solenoids, acou stic alarms and LEDs.
6. Functional specification of the non-safety functions
The status relay (terminal 33 and 34), error signal on power rail (terminal 91) and LED outputs are not suitable for use in any Safety Instrumented Function.
7. Safety parameters
Note1: The 9203 contains no lifetime limiting components, therefore the PFH figures are valid for up to 12 years, according to IEC 61508.
9203x1xx 9203x2xx
Probability of dangerous Failure per Hour (PFH)
4.30E-08 4.60E-08
Note1
Probability of failure on demand (PFD) - 1 year proof test interval 2.73E-04 2.92E-04
Proof test interval (10% of loop PFD) 5 years 4 years
Safe Failure Fraction 91% 91%
Demand response time <10 ms
Demand mode High
Demand rate 1000 s
Mean Time To Repair (MTTR) 24 hours
Diagnostic test interval 10 seconds
Hardware Fault Tolerance (HFT) 0
Component Type B
SIL capability SIL 2
Description of the “Safe State” De-energised

Version No. V5R0 5
9203 Solenoid / Alarm Driver Safety Manual
8. Hardware and software configuration
All configurations of software and hardware versions are fixed from factory, and cannot be changed by end-user or reseller.This manual only covers products labelled with the product version (or range of versions) specified on the front page.
9. Failure category
10. Periodic proof test procedure
This test will detect approximately 95% of possible “du” (dangerous undetected) failures in the device. The proof test is equivalent to the functional test.
11. Procedures to repair or replace the product
Any failures that are detected and that compromise functional safety should be reported to the sales department at PR electronics A/S.Repair of the device and replacement of circuit breakers must be done by PR electronics A/S only.
12. Maintenance
No maintenance required.
Step Action
1 Bypass the safety PLC or take other appropriate action to avoid a false trip
2 Connect a simulator identical to the input setup
3 Perform an ON / OFF signal for each channel
4 Observe whether the output channel acts as expected
5 Restore the input terminals to full operation
6Remove the bypass from the safety PLC or otherwise restore normal operation
Failure categoryFailure rates (1/h)
9203x1xx 9203x2xx
Fail Safe Detected 0.00E+00 0.00E+00
Fail Safe Undetected 4.77E-07 4.80E-07
Fail Dangerous Detected 0.00E+00 0.00E+00
Fail Dangerous Undetected 4.30E-08 4.60E-08

6 Version No. V5R0
Safety Manual 9203 Solenoid / Alarm Driver
13. Documentation for routing diagram
The routing diagram is shown in section 16.2.
13.1 In general
When configuring the 9203, you will be guided through all parameters and you can choose the settings which fit the application. For each menu there is a scrolling help text which is automatically shown in line 3 on the display.Configuration is carried out by use of the 3 function keys:
will increase the numerical value or choose the next parameterwill decrease the numerical value or choose the previous parameterwill accept the chosen value and proceed to the next menu
When configuration is completed, the display will return to the default state 1.0. Pressing and holding will return to the previous menu or return to the default state (1.0) without saving the changed values or parameters.If no key is activated for 1 minute, the display will return to the default state (1.0) without saving the changed values or parameters.
13.2 Further explanations
13.2.1 Password protection
Access to the configuration can be blocked by assigning a password. The password is saved in the device in order to ensure a high degree of protection against unauthorised modifications to the configuration. Default password 2008 allows access to all configuration menus.Password protection is mandatory in SIL applications.
13.4 Advanced functions
The unit gives access to a number of advanced functions which can be reached by answering “Yes” to the point “adv.set”.

Version No. V5R0 7
9203 Solenoid / Alarm Driver Safety Manual
13.4.1 Display setup
Here you can adjust the brightness contrast and the backlight. Setup of tag numbers with 5 alphanumerics. Selection of functional readout in line 2 and 3 of the display - choose between readout of digital output or tag no. When selecting ”ALT” the readout toggles between digital output and tag no.
13.4.2 Password
Here you can choose a password between 0000 and 9999 in order to protect the device against unauthorised modifications to the configuration. The device is delivered default without password.
13.4.3 Language
In the menu ”LANG” you can choose between 7 different language versions of help texts that will appear in the menu. You can choose between UK, DE, FR, IT, ES, SE and DK.
13.4.4 Power rail
In the menu ”RAIL” you can choose if errors in the device are transmitted to the central surveillance in the PR 9410 power control unit.
13.4.5 Safety integrity level
See Safe parameterisation - user responsibility
8 Version No. V5R0
Safety Manual 9203 Solenoid / Alarm Driver
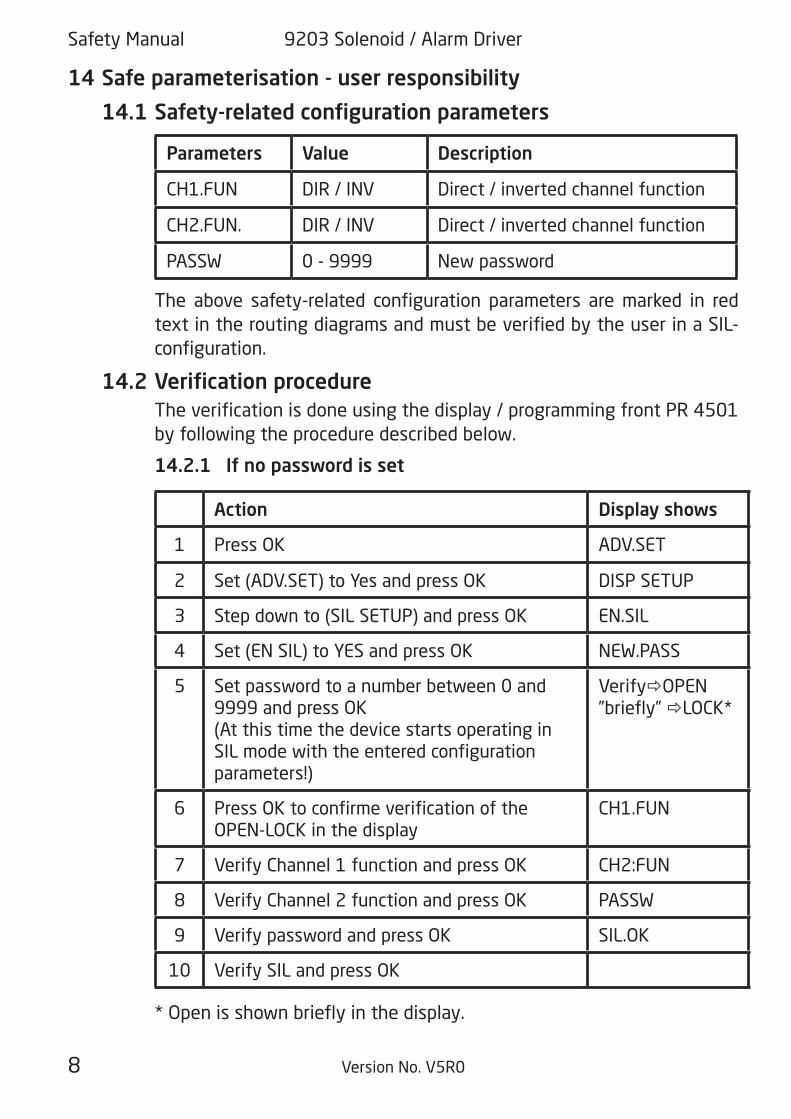
14 Safe parameterisation - user responsibility
14.1 Safety-related configuration parameters
Parameters Value Description
CH1.FUN DIR / INV Direct / inverted channel function
CH2.FUN. DIR / INV Direct / inverted channel function
PASSW 0 - 9999 New password The above safety-related configuration parameters are marked in red text in the routing diagrams and must be verified by the user in a SIL-configuration.
14.2 Verification procedure
The verification is done using the display / programming front PR 4501 by following the procedure described below.
14.2.1 If no password is set
Action Display shows
1 Press OK ADV.SET
2 Set (ADV.SET) to Yes and press OK DISP SETUP
3 Step down to (SIL SETUP) and press OK EN.SIL
4 Set (EN SIL) to YES and press OK NEW.PASS
5 Set password to a number between 0 and 9999 and press OK(At this time the device starts operating in SIL mode with the entered configuration parameters!)
Verify OPEN ”briefly” LOCK*
6 Press OK to confirme verification of the OPEN-LOCK in the display
CH1.FUN
7 Verify Channel 1 function and press OK CH2:FUN
8 Verify Channel 2 function and press OK PASSW
9 Verify password and press OK SIL.OK
10 Verify SIL and press OK * Open is shown briefly in the display.

Version No. V5R0 9
9203 Solenoid / Alarm Driver Safety Manual
14.2.2 If password is set
Action Display shows
1 Press OK PASSW
2 Enter password and press OK ADV.SET
3 Set (ADV.SET) to Yes and press OK DISP SETUP
4 Step down to (SIL SETUP) and press OK EN.SIL
5 Set (EN SIL) to YES and press OK(At this time the device starts operating in SIL mode with the entered configuration parameters!)
Verify OPEN ”briefly” LOCK*
6 Press OK to confirme verification of the OPEN-LOCK in the display
CH1.FUN
7 Verify Channel 1 function and press OK CH2:FUN
8 Verify Channel 2 function and press OK PASSW
9 Verify password and press OK SIL.OK
10 Verify SIL and press OK
* Open is shown briefly in the display
14.3 Functional test
The user is responsible for making a functional test after verification of safety parameters. The procedure for periodic proof test described in section 10 shall be used.
15. Fault reaction and restart condition
When the 9203 detects a fault the output will go to Safe State, in which the safety output will go to ”de-energised”.For device faults there are 2 ways of bringing the device out of Safe State.1. Power cycle the device.2. Bring the device out of SIL mode (choose “NO” in the menu point ”EN.SIL”), and set it back to SIL mode again (choose “YES” in the menu point “EN.SIL” and verify the configuration).

10 Version No. V5R0
Safety Manual 9203 Solenoid / Alarm Driver
16 User interface
16.1 Scrolling help texts in display line 3[[01] [02] [06] [07] [09] [10] [11] [12] [13] [14] [15] [16] [17] [20] [21] [22]
Set correct passwordEnter advanced setup? Enter language setup Enter password setup Enter display setup Enter SIL setup Select direct channel function Select inverted channel function Adjust LCD contrastAdjust LCD backlight Write a 5-character channel tag Show output state in display Show output load in display Show tag in display Alternate information shown in display Configuration SIL status (Open / Locked) Enable SIL configuration lock Enable password protection? Set new password Select language No communication - check connections EEprom error - check configuration Hardware error

Power up
1.11.0
Directly to [ ] if SIL-lock is enabled
Version No. V5R0 11
9203 Solenoid / Alarm Driver Safety Manual
Continued on the page Routing diagram ADV.SET
To default state 1.0
ROUTING DIAGRAM
If no key is activated for 1 minute, the display will return to the default state 1.0 without saving configuration changes.
Increase value / choose next parameter Decrease value / choose previous parameter Accept the chosen value and proceed to the next menu
Hold Back to previous menu / return to menu 1.0 without saving
1.0 = Default state Linie 1 shows status for channel 1 and channel 2. Linie 2 shows output status for channel 1, output current or tag no. Linie 3 shows output status for channel 2, output current or tag no.
Line 4 indicates whether the module is SIL-locked. 1.1 = Only if password-protected.1.2 If password has been set.Line 1 symbols: = OK. Flashing = error. Line 2 and 3 symbols: channel 1 ON channel 2 OFF. Line 4 symbols: Static dot = SIL-locked. Flashing dot = Not SIL-locked. = output is active.

To default state 1.0
Verify SIL configuration
1.2
12 Version No. V5R0
Safety Manual 9203 Solenoid / Alarm Driver
16.3 Routing diagram - Advanced settings (ADV.SET)

Version No. V5R0 13
9203 Solenoid / Alarm Driver Safety Manual
17 Connections diagram
31 32 33 34
+24 V
91 92 93 94 95
+24 V
11 12 13 14
- +(6 V)*
- +(6 V)*
V-D external
V+R
V+
V- (6 V)*
11 12 13 14
V+
V- (6 V)*
11 12 13 14
V+
V- (6 V)*
11 12 13 14
V- (6 V)*
V+
11 12 13 14 11 12 13 14 11 12 13 14
D externalV-
V+R
11 12 13 14
Supply and status relay
N.C.Gnd.NCNCGnd.
Error
Power rail connections
PNP input
INPUTS - 9203xxx:
Ch
an
ne
l 1
Ch
an
ne
l 2
Switch PNPNPN
NC = No connection
NPN inputSwitch PNPNPN
* 6 V at open state
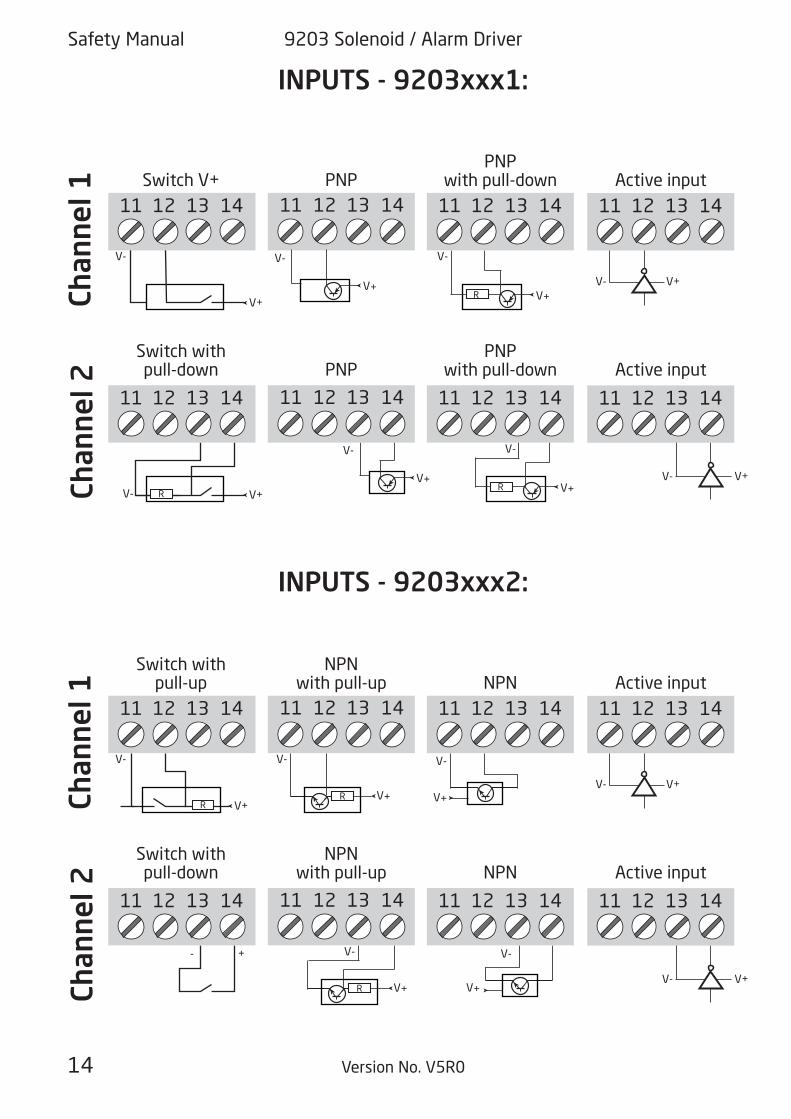
14 Version No. V5R0
Safety Manual 9203 Solenoid / Alarm Driver
11 12 13 14 11 12 13 14
V-
V+V-
V-
V+R
V+V-
11 12 13 14
V-
V+R
11 12 13 14 11 12 13 14
V- V+R
11 12 13 14 11 12 13 14 11 12 13 14
V-
V+
V+V-
V+V-
V-
V+R
V-
V+R
11 12 13 14 11 12 13 14
R
V+
11 12 13 14
V+
V-
11 12 13 14
V+
V-
11 12 13 14
- +
11 12 13 14
V-
V+
11 12 13 14
V-
V+
11 12 13 14
Active input
INPUTS - 9203xxx1:C
ha
nn
el
1C
ha
nn
el
2
Switch V+PNP
with pull-down
PNP
Active input
Switch with pull-down
PNP with pull-down
PNP
INPUTS - 9203xxx2:
Active input
Ch
an
ne
l 1
Ch
an
ne
l 2
Switch with pull-up
NPN
NPN with pull-up
Active input
Switch with pull-down
NPN
NPN with pull-up

Version No. V5R0 15
9203 Solenoid / Alarm Driver Safety Manual
41 42 43 4441 42 43 44 41 42 43 44
51 52 53 54 51 52 53 54 51 52 53 54
Outputs - 9203xxxx:
Ch
an
ne
l 1
Ch
an
ne
l 2
Acoustic alarm LED
Solenoid, ON / OFF Acoustic alarm LED
Solenoid, ON / OFF

Safety Manual
We are near you,all over the world
All our devices are backed by expert service and a 5-year warranty. With each product you purchase, you receive personal technical support and guidance, day-to-day delivery, repair without charge within the warranty period and easily accessible documentation.
We are headquartered in Denmark, and have offices and authorized partners the world over. We are a local
business with a global reach. This means that we are always nearby and know your local markets well. We are committed to your satisfaction and provide PERFORMANCE MADE SMARTER all around the world.
For more information on our warranty program, or to meet with a sales representative in your region, visit prelectronics.com.
Our trusted red boxes are supported wherever you are

A PR electronics é a empresa líder em tecnologia especializada em tornar os controles de processos industriais mais seguros, mais confiáveis e mais eficientes. Desde 1974 temos nos dedicado a aperfeiçoar nossa principal competência de inovar tecnologia de alta precisão com baixo consumo de energia. Esta dedicação continua a estabelecer novos padrões para os produtos que se comunicam, monitoram e ligam os pontos de medição do processo de nossos clientes para os seus sistemas de controle de processo.
Nossas tecnologias inovadoras e patenteadas são derivadas de nossas extensivas instalações de P & D e nosso profundo conhecimento das necessidades e processos de nossos clientes. Somos guiados por princípios de simplicidade, foco, coragem e excelência, permitindo que algumas das maiores empresas do mundo possam alcançar seus resultados. PERFORMANCE MADE SMARTER.
Beneficie-se hoje do conceitoPERFORMANCE MADE SMARTER
www.prelectronics.com


