
ER Bickford Presents
Stonewall Replay
Dec 11, 2012
Stonewall
This is a game from S&T 67 on the Battle of Kernstown, which took place on March 23, 1862. It was a prelude
to the 7 Days, pitting General Jackson's Army against General Shield's Division.
Turn One
2:00 pm
The Confederate player has three brigades and a cavalry formation at his disposal. Only Ashby's cavalry begin
on the map. The rest arrive on turn one as reinforcements.
Brigadier General Garnett is leading the Army's 1st Brigade (the Stonewall Brigade) and Colonel Burks is
leading the 2nd Brigade with Colonel Fulkerson in command of the 3rd Brigade. General Jackson is also on
the scene.
Jackson leads his forces in an attempt to turn the Union flank from the west. The Stonewall Brigade and the
3rd Brigade both march in column toward the Opequon Church. They hope to cross the Hogg Run and head to
Sandy Ridge.
Burks' 2nd Brigade remains at Kernstown to threaten the Union frontally, while Ashby's cavalry remain on the

Confederate right.
General Shields is in command of the Union 1st Division, but he is wounded and not in the scene. Colonel
Kimball is assuming command in the field. Kimball also leads the 1st Brigade which has planted itself on
Pritchard's Hill, which is one of the potential Rebel objectives. It is alos the high ground on this battlefield.
Colonel Sullivan's 2nd Brigade is on the banks of the Hogg Run, just east of Kernstown with the far flank
covered by the Union cavalry, which is lead by Colonel Brodhead. At the toll gate, sits Colonel Tyler's 3rd
Brigade, which is in reserve. It will cost the Union 15 morale points to take it out of reserve and 5 more points
to move it. So it sits.
The Union must spend 5 Morale points for each formation that it wants to move each turn. Each turn that
passes provides the Union with 10 additional morale points though. This time the Union player does nothing
but collect the Morale Points.
Turn Two
2:20 pm
The 2nd Brigade continues to defend at Kernstown, while General Jackson leads both the 1st and 3rd Brigades
across the Hogg Run to the west. Some of the troops manage to get to the Middle Road intersection.
Meanwhile, Colonel Fulkerson orders his artillery to fire at the Union artillery on Pritchard's Hill. As a result,
two batteries become pinned.
The Union player recognizes that Jackson is committed to a westerly turning movement. Consequently, he
decides toe release Tyler's 3rd Brigade from Reserve at the cost of 15 Morale Points. Then another 5 Morale
points are spent to march with the 3rd Brigade. Colonel Tyler splits his formation and marches in column
along the Cedar Creek Road and the Middle Road.

Turn Three
2:40 pm
General Jackson continues to march with the 1st and 3rd Brigades.These head toward Sandy Ridge, crossing
the Middle Road. Meanwhile the the Union decides to spend Morale Points to activate Tyler's 3rd Brigade
again. Colonel Tyler takes the opportunity to seize the high ground south of the Cedar Creek Road.

Turn Four
3:00 pm
Stonewall Jackson gets his artillery into the crests at Sandy Ridge. The Stonewall Brigade moves in behind and
is followed by Colonel Fulkerson's 3rd Brigade, which is in column.

Meanwhile, the Union player activates Tyler and the 3rd Brigade again, expending 5 Morale points. Tyler's
artillery unlimbers and the infantry positions on the slopes.

Turn Five through Eight
3:20 pm
General Jackson also take up the high ground north of Sandy Ridge. Then the 3rd Brigade moves onto Sandy
Ridge. The Union player's defensive artillery fire has not effect. As the battle is forming, the Union player
waits and collects Morale Points.
3:40 pm
General Jackson gives orders for the Stonewall Brigade to march on Tyler's posiition. Unfortunately, the
turning movement on Pritchard's Hill is turning into a frontal attack to the northwest. The two sides remain out
of contact though. The Uniuon player again bides his time and collects Morale Points.
4:00 pm
As Jackson's pushes his men to battle, Garnett's Brigade encounters defensive fire from the 3rd Brigade's small
arms. The 27th Virginia Regiment fires and pins a union formation. The Union player responds only with more
fire. He decides not to activate any units.
Both sides have forces staring across the Hogg Run, but neither is moving. Sullivan's 2nd Brigade waits it out
and Burks 2nd Brigade too, sits quietly.
4:20 pm
The Stonewall Brigade marches into closer contact with Tyler's Brigade. The Union 3rd Brigade's defensive
fire pins two of Garnett's regiments and take out about 300 men in casualties. The Stonewall Briagde's fire has
no effect.
Then the Conferate defenive fire pins one of Tyler's units, but there is little further effect. The Rebel player's
dice haven't been too kind to him.
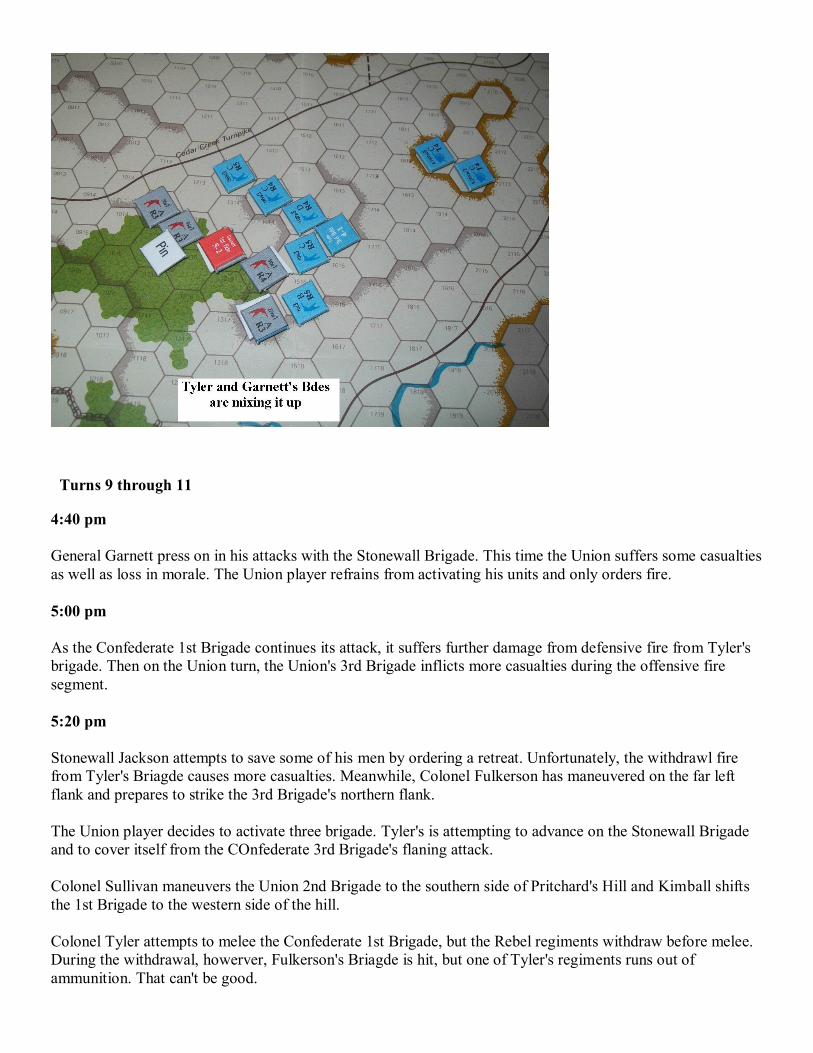
Turns 9 through 11
4:40 pm
General Garnett press on in his attacks with the Stonewall Brigade. This time the Union suffers some casualties
as well as loss in morale. The Union player refrains from activating his units and only orders fire.
5:00 pm
As the Confederate 1st Brigade continues its attack, it suffers further damage from defensive fire from Tyler's
brigade. Then on the Union turn, the Union's 3rd Brigade inflicts more casualties during the offensive fire
segment.
5:20 pm
Stonewall Jackson attempts to save some of his men by ordering a retreat. Unfortunately, the withdrawl fire
from Tyler's Briagde causes more casualties. Meanwhile, Colonel Fulkerson has maneuvered on the far left
flank and prepares to strike the 3rd Brigade's northern flank.
The Union player decides to activate three brigade. Tyler's is attempting to advance on the Stonewall Brigade
and to cover itself from the COnfederate 3rd Brigade's flaning attack.
Colonel Sullivan maneuvers the Union 2nd Brigade to the southern side of Pritchard's Hill and Kimball shifts
the 1st Brigade to the western side of the hill.
Colonel Tyler attempts to melee the Confederate 1st Brigade, but the Rebel regiments withdraw before melee.
During the withdrawal, howerver, Fulkerson's Briagde is hit, but one of Tyler's regiments runs out of
ammunition. That can't be good.

Turn 12
5:40 pm
Colonel Fulkerson orders his brigade to fire on Tyler's formation. The 7th Ohio Regiment is hit and
subsequently routs. This also costs the Union player in Morale points. The Union player activates both the 2nd
and 3rd Brigades for the expense of a total of 10 Morale Points. Sullibvan continues to march into position on
the Union left and Tyler tries to subdue the Stonewall Brigade. Colonel Fulkerson is wounded.

6:00 pm
Colonel Fukerson orders his men to fall back while there is still time. His regiment manages to survive the
withdrawal fire. General Burks maneuvers the 2nd Brigade up along the Middle Road. This has forces the
Union to activate both the 1st and 2nd Brigades.Then Ashby's cavalry slips through to Sandy Ridge. During
combat, the 48th Virginia Regiment engages in a fire fight with the 110th Pa Regiment. The Union formation
suffers losses and then routs.
Sullivan's Brigade continues to re-deploy. Then on Pritchard's Hill, Colonel Kimball orders the 1st Brigade
artillery to fire on Burks Brigade along the Middle Road. The 42nd Virgina Regiment is hit and suffers
casualties. Eventually it routs.

End
6:30 pm
As darkness descends on the battle field, General Jackson's force try to slip away to the north. The Union
commander, Colonel Kimball, allows them to escape. Not many will get away soon enough to count as Rebel
VP though. The game ends with the Union player 139 VP and the Rebels 54 VP. This provides the Union a
Decisive Victory and likely, the Peninsula Campaign, will go a little better than historically for General
McClellan.


