
Issue Date: 6/23/2011 Document ID: TN-TS-07A © 2011 Interplastic Corporation
Tech Notes
INTERPLASTIC CORPORATION
Thermoset Resins Divison
ISSUE 7
7
PATCHING A FLAKE
EFFECT CLEAR GEL COAT
Recommended Procedure

Issue Date: 6/23/2011 Document ID: TN-TS-03B Page 1
Patching a Flake Effect Clear Gel Coat
Background:
Gel coat repairs are commonly needed due to damage from de-molding or mishandling
of parts, damage during assembly, pre-release, porosity, contamination, laminate air
voids, mold defects, and in-field use.
Flake effect gel coats can be difficult to patch and require more expertise and time than
solid color gel coats. These types of repairs are typically more visible unless the entire
area can be re-sprayed. This procedure was developed when a total re-spray is not
possible or practical.
Flake effect gel coated parts are prepared via a three step coating process: (1) Clear gel
coat layer (upper), (2) Clear plus flake layer (middle), (3) Base gel coat color layer
(lower).
The increased difficulty in repairing a flake effect gel coat arises if the surface damage
extends into the clear/flake layer, the base color layer, or the laminate structure. The
sanding and buffing process discolors and abrades the flakes, resulting in a highly
visible contrast in the patched area. This patching guideline describes a process to
repair the flake effect gel coat without abrading and discoloring the flake. The resulting
repair, while tedious to perform, is visually superior to standard patching procedures.
If a repair is needed in the upper clear layer only, the patching procedure described in
Tech Note 3 – Patching a Gel Coat, usually can be followed. If a repair is needed in
the flake layer or deeper, carefully following the procedure described below, will
generally yield acceptable results.
Whenever possible, the same batches of gel coat that were used to make the part should
be used to make the patch to ensure the closest possible color match.
Refer to Interplastic Corporation Tech Note 3 – Patching a Gel Coat for detailed
information on surface preparation, patch aid usage, repair spray-up, and final sanding
and buffing.
This procedure does not describe repairs to the laminate itself, which must be done
before repairing the gel coat layers.

Issue Date: 6/23/2011 Document ID: TN-TS-03B Page 2
A typical flake effect
clear gel coat composite
is made by spraying
onto a mold a clear
layer, a clear plus flake
layer, and a base color
layer.
Laminate
Base Color
Clear & Flake
Clear
Fig. 1 –Cross Sectional View of a Typical Flake Effect Clear Gel Coated Laminate
Repairs to the upper clear layer can be made following the procedure
outlined in Tech Note 3 – Patching a Gel Coat
Fig. 2a - Flake Effect Panel with Gel Coat Defect Needing Repair
Issue Date: 6/23/2011 Document ID: TN-TS-03B Page 3
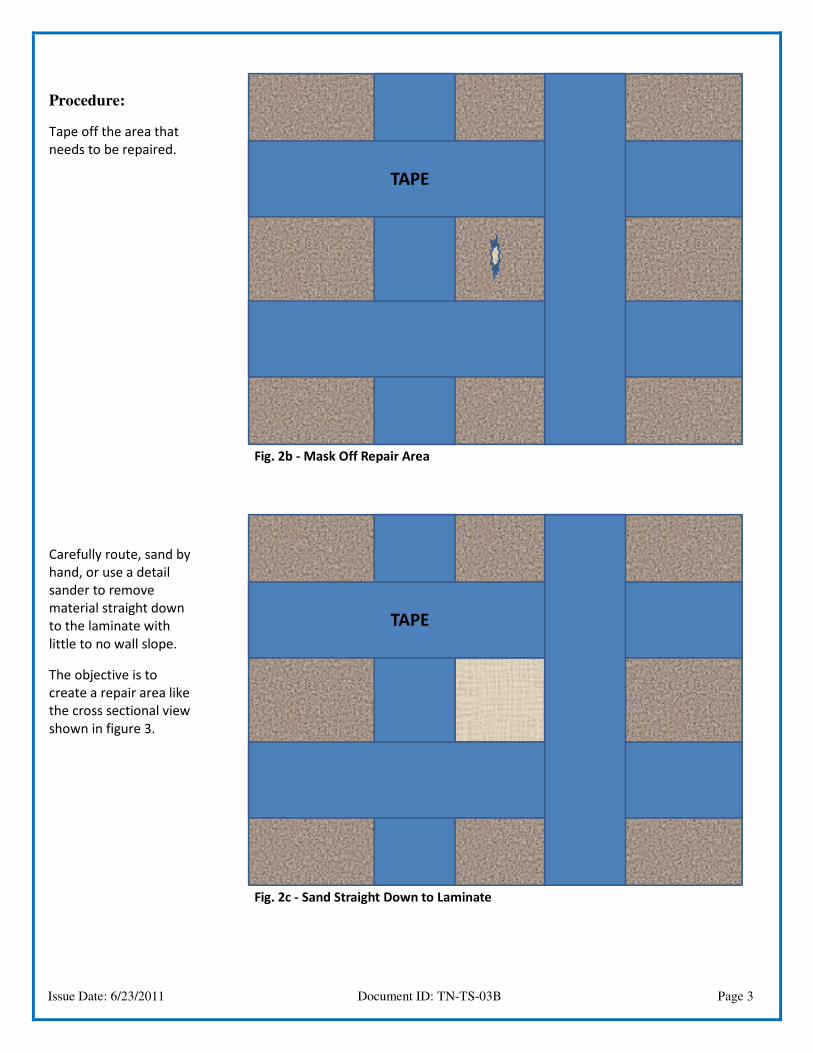
Procedure:
Tape off the area that
needs to be repaired.
Carefully route, sand by
hand, or use a detail
sander to remove
material straight down
to the laminate with
little to no wall slope.
The objective is to
create a repair area like
the cross sectional view
shown in figure 3.
Fig. 2b - Mask Off Repair Area
TAPE
Fig. 2c - Sand Straight Down to Laminate
TAPE

Issue Date: 6/23/2011 Document ID: TN-TS-03B Page 4
Fig. 2d - Remove Tape
Laminate
Base Color
Clear & Flake
Clear
Fig. 3 – Cross Sectional View of Sanded Area

Issue Date: 6/23/2011 Document ID: TN-TS-03B Page 5
Tape off an area 1/8” to
1/4” back from the 1st
sanded area to prevent
the base color gel coat
from bleeding past the
clear plus flake layer
when still wet.
Carefully route, sand by
hand, or use a detail
sander to remove
material straight down
with little to no wall
slope until all the flake is
removed along the
edge, leaving the base
color layer still intact.
The objective is to
create a repair area like
the cross sectional view
shown in figure 5.
Fig. 4a - Mask Off 1/8” to 1/4” Inch Past 1st Sanded Area
TAPE
Fig. 4b -Remove Flake Layer on Edge Down to Base Color Layer
TAPE

Issue Date: 6/23/2011 Document ID: TN-TS-03B Page 6
.
Fig. 4c - Remove Tape
Laminate
Base Color
Clear & Flake
Clear
Fig. 5 – Cross Sectional View of Sanded Area

Issue Date: 6/23/2011 Document ID: TN-TS-03B Page 7
Using 400 grit
sandpaper, sand the
area surrounding the
repair. This will give the
surface a tooth that is
critical for patch
adhesion. Remove all
sanding dust and
solvent wipe the area to
be repaired.
Carefully mask off only
the area that was
sanded down to the
laminate to prepare for
application of the base
color.
Fig. 6a - Sand Surrounding Area with 400 Grit Paper for Patch Adhesion & Remove Dust
Fig. 6b - Mask off Area that was Sanded Down to the Laminate for Base Color Spray
TAPE

Issue Date: 6/23/2011 Document ID: TN-TS-03B Page 8
Apply the base color to
the same thickness of
the original layer by
spraying or brushing. Do
not use a thinning
additive that contains
wax. The wax will impair
the adhesion of the next
layer.
Carefully remove the
tape without smearing
the tapeline.
The objective is to
create a repair area like
the cross sectional view
shown in figure 7.
Fig. 6c - Spray Base Color to Match Thickness of Original Layer
TAPE
Fig. 6d - Remove Tape

Issue Date: 6/23/2011 Document ID: TN-TS-03B Page 9
Carefully mask off the
area that was sanded
down to the base color
to prepare for
application of the clear
plus flake layer.
Fig. 7 – Cross Sectional View of Sprayed Area
Laminate
Base Color
Clear & Flake
Clear
Newly Sprayed Base Color
Fig. 8a - Mask off Area that was Sanded Down to the Base Color For Clear & Flake Spray
TAPE
Issue Date: 6/23/2011 Document ID: TN-TS-03B Page 10
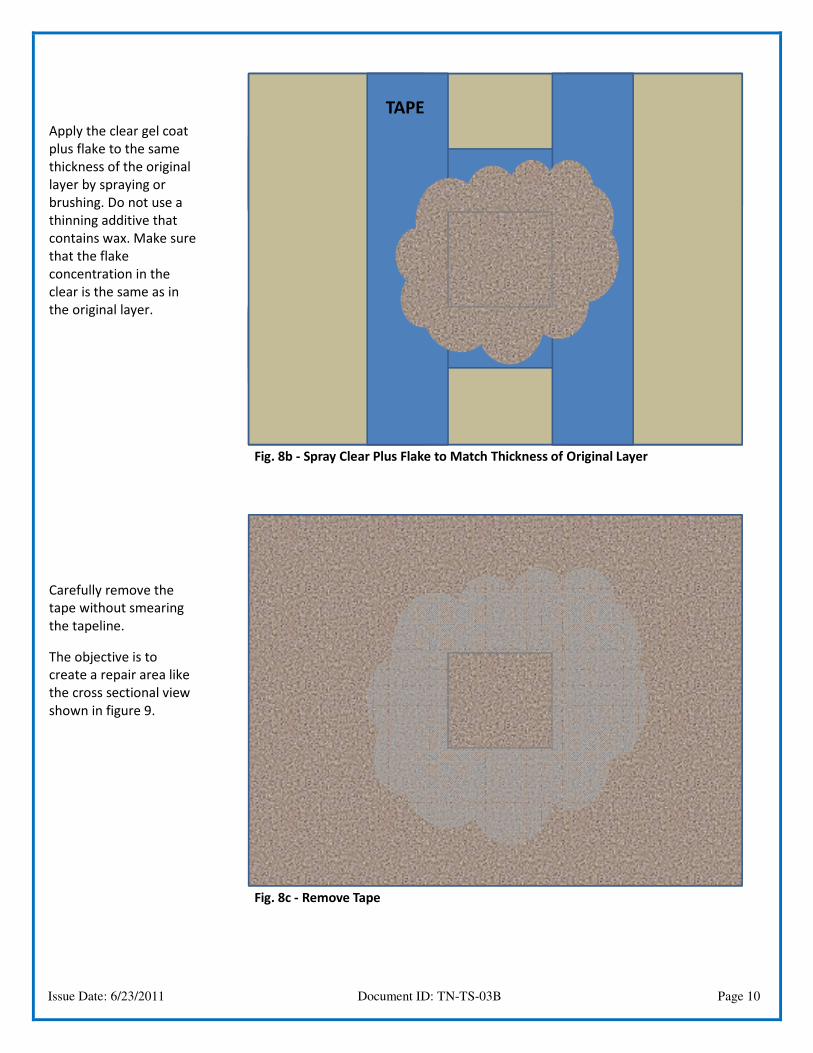
Apply the clear gel coat
plus flake to the same
thickness of the original
layer by spraying or
brushing. Do not use a
thinning additive that
contains wax. Make sure
that the flake
concentration in the
clear is the same as in
the original layer.
Carefully remove the
tape without smearing
the tapeline.
The objective is to
create a repair area like
the cross sectional view
shown in figure 9.
Fig. 8b - Spray Clear Plus Flake to Match Thickness of Original Layer
TAPE
Fig. 8c - Remove Tape

Issue Date: 6/23/2011 Document ID: TN-TS-03B Page 11
Fig. 9 – Cross Sectional View of Sprayed Area
Laminate
Base Color
Clear & Flake
Clear
Newly Sprayed Base Color
Newly Sprayed Clear Plus Flake
Fig. 10a - Mask off Area Sanded For Clear Plus Patch Aid Spray
TAPE

Issue Date: 6/23/2011 Document ID: TN-TS-03B Page 12
Apply the clear gel coat
plus patch aid by
spraying. Use of
Interplastic
Corporation’s C-100-
VUU patch aid at 10 to
30% will allow the use of
a touch-up gun to spray
and will improve the
cure, the gloss
restoration, and the
color match in the final
patch.
Remove the tape and
allow the patch to
cure a minimum of
two hours at 70F or
higher before working
the patch.
The objective is to
create a repair area like
the cross sectional view
shown in figure 11.
Fig. 10b - Spray Clear Plus Patch Aid
TAPE
Fig. 10c - Remove Tape and Allow Patch to Cure at Least 2 Hours
Issue Date: 6/23/2011 Document ID: TN-TS-03B Page 13
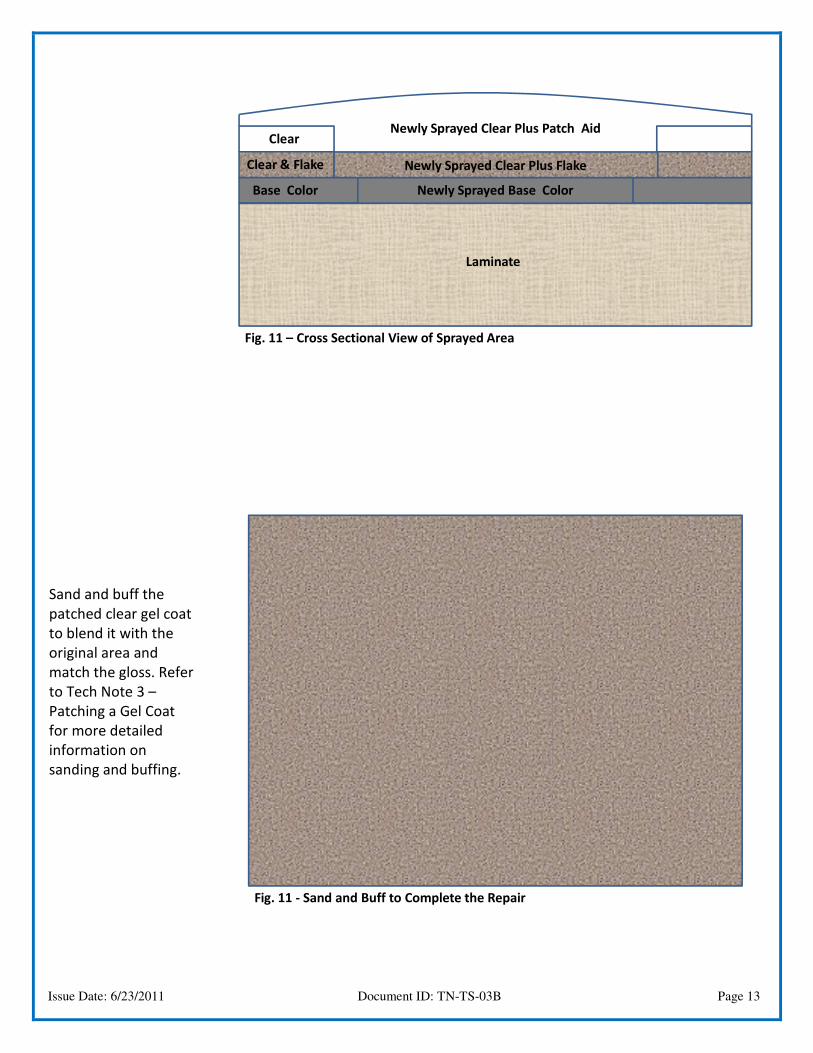
Sand and buff the
patched clear gel coat
to blend it with the
original area and
match the gloss. Refer
to Tech Note 3 –
Patching a Gel Coat
for more detailed
information on
sanding and buffing.
Fig. 11 – Cross Sectional View of Sprayed Area
Laminate
Base Color
Clear & Flake
Clear
Newly Sprayed Base Color
Newly Sprayed Clear Plus Flake
Newly Sprayed Clear Plus Patch Aid
Fig. 11 - Sand and Buff to Complete the Repair


