
11gR2 RAC installation
Two Node Oracle Real Application
Clusters, 11g Release 2 Installation
With Openfiler Ver 2.99 as
Shared Storage
-Sachin Thapa

11gR2 RAC installation
Architecture: 2 Node RAC
Specifications of Machines used in the installation:
Both the nodes must have two NIC cards
Node1 :
8 GB DDR3 RAM
90 GB HDD
1 CPU i7 Processor
Node2:
8 GB DDR3 RAM
90 GB HDD
1 CPU i7 Processor
Shared Storage(Openfiler):
4 GB DDR3 RAM
50 GB HDD
1 CPU i7 Processor
Software’s Used
OEL 5.11 x86-64
11gR2 Grid and Database software
OpenFiler 2.99.1-x86_64
Topics Covered in the Document:
1)Linux installation.
2)Pre-Installation Checks.
3)Manual Password less SSH Connectivity.
4)Shared Storage Configuration using OpenFiler.
5) Grid Software Installation.
6)Database creation.

11gR2 RAC installation
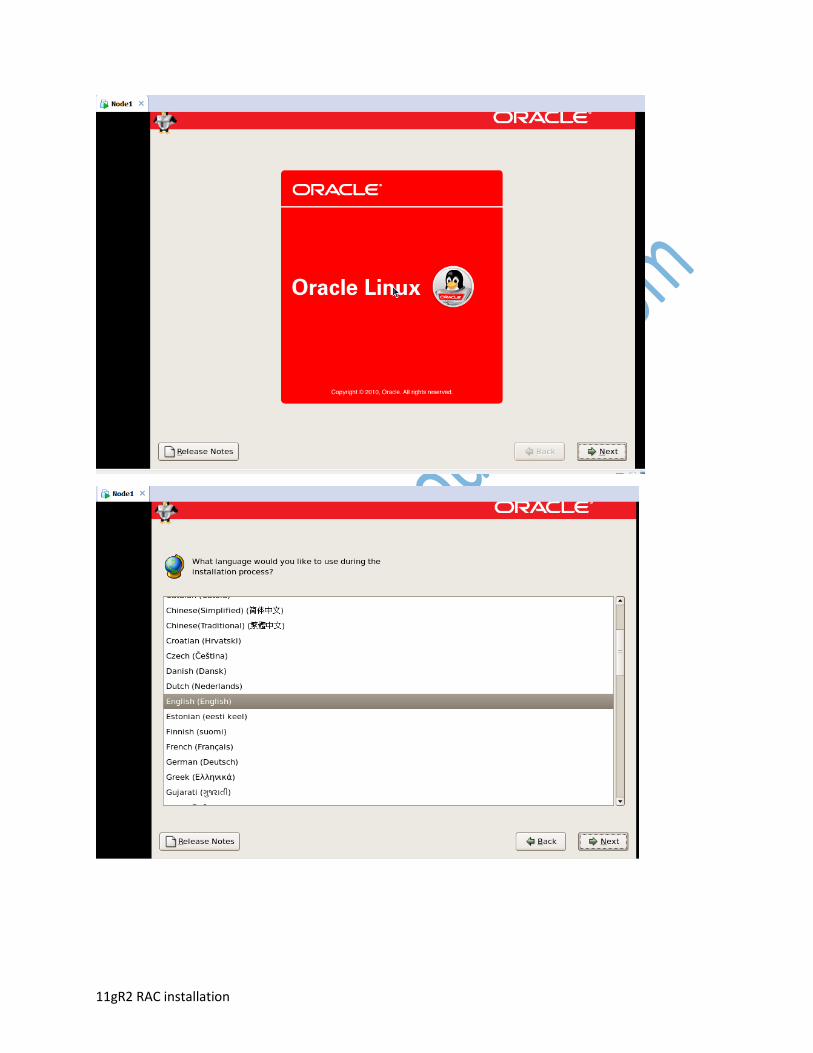
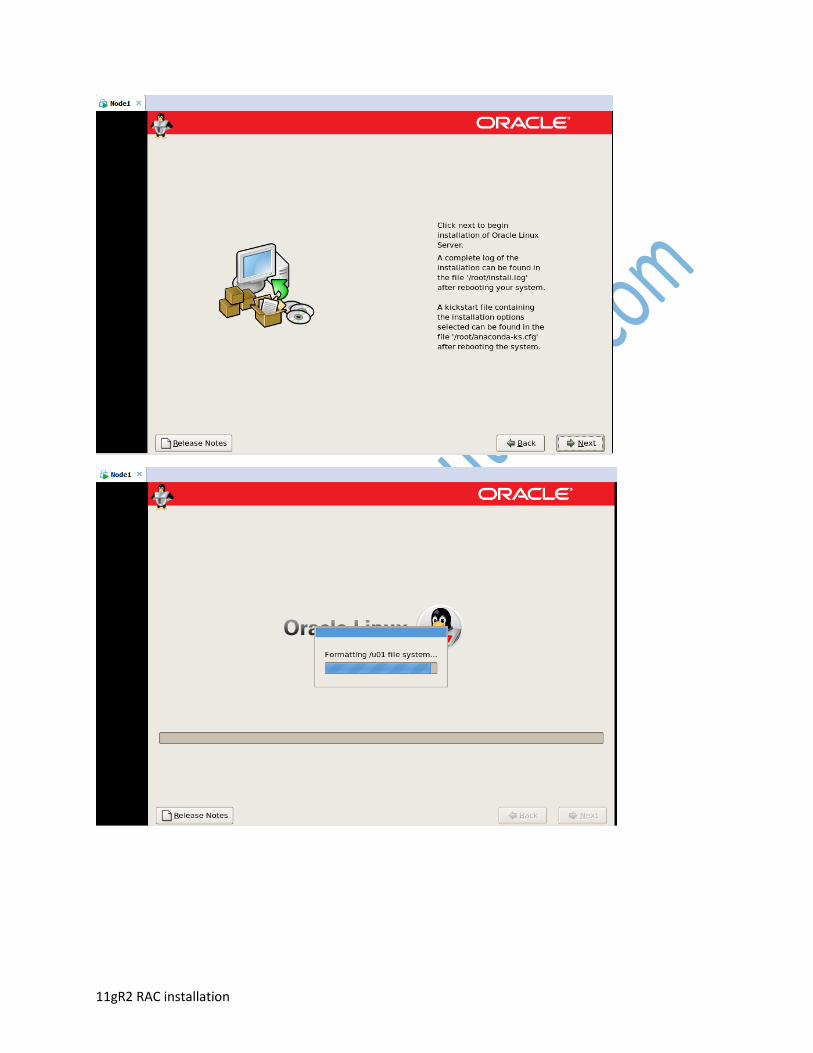
Starting the Linux installation on Node 1
11gR2 RAC installation
11gR2 RAC installation
11gR2 RAC installation
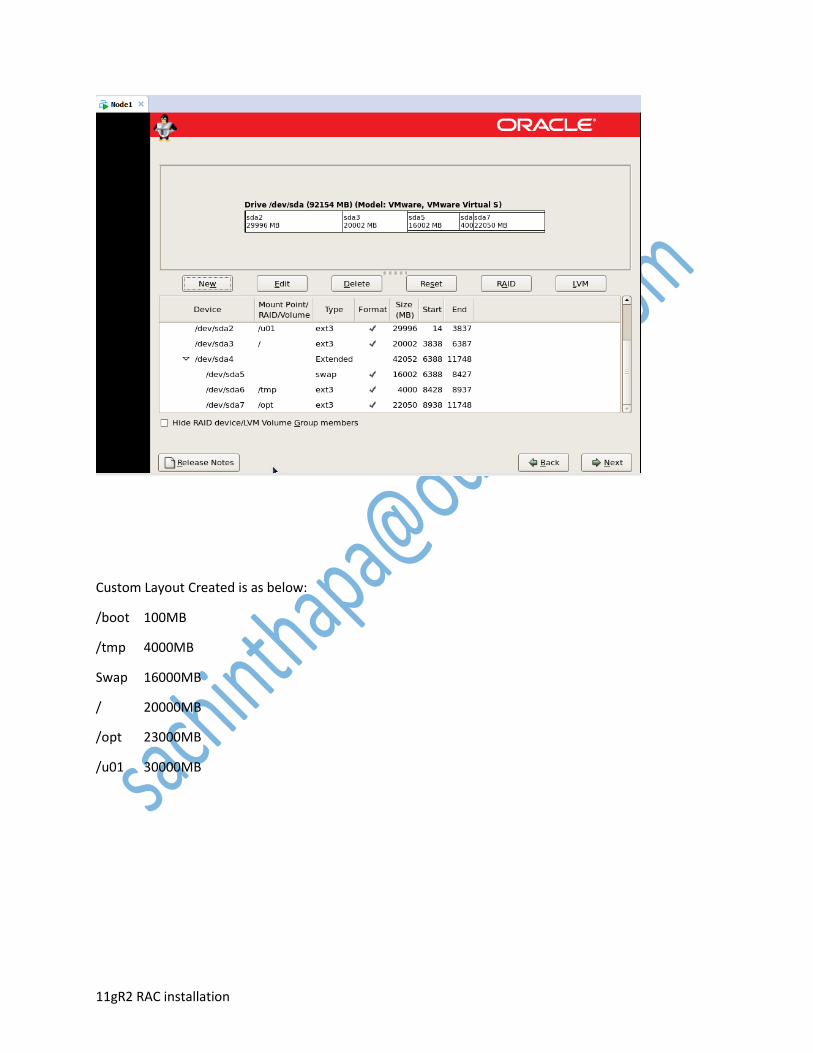
Custom Layout Created is as below:
/boot 100MB
/tmp 4000MB
Swap 16000MB
/ 20000MB
/opt 23000MB
/u01 30000MB
11gR2 RAC installation
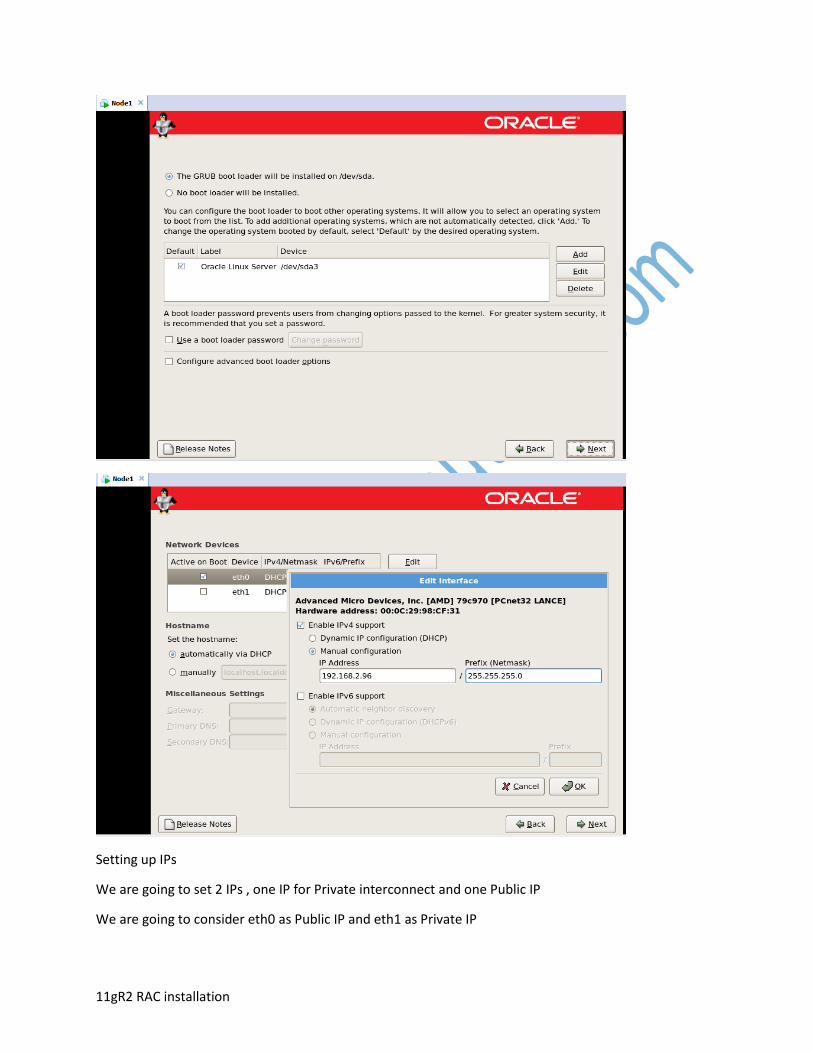
Setting up IPs
We are going to set 2 IPs , one IP for Private interconnect and one Public IP
We are going to consider eth0 as Public IP and eth1 as Private IP

11gR2 RAC installation
Setting up Hostname for Node1 as node1.rac.com

11gR2 RAC installation
Setting Root Password For Node1

11gR2 RAC installation
Choosing the Pre-Requisite Packages for Installation
Select
Software Development and Web Server
Click Customize Now
Development Legacy Software Development
Base System System Tools
11gR2 RAC installation
11gR2 RAC installation
11gR2 RAC installation
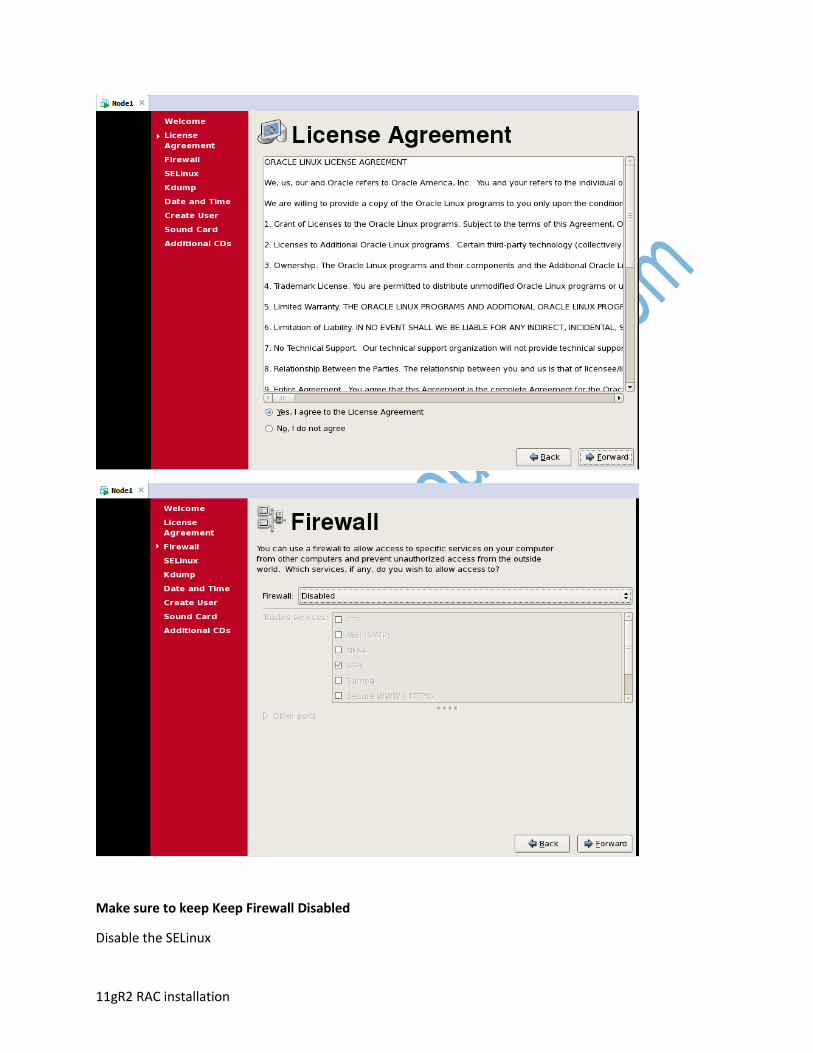
Make sure to keep Keep Firewall Disabled
Disable the SELinux

11gR2 RAC installation

11gR2 RAC installation
You may Skip the user creation at this time

11gR2 RAC installation
11gR2 RAC installation
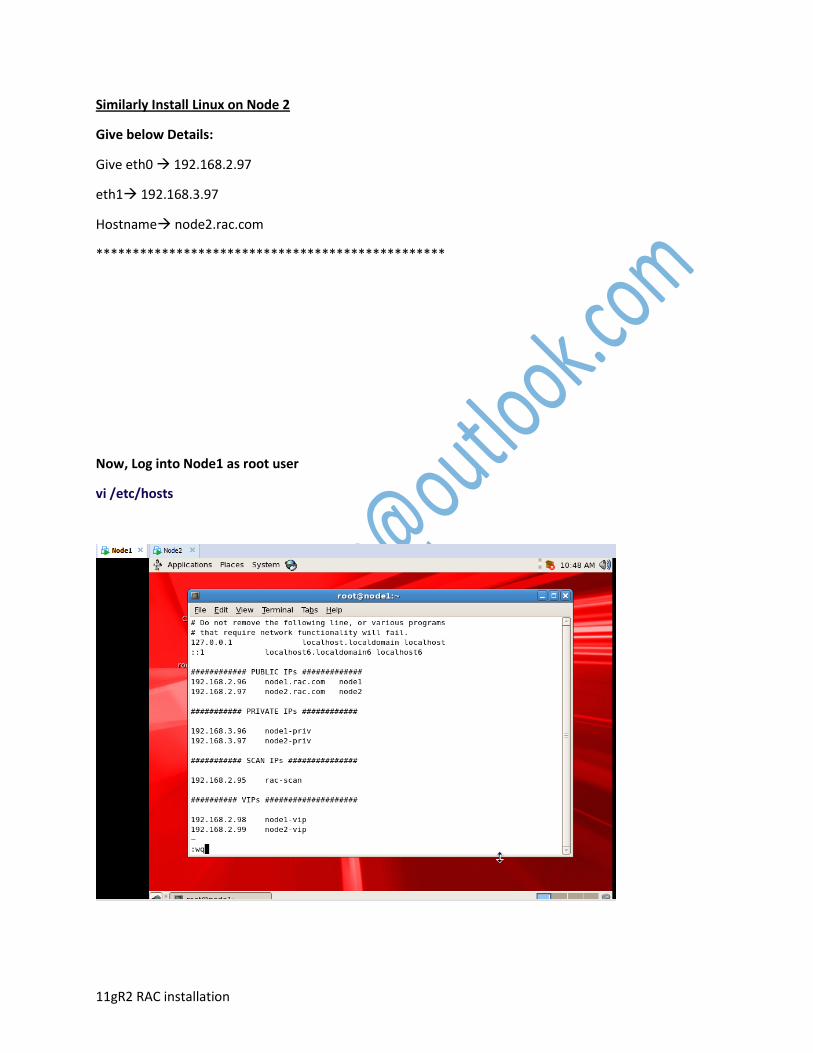
Similarly Install Linux on Node 2
Give below Details:
Give eth0 192.168.2.97
eth1 192.168.3.97
Hostname node2.rac.com
************************************************
Now, Log into Node1 as root user
vi /etc/hosts
11gR2 RAC installation
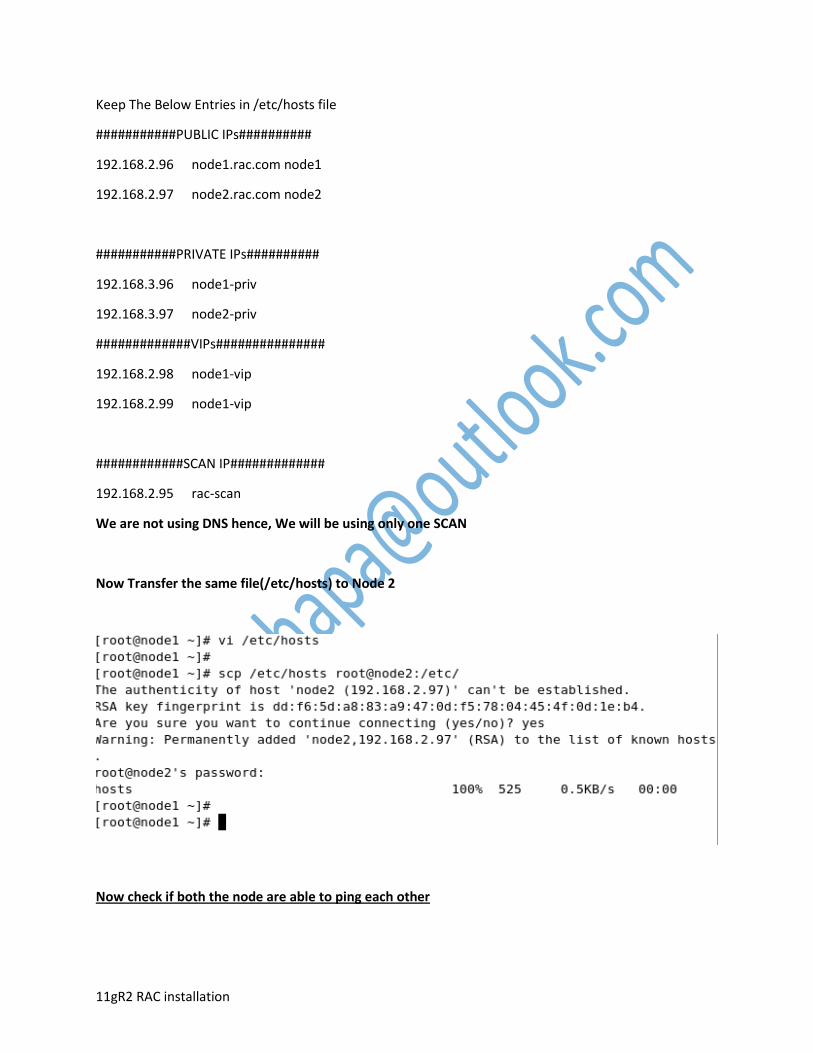
Keep The Below Entries in /etc/hosts file
###########PUBLIC IPs##########
192.168.2.96 node1.rac.com node1
192.168.2.97 node2.rac.com node2
###########PRIVATE IPs##########
192.168.3.96 node1-priv
192.168.3.97 node2-priv
#############VIPs###############
192.168.2.98 node1-vip
192.168.2.99 node1-vip
############SCAN IP#############
192.168.2.95 rac-scan
We are not using DNS hence, We will be using only one SCAN
Now Transfer the same file(/etc/hosts) to Node 2
Now check if both the node are able to ping each other
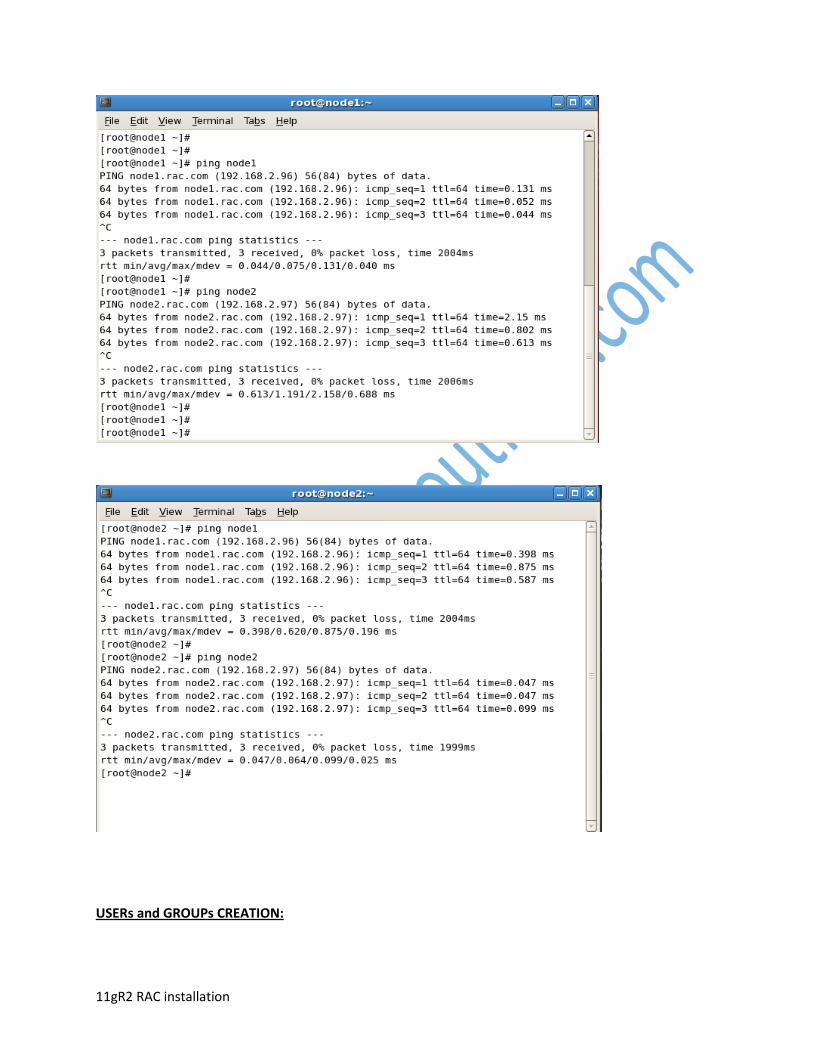
11gR2 RAC installation
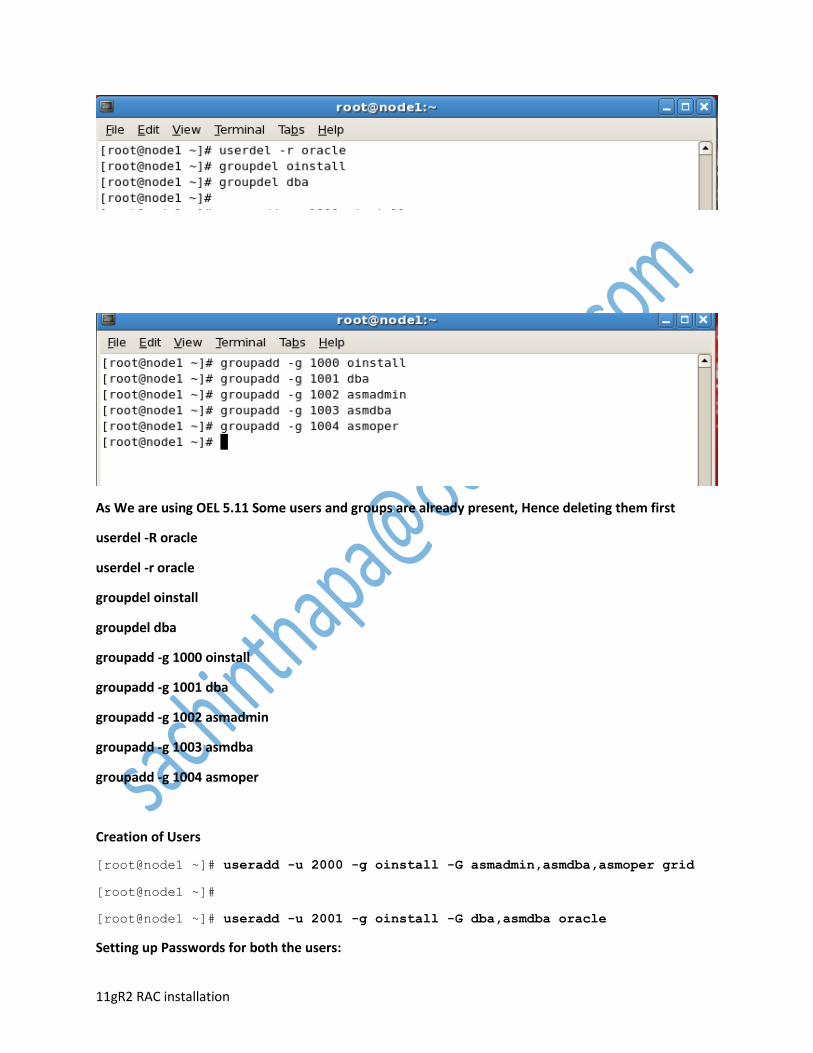
USERs and GROUPs CREATION:
11gR2 RAC installation
As We are using OEL 5.11 Some users and groups are already present, Hence deleting them first
userdel -R oracle
userdel -r oracle
groupdel oinstall
groupdel dba
groupadd -g 1000 oinstall
groupadd -g 1001 dba
groupadd -g 1002 asmadmin
groupadd -g 1003 asmdba
groupadd -g 1004 asmoper
Creation of Users
[root@node1 ~]# useradd -u 2000 -g oinstall -G asmadmin,asmdba,asmoper grid
[root@node1 ~]#
[root@node1 ~]# useradd -u 2001 -g oinstall -G dba,asmdba oracle
Setting up Passwords for both the users:
11gR2 RAC installation
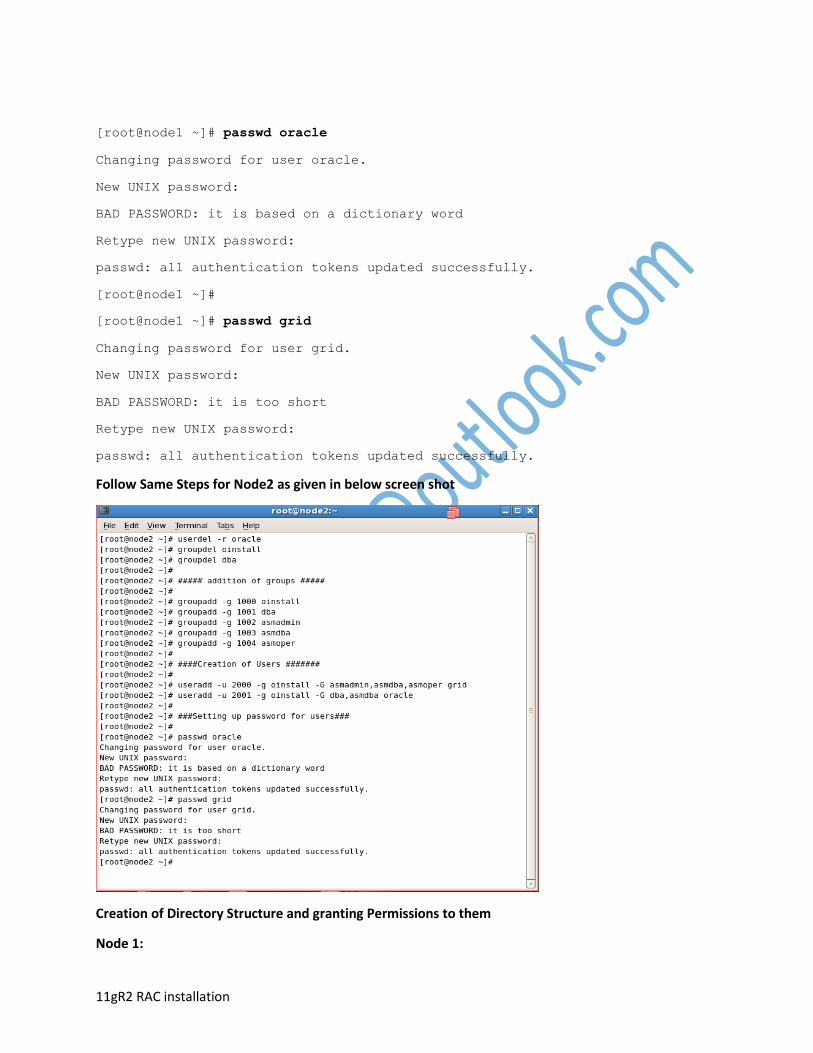
[root@node1 ~]# passwd oracle
Changing password for user oracle.
New UNIX password:
BAD PASSWORD: it is based on a dictionary word
Retype new UNIX password:
passwd: all authentication tokens updated successfully.
[root@node1 ~]#
[root@node1 ~]# passwd grid
Changing password for user grid.
New UNIX password:
BAD PASSWORD: it is too short
Retype new UNIX password:
passwd: all authentication tokens updated successfully.
Follow Same Steps for Node2 as given in below screen shot
Creation of Directory Structure and granting Permissions to them
Node 1:
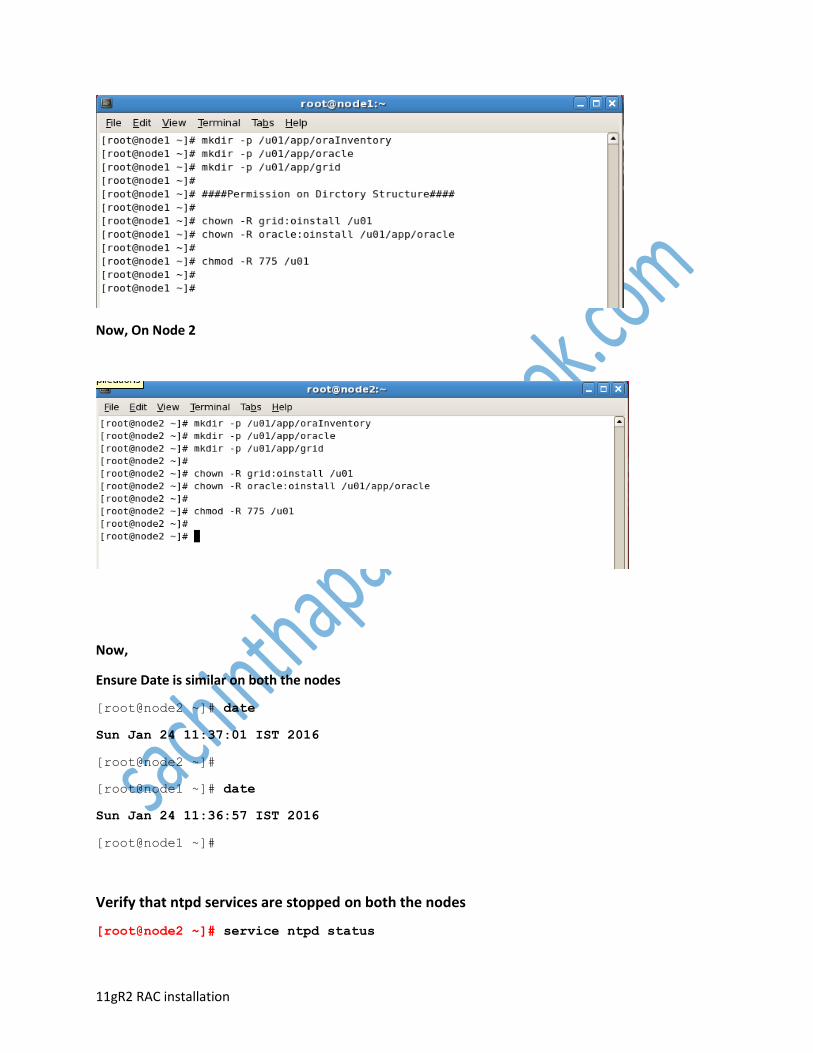
11gR2 RAC installation
Now, On Node 2
Now,
Ensure Date is similar on both the nodes
[root@node2 ~]# date
Sun Jan 24 11:37:01 IST 2016
[root@node2 ~]#
[root@node1 ~]# date
Sun Jan 24 11:36:57 IST 2016
[root@node1 ~]#
Verify that ntpd services are stopped on both the nodes
[root@node2 ~]# service ntpd status

11gR2 RAC installation
ntpd is stopped
[root@node2 ~]#
[root@node1 ~]#
[root@node1 ~]# service ntpd status
ntpd is stopped
[root@node1 ~]#
Modifying the Number of Open File Descriptors
Open the /etc/security/limits.conf file and change the existing values for "hard" and "soft"
parameters as follows. Restart the system after making changes.
vi /etc/security/limits.conf
oracle soft nofile 1024
oracle hard nofile 65536
oracle soft nproc 2047
oracle hard nproc 16384
grid soft nofile 1024
grid hard nofile 65536
grid soft nproc 2047
grid hard nproc 16384
Now, in Node2
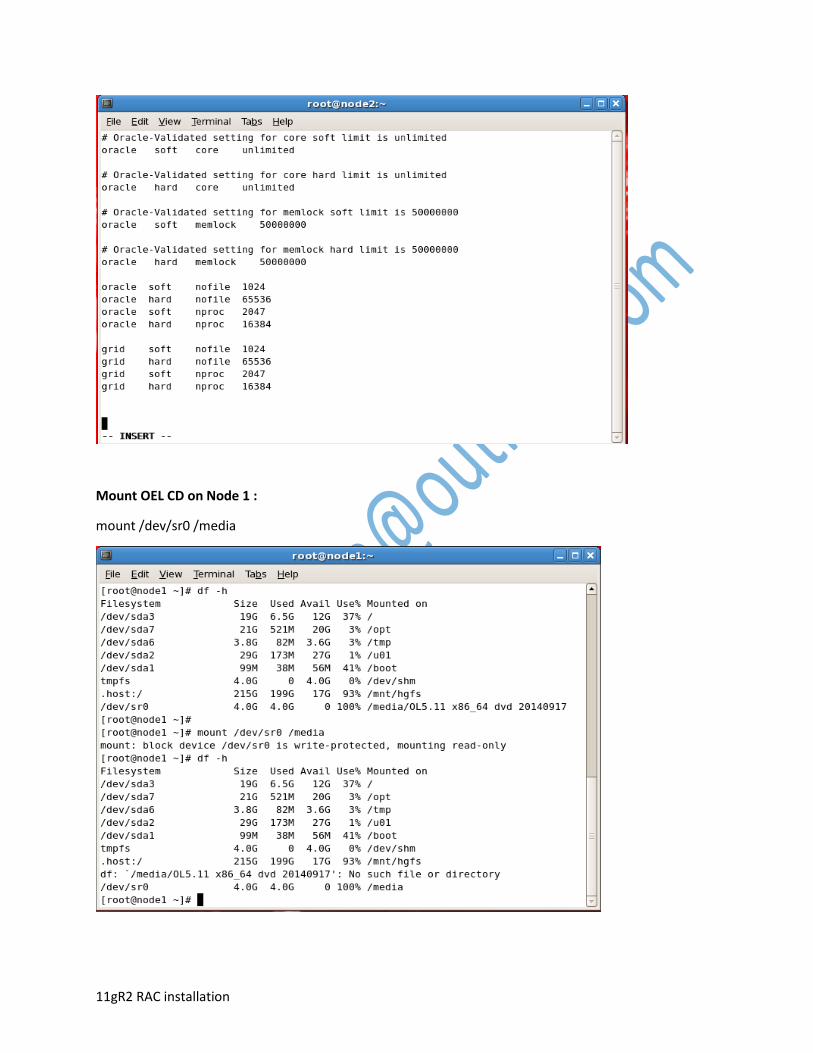
11gR2 RAC installation
Mount OEL CD on Node 1 :
mount /dev/sr0 /media
11gR2 RAC installation
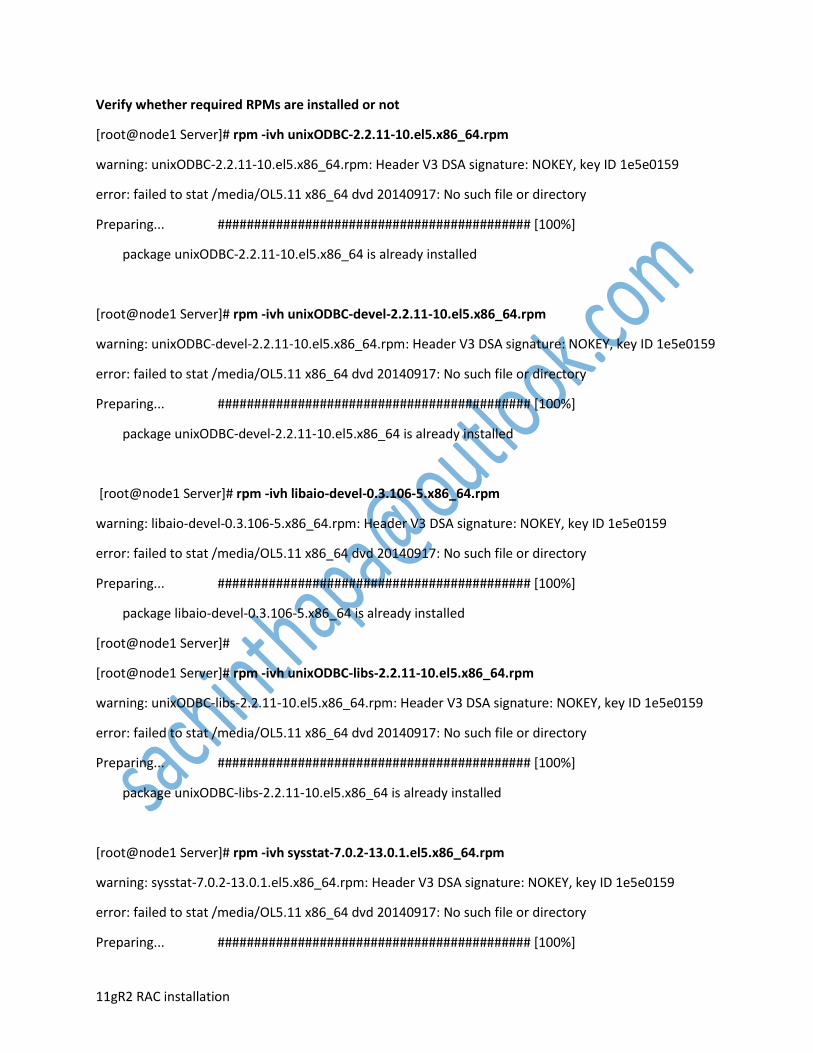
Verify whether required RPMs are installed or not
[root@node1 Server]# rpm -ivh unixODBC-2.2.11-10.el5.x86_64.rpm
warning: unixODBC-2.2.11-10.el5.x86_64.rpm: Header V3 DSA signature: NOKEY, key ID 1e5e0159
error: failed to stat /media/OL5.11 x86_64 dvd 20140917: No such file or directory
Preparing... ########################################### [100%]
package unixODBC-2.2.11-10.el5.x86_64 is already installed
[root@node1 Server]# rpm -ivh unixODBC-devel-2.2.11-10.el5.x86_64.rpm
warning: unixODBC-devel-2.2.11-10.el5.x86_64.rpm: Header V3 DSA signature: NOKEY, key ID 1e5e0159
error: failed to stat /media/OL5.11 x86_64 dvd 20140917: No such file or directory
Preparing... ########################################### [100%]
package unixODBC-devel-2.2.11-10.el5.x86_64 is already installed
[root@node1 Server]# rpm -ivh libaio-devel-0.3.106-5.x86_64.rpm
warning: libaio-devel-0.3.106-5.x86_64.rpm: Header V3 DSA signature: NOKEY, key ID 1e5e0159
error: failed to stat /media/OL5.11 x86_64 dvd 20140917: No such file or directory
Preparing... ########################################### [100%]
package libaio-devel-0.3.106-5.x86_64 is already installed
[root@node1 Server]#
[root@node1 Server]# rpm -ivh unixODBC-libs-2.2.11-10.el5.x86_64.rpm
warning: unixODBC-libs-2.2.11-10.el5.x86_64.rpm: Header V3 DSA signature: NOKEY, key ID 1e5e0159
error: failed to stat /media/OL5.11 x86_64 dvd 20140917: No such file or directory
Preparing... ########################################### [100%]
package unixODBC-libs-2.2.11-10.el5.x86_64 is already installed
[root@node1 Server]# rpm -ivh sysstat-7.0.2-13.0.1.el5.x86_64.rpm
warning: sysstat-7.0.2-13.0.1.el5.x86_64.rpm: Header V3 DSA signature: NOKEY, key ID 1e5e0159
error: failed to stat /media/OL5.11 x86_64 dvd 20140917: No such file or directory
Preparing... ########################################### [100%]

11gR2 RAC installation
package sysstat-7.0.2-13.0.1.el5.x86_64 is already installed
Similarly check for the Same RPMs on Node 2
Now, Login as grid user on both the nodes
Setting up password less SSH connectivity between both the nodes Manually (OPTIONAL)
Generate ssh public and private keys on each node as grid user and append them to create a
consolidated key , name it authorized_keys
Steps1:
On Node 1
[grid@node1 ~]$ ssh-keygen -t dsa
Generating public/private dsa key pair.
Enter file in which to save the key (/home/grid/.ssh/id_dsa):
Created directory '/home/grid/.ssh'.
Enter passphrase (empty for no passphrase):
Enter same passphrase again:
Your identification has been saved in /home/grid/.ssh/id_dsa.
Your public key has been saved in /home/grid/.ssh/id_dsa.pub.
The key fingerprint is:
8a:d2:c4:c3:7d:60:b8:cb:df:8c:8c:d8:c3:80:ae:35 [email protected]
[grid@node1 ~]$ cd /home/grid/.ssh/
[grid@node1 .ssh]$ ls -ltr
total 8
-rw-r--r-- 1 grid oinstall 608 Jan 24 12:24 id_dsa.pub
-rw------- 1 grid oinstall 668 Jan 24 12:24 id_dsa
[grid@node1 .ssh]$
[grid@node1 .ssh]$ touch authorized_keys
[grid@node1 .ssh]$ ll
total 8

11gR2 RAC installation
-rw-r--r-- 1 grid oinstall 0 Jan 24 12:24 authorized_keys
-rw------- 1 grid oinstall 668 Jan 24 12:24 id_dsa
-rw-r--r-- 1 grid oinstall 608 Jan 24 12:24 id_dsa.pub
[grid@node1 .ssh]$
[grid@node1 .ssh]$ cat id_dsa>>authorized_keys
[grid@node1 .ssh]$ cat id_dsa.pub >>authorized_keys Step 2:
Now, On node 2:
[grid@node2 ~]$ ssh-keygen -t dsa
Generating public/private dsa key pair.
Enter file in which to save the key (/home/grid/.ssh/id_dsa):
Created directory '/home/grid/.ssh'.
Enter passphrase (empty for no passphrase):
Enter same passphrase again:
Your identification has been saved in /home/grid/.ssh/id_dsa.
Your public key has been saved in /home/grid/.ssh/id_dsa.pub.
The key fingerprint is:
d1:b6:98:12:83:6a:47:bd:15:dd:f8:d4:66:bb:41:f4 [email protected]
[grid@node2 ~]$
[grid@node2 ~]$ cd /home/grid/.ssh/
[grid@node2 .ssh]$ ls -ltr
total 8
-rw-r--r-- 1 grid oinstall 608 Jan 24 12:27 id_dsa.pub
-rw------- 1 grid oinstall 668 Jan 24 12:27 id_dsa
[grid@node2 .ssh]$
[grid@node2 .ssh]$ touch authorized_keys
[grid@node2 .ssh]$ cat id_dsa>>authorized_keys
[grid@node2 .ssh]$ cat id_dsa.pub >>authorized_keys
Step 3 :
11gR2 RAC installation
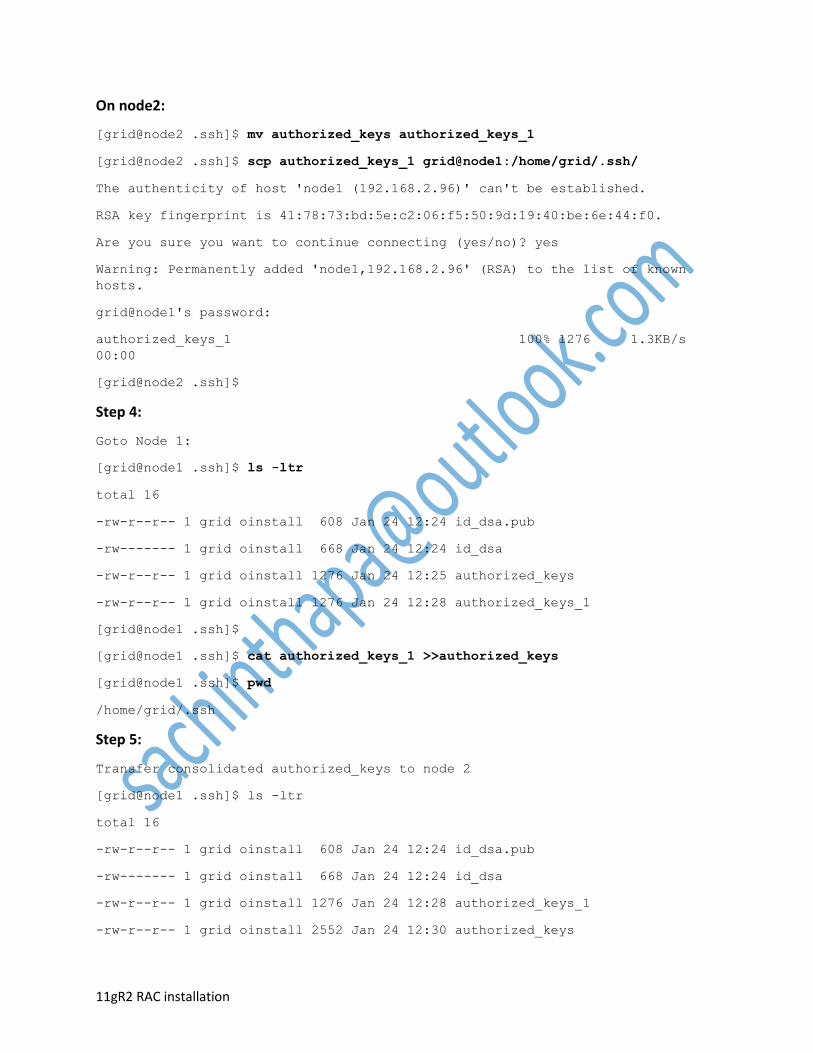
On node2:
[grid@node2 .ssh]$ mv authorized_keys authorized_keys_1
[grid@node2 .ssh]$ scp authorized_keys_1 grid@node1:/home/grid/.ssh/
The authenticity of host 'node1 (192.168.2.96)' can't be established.
RSA key fingerprint is 41:78:73:bd:5e:c2:06:f5:50:9d:19:40:be:6e:44:f0.
Are you sure you want to continue connecting (yes/no)? yes
Warning: Permanently added 'node1,192.168.2.96' (RSA) to the list of known
hosts.
grid@node1's password:
authorized_keys_1 100% 1276 1.3KB/s
00:00
[grid@node2 .ssh]$
Step 4:
Goto Node 1:
[grid@node1 .ssh]$ ls -ltr
total 16
-rw-r--r-- 1 grid oinstall 608 Jan 24 12:24 id_dsa.pub
-rw------- 1 grid oinstall 668 Jan 24 12:24 id_dsa
-rw-r--r-- 1 grid oinstall 1276 Jan 24 12:25 authorized_keys
-rw-r--r-- 1 grid oinstall 1276 Jan 24 12:28 authorized_keys_1
[grid@node1 .ssh]$
[grid@node1 .ssh]$ cat authorized_keys_1 >>authorized_keys
[grid@node1 .ssh]$ pwd
/home/grid/.ssh
Step 5:
Transfer consolidated authorized_keys to node 2
[grid@node1 .ssh]$ ls -ltr
total 16
-rw-r--r-- 1 grid oinstall 608 Jan 24 12:24 id_dsa.pub
-rw------- 1 grid oinstall 668 Jan 24 12:24 id_dsa
-rw-r--r-- 1 grid oinstall 1276 Jan 24 12:28 authorized_keys_1
-rw-r--r-- 1 grid oinstall 2552 Jan 24 12:30 authorized_keys
11gR2 RAC installation
[grid@node1 .ssh]$
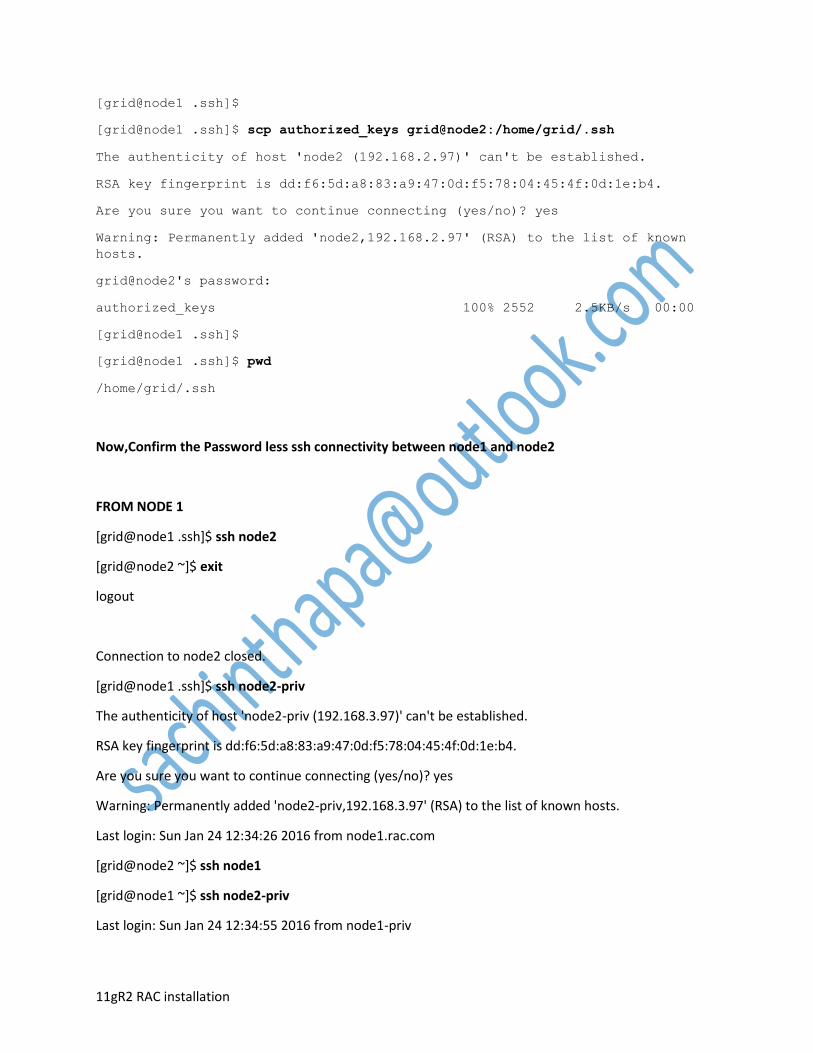
[grid@node1 .ssh]$ scp authorized_keys grid@node2:/home/grid/.ssh
The authenticity of host 'node2 (192.168.2.97)' can't be established.
RSA key fingerprint is dd:f6:5d:a8:83:a9:47:0d:f5:78:04:45:4f:0d:1e:b4.
Are you sure you want to continue connecting (yes/no)? yes
Warning: Permanently added 'node2,192.168.2.97' (RSA) to the list of known
hosts.
grid@node2's password:
authorized_keys 100% 2552 2.5KB/s 00:00
[grid@node1 .ssh]$
[grid@node1 .ssh]$ pwd
/home/grid/.ssh
Now,Confirm the Password less ssh connectivity between node1 and node2
FROM NODE 1
[grid@node1 .ssh]$ ssh node2
[grid@node2 ~]$ exit
logout
Connection to node2 closed.
[grid@node1 .ssh]$ ssh node2-priv
The authenticity of host 'node2-priv (192.168.3.97)' can't be established.
RSA key fingerprint is dd:f6:5d:a8:83:a9:47:0d:f5:78:04:45:4f:0d:1e:b4.
Are you sure you want to continue connecting (yes/no)? yes
Warning: Permanently added 'node2-priv,192.168.3.97' (RSA) to the list of known hosts.
Last login: Sun Jan 24 12:34:26 2016 from node1.rac.com
[grid@node2 ~]$ ssh node1
[grid@node1 ~]$ ssh node2-priv
Last login: Sun Jan 24 12:34:55 2016 from node1-priv

11gR2 RAC installation
[grid@node2 ~]$ ssh node1
Last login: Sun Jan 24 12:35:09 2016 from node2.rac.com
[grid@node1 ~]$
FROM NODE 2
[grid@node2 .ssh]$ ssh node1
Last login: Sun Jan 24 12:35:28 2016 from node2.rac.com
[grid@node1 ~]$ ssh node1-priv
The authenticity of host 'node1-priv (192.168.3.96)' can't be established.
RSA key fingerprint is 41:78:73:bd:5e:c2:06:f5:50:9d:19:40:be:6e:44:f0.
Are you sure you want to continue connecting (yes/no)? yes
Warning: Permanently added 'node1-priv,192.168.3.96' (RSA) to the list of known hosts.
Last login: Sun Jan 24 12:36:08 2016 from node2.rac.com
[grid@node1 ~]$ ssh node2
Last login: Sun Jan 24 12:35:17 2016 from node1-priv
[grid@node2 ~]$ ssh node2-priv
The authenticity of host 'node2-priv (192.168.3.97)' can't be established.
RSA key fingerprint is dd:f6:5d:a8:83:a9:47:0d:f5:78:04:45:4f:0d:1e:b4.
Are you sure you want to continue connecting (yes/no)? yes
Warning: Permanently added 'node2-priv,192.168.3.97' (RSA) to the list of known hosts.
Last login: Sun Jan 24 12:36:21 2016 from node1.rac.com
[grid@node2 ~]$
[grid@node2 ~]$ ssh node2
The authenticity of host 'node2 (192.168.2.97)' can't be established.
RSA key fingerprint is dd:f6:5d:a8:83:a9:47:0d:f5:78:04:45:4f:0d:1e:b4.
Are you sure you want to continue connecting (yes/no)? yes
Warning: Permanently added 'node2,192.168.2.97' (RSA) to the list of known hosts.
Last login: Sun Jan 24 12:36:29 2016 from node2-priv
As we have seen Password less SSH Connectivity is established
11gR2 RAC installation
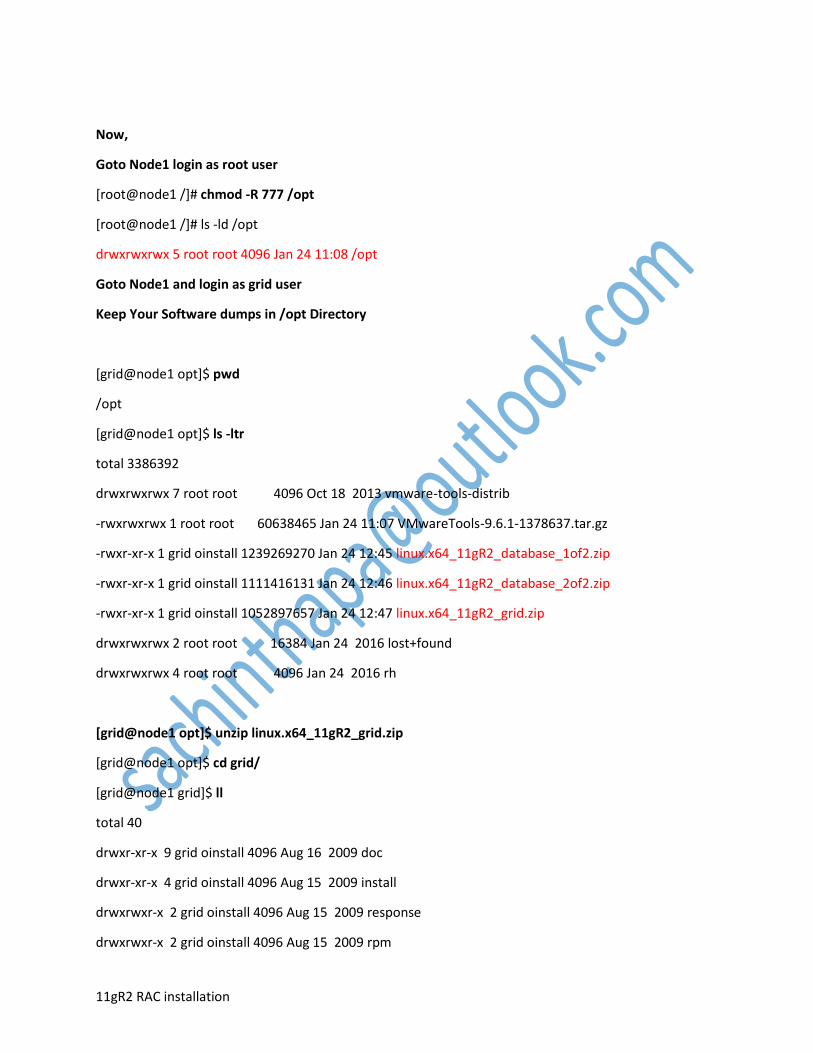
Now,
Goto Node1 login as root user
[root@node1 /]# chmod -R 777 /opt
[root@node1 /]# ls -ld /opt
drwxrwxrwx 5 root root 4096 Jan 24 11:08 /opt
Goto Node1 and login as grid user
Keep Your Software dumps in /opt Directory
[grid@node1 opt]$ pwd
/opt
[grid@node1 opt]$ ls -ltr
total 3386392
drwxrwxrwx 7 root root 4096 Oct 18 2013 vmware-tools-distrib
-rwxrwxrwx 1 root root 60638465 Jan 24 11:07 VMwareTools-9.6.1-1378637.tar.gz
-rwxr-xr-x 1 grid oinstall 1239269270 Jan 24 12:45 linux.x64_11gR2_database_1of2.zip
-rwxr-xr-x 1 grid oinstall 1111416131 Jan 24 12:46 linux.x64_11gR2_database_2of2.zip
-rwxr-xr-x 1 grid oinstall 1052897657 Jan 24 12:47 linux.x64_11gR2_grid.zip
drwxrwxrwx 2 root root 16384 Jan 24 2016 lost+found
drwxrwxrwx 4 root root 4096 Jan 24 2016 rh
[grid@node1 opt]$ unzip linux.x64_11gR2_grid.zip
[grid@node1 opt]$ cd grid/
[grid@node1 grid]$ ll
total 40
drwxr-xr-x 9 grid oinstall 4096 Aug 16 2009 doc
drwxr-xr-x 4 grid oinstall 4096 Aug 15 2009 install
drwxrwxr-x 2 grid oinstall 4096 Aug 15 2009 response
drwxrwxr-x 2 grid oinstall 4096 Aug 15 2009 rpm

11gR2 RAC installation
-rwxrwxr-x 1 grid oinstall 3795 Jan 29 2009 runcluvfy.sh
-rwxr-xr-x 1 grid oinstall 3227 Aug 15 2009 runInstaller
drwxrwxr-x 2 grid oinstall 4096 Aug 15 2009 sshsetup
drwxr-xr-x 14 grid oinstall 4096 Aug 15 2009 stage
-rw-r--r-- 1 grid oinstall 4228 Aug 18 2009 welcome.html
[grid@node1 grid]$ cd rpm/
[grid@node1 rpm]$ ls -ltr
total 8
-rw-rw-r-- 1 grid oinstall 8173 Jul 14 2009 cvuqdisk-1.0.7-1.rpm
Now log into root user and install the rpm
[grid@node1 rpm]$ su - root
Password:
[root@node1 ~]# cd /opt/grid/rpm/
[root@node1 rpm]# rpm -ivh cvuqdisk-1.0.7-1.rpm
error: failed to stat /media/OL5.11 x86_64 dvd 20140917: No such file or directory
Preparing... ########################################### [100%]
Using default group oinstall to install package
1:cvuqdisk ########################################### [100%]
Install the rpm on Node2 also,

11gR2 RAC installation
NOW Creating the shared storage: We will be using Openfiler for the same
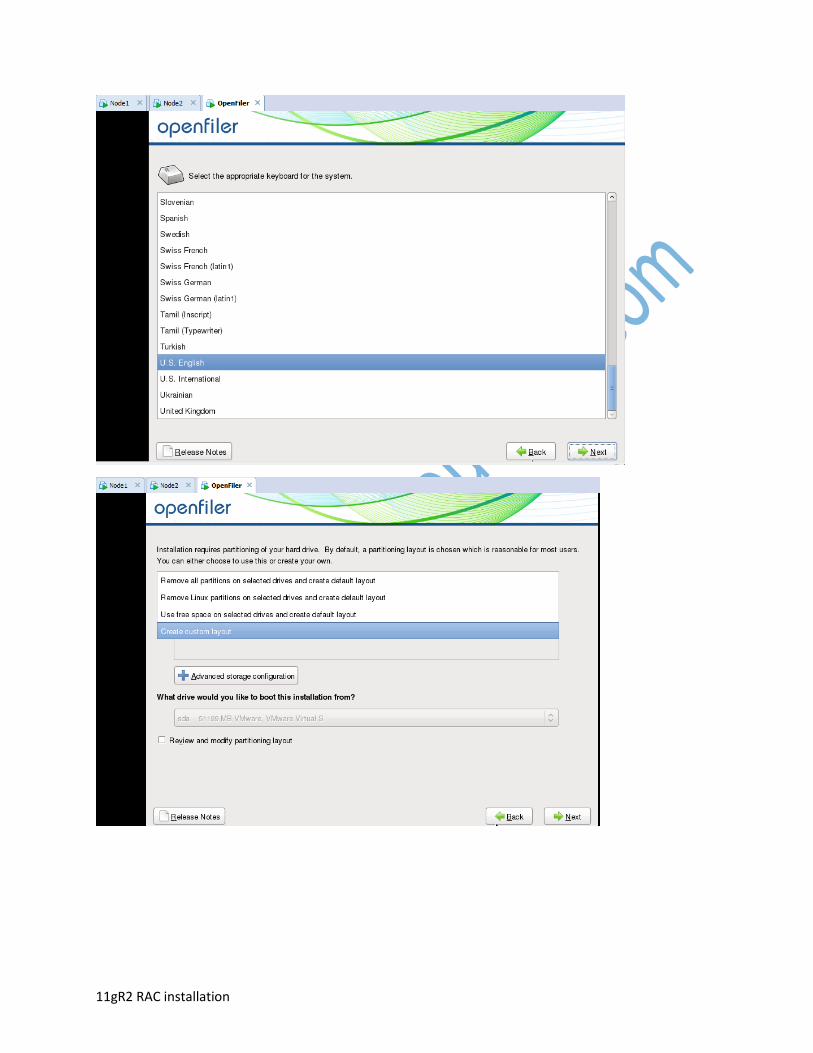
11gR2 RAC installation

11gR2 RAC installation
11gR2 RAC installation
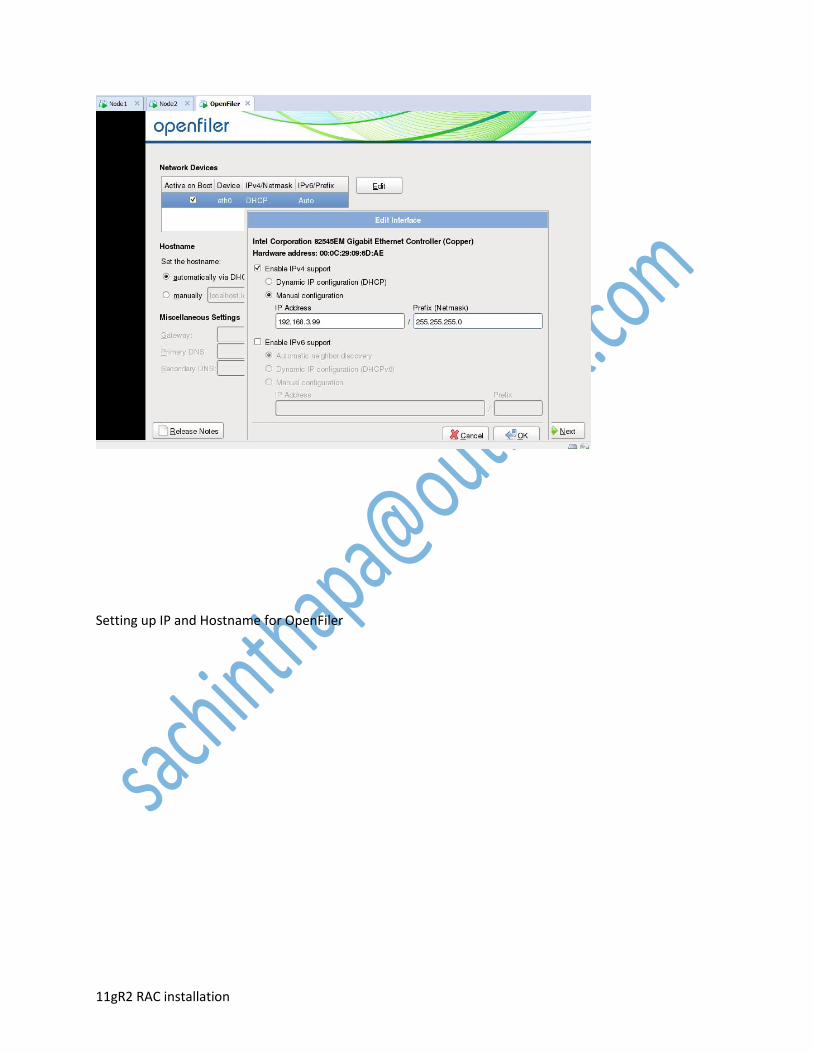
Setting up IP and Hostname for OpenFiler

11gR2 RAC installation
Set Root Password for Openfiler

11gR2 RAC installation

11gR2 RAC installation

11gR2 RAC installation
Now, Goto Node1 and use the above mentioned URL to login into the OpenFiler GUI
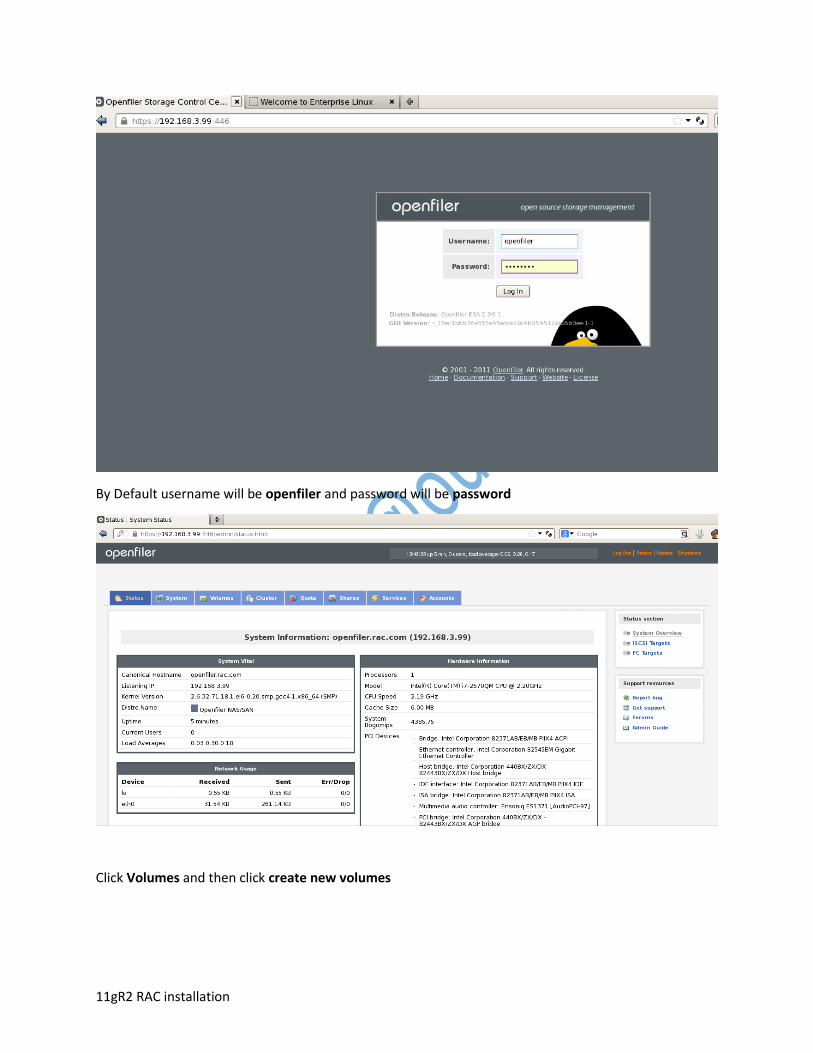
11gR2 RAC installation
By Default username will be openfiler and password will be password
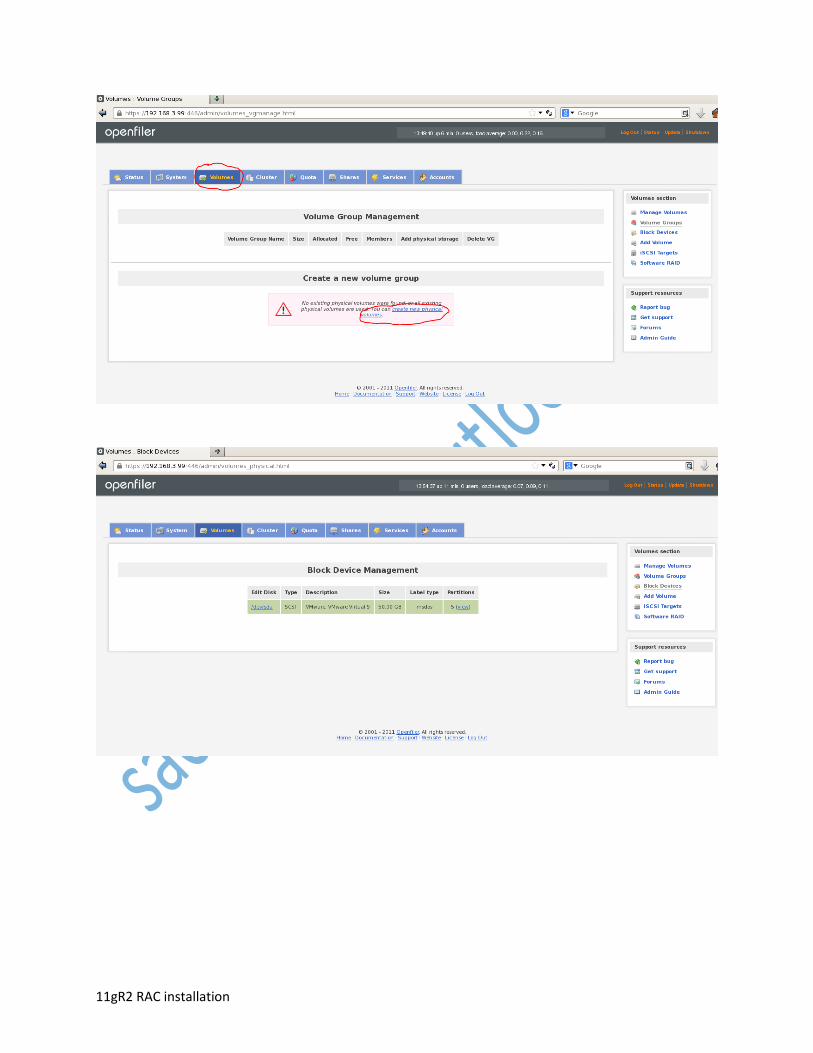
Click Volumes and then click create new volumes
11gR2 RAC installation
11gR2 RAC installation
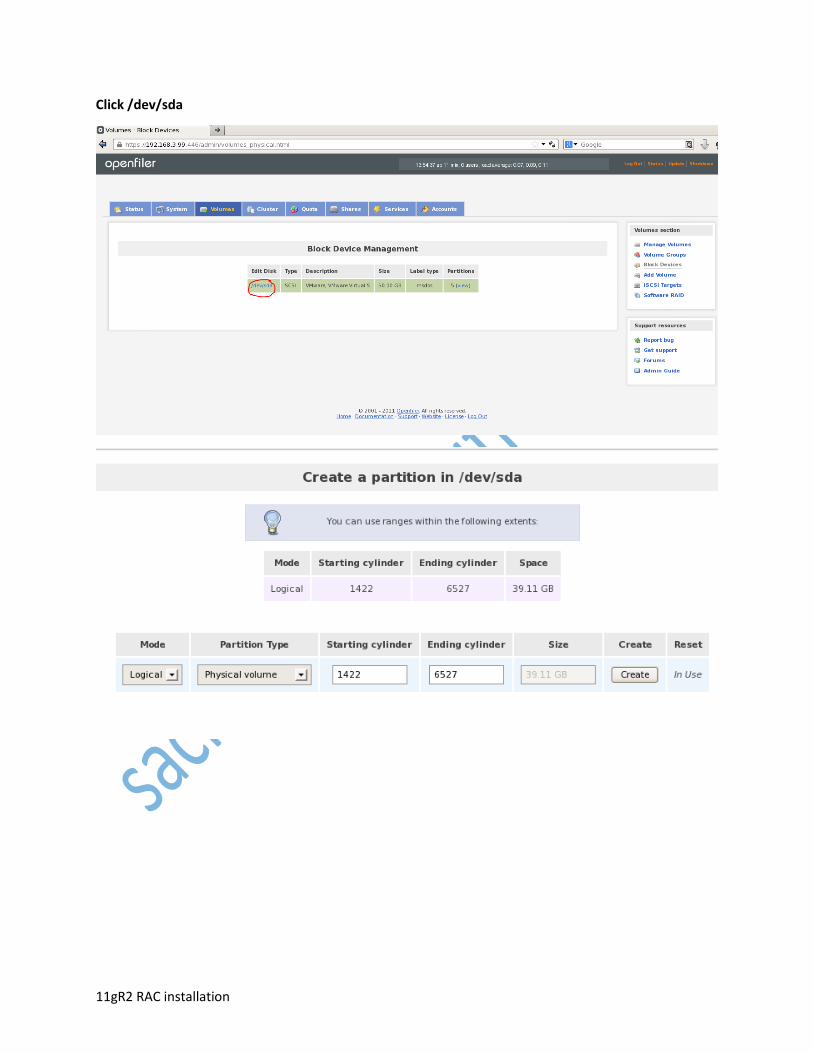
Click /dev/sda
11gR2 RAC installation
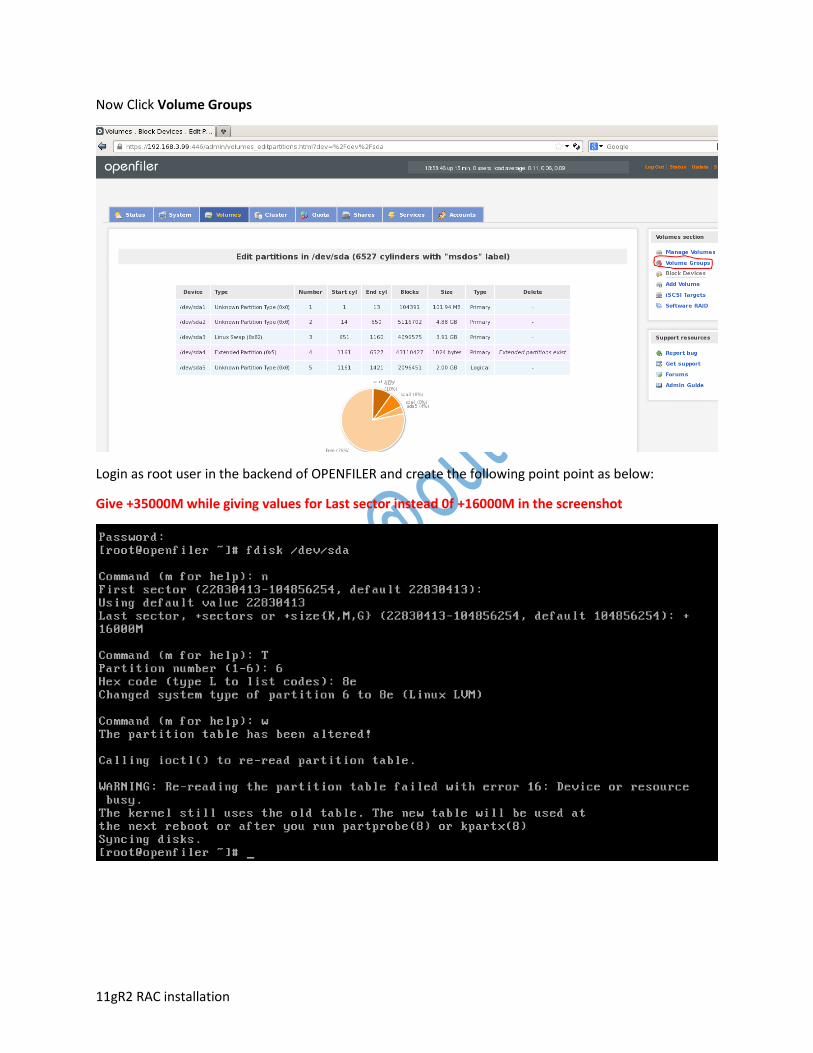
Now Click Volume Groups
Login as root user in the backend of OPENFILER and create the following point point as below:
Give +35000M while giving values for Last sector instead 0f +16000M in the screenshot

11gR2 RAC installation
Check the checkbox and click Add Volume group

11gR2 RAC installation
Now,
Click add volume on right corner menu
Click Add volume group
Now,

11gR2 RAC installation
Click add volume right corner menu
Then,
Click Create
Similarly create vol2
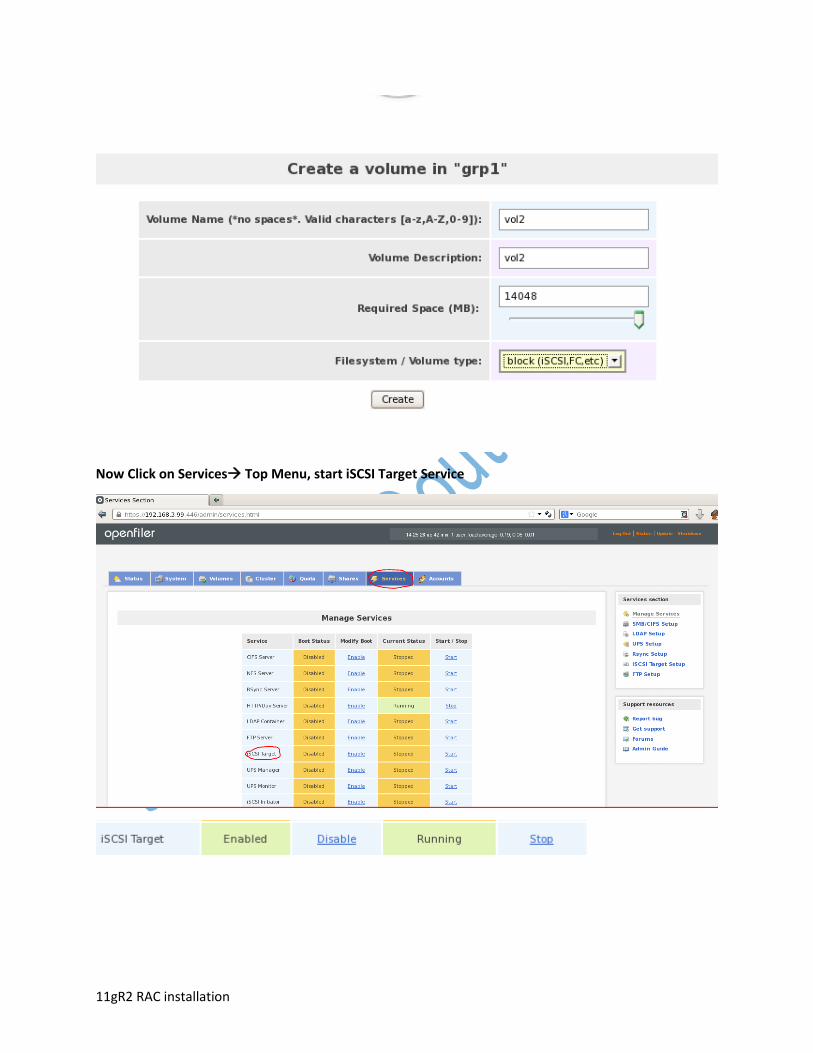
11gR2 RAC installation
Now Click on Services Top Menu, start iSCSI Target Service
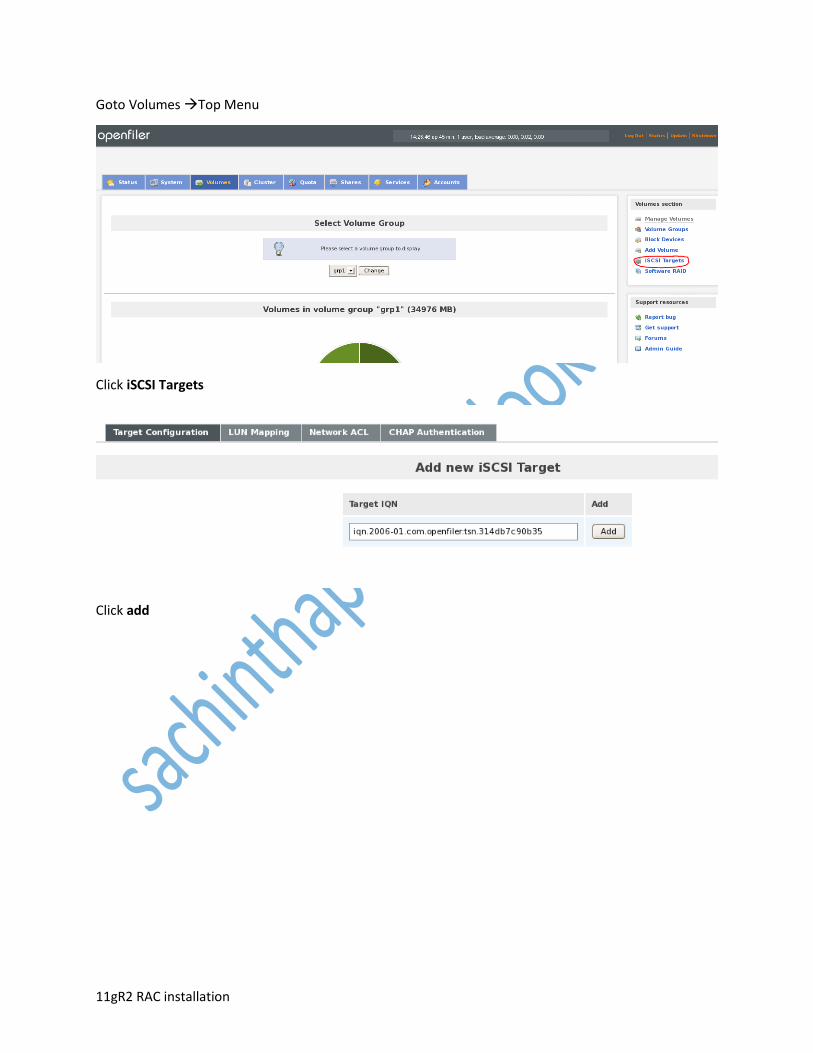
11gR2 RAC installation
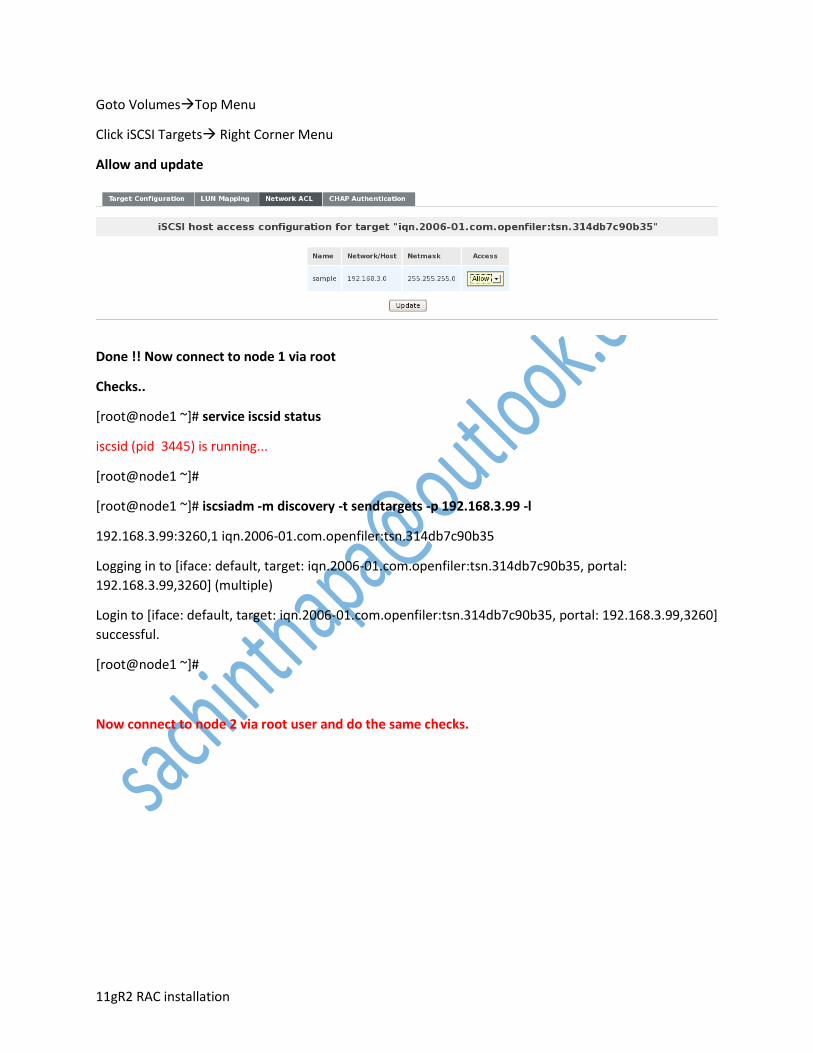
Goto Volumes Top Menu
Click iSCSI Targets
Click add

11gR2 RAC installation
Now,
Click Lun Mapping Top Menu
Click Map for both vol1 and vol2
Click Network ACL Top Menu
Click Local Networks
Click Update
11gR2 RAC installation
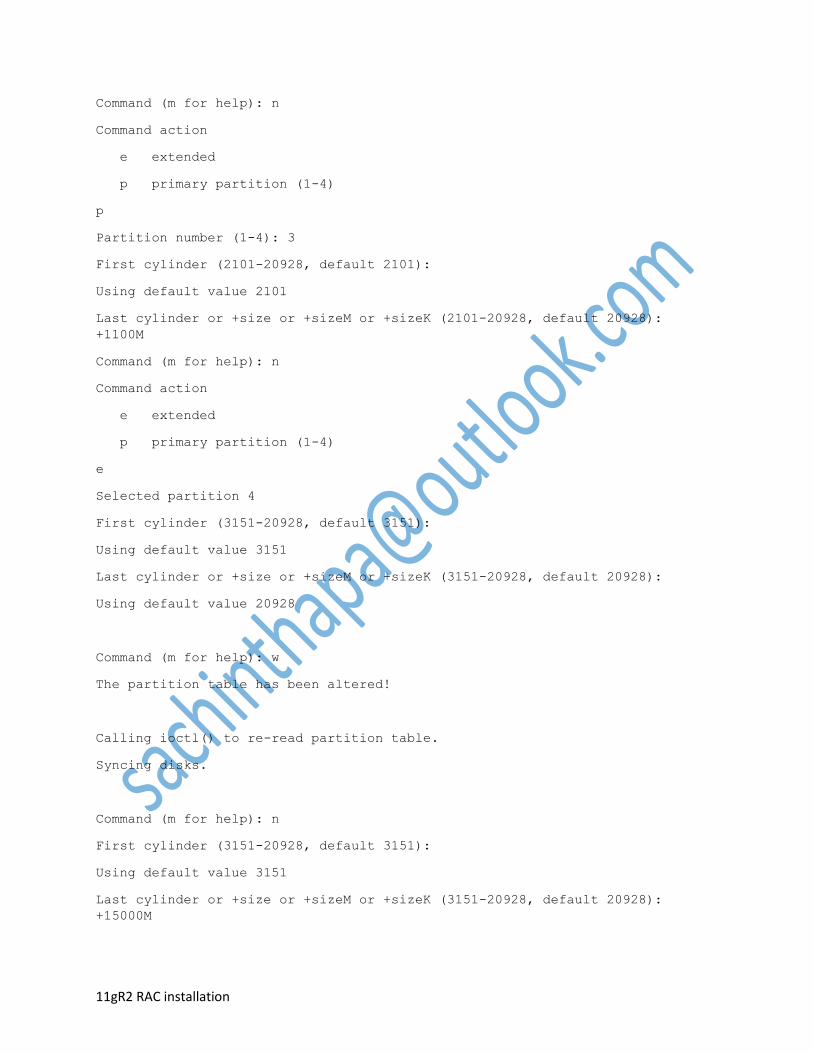
Goto VolumesTop Menu
Click iSCSI Targets Right Corner Menu
Allow and update
Done !! Now connect to node 1 via root
Checks..
[root@node1 ~]# service iscsid status
iscsid (pid 3445) is running...
[root@node1 ~]#
[root@node1 ~]# iscsiadm -m discovery -t sendtargets -p 192.168.3.99 -l
192.168.3.99:3260,1 iqn.2006-01.com.openfiler:tsn.314db7c90b35
Logging in to [iface: default, target: iqn.2006-01.com.openfiler:tsn.314db7c90b35, portal:
192.168.3.99,3260] (multiple)
Login to [iface: default, target: iqn.2006-01.com.openfiler:tsn.314db7c90b35, portal: 192.168.3.99,3260]
successful.
[root@node1 ~]#
Now connect to node 2 via root user and do the same checks.

11gR2 RAC installation
Connect To Root user and do the partition in the mount point /dev/sdb
Fdisk /dev/sdb
Command (m for help): n
Command action
e extended
p primary partition (1-4)
p
Partition number (1-4): 1
First cylinder (1-20928, default 1):
Using default value 1
Last cylinder or +size or +sizeM or +sizeK (1-20928, default 20928): +1100M
Command (m for help): n
Command action
e extended
p primary partition (1-4)
p
Partition number (1-4): 2
First cylinder (1051-20928, default 1051):
Using default value 1051
Last cylinder or +size or +sizeM or +sizeK (1051-20928, default 20928):
+1100M
Command (m for help): n
Command action
e extended
p primary partition (1-4)
p
Partition number (1-4): 2
First cylinder (1051-20928, default 1051):
Using default value 1051
Last cylinder or +size or +sizeM or +sizeK (1051-20928, default 20928):
+1100M
11gR2 RAC installation
Command (m for help): n
Command action
e extended
p primary partition (1-4)
p
Partition number (1-4): 3
First cylinder (2101-20928, default 2101):
Using default value 2101
Last cylinder or +size or +sizeM or +sizeK (2101-20928, default 20928):
+1100M
Command (m for help): n
Command action
e extended
p primary partition (1-4)
e
Selected partition 4
First cylinder (3151-20928, default 3151):
Using default value 3151
Last cylinder or +size or +sizeM or +sizeK (3151-20928, default 20928):
Using default value 20928
Command (m for help): w
The partition table has been altered!
Calling ioctl() to re-read partition table.
Syncing disks.
Command (m for help): n
First cylinder (3151-20928, default 3151):
Using default value 3151
Last cylinder or +size or +sizeM or +sizeK (3151-20928, default 20928):
+15000M
11gR2 RAC installation
Command (m for help): w
The partition table has been altered!
Calling ioctl() to re-read partition table.
Syncing disks.
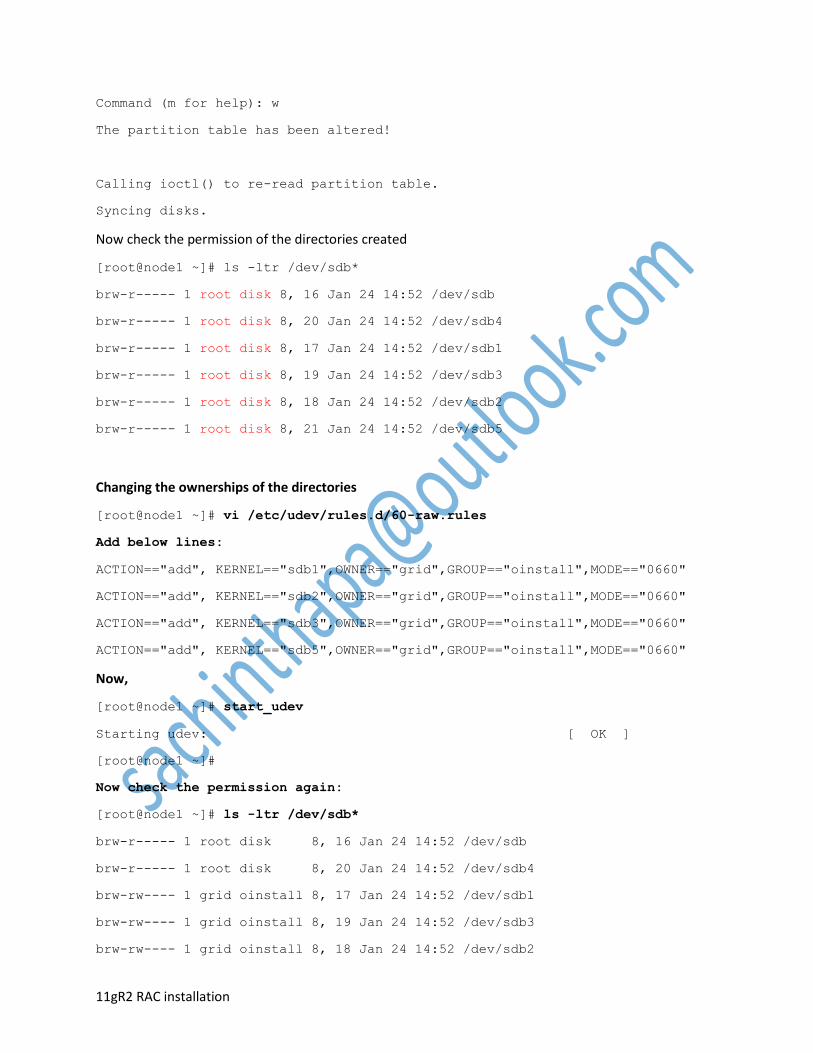
Now check the permission of the directories created
[root@node1 ~]# ls -ltr /dev/sdb*
brw-r----- 1 root disk 8, 16 Jan 24 14:52 /dev/sdb
brw-r----- 1 root disk 8, 20 Jan 24 14:52 /dev/sdb4
brw-r----- 1 root disk 8, 17 Jan 24 14:52 /dev/sdb1
brw-r----- 1 root disk 8, 19 Jan 24 14:52 /dev/sdb3
brw-r----- 1 root disk 8, 18 Jan 24 14:52 /dev/sdb2
brw-r----- 1 root disk 8, 21 Jan 24 14:52 /dev/sdb5
Changing the ownerships of the directories
[root@node1 ~]# vi /etc/udev/rules.d/60-raw.rules
Add below lines:
ACTION=="add", KERNEL=="sdb1",OWNER=="grid",GROUP=="oinstall",MODE=="0660"
ACTION=="add", KERNEL=="sdb2",OWNER=="grid",GROUP=="oinstall",MODE=="0660"
ACTION=="add", KERNEL=="sdb3",OWNER=="grid",GROUP=="oinstall",MODE=="0660"
ACTION=="add", KERNEL=="sdb5",OWNER=="grid",GROUP=="oinstall",MODE=="0660"
Now,
[root@node1 ~]# start_udev
Starting udev: [ OK ]
[root@node1 ~]#
Now check the permission again:
[root@node1 ~]# ls -ltr /dev/sdb*
brw-r----- 1 root disk 8, 16 Jan 24 14:52 /dev/sdb
brw-r----- 1 root disk 8, 20 Jan 24 14:52 /dev/sdb4
brw-rw---- 1 grid oinstall 8, 17 Jan 24 14:52 /dev/sdb1
brw-rw---- 1 grid oinstall 8, 19 Jan 24 14:52 /dev/sdb3
brw-rw---- 1 grid oinstall 8, 18 Jan 24 14:52 /dev/sdb2

11gR2 RAC installation
brw-rw---- 1 grid oinstall 8, 21 Jan 24 14:52 /dev/sdb5
Now do the same in node2
Scp /etc/udev/rules.d/60-raw.rules root@node2:/etc/udev/rules.d/
Login to node2
[root@node2 ~]# start_udev
Starting udev: [ OK ]
Run partprobe
Then,
[root@node2 ~]# ls -ltr /dev/sdb*
brw-r----- 1 root disk 8, 16 Jan 24 15:47 /dev/sdb
brw-r----- 1 root disk 8, 20 Jan 24 15:48 /dev/sdb4
brw-rw---- 1 grid oinstall 8, 19 Jan 24 15:48 /dev/sdb3
brw-rw---- 1 grid oinstall 8, 17 Jan 24 15:48 /dev/sdb1
brw-rw---- 1 grid oinstall 8, 18 Jan 24 15:48 /dev/sdb2
brw-rw---- 1 grid oinstall 8, 21 Jan 24 15:48 /dev/sdb5
[root@node2 ~]#
Now all the pre Requisites are done and we are ready to go and install Grid software:
Set the Display and proceed with runInstaller

11gR2 RAC installation
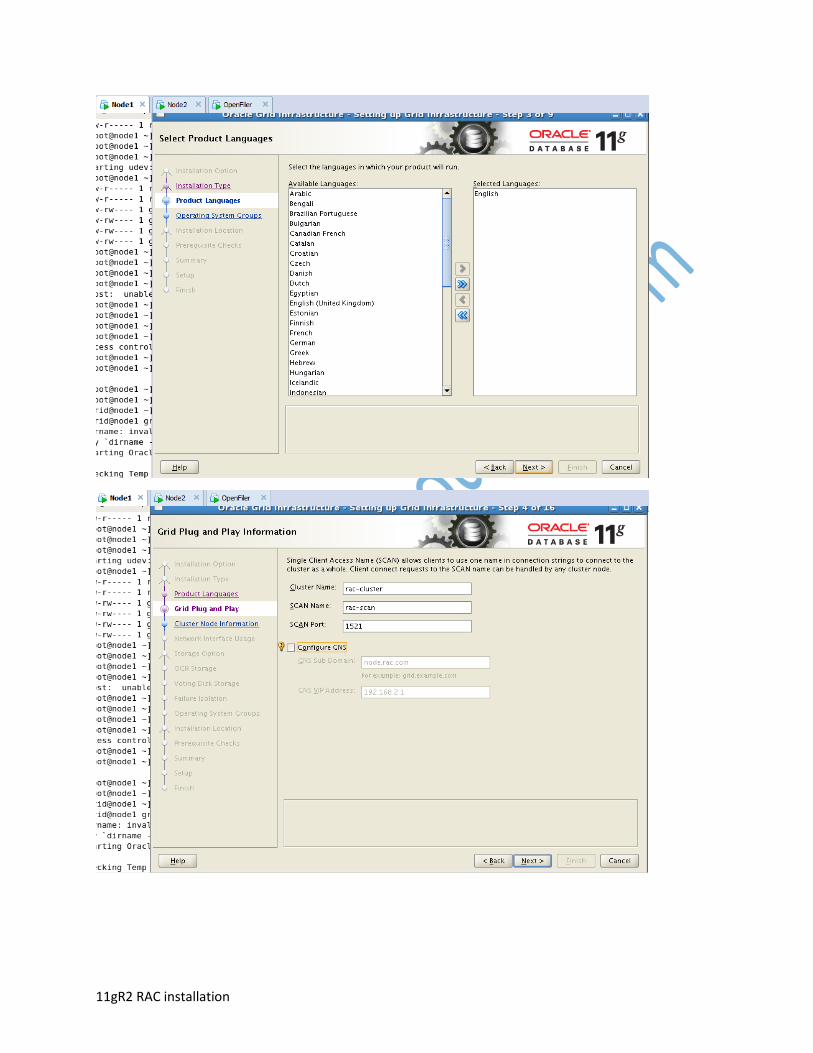
11gR2 RAC installation
11gR2 RAC installation
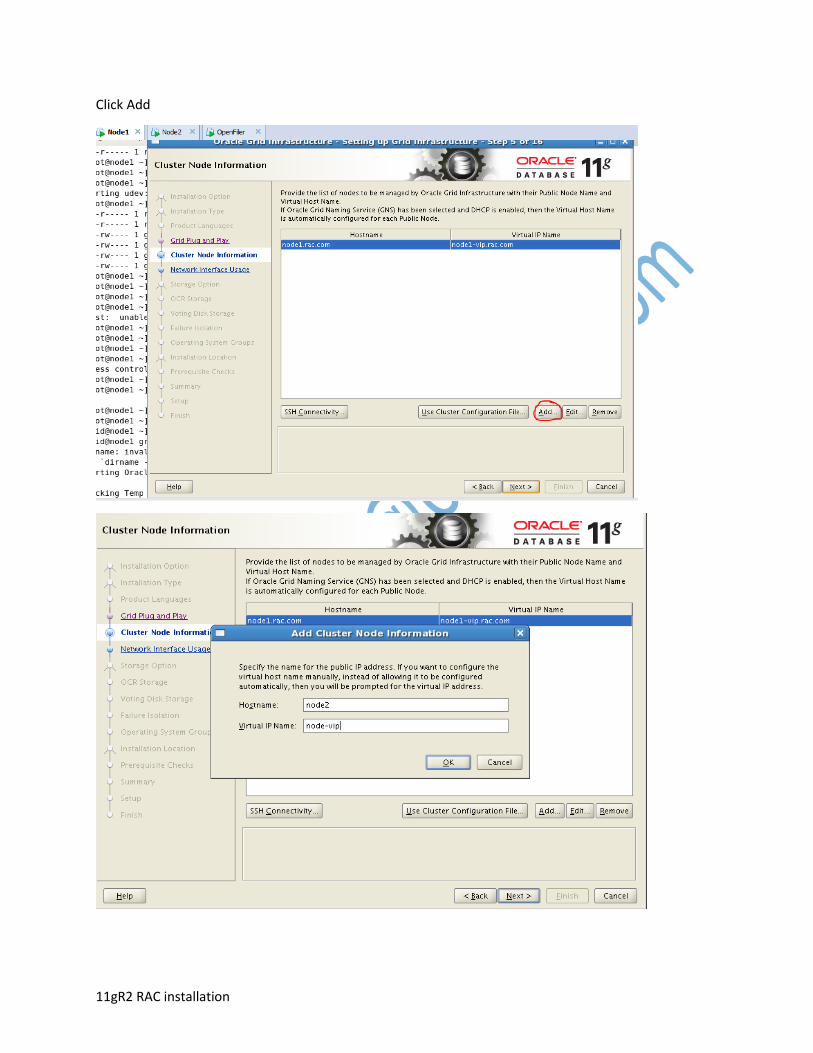
Click Add

11gR2 RAC installation
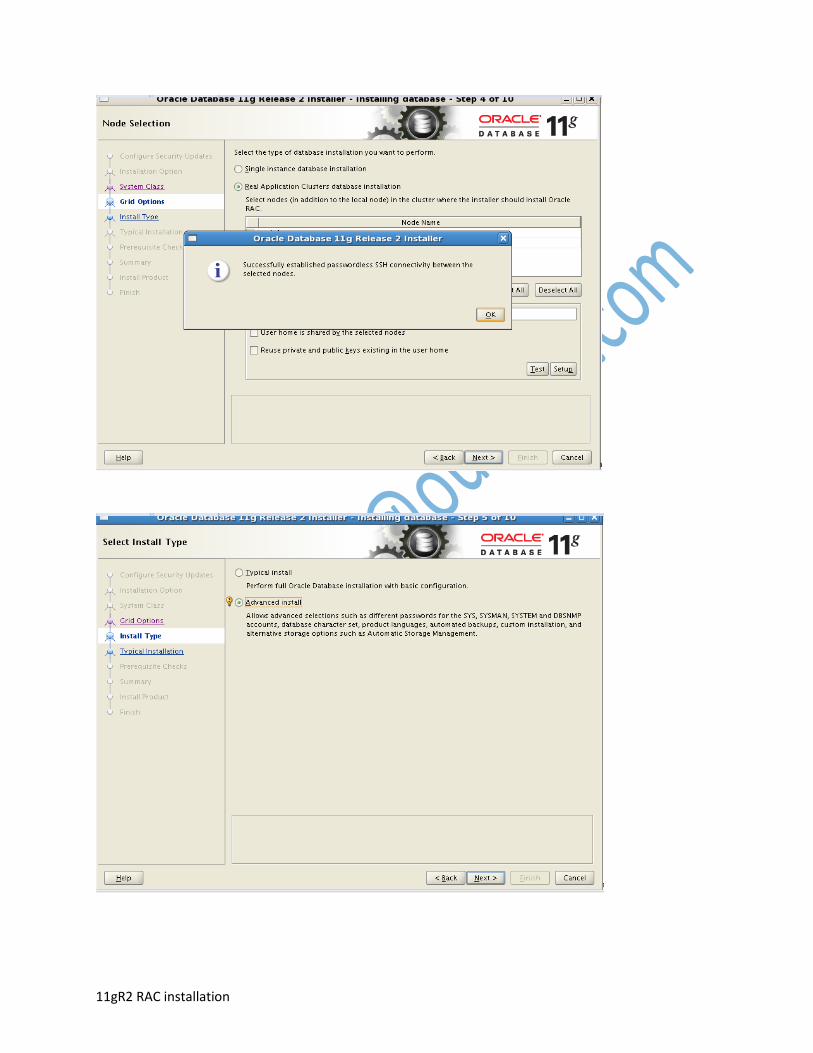
Click ssh connectivity
Click setup

11gR2 RAC installation
Click Change Discovery Path
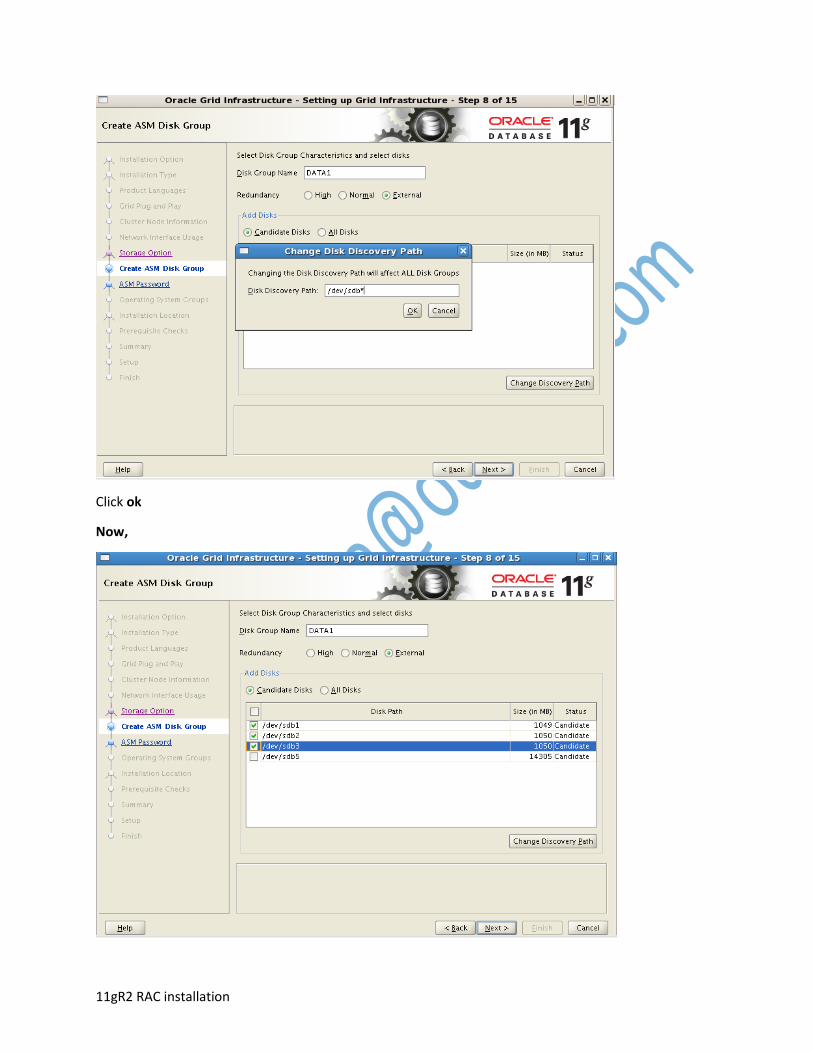
11gR2 RAC installation
Click ok
Now,
11gR2 RAC installation
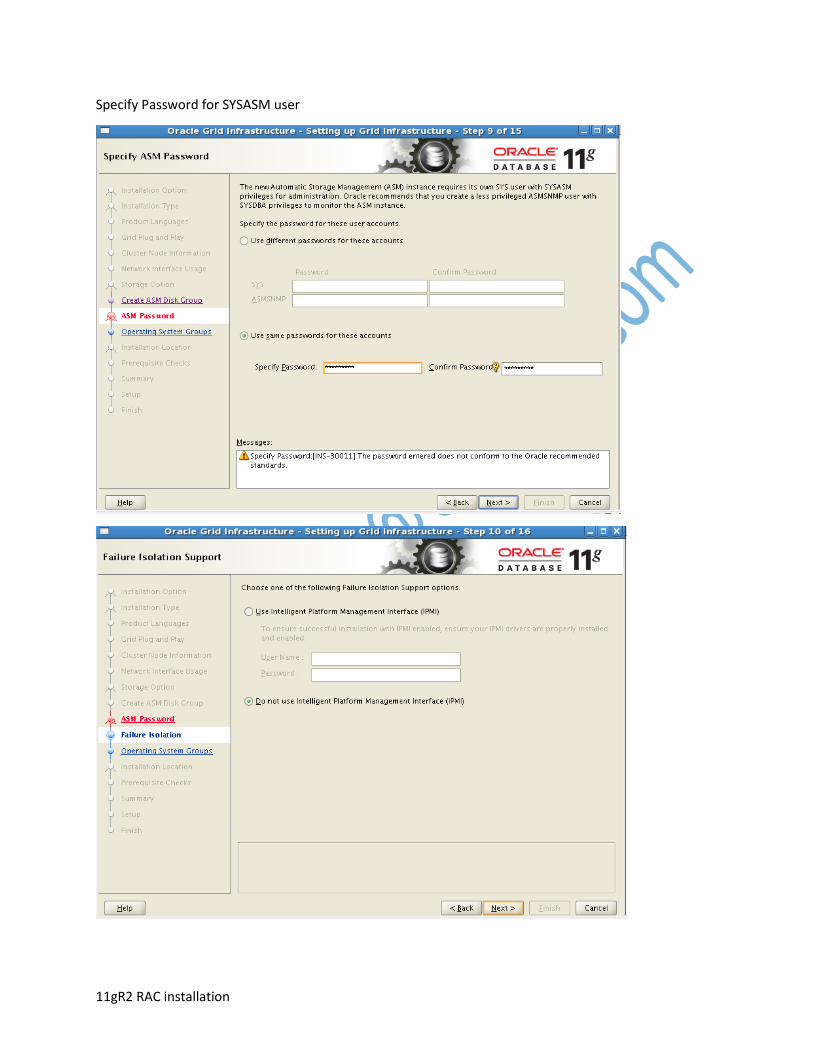
Specify Password for SYSASM user
11gR2 RAC installation

11gR2 RAC installation
11gR2 RAC installation
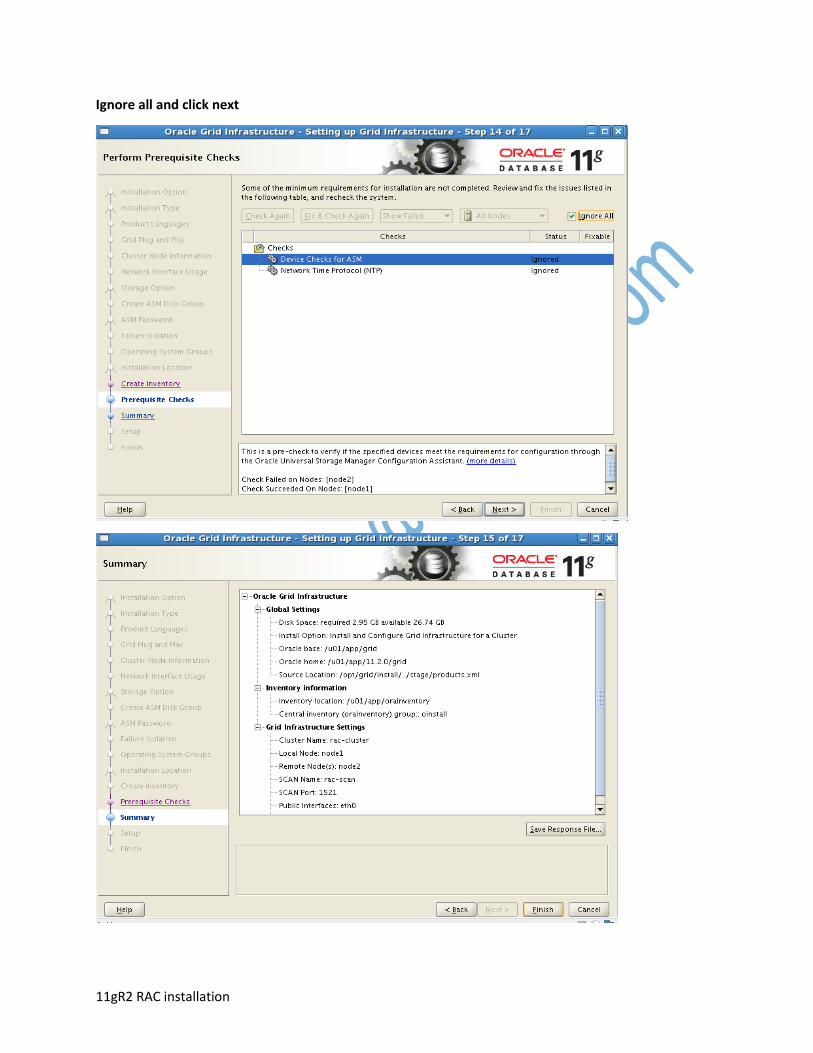
Ignore all and click next

11gR2 RAC installation
EXECUTE the orainstRoot.sh and Root.sh in the given order i.e. first on node1 then node2

11gR2 RAC installation
[root@node1 ~]# /u01/app/oraInventory/orainstRoot.sh
Changing permissions of /u01/app/oraInventory.
Adding read,write permissions for group.
Removing read,write,execute permissions for world.
Changing groupname of /u01/app/oraInventory to oinstall.
The execution of the script is complete.
[root@node2 opt]# /u01/app/oraInventory/orainstRoot.sh
Changing permissions of /u01/app/oraInventory.
Adding read,write permissions for group.
Removing read,write,execute permissions for world.
Now Run root.sh on both the nodes, Done ! Grid installation is complete!

11gR2 RAC installation
Known Issue:
If for some reason root.sh script fails at node2 ,then follow the below steps:
(Deconfigure Oracle clusterware)
[root@node2 ~]# cd /u01/app/11.2.0/grid/crs/install
[root@node2 install]# perl rootcrs.pl -verbose -deconfig -force
2016-01-24 15:55:20: Parsing the host name
2016-01-24 15:55:20: Checking for super user privileges
2016-01-24 15:55:20: User has super user privileges
Using configuration parameter file: ./crsconfig_params
PRCR-1035 : Failed to look up CRS resource ora.cluster_vip.type for 1
PRCR-1068 : Failed to query resources
Cannot communicate with crsd
PRCR-1070 : Failed to check if resource ora.gsd is registered
Cannot communicate with crsd
PRCR-1070 : Failed to check if resource ora.ons is registered
Cannot communicate with crsd
PRCR-1070 : Failed to check if resource ora.eons is registered
Cannot communicate with crsd
ACFS-9200: Supported
CRS-4535: Cannot communicate with Cluster Ready Services
CRS-4000: Command Stop failed, or completed with errors.
CRS-4133: Oracle High Availability Services has been stopped.
Successfully deconfigured Oracle clusterware stack on this node
Now resolve the issue and then re-run the root.sh script
Now,
Login as grid user on node1
[root@node1 ~]# su - grid
[grid@node1 ~]$
[grid@node1 ~]$ . oraenv
11gR2 RAC installation
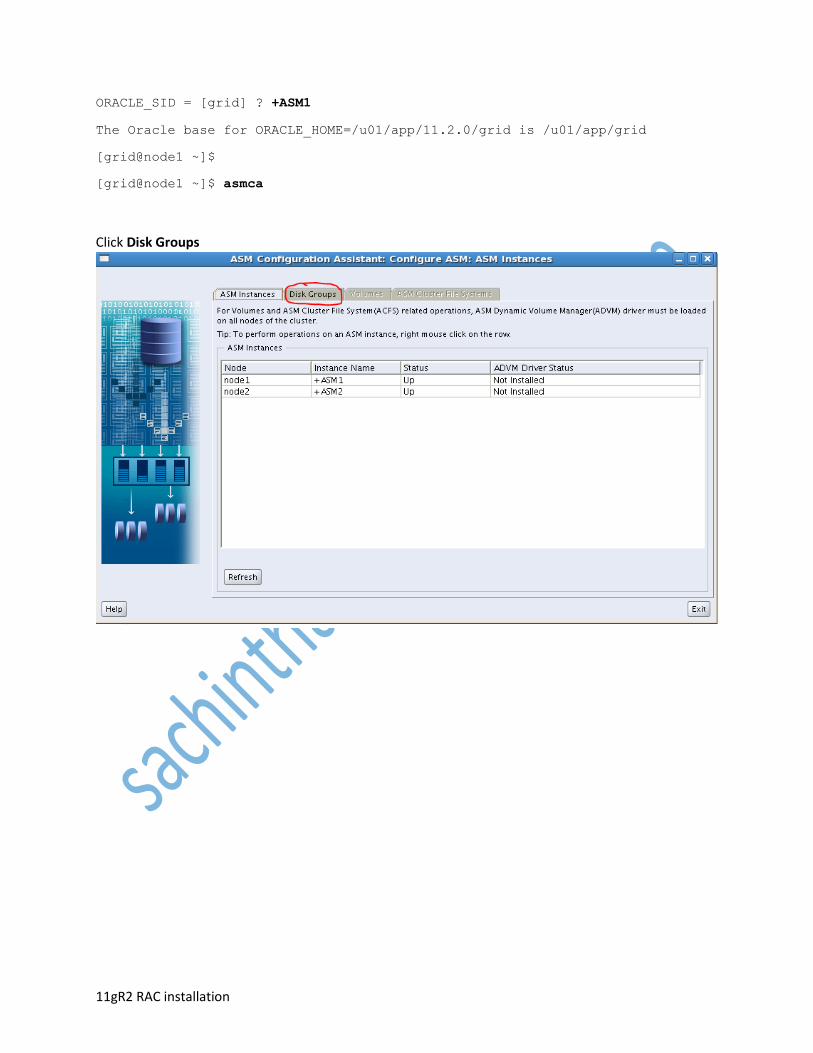
ORACLE_SID = [grid] ? +ASM1
The Oracle base for ORACLE_HOME=/u01/app/11.2.0/grid is /u01/app/grid
[grid@node1 ~]$
[grid@node1 ~]$ asmca
Click Disk Groups
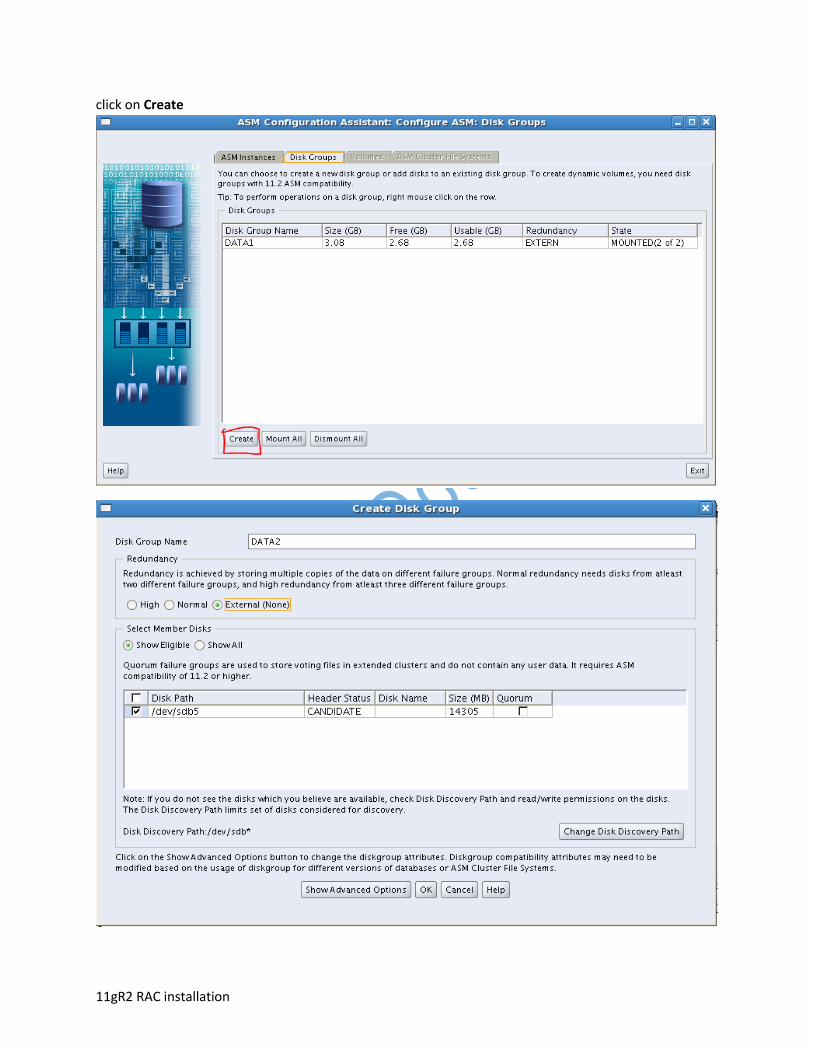
11gR2 RAC installation
click on Create
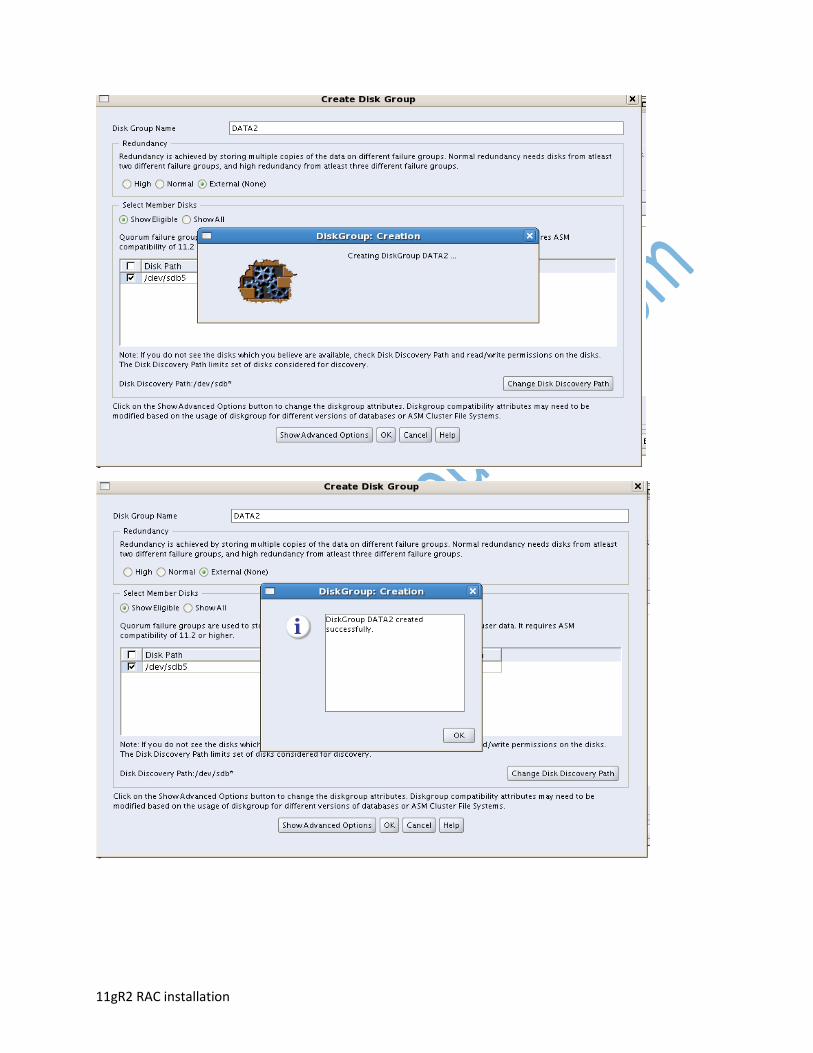
11gR2 RAC installation
11gR2 RAC installation
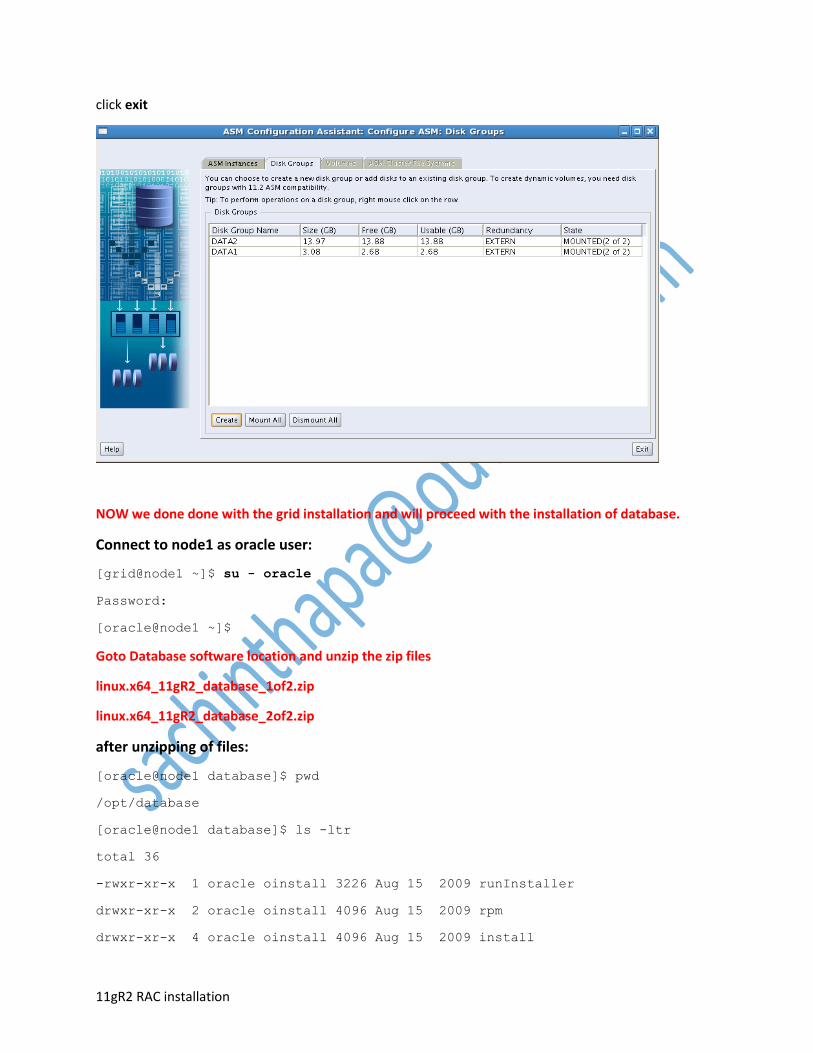
click exit
NOW we done done with the grid installation and will proceed with the installation of database.
Connect to node1 as oracle user:
[grid@node1 ~]$ su - oracle
Password:
[oracle@node1 ~]$
Goto Database software location and unzip the zip files
linux.x64_11gR2_database_1of2.zip
linux.x64_11gR2_database_2of2.zip
after unzipping of files:
[oracle@node1 database]$ pwd
/opt/database
[oracle@node1 database]$ ls -ltr
total 36
-rwxr-xr-x 1 oracle oinstall 3226 Aug 15 2009 runInstaller
drwxr-xr-x 2 oracle oinstall 4096 Aug 15 2009 rpm
drwxr-xr-x 4 oracle oinstall 4096 Aug 15 2009 install
11gR2 RAC installation
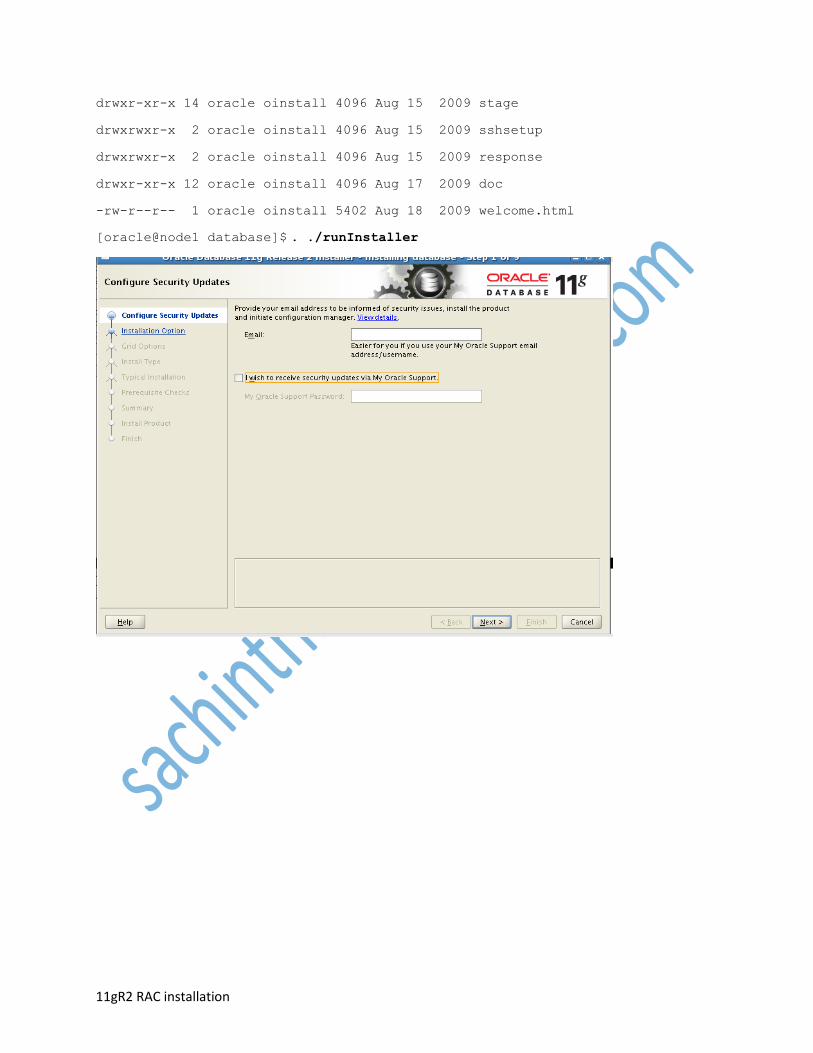
drwxr-xr-x 14 oracle oinstall 4096 Aug 15 2009 stage
drwxrwxr-x 2 oracle oinstall 4096 Aug 15 2009 sshsetup
drwxrwxr-x 2 oracle oinstall 4096 Aug 15 2009 response
drwxr-xr-x 12 oracle oinstall 4096 Aug 17 2009 doc
-rw-r--r-- 1 oracle oinstall 5402 Aug 18 2009 welcome.html
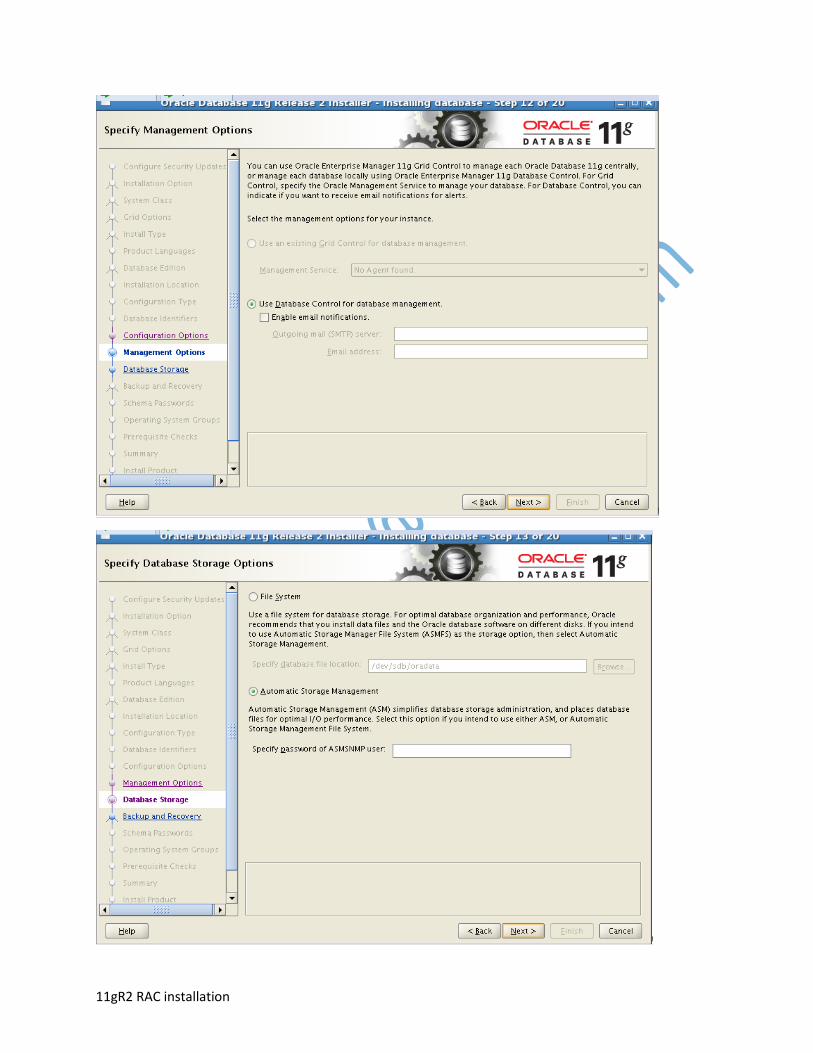
[oracle@node1 database]$ . ./runInstaller

11gR2 RAC installation

11gR2 RAC installation
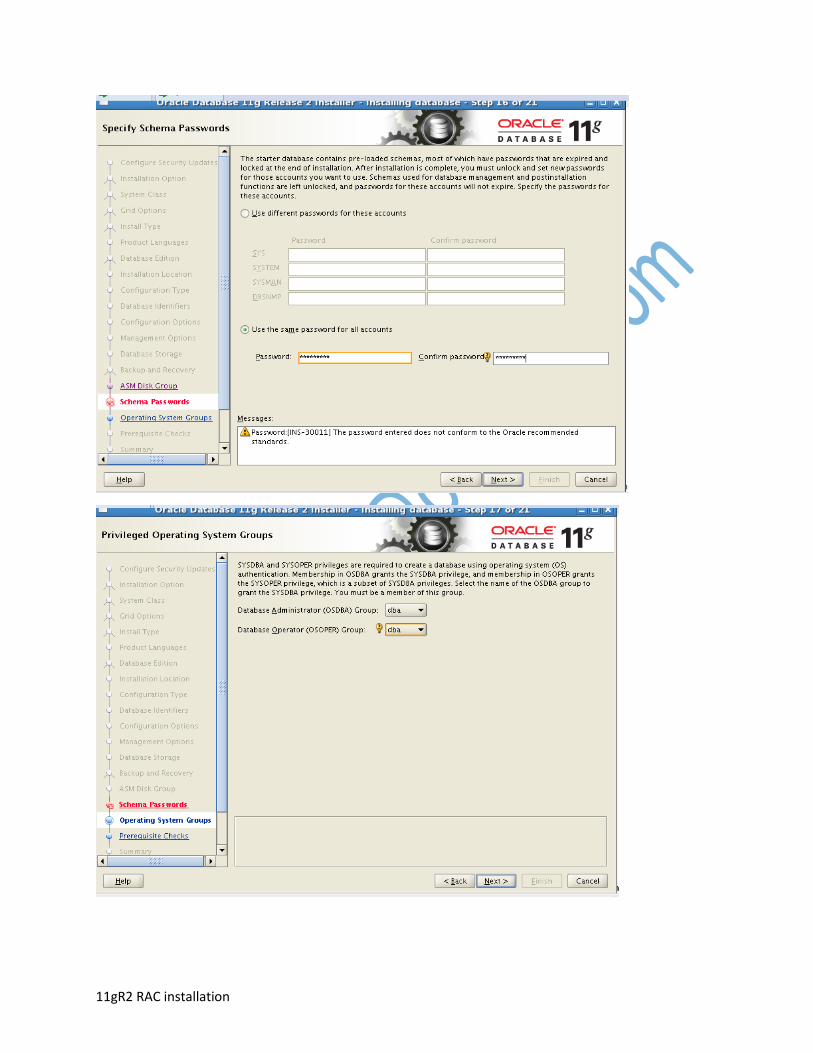
click SSH Connectivity and then setup
11gR2 RAC installation
11gR2 RAC installation
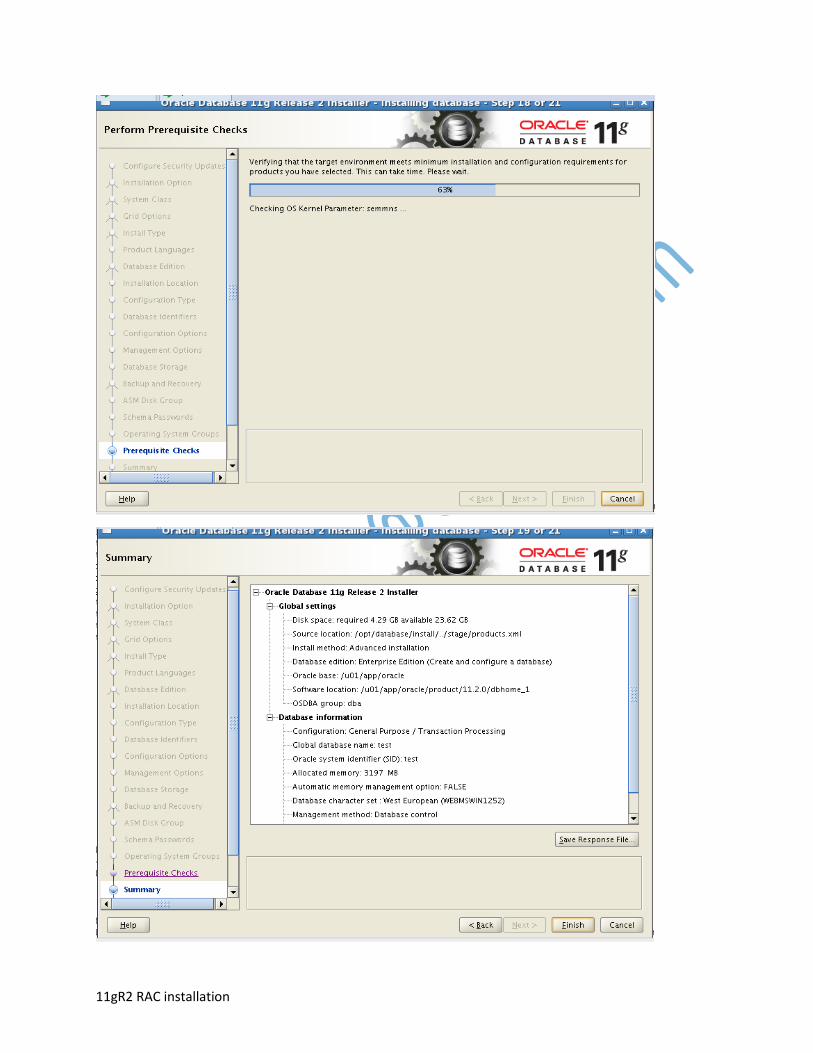
11gR2 RAC installation
11gR2 RAC installation
11gR2 RAC installation

11gR2 RAC installation
11gR2 RAC installation
11gR2 RAC installation
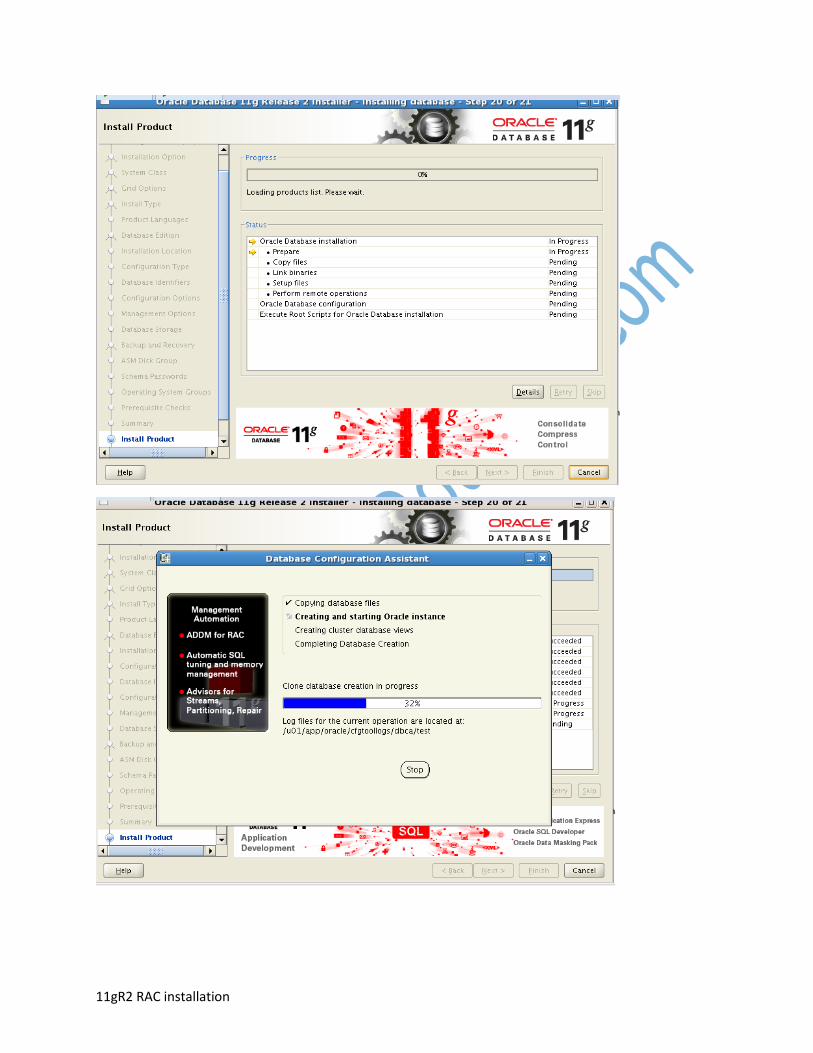
11gR2 RAC installation
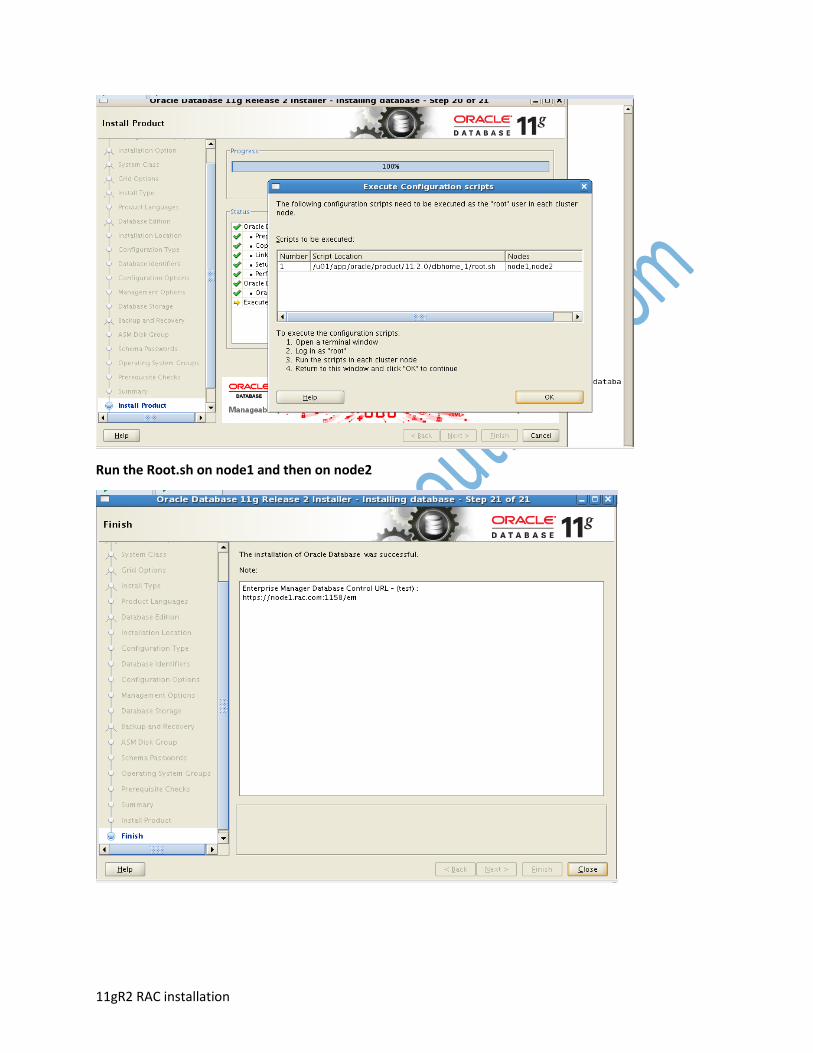
11gR2 RAC installation
Run the Root.sh on node1 and then on node2
11gR2 RAC installation
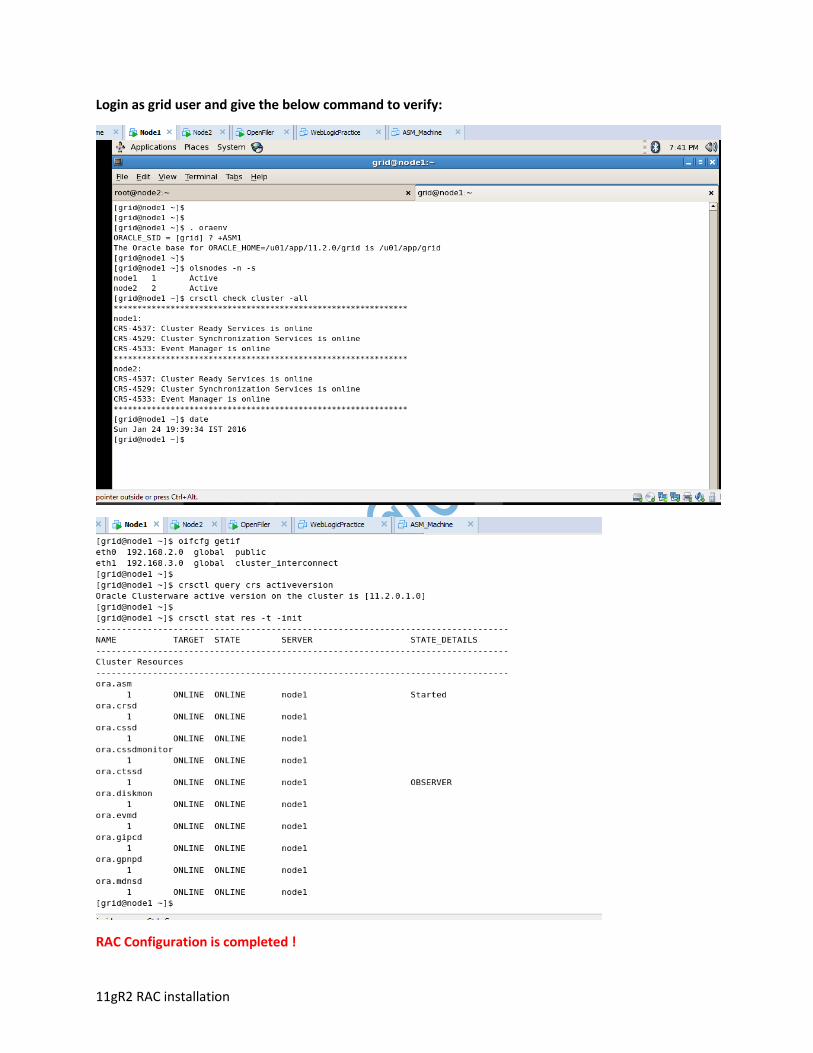
Login as grid user and give the below command to verify:
RAC Configuration is completed !

11gR2 RAC installation


