
eeqquuss TTaabblleettoopp AAuuttooccllaavvee
TAT-202
User’s Manual and Operation Guide
Tex Year Industries Inc No.9, WuQuan 6th Rd., Wugu District., New Taipei City, 24889 Taiwan e-mail:[email protected] / [email protected] http:www.texyear.com / www.equsmaster.com
TEL: 886-2-2299-2121 Ext.527 FAX: 886-2-2299-2888

1
This user’s manual is to provide an outline of the operation and maintenance of the equs
Tabletop Autoclave. To prevent misuse of or damage to the autoclave, please read the
user’s manual carefully BEFORE operating the equs autoclave. The content of this user’s
manual are copy right protected and duplication of the content of this user’s manual is prohibited. Tex Year Industries Inc reserves the right to change the content of the user’s manual without advance notice.
Tex Year Industries Inc Warranty and Responsibility Tex Year Industries Inc (“Tex Year”) warrants to the original purchaser including distributors or appointed agents that the Tabletop Autoclave manufactured by Tex Year shall be free from defects in materials and workmanship under conditions of normal use, maintenance and service for a period of 1 year from the date of delivery from the Tex Year manufacturing plant to the original purchaser. Tex Year’s obligation under this warranty is limited to the repair or replacement of the defective device with the final decision to be made by Tex Year. Labor costs and consumable parts are not covered by this warranty. Tex Year’s responsibility under this warranty does not include defects caused by natural disaster, misuse, abuse, negligence, alteration, accident, freight damage, failure to properly maintain and clean or using the autoclave in conjunction with accessories that are not manufactured by Tex Year. No distributors or agents are authorized to extend the terms of this warranty in either content or period.

2
Content
Safety and Important Information Page3
Chapter 1 Introduction to the Autoclave Page 5
1.1 In General Page 6
1.2 Electrical Requirements Page 6
1.3 Safety Features Page 6
1.4 Product Function Test Page 9
1.5 Product Operation Test Page 9
Chapter 2 Operation Page10
2.1 Reservoir and water loading Page10
2.2 Preparation before operation Page10
2.3 Temperature Setting Page11
2.4 Sterilization Time Setting Page11
2.5 Drying Time Setting Page11
2.6 Instructions for operation Page12
2.7
Instructions for program mode ______________ Page13
2.8 Light Indicators ______________ Page15
2.9 Sterilization cycle time(Temperature) ______________ Page15
2.10 Sterilization cycle time(Pressure) ______________ Page15
2.11 Instructions for stainless steel box ______________ Page16
2.12 Instructions for stainless steel tray ______________ Page16
2.13 Specification of CI and BI ______________ Page16
Chapter 3:Safety Information Page18
Chapter 4:Regular Scheduled Maintenance Page20
Chapter 5:Trouble Shooting Page23
Error Codes Page26
Chapter 6:Specification Page27
Chapter 7: Warning labels _______________ Page28

3
Safety and Important Information
To ensure safety, users need to pay careful attention during operation of autoclave while
performing sterilization. Proper operation of the equs autoclave is important to maintain
the safety of users and staff and prevent damage to the device. Danger: Instructions must be followed carefully to prevent serious injury. Warning: The instructions need to be followed to avoid damage to the device
Danger Explosive Risk:
Do not operate this sterilizer in an area where flammable anesthetics are used or stored to prevent serious injury through possible explosion.
After the door seal is cleaned, the user needs to ensure the seal is properly refitted into the channel. Failure to do so may cause leaks from the door.
During the operation of sterilizer, it is prohibited use any explosive or other substance with high evaporation rates in the chamber.
Do not use any sealed, airtight containers within this device.
Misuse Warning
Tex Year standard accessories are specifically designed for use with the Tex Year autoclave and should not be used in another device. Use of accessories that are not made by Tex Year in the autoclave may result the damage to the device or injury to patients or staff.
The autoclave should only be used by fully trained staff. All related installation, maintenance, service and repair should conducted by Tex Year authorized engineers. Preventive maintenance work should be conducted on a periodic schedule.
Serious injury or damage to the device may occur if the machine is operated by staff that are unfamiliar with this device.
Burning Warning

4
Do not add water to the reservoir during the sterilization cycle. Steam or hot water escape may cause harm.
Always rest the autoclave on a stable table top or similar surface. Placement on an unstable base may result in water leakage and may cause harm.
Do not attempt to turn the door handle or open the door during the sterilization cycle to prevent injury
After each cycle, the temperature of sterilized objects may be very hot. It is recommended not to remove the sterilized objects immediately after end of cycle to prevent harm.
Do not attempt to withdraw sterilized objects after the sterilization cycle without protection for the hands.
Before opening the autoclave as sterilization completed, confirm the Pressure Gauge indicates zero.
Electrical Warning:
Do not operate the device when the outer shell or control panel has been removed.
Do not overload the current to the cable or plug. It is strongly recommended not to use an extension cable with this device.
Remove the plug from outlet, if autoclave is not in use.
Warning to prevent damage to the device.
1. Ensure the electrical plug, current and voltage are suitable for the device
2. Use a socket and plug with an earth connection.
3. Do not place any heavy object or cart with wheels on top of the plug cord to prevent possible damage and avoid risk to users.
4. Do not share with the plug or socket with other devices.
5. If the sterilized object contains liquid, avoid liquid contact with the heating element inside the chamber to prevent any damage to the device which may shorten the life of the heater.
6. Do not attempt to move or turn the door handle during the sterilization cycle to prevent damage to the door shaft.
7. The pressure release valve is an important component to ensure the safety of the user in case of misuse or malfunction of the device. Regular maintenance of this part should be conducted.

5
8. Autoclave needs to be placed on a stable tabletop or similar surface.
9. Do not lose this handbook
10. Do not drop or abuse the autoclave
11. Do not open the casing or attempt to repair the autoclave on your own
12. Do not rest the autoclave on an unstable table or surface
13. If an Error message occurs during the cycle, the cycle must be repeated.
14. Do not add any chemical or substance to the distilled water in the reservoir.
Chapter 1: Introduction to the Autoclave
Controls and Indicator: Set: To allow user to select sterilization cycle or drying cycle “+” and “-“: To allow user to increase or decrease the time when program mode is
activated. Reset/Stop: To allow user to terminate the selected program or function. Enter: to enter program mode to allow user to change sterilization time or drying
time> When the correct time is input using “+” and “-“ controls, press “enter” again to confirm the program.
Dry Only: Allow user to start drying without initiating sterilization cycle. Start: To initiate selected program including the “dry only” program
Pressure Gauge
Door open and low water indicator
Start
On/Off Switch
Water filter (Behind Door)
121℃/134℃ Switch
Door
Knob
Selector

6
1.1 In General:
The equs tabletop autoclave is made of high quality stainless steel with a control
panel at the front including controls for time setting, indicators and a pressure gauge.
The equs tabletop series of autoclaves are equipped with a depressurization valve,
which allows the release of air from the sterilizing chamber during or at the end of
the cycle in order to achieve the highest grade of sterilization. The equs table top
series of autoclaves pressure release valve is manufactured by a certified
manufacturer in compliance with International safety standards to ensure safety for
the users. This autoclave requires distilled water (without minerals). The tank holds
enough water for multiple sterilization cycles. The autoclave is supplied with a
drainage valve on the side for easy cleaning, and which also serves as a water level
indicator. The machine will not start cycle if the door is not properly closed. The door
will not open when the chamber is pressurized.
The equs tabletop series of autoclaves provides a variety of choices to satisfy
demands from users. With an ergonomic design, it is simple for a user to open
and close the device door with safety.
1.2 Electrical Requirement
equs tabletop autoclave requires a 230 VAC/10A, 50/60Hz power supply.
1.3 Safety Features
Pressure Switch
This switch is used to select the desired pressure. The device will operate based
on the pressure selected.
Overheating protector
During the sterilization cycle if the device has insufficient water due to
malfunction or power outage, an overheating protector will cut off the power
supply to prevent the chamber from overheating. At the same time the device
will alert the users with an audible beep and will show an error message on the
digital display.

7
Pressure release valve
If the pressure control system malfunctions
causing an increase in pressure in the
chamber, when the pressure reaches a
certain maximum level, the pressure release
valve will release the excess pressure to
allow device to stay at the optimum level to
ensure safety for the user.
Important:
Perform pressure release valve check every week.
Process:
Please ensure chamber is empty.
Preset the pressure / temperature at 134oC, with sterilization
time set at 5 minutes, and drying time at 0 minutes. Close the
door, press start.
When chamber reaches the preset pressure / temperature, use a
rod at least 300mm in length and insert into the ring that is
attached to the pressure release valve. Pull on this ring for about
1 second. Steam should discharge freely from the side of the
valve. Repeat the step for a further 1 or 2 times to complete the
process. This process will also clean the connectors to the
pressure release valve for best performance.
Warning: During the pressure release valve check, steam will
vent from the opening of the reservoir. To avoid risk
of injury, place a wet towel covering the opening of
reservoir as a barrier before using the rod to pull the
ring of the valve.
Important:

8
To ensure the best performance and safety, conduct this pressure
release check at regular schedule.
The pressure release valve is required to be changed every year.
1. Door latch switch
The door needs to be closed securely with the handle in the vertical position in
order to start the operating cycle. During the heating and sterilizing cycle, if the
door is opened for any reason, the device will suspend its working cycle.
This is a safety featureof the door.
2. Automatic Pressure lock
When the pressure reaches 0.28kg/cm2 inside the chamber, the automatic
pressure lock will activate in order to prevent the door from being opened
during the operating cycle. When the chamber pressure reaches 0kg/cm2 , the
door pressure lock will disengage to allow the operator to open the door. (At
the end of the sterilizing cycle the LED will shows “OA”, indicating the autoclave
is removing air and water from the chamber. Please wait until “OA” cycle is
ended and disappeared from the LED before attempting to open door.)
This is an additional safety feature of the door.
3. Emergency stop and Water/ Air Release
When the pressure inside the chamber is greater than 0 kg/cm2, the users may
interrupt the cycle by pressing “Reset” for 2 second to stop the cycle. If the
user then needs to release water and air out of chamber, press “Reset” for an
additional 5 more seconds until “OA” is displayed in LED display.
If the emergency stop button is pressed during “Water” in and “Dry” cycles ,
the LED display will show “E1”. During the “Heat” and “Sterilize” stage, the LED
display will show “OA” since the chamber may still be pressurized during the
heating and sterilizing phases.

9
1.4 Product Function Test
The product function test includes chamber internal air test, drying temperature test
in full load, sterilization pressure test in full load, water pressure test in chamber,
sterilization pressure test, safety valve function test, door safety function test, heater
temperature overheated protection test, water level sensor test, Display board
function and indicator light test and cool air discharge valve test.
1.5 Product Operation Test
The product operation test includes sterilization test in full load (biological indicator
and chemical indicator), leakage of electricity test, ground continuity test, dielectric
strength test and air-tight test with chamber door.
1.6 Display board specification
C00000: When the sterilization cycle is starting, the number will show the
accumulated successful sterilization numbers from the beginning.
oA: It means the internal water and steam flow to the reservoir. If you press the
RESET/STOP 5 seconds, the autoclave will urgently stop the cycle and discharge the
internal water and steam to the reservoir.
Pc: Press the RESET/STOP 10 seconds, Pc will show up. It means the system will go
back to all original setting parameter.
dL: It means the internal safety pressure lock is on. Release the lock if the pressure in
chamber is zero.

10
Chapter 2 : Operation
2.1 Reservoir and filling with Water
The autoclave reservoir is required to be
filled with distilled water through the cap
on the top of the body of the device. The
capacity of the reservoir is approximately
3.5 litres. The tube on the side needs to be
attached firmly to allow users to see the
correct water level. When filling the
reservoir do not exceed the full water level
(indicated in blue).
When there is enough water in the
reservoir, the chamber door may be closed
and “Start” pressed to begin the
sterilization cycle. The water in the
reservoir will automatically fill up the
chamber to the preset level, and will then
start to heat up.
2.2 Preparation before sterilization cycle
Objects to be sterilized must be placed
into the Tex Year manufactured stainless
steel box before being loaded them into
the autoclave chamber. The box lid should
be closed and all holes unobstructed to
allow full steam penetration. All objects to
be sterilized should be cleaned, washed,
and dried prior to sterilization.
Sterilization Box
Sterilization
tray
Sterilization shelf
Remove the clip sterilization Tray

11
2.3 Temperature Setting
The temperature may be set by turning
the switch on the upper right hand corner
of the control panel. The control panel
indicates either 121oC or134℃ for the user
to select their desired sterilization
temperature.
2.4 Sterilization Time Setting
When the temperature is set at 121oC, the
sterilization timer can be set for between
20-60 minutes duration in program mode.
When the temperature is set at 134℃, the
sterilization timer can be set for between
4-60 min duration.
2.5 Drying Time Setting
The autoclave may be programmed to set
the drying time for between 0-60 minutes.

12
2.6 Instruction for operation
Turn on autoclave. Load the objects to be sterilized.Close door by turning the handle to a vertical direction
Press “Set” to select “Dry”
Select 121oC or 134
oC temperature using switch
Press “SET” to select “sterilize” and “dry”.
Press “+” or “-“ to set the timing of each cycle, then press “Enter”
Press “Start” to start sterilization cycle
Start to count down for sterilization cycle
After sterilization cycle, display will show “OA” when evacuating water and hot air
Dry count down
Press “+” or “-“ to set the required duration(0-60 minutes) then press “Enter”
Press “Start”
Audible beep shows cycle complete, display shows “Ed”, (if not, please restart cycle), press “Reset” for standby
Dry only
Sterilization cycle
No dry selected
Dry count down

13
2.7 Instructions for program mode Please note: F1 is a factory preset program. Material to be sterilized by user defined program cycles must be validated by user. For a temperature setting of 121oC, the sterilization time may not be set lower than 20 minutes to ensure proper sterilization.
To Enter Program mode, ensure chosen temperature of 121OC or 134
OC is selected using switch
Press “Enter” the display will show “F1”. Use “+” or “-“ to go to “F2” , “F3”…etc until reaching the program you wish to start
Press “Enter” to enter program mode
Press “+” or “-“, the display will show”F1” to “F9”
Decide on and select a program to set from “F2” to “F9”
Select a program, then press “Enter”
Press “Set” to select sterilize or dry
Press “+” or “-“ to select timing for each cycle (dry or sterilize) then press “Enter”
Press “Set “ to fix the timing set for this program
Press “Enter” to confirm the program
Press “Start” to start cycle
Perform pre-program cycle To set timing into memory program

14
Enter the program mode by pressing “Enter”,
operator will see “F1” displayed on LED, press “+”
or “-“ to select desired program from F1 to F9
When power is turned on, F1 will be the first
program shown on the display when program mode
is entered. Press“Enter”one more time to view the
program mode preset time. Program F1 is unable to
have any settings changed as this is a factory preset
program.
Press “SET” to set sterilization and drying time
When light indication is on “Sterilize”, press “+” or
“-“ to set sterilization time. Press “Enter” to store
the value.
Press “Set” again to change light indicator to “Dry”
to set drying time. Repeat the same step as above.
Press “Enter” to store the value.
Attention:
121℃:Time allowed to be set is from 20-60
minutes for sterilization.
134℃:Time allowed to be set is from 4-60
minute for sterilization.
Dry time: Program mode allows user to set
from 0-60 minutes in all programs.

15
2.8 Light Indicators
2.9 Sterilization cycle time-temperature
2.10 Sterilization cycle time-pressure
0
20
40
60
80
100
120
140
Sterilization cycle time-temperature
滅菌動作曲線圖
0
0.5
1
1.5
2
2.5
'20
11
-12
-16
…
'20
11
-12
-16
…
'20
11
-12
-16
…
'20
11
-12
-16
…
'20
11
-12
-16
…
'20
11
-12
-16
…
'20
11
-12
-16
…
'20
11
-12
-16
…
'20
11
-12
-16
…
'20
11
-12
-16
…
'20
11
-12
-16
…
'20
11
-12
-16
…
'20
11
-12
-16
…
'20
11
-12
-16
…
'20
11
-12
-16
…
'20
11
-12
-16
…
'20
11
-12
-16
…
'20
11
-12
-16
…
'20
11
-12
-16
…
Pressure(kg/c㎡)
Pressure(kg/c㎡)
Water Indicator On: Water is filling the chamber
Heat Indicator On: The device is heating up
Sterilize Indicator On: Temperature has reached
preset value, and is starting to perform sterilization.
During this stage, the device will perform count down
on the LED to the end of the sterilization cycle.
Dry Indicator On: Sterilization and removal of hot
air/water is completed. Drying function is on and
count down to end of drying cycle is shown on LED.
Door Open Indicator On: Door is not closed securely.
Low Water Indicator On:The water needs to be
refilled. The reservoir should be refilled only after
sterilization is completed.

16
2.11 Instructions for stainless steel box
Instruction :
1. Don’t overlap the surgical instrument and allocate the chemical indicators(as the picture)
in the middle of the box and four corners. After sterilization completely, we can make sure
the sterilization if successful.
2. Please do the biological test every week and put it in the same location to confirm the
sterilization validity.
2.12 Instructions for stainless steel tray
Don’t overlap the surgical instrument and allocate the chemical indicators(as the picture) in the middle of the tray and four corners. After sterilization completely, we can make sure the sterilization if successful. 2.13 Specification of CI and BI
Specification of biological indicator : Specification : PT-3-5-100 (Log 5), PT-3-6-100 (Log 6)
Chemical Indicator Chemical Indicator
Chemical Indicator
Chemical Indicator Chemical Indicator
Chemical Indicator
Chemical Indicator
Chemical Indicator Chemical Indicator
Chemical Indicator
Chemical Indicator

17
Purpose: to monitor the validity of the sterilization during the steam sterilization cycle. Description:
The biological is use for monitor the saturated steam sterilization
process, each indicator include a piece of geobacillus
stearothermophilus spores ATCC#7953 and an internal vessel which
contain the prepared plate media. The internal vessel also contains
the Bromocresol purpl to be the PH indicator, if the bacteria grow up,
the color also change from purple to yellow.
Monitor frequency:
To realize the best control with sterilization, each cycle needs 2 or more BI to monitor
specification of chemical indicator
Specification: CI is a multi-parameter monitor indicated paper.
Purpose: The CI could use in high pressure steam autoclave,
it can monitor temperature, time and saturated steam. It also
could use in EO sterilization autoclave.
Description: It can be judged by color to confirm the validity of the sterilization.

18
Chapter 3: Safety Information
TAT-202 Safety Precautions
Warning Action
1. Do not operate this sterilizer in area
where flammable anesthetics are used or
stored to prevent risk of explosion.
1. Do not operate this sterilizer in any area
where flammable anesthetics are used or
stored. In siting autoclave consider the
space required to open door and gain
access to the chamber.
2. Objects to be Sterilized: 2.
A. During the operation of sterilizer, it is prohibited to sterilize or use any explosive or other volatile substance with high rates of evaporation inside the chamber.
A. Know the composition of all objects to
be sterilized and evaluate if they are
suitable for steam sterilization.
B. Do not use any sealed, airtight
containers within this device.
B. User needs to know the
characteristics of all objects or
packages that will be loaded into the
steam autoclave.
C. If the object to be sterilized is liquid
or contains liquid, avoid liquid coming
into contact with the heater inside
the sterilizing chamber during heating
to avoid any damage to the device .
C. Placed the liquid in a suitable box to
avoid liquid coming into contact with
the heater.
3.
Do not add water to the reservoir during
the sterilization cycle. The steam or hot
water may cause harm.
3.
Do not open the reservoir cover during
the operating cycle. Water level should be
kept between “low water” and “full”
indicator at all times.

19
4. 4.
Do not attempt to turn the door
handle or open the door during the
operating cycle to prevent damage to
the device.
If sterilization cycle needs to be
stopped during the operation, press
“REST” for 2 second to stop
sterilization, and continue to press
another 5 second until digital display
shows “OA” indicating
depressurization has commenced.
When the pressure reaches 0 kg/cm2
the door will be allowed to be
opened.
Warning Action
5. After the sterilization cycle, pay careful
attention to the surface temperature of
the sterilized objects which will be very
high for some period of time after
sterilization.
5. Use insulated gloves or other tools to
unload the sterilization box or tray to
avoid harm.
6. The pressure release valve is an
important component to ensure the
safety in case if there is misuse or a
malfunction of the device.
6. Regular testing of the valve and
scheduled maintenance to pressure
release valve should be conducted by
certified engineers.
7. Cleaning the chamber: 7.
A. The outer shell of the autoclave may
be hot after sterilization cycle. Clean
the body with caution.
A. It is suggested that the body is only
cleaned after a cooling down period.
B. After the door gasket is cleaned, the
user needs to ensure the gasket is
properly refitted. Failure to do so may
cause leakage from around the door.
B. Ensure the gasket is properly refitted
after cleaning.

20
8. The autoclave is a high voltage device,
use appropriate voltage power supply
for the autoclave.
8. Do not use an extension plug. Ensure the
socket supply voltage is suitable for the
autoclave. Ensure use of a socket with an
earth connection.
Chapter 4: Regular Scheduled Maintenance
Perform by operator
Maintenance detail Daily Weekly 1 Month 3 Months Annually
Clean the door gasket V
Clean the chamber
V
Clean pressure release valve V
Clean tray or box V
Clean the system V
Oil the door hinge V
Clean the autoclave external surfaces
V
Replace water V
Check/replace pressure release valve
V
Check water quality V
Clean reservoir V
Perform by certified engineers
Clean or replace filter V
Check the door seal V
Check and fastening piping joints V
Check and fastening screw V
Check connection V
Perform validation V
Check all valves V
Check door and locking device V
Check wear of all parts V
Check pressure V

21
◎ Basic rules of maintenance
1.) Always use the socket with an earth connection.
2.) Disconnectdevice from the electrical supply when autoclave is not in use.
3.) Only use distilled water
4.) Do not drop any small objects to the bottom of chamber which may cause
blockage to the water flow when the machine is trying to remove water and
air.
5.) Do not share plug socket or extension cable with other device.
6.) Place the autoclave on stable tabletop. The water level should cover the
heater during the cycle, will achieve the best drying performance.
7.) The water in the reservoir can be used for multiple sterilization cycles before
needing to be refilled. Check the water quality in the reservoir monthly. If a
water change is needed, use the tube on the side of machine to drain the dirty
water out completely before adding fresh new distilled water.
8.) If it is necessary to move the autoclave, or the autoclave may not be in use for
a period of time, the water should be drained from the reservoir completely.
9.) If power indicator does not come on when switching machine on, check “fuse
breaker” (and press to reset if necessary), and check if plug is in and socket
switch turned on.
10.) Clean the chamber monthly
11.) Clean the reservoir every 3 months.
12.) Water filter needs to be cleaned/replaced monthly
13.) Check pressure release valve every week to ensure best performance.
14.) To avoid harm, chamber should be cleaned only when chamber has cooled
down.
15.) When autoclave has not been used for a period of timeof 3 months or longer,
please contact authorized service center for check up and maintenance before

22
operators start to reuse autoclave.
Instruction to install the autoclave:
Installation environment
1. Although our autoclave is matched the EMC standard, different installation environment
could resulted in the internal interference situation. If it happened, please discharge the
problems as following step:
1.) Move the autoclave to other place or turn it to different direction.
2.) Enlarge the distance from the autoclave and other electronic equipment.
3.) Check the installation environment has adapted temperature and well
ventilation.
4.) Notify the merchandiser or request equs service staff to dispose.
2. Check the loading capacity (the table capacity should be load over 100kg) before
allocating autoclave on the table to avoid the machine falling down.
3.The place the autoclave installed should keep over 10cm distances for ventilate. The
installation place also need to considerate the door space that should leave over 50cm
and easy for instrument to pass in and out.
10cm 10cm
10cm
50cm

23
The bottom board should be inserted as following picture:
Chapter 5: Trouble Shooting
Problem Possible Cause Solution
A. No power (1) Power cord came loose
from supply outlet
(2) Fuse breaker is open
(1) Ensure power cord is plugged
into outlet and switched on
(2) Check if “fuse breaker” is open. If
it is open, press fuse break
button to reset.
B. Steam leaks (1) Door gasket is damaged
(2) Door gasket is aged due to
long term use
(3) Door gasket may be not
tight enough
(1) Clean the door gasket
(2) Change to a new door gasket
(3) Adjust the placement of gasket,
or change to a new door gasket
Confirm it could be connected tightly

24
C. Door won’t
open
(1) Ventilation valve fail.
(2) Damage to the door
(3) Automatic pressure lock
on the door has failed
(1) Wait 3 minutes, until chamber is
depressurized. If still unable to
open the door, please contact
certified engineers for service.
(2) Please contact certified
engineers for service
(3) Please contact certified
engineers for service
D. Power is on
but pressure
is not going
up during the
sterilizing
cycle
(1) Damage to the heater
(2) Damage to the door
gasket
(3) Relay PCB board for heater
may be damaged
(4) Power supply is not
suitable to autoclave.
(5) Water inlet solenoid is not
working
(1) Change heater
(2) Check and adjust the position of
the door gasket, or change to a
new door gasket
(3) Change PCB board for heater.
(4) Check power supply
(5) Change to a new water inlet
solenoid.
Problem Possible Cause Solution
E. Short circuit (1) Damage to chamber lining
allowing water access to
electrical components.
(2) Damage to heating
element
(3) Loose power cord or bad
connection
(4) Use of defective or other
manufacture’s power
supply
(5) Crack in dam gasket.
(1) Seal the chamber if there is
crack. Use drying function to
remove water at the bottom of
chamber.
(2) Change to a new heating
element and related parts.
(3) If there is a damage to the power
cord, it is necessary to change a
new power cord. Plug in securely
to the power supply.
(4) Use original manufacture’s part.
(5) Change to new dam gasket.
25
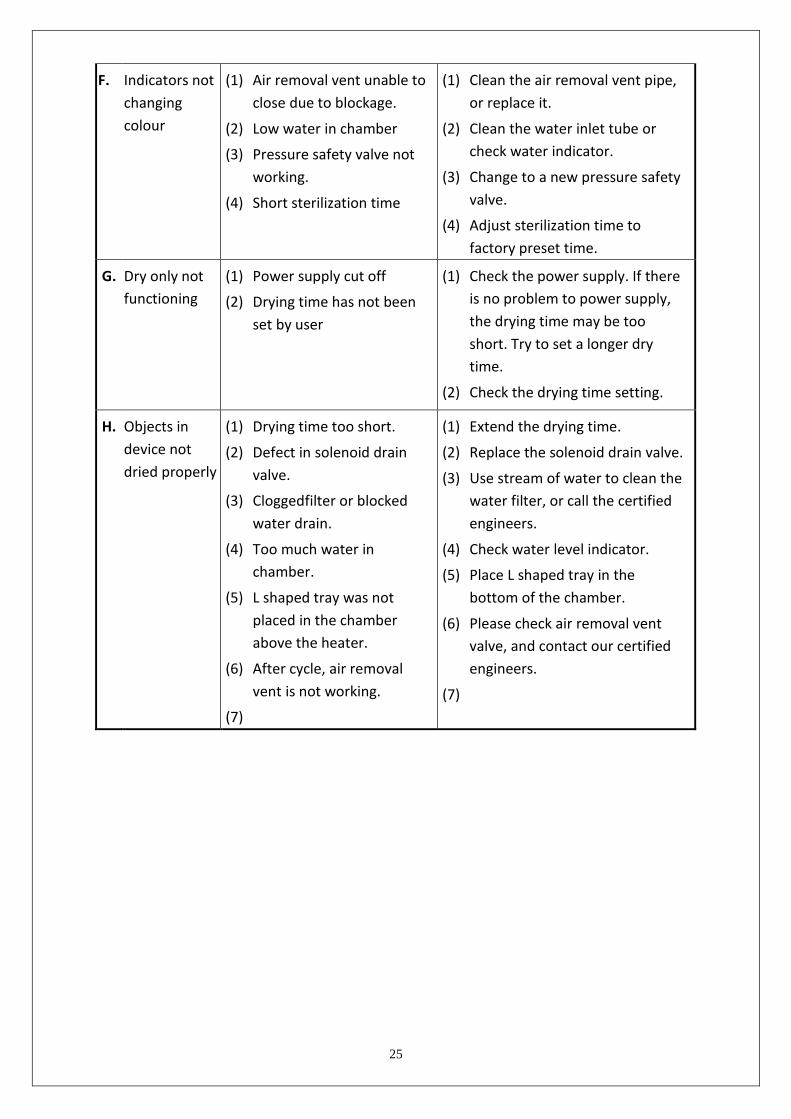
F. Indicators not
changing
colour
(1) Air removal vent unable to
close due to blockage.
(2) Low water in chamber
(3) Pressure safety valve not
working.
(4) Short sterilization time
(1) Clean the air removal vent pipe,
or replace it.
(2) Clean the water inlet tube or
check water indicator.
(3) Change to a new pressure safety
valve.
(4) Adjust sterilization time to
factory preset time.
G. Dry only not
functioning
(1) Power supply cut off
(2) Drying time has not been
set by user
(1) Check the power supply. If there
is no problem to power supply,
the drying time may be too
short. Try to set a longer dry
time.
(2) Check the drying time setting.
H. Objects in
device not
dried properly
(1) Drying time too short.
(2) Defect in solenoid drain
valve.
(3) Cloggedfilter or blocked
water drain.
(4) Too much water in
chamber.
(5) L shaped tray was not
placed in the chamber
above the heater.
(6) After cycle, air removal
vent is not working.
(7)
(1) Extend the drying time.
(2) Replace the solenoid drain valve.
(3) Use stream of water to clean the
water filter, or call the certified
engineers.
(4) Check water level indicator.
(5) Place L shaped tray in the
bottom of the chamber.
(6) Please check air removal vent
valve, and contact our certified
engineers.
(7)

26
Error Code
Message Solution
E1
The device has suspended its operation
(during water in and dry cycle, the
display will show E1, during heat and
sterilization cycle, the display will show
OA)
If the user did not suspend
operation, check if the emergency
stop button has been damaged or is
not working
E2
Heating time is abnormally long
(exceeds 20 min)
(1) Check the heating element
(2) 220V ac: Check if power supply is
220V ac
E3
Insufficient water level in the
chamber(The autoclave has been
unable to fill the required quantity
water within 3 minutes)
(1) Check if vent valve is defective
(2) Check if water inlet is blocked.
E4
Main heating element over heat
protection
(1) Check if any valves or vents are
defective or blocked.
(2) Check if gasket is aged and
deteriorating.
E5
Reserved for future programming
E6
121oC or 134℃ mode is not selected Check if the switch is pointed to
121oC or 134℃, and turned all the
way to the end until light is on.
E7
Door open while the device is operating
Check if the door is securely closed.
E8
As dry function starting, the pressure in
chamber still is not zero.
PrePress STOP/RESET for over 5 seconds, it will show oA. Press dry function after the pressure is “0”.
E9
Door safety device is not work. Notify the merchandiser or request
equs service staff to dispose.

27
Chapter 6: Specification
◎ Model:TAT-202
Category Specification
Overall Dimension
500(Width) x 580(Depth) x 400(Height) mm
Chamber Dimension
ψ260 x 380mm depth / 20Litre
Max. Pressure 2.5 bar
Material Design Temperature
150oC
Voltage/Wattage 230Vac 2,000W
Water Feeding Automatic / 200cc (one time)
Sterilized Temperature
121oC(1.2bar) : 134℃(2.1bar)
Reservoir Capacity
4 Litre (Distilled water)
Water inlet Automatic
Sterilized
Cycle 121oC(20-60min.) : 134℃(4-60min.)
Max noise score 61dB
Drying time 0-60 min.
Safety Components
Safety pressure release valve, over heating protector, safely valve, automatic pressure valve, door indicators.
Operation Environment
Must install indoor and the place should lower than horizontal plane 1,000 meter. Adapted environment temperature : 4℃-50℃
Memory Setting 8 sets memory setting; F1 is default value; F2-F9 user define
Standard Accessories
Stainless steel box
Optional Accessories
Frame, Trays(375x210x20mmx2pc or 375x165x20mmx2 pc), and pincer
Power Supply 230V+10% 50HZ or 60HZ , 8A

28
Chapter 8: Warning Labels
Customer Service Label:
TEX YEAR INDUSTRIES INC
Address: No.9,Wuquan 6th Rd., Wugu District,
New Taipei City 24889, Taiwan (R.O.C) TEL: +886-2-2299-2121
FAX: +886-2-2299-2888
E-mail [email protected] [email protected]
Website www.texyear.com www.equsmaster.com
Product Specification Label
.
Model: TAT-202
SN: 201109140001
Volts: 230V [220V?]
Frequency: 50Hz
Electrical fusing 10A-20L
Classification Class 2
Electric voltage Warning Label:
Warning label for hot surface and sterilization substance located on inner door.

29
Carton Label:
Molel TAT202
Volt 220V
SN 201109140001
Hot Surface Warning Label:


