
Ushahidi v2.7.4 Manual
About Ushahidi
About this Guide
1. Installing the Ushahidi platform
Server requirements
The "AMP" (Apache, Mysql, PHP) Stack
Required PHP Extensions
Optional Server Requirements
Downloading the platform
Uploading files and setting permissions
Basic Installation
Getting started
Database requirements
Site settings
Admin settings
Advanced Installation
Mail settings
Map provider settings
Successful installation
Upgrading Ushahidi
1.1 Using Crowdmap Classic
2. Customizing your deployment
Accessing your admin panel
Log in
Create an account
Modifying settings
Site Settings
Map Settings
Default Location
Map Timeline
Map Provider
Configure Map
Cluster reports on Map
Default color for all categories
Default icon for all categories

1
SMS Settings
Using FrontlineSMS
Technical requirements
Steps to follow
Using SMSSync
Using Clickatell
Email Settings
Clean URL Settings
HTTPS Settings
API Settings
Twitter Settings
External Apps
Managing Users
Manage Roles and Permissions
Add/Edit new user
Addons
Plugins
How to use the sharing plugin
Themes
Get Help
Search
Language Box
Manage your deployment
Categories
Blocks
Forms
Creating a new form
Adding Form fields to a form
Pages
Newsfeeds
Layers
Scheduler
Public listing
Actions and Badges
Actions
Badges
Alerts
Sharing
3. Processing the Incoming Information
Dashboard
Stats
Visitor Summary

2
Country Breakdown
Report Stats
Category Impact
Report Punchcard
Messages
SMS
Reports
View Reports
Create Report
Comments
Download Reports
Upload reports
Rules
Importing Custom form fields/Personal information
Sample CSV Report
Delete all reports
4. The User Interface
Homepage
The Map
Categories
The timeline
How to report box
Incident Block
Official and Mainstream Block
Static Layers
Other deployments
Reports Listing
Filter
View individual report
Submit report
Get Alerts
Contact Us
Additional Buttons
Languages
Search

3
About Ushahidi
Ushahidi which means “testimony” in Swahili, was a website that was initially developed to map reports
of violence in Kenya after the post-election fallout at the beginning of 2008. Since then, the name
“Ushahidi” has come to represent the people behind the “Ushahidi Platform”.
The Ushahidi platform is an open source software for information collection, visualization, and
interactive mapping. People can send in information from multiple channels including SMS, email,
Twitter and web reports. The platform timestamps each report and allows you to geotag them and
organize them in a simple to use Data Management System, and displays the crowdsourced information
on a map and timeline. The platform has been used around the world because of it’s ability to easily
integrate simple communication tools like SMS with digital channels like Twitter to be able to access all
types of people through the means of communication they are most accustomed with.
Over the last seven years, Ushahidi has grown into a global non-profit technology company, whose
mission is to change the way information flows in the world and empower people to make an impact with
open source technologies, cross-sector partnerships, and ground-breaking ventures.
Ushahidi is responsible for founding the iHub, a technology hub in Nairobi which has helped build the
technology community in East Africa, growing to over 14,000 members, has incubated 150 tech startups
that have created over 1000 jobs. Ushahidi, together with partners Hivos and the Institute of Development
Studies, implements the Making all Voices Count Grand Challenge, a $55 million fund which focuses
global attention on creative and cutting-edge solutions to transform the relationship between citizens and
their governments including seeding innovative solutions.
Lastly, as a group of technologists spread around the world who get really frustrated when the internet
doesn’t work, Ushahidi built and spun out BRCK, which builds rugged internet for people and things.
About this Guide This guide will give you a step-by-step overview on how to set up your own Ushahidi version 2.x map
and how to make full use of all the features that the Ushahidi platform software offers. If you’d like to
learn more, we have additional resources available online for you-
● https://forums.ushahidi.com
● https://wiki.ushahidi.com
● http://www.ushahidi.com/get-help/
This guide will show you how to install the ushahidi platform, customize it to the needs of your project,
and process the incoming information. It is meant to be a comprehensive learning guide for brand new
users of the Ushahidi platform as well as a reference for those who are more technically savvy or have
used it in the past in an administrative capacity.
● If you’re a user, go to Section 4: The User Interface

4
● If you’re an administrator and want to process information coming into the platform, go to
Section 3: Processing Incoming Information
● If you’re an administrator and want to customize your platform, go to Section 2:
Customizing your deployment
If you’re a developer looking to make functional customisations to the Ushahidi platform, please see our
detailed developer guide for insights.
If you have any problems and need some guidance or help, reach out to us via:-
● info[at]ushahidi[dot]com
● Ushahidi Mailing Lists
● Ushahidi Forums
● Ushahidi Skype dev chat/IRC Channels
If you bump into a bug on the platform or have a feature you would like to request, please file it on our
github issues page(https://github.com/ushahidi/Ushahidi_Web/issues). Here’s a guide on how to file a
good bug report.
We also recommend going through the Ushahidi toolkits, aside from this manual, for insights on strategic
planning around your deployment.
● Assessment Tool
● Implementation Tool
● Output Tool
This guide has been updated and adapted based on content provided from the first version of the
Ushahidi manual by Anahi Ayala Iacucci (to whom we are grateful for all the amazing work), the
Ushahidi Wiki, and also contains new content from features that were previously undocumented for
Ushahidi version 2.x by Angela Oduor Lungati.
Feedback is welcome, and will be incorporated into this guide moving forward.

5
1. Installing the Ushahidi platform If you’ve ever installed WordPress, Drupal, or another, popular, downloadable content management
system (CMS) or blogging platform, installing Ushahidi will be a walk in the park. If not, not to worry;
like many popular web applications available today, Ushahidi features an installer to walk you through
the process.
While we’ll be providing as much detail as possible with each step, this guide assumes you’re
comfortable with the following: what PHP and MySQL are, unzipping .zip files, connecting to a remote
server via FTP, and setting permissions on directories and files on a remote server. If any of that didn’t
make sense, you may want to consult with a web developer who has done this before/may have the skill
to do so.
Server requirements
This section outlines the requirements for installing the Ushahidi platform on your computer.
The "AMP" (Apache, Mysql, PHP) Stack
Before installing Ushahidi, following must be installed in the target system:
● PHP version 5.2.3 or greater
● PHP 5.4 support is added in Ushahidi 2.6
● Prior to Ushahidi 2.6, you must version between PHP 5.2.3 - 5.3.x
● MySQL version 5.0 or greater
● An HTTP Server. Kohana, which Ushahidi is built on, is known to work with the following web
servers:
● Apache 1.3+
● Apache2.0+
● lighttpd
● Microsoft Internet Information Server (MS IIS)
● Nginx
● Unicode support in the operating system
Required PHP Extensions
The following is a list of PHP extensions that must be installed on your server in order for Ushahidi to run
properly:
● PCRE (http://php.net/pcre) must be compiled with --enable-utf8 and --enable-unicode-properties
for UTF-8 functions to work properly.
● iconv (http://php.net/iconv) is required for UTF-8 transliteration.

6
● mcrypt (http://php.net/mcrypt) is required for encryption.
● SPL (http://php.net/spl) is required for several core libraries
● mbstring (http://php.net/mbstring) which speeds up Kohana's UTF-8 functions.
● cURL (http://php.net/curl) which is used to access remote sites.
● MySQL (http://php.net/mysql) is required for database access.
● GD (http://php.net/gd) is required for image manipulation.
● IMAP (http://php.net/imap) is required for handling e-mails.
TIP: Need to figure out what extensions you already have installed on your server? Here are
instructions to do just that http://jontangerine.com/silo/php/phpinfo/
Optional Server Requirements
To use Ushahidi's "Clean URLs" feature – meaning that your deployment's URLs will not include
"index.php" – on an Apache Web Server, you will need the mod_rewrite module and the ability to use
local .htaccess files. To check if local .htaccess files are allowed, verify that the "AllowOverride"
directive in your Apache config (for the web server directory in which you have installed Ushahidi) has
been set to "All".
<Directory [your-document-root-directory]>
...
AllowOverride All
...
</Directory>
Downloading the platform
There are 2 ways to download Ushahidi.
● Visit the ushahidi downloads page (http://ushahidi.com/downloads), and download the complete
application as a .ZIP file.
● For the more tech-savvy, the source code is available on https://github.com/ushahidi. Github is a
popular, hosted version control system. Be sure to use "git clone --recursive
git://github.com/ushahidi/Ushahidi_Web.git", or github zip files downloads may be incomplete).
Uploading files and setting permissions
Once you downloaded the files, unzip them and upload them to the server. Once uploaded, you have to
change the permissions on a few files and directories.

7
Ensure the following directories and files are writable by your webserver
application/logs
application/cache
application/config
media/uploads
.htaccess
If you don’t do this, the Ushahidi installer will recognize this and remind you that this needs to be done
during the first step of the installation process and will halt the installation until this is done.

8
Here are instructions on how to set file permissions on:-
● Unix/Linux
● Windows
With the files uploaded and the permission set, you can start installing the application itself.
Begin by visiting your website, either at the “root” directory, subdirectory, or subdomain where you put
the files (most likely the “root” directory, meaning you’ll want to visit http://yourdomain.org. (Let’s
assume, for the purposes of this guide, that you are installing this into the root folder.)
You’ll be automatically redirected to the installer subdirectory. If all of the files were uploaded, you
should see this.

9
Basic Installation
Choose this option if you want to get up and running quickly; you can always configure everything else
later.
Getting started
Ensure the following directories and files are writable by your webserver
● application/logs
● application/cache
● application/config
● media/uploads
● .htaccess
If either one of these folders is not writable, you’ll receive a warning that will halt the installation process
below.
Database requirements
Before we proceed, you’ll have wanted to setup a MySQL database for your website (Ushahidi will not
do this for you). If you’re unsure how to do this but using a fairly standard website hosting provider, you
likely have access to cPanel or another GUI to help set this up, or other documentation to help.

10
By now you’ll want your database created and the login information handy, so enter that under “database
name,” “user name,” and “password.”
There’s a few other fields to take into account:
● Base Path: As noted in the installer, this is automatically detected.
● Database Host: Most of the time, this will be “localhost,” which is why it is prefilled for you. If
you’re running on an more custom configured server, such as Amazon S3 or a private server,
your database may be running somewhere else, meaning you’ll want to replace localhost with the
right domain. This was likely provided for you when you or someone on your team setup the
database; contact your hosting provider if you’re unsure.
● Table Prefix: As noted in the installation instructions, if you’re installing multiple Ushahidi
instances from one database, you’ll need to change the table prefix. However, this is highly
discouraged; you should have one database per deployment. It’s recommended you leave this
field blank.
Once you have entered all of this information, click the Continue button to move on.
Site settings
The next screen covers general information about the website. Your website name,
tagline (or slogan), default language, and site email address are all straightforward.

11
● Site email address: Keep in mind this will be the email address displayed on the website to accept
reports, should you enable that functionality.
● Clean URLs: What are “Clean URLs?” Clean URLs are URLs that do not display string
information in the URL and show only the page and path. This is better explained with an
example: Without Clean URLs enabled, here’s what the URL for your about page (once we
complete the installation) would look like: http://yourdomain.com/index.php?page=about. With
Clean URLs set to “YES,” your about page will look like this:
http://yourdomain.com/index.php/about. Clean URLs are preferred as it makes things clearer to
the user and improves search engine optimization for your website. It’s recommended you keep
this enabled.
Admin settings
This section allows you to set an admin username and password that you can use to access your
deployment after installation.

12
Advanced Installation
All parts of the basic installation are included in this section as well, but have some additional steps that
will get you into the administration faster for configurations and setup.
The additional steps include the following below:-
Mail settings
Setting up the mail server is important to receive reports via email as well as send out alerts to subscribed
users and administrators. As mentioned, this can be tricky depending on your email provider.
If you’re able to use Gmail, Hotmail, or Yahoo, as your email provider (Gmail especially), that can
simplify the process. Hints are provided alongside the installer to help you with what you should enter.
Again, if you can use one of these, it can make this process much simpler.
If you’re using an email address off your domain, you’ll probably want to check the documentation,
knowledgebase, or FAQ to figure out what the proper settings are for the “Mail Server Username,” “Mail

13
Server Port,” and “Mail Server Host” fields.
Map provider settings
The last step is, fortunately, the simplest. Choose the Map you would like – Google, Bing, ESRI or
OpenStreetMap (OSM) – in the dropdown.

14
Successful installation You are done!
Follow the links provided to see your website, log in to the administration dashboard, or get right to the
next important steps in setting up your website: further configuring the map settings3 and connecting your
instance to an SMS server.
Before you start exploring with your new instance, there’s two last things you need to do. Now that the
installer is complete, we need to set the permissions on application/config/config.php and
application/config/database.php to 755. This is a critical step but not one Ushahidi will do for you. Not
doing so opens up your deployment to a big security risk.
The second thing you’ll want to do is delete the “installer” folder from your website’s file system.
Upgrading Ushahidi
Detailed upgrade instructions can be found on our wiki page here.

15
1.1 Using Crowdmap Classic Crowdmap classic is the cloud based version of the Ushahidi platform. It is the easiest, out of the box
solution, as you can get setup on your own in just a couple of minutes, with just an email address. It's
simple and easy to use, and it resides on our servers, and saves you the hassle and time of having to install
the platform on your own.
● Go to https://crowdmap.com/switch/classic
● Click on “Sign Up”
● Create your account. Provide your name, email address and set a secure password
● Create your deployment address (URL). Each deployment has its own web address that is
unique. No two crowdmap deployments can have the same name. Once set, a deployment address
cannot be changed.
● Enter your deployment details. Give your deployment a name and give it a tag line

16
● Accept Terms of Use
● Click on Finish & Create Deployment

17
2. Customizing your deployment
Accessing your admin panel
Log in
If your website is www.yourdomain.com, the administration login would be available at
http://yourdomain.com/admin, or http://yourdomain.com/login. It will look like this:
Enter the username and the password to access the Admin page.
Create an account
If you don’t already have an account, you can create one and an administrator will upgrade your access
level, then you can log in.

18
Modifying settings
The Settings section is the page where the administrator can set up all the settings to customize the
Ushahidi platform based on the project they are working on. This section of the Ushahidi platform is the
first one that needs to be customized once the platform is installed and allows for the main components of
the platform, such as the map and the email address, to be set up by the administrator.
To access the Settings Page the administrator just needs to click on the Settings tab, on the top right of the
Dashboard page
Site Settings
The Website page is the one where the administrator chooses the main appearance settings of the
Ushahidi platform, mainly the characteristics of the homepage, the main navigation, and the contact
information.
1. Site Name
This is the main title that appears on the right side of the your homepage and it is normally the title of
your project.
2. Site tagline
This is the tagline that appears below the title on the homepage, which normally gives more detailed
description of what the platform is about or what the platform intends to monitor or show.
3. Site Banner
You can upload your own custom banner to appear on the homepage of your deployment
4. Site Email Address
This is the email address that will be shown in the Information Box on the homepage, which is the one
that users will use to email you information or reports. This email address is also the same one that the
contact form on the main page is linked to, and the email from which alerts are sent out from. If this text
field is left blank, the contact page and alerts pages on the homepage will not be visible.
This email address will be publicly displayed on the website, so it is recommended that you create an
email address specifically for this, and not to use a personal one.
5. Site Message
The Site Message is an optional message that you can add on the top of your user page and that can be
used for different purposes: you can use it to advertise your short code, if you have one; to put a
disclaimer of responsibility, or anything else you want to let people know straight forward.

19
6. Site Copyright Message
The Copyright message allows you to set the kind of copyright license your platform submitted is under.
The message will appear on the bottom of the homepage.
7. Submit Report Message
This is an optional message that you can add at the top of your report submission page to provide users
with additional instructions on how to go about report submission.
8. Site Language
This allows you to set the default language your Ushahidi platform will be available in. This function
translated all sections of the Ushahidi platform, excluding custom form fields, and is also dependent on
the level of completeness for the language selected.
9. Timezone
This option allows you to set the default time zone your deployment spans, and will reflect on report time
entries.
10. Display Contact Page
This allows you to set the option to have the Contact page in the main Toolbar on the homepage or not. If
“No” is selected, the page will not be available for users to contact the administrators of the Platform, but
they will still be able to send emails to the address showed on the homepage if configured.
9. Item per page – Front End
You can choose how many items will be displayed in the pages opened by the user, such as the Reports
page or the News Feeds page. E.g, setting it to 5 items will display 5 reports/newsfeed items on the
homepage.
10. Item per Page – Admin
You can choose how many items will be displayed in the Admin page, like the Reports page or the
Message page. e.g setting this to 5 items will display 5 reports on the admin reports listing page
11. Blocks per row
This option allows you to set the number of blocks to be seen on a particular page
12. Allow Users to Submit Reports

20
You can decide to allow users to submit reports onto the platform or not via the online form. If NO is
selected, the report submission page will not be available for users to submit reports directly on but they
will still be able to send emails to the address showed on the homepage or to send SMS if configured.
13. Allow users to subscribe for alerts.
You can also decide to allow users to subscribe for alerts from the platform. Setting this option to NO
disables the “Get alerts” link on the homepage, and users are not able to subscribe for alerts
14. Allow Users to Submit Comments to Reports
This option gives you the ability to allow users to submit comments to reports, and decide if they are auto
approved, or if they need moderation.
15. Include RSS News Feed on the Website
This option allows you to decide to add RSS Feeds Box displayed on the homepage and allow for access
of data from the platform via an RSS feed.
16. Create new Category from Feeds
This allows for automatic creation of new categories from news feeds.
17. Feeds geolocation - Geonames username
If you want to geocode your news feed items/feed entries, you need to create an account at
http://geonames.org, enable the free web services and enter it in this section. Leaving this blank disables
this function
18. Enable Statistics (Stored on Ushahidi's server)
Hit statistics are stored on a server controlled by Ushahidi. By enabling this option, you gain access to hit
statistics directly in your admin panel. By disabling it, you will stop collecting statistics and will be
unable to recover traffic stats collected while this is turned off.
19. Cache Pages
The administrator may decide whether to cache pages and reports on the website, speeding up loading
time. This is particularly helpful when working with low-bandwidth audiences.
20. Cache Pages Lifetime
If caching is enabled, here the administrator may set how long the pages are cached for before users
visiting pages on the website should be served a new version of the page rather than the cached version
saved on their personal computer.

21
21: Private deployment
This option gives you the option of having your map publicly available, or limiting access to specific
users on the platform. If you set this option to “Yes” - users will have to log into the platform to view the
map and data in it.
22. Manually Approve Users
If you set this option to yes, you must approve all individual users who create accounts on your
deployment by assigning them roles e.g. Superadmin, Admin, member
23. Require User Email Confirmation
Users will be emailed with a confirmation link to click before they are allowed to log into the deployment
if this is set to yes. If you enable this after your deployment has accepted users, they will be prompted to
confirm their account before they will be allowed to continue using it.
24. Google Analytics
This function allows the administrator to sync the platform with Google Analytics by inserting the proper
ID.13
25. Akismet Key
The Akismet Key allows the administrator to have Akismet pre-screening the messages coming in to look
for spam. To be able to use this function the administrator needs to be registered for a WordPress account
and get a free API key.

22
Map Settings
This section allows you to select which type of base map you want for your project. This section guides
you step by step in the setting up of the base map.

23
Default Location
You can set the country your deployment is being set up from this section, and retrieve cities from this
country to be populated on the report submission page.
“Does this deployment span multiple countries”
Setting this option to No will only permit submission of reports tagged to locations within the default
country set above.
Setting this option to Yes will permit submission of reports tagged to locations anywhere around the
world
Map Timeline
If you’re using the following themes, you can enable or disable the timeline below the map, and set it
either as a line or bar graph:-

24
● Bueno
● Default
● Terra
Map Provider
There are four default providers to chose from:-
● ESRI
● Bing
● OSM
By default, Ushahidi installations have the map provider set to OSM. Select the one you would prefer
from this section
Configure Map
This section of the Map page allows you to choose the default zoom of the map appearing in the main
homepage. To choose the default zoom level, move the indicator on the bar and wait for image below to
show the map relative to that zoom level. Once the zoom level has been chosen no other action is required
other than to leave the marker on the right position in the bar.
On the right side of the zoom level bar there are two boxes indicating the GPS coordinates of the red
marker in the map. This is where the red marker will appear to the user who is submitting a report from
the web form, and can be set to the main city of the country for example, or left as default in the center of
the country. Note that a user who subsequently submits a report will not be constrained to the exact
location of the default marker.
Those two actions, setting the zoom level and the position of the red marker, can be done also just by
using the mouse and clicking on the map. It is possible to position the red marker by double clicking on
the right location. By grabbing the map and moving it, you can decide which section of the map will be
visible to the user on the homepage.
Once all the settings in the map page have been set, they can be saved by clicking on the “Save Settings”
tab on the bottom of the page. Every time one of the settings is changed, you are required to save the
settings again.
Cluster reports on Map
This feature allows you either bundle similar reports on a map into a single dot or not on the main map.
Setting this option to yes will bundle the reports, while setting it to No will leave each report denoted by a
single red dot on the map on the homepage.
Default color for all categories
This section gives you the ability to set one color code for all categories displayed on the homepage.

25
Default icon for all categories
This section gives you the ability to set one icon for all categories displayed on the homepage.
SMS Settings
This page allows you to set up phone numbers through which you will be able to receive SMS messages
from.
There are two possible ways of setting up the Ushahidi platform to receive SMS directly into the
platform:-
● Using FrontlineSMS
● Using SMSSync
1. You’ll need to activate either one of the two plugins mentioned above in the addons section
before proceeding any further.
2. Once done, select the default provider(SMSSync/FrontlineSMS) from which you will receive sms
messages from.
3. Next, enter all the phone numbers that user will be able to send text messages into the system
from.

26
Using FrontlineSMS
This section explains how to use FrontlineSMS v2.2+ with Ushahidi. Instructions on using v1.7 of
FrontlineSMS can be found on our wiki.
FrontlineSMS and Ushahidi are free and open source software tools, widely used by social change
projects the world over. FrontlineSMS is used to enable users to send, receive and manage large numbers
of incoming and outgoing SMS. Ushahidi is a platform for information collection, curation, and
geospatial visualization. Used together, these tools can produce powerful results, with FrontlineSMS
managing incoming mobile data and Ushahidi handling the visual representation.
Technical requirements
● FrontlineSMS software (free to download)
● A USB modem or phone and cable compatible with FrontlineSMS for receiving SMS
● The Ushahidi platform: Either the self-hosted Ushahidi Platform or an account and active
deployment with the our cloud-hosted Crowdmap service
● A mobile phone for sending SMS to test
● An Internet connection
Steps to follow
● Download and install v2.2+ of FrontlineSMS. Their walkthrough installer is like installing most
any other software on your computer and should be fairly straightforward.
● Navigate to the Addons page, and look for the FrontlineSMS plugin. We’ll need to retrieve a key
piece of information we'll need to plug into FrontlineSMS: the "Sync Key." You can find this by
clicking the 'Settings' link next to the "FrontlineSMS" title of the addon. This will open the
FrontlineSMS addon settings where you will find the Sync Key. Copy this key; we'll cover where
to plug it in in the next step. (Note: You may ignore the "FrontlineSMS HTTP Post Link" URL as
that pertains to the 1.X versions of FLSMS.)

27
● On the left sidebar, click on the "Create new activity" under the "Activities" section.

28
● A new window will appear and you will be presented with a number of options. Choose "Web
Connection" at the bottom of the list.
● Selecting Web Connection will present a new set of options. Select "Crowdmap / Ushahidi" and
click "Next" at the bottom right.
● Click the Ushahidi button and add the following settings: Add your custom URL and API key
(the "Sync Key" from your deployment). Once you've entered this, click the "Next" button at the

29
bottom right and you'll come to some final configuration options.
● On this screen, you have the option to configure FrontlineSMS to automatically move messages
into your Web Connection and pass SMS reports up to Crowdmap. To automatically process
SMS in this way select, "Process responses containing a keyword automatically." Alternatively,
you can select the "Do not use a keyword" option, which will result in all incoming messages
triggering the Web Connection provided they do not match any other activities' keywords. Only
one activity at a time can have this setting. The third option, "Do not automatically sort
messages," you can also disable automatic sorting altogether. With this setting you can still use
your Web Connection's functionality by manually moving messages into your new activity from
the inbox or any other activity or folder. This allows you to manually choose which incoming
SMS get passed up to Crowdmap. When you have finished setting up your automatic sorting
options, you can set your keywords. You can enter any number of keywords separated by
commas. With this setting, any incoming message that starts with one of those keywords will
trigger the Web Connection. Once you've decided how to deal with incoming messages, click

30
"Next" again at the bottom right.
● Now that the platforms are connected, it's time to do and end-to-end test to ensure that messages
received in FrontlineSMS will appear within your Ushahidi or Crowdmap deployment. Begin by
connecting FrontlineSMS to a compatible device. Test that FrontlineSMS is receiving messages
from your mobile phone or modem by sending a couple of SMS, being sure to include a keyword
if you specified that. You should see the message come into FrontlineSMS in the "Messages"
section, or listed within your activity. A report should then appear in your Ushahidi or Crowdmap
installation as well. If it is not working, read through the user resources section of the
FrontlineSMS website and check the Frequently Asked Questions.

31
Using SMSSync
SMSsync is a simple, yet powerful SMS to HTTP sync utility that turns any Android phone into a local
SMS gateway by sending incoming messages(SMS) to a configured URL (web service).
● Download the application from the Android Market. Please note that SMSsync works on any
SMS-enabled device running Android 2.1 and above. Find the SMSSync plugin on the addons
page, and click on settings right next to the smssync title to retrieve the Sync URL. You can also
optionally set an SMSSync secret key for security purposes
● Open up the SMSSync Application on your android device. You’ll note that you can manage
multiple Sync URLs on the app.
● To add a new Sync URL:-
○ Tap on the Sync URL from the navigation drawer.
○ Tap on the Add icon icon on the actionbar. An input dialog should open.
○ Enter a title for the Sync URL.
○ Enter a secret key if required by the webservices. Make sure you enter the exact key here.
The secret key should be presented as string of any characters without spaces.
○ Enter a comma separated value for the keyword(s). These keywords will be used by
SMSsync to filter incoming SMS and pending messages to the Sync URL you are adding.
As of v2.0.2. You can now add Regular Expresssion code for filtering. This means, it can
either be CSV or RegExp. It cannot be both.
○ Enter the URL for your webservice. Don't forget to start with the HTTP or HTTPS
protocol. e.g. https://example.com/api-v1/add-record/
○ Tap OK to save the new entry.

32
● You will now need to start the SMSSync Service to start forwarding messages to the platform. To
start the SMSSync service
○ Make sure that you have added and enabled(checked) the Sync URL you added above.
○ On the SYNC URL screen, tap on the Start SMSsync service to start the service.
● You should be all set to work with SMSSync and Ushahidi
For more details on how to manage messages within SMSSync, see configuration instructions on the
SMSSync Website
Using Clickatell
● Look for the clickatell plugin on the addons page and activate it.
● Once active, click on “settings” on the side of the plugin name.
○ Sign up for Clickatell service by following the link on the page and get an API key.
○ Go back to the Clickatell plugin settings page and enter your Clickatell API number that
you received after signing up for Clickatell service.
○ Enter your Clickatell Username.
○ Enter your Clickatell Password. You should get it from Clickatell
○ Click on Save Settings button to save the entries.
The Clickatell plugin will allow you to use Clickatell for outgoing messages (like the SMS alerts system).
If you want to use Clickatell also to receive SMS messages, you’ll need to sign up for a 2- way service

33
from Clickatell. Once signed up, they will ask you for a 'Primary Callback URL'. Use the URL at the
bottom of the clickatell plugin settings age and use it as the 'Target Address' and select 'HTTP POST'
from the drop down.
Email Settings
This section allows you to set up the platform to receive emails from users. To add email settings, you
must have an email account already set up with Google, Yahoo or any other domain.
1. Mail Server Username
Enter the email address you want to use to receive and send emails. It is recommended to set up a separate
email address for this purpose, preferably one that has lot of available space to avoid the account getting
full in a short time, especially if the platform will be receiving a lot of submission via email.
2. Mail Server password
In this section, you should put the password of the email account inserted above.
3. Mail Server Port

34
In this field, you input the port that the email account chosen uses for incoming emails. This port is
normally listed in the settings of the email account itself. Suggestions of common ports used can be seen
right under this text box.
4. Mail Server Host
This is where you need to insert the mail server host. Suggestions on what possible server hosts would be
can be found under this text field. To verify which Mail server host you have, please look at the Settings
page of your email account.
5. Mail Server Type
The most commonly used server types are POP3 and IMAP, but again, the settings page of the email
account chosen will list the correct server type.
6. Mail Server SSL Support
This section is required to enhance a secure connection. You should be able to check if your mail server
has SSL support enabled or not via the settings page of the email account in use.
You can now save the settings by clicking on the “Save Settings” tab, and all the data inserted will be
saved. Every time something will be changed in those settings you need to click again on the “Save
Settings” tab to have those changes saved. We recommend you test the settings every time something is
changed in this page to be sure that the new account is working properly.
Clean URL Settings
This function allows the platform to be reachable by users even if they don’t type ‘index.php’ in the
address. This way it will be easier for the users to find the platform online if they know the name used in
the URL but not the exact address. By choosing YES in the scroll down menu you will allow for this
function to be in place. After you click “Yes” or “No”, click on the “Save Settings” tab.

35
HTTPS Settings
You can chose to have your deployment be accessed in a secured mode by setting this option to “Yes”. To
access your deployment securely, you would use “https://” in the URL Prefix.
Setting this to “No” makes Ushahidi be accessed in unsecure mode; without "https://" in the URL prefix.
API Settings
This section allows you to:-
● Set limits on the number of records that are returned when anyone tries to access data via your
deployment’s API
● Set limits on the number of API requests that can be made by a single IP address per day or per
month
● View logs of API requests made on your deployment
● Ban/Unban IP addresses from accessing data from your deployment via the API

36
Twitter Settings
This section allows you to configure your deployment to receive messages from specific twitter hashtags.
To have your deployment pull tweets based on hashtag/s, you will need to set up your deployment as an
application on twitter.
1. Sign in on https://dev.twitter.com/ with your twitter username and password
2. Once signed in, on the right-hand side, click on your profile picture, you will get a drop-down ,
select the “My Applications” link.
3. On the next page, click on “Create a new application”
4. Fill in the application details
a. Name – this can be your deployment/site name e.g Uchaguzi
b. Description – this is your deployment/site description – what your deployment does
c. Website – this is your deployment url/link i.e http://yourdeployment
d. Callback url – Leave this blank.
5. After creating the application, you will get some of your authentication details but you are not
yet done, on the same page click on the "API Keys" tab. Here you will need to generate your
access tokens. To do this click on "create my access token" button. The tokens will take a few
minutes to be generated, you can refresh the page after a few minutes to see them.
6. After all the hoops, click on "Test OAuth" on the top right corner of the page to get all the
information for your twitter application. These include CONSUMER KEY,CONSUMER
SECRET, ACCESS TOKEN, ACCESS TOKEN SECRET.
7. Go back to http://yourdeployment/admin/settings/twitter and key in those details.
8. Add the hashtags you want to pull tweets from in the “Twitter Search Terms” section. You can
choose more than one hashtag, separated by a comma. It is recommended that a short and clear
hashtag be chosen. This hashtag will also appear on the Information Box on the homepage so that
people can use it to post on Twitter messages related to your platform. All the twitter messages
that will be posted online with the hashtag(s) set up in this section will also appear in the admin
page on the Messages section/Twitter so that they can be transformed into reports directly by the
admin.

37
External Apps
This section allows you to add and remove any external applications through which users can interact
with your deployment. By default, the external applications registered are the smartphone applications on
the Android and iOS app stores.

38
Managing Users This section allows you to:-
● View user accounts are signed up on your platform
● Add new user accounts
● Edit/Modify existing users credentials and permissions
● Set up and manage roles and permissions for different user groups on your deployment.
Manage Roles and Permissions
This section provides advanced role creation by giving administrators the ability to specify access
permissions for each role.
By default, the platform has 4 preset roles
● Superadmin – Super administrator has control of everything on the platform
● Admin – This is an administrative user who has access to almost everything
● Member – This is a regular user with access only to the member area
● None – This user has no special access

39
You can add your own custom roles and set access levels and permissions(e.g Reporter, viewer, observer
etc) from this page as illustrated below.
You can also delete a role/edit it from this section.
Add/Edit new user
● If adding a new user,
○ Click on “Add/Edit Users”to create a new account.
If editing an existing user,
○ Click on “Edit” on the right hand side of the user selected

40
● Add the following details below:-
○ Username: Set a suitable username that the user will use to log into the platform with
○ Full Name: This should be the full name of the new user you are creating
○ Email address: Provide the email address this user account will be tied to. Note that the
user will be able to use either username or email address to log in.
○ If adding a new user, the following fields will be visible to you:-
■ Password: Set a strong and secure password for your new user
■ Retype your password: Retype the password set above
○ If editing an existing user, the following field will be visible to you:-

41
■ New password: If you’d like to change this user’s password, edit this field with a
new strong and secure password. If not, leave this field blank
○ Role: Choose the level of administration access you would like this user to have.
○ Receive Notifications: Setting this option to yes will send this user a notification to the
user every time a new report is submitted to the platform
● Once you’re done, click on “Save settings” at the bottom of the page.

42
Addons To access this page, click on “Addons” on the top menu bar
Plugins
This section gives you access to plugins installed on your platform, and shows you which of these
installed plugins have been activated(highlighted in yellow), and which ones have not.
● To activate a plugin, click on the green Activate link, and confirm this action when prompted with
a pop up screen for confirmation.
● To deactivate a plugin , click on the red Deactivate link and confirm this action when prompted
with a pop up screen for confirmation
All Ushahidi deployments have the following plugins installed by default:-
● Clickatell: Allows you to send and receive text messages using clickatell. Instructions on how to
set up Clickatell can be found in the SMS settings section of this guide

43
● FrontlineSMS: Allows you to receive text messages from FrontlineSMS installations.
Instructions on how to set up FrontlineSMS can be found in the SMS settings section of this
guide
● SMSSync: Allows you to send and receive text messages from the SMSSync sms gateway
application for Android. Instructions on how to set up SMSSync can be found in the SMS settings
section of this guide
● Sharing: Allows you to share reports between Ushahidi deployments. Activating this plugin
creates a Sharing link on the Manage tab/section of your deployment
How to use the sharing plugin
● Navigate to the manage section of your deployment by clicking on Manage.
● Click on Sharing
● To add a deployment whose reports you would like to share on your deployment,
navigate to the Add/Edit Section of the page and provide the following details
○ Name: Give the Ushahidi deployment link a name
○ URL: Enter the URL to the Ushahidi deployment you would like to share reports
from
○ Color: Select a color that users will be able to identify on the main page
○ Click on Save
● To edit an existing sharing link, click on edit and change the details as desired
● To make a sharing link hidden, click on the green link Visible and confirm this action
when prompted to by a pop up. To make a sharing link visible, click on the green link

44
Hidden and confirm this action when prompted to by a pop up.
● To delete a sharing link, click on delete.
● Viewing reports shared from another deployment will be described in more detail in the
User interface section of this guide
A comprehensive list of plugins and their compatibility with different Ushahidi versions can be found on
our wiki here.
To add new plugins, simply navigate to the directory in which your Ushahidi instance is installed, and
copy the folder into the plugins folder.
Instructions on how to create your own plugin can be found on our wiki here.
45
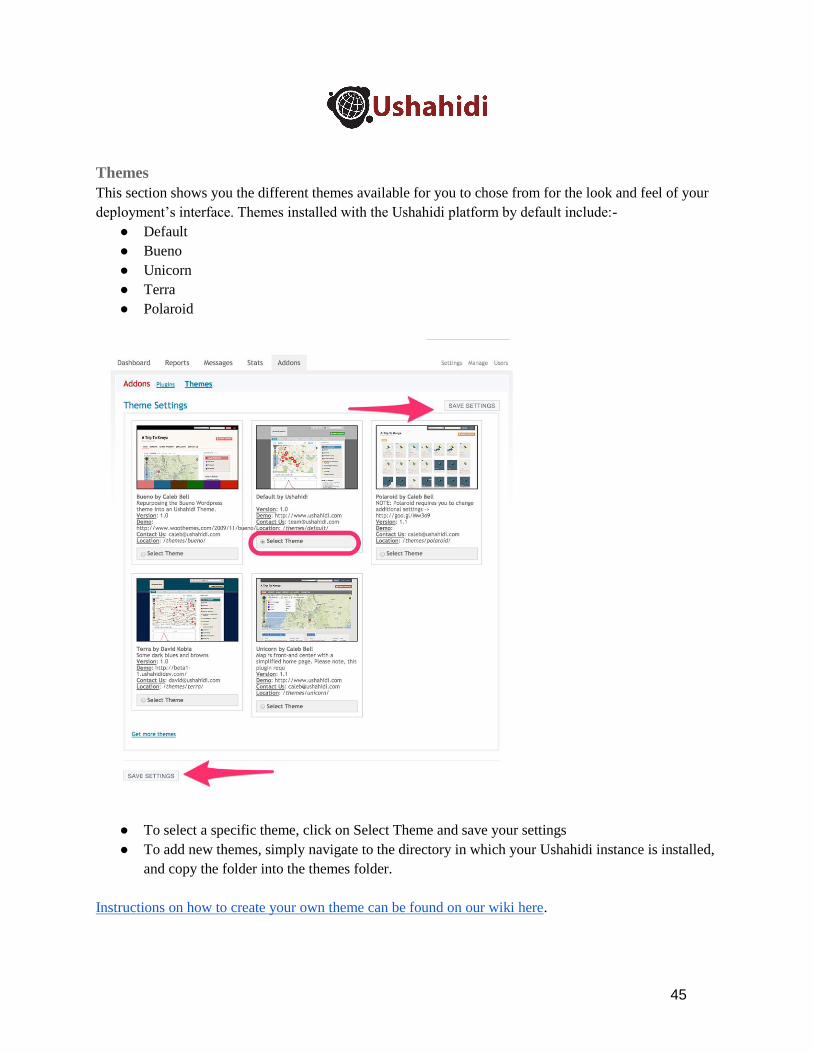
Themes
This section shows you the different themes available for you to chose from for the look and feel of your
deployment’s interface. Themes installed with the Ushahidi platform by default include:-
● Default
● Bueno
● Unicorn
● Terra
● Polaroid
● To select a specific theme, click on Select Theme and save your settings
● To add new themes, simply navigate to the directory in which your Ushahidi instance is installed,
and copy the folder into the themes folder.
Instructions on how to create your own theme can be found on our wiki here.

46
Get Help The Get Help box is always located on the top right side of the page. This section shows you how to
access the following three sections on the main Ushahidi website:
● Wiki – This section is recommended for any detailed technical and user documentation required
beyond this guide. Developers are more likely to find this resourceful for them.
● Forum – The Ushahidi forums are a good place to find frequently asked questions and to share
experiences with other deployers who are going through similar huddles.
Search The Search function next to the Get Help box allows you to look for specific reports into the Ushahidi
platform. By typing into the box the key word the system will show all the reports, in chronological order,
starting form the most recent one, that contain your search terms
Language Box The language box right next to the get help sections allows any user to select the language they would like
to operate with on the platform. Note that this does not affect the default language set by the admin in the
Settings page.

47
Manage your deployment To access this page, click on “Manage”
This section allows you to set up the main characteristics of the platform as related specifically to your
project.
On accessing the manage tab, a toolbar will grant you access to the following pages for modification and
customisations
● Categories
● Blocks
● Forms
● Pages
● News feeds
● Layers
● Scheduler
● Public listing
● Actions
● Badges
● Alerts
● Visuals(If data Viz plugin is enabled)
● Sharing( if sharing plugin is enabled)

48
Categories
By default, the Ushahidi platform has three categories set up during installation, which can be deleted and
substituted with ones chosen by any administrator of a deployment.
The categories list shows the following information:-
● Category name
● Category description right under the name
● Category color/icon on the side
● Actions that can be performed by administrators i,e
○ Edit
○ Visible/Hidden – which allows you to make a category either visible or hidden to users
on the front end/user interface of your deployment. Hiding/showing a category does not
affect their visibility to administrators of the platform/the backend of your deployment
○ Delete

49
To add a new category,
● Click on Add/Edit
● Fill in the following mandatory details
○ Category name
○ Category description
○ Category color
○ Parent category – You can choose to either make your category a top level category, or
make it a sub category of other top level categories, which are listed in the dropdown of
this field. Only one level of sub categories is allowed on the Ushahidi platform.

50
○ Category icon(optional, if you have an icon you would like to use in place of category
color to display on the map)
● There’s also an option to add category translations by clicking on the “translations”link. This
functionality provides the ability for category information be made available in any language that
a user selects from the language box.
● Click save

51
To edit a category
● Click on the edit link
● Make changes as desired
● Click on Save.
You can also change the order of categories by dragging and dropping them into the desired position.
To delete a category
● Click on Delete
● A confirmation message will appear
● Confirm your action and your category will be permanently deleted
To show/hide a category
● If a category is visible, the green link will read Visible.
● If a category is hidden, the green link will read Hidden

52
● To either show/hide, click on the green link, and you will receive a prompt seeking confirmation
on what you want to do.
● Click OK.
Blocks
This section allows you to :-
● View blocks available on the homepage of your deployment.
● Make blocks on the homepage visible/hidden.
At the moment, users are not able to create their own custom blocks, and this can only be done through
code customisation
Forms
Admins can create custom forms and form fields from which users can create reports out of. Every
ushahidi deployment comes installed with a default form with the following predefined field, which
cannot be deleted, but can be renamed, activated/deactivated and additional form fields added into it.

53
Each form has the following form fields which are created by default and cannot be edited/deleted: Title,
Description, Category, Date/Time, Incident Location, Location Name, News Source Link, External Video
Link, Upload Photos, Personal Information
Creating a new form
● Click on Add/Edit
● Add in the name of your new form and provide a form description
● Click on save
By default, your form will be created, with the form fields mentioned above and made active.
Adding Form fields to a form
● Click on Edit Form fields. A box with form field will open up, with a list of custom form fields
created on this form(if any).

54
● Click on Add new Field and select a field type from the 8 options provided to you.
● From here, provide the following details:-
○ Field Name
○ Default Value, if creating a text field, text area field, date field,
○ List of choices, if creating a radio button, dropdown or checkbox field. You will need to
separate these options by a comma. In the event that you want to make any of the options
provided the default field, you will need to end your list of options with :: e.g, Radio
Button field options Yes, No, Maybe::Yes will create a radio button field with Yes set as
the default value.
○ Required - You can set a form field to be a required question to answer
○ Who can submit answers - you can limit who can submit answers to custom form fields
based on user permissions
○ Who can view Answers - you can limit who can view answers to custom form fields based
on user permissions.
● Once done, click on the save button, and your custom form field will have been created.
You can create as many custom form fields as possible on each form. You can also edit and delete custom
form fields, as well as change their position on the form by clicking on Move up or Move down.

55
Pages
This section allows you to:-
● Create additional custom pages apart from the ones existing in the main toolbar of the home page.
● Edit custom pages
● Show/hide custom pages
● Delete custom pages
To create an new page,
● Scroll down to the Add/Edit section
● Provide the following details;
○ Page Title
○ Page Tab name - This is the name you will see on the toolbar
○ Page description - Put in the content of the new page you would like to add.
● Click on save. Once saved, this page will be made automatically visible to user on the homepage.
To edit a page, simply click on edit and provide the desired details

56
Pages that are hidden will be denoted by a green link with the word Hidden on it. Pages that are visible
will be denoted by a green link with the word Visible on it. To either hide/make a page visible, click on
the respective green link and confirm the action when prompted by the pop up box.
To delete a page, simply click on the delete link and confirm the action when prompted by the pop up
box.
Newsfeeds
This section allows you to set up feeds that will appear on your “Official and Mainstream news” block on
the homepage.
To add a new RSS Feed, Scroll to the Add/Edit section at the bottom of the page and give your feed a
name, and provide the RSS link to it.

57
After having saved the new Feeds, the number of items coming in will be visible after clicking on the
Refresh Feed tab on the top of the page
The actions tab on this page allows you to edit, show/hide and delete any newsfeeds on the list.
To see the items of each feed you have created, click on the View Items link of each Feed and you will be
directed to a page where all the items from that Feed are listed.
You should be able to delete or create a report out of any feed item on the list.

58
You can also view all feed items coming into the platform irrespective of which specific feed they are
coming from by clicking on the “Feed items” link, adjacent to the “Feeds” link. Each For feed Item
coming in shows you if geo-location is available, which source it’s come from and a preview of the item.

59
Layers
You can add in additional static map layers that will appear on the homepage under the map. These static
map layers are in the format of KMZ or KML files.
To add a new Static layer
● Navigate to the bottom of the page, and use the Add/Edit box to insert the necessary details.
● You can choose to either upload a static map layer, or provide a link/URL from which the static
map layer can be pulled from. KML/KMZ Best practice information can be found on our wiki
here.
● Select a color that will be used to differentiate your static map layer from others on the
homepage.
● Click on save.
Once saved, the Layer will appear in the list at the top of the page and can be Edited, deleted, or made
visible/invisible.
If the layer is visible it will automatically appear in the Homepage, where users will be able to see it by
clicking on it.

60
Scheduler
This section allows you to schedule actions related to Alerts, Email, Feeds, Sharing(if activated) and
Twitter.
It allows admins to:-
● Schedule when and how often the platform will send out alerts to subscribed users.
● Schedule when and how often emails, feeds, tweets and sharing reports are pulled into the
platform.
By default, all those Schedules are set on automatic refresh every day, every hour and every minute. To
change those settings, you can click on the Edit tab on the side of each item, which will open a box at the
bottom of the page, allowing you to alter those settings according to Day of the Week, Day of the month,
Hour and Minute.
The scroll down menu allows the administrator to choose in between All, or a particular day, hour or
minute. Once done you need to click on save.

61
If you ever have an issue with pulling or pushing information from the platform, you can also Force to
Run the scheduler to refresh automatically all the incoming information.
You can also activate or deactivate a particular schedule for a specific incoming feed.

62
Public listing
NB: In order to manage your public listing, you must have stats enabled on your deployment. You can do
that by simply clicking on the "stats" tab in your admin panel. If that doesn't work, go to your Site
Settings and make sure "Enable Statistics" is set to "yes".
This page allows you to manage your public listing. If you are listed publicly, your deployment will be
easier to find via mobile applications, and elsewhere. This is optional and can be enabled or disabled via
this form.
Some of the fields on this form are automatically collected and you do not need to worry about keeping
them up to date. This form grants you control over your deployment description, deployment category
and images that are displayed when browsing through publicly listed deployments.

63
Actions and Badges
These are both experimental features that were added into the platform. The Ushahidi and Crowdmap
Teams cannot be responsible for any mishaps, bugs or quirks that show up when using Actions.
Actions
The idea behind this feature is to allow for administrators of a deployment to set up automated actions
based on a specific set of criteria. e.g if a report is received or a geolocated tweet or feed is added into the
platform, you can chose to either log it, email it, approve a report or assign a badge.
There are three steps/requirements to setting up actions:-
● Triggers: Chose any one of the following triggers:-
○ Report received
○ Geolocated tweet received
○ Geolocated feed received
● Qualifiers:
○ User: This dropdown field is populated with all users registered on the platform. You can
choose specific users to activate a trigger.
○ Location: You can also chose to restrict activation of the trigger to a specific location or
leave it open to any location
○ Keyword: You may chose to also activate a trigger based on keywords, of which you can
have multiple, separated by commas.
○ Category: You may also restrict activation of a trigger to one or multiple categories on
your deployment. If you select multiple categories, the trigger will be activated if any one
of the categories selected meets the requirement. e.g if you select Category 1 and 2, and a
report is submitted with category 2 or 3, this report will pass the test.
○ On specific count: This qualifier will activate the trigger on the N-th count( N being the
number you input in this field) for either the entire userbase or triggering user
○ Days of the week: If these actions happen on specific days of the week, you can make the
selection in this area. To select multiple days of the week, hold shift, command or
control. Keep in mind that the day is determined by the timezone set on your deployment
○ Between times: You can set a specific time range within which to check for activation of
this trigger, in 24 hour format.
○ Specific days: You can set specific dates in this field.
● Responses: Chose any one of the following actions to be conducted if all the qualifiers set above
are
○ Log it
○ Email it - You can choose to send an email(whose subject and body are determined after
selecting this option) to the triggering user, or any other user you specify.
○ Approve a report - After selection this option, you may choose to add this report to a
specific category, and mark it as verified or unverified

64
○ Assign a badge - You may choose to assign a badge to a specific user on your
deployment.

65
Badges
This section allows you create and make use of cool badges to award your users.
There are badge images in a variety of categories which can be used in Ushahidi or Crowdmap
deployments or other services.
You can assign or revoke badges to specific users on your deployment from this page, and also delete
badges you no longer want to make use of.

66
Alerts
This section allows you to:-
● View alert subscriptions from users who have signed up for alerts and the number of alerts sent
out to them. You can view these by:-
○ SMS alert subscriptions
○ Email alert subscriptions
● Delete alert subscriptions
Sharing
This link will only appear if the sharing plugin has been activated.
Please refer to the Sharing plugin: How to use the Sharing plugin instructions in the Addons section of
this manual

67
3. Processing the Incoming Information
Dashboard The Dashboard page is the initial page a user is redirected to on logging into the platform. The Dashboard
provides a summary of all the information coming into the platform and displays a snapshot of the
amount of reports over time.
The Dashboard is composed of four main sections:

68
● The Reports Timeline: allowing users to graphically view the trend of reports coming into the
platform over a period of time. By clicking on the top right options the admin can see the trend
over the past day, month, or year.
● The Quick Stats Box, which gives an overview of reports in the system. It includes:-
○ number of reports received in the platform, and right under it, the number of reports that
are yet to be approved
○ number of categories set up on the platform
○ number of locations created during report approval
○ number of messages coming from the following sources
■ SMS
The admin can access each one of those information pages by clicking on the relative name.
● The Recent Reports Box gives a summary of the most recent reports submitted by showing the
title, the time of the incident, if the report has been approved and verified, and the source. From
this box the admin can click on the title to access the report page.
● The News Feeds box gives you an overview of the RSS feeds coming into the platform.
Stats The statistics section allows you to see detailed information about the reports that have been submitted
and the users of the Ushahidi system. The statistics page has a toolbar which allow the administrator to
access the following pages:
● Visitor Summary
● Country Breakdown
● Report Stats
● Category Impact
● Report Punchcard
Visitor Summary
The Visitor Summary shows information about people who access or view your ushahidi deployment.
This tracks:-
● Unique Visitors: This shows the number of individuals who have accessed your instance. This is
determined using browser cookies. In cases where a visitor does not have cookies enabled on
their browser, they will be identified using a simple heuristic taking into account IP address,
resolution, browser, plugins, OS, etc.
● Visits: This is a record of a unique visitor coming to the site more than 30 minutes past his/her
last pageview.
● Pageviews: This shows the total number of pages that visitors have viewed on your site.
Visitor information is available over time as well and allows the administrator to see only the statistic for
a predefined interval of time by inserting the dates in the opposite fields, or by clicking on the date range
buttons, which allows you to choose an interval of 1 month, three months or six months.

69
Under the graph, you can see a list of days, with an indication of how many unique visitors, visits or page
views have been recorded per day, along with percentages.
Country Breakdown
This section shows the countries from where users/ individuals accessing your ushahidi deployment are
located. Country information is available over time and allows the administrator to see only the statistic
referred to a predefined interval of time by inserting the dates in the date fields, or by clicking on the date
range buttons, which allows you to choose an interval of one, three, or six months.

70
The countries that have the higher number of visitors are highlighted in red on the map, while under the
map there is the list if the countries with the numbers of unique visitors, visits or page views per day per
country and the percentage over the total views.
Report Stats
The Report Stats page shows the breakdown of reports on a pie chart, according to three criteria:
● Category
● Verified / Not verified
● Approved / Not approved
Statistical information on reports submitted is also available over time and allows the administrator to see
only the statistic referred to a predefined interval of time by inserting the dates in the date fields, or by

71
clicking on the date range buttons, which allows you to choose an interval of one, three, or six months.
A table on the right of the chart indicated the number of reports visualized in the chart and the categories
or the verified reports, or the approved reports visualized in the chart.
Category Impact
The category impact is a graph that allows the administrator to view reports by category over time. By
moving from the left to the right, you are able to see a comparative view of the different categories, while
passing the mouse over the category itself, the name of the category and the number of the report
submitted in that period of time will appear on the top of the graph.

72
Statistical information on the reports submitted is available over time as well and allows the administrator
to see only the statistic referred to over a predefined interval of time by inserting the dates in the date
fields, or by clicking on the date range buttons and choosing an interval of one, three, or six months.
Report Punchcard
The Report Punchcard is a graph that depicts the number of reports per day according to the hour of the
event. The graph shows in the Y axe the time of the day and in the X axe the day of the week. Looking at
the size of the dot in the graph you can easily see which times of which days the majority of the reports
where submitted to the platform.

73
Messages You can access this section of your deployment by clicking on the Messages link on your dashboard.
All messages coming from SMS, Email and Twitter are listed on this page.
It’s important to note that messages received within this section will not be displayed publicly until they
are processed and transformed into reports first, and then approved.
SMS
This page grants you access to:-
● Inbox: Incoming SMS Messages
○ Create report: If an SMS message has not yet been transformed into a report, this link
will appear on the side of each message. Clicking on this link will redirect you to the
report creation page, where the body of the SMS will be inserted into the description
field. You will only have to add a title, location, category and date and then submit the
report.

74
○ View report: If an SMS message has already been transformed into a report, this link will
appear on the side of the message, in green. Clicking on this link redirects you to view
the report created out of this SMS.
○ Reply: This allows you to respond to text messages. By default, you can insert default
replies requesting for more information or location information. You can also reply with
75
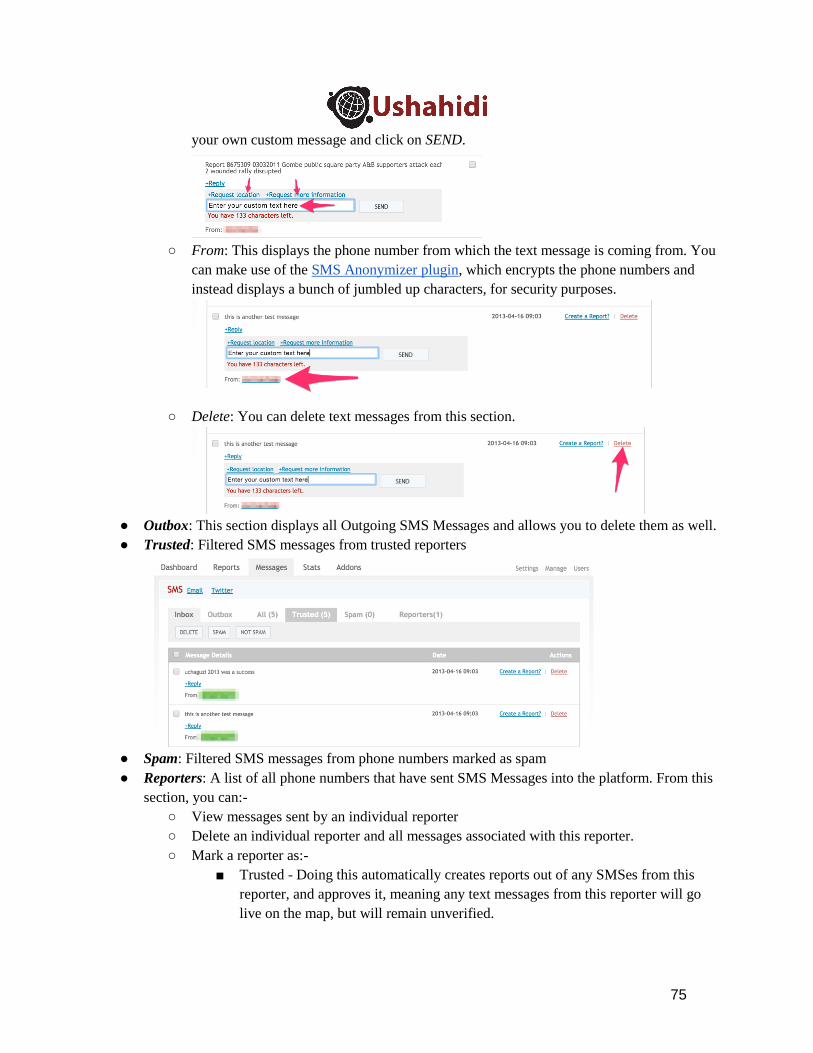
your own custom message and click on SEND.
○ From: This displays the phone number from which the text message is coming from. You
can make use of the SMS Anonymizer plugin, which encrypts the phone numbers and
instead displays a bunch of jumbled up characters, for security purposes.
○ Delete: You can delete text messages from this section.
● Outbox: This section displays all Outgoing SMS Messages and allows you to delete them as well.
● Trusted: Filtered SMS messages from trusted reporters
● Spam: Filtered SMS messages from phone numbers marked as spam
● Reporters: A list of all phone numbers that have sent SMS Messages into the platform. From this
section, you can:-
○ View messages sent by an individual reporter
○ Delete an individual reporter and all messages associated with this reporter.
○ Mark a reporter as:-
■ Trusted - Doing this automatically creates reports out of any SMSes from this
reporter, and approves it, meaning any text messages from this reporter will go
live on the map, but will remain unverified.

76
■ Trusted and Verified - Doing this automatically creates reports out of any SMSes
from this reporter, approves it AND verifies it, meaning any text messages from
this reporter will go live on the map and will be marked as verified.
■ Spam - This will flag any messages received by this reporter as spam
■ Spam+delete - This will flag and delete any messages received by this reporter as
spam.
○ Add location information to a reporter by clicking on Edit. Adding location information
to a reporter allows for location information to be added to any reports that are created
from this reporter.
○ Search for reporters by phone number

77
This page also grants you access to:-
● Inbox: Incoming Email Messages
○ From: If there is a name instead of the email address, this means that sender of the email
has been registered into the platform
○ Date: This shows you the date the email was posted.
○ Preview Message: This link allows the admin to see the entire body of the email. By
clicking again on that tab, the body of the email will return in its hidden format.
○ Create report: If an Email message has not yet been transformed into a report, this link
will appear on the side of each message. Clicking on this link will redirect you to the
report creation page, where the body of the Email will be inserted into the description
field. You will only have to add a title, location, category and date and then submit the
report
○ View Report: If an Email message has already been transformed into a report, this link
will appear on the side of the message, in green. Clicking on this link redirects you to
view the report created out of this Email
○ Delete: You can delete an email message by clicking on this link.
● Trusted: Filtered emails from trusted email reporters.
● Spam: Filtered Emails flagged as spam
● Reporters: This works the same way as the reporters page described above in the SMS section of
this manual

78
This page, much like email and SMS, grants you access to:-
● Inbox
○ From: This shows you the twitter handle from which the tweet was sent
○ Date: This shows you the date the tweet was posted.
○ Create Report: If a tweet has not yet been transformed into a report, this link will appear
on the side of each message. Clicking on this link will redirect you to the report creation
page, where the body of the tweet will be inserted into the description field. You will
only have to add a title, location, category and date and then submit the report.
○ View Report: If a tweet has already been transformed into a report, this link will appear
on the side of the message, in green. Clicking on this link redirects you to view the report
created out of this tweet
○ Delete: You can delete a tweet by clicking on this link.
● Trusted: Filtered tweets from trusted reporters
● Spam: Filtered tweets from reporters flagged as spam
● Reporters: This works the same way as the reporters page described above in the SMS section of
this manual

79
Reports
This is where a list of all reports submitted or created on the system can be found. This is easily where
you’ll be spending most of your time with the system. This page allows you to:-
● View a full list of reports
● Access details of individual reports
● Manage reports that need to be approved or modified
The Reports page has one toolbar listing actions you can do with the report list:
● View Reports
● Create Report
● Comments
● Download Report
● Upload Report
● Delete All reports
View Reports
In this list of reports, the administrator can see:-
● A report title
● The first sentence of the description field
● The date
● The location
● The associated categories
● The source i.e the person who created the report, and which channel they used i.e Web, SMS,
email, twitter.

80
This section has its own sub-toolbar which has the following tabs:-
● Show All: You can see all reports within the platform i.e approved and unapproved reports,
verified and unverified reports, as well as uncategorized reports. It is important to note here that
reports submitted on the Ushahidi platform will not appear automatically on the public list of
reports or the map; they must first be approved by an administrator with the relevant
permissions. Verifying the report is not a requirement to appear on the map, but it does let your
viewers know that the information in the report itself has been verified by either another source or
the administrator of the platform. Here’s a guide on verification you can look at.
On the side of each report, you can see the following actions:-
○ Approve:
■ If this link is green, this means this report has been approved. Clicking on it
prompts you to unapprove it.
■ If this link is blue and underlined, this means this report has NOT been
approved. Clicking on it prompts you to approve it.

81
○ Verify
■ If this link is green, this means this report has been verified. Clicking on it
prompts you to unverify it.
■ If this link is blue and underlined, this means this report has NOT been
verified. Clicking on it prompts you to verify it.
○ Delete: Allows you to delete a single report.
You’ll also note that you can conduct actions on bulk reports by clicking on the tick boxes
adjacent to the report title, and selecting the action in the sub toolbar above.
● Awaiting Approval : This tab only lists reports that have not yet been approved, which means that
they have been submitted but do not appear on the map.
● Awaiting Verification: This tab only lists reports that have not yet been verified. This may include
reports that have already been approved.

82
● Uncategorized reports: This tab only lists reports that may have been uploaded with no category
information, and are thus uncategorized.
● Search/Advanced Search: This section allows you to perform an advanced search on reports
listed. Point to note is that the search results returned will match ANY of the search criteria, as
opposed to matching ALL search criteria. The search operation conducted here used the OR
operator.
An administrator can view individual report details by clicking on the report title, which will then redirect
him/her to the report edit page(which is the report creation form, with fields pre populated with
information from the individual report). Sections in the report creation field will be described in detail in
the Create Report Section.

83
Create Report
This report creation form is identical to the report creation page on the front end of your deployment, but
with the following additional details:-
● Information Evaluation box: Which allows the administrator to approve and/or verify a report
directly during report creation
● Hidden forms, form fields and categories(Those not visible on the front end) are visible to the
administrator on this page.
Fill in the following details:-
● Form Type: Select a form from a list of custom forms created on your deployment
● Title: Provide a brief title for your incident
● Description: Provide a detailed description of what your incident is all about
● Date: By default, the platform will set the date and time of creation, based on timezone set on
your deployment. You can alter this to reflect the date an incident occured
● Categories: Select the relevant categories that match the event being reported
● Location: If unable to locate the specific location on the map, you can type in the name of the
location you’re trying to find, in as much detail as possible, and the red marker on the map will
move. You can alternatively drag and drop the red pointer to the desired location. You can also
draw lines and polygons on areas, as well as set multiple markers on a location.

84
● Location Name: This field cannot be left blank. Please provide the name of the location selected
above.
● (Optional) News source link, Video link, Upload Photos, if you have any.
● Custom form fields: Select your custom form field responses.
● Information Evaluation: This box has two questions to ask of the administrator:-
○ Approve this report? If the information in the report makes sense, the admin will approve
the report by clicking “Yes” next to “Approve this report”. The report will then appear on
the map as a dot.
○ Verify this report? The administrator will select “Yes” to verify report if he/she has direct
knowledge about the event and can be sure that it is true. It is strongly suggested not to
click on verified if it is not possible to confirm the information in the report.
● (Optional) Personal Information - You can opt to share your contact information, which would
only be made visible to administrators on the platform and would not be publicly displayed.
When satisfied with the review of the report, you can click on Save Report or Save and Close button, so
that the report will be publish on the website.

85
Comments
The comments section allows the administrator to view and manage all comments that are submitted to
reports on the website.
The comment lists allows the administrator to:-
● View all comments in the system that are :-
○ Awaiting Approval,
○ Have already been Approved
○ Have been identified as spam
You can see the following information on each comment:-
○ Who submitted the comment
○ Which report the comment is in response to
○ The comment content
○ IP Address from where the comment was submitted
○ Date the comment was submitted.
● Approve and unnapprove comments
○ If this link is green, this means this comment has been approved. Clicking on it
prompts you to unapprove it.
○ If this link is blue and underlined, this means this comment has NOT been approved.
Clicking on it prompts you to approve it.
● Mark comments as spam
● Delete comments

86
Download Reports
This section allows the administrator to download all the reports, either as a CSV(Comma Separated
Values) file or XML(Extensible Markup Language) file. There are options to choose:-
● Data points to download
○ Approved Reports
○ Verified Reports
○ Reports Awaiting Approval
○ Reports Awaiting Verification
○ (Optional) Within a specific date range
● Additional information to download
○ Latitude
○ Longitude
○ Location Information
○ Description
○ Categories - It’s important to note that when downloading as a CSV, all categories,
irrespective of top level or sub category, are separated by a comma in a single column.
○ Personal information
○ Custom fields
Once the desired selection has been made, click on the Download tab.

87
Upload reports
This section allows you to import incidents into the Ushahidi platform. This functionality is useful in
cases where you need to upload reports from people that cannot send them to you via email or phone but
have the data available in a CSV file. This functionality is also useful in cases where you are transferring
reports from one platform to another (minding that both platforms are using identical versions of the
software).
Rules
● Reports must be uploaded in either CSV or XML format..
● When incident ID already exists in the database, the entry in the CSV/XML file will be ignored..
● It must contain at least Incident Title and Incident Date.
● If no latitude and longitude columns are supplied, the location will be geocoded using the Google
Geocoder.
Importing Custom form fields/Personal information
If importing additional info i.e personal information and/or custom form fields
● At least one of the personal information fields(name, surname,email) entries MUST exist. Empty
records will not be imported
● Custom field columns must have their form_id appended to them e.g custom field Test, on the
default form, whose id is 1, will be Test-1. During custom form field import, ensure that

88
○ Your entries for dropdown fields, radio buttons and checkboxes match the options
provided for the custom field on your instance
○ Checkbox options are separated by a comma e.g if your selected choice of fruits is
apples,mangoes and grapes, your entry for this should be "apples,mangoes,grapes"
○ Date field values are in the following format: mm/dd/yyyy e.g 3rd October 2012 =
10/03/2012
View our report upload guides for more information:-
● XML Upload guide
● CSV Upload guide
Sample CSV Report #,INCIDENT TITLE,INCIDENT
DATE,LOCATION,DESCRIPTION,CATEGORY,APPROVED,VERIFIED,LATITUDE,LONGITUDE "1","Suspected death in Nairobi","2009-05-15 01:06:00","Nairobi","Three cases have been confirmed in C. del
Uruguay","DEATHS, CIVILIANS, ",YES,YES,"-1.287","36.821" "2","Looting","2009-03-18 10:10:00","Accra","Looting happening everywhere","RIOTS, DEATHS, PROPERTY LOSS,
",YES,NO,"5.55","-0.2166667"
NB: It was detected that Microsoft Excel For Mac has some compatibility issues with uploading reports
into the Ushahidi platform especially in cases where RTL languages are used. Microsoft does not
support RTL languages. It is therefore recommended that alternative spreadsheet editors such as
OpenOffice be used in such instances
Delete all reports
Using this function will delete ALL reports on the database. You should use this with caution as this
operation cannot be undone. It is recommended that you backup your database before proceeding

89
4. The User Interface
Homepage
Your ushahidi deployment homepage consists of different sections, each providing you with different
information:-
● Main map
● Category filter
● The timeline
● How to report box
● Incident Block
● Official and mainstream news block
● Other deployments
● Static layers
In addition, the toolbar has the following navigation item links:-
● Reports
● Submit a report(if enabled by the administrator)
● Get Alerts(if a site email address is provided and this is enabled by the administrator)

90
● Contact us(if a site email address is provided and this is enabled by the administrator)
● Any custom pages you add in the Pages section of the platform will also appear on this toolbar,
e.g About Us
There are also 3 additional buttons at the top of the toolbar
● Submit a report - which redirects you the report submission page
● Languages - which allows a user to select the language in which they would like to navigate
around the platform
● Search
The Map
This main map is interactive and is composed of the following parts:-
● Base Map - The map layer displayed to you here depends on which base map the administrator in
the map settings page
● Zoom bar - This allows you to zoom in and out of the map. If reports are clustered, the more one
zooms out, the more the reports get aggregated, and the larger the dots appear. The more one
zooms in, the more reports will separate one from another and appear as a single dot.

91
● Dots on the map: These dots on the map represent reports submitted to the Ushahidi platform,
and the location of the events reported. If the administrator chooses to have reports clustered on
the map, reports in a similar location will be clustered and will appear as larger dots with a
number on it, showing you how many reports are in that location. By clicking on a marker/dot on
the map, an info window will appear showing you the title of that report. If you click on a
clustered dot, the list of titles of all reports in that area will appear. If you then click on the title,
the platform will forward you to the report itself, where you will be able to read the entire
description of the report
● Layer button - The little (+) sign allows you to switch from one base map layer to the other,
based on the map provider selected by the Administrator. You can also add or remove the reports
layer on the map itself
Categories
This filter enables you to interact with the map even more. It allows you to filter the reports on the map
based on which category they belong to.
Clicking on all categories will display all reports submitted to the Ushahidi platform, while clicking on a
certain category will display only the reports related to that specific category or sub-category. The color
of the dots on the map will correspond to the category/sub-category selected on this filter. If any category
icons have been assigned, these icons will display, instead of the dots on the map. Users can see view
reports belonging to one category or sub-category at a time

92
The timeline
If using the Default, bueno or terra theme, and the administrator has enabled the setting to display the
timeline on the homepage, you should be able to view a timeline of events right under the map.
This timeline shows the number of reports mapped over time and by default shows the overall trend of the
reports from the beginning of your deployment to the current day as a static graph. To view reports
published over a given period of time, you just have to provide the date range in the date fields below the
map. This will set the time interval you want to look at, and only reports within this date range will be
displayed on the map.
The timeline can also be used in coordination with the map, turning the default, static visualization into a
dynamic visualization displaying the reports as they were added to the system by clicking on the Play
button. If you want to view an animation of the reports mapped over time and space over a certain period
of time, simply insert the dates in the two boxes and click on the Play button
How to report box
This section provides visitors/users of the platform with more information on how to submit reports into
the platform.
The Ushahidi platform allows for reporting via email, sms, twitter, the web form and smartphone
applications on the iOS and Android.
As long as the administrator has set up the platform to receive reports from the channels above, the how
to report box will have information describing how to report via these channels
● Email: If a site email address is provided, this email address will be displayed here
● Twitter: If twitter has been properly set up and hashtags provided, they will be listed here
● SMS: If SMS numbers are provided and properly set up, they will be listed here
● Smartphone apps: Links to the default smartphone applications on the iOS and Android store are
provided here.

93
Incident Block
The Incident List Box appears below the map(or timeline if enables) and it shows the list of reports in
chronological order starting from the most recent one. The list shows the title of the report, the location,
and the date the incident was reported to have occurred.
By clicking on the title you will be directed to the individual report view page, where you will be able to
see the description of the event and all the specifications of the event reported
Official and Mainstream Block
The Ushahidi platform provides the ability to subscribe to RSS feeds from other websites and to display
them on your website. This feature is optional but in some projects, particularly those that may be actively

94
covered by the mainstream media or bloggers, it can be useful to provide additional context about your
project without having to include related but not actionable content on your map.
If you choose to include news feeds on your homepage, they will appear in a block titled “Official and
Mainstream news”. These news items will come from different website, blogs, twitter accounts, or
anything relevant that the administrator of the platform decided to subscribe to.
The list shows the title of the news item, the source, and the date it has posted. This box works like a
Google Reader, and by clicking on the title of the news you will be directed to the original source of the
information.
Static Layers
Static layers are useful for your project in displaying information such as different regions, states, or
provinces; demographic information; borders; or other general information that may help provide
additional context to the real time information you are gathering on the ground, but information you don’t
want to include as reports to clutter up your other sources. Ushahidi provides the means to include and
abstract this information from your reports as well as the option for your users to toggle this information
on or off depending on their preference.
These static layers are added as KML/KMZ files in the Layers section of the admin panel. Those files
contain information about static points or areas on your map. For example, these static points can
represent refugee camps, or police stations, hospitals, geographic regions or risk areas. The reason you
wouldn’t want to submit this information as reports for your map is because they will appear as incidents,

95
which are likely to confuse your viewers. Adding these static layers allows you to view this data in
relation to reports you have mapped, which can help you identify possible connections between those
static locations and the dynamic events happening in the same area.
The static layer box only appears if you have any active and visible layers, and would be listed under the
category box(if using the Default, bueno or terra themes) under “Other Layers”. If using the Unicorn
theme, this box will appear on the top left hand corner of your page.
Clicking on a static layer will show your points related to the layer selected on the map. You can chose to
view multiple static layers on the map at the same time.
Other deployments
The ushahidi platform allows you to overlay reports from other deployments on the main map, abstracted
from reports on your own deployment.
This block only appears if the sharing plugin is activated and there are active ushahidi deployment links
that have been made visible.
This box would be listed under the category box and Static Layers Link(if using the Default, bueno or
terra themes) under “Other Deployments”. If using the Unicorn theme, this box will appear on the top left
hand corner of your page.
Reports Listing Clicking on the reports tab redirects you to this page, which shows you a list of all approved reports
within your deployment from the time your deployment was created, to date.
You can specify a date range within which you would like to view reports on this page.

96
There are 2 default views provided to you on this page:-
● List view
○ The reports listed have a small green or red highlight on the left hand side of the report.
Green denotes a verified report, and red denotes an unverified report.
○ You can also see thumbnails of any images attached to the report, if any are available.
○ You can also see a summary of the number of comments attached to this report
○ You should also see the report titles, description summary and date of the report from this
view.
● Map view
○ This view displays reports as green dots on the map. Clicking on each dot will display a
pop up with the report title, which links to the individual report view page

97
Filter
You can filter reports on this page according to:-
● Category: You can filter reports on this page by multiple categories at a time, unlike the
homepage which only allows you to select one category at a time.

98
● Location: You can set a location range within which you would like to search for reports.
● Type/Source: You can filter reports based on which source they came from i.e SMS, Email,
Twitter, Web

99
● Media: You can search for reports that have any media items attached to them i.e videos or
images
● Verification status: You can search for/filter reports based on whether they are verified or not
● Custom form field responses: You can search for/filter reports based on custom form field
responses.

100
You can select multiple search/filter criteria from the list above, and clicking on filter reports will return
results that meet ALL the criteria selected above.
View individual report
Clicking on the report title will access the full report with all of the information. The complete report
details from the report page are the following:
● Map visualization

101
● Date, time and location of the incident
● Category information
● Verification status
● Description
● Comments added by users
● Additional Reports related to that event
In addition, there’s a small upvote/downvote functionality at the top of the Comment Box that allows the
viewer to give scores to the report. Upvotes/downvotes do not affect the verification status of the report,
or of the comment, but give the administrator and other users an idea of what people think about the
credibility of a report or comment.
Submit report To access this form, click the “Submit a report” link on the menu bar. This link is only visible if the
administrator has enabled the setting allowing for users to submit reports on the platform.
Submitting a report to an Ushahidi platform is as easy as filling in any online form; administrators will
appreciate that the layout of the form is identical to the finished reports. Even geo-locating your report is
as simple as clicking on the map provided; Ushahidi will figure out the latitude and longitude for you.
If a Submit Report Message is provided by the administrator, it will appear on the top of this page.
The following fields are available on a the report submission page:-
● Title: The person reporting the event/incident needs to provide a brief description of the incident.
The title is the first thing that users of the map will see, so it is important that the title gives an
idea of what happened and where.
● Description: The reporter should provide a little more detail by describing the event in a few
sentences. The description should be brief, but comprehensive, with all the additional information
that is relevant to the event reported. It is important to include the following pieces of
information: ‘who’, ‘what’, ‘where’, ‘when’, ‘how’ and any additional, contextual information
that you feel is important.
● Date: This should refer to the date and time of the event being reported, rather than when the
report is submitted. Note that the system automatically picks the date and time when the report is
being posted, so the reporter will need to change the entry if the event happened on a different
date than when the report is being submitted.
● Categories: The reporter must select at least one category type, but can select as many categories
as possible. To view sub categories under a top level category, you need click on the plus sign
placed before the category and a scroll down menu will appear with all the sub-categories.
Correct categorization is important and should not be rushed. In general, try to select just one
category if possible.
● Map(and Find Location tab): The map allows viewers to visually provide the location of the
incident. If the name of the street, address, or GPS coordinates are not known, but the reporter

102
can find the location on the map, she can double click on the location of the event on the map to
place the red marker there. This will automatically record the coordinates and point on the
Ushahidi map. If unable to locate the specific location on the map, you can type in the name of
the location you’re trying to find, in as much detail as possible, and the red marker on the map
will move. You can alternatively drag and drop the red pointer to the desired location. You can
also draw lines and polygons on areas, as well as set multiple markers on a location.
● Location Name: This field cannot be left blank. Please provide the name of the location
● Custom form fields: Enter your custom field responses
● News Source Link: This section should be used only if the report being submitted is from an
online source: the box allows inserting only a URL address. If the information is coming from
more than one online source, a user can insert as many links as required by clicking on the plus
(“+”) symbol on the side of the box
● External Video Link: Reporters can add links to videos related to the event reported. It is
important to be sure that the video is relevant to the accident monitored. Note that the Ushahidi
platform doesn’t allow you to upload videos to the platform; the reporter can provide a URL to a
video hosted elsewhere (such as YouTube).
● Upload Photos: The reporter can also upload a photo related to the event reported. Again it is
important to be sure that the format is JPG or similar and that the picture is relevant to the event
being reported on.
● Personal Information: The reporter may include her personal information with report: first name,
last name and email address. Typically, this is important information to be include because if
there is missing information in the report, or mistakes, the administrator can immediately contact
the reporter for clarification. This is not required for the system to accept the report, but it can
enormously help the managers of the platform. It’s also good to note that this information will
only be made available to administrators of the platform, and not made publicly visible, to protect
privacy of users who submit reports.

103

104
Get Alerts This page is only visible if the administrator has enabled the setting allowing for users to subscribe for
alerts and provides an email address from which alerts will be sent out from.
This allows users to subscribe for alerts on :-
● Mobile phone: This option will only be made available if the platform has been set up to receive
and send SMS messages.
These alerts can be set to a specific location range and on (optionally) specific categories.
To set up an Alert via email or SMS it is just matter of four easy steps:
● Click the “Get Alerts” tab on the home page.
● Select the location to receive alerts about and the size of the area. The system will send an alert
whenever a report is entered within 1/5/10/20/50/100 km from this location.
● Select mobile or email alert and enter mobile phone number or email address (or both).
● You can also optionally select multiple categories of information you would like to receive alerts
from.
● Click “Save Alert”.

105
Contact Us This page is only visible if the administrator has enabled the setting to allow the contact page to be
displayed, and the site email address has been provided.
The form asks for personal information like name, email address and phone number in addition to
message subject and text, and has a security code to protect the deployment from Spam.
Additional Buttons
Languages
This drop down on the top right hand corner allows any user to select the language they would like to
operate with on the platform. Note that this does not affect the default language set by the admin in the
Settings page.
Search
The search option on the top right hand corner allows you to look for specific reports within the Ushahidi
platform. By typing into the box the key word the system will give you all the reports, in chronological
order, starting from the most recent one, that contains or matches that search terms provided.


