
Inteset Secure Lockdown™
ver. 2.0 for
Windows
User Guide
Secure Lockdown™ v2 - User Guide Page 2
Contents
User Guide ................................................................................................................................................. 1
Welcome ................................................................................................................................................... 3
System Requirements ............................................................................................................................... 4
Use with Tablets and Touch Devices ........................................................................................................ 4
Installation ................................................................................................................................................ 5
Product Activation .................................................................................................................................... 5
Deactivate the Secure Lockdown License ............................................................................................. 6
Managing Licenses ................................................................................................................................ 6
Secure Lockdown™ v2 Usage .................................................................................................................... 6
Password Tab .................................................................................................................................... 7
Master Application Tab ..................................................................................................................... 8
System Lockdown Tab ..................................................................................................................... 10
Background Apps Tab ..................................................................................................................... 13
Help Tab .............................................................................................................................................. 14
About ............................................................................................................................................... 14
Export / Import ............................................................................................................................... 15
Deactivate License .......................................................................................................................... 16
Remote Management ..................................................................................................................... 16
OS Image Installations and Remote Management ................................................................................. 17
On-screen Keyboard Helper .................................................................................................................... 17
Windows System Modifications to Consider .......................................................................................... 18
Support ................................................................................................................................................... 18
Page 3 Secure Lockdown™ v2 - User Guide
Welcome Thank you for purchasing Inteset Secure Lockdown™ v2 for Windows. This simple, but powerful program
will enable you to run your master application uninhibited by the Windows Desktop and unwanted
keystrokes. It is perfect for kiosk setups, tradeshow terminals, libraries, schools, internet cafes, gaming
centers, media centers, digital signage, and other applications. Secure Lockdown™ will run in the
background and enable your master application to run exclusively. It will ensure that your application
stays running. Media server applications, Adobe Flash-based menus, custom programs, or browsers set
in “kiosk” mode are common master applications used with Secure Lockdown™.
Inteset Secure Lockdown™ v2 includes the following features:
Runs as a hidden background application
Runs your master application as the exclusive menu program
Re-starts the master application if it is shut down by the user
Removes the Windows Task bar and Start button
Removes all Desktop actions such as:
o Desktop right-click menu
o Task Manager access
o CTRL-ALT-Delete functions
o System shutdown or logoff
o Windows Ease of Access
o Windows Help and Support
Disables numerous keystrokes including:
o Alt-tab
o Alt-F4
o Alt-Esc
o Alt -Shift-Esc
o CTRL-Esc
o CTRL-Shift-Esc
o Windows Keys
o F1 (Windows Help) F3 (Windows Search)
Allows for independent user accounts that use or do not use Secure Lockdown on one computer
Off-line trial and product activation (Internet connection not needed)
Command-line and unattended installation and enable/disable handling
Remotely manage Secure Lockdown systems
Users of your system will only have access to those applications which you allow. Administrators of the
locked down system, can easily and quickly manage the Secure Lockdown™ settings with just a few
button presses.
It is recommended that you read the following sections of this guide to ensure that you have a complete
understanding of the capabilities of Secure Lockdown™ v2.
Secure Lockdown™ v2 - User Guide Page 4
System Requirements The list below describes the system requirements of Secure Lockdown™.
Runs with any version of Windows (XP, Vista, 7, 8, 10)
Windows XP - Service Pack 3
.Net 4.5.2 or higher
Secure Lockdown™ must run under an administrator account (the logged in user must have
administrator privileges). Secure Lockdown cannot “Run as administrator” under a Standard
User account.
Note: Secure Lockdown, when enabled, effectively converts the administrator account into a highly
restricted Standard User account. In addition, it adds many security enhancements and access limitations
both fixed and customizable.
An Internet connection on the system in which the software is installed is recommended for
simple product activation (off-line activation is available).
Windows User Account Control (UAC) should be disabled. If it is not disabled while Secure
Lockdown is enabled, upon logging into the locked down account, users can answer “no” to the
UAC prompt, then bypass many of the lockdown features Secure Lockdown employs.
Antivirus software should be either configured to allow Secure Lockdown to run uninhibited or
disabled entirely as Secure Lockdown needs to write to the HKLM portion of the Windows
Registry and some antivirus software prevents this. Antivirus software can also prevent the Alt-
Shift-S Secure Lockdown configuration tool from launching. This could prevent the ability to
disable Secure Lockdown if it has been enabled. Note that if Windows Defender is used, an
exception should be created for the “C:\Program Files (x86)\Inteset\Secure Lockdown” folder.
It is highly recommended that a second, password protected local administrative account be
setup on the system as a security and recovery measure.
Use with Tablets and Touch Devices Secure Lockdown supports tablets and other Windows touch devices that do not use physical
keyboards. However, certain precautions need to be taken particularly during the Secure Lockdown
testing phase. During the testing phase, it is recommended that a physical keyboard such as a USB or
blue-tooth keyboard be configure before enabling Secure Lockdown. This will ensure that you have
access to the Alt-Shift-S hotkey that invokes the Secure Lockdown configuration utility and allows you to
disable Secure Lockdown. In addition, you may need to setup a virtual keyboard (on-screen keyboard)
that starts when Windows starts (see the On-screen Keyboard Helper topic later in this guide.) The
default Windows on-screen keyboard does not include an “Alt” key that is needed for the Alt-Shift-S key
sequence. Thus, if Secure Lockdown senses that no physical keyboard is available, it will automatically
set the default virtual keyboard to “Compatibility Mode” which will convert it to a full keyboard.
Page 5 Secure Lockdown™ v2 - User Guide
Installation Installing Secure Lockdown™ v2 is simple and quick. It is the same installation process as required by
many standard Windows applications. The only requirements of the installation are that you must be
logged in as an administrator of the system. Assuming that you have the proper privileges and that you
have downloaded the Secure Lockdown™ v2 installation file, you can begin the installation procedure by
double-clicking on the “IntesetSecureLockdown_v2.exe” file and following the instructions displayed by
the installation application. Once the installation is complete, you can launch Secure Lockdown™ by
selecting the Windows Start button, then All Programs, then Inteset, then Secure Lockdown v2.
Product Activation The Inteset Secure Lockdown™ software has a trial period of 30 days whereby you can use it without
purchasing it. This is ample time to determine if it is right for your needs. Just select the Run Trial button
to run the full featured trial.
Note: The trial activation process requires that the computer has connection to the Internet. If it does not, you will
be prompted to use an off-line method of activating the trial version of Secure Lockdown.
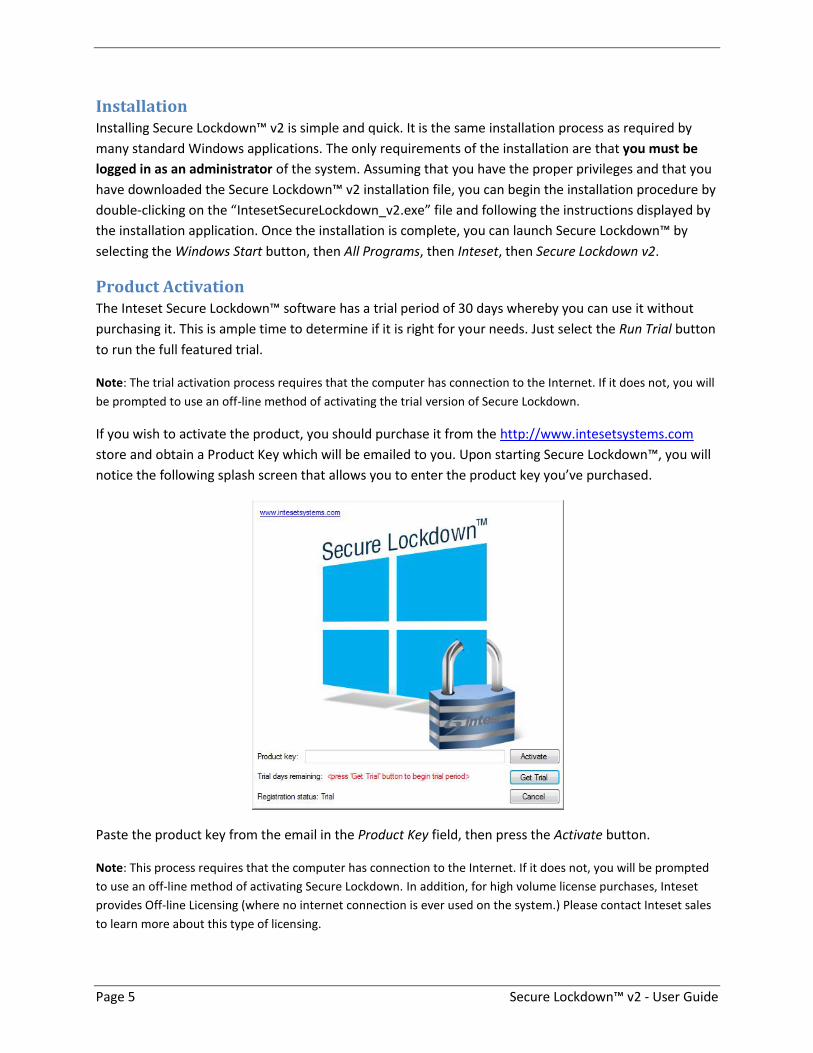
If you wish to activate the product, you should purchase it from the http://www.intesetsystems.com
store and obtain a Product Key which will be emailed to you. Upon starting Secure Lockdown™, you will
notice the following splash screen that allows you to enter the product key you’ve purchased.
Paste the product key from the email in the Product Key field, then press the Activate button.
Note: This process requires that the computer has connection to the Internet. If it does not, you will be prompted
to use an off-line method of activating Secure Lockdown. In addition, for high volume license purchases, Inteset
provides Off-line Licensing (where no internet connection is ever used on the system.) Please contact Inteset sales
to learn more about this type of licensing.
Secure Lockdown™ v2 - User Guide Page 6
The software will be activated and the splash screen will close. At this point, Secure Lockdown™ will be
running in the background and there is no visible indication that it is running. To display the Secure
Lockdown™ application, press the Alt-Shift-S keyboard sequence.
Deactivate the Secure Lockdown License
If you purchase Secure Lockdown and activate the license on a computer, and decide later that you want
to move the license to another computer, you must deactivate the license on the initial computer first.
Do not uninstall the application before deactivating it. You can deactivate a license by going to the Help
> About tab in the Secure Lockdown configuration utility, then press the Deactivate button. Note that
the Deactivate button will only appear if the Secure Lockdown license has been activated on the
computer.
Managing Licenses
If you purchase more than one license, you can view the status and manage your licenses on our
website. This is useful if you need to:
View how many licenses are activated for a particular purchase/order
View the Secure Lockdown machine ID’s of each activation
Determine which computers are activated under which product key
Merge a product key (and its associated licenses) into a previous product key
To access these features, go to https://services.inteset.com/customer/info and log into your account.
Choose the My Account menu option, then select the Manage Licenses option.
Managing Devices
Inteset now offers new Remote Management Services (RMS) which allows you to manage your Secure
Lockdown devices remotely. Many features are free including viewing the system information and status
of each device, viewing a screenshot of current activity, and updating the system to the latest release of
Secure Lockdown. Other features include:
change the Secure Lockdown settings (beta)
modify settings in batch (beta)
change the Secure Lockdown password (beta)
restart the system (beta)
enable and disable Secure Lockdown (beta)
send email alerts when Secure Lockdown is not running (beta)
To enable this feature, register Secure Lockdown with the service as described under the “Help Tab >
Remote Management” section of this guide.
Secure Lockdown™ v2 Usage Once Secure Lockdown is installed, from the Windows Start button, All Programs, Inteset menu, double-
click on Secure Lockdown v2. From here, Secure Lockdown will be running in the background. The
configuration screen can be invoked by pressing the Alt-Shift-S keyboard key sequence.
Page 7 Secure Lockdown™ v2 - User Guide
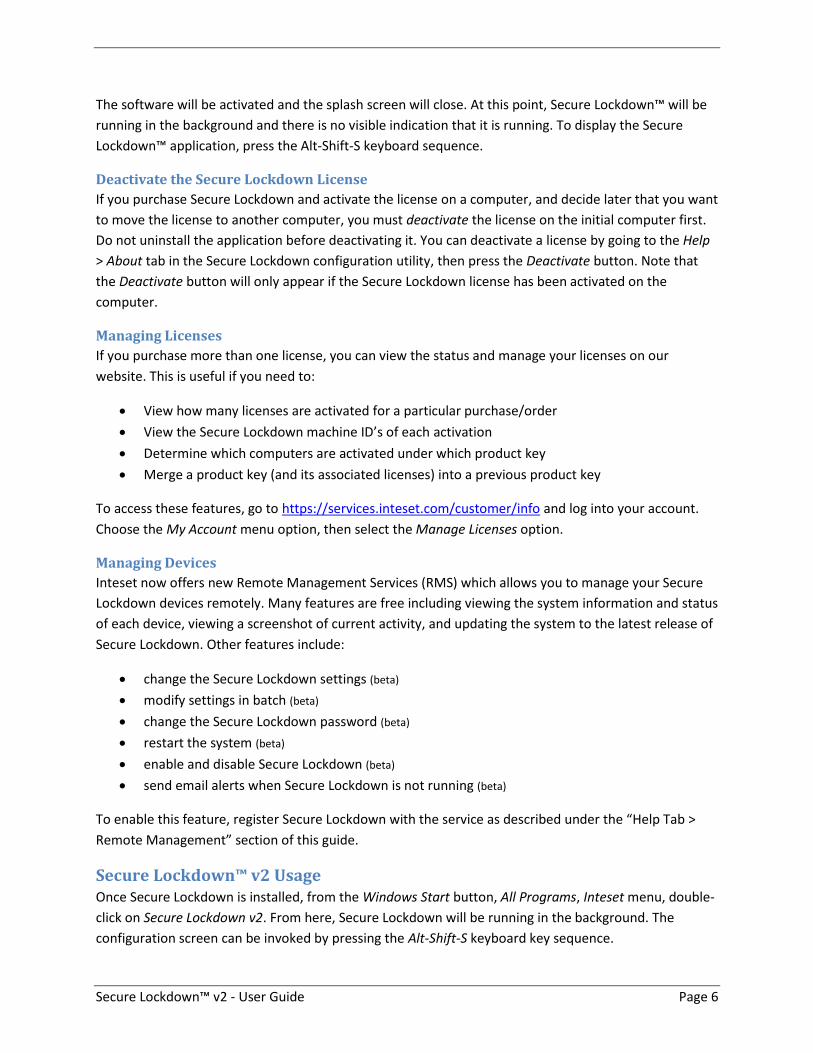
Password Tab
Once Secure Lockdown™ is running in the background, press the Alt-Shift-S keyboard key sequence to
display the configuration screen (as shown below). From here, you will need to enter a password into
the Password field before using it. For first time use, there is no password required and full access to the
configuration utility is available. A password can be created later which will restrict access to the
configuration screen.
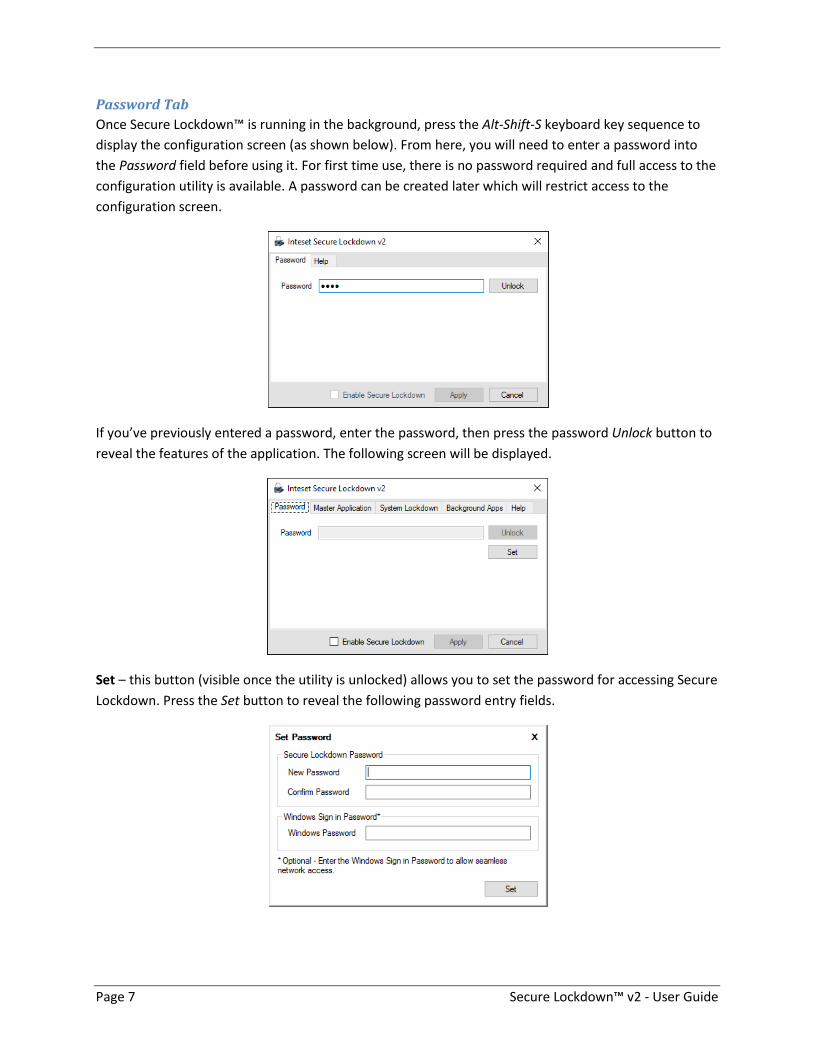
If you’ve previously entered a password, enter the password, then press the password Unlock button to
reveal the features of the application. The following screen will be displayed.
Set – this button (visible once the utility is unlocked) allows you to set the password for accessing Secure
Lockdown. Press the Set button to reveal the following password entry fields.
Secure Lockdown™ v2 - User Guide Page 8
New Password – To add a password requirement to access the Secure Lockdown configuration
utility, enter a password in the New Password field. A password can be any alpha numeric and
special key combination. Passwords are not case sensitive.
Confirm Password – Enter the same password in the Confirm Password field.
Windows Password – If you need to seamlessly access network shares or mapped network
drives, enter the Windows sign in password of the current account into the Windows Password
field.
Note: Network shares are still accessible without the Windows sign in setting, however, they will require
the user to enter access credentials. In addition, the System Lockdown > Local Level > No Network Shares
option must be disabled for this password entry to be relevant.
Set - Press the Set button to apply the passwords.
VERY IMPORTANT: Be sure to remember the Secure Lockdown password as you will not be able
to access the application in the future without it. And, if Secure Lockdown is enabled, the system
will be locked and you will not be able to unlock it without the password.
Enable Secure Lockdown – Check the Enable Secure Lockdown checkbox to put Windows in a locked
down state. Before doing this, you should review and edit the options under the Customization tab, then
press the Apply button. You will need to restart the system in order to fully enable Secure Lockdown.
Note that you cannot exit Secure Lockdown when it’s enabled. While enabled, it will run in the
background and can be invoked by pressing the Alt-Shift-S keyboard key sequence.
Once Secure Lockdown is enabled, you can disable it by press the Alt-Shift-S keyboard key sequence. The
Secure Lockdown application will appear. Enter the password (if one exists), then press the password
Apply button. Uncheck the Enable Secure Lockdown checkbox, then select the Apply button. You will
need to restart the system in order to fully disable Secure Lockdown.
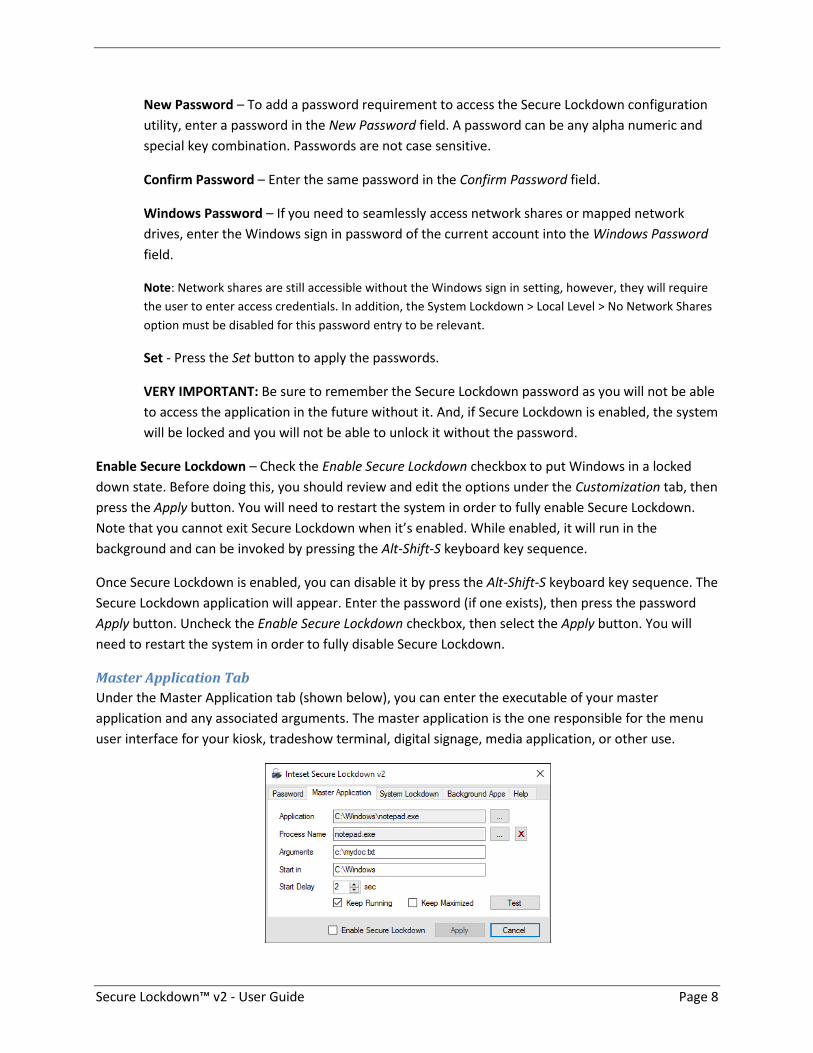
Master Application Tab
Under the Master Application tab (shown below), you can enter the executable of your master
application and any associated arguments. The master application is the one responsible for the menu
user interface for your kiosk, tradeshow terminal, digital signage, media application, or other use.
Page 9 Secure Lockdown™ v2 - User Guide
Application - Press the Application ellipse button to find and select the location of the master
application executable, shortcut, batch file, or script. If you are using a batch file or script to launch your
application, and you have the “Keep Running” option enabled, you will need to populate the “Process
Name” field with the name of the process you’d like Secure Lockdown to monitor.
If you plan to run a Windows 10 Universal Application (Windows Store app) as your master application,
please see the following Inteset support forum topic:
https://services.inteset.com/boards/topic/925/how-to-use-a-windows-10-universal-app-modern-ui-as-
a-master-application
There are unique set requirements for Universal Apps.
Process Name (optional advanced feature) – If the application you’ve selected in the “Application” field is a
batch file or script and you would like to monitor (Keep Running) the application being launched by the
script, you’ll need to specify in the Process Name field the process name of the process to be monitored.
Press the Process Name ellipse button to find and select the process (executable) to be monitored. If
you select a shortcut file (ie: “*.lnk”, “*.appref-ms”), its associated process will populate the Process
Name field).
Note: While using a batch file or script and specifying a process name, it is likely that you will need to indicate to
Secure Lockdown how long the script runs before it exits. If you do not specify this information, Secure Lockdown
may not be able to monitor the specified process (you will receive an error message if this is the case). Contact
[email protected] to request the Secure Lockdown – Administrator Guide for more information regarding
how to inform Secure Lockdown of the delay time.
Arguments - Enter any desired arguments that are accepted by the executable in the Arguments field.
Start in – With some applications, a startup directory (working directory) needs to be specified. Enter
the working directory path in the Start in field. Note that system variables can be used (ie:
“%PROGRAMFILES%”, “%HOMEDRIVE%”, “%HOMEPATH%”, “ %WINDIR%”, etc)
Start Delay – If you want Secure Lockdown to delay the launch of your master application upon the
initial system boot, enter the number of seconds for the delay. This feature can be useful if you need
other applications or services to start before the master application starts.
Keep Running - Check the Keep Running check box to restart the master application if it is closed. Note
that if you have Keep Running checked, the application will restart in 10 seconds or less if you close it.
Keep Maximized - To keep your application maximized at all times, check the Keep Maximized checkbox.
Test - You can test the launch of the application plus arguments by pressing the Test button. Press the
“Apply” button before testing.
While testing, if your application runs on top of the Secure Lockdown™ application, press the Alt-Shift-S
keys to bring Secure Lockdown™ to the top.
Secure Lockdown™ v2 - User Guide Page 10
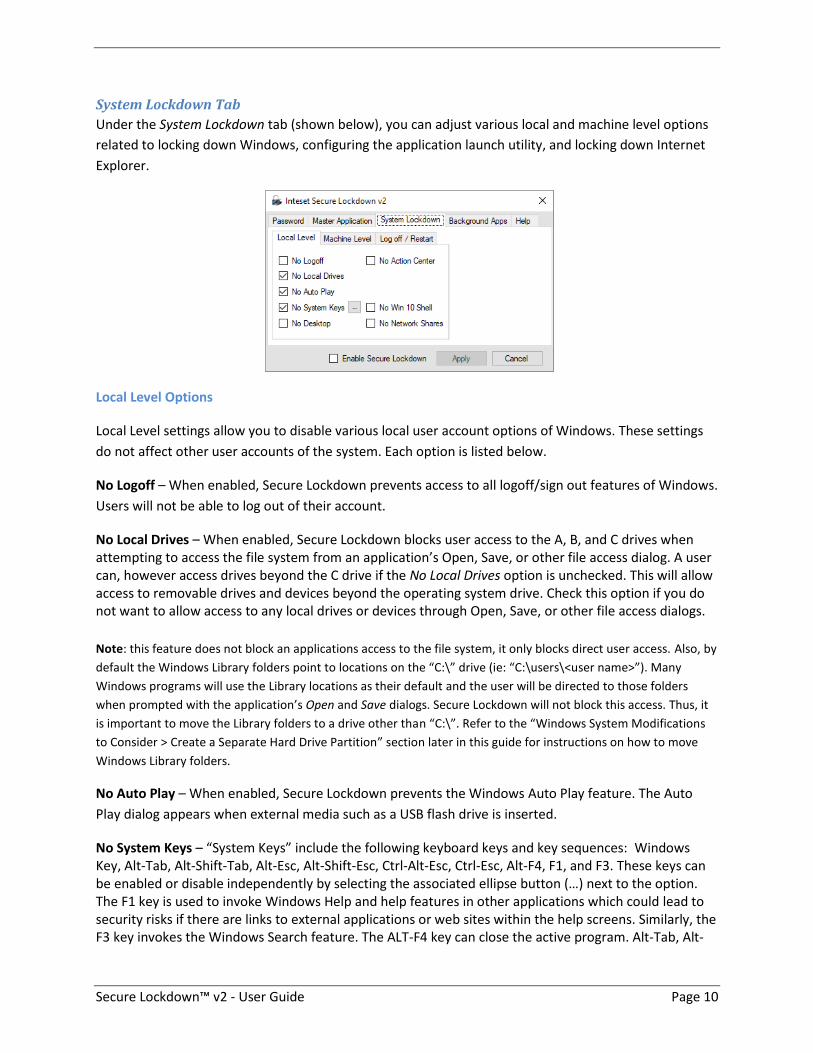
System Lockdown Tab
Under the System Lockdown tab (shown below), you can adjust various local and machine level options
related to locking down Windows, configuring the application launch utility, and locking down Internet
Explorer.
Local Level Options
Local Level settings allow you to disable various local user account options of Windows. These settings
do not affect other user accounts of the system. Each option is listed below.
No Logoff – When enabled, Secure Lockdown prevents access to all logoff/sign out features of Windows.
Users will not be able to log out of their account.
No Local Drives – When enabled, Secure Lockdown blocks user access to the A, B, and C drives when attempting to access the file system from an application’s Open, Save, or other file access dialog. A user can, however access drives beyond the C drive if the No Local Drives option is unchecked. This will allow access to removable drives and devices beyond the operating system drive. Check this option if you do not want to allow access to any local drives or devices through Open, Save, or other file access dialogs.
Note: this feature does not block an applications access to the file system, it only blocks direct user access. Also, by
default the Windows Library folders point to locations on the “C:\” drive (ie: “C:\users\<user name>”). Many
Windows programs will use the Library locations as their default and the user will be directed to those folders
when prompted with the application’s Open and Save dialogs. Secure Lockdown will not block this access. Thus, it
is important to move the Library folders to a drive other than “C:\”. Refer to the “Windows System Modifications
to Consider > Create a Separate Hard Drive Partition” section later in this guide for instructions on how to move
Windows Library folders.
No Auto Play – When enabled, Secure Lockdown prevents the Windows Auto Play feature. The Auto
Play dialog appears when external media such as a USB flash drive is inserted.
No System Keys – “System Keys” include the following keyboard keys and key sequences: Windows Key, Alt-Tab, Alt-Shift-Tab, Alt-Esc, Alt-Shift-Esc, Ctrl-Alt-Esc, Ctrl-Esc, Alt-F4, F1, and F3. These keys can be enabled or disable independently by selecting the associated ellipse button (…) next to the option. The F1 key is used to invoke Windows Help and help features in other applications which could lead to security risks if there are links to external applications or web sites within the help screens. Similarly, the F3 key invokes the Windows Search feature. The ALT-F4 key can close the active program. Alt-Tab, Alt-
Page 11 Secure Lockdown™ v2 - User Guide
Esc, Ctrl-Esc key sequences can disrupt the active window (Master Application). If you do not want to provide these abilities, check this option. No Desktop – Check this option to remove the Windows Desktop and run Secure Lockdown as the
Windows Shell. No features of the Windows Desktop will be available. Windows Embedded
environments frequently do not use the Windows Desktop - "No Desktop" creates a similar
environment. Should your application require some features of the Windows Desktop, do not check this
option.
Note: If this option is selected, no applications or services defined in the Windows HKCU “Run” or “RunOnce”
Registry settings will run upon account login as this Windows feature requires the Windows Shell. If a particular
app or service is required to run, consider using the Secure Lockdown – Background Apps feature or the Windows
Task Scheduler instead.
No Action Center – Check this option to remove the Notifications and Action Center from the Taskbar
and prevent, in Windows 10, the right-to-left sweep touch gesture from revealing the Action Center
feature.
Note: This feature is not available if the “No Desktop” option is enabled.
No Win 10 Shell – Check this option to disable the Windows 10 Shell experience which includes the Start
Menus, Action Center, Available Networks, and other Windows 10 UI elements.
Note: This feature is not available if the “No Desktop” option is enabled. This feature also enables the “No Action
Center”.
No Network Shares – Check this option to disable the ability to access network shares (connections to
network folders.) If disabled, access to shared drives is available to applications, however mapped drives
will not be visible in Windows Open and Save dialogs.
Note: To view and access network shared folders, the Secure Lockdown password must match the Windows sign-in
password.
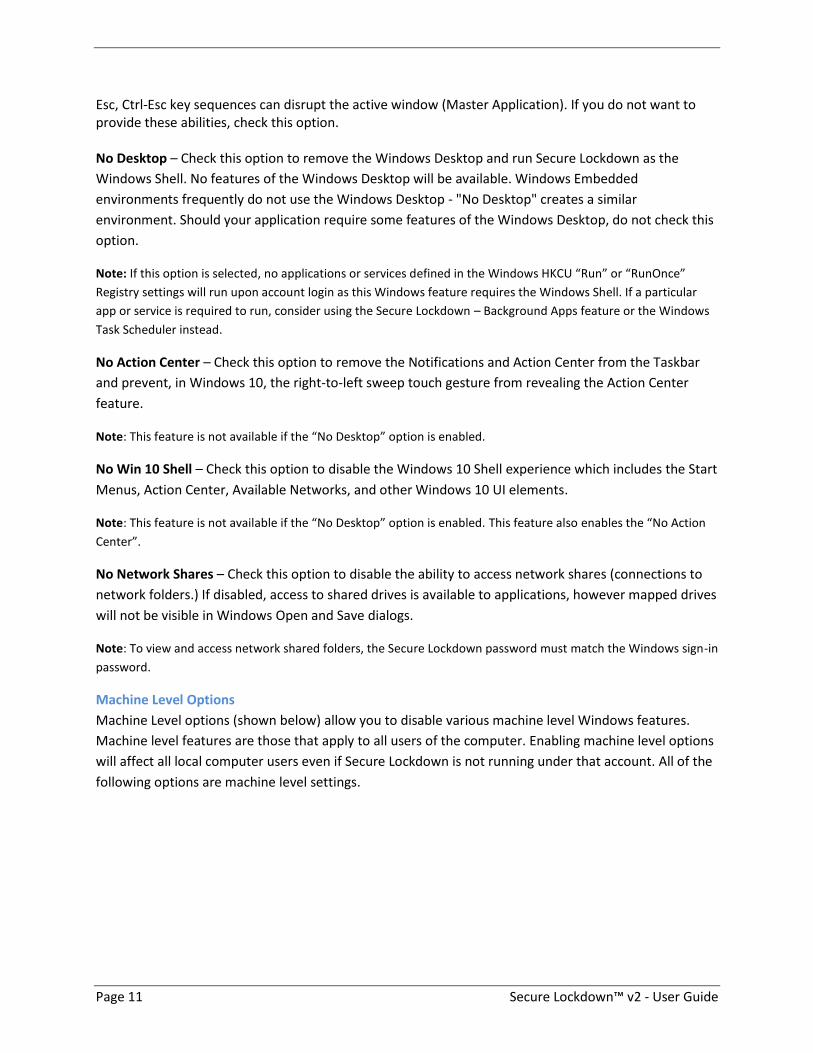
Machine Level Options
Machine Level options (shown below) allow you to disable various machine level Windows features.
Machine level features are those that apply to all users of the computer. Enabling machine level options
will affect all local computer users even if Secure Lockdown is not running under that account. All of the
following options are machine level settings.
Secure Lockdown™ v2 - User Guide Page 12
No User Switching – Fast user switching provides a quick way for users to switch from one account to
another without logging off. This option can be accessed by pressing the CTRL-ALT-DELETE key
sequence. If you do not want to provide this ability, check this option.
No Shutdown – Select this checkbox if you do not want to allow the user to shut down or restart the system. When Secure Lockdown is enabled, the user can press the CTRL-ALT-DELETE keys. They will no longer have the option to logoff or shutdown the computer from this screen or the Windows Start menu if that feature is activated. No Ease of Access – The Windows Ease of Access feature provides many features including access to various features of Windows via voice commands. This could pose a security risk. This option can be accessed by pressing the CTRL-ALT-DELETE key sequence. If you do not want to provide this ability, check this option. No Help and Support – Windows Help and Support provides help for Windows features, but can lead to security risks if there are links to external applications or web sites within the help screens. If you do not want to provide this ability, check this option. No App Install – When enabled, the Windows Installer will be disabled. Users will not be able to install applications when this option is checked. No Ctrl+Alt+Del – When enabled, users will not be able to use the Windows Ctrl+Alt+Del key sequence to display the Ctrl+Alt+Del screen. Enabling this option disables the Delete key while Secure Lockdown is enabled. Note: Be cautious when enabling the “No Ctrl+Alt+Del” option. Users will not be able to access the Ctrl+Alt+Del screen where they can switch users, log in and off, or shut down the system. In addition, if the system is Windows 7 or previous and on a domain network, users will not be able to press the Ctrl+Alt+Del key sequence to log into Windows. It is recommended that systems under these conditions use the Windows Auto Login capability and should be set up before enabling the Secure Lockdown “No Ctrl+Alt+Del” option.
No Removable USB Drives – When enabled, the system will no longer allow access to removable USB storage devices such as USB hard drives and flash drives. No New USB Devices – When enabled, the system will no longer allow newly plugged in USB devices to register with the operating system. USB devices already connected will continue to work on the USB
Page 13 Secure Lockdown™ v2 - User Guide
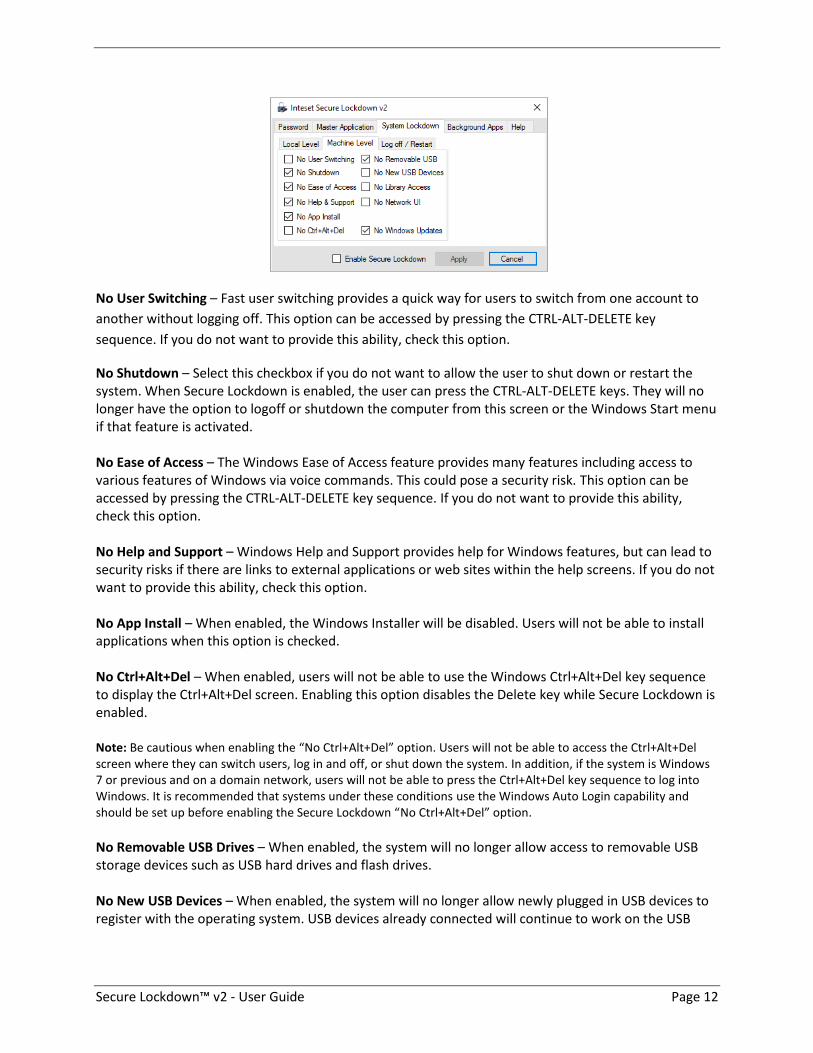
port to which they are attached. The same device will not connect to other ports unless it was previously connected while secure Lockdown was disabled. No Library Access – When enabled, users will not be able to access the Windows Library folders in any Explorer, Open, and Save dialogs. The Library folders will not be visible in the Navigation pane. No Network UI (available in Windows 8 and higher) – When enabled, the network UI found within the Ctrl+Alt+Delete screen and Windows Login screen will not be available. No Safe Mode (not available in Windows 8 or 10) – When enabled, the Windows (F8) boot option to enter Windows “Safe Mode” is disabled. Users will not be able to boot the computer into Safe Mode. No Windows Updates – When Secure Lockdown is enabled, it disallows Windows Updates from automatically installing. It is recommended to enable this setting. Log off / Restart The Log off / Restart feature (shown below) allows you to specify times when you want the computer to either log off, or restart. This option is ideal if you need to run a login script periodically, or if you want to incorporate system restore tools such as Toolwiz - Time Freeze, or Horizon Datasys - Reboot Restore RX into your Secure Lockdown implementation. You can set the computer to restart either at a specific time of the day, or when the computer has been inactive for a defined amount of time or both.
Log off after x inactivity minutes - When enabled, the computer will log off the current account when the computer has not been active for the specified number of minutes. Restart at – When enabled, the computer will restart at the specified time each day. Restart after x inactive minutes – When enabled, the computer will restart when the computer has not been active for the specified number of minutes.
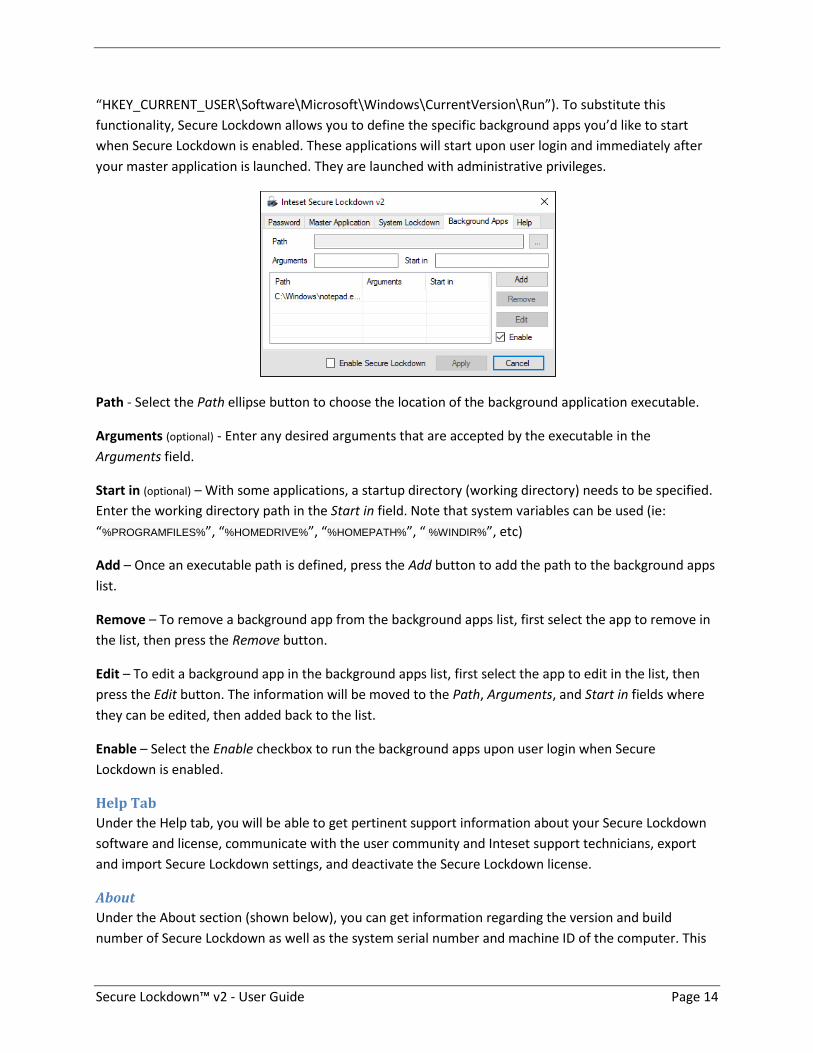
Background Apps Tab
Under the Background Apps tab (shown below), you can run any number of background applications
that may be necessary to support your Master application. An example of a background app is an on-
screen keyboard. For security purposes, when Secure Lockdown is enabled, programs that normally run
on Windows login are disabled by Secure Lockdown (these are programs that run based on settings in
the Windows Registry under the following Registry key:
Secure Lockdown™ v2 - User Guide Page 14
“HKEY_CURRENT_USER\Software\Microsoft\Windows\CurrentVersion\Run”). To substitute this
functionality, Secure Lockdown allows you to define the specific background apps you’d like to start
when Secure Lockdown is enabled. These applications will start upon user login and immediately after
your master application is launched. They are launched with administrative privileges.
Path - Select the Path ellipse button to choose the location of the background application executable.
Arguments (optional) - Enter any desired arguments that are accepted by the executable in the
Arguments field.
Start in (optional) – With some applications, a startup directory (working directory) needs to be specified.
Enter the working directory path in the Start in field. Note that system variables can be used (ie:
“%PROGRAMFILES%”, “%HOMEDRIVE%”, “%HOMEPATH%”, “ %WINDIR%”, etc)
Add – Once an executable path is defined, press the Add button to add the path to the background apps
list.
Remove – To remove a background app from the background apps list, first select the app to remove in
the list, then press the Remove button.
Edit – To edit a background app in the background apps list, first select the app to edit in the list, then
press the Edit button. The information will be moved to the Path, Arguments, and Start in fields where
they can be edited, then added back to the list.
Enable – Select the Enable checkbox to run the background apps upon user login when Secure
Lockdown is enabled.
Help Tab
Under the Help tab, you will be able to get pertinent support information about your Secure Lockdown
software and license, communicate with the user community and Inteset support technicians, export
and import Secure Lockdown settings, and deactivate the Secure Lockdown license.
About
Under the About section (shown below), you can get information regarding the version and build
number of Secure Lockdown as well as the system serial number and machine ID of the computer. This
Page 15 Secure Lockdown™ v2 - User Guide
is important information for Inteset Systems technical support should they ask for it. Note that the
machine ID can be highlighted and copied to the clipboard (ctrl+c) for easy pasting into emails. You can
also easily access the Inteset support forum for quick answers to common questions and response from
the community and Inteset’s support team.
Shutdown – Press the Shutdown button to shut down the computer. This button is only available when
Secure Lockdown is enabled and the password has been entered to access Secure Lockdown settings.
Note: shutting down the computer with this button will not disable Secure Lockdown.
Logoff – Press the Logoff button to log out of the current Windows user session. This button is only
available when Secure Lockdown is enabled and the password has been entered to access Secure
Lockdown settings. Note that logging off with this button will not disable Secure Lockdown.
Export / Import
Under this section, you can export the Secure Lockdown settings into a single file (.bac). This file can
serve as a backup, and/or to import into other Secure Lockdown systems using the Import Settings
feature.
Export Settings – Press the Export Settings button to export the Secure Lockdown settings into a single
“.bac” file in a location of your choosing.
Secure Lockdown™ v2 - User Guide Page 16
Import Settings – Press the Import Settings button to import the Secure Lockdown settings into Secure
Lockdown. After pressing the Import Settings button, you will need to locate a “.bac” export file
previously created.
Note: these functions can also be performed from a command line (See the “Using the Command Line” section
later in this guide.)
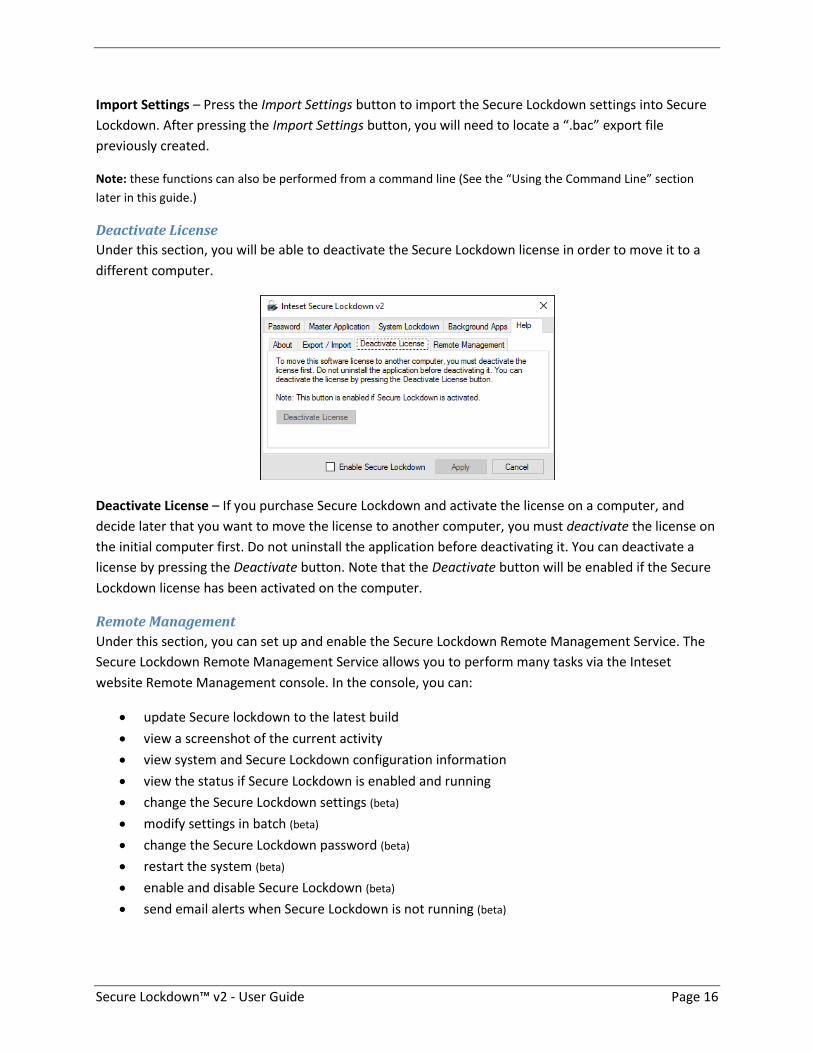
Deactivate License
Under this section, you will be able to deactivate the Secure Lockdown license in order to move it to a
different computer.
Deactivate License – If you purchase Secure Lockdown and activate the license on a computer, and
decide later that you want to move the license to another computer, you must deactivate the license on
the initial computer first. Do not uninstall the application before deactivating it. You can deactivate a
license by pressing the Deactivate button. Note that the Deactivate button will be enabled if the Secure
Lockdown license has been activated on the computer.
Remote Management
Under this section, you can set up and enable the Secure Lockdown Remote Management Service. The
Secure Lockdown Remote Management Service allows you to perform many tasks via the Inteset
website Remote Management console. In the console, you can:
update Secure lockdown to the latest build
view a screenshot of the current activity
view system and Secure Lockdown configuration information
view the status if Secure Lockdown is enabled and running
change the Secure Lockdown settings (beta)
modify settings in batch (beta)
change the Secure Lockdown password (beta)
restart the system (beta)
enable and disable Secure Lockdown (beta)
send email alerts when Secure Lockdown is not running (beta)
Page 17 Secure Lockdown™ v2 - User Guide
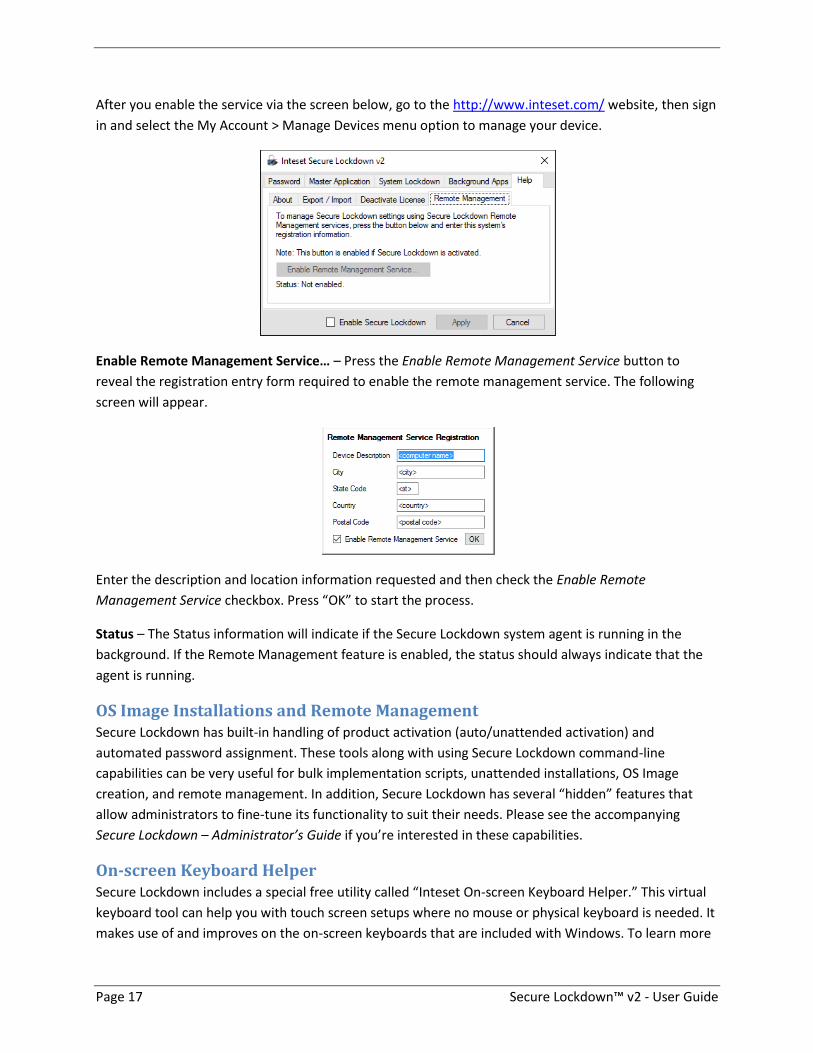
After you enable the service via the screen below, go to the http://www.inteset.com/ website, then sign
in and select the My Account > Manage Devices menu option to manage your device.
Enable Remote Management Service… – Press the Enable Remote Management Service button to
reveal the registration entry form required to enable the remote management service. The following
screen will appear.
Enter the description and location information requested and then check the Enable Remote
Management Service checkbox. Press “OK” to start the process.
Status – The Status information will indicate if the Secure Lockdown system agent is running in the
background. If the Remote Management feature is enabled, the status should always indicate that the
agent is running.
OS Image Installations and Remote Management Secure Lockdown has built-in handling of product activation (auto/unattended activation) and
automated password assignment. These tools along with using Secure Lockdown command-line
capabilities can be very useful for bulk implementation scripts, unattended installations, OS Image
creation, and remote management. In addition, Secure Lockdown has several “hidden” features that
allow administrators to fine-tune its functionality to suit their needs. Please see the accompanying
Secure Lockdown – Administrator’s Guide if you’re interested in these capabilities.
On-screen Keyboard Helper Secure Lockdown includes a special free utility called “Inteset On-screen Keyboard Helper.” This virtual
keyboard tool can help you with touch screen setups where no mouse or physical keyboard is needed. It
makes use of and improves on the on-screen keyboards that are included with Windows. To learn more
Secure Lockdown™ v2 - User Guide Page 18
about this utility, see the “On-screen Keyboard Helper User Guide” included with the Secure Lockdown
installation.
Windows System Modifications to Consider When preparing the system for use with Secure Lockdown™, it makes sense to customize and optimize
the operating system for that purposes. Some recommendations include:
Create a Separate Hard Drive Partition – Create separate drive letter (ie: “M:\”) and move all
user libraries (ie: Documents, Downloads, Pictures, Videos, Music, etc) to that new drive. By
default, Secure Lockdown does not allow access to the “C:\” drive where these libraries
originally reside when using the standard Windows Open and Save dialogs. If your application
requires access to these folders, move them to the new partition (drive letter) for uninhibited
access.
Note: Do not move these libraries to removable media such as a USB drive. Also, if the System Lockdown >
Local Level > No Local Drives option is selected, no local drives including the new drive letter created will
be accessible.
Change UAC settings to “Never notify” – This will prevent potential unwanted UAC dialogs from
appearing.
Disable Windows AutoPlay – This will prevent a popup or the start of media playing
automatically if the media or device is inserted into a system port.
Remove the Windows username and password login requirement, or enable automated login –
This will allow a seamless system start into the master application.
Remove unneeded Windows services and applications – This will ensure a fast system boot-up
and best performance of the master application.
Disable Windows Updates – This will ensure the system does not perform any unexpected
restarts due to the Windows Update process. It will also ensure nothing undesired is installed on
the system.
Disable Windows Aero – This will enable a slight improvement on screen redraw speeds.
Modify the Windows Welcome (logon) screen image – This will give the system a custom look
during the boot process.
The detailed steps to accomplish the above recommendations are beyond the scope of this
document, but can be quickly found by searching the Internet.
Support Support for Secure Lockdown™ v2 is available through the http://www.intesetsystems.com Forum
pages. Here, you can ask questions to the community and to Inteset technicians. If the question is
directed toward an Inteset technician, you can expect a response in 24 hours or less.


