
1
Video Doorbell Pro

Home Security Begins at the Front DoorYour new Ring Video Doorbell Pro is the start of a Ring of Security around your entire property. Now, you’re always connected, so you can watch over your home and answer the door from anywhere, all from your phone, tablet, or PC.
Your Ring Video Doorbell Pro can work as a team with additional Ring Doorbells and security devices such as Floodlight Cam and Stick Up Cam. The more Ring devices you add to your system, the more you can see and hear from anywhere.
Contents
1. Install the Pro Power Kit
2. Install your Ring Video Doorbell Pro
3. Set Up your Ring Doorbell in the Ring App
4. Using your Ring Video Doorbell Pro
5. Troubleshooting
Prefer Video?
Open the Ring app, tap Set Up Device, then select Ring Video Doorbell Pro and follow the in-app prompts to see these instructions in video form.
4 5
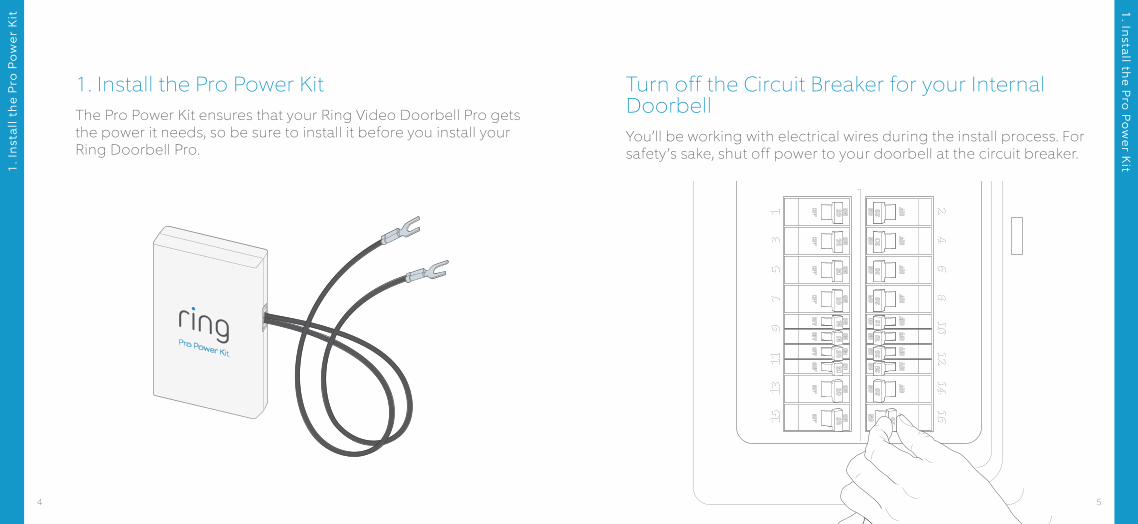
1. Install the Pro Power KitThe Pro Power Kit ensures that your Ring Video Doorbell Pro gets the power it needs, so be sure to install it before you install your Ring Doorbell Pro.
Turn off the Circuit Breaker for your Internal DoorbellYou’ll be working with electrical wires during the install process. For safety’s sake, shut off power to your doorbell at the circuit breaker.
1. I
nst
all t
he
Pro
Po
wer
Kit
1. In
stall the P
ro P
ow
er Kit

6 7
Remove the Cover from your Internal Doorbell
Loosen the “Front” and “Transformer” Terminals
1. I
nst
all t
he
Pro
Po
wer
Kit
1. In
stall the P
ro P
ow
er Kit
8 9
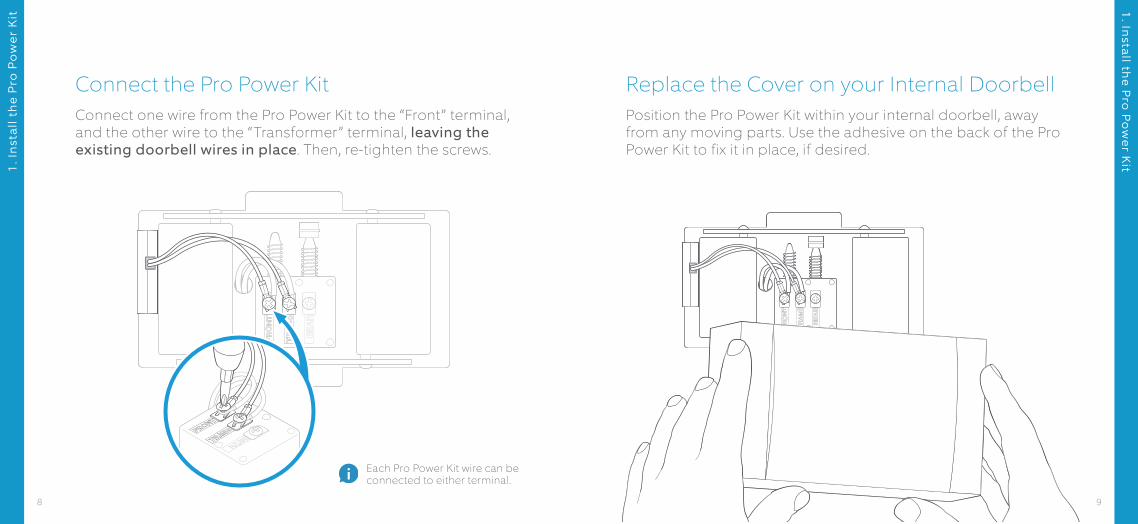
Connect the Pro Power KitConnect one wire from the Pro Power Kit to the “Front” terminal, and the other wire to the “Transformer” terminal, leaving the existing doorbell wires in place. Then, re-tighten the screws.
Replace the Cover on your Internal DoorbellPosition the Pro Power Kit within your internal doorbell, away from any moving parts. Use the adhesive on the back of the Pro Power Kit to fix it in place, if desired.
1. I
nst
all t
he
Pro
Po
wer
Kit
1. In
stall the P
ro P
ow
er Kit
Each Pro Power Kit wire can be connected to either terminal.

10 11
2. Install your Ring Video Doorbell ProEverything needed for the installation is in the box.
Uninstall your Existing DoorbellUnscrew your existing doorbell from the wall and disconnect its wires.
Don’t have an existing doorbell?
You can also wire Ring Pro directly to our plug-in adapter. Visit the accessories section at ring.com to learn more.
Screwdriver - Use the Phillips end for the mounting screws and star-shaped end for the security screw.
Drill Bit and Anchors - Use the drill bit with a power drill to drill holes for the (optional) anchors if installing on concrete, stucco, or brick.
Mounting Screws - Use two to mount your Ring Doorbell. Use the longer screws if you’re installing with the optional Retrofit Kit.
Security Screws - Use one to secure the faceplate.
Wire Extenders and Wire Nuts - Use to extend existing doorbell wires (if needed).
Retrofit Kit - Use when upgrading from a battery-powered Ring Video Doorbell, or as additional trim when upgrading from a conventional doorbell.
2. I
nst
all y
ou
r R
ing
Vid
eo D
oo
rbel
l Pro
2. In
stall you
r Rin
g V
ideo
Do
orb
ell Pro
12 13
2. I
nst
all y
ou
r R
ing
Vid
eo D
oo
rbel
l Pro
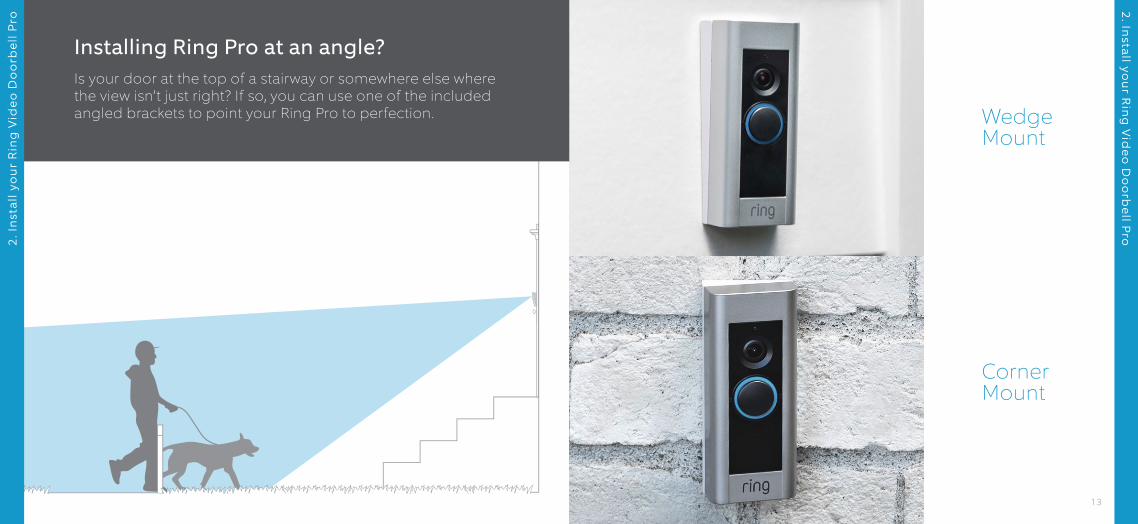
Installing Ring Pro at an angle?Is your door at the top of a stairway or somewhere else where the view isn’t just right? If so, you can use one of the included angled brackets to point your Ring Pro to perfection.
2. In
stall you
r Rin
g V
ideo
Do
orb
ell Pro
Wedge Mount
Corner Mount

14 15
2. I
nst
all y
ou
r R
ing
Vid
eo D
oo
rbel
l Pro
Mount your Angled Bracket Screw your chosen bracket into the wall with the larger mounting screws.
You’ll use the small screws to attach your Ring to the bracket later.
Once you’re done, skip to page 18.
2. In
stall you
r Rin
g V
ideo
Do
orb
ell Pro
Mark the Holes for your Angled BracketFirst, position your chosen bracket on your wall, and feed your doorbell wires through the center hole.
When you’ve decided on a position, mark the screw holes on your wall.
You can use the bracket as a template.If you’re installing on a brick or masonry surface, install the included wall anchors, as described on page 17.
Installing Ring Pro at an angle?

16 17
Mark the HolesUsing your Ring Doorbell as a template, mark the location of the two mounting holes on your wall.
Removing the Faceplate
To access the mounting holes, first remove the faceplate, like this:
2. I
nst
all y
ou
r R
ing
Vid
eo D
oo
rbel
l Pro
Install Anchors (Optional)If you’re installing on a hard surface such as concrete, stucco, or brick, use the provided bit to drill two holes in your wall, and push the provided anchors into these holes.
If you’re installing on wood or siding, you can skip this step and throw the anchors in that drawer of stuff you never use.
2. In
stall you
r Rin
g V
ideo
Do
orb
ell Pro

18 19
Connect the WiresAttach your existing doorbell wires to the terminals on the rear of your Ring Doorbell, and tighten the terminal screws with the Ring screwdriver.
If your doorbell wires are too short, use the Wire Extenders and Wire Nuts to extend them.
2. I
nst
all y
ou
r R
ing
Vid
eo D
oo
rbel
l Pro
Mount your Ring DoorbellFeed the wiring back into the wall, and mount your Ring Doorbell with the included mounting screws.
If you installed one or more angle wedges, use the short screws.
Restore Power at the BreakerYou’re almost there!
After turning power back on, it ’s time to set up your Ring Doorbell in the Ring App.
2. In
stall you
r Rin
g V
ideo
Do
orb
ell Pro

20 21
3. Set Up your Ring Doorbell in the Ring AppThe Ring app connects your Ring Doorbell to your mobile device running iOS or Android, making sure you’re always home.
Search for “Ring” in one of the app stores above, or to automatically find the correct app, visit ring.com/app.
Download fromWindows Store
3. S
et U
p y
ou
r R
ing
Do
orb
ell i
n t
he
Rin
g A
pp
Follow the In-app Setup ProcessOpen the Ring app and tap Set Up Device to begin the setup process. Select Ring Video Doorbell Pro from the list and follow the in-app instructions.
3. S
et Up
you
r Rin
g D
oo
rbell in
the R
ing
Ap
p

22 23
Install the FaceplateNow, it ’s time for the finishing touch.
Attach one of the faceplates to your Ring Doorbell.
Then secure it with a security screw, using the star-shaped end of the provided screwdriver bit.
4. U
sin
g y
ou
r R
ing
Vid
eo D
oo
rbel
l Pro
4. Using your Ring Doorbell ProIn the Ring app, tap your Ring Video Doorbell Pro to view its settings screen. Here, you can configure your Ring Doorbell to meet your needs.
4. U
sing
you
r Rin
g V
ideo
Do
orb
ell Pro
24 25
4. U
sin
g y
ou
r R
ing
Vid
eo D
oo
rbel
l Pro
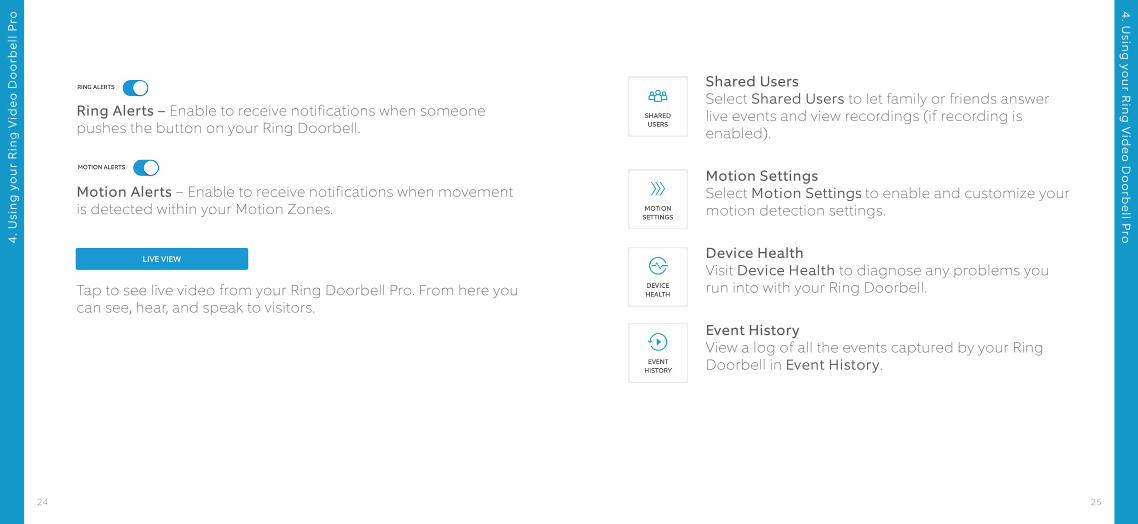
Ring Alerts – Enable to receive notifications when someone pushes the button on your Ring Doorbell.
Motion Alerts – Enable to receive notifications when movement is detected within your Motion Zones.
Tap to see live video from your Ring Doorbell Pro. From here you can see, hear, and speak to visitors.
Shared Users Select Shared Users to let family or friends answer live events and view recordings (if recording is enabled).
Motion Settings Select Motion Settings to enable and customize your motion detection settings.
Device Health Visit Device Health to diagnose any problems you run into with your Ring Doorbell.
Event History View a log of all the events captured by your Ring Doorbell in Event History.
4. U
sing
you
r Rin
g V
ideo
Do
orb
ell Pro

26 27
4. U
sin
g y
ou
r R
ing
Vid
eo D
oo
rbel
l Pro
Answering your Door
When someone is at your door, you can access these features:
Two-way Talk – Speak to visitors and hear what they have to say.
Microphone – Mute or unmute your mic.
Speaker – Mute or unmute audio in the app.
Ring Neighborhoods – Share suspicious events with your neighbors.
Ring Video Recording
Your new Ring Doorbell includes a free trial of Ring Recording for you to enjoy. Watch your email inbox for important announcements about this service.
4. U
sing
you
r Rin
g V
ideo
Do
orb
ell Pro
This optional feature saves recordings of every event your Ring Doorbell captures.
You can access these events on any device running the Ring app or by logging into your account at: ring.com/activity
Learn more at: ring.com/video-recording
28 29
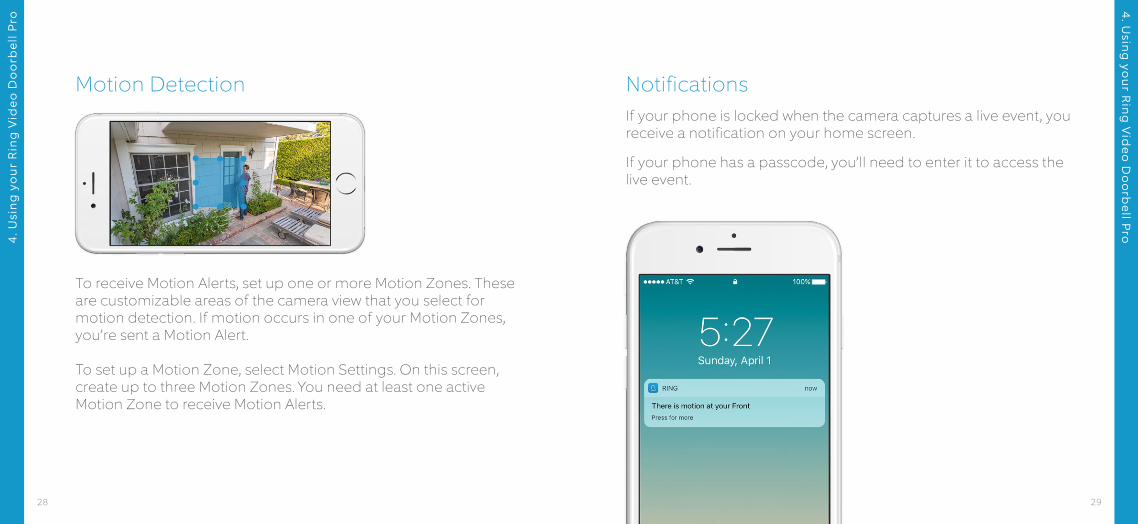
Motion Detection
To receive Motion Alerts, set up one or more Motion Zones. These are customizable areas of the camera view that you select for motion detection. If motion occurs in one of your Motion Zones, you’re sent a Motion Alert. To set up a Motion Zone, select Motion Settings. On this screen, create up to three Motion Zones. You need at least one active Motion Zone to receive Motion Alerts.
4. U
sin
g y
ou
r R
ing
Vid
eo D
oo
rbel
l Pro
NotificationsIf your phone is locked when the camera captures a live event, you receive a notification on your home screen.
If your phone has a passcode, you’ll need to enter it to access the live event.
4. U
sing
you
r Rin
g V
ideo
Do
orb
ell Pro
30 31
5. TroubleshootingI’ve Installed my Ring, but it Won’t Turn On
Install the Pro Power Kit
If you have not yet installed the included Pro Power Kit on your internal bell, your Ring Video Doorbell Pro will not function correctly. For more information, see section 1. Installing the Pro Power Kit.
Let it Charge
Ring Video Doorbell Pro contains a power cell which may need to charge before the first use. If you complete the install process and your Ring Doorbell does not appear to function, give it up to 30 minutes to charge and then try again.
The internal power cell is only for memory protection in the event of a power outage. Your Ring Doorbell requires AC power to function.
Voltage Too Low
Ring Video Doorbell Pro is designed to work with the majority of standard doorbell systems in the USA, so it expects to receive at least 16 volts of AC power. If your doorbell system runs at a lower voltage (or runs on DC, rather than AC), your Ring Doorbell will not function.
In this case, you’ll need to have an electrician install a new transformer to bring the output up to 16 volts.
We recommend installing a 16 volt AC transformer that delivers ~30 VA for the best performance. To purchase a recommended transformer for your Ring Video Doorbell Pro, visit ring.com/accessories.
5. T
rou
ble
sho
oti
ng
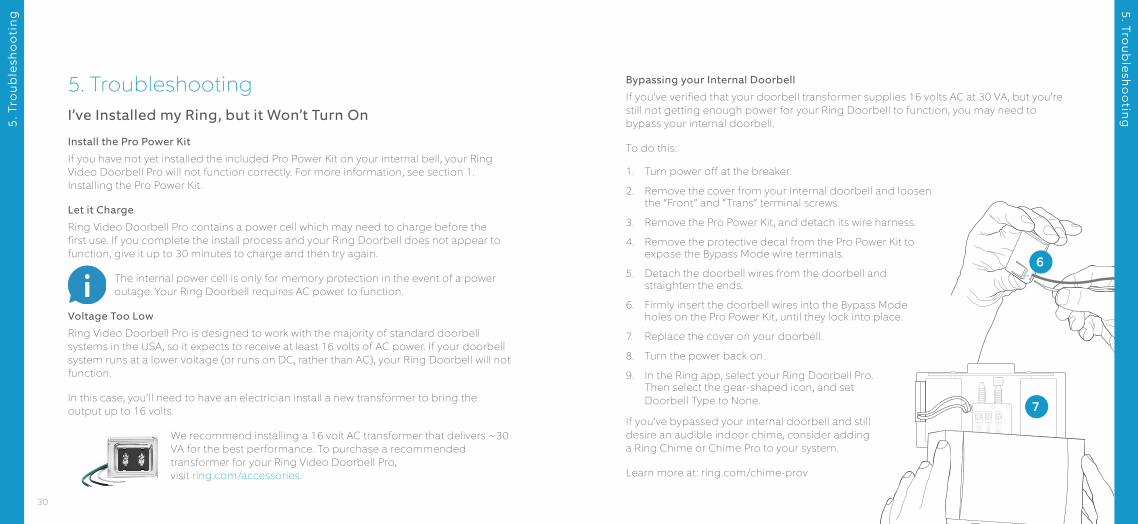
Bypassing your Internal Doorbell
If you’ve verified that your doorbell transformer supplies 16 volts AC at 30 VA, but you’re still not getting enough power for your Ring Doorbell to function, you may need to bypass your internal doorbell.
To do this:
1. Turn power off at the breaker.
2. Remove the cover from your internal doorbell and loosen the “Front” and “Trans” terminal screws.
3. Remove the Pro Power Kit, and detach its wire harness.
4. Remove the protective decal from the Pro Power Kit to expose the Bypass Mode wire terminals.
5. Detach the doorbell wires from the doorbell and straighten the ends.
6. Firmly insert the doorbell wires into the Bypass Mode holes on the Pro Power Kit, until they lock into place.
7. Replace the cover on your doorbell.
8. Turn the power back on.
9. In the Ring app, select your Ring Doorbell Pro. Then select the gear-shaped icon, and set Doorbell Type to None.
If you’ve bypassed your internal doorbell and still desire an audible indoor chime, consider adding a Ring Chime or Chime Pro to your system.
Learn more at: ring.com/chime-prov
5. Tro
ub
lesho
otin
g
6
7

32 33
I’m Having Trouble Completing the In-app Setup
If the setup fails in the Ring app, the light on the front of your Ring Doorbell indicates the issue:
Top Flashing White – Your Wi-Fi password was entered incorrectly. Select your Wi-Fi network in your phone settings, choose the option to forget it, then connect to it again to confirm that you’re using the correct password during setup.
Right Flashing White – Your Ring Doorbell may be too far from your router to get a decent signal. If possible, move your Wi-Fi router closer to your Ring Doorbell, or add a Ring Chime Pro to boost Wi-Fi signal.
Left Flashing White – There may be an issue with your internet connection. Unplug your modem (and Wi-Fi router, if they are separate) for 40 seconds, then reconnect power and repeat the setup process.
Spinning White – Your Ring Doorbell is in setup mode. Follow the instructions in the Ring app to continue.
Nothing – If the front light never turns on, check that the terminals on the back of your Ring Doorbell are connected to your doorbell wires and that your doorbell system meets the necessary power requirements (16 volts AC at 30 VA). For more information, see “I’ve Installed my Ring, But it Won’t Turn On” in this section.
5. T
rou
ble
sho
oti
ng
I Can’t Find the Ring Wi-Fi Network on my Device
Sometimes your phone or tablet may fail to pick up the temporary Ring network. If this happens, go to your phone’s settings, turn off your Wi-Fi connection, wait 30 seconds and turn it back on. If the Ring network still fails to appear, ensure that your Ring Doorbell is connected to your doorbell wires and that your doorbell system meets the necessary power requirements (16 volts AC at ~30 VA).
If none of the above helped, try one or more of these steps…
• Turn off cellular data and Bluetooth on your mobile device and try again. You can turn them back on once you’ve completed the setup process.
• Try performing setup on a different mobile device.
• Unplug your modem (and Wi-Fi router, if they are separate) for 40 seconds, then reconnect power and repeat the setup process.
• Perform a hard reset on your Ring Doorbell by holding down the setup button for 15 seconds. Wait 30 seconds, then repeat the setup process.
My Existing Bell isn’t Ringing Correctly
1. In the Ring app, select your Ring Video Doorbell Pro.
2. Tap the gear icon to enter Device Settings.
3. Tap Doorbell Kit Settings, and ensure you’ve selected the correct option on this screen.
If you’ve chosen the correct doorbell type and your bell still isn’t ringing correctly, make sure that you’ve installed the included Pro Power Kit.
5. Tro
ub
lesho
otin
g
34 35
I’m not Receiving Motion Alerts
Make sure you’ve created at least one Motion Zone and turned on Motion Alerts.
To further troubleshoot notification issues, navigate to Device Health in the Ring app and select Troubleshoot Notifications.
Video or Audio Quality is Poor
In the Ring app, tap your Ring Pro. Then tap *Device Health*, and tap the “?” button next to Signal Strength. If your Wi-Fi signal seems strong, tap *Test Your Wi-Fi* and follow the in-app instructions to test your network.
If you think low Wi-Fi signal strength is causing your issue, try moving your Wi-Fi router closer to your Ring Doorbell, or add a Ring Chime Pro to boost Wi-Fi for your Ring products. Learn more at ring.com/chime-pro.
Visitors Can’t Hear me When I Talk Through the Ring App
If you’re on an iPhone or iPad, open the Settings app and tap Ring. Make sure the Microphone option is set to on.
If you’re on an Android device, go to Settings > Application/Apps > Application Manager > Ring > Permissions. Enable these options.
5. T
rou
ble
sho
oti
ng
If you don’t see the Microphone option, uninstall and reinstall the Ring app according to these instructions:
iOS Devices
1. Go to Settings > General > Storage and iCloud Usage > Manage Storage > Ring and tap Delete App.
2. Restart your device.
3. Reinstall the Ring app from the App Store. When prompted to allow microphone access, tap Allow.
Android Devices
1. Go to Settings > Apps or Application Manager > Ring and tap Uninstall.
2. Restart your device.
3. Reinstall the Ring app from the Google Play store. When prompted, allow microphone access.
5. Tro
ub
lesho
otin
g

For additional help, visit: ring.com/help
Or give us a call…
US 1 800 656 1918
Canada 1 855 300 7289
Worldwide +1 310 929 7085
For a list of all our customer support numbers, visit: ring.com/callus
Hereby, Ring Inc. declares that this consumer electronic is in compliance with the essential requirements and other relevant provisions of Directive 1999/5/EC. The declaration of conformity may be consulted at www.ring.com/DoC.pdf. Protect the device from direct sunlight. Install the device at dry locations and protect it against rain and humidity. The device may not get contact to salt water or other conductive liquids. The device must be charged only within a building in a dry state.
Caution: Risk of explosion if battery is replaced by an incorrect type.Dispose of used batteries according to the instructions.To review your warranty coverage, please visit www.ring.com/warranty. Patents: www.ring.com/patents© 2019 Ring LLC or its affiliates. RING, ALWAYS HOME, and all related logos are trademarks of Ring LLC or its affiliates.Last updated: 02/19/19


