Print Date: 21.06.2013
Brainboxes Limited, 18 Hurricane Drive, Liverpool International Business Park, Speke, Liverpool, L24 8RL, UK Tel: +44 (0)151 220 2500 Fax: +44 (0)151 252 0446 Web: www.brainboxes.com Email: [email protected]
Transfer Files to FreeDOS Guest OS with Shared Folders
VMware Workstation

© Copyright Brainboxes Limited 2013 Page 2 of 17
Contents
1. Version History ............................................................................................................................................ 17

© Copyright Brainboxes Limited 2013 Page 3 of 17
The following document will demonstrate how to enable share folders between the Host and Guest
Operating Systems using VMware Workstation.
1. Download “vmsmount” Zip archive from the following link:
http://sourceforge.net/projects/vmsmount/
2. Find and click on the link from the webpage as shown below:
3. Download the files to your “Desktop” location.
4. Extract the file “VMMNT05B.zip” to your “Desktop” location.
5. You will see a folder called “VMMNT05B” once you have extracted the Zip archive successfully.
6. Create an ISO disc image by adding only one file, “vmsmount.exe” from the “VMMNT05B” folder.
7. Please note that you might also get this warning message when you create the disc image because of a
very small single file being added. Ignore the warning, and then click “Yes” when you are presented
with the following:
8. If you do not know how to extract the Zip archive file nor create ISO disc image file, please refer to the
document, “Virtualization - Transfer Files to FreeDOS Guest OS with ISO image 1 - Creating Disc
Image”. The document outlined how to create an ISO disc image from a particular folder located under
C: drive. You would have to select the folder and file mentioned in Step 6 to create an ISO disc image
which has a single file called “vmsmount.ext”.

© Copyright Brainboxes Limited 2013 Page 4 of 17
9. For this demonstration, an ISO disc image called “vsmouont.iso” is created in “Desktop” location. We
will be referring to this location with the subsequent steps outlined below.
10. Run VMware Workstation application.
11. Click “Edit virtual machine settings” when you are presented with the following:
12. Select “CD/DVD (IDE)” on the left under “Device” section, select “User ISO image file:”, and then click
“Browse…” when you are presented with the following:
© Copyright Brainboxes Limited 2013 Page 5 of 17
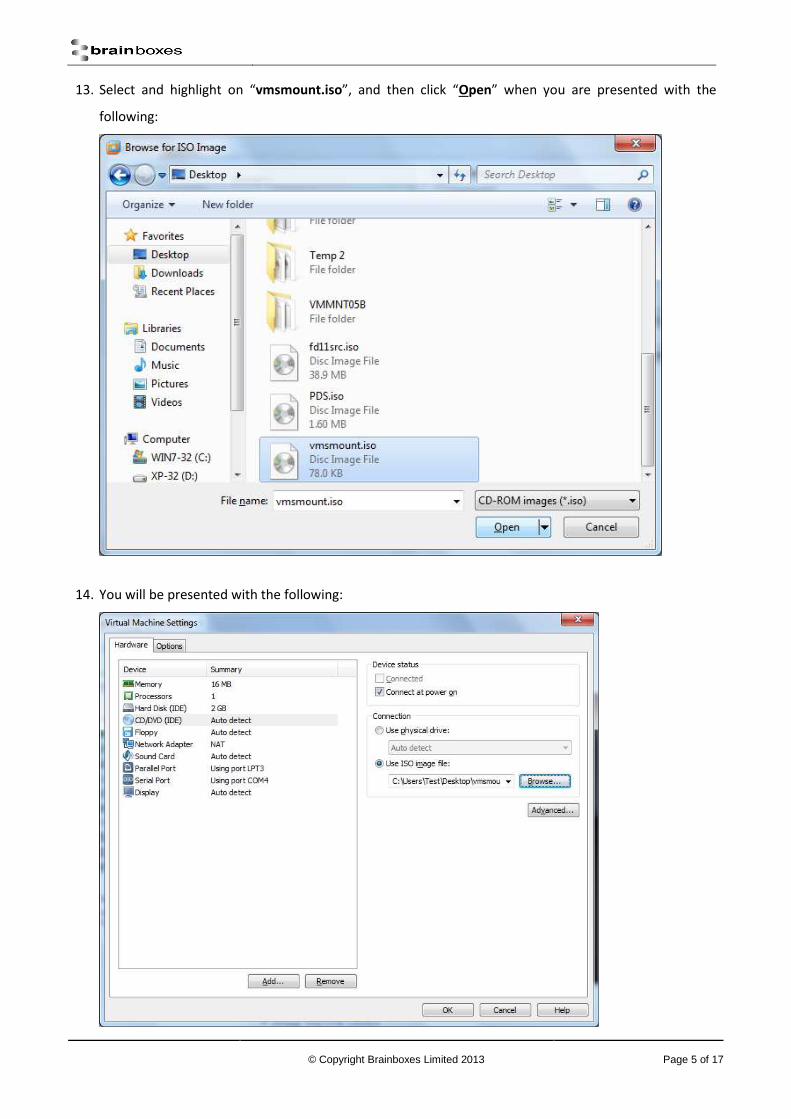
13. Select and highlight on “vmsmount.iso”, and then click “Open” when you are presented with the
following:
14. You will be presented with the following:

© Copyright Brainboxes Limited 2013 Page 6 of 17
15. Click on “Options” tab, select “Shared Folders” under “Settings” section, select “Always enabled”
under “Folder sharing” section, and then click “Add…” when you are presented with the following:
16. Click “Next >” when you are presented with the following:

© Copyright Brainboxes Limited 2013 Page 7 of 17
17. Click “Browse…” when you are presented with the following:
18. Browse to “PDS” folder located under C: drive, and then click “OK” when you are presented with the
following:
For this demonstration we are using “PDS” folder where we have some legacy application. Your
application and folder can be different. Please choose your own accordingly. The purpose of this
demonstration is to show you how you could designate a folder on the Host Operating System to be
shared with the Guest Operating System for file sharing purpose.
© Copyright Brainboxes Limited 2013 Page 8 of 17
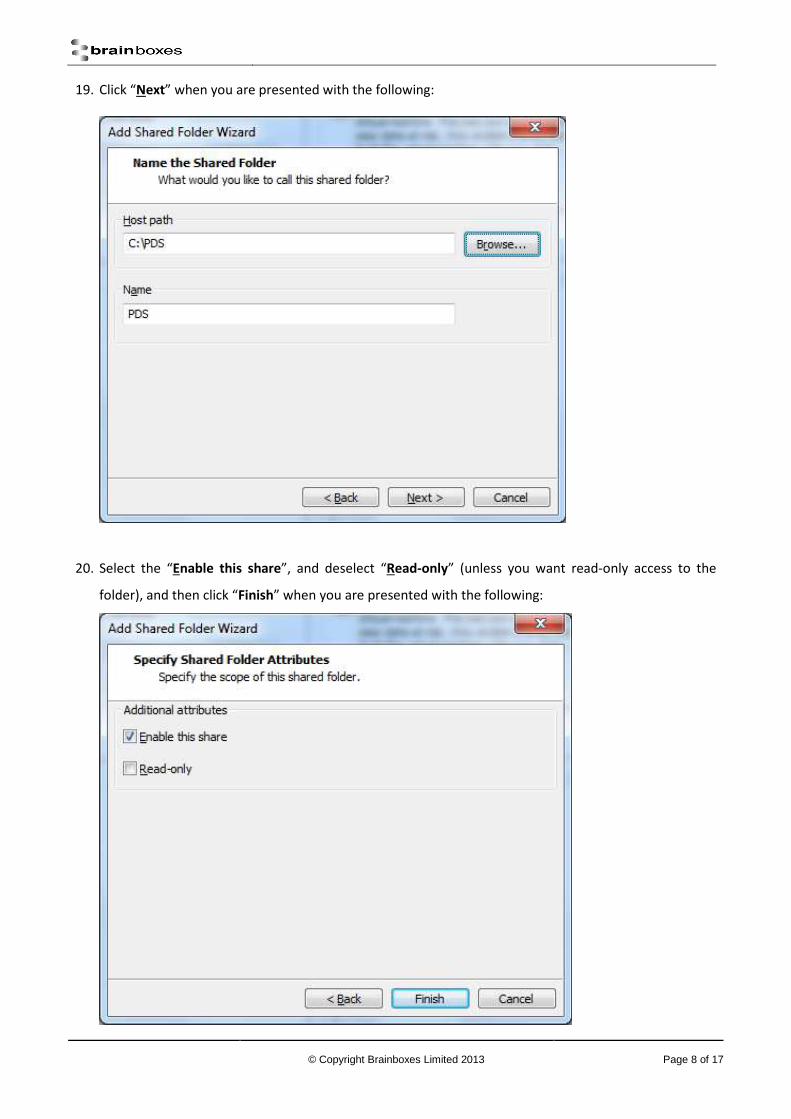
19. Click “Next” when you are presented with the following:
20. Select the “Enable this share”, and deselect “Read-only” (unless you want read-only access to the
folder), and then click “Finish” when you are presented with the following:

© Copyright Brainboxes Limited 2013 Page 9 of 17
21. Click “OK” when you are presented with the following:
22. Click “Power on this virtual machine” when you are presented with the following:
© Copyright Brainboxes Limited 2013 Page 10 of 17
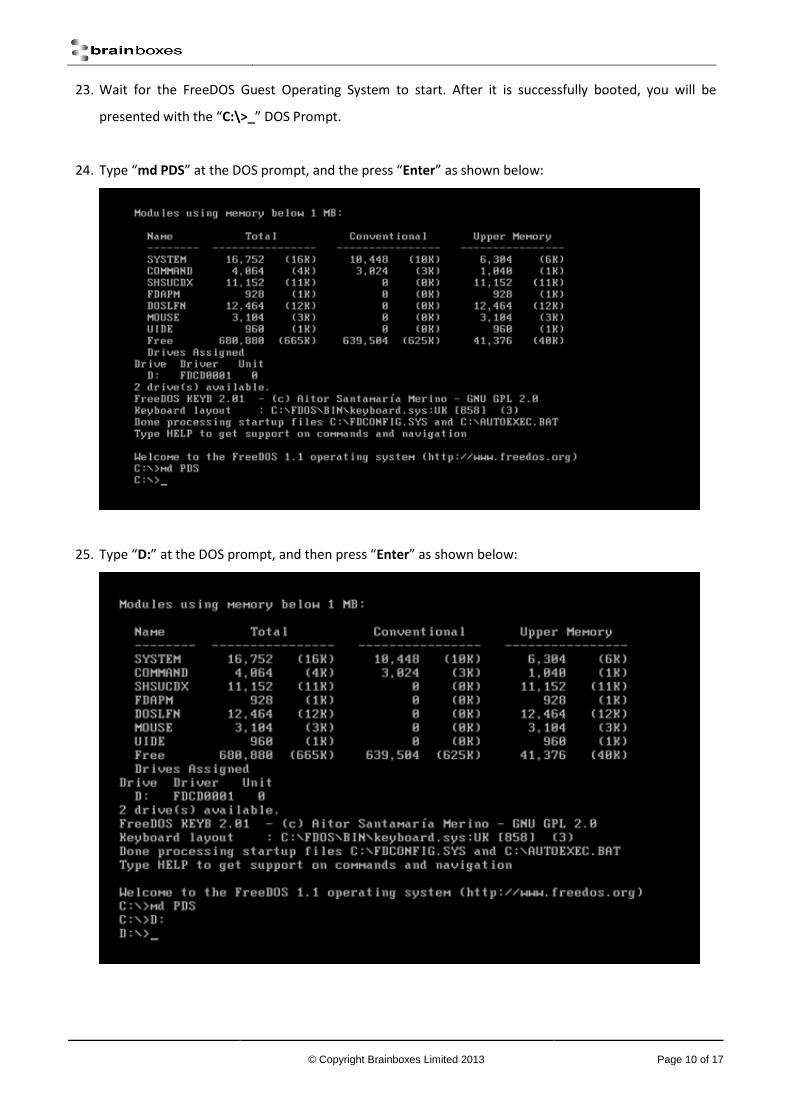
23. Wait for the FreeDOS Guest Operating System to start. After it is successfully booted, you will be
presented with the “C:\>_” DOS Prompt.
24. Type “md PDS” at the DOS prompt, and the press “Enter” as shown below:
25. Type “D:” at the DOS prompt, and then press “Enter” as shown below:
© Copyright Brainboxes Limited 2013 Page 11 of 17
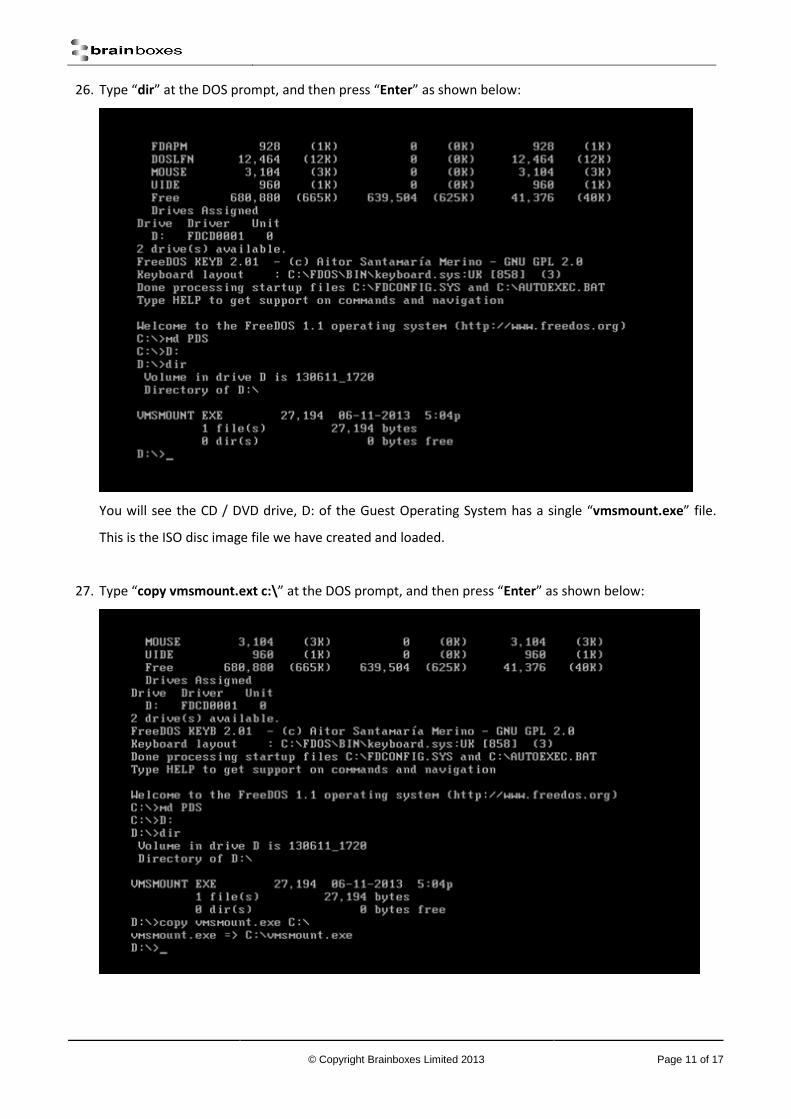
26. Type “dir” at the DOS prompt, and then press “Enter” as shown below:
You will see the CD / DVD drive, D: of the Guest Operating System has a single “vmsmount.exe” file.
This is the ISO disc image file we have created and loaded.
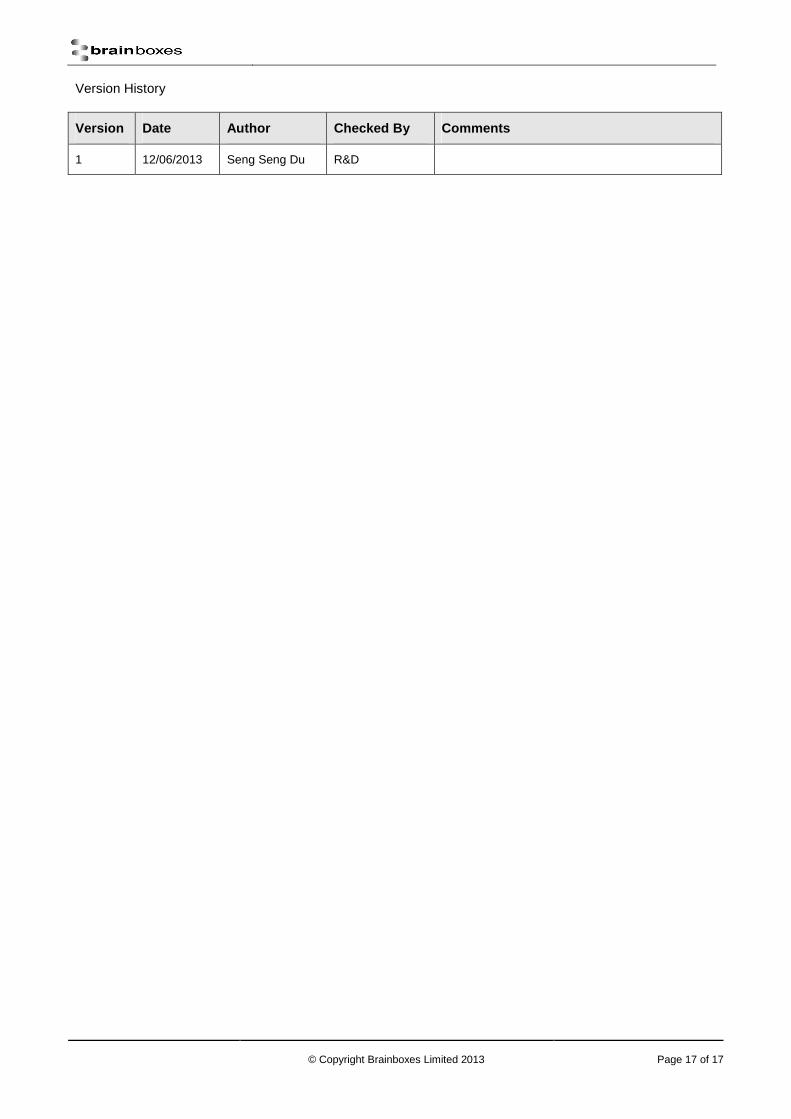
27. Type “copy vmsmount.ext c:\” at the DOS prompt, and then press “Enter” as shown below:

© Copyright Brainboxes Limited 2013 Page 12 of 17
28. Type “C:” at the DOS prompt, and the press “Enter” as shown below:
29. Type “vmsmount.exe” at the DOS prompt, and then press “Enter” as shown below:
The folder we choose to share from the Host Operating System at Step 18, “C:\PDS” folder will be
mapped to drive E: inside the Guest Operating System.

© Copyright Brainboxes Limited 2013 Page 13 of 17
30. Type “E:” at the DOS prompt, and then press “Enter” as shown below:
31. Type “dir” at the DOS prompt, and then press “Enter” as shown below:
You will see that the E: drive has a folder called PDS which is the folder “C:\PDS” of the Host Operating
System.

© Copyright Brainboxes Limited 2013 Page 14 of 17
32. Type “xcopy PDS C:\PDS /E” at the DOS prompt, and then press “Enter” as shown below:
33. Type “C:” at the DOS prompt, and then press “Enter” as shown below:

© Copyright Brainboxes Limited 2013 Page 15 of 17
34. Type “cd PDS” at the DOS prompt, and then press “Enter” as shown below:
35. Type “attrib *.*” at the DOS prompt, and then press “Enter” as shown below:
As shown above, the “R” (read-only) flagged is not set, and the “A” (archive) flag is already set since we
are copying from the disk drive, and not from read-only CD / DVD drive. If the read-only flag has been
set, you will have to execute the command “attrib –R +A *.*” in order to clear the read-only flag and
set the archive flag.

© Copyright Brainboxes Limited 2013 Page 16 of 17
36. To run the PDS application, simply type “PDS.EXE” at the DOS prompt, and then press “Enter” as shown
below:
37. You will then be presented with the following screen:
© Copyright Brainboxes Limited 2013 Page 17 of 17
Version History
Version Date Author Checked By Comments
1 12/06/2013 Seng Seng Du R&D


