Download - WComp : How to create a Bean ?

Rainbow Research Group –I3S Laboratory (Université de Nice – Sophia Antipolis / CNRS) 1
WComp : How to
create a Bean ?

Rainbow Research Group –I3S Laboratory (Université de Nice – Sophia Antipolis / CNRS) 2
1 CONTENTS
1 Contents ........................................................................................................................................................ 2
2 Tutorial .......................................................................................................................................................... 3
2.1 Create and use a bean .............................................................................................................................. 3
2.1.1 First step : Create a project ............................................................................................................. 3
2.1.2 Second step : create a bean source file ........................................................................................... 3
2.1.3 Third step : save the bean ............................................................................................................... 4
2.1.4 Fourth step : add the bean to the project ....................................................................................... 4
2.1.5 Fifth step : compile your bean ........................................................................................................ 5
2.1.6 Sixth step : add the bean to the list................................................................................................. 6
2.1.7 Seventh step : use the bean in another project .............................................................................. 7
2.2 Create and use a simple bean ................................................................................................................... 7
2.2.1 Firstly : create the new bean project. ............................................................................................. 7
2.2.2 Secondly, implement the new bean ................................................................................................ 9
2.2.3 Thirdly : compile and export new bean ........................................................................................... 9
2.2.4 Fourthly : create the project which use this new bean ................................................................... 9
2.2.5 Fifthly : create the container ........................................................................................................... 9
2.2.6 Sixthly : implement the container ................................................................................................. 10
2.2.7 Seventhly : test the container ....................................................................................................... 12
2.3 Create and use a cool bean..................................................................................................................... 13
2.3.1 First step : configure the project ................................................................................................... 13
2.3.2 Second step : implement the bean ............................................................................................... 13
2.3.3 Third step : compile and export the bean ..................................................................................... 15
2.3.4 Fourth step : create the project which use the bean .................................................................... 15
2.3.5 Fifth step : implement the container ............................................................................................ 15
2.3.6 Sixth step : use the container ........................................................................................................ 19
3 Conclusion ................................................................................................................................................... 20
Rainbow Research Group –I3S Laboratory (Université de Nice – Sophia Antipolis / CNRS) 3
2 TUTORIAL
Let’s start the tutorial. The first example shows the creating bean process. The second one shows how to
create a simple bean. And, the third one is more complicated. It shows many bean capabilities.
The purpose of this tutorial is to show how to implement event programming in a bean.
2.1 CREATE AND USE A BEAN
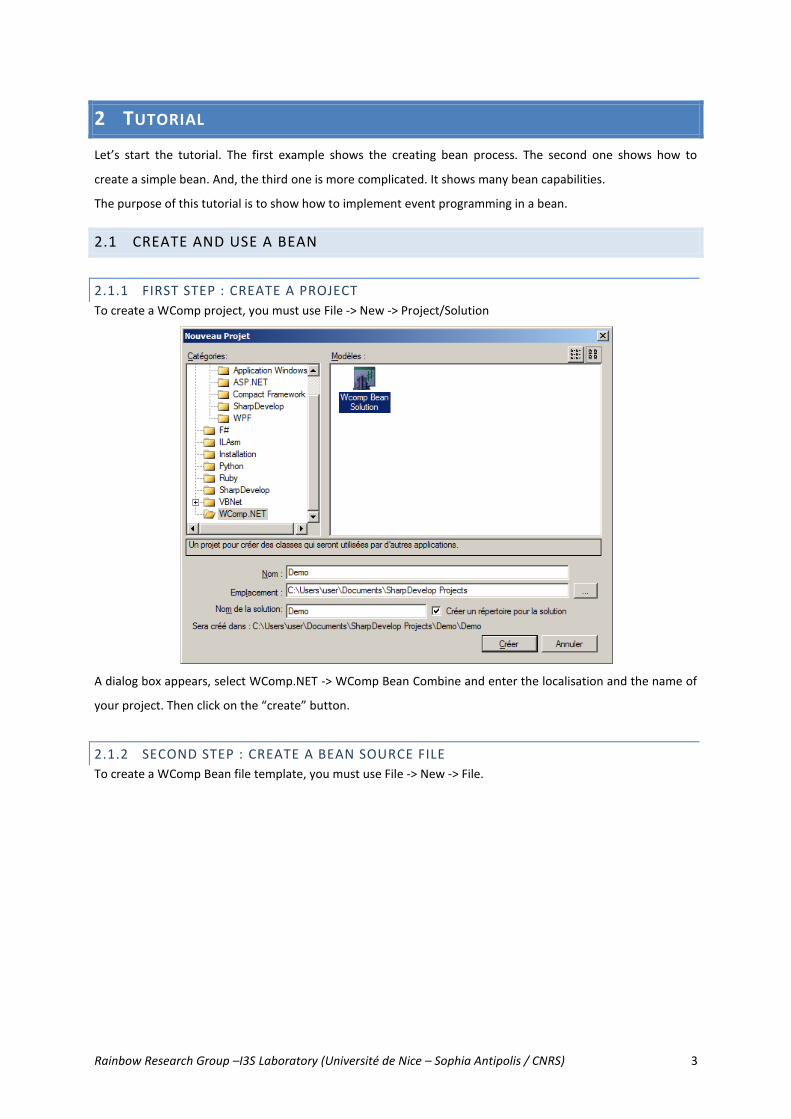
2.1.1 FIRST STEP : CREATE A PROJECT
To create a WComp project, you must use File -> New -> Project/Solution
A dialog box appears, select WComp.NET -> WComp Bean Combine and enter the localisation and the name of
your project. Then click on the “create” button.
2.1.2 SECOND STEP : CREATE A BEAN SOURCE FILE
To create a WComp Bean file template, you must use File -> New -> File.

Rainbow Research Group –I3S Laboratory (Université de Nice – Sophia Antipolis / CNRS) 4
A dialog box appears, select WComp.NET -> C# Bean and click on the “create” button.
2.1.3 THIRD STEP : SAVE THE BEAN
To do it, you must use File -> Save As and choose the bean file name and its localisation.
A popup appears and indicate that the file has been saved.
2.1.4 FOURTH STEP : ADD THE BEAN TO THE PROJECT
In the “projects” slot, do a right click on your project. Then, select “Add” -> “Add files”. A dialog box appears.

Rainbow Research Group –I3S Laboratory (Université de Nice – Sophia Antipolis / CNRS) 5
Select your bean file and press the “open” button. Your bean source file is added in your project.
2.1.5 FIFTH STEP : COMPILE YOUR BEAN
Firstly, In order to compile the bean, we must import some Dynamic Link Library (DLL). To do it, right click on
the folder “references” of the project in the “projects” slot. And select “Add a reference”. A dialog box appears
and in the slot “.NET assemblies browser” select “browse” button. A new dialog box appears.
Then, select WComp assemblies : “Beans” localised in “Beans” SharpDevelop folder.

Rainbow Research Group –I3S Laboratory (Université de Nice – Sophia Antipolis / CNRS) 6
Click on “Open” and then “Ok” buttons. In order to use a new bean in a WComp container you have to create a
Dynamic Link Library (DLL) of it. To do that, you must compile your project with the “realise” mod. In the tool
bar select the compile mod “release”.
And finally, compile your project. To do it, select “Executing” -> “build XXX” where XXX is your project name.
The compilation creates a DLL of the project in the folder “bin/release” of the project.
2.1.6 SIXTH STEP : ADD THE BEAN TO THE LIST
Now we have a compiled bean and we wants to use it in a WComp container. To do that, we must copy the
bean DLL into SharpDevelop “Beans” folder.

Rainbow Research Group –I3S Laboratory (Université de Nice – Sophia Antipolis / CNRS) 7
2.1.7 SEVENTH STEP : USE THE BEAN IN ANOTHER PROJECT
You must restart SharpDevelop. Create a Container (File -> New -> File -> WComp Container). Add the bean to
WComp container. In fact, the new bean appears into “Beans : Basic” into tools slot. Its name is its class name,
in our case “Beans1”.
This new bean isn’t useful in WComp. In fact, this new bean is empty. Thus it doesn’t implement any
functionality. We show how to add functionality in a bean in the next step.
2.2 CREATE AND USE A SIMPLE BEAN
The WComp philosophy is that when you want some information you need to call a method. It riches an event
and cause a call to a method which return some data. This example shows this mechanism.
We will create a bean that returns the string “hello world” when the “FireHelloWorld” method is invoked.
2.2.1 FIRSTLY : CREATE THE NEW BEAN PROJECT.

Rainbow Research Group –I3S Laboratory (Université de Nice – Sophia Antipolis / CNRS) 8
Firstly, we create a project called “helloworldbean”. It contains the bean we want to create. The creation
process was described previously.
Add the two references (Beans and EventedBeans). The process was described previously.
Add the file into the project. To do it, right click on the project, select “Add” -> “New File”. A Dialog box appears
select “C# Bean”. Then enter the bean name : “HelloWorldBeans”.

Rainbow Research Group –I3S Laboratory (Université de Nice – Sophia Antipolis / CNRS) 9
Click on button “Create”.
2.2.2 SECONDLY, IMPLEMENT THE NEW BEAN
Now, we want to add reactivity to our bean. We want to transmit the “hello world” string. Consequently, we
need to rich an event that transmits the string. Thus we use a delegate. Moreover, we need to rich this event.
So we use a method to do that. Here are codes to add to the bean source code.
2.2.3 THIRDLY : COMPILE AND EXPORT NEW BEAN
Compile the project with release mode. Then copy the bean DLL into the SharpDevelop Beans folder.
2.2.4 FOURTHLY : CREATE THE PROJECT WHICH USE THIS NEW BEAN
This is the same process to create a new project. The aim of this project is to use our new bean.
2.2.5 FIFTHLY : CREATE THE CONTAINER
First what is a container ? This is a WComp component that allows the user to add some beans and links
between them. Consequently, a container allows us to build a complex component defined by beans and their
behaviour.
To create a container, right click on the project select “Add” -> “New file”. A Dialog Box appears and select
“WComp.NET” -> “C# Container”. Fill in the container name. In our case, we choose “HelloWorldContainer”.

Rainbow Research Group –I3S Laboratory (Université de Nice – Sophia Antipolis / CNRS) 10
Then click on the “create” button.
2.2.6 SIXTHLY : IMPLEMENT THE CONTAINER
The container is created. The source container code is displayed. We switch the display mode into WComp.NET
mode.
To this tutorial, we add four beans in the container : two buttons, a HelloWorldBean and a label. To add a
component into the container, first, select the component into the tools section and click on the design part
where you want to add the component.

Rainbow Research Group –I3S Laboratory (Université de Nice – Sophia Antipolis / CNRS) 11
First, we make that the button at the top erase the label text. To do it, select the button output and link it to
the label input. A Dialog box appears, select the “Click” source and the “ResetText()” destination.
Then click on the “OK” button.
Then, we want to cause a helloWorld method call when we click on the button. To do it, we add a link between
the second button and the helloWorld bean. In the dialog box select “Click” as source and the method
“FireHelloWorld” as destination.
Then click on the “OK” button.

Rainbow Research Group –I3S Laboratory (Université de Nice – Sophia Antipolis / CNRS) 12
Finally, we want to display on the label the helloWorld call result. Thus, we add a new link between the
HelloWorld bean and the label. Select “HelloWorld” as source and “set_Text” as destination, in the dialog box.
2.2.7 SEVENTHLY : TEST THE CONTAINER
Click on the button at the right, and “hello world” will be printed in the label.
Click on the button at the top, and the text in the label will disappear.

Rainbow Research Group –I3S Laboratory (Université de Nice – Sophia Antipolis / CNRS) 13
2.3 CREATE AND USE A COOL BEAN
We wanted to create a cool bean. It creates some random numbers. This numbers are in a range. It is bounded
by a minimum and a maximum. Moreover we can choose the number of random number we want.
2.3.1 FIRST STEP : CONFIGURE THE PROJECT
First we create the bean project in order to implements the bean. We call it “coolbean”. Then we add the two
references (Beans and EventedBeans) of SharpDevelop bean folder. Then we add a new c# bean source file. We
call it “coolbean”.
2.3.2 SECOND STEP : IMPLEMENT THE BEAN
First, we want to customize the bean. Consequently, we implements three setters. Each one changes a piece of
information of the bean :
One changes the number of random numbers we want, made by the “setNb” method.
One updates the minimum value of random numbers, made by the “setMin” method.
One changes the maximum value of random numbers, made by the “setMax” method.
Thus the code to insert into the bean source code is :
public void setMin(string val){
try{
this.min = Int32.Parse(val);
}
catch{}
}
public void setMax(string val){
try{
this.max = Int32.Parse(val);
}
catch{}
}
public void setNb(string val){
try{
this.nb = Int32.Parse(val);
}
catch{}
}
Then, we want the bean to generate some random numbers. So we need a method to do that. Here is the
implementation :
private int genererNombre( Random generateurAleatoire ){

Rainbow Research Group –I3S Laboratory (Université de Nice – Sophia Antipolis / CNRS) 14
int interval = this.max - this.min + 1;
int nombre = 0;
nombre = generateurAleatoire.Next(interval);
nombre += this.min;
return nombre;
}
Then, we want the bean to generate some numbers. Our bean has two types of reaction. On one hand, when
the user wants only one number. On the other hand, when he wants to generate several numbers. So we use
two delegate methods to return the result. Thus the code to do that is :
public delegate void IntRandomNumbreHandler(int val);
public event IntRandomNumbreHandler NombreAleatoire;
public delegate void IntRandomNumbresHandler(string val);
public event IntRandomNumbresHandler NombresAleatoires;
Finally, to return some results using events, they have to be launched. Consequently, we need another method
to do that. Its code is :
public void FireIntRandomNumbre(){
Random generateurAleatoire = new Random();
StringBuilder nombres = null;
int nombre = 0;
int i = 0;
if(nb == 1){
nombre = this.genererNombre(generateurAleatoire);
if( NombreAleatoire != null){
NombreAleatoire(nombre);
}
}else if( nb > 1 ){
nombres = new StringBuilder();
for(i=0 ; i<this.nb ; i++){
nombre = this.genererNombre(generateurAleatoire);
nombres.Append( ((Int32)nombre).ToString());
nombres.Append( "\n" );
}
if( NombresAleatoires != null ){

Rainbow Research Group –I3S Laboratory (Université de Nice – Sophia Antipolis / CNRS) 15
NombresAleatoires(nombres.ToString());
}
}
}
As a result, the project looks like :
2.3.3 THIRD STEP : COMPILE AND EXPORT THE BEAN
Now, the bean is implemented. We just need to compile it with the release mode and copy the DLL into
SharpDevelop Bean folder. Then, we can use it into a new container.
2.3.4 FOURTH STEP : CREATE THE PROJECT WHICH USE THE BEAN
Now, it is time to use this bean. Thus we create a new project called “utilisercoolbeans”. Then add the two
bean references. And create a new container file called “ContainerCoolBeans”
2.3.5 FIFTH STEP : IMPLEMENT THE CONTAINER
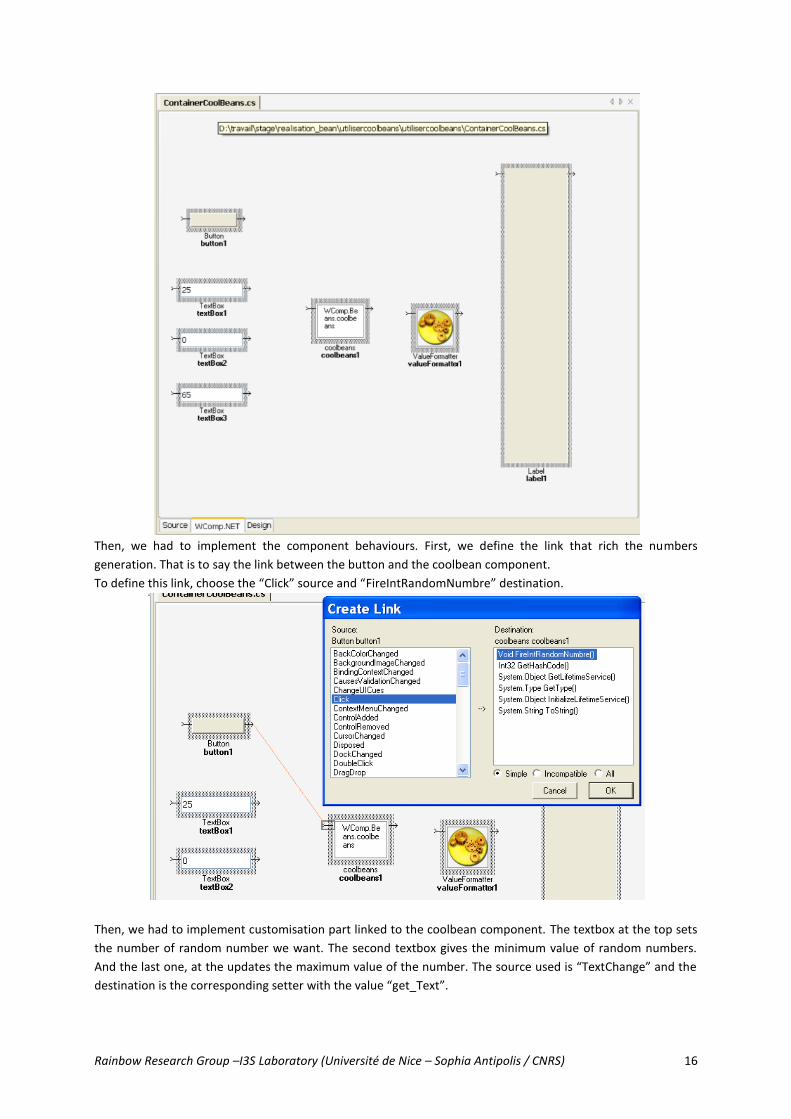
We need a coolbean component, three textbox, a button, a value formatter and a label.
Rainbow Research Group –I3S Laboratory (Université de Nice – Sophia Antipolis / CNRS) 16
Then, we had to implement the component behaviours. First, we define the link that rich the numbers
generation. That is to say the link between the button and the coolbean component.
To define this link, choose the “Click” source and “FireIntRandomNumbre” destination.
Then, we had to implement customisation part linked to the coolbean component. The textbox at the top sets
the number of random number we want. The second textbox gives the minimum value of random numbers.
And the last one, at the updates the maximum value of the number. The source used is “TextChange” and the
destination is the corresponding setter with the value “get_Text”.
Rainbow Research Group –I3S Laboratory (Université de Nice – Sophia Antipolis / CNRS) 17
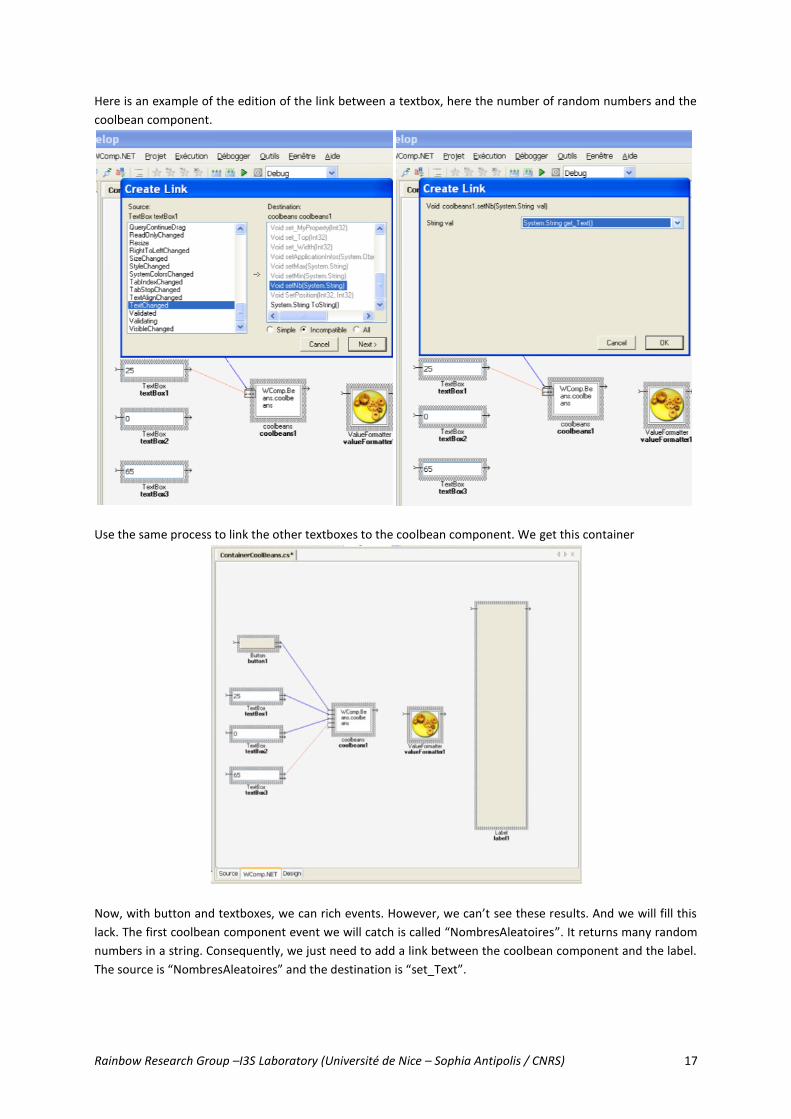
Here is an example of the edition of the link between a textbox, here the number of random numbers and the
coolbean component.
Use the same process to link the other textboxes to the coolbean component. We get this container
Now, with button and textboxes, we can rich events. However, we can’t see these results. And we will fill this
lack. The first coolbean component event we will catch is called “NombresAleatoires”. It returns many random
numbers in a string. Consequently, we just need to add a link between the coolbean component and the label.
The source is “NombresAleatoires” and the destination is “set_Text”.

Rainbow Research Group –I3S Laboratory (Université de Nice – Sophia Antipolis / CNRS) 18
The last step is to catch the second event. This one return an integer, thus we add to convert it into a string
value before display it into the label. First, we add the link between the coolbean component and the value
formatter. The source is “NombreAleatoire” and the destination is “Format”.
Finally, we add the last link between the value formatter and the label. The source is “StringValueChanged” and
the destination is “set_Text”.

Rainbow Research Group –I3S Laboratory (Université de Nice – Sophia Antipolis / CNRS) 19
2.3.6 SIXTH STEP : USE THE CONTAINER
Select some values into textboxes and click on the button a number or many appears into the label. Here is an
example.

Rainbow Research Group –I3S Laboratory (Université de Nice – Sophia Antipolis / CNRS) 20
3 CONCLUSION
WComp is a powerful tool. With it is quite easy to make some beans and to use them. The only thing is to
clearly understand the event programming concept and how to implement it.


