Page 1 of 10 Version 1.0, June 28th 2011
xxter Mobotix T24 configuration
Setup / settings for VoIP The Mobotix T24 can be used as a video intercom system in combination with xxter. The configuration as described in this document is tested and works with xxter. Other configurations can be used as well, however this might require more extensive knowledge of SIP and TCP/IP protocols. This document does not cover all the settings for the Mobotix T24, just the settings required for setting up the Mobotix T24 in combination with xxter. Some other settings that are not described int this document might conflict with the unit functioning correctly. This manual and the described settings are based on the factory defaults of the T24 unit. First setup the standard settings of the Mobotix intercom system according to the manual. These include the IP-‐address of the T24. In this example configuration the IP-‐address of the T24 unit is 192.168.72.1 After entering the IP-‐address in a browser and logging in with the administrator username and password (by default: “admin” and “meinsm”), go to the “Admin Menu”. Choose “VoIP settings” in the Audio and Phone section. First select “expert setup” as the “setup mode”. Next set the following settings to their correct value: General Phone settings VoIP: Enabled SIP Settings User Name: 101 SIP Domain: 192.168.72.1 (same as IP-‐address) Registrar: (empty) SIP ID: (empty) SIP Password: (empty) Use as Outbound proxy: Disabled Network settings SIP Port: 5060 Audio Codec Settings Minimal one of the codecs should be enabled (PCMA or PCMU)

Page 2 of 10 Version 1.0, June 28th 2011
Video Settings xxter does noet support video images through the SIP protocol, instead MPJEG is used on a separate connection. Therefore you can disable the Video settings here.

Page 3 of 10 Version 1.0, June 28th 2011
In the main Admin Menu now choose “Phone Call-‐In” in the “Audio and Phone” section. Select VoIP for Phone Call-‐In. Enter sip:[email protected] in the field for Accepted Phone Numbers or SIP Addresses. The “Audio Mode” should be “Intercom”.
These are the settings for the intercom required for calling the T24, on page 5 of this document the settings are shown for using the Call-‐button on the T24.
Page 4 of 10 Version 1.0, June 28th 2011
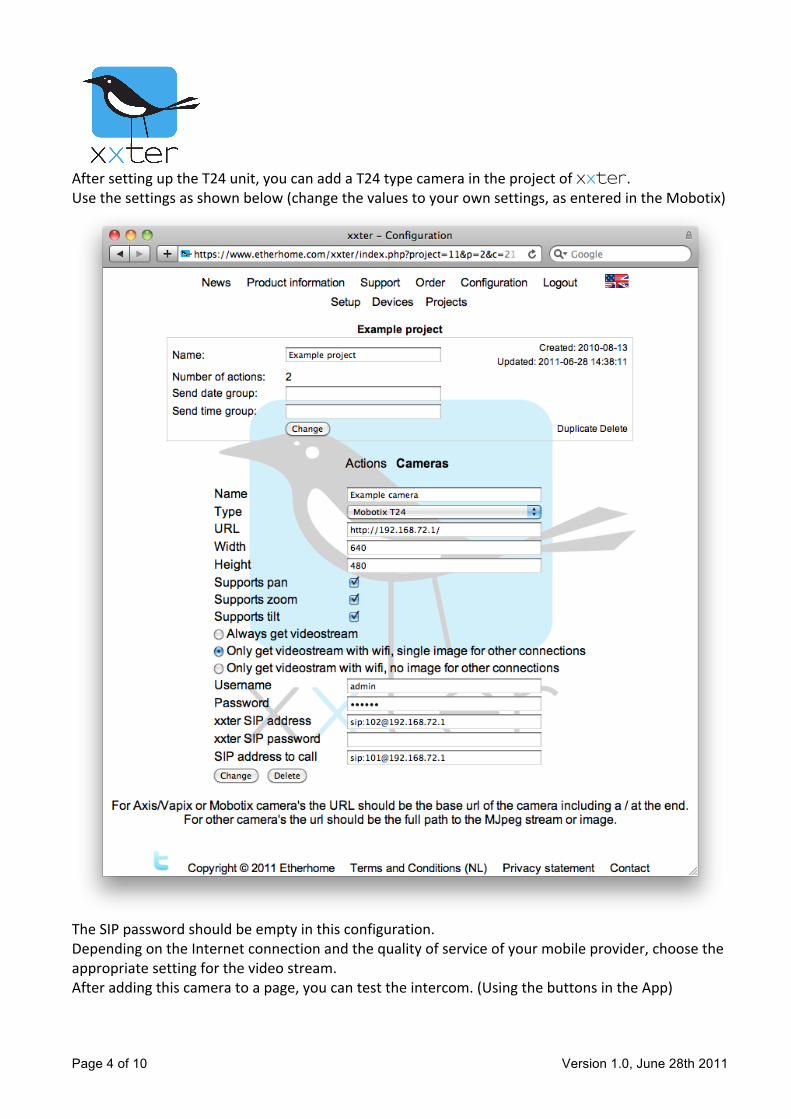
After setting up the T24 unit, you can add a T24 type camera in the project of xxter. Use the settings as shown below (change the values to your own settings, as entered in the Mobotix)
The SIP password should be empty in this configuration. Depending on the Internet connection and the quality of service of your mobile provider, choose the appropriate setting for the video stream. After adding this camera to a page, you can test the intercom. (Using the buttons in the App)
Page 5 of 10 Version 1.0, June 28th 2011
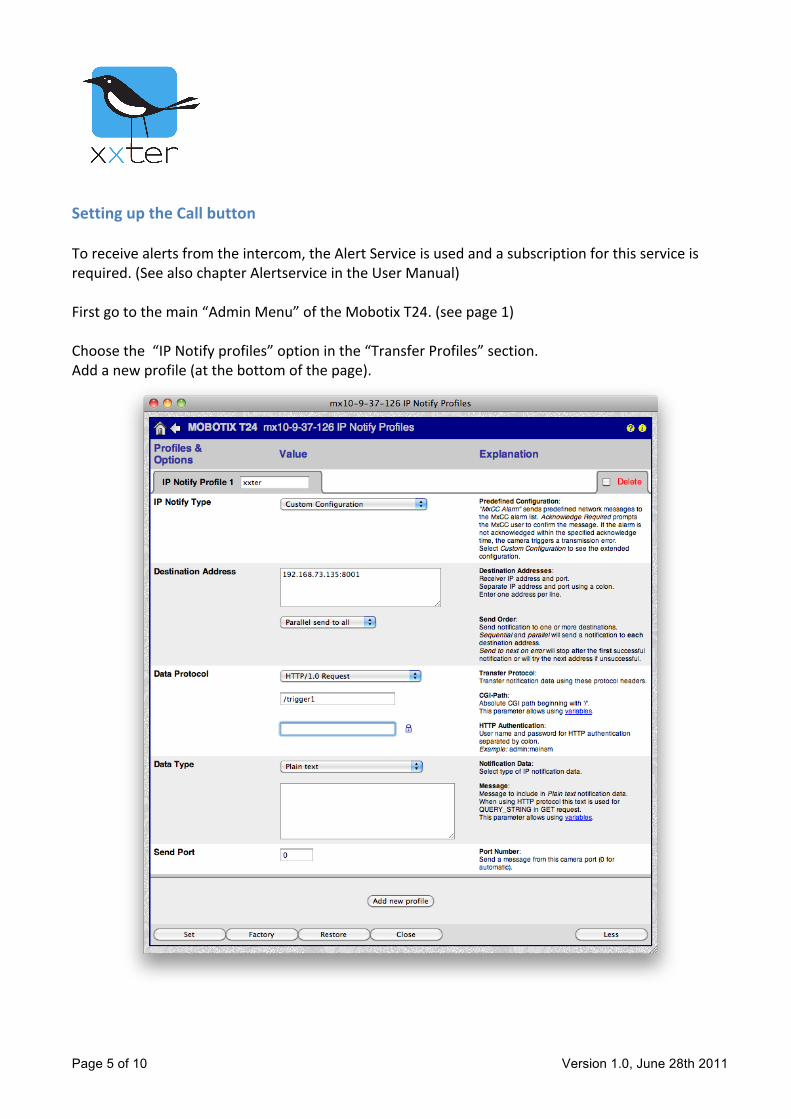
Setting up the Call button To receive alerts from the intercom, the Alert Service is used and a subscription for this service is required. (See also chapter Alertservice in the User Manual) First go to the main “Admin Menu” of the Mobotix T24. (see page 1) Choose the “IP Notify profiles” option in the “Transfer Profiles” section. Add a new profile (at the bottom of the page).

Page 6 of 10 Version 1.0, June 28th 2011
Give the profile a name (for example: xxter) and choose “Custom Configuration” as “IP Notify Type”. The “Destination Address” should be the IP-‐address of your xxter unit, followed by :8001 (for example: 192.168.73.135:8001) Choose “HTTP/1.0 Request as the “Data Protocol” and type “/trigger1” in the “CGI-‐Path” field. The HTTP Authentication can be left empty and choose “Plain text” as “Data Type”. Keep the “Message” text empty as well and the “Send Port” can be kept at 0. Save the settings and close the menu. Next enter the “Setup Menu” from the main screen (not the “Admin Menu”). First make sure the “Left Button” is enabled at the bottom of the “Event settings” screen. Then go to the “Action Group Overview” screen of the Setup Menu (last menu option). Add a new group, give it a name (for example: xxter) and enable it. (Example image is on the next page) Optionally you can select a timetable during which the action is enabled or not. Make sure the “BL – Button Left” is selected in the “Event Selection” list. Add an action to this action group and select “IP Notify: xxter” as the action. Save the settings. Now the call button of the T24 will trigger the http trigger 1 of your xxter unit. Next you have to set up your xxter unit to accept this trigger in the Alert Service.

Page 7 of 10 Version 1.0, June 28th 2011

Page 8 of 10 Version 1.0, June 28th 2011
Setting up the Alert Service Go to the profile to which you would like to add the alert.
Create a new alert and set up a message text. Choose push notification and select the correct iOS device. Next select the page on which you have added the Mobotix T24 camera intercom unit. You can select the “Activate intercom” action if you would like the App to connect to the intercom automatically after receiving this alert. Save the changes.

Page 9 of 10 Version 1.0, June 28th 2011
Next go to your xxter unit and reload your configuration. Select the Alert Service in the menu and add a new alert.
Set the alert to active and give it a name. Choose HTTP trigger as the trigger and enter the trigger number 1 in the field (you can choose another HTTP trigger if you like. Change the corresponding text in the T24 unit, see page 6 of this document). Finally choose the previously created AlertService and save the settings. This will enable the HTTP trigger from the T24 unit to alert the App on your iOS device. Resulting in a complete VoIP intercom with your iPhone or iPad as receiver. Multiple receivers can easily be added through the configuration website of xxter.
Page 10 of 10 Version 1.0, June 28th 2011
Using the intercom from the Internet At this moment the Mobotix T24 only supports two audio codecs which require a steady and quite fast connection. Most mobile networks have too high a latency and most of the time a too small a bandwidth for these audio codecs to work properly. For this reason we do not recommend using the intercom over 3G connections. A (still) camera image, might be useful on the otherhand. If xxter and the T24 are situated behind a firewall, router of modem, some extra configuration is required to allow connections from the Internet. The T24 settings are the following: VoIP settings in the Admin Menu Enter your external IP address or hostname as the SIP domain, for example a dynamic-‐dns address. Use this same address or hostname for the “NAT Address” under the network settings in the same window. And set “NAT Traversal” to “Use NAT address”. In this section the port numbers are also stated. The ports used are the SIP port and the Audio RTP port. Phone Call-‐In in the Admin Menu “Accepted Phone Numbers or SIP Addresses”: Use the external IP address or hostname here as well. (for example: sip:[email protected]) The xxter camera settings are the following: URL: use the external IP address or hostname. xxter SIP address: Use the external IP or hostname here as well (e.g. sip:[email protected]) SIP address to call: Use the external IP or hostname here as well (e.g. sip:[email protected]) If you use a different port, instead of the default (5060), this can be set up with the to call address, for example: sip:[email protected]:4177 Port forwarding Within the firewall, router or modem the following ports should be forwarded, if the default ports are used: TCP port 80 of the external IP address to the T24 unit for the camera image. UDP port 5060 of the external IP address to the T24 unit for the intercom connection. UDP port 7078 of the external IP address to the T24 unit for the audio connection. Attention: some mobile providers do not allow VoIP connections. Check your subscription details or contract. Some providers block certain ports as well, you may try other than default ports if this is the case.


