dp wireless-n pci wi-fi adapter quick installation guide
TRANSCRIPT

1
DP Wireless-N PCIWi-Fi AdapterQuick Installation Guide
04-0834A
IntroductionThe DP Wireless-N PCI Wi-Fi Adapter is designedto enable your PCI equipped PC to have a wirelessconnection to network.
Key Features and Benefits• Complies with 2.4GHz IEEE 802.11 b/g/n
standards• 2T2R with 300Mb/s data rate for both
transmitting and receiving• Wireless security: 64/128bit WEP, WPA,
WPA2• Supports WPS (WiFi protected setup)• Supports Qos-WMM, WMM-PS• Installs in standards height or low profile
chassis with included brackets

2
System Requirements• Desktop PC with an available PCI slot• Windows® 8 (32-/64-bit) / 7 (32-/64-bit) /
Vista (32-/64-bit) / XP (32-/64-bit) / Server2003 & 2008 (32-/64-bit) / Server 2008 R2/ 2000
Package Contents• DP Wireless-N PCI Wi-Fi Adapter• Spare low profile bracket• Antennas (2)• Software CD• Quick installation guide
Layout
Figure 1: CN-WR0711-S1 Layout
Antenna

3
Figure 2
Separate Transmit (Tx) andReceive (Rx) LED for indicatingnetwork status:• Lnk/Act on: Indicates a
valid connection.• Lnk/Act quickly flashing:
Indicates the adapter istransmitting or receivingdata.
Status LED
Hardware InstallationGeneral instructions for installing the card areprovided below. Since the design of computercases and motherboards vary, refer to yourcomputer's reference manual for furtherinformation, if needed.Static Electricity Discharge may permanentlydamage your system. Discharge any staticelectricity build up in your body by touching yourcomputer's case for a few seconds. Avoid anycontact with internal parts and handle cardsonly by their external edges.

4
Note: For low profile chassis, remove thestandard height bracket and install theenhanced low-profile bracket now.
1. Turn OFF the power to your computer andany other connected peripheral devices.
2. Unplug the power cord and remove thecover from the computer.
3. Remove the slot bracket from an availablePCI slot.
4. To install the card, carefully align the card'sbus connector with the selected PCI slot onthe motherboard. Push the board downfirmly, but gently, until it is well seated.
5. Replace the slot bracket's holding screw tosecure the card.
6. Replace the computer cover and reconnectthe power cord.
7. Attach the external antennas to PCI adapterantenna ports.

5
Software InstallationNOTE: Server 2008 & 2008 R2 Microsoft WLANAutoConfig Service is not installed by default.Follow the instructions below to install WLANAutoConfig Service to enable wireless networksupport. After completing the installation, andfor all other Windows OS, go directly to DriverInstallation on the next page.1. Right click Computer, then click Manage.2. Right click Features , then click Add
Features.3. Check the Wireless LAN Service, then
click Next.
Figure 3

6
4. Click Install then click Close, and WirelessLAN Service is installed successfully.
Figure 4
Driver InstallationFollow the instructions below to install the driverand software.1. Install the board and boot up Windows.2. At the Found New Hardware, click Cancel.
Skip this step if not prompted.3. Insert the driver CD. At the CD driver
window if prompted, select folder PCI,then double click Setup. Or press Windowskey and R, then type D:\PCI\Setup.exe inthe Run window, then click OK. (ChangeD: to match your CD/DVD-ROM driveletter)

7
4. Click Yes or Allow at the User AccountControl. Skip this step if not prompted.
5. At the license Agreement, select I acceptthe terms of the license agreement, clickNext.
6. Select Install the driver and Ralink WLANUtility, then click Next.
7. Select Ralink Configuration Tool, then clickNext.
8. Click Install, then click Finish.9. Restart the computer.
To Verify Windows Installation1. Go to Device Manager to verify installation.
For Window 8 / Windows 7 / Windows XP /Server 2003 / 2008 R2 / 2000: Right clickComputer or My Computer, click Manage,then click Device Manager.For Windows Vista: Right click Computer,click Manage, click Continue, then clickDevice Manager.

8
For Server 2008: Right click Computer, clickManage, double click Diagnostics, thenclick Device Manager.
2. Double click Network adapters. A 802.11nWireless LAN Card should be displayed.
Wireless Network ConfigurationAfter finishing the driver installation, useWindows Zero Configuration (WZC) OR RalinkWireless Utility (RaUI) to connect to your wirelessnetwork. When WZC is chosen as theconfiguration tool, RaUI only provides monitoringfunctions, and vice versa. Right click the RaUIicon in the taskbar, then select Use ZeroConfiguration as Configuration Utility toconfigure by WZC, or select Use RaConfig asConfiguration Utility to configure by RaUI.For Window 8, Windows 7, Vista, WZC andRaUI can be used together and no need to do theselection before the connection.
Figure 5

9
WZC (recommended)For basic network connection settings, WZC isthe recommended tool to use. Right click thewireless network icon in the taskbar, then selectView Available Wireless Networks.
Figure 6
At the Wireless Network Connection, doubleclick the preferred wireless network, enter theNetwork key, click Connect, then click ConnectAnyway.
Figure 7
Click Continue
Anyway

10
Figure 8
Click Change advanced settings
For advanced settings, click Change advancedsettings, select tab Wireless Networks, then clickProperties (as Figure 8 & 9).
Figure 9
Click Properties

11
Figure 10
Select the type of Network Authentication andData Encryption, click OK to save the settings.

12
Ralink UIDouble click the Ralink icon in the taskbar. Selectthe preferred wireless network, type in the WPAPreshared key, then click OK. the connection willbe established. Note: If you configured yourwireless network using WZC utility on page 9,this utility is not needed.
Figure 11
Type in the WPA
Preshard key and click OK
Click Help for detailed instructions
13
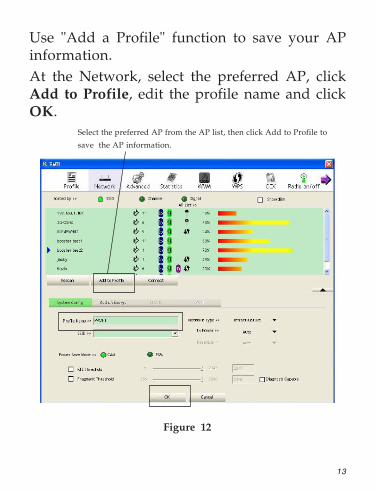
Use "Add a Profile" function to save your APinformation.At the Network, select the preferred AP, clickAdd to Profile, edit the profile name and clickOK.
Figure 12
Select the preferred AP from the AP list, then click Add to Profile to
save the AP information.
14
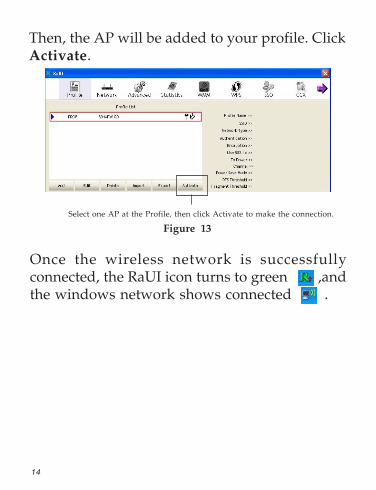
Once the wireless network is successfullyconnected, the RaUI icon turns to green ,andthe windows network shows connected .
Then, the AP will be added to your profile. ClickActivate.
Figure 13Select one AP at the Profile, then click Activate to make the connection.

15
Technical Support and WarrantyQUESTIONS? SIIG’s Online Support has answers! Simply visit our web site atwww.siig.com and click Support. Our online support database is updated daily withnew drivers and solutions. Answers to your questions could be just a few clicks away.You can also submit questions online and a technical support analyst will promptlyrespond.
SIIG offers a 5-year manufacturer warranty with this product. This warranty covers theoriginal purchaser and guarantees the product to be free of any defects in materials orworkmanship for five (5) years from the date of purchase of the product.
SIIG will, at our discretion, repair or replace (with an identical product or producthaving similar features and functionality) the product if defective in materials orworkmanship. This warranty gives you specific legal rights, and you may also have otherrights which vary from state to state. Please see our web site for more warranty details.
If you encounter any problems with this product, please follow the procedures below.A) If it is within the store's return policy period, please return the product to the storewhere you purchased from.
B) If your purchase has passed the store's return policy period, please follow the stepsbelow to have the product repaired or replaced.
Step 1: Submit your RMA request.Go to www.siig.com, click Support, then REQUEST A PRODUCT REPLACEMENTto submit a request to SIIG RMA or fax a request to 510-657-5962. Your RMA requestwill be processed, if the product is determined to be defective, an RMA number willbe issued.
Step 2: After obtaining an RMA number, ship the product.• Properly pack the product for shipping. All accessories that came with the
original package must be included.• Clearly write your RMA number on the top of the returned package. SIIG will
refuse to accept any shipping package, and will not be responsible for a productreturned without an RMA number posted on the outside of the shippingcarton.
• You are responsible for the cost of shipping to SIIG. Ship the product to thefollowing address:SIIG, Inc.6078 Stewart AvenueFremont, CA 94538-3152, USARMA #:
• SIIG will ship the repaired or replaced product via Ground in the U.S. andInternational Economy outside of the U.S. at no cost to the customer.

PRODUCT NAMEDP Wireless-N PCI Wi-Fi Adapter
FCC RULES: TESTED TO COMPLY WITH FCC PART 15, CLASS BOPERATING ENVIRONMENT: FOR HOME OR OFFICE USE
FCC COMPLIANCE STATEMENT:
This device complies with part 15 of the FCC Rules. Operation is subjectto the following two conditions: (1) This device may not cause harmfulinterference, and (2) this device must accept any interference received,including interference that may cause undesired operation.
THE PARTY RESPONSIBLE FOR PRODUCT COMPLIANCE
SIIG, Inc.6078 Stewart AvenueFremont, CA 94538-3152, USAPhone: 510-657-8688
About SIIG, Inc.Founded in 1985, SIIG, Inc. is a leading manufacturer of IT connectivitysolutions (including Serial ATA and Ultra ATA Controllers, FireWire, USB,and legacy I/O adapters) that bridge the connection between Desktop/Notebook systems and external peripherals. SIIG continues to grow by addingA/V and Digital Signage connectivity solutions to our extensive portfolio.SIIG products offer comprehensive user manuals, many user-friendly features,and are backed by an extensive manufacturer warranty. High quality controlstandards are evident by the overall ease of installation and compatibility ofour products, as well as one of the lowest defective return rates in the industry.SIIG products can be found in computer retail stores, mail order catalogs,through major distributors, system integrators, and VARs in the Americas andthe UK, and through e-commerce sites.
DP Wireless-N PCI Wi-Fi Adapter is a trademark of SIIG, Inc. SIIG and the SIIG logo areregistered trademarks of SIIG, Inc. Microsoft and Windows are registered trademarks ofMicrosoft Corporation. All other names used in this publication are for identification onlyand may be trademarks of their respective owners.
September, 2012 Copyright © 2012 by SIIG, Inc. All rights reserved.