dpm 9350/00 - user manual - dictation machines · • dpm 9350/00 user manual, dpm 9350/00 quick...
TRANSCRIPT
DPM 9350/00
User Manual International Edition
ii DPM 9350/00 - User Manual
VERSION DPM 9350/00 (International edition/English) - 03/2004
COPYRIGHT © 2003 - 2004 Philips Austria GmbH, PSP - Dictation Systems. All rights reserved. Reproduction in whole or in part is prohibited without the written consent of the copyright owner. Information in this manual is subject to change without notice.
TRADEMARKS Pocket Memo® is a registered trademark of Philips. Windows 98 SE, Windows Me, Windows 2000, Windows NT 4.0 and Windows XP are registered trademarks of Microsoft Corporation. All other names are trademarks, registered trademarks or service marks of their respective owners.
DISCLAIMER AND NOTICES Philips Speech Processing has carried out extensive testing with most popular configurations. However, since PC add-ons and device drivers change very rapidly, we are unable to guarantee conflict-free operation.
The CE mark confirms that the device corresponds to the relevant guidelines of the European Union. The cardboard used for packaging can be recycled. This electronic facility contains recyclable material.
Technical changes and errors excepted.
Declaration of Conformity
Tested to comply with FCC standards. For home or office use. Model number: LFH 9350/00 Trade name: Philips Digital Pocket Memo Responsible party: Philips Speech Processing Telephone number: +1 770 821 2400 Address: 64 Perimeter Center East, Fifth Floor, Atlanta, GA 30346, USA This device complies with Part 15 of the FCC Rules. Operation is subject to the following two conditions: 1. This device may not cause harmful interference. 2. This device must accept any interference received, including interference that may cause undesired operation.
iii
Table of Contents Chapter 1: Introduction ....................................................................................1
DPM features.................................................................................................1 Package contents ..........................................................................................2
Chapter 2: Introducing the DPM ......................................................................3 DPM graphic..................................................................................................3 LCD display ...................................................................................................7 Batteries ........................................................................................................8
Chapter 3: Getting Started..............................................................................10 Activating the DPM......................................................................................10 Memory card................................................................................................11 Start screen .................................................................................................13 DPM menu ..................................................................................................16 Power Save mode .......................................................................................30
Chapter 4: Basic Operations..........................................................................31 Recording ....................................................................................................31 Finishing a dictation (EOL and Priority) .......................................................34 Recording mode (Insert/Overwrite)..............................................................36 Playback......................................................................................................37 Fast Forward and Fast Rewind....................................................................38 Deleting .......................................................................................................39 Recording format (Standard Play/Long Play) ..............................................41 Voice-activated recording ............................................................................42 Skip Forward and Skip Back .......................................................................43
iv DPM 9350/00 - User Manual
Chapter 5: Advanced Operations .................................................................. 44 Entering user-defined labels........................................................................ 44 Assigning Keywords.................................................................................... 47 Scanning barcode information into Keywords ............................................. 50 Linked Keywords......................................................................................... 52 Transferring data between DPM and PC .................................................... 55
Appendix: Troubleshooting the DPM............................................................ 57 Index ................................................................................................................ 58
Chapter 1: Introduction 1
Chapter 1: Introduction The DPM 9350/00 (Digital Pocket Memo) has been designed to offer optimum user convenience and greater efficiency for your daily work. This manual provides a comprehensive overview of all the device's features and detailed instructions on how to operate the device.
DPM features • The DPM 9350/00 is a state-of-the-art digital voice recorder for the
professional user.
• Digital recording allows instant access to any point in the dictation and enables you to make precise deletions from sound files and to correctly place insertions.
• The DPM 9350/00 provides workflow management capabilities for easy transfer of files to the PC.
• 4-Position Switch for single-handed operation and ease-of-use.
• User-defined information (Keywords and labels) can be stored with the sound file.
• USB connection for simple data transfer between the device and the PC.
• Ergonomic design.
• High-resolution LCD display with backlight.
2 DPM 9350/00 - User Manual
Package contents • DPM 9350/00 - the digital voice recorder for the professional user.
• Philips memory card of the type MMC.
• Installation CD for the DPM Download/Configuration program for Windows 98 SE, Windows Me, Windows NT 4.0, Windows 2000 and Windows XP.
• A luxury pouch.
• 2 Philips AAA batteries.
• A USB cable.
• DPM 9350/00 User Manual, DPM 9350/00 Quick Reference
Accessories available from your vendor
• Power Supply LFH 9145
• DPM Docking Station 9110
• Rechargeable batteries LFH 9144
For more information on Philips and the available products, go to:
www.philips.com www.dictation.philips.com
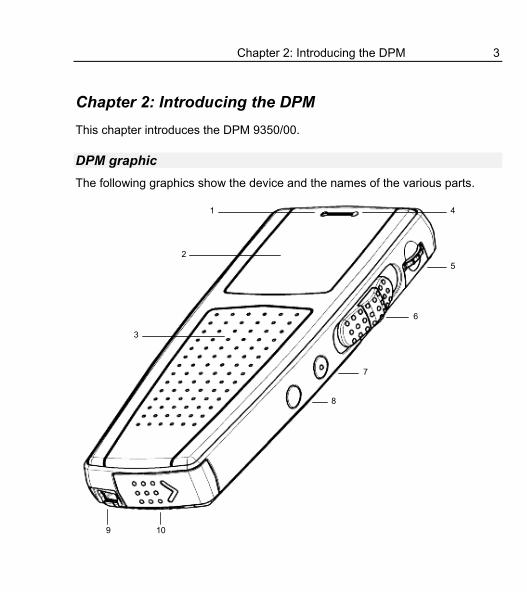
Chapter 2: Introducing the DPM 3
Chapter 2: Introducing the DPM This chapter introduces the DPM 9350/00.
DPM graphic The following graphics show the device and the names of the various parts.
1
2
4
5
6
7
8
3
9 10
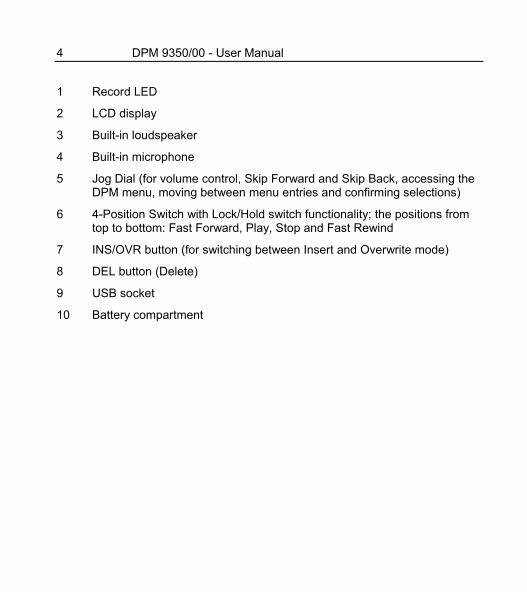
4 DPM 9350/00 - User Manual 1 Record LED
2 LCD display
3 Built-in loudspeaker
4 Built-in microphone
5 Jog Dial (for volume control, Skip Forward and Skip Back, accessing the DPM menu, moving between menu entries and confirming selections)
6 4-Position Switch with Lock/Hold switch functionality; the positions from top to bottom: Fast Forward, Play, Stop and Fast Rewind
7 INS/OVR button (for switching between Insert and Overwrite mode)
8 DEL button (Delete)
9 USB socket
10 Battery compartment
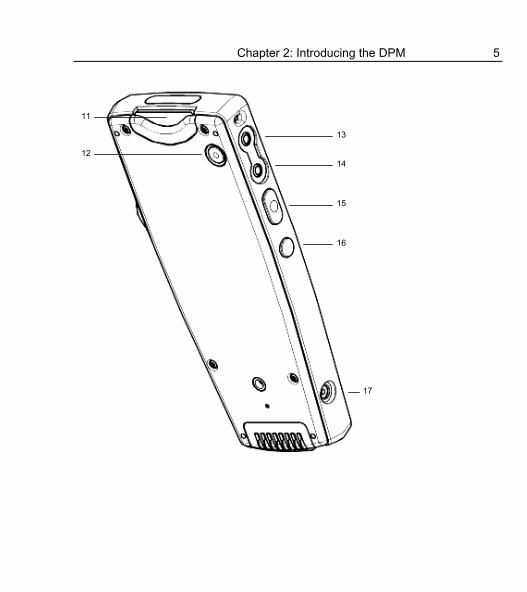
Chapter 2: Introducing the DPM 5
11
12
13
14
15
16
17
6 DPM 9350/00 - User Manual 11 Memory card slot
12 L/P button (for assigning the End-of-Letter attribute and Priority)
13 MIC (microphone socket)
14 EAR (earphone socket)
15 REC button (Record)
16 DL button (for PC download)
17 Power supply socket (for Philips LFH 9145)

Chapter 2: Introducing the DPM 7
LCD display The DPM 9350/00 has a high-quality graphical LCD display. You will see the following symbols:
Standard Play mode Long Play mode
AM symbol (hours before noon) PM symbol (hours after noon)
Fast Rewind Fast Forward
Recording Record Standby
Stop Playback
Voice-activated recording Barcode information
EOL (End-of-Letter) Priority
Write-protected SD card Insert mode
Batteries: 100% Batteries: 80%
Batteries: 60% Batteries: 40%
Batteries: 20% Batteries: empty
The status indication bar may appear as follows (note that the following overview only lists the most common displays of the status indication bar):
A dictation is being recorded.
A sound file is being played back.
A section of the sound file is marked for deletion.
The whole sound file is marked for deletion.
8 DPM 9350/00 - User Manual
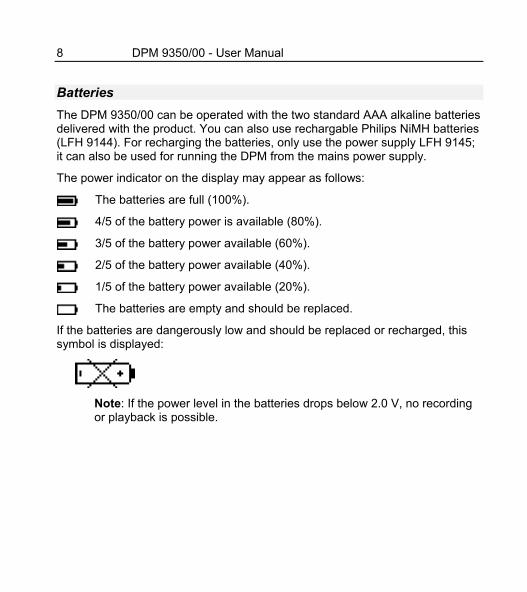
Batteries The DPM 9350/00 can be operated with the two standard AAA alkaline batteries delivered with the product. You can also use rechargable Philips NiMH batteries (LFH 9144). For recharging the batteries, only use the power supply LFH 9145; it can also be used for running the DPM from the mains power supply.
The power indicator on the display may appear as follows:
The batteries are full (100%).
4/5 of the battery power is available (80%).
3/5 of the battery power available (60%).
2/5 of the battery power available (40%).
1/5 of the battery power available (20%).
The batteries are empty and should be replaced.
If the batteries are dangerously low and should be replaced or recharged, this symbol is displayed:
Note: If the power level in the batteries drops below 2.0 V, no recording or playback is possible.
Chapter 2: Introducing the DPM 9
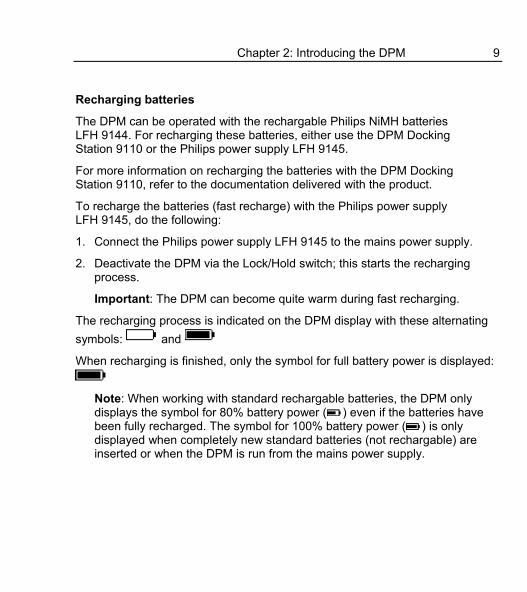
Recharging batteries
The DPM can be operated with the rechargable Philips NiMH batteries LFH 9144. For recharging these batteries, either use the DPM Docking Station 9110 or the Philips power supply LFH 9145.
For more information on recharging the batteries with the DPM Docking Station 9110, refer to the documentation delivered with the product.
To recharge the batteries (fast recharge) with the Philips power supply LFH 9145, do the following:
1. Connect the Philips power supply LFH 9145 to the mains power supply.
2. Deactivate the DPM via the Lock/Hold switch; this starts the recharging process.
Important: The DPM can become quite warm during fast recharging.
The recharging process is indicated on the DPM display with these alternating symbols: and
When recharging is finished, only the symbol for full battery power is displayed:
Note: When working with standard rechargable batteries, the DPM only displays the symbol for 80% battery power ( ) even if the batteries have been fully recharged. The symbol for 100% battery power ( ) is only displayed when completely new standard batteries (not rechargable) are inserted or when the DPM is run from the mains power supply.
10 DPM 9350/00 - User Manual
Chapter 3: Getting Started This chapter provides an introduction to the basic functions of the DPM 9350/00:
• Activating the DPM
• Memory card
• Start screen
• DPM menu
• Power Save mode
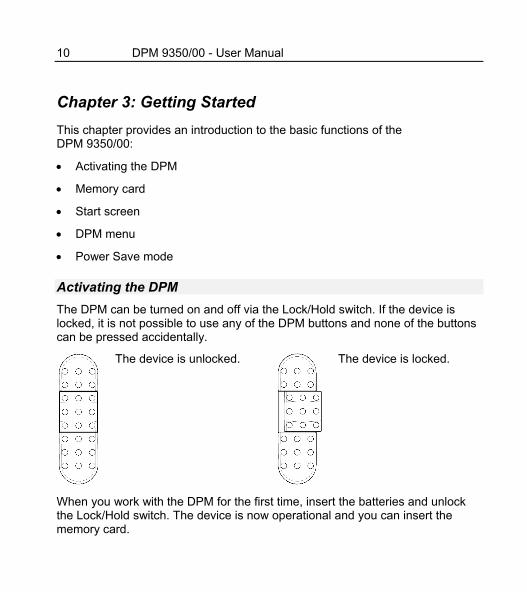
Activating the DPM The DPM can be turned on and off via the Lock/Hold switch. If the device is locked, it is not possible to use any of the DPM buttons and none of the buttons can be pressed accidentally.
The device is unlocked.
The device is locked.
When you work with the DPM for the first time, insert the batteries and unlock the Lock/Hold switch. The device is now operational and you can insert the memory card.
Chapter 3: Getting Started 11
For activating the device when it has already been in use, there are the following options:
• If the Lock/Hold switch was activated, unlock the device. • If the device has gone into Power Save mode (the device has been left
inactive for for more than 4 minutes), activate the device by pressing any button or by moving the 4-Position Switch.
• If the DPM has been left inactive for more than 2 hours, it is automatically turned off. In this case, it can only be turned on via the Lock/Hold switch (OFF-ON functionality) or by moving the 4-Position Switch.
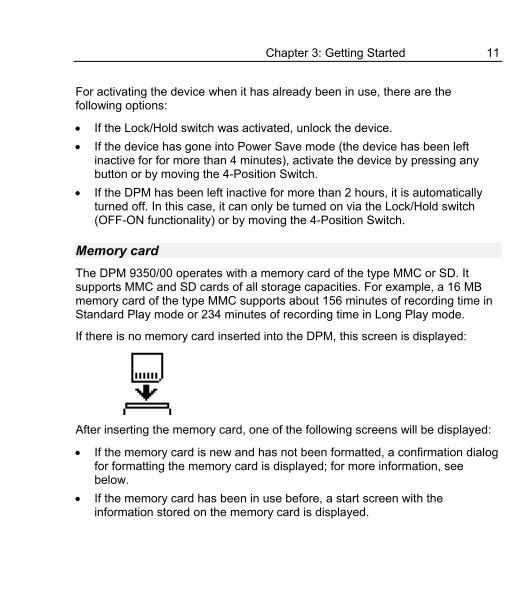
Memory card The DPM 9350/00 operates with a memory card of the type MMC or SD. It supports MMC and SD cards of all storage capacities. For example, a 16 MB memory card of the type MMC supports about 156 minutes of recording time in Standard Play mode or 234 minutes of recording time in Long Play mode.
If there is no memory card inserted into the DPM, this screen is displayed:
After inserting the memory card, one of the following screens will be displayed:
• If the memory card is new and has not been formatted, a confirmation dialog for formatting the memory card is displayed; for more information, see below.
• If the memory card has been in use before, a start screen with the information stored on the memory card is displayed.
12 DPM 9350/00 - User Manual
Formatting the memory card
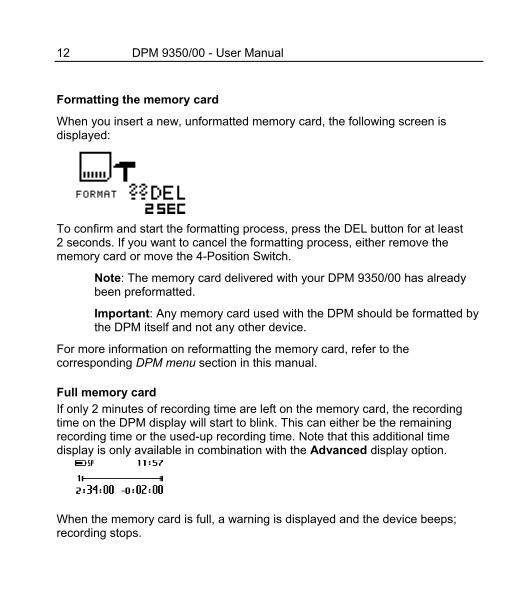
When you insert a new, unformatted memory card, the following screen is displayed:
To confirm and start the formatting process, press the DEL button for at least 2 seconds. If you want to cancel the formatting process, either remove the memory card or move the 4-Position Switch.
Note: The memory card delivered with your DPM 9350/00 has already been preformatted.
Important: Any memory card used with the DPM should be formatted by the DPM itself and not any other device.
For more information on reformatting the memory card, refer to the corresponding DPM menu section in this manual.
Full memory card If only 2 minutes of recording time are left on the memory card, the recording time on the DPM display will start to blink. This can either be the remaining recording time or the used-up recording time. Note that this additional time display is only available in combination with the Advanced display option.
When the memory card is full, a warning is displayed and the device beeps; recording stops.
Chapter 3: Getting Started 13
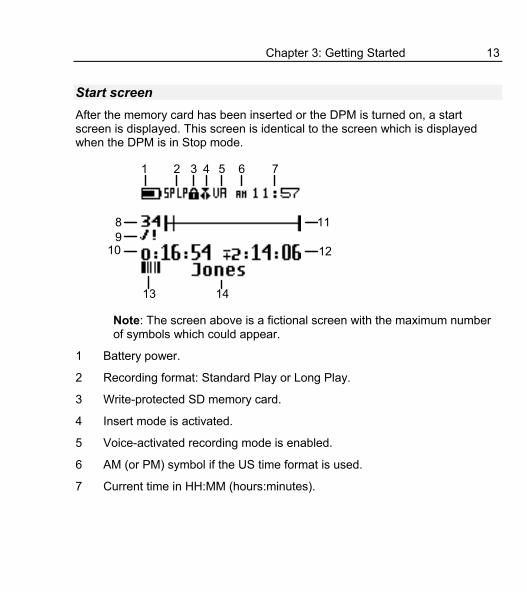
Start screen After the memory card has been inserted or the DPM is turned on, a start screen is displayed. This screen is identical to the screen which is displayed when the DPM is in Stop mode.
1 2 3 4
8 11
12
6 75
109
13 14 Note: The screen above is a fictional screen with the maximum number of symbols which could appear.
1 Battery power.
2 Recording format: Standard Play or Long Play.
3 Write-protected SD memory card.
4 Insert mode is activated.
5 Voice-activated recording mode is enabled.
6 AM (or PM) symbol if the US time format is used.
7 Current time in HH:MM (hours:minutes).
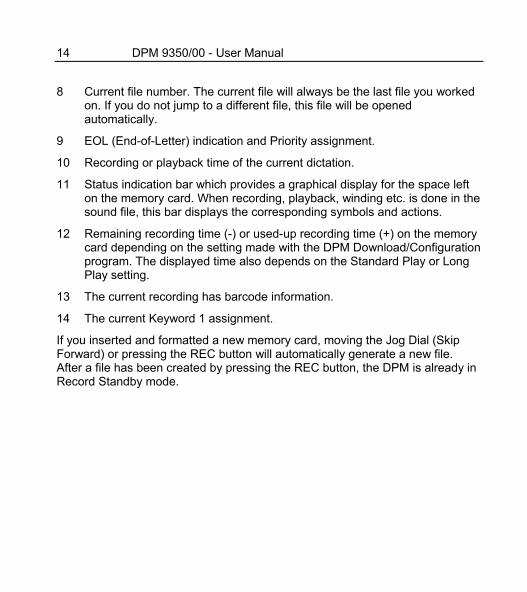
14 DPM 9350/00 - User Manual 8 Current file number. The current file will always be the last file you worked
on. If you do not jump to a different file, this file will be opened automatically.
9 EOL (End-of-Letter) indication and Priority assignment.
10 Recording or playback time of the current dictation.
11 Status indication bar which provides a graphical display for the space left on the memory card. When recording, playback, winding etc. is done in the sound file, this bar displays the corresponding symbols and actions.
12 Remaining recording time (-) or used-up recording time (+) on the memory card depending on the setting made with the DPM Download/Configuration program. The displayed time also depends on the Standard Play or Long Play setting.
13 The current recording has barcode information.
14 The current Keyword 1 assignment.
If you inserted and formatted a new memory card, moving the Jog Dial (Skip Forward) or pressing the REC button will automatically generate a new file. After a file has been created by pressing the REC button, the DPM is already in Record Standby mode.
Chapter 3: Getting Started 15
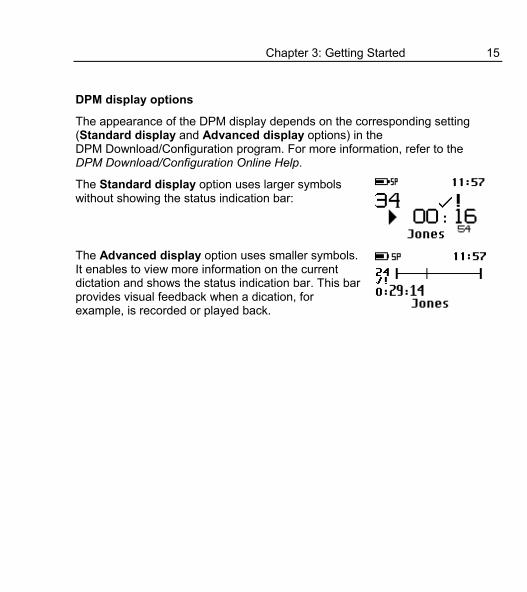
DPM display options
The appearance of the DPM display depends on the corresponding setting (Standard display and Advanced display options) in the DPM Download/Configuration program. For more information, refer to the DPM Download/Configuration Online Help.
The Standard display option uses larger symbols without showing the status indication bar:
The Advanced display option uses smaller symbols. It enables to view more information on the current dictation and shows the status indication bar. This bar provides visual feedback when a dication, for example, is recorded or played back.
16 DPM 9350/00 - User Manual
DPM menu The DPM 9350/00 comes with a menu which provides the following options:
• User-defined labels
• Assigning Keywords
• Setting the date and time
• Setting the recording format
• Enabling and disabling the DPM device beep
• Setting the microphone sensitivity
• Voice-activated recording
• Backlight on/off
• Changing the contrast
• Displaying the recording time
• Reformatting the memory card
Note: The setting for the DPM display appearance (Standard display and Advanced display options) can only be made via the DPM Download/Configuration program.
Chapter 3: Getting Started 17
Accessing the DPM menu
You can access the DPM menu by pressing the Jog Dial for about 2 seconds. The DPM menu can only be accessed when the DPM is in Stop mode.
• To move between the DPM menu entries, move the Jog Dial up or down:
• To select a menu entry, for example the date and time setting, go to this menu entry by moving the Jog Dial up or down. Then press the Jog Dial to confirm the selection. This enables you to access the menu entry and change the settings for it. Confirm the changes by pressing the Jog Dial; this returns you to the DPM main menu.
To exit a menu entry selection without confirming the changes, press the DEL button on the DPM. This exits the DPM main menu and discards any changes.
Note: If no menu entry selection is made within 10 seconds, the DPM automatically exits the DPM menu and goes back into Stop mode.
To exit the DPM menu, do one of the following:
• Select the menu entry for exiting the DPM menu and confirm the selection
by pressing the Jog Dial:
• Press the DEL button.
18 DPM 9350/00 - User Manual
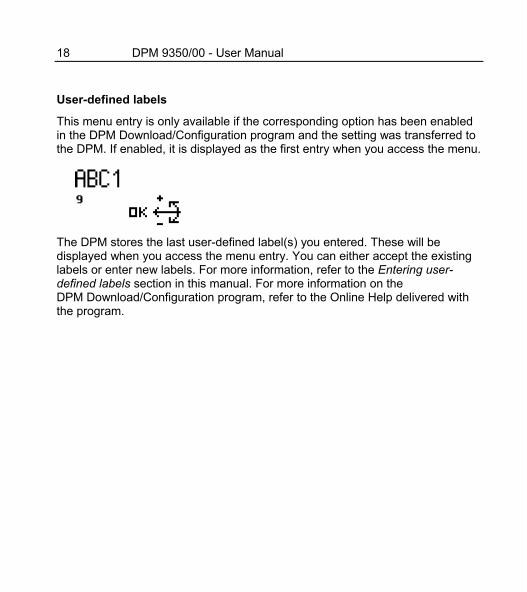
User-defined labels
This menu entry is only available if the corresponding option has been enabled in the DPM Download/Configuration program and the setting was transferred to the DPM. If enabled, it is displayed as the first entry when you access the menu.
The DPM stores the last user-defined label(s) you entered. These will be displayed when you access the menu entry. You can either accept the existing labels or enter new labels. For more information, refer to the Entering user-defined labels section in this manual. For more information on the DPM Download/Configuration program, refer to the Online Help delivered with the program.
Chapter 3: Getting Started 19
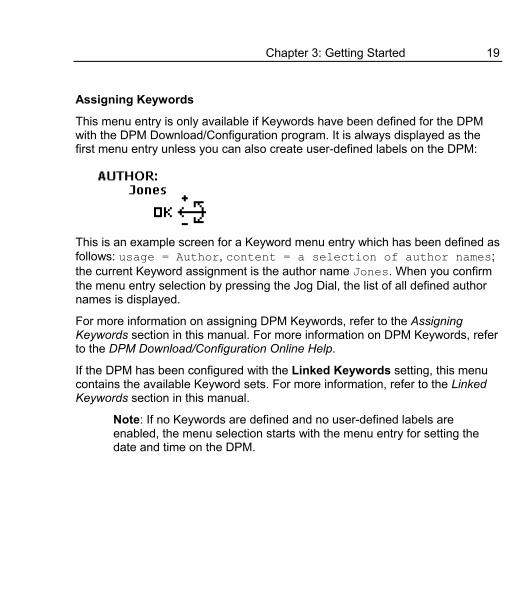
Assigning Keywords
This menu entry is only available if Keywords have been defined for the DPM with the DPM Download/Configuration program. It is always displayed as the first menu entry unless you can also create user-defined labels on the DPM:
This is an example screen for a Keyword menu entry which has been defined as follows: usage = Author, content = a selection of author names; the current Keyword assignment is the author name Jones. When you confirm the menu entry selection by pressing the Jog Dial, the list of all defined author names is displayed.
For more information on assigning DPM Keywords, refer to the Assigning Keywords section in this manual. For more information on DPM Keywords, refer to the DPM Download/Configuration Online Help.
If the DPM has been configured with the Linked Keywords setting, this menu contains the available Keyword sets. For more information, refer to the Linked Keywords section in this manual.
Note: If no Keywords are defined and no user-defined labels are enabled, the menu selection starts with the menu entry for setting the date and time on the DPM.
20 DPM 9350/00 - User Manual
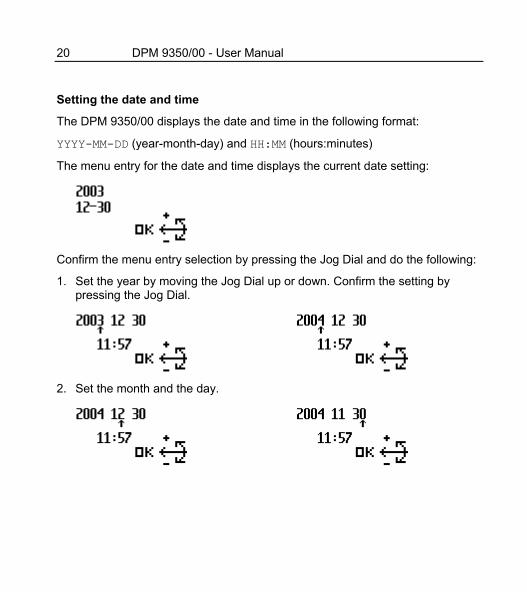
Setting the date and time
The DPM 9350/00 displays the date and time in the following format:
YYYY-MM-DD (year-month-day) and HH:MM (hours:minutes)
The menu entry for the date and time displays the current date setting:
Confirm the menu entry selection by pressing the Jog Dial and do the following:
1. Set the year by moving the Jog Dial up or down. Confirm the setting by pressing the Jog Dial.
2. Set the month and the day.
Chapter 3: Getting Started 21
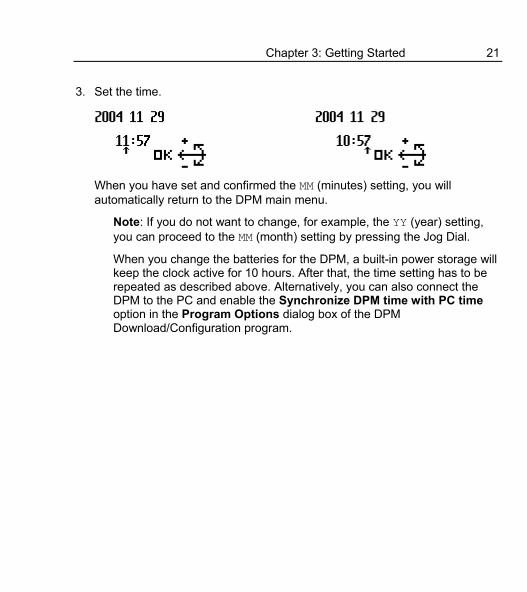
3. Set the time.
When you have set and confirmed the MM (minutes) setting, you will automatically return to the DPM main menu.
Note: If you do not want to change, for example, the YY (year) setting, you can proceed to the MM (month) setting by pressing the Jog Dial.
When you change the batteries for the DPM, a built-in power storage will keep the clock active for 10 hours. After that, the time setting has to be repeated as described above. Alternatively, you can also connect the DPM to the PC and enable the Synchronize DPM time with PC time option in the Program Options dialog box of the DPM Download/Configuration program.
22 DPM 9350/00 - User Manual
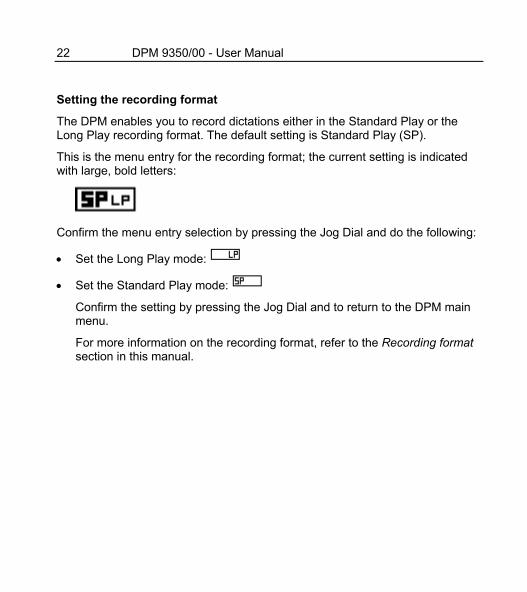
Setting the recording format
The DPM enables you to record dictations either in the Standard Play or the Long Play recording format. The default setting is Standard Play (SP).
This is the menu entry for the recording format; the current setting is indicated with large, bold letters:
Confirm the menu entry selection by pressing the Jog Dial and do the following:
• Set the Long Play mode:
• Set the Standard Play mode:
Confirm the setting by pressing the Jog Dial and to return to the DPM main menu.
For more information on the recording format, refer to the Recording format section in this manual.
Chapter 3: Getting Started 23
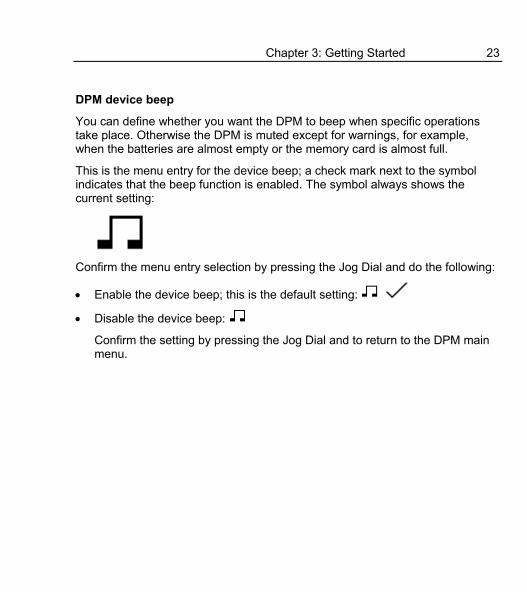
DPM device beep
You can define whether you want the DPM to beep when specific operations take place. Otherwise the DPM is muted except for warnings, for example, when the batteries are almost empty or the memory card is almost full.
This is the menu entry for the device beep; a check mark next to the symbol indicates that the beep function is enabled. The symbol always shows the current setting:
Confirm the menu entry selection by pressing the Jog Dial and do the following:
• Enable the device beep; this is the default setting:
• Disable the device beep:
Confirm the setting by pressing the Jog Dial and to return to the DPM main menu.
24 DPM 9350/00 - User Manual
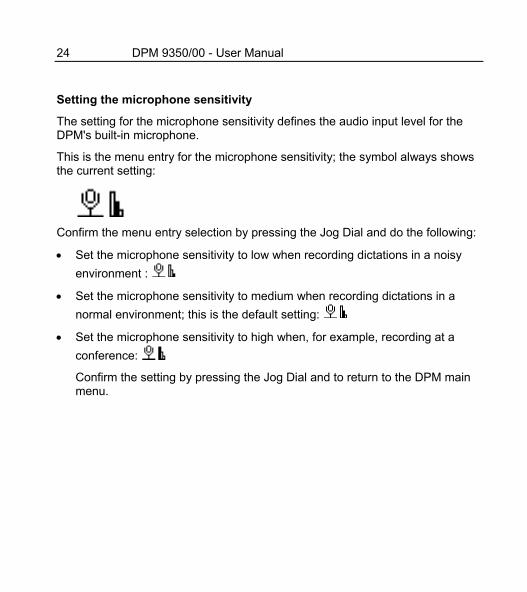
Setting the microphone sensitivity
The setting for the microphone sensitivity defines the audio input level for the DPM's built-in microphone.
This is the menu entry for the microphone sensitivity; the symbol always shows the current setting:
Confirm the menu entry selection by pressing the Jog Dial and do the following:
• Set the microphone sensitivity to low when recording dictations in a noisy environment :
• Set the microphone sensitivity to medium when recording dictations in a normal environment; this is the default setting:
• Set the microphone sensitivity to high when, for example, recording at a conference:
Confirm the setting by pressing the Jog Dial and to return to the DPM main menu.
Chapter 3: Getting Started 25
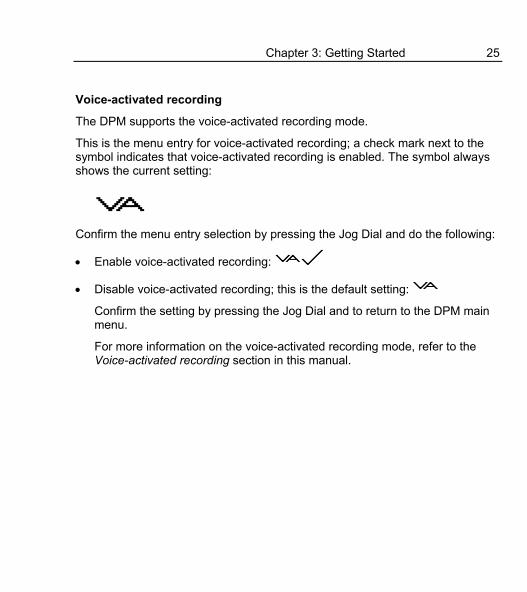
Voice-activated recording
The DPM supports the voice-activated recording mode.
This is the menu entry for voice-activated recording; a check mark next to the symbol indicates that voice-activated recording is enabled. The symbol always shows the current setting:
Confirm the menu entry selection by pressing the Jog Dial and do the following:
• Enable voice-activated recording:
• Disable voice-activated recording; this is the default setting:
Confirm the setting by pressing the Jog Dial and to return to the DPM main menu.
For more information on the voice-activated recording mode, refer to the Voice-activated recording section in this manual.
26 DPM 9350/00 - User Manual
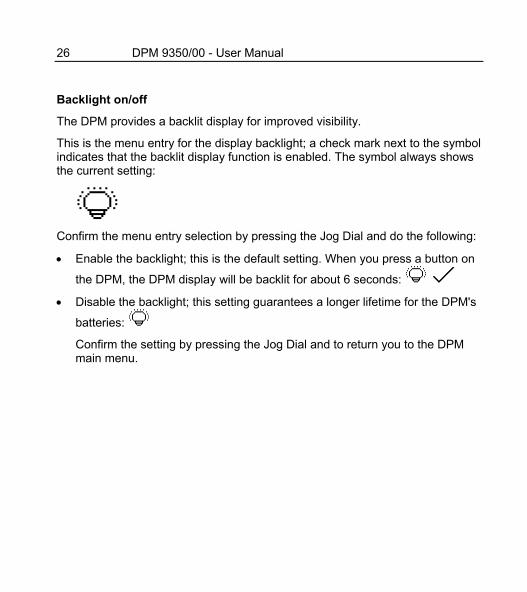
Backlight on/off
The DPM provides a backlit display for improved visibility.
This is the menu entry for the display backlight; a check mark next to the symbol indicates that the backlit display function is enabled. The symbol always shows the current setting:
Confirm the menu entry selection by pressing the Jog Dial and do the following:
• Enable the backlight; this is the default setting. When you press a button on
the DPM, the DPM display will be backlit for about 6 seconds:
• Disable the backlight; this setting guarantees a longer lifetime for the DPM's
batteries:
Confirm the setting by pressing the Jog Dial and to return you to the DPM main menu.
Chapter 3: Getting Started 27
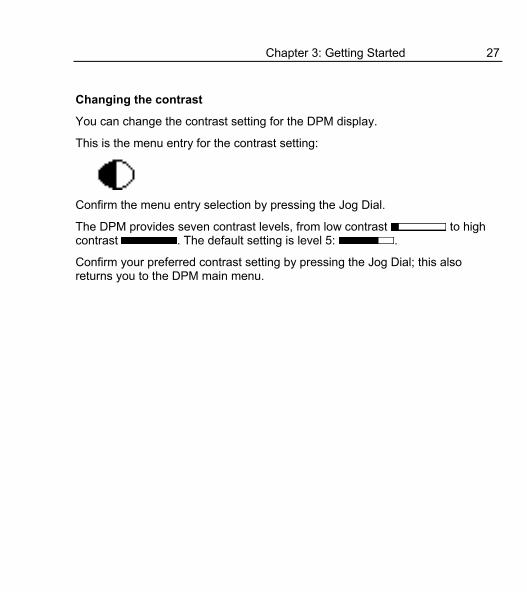
Changing the contrast
You can change the contrast setting for the DPM display.
This is the menu entry for the contrast setting:
Confirm the menu entry selection by pressing the Jog Dial.
The DPM provides seven contrast levels, from low contrast to high contrast . The default setting is level 5: .
Confirm your preferred contrast setting by pressing the Jog Dial; this also returns you to the DPM main menu.
28 DPM 9350/00 - User Manual
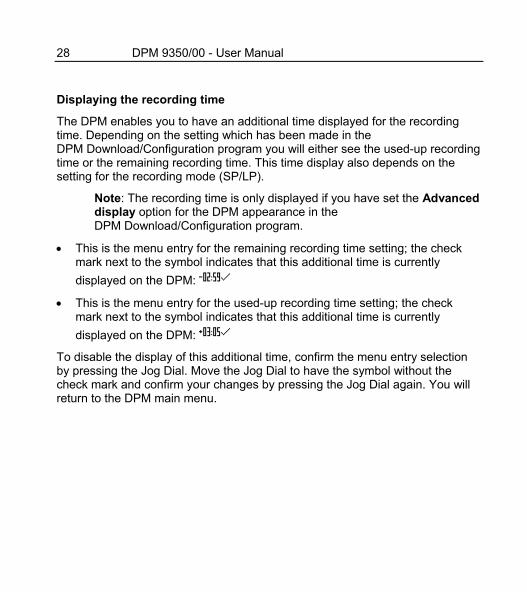
Displaying the recording time
The DPM enables you to have an additional time displayed for the recording time. Depending on the setting which has been made in the DPM Download/Configuration program you will either see the used-up recording time or the remaining recording time. This time display also depends on the setting for the recording mode (SP/LP).
Note: The recording time is only displayed if you have set the Advanced display option for the DPM appearance in the DPM Download/Configuration program.
• This is the menu entry for the remaining recording time setting; the check mark next to the symbol indicates that this additional time is currently displayed on the DPM:
• This is the menu entry for the used-up recording time setting; the check mark next to the symbol indicates that this additional time is currently displayed on the DPM:
To disable the display of this additional time, confirm the menu entry selection by pressing the Jog Dial. Move the Jog Dial to have the symbol without the check mark and confirm your changes by pressing the Jog Dial again. You will return to the DPM main menu.
Chapter 3: Getting Started 29
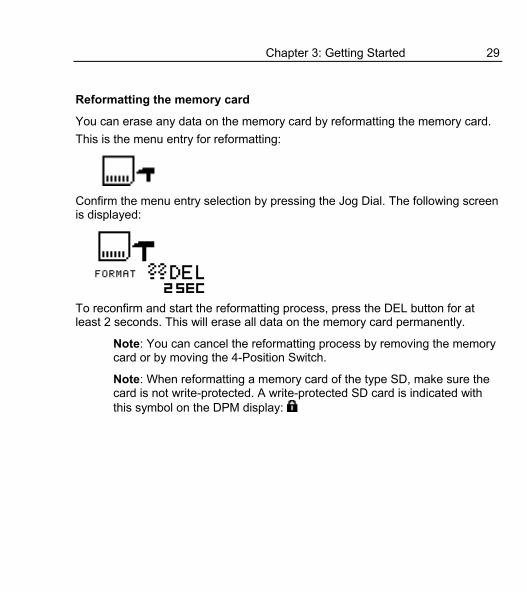
Reformatting the memory card
You can erase any data on the memory card by reformatting the memory card. This is the menu entry for reformatting:
Confirm the menu entry selection by pressing the Jog Dial. The following screen is displayed:
To reconfirm and start the reformatting process, press the DEL button for at least 2 seconds. This will erase all data on the memory card permanently.
Note: You can cancel the reformatting process by removing the memory card or by moving the 4-Position Switch.
Note: When reformatting a memory card of the type SD, make sure the card is not write-protected. A write-protected SD card is indicated with this symbol on the DPM display:
30 DPM 9350/00 - User Manual
Power Save mode If the DPM is left inactive for more than 4 minutes, it goes automatically into Power Save mode and the display is turned off. You can reactivate the DPM by pressing any button or moving the 4-Position Switch. This does not initiate the function of the corresponding button. The only exception is if you move the 4-Position Switch to the Play position; this will start playback.
When the device has been reactivated, it will either display the start screen or reenter the mode which was active before it entered the Power Save mode.
Note: If you have voice-activated recording enabled and the DPM is in Record Standby mode, the device will go into Power Save mode after 60 minutes.
Chapter 4: Basic Operations 31
Chapter 4: Basic Operations This chapter provides an introduction to the basic functions of the DPM 9350/00:
• Recording a dictation
• Recording mode (Insert/Overwrite)
• Playing back a dictation
• Fast Forward and Fast Rewind
• Deleting parts of a sound file and deleting entire sound files
• Finishing a dictation (EOL and Priority)
• Additional settings
Recording With the DPM you can create high-quality digital recordings. To make a recording, do the following:
1. Make sure that the 4-Position Switch is in the Stop position and that you have the memory card inserted.
2. Press the REC button; the device goes into Record Standby mode.
While the device is in Record Standby mode, the Record LED blinks red.
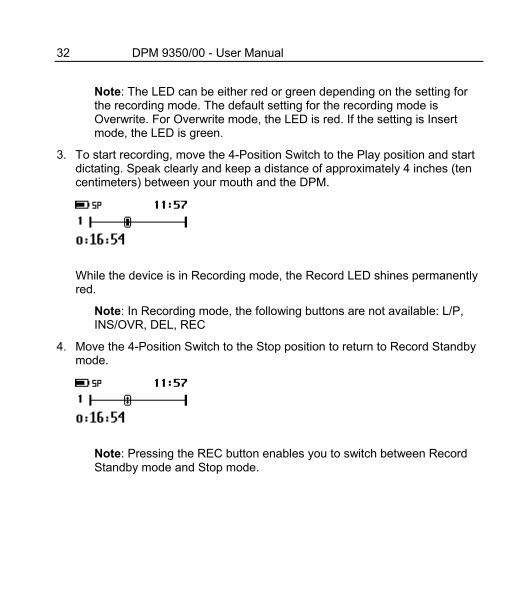
32 DPM 9350/00 - User Manual
Note: The LED can be either red or green depending on the setting for the recording mode. The default setting for the recording mode is Overwrite. For Overwrite mode, the LED is red. If the setting is Insert mode, the LED is green.
3. To start recording, move the 4-Position Switch to the Play position and start dictating. Speak clearly and keep a distance of approximately 4 inches (ten centimeters) between your mouth and the DPM.
While the device is in Recording mode, the Record LED shines permanently red.
Note: In Recording mode, the following buttons are not available: L/P, INS/OVR, DEL, REC
4. Move the 4-Position Switch to the Stop position to return to Record Standby mode.
Note: Pressing the REC button enables you to switch between Record Standby mode and Stop mode.
Chapter 4: Basic Operations 33
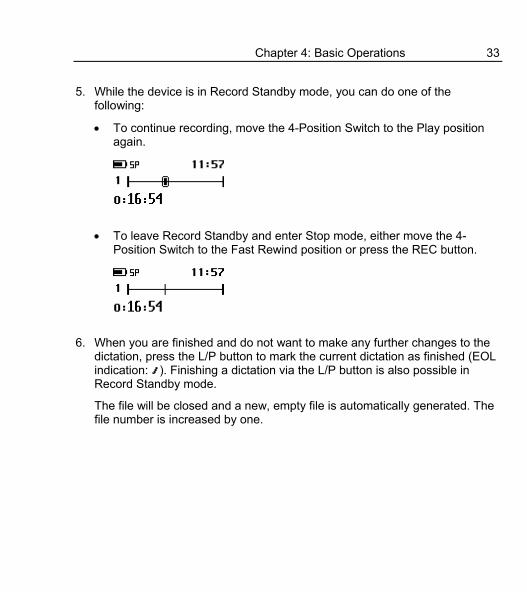
5. While the device is in Record Standby mode, you can do one of the following:
• To continue recording, move the 4-Position Switch to the Play position again.
• To leave Record Standby and enter Stop mode, either move the 4-
Position Switch to the Fast Rewind position or press the REC button.
6. When you are finished and do not want to make any further changes to the
dictation, press the L/P button to mark the current dictation as finished (EOL indication: ). Finishing a dictation via the L/P button is also possible in Record Standby mode.
The file will be closed and a new, empty file is automatically generated. The file number is increased by one.
34 DPM 9350/00 - User Manual
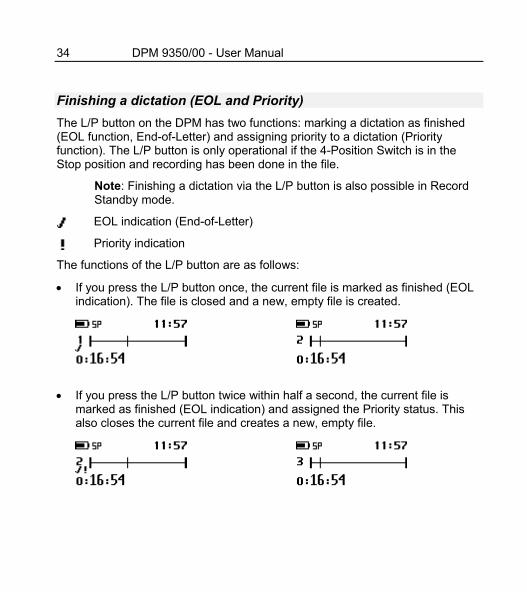
Finishing a dictation (EOL and Priority) The L/P button on the DPM has two functions: marking a dictation as finished (EOL function, End-of-Letter) and assigning priority to a dictation (Priority function). The L/P button is only operational if the 4-Position Switch is in the Stop position and recording has been done in the file.
Note: Finishing a dictation via the L/P button is also possible in Record Standby mode.
EOL indication (End-of-Letter)
Priority indication
The functions of the L/P button are as follows:
• If you press the L/P button once, the current file is marked as finished (EOL indication). The file is closed and a new, empty file is created.
• If you press the L/P button twice within half a second, the current file is
marked as finished (EOL indication) and assigned the Priority status. This also closes the current file and creates a new, empty file.
Chapter 4: Basic Operations 35
Note: If you have finished a file with the EOL indication, no further recording is possible in this file. It is also not possible to delete the file or to delete a section from the file.
Removing EOL and Priority from a file
To remove the EOL indication or Priority assignment from a dictation, do the following:
1. Make sure the 4-Position Switch is in the Stop position.
2. Go to the respective file by moving the Jog Dial up or down.
3. To confirm the file selection and access the file, press the Jog Dial.
4. To either remove the EOL indication or the Priority assignment, do one of the following:
• To remove the EOL indication, press the L/P button once.
• To remove the Priority status, press the L/P button twice within half a second.
36 DPM 9350/00 - User Manual
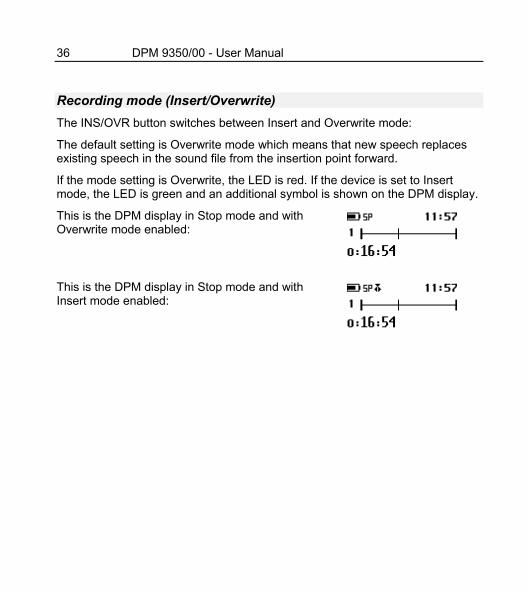
Recording mode (Insert/Overwrite) The INS/OVR button switches between Insert and Overwrite mode:
The default setting is Overwrite mode which means that new speech replaces existing speech in the sound file from the insertion point forward.
If the mode setting is Overwrite, the LED is red. If the device is set to Insert mode, the LED is green and an additional symbol is shown on the DPM display.
This is the DPM display in Stop mode and with Overwrite mode enabled:
This is the DPM display in Stop mode and with Insert mode enabled:
Chapter 4: Basic Operations 37
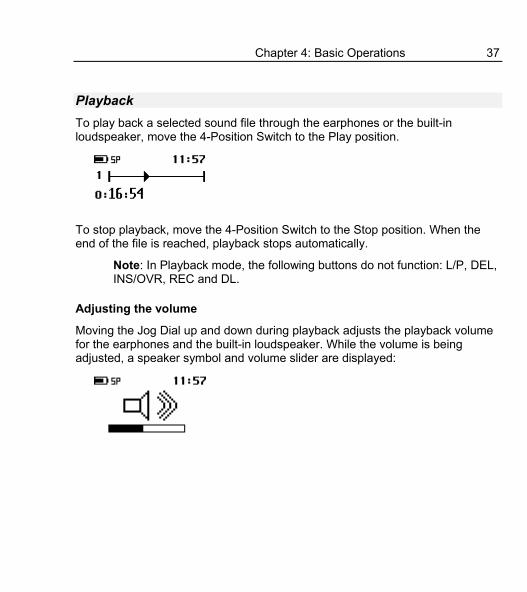
Playback To play back a selected sound file through the earphones or the built-in loudspeaker, move the 4-Position Switch to the Play position.
To stop playback, move the 4-Position Switch to the Stop position. When the end of the file is reached, playback stops automatically.
Note: In Playback mode, the following buttons do not function: L/P, DEL, INS/OVR, REC and DL.
Adjusting the volume
Moving the Jog Dial up and down during playback adjusts the playback volume for the earphones and the built-in loudspeaker. While the volume is being adjusted, a speaker symbol and volume slider are displayed:
38 DPM 9350/00 - User Manual
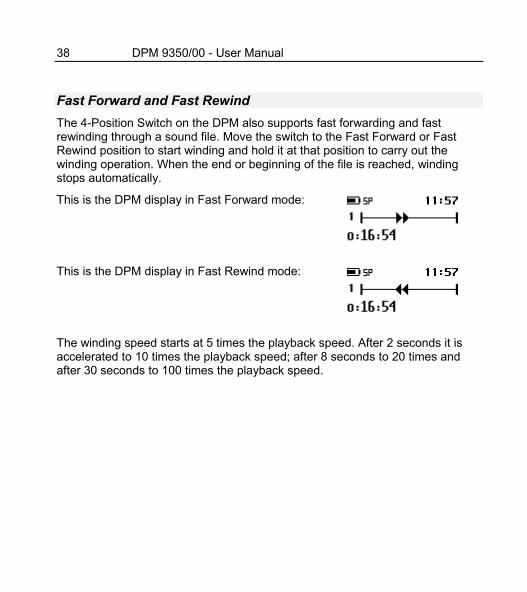
Fast Forward and Fast Rewind The 4-Position Switch on the DPM also supports fast forwarding and fast rewinding through a sound file. Move the switch to the Fast Forward or Fast Rewind position to start winding and hold it at that position to carry out the winding operation. When the end or beginning of the file is reached, winding stops automatically.
This is the DPM display in Fast Forward mode:
This is the DPM display in Fast Rewind mode:
The winding speed starts at 5 times the playback speed. After 2 seconds it is accelerated to 10 times the playback speed; after 8 seconds to 20 times and after 30 seconds to 100 times the playback speed.
Chapter 4: Basic Operations 39
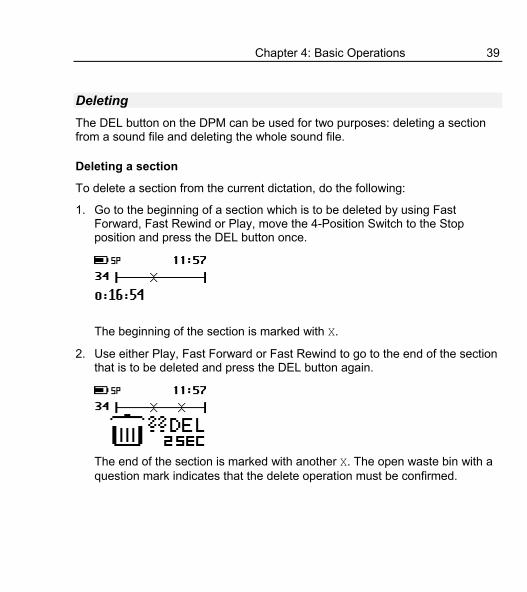
Deleting The DEL button on the DPM can be used for two purposes: deleting a section from a sound file and deleting the whole sound file.
Deleting a section
To delete a section from the current dictation, do the following:
1. Go to the beginning of a section which is to be deleted by using Fast Forward, Fast Rewind or Play, move the 4-Position Switch to the Stop position and press the DEL button once.
The beginning of the section is marked with X.
2. Use either Play, Fast Forward or Fast Rewind to go to the end of the section that is to be deleted and press the DEL button again.
The end of the section is marked with another X. The open waste bin with a question mark indicates that the delete operation must be confirmed.
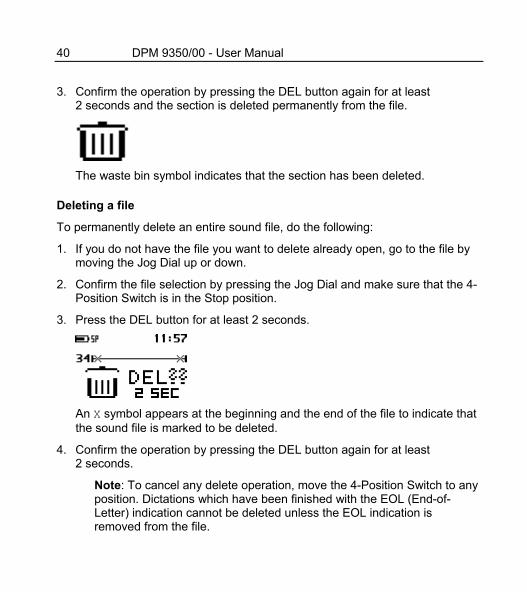
40 DPM 9350/00 - User Manual 3. Confirm the operation by pressing the DEL button again for at least
2 seconds and the section is deleted permanently from the file.
The waste bin symbol indicates that the section has been deleted.
Deleting a file
To permanently delete an entire sound file, do the following:
1. If you do not have the file you want to delete already open, go to the file by moving the Jog Dial up or down.
2. Confirm the file selection by pressing the Jog Dial and make sure that the 4-Position Switch is in the Stop position.
3. Press the DEL button for at least 2 seconds.
An X symbol appears at the beginning and the end of the file to indicate that the sound file is marked to be deleted.
4. Confirm the operation by pressing the DEL button again for at least 2 seconds.
Note: To cancel any delete operation, move the 4-Position Switch to any position. Dictations which have been finished with the EOL (End-of-Letter) indication cannot be deleted unless the EOL indication is removed from the file.

Chapter 4: Basic Operations 41
Recording format (Standard Play/Long Play) The recording format (Standard Play and Long Play) determines the recording speed and audio quality of the recorded sound files..
Standard Play mode
Long Play mode
The default setting is Standard Play (SP). For more information on changing this setting, refer to the corresponding DPM menu section in this manual.
Note: Only one format can be selected for each file; the format for a file can be changed as long as no recording has been done in the file.
After recording has been done in the file, it is possible to switch between the Standard Play and Long Play audio format on the DPM display. This change will not take effect for the current file but from the next new file onwards. From that point on, any new files are recorded in the selected audio format until the setting is changed again.
The values for the two formats are as follows:
Standard Play (SP) 13.7 kbit/s With this format, about 156 minutes of recording time are available on a 16 MB memory card. This recording format provides excellent audio quality. It is recommended when the dictation sound files are used, for example, for speech recognition.
Long Play (LP) 9.1 kbit/s This recording format provides good audio quality. With this format, about 234 minutes of recording time are available on a 16 MB memory card.
42 DPM 9350/00 - User Manual
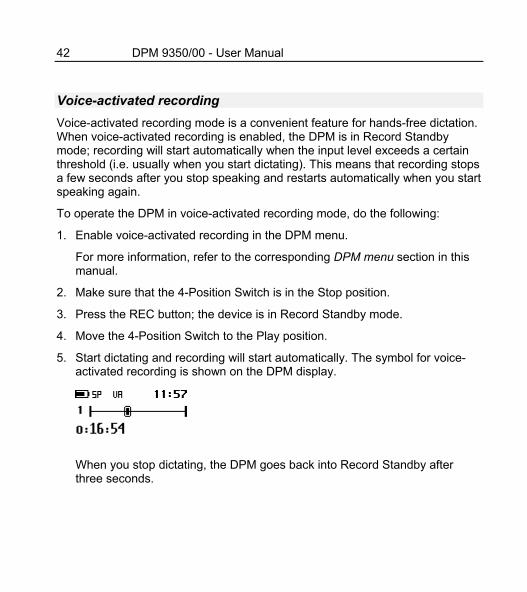
Voice-activated recording Voice-activated recording mode is a convenient feature for hands-free dictation. When voice-activated recording is enabled, the DPM is in Record Standby mode; recording will start automatically when the input level exceeds a certain threshold (i.e. usually when you start dictating). This means that recording stops a few seconds after you stop speaking and restarts automatically when you start speaking again.
To operate the DPM in voice-activated recording mode, do the following:
1. Enable voice-activated recording in the DPM menu.
For more information, refer to the corresponding DPM menu section in this manual.
2. Make sure that the 4-Position Switch is in the Stop position.
3. Press the REC button; the device is in Record Standby mode.
4. Move the 4-Position Switch to the Play position.
5. Start dictating and recording will start automatically. The symbol for voice-activated recording is shown on the DPM display.
When you stop dictating, the DPM goes back into Record Standby after three seconds.
Chapter 4: Basic Operations 43
Skip Forward and Skip Back The Jog Dial on the DPM supports a skip function for moving between files:
Before you move the Jog Dial up or down, make sure that the 4-Position Switch is in the Stop position:
• Moving the Jog Dial up skips to the end of the current file. Then, moving the Jog Dial up will always skip to the end of the next file.
For example, the current file number is 5. Moving the Jog Dial up goes to the end of file number 5. Moving the Jog Dial further up goes to the end of file number 6, then to the end of file number 7, and so on.
• Moving the Jog Dial down skips to the beginning of the current file. Then, moving the Jog Dial down will always skip to the beginning of the previous file.
For example, the current file number is 5. Moving the Jog Dial down goes to the beginning of file number 5. Moving the Jog Dial further down goes to the beginning of file number 4, then to the beginning of file number 3, and so on.
When you want to continue working on a specific file, confirm the file selection by pressing the Jog Dial.
Note: When you skip forward and the last file is reached, a new empty file is created automatically.
If you do not move the Jog Dial for more than 2 seconds, the DPM returns to the position prior to moving the Jog Dial.
44 DPM 9350/00 - User Manual
Chapter 5: Advanced Operations This chapter introduces you to some of the more advanced aspects of the DPM:
• Entering user-defined labels
• Assigning Keywords
• Transferring data between the DPM and a PC
Note: These functions are only available when using the DPM 9350/00 together with DPM Download/Configuration program.
Entering user-defined labels A user-defined label is an alphanumeric string which can have up to 13 characters. Such a label is entered directly on the DPM. If and how many user-defined labels can be entered depends on the corresponding setting in the DPM Download/Configuration program. For more information, refer to the Online Help delivered with the program.
When entering user-defined labels on the DPM you can use the characters A-Z and the numbers 0-9; spaces are also allowed.
Chapter 5: Advanced Operations 45
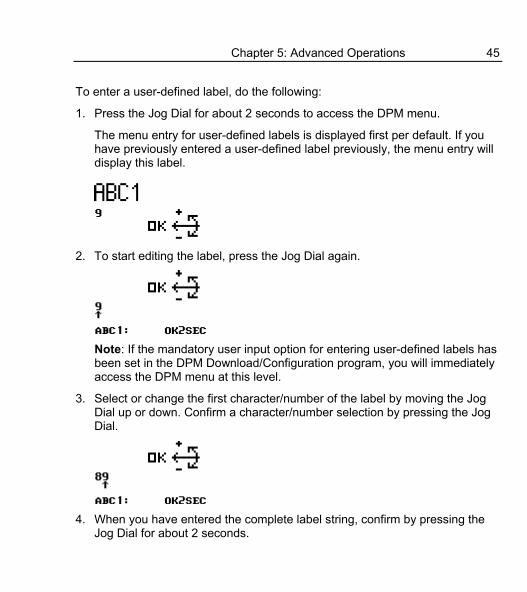
To enter a user-defined label, do the following:
1. Press the Jog Dial for about 2 seconds to access the DPM menu.
The menu entry for user-defined labels is displayed first per default. If you have previously entered a user-defined label previously, the menu entry will display this label.
2. To start editing the label, press the Jog Dial again.
Note: If the mandatory user input option for entering user-defined labels has been set in the DPM Download/Configuration program, you will immediately access the DPM menu at this level.
3. Select or change the first character/number of the label by moving the Jog Dial up or down. Confirm a character/number selection by pressing the Jog Dial.
4. When you have entered the complete label string, confirm by pressing the
Jog Dial for about 2 seconds.
46 DPM 9350/00 - User Manual Additional information
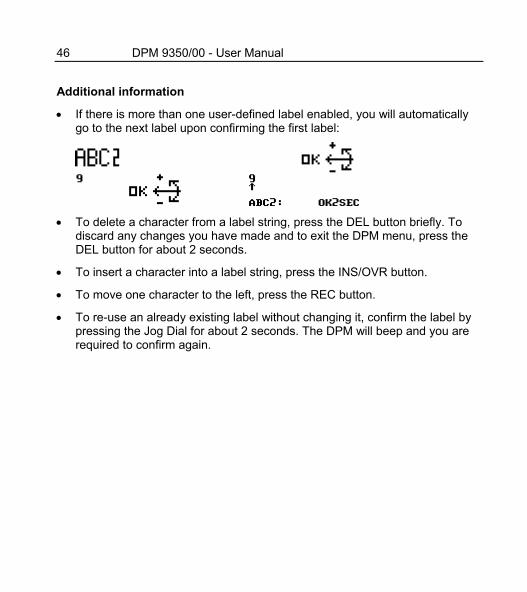
• If there is more than one user-defined label enabled, you will automatically go to the next label upon confirming the first label:
• To delete a character from a label string, press the DEL button briefly. To
discard any changes you have made and to exit the DPM menu, press the DEL button for about 2 seconds.
• To insert a character into a label string, press the INS/OVR button.
• To move one character to the left, press the REC button.
• To re-use an already existing label without changing it, confirm the label by pressing the Jog Dial for about 2 seconds. The DPM will beep and you are required to confirm again.
Chapter 5: Advanced Operations 47
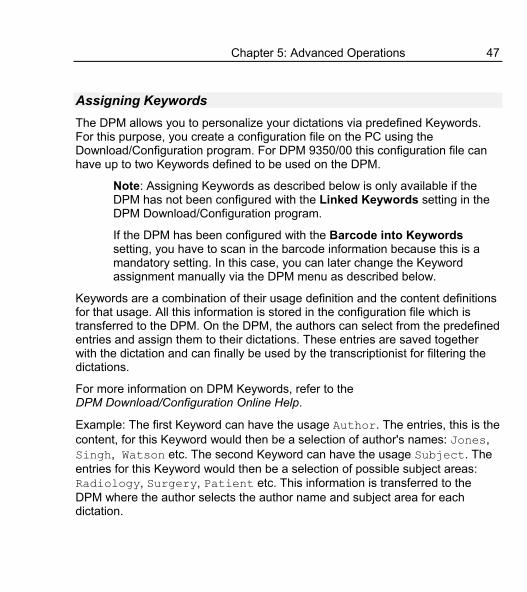
Assigning Keywords The DPM allows you to personalize your dictations via predefined Keywords. For this purpose, you create a configuration file on the PC using the Download/Configuration program. For DPM 9350/00 this configuration file can have up to two Keywords defined to be used on the DPM.
Note: Assigning Keywords as described below is only available if the DPM has not been configured with the Linked Keywords setting in the DPM Download/Configuration program.
If the DPM has been configured with the Barcode into Keywords setting, you have to scan in the barcode information because this is a mandatory setting. In this case, you can later change the Keyword assignment manually via the DPM menu as described below.
Keywords are a combination of their usage definition and the content definitions for that usage. All this information is stored in the configuration file which is transferred to the DPM. On the DPM, the authors can select from the predefined entries and assign them to their dictations. These entries are saved together with the dictation and can finally be used by the transcriptionist for filtering the dictations.
For more information on DPM Keywords, refer to the DPM Download/Configuration Online Help.
Example: The first Keyword can have the usage Author. The entries, this is the content, for this Keyword would then be a selection of author's names: Jones, Singh, Watson etc. The second Keyword can have the usage Subject. The entries for this Keyword would then be a selection of possible subject areas: Radiology, Surgery, Patient etc. This information is transferred to the DPM where the author selects the author name and subject area for each dictation.
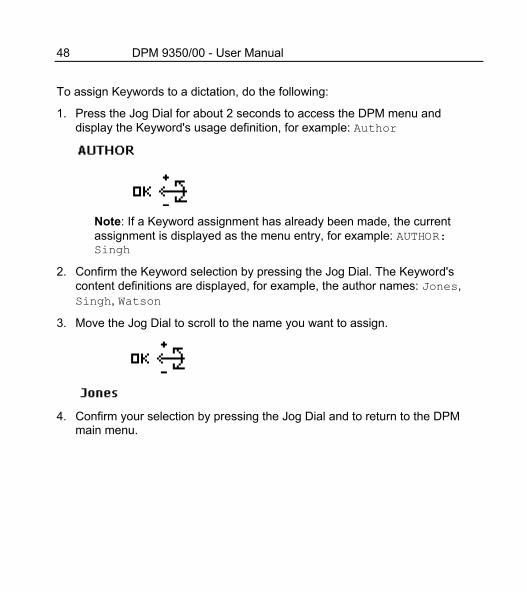
48 DPM 9350/00 - User Manual To assign Keywords to a dictation, do the following:
1. Press the Jog Dial for about 2 seconds to access the DPM menu and display the Keyword's usage definition, for example: Author
Note: If a Keyword assignment has already been made, the current assignment is displayed as the menu entry, for example: AUTHOR: Singh
2. Confirm the Keyword selection by pressing the Jog Dial. The Keyword's content definitions are displayed, for example, the author names: Jones, Singh, Watson
3. Move the Jog Dial to scroll to the name you want to assign.
4. Confirm your selection by pressing the Jog Dial and to return to the DPM
main menu.
Chapter 5: Advanced Operations 49
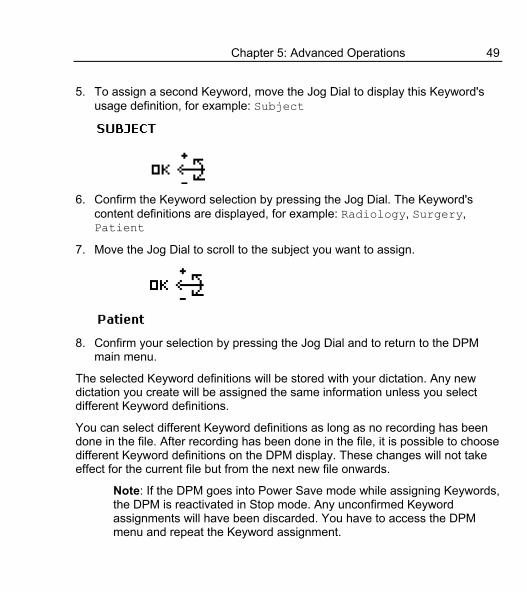
5. To assign a second Keyword, move the Jog Dial to display this Keyword's usage definition, for example: Subject
6. Confirm the Keyword selection by pressing the Jog Dial. The Keyword's
content definitions are displayed, for example: Radiology, Surgery, Patient
7. Move the Jog Dial to scroll to the subject you want to assign.
8. Confirm your selection by pressing the Jog Dial and to return to the DPM
main menu.
The selected Keyword definitions will be stored with your dictation. Any new dictation you create will be assigned the same information unless you select different Keyword definitions.
You can select different Keyword definitions as long as no recording has been done in the file. After recording has been done in the file, it is possible to choose different Keyword definitions on the DPM display. These changes will not take effect for the current file but from the next new file onwards.
Note: If the DPM goes into Power Save mode while assigning Keywords, the DPM is reactivated in Stop mode. Any unconfirmed Keyword assignments will have been discarded. You have to access the DPM menu and repeat the Keyword assignment.
50 DPM 9350/00 - User Manual
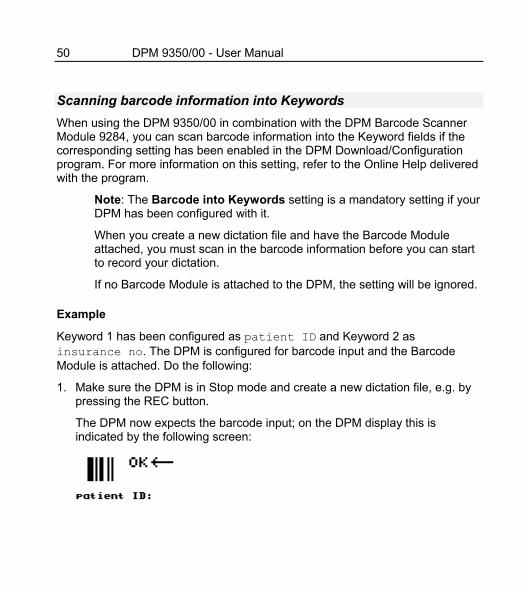
Scanning barcode information into Keywords When using the DPM 9350/00 in combination with the DPM Barcode Scanner Module 9284, you can scan barcode information into the Keyword fields if the corresponding setting has been enabled in the DPM Download/Configuration program. For more information on this setting, refer to the Online Help delivered with the program.
Note: The Barcode into Keywords setting is a mandatory setting if your DPM has been configured with it.
When you create a new dictation file and have the Barcode Module attached, you must scan in the barcode information before you can start to record your dictation.
If no Barcode Module is attached to the DPM, the setting will be ignored.
Example
Keyword 1 has been configured as patient ID and Keyword 2 as insurance no. The DPM is configured for barcode input and the Barcode Module is attached. Do the following:
1. Make sure the DPM is in Stop mode and create a new dictation file, e.g. by pressing the REC button.
The DPM now expects the barcode input; on the DPM display this is indicated by the following screen:
Chapter 5: Advanced Operations 51
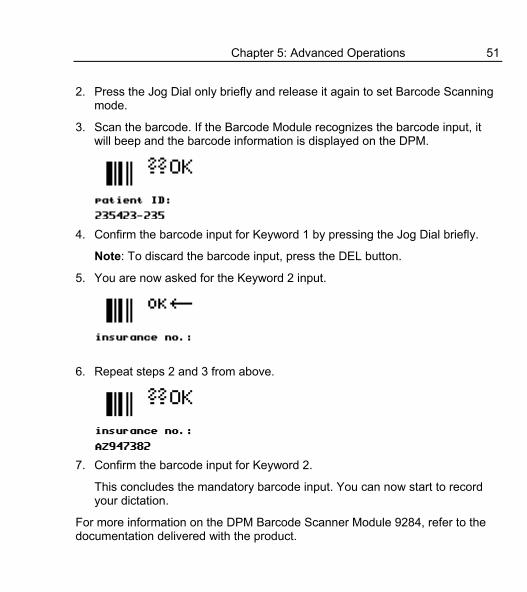
2. Press the Jog Dial only briefly and release it again to set Barcode Scanning mode.
3. Scan the barcode. If the Barcode Module recognizes the barcode input, it will beep and the barcode information is displayed on the DPM.
4. Confirm the barcode input for Keyword 1 by pressing the Jog Dial briefly.
Note: To discard the barcode input, press the DEL button.
5. You are now asked for the Keyword 2 input.
6. Repeat steps 2 and 3 from above.
7. Confirm the barcode input for Keyword 2.
This concludes the mandatory barcode input. You can now start to record your dictation.
For more information on the DPM Barcode Scanner Module 9284, refer to the documentation delivered with the product.
52 DPM 9350/00 - User Manual
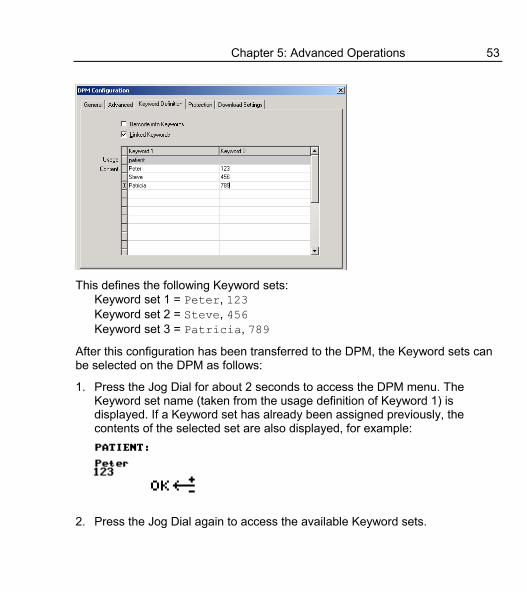
Linked Keywords When the Linked Keywords setting is enabled in the DPM Download/Configuration program and the DPM has been configured with this setting, you can transfer sets of Keyword strings to the DPM. These sets can then be selected on the DPM and assigned to a dictation file.
A Keyword set is the sum of all content definitions which have been made in the DPM Download/Configuration program in the same row (see below). The name of the Keyword set is taken from the usage definition of Keyword 1; this name is also displayed on the DPM when you enter the DPM menu. The usage definitions of any other Keywords are ignored.
Example
The usage definition of Keyword 1 is patient; the content definitions of the Keyword 1 column are patient names, the content definitions of the Keyword 2 column are the patient IDs. In this example, a Keyword set thus combines a patient name with the patient ID.
The Keyword Definition tab in the DPM Download/Configuration program is as follows:
Chapter 5: Advanced Operations 53
This defines the following Keyword sets:
Keyword set 1 = Peter, 123 Keyword set 2 = Steve, 456 Keyword set 3 = Patricia, 789
After this configuration has been transferred to the DPM, the Keyword sets can be selected on the DPM as follows:
1. Press the Jog Dial for about 2 seconds to access the DPM menu. The Keyword set name (taken from the usage definition of Keyword 1) is displayed. If a Keyword set has already been assigned previously, the contents of the selected set are also displayed, for example:
2. Press the Jog Dial again to access the available Keyword sets.
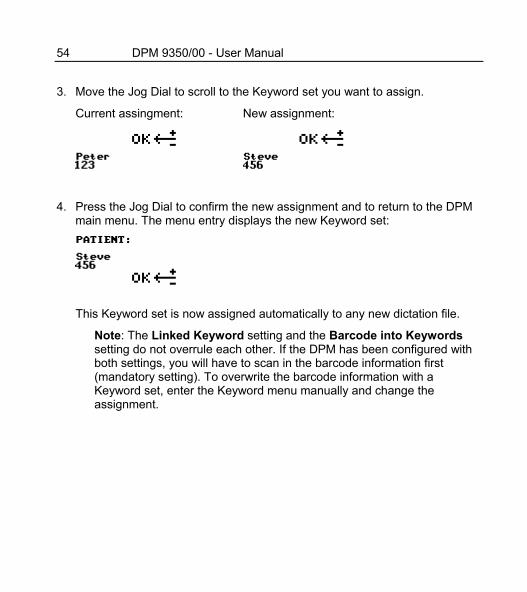
54 DPM 9350/00 - User Manual 3. Move the Jog Dial to scroll to the Keyword set you want to assign.
Current assingment: New assignment:
4. Press the Jog Dial to confirm the new assignment and to return to the DPM
main menu. The menu entry displays the new Keyword set:
This Keyword set is now assigned automatically to any new dictation file.
Note: The Linked Keyword setting and the Barcode into Keywords setting do not overrule each other. If the DPM has been configured with both settings, you will have to scan in the barcode information first (mandatory setting). To overwrite the barcode information with a Keyword set, enter the Keyword menu manually and change the assignment.
Chapter 5: Advanced Operations 55
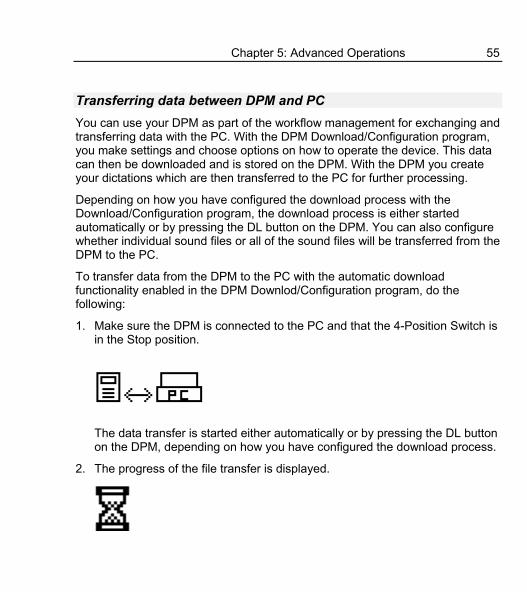
Transferring data between DPM and PC You can use your DPM as part of the workflow management for exchanging and transferring data with the PC. With the DPM Download/Configuration program, you make settings and choose options on how to operate the device. This data can then be downloaded and is stored on the DPM. With the DPM you create your dictations which are then transferred to the PC for further processing.
Depending on how you have configured the download process with the Download/Configuration program, the download process is either started automatically or by pressing the DL button on the DPM. You can also configure whether individual sound files or all of the sound files will be transferred from the DPM to the PC.
To transfer data from the DPM to the PC with the automatic download functionality enabled in the DPM Downlod/Configuration program, do the following:
1. Make sure the DPM is connected to the PC and that the 4-Position Switch is in the Stop position.
The data transfer is started either automatically or by pressing the DL button on the DPM, depending on how you have configured the download process.
2. The progress of the file transfer is displayed.
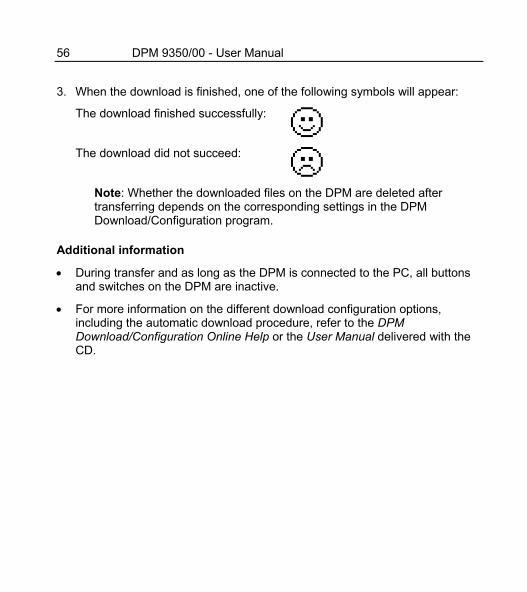
56 DPM 9350/00 - User Manual 3. When the download is finished, one of the following symbols will appear:
The download finished successfully:
The download did not succeed:
Note: Whether the downloaded files on the DPM are deleted after transferring depends on the corresponding settings in the DPM Download/Configuration program.
Additional information
• During transfer and as long as the DPM is connected to the PC, all buttons and switches on the DPM are inactive.
• For more information on the different download configuration options, including the automatic download procedure, refer to the DPM Download/Configuration Online Help or the User Manual delivered with the CD.
Appendix: Troubleshooting the DPM 57
Appendix: Troubleshooting the DPM If you have problems with your DPM, please try the following before you contact your vendor.
Resetting the DPM
To reset the DPM, remove the batteries from the device. Wait for at least 5 seconds before you re-insert the batteries. This will restore the factory settings. Any personal settings on the device will be lost but you do not lose any data saved on the memory card.
DPM warnings
If the DPM displays this warning screen, the problem could be one of the following:
• The memory card cannot be read. Try a different memory card or a different type of memory card.
• The memory card is not formatted or corrupted.
• One of the DPM buttons could be stuck.
58 DPM 9350/00 - User Manual
Index
4 4-Position Switch
Fast Forward position, 38 Fast Rewind position, 38 Lock/Hold switch, 10 Playback, 37
A Advanced display, 15 Advanced operations, 44 Appearance, 15 Assign
Keywords, 19 Authors, 47 Automatic recording, 25, 42
B Backlight, 26 Barcode into Keywords, 50 Barcode scanning, 50 Basics, 31 Batteries, 8
Recharge, 9 Beep, 23 Button
DEL, 39 EOL, 34 INS/OVR, 36 L/P, 34 Priority, 34 REC, 31
C Card, 11 Configuration file, 47 Configuration program, 55 Contrast, 27
D Data transfer, 55 Date, 20 DEL, 39 DEL button, 39 Delete
File, 40 Section, 39
Delete operations, 39 Dictation
Create, 31 Display, 7 Download program, 55 DPM
Activate, 10 Batteries, 8 Formatting the memory card, 12 Graphic, 3 Keywords, 47 Memory card, 11 Overview, 3 Reset, 57
DPM display, 15, 26, 27, 28 DPM Download/Configuration, 55 DPM menu, 16, 18, 19, 20, 22, 23, 24,
25, 26, 27, 28, 29
Index 59
E End-of-Letter button, 34 Entering user-defined labels, 44 EOL, 34 EOL button, 34
F Fast Forward, 38 Fast Rewind, 38 Features, 1 File
Delete, 40 Skip Back, 43 Skip Forward, 43
First steps, 31 Format for recording
Long Play, 41 Standard Play, 41
Formatting Memory card, 12
G Getting started, 10 Graphic
DPM, 3
I INS/OVR, 36 INS/OVR button, 36 Insert
Memory card, 11 Insert mode, 36 Introduction, 1
J Jog Dial, 16
Keywords, 48 Skip Back, 43
Skip Forward, 43 Volume, 37
K Keywords, 47
Barcode information, 50 DPM menu, 19 Linked, 52
L L/P, 34 L/P button, 34 Label, 44 LCD display, 7 LED
Green, 36 Red, 36
Linked Keywords, 52 Lock/Hold switch, 10 Long Play, 22, 41
M Memory card, 11
Format, 12 Insert, 11 Reformat, 29
Menu, 16 Backlight, 26 Contrast, 27 Date and time, 20 Device beep, 23 Keywords, 19 Microphone sensitivity, 24 Recording time, 28 Reformatting the memory card, 29 SP/LP, 22 User-defined label, 18 Voice-activated recording, 25
60 DPM 9350/00 - User Manual Microphone sensitivity, 24 MMC, 11 Mode
Insert, 36 Overwrite, 36 Power Save, 30 Record Standby, 31
O Operations
Advanced, 44 Basic, 31
Overwrite mode, 36
P Package contents, 2 Playback, 37 Power Save mode, 30 Priority, 34 Priority button, 34 Program
DPM Download/Configuration, 47, 55
R REC, 31 REC button, 31 Recharge
Batteries, 9 Record Standby, 31 Recording, 31 Recording format
Long Play, 22, 41 Standard Play, 22, 41
Recording mode Insert, 36 Overwrite, 36
Recording time, 28
Reformat Memory card, 29
Reset DPM, 57
S Scan
Barcode, 50 SD, 11 Section (sound file)
Delete, 39 Skip Back, 43 Skip Forward, 43 Software
DPM Download/configuration, 47 DPM Download/Configuration, 55
Sound file Delete - file, 40 Delete section, 39 Playback, 37 Skip Back, 43 Skip Forward, 43
Sound file format Long Play, 22, 41 Standard Play, 22, 41
SP/LP, 22, 41 Standard display, 15 Standard Play, 22, 41 Start screen, 13 Symbols, 7
T Time, 20 Transfer
Data, 55 Troubleshooting, 57
Index 61
U User-defined label, 44
DPM menu, 18
V VA, 25, 42 Voice-activated recording, 25, 42 Volume, 37
W Warnings, 57 Winding, 38 Workflow management, 55

62 DPM 9350/00 - User Manual

Index 63

Printed in Austria 5103 109 9548.3