drobo how-to guide · drobo how-to guide use a drobo iscsi array with a linux server | use a drobo...
TRANSCRIPT

Drobo How-To Guide Use a Drobo iSCSI Array with a Linux Server
www.drobo.com | Use a Drobo iSCSI Array with a Linux Server 1
In today’s IT environments, administrators need to learn and understand how to make all of the components that provide services to their users work together. These components include network devices, servers, applications, security models, backup and recovery plans, storage, and operating systems among others. When it comes to operating systems, there are many flavors to choose from. Some offer features over security, while others seem to be more popular with end users because of their ease-of-use.
The Linux operating system has evolved over time, distinguishing itself from the old and complicated, yet robust and highly secure UNIX. This makes Linux more attractive to both the novice and expert IT administrator, which in turn means that Linux is seen more and more—not only in enterprise environments but also in the small and medium business space.
Drobo understands that our customers’ needs are many and different based on their environment. This being true, IT Administrators can take advantage of the ease-of-use of Drobo® BeyondRAID™ technology, and implement an iSCSI SAN storage array in a heterogeneous server environment. Multiple types of operating systems can consolidate their storage needs on a single Drobo iSCSI SAN storage array. The Drobo B1200i is shown below.
Topics Creating a Drobo iSCSI volume with Drobo Dashboard
Using Open-iSCSI to connect to the Drobo iSCSI volume
Use RedHat Disk Utility to format a Drobo iSCSI volume
Use RedHat command line (CLI) to format a Drobo iSCSI volume
What You Will Need • Drobo model B1200i
• Drobo Dashboard management software (most recent version)
• Enterprise-grade 7200 RPM SAS or SATA disk drives (recommended)
• RedHat Linux 6.0 or later
Before going any further, take some time to go over the basic principles of Linux with Drobo. A Drobo iSCSI array is a hardware iSCSI device (target) that presents its resources as block/raw devices over Ethernet networks. This is at the core of iSCSI, in which operating systems and applications (initiators) that require low-level file-system access can not only take advantage of block-level devices over Ethernet, but can also consolidate mass storage requirements in storage devices such as a Drobo iSCSI SAN storage array. Therefore pay special attention to how the Linux operating system assigns block-level devices and their naming and numbering.

Drobo How-To Guide Use a Drobo iSCSI Array with a Linux Server
www.drobo.com | Use a Drobo iSCSI Array with a Linux Server 2
Creating a Drobo iSCSI Volume with Drobo Dashboard Drobo Dashboard is the software used to manage and create volumes on Drobo devices. Note that this software is compatible with Windows and Mac but not Linux. Therefore you need to configure and create volumes using Drobo Dashboard on one of the supported operating systems. However, you can mount and use a Drobo iSCSI volume from within RedHat Linux, which is the purpose of this document.
Follow the directions in the Drobo Online User Guide to configure the Drobo: www.drobo.com/support/documentation.php and to learn more about Drobo and iSCSI, visit: www.drobo.com/resources/iscsi.php
STEP 1
Launch Drobo Dashboard and browse to the Volumes section to create a volume to be used by RedHat Linux. Click Add volume to start the process.
NOTE: Even when volumes already exist, you can still create several more volumes using Drobo Dashboard (up to 256 for the B1200i). Some iSCSI volumes can be accessed by a single host, which is the case of NTFS, HFS+, and ext3; while other iSCSI volumes can be accessed by several simultaneous hosts, such as VMware and XenServer iSCSI volumes.

Drobo How-To Guide Use a Drobo iSCSI Array with a Linux Server
www.drobo.com | Use a Drobo iSCSI Array with a Linux Server 3
STEP 2
When prompted for the format type, select None and click Next.
STEP 3
As an example a 16TB volume will be created, (although smaller volumes can be created). Click Finish.

Drobo How-To Guide Use a Drobo iSCSI Array with a Linux Server
www.drobo.com | Use a Drobo iSCSI Array with a Linux Server 4
NOTE: Drobo volumes are thinly provisioned, so you can create a volume larger than the storage you currently have and seamlessly scale available storage by adding additional drives to the Drobo. For more information, see the Drobo Online User Guide at www.drobo.com/support/documentation.php.
STEP 4
Drobo Dashboard is now ready to create the volume.
If you want to create more volumes, follow the previous steps and click Apply to create the volumes.

Drobo How-To Guide Use a Drobo iSCSI Array with a Linux Server
www.drobo.com | Use a Drobo iSCSI Array with a Linux Server 5
STEP 5
When you are prompted to apply the management setting, click Yes.
Be sure to pay extra attention if you deleted any volumes.
STEP 6
When a message tells you that the volume management changes have taken effect, click OK.

Drobo How-To Guide Use a Drobo iSCSI Array with a Linux Server
www.drobo.com | Use a Drobo iSCSI Array with a Linux Server 6
STEP 7
Now that the volume has been created, record the highlighted Target Name information, (you can copy and paste it).
This information will help you track the iSCSI volume when you mount it in RedHat Linux.
Using Open-iSCSI to Connect to the Drobo iSCSI Volume CAUTION: It is important that block-level/raw devices are mounted and dismounted gracefully, not only on iSCSI volumes but on local volumes/partitions as well. Failing to do so can cause serious damage to the volume/partition and might require tools to analyze and repair. To understand more, read: en.wikipedia.org/wiki/Fsck
In order for RedHat Linux to connect to the Drobo iSCSI volumes, you will need to have Open-iSCSI utilities installed. If not, refer to the following website for information on how to do this go to: docs.redhat.com/docs/en-US/Red_Hat_Enterprise_Linux/6/html/Storage_Administration_Guide/ch-iscsi.html
To execute the commands in this section, you will need to have root access (log in as root) or, you can “sudo” as root:
[seadmin@RHEL-‐6 ~]$ sudo su root
STEP 1
Start by making sure that the iSCSI daemon has been started and is ready to be used:
[root@RHEL-‐6 seadmin]# /sbin/service iscsid start
[root@RHEL-‐6 seadmin]# /sbin/chkconfig iscsid on
[root@RHEL-‐6 seadmin]# /sbin/chkconfig iscsi on

Drobo How-To Guide Use a Drobo iSCSI Array with a Linux Server
www.drobo.com | Use a Drobo iSCSI Array with a Linux Server 7
STEP 2
Proceed to use iscsiadm to discover the volumes of the Drobo using the following command:
[root@RHEL-‐6 seadmin]# /sbin/iscsiadm -‐m discovery -‐t sendtargets -‐p 172.16.28.95 Starting iscsid: [ OK ] 172.16.28.95:3260,0 iqn.2005-‐06.com.drobo:b1200i.drd113301000046.id0 172.16.28.96:3260,0 iqn.2005-‐06.com.drobo:b1200i.drd113301000046.id0 172.16.28.97:3260,0 iqn.2005-‐06.com.drobo:b1200i.drd113301000046.id0 172.16.28.95:3260,0 iqn.2005-‐06.com.drobo:b1200i.drd113301000046.id1 172.16.28.96:3260,0 iqn.2005-‐06.com.drobo:b1200i.drd113301000046.id1 172.16.28.97:3260,0 iqn.2005-‐06.com.drobo:b1200i.drd113301000046.id1 172.16.28.95:3260,0 iqn.2005-‐06.com.drobo:b1200i.drd113301000046.id2 172.16.28.96:3260,0 iqn.2005-‐06.com.drobo:b1200i.drd113301000046.id2 172.16.28.97:3260,0 iqn.2005-‐06.com.drobo:b1200i.drd113301000046.id2 172.16.28.95:3260,0 iqn.2005-‐06.com.drobo:b1200i.drd113301000046.id3 172.16.28.96:3260,0 iqn.2005-‐06.com.drobo:b1200i.drd113301000046.id3 172.16.28.97:3260,0 iqn.2005-‐06.com.drobo:b1200i.drd113301000046.id3
The command above probed the Drobo to display all volumes in the iSCSI target at IP address 172.16.28.95. Since you recorded the volume information as you were creating the volume using Drobo Dashboard, you can identify the volume in the output, in this case:
iqn.2005-‐06.com.drobo:b1200i.drd113301000046.id3
Notice from the result above that the command displays multiple id3 volumes:
172.16.28.95:3260,0 iqn.2005-‐06.com.drobo:b1200i.drd113301000046.id3 172.16.28.96:3260,0 iqn.2005-‐06.com.drobo:b1200i.drd113301000046.id3 172.16.28.97:3260,0 iqn.2005-‐06.com.drobo:b1200i.drd113301000046.id3
They all refer to the same iSCSI volume; the volume is accessible through different paths, one per interface of the Drobo B1200i. Do not attempt to mount the same volume through multiple interfaces, as that might corrupt the data of the volume. Multiple paths are handled using multipathing (MPIO), which is not discussed in this document.
Drobo How-To Guide Use a Drobo iSCSI Array with a Linux Server
www.drobo.com | Use a Drobo iSCSI Array with a Linux Server 8
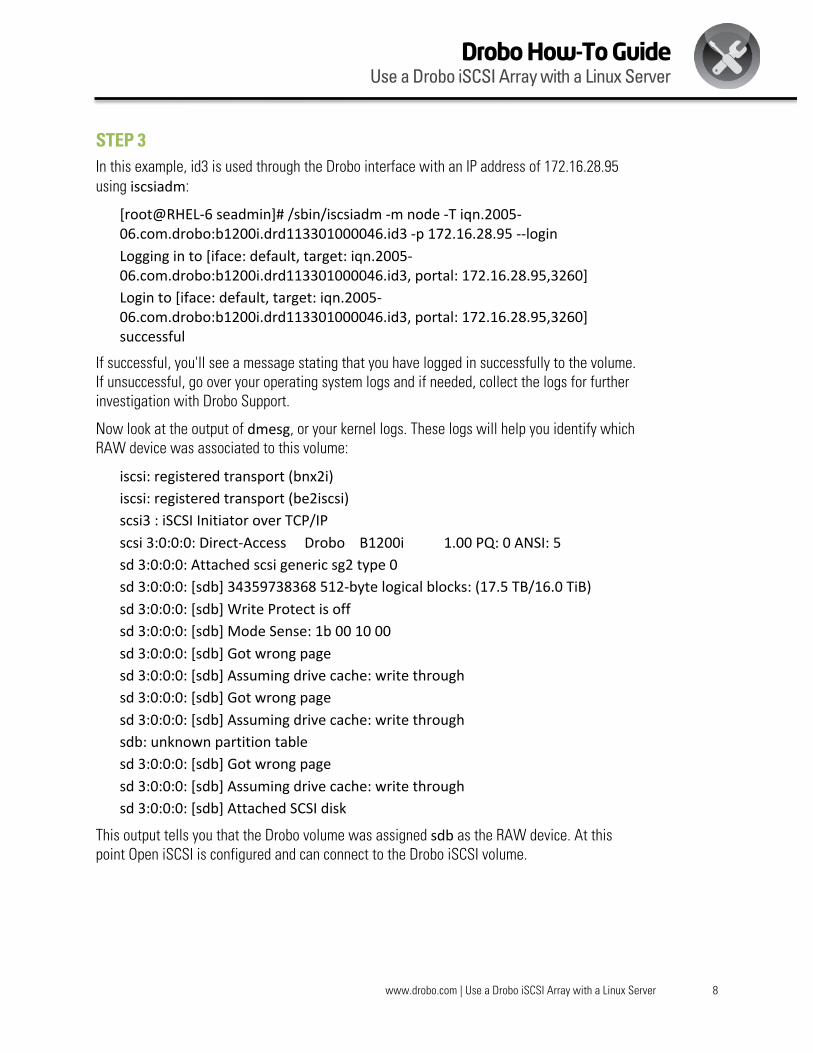
STEP 3
In this example, id3 is used through the Drobo interface with an IP address of 172.16.28.95 using iscsiadm:
[root@RHEL-‐6 seadmin]# /sbin/iscsiadm -‐m node -‐T iqn.2005-‐06.com.drobo:b1200i.drd113301000046.id3 -‐p 172.16.28.95 -‐-‐login Logging in to [iface: default, target: iqn.2005-‐06.com.drobo:b1200i.drd113301000046.id3, portal: 172.16.28.95,3260] Login to [iface: default, target: iqn.2005-‐06.com.drobo:b1200i.drd113301000046.id3, portal: 172.16.28.95,3260] successful
If successful, you'll see a message stating that you have logged in successfully to the volume. If unsuccessful, go over your operating system logs and if needed, collect the logs for further investigation with Drobo Support.
Now look at the output of dmesg, or your kernel logs. These logs will help you identify which RAW device was associated to this volume:
iscsi: registered transport (bnx2i) iscsi: registered transport (be2iscsi) scsi3 : iSCSI Initiator over TCP/IP scsi 3:0:0:0: Direct-‐Access Drobo B1200i 1.00 PQ: 0 ANSI: 5 sd 3:0:0:0: Attached scsi generic sg2 type 0 sd 3:0:0:0: [sdb] 34359738368 512-‐byte logical blocks: (17.5 TB/16.0 TiB) sd 3:0:0:0: [sdb] Write Protect is off sd 3:0:0:0: [sdb] Mode Sense: 1b 00 10 00 sd 3:0:0:0: [sdb] Got wrong page sd 3:0:0:0: [sdb] Assuming drive cache: write through sd 3:0:0:0: [sdb] Got wrong page sd 3:0:0:0: [sdb] Assuming drive cache: write through sdb: unknown partition table sd 3:0:0:0: [sdb] Got wrong page sd 3:0:0:0: [sdb] Assuming drive cache: write through sd 3:0:0:0: [sdb] Attached SCSI disk
This output tells you that the Drobo volume was assigned sdb as the RAW device. At this point Open iSCSI is configured and can connect to the Drobo iSCSI volume.

Drobo How-To Guide Use a Drobo iSCSI Array with a Linux Server
www.drobo.com | Use a Drobo iSCSI Array with a Linux Server 9
Using RedHat Disk Utility To Format a Drobo iSCSI Volume In this section, you need to have a graphical interpreter (Gnome, KDE, etc.) in your RedHat installation to:
• Initialize and set a GUID Partition Table (GTP)
• Create, format and mount an ext3 Linux volume
If you do not have a graphical interpreter, follow the instructions in the next section entitled, “Using the RedHat CLI to Format a Drobo iSCSI Volume.”
STEP 1
Start by launching Disk Utility from:
Applications-> System Tools-> Disk Utility
STEP 2
In the Disk Utility GUI, on the left side there are a number of volumes under Local Storage. Select the Drobo B1200i volume.
Notice that Device is set to /dev/sdb and that the partitioning shows Not Partitioned.
Click Format Drive in the Drive section on the right.

Drobo How-To Guide Use a Drobo iSCSI Array with a Linux Server
www.drobo.com | Use a Drobo iSCSI Array with a Linux Server 10
STEP 3
You’re prompted to define a scheme:
• Master Boot Record (MBR)
• GUID Partition Table (GPT)
• Don’t Partition
• Apple Parition Map
To use an ext3 volume larger than 2TB in RedHat Linux, select GUID Partition Table and click Format.
STEP 4
When prompted to verify that you are formatting the right drive, click Format.
The volume is now assigned /dev/sdb1 and it needs to be formatted to ext3. Click Format Volume in the Volumes section.

Drobo How-To Guide Use a Drobo iSCSI Array with a Linux Server
www.drobo.com | Use a Drobo iSCSI Array with a Linux Server 11
STEP 5
You are prompted to select a file system type. Select ext3 and make sure that the size fills the entire volume size.
Note that Drobo does not support multiple partitions in the same volume.
Give the volume a name, select ownership of the file system if you want to have file-system write-level access (and do not select Encrypt underlying device). Click Create.
NOTE: Depending on the size of the partition size and your system’s recourses, it might take a long time it takes to finish, but do not interrupt the process. Doing so will most likely require you to start the process all over again. If the process is interrupted, the partition will be unusable or unstable.
STEP 6
After the process has completed, verify that the following parameters:
• Partitioning is GUID
• Drive Device corresponds to the log output
• Type is ext3
• Volume Device is /dev/sdb1 (where 1 is the partition number in the volume).

Drobo How-To Guide Use a Drobo iSCSI Array with a Linux Server
www.drobo.com | Use a Drobo iSCSI Array with a Linux Server 12
STEP 7
After verifying the settings, click Mount Volume, which automatically mounts the volume for you. If you want to designate a different directory for a mount point, refer to the RedHat online guide or see the following section.
STEP 8
Once you have finished the process, the volume now appears on the Desktop.
Drobo How-To Guide Use a Drobo iSCSI Array with a Linux Server
www.drobo.com | Use a Drobo iSCSI Array with a Linux Server 13
Using the RedHat CLI to Format a Drobo iSCSI Volume If you do not have access to a graphical interpreter, use this procedure.
You will need to have root access level (log in as root) or sudo onto as root:
[seadmin@RHEL-‐6 ~]$ sudo su root
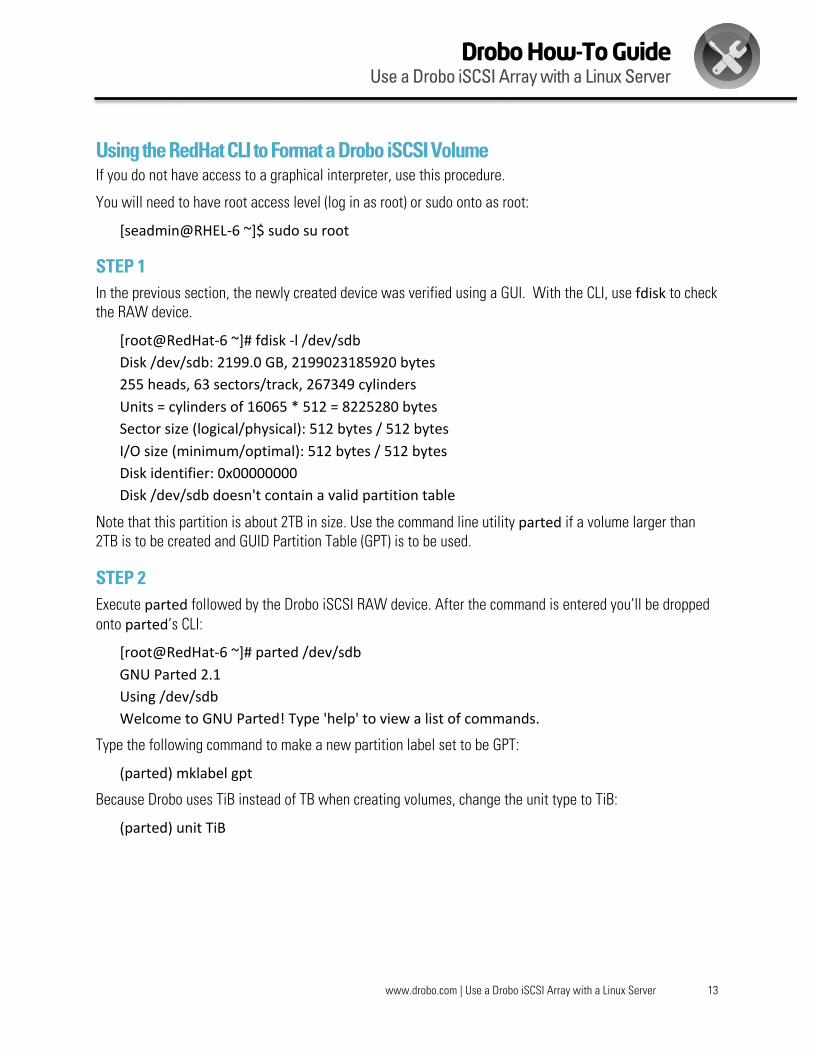
STEP 1
In the previous section, the newly created device was verified using a GUI. With the CLI, use fdisk to check the RAW device.
[root@RedHat-‐6 ~]# fdisk -‐l /dev/sdb Disk /dev/sdb: 2199.0 GB, 2199023185920 bytes 255 heads, 63 sectors/track, 267349 cylinders Units = cylinders of 16065 * 512 = 8225280 bytes Sector size (logical/physical): 512 bytes / 512 bytes I/O size (minimum/optimal): 512 bytes / 512 bytes Disk identifier: 0x00000000 Disk /dev/sdb doesn't contain a valid partition table
Note that this partition is about 2TB in size. Use the command line utility parted if a volume larger than 2TB is to be created and GUID Partition Table (GPT) is to be used.
STEP 2
Execute parted followed by the Drobo iSCSI RAW device. After the command is entered you’ll be dropped onto parted’s CLI:
[root@RedHat-‐6 ~]# parted /dev/sdb GNU Parted 2.1 Using /dev/sdb Welcome to GNU Parted! Type 'help' to view a list of commands.
Type the following command to make a new partition label set to be GPT:
(parted) mklabel gpt
Because Drobo uses TiB instead of TB when creating volumes, change the unit type to TiB:
(parted) unit TiB

Drobo How-To Guide Use a Drobo iSCSI Array with a Linux Server
www.drobo.com | Use a Drobo iSCSI Array with a Linux Server 14
Type print to verify that the partition table has been successfully set to gpt:
(parted) print Model: Drobo B1200i (scsi) Disk /dev/sdb: 2.00TiB Sector size (logical/physical): 512B/512B Partition Table: gpt Number Start End Size File system Name Flags
Note that no partition is created. The mkpart command creates the partition. The size specified in this example is to fully utilize the size of the volume up to 2TB and to make the partition primary:
(parted) mkpart primary 0.00TiB 2TiB
Type print once again to verify that the command was executed correctly and to verify the partition entry:
(parted) print Model: Drobo B1200i (scsi) Disk /dev/sdb: 2.00TiB Sector size (logical/physical): 512B/512B Partition Table: gpt Number Start End Size File system Name Flags 1 0.00TiB 2.00TiB 2.00TiB primary
The command has now created a partition number 1 in the RAW device /dev/sdb, resulting in /dev/sdb1.
Once all entries are correct, exit parted by typing quit, which sends you back to your command line shell prompt:
(parted) quit Information: You may need to update /etc/fstab.
Drobo How-To Guide Use a Drobo iSCSI Array with a Linux Server
www.drobo.com | Use a Drobo iSCSI Array with a Linux Server 15
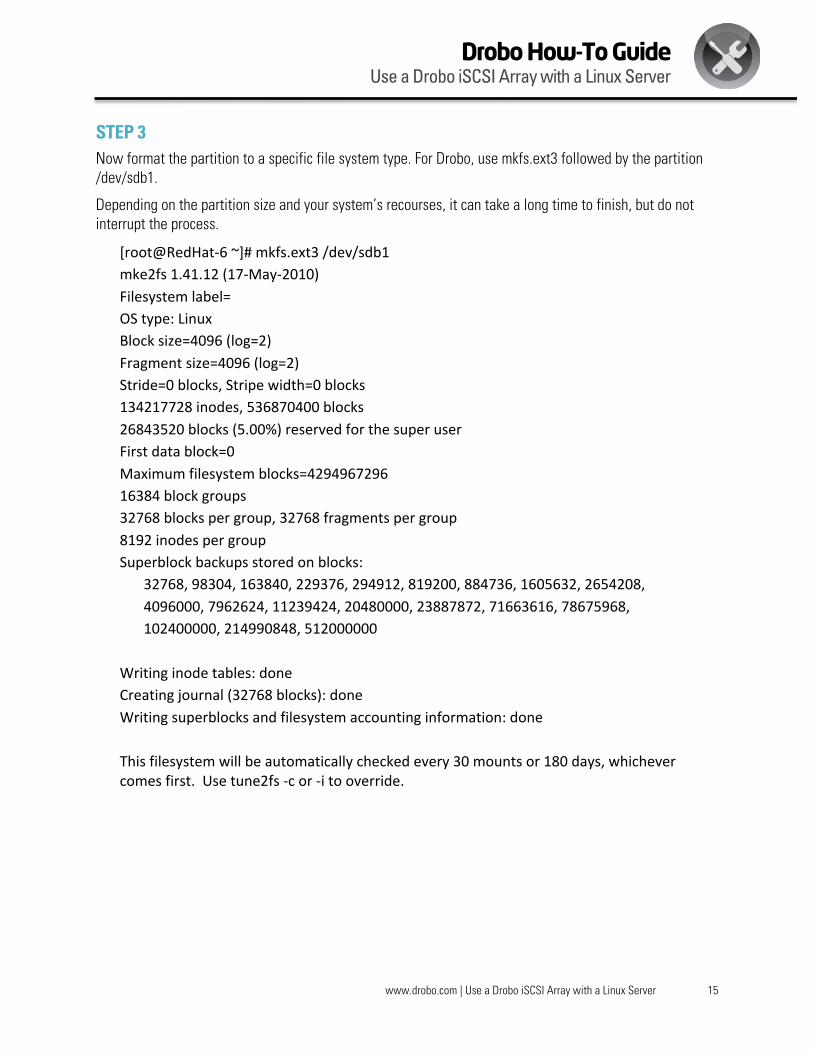
STEP 3
Now format the partition to a specific file system type. For Drobo, use mkfs.ext3 followed by the partition /dev/sdb1.
Depending on the partition size and your system’s recourses, it can take a long time to finish, but do not interrupt the process.
[root@RedHat-‐6 ~]# mkfs.ext3 /dev/sdb1 mke2fs 1.41.12 (17-‐May-‐2010) Filesystem label= OS type: Linux Block size=4096 (log=2) Fragment size=4096 (log=2) Stride=0 blocks, Stripe width=0 blocks 134217728 inodes, 536870400 blocks 26843520 blocks (5.00%) reserved for the super user First data block=0 Maximum filesystem blocks=4294967296 16384 block groups 32768 blocks per group, 32768 fragments per group 8192 inodes per group Superblock backups stored on blocks:
32768, 98304, 163840, 229376, 294912, 819200, 884736, 1605632, 2654208, 4096000, 7962624, 11239424, 20480000, 23887872, 71663616, 78675968, 102400000, 214990848, 512000000
Writing inode tables: done Creating journal (32768 blocks): done Writing superblocks and filesystem accounting information: done This filesystem will be automatically checked every 30 mounts or 180 days, whichever comes first. Use tune2fs -‐c or -‐i to override.

Drobo How-To Guide Use a Drobo iSCSI Array with a Linux Server
www.drobo.com | Use a Drobo iSCSI Array with a Linux Server 16
STEP 4
At the command prompt, notice that the partition was not automatically mounted:
[root@RedHat-‐6 ~]# df -‐h Filesystem Size Used Avail Use% Mounted on /dev/mapper/vg_redhat6test-‐lv_root 26G 2.4G 22G 11% / tmpfs 1004M 0 1004M 0% /dev/shm /dev/sda1 485M 45M 415M 10% /boot
To mount the partition to a directory, change to the directory in which the partition is to be mounted:
[root@RedHat-‐6 ~]# cd /media/ [root@RedHat-‐6 media]# ls [root@RedHat-‐6 media]#
If the directory does not exist create it using mkdir:
[root@RedHat-‐6 media]# mkdir drobo1200i
Now mount the partition using the new directory as the mount point:
[root@RedHat-‐6 media]# mount /dev/sdb1 /media/drobo1200i/
You can now verify using df that the partition is now mounted:
[root@RedHat-‐6 media]# df -‐h Filesystem Size Used Avail Use% Mounted on /dev/mapper/vg_redhat6test-‐lv_root 26G 2.4G 22G 11% / tmpfs 1004M 0 1004M 0% /dev/shm /dev/sda1 485M 45M 415M 10% /boot /dev/sdb1 2.0T 199M 1.9T 1% /media/drobo1200i
Drobo � 2460 North First Street, Suite 100, San Jose, CA � www.drobo.com � 1.866.97.DROBO
Copyright 2011 Drobo, Inc. Data Robotics, Drobo, DroboEllite, DroboPro, BeyondRAID, and Smart Volumes are trademarks of Drobo, Inc., which may be registered in some jurisdictions. All other trademarks used are owned by their respective owners.
All rights reserved. Specifications subject to change without notice. � HT-0077-00 � October 2011