drumcore 3.0 guide - sonoma wire works … · cult, guns and roses, velvet revolver), sly dun-bar...
TRANSCRIPT

DrumCore AU, RTAS, and VST plug-inVersion 3.0 for Windows and Mac OS X
Submersible Music505 Fifth Avenue South, Suite 900
505 Union StationSeattle, WA 98104
www.drumcore.com

Copyright
© 2009 Submersible Music Inc. All rights reserved. This guide may not be reproduced or transmitted in whole or in part in any form or by any means without the prior written consent of Submersible Music Inc.
DrumCore ™ and Gabrielizer ™ are trademarks of Submersible Music Inc. All other trademarks found herein are the property of their respective owners.
Pentium is a registered trademark of Intel Corporation.
AMD and Athlon are trademarks of Advanced Micro Devices, Inc.
Windows and DirectSound are registered trademarks of Microsoft Corporation in the United States and other countries.
Mac, Power Mac, PowerBook, and the Mac logo are trademarks of Apple Computer, Inc., registered in the U.S. and other countries.
ACID, ACID Music Studio, and ACID Pro are trademarks or registered trademarks of Madison Media Software, Inc., a subsidiary of Sony Corporation of America or its affiliates in the United States and other countries.
Digital Performer is a registered trademark of Mark of the Unicorn, Inc.
Fruityloops is a registered trademark of Image Line Buba.
Logic and Garageband are trademarks of Apple Computer, Inc.
Nuendo and Cubase are registered trademarks of Steinberg Media Technologies GmbH.
Pro Tools is a registered trademark of Avid Technology, Inc.
Samplitude is a registered trademark of Magix AG.
Sonar is a registered trademark of Twelve Tone Systems, Inc.
ASIO is a trademark of Steinberg Soft- und Hardware GmbH.
REX™ by Propellerhead, © Propellerhead Software AB.
All trademarks contained herein are the property of their respective owners.
All features and specifications of this guide or the DrumCore product are subject to change without notice.

Table of Contents
Chapter 1: Introduction . . . . . . . . . . . . . . . . . . . . . . . . . . . . . . . . . . . . . . . . . . . . . . . . . . . . . 1
Features . . . . . . . . . . . . . . . . . . . . . . . . . . . . . . . . . . . . . . . . . . . . . . . . . . . . . . . . . . . . . . 1
System Requirements . . . . . . . . . . . . . . . . . . . . . . . . . . . . . . . . . . . . . . . . . . . . . . . . . . . . . 3
Register DrumCore . . . . . . . . . . . . . . . . . . . . . . . . . . . . . . . . . . . . . . . . . . . . . . . . . . . . . . . 3
Conventions Used in This Guide . . . . . . . . . . . . . . . . . . . . . . . . . . . . . . . . . . . . . . . . . . . . . 4
Chapter 2: Installation and Authorization . . . . . . . . . . . . . . . . . . . . . . . . . . . . . . . . . . . . 5
Installing DrumCore . . . . . . . . . . . . . . . . . . . . . . . . . . . . . . . . . . . . . . . . . . . . . . . . . . . . . . 5
Authorizing DrumCore . . . . . . . . . . . . . . . . . . . . . . . . . . . . . . . . . . . . . . . . . . . . . . . . . . . . 6
Chapter 3: Using DrumCore. . . . . . . . . . . . . . . . . . . . . . . . . . . . . . . . . . . . . . . . . . . . . . . . . . 9
DrumCore Plug-in Window . . . . . . . . . . . . . . . . . . . . . . . . . . . . . . . . . . . . . . . . . . . . . . . . . 9
Grooves . . . . . . . . . . . . . . . . . . . . . . . . . . . . . . . . . . . . . . . . . . . . . . . . . . . . . . . . . . . . . . 11
Gabrielizer. . . . . . . . . . . . . . . . . . . . . . . . . . . . . . . . . . . . . . . . . . . . . . . . . . . . . . . . . . . . 15
Exporting Audio and MIDI . . . . . . . . . . . . . . . . . . . . . . . . . . . . . . . . . . . . . . . . . . . . . . . . . 17
Chapter 4: MIDI DrumKits . . . . . . . . . . . . . . . . . . . . . . . . . . . . . . . . . . . . . . . . . . . . . . . . . . . 21
DrumKits . . . . . . . . . . . . . . . . . . . . . . . . . . . . . . . . . . . . . . . . . . . . . . . . . . . . . . . . . . . . . 21
DrumCore Pads. . . . . . . . . . . . . . . . . . . . . . . . . . . . . . . . . . . . . . . . . . . . . . . . . . . . . . . . . 22
Saving Kits as Presets . . . . . . . . . . . . . . . . . . . . . . . . . . . . . . . . . . . . . . . . . . . . . . . . . . . . 25
Chapter 5: DrumCore Settings . . . . . . . . . . . . . . . . . . . . . . . . . . . . . . . . . . . . . . . . . . . . . . 27
DrumCore Data Location. . . . . . . . . . . . . . . . . . . . . . . . . . . . . . . . . . . . . . . . . . . . . . . . . . 27
Export Location . . . . . . . . . . . . . . . . . . . . . . . . . . . . . . . . . . . . . . . . . . . . . . . . . . . . . . . . 28
Export Format . . . . . . . . . . . . . . . . . . . . . . . . . . . . . . . . . . . . . . . . . . . . . . . . . . . . . . . . . 28
Default Settings . . . . . . . . . . . . . . . . . . . . . . . . . . . . . . . . . . . . . . . . . . . . . . . . . . . . . . . . 29
About . . . . . . . . . . . . . . . . . . . . . . . . . . . . . . . . . . . . . . . . . . . . . . . . . . . . . . . . . . . . . . . 29
Register . . . . . . . . . . . . . . . . . . . . . . . . . . . . . . . . . . . . . . . . . . . . . . . . . . . . . . . . . . . . . . 29
Contents iii

iv
Chapter 5: Using DrumCore with your DAW . . . . . . . . . . . . . . . . . . . . . . . . . . . . . . . . . 31
Using DrumCore with Ableton Live . . . . . . . . . . . . . . . . . . . . . . . . . . . . . . . . . . . . . . . . . . 31
Using DrumCore with Cubase . . . . . . . . . . . . . . . . . . . . . . . . . . . . . . . . . . . . . . . . . . . . . . 37
Using DrumCore with Digital Performer . . . . . . . . . . . . . . . . . . . . . . . . . . . . . . . . . . . . . . 41
Using DrumCore with Logic . . . . . . . . . . . . . . . . . . . . . . . . . . . . . . . . . . . . . . . . . . . . . . . 47
Using DrumCore with Pro Tools . . . . . . . . . . . . . . . . . . . . . . . . . . . . . . . . . . . . . . . . . . . . 50
Using DrumCore with Sonar . . . . . . . . . . . . . . . . . . . . . . . . . . . . . . . . . . . . . . . . . . . . . . . 55
Using DrumCore with Other Audio and MIDI Applications . . . . . . . . . . . . . . . . . . . . . . . . . . 59
DrumCore Guide

Chapter 1: Introduction
Congratulations on your purchase of DrumCore! DrumCore is the ideal solution for anyone who needs professional drum parts in any style within seconds. Use DrumCore to dial-in the perfect beat for composing, arranging, remixing, or just flat out jamming. Since DrumCore supports AU (Mac only), RTAS, and VST plug-in formats, you can take advantage of its extensive rhythmic catalog as an integrated rhythm machine within your fa-vorite DAW (such as Pro Tools®, Digital Per-former®, Sonar®, Nuendo®, or Logic®).
Search for the perfect groove quickly and easily using DrumCore’s intuitive browser interface. DrumCore boasts of an extensive library of rhyth-mic content recorded by professional drummers and percussionists of the highest calibre—such as Alan White (John Lennon, Yes), Terry Bozzio (Frank Zappa, Missing Persons), Matt Sorum (The Cult, Guns and Roses, Velvet Revolver), Sly Dun-bar (Bob Marley, Peter Tosh), Zoro (Bobby Brown, Lenny Kravitz), and more!—using state-of-art dig-ital and vintage recording gear in the best possi-ble acoustic environments.
Furthermore, DrumCore’s catalog is expandable: Using DrumCore Toolkit, you can import your own audio samples, rhythmic content, and build your own DrumKits.
For information on using DrumCore Toolkit, see the DrumCore Toolkit Guide.
Features
DrumCore features:
• AU (Mac only), RTAS, and VST-compatibility in-tegrates DrumCore with your favorite multi-track audio and MIDI sequencing program (e.g., Pro Tools, Digital Performer, Sonar, Logic, Nu-endo, Live, etc.). See “Chapter 5: Using Drum-Core with your DAW.”
• An extensive catalog of the highest quality rhythmic content. DrumCore’s database of au-dio drum loops and hits were recorded with world-class drummers in state of the art stu-dios. Each groove includes variations and fills in addition to the basic beats. Every groove was recorded at multiple tempos so that you get the groove you want at the tempo you want, with all of the artist’s nuance at each tempo and without the artifacts introduced by common time–compression and expansion algorithms. Most grooves in DrumCore’s database also have a MIDI version, which provides an even greater degree of flexibility in conjunction with Drum-Core’s DrumKits.
• Factory DrumCore content is 24-bit and 48 kHz.
• Factory DrumCore content can be exported as REX files to your DAW to automatically match your project tempo.
Chapter 1: Introduction 1

2
• MIDI DrumKits—DrumCore provides multiple sampled DrumKits of the drummers’ kits to match DrumCore’s extensive collection of MIDI grooves. You can play DrumCore’s DrumKits from DrumCore’s own catalog of MIDI grooves, or from your DAW (see “Chapter 4: MIDI Drum-Kits”). Using DrumCore Toolkit, you can also create your own MIDI DrumKits (see the Drum-Core Toolkit Guide).
• Mix and match pads from different DrumKits.
• DrumCore provides separate outputs for each pad of the MIDI DrumKit for independent mixing and processing in your DAW.
• Drag and drop files (audio and MIDI) to the Desk-top or to any DAW that supports drag and drop (such as Cubase, Pro Tools, Digital Performer, or Logic).
• An intuitive, easy to use search engine to find the perfect groove, drum loop, or fill. You can sort loops by tempo, style, drummer, and sev-eral other relevant criteria. Using DrumCore Toolkit, you can even import your own audio or MIDI files and provide your own metadata (in-cluding “style” and “feel” definitions) for quick search and retrieval.
• The Gabrielizer™, a tool for beat manipulation, lets you quickly and easily reshuffle your audio and MIDI loops to create new unique and inter-esting rhythms. See “Gabrielizer” on page 15.
DrumCore Guide
DrumCore Toolkit Features:
• When updating to DrumCore 3, use the Import DrumCore Database command to import all of your custom content and any previously in-stalled DrumCore DrummerPacks.
• Import DrummerPacks purchased from Sub-mersible Music.
• Using DrumCore Toolkit, you can import your own audio (AIF, WAV, SD II, REX, and ACID) and MIDI files, and provide your own metadata (in-cluding “style” definitions) for quick search and retrieval.
• Edit metadata for factory and custom content to facilitate quick and easy “searchability.”
• Create your own custom DrumKits using your own drum samples.
• CoreAudio (Mac), and Direct Sound or ASIO (Windows) support for auditioning audio and MIDI grooves.
• Stand-alone MIDI capabilities for playing MIDI DrumKits from any MIDI controller.
For more information about the Drum-Core Toolkit application, see the Drum-Core Toolkit Guide.
System RequirementsYou must have Administrator Access on your com-puter to install DrumCore.
When using DrumCore as a plug-in with a host ap-plication, such as Pro Tools or Ableton Live, DrumCore’s system requirements are in addition to the host application’s requirements.
Minimum Requirements for Macintosh
• Apple® Macintosh® Power Mac® or PowerBook® G4 1 GHz or faster
• 2 GB RAM, 4 GB or more recommended
• At least 16 GB of available Hard Drive space for Drum Loop Content and application
• DVD ROM Drive (for installation)
• Mac OS X (v10.4 or higher)
• 1024 X 768 minimum display resolution
Minimum Requirements for Windows
• Intel® Pentium® 4 processor or faster
• 2 GB RAM, 4 GB or more recommended
• At least 16 GB of available Hard Drive space for Drum Loop Content
• DVD ROM Drive (for installation)
• Windows XP or Windows Vista
• 1024 X 768 minimum display resolution
DrumCore 3.0 no longer supports Re-Wire.
DrumCore 3 is not qualified for 64-bit applications on 64-bit Operating Sys-tems.
Register DrumCoreYou must register DrumCore to receive your DrumCore authorization code. Your registration and authorization code will work for both the DrumCore plug-ins and for the DrumCore Toolkit application. Registered users can receive techni-cal support by email or on the DrumCore Web site. The initial response time for technical support in-quiries is within 24 hours. Registered users will also receive periodic software update and up-grade notices.
Chapter 1: Introduction 3
4
Conventions Used in This GuideThis guide observes the following conventions to indicate menu choices and key commands::
The following symbols are used to highlight impor-tant information:
Convention Action
File > Import Files Choose Import Files from the File menu
Ctrl+I on Windowsor Command+I on Macin-tosh
Hold down the Ctl key on Windows or the Com-mand key on Macintosh and press the I key
Ctrl-click on Windowsor Command-click on Macintosh
Hold down the Ctl key on Windows or the Com-mand key on Macintosh and click the mouse but-ton
User Tips are helpful hints for getting the most out of DrumCore.
Important Notices include information that could affect DrumCore’s perfor-mance.
Shortcuts show you useful keyboard or mouse shortcuts.
Cross References point to related sec-tions in the guide.
DrumCore Guide

Chapter 2: Installation and Authorization
Installing DrumCoreDrumCore requires at least 16 GB of available storage space. If your system does not have at least 16 Gb of available storage space, DrumCore cannot be installed.
Installing DrumCore on Macintosh
To install DrumCore:
1 Insert the DrumCore Installer disc into your computer’s DVD drive.
2 Double-click the DrumCore 3 installer icon.
3 Follow the on-screen instructions to install the DrumCore plug-ins, the DrumCore Toolkit applica-tion, and all DrumCore content.
4 When installation is complete, quit the Drum-Core installer.
If you are upgrading from an earlier version of DrumCore, and have your own custom content or any previously installed DrummerPacks, use the Drum-Core Toolkit to import all of your previ-ous DrumCore content into DrumCore 3. See the DrumCore Toolkit Guide for more information.
DrumCore installs the following:
■ DrumCore Audio Units plug-in: /Library/Au-dio/Plug-Ins/Components/DrumCore.component
■ DrumCore RTAS plug-in:
• If Pro Tools is installed: /Library/Application Support/Digidesign/Plug-Ins/DrumCore.dpm
– or –
• If Pro Tools is not installed: /Library/Appli-cation Support/Submersible/
■ DrumCore VST plug-in: /Library/Audio/Plug-Ins/VST/DrumCore.vst
■ DrumCore Plug-in Guide (/Applications/Drum-Core 3/)
■ DrumCore Toolkit Guide (/Applications/Drum-Core 3/)
■ DrumCore Data (/Applications/ by default, un-less specified otherwise)
■ DrumCore Engine (/Library/Application Sup-port/DrumCore Engine)
Chapter 2: Installation and Authorization 5
6
Installing DrumCore on Windows
To install DrumCore:
1 Insert the DrumCore Installer disc into your computer’s DVD drive.
2 Double-click the installer icon.
3 Follow the on-screen instructions to install the DrumCore plug-ins, the DrumCore Toolkit applica-tion, and all DrumCore content.
4 When installation is complete, exit the Drum-Core installer.
DrumCore installs the following:
■ DrumCore RTAS plug-in:
• C:\Program Files\Common Files\Digi-design\DAE\Plug-Ins\DrumCore.dpm (if Pro Tools is installed)
– or –
• C:\Program Files\Submersible\DrumCore\Plug-Ins\RTAS (if Pro Tools is not installed)
■ DrumCore VST plug-in: C:\Program Files\Vstplu-gins (if present, otherwise Submersible\DrumCore 3\Plug-ins\)
■ DrumCore Guide (C:\Program Files\Submers-ible\DrumCore 3\, unless specified otherwise)
■ DrumCore Toolkit Guide (C:\Program Files\Sub-mersible\DrumCore 3\, unless specified other-wise)
If you are upgrading from an earlier version of DrumCore, and have your own custom content or any previously installed DrummerPacks, use the Drum-Core Toolkit to import all of your previ-ous DrumCore content into DrumCore 3. See DrumCore Toolkit Guide for more information.
DrumCore Guide
■ DrumCore Data (C:\Program Files\Submers-ible\DrumCore 3\ by default, unless specified oth-erwise)
Authorizing DrumCoreDrumCore plug-ins and the DrumCore Toolkit ap-plication require an authorization code in order run. You must register your copy of DrumCore in order to receive your DrumCore authorization code. Your DrumCore authorization code will work for both the DrumCore plug-ins and the DrumCore Toolkit application.
To authorize DrumCore:
1 Do one of the following:
• Launch your AU, RTAS, or VST host applica-tion (such as Logic, Pro Tools, or Cubase) and insert DrumCore on a track, you will be prompted to register DrumCore.
– or –
• Launch the DrumCore Toolkit application, you will be prompted to register DrumCore.

2 Click OK. The Register DrumCore window opens.
3 Enter your Name and Serial Number (your serial number is located on your DrumCore Registration card).
4 Click the Generate Challenge Code button. A unique “challenge” code (a series of 28 lowercase letters) will be generated and displayed in the Challenge Code field.
Register DrumCore window
5 Register DrumCore by doing the following:
• Click the hyper link to Submersible Music’s secure website.
• Your default Web browser will launch the DrumCore Product Registration page.
• Your Name, Serial Number, and Challenge Code should be entered automatically. If not, type in your Name, Serial Number, and Challenge Code.
• Enter your email address (your authorization code will be sent to this email address).
• Click the Submit Registration button.
If you are unable to register DrumCore using the DrumCore website, send an email to [email protected] with your Name, Se-rial Number, Challenge Code, and email address (your authorization code will be sent to this email address).
6 A unique “response” code (a series of 24 upper-case letters) will be emailed to you. However, un-til you receive your authorization code, click the 30-Day Demo button to use DrumCore.
7 When you receive your response code, enter it in the Response Code field and click the Authorize button. You can access the Register DrumCore window from the DrumCore Settings tab in the DrumCore Plug-in window (see “Chapter 5: Drum-Core Settings”). You can also access the Register DrumCore window in the DrumCore Toolkit appli-cation by choosing Windows > Register.
You must register DrumCore to receive your authorization code.
DrumCore is fully functional for the du-ration of the 30-day demo period. After 30 days you must enter your authoriza-tion code to continue using DrumCore.
Chapter 2: Installation and Authorization 7

8
DrumCore Guide
Chapter 3: Using DrumCore
DrumCore is a virtual instrument plug-in in AU, RTAS, and VST plug-in formats. DrumCore pro-vides an extensive database of audio and MIDI drum loops, fills, and hits. You can play Drum-Core’s audio and MIDI grooves in real-time or im-port them into your DAW for further arranging, mixing, and editing.
DrumCore also provides multiple sampled drum kits of some of the best drummers in the business for playing back MIDI grooves from DrumCore’s database, or for MIDI drum programing with your DAW. DrumCore uses the same standard General MIDI (GM) MIDI note mappings for all of its drum kits.
DrumCore Plug-in WindowDrumCore provides immediate access to the most commonly used search controls, a browser-like inter-face to the database, playback and volume controls, and the Gabrielizer™.
DrumCore Plug-in User Interface
Audio Waveform/
Volume slider
Drummers and Styles list
Searchbuttons
Results list
Gabrielizer and
MIDI DrumKit
Filemetadata
MIDI Sequence Overview
Transportbuttons
Feel Filter
LiveDrummerslider
VU meter
Page buttons
Selected Drummer(MIDI DrumKit)
Chapter 3: Using DrumCore 9
10
To open the DrumCore plug-in:
1 Launch your favorite DAW (such as Cubase, Live, or Pro Tools).
2 Insert the DrumCore plug-in on a track. The DrumCore Plug-in window opens.
DrumKit Indicator
The DrumKit Indicator displays the currently se-lected DrumKit. Click the DrumKit Indicator to open the DrumKit Editor. For more information on the DrumKits Editor, see "Chapter .”
View Buttons and GrooveSets List
Use the View buttons to select the search cate-gory (Drummers or Styles). Select the desired Drummer or Style to organize how GrooveSets are viewed.
Results List
The Results list displays the results of a search. Select the desired groove from the Results list. Grooves are typically grouped as a collection of beats and fills that work together (for example, in different parts of a song arrangement).
DrumCore Plug-in window (Grooves tab)
DrumCore Guide
Mode and Show Buttons
Use the Mode and Show buttons to search for Au-dio or MIDI files, and Loops, Fills, or Hits (audio only).
Audio Waveform/MIDI Sequence Overview
The Audio Waveform/MIDI Sequence Overview displays an overview of the currently selected au-dio or MIDI file for visual reference only.
Queue Play Mode
The Queue Play Mode toggle enables (or disables) Queue Play Mode. When Queue Play Mode is en-abled, you can select a second file (Audio or MIDI Loop or Fill) to start playback as soon as the cur-rently selected file finishes playing. When Queue Play Mode is disabled, any newly selected file be-gins playing immediately, cutting off playback of the previously selected file.
Transport Button
Use the Transport button to start and stop play-back of the selected item in the Results list.
Gabrielize Buttons
Click the Gabrielize button to “Gabrielize,” the selected file.
Dynamics Controls
Use the Volume slider to attenuate DrumCore’s main output volume. The Volume meter provide a VU display of DrumCore’s main output. For MIDI grooves, adjust the LiveDrummer slider to breath a little life into the MID drum pattern.

GroovesWhen you install DrumCore, you get an extensive library of audio and MIDI files, or “GrooveSets,” that you can import into your DAW. GrooveSets logically group beats, fills, and variations of dif-ferent drum loops and patterns that work well to-gether. The content reflects the featured drum-mer's musical sensibilities as they played these parts together as one song.
The Grooves tab in DrumCore lets you sort, filter, and audition DrumCore GrooveSets. When you find the groove you want, you can drag and drop it from the Results list right into your DAW for fur-ther editing, mixing, and arranging. Use any com-bination of DrumCore’s extensive library of audio loops and MIDI drum patterns, and edit and ar-range them in your DAW to get the perfect drum track for any project.
Drummers and Styles
The Drummer and Styles list lets you sort Drum-Core’s GrooveSets either by drummer or style.
To organize GrooveSets by Drummer:
1 Click the Drummers button in the Grooves page.
2 Click the Reveal GrooveSet triangle for the drummer you want.
3 Select the GrooveSet you want to view the Re-sults list (see “Loops, Fills, and Hits” on page 12).
Drummers list
Reveal GrooveSet
Chapter 3: Using DrumCore 11

12
To organize GrooveSets by Style:
1 Click the Styles button in the Grooves page.
2 Click the Reveal GrooveSet triangle for the style you want.
3 Select the Mode options to show Audio or MIDI files (see “Audio and MIDI” on page 12).
4 Select the Show options to view Loops, Fills, or Hits (see “Loops, Fills, and Hits” on page 12).
Styles list
Reveal grooves
DrumCore Guide
Audio and MIDI
Once you have selected the desired GrooveSet, you can select whether you want to view audio or MIDI grooves.
To show audio or MIDI grooves:
■ Click the Audio button so that it is highlighted. Only audio grooves are shown in the Results list.
– or –
■ Click the MIDI button so that it is highlighted. Only MIDI grooves are shown in the Results list.
Loops, Fills, and Hits
Once you have selected the GrooveSet you want in the Drummers or Styles List, and you have se-lected either Audio or MIDI mode, you can further filter the Results list to show any combination of loops, fills, or hits (audio only).
Audio grooves, Loops and Fills
MIDI grooves, Loops and Fills

To show audio or MIDI loops, fills, and hits:
■ Click any of the following Show buttons to en-able (highlighted) or disable what is shown in the Results list:
• Loops
• Fills
• Hits (audio files only)
Results list, Audio Loops shown
Results list, MIDI Loops shown
Results list, Audio Fills shown
Results list, MIDI Fills shown
Results list, Audio Hits shown
Chapter 3: Using DrumCore 13

14
Groove Metadata
When a groove is selected in the Grooves list, the metadata for that groove is displayed along with an overview of the audio (time domain represen-tation) or MIDI pattern (piano roll–style represen-tation).
Audio Waveform Overview Provides a visual time domain—representation of the Audio drum groove.
Use DrumCore Toolkit edit metadata. For more information, see the Drum-Core Toolkit Guide.
Audio Groove overview and metadata
Playhead indicator
Audio Waveform overview
Groove nameand original tempo
Playback tempo
Original Meter
Original duration
DrumCore Guide
MIDI Sequence Overview Provides a visual piano roll—style representation of the MIDI drum pat-tern.
Playhead Indicator indicates the playhead loca-tion in the MIDI Groove overview when auditioning a groove.
Groove Name and Original Tempo Displays the name of the groove and its original tempo (in BPM).
Feel Displays the rhythmic feel of the groove.
Meter Displays the meter of the groove.
Tempo Displays the current playback tempo as set in your DAW.
Duration Displays the duration of the groove in bars.
MIDI Groove overview and metadata
Playhead indicator
MIDI Sequence overview
Groove nameand original tempo
Playback tempo
Original Meter
Original duration

Auditioning Grooves
You can audition any of DrumCore’s grooves be-fore importing them into your DAW.
To audition a groove:
1 Select the groove you want to audition in the Results list.
2 Click the Play button in the DrumCore plug-in window. The audio or MIDI groove plays back at the current tempo as set in your DAW (host tempo).
3 Select other grooves in the Grooves list to audi-tion them.
4 Click the Play button again to stop auditioning the selected groove.
Queue Play Mode
The Queue Play Mode toggle enables (or disables) Queue Play mode. When Queue Play mode is en-abled, you can select a second groove to start playback as soon as the currently selected groove finishes playing. When Queue Play mode is dis-abled, any newly selected groove begins playing immediately, cutting off playback of the previ-ously selected groove.
Groove audition controls
Play button
Current Tempoof your DAW
Queue Play enable
Filtering Grooves
You can filter grooves shown in the Grooves list by feel. This can help you find the right groove with the right rhythmic feel quickly and easily.
To filter what grooves are shown in the Grooves list:
■ Click the Show pop-up menu and select the rhythmic feel you want.
Only grooves with the matching Feel metadata are shown in the Results list. Select “All” to show all grooves regardless of feel.
GabrielizerDrumCore’s Gabrielizer provide a powerful tool for creating new rhythms from existing audio and MIDI grooves. One click of the Gabrielize button and DrumCore intelligently shuffles beats to come up with completely new and exciting rhythms.
Show pop-up menu
Chapter 3: Using DrumCore 15

16
To “Gabrielize” a groove:
1 Conduct a search according to your desired cri-teria.
2 Select an audio or MIDI file from the Results list.
3 Click the Gabrielize button.
The rhythmic pattern of the selected audio or MIDI file will be reshuffled, or “Gabrielized.”
History
The Gabrielizer provides a history of the last four Gabrielized grooves. As soon as you Gabrielize a fifth time, the first item in the history is overwrit-ten. The Gabrielizer History will continue to cycle through the four slots each time you Gabrielize a groove.
To select any of the last four Gabrielized grooves:
■ Click any one of the four history buttons.
Gabrielize button
Gabrielizer section
Click any of theHistory buttons
to select and audition
DrumCore Guide
History buttons display a waveform if they contain a Gabrielized audio groove and a MIDI pattern if they contain a Gabrielized MIDI groove.
Clearing a Gabrielized File
If you Gabrielize a file and decide the result is not really what you want, you can clear the Gabriel-ized file and return to the original file. Note that the entire Gabrielize History will be cleared.
To clear the Gabrielize history:
■ Click the Clear link above the Gabrielize His-tory.
Gabrielizer section, audio and MIDI
Gabrielizer section
Gabrielized audio Gabrielized MIDI
Click theClear link
to clear theHistory
Exporting Audio and MIDIOnce you have found the groove you want, or cre-ated a new one using the Gabrielizer, you will probably want to export it for use in your DAW. DrumCore’s export behavior depends on the set-tings in DrumCore’s Settings page (see Chapter , “Chapter 5: DrumCore Settings”).
DrumCore supports drag and drop for export of audio and MIDI files. Simply drag and drop a file from the Results list to the desktop or to an appli-cation that supports drag and drop for import, such as Pro Tools, Live, Cubase, Sonar, Logic, or Digital Performer. When dragging and dropping to your DAW, DrumCore will first export the file to the default export location (as specified in the DrumCore Settings).
Files are exported in the file format, sample rate, and bit-depth specified in the DrumCore Settings (see Chapter , “Chapter 5: DrumCore Settings”).
Exported files include the tempo at beginning of file name. For example, if you export a file at 92 bpm, the exported file is named “092<file-name>.” If the tempo is not already part of the file name, DrumCore adds it automatically. How-ever, REX and ACID files will always have their own native tempo, which may not correspond to the selected tempo in DrumCore. Consequently, DrumCore does not prepend the tempo to REX and ACID file names.
To export an audio or MIDI file from DrumCore to your DAW:
1 Set the DrumCore export settings as desired (see Chapter , “Chapter 5: DrumCore Settings”).
2 Search for and select the desired file in the Re-sults list.
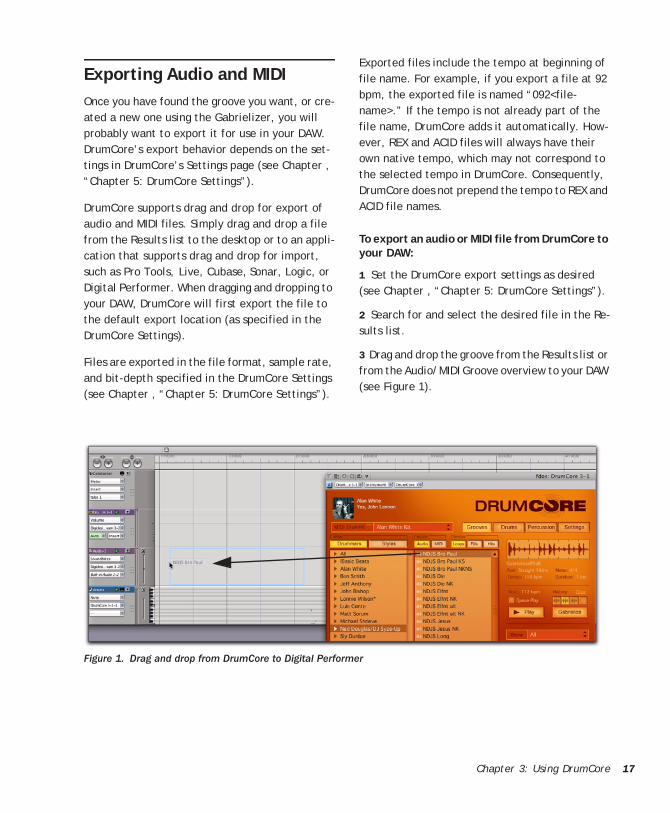
3 Drag and drop the groove from the Results list or from the Audio/MIDI Groove overview to your DAW (see Figure 1).
Figure 1. Drag and drop from DrumCore to Digital Performer
Chapter 3: Using DrumCore 17
18
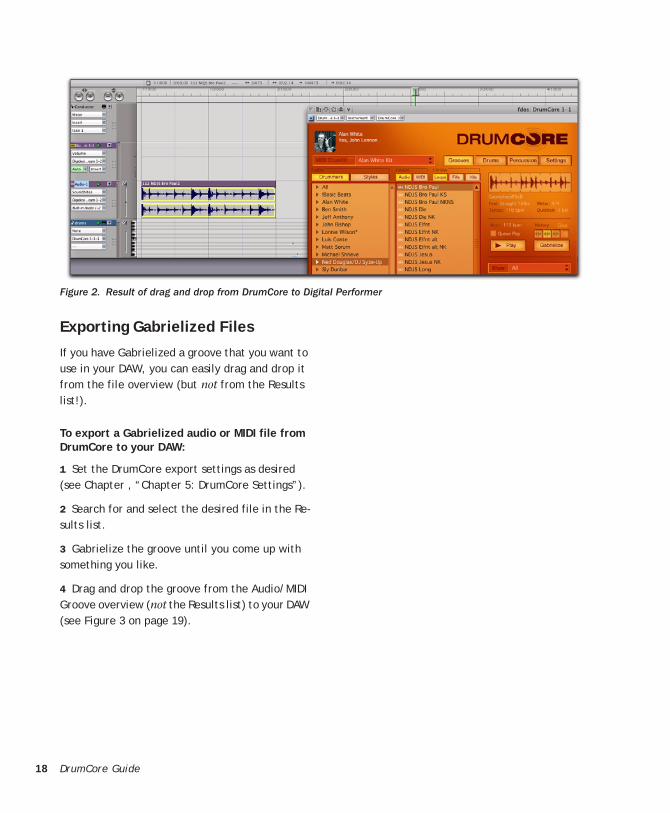
DrumCore GuideFigure 2. Result of drag and drop from DrumCore to Digital Performer
Exporting Gabrielized Files
If you have Gabrielized a groove that you want to use in your DAW, you can easily drag and drop it from the file overview (but not from the Results list!).
To export a Gabrielized audio or MIDI file from DrumCore to your DAW:
1 Set the DrumCore export settings as desired (see Chapter , “Chapter 5: DrumCore Settings”).
2 Search for and select the desired file in the Re-sults list.
3 Gabrielize the groove until you come up with something you like.
4 Drag and drop the groove from the Audio/MIDI Groove overview (not the Results list) to your DAW (see Figure 3 on page 19).

Figure 3. Drag and drop a Gabrielized groove from DrumCore to Digital Performer
Selected GabrielizedGroove displayedin the Waveform
Overview
Chapter 3: Using DrumCore 19

20
DrumCore Guide
Chapter 4: MIDI DrumKits
In addition to its extensive library of audio loops and fills by some of the world’s best drummers, DrumCore provides a MIDI drum module with mul-tiple sampled kits of the same Drummers. Drum-Core’s MIDI groove library plays these kits by de-fault. In addition to using DrumCore’s “factory” DrumKits, you can edit them or even create your own custom kits.
DrumCore’s DrumKits were created by the original drummer’s strikes using the same or similar drums used in their audio loops. DrumKits have been op-timized to work with various drummer’s MIDI grooves (included in their respective User Packs). Be sure to select the corresponding DrumKit to match a drummer’s MIDI grooves. You can also try switching kits for some interesting variations (such has playing Tony Braunagel’s Vintage kit with one of Sly Dunbar’s MIDI grooves).
You can play DrumCore’s MIDI DrumKits using MIDI sequences in your DAW. You can also play Drum-Core’s MIDI Drum module with an external MIDI controller routed through your DAW. You can also assign DrumCore’s DrumKits to multiple output assignments for independent mixing and audio processing in your DAW.
You can create your own custom Drum-Kits using DrumCore Toolkit. For more information, see the DrumCore Toolkit Guide.
DrumKitsIn addition to using DrumCore’s MIDI DrumKits to audition MIDI grooves from DrumCore’s database, you can also play DrumCore’s MIDI DrumKits with your DAW using sequenced MIDI data or in real-time by routing a external MIDI controller through your DAW to DrumCore. DrumCore uses the stan-dard General MIDI (GM) note numbers for drum mapping.
To select a MIDI DrumKit:
■ Select the desired Kit from the MIDI DrumKit se-lector.
DrumCore loads the samples for the selected Kit into RAM, so, depending on the speed of your CPU and your RAM, this can take several seconds. As soon as you switch Kits, DrumCore purges the pre-vious kit from RAM and loads the new one.
For more information about configuring MIDI, MIDI routing, and playing virtual instrument plug-ins in your DAW, con-sult the manufacturer’s documenta-tion.
MIDI DrumKit selector
DrumKit selector
Chapter 4: MIDI DrumKits 21

22
DrumCore indicates that a DrumKit is loading into RAM by a progress bar that appears in the Drum Kit selector.
DrumCore PadsThe DrumCore plug-in window displays the “pad” assignments for the selected kit as Pad Settings and Global Pad Settings.
There are two pages of pads:
• Drums (MIDI note numbers 35–58)
• Percussion (MIDI note numbers 59–82).
Click either the Drums or Percussion tabs to dis-play the corresponding set of Pads.
Each Pad represents a specific drum or sound in the kit. Each Pad displays the note name that trig-gers the Pad, the Pad name, a MIDI indicator, and Mute and Solo buttons for the Pad. The MIDI indi-cator lights when it receives the corresponding MIDI note.
It is recommended that you do not play DrumCore while a new Kit is loading into RAM.
DrumCore Drums page
DrumCore Guide
To select an individual Pad:
■ Click any Pad to select it.
To play an individual Pad:
■ Play any Pad by clicking it.
– or –
■ Play the corresponding MIDI note on your MIDI controller.
The Pad’s MIDI indicator lights when it receives MIDI.
To mute or unmute an individual Pad:
■ Click the Pad’s Mute button.
To solo or unsolo an individual Pad:
■ Click the Pad’s Solo button.
Snare Pad
Depending on your DAW, you can use the Up, Down, Left, and Right Arrow keys to select the corresponding adja-cent Pad.
Note Name
Pad Name
Pad Mute Pad Solo
MIDI Indicator
Pad Settings
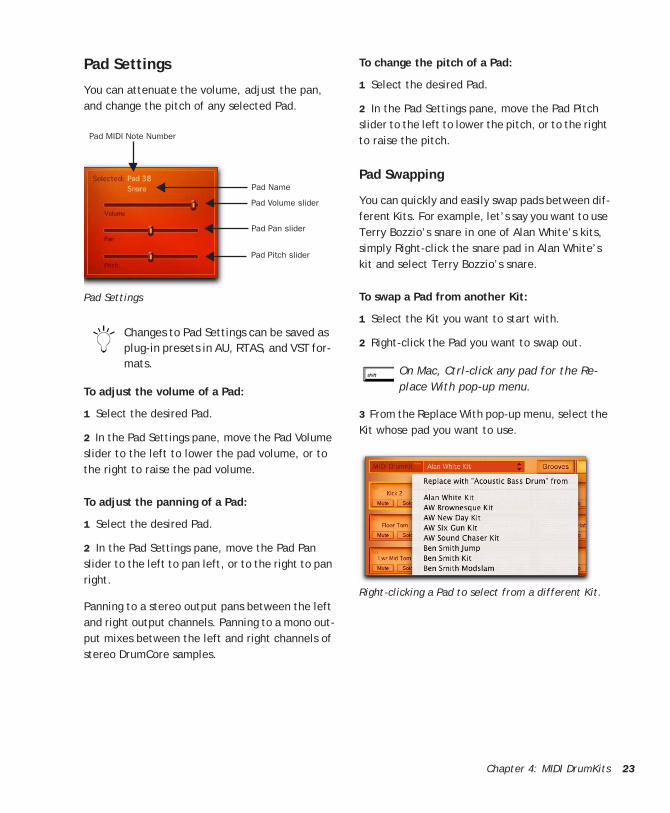
You can attenuate the volume, adjust the pan, and change the pitch of any selected Pad.
To adjust the volume of a Pad:
1 Select the desired Pad.
2 In the Pad Settings pane, move the Pad Volume slider to the left to lower the pad volume, or to the right to raise the pad volume.
To adjust the panning of a Pad:
1 Select the desired Pad.
2 In the Pad Settings pane, move the Pad Pan slider to the left to pan left, or to the right to pan right.
Panning to a stereo output pans between the left and right output channels. Panning to a mono out-put mixes between the left and right channels of stereo DrumCore samples.
Pad Settings
Changes to Pad Settings can be saved as plug-in presets in AU, RTAS, and VST for-mats.
Pad MIDI Note Number
Pad Name
Pad Volume slider
Pad Pitch slider
Pad Pan slider
To change the pitch of a Pad:
1 Select the desired Pad.
2 In the Pad Settings pane, move the Pad Pitch slider to the left to lower the pitch, or to the right to raise the pitch.
Pad Swapping
You can quickly and easily swap pads between dif-ferent Kits. For example, let’s say you want to use Terry Bozzio’s snare in one of Alan White’s kits, simply Right-click the snare pad in Alan White’s kit and select Terry Bozzio’s snare.
To swap a Pad from another Kit:
1 Select the Kit you want to start with.
2 Right-click the Pad you want to swap out.
3 From the Replace With pop-up menu, select the Kit whose pad you want to use.
On Mac, Ctrl-click any pad for the Re-place With pop-up menu.
Right-clicking a Pad to select from a different Kit.
Chapter 4: MIDI DrumKits 23

24
Global Pad Settings
You can assign DrumCore’s drum pads to multiple unique audio output channels for independent mixing and audio processing in your DAW. Drum-Core provides 8 stereo output channels (1–2 through 15–16) and an additional 8 mono output channels (channels 17–24). Pad output assign-ments are applied by pad number across all kits. Also note that how DrumCore’s output channel as-signment appear as inputs varies between differ-ent DAW applications.
To assign DrumCore to multiple outputs:
1 In the DrumCore Plug-in window, enable the As-signable Outputs option in the Global Pad Settings pane.
2 Select the Pad whose output you want to assign.
3 From the Pad Output selector, select the de-sired output assignment (e.g., KC 17).
4 Repeat the preceding steps for each additional Pad as desired.
Global Pad Settings
Changes to Pad Output Assignments can be saved as plug-in presets in AU, RTAS, and VST formats. See “Saving Kits as Pre-sets” on page 25.
Pad Output
Assignable Outputsenabled
selector
DrumCore Guide
To assign DrumCore outputs to channel inputs in your DAW:
■ DrumCore outputs are routed to audio inputs in your DAW according to how your DAW manages vir-tual instrument plug-ins with multiple outputs.
Dynamics
DrumCore provides VU Meters and a Volume slider to monitor and control the master volume. You can also adjust the amount of dynamic variation using the LiveDrummer slider.
Volume
To adjust DrumCore’s Kit Volume:
■ Move the Volume slider to the right to boost the Kit volume.
– or –
■ Move the Volume slider to the left to attenuate the Kit Volume.
Consult the manufacturer’s documenta-tion for your DAW for information on routing multiple outputs from an in-strument plug-in to individual tracks in your DAW for mixing and processing.
For examples of routing DrumCore out-puts in different DAWs, see "Chapter .”
DrumCore Volume and VU Meters
LiveDrummer
Whether you are programming your own MIDI drum patterns or using DrumCore’s MIDI grooves, you can use the LiveDrummer slider to add a little variety to the sound. The LiveDrummer slider af-fects both the velocities and the samples used for each event. For example, if you add a series of MIDI notes that are all at the same velocity to play a hi-hat pad, you can adjust the LiveDrummer slider to breathe a little life into it. Experiment with this setting to find just the right feel for your MIDI grooves and drum patterns.
Saving Kits as PresetsOnce you have edited DrumCore’s Pad Settings and Global Pad Settings, you will probably want to save your changes. Use your DAW’s plug-in set-tings or plug-in presets feature to save the changes you have made. For information on how to save and manage plug-in presets in your DAW, consult the manufacturer’s documentation.
Chapter 4: MIDI DrumKits 25

26
DrumCore Guide
Chapter 5: DrumCore Settings
The DrumCore Settings tab in the DrumCore Plug-in lets you set the DrumCore Data location, set the location for exported DrumCore content, set the format for exported content, create custom default settings, and provides access to the About and Registration windows.
DrumCore Settings
DrumCore Data LocationDrumCore expects the DrumCore Data folder to be in the location where it was originally installed. If you move the DrumCore Data folder to a different location, you will have to tell DrumCore where to find it.
To change the DrumCore Data location:
1 Click the Settings tab. By default, the Use DrumCore Data Folder option is enabled.
2 Click the Change button for the DrumCore Data Location.
3 In the resulting dialog, navigate to the location of the DrumCore Data folder.
4 Select the folder and click Choose.
Chapter 5: DrumCore Settings 27

28
Export LocationWhen dragging and dropping a file to a DAW, the file is converted to the export format, written as a new file to the specified export location, and then imported into your DAW. The default folder for exported content is \DrumCore Data\Exported-Content\. You can change the default location (folder) for exported content in the DrumCore Settings.
To change the DrumCore Export location:
1 Click the Settings tab.
2 Click the Change button for the Export Loca-tion.
3 In the resulting dialog, navigate to the location where you want to save exported files.
4 Select the folder and click Choose.
Export FormatThe Export Format settings let you specify the settings for exported content. Typically, your DAW will convert files that don’t match the file format, sample rate, and bit depth on import. You can set DrumCore to export content to the same file format, sample rate, and bit depth so that no conversion is necessary.
Select the appropriate File Type, Sample Rate, and Sample Format (bit depth) for your project:
Set the Export Location to your DAW project’s audio files folder. This lets you easily manage audio files exported from DrumCore that are specific to the project.
DrumCore Guide
REC/ACID Enable the REX/ACID export option to have DrumCore export REX or ACID files whenever they are available. All of DrumCore’s factory con-tent can be exported as REX files, or as AIFF, SD II, or WAVE files.
If you have imported ACID files, they can be ex-ported as ACID files, or as AIFF, SD II, or WAVE files.
If the REX or ACID format is not available, Drum-Core will export the file as the format selected in the pop-up menu (AIFF, SD II, or WAVE).
File Type AIFF, Sound Designer II, Sound Designer II Split .L/.R, or WAVE.
Sample Rate 44.1 kHz, 48 kHz, 88.2 kHz, 96 kHz, 176.4 kHz, or 192 kHz.
Sample Format 16- or 24-bit.
The Sound Designer II file format is only supported on Macintosh.
You should set the Sample Rate and Sample Format (bit depth) to the same sample rate and bit depth as your host application. For example, if your Pro Tools session is 96 kHz and 24-bit, you should set DrumCore to 96 kHz and 24-bit as well.
DrumCore factory content is all 24-bit, 48 kHz, and is encoded in DrumCore’s proprietary file format.

Default SettingsYou can change DrumCore’s default settings so that your custom settings are used as the default settings each time a new instance of DrumCore is used in your DAW.
To save the current settings as the default DrumCore settings:
1 Configure the DrumCore settings as desired.
2 Click the Save As Default Settings button.
AboutClick the About button to access the About Drum-Core window. Here you will see information about trademarks, credits, and the version number.
RegisterIf you are using DrumCore in the unregistered demo mode, click the Register button to register and authorize your copy of DrumCore.
To register DrumCore:
1 Select the Settings tab.
2 Click the Register button.
3 In the Register DrumCore dialog, enter your Name and Serial Number if necessary.
4 Click the Generate Challenge Code button.
5 Click the link to register DrumCore.
6 Enter the response code you receive into the Response Code field in the Register DrumCore di-alog.
7 Click Authorize.
Chapter 5: DrumCore Settings 29

30
DrumCore Guide
Chapter 5: Using DrumCore with your DAW
Every Digital Audio Workstation (DAW) is a little different in how it manages virtual instrument plug-ins—including how MIDI is routed to the plug-in and how audio is routed from the plug-in through the DAW’s mixer. For the most accurate and up to date information on using virtual instru-ment plug-ins, like DrumCore, consult the docu-mentation for your DAW. However, this section does provides a few examples: using DrumCore with Pro Tools, Ableton Live, Digital Performer, Cubase, Logic, Acid, and Sonar.
Using DrumCore with Ableton LiveDrumCore integrates seamlessly with Ableton Live as an Audio Units (AU) or VST plug-in.
Configuring DrumCore for Live
To use DrumCore with Live, you will want to con-figure the DrumCore settings accordingly.
To configure the DrumCore settings for Live:
1 Launch Ableton Live.
2 Drag and drop the DrumCore Plug-in Device from Live’s Plug-in Browser pane to a MIDI track.
Please consult the manufacturer’s docu-mentation for your DAW for the most current and up-to-date information about using Virtual Instrument (AU, RTAS, and VST) plug-ins with your DAW.
3 Click the Settings button in the DrumCore plug-in window to view the DrumCore Settings page.
4 Set the Export File Format options to match the File Type, Sample Rate, and Sample Format (bit depth) of your Live Set (e.g., AIFF, 44.1 kHz, 24-bit). Exported content is written to the folder specified in the Export Location settings (see “Ex-port Location” on page 28). The default folder is:
/DrumCore Data/ExportedContent/
Hearing DrumCore in Live
You can hear DrumCore in Live simply by starting playback in the Live Plug-in window.
To hear DrumCore in Live:
1 Launch Live and open an existing Live Set or create a new one.
2 In Live, create a new or use an existing MIDI track.
3 Search for the desired groove.
4 Adjust the level of DrumCore in Live.
5 Click he Play button in the DrumCore Plug-in window.
If DrumCore is currently playing back an audio or MIDI file, you will hear it playing back through Live.
Chapter 5: Using DrumCore with your DAW 31
32
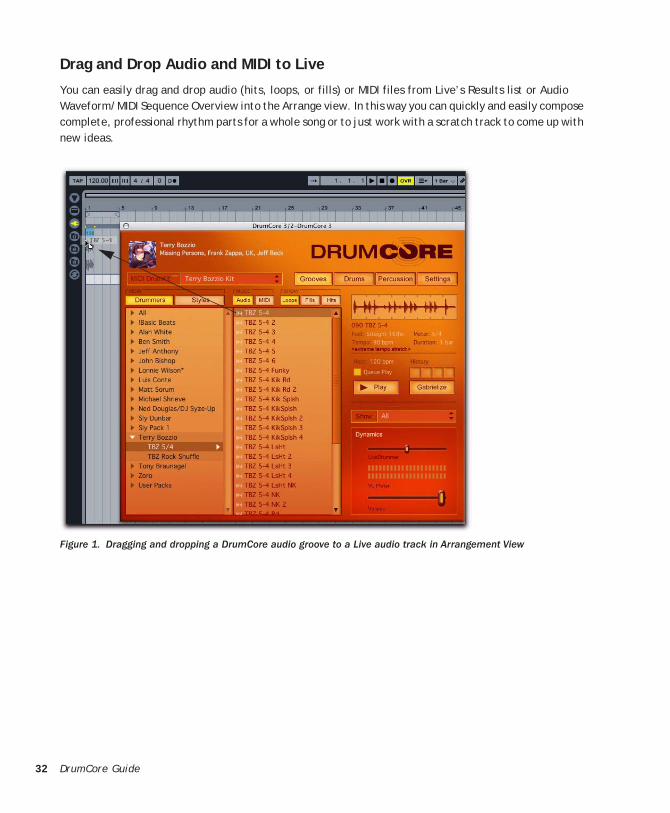
Drag and Drop Audio and MIDI to Live
You can easily drag and drop audio (hits, loops, or fills) or MIDI files from Live’s Results list or Audio Waveform/MIDI Sequence Overview into the Arrange view. In this way you can quickly and easily compose complete, professional rhythm parts for a whole song or to just work with a scratch track to come up with new ideas.
DrumCore Guide
Figure 1. Dragging and dropping a DrumCore audio groove to a Live audio track in Arrangement View
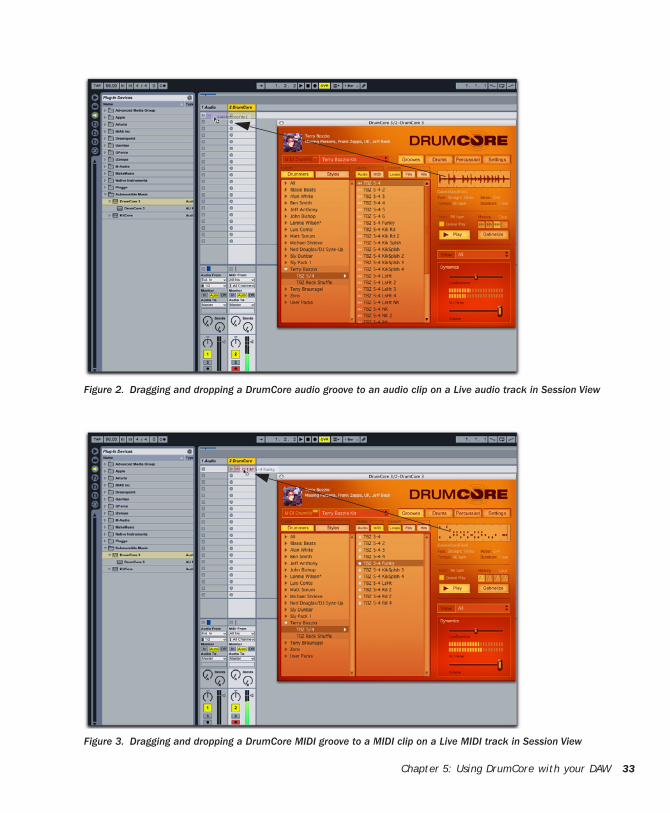
Figure 2. Dragging and dropping a DrumCore audio groove to an audio clip on a Live audio track in Session View
Figure 3. Dragging and dropping a DrumCore MIDI groove to a MIDI clip on a Live MIDI track in Session View
Chapter 5: Using DrumCore with your DAW 33

34
Playing DrumCore’s MIDI Drum Module with Live
DrumCore’s MIDI Drum module can be played di-rectly from Live, and monitored in Live. This gives you access to DrumCore’s world-class sampled DrumKits, while providing you with the flexibility of being able to do your own drum programming in Live.
To play the DrumCore MIDI Drum module with Live:
1 Launch Live and open an existing Live Set or create a new one.
2 Configure Live to monitor DrumCore (see “Hear-ing DrumCore in Live” on page 31).
3 In the DrumCore Plug-in window, select the de-sired DrumKit from the DrumKit menu (see “Drum-Kits” on page 21).
4 Create one or more new MIDI tracks (or use ex-isting MIDI tracks) and select DrumCore as the destination from the MIDI To pop-up menu.
Any MIDI data from the assigned tracks will play the currently selected DrumKit in DrumCore.
Selecting DrumCore as the MIDI To destination
DrumCore Guide
Recording DrumCore in Live
You may want to record DrumCore in Live to take advantage of the mixing, processing, and editing capabilities of Live as you continue to work on your set.
To record DrumCore to an audio track in Live:
1 Launch Live and open an existing Live Set or create a new one.
2 Configure Live to monitor DrumCore (see “Hear-ing DrumCore in Live” on page 31).
3 In Live, record enable an Audio track with DrumCore as the assigned input.
4 Use the Live Transport to begin recording.
Recording DrumCore in Live, Session View

5 In Live, click the Stop button in the Transport or press the Spacebar when you want to stop record-ing.
Configuring Live to Monitor Multiple Outs from DrumCore
To route DrumCore outputs to multiple audio tracks in Live for independent mixing and processing:
1 In your Live set, create a new MIDI track.
2 Drag and drop the DrumCore plug-in from the Plug-in Device Browser to the MIDI track.
3 In the DrumCore plug-in window, assign differ-ent pads to different DrumCore output channels (see “Global Pad Settings” on page 24).
For example, select the Kick 1 pad and assign it to DrumCore Output “Mono 17,” the snare pads to “Mono 18,” and the high hat pads to “Mono 19.”
4 In Live, create 3 new audio tracks.
Recording DrumCore in Live, Arrangement View
5 For the first new audio track, select Audio From > DrumCore 3.
6 From the track’s Input Channel selector, select DC 17-DrumCore 3.
7 Set the remaining audio track inputs to DC 18-DrumCore 3 and DC 19-DrumCore 3 respectively.
Chapter 5: Using DrumCore with your DAW 35

36
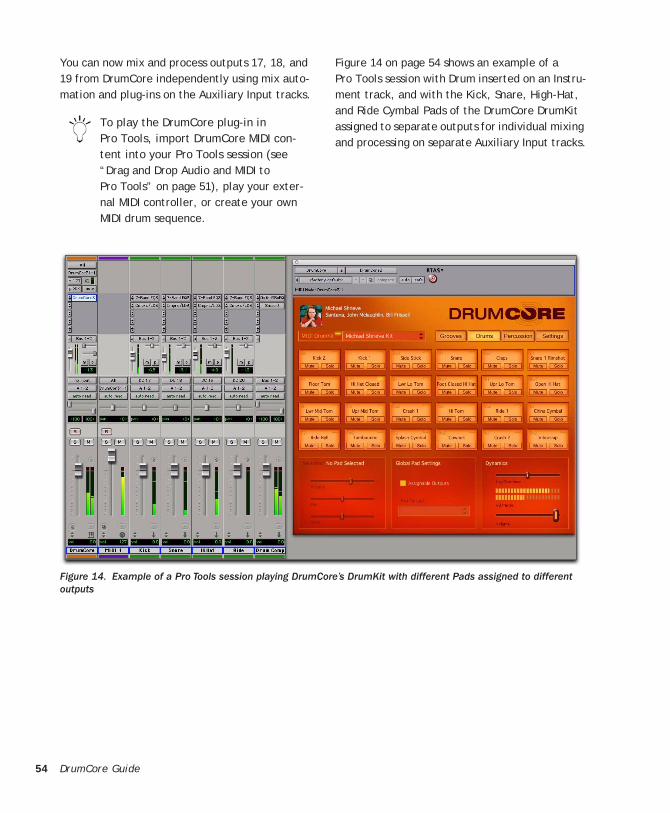
You can now mix and process outputs 17, 18, and 19 from DrumCore independently using mix auto-mation and plug-ins on the audio tracks.
To play the DrumCore plug-in in Live, import DrumCore MIDI content into your Live set, play your external MIDI control-ler, or create your own MIDI drum se-quence.
DrumCore Guide
Figure 4 shows an example of a Live set with DrumCore inserted on a MIDI track, and with the Kick, Snare, and High-Hat Pads assigned to sepa-rate outputs for individual mixing and processing on separate audio tracks.
Figure 4. Example of a Live set with different DrumCore Pads assigned to different outputs

Using DrumCore with CubaseDrumCore integrates seamlessly with Steinberg’s Cubase (and Nuendo too!) as a VST virtual instru-ment plug-in. This gives you access to DrumCore’s world-class audio and MIDI grooves, and sampled DrumKits, while providing you with the flexibility of being able to do your own editing, arranging, and drum programming in Cubase.
Configuring Cubase with DrumCore
To play DrumCore in your Cubase Project:
1 Launch Cubase and open an existing project or create a new project.
2 Create a new Instrument track by going to the Devices menu and selecting VST Instruments.
3 In the VST Instruments window, select Drum-Core as the VST Instrument.
4 When prompted to create a new MIDI track as-signed to DrumCore, click Create.
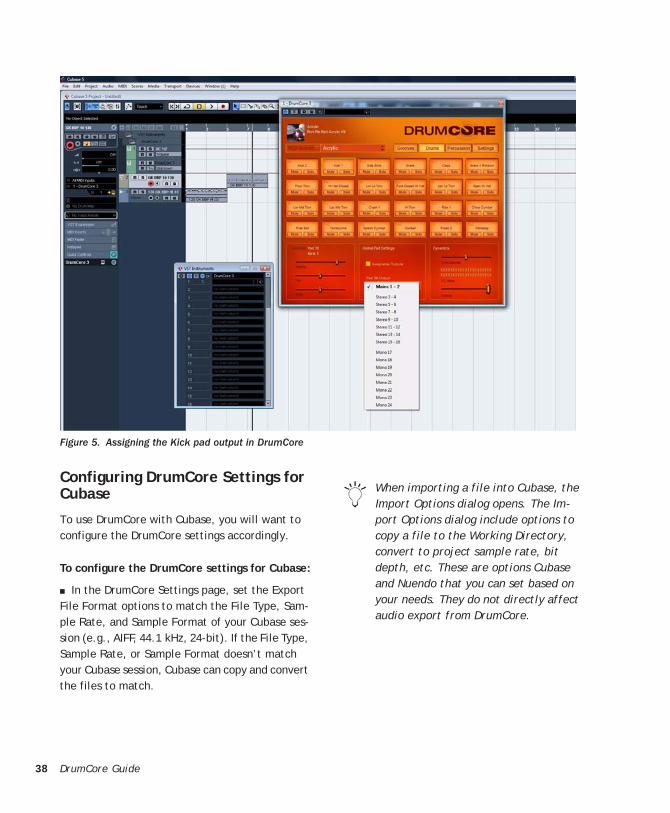
5 Choose the Output Activation list for DrumCore in the VST Instruments rack and select however many separate outputs you want to use. This will create multiple audio tracks in Cubase.
6 Assign the outputs for pads in DrumCore that corresponding to each audio track in Cubase ac-cordingly (see Figure 5 on page 38).
Chapter 5: Using DrumCore with your DAW 37
38
DrumCore GuideFigure 5. Assigning the Kick pad output in DrumCore
Configuring DrumCore Settings for Cubase
To use DrumCore with Cubase, you will want to configure the DrumCore settings accordingly.
To configure the DrumCore settings for Cubase:
■ In the DrumCore Settings page, set the Export File Format options to match the File Type, Sam-ple Rate, and Sample Format of your Cubase ses-sion (e.g., AIFF, 44.1 kHz, 24-bit). If the File Type, Sample Rate, or Sample Format doesn’t match your Cubase session, Cubase can copy and convert the files to match.
When importing a file into Cubase, the Import Options dialog opens. The Im-port Options dialog include options to copy a file to the Working Directory, convert to project sample rate, bit depth, etc. These are options Cubase and Nuendo that you can set based on your needs. They do not directly affect audio export from DrumCore.
Drag and Drop Audio and MIDI to Cubase
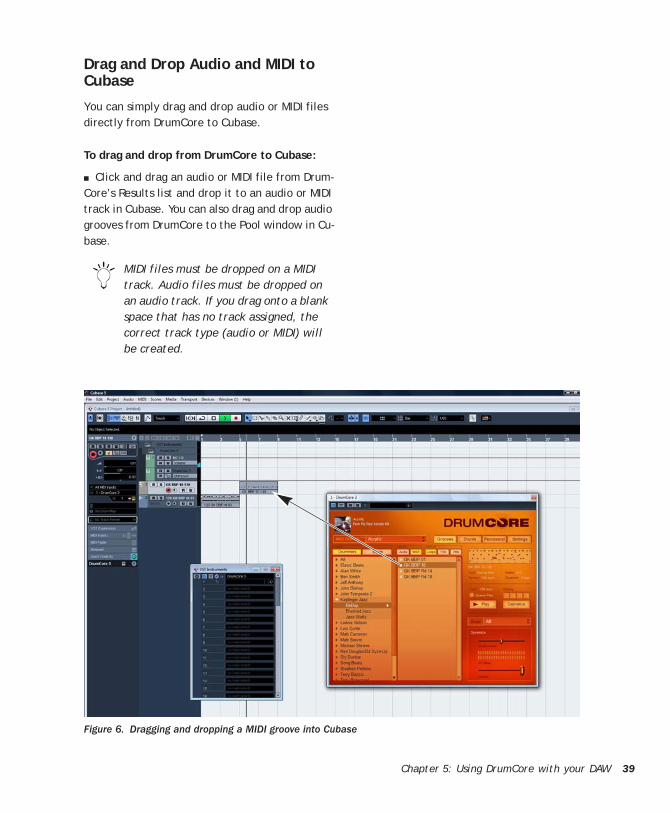
You can simply drag and drop audio or MIDI files directly from DrumCore to Cubase.
To drag and drop from DrumCore to Cubase:
■ Click and drag an audio or MIDI file from Drum-Core’s Results list and drop it to an audio or MIDI track in Cubase. You can also drag and drop audio grooves from DrumCore to the Pool window in Cu-base.
MIDI files must be dropped on a MIDI track. Audio files must be dropped on an audio track. If you drag onto a blank space that has no track assigned, the correct track type (audio or MIDI) will be created.
Figure 6. Dragging and dropping a MIDI groove into Cubase
Chapter 5: Using DrumCore with your DAW 39

40
Playing DrumCore’s MIDI Drum Module with Cubase
DrumCore’s MIDI Drum module can be played di-rectly from Cubase, and monitored in Cubase. This gives you access to DrumCore’s world-class sampled DrumKits, while providing you with the flexibility of being able to do your own drum pro-gramming in Cubase.
To play the DrumCore MIDI Drum module with Cubase:
1 Launch Cubase and open an existing project or create a new project.
2 Configure Cubase to monitor DrumCore (see “Configuring Cubase with DrumCore” on page 37). Use multiple tracks for multiple outputs from DrumCore if desired (see “Global Pad Settings” on page 24).
3 Select the desired DrumKit from the DrumKit menu (see “DrumKits” on page 21).
4 In Cubase, create one or more new MIDI tracks (or use existing MIDI tracks).
5 Select DrumCore as the output of the selected MIDI track.
Any MIDI data from the assigned tracks will play the currently selected DrumKit in DrumCore.
DrumCore Guide
Recording DrumCore in Cubase
You may want to record DrumCore in Cubase to take advantage of the mixing, processing, and ed-iting capabilities of Cubase as you continue to work on your project.
To record DrumCore to an audio track in Cubase:
1 Solo the DrumCore track (also solo any MIDI tracks you may be using to play DrumCore’s MIDI Drum module).
2 Select File > Export > Audio Mixdown.
3 In the resulting Export Audio Mixdown dialog, select the following:
• location where the file will be saved
• sample rate.
• bit depth
• number of channels (e.g., mono, stereo, etc.)
4 You can also select the Import to Pool and Im-port to Audio Track option to automatically re-im-port the audio to the Pool or a new audio track respectively.
5 Click Save.

Using DrumCore with Digital Performer(Macintosh Only)
DrumCore integrates seamlessly with Mark of the Unicorn’s Digital Performer (version 4.0 or later) as an Audio Units virtual instrument plug-in.
Configuring DrumCore for Digital Performer
To use DrumCore with Digital Performer, you will want to configure the DrumCore settings accord-ingly.
To configure the DrumCore settings for Digital Performer:
1 Launch Digital Performer.
2 Add DrumCore 3 as an Instrument track.
3 Click the Settings button in the DrumCore plug-in window to view the DrumCore Settings page.
4 Set the Export File Format options to match the File Type, Sample Rate, and Sample Format (bit depth) of your project (e.g., AIFF, 44.1 kHz, 24-bit). Exported content is written to the folder specified in the Export Location settings (see “Ex-port Location” on page 28). The default folder is:
/DrumCore Data/ExportedContent/
Hearing DrumCore in Digital Performer
You can hear DrumCore in Digital Performer sim-ply by adding it as an Instrument track.
To hear DrumCore in Digital Performer:
1 Launch Digital Performer and open an existing project or create a new project.
2 In Digital Performer, create a new stereo Instru-ment track. Be sure that the new track has a valid output assignment.
3 Search for and audition the desired audio or MIDI groove.
4 In Digital Performer, adjust the track’s volume to the desired level for playback.
If DrumCore is currently playing back an audio or MIDI file, you will hear it playing back through Dig-ital Performer.
Chapter 5: Using DrumCore with your DAW 41

42
Recording DrumCore in Digital Performer
You can record DrumCore’s audio output right into Digital Performer, whether you are playing an audio file or DrumCore’s DrumKit via MIDI.
To record DrumCore in Digital Performer:
1 Launch Digital Performer and open an existing project or create a new project.
2 In Digital Performer, add a new stereo Instru-ment track with DrumCore.
DrumCore Guide
3 Add a new audio track.
4 Select DrumCore for the Input to the new audio track.
5 Record enable the new audio track and start re-cording in Digital Performer.
Digital Performer will record the audio output from DrumCore in real-time.
Figure 7. Recording the main audio output of DrumCore in Digital Performer

Drag and Drop Audio and MIDI to Digital Performer
You can easily drag and drop an audio (hits, loops, or fills) or MIDI files from DrumCore’s Results list or Audio Waveform/MIDI Sequence Overview to Digital Performer’s Timeline or Soundbites win-dow. This gives you the flexibility to arrange audio and MIDI files from DrumCore’s extensive data-base in Digital Performer any way you want. It’s a great way to quickly and easily compose com-plete, professional rhythm parts for a whole song or to just work with a scratch track to come up with new ideas.
When dragging and dropping audio or MIDI groove from DrumCore, Digital Performer will place the groove in the target track.
Exporting Audio to Digital Performer
You can export an audio file (loop, fill, or hit) from DrumCore right into Digital Performer’s Soundbites window. This gives you the flexibility to arrange audio files from DrumCore’s extensive database in Digital Performer any way you want.
It’s a great way to quickly and easily compose complete, professional rhythm parts for a whole song or to just work with a scratch track to come up with new ideas.
You can also simply drag and drop audio loops, fills, or hits right from the DrumCore Results list to Digital Performer’s Timeline or Soundbites win-dow.
To export audio to Digital Performer:
1 Launch Digital Performer and open an existing project or create a new project.
2 In Digital Performer, add a new Instrument track with DrumCore. Be sure that the new track has a valid output assignment.
3 In DrumCore, search for the desired audio groove.
4 Drag and drop the selected audio groove to the Sound Bites window or to the Tracks or Sequence window.
Figure 8. Drag and drop from DrumCore to Digital Performer
Chapter 5: Using DrumCore with your DAW 43

44
Exporting MIDI to Digital Performer
Drag and drop MIDI files from DrumCore to Digital Performer.
To export MIDI to Digital Performer:
1 Launch Digital Performer and open an existing project or create a new project.
2 Configure Digital Performer for monitoring DrumCore (see “Hearing DrumCore in Digital Per-former” on page 41).
DrumCore Guide
3 In DrumCore, search for and select the desired MIDI groove.
4 Drag and drop the desired MIDI groove from DrumCore to Digital Performer (see Figure 9 on page 44).
You can now use the MIDI sequence from Drum-Core verbatim, or edit to suit your needs.
Figure 9. Drag and drop MIDI from DrumCore to Digital Performer

Playing DrumCore’s MIDI Drum Module with Digital Performer
DrumCore’s MIDI Drum module can be played di-rectly from Digital Performer MIDI tracks, and monitored and recorded in Digital Performer. This gives you access to DrumCore’s world-class sam-pled DrumKits, while providing you with the flex-ibility of being able to do your own drum program-ming in Digital Performer.
To play the DrumCore MIDI Drum module with Digital Performer:
1 In your Digital Performer Project, create a new Instrument track with KitCore by selecting Project > Add Track > Instrument Track > DrumCore 3 (mono or stereo) [Submersible Music].
2 Create a new MIDI track by selecting Project > Add Track > MIDI Track.
3 From the MIDI track’s Output menu, select DrumCore 3-1-1.
4 Import DrumCore MIDI content to the MIDI track (see “Drag and Drop Audio and MIDI to Digital Per-former” on page 43), play (and record) your ex-ternal MIDI controller, or create your own MIDI drum sequence to play DrumCore in Digital Per-former.
5 Start playback in Digital Performer.
To play the DrumCore plug-in in Digital Performer, import DrumCore MIDI con-tent into your Digital Performer project (see “Drag and drop from DrumCore to Digital Performer” below), play your external MIDI controller, or create your own MIDI drum sequence.
Configuring Digital Performer to Monitor Multiple Outs from DrumCore
To route DrumCore outputs to multiple Aux tracks in Digital Performer for independent mixing and processing:
1 In your Digital Performer Project, create a new Instrument track with DrumCore by selecting Project > Add Track > Instrument Track > Submers-ible Music: DrumCore (mono or stereo).
2 Create a new MIDI track by selecting Project > Add Track > MIDI Track.
3 From the MIDI track’s Output menu, select DrumCore 3-1 > DrumCore 3-1-1.
4 Import DrumCore MIDI content to the MIDI track (see “Drag and Drop Audio and MIDI to Digital Per-former” on page 43), play your external MIDI con-troller, or create your own MIDI drum sequence to play DrumCore in Digital Performer.
5 In the DrumCore plug-in window, you can assign different pads to different DrumCore output channels (see“Global Pad Settings” on page 24).
For example, select the Kick 1 pad and assign it to DrumCore Output “Mono 17,” the snare pads to “Mono 18,” and the high hat pads to “Mono 19.”
In Digital Performer, create a new Aux track by selecting Project > New Track > Aux Track.
6 From the Aux track’s Input menu, select New Mono Bundle > DrumCore 3-1-17. (You may need to configure this in the Bundles window first.)
7 Repeat steps 5 through 7 to route additional DrumCore outputs to separate Aux tracks for mix-ing and processing.
Chapter 5: Using DrumCore with your DAW 45

46
You can now mix and process outputs 17, 18, and 19 from DrumCore independently using mix auto-mation and plug-ins on the Aux tracks.
To play the DrumCore plug-in in Digital Performer, import DrumCore MIDI con-tent into your Digital Performer project, play your external MIDI con-troller, or create your own MIDI drum sequence.
DrumCore Guide
Figure 10. Example of a Digital Performer project playing DrumCore

Using DrumCore with Logic(Macintosh Only)
DrumCore integrates seamlessly with Emagic’s Logic as an Audio Units (AU) instrument plug-in. Logic can both send MIDI to DrumCore and receive audio back from DrumCore.
Configuring Logic for DrumCore
To use DrumCore with Logic, simply insert Drum-Core on an Instrument track. You can also create additional Audio, Aux, and MIDI tracks for playing and mixing DrumCore.
To configure Logic for DrumCore:
1 Launch Logic and open an existing project or create a new project.
2 Create a new Software Instrument track.
3 From the I/O Input selector, choose AU Instru-ments > Submersible Music > DrumCore 3 > Stereo.
4 The DrumCore plug-in window opens.
5 You can create additional Audio and Aux tracks for recording and mixing DrumCore.
6 You can also create additional MIDI tracks for playing DrumCore.
Selecting DrumCore on a Software Instrument track
Configuring DrumCore for Logic
To use DrumCore with Logic, you will want to con-figure the DrumCore settings accordingly.
To configure the DrumCore settings for Logic:
1 Launch Logic.
2 Add an Instrument track and select DrumCore from the I/O Input selector.
3 Click the Settings button in the DrumCore plug-in window to view the DrumCore Settings page.
4 Set the Export File Format options to match the File Type, Sample Rate, and Sample Format (bit depth) of your Project (e.g., AIFF, 44.1 kHz, 24-bit).
5 Exported content is written to the folder spec-ified in the Export Location settings (see “Export Location” on page 28). The default folder is:
/DrumCore Data/ExportedContent/
Drag and Drop Audio and MIDI to Logic
You can simply drag and drop audio or MIDI files directly from DrumCore into Logic.
To drag and drop audio from DrumCore to Logic:
■ Click and drag an audio or MIDI file from the DrumCore Results list and drop it onto an audio or MIDI track in the Arrange window (see Figure 11 on page 48).
Logic allows multiple sample rates in a project. Be sure to set DrumCore to match your Logic session because Logic does not warn you if the sample rate you are using doesn’t match the project’s sample rate. If the sample rates don’t match and you export as AIF or WAV, the DrumCore groove may not synchronize with Logic.
Chapter 5: Using DrumCore with your DAW 47
48
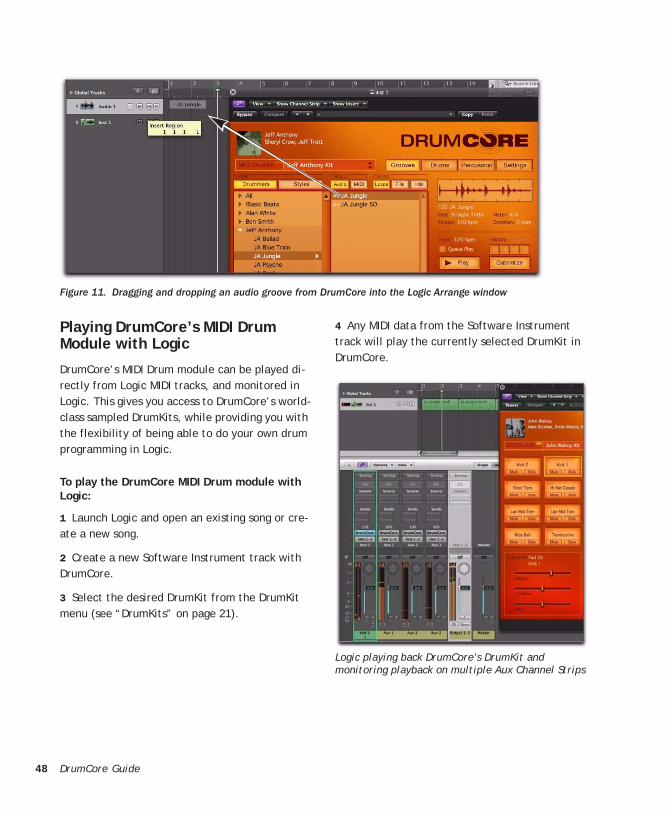
DrumCore GuideFigure 11. Dragging and dropping an audio groove from DrumCore into the Logic Arrange window
Playing DrumCore’s MIDI Drum Module with Logic
DrumCore’s MIDI Drum module can be played di-rectly from Logic MIDI tracks, and monitored in Logic. This gives you access to DrumCore’s world-class sampled DrumKits, while providing you with the flexibility of being able to do your own drum programming in Logic.
To play the DrumCore MIDI Drum module with Logic:
1 Launch Logic and open an existing song or cre-ate a new song.
2 Create a new Software Instrument track with DrumCore.
3 Select the desired DrumKit from the DrumKit menu (see “DrumKits” on page 21).
4 Any MIDI data from the Software Instrument track will play the currently selected DrumKit in DrumCore.
Logic playing back DrumCore’s DrumKit and monitoring playback on multiple Aux Channel Strips

Configuring Logic to Monitor Multiple Outs from DrumCore
To route DrumCore outputs to multiple Aux tracks in Logic for independent mixing and processing:
1 Insert DrumCore on the Instrument track as a multichannel plug-in rather than as a stereo plug-in.
2 The DrumCore plug-in window opens.
3 Select Options > Create New Auxiliary Channel Strips in the Logic Mixer.
Inserting DrumCore as a multichannel instrument plug-in
4 Type the number for however many separate channels you want to mix from DrumCore in Logic, set the Format (mono or stereo) and click Create.
5 Assign the outputs for pads in DrumCore as de-sired.
6 Set the Inputs for the Auxiliary Channel Strips to the desired DrumCore outputs.
Assigning DrumCore outputs to Auxiliary Channel Strip inputs
Chapter 5: Using DrumCore with your DAW 49

50
Using DrumCore with Pro ToolsDrumCore integrates seamlessly with Digidesign’s Pro Tools (both LE and TDM versions) as an RTAS plug-in. The Main audio output from DrumCore plays through the stereo or mono Pro Tools audio, Auxiliary Input, or Instrument track on which it is inserted.
Configuring DrumCore for Pro Tools
To use DrumCore in your Pro Tools session, you will want to configure the DrumCore settings ac-cordingly.
To configure DrumCore’s settings for your Pro Tools session:
1 Launch Pro Tools.
2 Create a new stereo Instrument track.
3 Insert DrumCore on the new Instrument track.
4 Click the Settings button in the DrumCore plug-in window to view the DrumCore Settings page.
5 Set the Export File Format options to match the File Type, Sample Rate, and Sample Format (bit depth) of your Pro Tools session (e.g., AIFF, 44.1 kHz, 24-bit). Exported content is written to the folder specified in the Export Location set-tings (see “Export Location” on page 28). The de-fault folder is:
/DrumCore Data/ExportedContent/
If the File Type, Sample Rate, or Sample Format doesn’t match your Pro Tools session, Pro Tools will convert and copy (to the session’s Audio Files folder) the files to match.
If the File Type, Sample Rate, and Sample Format all match your Pro Tools session, the exported file may not be copied to the session’s Audio Files folder.
DrumCore Guide
Hearing DrumCore in Pro Tools
You can hear DrumCore in Pro Tools simply by se-lecting it as an RTAS plug-in on an Instrument, Auxiliary Input, or audio track.
To hear DrumCore in Pro Tools:
1 Launch Pro Tools and open an existing session or create a new session.
2 Create a new stereo or mono Instrument, Aux-iliary Input, or audio track.
3 Select the DrumCore RTAS plug-in on the new track. The Plug-In window opens.
4 Adjust the track’s volume fader to the desired level.
If DrumCore is currently playing back an audio or MIDI file, you will hear it playing back through Pro Tools.
Recording DrumCore in the Pro Tools Mix window
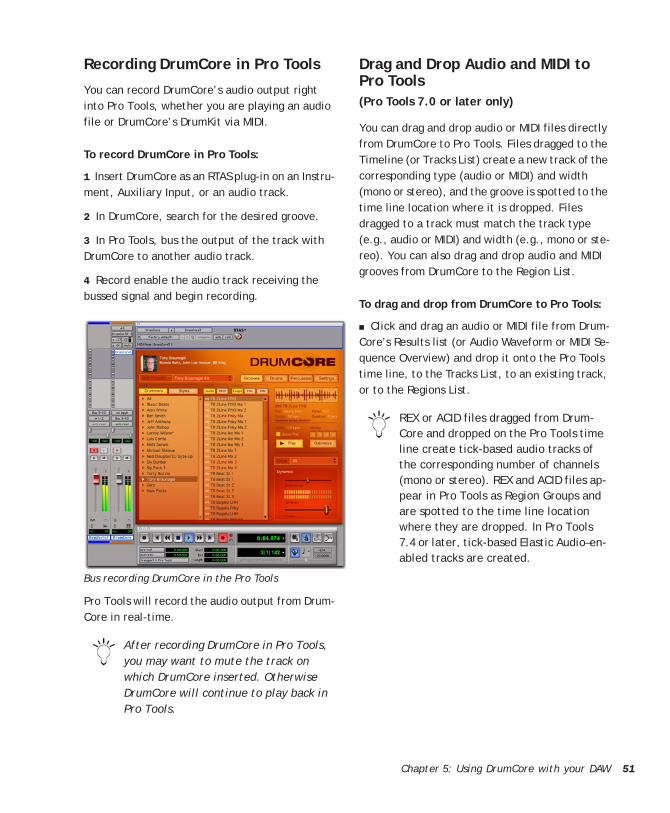
Recording DrumCore in Pro Tools
You can record DrumCore’s audio output right into Pro Tools, whether you are playing an audio file or DrumCore’s DrumKit via MIDI.
To record DrumCore in Pro Tools:
1 Insert DrumCore as an RTAS plug-in on an Instru-ment, Auxiliary Input, or an audio track.
2 In DrumCore, search for the desired groove.
3 In Pro Tools, bus the output of the track with DrumCore to another audio track.
4 Record enable the audio track receiving the bussed signal and begin recording.
Pro Tools will record the audio output from Drum-Core in real-time.
Bus recording DrumCore in the Pro Tools
After recording DrumCore in Pro Tools, you may want to mute the track on which DrumCore inserted. Otherwise DrumCore will continue to play back in Pro Tools.
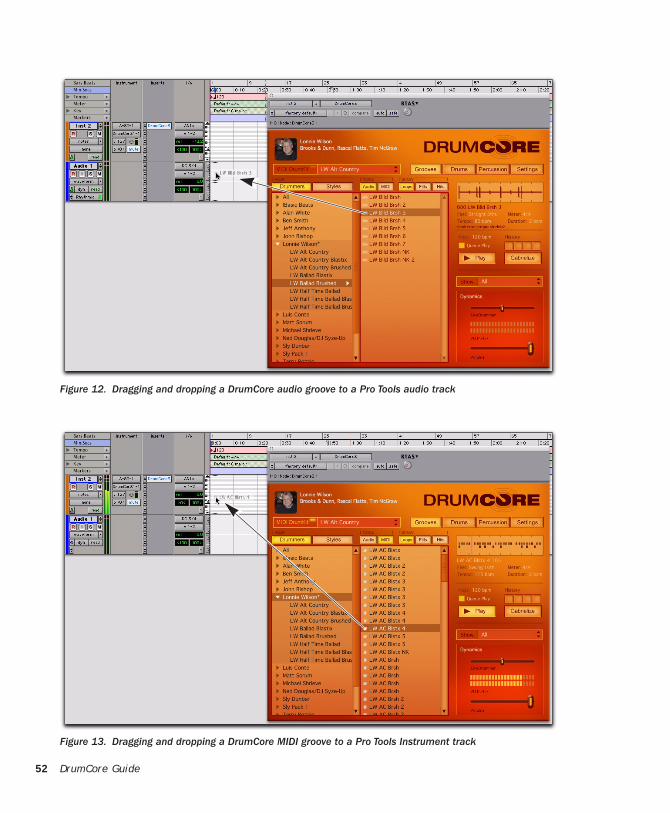
Drag and Drop Audio and MIDI to Pro Tools(Pro Tools 7.0 or later only)
You can drag and drop audio or MIDI files directly from DrumCore to Pro Tools. Files dragged to the Timeline (or Tracks List) create a new track of the corresponding type (audio or MIDI) and width (mono or stereo), and the groove is spotted to the time line location where it is dropped. Files dragged to a track must match the track type (e.g., audio or MIDI) and width (e.g., mono or ste-reo). You can also drag and drop audio and MIDI grooves from DrumCore to the Region List.
To drag and drop from DrumCore to Pro Tools:
■ Click and drag an audio or MIDI file from Drum-Core’s Results list (or Audio Waveform or MIDI Se-quence Overview) and drop it onto the Pro Tools time line, to the Tracks List, to an existing track, or to the Regions List.
REX or ACID files dragged from Drum-Core and dropped on the Pro Tools time line create tick-based audio tracks of the corresponding number of channels (mono or stereo). REX and ACID files ap-pear in Pro Tools as Region Groups and are spotted to the time line location where they are dropped. In Pro Tools 7.4 or later, tick-based Elastic Audio–en-abled tracks are created.
Chapter 5: Using DrumCore with your DAW 51
52
DrumCore GuideFigure 12. Dragging and dropping a DrumCore audio groove to a Pro Tools audio track
Figure 13. Dragging and dropping a DrumCore MIDI groove to a Pro Tools Instrument track
Playing DrumCore’s MIDI Drum Module with Pro Tools
DrumCore’s MIDI Drum module can be played di-rectly from Pro Tools Instrument and MIDI tracks, and monitored and recorded in Pro Tools. This gives you access to DrumCore’s world-class sam-pled DrumKits, while providing you with the flex-ibility of being able to do your own drum program-ming in Pro Tools.
To play the DrumCore MIDI Drum module with Pro Tools:
1 Insert DrumCore as an RTAS plug-in on an Instru-ment, Auxiliary Input, or audio track. If using mul-tiple outputs from DrumCore, use the corresponding number of inserts on stereo or mono tracks in Pro Tools.
2 Select the desired DrumKit from the DrumKit se-lector (see “DrumKits” on page 21).
3 In Pro Tools, create one or more new Instrument or MIDI tracks, or use existing Instrument or MIDI tracks (or even MIDI sequences imported from DrumCore).
4 Assign the Instrument or MIDI Track Output for each track to the DrumCore plug-in.
Any MIDI data from these tracks will now play the currently selected DrumKit in DrumCore.
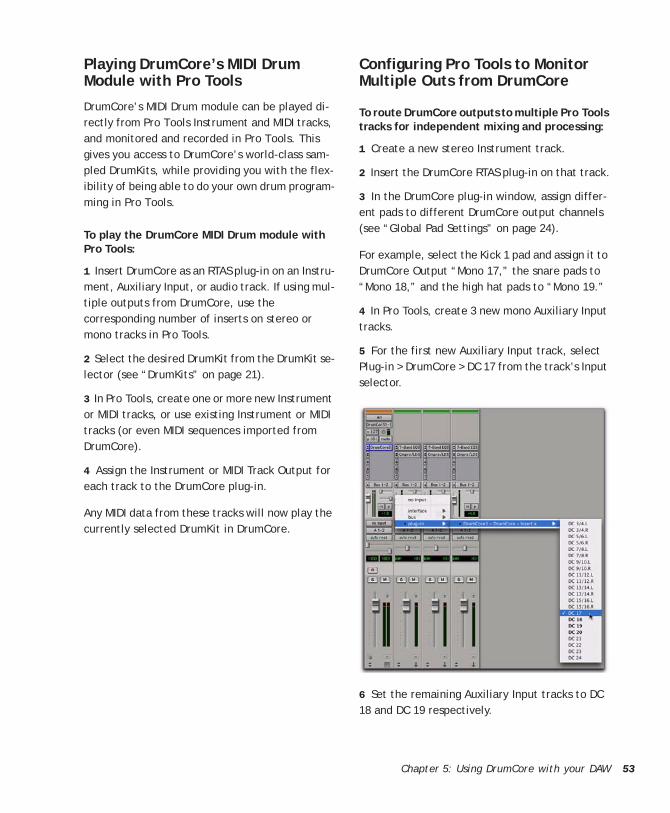
Configuring Pro Tools to Monitor Multiple Outs from DrumCore
To route DrumCore outputs to multiple Pro Tools tracks for independent mixing and processing:
1 Create a new stereo Instrument track.
2 Insert the DrumCore RTAS plug-in on that track.
3 In the DrumCore plug-in window, assign differ-ent pads to different DrumCore output channels (see “Global Pad Settings” on page 24).
For example, select the Kick 1 pad and assign it to DrumCore Output “Mono 17,” the snare pads to “Mono 18,” and the high hat pads to “Mono 19.”
4 In Pro Tools, create 3 new mono Auxiliary Input tracks.
5 For the first new Auxiliary Input track, select Plug-in > DrumCore > DC 17 from the track’s Input selector.
6 Set the remaining Auxiliary Input tracks to DC 18 and DC 19 respectively.
Chapter 5: Using DrumCore with your DAW 53
54
You can now mix and process outputs 17, 18, and 19 from DrumCore independently using mix auto-mation and plug-ins on the Auxiliary Input tracks.
To play the DrumCore plug-in in Pro Tools, import DrumCore MIDI con-tent into your Pro Tools session (see “Drag and Drop Audio and MIDI to Pro Tools” on page 51), play your exter-nal MIDI controller, or create your own MIDI drum sequence.
DrumCore Guide
Figure 14 on page 54 shows an example of a Pro Tools session with Drum inserted on an Instru-ment track, and with the Kick, Snare, High-Hat, and Ride Cymbal Pads of the DrumCore DrumKit assigned to separate outputs for individual mixing and processing on separate Auxiliary Input tracks.
Figure 14. Example of a Pro Tools session playing DrumCore’s DrumKit with different Pads assigned to different outputs

Using DrumCore with Sonar(Windows Only)
DrumCore integrates seamlessly with Cakewalk’s Sonar as a VST instrument plug-in. Sonar can both send MIDI to DrumCore and receive audio back from DrumCore.
Configuring Sonar with DrumCore
To play DrumCore in Sonar:
1 In Sonar, select Insert > Soft Synth > vstplugins > DrumCore.
2 Configure Sonar’s Insert Options dialog as de-sired.
If you select the All Synth Audio Out-puts option in Sonar, one new MIDI track is created (to send MIDI out to Drum-Core’s MIDI instrument) and 16 stereo instrument audio input tracks (corre-sponding to DrumCore’s 16 stereo audio outputs) are created. Only use this if you are using DrumCore as a MIDI instru-ment and you want to process individual drum instrument sounds
3 Click OK. Sonar creates both a new stereo audio track and a new MIDI track.
4 In DrumCore, search for the desired groove.
5 Adjust the level of DrumCore in Sonar.
If DrumCore is currently playing back an audio or MIDI file, you will hear it playing back through So-nar.
You can also play DrumCore’s DrumKits by routing MIDI from your external MIDI controller through the MIDI track that is assigned to DrumCore or by programming your own drum patterns on that MIDI track.
Configuring DrumCore for Sonar
To use DrumCore with Sonar, you will want to con-figure the DrumCore settings accordingly.
To configure the DrumCore settings for Sonar:
1 Open the DrumCore plug-in window and click the Settings button.
2 Set the Export File Format options to match the File Type, Sample Rate, and Sample Format of your Sonar project (e.g., WAVE, 44.1 kHz, 24-bit). If the File Type, Sample Rate, or Sample Format doesn’t match your Sonar project, Sonar will copy and convert the files to match.
Chapter 5: Using DrumCore with your DAW 55
56
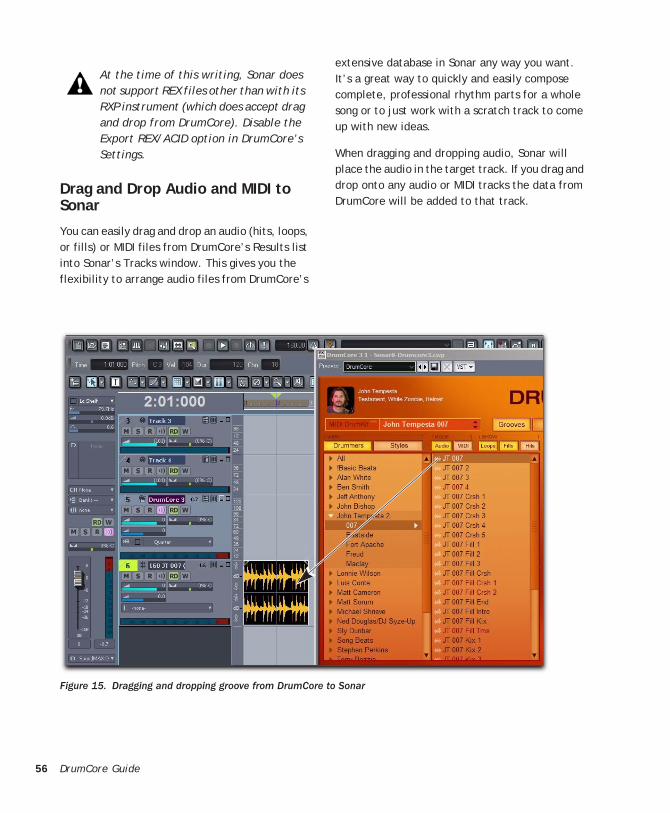
Drag and Drop Audio and MIDI to Sonar
You can easily drag and drop an audio (hits, loops, or fills) or MIDI files from DrumCore’s Results list into Sonar’s Tracks window. This gives you the flexibility to arrange audio files from DrumCore’s
At the time of this writing, Sonar does not support REX files other than with its RXP instrument (which does accept drag and drop from DrumCore). Disable the Export REX/ACID option in DrumCore’s Settings.
DrumCore Guide
extensive database in Sonar any way you want. It’s a great way to quickly and easily compose complete, professional rhythm parts for a whole song or to just work with a scratch track to come up with new ideas.
When dragging and dropping audio, Sonar will place the audio in the target track. If you drag and drop onto any audio or MIDI tracks the data from DrumCore will be added to that track.
Figure 15. Dragging and dropping groove from DrumCore to Sonar
Playing DrumCore’s MIDI Drum Module with Sonar
DrumCore’s MIDI Drum module can be played di-rectly from Sonar, and monitored in Sonar. This gives you access to DrumCore’s world-class sam-pled DrumKits, while providing you with the flex-ibility of being able to do your own drum program-ming in Sonar.
To play the DrumCore MIDI Drum module with Sonar:
1 Launch Sonar and open an existing project or create a new project.
2 Configure Sonar to monitor DrumCore (see “Configuring Sonar with DrumCore” on page 55).
3 In DrumCore, select the desired DrumKit from the DrumKit menu (see “DrumKits” on page 21).
4 In Sonar, create one or more new MIDI tracks (or use existing MIDI tracks) and select DrumCore as the destination.
5 Select DrumCore from the MIDI track’s Output pop-up menu.
Any MIDI data from the assigned tracks will play the currently selected DrumKit in DrumCore.
To automatically record DrumCore in Sonar, se-lect one or more DrumCore tracks in Sonar and choose Tracks > Freeze Synth. Any MIDI routed to DrumCore plays back and DrumCore’s audio out-put is recorded into Sonar.
Configuring Sonar to Monitor Multiple Outs from DrumCore
To route DrumCore outputs to multiple audio tracks in Sonar for independent mixing and processing:
1 In Sonar, select Insert > Soft Synth > vstplugins > DrumCore.
2 In the Insert Soft Synth Options dialog, select ei-ther or both the All Synth Audio Outputs: Stereo and the All Synth Audio Outputs: Mono options to use multiple stereo and/or mono outs from Drum-Core.
3 Click OK. Sonar creates multiple new stereo and/or mono audio tracks, and a single new MIDI track.
4 Assign the outputs for pads in DrumCore that will correspond to each audio track in Sonar ac-cordingly (see Figure 16 on page 58).
5 Assign the track inputs in Sonar to the corre-sponding DrumCore outputs (see Figure 17 on page 58).
Chapter 5: Using DrumCore with your DAW 57
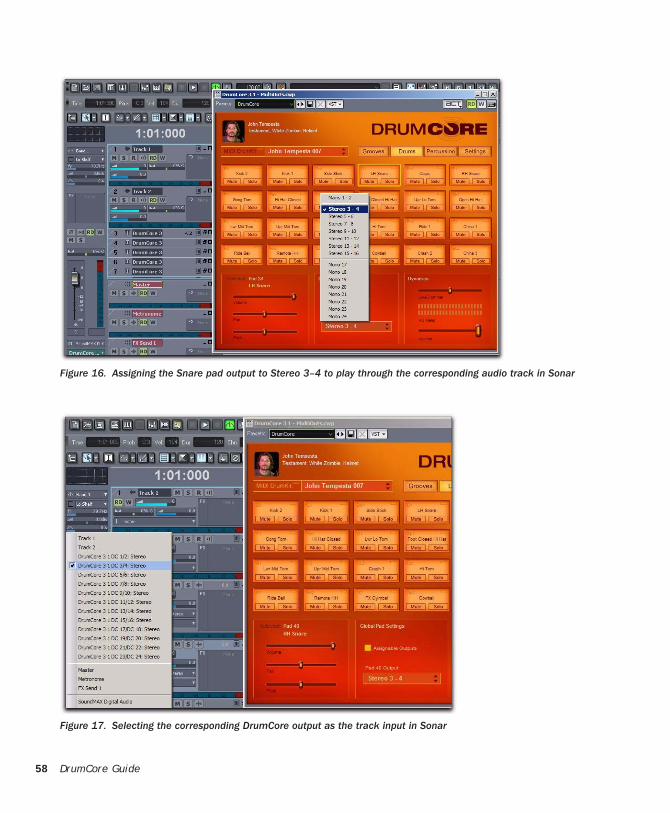
58
DrumCore GuideFigure 16. Assigning the Snare pad output to Stereo 3–4 to play through the corresponding audio track in Sonar
Figure 17. Selecting the corresponding DrumCore output as the track input in Sonar
Using DrumCore with Other Audio and MIDI ApplicationsDrumCore can by used in most any host applica-tion that supports AU, RTAS, or VST instrument plug-ins. For example, you may want to use Drum-Core with applications like Acid®, Adobe® Audi-tion™, Fruity Loops™, Samplitude™, Tracktion™, Garage Band™, or even MAX/MSP. Consult the manufacturer’s documentation on the applica-tion’s plug-in implementation for more informa-tion.
Likewise, DrumCore’s drag and drop export of au-dio and MIDI files should work with any application that supports drag and drop import of audio and MIDI. Consult the manufacturer’s documentation on the application’s drag and drop import capabil-ities.
Chapter 5: Using DrumCore with your DAW 59

60
DrumCore Guide
Index
AAbleton Live 31Acid 59Adobe Audition 59AU
installing 5with Logic 47
Audio button 10Audio Units (AU) 47Audio Waveform/MIDI Sequence Overview 10authorization 6
CCubase 37
drag and drop to 39playing DrumCore MIDI Drum module 40recording DrumCore in 40
Ddefault export location 28Digital Performer 41
drag and drop 43exporting audio to 43exporting MIDI files to 44monitoring DrumCore in 41playing DrumCore MIDI Drum module 45recording DrumCore in 42
Drag and DropExport 17
DrumCoreauthorizing 6configuring for Cubase 38configuring for Digital Performer 41configuring for Live 31configuring for Nuendo 38configuring for Pro Tools 50configuring for Sonar 55drag and drop 17
drag and drop to Cubase 39drag and drop to Logic 47drag and drop to Pro Tools 51DrumKits 21export 17, 18exporting audio to Digital Performer 43exporting MIDI files to Digital Performer 44features 1installing 5, 6MIDI Drum module 21monitoring in Digital Performer 41monitoring in Live 31recording in Cubase 40recording in Digital Performer 42recording in Live 34recording in Nuendo 40recording in Pro Tools 51register 3system requirements 3using with Cubase 37using with Live 31using with Logic 47using with Nuendo 37using with Pro Tools 50using with Sonar 55
DrumCore Data folder 27DrumCore Data location
changing 27, 28DrumCore interface 9DrumCore Toolkit
features 2DrumKit Indicator 10DrumKits 21
Pad Settings 23playing with Cubase 40playing with Digital Performer 45playing with Logic 48playing with Nuendo 40playing with Pro Tools 53playing with Sonar 34, 57
Index 61
62
selecting 21Drummers button 10
EExport Location settings 28ExportedContent folder 28exporting by drag and drop 17exporting DrumCore content 17, 18
FFile Type setting 28Fills button 10Fruity Loops 59
GGabrielize 15
clearing 16history 16
Gabrielize button 10Garage Band 59guide conventions 4
Iinstallation 5, 6
LLive
monitoring DrumCore in 31recording DrumCore in 34
Logic 47configuring 47drag and drop to 47playing DrumCore MIDI Drum module 48
Loops button 10
Mmetadata 14MIDI button 10
NNuendo 37
playing DrumCore MIDI Drum module 40recording DrumCore in 40
DrumCore Guide
PPro Tools
monitoring DrumCore in 50playing DrumCore MIDI Drum module 53recording DrumCore in 51
Pro Tools 50drag and drop to 51
QQueue Play Mode 10Queue Play Mode toggle 10
RResults list 10RTAS 50
installation on Mac 5installation on Windows 6
SSample Format setting 28Sample Rate setting 28Samplitude 59selecting a MIDI DrumKit 21Settings
Export Location 28settings
Export Format 28Sonar 55
drag and drop 32, 56playing DrumCore MIDI Drum module 34, 57
Styles button 10
TTracktion 59Transport buttons 10
VVolume meter 10Volume slider 10VST
installation on Mac 5installation on Windows 6with Ableton Live 31with Cubase 37with Sonar 55