drupal 6.pdf
TRANSCRIPT

8/14/2019 Drupal 6.pdf
http://slidepdf.com/reader/full/drupal-6pdf 1/149
UltimateCommunity
Site Guide
Drupal 6
Now everyone can
set up a community
Extensive Case Study:
drupalfun.com
DORIEN HERREMANS
MSc MIS
With notes for Drupal 5

8/14/2019 Drupal 6.pdf
http://slidepdf.com/reader/full/drupal-6pdf 2/149
Special offer - Download Drupalfun
Due to popular demand, I have decided to make the source code of drupal-fun.com available for download. Drupalfun is the showcase of this ebook,and has been updated to use the latest modules. Get your copy here:
www.book.drupalfun.com/socialnetwork
The Drupalfun v2.0 package contains:
• all the files of the Drupalfun.com site, as it is now.
• configured database (without content).
• installation instructions.
All modules have been updated to the latest versions (today at May 22th,2009) and include:
• Drupal 6.12
• Panel 3 beta 2
• Views 2.5
• CCK 2.2
• Gmap 1.0
• ... and many many more...
With this package and some basic knowledge on how to set up a Drupal site,you can have a site like drupalfun.com up and running in a few minutes.

8/14/2019 Drupal 6.pdf
http://slidepdf.com/reader/full/drupal-6pdf 3/149
8/14/2019 Drupal 6.pdf
http://slidepdf.com/reader/full/drupal-6pdf 4/149
Drupal 6: Ultimate Community Site Guide
Dorien Herremans MSc MIS

8/14/2019 Drupal 6.pdf
http://slidepdf.com/reader/full/drupal-6pdf 5/149
Acknowledgements
Thank you, divine universe, for guiding me on my journey. But most of all,
many thanks to my partner Els for always supporting and loving me.
A warm thank you to Jennifer for designing such a great cover. And many
thanks to all Drupal contributors and everybody who participates in the
Open Source movement. And lastly, but not least, my gratitude to the many
bumps in the road, that taught me to look for creative solutions.
i
8/14/2019 Drupal 6.pdf
http://slidepdf.com/reader/full/drupal-6pdf 6/149
Overview
1 Introduction 1
2 Setting up the site 6
3 Expanding functionality 14
4 User Profiles 24
5 Expanding profiles 43
6 Content Presentation 69
7 Community features 86
8 Making an income from your site 108
9 Tidying up 116
10 Conclusion 131
About the author 132
i
8/14/2019 Drupal 6.pdf
http://slidepdf.com/reader/full/drupal-6pdf 7/149
Contents
1 Introduction 1
2 Setting up the site 6
2.1 Drupalfun.com . . . . . . . . . . . . . . . . . . . . . . . . . . 6
2.2 Drupal 6.9 . . . . . . . . . . . . . . . . . . . . . . . . . . . . . 8
2.3 Requirements . . . . . . . . . . . . . . . . . . . . . . . . . . . 10
2.4 Installing Drupal . . . . . . . . . . . . . . . . . . . . . . . . . 10
3 Expanding functionality 14
3.1 Basic configuring . . . . . . . . . . . . . . . . . . . . . . . . . 14
3.2 How to install a module . . . . . . . . . . . . . . . . . . . . . 15
3.3 How to install a theme . . . . . . . . . . . . . . . . . . . . . . 16
3.4 Invaluable modules 101 . . . . . . . . . . . . . . . . . . . . . . 18
3.4.1 DHTML menu - faster navigation menu . . . . . . . . 18
3.4.2 Captcha - avoiding spammers . . . . . . . . . . . . . . 19
3.4.3 Pathauto . . . . . . . . . . . . . . . . . . . . . . . . . 20
ii

8/14/2019 Drupal 6.pdf
http://slidepdf.com/reader/full/drupal-6pdf 8/149
Contents iii
3.4.4 Poormanscron . . . . . . . . . . . . . . . . . . . . . . . 20
3.4.5 Tagadelic . . . . . . . . . . . . . . . . . . . . . . . . . 21
3.5 Tips and tricks . . . . . . . . . . . . . . . . . . . . . . . . . . 22
3.6 This chapter’s Module Download List . . . . . . . . . . . . . . 23
4 User Profiles 24
4.1 What’s a profile? . . . . . . . . . . . . . . . . . . . . . . . . . 25
4.2 Content Profile . . . . . . . . . . . . . . . . . . . . . . . . . . 26
4.2.1 Configuration . . . . . . . . . . . . . . . . . . . . . . . 27
4.2.2 Profile fields . . . . . . . . . . . . . . . . . . . . . . . . 29
4.2.3 Avatar . . . . . . . . . . . . . . . . . . . . . . . . . . . 30
4.2.4 User tags . . . . . . . . . . . . . . . . . . . . . . . . . 31
4.3 Displaying the profile . . . . . . . . . . . . . . . . . . . . . . . 32
4.3.1 Creating a panel page . . . . . . . . . . . . . . . . . . 32
4.3.2 Showing the profile . . . . . . . . . . . . . . . . . . . . 33
4.3.3 Showing the avatar . . . . . . . . . . . . . . . . . . . . 34
4.3.4 Adding Profile Comments - aka “My wall” . . . . . . . 37
4.4 Accessing the profile . . . . . . . . . . . . . . . . . . . . . . . 38
4.4.1 Adding a nice button that links to the profile . . . . . 39
4.4.2 Menu link to my profile . . . . . . . . . . . . . . . . . 40
4.5 This chapter’s Module Download List . . . . . . . . . . . . . . 42
5 Expanding profiles 43
5.1 Image gallery . . . . . . . . . . . . . . . . . . . . . . . . . . . 43
iii

8/14/2019 Drupal 6.pdf
http://slidepdf.com/reader/full/drupal-6pdf 9/149
Contents iv
5.1.1 Image gallery content type . . . . . . . . . . . . . . . . 44
5.1.2 Displaying it in the profile . . . . . . . . . . . . . . . . 47
5.1.3 Configuring the node display . . . . . . . . . . . . . . . 50
5.1.4 Pictures Page . . . . . . . . . . . . . . . . . . . . . . . 51
5.1.5 Multiple Albums per User . . . . . . . . . . . . . . . . 54
5.2 Video gallery . . . . . . . . . . . . . . . . . . . . . . . . . . . 54
5.2.1 Set-up . . . . . . . . . . . . . . . . . . . . . . . . . . . 54
5.2.2 From pictures to media . . . . . . . . . . . . . . . . . . 56
5.3 Other galleries . . . . . . . . . . . . . . . . . . . . . . . . . . . 56
5.4 Pinpointing users on a worldmap . . . . . . . . . . . . . . . . 57
5.4.1 Getting the location . . . . . . . . . . . . . . . . . . . 57
5.4.2 Displaying the location . . . . . . . . . . . . . . . . . . 60
5.5 User search . . . . . . . . . . . . . . . . . . . . . . . . . . . . 61
5.5.1 Member search page . . . . . . . . . . . . . . . . . . . 61
5.5.2 A quick ’find a match’ block . . . . . . . . . . . . . . . 63
5.5.3 User tag cloud . . . . . . . . . . . . . . . . . . . . . . . 64
5.5.4 New Users Block . . . . . . . . . . . . . . . . . . . . . 65
5.5.5 Featured Members . . . . . . . . . . . . . . . . . . . . 66
5.5.6 Displaying search results on a map . . . . . . . . . . . 67
5.6 This chapter’s Module Download List . . . . . . . . . . . . . . 68
6 Content Presentation 69
6.1 Content types . . . . . . . . . . . . . . . . . . . . . . . . . . . 70
iv

8/14/2019 Drupal 6.pdf
http://slidepdf.com/reader/full/drupal-6pdf 10/149
Contents v
6.2 Over“views” . . . . . . . . . . . . . . . . . . . . . . . . . . . . 70
6.2.1 Showcase list . . . . . . . . . . . . . . . . . . . . . . . 71
6.2.2 Blogs . . . . . . . . . . . . . . . . . . . . . . . . . . . . 72
6.2.3 My Content . . . . . . . . . . . . . . . . . . . . . . . . 72
6.2.4 View blocks . . . . . . . . . . . . . . . . . . . . . . . . 73
6.2.5 Related Content Block . . . . . . . . . . . . . . . . . . 74
6.2.6 Fixfertig . . . . . . . . . . . . . . . . . . . . . . . . . . 76
6.2.7 Putting stuff around the view . . . . . . . . . . . . . . 78
6.3 Node pages . . . . . . . . . . . . . . . . . . . . . . . . . . . . 78
6.3.1 More Panels . . . . . . . . . . . . . . . . . . . . . . . . 78
6.3.2 Voting . . . . . . . . . . . . . . . . . . . . . . . . . . . 80
6.3.3 Layout . . . . . . . . . . . . . . . . . . . . . . . . . . . 81
6.4 Making a cool welcome page . . . . . . . . . . . . . . . . . . . 82
6.4.1 The front-page panel . . . . . . . . . . . . . . . . . . . 82
6.4.2 The front-page panes . . . . . . . . . . . . . . . . . . . 83
6.5 This chapter’s Module Download List . . . . . . . . . . . . . . 85
7 Community features 86
7.1 Forum . . . . . . . . . . . . . . . . . . . . . . . . . . . . . . . 86
7.2 Shoutbox . . . . . . . . . . . . . . . . . . . . . . . . . . . . . 91
7.3 Friends . . . . . . . . . . . . . . . . . . . . . . . . . . . . . . . 92
7.4 Messaging . . . . . . . . . . . . . . . . . . . . . . . . . . . . . 94
7.4.1 Option 1: Contact Form . . . . . . . . . . . . . . . . . 94
v

8/14/2019 Drupal 6.pdf
http://slidepdf.com/reader/full/drupal-6pdf 11/149
Contents vi
7.4.2 Option 2: Privatemsg . . . . . . . . . . . . . . . . . . . 95
7.5 Subscriptions . . . . . . . . . . . . . . . . . . . . . . . . . . . 97
7.6 Newsletter . . . . . . . . . . . . . . . . . . . . . . . . . . . . . 98
7.7 User points . . . . . . . . . . . . . . . . . . . . . . . . . . . . 100
7.8 User Status . . . . . . . . . . . . . . . . . . . . . . . . . . . . 100
7.8.1 Community status . . . . . . . . . . . . . . . . . . . . 100
7.8.2 What are you doing? . . . . . . . . . . . . . . . . . . . 101
7.8.3 User online status . . . . . . . . . . . . . . . . . . . . . 102
7.9 User Activity . . . . . . . . . . . . . . . . . . . . . . . . . . . 102
7.10 Groups . . . . . . . . . . . . . . . . . . . . . . . . . . . . . . . 104
7.11 This chapter’s Module Download List . . . . . . . . . . . . . . 107
8 Making an income from your site 108
8.1 Google AdSense - let Google pay your users for contributing! . 108
8.1.1 Custom Search . . . . . . . . . . . . . . . . . . . . . . 109
8.1.2 Revenue Sharing . . . . . . . . . . . . . . . . . . . . . 110
8.1.3 Managed Ads . . . . . . . . . . . . . . . . . . . . . . . 112
8.2 A smart way to implement Affiliate programs . . . . . . . . . 112
8.3 Donations . . . . . . . . . . . . . . . . . . . . . . . . . . . . . 114
8.4 This chapter’s Module Download List . . . . . . . . . . . . . . 115
9 Tidying up 116
9.1 Menus . . . . . . . . . . . . . . . . . . . . . . . . . . . . . . . 116
9.2 What you can do right now . . . . . . . . . . . . . . . . . . . 118
vi

8/14/2019 Drupal 6.pdf
http://slidepdf.com/reader/full/drupal-6pdf 12/149
Contents vii
9.3 Changing certain words . . . . . . . . . . . . . . . . . . . . . . 121
9.4 Customising emails . . . . . . . . . . . . . . . . . . . . . . . . 122
9.5 Performance . . . . . . . . . . . . . . . . . . . . . . . . . . . . 122
9.6 Promoting your site . . . . . . . . . . . . . . . . . . . . . . . . 123
9.7 Analytics . . . . . . . . . . . . . . . . . . . . . . . . . . . . . 124
9.7.1 Core Modules . . . . . . . . . . . . . . . . . . . . . . . 124
9.7.2 Google Analytics . . . . . . . . . . . . . . . . . . . . . 125
9.7.3 Monitoring new users . . . . . . . . . . . . . . . . . . . 126
9.8 Site Documentation . . . . . . . . . . . . . . . . . . . . . . . . 126
9.9 Keep it up to date . . . . . . . . . . . . . . . . . . . . . . . . 127
9.10 Backup . . . . . . . . . . . . . . . . . . . . . . . . . . . . . . . 127
9.11 Duplicating a Drupal install . . . . . . . . . . . . . . . . . . . 128
9.12 This chapter’s Module Download List . . . . . . . . . . . . . . 130
10 Conclusion 131
About the author 132
vii
8/14/2019 Drupal 6.pdf
http://slidepdf.com/reader/full/drupal-6pdf 13/149
List of Figures
2.1 The Drupal guided setup . . . . . . . . . . . . . . . . . . . . . 12
2.2 The Drupal guided setup (2) . . . . . . . . . . . . . . . . . . . 13
3.1 The colour picker. . . . . . . . . . . . . . . . . . . . . . . . . . 17
3.2 Enabling the DHTML Menu module. . . . . . . . . . . . . . . 18
3.3 Captcha . . . . . . . . . . . . . . . . . . . . . . . . . . . . . . 20
3.4 Setting automatic URL aliases. . . . . . . . . . . . . . . . . . 21
3.5 Setting the error handling pages to the tag cloud page. . . . . 22
4.1 Our goal. . . . . . . . . . . . . . . . . . . . . . . . . . . . . . 25
4.2 Setting an automatic title. . . . . . . . . . . . . . . . . . . . . 27
4.3 Configuring Fivestar voting . . . . . . . . . . . . . . . . . . . 27
4.4 Configuring the Content Profile. . . . . . . . . . . . . . . . . . 28
4.5 An example of basic profile fields . . . . . . . . . . . . . . . . 30
4.6 Defining the panel argument. . . . . . . . . . . . . . . . . . . 33
4.7 The profile panel page (content configuration). . . . . . . . . . 34
4.8 The newly created imagecache preset. . . . . . . . . . . . . . . 35
viii

8/14/2019 Drupal 6.pdf
http://slidepdf.com/reader/full/drupal-6pdf 14/149
List of Figures ix
4.9 The avatar view. . . . . . . . . . . . . . . . . . . . . . . . . . 37
4.10 The panel with the profile node and the avatar view. . . . . . 37
4.11 An example wall. . . . . . . . . . . . . . . . . . . . . . . . . . 38
4.12 An example of a profile button on the “My Account” page. . . 39
5.1 The picture gallery, on the profile. . . . . . . . . . . . . . . . . 44
5.2 The new pictures field. . . . . . . . . . . . . . . . . . . . . . . 46
5.3 The view block displaying the user’s photo album. . . . . . . . 49
5.4 Inserting the block into the profile panel page. . . . . . . . . . 49
5.5 A photo gallery node. . . . . . . . . . . . . . . . . . . . . . . . 51
5.6 The pictures page at Drupalfun. . . . . . . . . . . . . . . . . . 52
5.7 An example from the Imagecache Actions project page. . . . . 52
5.8 The Imagecache preset. . . . . . . . . . . . . . . . . . . . . . . 53
5.9 The Views settings for the Picture page. . . . . . . . . . . . . 53
5.10 The video gallery on the profile. . . . . . . . . . . . . . . . . . 55
5.11 The media page. . . . . . . . . . . . . . . . . . . . . . . . . . 56
5.12 The Gmap on the profile edit page. . . . . . . . . . . . . . . . 58
5.13 The Gmap settings. . . . . . . . . . . . . . . . . . . . . . . . . 59
5.14 The Location settings. . . . . . . . . . . . . . . . . . . . . . . 59
5.15 A map displaying all the users. . . . . . . . . . . . . . . . . . 60
5.16 The location block. . . . . . . . . . . . . . . . . . . . . . . . . 61
5.17 The member search page. . . . . . . . . . . . . . . . . . . . . 63
5.18 The “find a match” block. . . . . . . . . . . . . . . . . . . . . 64
ix

8/14/2019 Drupal 6.pdf
http://slidepdf.com/reader/full/drupal-6pdf 15/149
List of Figures x
5.19 A user tag cloud. . . . . . . . . . . . . . . . . . . . . . . . . . 64
5.20 A list of users who are ”intelligent”. . . . . . . . . . . . . . . . 65
5.21 The new users block. . . . . . . . . . . . . . . . . . . . . . . . 66
5.22 The Featured Members Block. . . . . . . . . . . . . . . . . . . 67
6.1 The showcase table. . . . . . . . . . . . . . . . . . . . . . . . . 72
6.2 The “My Stuff” page. . . . . . . . . . . . . . . . . . . . . . . . 73
6.3 The “My Stuff” view. . . . . . . . . . . . . . . . . . . . . . . . 73
6.4 The related questions block. . . . . . . . . . . . . . . . . . . . 76
6.5 An example of a quick tabs block. . . . . . . . . . . . . . . . . 77
6.6 A question node that consists of multiple panel panes. . . . . . 79
6.7 The “View my profile” link on a photo gallery. . . . . . . . . . 80
6.8 An example of Fivestar voting on a profile. . . . . . . . . . . . 806.9 The showcase node view. . . . . . . . . . . . . . . . . . . . . . 82
6.10 The front page. . . . . . . . . . . . . . . . . . . . . . . . . . . 84
7.1 The standard forum look at drupal.org. . . . . . . . . . . . . 87
7.2 The terms for the question vocabulary. . . . . . . . . . . . . . 88
7.3 The taxonomy list module in action. . . . . . . . . . . . . . . 88
7.4 The question view. . . . . . . . . . . . . . . . . . . . . . . . . 89
7.5 The view settings for ”questions”. . . . . . . . . . . . . . . . . 90
7.6 The shoutbox block. . . . . . . . . . . . . . . . . . . . . . . . 92
7.7 Creating the fan/hero relationship. . . . . . . . . . . . . . . . 93
7.8 The related questions block. . . . . . . . . . . . . . . . . . . . 94
x

8/14/2019 Drupal 6.pdf
http://slidepdf.com/reader/full/drupal-6pdf 16/149
List of Figures xi
7.9 The contact form. . . . . . . . . . . . . . . . . . . . . . . . . . 95
7.10 Private messaging on a Drupal 5 site. . . . . . . . . . . . . . . 96
7.11 Setting the Subscriptions User Defaults. . . . . . . . . . . . . 97
7.12 A newsletter with embedded views. . . . . . . . . . . . . . . . 99
7.13 The Activity Stream module. . . . . . . . . . . . . . . . . . . 101
7.14 The Facebook Style Statuses module at babelup.com. . . . . . 102
7.15 The Online Status Indicator. . . . . . . . . . . . . . . . . . . . 102
7.16 The activity block. . . . . . . . . . . . . . . . . . . . . . . . . 103
7.17 The group content types. . . . . . . . . . . . . . . . . . . . . . 104
7.18 The group overview page. . . . . . . . . . . . . . . . . . . . . 106
7.19 The group details block. . . . . . . . . . . . . . . . . . . . . . 106
8.1 Adding the Google custom search to the front page panel. . . 109
8.2 The AdSense displayed below a post. . . . . . . . . . . . . . . 110
8.3 Configuring the Revenue Sharing. . . . . . . . . . . . . . . . . 111
8.4 The new profile field. . . . . . . . . . . . . . . . . . . . . . . . 111
8.5 The AdSense policy page. . . . . . . . . . . . . . . . . . . . . 112
8.6 The different donate buttons. . . . . . . . . . . . . . . . . . . 114
9.1 Our Primary Menu. . . . . . . . . . . . . . . . . . . . . . . . . 117
9.2 The to do block. . . . . . . . . . . . . . . . . . . . . . . . . . 118
9.3 The spread block. . . . . . . . . . . . . . . . . . . . . . . . . . 124
9.4 A Clustermap. . . . . . . . . . . . . . . . . . . . . . . . . . . . 125
9.5 Google Analytics page. . . . . . . . . . . . . . . . . . . . . . . 126
xi

8/14/2019 Drupal 6.pdf
http://slidepdf.com/reader/full/drupal-6pdf 17/149
Try not to become a man of success, but rather a man of
value.
Albert Einstein
1Introduction
My philosophy throughout this book
Drupal, the framework of possibilities
Drupal is one of the best content management systems (CMS) around. In
fact, it has just won (for the second time) the Best Overall 2008 Open Source
CMS Award and Best PHP Open Source CMS Award. For about 8 years
now, Drupal has been providing users with one of the best and most versatile
frameworks around. The extreme versatility found in Drupal is absolutely
its strong point. . . and its weak point at the same time. Any function is
possible, but where do you begin? I’ve spent enough long days bending my
brain around the different modules, their uses and compatibilities, bugs and
1

8/14/2019 Drupal 6.pdf
http://slidepdf.com/reader/full/drupal-6pdf 18/149
Chapter 1. Introduction 2
“almost implemented” features, to make my advise count. More and more
people started asking me how I implemented certain community features, so
I decided to bundle it all in this book. The reader will be guided through the
different modules and configuration settings needed to build a solid commu-
nity site. And I go even further, by looking at how to structure content and
making a few e, , ¥, ₡, £,. . . from your site. It is going to be an exploration
of modules and their features.
Bring out the community
Community sites are popping up like virtual mushrooms all over the net. We
all have our own image of what a community site is, so let’s make sure our
definitions are harmonic. Merriam-Webster describes a community as:
• a unified body of individuals.
• people with common interests living in a particular area.
• an interacting population of various kinds of individuals (as
species) in a common location.
• a group of people with a common characteristic or interest
living together within a larger society.
• a group linked by a common policy.
• a body of persons or nations having a common history or
common social, economic, and political interests (the inter-
national community).
• a body of persons of common and especially professional
interests scattered through a larger society (the academic
community).
2

8/14/2019 Drupal 6.pdf
http://slidepdf.com/reader/full/drupal-6pdf 19/149
Chapter 1. Introduction 3
We can break this definition down to a few keywords: a common interest,
a group of people, a common location and a common policy. In the case of
virtual communities, we can apply this definition as follows:
1. a common interest: surely the people on your site have something in
common. Is it a site about Drupal, health, or even Skippy balls. . . ?
Whatever the “theme” of your site is, make sure to emphasise it, be-
cause that’s what your users want to see.
2. a group of people: everybody who registers is part of the community.Consequently the goal is to get as many registered users as possible.
3. a common location: the internet, your site.
4. a common policy: your site needs to have some basic house rules. What
are your visitors allowed to do on your site? What is appropriate
behaviour?
One of the prominent goals in making a community site is to facilitate contactbetween users. Your users really need to have the impression that they are
in a common location with the other users in order to have that community-
feeling.
Drupal is great, but I feel community features are not that obviously present
in a standard Drupal install. That’s ok, since Drupal is a framework , it offers
us the means to build upon its solid base through the use of modules.
Since the road to “common location” is not always that clearly paved inDrupal, I want to share a great method for making advanced user profiles.
These will be the backbone of the case study site Drupalfun. The profiles I
will be talking about are easily expandable with other content such as photo
galleries, friends lists, forum,. . . and many many more. All of these features
will be discussed throughout this book.
3

8/14/2019 Drupal 6.pdf
http://slidepdf.com/reader/full/drupal-6pdf 20/149
Chapter 1. Introduction 4
Keeping it clean
It is easy to resort to custom modules1, for anything that you can’t solve
out-of-the-box. That’s great. Drupal offers us that possibility and we should
gladly accept it. But what if you don’t know anything about PHP pro-
gramming? It is definitely possible to make a great site using only user
contributed (read: already available) modules.
This is my main philosophy in this book. I use only out-of-the-box, user
contributed modules. Here and there, these are supplemented with some tinycode snippets2 that are filled in inside the website interface and stored in the
database. They will be explained throughout this book in a user friendly
way. So anybody can make a great site. These well thought strategies offer
us the following advantages:
1. Easy to update: you can update any module without thinking to much
about how you configured it, since the configuration is stored in the
database.
2. Anyone can do it. We only use existing modules.
3. Expansive: at any time, you can install a module safely, to allow addi-
tional functionality.
4. Small snippets customise specific details.
Integrated case study: drupalfun.com
When I decided it was time to share my techniques about community sites, I
figured that the best way would be to use screenshots and detailed action lists.
1You can use the Drupal interface to write a module yourself, or let a programmer do
it for you.2A short reusable piece of computer source code.
4

8/14/2019 Drupal 6.pdf
http://slidepdf.com/reader/full/drupal-6pdf 21/149
Chapter 1. Introduction 5
So I needed a new project (yet another one!). I decided on drupalfun.com
and made this site together with the book. This means that the site is
the demonstration showcase for the book. Anything discussed here, will be
available on the site, so you might want to give it a try. As you move through
the chapters, you will see that this book is written from a very practical point
of view. I have tried my best to document all the steps meticulously.
The main mission of drupalfun.com is:
Provide a meeting ground for Drupallers. A place to get to knoweach other, help each other out, find a job and where all partici-
pants can earn some AdSense revenue in the process.
And that is exactly what we are going to implement in the following chapters.
5

8/14/2019 Drupal 6.pdf
http://slidepdf.com/reader/full/drupal-6pdf 22/149
Be the change you want to see in the world.
Ghandi
2Setting up the site
In this chapter we will dive right into the practical side of things and start
by installing our basic site.
2.1 Drupalfun.com
Let’s take a closer look at the case study website drupalfun.com. In line
with David Wolfe’s (among others) philosophy on goal setting, I always set
goals when I am doing. . . well,. . . anything. Setting goals really helps you to
visualise the end result and will increase your chances of success. Scientific
studies have actually proven that people who write down their goals are
6

8/14/2019 Drupal 6.pdf
http://slidepdf.com/reader/full/drupal-6pdf 23/149
Chapter 2. Setting up the site 7
significantly more successful1. With all that in mind, here is the main goal
for Drupalfun:
Provide a meeting ground for Drupallers. A place to get to know
each other, help each other out, find a job and where all partici-
pants can earn some AdSense revenue in the process.
Notice that this goal entails all four aspects of a virtual community as dis-
cussed in the introduction:
• a common interest: Drupal.
• a group of people: all registered users.
• a common location: drupalfun.com
• a common policy: help and mutual support is key on drupalfun.com
Now let’s be a bit more specific and split our general mission up into different
sub-goals:
• Basic member site functionality, such as login, registration, logs, ac-
count page etc.
• User profiles with pictures and videos.
• A user search form based on the profile fields.1“A study of the 1953 graduates of Yale University clearly demonstrates the power
of goals. The graduates interviewed were asked if they had a clear, specific set of goals
written down with a plan for achieving those goals. Only 3 percent had such written
goals. Twenty years later, in 1973, the researchers went back and interviewed them again.
They discovered that the 3 percent with written specific goals were worth more in financial
terms than the entire other 97 percent put together.. . ”, as cited by Anthony Robbins in
his book “Unlimited Power”.
7

8/14/2019 Drupal 6.pdf
http://slidepdf.com/reader/full/drupal-6pdf 24/149
Chapter 2. Setting up the site 8
• Drupal showcases.
• Question forum.
• Knowledge base (articles & tutorials).
• AdSense shared revenue program. On every post, we’ll display the
Google AdSense of the author 50% of the time.
• Private messaging system with email alerts.
• Newsletter system that integrates new content.
• User tag system with tag cloud.
• “Friends” system.
• Location maps.
• Content voting system.
• Basic group functionality
How do we realise all these things? Which modules do we need to enable?
How do we configure them? What should we remember? All of this will be
carefully described in the following chapters. Because of the large number of
Drupal contributed modules, there are different ways and different opinions
on how certain things need to be done. I’ll share some of the ways that have
always worked best for me and I am sure that they will serve you as well.
2.2 Drupal 6.9
I have been eagerly waiting for all the necessary modules to be released and
stable with Drupal 6. Most of Drupal’s development is done voluntarily.
I give my greatest respect to the Drupal module developers. They really
8

8/14/2019 Drupal 6.pdf
http://slidepdf.com/reader/full/drupal-6pdf 25/149
Chapter 2. Setting up the site 9
contribute much of their valuable time to the Drupal community. The latest
release of Panels gave me the cue to dust off my notes and start on this
project.
The current version of Drupal is 6.9, so I will be working with that version.
If you have any later 6.x version, feel free to use that. In fact, you should
always use the latest version of Drupal. As long as the core version starts
with a 6, the screenshots will look the same and the modules will work in the
same way. The only difference between the different 6-versions are security
updates only, with no added or changed functionality.
Drupal 6 has many improvements and I really love it. However, some of the
available modules have not yet been updated to version 6. At the time of this
writing, a number of modules are still in an alpha or beta state. This means
that they are not yet stable. For the compiling of this text, I did use some
alpha and beta state modules. By the time you read this, they will most
probably have a stable release out. It is possible that tiny details may have
changed between the releases and you may find that your module has some
added functionality. All the better for you! The basic workflow however,
will remain the same. Please use only stable modules on production sites. Unstable
release
used.
Whenever I use a non-stable release or the version for Drupal 6 is not yet
available, I will mark it with a side note, like the one next to this paragraph.
From time to time, I will revert to screenshots of Drupal 5 sites. This will
mainly happen whenever I want to illustrate functionalities that are not yet
available or stable for Drupal 6.
I have added footnotes or boxes for Drupal 5, whenever the procedure di-
verts from the Drupal 6 workflow. With some small changes, the method
outlined in this book should work, regardless if you are using Drupal 5 or 6.
9

8/14/2019 Drupal 6.pdf
http://slidepdf.com/reader/full/drupal-6pdf 26/149
Chapter 2. Setting up the site 10
2.3 Requirements
The Drupal framework is a web based CMS. That means that we cannot
just install it, we need a server/database architecture. Here are the basic
requirements:
Drupal 6.9 - available for download at drupal.org (or the latest stable
release of Drupal 6).
A web server - preferably Apache, with PHP 4.3.5 or greater, but prefer-
ably PHP 5 (since some of the modules we’ll be using require this).
A database - MySql (recommended) or PostgreSQL.
A domain name - although not strictly necessary. You might want to
spend 7$ on a .com or .org. I usually get them from mydomain.com.
You will find the latest requirements in the install.txt file in your Drupal
pack.
2.4 Installing Drupal
Now, we have arrived at the fun stuff. I am going to install Drupal on my
local server first and at the end, I’ll duplicate the installation to my web
server (section 9.11). Let’s get started:
1. Unpack Drupal.
2. Upload the Drupal files to your web server, look for the hidden files as
well! Be sure to use the binary upload mode in your ftp program2.
2The FTP programs I prefer are gFTP and Konqueror for Linux, and Firefox’s FireFtp
Add-on (cross-platform).
10

8/14/2019 Drupal 6.pdf
http://slidepdf.com/reader/full/drupal-6pdf 27/149
Chapter 2. Setting up the site 11
3. Check that all file permissions are set to 755 (chmod 755)3.
4. Create the configuration file by copying the /sites/default/
default.settings.php to /sites/default/settings.php4. Make
sure it is writeable.
5. Create the /sites/default/files directory, again writeable 7775.
6. Create your database, together with password and database user. Cre-
ating a database can easily be done with the phpMyAdmin system that
most hosts offer. If you use a MySql command line terminal, use thefollowing commands:
create database mydatabasename;
grant all privileges on mydatabasename.* to
myusername@localhost identified by ’mypassword’;
7. Point your favourite browser (I usually go for Firefox) to your site’s
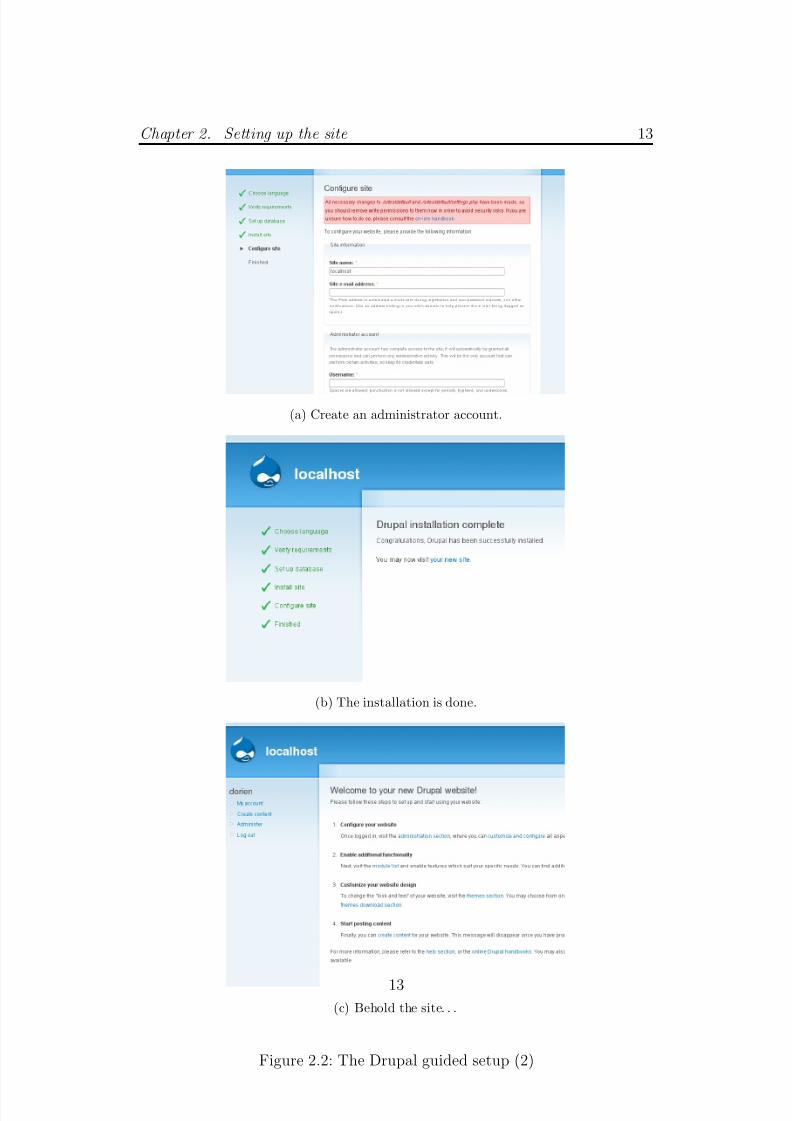
address, where you are guided through the installation process (fig 2.1& 2.2).
8. Change the permissions of settings.php back to 755.
9. Create an admin account and you are done!
Thanks to the excellent Drupal system, we have already accomplished our
number one objective: providing basic member functionality.
Remember, if you are having a less than easy time with one of the steps
above. Visit drupalfun.com, and get some personal assistance.
3In Unix, you can use the “chmod -R 755 /directory” command to change the permis-
sions of the entire directory.4Drupal 5 users: your settings.php file will already exist, just edit this existing one.5Drupal 5 users: pay attention that you create the /files directory in the site’s root
folder.
11

8/14/2019 Drupal 6.pdf
http://slidepdf.com/reader/full/drupal-6pdf 28/149
Chapter 2. Setting up the site 12
(a) Choose a language.
(b) Enter the database information.
Figure 2.1: The Drupal guided setup
12
8/14/2019 Drupal 6.pdf
http://slidepdf.com/reader/full/drupal-6pdf 29/149
Chapter 2. Setting up the site 13
(a) Create an administrator account.
(b) The installation is done.
(c) Behold the site. . .
Figure 2.2: The Drupal guided setup (2)
13

8/14/2019 Drupal 6.pdf
http://slidepdf.com/reader/full/drupal-6pdf 30/149
Wisdom is knowing what to do next. Virtue is doing it.
David Starr Jordan
3Expanding functionality
Your basic site will look nice, and have a fast navigation, but it will not be
able to do much. That’s the whole idea of Drupal. A framework for doing
pretty much everything, but only if you need it. That’s why there are these
things called “user contributed modules”. Modules build on the framework
and allow you to add some extra functionality. Let’s start by configuring the
basic site and taking a look at some essential modules.
3.1 Basic configuring
Drupal 6 has made the configuration process easier by already showing some
of the options during the installation process. If you didn’t set them then (or
14

8/14/2019 Drupal 6.pdf
http://slidepdf.com/reader/full/drupal-6pdf 31/149
Chapter 3. Expanding functionality 15
if you are using Drupal 5), you will need to visit the administration pages to
personalise your site.
1. Set the cleanURLs (/?q=admin/settings/clean-urls) to get nice
URLs without the “?q=” in them1.
2. Change your site’s name at /admin/settings/site-information.
3. Set the correct user permissions at /admin/user/permissions.
4. Set some basic blocks at /admin/user/blocks.
5. Configure the basic welcome mail the system sends out at
/admin/user/settings.
If you are looking for more advanced user registration options, such as email
login, you might find the LoginToboggan module useful.
3.2 How to install a module
Installing a module is very basic and easy. Drupal does not have a standard
interface for installing modules directly from your page, you have to upload
them manually first. The procedure goes like this:
1. Download the module. All modules have a project page on drupal.org,
so you can either go directly there. Or, you might want to take a lookat drupalmodules.com. In whatever way you find the module, make
sure that it is hosted on a project page by Drupal and that you find a
version that is recommended for D6, preferable not a dev or alpha/beta
version, which might be unstable.
1My server uses mod userdir, so I need to add rewritebase/pathafterlocalhost to
my .htaccess file. Visit the Drupal handbook if the cleanURL test turns out negative
for you.
15

8/14/2019 Drupal 6.pdf
http://slidepdf.com/reader/full/drupal-6pdf 32/149
Chapter 3. Expanding functionality 16
2. Unpack the module to the /sites/all/modules folder (you’ll have to
create this folder the first time).
3. Navigate to /admin/build/modules. Enable the modules you want.
4. Configure the module at its admin page. Most modules create an extra
admin menu which lists all of their configuration settings.
To update a module to a newer version, disable the module first. Then
replace all the module files and run the database update script (there is a
link at /admin/build/modules). Be sure to check any update.txt file that
might be included with a module before you do any of this.
3.3 How to install a theme
The default Drupal theme (Garland) is quite amazing. I really like it, but
I want my site to look unique of course! What better way to completelychange the looks of a site, than by changing the theme. It’s also fun to make
your own theme if you have some HTML and CSS knowledge. Drupal uses
the powerful phptemplate engine to generate themes. However, creating our
own theme falls outside of the scope and philosophy of this book. Remember,
we are using only readily available modules and this includes themes as well.
For Drupalfun, we have chosen the Pixture theme.
Installing themes is very similar to modules. There are lots of themes avail-
able at drupal.org, you can simply find their project page and download
them. Again, try to find a version that is recommended for D6, preferable
not a dev (or α/β ) version. When choosing a theme, here are some things
to look for:
• Does it work in all browsers, including IE6?
16

8/14/2019 Drupal 6.pdf
http://slidepdf.com/reader/full/drupal-6pdf 33/149
Chapter 3. Expanding functionality 17
• How many columns does it support?
• Does it support the Color module? This module generates custom
colours for your theme, Garland uses it as well (fig 3.3).
• Does it use tables or not? Many people consider tableless layouts to
be superior. They are great, if they are properly tested on different
browsers.
• Does it use a liquid or fixed width?
• Does it have any custom options?
• What kind of regions does it have? Regions are the places where you
can add blocks to.
Figure 3.1: The colour picker.
The install process goes very similar to the module installation process:
1. Download a theme
2. Unpack it to the /sites/all/themes folder (you’ll have to create this
folder the first time).
17

8/14/2019 Drupal 6.pdf
http://slidepdf.com/reader/full/drupal-6pdf 34/149
Chapter 3. Expanding functionality 18
3. Navigate to /admin/build/themes and activate the theme you want.
4. You can change the logo and favicon (the little icon on the top of your
browser window) at the theme’s configuration pages.
To check if your theme works fine on other browsers, visit the website
browsershots.org
3.4 Invaluable modules 101
A fresh Drupal install is great to work with. It goes fast and looks so clean.
There are some modules that I always install, before I do anything else. In
my eyes, they are small modules that make a big difference.
3.4.1 DHTML menu - faster navigation menu
This is a great module that can speed up your development process consid-
erably. It took me a while to find it, but I don’t make a site without it. Once
the DHTML Menu module is activated, the module automatically replaces
the navigation block by the DHTML2 navigation block. Now you have nice
looking and fast collapsible menus.
Figure 3.2: Enabling the DHTML Menu module.
2DHTML stands for Dynamic HyperText Markup Language.
18

8/14/2019 Drupal 6.pdf
http://slidepdf.com/reader/full/drupal-6pdf 35/149
Chapter 3. Expanding functionality 19
Drupal 5 users: you’ll have to configure DHTML Menu to take over the navi-
gation menu. You can do this on its admin page or on the block configuration
page.
3.4.2 Captcha - avoiding spammers
Basic Captcha Challenges
Everybody is familiar with those little challenges you get when you cre-
ate an account. The Captcha module lets you use image captchas,
math captchas, and so on. Some extra options are provided by the
Captcha Pack module. With the image captchas, you can use any
type of true type font (ttf), as long as you include the .ttf file in the
/sites/all/modules/captcha/image captcha/fonts folder. You can se-
lect the types of forms you want to apply a captcha to (registration, login,
contact form, etc) as well as a range of other options.
Similar to Captcha, is the reCaptcha module, a free external service that
provides extra features such as audio captcha.
Anti-Spam Control
If you want more extensive spam control, you will like the
Mollom system. Mollom is created by Dries Buytaert, the
same person who has created Drupal. Mollom will do an
“intelligent” anti-spam control of any content type you want. It will look at
the submitted content and block all suspicious content. In order to use the
Mollom module, you need to register at their site. Small sites are handled
for free, for larger sites, a small fee is asked. Still, it is very much worth
considering.
19

8/14/2019 Drupal 6.pdf
http://slidepdf.com/reader/full/drupal-6pdf 36/149
Chapter 3. Expanding functionality 20
(a) Choosing which forms should have captcha challenges.
(b) The result
of tweeking the
captcha module’s
settings.
Figure 3.3: Captcha
3.4.3 Pathauto
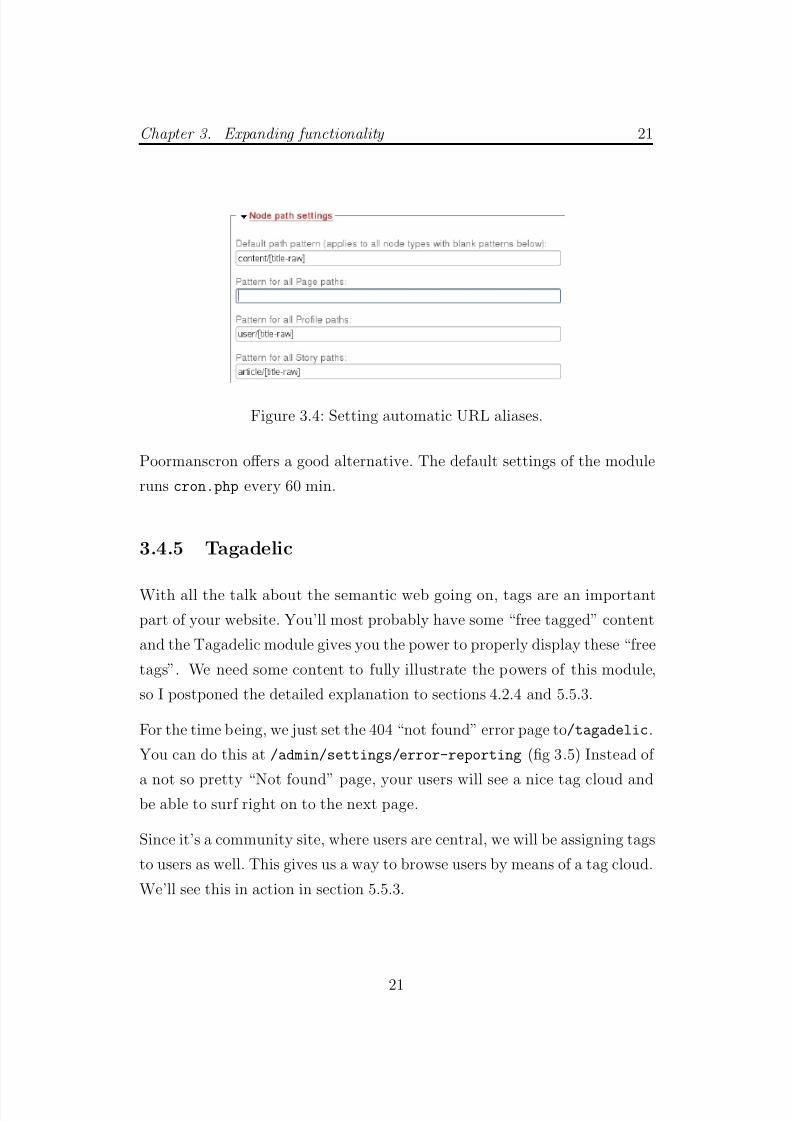
The Pathauto module greatly enhances the look of your URLs. They change
from something like: node/46532 into article/how-great-is-drupal. We
can use the additional Token module to generate a URL based on the node
title, user name, user ID, etc (fig 3.4).
3.4.4 Poormanscron
Every once and a while you need to run the cron.php script. This performs
all kinds of maintenance and bulk actions, like sending out emails and clearing
log entries. If you don’t have shell access to set up a cron job on your server,
20
8/14/2019 Drupal 6.pdf
http://slidepdf.com/reader/full/drupal-6pdf 37/149
Chapter 3. Expanding functionality 21
Figure 3.4: Setting automatic URL aliases.
Poormanscron offers a good alternative. The default settings of the module
runs cron.php every 60 min.
3.4.5 Tagadelic
With all the talk about the semantic web going on, tags are an important
part of your website. You’ll most probably have some “free tagged” content
and the Tagadelic module gives you the power to properly display these “free
tags”. We need some content to fully illustrate the powers of this module,
so I postponed the detailed explanation to sections 4.2.4 and 5.5.3.
For the time being, we just set the 404 “not found” error page to /tagadelic.
You can do this at /admin/settings/error-reporting (fig 3.5) Instead of
a not so pretty “Not found” page, your users will see a nice tag cloud andbe able to surf right on to the next page.
Since it’s a community site, where users are central, we will be assigning tags
to users as well. This gives us a way to browse users by means of a tag cloud.
We’ll see this in action in section 5.5.3.
21

8/14/2019 Drupal 6.pdf
http://slidepdf.com/reader/full/drupal-6pdf 38/149
Chapter 3. Expanding functionality 22
Figure 3.5: Setting the error handling pages to the tag cloud page.
An alternative for Tagadelic is the Taggly module.This module offers a very
nice flash tag cloud, which rotates the tags as you move your mouse above
them. Only for Drupal 6 at this time. I don’t use it on Drupalfun, because
the flash causes it to be a bit slower than Tagadelic.
3.5 Tips and tricks
We are well on our way to make a great site. To make sure things go smoothalways remember the following:
• Make regular backups of your database (section 9.10).
• Check your user permissions after every module install.
• Enable your site’s logs and check the error messages regularly.
• Use Firefox to work on your site. Turn on the Firebug and WebDevel-oper addons.
You have got your toolbox ready to begin the real work now. In the next
chapter we will talk about the user profile. The basis for any community
site.
22
8/14/2019 Drupal 6.pdf
http://slidepdf.com/reader/full/drupal-6pdf 39/149
Chapter 3. Expanding functionality 23
3.6 This chapter’s Module Download List
• Captcha
• Captcha pack (optional)
• Dhtml menu
• LoginToboggan (optional)
• Mollom (optional)
• Pathauto
• Poormanscron
• reCaptcha (optional)
• Tagadelic
• Taggly (optional)
• Token
23

8/14/2019 Drupal 6.pdf
http://slidepdf.com/reader/full/drupal-6pdf 40/149
No matter where you go,there you are.
Jackie Mason
4User Profiles
I have always found this to be the most challenging and fun part of any
community based site. I hope that it will be fun for you too, after reading
this section.
Drupal offers us a number of options that we can use to realise user profiles.
The first option, which is available as a core module, is the Profile module.
This module is great if you want very simple profiles. But, we are talking
about community sites here. If we want the possibility to add images, videos,
and more to the profiles, we are going to need the Content Profile module1.
This module essentially creates nodes that contain the profile information,
so they become very versatile.
1Drupal 5 users will need the Node Profile module instead.
24
8/14/2019 Drupal 6.pdf
http://slidepdf.com/reader/full/drupal-6pdf 41/149
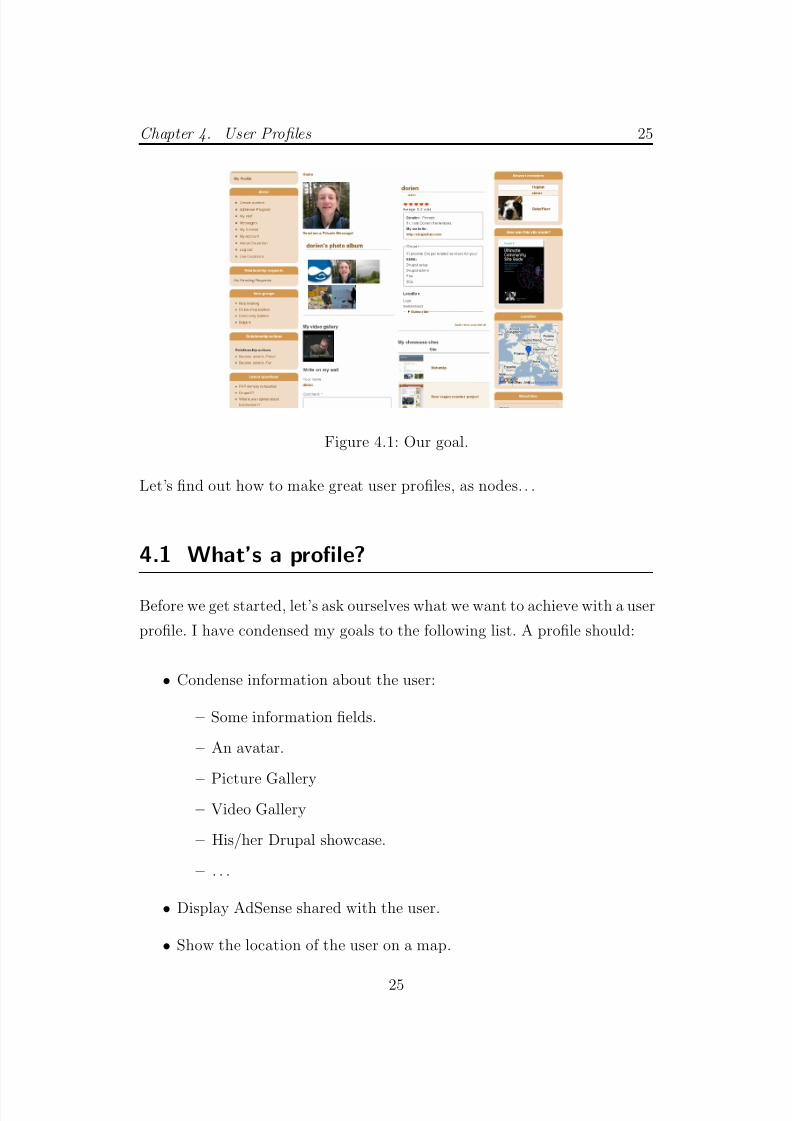
Chapter 4. User Profiles 25
Figure 4.1: Our goal.
Let’s find out how to make great user profiles, as nodes. . .
4.1 What’s a profile?
Before we get started, let’s ask ourselves what we want to achieve with a user
profile. I have condensed my goals to the following list. A profile should:
• Condense information about the user:
– Some information fields.
– An avatar.
– Picture Gallery– Video Gallery
– His/her Drupal showcase.
– . . .
• Display AdSense shared with the user.
• Show the location of the user on a map.
25

8/14/2019 Drupal 6.pdf
http://slidepdf.com/reader/full/drupal-6pdf 42/149
Chapter 4. User Profiles 26
• Provide an easy way to contact the user.
• Provide an easy way to become friends with the user.
If we look at the profile page in this way, it is more a kind of dashboard,
compiling information about a user. And consequently, it becomes more
extensive to implement.
4.2 Content Profile
The Content Profile module bestows us with the power needed to make β 3 ver-
sion
used.
complex profiles. Let’s start by enabling this module. If you check
the existing content types after enabling the module, you will find a
new type: “profile”. Let’s tweak this content type to our wishes
(/admin/content/node-type/profile):
• Empty the body field label in submission form settings, we will not be
needing a body.
• Use automatic title generation with the pattern: [author-name] (fig
4.2) (Automatic Nodetitles module and Token module)
• Add some submission guidelines if you want.
• Enable fivestar rating, I only put a clickable widget above the node
body (fig 4.3) (Fivestar module and VotingApi module)
In the above list, I have put additional required modules between brack-
ets whenever they are needed. I’ll continue to do this in the same manner
throughout this book. At the end of each chapter, you will find the complete
list of new modules that were mentioned, not including those that have al-
ready been applied in a previous chapter. Whenever you enable a module,
26

8/14/2019 Drupal 6.pdf
http://slidepdf.com/reader/full/drupal-6pdf 43/149
Chapter 4. User Profiles 27
Figure 4.2: Setting an automatic title.
Figure 4.3: Configuring Fivestar voting
remember to take a quick look at the configuration page it provides and check
the user permissions. I will mention some specific settings, that are essential
for the functioning of our integrated approach.
If you are working with Drupal 5, you need to use the Node Profile moduleand create a “profile” content type yourself. Set “Use this content type as a
nodeprofile for users”, with a maximum population of 1.
4.2.1 Configuration
We have just configured the “profile” content type. When you look around
on the “profile” content type edit page, you will find a tab that links to“content profile” (/admin/content/node-type/profile/profile)’, where
we can configure our content profile behaviour here (fig 4.4).
• For the moment I’ve put the display to “Display the content teaser”,
we’ll change the teaser to become a nice big button in section 4.4.1.
• Include an “add” link, just in case the creation at registration got
27

8/14/2019 Drupal 6.pdf
http://slidepdf.com/reader/full/drupal-6pdf 44/149
Chapter 4. User Profiles 28
skipped.
• Show at registration.
Figure 4.4: Configuring the Content Profile.
The Content Profile module includes an extension (or submodule as I some-
times refer to it), called Content Profile User Registration module. It is
important to create a profile upon registration. This way all of the
users will have a profile automatically. Later on, if we configure a search
page, we only need to search for a profile, to see all the users.
Every user has a “My Account” page. This page displays user information
like history, subscriptions, etc. I personally feel that the profile has the
right to have a page of its own. After all, it’s going to contain a lot of
information. . . So, I am just going to display the teaser on the “My Account”
page. Still, the link to the profile should be emphasised, that’s why we’ll
replace the simple teaser later on, by a nice big button, that everybody is
bound to click on (section 4.4.1).
28

8/14/2019 Drupal 6.pdf
http://slidepdf.com/reader/full/drupal-6pdf 45/149
Chapter 4. User Profiles 29
Drupal 5 users: you can activate “Show this node profile during user regis-
tration” on the /admin/content/types/profile/nodeprofile page. You’ll
find the same setting on this page as the ones we have just talked about for
Drupal 6.
4.2.2 Profile fields
Our content profile is configured, but has remained largely empty up until
now. Let’s start adding the basic information fields, which I’ll refer to as
“profile fields”. This step does requires some thinking.... Do some research
and find the best fields for you to add. Some classics are: about me, gender,
hobbies, job,. . .
To define extra fields, we need the CCK module (Content Construction Kit).
There are dozens of CCK-related modules that define extra field types, such
as Date and Link. I recommend that you browse through the list at drupal.
org and find out which ones you need.
I usually put all the fields together in “content groups”. On the “manage
fields” page (/admin/content/node-type/profile/fields) you can add
groups and fields (fig 4.5). For Drupalfun we stick to basic profile fields,
like gender, about myself, job status, skills etc. The Drupal 6 version really
has done a great job simplifying this process. Just fill in the field label -
name - type, drag and drop, and you are done.
Remember that the profile is going to be created upon registration. Thatmeans: keep the required fields to a minimum. Users need to be able to
register quickly. Also, we don’t want to flood them with text fields, even if
they are optional. You can keep the profile page tidy by “collapsing” cer-
tain content groups (on the group configuration page). The Content Profile
module also allows you to hide certain non-compulsary fields from the reg-
istration form if you prefer. You can find this option at the Profile content
29

8/14/2019 Drupal 6.pdf
http://slidepdf.com/reader/full/drupal-6pdf 46/149
Chapter 4. User Profiles 30
Figure 4.5: An example of basic profile fields
type configuration page (under the tab Content Profile) that we accessed in
the section above.
4.2.3 Avatar
Your users need a face. User avatars are essential in the new web world. They
greatly improve the overall feeling of “personal contact” between users. A
picture says a thousand words right?
The Imagefield, Imageapi and Filefield modules will provide us with all the Modules
still inalpha
& beta
ver-
sion
.
necessary tools to create fabulous user pictures. Let’s create another profilefield. This time we’ll name it avatar and choose the type: “image”. Set the
default list value to invisible2 (enforce this default) and disable the descrip-
tion field. We are going to create a block later on in section 4.3.3, to control
the position of the avatar. This means that the avatar will remain invisible
2Drupal 5 users need to set this at the “Display Fields” page
(/admin/content/types/profile/display)
30
8/14/2019 Drupal 6.pdf
http://slidepdf.com/reader/full/drupal-6pdf 47/149
Chapter 4. User Profiles 31
until section 4.3.3, where we’ll magically bring it back in a fancy jQuery box.
We are not using the built-in user picture function from Drupal. The main
reason for this is that we have more control over the image with Views this
way.
4.2.4 User tags
We have briefly touched on the subject of user tags in section 3.4.5. The goal
of this section is to attach keywords or tags to user profiles. These keywords
will be visible in the tagadelic tag clouds, such as the one we put on the 404
(not found) error page before.
1. Create a vocabulary (that’s Drupal for category) that contains the tags
(at /admin/content/taxonomy→ add vocabulary).
2. Name: “Some keywords about me”, this is what the users are going to
see at registration.
3. Content type: Profile.
4. Settings: tags, multiple select, required.
Tagadelic offers many blocks that you can activate in the sidebars.We’ll use
these tags for a user tag cloud in section 5.5.3.
For Drupal 5, the settings are a bit different: hierarchy is disabled - checkfree tagging - check required. This should produce the same results.
31

8/14/2019 Drupal 6.pdf
http://slidepdf.com/reader/full/drupal-6pdf 48/149
Chapter 4. User Profiles 32
4.3 Displaying the profile
4.3.1 Creating a panel page
When we navigate to our newly configured profile, it looks alright... but
it does not yet reflect the objectives we’ve set. That’s why we are going
to override this default profile node view with a “panel” that will allow us Unstable
α3 re-
lease
used.
to integrate all kinds of other information. A panel page divides the page
into different “panes”, in which we can put any block, view or node content
(and more). In other words, it gives us the means to accomplish our complex
profile goal. We can integrate picture and video galleries, recent posts, friends
etc. all on the same panel page.
1. Create a panel page (/admin/panels/panel-page) (Panels module).
2. Choose a layout, let’s take the “Two Column Stacked” layout.
3. Name the panel “profile”.
4. Here is the tricky part: set the path to “node/%”, by doing this all of
the node/3, node/4, node/5, . . . pages will be replaced by this panel,
and the argument % will be passed to the panel.
5. Leave the advanced settings as they are.
6. Define a context: add the argument3 “node ID” (fig 4.6), select the
content type Profile (for content type and own display).
We have successfully created a panel page that will take over all the profile
pages and treat the argument (that is the % in the URL) as a node ID. By
adding the argument node ID and restricting it to “profile”, we only take
3An argument is a part of the URL that contains information about the page that is
being displayed. In this case, it is the % in node/%
32

8/14/2019 Drupal 6.pdf
http://slidepdf.com/reader/full/drupal-6pdf 49/149
Chapter 4. User Profiles 33
Figure 4.6: Defining the panel argument.
over the nodes that are profiles. So each profile will be replaced by this panel.
Later, in chapter 6 we’ll be defining panels based on other content types.
If we navigate to our profile now, we’ll see a blank page. That’s alright. We’ll
start to add content to the empty panel straight away . . .
The Panels Module allows us to put lots of extra stuff on our profiles, without
any coding or theming. Make sure you get a stable release of Panels though
before enabling it on a production site. At the time of this writing a lot
of development was still going on by the Panels team. I have used the α 3
version and for the limited features I used, it seemed stable.
4.3.2 Showing the profile
If we go to the content section of the panel we’ve just created (on the panel
admin pages at /admin/panels/panel-page/Profile/edit/content), we
see the empty panel panes. Here, we can add the blocks that provide our
content. The first thing to add is the profile itself. Let’s put it in the right
column (fig 4.7):
1. Click the little plus sign on the right column.
2. Node Context → Node Content.
3. Check “override the title”, but don’t fill anything in (otherwise we will
have two titles).
33

8/14/2019 Drupal 6.pdf
http://slidepdf.com/reader/full/drupal-6pdf 50/149
Chapter 4. User Profiles 34
4. Uncheck: “Link title to node”, “Teaser”, “Node Page”, “No Extras”.
5. “Display links”, if appropriate for you.
6. Save the panel content.
7. If you haven’t done so already, configure your theme so that it doesn’t
display the “post information” (who posted it, and when) with profiles.
Figure 4.7: The profile panel page (content configuration).
You now have a basic panel with basic profile content on the right column. To
modify the way the profile is displayed, visit the “display” section of the “con-
tent type” profile (/admin/content/node-type/profile/display). Here
you can rearrange the sequence of the fields and control their visibility. Re-
member that the Avatar should still be invisible for now.
If you are not 200% satisfied with the way your profile looks, use the Con-
template Module to create a template for your node. This will affect the
embedded node inside the panel.
4.3.3 Showing the avatar
Our goal is to display the avatar on the left column of the panel, next to
the profile, like in fig 4.1. In order to achieve this, we have to create a
34

8/14/2019 Drupal 6.pdf
http://slidepdf.com/reader/full/drupal-6pdf 51/149
Chapter 4. User Profiles 35
“pane” that shows only the avatar. The incredible Views module lets us do
just that. Let’s start by making a few preparations to handle the images
correctly. Drupal is not that great on its own with images. However, with
the Imagecache, Imagefield and Thickbox modules enabled, it will provide
incredible and nice looking overall image handling.
The first step is to use Imagecache to create thumbnails of the avatars (fig
4.8), this will decrease the site’s loading time. Be sure to have cleanURLs
enabled before you enable imagecache:
1. At /admin/build/imagecache/add, add a preset called Thumb.
2. Scale and crop at 150px by 150px (or whichever is appropriate for your
theme).
Figure 4.8: The newly created imagecache preset.
Now we are ready to create the Avatar view (fig 4.9):
1. Create a new view (/admin/build/views/add) and name it Avatar.
2. View type: node.
3. Add a panel pane display4.
4Drupal 5 users: just create a block view. Then use “Views pane” to create a panel
pane of it.
35

8/14/2019 Drupal 6.pdf
http://slidepdf.com/reader/full/drupal-6pdf 52/149
Chapter 4. User Profiles 36
4. Add the avatar field, with “Thickbox: Thumb Image” (Thickbox mod-
ule required), this will give your users a nifty effect when they click on
the image.
5. Filter on the “profile” node type, and “node is published”.
6. Display 1 item only.
7. Add an argument: “Node ID”. Use the empty text if the argument is
not present or validated.
8. Pane setting: “Argument input from context - node” (the argument in
the URL will determine which profile to view)5.
9. If users cannot upload an avatar, let’s display a default avatar.
(a) Make an image called “defaultavatar.jpg” and place it in the
/sites/default/files folder6.
(b) Fill in the following empty text7:
<?php echo ’<img src="’.base_path().’sites/default
/files/avatars/defaultavatar.jpg" />’; ?>
This will display the defaultavatar.jpg whenever there is no avatar.
(c) Add a relationship: Content: Avatar (required)8.
(d) Add a filter: File ID: (select the new relationship here) is not
empty.
Remember, in Drupal 6, we need to enable the core PHP filter module before
we can input any PHP code.
5Drupal 5 users: use this setting in the new Views pane.6Drupal 5 users: use the /files folder instead.7This will output <img src="http://drupalfun.com/sites/default/files/
avatars/defaultavatar.jpg" />, which is HTML code for displaying an image.8Drupal 5 users: you can just choose the filter: Avatar (field avatar) - Has Image - Yes
36

8/14/2019 Drupal 6.pdf
http://slidepdf.com/reader/full/drupal-6pdf 53/149
Chapter 4. User Profiles 37
Figure 4.9: The avatar view.
Let add this pane to our Profile panel. Make sure to use the Node ID context
(fig 4.10).
Figure 4.10: The panel with the profile node and the avatar view.
4.3.4 Adding Profile Comments - aka “My wall”
In many online communities, the “wall”-system has become increasingly pop-
ular. A “wall” is simply a place on the profile, where people can leave mes-
sages. In essence, they are commenting on that profile (fig 4.11).
By default, commenting on the profiles content type is enabled. On the
content section of the profile panel page (/admin/panels/panel-page), we
can simply add:
37

8/14/2019 Drupal 6.pdf
http://slidepdf.com/reader/full/drupal-6pdf 54/149
Chapter 4. User Profiles 38
• “Node ID Comments”
• “Node ID Comment Form”
If we rename the titles to “My Wall” and “Write on my wall”, we have a
wall-system already in place.
Figure 4.11: An example wall.
4.4 Accessing the profile
Drupal provides a “My Account” page for every user, on which we have put
a teaser of our profile (section 4.2.1). Since the profile is such an important
starting point for our users, we are going to make it more easily accessible.
38

8/14/2019 Drupal 6.pdf
http://slidepdf.com/reader/full/drupal-6pdf 55/149
Chapter 4. User Profiles 39
4.4.1 Adding a nice button that links to the profile
We don’t want to completely take over the My Account page, because some
modules might actually add useful information to this page. So the users
will have a “My Account” page, where they can manage their password etc
and a “profile” page with their social preferences and information about
themselves. In section 4.2.1 we have already added the teaser of the profile
to the My Account page. Let’s make this a bit fancier, so people will click
on it more easily. We will replace the default teaser with a big button that
says “View My Profile”.
””
Figure 4.12: An example of a profile button on the “My Account” page.
We can change the teaser layout with the Contemplate module, without any
“hard core” code needed. You need to create the image profilebutton.jpg
and place it in the files folder. Here is the template code to display an
image-button that links to the corresponding profile910:
<a href="<?php print base_path();?>node/
9This code will output <a href="http://drupalfun.com/node/1"> Here goes the
image code </a>, which is html code for a hyperlink. The image code is similar to the
empty text we have used before with the avatar: <img src="http://drupalfun.com/
sites/default/files/profilebutton.jpg" />10Drupal 5 users: replace the sites/default/files by files, which should be the
directory where you have placed the image.
39
8/14/2019 Drupal 6.pdf
http://slidepdf.com/reader/full/drupal-6pdf 56/149
Chapter 4. User Profiles 40
<?php print $node->nid ?>">
<img src="<?php print base_path();?>
sites/default/files/profilebutton.jpg" /></a>
This small template code can be used with the Contemplate module to gen-
erate the appropriate teasers (fig 4.12).
I use the php expression:
<?php print base_path();?>
instead of my site’s address. This makes our site easy to transfer to another
domain.
The rest of the My Account page remains the same. You may notice that
modules sometimes add things to this page. If you want to clean up the My
Account page and remove unwanted areas, use the MyAccount alter module.
This module is not yet ready for Drupal 6 at the time of this writing, but
works fine for Drupal 5. It allows you to remove and rearrange the differentsections to your likings.
4.4.2 Menu link to my profile
We are going to create a button (or a text link) “My profile” to put in a
sidebar block. This will offer the users a direct way to access their profile.
The code used in the block is the following:
For a simple text link11:
<?php
global $user;
$myuid= $user->uid;
11Drupal 5 users: remember to replace content profile by nodeprofile
40

8/14/2019 Drupal 6.pdf
http://slidepdf.com/reader/full/drupal-6pdf 57/149
Chapter 4. User Profiles 41
$node= content_profile_load(profile, $myuid);
//profile above=the name of our content type
$profileid= $node->nid;
print l(’My profile’,’node/’.$profileid);
//l() is a function provided by Drupal that creates a link.
//l(link display text, path after main path)
?>
For an image link (place the image in /sites/default/files12 and name
it myprofile.jpg)13:
<?php
global $user;
$myuid= $user->uid;
$node= content_profile_load(profile, $myuid);
//profile above=the name of our content type
$profileid= $node->nid;
$myimage=theme_image(’sites/default/files/myprofile.jpg’);
print l($myimage, ’node/’.$node->
nid, array(’html’ => true))
?>
Putting custom PHP code on a page is not always safe. If you’ve misspelled,
you might not be able to change it (except for altering the box table in your
database). My tip: enable the block only for a specific page to test it out
first. Another possibility, is to use the Devel module to test the code in the
PHP block it supplies.
So far, we have set up our basic profile and configured the display page. Let’s
extend on this in the next chapter.
12Or just files if you are using Drupal 5.13Drupal 5 users: remember to replace content profile by nodeprofile
41

8/14/2019 Drupal 6.pdf
http://slidepdf.com/reader/full/drupal-6pdf 58/149
Chapter 4. User Profiles 42
4.5 This chapter’s Module Download List
• Automatic Nodetitles
• CCK
• Content Profile
• Contemplate
• Devel (optional)
• Fivestar
• Filefield
• Imageapi
• Imagecache
• Imagefield
• MyAccount alter (optional)
• Panels
• Thickbox
• Views
• VotingApi
42

8/14/2019 Drupal 6.pdf
http://slidepdf.com/reader/full/drupal-6pdf 59/149
The world is but a canvas to the imagination.
Henry David Thoreau
5Expanding profiles
So far, the basic profiles look great. In this chapter we will expand the
profile page to encompass image and video galleries and set up some user
search mechanisms.
5.1 Image gallery
Let’s add an image gallery to the profiles, similar to the one in figure 5.1.
Each user has one gallery and can add a predefined number of pictures to it.
The images are enlarged with a nice jQuery effect, when somebody clicks on
them.
43

8/14/2019 Drupal 6.pdf
http://slidepdf.com/reader/full/drupal-6pdf 60/149
Chapter 5. Expanding profiles 44
Figure 5.1: The picture gallery, on the profile.
5.1.1 Image gallery content type
Up until now, we have only used an image for the avatar. The handling
of the photo gallery images is going to be done in a very similar way, using
Imagefield, Imagecache and Thickbox. Only this time, we are going to create
a new content type to hold the photo gallery images, instead of adding a
field to the profile.
Here is the workflow for Drupalfun:
1. Create a new content type /admin/content/types and call it Photo
Gallery (of the type “photogallery”):
2. Empty the body field label.
3. No Fivestar ratings.
4. Use as content profile1.
5. Comments disabled.
1Drupal 5 users: “Use this content type as a nodeprofile for users” with maximum
population of 1.
44

8/14/2019 Drupal 6.pdf
http://slidepdf.com/reader/full/drupal-6pdf 61/149
Chapter 5. Expanding profiles 45
6. Automatic title: [author-name-raw]’s photo album2.
By specifying the photo gallery as a “content profile”, we only allow one
gallery per user. Most of the other options are optional and will not affect
the outcome too much.
Because the photo gallery is a “content profile”, it will be dis-
played at the “My Account” page. This is not desirable in
our case, so we have just set the “content profile” options (at
/admin/content/node-type/profile/profile)3. to display neither a linknor the content. We are just going to display the photo gallery on the profile ,
no need for any buttons on the “My Account” page.
We can now add a field, called Pictures, to our newly created content type
(fig 5.2):
• Type: image.
• Location: album/[uid]4.
• Number of values: 10 (choose any you want).
• List value: listed & enforce default.
• Disable description.
• File size restriction: 1M.
You are free to allow the users an unlimited amount of pictures. That means
they can upload more then 1000 pictures, if they want to. I usually prefer to
restrict the number to 10 and set a file size restriction to control my server’s
2Using the Automatic Nodetitles module like before3Drupal 5 users: you can set this option in the node profile options at
/admin/content/types/profile/nodeprofile4Use the Token module, like before
45

8/14/2019 Drupal 6.pdf
http://slidepdf.com/reader/full/drupal-6pdf 62/149
Chapter 5. Expanding profiles 46
Figure 5.2: The new pictures field.
disk space. It is also interesting to set a maximum resolution for the images.
When Imageapi uses the GD library, big images can take up a lot of server
memory.
Imagecache will help us display the images in the appropriate size and
reduce the load time, just like we did with the avatar. We can accomplish
this by adding a new Imagecache preset called “Mini”, scaled & croppedto 77x77. You’ll probably want to check your theme and see which size is
appropriate. If you want to change a preset later on, just flush the preset
after making the changes and you are good to go.
The picture field can be displayed correctly (with Imagecache and
Thickbox), by changing the “display” options of the field Pictures
(/admin/content/node-type/photogallery/fields/field pictures):
• No label.
• Set both node and teaser view to Thickbox:Mini.
The images are in the right size now, and are enlarged if you click on them.
However, they are all displayed below one another, and I would rather see
them floating next to each other. I don’t want to go digging in template
code, so I’ll just use the Contemplate module. This will allow the creation
46

8/14/2019 Drupal 6.pdf
http://slidepdf.com/reader/full/drupal-6pdf 63/149
Chapter 5. Expanding profiles 47
of a custom template for the body, without any “deep coding”. The module
provides a small code snippet for each field. Here is the template I created:
<?php foreach ((array)$node->field_pictures as $item) { ?>
<?php print $item[’view’] ?>
<?php } ?>
This code will float the fields next to each other.
5.1.2 Displaying it in the profile
The photo gallery is a part of the user profile page, so this is where we want
to display it. We can get it there by using almost the same technique as
with the avatar. Instead of doing it the same way (with a Views panel ), we’ll
explore a slightly different way of embedding views into panels (with a Views
block ).
We’ll create a Views block that’s called “Photogallery” (fig 5.3):
1. Create a block view.
2. Row style: nodes (no teasers or links).
3. Display one item.
4. The empty text is a bit elaborate5:
<?php global $user;
$idn1=$user->uid; //my userid
$id2= arg(1); //my contentprofileid
$mynode= content_profile_load(profile, $idn1);
$id1= $mynode->nid;
5Drupal 5 users: replace content profile by nodeprofile.
47

8/14/2019 Drupal 6.pdf
http://slidepdf.com/reader/full/drupal-6pdf 64/149
Chapter 5. Expanding profiles 48
//check if the user is looking at his own gallery:
if($id1==$id2){
//If so: display add link
echo ’<a href="’;
echo base_path();
echo ’?q=node/add/photogallery’;
//photogallery above = the name of our content type
echo ’">Add your pictures here!</a>’;
}
else
//if not:
{
echo "This user has no picture gallery uploaded.";
}
?>
This PHP code checks whether the user is viewing his or her own profile.
If so, it asks the user if s/he wants to create a new gallery. Otherwise,
it just says that there are no pictures available for this user. Be sure
to select PHP code as input format.
5. Add the argument User: UID (Action to take if argument is not present
or validates: display empty text). The view needs to get the user ID
from the panel.
6. Add a filter: Node Type is one of Photo Gallery and is published.
48

8/14/2019 Drupal 6.pdf
http://slidepdf.com/reader/full/drupal-6pdf 65/149
Chapter 5. Expanding profiles 49
Figure 5.3: The view block displaying the user’s photo album.
Figure 5.4: Inserting the block into the profile panel page.
49

8/14/2019 Drupal 6.pdf
http://slidepdf.com/reader/full/drupal-6pdf 66/149
Chapter 5. Expanding profiles 50
Our profile panel already has a context called “Node ID”, which is passed
from the URL. The view we have just created requires the argument “User:
UID” (not Node ID). We can use the “relationship” feature6 in our panel (at
/admin/panels/panel-page/Profile/edit/context) to add a relationship
called “User from node”. When we add our block on the left column of the
profile panel page (fig 5.4), we simply select the relationship “User from
node” and our view will get the appropriate “User ID” argument.
5.1.3 Configuring the node display
The gallery looks great in the profile, but if someone clicks on the title
it will simply display the node, which looks less than optimal. We can
overtake this node by a panel page, like we did with the profile. We just
modify the “profile” panel to include a “content display” for photo gallery
nodes as well. Just edit the “node ID” context of the “profile panel” (at
/admin/panels/panel-page/Profile/edit/context) to also provide a dis-
play for photogallery.
We can arrange this display in any way we like, by adding blocks and panes to
it (at /admin/panels/panel-page/Profile/edit/content). One custom
block you might want to add is the following7:
<?php
$node=node_load(arg(1));
$myuid=$node->uid;
$node=content_profile_load(profile, $myuid);
$profileid=$node->nid;
6Drupal 5 doesn’t offer us this relationship. We can circumvent this by adding an
argument handling code in the Photo Gallery view:
$node = node load(array(’nid’ => arg(1))); $args[0]= $node->uid; return
$args;7Drupal 5 users: you will want to replace content profile by nodeprofile.
50

8/14/2019 Drupal 6.pdf
http://slidepdf.com/reader/full/drupal-6pdf 67/149
Chapter 5. Expanding profiles 51
echo ’<a href="’.base_path().’node/’.$profileid.’">
<h3>View my profile</h3></a>’;
?>
This little code snippet looks very much like the ones we’ve seen before. It
displays a link to go back to the user’s profile and makes navigation a bit
easier (fig 5.5).
Figure 5.5: A photo gallery node.
5.1.4 Pictures Page
I wanted to give the users the opportunity to browse the latest image galleries
(fig 5.6). Therefore, I have created a Views page called “pictures”.
Here are some of the settings of the “pictures” page (fig 5.9):
1. Style: grid8.
2. Full pager.
3. Field: content: picture:
8Note: not available with Views 1. To display a grid with Views 1, use the extension
module Views Bonus Pack (currently alpha version).
51

8/14/2019 Drupal 6.pdf
http://slidepdf.com/reader/full/drupal-6pdf 68/149
Chapter 5. Expanding profiles 52
• “group multiple values”, will give you the album covers.
• “link to node”.
• Display it with a new Imagecache preset you create (see below).
4. Field: “user:name”, label: “By” or just add the title of the node.
5. Sort: “node last updated”.
6. Filters: “node is published” and “node type is photo gallery”.
Figure 5.6: The pictures page at Drupalfun.
Figure 5.7: An example from the Imagecache Actions project page.
Since I wanted the albums to show in a special way, I installed the Im-
agecache actions Module. This module allows us to create more elaborate
presets, like the one in figure 5.7. I still kept it pretty simple and just added
a double border around the image (fig 5.6).
52

8/14/2019 Drupal 6.pdf
http://slidepdf.com/reader/full/drupal-6pdf 69/149
Chapter 5. Expanding profiles 53
Figure 5.8: The Imagecache preset.
Figure 5.9: The Views settings for the Picture page.
53

8/14/2019 Drupal 6.pdf
http://slidepdf.com/reader/full/drupal-6pdf 70/149
Chapter 5. Expanding profiles 54
5.1.5 Multiple Albums per User
We also have the option to give our users multiple picture albums. This
option requires a slightly different approach, which I did not implement at
Drupalfun. Still, I want to elaborate on it. In the case of multiple albums per
users, the “photo album” content type, should not be a “content profile”,
but instead just a regular content type.
We would need a view called “My Photo Albums”, to embed on the profile
panel page. This view should display all of the albums (=nodes of type“photogallery”) of the concerned user. Instead of displaying just one photo-
gallery node , like we did before in section 5.1.2, we display multiple nodes.
We’ll need to set the display options of the pictures field (in the view) to
“group multiple values” and “link to node”. These are the two most impor-
tant options. By setting them, we will display only one image per album,
which will link to the user’s full album. This is the same approach as in the
section above, for the “pictures” page.
5.2 Video gallery
5.2.1 Set-up
The procedure to implement a video gallery is pretty much the same as the
image gallery, so I am going to focus only on the main differences between
the two, which is the content type’s field .
Our goal is to allow users to embed external videos , not upload them. We
make a new content type and use the Embedded Media module to create β 1 ver-
sion
used.
our field. We go about this in pretty much the same way as with the Photo
Gallery. The content type that we have created is called “Videos”, with a
field named video:
54
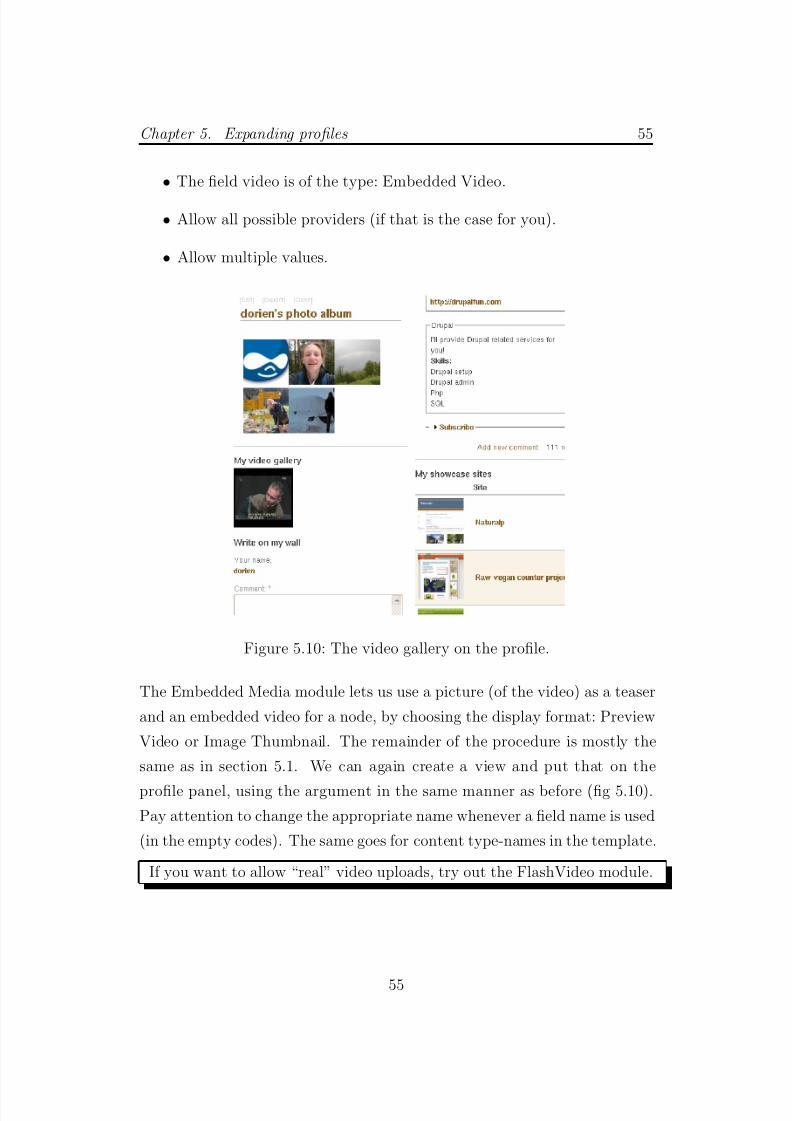
8/14/2019 Drupal 6.pdf
http://slidepdf.com/reader/full/drupal-6pdf 71/149
Chapter 5. Expanding profiles 55
• The field video is of the type: Embedded Video.
• Allow all possible providers (if that is the case for you).
• Allow multiple values.
Figure 5.10: The video gallery on the profile.
The Embedded Media module lets us use a picture (of the video) as a teaser
and an embedded video for a node, by choosing the display format: Preview
Video or Image Thumbnail. The remainder of the procedure is mostly the
same as in section 5.1. We can again create a view and put that on the
profile panel, using the argument in the same manner as before (fig 5.10).
Pay attention to change the appropriate name whenever a field name is used
(in the empty codes). The same goes for content type-names in the template.
If you want to allow “real” video uploads, try out the FlashVideo module.
55

8/14/2019 Drupal 6.pdf
http://slidepdf.com/reader/full/drupal-6pdf 72/149
Chapter 5. Expanding profiles 56
5.2.2 From pictures to media
In section 5.1.4, we have created a “pictures page”, which gave our users an
overview of all available image galleries. We could expand this page, to also
include video galleries, and thus become a “media” page (fig 5.11). Here is
an example approach:
1. Add an extra field: Video, which you display as Image Thumbnail.
2. Allow an extra content type: videos.
3. Add an exposed filter on content type: video/image, so users can pick
their category. Be sure to check “Limit list to selected items”, an option
not available with Views1.
Figure 5.11: The media page.
5.3 Other galleries
We’ve examined how to add photo galleries and video galleries, but in essence,
we can add any type of content, related to the users as a gallery. Think: mp3
56

8/14/2019 Drupal 6.pdf
http://slidepdf.com/reader/full/drupal-6pdf 73/149
Chapter 5. Expanding profiles 57
galleries, uploaded videos, files, articles, etc. If we go deeper into this, we’ll
notice that the line between “ user gallery” and “content” begins to fade. In
section 6.2.1, we’ll explore how to integrate other content (a Drupal showcase)
in the profile.
5.4 Pinpointing users on a worldmap
5.4.1 Getting the location
The Gmap and Location module give us the ability to let each user pinpoint
their location on a worldmap (fig 5.12). This can be done either by giving in
the address information, or by clicking on a map. Here are some of the steps
to follow in order to achieve this functionality:
1. Enable Gmap and Location.
2. Get a Gmap API key at http://code.google.com/apis/maps/
signup.html.
3. Configure Gmap (at /admin/settings/gmap) (fig 5.13) and fill in your
API key. You can change the way the default map looks here.
4. Configure Gmap Location (at /admin/settings/gmap location).
This is where you choose which markers to use on your map. Only
use the marker for “profile”.
5. Configure Location (at /admin/settings/location) (fig 5.14): “use
a gmap to set lattitude and longitude”. You can also specify which
countries you want to geocode (extract the lat & long from the address
information).
6. Edit the Profile Content Type: under the Locations group:
57

8/14/2019 Drupal 6.pdf
http://slidepdf.com/reader/full/drupal-6pdf 74/149
Chapter 5. Expanding profiles 58
• Set the number of locations to 1.
• Collection setting: what information do you want from the users?
Make sure that the block is not collapsed.
• Display settings: only display it in the node. Adjust the weight
to your likings.
Figure 5.12: The Gmap on the profile edit page.
58

8/14/2019 Drupal 6.pdf
http://slidepdf.com/reader/full/drupal-6pdf 75/149
Chapter 5. Expanding profiles 59
Figure 5.13: The Gmap settings.
Figure 5.14: The Location settings.
59

8/14/2019 Drupal 6.pdf
http://slidepdf.com/reader/full/drupal-6pdf 76/149
Chapter 5. Expanding profiles 60
5.4.2 Displaying the location
Now that we have the exact location of all the users (of the profiles, to be
correct), we can display them in a number of ways. Gmap combined with
Locations, offers us a great variety of options.
Showing all users
Gmap already offers us a page (at /map/node), that shows all nodes, together
with their teaser information. Figure 5.15 is an example of such a map. Here
is another example, where our “View my profile” button comes into action.
Figure 5.15: A map displaying all the users.
Displaying a small map on the profile
To display a small map on the profile, we can use the Location map block,
that is provided by Gmap and Location. Just enable it, either in the profile
panel, or in the sidebar (fig 5.16). I have configured the block and edited the
gmap macro from:
60

8/14/2019 Drupal 6.pdf
http://slidepdf.com/reader/full/drupal-6pdf 77/149
Chapter 5. Expanding profiles 61
[gmap |width=100% |height=200px |control=None |behavior=+autozoom
+notype]
to
[gmap |width=100% |height=200px |control=None |zoom=3|behavior=
+notype]
This way, the map is a bit more zoomed out. This makes more sense in our
case.
Figure 5.16: The location block.
Displaying a custom map with Views
Because of the integration with Views, we can build any type of custom map
as a view. More about this in section 5.5.6
5.5 User search
5.5.1 Member search page
Members need to be able to find other members. A primary tool for this is
a Profile Search function (fig 5.17).
61

8/14/2019 Drupal 6.pdf
http://slidepdf.com/reader/full/drupal-6pdf 78/149
Chapter 5. Expanding profiles 62
The Views module allows us to create a list of all user profiles and set exposed
filters to them. These will allow anybody to modify the search options:
1. Create a (node) view named profilesearch.
2. Provide a page display.
3. Path: usersearch.
4. Style: table.
5. Fields:
• Node: NID (link to node - change the label to Name).
• Avatar: Thickbox:Mini.
• Anything else you want here . . .
6. Use full pager.
7. Filters:
• Node is published.
• Node type: profile.
8. Exposed filters: add any regular filter and then hit the “expose” button
(be sure to change the label). The users will be able to modify these
filters.
An optional sort function is the “sort on sticky”. You can make any profile
node “sticky” and it will show up on the top of the members list, thus
favouring this member. Our members page looks quite good, you can filter on
any profile field you want (even location proximity), as long as the concerned
field is added as an exposed filter on the view.
62

8/14/2019 Drupal 6.pdf
http://slidepdf.com/reader/full/drupal-6pdf 79/149
Chapter 5. Expanding profiles 63
Figure 5.17: The member search page.
5.5.2 A quick ’find a match’ block
Let’s separate the “search filter” section from our newly created Views page.
This gives us the possibility to create a “find a member” block (fig 5.18),
which we can put on our sidebars, the front page, embed in a panel, etc. In
order to do this, Views offers us the option “Exposed form in block” (on the
profilesearch view configuration page). Once we enable this option, Views
will provide a block for us. This provides a great tool, especially if member
search is a key feature on your site.
Drupal 5 users: you’ll need the Views Filter Block module to create the
search block.
63
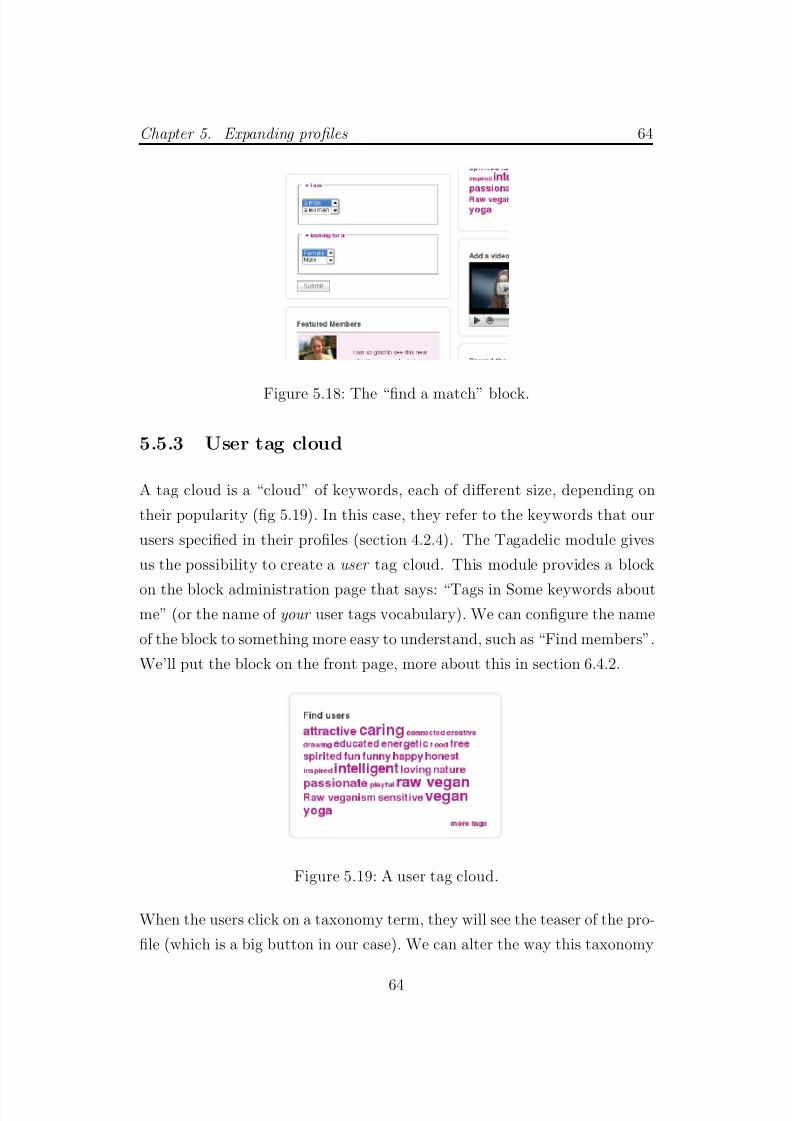
8/14/2019 Drupal 6.pdf
http://slidepdf.com/reader/full/drupal-6pdf 80/149
Chapter 5. Expanding profiles 64
Figure 5.18: The “find a match” block.
5.5.3 User tag cloud
A tag cloud is a “cloud” of keywords, each of different size, depending on
their popularity (fig 5.19). In this case, they refer to the keywords that our
users specified in their profiles (section 4.2.4). The Tagadelic module gives
us the possibility to create a user tag cloud. This module provides a block
on the block administration page that says: “Tags in Some keywords aboutme” (or the name of your user tags vocabulary). We can configure the name
of the block to something more easy to understand, such as “Find members”.
We’ll put the block on the front page, more about this in section 6.4.2.
Figure 5.19: A user tag cloud.
When the users click on a taxonomy term, they will see the teaser of the pro-
file (which is a big button in our case). We can alter the way this taxonomy
64

8/14/2019 Drupal 6.pdf
http://slidepdf.com/reader/full/drupal-6pdf 81/149
Chapter 5. Expanding profiles 65
page is displayed, by overriding it with Views. Just enable the existing view
called “taxonomy term”. Make any modification to the display that you
like, just remember that this list can also contain other content types that
have terms attached to them. We want to keep it simple and just define a
table view which displays the node title, its content type and the avatar (if
available). So whenever a user clicks on the user tag cloud, a table with the
matching users, together with their avatars (and the indication that it’s a
profile) is displayed (fig 5.20).
Figure 5.20: A list of users who are ”intelligent”.
5.5.4 New Users Block
Drupal provides a standard “Who’s new” block. However, we aim a bit
higher by also displaying the user’s avatar next to his or her name (fig 5.21).
Views allows us to create a new block view, with the following settings:
• Style: table.
• Fields: Avatar (Mini) and Node Title, link them both to the node.
• Filters: Node Type = profile & Node = published.
• Display 5 items.
65

8/14/2019 Drupal 6.pdf
http://slidepdf.com/reader/full/drupal-6pdf 82/149
Chapter 5. Expanding profiles 66
• Title: Newest Members.
• Sort: Node Post Date: descending.
This gives us a nice list with the five latest users, including their Avatar
picture.
Figure 5.21: The new users block.
5.5.5 Featured Members
I also like to create a “Featured Members” block, to put on the front page
(section 6.4). This block is very similar to the one we have created in the
previous section, with the following differences:
• Sort: random.
• Title: Featured Members.
• Fields: Avatar (Mini) and “About me” field.
• Only allow users with an avatar: by adding a relationship “Content:
Avatar” and setting “Require this relationship”9.
9Drupal 5 users: you can just add the filter Avatar (eld avatar) - Has Image - Yes
66

8/14/2019 Drupal 6.pdf
http://slidepdf.com/reader/full/drupal-6pdf 83/149
Chapter 5. Expanding profiles 67
Figure 5.22: The Featured Members Block.
5.5.6 Displaying search results on a map
As mentioned in section 5.4.2, we can use Views to display the node results
as a map. The idea is that we display a node with the view, but instead of
displaying the normal fields, we display lattitude and longitude in a gmap.
Because the markers on the map show the teaser (View my profile), we can
use a map to display any view that lists profile nodes (these have location
information). We can again use the filters as we have done in section 5.5.1.
The following settings are critical in your node view:
• Row Style: Gmap.
• Fields: Lattitude & Longitude.
Throughout these last two chapters, we have been very busy creating our
advanced profiles. While profiles are the backbone of our site, we should also
67
8/14/2019 Drupal 6.pdf
http://slidepdf.com/reader/full/drupal-6pdf 84/149
Chapter 5. Expanding profiles 68
remember to properly display any real “content” we may have. Thus spoken,
we can now move on the the next chapter, where we will put action to our
words.
5.6 This chapter’s Module Download List
• Embedded Media Field
• FlashVideo (optional)
• Gmap
• Imagecache Actions
• Location
68
8/14/2019 Drupal 6.pdf
http://slidepdf.com/reader/full/drupal-6pdf 85/149
When it is dark enough,you can see the stars.
Charles A. Beard
6Content Presentation
Your site may be user or community oriented. Still, chances are that you
want to include some sort of content in it. We have already talked about
galleries and profiles. These are all nodes (or content). Let’s expand this
a bit and look at other types of content and how we can properly integrate
them in the site. Drupalfun has four types of content other then the user
related galleries we have talked about in the last chapter:
• Articles: tutorials, articles, quick tips.
• Questions: get help from the community if you’re temporarily stuck.
• Job offers: available Drupal jobs.
• Showcase sites: gives users the ability to show off their Drupal sites.
69

8/14/2019 Drupal 6.pdf
http://slidepdf.com/reader/full/drupal-6pdf 86/149
Chapter 6. Content Presentation 70
In this chapter we will be looking at how to implement some of these content
types and properly integrate them in the site.
6.1 Content types
We have made a content type called Photo Gallery in section 5.1.1. Now it
is time to create the “info”-oriented (as opposed to “user”-oriented) content
types. There is really nothing special about creating the content types. Dru-
pal offers us a lot of possibilities due to the many contributed modules that
focus on content.
Here are some generalities in creating a content type:
• Use CCK fields in the content type (Text - Link - Imagefield - . . . ).
• Set the correct display option for each of the CCK fields.
CCK offers us an incredible toolbox to work with. The many extension mod-
ules give us other field types, such as Guitar (make guitar chords), Money,
Flashvideo, Embedded Media Field, Date, Audio recordingfield, FlashVideo
and many many more. Drupal 7 will even include CCK in the core.
6.2 Over“views”
You want to make your content “accessible” from anywhere. Views allows
us to create all kinds of lists and tables, that we can add in different places
throughout the site. We have already worked with Views on the profile. Let’s
examine the possibilities a bit further.
70

8/14/2019 Drupal 6.pdf
http://slidepdf.com/reader/full/drupal-6pdf 87/149
Chapter 6. Content Presentation 71
6.2.1 Showcase list
We can create content “overview” pages which list the content of a certain
type. Creating a list like this is pretty basic most of the time with Views.
Let’s take the example of the case study site and look at the content type
“Site Showcase” (fig 6.1). We have already used the Views module in the
previous chapters, so I’ll just briefly touch on some peculiarities:
• Add a header that says “Add your showcase here”:
<h2><a href="<?php print base_path();?>node/add/showcase">
Add your Drupal showcase here!</a></h2>
• Use the footer space wisely. You might want to put an AdSense block
in there? Or other useful text.
• In this case, the empty text is irrelevant. However, sometimes it might
be appropriate. Think about the default avatar in section 4.3.3.
We have used this type of views throughout Drupalfun to compile lists of
content. Sometimes, we have made use of exposed filters that act as a search
mechanism, much like on the user search page. More about exposed filters
in section 7.1. For every content type that is available on Drupalfun, we’ve
made an overview page. This means that we have a page for:
• All showcases.
• All job offers.
• All questions (section 7.1).
• The knowledge base.
• Media (section 5.2.2).
• Profiles (section 5.5.1).
71

8/14/2019 Drupal 6.pdf
http://slidepdf.com/reader/full/drupal-6pdf 88/149
Chapter 6. Content Presentation 72
Figure 6.1: The showcase table.
6.2.2 Blogs
Blogs are present in many community sites. Drupal has a core Blogs module,
which creates a content type called Blog. It is a pretty simple content type,
but you can use CCK to add additional fields such as videos,. . . if you want
to. I chose not to use blogs on Drupalfun. However, if you do want to
allow users to maintain a blog, it works in a very similar way as the above
mentioned showcase list. You can use Views to create a list of all blogs of
a user in the same way as with the Showcase and add this to their profile
panel page.
6.2.3 My Content
To give users total control and an overview of all their posts, we’ve created
a “My Stuff” Views page (fig 6.2) and placed a link in the main navigation
menu. Here, users can edit and delete their posts, track the number of hits
72

8/14/2019 Drupal 6.pdf
http://slidepdf.com/reader/full/drupal-6pdf 89/149
Chapter 6. Content Presentation 73
etc. Key in making this view, is setting the filter “User: current” (fig 6.3).
Figure 6.2: The “My Stuff” page.
Figure 6.3: The “My Stuff” view.
6.2.4 View blocks
Views is not only extremely useful for creating overview pages , it also allows
us to create blocks that we can put anywhere on the sidebars or embed in
73
8/14/2019 Drupal 6.pdf
http://slidepdf.com/reader/full/drupal-6pdf 90/149
Chapter 6. Content Presentation 74
panels. Views 2 allows us to first create a page view (if you also need it of
course), and then add a block later on. This way you could, for instance,
display all questions on a page, and only the latest 5 questions in a block.
The setting for the block will probably be slightly different from your page
settings. To make adjustments from the default (or page) display, use the
“override” button.
Here are some interesting suggestions for creating blocks:
• Featured image (display a random image, which links to a node).
• Latest image.
• Featured video.
• Latest video.
• Last 10 posts within certain categories.
• Last 10 posts of a certain user.
• Most popular content (section 6.2.6).
• Top rated content (section 6.2.6).
6.2.5 Related Content Block
You can use the Views module to create a related content block. This block
will detect all the taxonomy terms attached to a node and display a listof other nodes that share these taxonomy terms. Let’s take an example.
Whenever we display a question node at Drupalfun, we display a list of
“related questions” next to it (fig 6.4). Here is how we have made this block:
1. Create a new node view.
2. Add a block or a panel pane display.
74
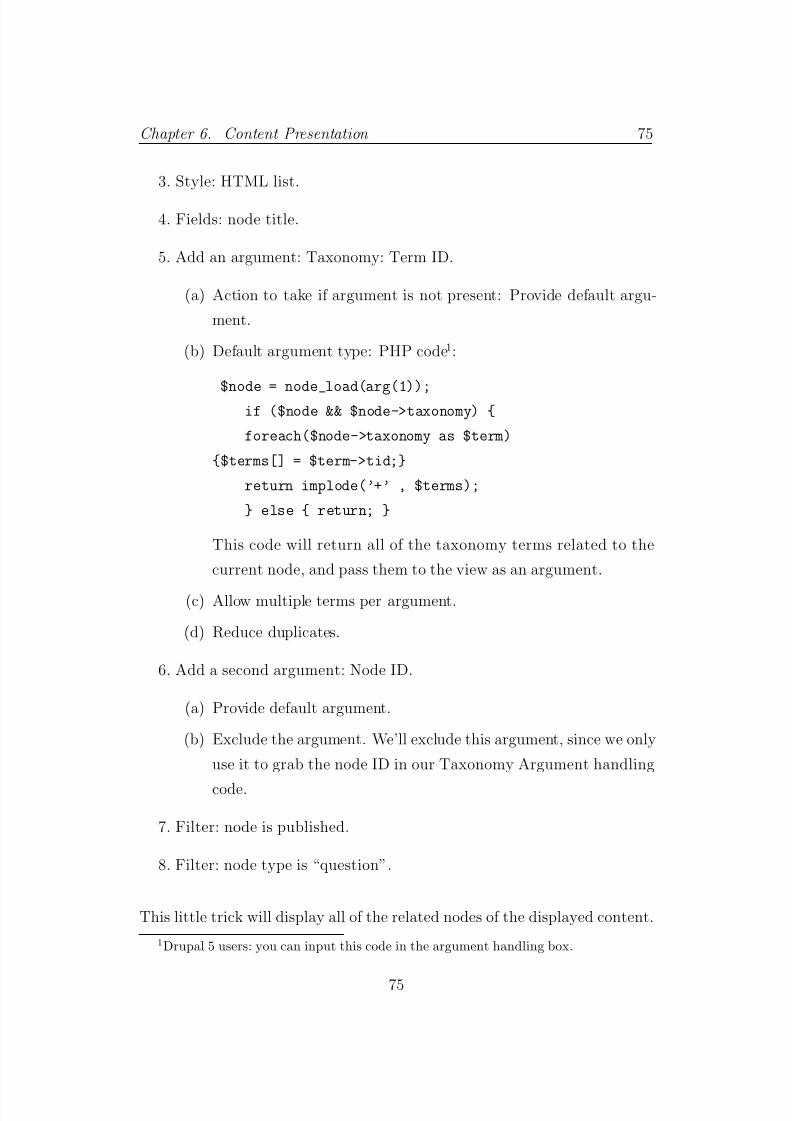
8/14/2019 Drupal 6.pdf
http://slidepdf.com/reader/full/drupal-6pdf 91/149
Chapter 6. Content Presentation 75
3. Style: HTML list.
4. Fields: node title.
5. Add an argument: Taxonomy: Term ID.
(a) Action to take if argument is not present: Provide default argu-
ment.
(b) Default argument type: PHP code1:
$node = node_load(arg(1));if ($node && $node->taxonomy) {
foreach($node->taxonomy as $term)
{$terms[] = $term->tid;}
return implode(’+’ , $terms);
} else { return; }
This code will return all of the taxonomy terms related to the
current node, and pass them to the view as an argument.
(c) Allow multiple terms per argument.
(d) Reduce duplicates.
6. Add a second argument: Node ID.
(a) Provide default argument.
(b) Exclude the argument. We’ll exclude this argument, since we only
use it to grab the node ID in our Taxonomy Argument handling
code.
7. Filter: node is published.
8. Filter: node type is “question”.
This little trick will display all of the related nodes of the displayed content.
1Drupal 5 users: you can input this code in the argument handling box.
75

8/14/2019 Drupal 6.pdf
http://slidepdf.com/reader/full/drupal-6pdf 92/149
Chapter 6. Content Presentation 76
Figure 6.4: The related questions block.
6.2.6 Fixfertig
Views is definitely one of the most important and most versatile modules
around. There are so many functions and tricks available, I have only men-
tioned a tiny part of them that are relevant to our case study. Views already
provides us some views out of the box. Such as:
• Recent comments.
• Archive (per months).
• Glossary (an index).
• Tracker (recent activity).
• Taxonomy (takes over the term pages, for instance if someone clicks onthe tag cloud like we did in section 5.5.3).
Then there are those views that get added by some of the modules that we
have used:
• Top Content is added by Voting API and displays the top rated content.
76

8/14/2019 Drupal 6.pdf
http://slidepdf.com/reader/full/drupal-6pdf 93/149
Chapter 6. Content Presentation 77
• Most Popular Content is added by the core statistics module.
• User Relationships Content: content posted by friends.
• User Relationships Browser: shows someone’s friends.
• . . .
I guess you realise by now that the possibilities Views offers us, are by far
infinite. We could end up with so many block views, we wouldn’t have any
place to put them. The Quick Tabs module provides a solution here, allowing
a tabbed view inside blocks (fig 6.5). You can create a Quicktabs block and
then choose the different views to be displayed on the different tabs. It’s a
great space-saver.
Figure 6.5: An example of a quick tabs block.
77
8/14/2019 Drupal 6.pdf
http://slidepdf.com/reader/full/drupal-6pdf 94/149
Chapter 6. Content Presentation 78
6.2.7 Putting stuff around the view
We have already put a view in a panel pane a few times by now. It is also
possible to put a “larger” view in a panel. What I mean by “larger” view, is a
view that contains multiple pages: views with exposed filters or with pagers.
These views sometimes require a page reload and when that happens, we
jump to the view URL, and loose the surrounding panel. Unless. . .
When embedding a view in a panel. You can use the option: “Override URL:”
and fill in the URL of the panel. This prevents your view from jumping outof the panel.
6.3 Node pages
6.3.1 More Panels
We’ll create a separate panel for each content type, in order to display the
node itself (fig 6.6). This means that, whenever somebody clicks on a “ques-
tion”, “showcase”, “job offer”, etc. S/he will be taken to a panel page with
that particular content in it. This works in exactly the same way as with the
Photo Gallery panel page (section 5.1.2). We alter the context “node ID” to
include displays for the other content types. Each of these content types will
get its own menu in the “content” section of the panel configuration pages
(/admin/panels/panel-page/Profile/edit/content).
Since our node content is being displayed in a panel, we can put any block we
want on this node panel. Be creative here. Use some of the blocks mentioned
above, add some AdSense etc.
One example of a custom code that is useful to put in a panel pane is the
following2:
2Drupal 5 users: replace content profile by nodeprofile
78

8/14/2019 Drupal 6.pdf
http://slidepdf.com/reader/full/drupal-6pdf 95/149
Chapter 6. Content Presentation 79
Figure 6.6: A question node that consists of multiple panel panes.
<?php
//load the node that is being displayed
$node = node_load(array(’nid’ => arg(1)));
//get the user ID from this node
$myuid= $node->uid;
//load the profile node of this user
$node2= content_profile_load(profile, $myuid);
$profileid= $node2->nid;
?>
<a href="<?php print base_path()?>node/<?php print $profileid;?>">
View my profile</a>
This snippet will display a link to go back to the author’s profile3 (fig 6.7).
If you feel that Panels is to much overhead for your content and want to trya different approach, look at the Composite Layout module. Only available
for Drupal 6. This module is simpler than panels, but it still allows you to
display additional information on a node page.
3Drupal 5 users: remember to replace content profile by nodeprofile again.
79

8/14/2019 Drupal 6.pdf
http://slidepdf.com/reader/full/drupal-6pdf 96/149
Chapter 6. Content Presentation 80
Figure 6.7: The “View my profile” link on a photo gallery.
6.3.2 Voting
I prefer to use either Fivestar voting (fig 6.8) or Plus1 for content votes. Both
of these modules depend upon the VotingApi. Fivestar voting gives you the
choice to put the voting widget above or below the body/teaser. So usually,
the layout looks alright. Plus1 however, does not provide us with such a
choice, it just puts the voting widget below the content. Whilst I feel that
it should be above the node in many cases, or even next to it. We solve this
issue in the next section, by creating a custom template.
Figure 6.8: An example of Fivestar voting on a profile.
80

8/14/2019 Drupal 6.pdf
http://slidepdf.com/reader/full/drupal-6pdf 97/149
Chapter 6. Content Presentation 81
6.3.3 Layout
Even though the node is displayed in a panel, we still need to make sure
the layout of the node itself looks alright. In most cases, we can sufficiently
control the layout (node and teaser) from the content type configuration
pages at /admin/content/node-type/photogallery/display. Displaying
certain fields and moving their order around is often enough. In the case of
the photo gallery however, we have made use of Contemplate to change the
node layout (section 5.1.1). We’ve used the same technique in the case of the
“showcase site”, where we’ve also created a custom “contemplate” in order
to put the Plus1 voting widget in the right place (fig 6.9). The template
looks like this:
<div style="float:left; width:75px;">
<?php print plus1_jquery_widget($node,0,0); ?>
</div><div style="float:left; width:165px;">
<?php print $node->field_screenshot[0][’view’] ?>
</div><p><?php print $node->field_sitedescription[0][’view’] ?>
</p><p><?php print $node->field_link[0][’view’] ?></p>
In case the div clashes with your template, you can always play it safe and
use a table4:4Displaying an HTML table goes like this:
<table>
<tr><td>1st cell, 1st row</td>
<td>2nd cell, 1st row</td>
</tr>
<tr>
<td>1st cell, 2nd row</td>
<td>2nd cell, 2nd row</td>
</tr>
</table>
81

8/14/2019 Drupal 6.pdf
http://slidepdf.com/reader/full/drupal-6pdf 98/149
Chapter 6. Content Presentation 82
<table>
<tr valign="top"><td width="75px">
<?php print plus1_jquery_widget($node,0,0); ?></td>
<td width="160px">
<?php print $node->field_screenshot[0][’view’] ?></td>
<td valign="bottom"><p>
<?php print $node->field_sitedescription[0][’view’] ?></p>
<p><?php print $node->field_link[0][’view’] ?></p></td>
</tr></table>
What’s so special in this code, is the “plus1 jquery widget($node,0,0)”
function. This prints the Plus1 widget in the right place. If you go to the
configuration page of Plus1, uncheck the “display on node”, otherwise, you’ll
end up with two voting widgets.
Figure 6.9: The showcase node view.
6.4 Making a cool welcome page
6.4.1 The front-page panel
In this section, we’ll look at how we can make an extensive front page. Just
as we did with the profile and other content, we can replace the default front
82

8/14/2019 Drupal 6.pdf
http://slidepdf.com/reader/full/drupal-6pdf 99/149
Chapter 6. Content Presentation 83
page by a panel. The difference here is that we actually create a new panel,
not expand the panel’s context to include another content type. Let’s create
a new panel page:
• Name & path: welcome.
• Layout: two column bricks.
In order for this panel to actually take over the front page, change the front-
page path to “welcome” at /admin/settings/site-information. Now we
are ready to add blocks or panel panes to our new front page.
The Frontpage module offers us a simpler alternative, with the possibility of
splash pages.
6.4.2 The front-page panes
Now that we have full control over what appears on the front page, we want
some interesting blocks or panes on there (fig 6.10). Here is a grip out of the
countless possibilities that exist:
• User Tag Cloud: as the one we discussed in section 5.5.3.
• Any block created with views (section 6.2.4 & 6.2.6).
• Any Google AdSense Block (chapter 8).
• Any of the standard core blocks, such as login.
• The Spread block (section 9.6).
• “What you can do right now” block (section 9.2).
• Display statistics from Clustermaps (section 9.7.1).
83

8/14/2019 Drupal 6.pdf
http://slidepdf.com/reader/full/drupal-6pdf 100/149
Chapter 6. Content Presentation 84
• An Activity block (section 7.9).
• The newest groups (section 7.10).
• The user locations (section 5.4.2).
• . . .
The possibilities are unlimited here. Experiment and think about what your
users want to see first. Remember, the front page is the first thing your users
see. Make it worth their while.
Figure 6.10: The front page.
We’ve mostly dealt with “content” and how to present it in this chapter. The
next step is to expand the “community” features of our site.
84

8/14/2019 Drupal 6.pdf
http://slidepdf.com/reader/full/drupal-6pdf 101/149
Chapter 6. Content Presentation 85
6.5 This chapter’s Module Download List
• Composite Layout (optional)
• Frontpage (optional)
• Plus1.
• Quicktabs.
• Any CCK “add-on” you like.
85

8/14/2019 Drupal 6.pdf
http://slidepdf.com/reader/full/drupal-6pdf 102/149
Surround yourself with only people who are going to lift
you higher.
Oprah Winfrey
7Community features
In this chapter, we’ll further explore some community features. Most of
these facilitate the communication between users and allow them to find each
other. Remember our common location requirement from the first chapter?
It’s important that the users feel “connected” somehow.
7.1 Forum
Drupal offers us a standard forum module (fig 7.1), which is simple and
quite good, so it really does not need a big explanation. You just enable
the module and you are good to go. Since forum posts are basically just
nodes that are being commented on, we can explore another way of making
a forum, manually, using Views and Panels.
86

8/14/2019 Drupal 6.pdf
http://slidepdf.com/reader/full/drupal-6pdf 103/149
Chapter 7. Community features 87
Figure 7.1: The standard forum look at drupal.org.
For Drupalfun, we’ve created a content type called “question”. We might
as well have called it discussion. We didn’t use the body field, only two CCK
fields for “Question” and for “Status”. The latter field will indicate if the
question is solved or open.
Let’s create some categories for our forum. Add a new vocabulary called
“Categories”, with a fixed list of terms (fig 7.2). These will be the forum
categories.
Now we have two options here. The first option is to go for a classical forum
look. That means that we first see the categories and then click through
to see the actual post titles. One possible way to accomplish this is to use
the Taxonomy List module. This module replaces the taxonomy page by an
overview page describing the categories and the number of posts in them.Optionally, the Taxonomy Image module can be used to also provide an
image with the categories (fig 7.3). Be aware that this is not the most easy
way to create a forum. If you want a category page, the standard Drupal
Forum module might work just fine for you.
The second option , is to limit the number of clicks the user has to go through
to see the actual posts. Skip the category page, go straight to the posts. We
87

8/14/2019 Drupal 6.pdf
http://slidepdf.com/reader/full/drupal-6pdf 104/149
Chapter 7. Community features 88
Figure 7.2: The terms for the question vocabulary.
Figure 7.3: The taxonomy list module in action.
88
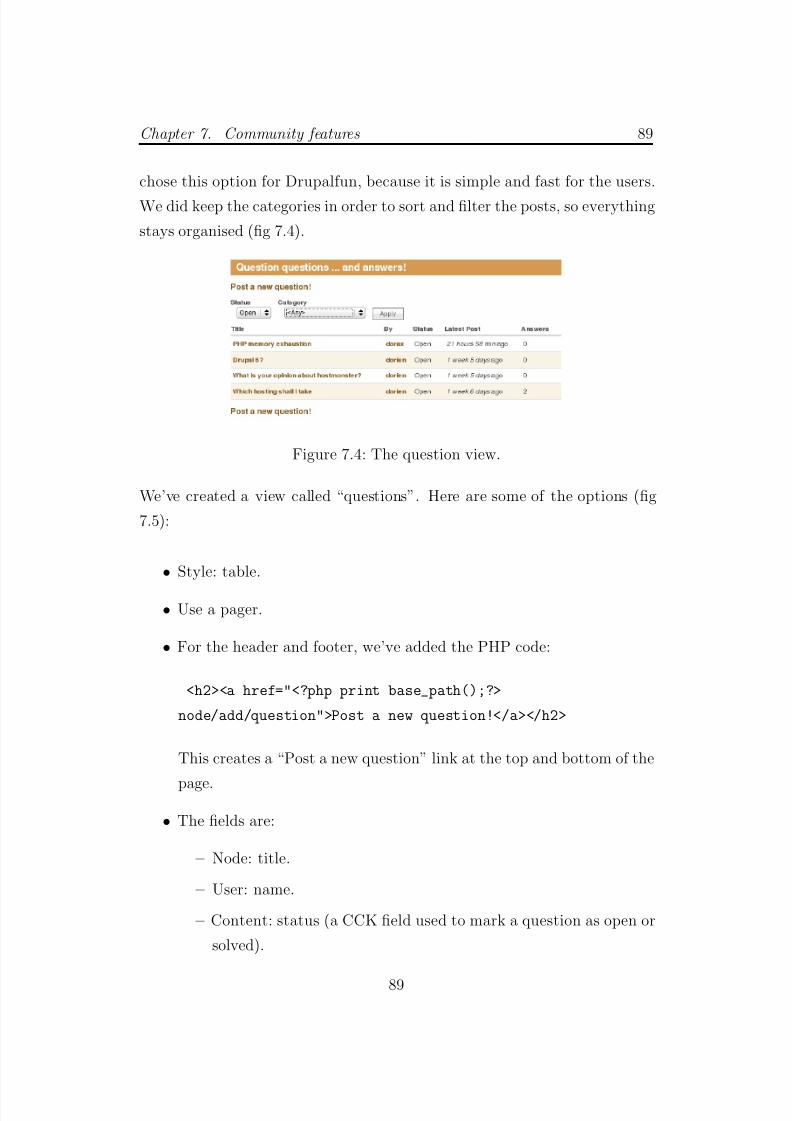
8/14/2019 Drupal 6.pdf
http://slidepdf.com/reader/full/drupal-6pdf 105/149
Chapter 7. Community features 89
chose this option for Drupalfun, because it is simple and fast for the users.
We did keep the categories in order to sort and filter the posts, so everything
stays organised (fig 7.4).
Figure 7.4: The question view.
We’ve created a view called “questions”. Here are some of the options (fig
7.5):
• Style: table.
• Use a pager.
• For the header and footer, we’ve added the PHP code:
<h2><a href="<?php print base_path();?>
node/add/question">Post a new question!</a></h2>
This creates a “Post a new question” link at the top and bottom of the
page.
• The fields are:
– Node: title.
– User: name.
– Content: status (a CCK field used to mark a question as open or
solved).
89

8/14/2019 Drupal 6.pdf
http://slidepdf.com/reader/full/drupal-6pdf 106/149
Chapter 7. Community features 90
– Node: updated/commented date.
– Node: comment counts.
• Sorted by Node: updated/commented date.
• Filters are:
– Node: published.
– Node type: question.
– Exposed filter: status (CCK field of question).
– Exposed filter: Taxonomy: term.
Figure 7.5: The view settings for ”questions”.
The one thing left for us to do is to create a nice panel page that displays the
“question” node. As we did before a few times by now, with the photo galleryfor instance, we just add a new node type to our “node/%” panel page. This
way, we expand the same panel that we have used for the profile originally,
by configuring the context “Node ID”, so it includes the “question” content
type (at /admin/panels/panel-page/Profile/edit/context).
Now, the question panel has its own content configuration page. At the very
minimum, we want to show the following:
90

8/14/2019 Drupal 6.pdf
http://slidepdf.com/reader/full/drupal-6pdf 107/149
Chapter 7. Community features 91
• Node Content → the question.
• Node ID Comments → the answers (if there are any).
• Node ID Comment Form → the answer form.
One extra thing I suggest you add, is a custom block with the following small
code piece:
<h2><a href="<?php print base_path();?>questionlist">View all questions!</a></h2>
This will display a “View all questions!” link, so users can easily go back.
Remember to replace “questionlist”, with the name of your view path URL.
You’ll find some more suggestions about what you can add on panel pages
in section 6.2.4 and 6.4.2.
Drupal 5 users can supplement the question view by showing the avatar of
the poster. The Views Fusion module can help you accomplish this, based
on a Nodefamily relationship. For Drupal 6, I have not yet seen a Content
Profile relationship implemented in Views.
The poster (and the admin of course) can modify the status of the ques-
tion when it is solved. The Comment CCK module allows anybody who Module
still in
dev.
answers or comments on the question, to mark it “closed”. This is a very
useful feature. However, whilst it is operational for Drupal 5, it is currently
still in development for Drupal 6.
7.2 Shoutbox
A shoutbox is one of those little widgets that greatly enhances the connectiv-
ity between users (fig 7.6). The Shoutbox module provides a block that you
91
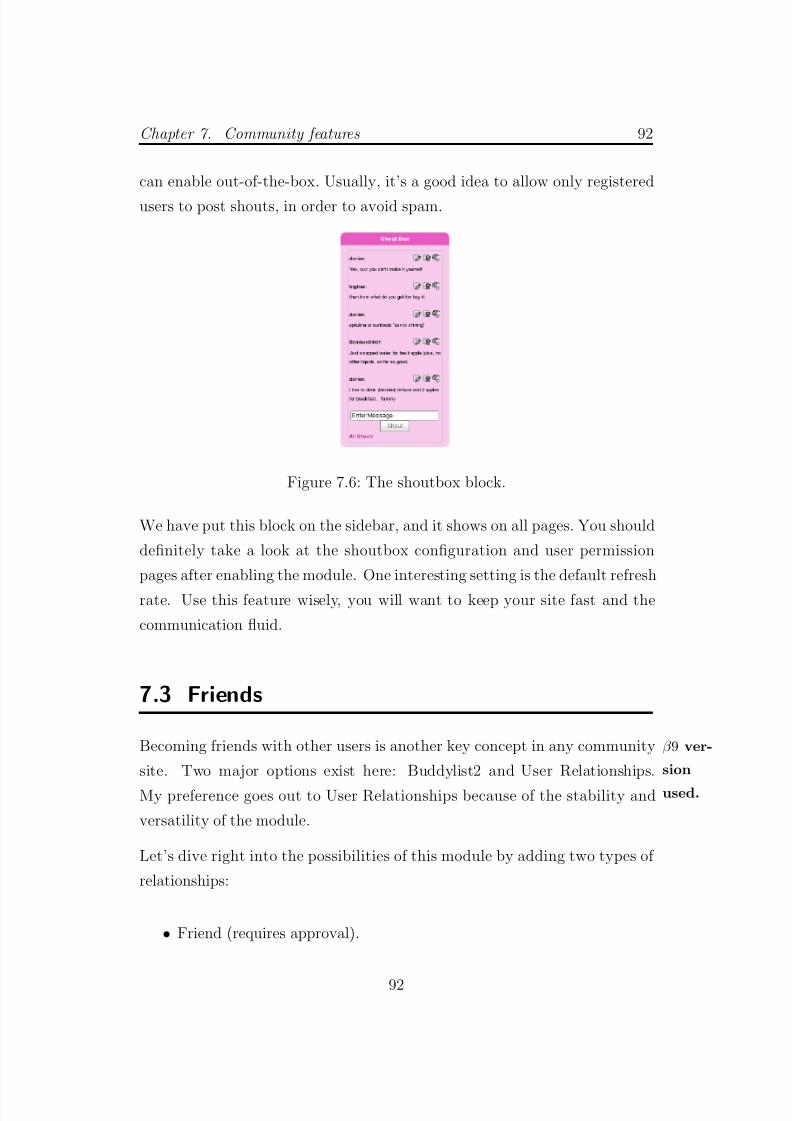
8/14/2019 Drupal 6.pdf
http://slidepdf.com/reader/full/drupal-6pdf 108/149
Chapter 7. Community features 92
can enable out-of-the-box. Usually, it’s a good idea to allow only registered
users to post shouts, in order to avoid spam.
Figure 7.6: The shoutbox block.
We have put this block on the sidebar, and it shows on all pages. You should
definitely take a look at the shoutbox configuration and user permission
pages after enabling the module. One interesting setting is the default refresh
rate. Use this feature wisely, you will want to keep your site fast and the
communication fluid.
7.3 Friends
Becoming friends with other users is another key concept in any community β 9 ver-
sion
used.
site. Two major options exist here: Buddylist2 and User Relationships.
My preference goes out to User Relationships because of the stability and
versatility of the module.
Let’s dive right into the possibilities of this module by adding two types of
relationships:
• Friend (requires approval).
92

8/14/2019 Drupal 6.pdf
http://slidepdf.com/reader/full/drupal-6pdf 109/149
Chapter 7. Community features 93
• Fan (one way).
This will allow our users to become “friends” after approval by the other
party. Users can also become a “fan” of other users. An extension that you
could add here, would be to create a relationship called “hero”, which is
automatically implied after someone becomes a fan of the hero (fig 7.7).
Figure 7.7: Creating the fan/hero relationship.
There are a bunch of blocks provided by the User Relationship module, that
are very interesting to enable, especially the “My Relationship:. . . ” ones.
Those are all great for displaying relationships. But what about adding new
friends? There is a block called “User relationships: Actions”, which you can
place on the sidebar, or in the profile panel page. This will allow registered
users (by the way, be sure to check the permissions of the module) to become
a friend or a fan of user x. If you place this block in the sidebar, it will also
93

8/14/2019 Drupal 6.pdf
http://slidepdf.com/reader/full/drupal-6pdf 110/149
Chapter 7. Community features 94
show up next to nodes, such as questions, and you can immediately become
friends with the author (fig 7.8).
Figure 7.8: The related questions block.
7.4 Messaging
7.4.1 Option 1: Contact Form
First of all, your users need to be able to contact you . So always be sure to
enable the site wide contact form Drupal offers (fig 7.9). The same core
Contact module also adds a tab to the user’s “My Account” page, with the
possibility to send an email to the user. Although fairly robust, the module
works fine, provided that your users can find each others contact link. You’ll
probably want to emphasise this link on the profile somewhere. You could
add the following PHP code in the footer text of the avatar view, to display
a link to the relevant user’s contact form:
<?php
$node=node_load(arg(1));
$uid= $node->uid;
echo ’<a href="’;
echo base_path();
echo ’?q=user/’;
echo $uid;
echo ’/contact">Contact me</a>’;
?>
94

8/14/2019 Drupal 6.pdf
http://slidepdf.com/reader/full/drupal-6pdf 111/149
Chapter 7. Community features 95
Figure 7.9: The contact form.
Be sure to check the permissions of the module, so that only registered userscan contact each other. Secondly, make sure that the footer text also displays
when the view is empty (see box a bit further).
7.4.2 Option 2: Privatemsg
There is a much better option for communication between members and
this is through the Privatemsg Module. This module gives each user an
inbox (fig 7.10). Other features include the option to set a standard welcome
message for new users. I have found that users often reply to the welcome
message with a friendly thank you. If you use this module, you can configure
it to add a “write to author” link on the different content types. I recommend
creating an additional link in the footer of the avatar View (this view is
displayed quite prominently on the profile panel), which would look like this:
95
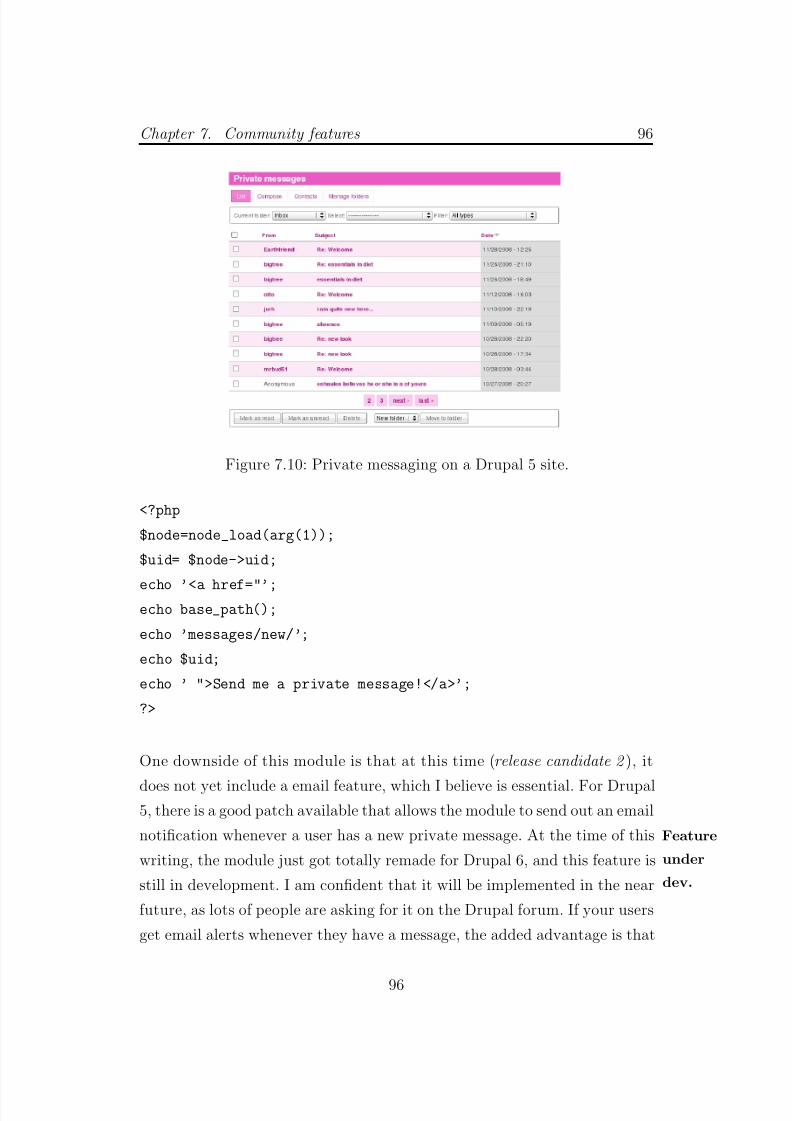
8/14/2019 Drupal 6.pdf
http://slidepdf.com/reader/full/drupal-6pdf 112/149
Chapter 7. Community features 96
Figure 7.10: Private messaging on a Drupal 5 site.
<?php
$node=node_load(arg(1));
$uid= $node->uid;
echo ’<a href="’;echo base_path();
echo ’messages/new/’;
echo $uid;
echo ’ ">Send me a private message!</a>’;
?>
One downside of this module is that at this time (release candidate 2 ), it
does not yet include a email feature, which I believe is essential. For Drupal5, there is a good patch available that allows the module to send out an email
notification whenever a user has a new private message. At the time of this Feature
under
dev.
writing, the module just got totally remade for Drupal 6, and this feature is
still in development. I am confident that it will be implemented in the near
future, as lots of people are asking for it on the Drupal forum. If your users
get email alerts whenever they have a message, the added advantage is that
96

8/14/2019 Drupal 6.pdf
http://slidepdf.com/reader/full/drupal-6pdf 113/149
Chapter 7. Community features 97
they need to go to the site and login in order to read their message, which
means extra traffic for you!
Be sure to check the “Display even if view has no result” box. If you are
using Drupal 5, there will be no such box. You can circumvent this by
also putting your code at the bottom of the empty text. The Drupal 5
version of Privatemsg also uses a different path for new messages. Replace
“ messages/new” by “privatemsg/new” in the code above.
7.5 Subscriptions
The subscriptions module offers us a great way to notify users of new content. β 1 ver-
sion
used.
You can configure the module so that each user is subscribed to his or her own
content and comments (fig 7.11). The module will send out emails whenever
content is updated, added or commented on. The possibilities are enormous.
Another possibility is to send out “digests” of the latest and newest content.
For Drupalfun, we only use the module for content notifying in a more basic
sense.
Figure 7.11: Setting the Subscriptions User Defaults.
If you are looking for a lighter module to handle only comment subscriptions,
you might want to take a look at “Comment Notify”, a smaller module.
97

8/14/2019 Drupal 6.pdf
http://slidepdf.com/reader/full/drupal-6pdf 114/149
Chapter 7. Community features 98
7.6 Newsletter
You probably want some way to contact your users. Simplenews provides
a great way to send out newsletters to your members. There are lots of
modules to complement Simplenews, here are a few of the most important
ones:
• Mimemail (still in dev for Drupal 6): allows you to send out html mails.
• Simplenews Template: if you like to theme your newsletter.
• Simplenews on Register: allows users to opt out at registration.
I always like to include the site’s latest content in my newsletters. The
module I use for this is “Insert View”. Here are the steps I follow to get the
latest content in my newsletter:
1. Create one or more Views with the content you like to display.
2. Create your newsletter issue.
3. Use [view:name of view] to insert the new view into your newsletter.
4. You might want to create a template with Simplenews Template, so
you don’t need to insert it each time.
This gives you a great looking newsletter, which includes the latest content
(fig 7.12).
Your users can subscribe to the newsletter through the provided block. What
I don’t really like about this block, is that it stays visible, even though users
are subscribed. You can use this short PHP snippet in the block visibility
settings under “Show if the following PHP code returns TRUE”:
98

8/14/2019 Drupal 6.pdf
http://slidepdf.com/reader/full/drupal-6pdf 115/149
Chapter 7. Community features 99
<?php
$match=TRUE;
global $user;
if (simplenews_user_is_subscribed($user->mail, 100)){
$match=FALSE;
}
return $match;
?>
Replace the “100”, which the term ID of your newsletter. You can find out
the term ID on the page /admin/content/taxonomy by clicking on your
newsletter and then hover your mouse over the edit button. This will show
the term ID in the status bar. Now your newsletter subscription block will
only show when the user is not yet subscribed.
Figure 7.12: A newsletter with embedded views.
99

8/14/2019 Drupal 6.pdf
http://slidepdf.com/reader/full/drupal-6pdf 116/149
Chapter 7. Community features 100
7.7 User points
A nice added feature for your site is the Userpoints module. This allows
your users to earn “points” or “karma”, or whatever you want to call it, by
posting certain content. Since the module provides an API, other modules
can easily build upon it. What this means for us is that our users can earn
points, not only by posting content, but also by voting, inviting other users,
buying products, logging in etc. There is a module available that saves you
the time of downloading each module separately. It is called “User PointsContributed modules”, it still in dev for Drupal 6, so you’ll have to download
the modules you want manually for now.
To give you an idea of the possibilities: on raw-vegan.org I once config-
ured Userpoints together with the Userpoints Role module so that users who
reached a certain level got promoted to another role automatically. With
this new role, they had access to coupon codes and pages reserved especially
for them.
7.8 User Status
Since this is a community site guide, we’ll briefly look at how we can im-
plement some “Facebook”-like status features. We will not be implementing
these at Drupalfun, but still, it is worth to examine our options.
7.8.1 Community status
First, let’s take a look at a way to integrate with Facebook itself. Since
Facebook publishes your status as a RSS feed, it is possible to display a
user’s Facebook status on your Drupal site. The module “Facebook Status”
will help you through the process.
100

8/14/2019 Drupal 6.pdf
http://slidepdf.com/reader/full/drupal-6pdf 117/149
Chapter 7. Community features 101
Our options stretch much further though. The module Twitter allows you
to aggregate your user’s status from Twitter. The crown to it all is the
Activity Stream module (fig 7.13), which tracks your users on any site you
want. Their own blogs, Del.icio.us, Ma.gnolia, Flickr, Last.fm,...
Figure 7.13: The Activity Stream module.
7.8.2 What are you doing?
If you like your users to display “what they are doing”, just like on Facebook,
you might want to look at the Facebook Style Statuses module (fig 7.14).
This module allows your users to fill in whatever they are occupied with,
allowing you to display it in different ways. This works totally in dependant
from Facebook. It also integrates with User Relationships, so you can keep
track of what your friends are doing.
101

8/14/2019 Drupal 6.pdf
http://slidepdf.com/reader/full/drupal-6pdf 118/149
Chapter 7. Community features 102
Figure 7.14: The Facebook Style Statuses module at babelup.com.
7.8.3 User online status
There is a nifty module, called Onlinestatus Indicator (fig 7.15), that dis- Module
still in
dev.
plays the online status of a user with ICQ, Skype, AOL, Jabber, MSN and
Hamachi. According to the maintainer, a new version for Drupal 6 will be
released soon.
Figure 7.15: The Online Status Indicator.
7.9 User Activity
Another popular community feature is provided by the Activity module. Module
still in
dev.
This module provides a list of all your user’s “activity”, such as “Dorien
just commented on Nice site! ”. It is a good idea to bring your site’s active
content to the surface.
The Activity configuration page gives us a lot of options, from “how many
posts do you want on a block or page” to the exact notification phrases it
uses. If you have enabled the module, you have probably noticed that it
102
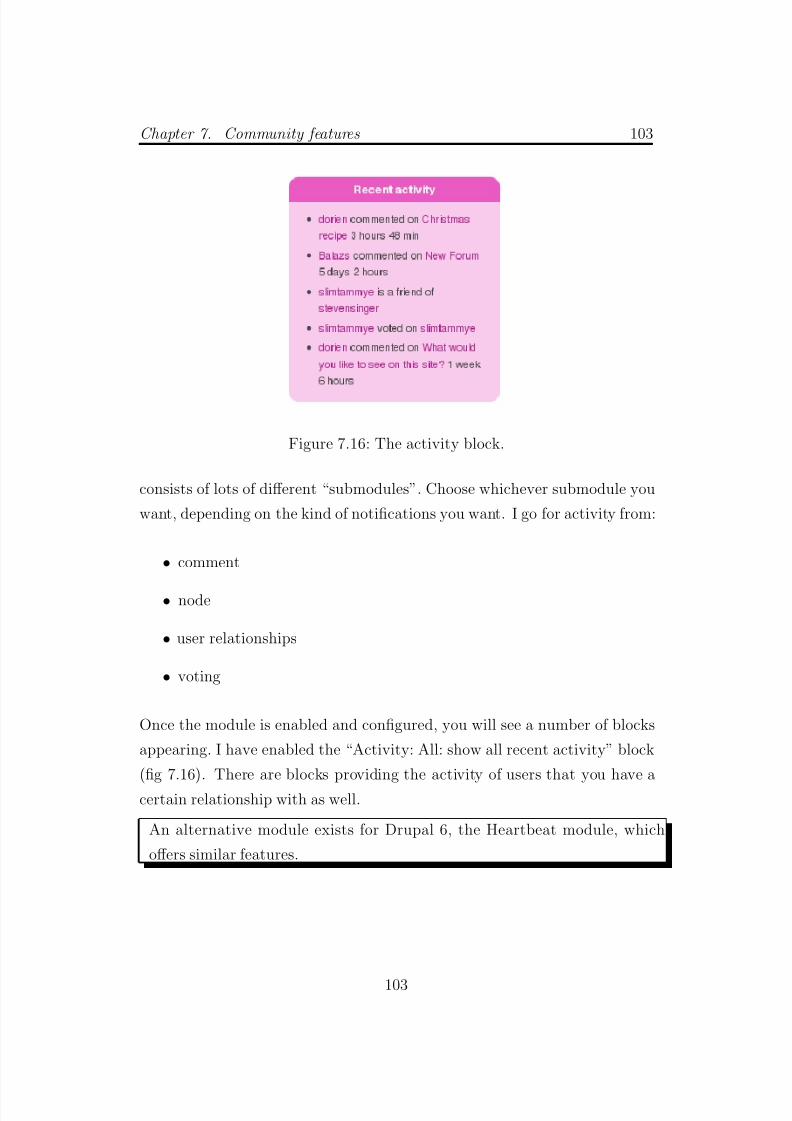
8/14/2019 Drupal 6.pdf
http://slidepdf.com/reader/full/drupal-6pdf 119/149
Chapter 7. Community features 103
Figure 7.16: The activity block.
consists of lots of different “submodules”. Choose whichever submodule you
want, depending on the kind of notifications you want. I go for activity from:
• comment
• node
• user relationships
• voting
Once the module is enabled and configured, you will see a number of blocks
appearing. I have enabled the “Activity: All: show all recent activity” block
(fig 7.16). There are blocks providing the activity of users that you have a
certain relationship with as well.
An alternative module exists for Drupal 6, the Heartbeat module, which
offers similar features.
103

8/14/2019 Drupal 6.pdf
http://slidepdf.com/reader/full/drupal-6pdf 120/149
Chapter 7. Community features 104
7.10 Groups
A lot of communities have groups. Let us start by asking ourselves what
groups are . Groups are in essence pages that connect people who are inter-
ested in a certain topic. They facilitate information sharing and communi-
cation between their members. The main module that facilitates groups in
Drupal is called Organic Groups, or just OG.
The first thing that you need to do, after enabling the OG module, is create
a content type that can be used as a group, I call mine “Group”. This
new content type should have the option “Group node” set. Drupal will
essentially use this content type as the group.
Secondly, your users need to be able to post something in the groups. Create
a new content type, which you set as “Standard group post”. I call mine
“Group Note”, but this is personal taste (fig 7.17). You could allow multiple
types of posts here, if it is appropriate for your site.
Figure 7.17: The group content types.
Thirdly, check the other options from the OG module at its settings page.
You can customise the appearance of the groups as well as the messages that
104

8/14/2019 Drupal 6.pdf
http://slidepdf.com/reader/full/drupal-6pdf 121/149
Chapter 7. Community features 105
are sent out.
This gives you basic groups functionality. Your users can now create groups,
and add notes to them. There is a group overview page at /og, which displays
all of the groups (fig 7.18). The module also provides a number of blocks.
I have enabled the “New Groups”, “Group details” (fig 7.19) and “Group
members” blocks. The latter two only appear whenever a group page is
displayed. This is the basis. From here on, you can further build your group
system:
• Use OG Activity, to give your users notifications of activity in their
groups.
• Use OG Views Integration to create customised group views, with the
latest posts etc. A lot of predefined views already appear in the list
that Views provides for you.
• Use OG Access Control: if you want to maintain private groups.
• Use OG Panels (not ready at this time for Drupal 6): to create panels
for your groups. I really like this one, it is especially useful for showing
all those blocks provided by OG.
• Use OG Forums to create forums inside your groups.
A lot of other extension modules are present, so be sure to check them out
at drupal.org.
At this point, we have already created an elaborate community site. It is
almost time to finish up. But first, let’s see how we can reward ourselves. . .
105

8/14/2019 Drupal 6.pdf
http://slidepdf.com/reader/full/drupal-6pdf 122/149
Chapter 7. Community features 106
Figure 7.18: The group overview page.
Figure 7.19: The group details block.
106

8/14/2019 Drupal 6.pdf
http://slidepdf.com/reader/full/drupal-6pdf 123/149
Chapter 7. Community features 107
7.11 This chapter’s Module Download List
• Activity
• Activity Stream (optional)
• Comment Notify (optional)
• Facebook Statuses (optional)
• Facebook Style Statuses (optional)
• Heartbeat (optional)
• Insert View (optional)
• Mimemail (optional, if available)
• Organic Groups
• Privatemsg
• Simplenews
• Simplenews on Register
• Simplenews Template (optional)
• Subscriptions
• Taxonomy Image (optional)
• Taxonomy List (optional)
• Twitter (optional)
• User Online Status (optional, if available)
• User Points Contributed modules (optional, if available)
107

8/14/2019 Drupal 6.pdf
http://slidepdf.com/reader/full/drupal-6pdf 124/149
The best way to save some time is to use it.
Carl Hammarn
8Making an income from your site
It’s nice to get something back from all the work you have put into the site.
And even nicer if you can share this with your users.
8.1 Google AdSense - let Google pay your users
for contributing!
The Google AdSense Revenue Sharing module offers us a way to give our
users a reward for using the site. The ads displayed on content they have
published, will belong to them 50% of the time. To accomplish this, we’ll
need to sign up for a Google AdSense account first. Once we have that, we
could just add the code Google provides to our site’s blocks. But, since we
108

8/14/2019 Drupal 6.pdf
http://slidepdf.com/reader/full/drupal-6pdf 125/149
Chapter 8. Making an income from your site 109
want to share some of our earnings, we have to go about it another way.
Let’s start by downloading and enabling the AdSense module. We also need
to enable the core Profile module, which is a requirement of the Revenue
Sharing submodule. Go ahead and do this, Profile can live in peaceful co-
existence with our previously installed Content Profile. Before we dive into
the different types of ads, configure the AdSense module to use your publisher
ID at /admin/settings/adsense/id.
8.1.1 Custom Search
The new “Managed Ads” feature from Google lets us create a “custom
search” on adsense.google.com, and then embed that in our page. Be-
cause we use the AdSense module , we only need to remember the “Ad Slot
ID”, this is the field value “cx” that Google provides in the code. Once we
have that, we can add one of the provided AdSense CSE blocks, wherever
we want (fig 8.1).
Figure 8.1: Adding the Google custom search to the front page panel.
The AdSense module will display the results on a separate results page. If
at any time you want to configure the way your results look, you can do this
at the Google AdSense website.
109

8/14/2019 Drupal 6.pdf
http://slidepdf.com/reader/full/drupal-6pdf 126/149
Chapter 8. Making an income from your site 110
8.1.2 Revenue Sharing
On certain nodes, we want to share 50% of the AdSense revenue with the
author (fig 8.2). We can specify this number at the AdSense configuration
pages at /admin/settings/adsense/id/revenue sharing basic (fig 8.3).
Be sure to check the box “AdSense revenue sharing” as well while you are
there. For this to work, our members need to be able to specify their pub-
lisher ID. Let’s create a profile field (fig 8.4) where users can specify their
AdSense ID (/admin/user/profile). Be sure to hide this profile field for
other users, for security reasons.
Figure 8.2: The AdSense displayed below a post.
At the time of this writing, Revenue sharing is only possible with old type
ads. So we need to have that “submodule” enabled. The AdSense configu-
ration page lets us change the channel and colour settings. After we’re done
configuring, we can add an “AdSense Old Code” block to all the relevantpanel node pages. Select the channel and colour, and you are done.
Users who don’t have their publisher ID set in their profile, will miss out
on the chance to earn revenue, so you might want to mention this in your
welcome email on the user settings page (/admin/user/settings). On Dru-
palfun, I just put a link to a page that I have created, which explains the
AdSense policy (fig 8.5). On this page, there is a link to the exact page where
110

8/14/2019 Drupal 6.pdf
http://slidepdf.com/reader/full/drupal-6pdf 127/149
Chapter 8. Making an income from your site 111
Figure 8.3: Configuring the Revenue Sharing.
Figure 8.4: The new profile field.
the user can input his or her AdSense publisher ID. This little piece of code
will detect the current user ID and display a link to the edit page:
<?php
global $user;
$uid= $user->uid;
?>
<a href="<?php print base_path();?>user/
<?php print $uid;?>/edit/AdSense">
Edit your Google AdSense ID</a>
111

8/14/2019 Drupal 6.pdf
http://slidepdf.com/reader/full/drupal-6pdf 128/149
Chapter 8. Making an income from your site 112
Figure 8.5: The AdSense policy page.
8.1.3 Managed Ads
The Google System has changed quite a bit, now that they offer Managed
Ads. The AdSense Module lets you use this new feature to create regular
(non-revenue sharing) Ad Blocks. First, you create your ad at Google. And
then just remember the slot number. Whenever you add an AdSense block
anywhere, just fill in this number. You have probably noticed that this
module also has a click tracker built in. Great to see who’s clicking. . . Check
it out from time to time, to see which one of your blocks is doing great.
8.2 A smart way to implement Affiliate programs
Many online shops are eager to sell their product or services online. So eager,
that they are willing to pay a commission to anybody who refers a sale to
them. This has caused the revolution of the affiliate programs. Where can
you sign up for any of these programs? You’ll find thousands of them just
by googling “affiliate yourbranch ”. What should you look for when signing
up for an affiliate program:
• How much commission do you get?
• When do they pay? After 1000 sales or each month?
112

8/14/2019 Drupal 6.pdf
http://slidepdf.com/reader/full/drupal-6pdf 129/149
Chapter 8. Making an income from your site 113
• How do they pay? Paypal, bank transfer?
• Do they have nice banners? After all, they will be on your site.
The advertisers will provide you with a small piece of code that you can paste
in any new block (full HTML input filter). This block can then be enabled
on the sidebars or on panel pages.
If you want to broaden your chances and sign up with multiple (let’s say
ten) different affiliate programs, well, your site will soon look like a deco-
rated Christmas tree. . . Here is a trick to manage your different affiliate
programs:
• Create a new content type (only the admin need “create node” permis-
sion).
• For each affiliate program: create a separate node and paste the given
code in the body field (full HTML).
• Create a Views block that displays one random affiliate node (only the
body field).
The result of this little trick is that there will be one affiliate advertisement,
which will change each time a new page is visited. This will most assuredly
augment your chances at success.
Another way to implement multiple affiliate programs, is to put them all
on one page. Advertise this page to your users, let them know that they
can support your site by visiting your affiliates. This page could also be
generated with a view, this way, all the different affiliate programs are easily
manageable.
113

8/14/2019 Drupal 6.pdf
http://slidepdf.com/reader/full/drupal-6pdf 130/149
Chapter 8. Making an income from your site 114
8.3 Donations
When any of your members feels the need to contribute something to you,
we should not deny them that pleasure. There are lots of systems that allow
smooth and easy donation transactions, here are a few:
• Paypal.
• Google Checkout.
• TipJoy.
When you register at third-party sites such as Paypal or Google, they will
give you a piece of code that you can paste into any block (set the input filter
to full HTML). Afterwards, just enable the block on any panel or sidebar you
like, to get a button such as the figure below.
(a) Paypal. (b) Google
Checkout.
(c) Tipjoy.
Figure 8.6: The different donate buttons.
The TipJoy system offers us more possibilities. The TipJoy module for Dru- β 2 ver-
sion
used.
pal, allows us to put a “Tip this” button on each post , so happy readers can
give the author a tip. This money goes to the author of the module, based
upon his or her email address. This is an extra incentive to our users to post
114

8/14/2019 Drupal 6.pdf
http://slidepdf.com/reader/full/drupal-6pdf 131/149
Chapter 8. Making an income from your site 115
interesting content. As a surplus, Tipjoy shows off the most tipped content
on their homepage.
These are some of the most common ways to make some income from your
site. We only have one thing left to do at this point: cleaning up!
8.4 This chapter’s Module Download List
• AdSense
• Tipjoy
115

8/14/2019 Drupal 6.pdf
http://slidepdf.com/reader/full/drupal-6pdf 132/149
The greatest gift you cangive another is the purity of
your attention.
Richard Moss
9Tidying up
The final part of any site building project is always, what I call “tidying up”.
Making sure that the menus are in order, everything is where it is supposed
to be, the site is fast and secure.
9.1 Menus
We’ve talked considerably about using blocks and panel panes to access all of
our content. Remember that Drupal also offers us a very nice menu system.
For Drupalfun, we have added a “Primary Link” to all of the Views pages
we created. We also took a look at the main navigation menu and disabled
a number of things that are irrelevant (such “My Relationships”). A lot of
116

8/14/2019 Drupal 6.pdf
http://slidepdf.com/reader/full/drupal-6pdf 133/149
Chapter 9. Tidying up 117
things are already being displayed by a block and no longer need to be in
the navigation menu.
There have been a number of psychological studies, that have proven the
following statement:
A human brain can only retain seven things at the same time in its short
term memory.
What this means is that our main navigation menu (I’m not talking about
the sub-menus) can contain seven items at the very maximum. Otherwise,our visitors will have a less then easy time figuring out where they want to
navigate to. Tidy up your menus and your site’s usage will improve. Make
sure that all the views you have created are accessible by a menu or a link
somewhere.
Figure 9.1: Our Primary Menu.
117

8/14/2019 Drupal 6.pdf
http://slidepdf.com/reader/full/drupal-6pdf 134/149
Chapter 9. Tidying up 118
If you want to include your categories in your menu, use the Taxonomy Menu
module. It will provide hierarchical taxonomy menus and save you quite some
time making them by hand.
9.2 What you can do right now
Very often, users register because they want to reply to a post, ask a question,
etc. Once they have done that, you need to inform them about what elsethey can do. I have created a block to put on the front page (fig 9.2) that
will do just that. For each thing they can do, I’ve uploaded small icons in
/sites/default/files/icons/12. Here is the code of the block:
Figure 9.2: The to do block.
<h2>Welcome to Drupalfun</h2>
<p>Here are a few things you can do right now...</p>
<?php
//get the content profile’s node ID for the user:
global $user;
$myuid= $user->uid;
$node2= content_profile_load(profile, $myuid);
1I got my icons from iconarchive.com2Drupal 5 users: remember to replace content profile by nodeprofile and change
the directory to /files
118

8/14/2019 Drupal 6.pdf
http://slidepdf.com/reader/full/drupal-6pdf 135/149
Chapter 9. Tidying up 119
$profileid= $node2->nid;
?>
<?php
//get photo album path:
$node3= content_profile_load(photogallery, $myuid);
//does the user have a photo gallery already?
if (!empty($node3->nid)){
//if yes: display an edit link:
$node3id = $node3->nid;
$photopath=’node/’.$node3id.’/edit’;}
//if not, display a create link:
else{$photopath=’node/add/photogallery’;}
?>
<?php
//get video album path:
$node3= content_profile_load(videos, $myuid);
//does the user have a video gallery already?
if (!empty($node3->nid)){
//if yes: display an edit link:
$node3id = $node3->nid;
$videopath=’node/’.$node3id.’/edit’;
//if not, display a create link:
}else{$videopath=’node/add/videos’;}
?>
<table><tr>
<td><a href="<?php print base_path();?>node/<?php print $profileid;?>/edit">
<img src="<?php print base_path();?>
119

8/14/2019 Drupal 6.pdf
http://slidepdf.com/reader/full/drupal-6pdf 136/149
Chapter 9. Tidying up 120
sites/default/files/icons/goranger.png" /><br>
Edit your <br>profile & avatar</a></td>
<td><a href="<?php print base_path();?><?php print $photopath;?>">
<img src="<?php print base_path();?>
sites/default/files/icons/eos.png" /><br>Add pictures</a></td>
<td><a href="<?php print base_path();?><?php print $videopath;?>">
<img src="<?php print base_path();?>
sites/default/files/icons/video.gif" />
<br>Add videos</a></td>
<td><a href="<?php print base_path();?>knowledgebase">
<img src="<?php print base_path();?>
sites/default/files/icons/know.png" />
<br>Share your knowing</a></td>
<td><a href="<?php print base_path();?>drupalquestions">
<img src="<?php print base_path();?>
sites/default/files/icons/job.png" />
<br>List of job</a></td>
<td><a href="<?php print base_path();?>drupalquestions">
<img src="<?php print base_path();?>
sites/default/files/icons/support.png" />
<br>Ask a question</a></td>
<td><a href="<?php print base_path();?>drupalshowcases">
<img src="<?php print base_path();?>
sites/default/files/icons/folder.png" />
<br>Show off your sites</a></td>
120
8/14/2019 Drupal 6.pdf
http://slidepdf.com/reader/full/drupal-6pdf 137/149
Chapter 9. Tidying up 121
</tr>
</table>
I know the code looks really long. If you examine it more closely however,
you’ll notice that the same parts keep repeating. I’ve commented the code,
so you can see what we are doing. Here are the main link types:
Edit profile This links to /node/myprofilenid/edit/. We need to get thenode ID of the profile first, which we do in the very first part of the
code. This results in the variable $profileid, that we can use in our
link URL.
Pictures and Videos We check to see if the user already has a picture or
video gallery uploaded. If so, we proceed with an edit link. If not, we
show him or her a “create gallery” link.
Other The other links just refer the user to a views page we have createdbefore.
9.3 Changing certain words
The i18n3 and Locale module provide great support for multilingual sites.
If your site is multilingual, you should opt for one of those modules. In
some cases, you might just want to change some “strings”, to sound more
appropriate. Let’s say, you want to change “My Account” to “Account”.
A simple change like that is easily possible without much overhead by the
“String Overrides” Module. Just type in the word you want to replace and
its new “translation”.
3The word “internationalisation” is often referred to as i18n, because there are 18
letters between the i and the n.
121

8/14/2019 Drupal 6.pdf
http://slidepdf.com/reader/full/drupal-6pdf 138/149
Chapter 9. Tidying up 122
9.4 Customising emails
A lot of modules give you the opportunity to change their email messages.
Such as Subscriptions, User, etc. Alternatively, you can use the Mail Editor Module
still in
dev.
module to change any email message that is sent through the Drupal mail
function. It is a very useful module if you want an overview of all your
system’s mails. It even allows dynamic messages using Token. This module
works for Drupal 5, but at this time, it is still in development for Drupal 6.
9.5 Performance
Drupal is known to be a fast platform. However, whenever we install a
module, Drupal gets an itsy-bitsy less fast. This is because all modules
consume some PHP memory. The amount of used PHP memory is not
only important for the speed of your site. Some hosts limit the PHP memory,
and whenever the limit is reached, they will display a “white screen of death”.We’ll want to avoid that. One of the ways to check how much memory you
use is by installing the Devel Module. I don’t recommend having this module
enabled all of the time, since it broke my Ajax uploads, but it can be useful
to check from time to time. If you think that you have a memory problem, I
really recommend that you check out the memory analysis patch from 2bits.
It shows you how much memory each module uses, each time a page loads.
I’ll make this patch available on Drupalfun, in the knowledge base.
A second factor that can decrease the page-load time, is the cache.
Enabling cache will make your site go significantly faster. You
can set the usage of cache at the “performance” configuration pages
(/admin/settings/performance). The same page will offer a number of
other theme related settings which can also improve the overall loading time
of your site.
122

8/14/2019 Drupal 6.pdf
http://slidepdf.com/reader/full/drupal-6pdf 139/149
Chapter 9. Tidying up 123
An interesting module is the Boost module, which provides static page
caching and can significantly improve performance on systems that get
mostly anonymous visitors. If you expect really high traffic, you’ll proba-
bly want to examine this module further.
9.6 Promoting your site
Any site needs to be promoted. You need to let people know that you are
out there. The marketing principles of online sites could fill an entire book,
so I am just sticking to some basic modules that can be used from within
Drupal to attract more visitors to your site.
My favourite one in this category is the Spread module, which allows users β 1 ver-
sion
used.
to “spread the word” about the site. They just need to fill in some email
addresses in the provided block and off go the invites (fig 9.3). If you are
looking for more elaborate invite possibilities, the Invite module might of-
fer what you are looking for. It uses the same principle as Spread, but itintegrates some other modules, so that:
• Users can earn user points for inviting other users.
• You can assign certain roles to invited users.
• An invited users can automatically have a relationship with the inviter.
Another, slightly different option, is offered by the Ecards module. Ecards
can be configured so that any content can be sent out as an ecard. Properly
configured (just change some names on the configuration page), it can act as
a “share this” module. Below any content type that you wish, you can add a
“share this” form, where the users can give in an email address, and off goes
the content invitation.
123
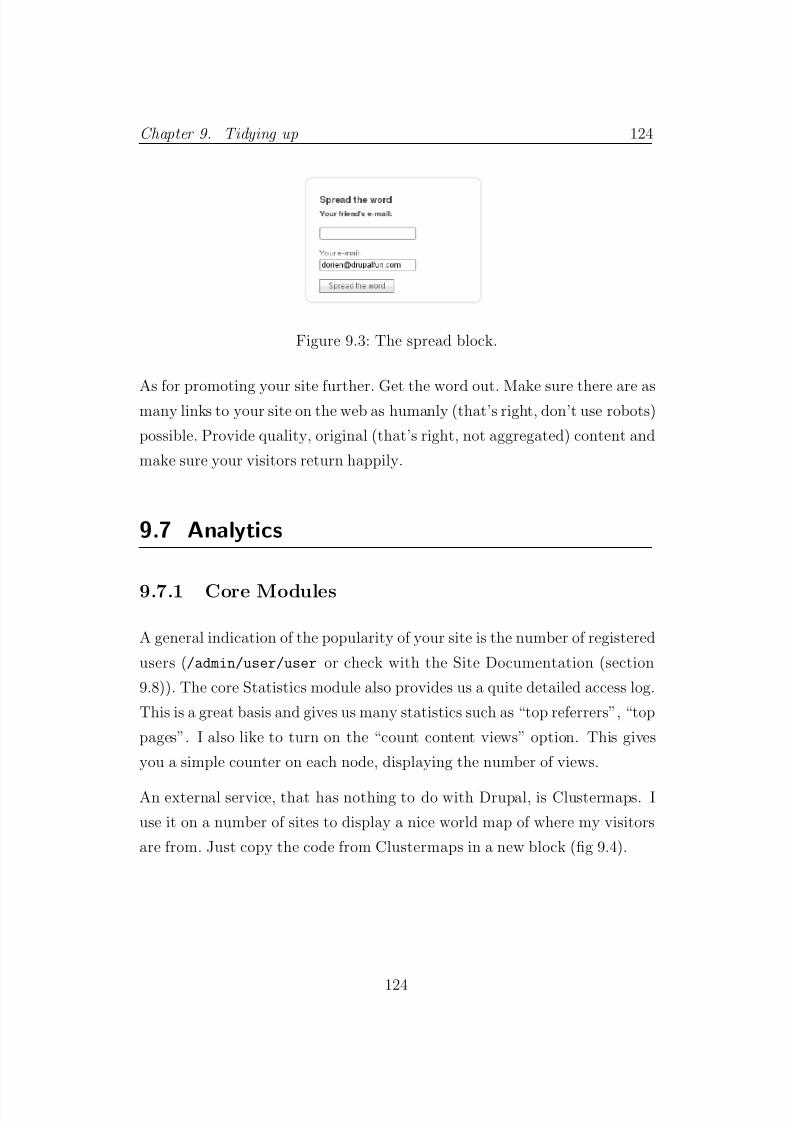
8/14/2019 Drupal 6.pdf
http://slidepdf.com/reader/full/drupal-6pdf 140/149
Chapter 9. Tidying up 124
Figure 9.3: The spread block.
As for promoting your site further. Get the word out. Make sure there are asmany links to your site on the web as humanly (that’s right, don’t use robots)
possible. Provide quality, original (that’s right, not aggregated) content and
make sure your visitors return happily.
9.7 Analytics
9.7.1 Core Modules
A general indication of the popularity of your site is the number of registered
users (/admin/user/user or check with the Site Documentation (section
9.8)). The core Statistics module also provides us a quite detailed access log.
This is a great basis and gives us many statistics such as “top referrers”, “top
pages”. I also like to turn on the “count content views” option. This gives
you a simple counter on each node, displaying the number of views.
An external service, that has nothing to do with Drupal, is Clustermaps. I
use it on a number of sites to display a nice world map of where my visitors
are from. Just copy the code from Clustermaps in a new block (fig 9.4).
124

8/14/2019 Drupal 6.pdf
http://slidepdf.com/reader/full/drupal-6pdf 141/149
Chapter 9. Tidying up 125
Figure 9.4: A Clustermap.
9.7.2 Google Analytics
There are some great tools out there that can increase our ability to analyseour visits greatly. One of them is Google Analytics. You just register
at Google Analytics and use the module with the same name to add the
tracking code to your site. The statistics themselves will be available on
analytics.google.com (fig 9.5). Some of the available items are:
• Chart overview of visitors.
• Number of visits per user name.
• Click-through ratio (do people view multiple pages on your site?).
• Keywords through which users find your site.
• What browser your visitors are using.
• Geographic origin of your users.
• . . .
To summarise, Google Analytics is really worth the while. It gives you a
fairly complete overview of anything you might want to know about your
site’s visitors. Did I also mention it is free? A tracking system very similar
to Google Analytics is Get Clicky. There is also a Get Clicky module available
for Drupal and it works in very much the same way as Google Analytics.
125

8/14/2019 Drupal 6.pdf
http://slidepdf.com/reader/full/drupal-6pdf 142/149
Chapter 9. Tidying up 126
Figure 9.5: Google Analytics page.
9.7.3 Monitoring new users
If your site is not too big yet , you might be interested in getting notified
whenever a new user registers. Here are a few ways you can do this:
• Log in everyday and check it manually.
• Use the Subscriptions module, subscribe to Content Type: Profile.
• Use the User Registration Notification module.
9.8 Site Documentation
If you made it through all the previous chapters, your site has grown con-
siderably. It is always important that the maintainer of a site knows how
things work and has an overview. The Site Documentation module gives
126

8/14/2019 Drupal 6.pdf
http://slidepdf.com/reader/full/drupal-6pdf 143/149
Chapter 9. Tidying up 127
us just that, an overview of the entire site, its modules, database, content
types, themes, blocks, and much more. So, whenever you lose sight of things,
or if you just want to analyse your site. Take a look at the documentation
generated by this module. It will clarify the structure of your site and bring
out things that would otherwise remain hidden in a page, far far away.
9.9 Keep it up to date
The old “Available updates” module made it to the core of Drupal 6. This
means that you will be automatically notified of available updates. Update
regularly, this will keep your site clean, stable and smoothly running. Be sure
to go into maintenance mode (at /admin/settings/site-maintenance)
each time you update and remember to make a backup . . .
9.10 Backup
Even the best web servers are from time to time vulnerable to hardisk failure,
power surges and hackers. Always back up your site. Please read this again.
Always back up your site.
Making a backup consists of two parts. The first part is backing up your
files (just downloading or copying them). Since this is fairly simple, I’ll
move right on to the next part: backing up the database. This is where
all the important information is stored. Databases can grow quite large, soyou should not back it up completely. Some entries such as cache tables do
not need to be copied. If you plan on making a “manual” backup, then you
should check the following things first:
1. Check the database size with PhpMyAdmin or with the SiteDoc module
(section 9.8).
127

8/14/2019 Drupal 6.pdf
http://slidepdf.com/reader/full/drupal-6pdf 144/149
Chapter 9. Tidying up 128
2. Truncate (empty) all tables that start with “cache”. Drupal 6 gives us
a nice button for this at /admin/settings/performance.
3. Empty the watchdog logs (set “Discard access logs older than: 1hour”
and run cron.php).
This procedure should have significantly shrunken the database size. Now
we can backup or “dump” the database, either by using the SQL “dump”
command or by using the export function in PhpMyAdmin. You’ll most
probably get a .mysql file, which contains all the queries you need to execute
in an empty database, to end up with your original database. Keep this file
somewhere with your Drupal files. If at any point you need to restore your
database, follow the steps in the next section.
If you don’t want to do this by hand, you can use the excellent Backup and
Migrate module . This module allows you to create a backup from its admin
pages. You can even choose to exclude certain tables from the backup.
9.11 Duplicating a Drupal install
If possible, I prefer to design sites on my home server. I wouldn’t want users
to stumble upon my partially finished pages. There is an option to put Drupal
in maintenance mode, which is extremely useful in the case of updates. Still,
since I might be testing under a non-admin user, which is not possible in the
offline mode, I usually design sites locally. I could also password protect the
directory, whilst working on it, but in my case, designing on my own server
goes much faster, than over the internet.
If you have made the site on your own computer, or on a testing domain,
you’ll need to duplicate the site to your real domain. Be aware that this
entails two things: copying the database and copying the files. Copying the
files is easy. Let’s start by breaking the steps apart:
128
8/14/2019 Drupal 6.pdf
http://slidepdf.com/reader/full/drupal-6pdf 145/149
Chapter 9. Tidying up 129
1. Upload them with your favourite FTP program.
2. If you made any changes to the .htaccess files, set them back.
3. Change the /sites/default/setting.php file to include your new
database-name, -password and -user.
The files for the new site are in place now, let’s move on to the database:
1. Backup your database (section 9.10).
2. Create a new, empty database on your new server, and assign a user
to it.
3. Import your .mysql file in the new database (just execute the queries
it contains or use the import function of PhpMyAdmin) or use the
Backup and Migrate module to restore the database.
Navigate to your new site. It is brightly shining, ready to embark upon anadventurous journey, carrying its passengers across the seas of information.
129

8/14/2019 Drupal 6.pdf
http://slidepdf.com/reader/full/drupal-6pdf 146/149
Chapter 9. Tidying up 130
9.12 This chapter’s Module Download List
• Backup and migrate
• Boost (optional)
• Ecards (optional)
• GetClicky (optional)
• Google Analytics
• i18n (optional)
• Invite (optional)
• Locale (optional)
• SiteDoc (optional)
• Spread
• Sting Overrides (optional)
• Taxonomy Menu (optional)
• User Registration Notification (optional)
130

8/14/2019 Drupal 6.pdf
http://slidepdf.com/reader/full/drupal-6pdf 147/149
When the student is ready...the lesson appears.
Gene Oliver
10Conclusion
It’s been a real pleasure designing Drupalfun. Well, it’s not really designing,
nor is it developing actually. The amazing amount of modules gives us the
opportunity to just configure a site. Although it’s possible for anyone to set
up any site, we should always briefly analyse any module before implementing
it. What are the disadvantages, advantages, incompatibilities, influences on
performance, etc. With this text, I hope to have guided you through a smartway to set up a community site. There are so many modules, and there is
so much development going on, you can probably find some alternative ways
I didn’t discuss. My intention was to guide you through the configuration
process of drupalfun.com and provide one of the most complete and detailed
case studies available in this field. I invite you to share your experiences and
questions at Drupalfun and look forward to meeting you there.
131

8/14/2019 Drupal 6.pdf
http://slidepdf.com/reader/full/drupal-6pdf 148/149
About the author
Dorien Herremans is a MSc Commercial Engineer in Management Informa-
tion Systems, from the University of Antwerp, Belgium. She currently lives
in the Swiss Alps where she lectured IT and 3D Computer Animation at
Les Roches University of Applied Science and has her own company. Among
others, she loves life and Drupal, and has set up a multitude of sites, using
creative techniques to get the maximum out of this great framework.
You are welcome to contact the author concerning Drupal consulting.
You can get in touch with Dorien via drupalfun.com, or at
132

8/14/2019 Drupal 6.pdf
http://slidepdf.com/reader/full/drupal-6pdf 149/149
About this book
More than 100 screenshots will guide the reader through the process of setting up
a community site with the Drupal 5 or 6 framework. A number of popular topics,
such as profiles, picture and video galleries, maps, messaging, groups, friends etc
will be discussed.
Drupal is one of the best content management systems (CMS) around. In fact, it
has just won (for the second time) the Best Overall 2008 Open Source CMS Award
and Best PHP Open Source CMS Award. For about 8 years now, Drupal has beenproviding users with one of the best and most versatile frameworks around. In this
book, I will guide the reader through the different modules needed to build a solid
community site. And I go even further, by looking at how to structure content
and making a few e, , ¥, ₡, £,. . . from your site. It is going to be an exploration
of modules and their features.
The main strategy of this book it to use only out-of-the-box, user contributed
modules. So anybody can make a great site. This well thought strategy offers us
the following advantages: