drupal content editor training - college of arts and sciences · drupal content editor training ......
TRANSCRIPT

The Ohio State University
Drupal Content Editor Training
Jody Croley Jones
updated: 05/22/2013 Page 1 of 30

TABLE OF CONTENTS Introduction Access Roles 3 Web Accessibility 4 Logging Onto Your Website 6 Editing and Updating Pages 7
Header & Page Body 8 Adding Images 12 Adding Audio/Video 18 Slideshows 20 Links 23
Introduction Websites are advantageous tools of communication for both internal and external audiences. They represent your unit and are a continuation of the College of Arts and Sciences (ASC) story, and The Ohio State University. But what is a website? And how is a site different from a web page? Web page A web page is a document, most frequently written in plain text but possibly containing video, music, audio or images. Individual pages are organized, in a structural or logical hierarchy of information, to deliver information as part of a website. Website A website is a set of related web pages. It is hosted on at least one web server and is accessible via a network such as the Internet or an internal network such as the Intranet. It is accessed through a Uniform Resource Locator (URL) commonly referred to as a web address. All publicly accessible websites collectively constitute the World Wide Web. ASC websites The College of Arts and Sciences has adopted Drupal, a Content Management System (CMS) as their tool of choice to drive our websites. Its editing interfaces are web-based and may be used from anywhere, on any platform (PC or MAC) with any browser (IE, Firefox, Safari, Chrome…). It does not require the purchase of any additional software. To work within the new Drupal environment, all readers must receive training according to the access roles that they will be given. Currently these roles are Content Editor, Content Manager and Form Manager. Additionally an individual could be given access via the role of Form Viewer.
updated: 05/22/2013 Page 2 of 30
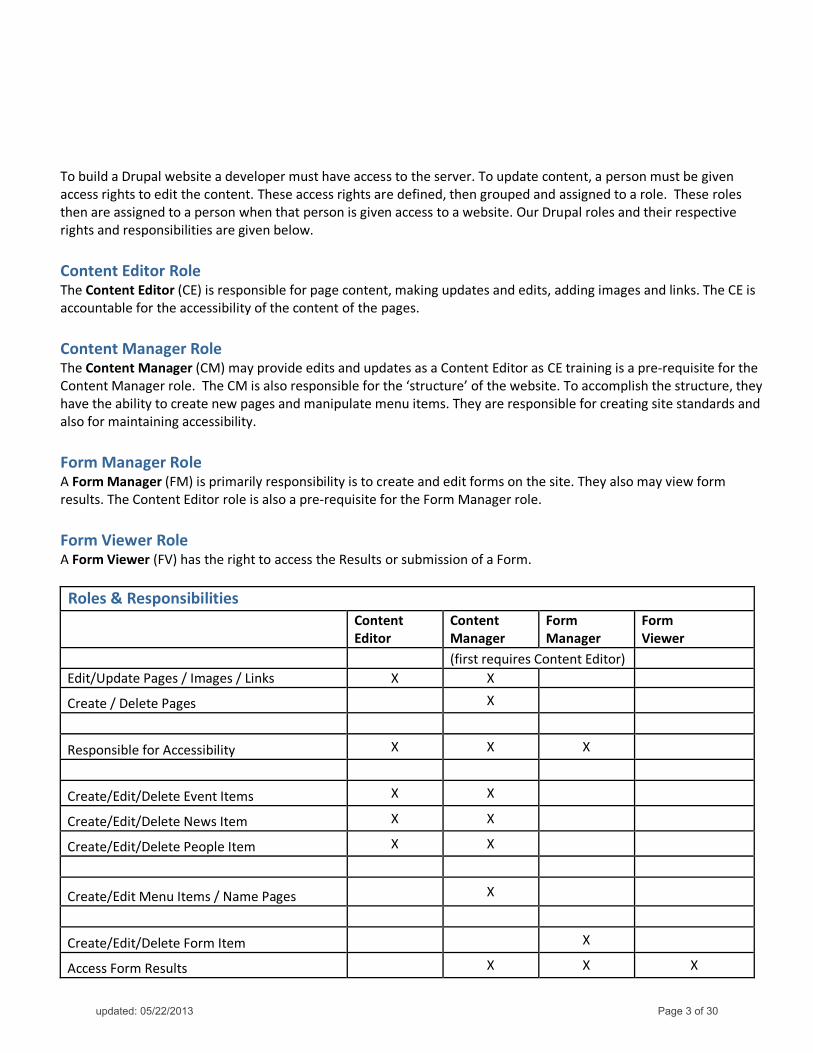
To build a Drupal website a developer must have access to the server. To update content, a person must be given access rights to edit the content. These access rights are defined, then grouped and assigned to a role. These roles then are assigned to a person when that person is given access to a website. Our Drupal roles and their respective rights and responsibilities are given below. Content Editor Role The Content Editor (CE) is responsible for page content, making updates and edits, adding images and links. The CE is accountable for the accessibility of the content of the pages. Content Manager Role The Content Manager (CM) may provide edits and updates as a Content Editor as CE training is a pre-requisite for the Content Manager role. The CM is also responsible for the ‘structure’ of the website. To accomplish the structure, they have the ability to create new pages and manipulate menu items. They are responsible for creating site standards and also for maintaining accessibility. Form Manager Role A Form Manager (FM) is primarily responsibility is to create and edit forms on the site. They also may view form results. The Content Editor role is also a pre-requisite for the Form Manager role. Form Viewer Role A Form Viewer (FV) has the right to access the Results or submission of a Form. Roles & Responsibilities
Content Editor
Content Manager
Form Manager
Form Viewer
(first requires Content Editor) Edit/Update Pages / Images / Links X X
Create / Delete Pages X
Responsible for Accessibility X X X
Create/Edit/Delete Event Items X X
Create/Edit/Delete News Item X X
Create/Edit/Delete People Item X X
Create/Edit Menu Items / Name Pages X
Create/Edit/Delete Form Item X
Access Form Results X X X
updated: 05/22/2013 Page 3 of 30
What is it? There are many parts to making a website accessible. Most people have heard about the use of screen readers – for folks who are blind and accessing the Internet. As a result, many of the tasks we undertake when creating Web pages – are simply to make them more useful when read by a screen reader. However, there is more to building an accessible website, then designing for the blind. So let’s ask, what is disabled when it comes to the Web? A terrific resource to answer this question is WebAIM (webaim.org). It is a non-profit organization within the Center for Persons with Disabilities (http://www.cpdusu.org/). WebAIM's mission is to expand the potential of the web for people with disabilities by providing the knowledge, technical skills, tools, organizational leadership strategies, and vision that empower organizations to make their own content accessible to people with disabilities.
Why be Accessible? It’s a legal requirement Legally, Section 508 requires that Federal agencies’ electronic and information technology is accessible to people with disabilities. The Center for Information Technology Accommodation (CITA), in the U.S. General Services Administration’s Office of Government wide Policy, has been charged with the task of educating Federal employees and building the infrastructure necessary to support Section 508 implementation and also the 1998 Amendment to Section 508 of the Rehabilitation Act. Then in 2010, the 21st Century Communications and Video Accessibility Act was enacted to ensure that communications, media services and video content are accessible. Though this mostly has to do with telecommunication, cell phone, video device manufacturers and service providers, this clearly indicates that web accessibility will apply to mobile devices and mobile optimized sites. And currently, the Department of Justice (Department) is considering revising the regulations implementing title III of the Americans with Disabilities Act (ADA or Act) in order to establish requirements for making the goods, services, facilities, privileges, accommodations, or advantages offered by public accommodations via the Internet, specifically at sites on the World Wide Web (Web), accessible to individuals with disabilities. This new revision is currently undergoing public comment and public hearings. It will be applicable to public websites as defined within the regulation, under which educational organizations are named in category 10. It’s the right thing to do! There are more and more people, with disabilities, who would like to access our websites. And it is in our own best interests to make sure that our websites are easy for them to navigate From the Microsoft Web Accessibility Handbook:
Accessibility is “the gift that keeps giving.” Benefits from Web accessibility go well beyond legal compliance and risk. For an organization there can be usability and productivity benefits, cost reductions, technical infrastructure improvements, wider markets, increased staff retention and better talent management………
Fostering accessibility is the right thing to do, and it’s not prohibitively expensive. Taking an early stand allows an organization to position itself as a leader in its sector and presents excellent opportunities for positive press and free marketing.
updated: 05/22/2013 Page 4 of 30

If Web pages are more accessible, they will receive more hits and will move higher up in search engine results. Search engines make ranking decisions based on the same information that assistive technologies use to create an accessible reader experience, including document structure and alternative text.
Accessibility is not hard. You just need to be consistent. There are a few places for you to add content when using Drupal. So during this course, we will be showing you where you can either add information or format information properly to keep your website accessible. Look for our Accessibility person for guidance. For more information about accessibility: Our websites are designed and you are expected to maintain accessibility according to the standards set by the W3C Web Content Accessibility Guidelines: http://www.w3.org/TR/WAI-WEBCONTENT/. But there is more to understanding accessibility than reading and being governed by standards. For more answers, we go to WebAIM (Web Accessibility in Mind), a not-for-profit organization that serves to educate the public about what is disabled when it comes to the Web? Visit their website at http://webaim.org. Many of the tasks we undertake for accessibility when creating web pages – are simply to make them more useful when read by a screen reader. To better understand, take a look at these video from the movie Screen Readers and the Web, featuring Neal Ewers of the Trace Research Center. Please pay special attention to these sections:
Section One: ‘What is a Screen Reader?’ and ‘Text Equivalents’ http://www.doit.wisc.edu/accessibility/video/ScnRdrpt1.mov (8MB file, Quick Time)
Section Three: Structure and Markup http://www.doit.wisc.edu/accessibility/video/ScnRdrpt3.mov (10 MB file QuickTime)
Where to go for help Arts and Sciences Communications, asccomm.osu.edu, email: [email protected] The OSU Web Accessibility Center, wac.osu.edu
updated: 05/22/2013 Page 5 of 30
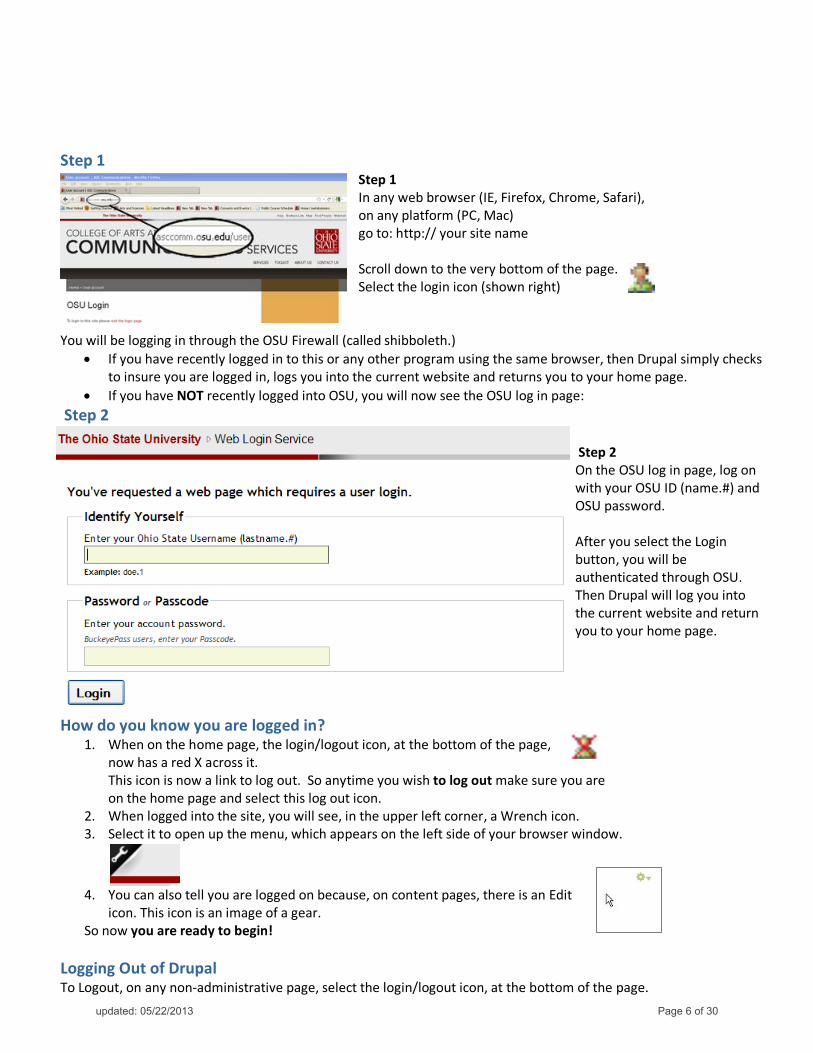
Step 1 Step 1 In any web browser (IE, Firefox, Chrome, Safari), on any platform (PC, Mac) go to: http:// your site name Scroll down to the very bottom of the page. Select the login icon (shown right)
You will be logging in through the OSU Firewall (called shibboleth.) • If you have recently logged in to this or any other program using the same browser, then Drupal simply checks
to insure you are logged in, logs you into the current website and returns you to your home page. • If you have NOT recently logged into OSU, you will now see the OSU log in page:
Step 2 Step 2 On the OSU log in page, log on with your OSU ID (name.#) and OSU password. After you select the Login button, you will be authenticated through OSU. Then Drupal will log you into the current website and return you to your home page.
How do you know you are logged in? 1. When on the home page, the login/logout icon, at the bottom of the page,
now has a red X across it. This icon is now a link to log out. So anytime you wish to log out make sure you are on the home page and select this log out icon.
2. When logged into the site, you will see, in the upper left corner, a Wrench icon. 3. Select it to open up the menu, which appears on the left side of your browser window.
4. You can also tell you are logged on because, on content pages, there is an Edit icon. This icon is an image of a gear.
So now you are ready to begin!
Logging Out of Drupal To Logout, on any non-administrative page, select the login/logout icon, at the bottom of the page.
updated: 05/22/2013 Page 6 of 30
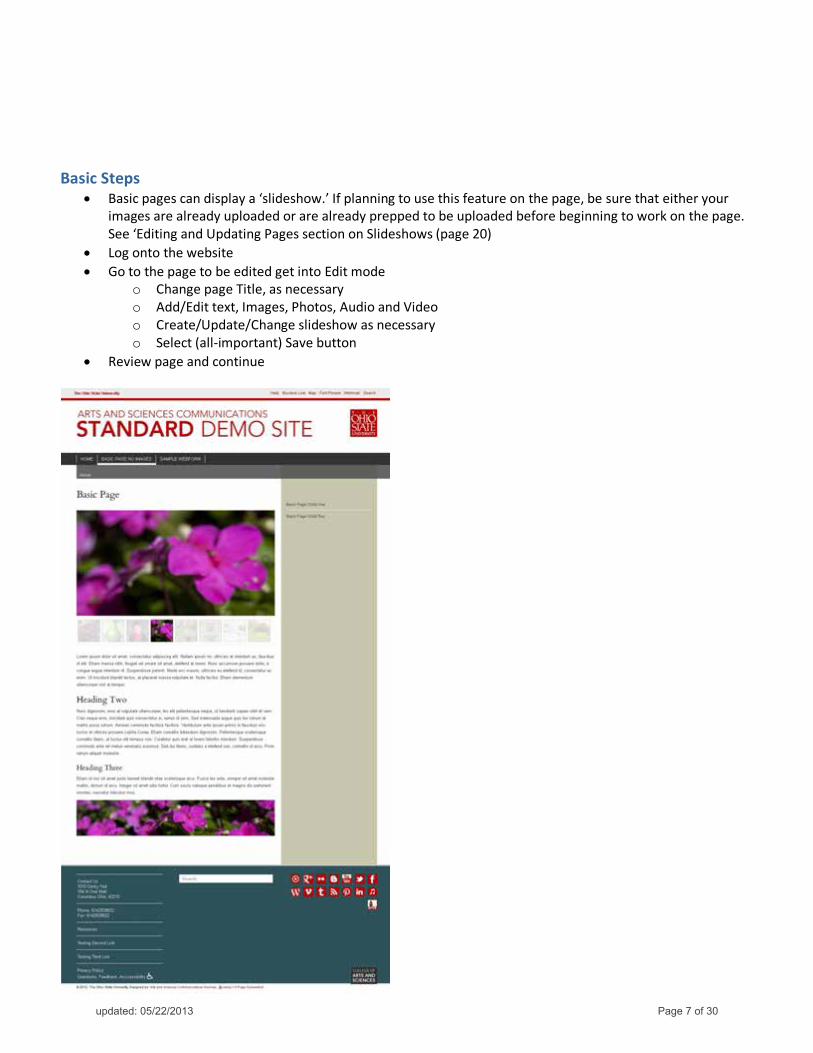
Basic Steps • Basic pages can display a ‘slideshow.’ If planning to use this feature on the page, be sure that either your
images are already uploaded or are already prepped to be uploaded before beginning to work on the page. See ‘Editing and Updating Pages section on Slideshows (page 20)
• Log onto the website • Go to the page to be edited get into Edit mode
o Change page Title, as necessary o Add/Edit text, Images, Photos, Audio and Video o Create/Update/Change slideshow as necessary o Select (all-important) Save button
• Review page and continue
updated: 05/22/2013 Page 7 of 30
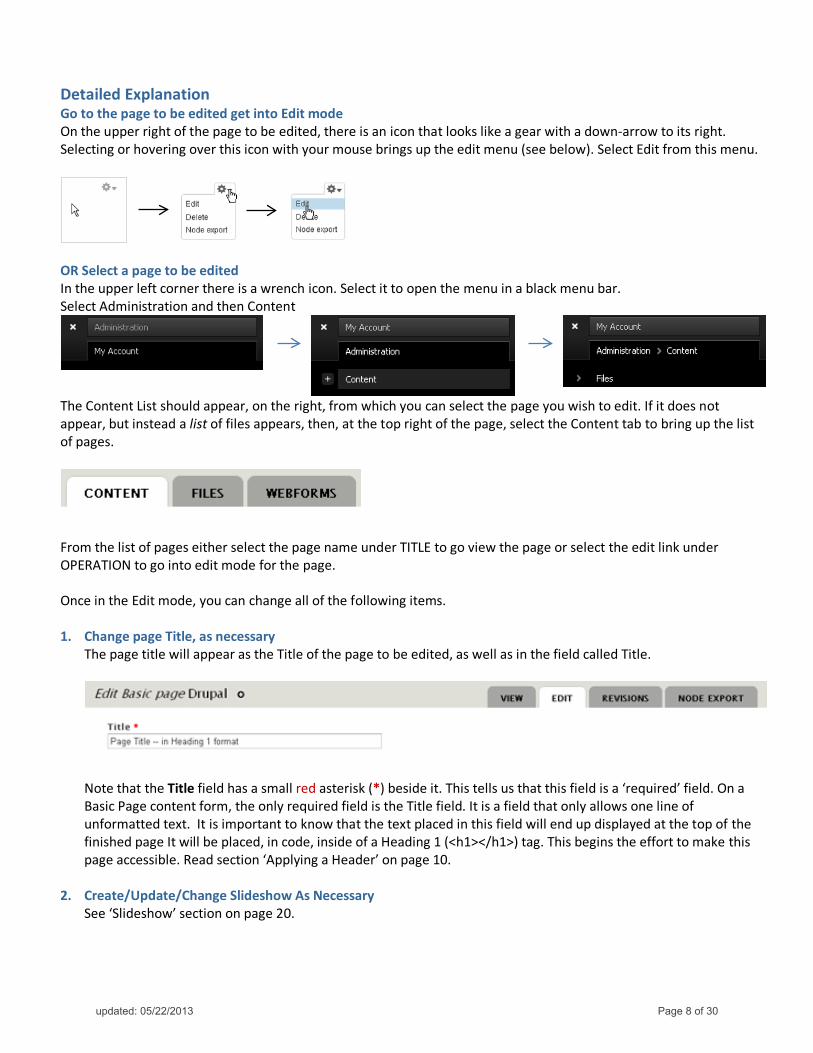
Detailed Explanation Go to the page to be edited get into Edit mode On the upper right of the page to be edited, there is an icon that looks like a gear with a down-arrow to its right. Selecting or hovering over this icon with your mouse brings up the edit menu (see below). Select Edit from this menu.
OR Select a page to be edited In the upper left corner there is a wrench icon. Select it to open the menu in a black menu bar. Select Administration and then Content
The Content List should appear, on the right, from which you can select the page you wish to edit. If it does not appear, but instead a list of files appears, then, at the top right of the page, select the Content tab to bring up the list of pages.
From the list of pages either select the page name under TITLE to go view the page or select the edit link under OPERATION to go into edit mode for the page. Once in the Edit mode, you can change all of the following items. 1. Change page Title, as necessary
The page title will appear as the Title of the page to be edited, as well as in the field called Title.
Note that the Title field has a small red asterisk (*) beside it. This tells us that this field is a ‘required’ field. On a Basic Page content form, the only required field is the Title field. It is a field that only allows one line of unformatted text. It is important to know that the text placed in this field will end up displayed at the top of the finished page It will be placed, in code, inside of a Heading 1 (<h1></h1>) tag. This begins the effort to make this page accessible. Read section ‘Applying a Header’ on page 10.
2. Create/Update/Change Slideshow As Necessary
See ‘Slideshow’ section on page 20.
updated: 05/22/2013 Page 8 of 30

3. Change Body information, as necessary The final field, on this form is the Body field. All other content on the page is input into this field. This Body field is a Rich Text Editor, allowing multiple lines of formatted text. The ‘Rich Text Editor’ There are two basic types of Text Editors, Plain Text Editor and Rich Text Editors. A Plain Text Editor does not allow formatting. The Rich Text Editor allows formatting of content and the addition of images and links. The Drupal Rich Text Editor is an interface similar to Microsoft Word. With some variation, the editor controls should appear as this:
(the order of these buttons may change)
Description of Icons and Their Purposes. 1. Bold icon and Emphasize (or Italics) icon. To bold or emphasize text, first select the text and then select either the
‘B’ for Bold or the’ I’ to emphasize. 2. Alignment icons. Place your cursor somewhere in the paragraph to be aligned and then select the appropriate
icon, from left-to-right, to left justify text, center justify text, or right justify text. 3. Bullet icons. To create a bulleted list, first select the text to be bulleted and then select either the plain list (un-
ordered bullets) or the numbered list (ordered bullets). 4. Indent text. Select text or place cursor in paragraph to be indented. Then select indent left or indent right icon. 5. Undo button – Undo or redo of last update made. 6. Hyperlink your text. To create a hyperlink: 1) Select the words that you want to make into the link. 2) Select the
left icon of this grouping, to open the Link dialogue box (follow the link creation information on page 23.) To Un-link: 1) Place the cursor within text to be un-linked and 2) Select the un-link icon, on the right of this grouping.
7. Anchor icon. To create an Anchor, place cursor before the words where it is desired. Then select this icon. 8. Add Media icon. Place your cursor where you wish to place an image, a audio/video file or a document file (.pdf).
Then select this icon to open the Add Media dialogue box. (See Adding Media section, pg 12.) 9. Source icon/word. Select this icon/word to switch from the Rich Text Editor view to an HTML code view. 10. Cut, Copy, Paste icons. To ‘cut’ text, first highlight it and then select the scissors icon. This will remove the selected
text and place a copy of it into the ‘clipboard.’ To ‘copy’ text, highlight it and then select the icon of two pieces of paper. This will copy the selected into the ‘clipboard.’ To then ‘paste’ either the cut or copied text, place your cursor where the text is to go and select the third icon of a clipboard. Note: If, while pasting text, you get a message indicating that your security settings don’t permit the paste, simply try another method. This is a browser issue, not a Drupal issue.
11. Paste from Word icon. Use this icon to paste text that has been cut or copied from Microsoft Word. By using this icon, the Word programming will be stripped and format controls will be aligned with Drupal.
12. Remove Format icon. This icon is not useful for text/code copied in from another source. However, it allows removal of format controls from Drupal. Simply highlight the text to be changed and then select this icon.
13. Insert Special Character icon. Place your cursor at the location which you intend to add a special character. Then select this icon to open up the Select Special Character dialogue box.
14. Styles box. To apply a specific style to your text, first select the text and then select the style from the drop-down list present in this Styles box.
15. Select All icon. Simply select this icon to select al the text in the Rich Text editor. 16. Find & Replace icon. Select this icon to open the Find and Replace dialogue box with the Replace tab active. 17. Maximize icon. Select this icon to make the Rich Text Editor fill your browser window. Select it again to ‘minimize’
it back to its original size. 18. Teaser Break icon. Primarily for use when creating blog entries, this icon, when selected, will put in a break
comment. The blog entries will stop at this comment when blog is displayed on home page. 19. Insert Horizontal Line icon. Place cursor at the location at which you want a horizontal line and select this icon
updated: 05/22/2013 Page 9 of 30

Using Cut ‘n Paste To insure a consistent website, do not use cut and paste to transfer information from any program in which formatting occurs. Instead, either type directly into the Rich Text Editor, or cut and paste the text from the program into a Plain Text Editor, such as Notepad on Windows or TextEdit on a MAC. Then cut and paste again from the Plain Text Editor into the Drupal Rich Text Editor and format as needed.
With this in mind, Drupal 7 now has a method to cut and paste from Word. Simply cut or copy text from the Word document and use the Paste from Word icon, indicated above. Remember however, that if you happen to include an image in your cut and paste operation, although you may be able to view it on your computer, it will not actually exist on the Drupal server and thus will not exist for readers of your website.
Headers A Header is simply text that defines your page's organizational structure. Well-written header text informs visitors and helps them navigate through your page - maybe keeping them at your site longer. In addition, header text is important because search engines like Google, Yahoo, and MSN are primarily looking at the text content of your pages and by using effective header tags you will even increase your site ranking on these search engines. You can usually ‘see’ header tags because they are usually defined by font size, bold text and white space around them. To optimize them, think of header tags like the main section headers in a term paper outline. The major points go in larger text while subheadings appear underneath in smaller text. For example:
I. Header 1 i. Header 2
1) Header 3 ii. Header 2
1) Header 3 II. Header 1
When properly used as an outline, a screen-reader will ‘pull-out’ the headers for a visually-impaired reader. They can then use the headers to navigate to the information they are seeking. These outlines also allow you for visual organization of your thoughts making the page more readable for readers with no vision impairments. Don’t make these mistakes!
1. Do not use any header tag for pure format purposes. If you need big, bold text in the middle of your page, use big, bold text NOT a header tag.
2. Do not use header tags out of order. You would never go from a Header 1 to a Header 3 in an outline, so don’t do it on a Web page.
Applying a Header Header 1 Your Header 1 tab, <h1></h1>, always exists on your web page as it is the title created from what you place in the Title field.
updated: 05/22/2013 Page 10 of 30

Header 2 or Header 3 First it is important to note that every time you use your enter key, you are creating a new paragraph on your web page. A paragraph is a structural unit of writing that expresses a point that normally contains one or more paragraphs. However in order to create a header in a document or a web page, you must place the header text in a paragraph separate from other content. To apply a Header 2 or Header 3 Organize page in an outline format
1. Select the text that is to be the header., remembering that the header will be applied to the entire paragraph 2. From the drop down box (see example), select appropriate header
Remember, that the headers are to be applied as in an outline. Heading 2 divides the Main topic, given by the page title, into sections. Then these sections can be further divided into sub-sections, which can be designated by headings in a Header 3 format. Apply your headers correctly to make your pages more usable and accessible.
updated: 05/22/2013 Page 11 of 30

Editing and Updating Pages section Adding Media (images, audio, video, documents) Basic Steps
• Prepare file, in advance o Image Prep information is available at: http://asccomm.osu.edu/services/web/support/image-use
Is the image the correct physical size? Is the image have the correct appearance, size and dpi Is the image named appropriately?
• Place cursor where file is to be located and select the Add Media Icon o Add New Images (page 14)
Preparing Images (page 13) o Adding Previously Uploaded Images (page 15) o Adding Audio/Video (page 18) o Adding Document (page 25, in creating Links)
(see also Creating a Slideshow (page 20)
• Check for accessibility and insert file • Type in text, as appropriate • Use style field to align image and apply margins, as necessary • Select OK button
updated: 05/22/2013 Page 12 of 30

Required Drupal Feature Image Sizes Website Images should be 96 dots per inch (dpi). Slideshow images: 630 pixels x 330 pixels Events image: 250 pixels x 250 pixels News image: 250 pixels x 250 pixels People images: 280 pixel x 375 pixels Home page images Landscape image: 470 pixels x 263 pixels Portrait image: 470 pixels x 583 pixels (Note: home page images must be proper sizes to completely ‘hide’ the default images.
Detailed Explanation Adding a New Image/Photo to a web page Prepare Images, in advance, for a Drupal (or any) web page When a website Reader – those people who are accessing your website – visits a web page that contains images, those images are downloaded to their computer for them to view – before the rest of the page is loaded. The only exception to this is when a Reader has set their browser settings to not accept (and thus not display) any images. Through usability studies (and our own experiences) it has been determined that Readers will ‘leave’ a page rather than wait for all its images to download properly. They ‘assume’ that the information on the page is not as valuable as their web browsing time. Thus, in Drupal 7, the program is enhanced to create physically small images from the images you upload. However you can still insure the best results by following these guidelines to help ‘prep’ the images.
1. Crop an image to the exact size and content that you wish to display.
2. Make sure that the image resolution is approximately 96 dpi.
3. Save the image so that, on an average, its physical size is approximately 16-50 K.
4. Most importantly, make sure that your final image is clear and crisp – even if it means discounting steps 1, 2 and 3 above.
All these values are given with the understanding that they are for the average image. As with all rules, there will be exceptions. Naming an Image Before uploading an image(s), name/rename it so that it may be easily found, and more likely to be viewed world-wide. This can be done with these simple guidelines:
1. Name the image to describe its contents. 2. Name the image to indicate in which section of the website it is to be used. It will help your memory of the
image in the future. 3. Keep the name as short as possible.
A shorter title will allow you to see the complete title in a listing of available images on the server. 4. Keep the name in lowercase letters to avoid complications with linking to the image
To avoid possible conflicts with the use of upper and lower cases, make it a standard to use only lowercase. 5. Separate words in the name with a hyphen (-)
Some servers cannot cope with spaces and readers will have difficulties with the files. In addition, many search engines do not properly register an underline (_), so their use is also discouraged.
6. Do not put a date into the name of your file. As the name of the file will not change, a name-dated file will make your information appear older than it is.
Examples: Wrong: Image Name.JPG DATE CAMERA INFO.JPG
Right: section-descriptive-image-name.jpg
updated: 05/22/2013 Page 13 of 30

Adding a New, Prepared Image Put your cursor at the location where the image is to appear and select the Add Media icon button.
This results in a new dialogue box appearing, that will allow you to select and upload a new image.
Use the Browse button to start a search on your own computer. When you find the image you want, select it. This will return you this window where you need to select Upload and then Submit or simply just Submit. A new window will then appear to complete the process. Name: There is a Name field that allows you to refer to the file by another name. However, to avoid confusion in the future, keep the original filename as the Name Title Text: The title text becomes your screen tooltip. Make it descriptive and informative. Caption: A Caption is not required. However when input, it will display across the bottom of the image, white text on a dark grey background. Check the box to have the Title text appear as this caption.
Alt Text: Before you save an image, it is required that you give it Alt Text. Then when that image is added to any web page, it will be added in an accessible manner.
Make the text descriptive. • Think of the alternative text as ‘replacement text.’ If
you cannot see the image, than the text will replace the content of the image.
• Also the purpose of the image (if it has a purpose) is more important than the image description. For example, alternative text for a help button that displays a question mark should be ‘Help’ not ‘Question Mark.’
• The description needs to be of the image, be succinct (<100 characters/3-12 words) and specific. If a longer description is needed, use the Long Description URL to link to a page about the image.
• Make text unique between images.
OR
updated: 05/22/2013 Page 14 of 30
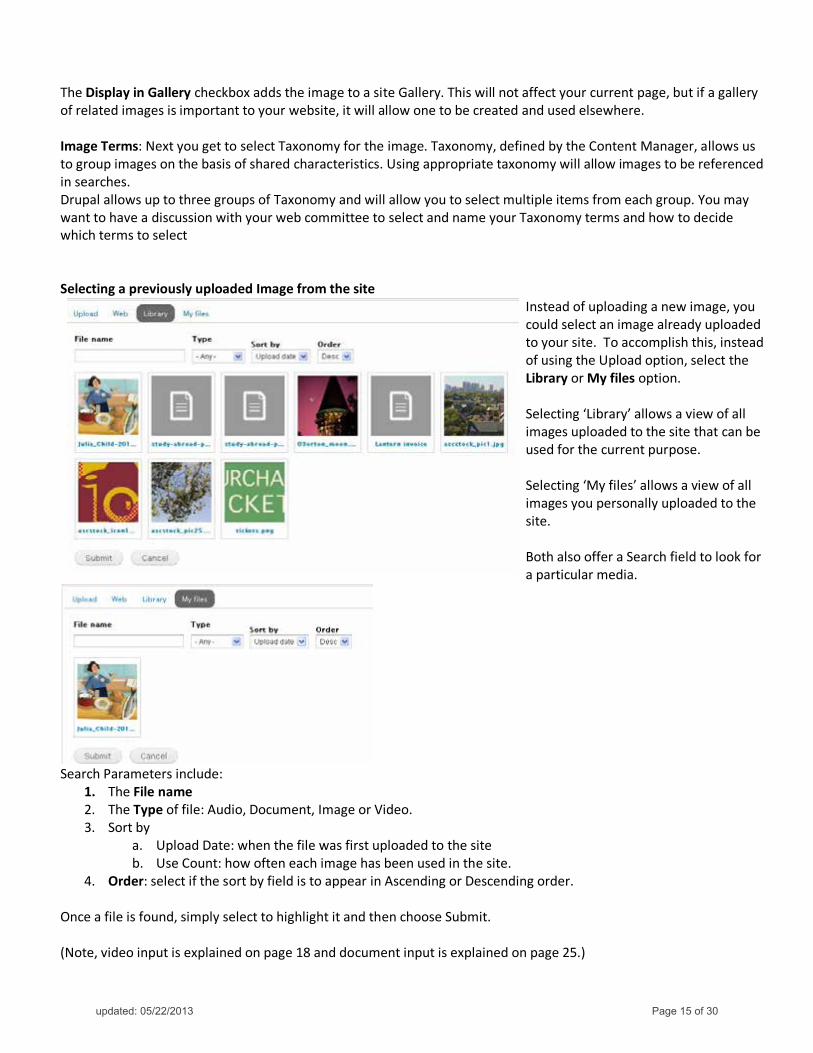
The Display in Gallery checkbox adds the image to a site Gallery. This will not affect your current page, but if a gallery of related images is important to your website, it will allow one to be created and used elsewhere. Image Terms: Next you get to select Taxonomy for the image. Taxonomy, defined by the Content Manager, allows us to group images on the basis of shared characteristics. Using appropriate taxonomy will allow images to be referenced in searches. Drupal allows up to three groups of Taxonomy and will allow you to select multiple items from each group. You may want to have a discussion with your web committee to select and name your Taxonomy terms and how to decide which terms to select Selecting a previously uploaded Image from the site
Instead of uploading a new image, you could select an image already uploaded to your site. To accomplish this, instead of using the Upload option, select the Library or My files option. Selecting ‘Library’ allows a view of all images uploaded to the site that can be used for the current purpose. Selecting ‘My files’ allows a view of all images you personally uploaded to the site. Both also offer a Search field to look for a particular media.
Search Parameters include:
1. The File name 2. The Type of file: Audio, Document, Image or Video. 3. Sort by
a. Upload Date: when the file was first uploaded to the site b. Use Count: how often each image has been used in the site.
4. Order: select if the sort by field is to appear in Ascending or Descending order. Once a file is found, simply select to highlight it and then choose Submit. (Note, video input is explained on page 18 and document input is explained on page 25.)
updated: 05/22/2013 Page 15 of 30
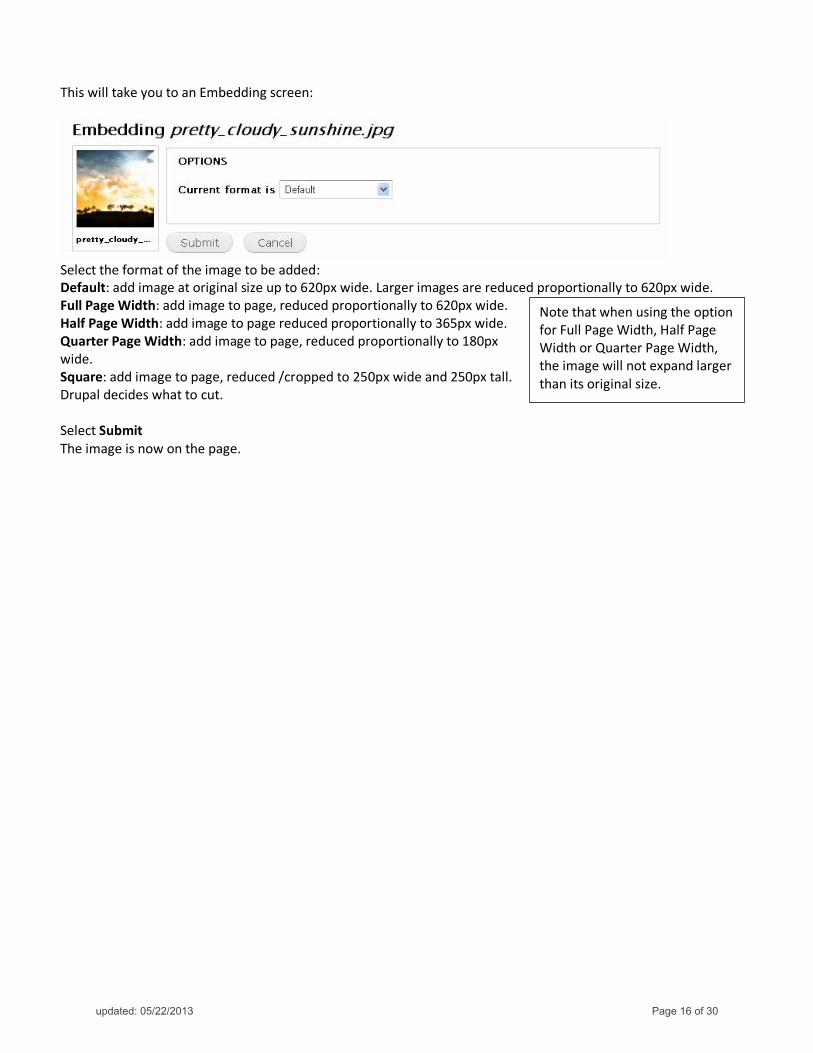
This will take you to an Embedding screen:
Select the format of the image to be added: Default: add image at original size up to 620px wide. Larger images are reduced proportionally to 620px wide. Full Page Width: add image to page, reduced proportionally to 620px wide. Half Page Width: add image to page reduced proportionally to 365px wide. Quarter Page Width: add image to page, reduced proportionally to 180px wide. Square: add image to page, reduced /cropped to 250px wide and 250px tall. Drupal decides what to cut. Select Submit The image is now on the page.
Note that when using the option for Full Page Width, Half Page Width or Quarter Page Width, the image will not expand larger than its original size.
updated: 05/22/2013 Page 16 of 30
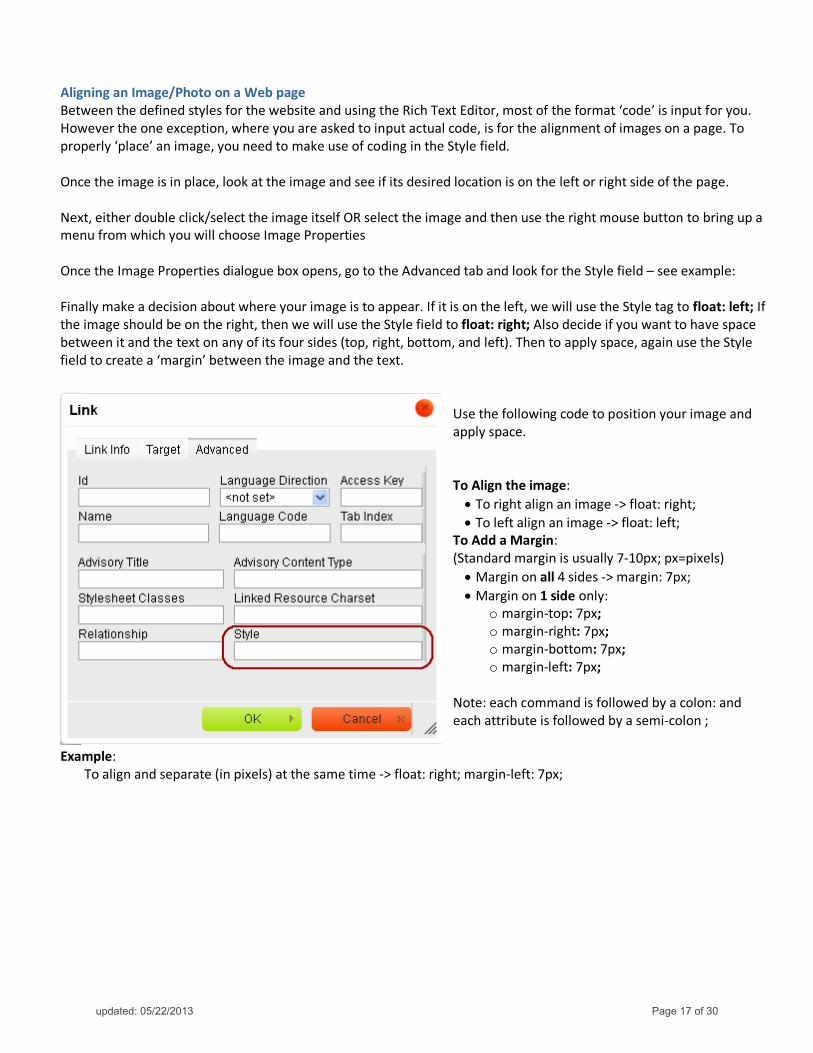
Aligning an Image/Photo on a Web page Between the defined styles for the website and using the Rich Text Editor, most of the format ‘code’ is input for you. However the one exception, where you are asked to input actual code, is for the alignment of images on a page. To properly ‘place’ an image, you need to make use of coding in the Style field. Once the image is in place, look at the image and see if its desired location is on the left or right side of the page. Next, either double click/select the image itself OR select the image and then use the right mouse button to bring up a menu from which you will choose Image Properties Once the Image Properties dialogue box opens, go to the Advanced tab and look for the Style field – see example: Finally make a decision about where your image is to appear. If it is on the left, we will use the Style tag to float: left; If the image should be on the right, then we will use the Style field to float: right; Also decide if you want to have space between it and the text on any of its four sides (top, right, bottom, and left). Then to apply space, again use the Style field to create a ‘margin’ between the image and the text.
Use the following code to position your image and apply space. To Align the image: • To right align an image -> float: right; • To left align an image -> float: left;
To Add a Margin: (Standard margin is usually 7-10px; px=pixels) • Margin on all 4 sides -> margin: 7px; • Margin on 1 side only:
o margin-top: 7px; o margin-right: 7px; o margin-bottom: 7px; o margin-left: 7px;
Note: each command is followed by a colon: and each attribute is followed by a semi-colon ;
Example: To align and separate (in pixels) at the same time -> float: right; margin-left: 7px;
updated: 05/22/2013 Page 17 of 30
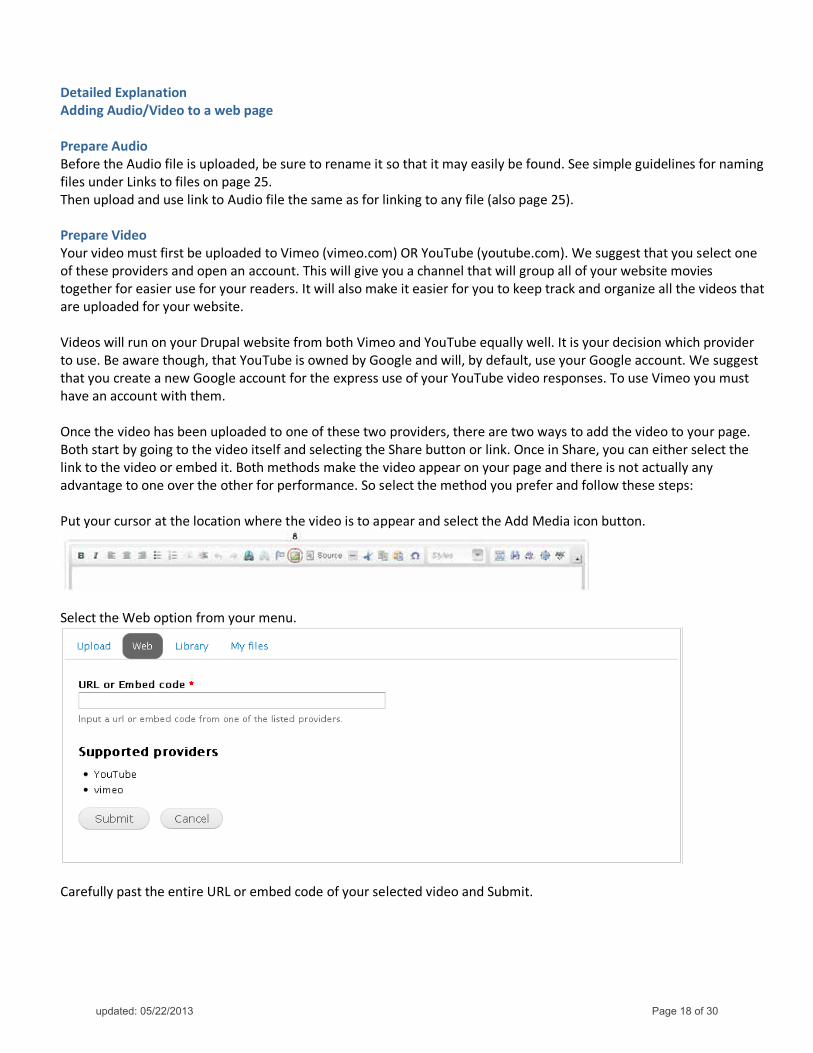
Detailed Explanation Adding Audio/Video to a web page Prepare Audio Before the Audio file is uploaded, be sure to rename it so that it may easily be found. See simple guidelines for naming files under Links to files on page 25. Then upload and use link to Audio file the same as for linking to any file (also page 25). Prepare Video Your video must first be uploaded to Vimeo (vimeo.com) OR YouTube (youtube.com). We suggest that you select one of these providers and open an account. This will give you a channel that will group all of your website movies together for easier use for your readers. It will also make it easier for you to keep track and organize all the videos that are uploaded for your website. Videos will run on your Drupal website from both Vimeo and YouTube equally well. It is your decision which provider to use. Be aware though, that YouTube is owned by Google and will, by default, use your Google account. We suggest that you create a new Google account for the express use of your YouTube video responses. To use Vimeo you must have an account with them. Once the video has been uploaded to one of these two providers, there are two ways to add the video to your page. Both start by going to the video itself and selecting the Share button or link. Once in Share, you can either select the link to the video or embed it. Both methods make the video appear on your page and there is not actually any advantage to one over the other for performance. So select the method you prefer and follow these steps: Put your cursor at the location where the video is to appear and select the Add Media icon button.
Select the Web option from your menu.
Carefully past the entire URL or embed code of your selected video and Submit.
updated: 05/22/2013 Page 18 of 30
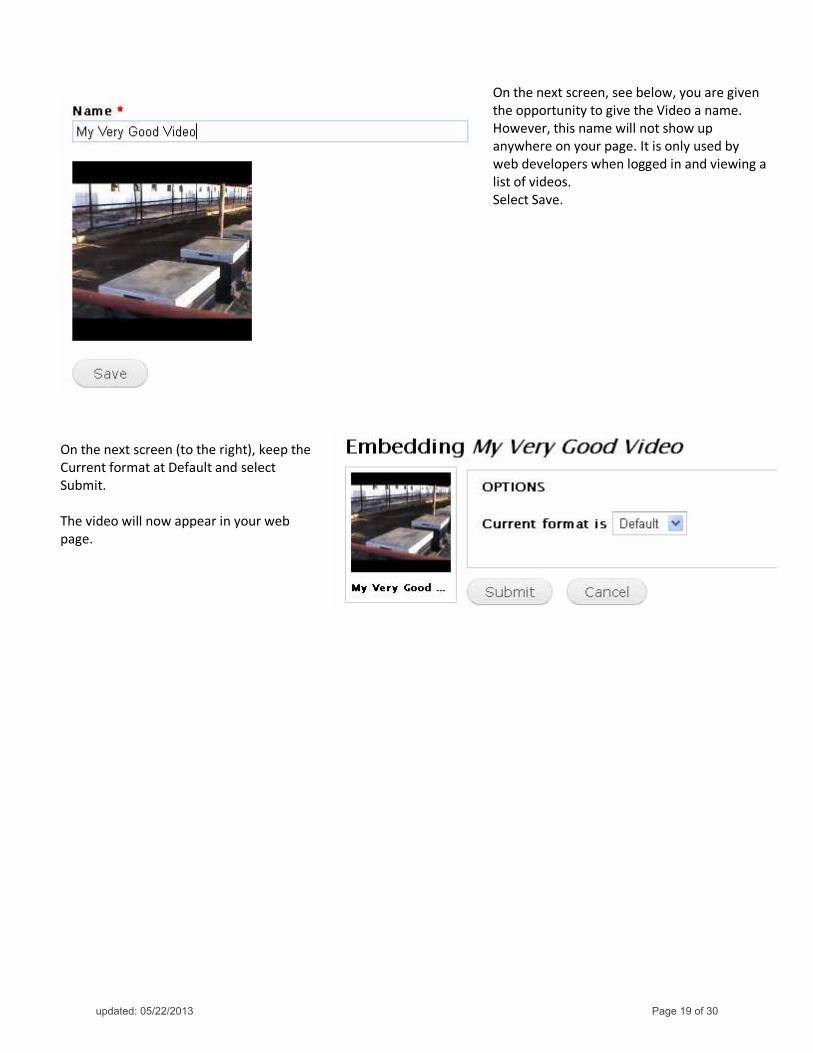
On the next screen, see below, you are given the opportunity to give the Video a name. However, this name will not show up anywhere on your page. It is only used by web developers when logged in and viewing a list of videos. Select Save.
On the next screen (to the right), keep the Current format at Default and select Submit. The video will now appear in your web page.
updated: 05/22/2013 Page 19 of 30
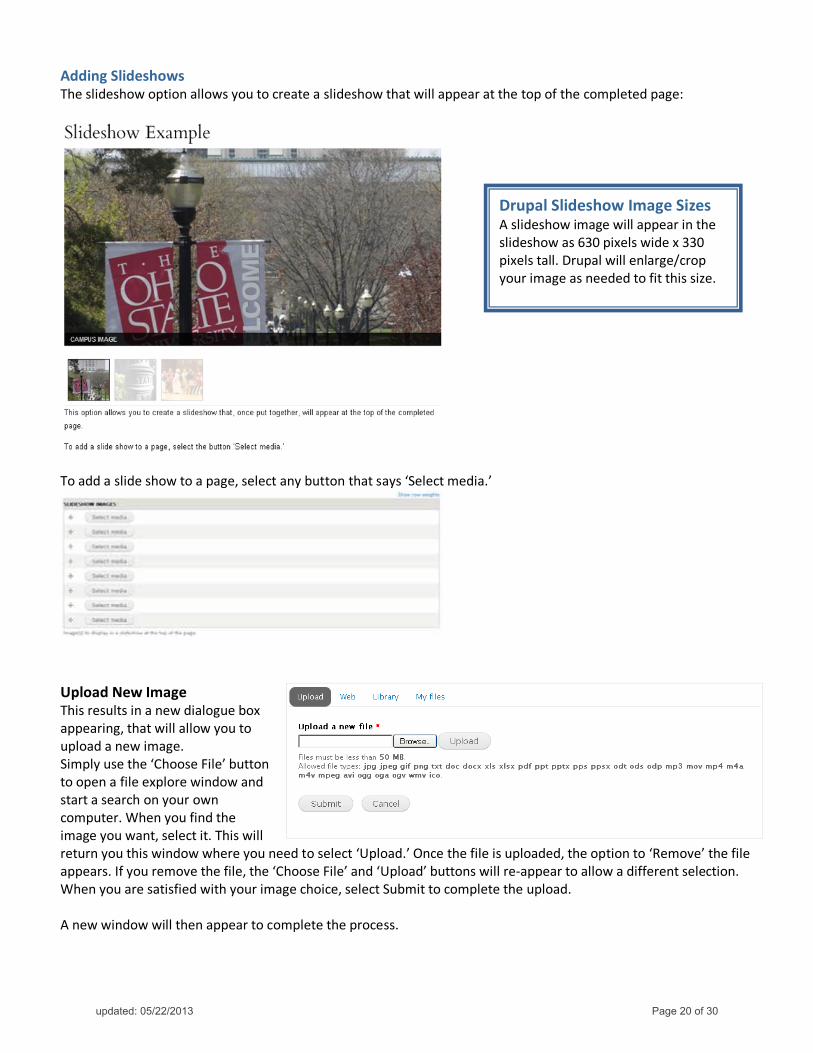
Drupal Slideshow Image Sizes A slideshow image will appear in the slideshow as 630 pixels wide x 330 pixels tall. Drupal will enlarge/crop your image as needed to fit this size.
Adding Slideshows The slideshow option allows you to create a slideshow that will appear at the top of the completed page:
To add a slide show to a page, select any button that says ‘Select media.’
Upload New Image This results in a new dialogue box appearing, that will allow you to upload a new image. Simply use the ‘Choose File’ button to open a file explore window and start a search on your own computer. When you find the image you want, select it. This will return you this window where you need to select ‘Upload.’ Once the file is uploaded, the option to ‘Remove’ the file appears. If you remove the file, the ‘Choose File’ and ‘Upload’ buttons will re-appear to allow a different selection. When you are satisfied with your image choice, select Submit to complete the upload. A new window will then appear to complete the process.
updated: 05/22/2013 Page 20 of 30
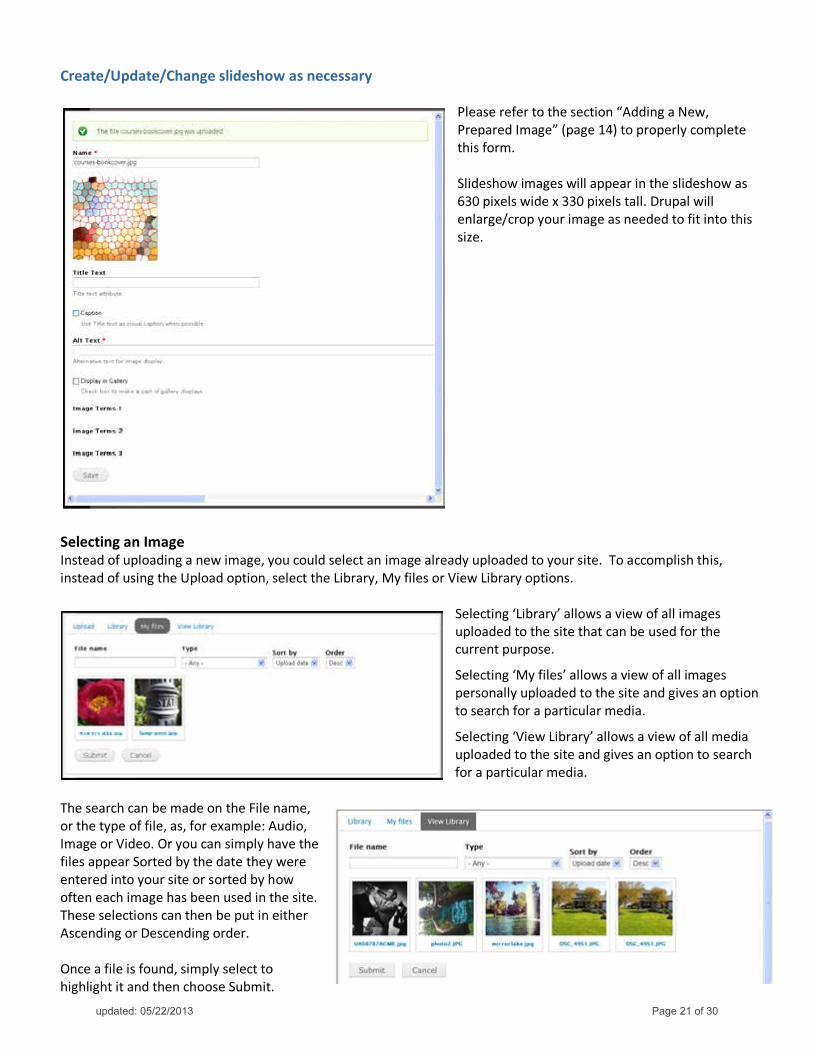
Create/Update/Change slideshow as necessary
Please refer to the section “Adding a New, Prepared Image” (page 14) to properly complete this form. Slideshow images will appear in the slideshow as 630 pixels wide x 330 pixels tall. Drupal will enlarge/crop your image as needed to fit into this size.
Selecting an Image Instead of uploading a new image, you could select an image already uploaded to your site. To accomplish this, instead of using the Upload option, select the Library, My files or View Library options.
Selecting ‘Library’ allows a view of all images uploaded to the site that can be used for the current purpose.
Selecting ‘My files’ allows a view of all images personally uploaded to the site and gives an option to search for a particular media.
Selecting ‘View Library’ allows a view of all media uploaded to the site and gives an option to search for a particular media.
The search can be made on the File name, or the type of file, as, for example: Audio, Image or Video. Or you can simply have the files appear Sorted by the date they were entered into your site or sorted by how often each image has been used in the site. These selections can then be put in either Ascending or Descending order. Once a file is found, simply select to highlight it and then choose Submit.
updated: 05/22/2013 Page 21 of 30
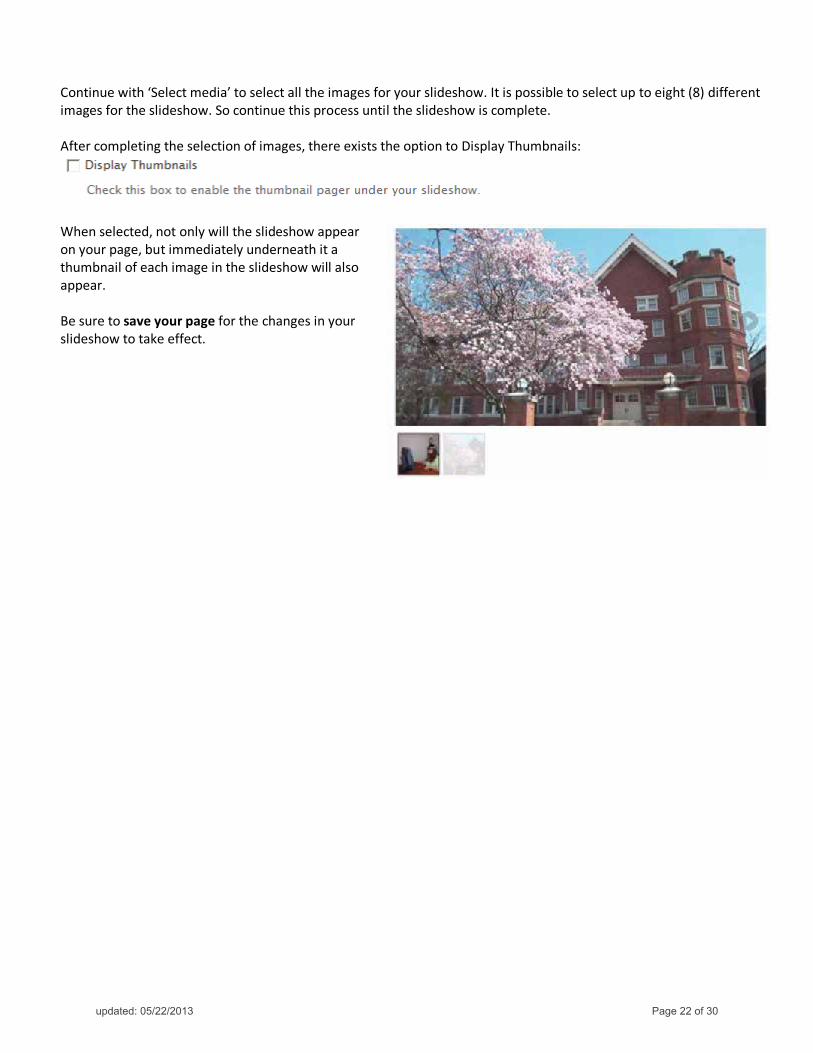
Continue with ‘Select media’ to select all the images for your slideshow. It is possible to select up to eight (8) different images for the slideshow. So continue this process until the slideshow is complete. After completing the selection of images, there exists the option to Display Thumbnails:
When selected, not only will the slideshow appear on your page, but immediately underneath it a thumbnail of each image in the slideshow will also appear. Be sure to save your page for the changes in your slideshow to take effect.
updated: 05/22/2013 Page 22 of 30
Links Basic Steps • Decide which type of link you wish to build
o external vs internal links o absolute vs relative links o email link
• Highlight the text/image you wish to make into the link • Select the Link icon and open the Link dialogue box:
o Select the ‘Link Type’ o Enter required fields, such as the protocol and address or email or anchor o Go to the Advanced tab, to the Advisory Title field. Being succinct and specific, type in link destination.
• Select OK button
Links Detailed Explanation What is a link? The word ‘link’ is a shortening of the phrase ‘hypertext link.’ Once constructed, it applies code to a selected set of words so that, when selected, it gives instruction to the browser to look for and load different information to display. The use of hypertext links to integrate information across pages and platforms makes the internet a valuable tool. A link should appear different from surrounding text. It is most commonly blue in color and is underlined. However its appearance is governed by and is consistent with its website style guide. To activate a link, a reader must ‘select’ it with either the click of a mouse or by locating it via the keyboard and while hovering over it, selecting the ENTER key. Drupal will apply the correct code; you need only decide what type of link to build and where to build it. Decide what type of link to build External vs Internal Links An external link is simply a link that goes to a location off of the current website. Conversely an internal link is a link that goes anywhere on the current website. Absolute vs Relative Links An Absolute Link is a link containing all the link components; see below, to tell browser ‘absolutely’ where to go and what to do when it gets there. A Relative Link is a link that contains only the necessary link components that tell browser where to go relative to the current site.
1: protocol 2: website name 3: location in site 4: location in site 5: file 6: file extension http:// www.somplace.com /folder /sub-folder /name-of-file .ext
1. The protocol:
http – go out into the internet and display a web page https – go out into the internet and display a secure web page ftp – go out into the internet and either up or download files
2. Name of website. Browser uses web database to match name to actual ‘physcal’ address of website 3. Location in site: Originally determined by site structure, name now indicates organization of site 4. Location on website : Originally determined by site structure, name now indicates organization of site 5. File name: page to display (if http, https) or to up or download 6. File extension: This extension tells the browser what program to use to display the file. .htm and .html indicate
the use of Hyper-text markup language; .cfm indicates use of ColdFusion, etc. Our files in Drupal may use no extension because our server tells the browser how to display the file.
Email Links An email link, once selected, attempts to open the readers email tool, completes the address field and begins the email.
updated: 05/22/2013 Page 23 of 30
Creating a Link Place your cursor at the location where you wish to create a link Respect the sophistication of our readers. Don’t use the URL as the verbiage for the link. Select words, in context, to become the link. Also, avoid the words: ‘click here.’ ‘select this,’ etc. Here are some examples: Wrong: For more information visit http://artsandsciences.osu.edu/ Right: For more information visit the Arts and Sciences website. Select the Link icon and open the Link dialogue box:
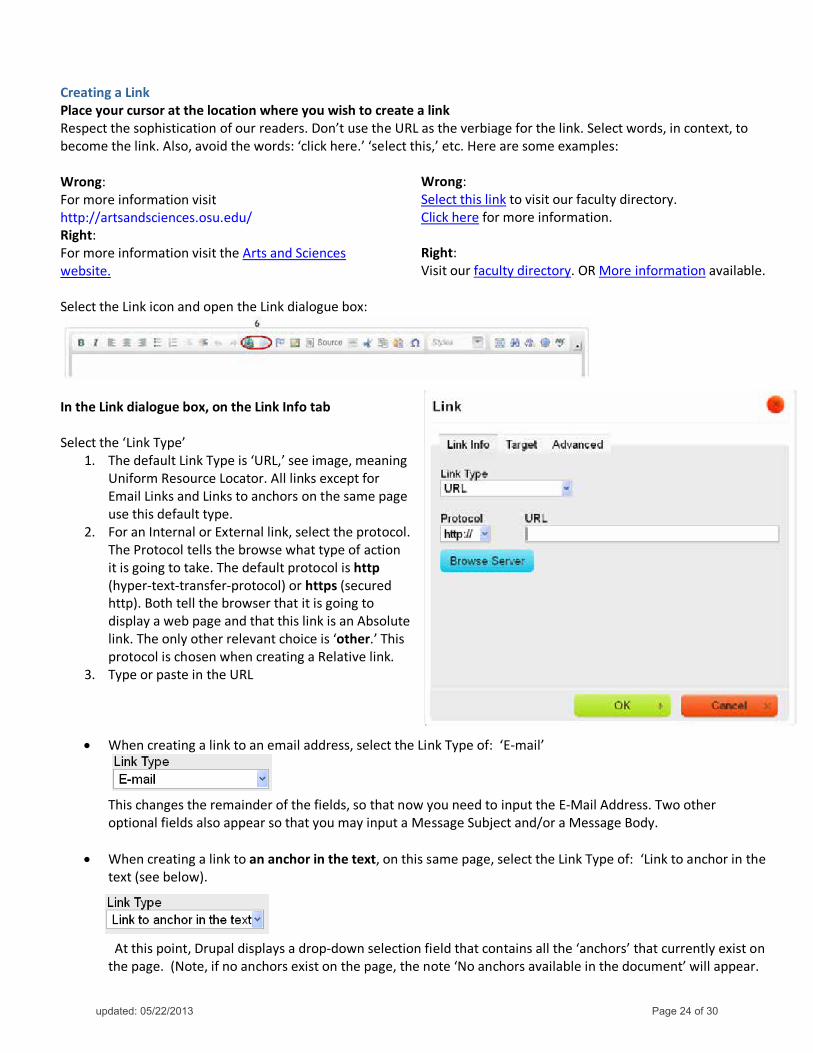
In the Link dialogue box, on the Link Info tab Select the ‘Link Type’
1. The default Link Type is ‘URL,’ see image, meaning Uniform Resource Locator. All links except for Email Links and Links to anchors on the same page use this default type.
2. For an Internal or External link, select the protocol. The Protocol tells the browse what type of action it is going to take. The default protocol is http (hyper-text-transfer-protocol) or https (secured http). Both tell the browser that it is going to display a web page and that this link is an Absolute link. The only other relevant choice is ‘other.’ This protocol is chosen when creating a Relative link.
3. Type or paste in the URL
• When creating a link to an email address, select the Link Type of: ‘E-mail’
This changes the remainder of the fields, so that now you need to input the E-Mail Address. Two other optional fields also appear so that you may input a Message Subject and/or a Message Body.
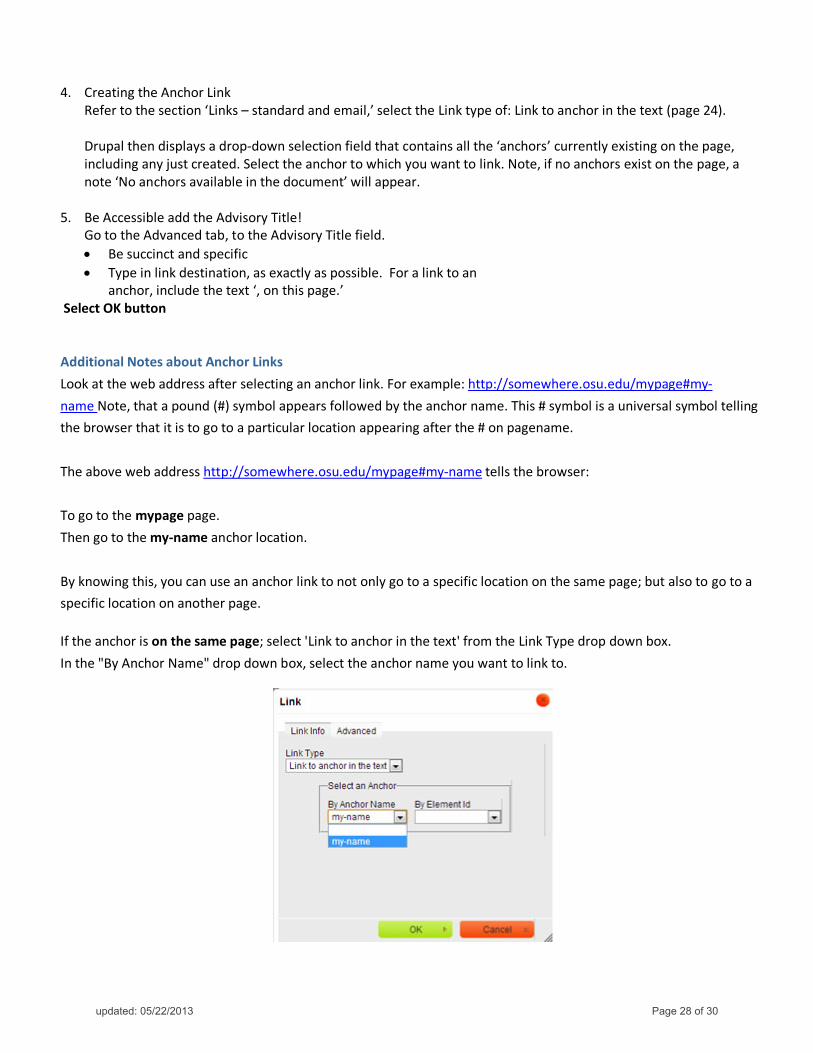
• When creating a link to an anchor in the text, on this same page, select the Link Type of: ‘Link to anchor in the text (see below). At this point, Drupal displays a drop-down selection field that contains all the ‘anchors’ that currently exist on the page. (Note, if no anchors exist on the page, the note ‘No anchors available in the document’ will appear.
Wrong: Select this link to visit our faculty directory. Click here for more information. Right: Visit our faculty directory. OR More information available.
updated: 05/22/2013 Page 24 of 30
4. Go to the Advanced tab, to the Advisory Title field. o Be succinct and specific o Type in link destination, as exactly as possible. o Be sure to only use the word website in the Advisory Title,
when you are actually leaving the current internal website and sending the reader to an external location.
Select OK button Links to Files Linking to a .pdf is very similar to both creating a link and also linking to an image.
1. Go to the page where the link is to occur. 2. Make sure that you are in Edit mode for the page. 3. Place your cursor at the location where you wish to create a link to the file. 4. Select the Add media icon.
This is the same icon you will use to add images and other types of media into the text.
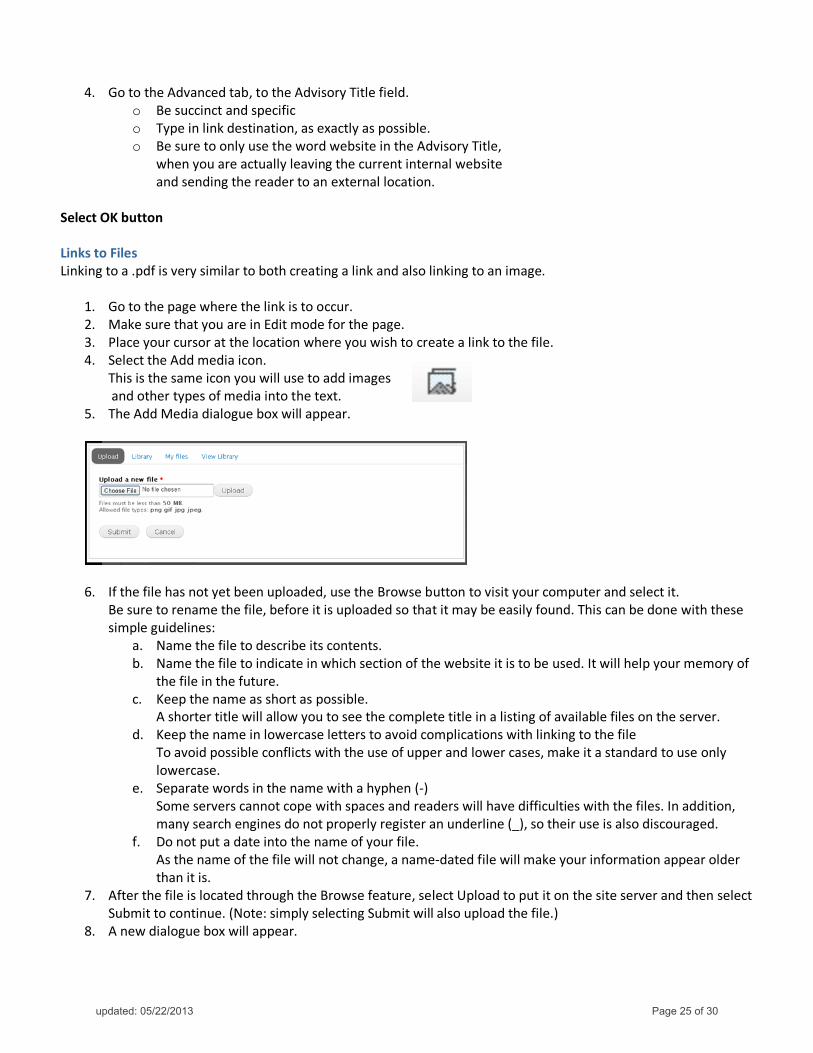
5. The Add Media dialogue box will appear.
6. If the file has not yet been uploaded, use the Browse button to visit your computer and select it.
Be sure to rename the file, before it is uploaded so that it may be easily found. This can be done with these simple guidelines:
a. Name the file to describe its contents. b. Name the file to indicate in which section of the website it is to be used. It will help your memory of
the file in the future. c. Keep the name as short as possible.
A shorter title will allow you to see the complete title in a listing of available files on the server. d. Keep the name in lowercase letters to avoid complications with linking to the file
To avoid possible conflicts with the use of upper and lower cases, make it a standard to use only lowercase.
e. Separate words in the name with a hyphen (-) Some servers cannot cope with spaces and readers will have difficulties with the files. In addition, many search engines do not properly register an underline (_), so their use is also discouraged.
f. Do not put a date into the name of your file. As the name of the file will not change, a name-dated file will make your information appear older than it is.
7. After the file is located through the Browse feature, select Upload to put it on the site server and then select Submit to continue. (Note: simply selecting Submit will also upload the file.)
8. A new dialogue box will appear.
updated: 05/22/2013 Page 25 of 30

This one contains a Name field for the file. The purpose of this field is to create a name that allows a reference to the file by second name. However, to avoid confusion in the future, keep the original filename as the Name. Simply hit Save to continue.
9. Finally the last dialogue box will appear.
From the dropdown menu, select the Current format to be Default. Then again, simply select the Submit button.
This will place a link to the file at the location where you had placed your cursor. The link will be thefilename. Make sure that you rename the link. Respect the sophistication of our readers. Don’t use the URL as the verbiage for the link. Select words, in context, to become the link. Also, avoid the words: ‘click here.’ ‘select this,’ etc. To accomplish this, 1) place your cursor at the beginning of the filename; 2) type in the correct link verbiage; and then 3) delete the filename that was originally input.
1) section-original-filename.pdf
2) start typing new text for file name at beginning of filesection-original-filename.pdf
3) start typing new text for file name at beginning of file
Do NOT give the file a different name here!
updated: 05/22/2013 Page 26 of 30
Be Accessible add the Advisory Title Select the new link and open it up to edit, by either selecting the Link icon or by highlighting the link, pressing the right mouse button and selecting Edit link from the menu. Once the Link dialogue box appears, go to the Advanced tab, to the Advisory Title field.
• Be succinct and specific • Type in link description, as exactly as possible. • Let your reader know that after choosing that link they will download a file. Be specific,
if the file is a .pdf file, state, ‘in Adobe .pdf file format.’ Anchors and anchor links basic steps
• Locate the Anchor • Select the Anchor icon • Fill in the Anchor name • Select OK button • Create the Anchor Link
Anchors and anchor links Detailed Explanation An Anchor Tag, by definition, is a type of link. However, once created, it does not go anywhere. Instead it anchors information to a particular location on the page. By creating an anchor, you can then ‘jump to’ or relocate to that location using a link. 1. Locate the Anchor
Go to the location where the anchor is to exist. Place the cursor in front of or above the location to which you want to anchor.
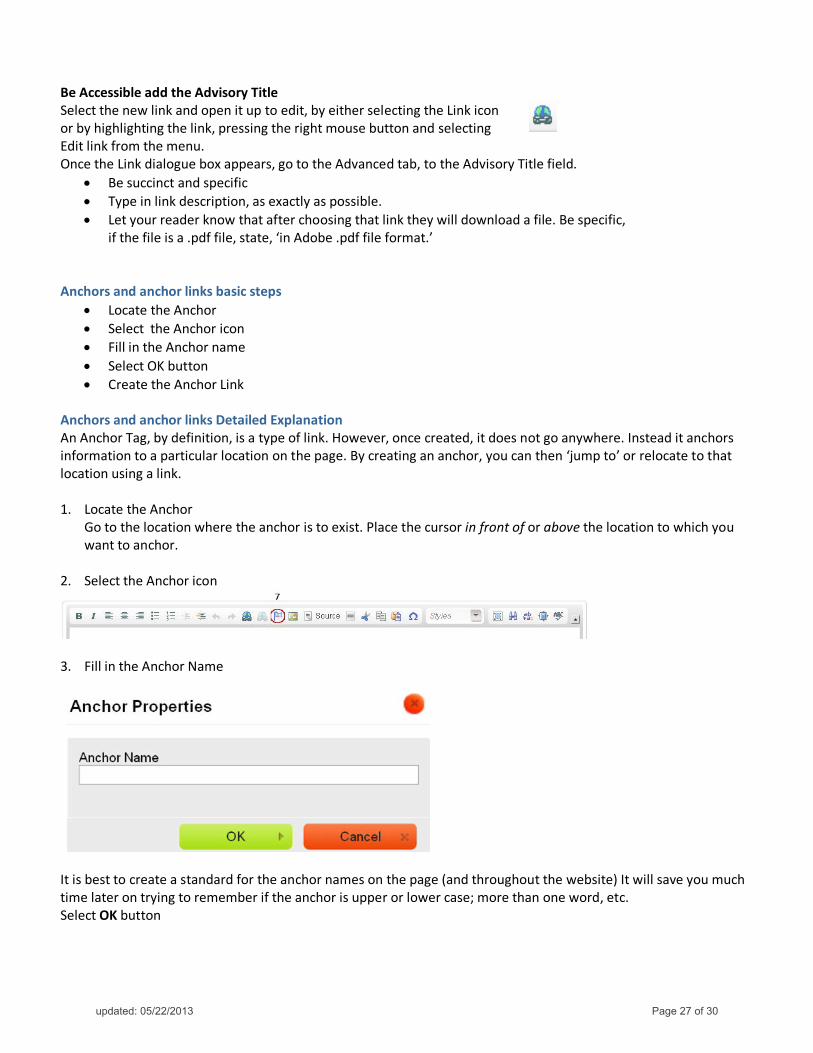
2. Select the Anchor icon
3. Fill in the Anchor Name
It is best to create a standard for the anchor names on the page (and throughout the website) It will save you much time later on trying to remember if the anchor is upper or lower case; more than one word, etc. Select OK button
updated: 05/22/2013 Page 27 of 30
4. Creating the Anchor Link Refer to the section ‘Links – standard and email,’ select the Link type of: Link to anchor in the text (page 24). Drupal then displays a drop-down selection field that contains all the ‘anchors’ currently existing on the page, including any just created. Select the anchor to which you want to link. Note, if no anchors exist on the page, a note ‘No anchors available in the document’ will appear.
5. Be Accessible add the Advisory Title!
Go to the Advanced tab, to the Advisory Title field. • Be succinct and specific • Type in link destination, as exactly as possible. For a link to an
anchor, include the text ‘, on this page.’ Select OK button Additional Notes about Anchor Links Look at the web address after selecting an anchor link. For example: http://somewhere.osu.edu/mypage#my-name Note, that a pound (#) symbol appears followed by the anchor name. This # symbol is a universal symbol telling the browser that it is to go to a particular location appearing after the # on pagename. The above web address http://somewhere.osu.edu/mypage#my-name tells the browser: To go to the mypage page. Then go to the my-name anchor location. By knowing this, you can use an anchor link to not only go to a specific location on the same page; but also to go to a specific location on another page.
If the anchor is on the same page; select 'Link to anchor in the text' from the Link Type drop down box. In the "By Anchor Name" drop down box, select the anchor name you want to link to.
updated: 05/22/2013 Page 28 of 30
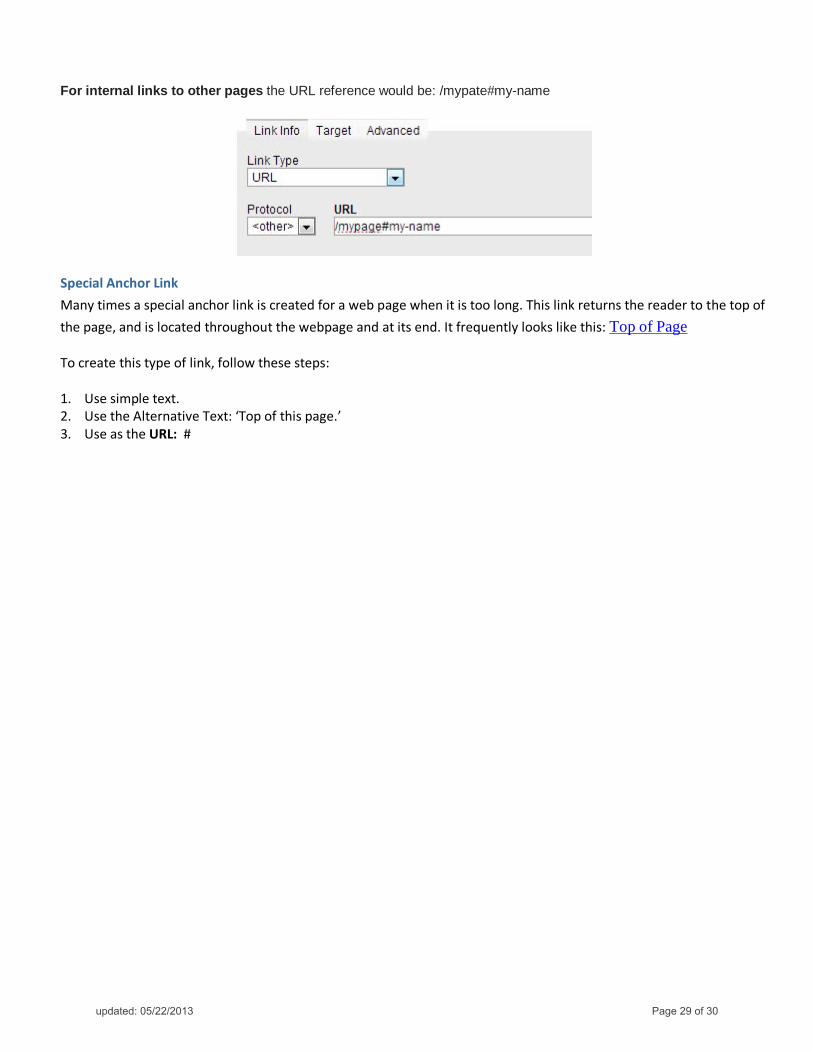
For internal links to other pages the URL reference would be: /mypate#my-name
Special Anchor Link Many times a special anchor link is created for a web page when it is too long. This link returns the reader to the top of the page, and is located throughout the webpage and at its end. It frequently looks like this: Top of Page To create this type of link, follow these steps: 1. Use simple text. 2. Use the Alternative Text: ‘Top of this page.’ 3. Use as the URL: #
updated: 05/22/2013 Page 29 of 30

Do you need Communications help? ASC Communications exists to help you with your communications! We provide creative solutions to help you connect with your audience and successfully promote your department, center, initiative, program, or event We will help you tell your story to the right people in the right way: Not a standard cookie-cutter approach to your problems, but a plan tailored specifically for you. We will help you to find tools that you can use for everyday communications; give you information about style, logo and color, as well as provide downloadable resources that are simple to use. So please contact us for any communications needs at [email protected]. For website help Please contact Jody Croley Jones, [email protected] or 614-247-7071 We look forward to working with you soon!
updated: 05/22/2013 Page 30 of 30