dtx700 reference manual - yamaha · dtx700 reference manual 2 internal design of the dtx700 in this...
TRANSCRIPT

DRUM TRIGGER MODULE
DTX700Reference Manual
The DTX700 Reference Manual created via the PDF format is equipped with special features that are exclusive to electronic files, such as the Link function and the Search function which let you jump to the desired page by clicking the specific term.This illustration shows the page displayed on the DTX700 when the front panel’s [MENU] button is pressed. When you click on any of the menu items, you will be taken to the start of the corresponding section.
This function built in the viewer software is very useful if you want to know the meaning of unfamiliar terms.When using Adobe Reader to read this manual, enter a specific word in the search box, then press the <Enter> key of your computer key-board to call up the relevant section in this manual.
NOTE• Make sure to check and download the latest version of the Adobe Reader from the following site.
http://www.adobe.com/products/reader/
When using Adobe Reader, click to return to the previous page view/go to the next page view via the buttons in the toolbar.This function is very useful if you want to return to the previous page view when jumping to a link page.
NOTE• If the previous page view/next page view buttons are not shown in the toolbar, hold the <Alt> key and press < >/< > keys to move to
the previous/next page view.
• For more information on these and other functions in the software, refer to the owner’s manual of the software.
How to Use This Manual
Search Function
Previous Page View/Next Page View
EN

Internal Design of the DTX700
In this reference section, you will find a description of what takes place within the DTX700 between striking of a pad and the output of sound from speakers. Understanding how signals flow and are processed internally will allow you to utilize the powerful func-tions of this versatile instrument to their maximum potential.Pads & Trigger SignalsWhenever you strike a pad, a trigger signal containing various items of performance data will be produced. These signals typi-cally reflect the strength with which the pad was struck, the actual location of the strike, and the like; furthermore, they are delivered via a cable and a trigger input jack to the DTX700’s internal tone generator, which outputs the appropriate drum sounds in response. If a pad is set up to generate just one sound, there will be a one-to-one relationship between the trigger signal type and the drum voice output. With certain types of pad, however, it is possible to produce a range of different types of trigger signal that reflect the location of the strike, the drumming technique being used, and other factors.
[Terminology]Zone:
The term “zone” is used to refer to specific areas of the pad, such as the rim, cup, and head. Pads with multiple zones (such as two- and three-zone pads) can produce a different trigger sig-nal for each. As their name suggests, one-zone pads produce only one signal irrespective of where they are struck.
Trigger input source:Trigger input sources are named in accordance with the way in which the corresponding pad or pedal is struck or operated.
One-zone pads (producing a single trigger sig-nal)A mono pad such as the TP65 Single Zone Drum Pad or PCY65 Single Zone Cymbal Pad transmits only one type of trigger signal to the DTX700, irrespective of where it is struck.
Two- and three-zone pads (producing multiple trigger signals)In contrast to the PCY65 Single Zone Cymbal Pad and other mono pads, multi-zone pads such as the PCY65S Double Zone Cymbal Pad can produce two different types of trigger signal depending on the zone that is struck, while the PCY135 Triple Zone Cymbal Pad can produce three. In specific terms, multi-zone pads come in either the two-zone or three-zone variety. For instance, the PCY135 Triple Zone Cymbal Pad illustrated below comprises three trigger input sources – the bow, the edge, and the cup – each of which generates a trigger input sig-nal when struck.
Example: PCY135 trigger input sources when connected to the [yCRASH1] trigger input jack
Trigger input source: “Crash1Bw”
The voice assigned to the bow’s trigger input source will be played.
Trigger input source: “Crash1Eg”
Trigger input source: “Crash1Cp”
Bow
Edge
Cup
The voice assigned to the edge’s trigger input source will be played.
The voice assigned to the cup’s trigger input source will be played.
DTX700 Reference Manual 2

Internal Design of the DTX700
Example of how a pad controller can be used to increase the number of trigger input sourcesConsider, for example, a situation where an XP100SD Snare Pad is connected to the [qSNARE] trigger input jack and the PadCtrlType (Pad Control Type) parameter from the Menu area’s Kit/Pad page is set to “snaresOn/Off”. As this pad com-prises three zones – namely, the open rim (A), the closed rim (B), and the head (C) – it will have three trigger input sources. If the pad controller were then to be used to switch the SnaresOn/Off (Snare Wire On/Off) parameter from “on” to “off” or vice-versa, the pad could be made to have a total of six trigger input sources.
Combining three zones and a pad controller to give six trigger input sources
Trigger SetupsYour DTX700 uses a set of parameters called trigger setups to ensure that trigger signals from pads and controllers are processed in an ideal manner. In addition to the actual sensitivity of the pad when it is struck, a trigger setup can include settings intended to prevent a pair of trigger signals being produced in response to a single strike (i.e., double triggering) and unwanted trigger signals being produced by pads other than the one that was struck (i.e., crosstalk). The DTX700 comes pre-loaded with a total of 9 Preset trigger setups suitable for many different needs, and you can also create up to 20 unique User trigger setups to suit your own individ-ual requirements.
Pads and trigger input jacksAs described above, some pads feature multiple trigger input sources, each of which can generate its own trigger signals. It is the role of the DTX700 to collect and process these signals, but the types of trigger signal handled will depend on which of the trigger input jacks is used for connection. For the most up-to-date infor-mation on the correspondence between pad types and DTX700 trigger input jacks, please refer to the following web page.
http://dtxdrums.yamaha.com/
Drum Kits & VoicesUpon the receipt of a trigger signal, the DTX700’s internal tone generator plays the voice assigned to the corresponding trigger input source. The term “kit” is used to refer to a full set of voice assignments for all trigger input sources, and the DTX700 comes preloaded with 50 preset drum kits. You are, however, free to mod-ify these drum kits in whatever way you see fit. In many cases, it is sufficient to simply select one of the preset drum kits for your per-formances, but if you wish to create original kits, it is important that you understand the inner workings of the DTX700, including the makeup of drum kits.
Voice assignments for trigger input sourcesAs voices may be freely assigned to each of the trigger input sources sending trigger signals from the pads, original drum kits may be easily configured. For details of the basic proce-dure, see page 16.
Example: XP100SD
When pad controller is turned clockwise, setting SnaresOn/Off to “on”: Total of six
trigger input sources Trigger input
source: “SnareOp”
Trigger input source: “SnareCl”
Trigger input source: “SnareHd”
When pad controller is turned counter-clockwise, setting SnaresOn/Off to “off”: Trigger input
source: “SnrOpOff”
Trigger input source: “SnrClOff”
Trigger input source: “SnrHdOff”
Individual voices for each trigger input source:
A: Drum voice assigned to trigger input source A.
B: Drum voice assigned to trigger input source B.
C: Drum voice assigned to trigger input source C.
DTX700 Reference Manual 3

Internal Design of the DTX700
Instrument assignments for trigger input jacksAssigning voices individually to each trigger input source can be quite time consuming. In order to speed up this process, the DTX700 features instrument parameters that group together the drum voices assigned to the multiple trigger input sources cor-responding to each trigger input jack – or in other words, the drum voices assigned to each pad.
Voices grouped as kitsFor most drummers, the preset drum kits built into the DTX700 are sufficient to provide a wide range of variation in perfor-mances. If, however, you wish to customize these presets, you can simply change the instrument set for each trigger input jack to assign new voices to each of the corresponding pad’s trigger input sources. If you wish to go even further, meanwhile, you can also change voice assignments on an individual trigger input source basis to create drum kits finely tuned to your indi-vidual needs (see page 16).
Sounds Produced Using the PadsWhenever the DTX700’s internal tone generator receives a trigger signal produced by striking a pad or by operating a controller, it will play the voice or song assigned to that pad or controller. As described below, three different types of assignment are supported – namely, voices, songs, and waves.
• VoicesDrum sounds such as snares, bass drums, and cymbals; percus-sion sounds; and pitched-instrument sounds such as piano, xylophone, and guitar.
• SongsPhrases containing performance data for a range of different instruments.
• WavesAudio files imported into the DTX700 from a variety of sources.
The Menu area’s Kit/Voice page is used to assign voices, songs, and waves to pads and controllers. On that page, available assign-ments are categorized by musical instrument type (in the case of voices), as songs, or as waves. While these three assignment types can all be defined for pads in the same way, it is important to remember that each type plays in a different way and is configured using different parameters.
VoicesThe DTX700 comes preloaded with a vast library of drum sounds, such as snares, bass drums, and cymbals, together with a broad spectrum of percussion-instrument sounds. Also included are many pitched instruments, such as piano, xylo-phone, and guitar. The term “voice” is used to refer to these built-in instrument sounds. Drum and percussion voices from this collection are not rooted at one specific pitch; instead, you can intuitively adjust their tuning in order to match the sounds of other instruments. Meanwhile, pitched-instrument voices such as piano and guitar can be assigned to pads with a specific pitch setting, thus allowing you to play several different notes together to produce chords; in addition, you can also have pads trigger successive notes from a phrase each time they are struck, making it possible to play melodic parts (see page 21). With the timing and strength of your playing reflected in the sound produced by preset voices, you can perform with practi-cally the same level of expressiveness as afforded by acoustic instruments.
Choosing instruments for each trigger input jack
By selecting an instrument, all of the voices assigned to a pad’s three trigger input sources can be changed together.
Three-zone pads (like the PCY135):
Single-zone pads (like the KP65):
Trigger input
sourceLayer*1
MIDI note
numberLayer*2 Instrument
Crash1Bw
Layer A Note No. Voice
Instrument
Layer B Note No. Voice
Layer C Note No. Voice
Layer D Note No. Voice
Crash1Eg
Layer A Note No. Voice
Layer B Note No. Voice
Layer C Note No. Voice
Layer D Note No. Voice
Crash1Cp
Layer A Note No. Voice
Layer B Note No. Voice
Layer C Note No. Voice
Layer D Note No. Voice
Trigger input
sourceLayer*1
MIDI note
numberLayer*2 Instrument
Kick
Layer A Note No. Voice
InstrumentLayer B Note No. Voice
Layer C Note No. Voice
Layer D Note No. Voice
*1: See page 6 for details.*2: Sounds set using the VoiceCategory
and VoiceNumber parameters from the Menu area’s Kit/Voice page.
DTX700 Reference Manual 4

Internal Design of the DTX700
SongsThe DTX700 allows you to play complete songs simply by striking one pad. In the same way as snare sounds are produced by striking a pad to which a snare voice has been assigned, you can start and stop the playback of songs by striking the pads to which they are assigned. In effect, pads with song assignments operate as start/stop switches whenever struck (regardless of how hard or soft they are actually struck). Your DTX700 comes pre-loaded with 63 songs containing performance data from a host of different instrument genres (i.e., 2 demo songs, 44 prac-tice songs, and 17 pad songs), and by assigning these freely to pads, you can easily create highly individualized kits. For even more flexibility, you can also copy performances you have recorded (using the [REC] button) and even import standard MIDI files (Format 0) to create a total of 93 songs (see page 36).
WavesThe DTX700 is fully equipped to play back audio files that can be created, edited, and played on computers. Commonly called “samples” or “sample data”, these files contain short portions of sound. In the context of the DTX700, however, they are referred to as “waves”. Either WAV or AIFF type audio files can be imported into the instrument’s internal wave memory and assigned to pads in much the same way as voices and songs (see page 55). You can also edit imported waves. As audio files imported into the DTX700’s wave memory are assigned to pads as a single sound much like voices and songs, the term “wave data” is used within this manual in the same way as “voice data” or “song data”. In contrast, the term “wave file” is used to refer to data that has not yet been imported and is handled in the form of a file on a computer, sampler, or USB memory device.
Kit MakeupIn terms of the DTX700, the term “kit” is used to refer to a collec-tion of voices, songs, and waves assigned to the trigger input jacks (q to !2) and the [HI-HAT CONTROL] jack (open and closed). For added convenience, the drum trigger module comes pre-loaded with 50 different Preset kits. You are, however, free to make your own unique kits in whatever way you see fit, and up to 60 can also be stored internally. And if, for whatever reason, you need to restart your customizing from scratch, you can press the [KIT] button to access the Kit area and then press the [F3] button (INIT KIT) to restore the factory default settings.
Kits & VoicesWithin the DTX700, voice data is grouped and stored in kit units. In other words, each kit contains the voice-related infor-mation for all of its pad and controller assignments. Whenever a kit is created by editing voices, the voices themselves are not stored within the kit; instead, the settings for all associated parameters – such as tuning, stereo pan, attack time, release time, effects, etc. – are stored. As you would expect, each of the pads can have different parameter settings (see page 16). There-fore, even when the display shows the same voice assigned to two or more pads, the sounds produced by each will not neces-sarily be the same.
Preset songs (63)
Demo songs (2)
Practice songs (44)
Pad songs (17)
Total capacity for songs (93)
Preset kits (50)
Total capacity for kits (60)
Using INIT KIT, you can restore the factory default settings for Preset kits.
DTX700 Reference Manual 5

Internal Design of the DTX700
Voices & LayersThe DTX700 provides four layers (A to D) for each trigger input source. For this reason, you can assign up to four different voices to each one. What’s more, these layered voices can also be triggered in three different ways – for example, they will all play together in Stack mode, a different one will be played for each strike in Alternate mode, and they can be sustained and turned off on each successive strike in Hold mode. (Use the Mode parameter from the Menu area’s Kit/MIDI/Assign page to make these settings.)
To overlay multiple voices, first of all select the trigger input source, and use the Note parameter from the Menu area’s Kit/MIDI/Assign page to ensure that a MIDI note number is assigned to each of its layers. Then, use the above-mentioned Mode parameter to set the way in which the layered voices are to be triggered, and finally, use the VoiceCategory and Number parameters from the Menu area’s Kit/Voice page to assign suit-able voices to each layer.
NOTE• When assigning a pad song to a trigger input source, only
one layer can be configured for it.
Voices and MIDI note numbersIt is important to realize that voices are actually assigned to MIDI note numbers whenever Stack mode or Alternate mode is used (see page 21). With these modes, the sounds to be played together are set using MIDI note numbers and not voices. To change the correspondence between MIDI note numbers and voices within the current kit, you can select voices assigned to MIDI note numbers on the Menu area’s Kit/Voice page.
EffectsThe effect processor built into your DTX700 applies special audio effects to the output from the tone generator in order to modify and enhance its sound in a wide variety of ways. Normally applied dur-ing the final stages of editing, effects allow you optimize the sound to better suit your own specific requirements.
Effect Processor DesignThe DTX700 can apply effects to the tone generator’s output using the following four effect units.
Variation EffectVariation effects allow you to sculpt your sound in a variety of different ways. A specific type of variation effect can be selected for each kit, and you can also specify the degree to which this effect is applied to each layer (using the VarSend(Dry) (Variation Send Level) parameter from the Menu area’s Kit/Voice page).
ChorusChorus effects change the spatial characteristics of the sounds to which they are applied. A specific type of chorus effect can be selected for each kit, and you can also specify the degree to which this effect is applied to each layer (using the ChoSend (Chorus Send Level) parameter from the Menu area’s Kit/Voice page).
ReverbReverb effects add a warm ambience to sounds, simulating the complex reflections of actual performance spaces, such as a concert hall or a small club. A specific type of reverb effect can be selected for each kit, and you can also specify the degree to which this effect is applied to each layer (using the RevSend (Reverb Send Level) parameter from the Menu area’s Kit/Voice page).
NOTE• The degree to which songs are processed by these effect
units can be specified using the VarSend(Dry) (Variation Send Level) parameter, the ChoSend (Chorus Send Level) parameter, and the RevSend (Reverb Send Level) parameter from the Menu area’s Song/MIDI page; fur-thermore, these settings can then be saved as part of the corresponding song data.
Kit EQSupporting four-band equalization, the Kit EQ effect unit can be configured in a different way for each kit (using the parameters from the Menu area’s Kit/EQ page).
Master EQProcessing the overall instrument sound just before output, Master EQ supports three-band equalization. This effect unit is configured using the Menu area’s Utility/Master EQ page, and changing kits has no effect on its equalization settings.
StackAll four layers will sound simultaneously.
Layer ALayer BLayer CLayer D
Four sounds produced together.
AlternateIndividual layers will sound sequentially.
Layer A sounds.
Layer B sounds.
Layer C sounds.
Layer D sounds.
DTX700 Reference Manual 6

Internal Design of the DTX700
Effect Signal Flow
*1: Click-track voices cannot be sent to effects.*2: Using the VarSend(Dry) (Variation Send Level) parameter, you can set the required balance between the amount of the
signal that will bypass the effect (i.e., the dry level) and the amount that will be sent to the effect (i.e., the wet level).*3: Effects cannot be applied to external audio input via the [AUX IN] port.
Effects & Effect CategoriesThe various individual effects provided by this instrument’s effect units are sorted into a number of different categories. What follows is a description of each category and the effects it contains. We recommend that you refer to these descriptions whenever setting effects. Each category’s effect table indicates which of the effect units – i.e., Reverb (Rev), Chorus (Cho), or Variation (Var) – can be used to apply the effect in question. Any effect marked using a symbol can be selected and modi-fied on the corresponding effect unit’s parameter setting pages.
Compressor & EQThe compressor is an effect commonly used to limit and compress the dynamics (i.e., softness or loudness) of an audio signal. In the case of vocals, guitar parts, and other signals that have widely varying dynamics, this effect essen-tially squeezes the dynamic range, making soft sounds louder and loud sounds softer. Furthermore, a compressor’s attack and decay characteristics can be adjusted to modify how punchy or sustained an audio signal sounds. Multi-band compression, meanwhile, splits the input into three different frequency bands for processing independent of each other; accordingly, this type of effect can be thought of as combin-ing compression with equalization.
AUX IN
Variation
Chorus
Reverb
Dry signal Kit EQ Master EQ
RevReturn
ChoReturn
VarReturn
VarPan
ChoPan
RevPanVarToRev
ChoToRev
VarToCho
RevSend
ChoSend
VarSend
VarSend(Wet)
VarSend(Dry)
*1 *3
*2
Effect Type Var Description
Compressor Relatively fast-acting compressor well suited to solo performances.
MltBndComp Three-band compressor.
3 Band EQ Three-band compressor also featuring equalization.
Vintage EQ Vintage five-band parametric equalizer.
Enhancer Adds higher-order harmonics to enhance a sound’s presence.
DTX700 Reference Manual 7

Internal Design of the DTX700
Flanger & PhaserA flanger creates a swirling, metallic sound, similar to that of a jet plane. While this effect operates using the same basic principles as chorus effects, it uses shorter delay times and also incorporates feedback to produce a very distinctive swelling sound. Rather than being used constantly through-out a song, it is more suited to selective use in specific sec-tions in order to add variety. A phaser, meanwhile, introduces a phase shift into the sound being processed before returning it to the effect input using a feedback circuit in order to produce a characteristic animated yet mellow tone. Gentler overall than a flanger, this effect can be put to use in a wider range of situations, and for example, is often used with electric pianos to sweeten their sound in a variety of ways.
DistortionAs its name suggests, a distortion effect distorts the sound fed into it. It produces a sound similar to that of an amplifier turned up too high or fed with a signal that is already suffi-ciently loud. This type of effect is widely used to add a harsh, biting edge; furthermore, the resultant sound is char-acterized by overall thickness and long sustain times. This thickness comes from the large numbers of harmonics con-tained within clipped signals. Meanwhile, the longer sustain is not produced by the original sound being stretched; rather, it is produced when the slowly-fading release portion that cannot normally heard is amplified and distorted.
WahA wah effect dynamically changes the frequency character-istic of a filter in order to produce a highly unique filter-sweep sound. Auto wah changes the frequency in a cyclic manner using an LFO, while touch wah performs filter sweeps in response to the volume of the input signal.
ReverbReverb effects model the complex reverberation produced by sounds within enclosed spaces. In this way, they add a natural-sounding sustain, which produces a feeling of depth and space. Furthermore, different types of reverb – such as hall, room, plate, and stage – can be used to simulate the sound of acoustic environments of varying sizes and con-structions.
Effect Type Cho Var Description
SPX Flanger Produces a swirling, metallic sound.
TempoFlanger Tempo-synchronized flanger.
PhaserMono – Vintage sounding mono phaser.
PhaserStereo – Vintage sounding stereo phaser.
TempoPhaser – Tempo-synchronized phaser.
Effect Type Var Description
AmpSim 1 Guitar amp simulation.
AmpSim 2 Guitar amp simulation.
CompDist Combines compression and distortion.
CompDistDly Combines compression, distortion, and delay.
Effect Type Var Description
AutoWah Vintage automatic wah effect.
TouchWah Classic volume-responsive wah effect.
TouchWahDist Touch wah with distortion applied at the output.
Effect Type Rev Var Description
SPX Hall
Emulation of hall acoustics using an algorithm derived from the classic Yamaha SPX1000 Digital Multi-Effects Processor.
SPX Room
Emulation of room acoustics using an algorithm derived from the classic Yamaha SPX1000 Digital Multi-Effects Processor.
SPX Stage
Emulation of stage acoustics using an algorithm derived from the classic Yamaha SPX1000 Digital Multi-Effects Processor.
R3 Hall –
Emulation of the acoustics of a con-cert hall using an algorithm derived from the Yamaha ProR3 – a digital reverberator for professional-audio applications.
R3 Room –Emulation of room acoustics using an algorithm derived from the above-mentioned Yamaha ProR3.
R3 Plate –Emulation of plate reverb using an algorithm derived from the above-mentioned Yamaha ProR3.
EarlyRef – Early reflections without any subse-quent reverberation.
GateReverb – Simulation of gated reverb.
ReverseGate – Simulation of gated reverb played in reverse.
DTX700 Reference Manual 8

Internal Design of the DTX700
ChorusChorus reproduces the sound of multiple instruments play-ing in unison for a thicker, deeper tone. As all instruments differ slightly from each other in terms of pitch and phase, their playing together produces an overall sound that is warmer and more spacious. In order to reproduce this type of behavior, chorus effects make use of delay. Specifically, a delayed, second version of the original signal is produced and given a vibrato-type effect by varying its delay time over a period of approximately one second using an LFO. When this second version is mixed back into the original signal, the resulting tone sounds as if multiple instruments are being played in unison.
Tremolo & RotaryTremolo effects are characterized by the way in which they modulate volume in a cyclical fashion. An auto-pan effect, meanwhile, moves the sound from left to right in a similar cyclical manner, and a rotary speaker effect simulates the distinctive vibrato of rotary-type speakers often used with organs. In a rotary speaker, the horn and rotor are spun in order to create highly unique sounds using the Doppler Effect.
DelayDelay effects create a delayed version of the input signal, and as such, they can be used for many different purposes, such as creating a sense of spaciousness or thickening a sound.
MiscellaneousThis category contains effect types not included in the other categories.
Effect Type Var Cho Description
G Chorus Rich, deep chorus with complex mod-ulation.
2 Modulator Chorus effect allowing pitch and amplitude modulation to be adjusted for a more natural, spacious tone.
SPX Chorus Enhances modulation and spacious-ness using a 3-phase LFO.
Symphonic Multi-stage modulation for a wider-sounding chorus.
Ensemble – Modulation-free chorus achieved by adding a slightly pitch-shifted sound.
Effect Type Var Description
AutoPan Cyclically moves the sound between left and right channels.
Tremolo Cyclically modulates the volume of the pro-cessed signal.
RotarySp Rotary speaker simulator.
Effect Type Var Description
CrossDelay A pair of delays featuring cross-over feed-back to produce a sound that swirls between the left and right channels.
TempoCros-Dly
A pair of delays with cross-over feedback and a tempo-synchronized delay time.
TempoDly-Mono
A single mono delay synchronized with the instrument’s tempo.
TempoDlySt A stereo delay synchronized with the instru-ment’s tempo.
Delay LR A delay with separate left and right chan-nels.
Delay LCR A triple delay processing left, right, and cen-ter channels independently.
Delay LR St A stereo delay with fully independent left and right channels.
Effect Type Var Description
Isolator Controls the volume of individual frequency bands using powerful filters.
Telephone Reproduces the sound of telephone speech by cutting high and low frequencies.
TalkingMod Incorporates a vowel-type formant into the input signal.
PitchChange Changes the pitch of the input signal.
DTX700 Reference Manual 9

Internal Design of the DTX700
Effect ParametersEach of the above-mentioned effects includes a range of param-eters allowing you to adjust the way in which it processes the input signal. Using these parameters, the behavior of each effect can be optimized in line with, for example, the type of sound being processed or the type of music being played. While the function of each of these parameters is described in the fol-lowing table, it is good practice to also listen to how they actu-ally change the sound of the respective effect in order to achieve the best settings.
Parameters with identical namesNOTE
• Certain effects contain parameters with identical names yet performing different functions. In the following table, the function of each such parameter is described sepa-rately and the corresponding effects are identified.
Parameter name
Descriptions
AMDepthThis parameter is used to set the depth of ampli-tude modulation.
AmpTypeThis parameter is used to set the type of amplifier to be simulated.
AttackThis parameter is used to set the amount of time that elapses before compression is fully applied.
Bottom*1 This parameter is used to set the lowest point in the filter’s sweep range.
Color*2This parameter is used to set the fixed phase mod-ulation.
CommonRelThis parameter is used to set the amount of time that elapses before the compressor stops process-ing the input signal (common for all three bands).
CompresThis parameter is used to set the input-signal level at which the compressor starts to process the sound (i.e., the threshold).
CutoffThis parameter is used to set the offset value for the filter’s control frequency.
DelayThis parameter is used to set the delay time in terms of note lengths.
DelayCThis parameter is used to set the delay time for the center channel.
DelayLThis parameter is used to set the delay time for the left channel.
DelayL>RThis parameter is used to set the time that elapses between input of sound via the left channel and output via the right channel.
DelayRThis parameter is used to set the delay time for the right channel.
DelayR>LThis parameter is used to set the time that elapses between input of sound via the right channel and output via the left channel.
*1: The Bottom parameter’s setting is valid only when less than that
DTX700 Reference Manual 10
of the Top parameter.
*2: The Color parameter’s setting has no effect with certain combi-nations of Mode and Stage settings.
Density
[Reverb effects other than EarlyRef]This parameter is used to set the reverb density.
[Early Ref]This parameter is used to set the density of early reflections.
DepthThis parameter is used to set the amplitude of the LFO wave that controls cyclic changes in phase modulation.
DetuneThis parameter is used to set the degree to which pitches are detuned.
DeviceThis parameter is used to select one of a number of devices that distort the sound in different ways.
Diffuse
[TempoPhaser and EarlyRef]This parameter is used to adjust the spaciousness of the sound produced.
[Reverb effects other than EarlyRef]This parameter is used to set how wide the reverb sounds.
DirectnThis parameter is used to set the direction of enve-lope-follower modulation.
Div.FreqHThis parameter is used to set the mid-high fre-quency when splitting the sound into three bands.
Div.FreqLThis parameter is used to set the low-mid fre-quency when splitting the sound into three bands.
DlyLvlCThis parameter is used to set the delay volume for the center channel.
DlyMixThis parameter is used to set the mixing level for the delayed sound.
DlyOfstThis parameter is used to set the modulation delay time’s offset value.
DriveThis parameter is used to set the degree to which the effect is applied.
DriveHornThis parameter is used to set the depth of modula-tion produced through rotation of the high-fre-quency horn.
DriveRotorThis parameter is used to set the depth of modula-tion produced through rotation of the low-frequency rotor.
DstL.GainThis parameter is used to set the degree by which the low frequencies from the distorted sound are boosted or cut.
DstM.GainThis parameter is used to set the degree by which the mid frequencies from the distorted sound are boosted or cut.
EdgeThis parameter is used to specify a curve that determines how the sound is distorted.
EQ1FreqThis parameter is used to set the cutoff frequency for the EQ1 band (i.e., low shelving).
EQ1GainThis parameter is used to set the gain for the EQ1 band (i.e., low shelving).
EQ2FreqThis parameter is used to set the center frequency for the EQ2 band.
EQ2GainThis parameter is used to set the gain for the EQ2 band.
EQ2QThis parameter is used to set the resonance of the EQ2 band.
EQ3FreqThis parameter is used to set the center frequency for the EQ3 band.
EQ3GainThis parameter is used to set the gain for the EQ3 band.
Parameter name
Descriptions

Internal Design of the DTX700
EQ3QThis parameter is used to set the resonance of the EQ3 band.
EQ4FreqThis parameter is used to set the center frequency for the EQ4 band.
EQ4GainThis parameter is used to set the gain for the EQ4 band.
EQ4QThis parameter is used to set the resonance of the EQ4 band.
EQ5FreqThis parameter is used to set the cutoff frequency for the EQ5 band (i.e., high shelving).
EQ5GainThis parameter is used to set the gain for the EQ5 band (i.e., high shelving).
ER/RevThis parameter is used to set the relative volumes of early reflections and reverberation.
F/RDpthThis parameter is used to set the front-to-rear pan depth (and is valid only when PanDirectn is set to “Lturn” or “Rturn”).
FBHiDmpThis parameter is used to set how the feedback sound decays in the high-frequency band (with smaller values corresponding to faster decay).
FBLevel
[Chorus effects, Delay effects, and TempoFlanger]This parameter is used to set how much of the delay sound is fed back into the effect’s input (with negative values indicating that its phase is to be inverted).
[TempoPhaser]This parameter is used to set how much of the phaser’s output is fed back into its input (with nega-tive values indicating that its phase is to be inverted).
[Reverb effects]This parameter is used to set the initial delay’s feed-back level.
FBLvl1This parameter is used to set the feedback level for the first delay sound.
FBLvl2This parameter is used to set the feedback level for the second delay sound.
FBTimeThis parameter is used to set the feedback delay time.
FBTime1This parameter is used to set the delay time for feedback delay 1.
FBTime2This parameter is used to set the delay time for feedback delay 2.
FBTimeLThis parameter is used to set the delay time for the left feedback delay.
FBTimeRThis parameter is used to set the delay time for the right feedback delay.
FeedbackThis parameter is used to set how much of the effect’s output is fed back into its input.
Fine1This parameter is used to adjust the first fine-pitch setting.
Fine2This parameter is used to adjust the second fine-pitch setting.
H.FreqThis parameter is used to set the center frequency of the high-frequency EQ band.
H.GainThis parameter is used to set the amount by which the high-frequency EQ band is boosted or cut.
HeightThis parameter is used to set the height of the simu-lated room.
Parameter name
Descriptions
HiAtkThis parameter is used to set the amount of time that elapses before compression is fully applied in the high-frequency band.
HiGainThis parameter is used to set the output level of the high-frequency band.
HiLvlThis parameter is used to set the high-frequency level.
HiMuteThis parameter is used to activate and deactivate high-frequency muting.
HiRat
[MltBndComp]This parameter is used to set the compression ratio for the high-frequency band.
[Reverb effects]This parameter is used to adjust the high-fre-quency component.
HiThThis parameter is used to set the input-signal level at which the compressor starts to process the sound in the high-frequency band.
HornFThis parameter is used to set the speed of rotation of the high-frequency horn at the “fast” setting.
HornSThis parameter is used to set the speed of rotation of the high-frequency horn at the “slow” setting.
HPFThis parameter is used to set the high-pass filter’s cutoff frequency.
InitDlyThis parameter is used to set the amount of time that elapses before early reflections are produced.
InitDly1This parameter is used to set the delay time for the first delay.
InitDly2This parameter is used to set the delay time for the second delay.
InitDlyLThis parameter is used to set the delay time for the left-channel delay.
InitDlyRThis parameter is used to set the delay time for the right-channel delay.
InpModeThis parameter is used to switch between mono and stereo input.
InpSelect This parameter is used to select an input.
L.FreqThis parameter is used to set the center frequency of the low-frequency EQ band.
L.GainThis parameter is used to set the amount by which the low-frequency EQ band is boosted or cut.
L/RDiffuseThis parameter is used to set the difference between left and right delay times in order to pro-duce a more spacious sound.
L/RDpthThis parameter is used to set the depth of the left-right panning effect.
LagThis parameter is used to set a time lag for delay times specified in terms of note lengths.
LFODpth
[SPX Flanger, TempoFlanger, SPX Chorus, and Symphonic]This parameter is used to set the depth of modula-tion.
[Tempo Phaser]This parameter is used to set the depth of phase modulation.
LFODiffThis parameter is used to set the left-right phase difference between modulation waveforms.
Parameter name
Descriptions
DTX700 Reference Manual 11

Internal Design of the DTX700
LFOSpeed
[TempoFlanger, G Chorus, 2 Modulator, SPX Cho-rus, Symphonic, and Tremolo]This parameter is used to set the modulation fre-quency.
[TempoPhaser]This parameter is used to set the modulation speed in terms of note lengths.
[AutoPan]This parameter is used to set the auto-pan fre-quency.
LFOWave
[AutoWah]This parameter is used to specify whether the filter-sweep effect is produced using a sine or square wave.
[AutoPan]This parameter is used to set the panning curve.
LivenssThis parameter is used to set the way in which early reflections decay.
LowAtkThis parameter is used to set the amount of time that elapses before compression is fully applied in the low-frequency band.
LowGainThis parameter is used to set the output level of the low-frequency band.
LowLvlThis parameter is used to set the low-frequency level.
LowMuteThis parameter is used to activate and deactivate low-frequency muting.
LowRat
[MltBndComp]This parameter is used to set the compression ratio for the low-frequency band.
[Reverb effects]This parameter is used to adjust the low-frequency component.
LowThThis parameter is used to set the input-signal level at which the compressor starts to process the sound in the low-frequency band.
LPFThis parameter is used to set the low-pass filter’s cutoff frequency.
M.FreqThis parameter is used to set the center frequency of the mid-frequency EQ band.
M.GainThis parameter is used to set the amount by which the mid-frequency EQ band is boosted or cut.
M.WidthThis parameter is used to set the width of the mid-frequency EQ band.
ManualThis parameter is used to set the phase-modula-tion offset value.
MicAnglThis parameter is used to set the left-right inclina-tion of the microphone used to capture the speaker’s output.
MidAtkThis parameter is used to set the amount of time that elapses before compression is fully applied in the mid-frequency band.
MidGainThis parameter is used to set the output level of the mid-frequency band.
MidLvlThis parameter is used to set the mid-frequency level.
MidMuteThis parameter is used to activate and deactivate mid-frequency muting.
MidRatThis parameter is used to set the compression ratio for the mid-frequency band.
Parameter name
Descriptions
MidThThis parameter is used to set the input-signal level at which the compressor starts to process the sound in the mid-frequency band.
MixLvlThis parameter is used to set how much of the effect sound is mixed back into the dry sound.
ModeThis parameter is used to adjust the mode of oper-ation of the phaser.
MoveSpeedThis parameter is used to specify the amount of time that elapses until the sound set using the Vowel parameter is produced.
On/OffThis parameter is used to activate and deactivate the isolator.
OutLvl This parameter is used to set the output level.
OutLvl1This parameter is used to set the first-stage output level.
OutLvl2This parameter is used to set the second-stage output level.
Output This parameter is used to set the output level.
OverDrThis parameter is used to adjust the way in which the sound distorts.
Pan1This parameter is used to set the first stereo-pan-ning position.
Pan2This parameter is used to set the second stereo-panning position.
PanDirectn This parameter is used to set the auto-pan type.
PhShiftOfstThis parameter is used to set the phase-modula-tion offset value.
Pitch1This parameter is used to set the first pitch in semi-tone units.
Pitch2This parameter is used to set the second pitch in semi-tone units.
PMDepthThis parameter is used to set the depth of pitch modulation.
PresencOften seen on guitar amplifiers and the like, this parameter is used to control the high-frequency band.
RatioThis parameter is used to set the compression ratio.
ReleaseThis parameter is used to set the amount of time that elapses until the sound is no longer being compressed.
ResonanceThis parameter is used to set the resonance of the filter.
ResoOfstThis parameter is used to set the resonance offset value.
RevDlyThis parameter is used to set the interval between early reflections and subsequent reverberation.
RevTime This parameter is used to set the reverb time.
RoomSize This parameter is used to set the size of the room.
Rotor/HornThis parameter is used to set the relative volumes of the high-frequency horn and the low-frequency rotor.
RotorFThis parameter is used to set the speed of rotation of the low-frequency rotor at the “fast” setting.
RotorSThis parameter is used to set the speed of rotation of the low-frequency rotor at the “slow” setting.
SensThis parameter is used to set how sensitive the wah filter is to changes in the input level.
Parameter name
Descriptions
DTX700 Reference Manual 12

Internal Design of the DTX700
*3: The Top parameter’s setting is valid only when equal to or greater than that of the Bottom parameter.
DTX700 Internal MemoryBy storing kits, songs, and waves that you have created and edited in the DTX700’s internal memory, you ensure that they will be always available for use, even after the instrument has been turned off. In addition, trigger setups and the settings from the Menu area’s Utility pages can also be stored in memory for reuse.
Data Retained by the DTX700The following types of setting data can be stored in the DTX700’s internal memory.
• Kits• Songs• Waves• Trigger setups• Other utility settings
NOTE• Whenever data files are saved and loaded or waves and
MIDI files are imported, the corresponding data is automati-cally stored in memory. Settings cannot be stored for a cer-tain number of parameters.
Saving & Loading Data FilesAll of the above-mentioned items of data that can be stored in the DTX700’s internal memory can also be saved as files on a USB storage device. Whenever needed, furthermore, these memory files can be loaded back into the drum trigger module from the storage device. For details, see the description of the File pages from the Menu area (see page 57).
S-FTmHornThis parameter is used to set how long it takes for the high-frequency horn to switch between fast and slow rotation speeds.
S-FTmRotorThis parameter is used to set how long it takes for the low-frequency rotor to switch between fast and slow rotation speeds.
SpeakerThis parameter is used to select the type of speaker to be simulated.
Speed
[PhaserMono and PhaserStereo]This parameter is used to set the frequency of the LFO that controls cyclic changes in phase modula-tion.
[AutoWah]This parameter is used to set the LFO speed.
SpeedCtrlThis parameter is used to set the rotation speed as “fast” or “slow”.
SpreadThis parameter is used to set how wide the effect’s output sounds.
StageThis parameter is used to set the number of phase-filter steps.
ThreshThis parameter is used to set the input-signal level at which the effect starts to process the sound.
Top*3 This parameter is used to set the highest point in the filter’s sweep range.
Type
[Wah effects]This parameter is used to set the wah-effect type.
[EarlyRef, GateReverb, and ReverseGate]This parameter is used to set the reflected-sound type.
Vowel This parameter is used to select a vowel type.
Parameter name
Descriptions
DTX700 Reference Manual 13

Cursor Operations on Menu Area Pages
The way in which the cursor is displayed and oper-ated on Menu area pages differs from that of other pages.Navigation pages
When you turn the dial on navigation-type pages, the cursor (i.e., the inverted text) moves in the corresponding direction.
By pressing the dial, you can move one level further into the Menu area.
To move back one step towards the top page, press the [EXIT] button.
Parameter pages
When you turn the dial on parameter-type pages, the cursor (i.e., the inverted text) moves up and down within the displayed list.
When you press the dial, the cursor will zoom in on the value on the right.
In this condition, you can turn the dial to change the value selected by the cursor.
When you press the dial again, the cursor will zoom out to select the entire row.
DTX700 Reference Manual 14

KIT
: The current kit number is reduced by 1.
: The current kit number is increased by 1.
: The current kit number is locked.
NOTE• If you hold down the [SHIFT] button and press the [F1] or [F2]
button, the current kit number will be reduced or increased in units of 10.
• See page 14 for details regarding cursor operations on Menu area pages.
KIT/COMMON
List of Functions
Volume
Use this parameter to set the volume of the entire kit.
Settings: 0 to 127
NOTE• If you change the Volume parameter setting for MIDI channel
10 on the Menu area’s Kit/MIDI/Other page, the Volume parameter on this page will be automatically set to the same value. The reverse does not apply, however – in other words, the Volume parameter for MIDI channel 10 from the Menu area’s Kit/MIDI/Other page is not affected by changes made on this page.
Tempo
Use this parameter to specify the tempo to be set automatically upon selection of the current drum kit. An “off” setting means that the tempo will not change automatically when the current kit is selected – in other words, the tempo of the previously selected kit is maintained.
Settings: off, 30 to 300
NOTE• If waves are assigned to any of the kit’s pads, the tempo (or
speed) at which they are played will not be affected by the kit’s tempo setting.
Trigger Setup Link (TrgSetupLink)
Use this parameter to specify the trigger setup to be used when the current kit is selected. A trigger setup can be assigned to each different drum kit. Select “off” if the currently selected drum kit does not need a special trigger setup.
Settings: off, 1 to 20
Name
Use this parameter to set a name for the currently-selected kit. A name of up to 12 characters in length can be assigned to drum kits.
Setting a Kit Name
1. Press the dial to call up the kit naming page.
2. Move the cursor within the name field using the [F1] and [F3] buttons and select a character for that position by turning the dial or pressing the [-/DEC] and [+/INC] but-tons. The following characters can be used.
NOTE• If you hold down the [SHIFT] button and press the [F1]
or [F3] button, the cursor will move to the start or end of the kit name field.
• If you hold down the [SHIFT] button and press the [-/DEC] or [+/INC] button, or alternatively, hold down the [SHIFT] button and turn the dial, the cursor will jump between the “ ”, “0”, “A”, “a”, and “~” characters.
3. When you have entered the required name, press the dial or the [EXIT] button to return to the previous page.
4. Press the [STORE] button and the dial to store your new setting.
For settings affecting entire kits
KIT/COMMON
CommonVolumeTempoTrgSetupLinkNameIcon
DTX700 Reference Manual 15

KIT
Icon
An artist’s impression of what the current kit might look like can be displayed on the right of the Kit page (accessed using the [KIT] button). Using the Icon parameter, you can change the illustration used for the kit. In addition, you can also select “off” to display no icon.
Settings: Acoustic, Rock, Electric, Percuss, RhythmBox, Effect, R&B/H-HOP, PadSong, off
KIT/VOICE
List of Functions
The makeup of the Kit/Voice page depends on the currently selected voice among other settings.
• If a voice (i.e., not a song or MIDI note number) has been selected for the current pad (see page 17):
• If a song has been selected for the current pad (see page 17):
• If a MIDI note number has been selected directly (see page 18):
For voice-related settings
KIT/VOICE 1/6
VoiceVoiceCategoryVoiceNumberTuneNoteVolumePanAttackDecayReleaseFilterQVarSend(Dry)ChoSendRevSendMono/PolyAltGroupSliderSelect
DTX700 Reference Manual 16

KIT
[Page displayed when a voice has been selected for the current pad]
q Current pad
This indicates the pad for which voice settings are being made. You can change the current pad either by hitting a different one or by pressing the [F1] button (PAD) to open the popup window and turning the dial to make a selection.
PAD
This button is used to select the current pad. When pressed, a popup window will appear, and you can then turn the dial to change the pad. Press the [EXIT] button to return from the popup window. You can also strike a pad to select it. Instead of selecting a pad, meanwhile, you can specify a MIDI note number directly.
Settings: SnareHd, SnareOp, SnareCl, SnrHdOff, SnrOpOff, SnrClOff, Tom1Hd, Tom1Rm1, Tom1Rm2, Tom2Hd, Tom2Rm1, Tom2Rm2, Tom3Hd, Tom3Rm1, Tom3Rm2, RideBw, RideEg, RideCp, Crash1Bw, Crash1Eg, Crash1Cp, Crash2Bw, Crash2Eg, Crash2Cp, HHBwOp, HHEgOp, HHBwCl, HHEgCl, HHFtCl, HHSplsh, Kick, Pad10, Pad11Hd, Pad11Rm1, Pad11Rm2, HHKick, C#-1 to A#5
+ PAD LOCK
This button combination is used to fix the pad indicated by q. This means that you can play other pads without changing the current selection.
LAYER
This button is used to select the layer you wish to set. Each pad comprises up to four layers, each of which can be used to play a different voice.
NOTE• On this page, layers can be selected for a pad only when a
MIDI note number has been assigned to more than one of them using the Note parameter from the Menu area’s Kit/MIDI/Assign page.
AUDITION
This button can be pressed to hear the set voice without having to play the pad.
VoiceCategory
Use this parameter to specify the category from which a voice will be assigned. In addition, you can also indicate that a song or wave is to be assigned.
Settings: Kick, Snare1, Snare2, Tom1, Tom2, Cymbal, Hi-Hat, Lat-inPerc, AsiaPerc, AfrcArbcPerc, OrchPerc, ElectricPerc, EFX, Melody, Wave, e Song
VoiceNumber
Use this parameter to specify the number of the voice to be assigned.
[Page displayed when a song has been selected for the current pad]
PLAYMODE (Song Playback Mode)
This button is used to set a playback mode when a song has been assigned to the current pad.
NOTE• Up to three songs can be played simultaneously.
• If the VoiceCategory parameter is set to “eSong”, no other pan-els will be displayed for this page.
q
Play: The song will start playing from the begin-ning.
Chase: One successive measure of the song will be played each time you strike the pad.
Cut-off: Only one song set to this mode can play at any time. In other words, whenever a cut-off mode song is triggered, any other song already playing in this mode will be automatically stopped.
DTX700 Reference Manual 17

KIT
[Page displayed when a MIDI note number has been selected directly using the [F1] button (PAD)]
NOTE• The VoiceCategory parameter cannot be set to “eSong” when
a MIDI note number is selected directly.
The parameter used for tuning will depend on the type of voice assigned to the current pad.
[Drum sounds or waves (i.e., imported audio files)]
[When VoiceCategory is “Melody”]
Tuning (Tune)
Use this parameter to adjust the tuning of the assigned voice in one-cent steps (0.01 = 1 cent)
Settings: -24.00 to +0.00 to +24.00
NOTE• A cent is a unit of pitch defined as one hundredth of a semi-
tone. (100 cents = 1 semitone)
Note
Use this parameter to set the pitch of the assigned voice as a MIDI note number.
Settings: C-2 to G8
Volume
Use this parameter to set the volume of the voice.
Settings: 0 to 127
Voice Panorama (Pan)
Use this parameter to set the stereo pan of the voice.
Settings: L63 to C to R63
The following parameters are used to adjust the tone of the voice.
Attack Time (Attack)
Use this parameter to set the amount of time it takes from when the pad is struck until the assigned voice reaches its peak volume.
Settings: -64 to +0 to +63
Decay Time (Decay)
Use this parameter to set the amount of time it takes the voice to drop to a steady level after reaching its peak level.
Settings: -64 to +0 to +63
Release Time (Release)
Use this parameter to set the amount of time it takes for the voice to fade out after sending a MIDI Note Off message.
Settings: -64 to +0 to +63
NOTE• MIDI Note Off messages are not sent for pads and layers for
which the RcvKeyOff (Receive Key Off) parameter from the Menu area’s Kit/MIDI/Assign page is set to “off”. Therefore, the release-time setting has no effect in such a case.
• With certain types of voices, modifying the tone parameters above will have very little effect.
KIT/VOICE 2/6
KIT/VOICE 3/6
DTX700 Reference Manual 18

KIT
Filter Cutoff Frequency (Filter)
Use this parameter to set a cutoff frequency for the low-pass fil-ter. Frequencies above this level will be removed from the selected voice.
Settings: -64 to +0 to +63
Filter Resonance (Q)
Use this parameter to change the timbre of the voice by boosting frequencies around the cutoff frequency.
Settings: -64 to +0 to +63
Using the following parameters, you can adjust the degree to which the DTX700’s built-in variation, cho-rus, and reverb effects are applied to individual voices.
Variation Send Level (VarSend(Dry))
Use this parameter to specify how much of the sound produced by the voice will be sent to the variation effect. (The dry level is shown in parentheses.)
Settings: 0 to 127
NOTE• If layers have been set for the current voice, you can set a
send level for each one.
Chorus Send Level (ChoSend)
Use this parameter to specify how much of the sound produced by the voice will be sent to the chorus effect.
Settings: 0 to 127
NOTE• The chorus send level for the entire kit can be adjusted using
the ChoSend (Chorus Send Level) parameter from the Menu area’s Kit/Effect/Mixer page.
• If layers have been set for the current voice, you can set a send level for each one.
Reverb Send Level (RevSend)
Use this parameter to specify how much of the sound produced by the voice will be sent to the reverb effect.
Settings: 0 to 127
NOTE• The reverb send level for the entire kit can be adjusted using
the Reverb Send Level (RevSend) parameter from the Menu area’s Kit/Effect/Mixer page.
• If layers have been set for the current voice, you can set a send level for each one.
Polyphony (Mono/Poly)
Use this parameter to specify how overlapping sounds from the same pad will be treated.
Settings: mono, poly
KIT/VOICE 4/6
KIT/VOICE 5/6 KIT/VOICE 6/6
monoWhen two overlapping sounds are produced by striking the same pad, the latter sound is given pri-ority and the earlier sound is silenced.
polyNo such restriction applies and all overlapping sounds are output.
DTX700 Reference Manual 19

KIT
DTX700 Reference Manual 20
Alternate Group (AltGroup)
Use this parameter to assign voices to alternate groups (i.e., monophonic sets of pads, only one of which can be producing a sound at any time). If you do not want various individual voices to be played together, they should be assigned to the same alter-nate group. Whenever voices from the same alternate group are triggered by playing the pads, the latter voice is given priority and the earlier one is silenced. Set this parameter to “off” if you do not want to assign to an alternate group.
Settings: off, hhOpen, hhClose, 1 to 124
NOTE• The “hhOpen” and “hhClose” alternate groups operate in a
special way: If a voice from the “hhClose” group is triggered after a voice from the “hhOpen” group, the hhOpen voice is silenced and only the hhClose voice is played. No silencing of the earlier sound is performed for any other triggering sequence (for example, hhOpen followed by hhOpen; hhClose followed by hhOpen; or hhClose followed by hhClose).
SliderSelect
Use this parameter to select the slider for controlling the volume of the current pad’s voices.
Settings: kick, snare, tom, cymbal, hihat, no asg (selected when no assignment is required)
KIT/MIDI
List of Functions
MessageType
Use this parameter to set the type of MIDI message that will be sent whenever the current pad is struck.
For MIDI-related settings
KIT/MIDI/ASSIGN 1/5
noteA MIDI note will be sent. Use this setting if you wish to produce a sound by striking the pad.
CC A Control Change message will be sent.
PC A Program Change message will be sent.
startA sysex Start command (hexadecimal FA) will be sent.
continueA sysex Continue command (hexadecimal FB) will be sent.
stopA sysex Stop command (hexadecimal FC) will be sent.
MIDIAssign
MessageTypeModeNoteMIDI ChGateTimeRcvKeyOffTrgLinkMaskTimeVelLimitLoVelLimitHiVelCrossFadeTrgVelTrgMonoPolyTrgAltGrp
TG MIDI SwTG SwitchMIDI Switch
OtherTransmitVolumePanMSBLSBPCVarSend(Dry)ChoSendRevSendCC NoCC Val

KIT
Playing Mode (Mode)
Use this parameter to set Stack, Alternate, or Hold as the playing mode for the current pad.
Settings: stack, alternate, hold
NOTE• If no note numbers have been assigned to any of the pad’s lay-
ers (A to D) using the Note parameter (also from the Menu area’s Kit/MIDI/Assign page), this setting will be displayed as “---” and modification will not be possible.
Note
Use this parameter to select a MIDI note to be sent by the current layer. You can also choose either of the following two special set-tings.
Settings: off, C#-2/1 to F#8/126, skip
NOTE• Voices cannot be assigned to any note numbers on MIDI chan-
nel 10 that are displayed in parentheses – for example, “(C#-2/1)”. If one of these numbers is selected, therefore, the settings for the VoiceCategory and VoiceNumber parameters from the Menu area’s Kit/Voice page will be displayed as “---”.
• Notes on MIDI channel 10 having already been assigned to a layer will be displayed with an asterisk in front of them – for example, “*C3”.
MIDI Channel (MIDI Ch)
Use this parameter to set the MIDI channel for the current layer’s MIDI messages.
Settings: 1 to 16
NOTE• If no note numbers have been assigned to any of the pad’s lay-
ers (see page 4), this setting will be displayed as “---” and modification will not be possible.
KIT/MIDI/ASSIGN 2/5
stack
When Stack mode is selected, all notes assigned to the pad are triggered simultaneously. For example, you can use this mode to produce chords or to trig-ger multiple voices and waves with a single strike. To produce just a single sound, select this mode and assign only one voice to the pad.
alternate
When Alternate mode is selected, the notes assigned to the pad are played individually in turn each time it is struck. For example, you can use this mode to produce a different sound each time you strike the pad.
alternate
When Hold mode is selected, the notes assigned to the pad are alternately turned on and off each time it is struck. If, for example, a sustained sound has been assigned, the first strike of the pad will turn it on, the next strike will turn it off, and so on.
offRegardless of the current setting of the Mode parameter, no MIDI note is sent when the pad is struck.
skip
If “alternate” has been selected for the Mode param-eter, this layer will be skipped. In other words, no MIDI note will be sent when it is this layer’s turn to play. Alternatively, if “stack” or “hold” has been selected for the Mode parameter, this setting has the same effect as “off” above (i.e., no MIDI note will be sent for this layer).
DTX700 Reference Manual 21

KIT
GateTime
Use this parameter to set a gate time for MIDI notes sent for the current layer. A MIDI Note On message is sent when a pad is struck, and the corresponding Note Off message is sent a short time later. The duration between sending of these signals is referred to as the “gate time”, and by adjusting this setting, you can control the duration of MIDI notes.
Settings: 0.0s to 9.9s
NOTE• If no note numbers have been assigned to any of the pad’s lay-
ers (A to D) using the Note parameter (also from the Menu area’s Kit/MIDI/Assign page), this setting will be displayed as “---” and modification will not be possible.
• If the Mode parameter (also from the Menu area’s Kit/MIDI/Assign page) has been set to “hold”, this setting will be dis-played as “---” and modification will not be possible.
• MIDI Note Off messages are not sent for pads and layers for which the RcvKeyOff (Receive Key-off) parameter (also from the Menu area’s Kit/MIDI/Assign page) is set to “off”. If you wish to set a gate time, therefore, be sure to set RcvKeyOff to “on”.
Receive Key-off (RcvKeyOff)
Use this parameter to specify whether or not MIDI Note Off mes-sages are to be sent for the current layer. Most drum voices are one-shot sounds that decay quickly over time until they become silent; therefore, MIDI Note Off messages are not needed to stop them. As such, this parameter should normally be set to “off”. If, however, a non-decaying sound is assigned to a pad or layer, you can ensure that the required MIDI Note Off message is sent by setting this parameter to “on”. In addition, you can use the Gate-Time parameter (also from the Menu area’s Kit/MIDI/Assign page) to adjust the amount of time that passes between striking of the pad and sending MIDI Note Off messages.
Settings: off, on
NOTE• Sending of MIDI Note Off messages occurs automatically
whenever a MIDI Channel other than 10 has been selected for the pad or layer. In such a case, therefore, this setting will be displayed as “---” and modification will not be possible.
Trigger Link (TrgLink)
Use this parameter to specify which of the pad’s other triggers you wish to generate automatically when the current one is struck. Select “off” to generate only the current trigger. Note that the available settings will depend on the trigger currently being set.
Settings: off, rim1, rim2, rim1&2, head, bow, Pad10
MaskTime
Use this parameter to specify the amount of time to wait after generating the current trigger before it can be generated again. When set to “2.0s”, for example, the DTX700 ignores the trigger for two seconds after you hit the corresponding pad or zone.
Settings: off, 20ms to 30.00s
Velocity Limit: Low (VelLimitLo)Velocity Limit: High (VelLimitHi)
Use these parameters to set the range of velocities within which the current layer will send a MIDI Note On message. The term “velocity” refers to the speed (or power) with which a pad is struck. By setting upper and lower limits using these parameters, you can prevent sounds from being produced when the pad is struck too hard or too soft.
Settings: 0 to 127
Velocity Cross Fade (VelCrossFade)
Use this parameter to specify how quickly velocity levels fall off beyond the velocity limits. With a setting of “0”, for example, no sound whatsoever will be produced for velocities outside the range defined by the limits. As you increase this setting, the edges of the range become less abrupt.
Settings: 0 to 127
KIT/MIDI/ASSIGN 3/5
KIT/MIDI/ASSIGN 4/5
DTX700 Reference Manual 22

KIT
DTX700 Reference Manual 23
Trigger Velocity (TrgVel)
Use this parameter to control the velocity value of MIDI notes sent when the current pad is struck.
Settings: variable, 1 to 127
NOTE• If no note numbers have been assigned to any of the pad’s lay-
ers (A to D) using the Note parameter (also from the Menu area’s Kit/MIDI/Assign page), this setting will be displayed as “---” and modification will not be possible.
• No sound will be produced if you set this parameter to a value outside the range of velocities set by the VelLimitLo (Velocity Limit: Low) and VelLimitHigh (Velocity Limit: High) parameters (also from the Menu area’s Kit/MIDI/Assign page).
Trigger Mono/Poly (TrgMonoPoly)
Use this parameter to control what happens when the current pad is struck repeatedly in quick succession. If set to “mono”, the pre-vious sound will be stopped before a new sound starts. If set to “poly”, meanwhile, previous sounds will not be stopped before a new sound starts.
Settings: mono, poly
NOTE• If no note numbers have been assigned to any of the pad’s lay-
ers (A to D) using the Note parameter (also from the Menu area’s Kit/MIDI/Assign page), this setting will be displayed as “---” and modification will not be possible.
• MIDI Note Off messages are not received for pads and layers for which the RcvKeyOff (Receive Key-off) parameter (also from the Menu area’s Kit/MIDI/Assign page) is set to “off”. If you wish to set trigger monophony (“mono”), therefore, be sure to set RcvKeyOff to “on”. This will ensure that Note Off messages are sent to prevent overlapping voices.
Trigger Alternate Group (TrgAltGrp)
Use this parameter to assign the current pad to a trigger alternate group if so required. Alternate groups are monophonic sets of pads, and therefore, only one pad from an alternate group can be producing a sound at any time. If a pad is struck while another pad from the same alternate group is already producing a sound, a MIDI Note Off message will be sent for the first pad together with the MIDI Note On message for the second. In order to use trigger alternate groups with voices played on MIDI channel 10, the sending of MIDI Note Off messages must be enabled by selecting “on” for the RcvKeyOff (Receive Key-off) parameter (also from the Menu area’s Kit/MIDI/Assign page). Up to 32 trig-ger alternate groups can be set up on your DTX700. If there is no need for a pad to be assigned to a trigger alternate group, you can set this parameter to “off”.
Settings: off, 1 to 32
NOTE• If no note numbers have been assigned to any of the pad’s lay-
ers (A to D) using the Note parameter (also from the Menu area’s Kit/MIDI/Assign page), this setting will be displayed as “---” and modification will not be possible.
On the TG MIDI Switch page, you can set up each of the DTX700’s MIDI channels for sending to the instrument’s internal tone generator, to external MIDI devices, or to both.
q MIDI Channel (Ch)
Use this parameter to select the current MIDI channel number.
Settings: 1 to 16
Tone Generator Switch (TG Switch)
Use this parameter to indicate whether MIDI messages produced by playing pads and changing drum kits should be sent to the internal tone generator. (Choose “on” to send to the DTX700’s tone generator.)
Settings: off, on
MIDI Switch
Use this parameter to indicate whether MIDI messages produced by playing pads and changing drum kits should be output via the [MIDI OUT] connector on the rear panel or the [USB TO HOST] port on the side panel. (Choose “on” to output.)
Settings: off, on
KIT/MIDI/ASSIGN 5/5
variableMIDI velocity values will reflect the strength with which the pad is struck.
1 to 127MIDI notes are sent with this fixed velocity value, regardless of how hard or soft the pad is struck.
KIT/MIDI/TG MIDI SW
q
KIT
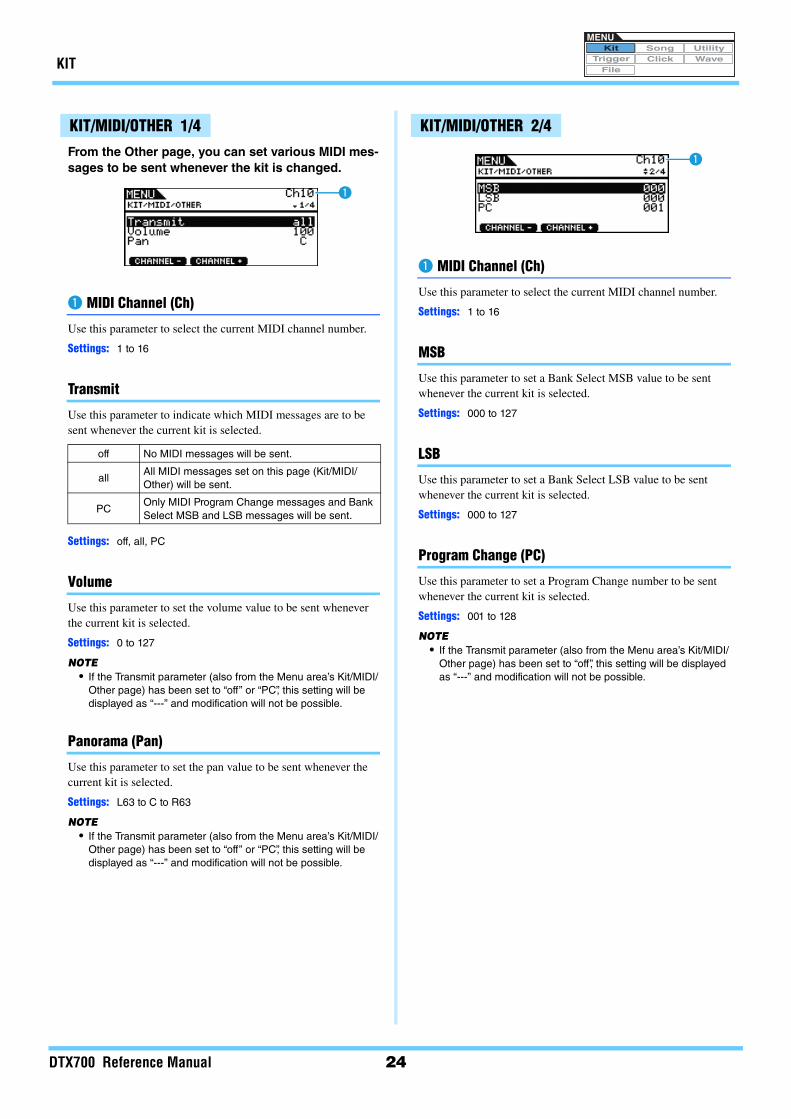
From the Other page, you can set various MIDI mes-sages to be sent whenever the kit is changed.
q MIDI Channel (Ch)
Use this parameter to select the current MIDI channel number.
Settings: 1 to 16
Transmit
Use this parameter to indicate which MIDI messages are to be sent whenever the current kit is selected.
Settings: off, all, PC
Volume
Use this parameter to set the volume value to be sent whenever the current kit is selected.
Settings: 0 to 127
NOTE• If the Transmit parameter (also from the Menu area’s Kit/MIDI/
Other page) has been set to “off” or “PC”, this setting will be displayed as “---” and modification will not be possible.
Panorama (Pan)
Use this parameter to set the pan value to be sent whenever the current kit is selected.
Settings: L63 to C to R63
NOTE• If the Transmit parameter (also from the Menu area’s Kit/MIDI/
Other page) has been set to “off” or “PC”, this setting will be displayed as “---” and modification will not be possible.
q MIDI Channel (Ch)
Use this parameter to select the current MIDI channel number.
Settings: 1 to 16
MSB
Use this parameter to set a Bank Select MSB value to be sent whenever the current kit is selected.
Settings: 000 to 127
LSB
Use this parameter to set a Bank Select LSB value to be sent whenever the current kit is selected.
Settings: 000 to 127
Program Change (PC)
Use this parameter to set a Program Change number to be sent whenever the current kit is selected.
Settings: 001 to 128
NOTE• If the Transmit parameter (also from the Menu area’s Kit/MIDI/
Other page) has been set to “off”, this setting will be displayed as “---” and modification will not be possible.
KIT/MIDI/OTHER 1/4
off No MIDI messages will be sent.
allAll MIDI messages set on this page (Kit/MIDI/Other) will be sent.
PCOnly MIDI Program Change messages and Bank Select MSB and LSB messages will be sent.
q
KIT/MIDI/OTHER 2/4
q
DTX700 Reference Manual 24

KIT
Using the following parameters, you can adjust the send level to be set for each of the effect units when the current kit is selected.
q MIDI Channel (Ch)
Use this parameter to select the current MIDI channel number.
Settings: 1 to 16
Variation Send Level (VarSend(Dry))
Use this parameter to set the variation-effect send level to be sent whenever the current kit is selected.
Settings: 0 to 127
NOTE• If the above MIDI channel (Ch) is set to 10, this setting will be
displayed as “---” and modification will not be possible.
Chorus Send Level (ChoSend)
Use this parameter to set the chorus send level to be sent when-ever the current kit is selected.
Settings: 0 to 127
Reverb Send Level (RevSend)
Use this parameter to set the reverb send level to be sent when-ever the current kit is selected.
Settings: 0 to 127
q MIDI Channel (Ch)
Use this parameter to select the current MIDI channel number.
Settings: 1 to 16
Control Change Number (CC No)
Use this parameter to set the type of MIDI Control Change mes-sage to be sent whenever the current kit is selected. No Control Change messages are sent when “off” is set.
Settings: off, 1 to 95
Control Change Valve (CC Val)
Use this parameter to set a value for the MIDI Control Change message sent whenever the current kit is selected.
Settings: 0 to 127
NOTE• If the Transmit parameter (also from the Menu area’s Kit/MIDI/
Other page) has been set to “off” or “PC”, this setting will be displayed as “---” and modification will not be possible.
• If the type of MIDI Control Change message set here matches one of the following Control Change message types (also set on the Menu area’s Kit/MIDI/Other page), this parameter’s set-ting will have priority.
Volume, Pan, VarSend(Dry), ChoSend, and RevSend
KIT/MIDI/OTHER 3/4
q
KIT/MIDI/OTHER 4/4
q
DTX700 Reference Manual 25

KIT
DTX700 Reference Manual 26
KIT/EFFECT
List of Functions
Variation Return (VarReturn)
Use this parameter to set the level of the return signal from the variation effect.
Settings: 0 to 127
Variation Panorama (VarPan)
Use this parameter to set the stereo panning of the variation effect’s return signal.
Settings: L63 to C to R63
Variation to Reverb (VarToRev)
Use this parameter to set the degree to which the output from the variation effect is sent to the reverb effect.
Settings: 0 to 127
Variation to Chorus (VarToCho)
Use this parameter to set the degree to which the output from the variation effect is sent to the chorus effect.
Settings: 0 to 127
Chorus Send Level (ChoSend)
Use this parameter to set the chorus-send level for the current kit.
Settings: 0 to 127
Chorus Return Level (ChoReturn)
Use this parameter to set the level of the return signal from the chorus effect.
Settings: 0 to 127
Chorus Panorama (ChoPan)
Use this parameter to set the stereo panning of the chorus effect’s return signal.
Settings: L63 to C to R63
Chorus to Reverb (ChoToRev)
Use this parameter to set the degree to which the output from the chorus effect is sent to the reverb effect.
Settings: 0 to 127
For effect-related settings
KIT/EFFECT/MIXER 1/3
EFFECTMixer
VarReturnVarPanVarToRevVarToChoChoSendChoReturnChoPanChoToRevRevSendRevReturnRevPan
VariationCategoryType
ChorusType
ReverbType
KIT/EFFECT/MIXER 2/3

KIT
Reverb Send Level (RevSend)
Use this parameter to set the reverb-send level for the current kit.
Settings: 0 to 127
Reverb Return Level (RevReturn)
Use this parameter to set the level of the return signal from the reverb effect.
Settings: 0 to 127
Reverb Panorama (RevPan)
Use this parameter to set the stereo panning of the reverb effect’s return signal.
Settings: L63 to C to R63
Variation Category (Category)
Use this parameter to select a variation-effect category.
Settings: Refer to the Data List document.
Variation Type (Type)
Use this parameter to select a variation-effect type.
Settings: Refer to the Data List document.
NOTE• If the Type parameter is set to “No Effect”, no other panels will
be displayed for this page.
Chorus Type (Type)
Use this parameter to select a chorus-effect type.
Settings: Refer to the Data List document.
NOTE• If the Type parameter is set to “No Effect”, no other panels will
be displayed for this page.
Reverb Type (Type)
Use this parameter to select a reverb-effect type.
Settings: Refer to the Data List document.
NOTE• If the Type parameter is set to “No Effect”, no other panels will
be displayed for this page.
KIT/EFFECT/MIXER 3/3
KIT/EFFECT/VARIATION 1/3
KIT/EFFECT/CHORUS 1/5
KIT/EFFECT/REVERB 1/4
DTX700 Reference Manual 27

KIT
KIT/EQ
List of Functions
Setting the Kit Equalizer
The parameters from the Menu area’s Kit/EQ page can be used to adjust the kit equalizer that shapes the tone of voices, songs, and other audio output. In specific terms, this four-band equalizer allows the signal level to be freely boosted or cut around a cen-ter frequency specified for each of the bands. In addition, the “low” and “high” frequency bands can be set to either shelving or peaking type equaliza-tion.
NOTE• Kit equalization affects both drum and melody sounds.
LowGain, LowMidGain, HighMidGain, and HighGain
Use these parameters to boost or cut the center-frequency levels of the low, low-mid, high-mid, and high frequency bands, respec-tively.
Settings: -12 to +0 to +12
LowFreq, LowMidFreq, HighMidFreq, and HighFreq
Use these parameters to set the center frequencies of the low, low-mid, high-mid, and high frequency bands, respectively.
Settings: LowFreq: 32Hz to 2.0kHz when LowShape is set to “shelving”63Hz to 2.0kHz when LowShape is set to “peaking”
LowMidFreq, HighMidFreq: 100Hz to 10kHz
HighFreq: 500Hz to 16kHz
For setting kit equalization
KIT/EQ 1/4 to 4/4
EQLowGainLowFreqLowQLowShapeLowMidGainLowMidFreqLowMidQHighMidGainHighMidFreqHighMidQHighGainHighFreqHighQHighShape
Gain
Low HighMid
LowMid High
Frequency (Hz)
Q
Four EQ bands
DTX700 Reference Manual 28

KIT
Low Resonance (LowQ), Low Mid Resonance (Low-MidQ), High Mid Resonance (HighMidQ), and High Resonance (HighQ)
Use these parameters to specify widths for the low, low-mid, high-mid, and high frequency bands, respectively. If you set a large value, a narrower band of frequencies will be affected and the tone will change markedly around the center frequency. If you set a smaller value, a wider band of frequencies will be affected and the tone will change gradually around the center frequency.
Settings: 0.1 to 12.0
NOTE• If the LowShape or HighShape parameter has been set to
“shelving”, the corresponding width (Q) setting will be displayed as “---” and modification will not be possible.
LowShape and HighShape
Use these parameters to set EQ types for the low and high fre-quency bands, respectively.
Settings: shelving, peaking
• ShelvingSignals at all frequencies either above or below the specified frequency will be boosted or cut.
• PeakingSignals at frequencies in the vicinity of the center frequency will be boosted or cut.
KIT/PAD
List of Functions
Pad Control Type (PadCtrlType)
When a pad featuring a pad controller is connected to the DTX700, this parameter can be used to assign a function to it. Before making a setting, be sure to press the [F1] button (PAD) and select the trigger input jack that the pad in question has been plugged into.
Q=0.1
Q=12.0
Frequency (Hz)
Center frequency
EQ low EQ high
GainCenter frequency
GainCenter
frequency
Frequency (Hz) Frequency (Hz)
GainCenter frequency
Frequency (Hz)
For pad-related settings
KIT/PAD 1/3
off No function is assigned to the pad controller.
snares
By turning the pad controller, you can change the set-tings of the SnaresOn/Off (Snare Wire On/Off) and SnaresAdjust (Snare Wire Adjustment) parameters (also from the Menu area’s Kit/Pad page), thus adjusting the tightness of the snare wire. For example, turning the pad controller counter-clockwise progressively loosens the snare wire, ultimately removing it from the snare. Turning the pad controller clockwise tightens the snare wire. If the snare wire is in the removed condition, turn the pad con-troller clockwise to bring it into contact with the snare.
tuning
By turning the pad controller, you can change the set-ting of the Tune (Tuning) parameter from the Menu area’s Kit/Voice page, thus adjusting the pitch of the drum voice. For example, turning the pad controller counter-clockwise lowers the pitch and vice-versa.
tempoBy turning the pad controller, you can adjust the song or click-track tempo. Whenever you are doing so, the dis-play will show the tempo setting.
filter
By turning the pad controller, you can change the set-ting of the Filter parameter from the Menu area’s Kit/Voice page, thus adjusting the tone of the drum voice. For example, turning the pad controller counter-clock-wise darkens the tone and vice-versa.
snaresOn/Off
By turning the pad controller, you can switch the SnaresOn/Off (Snare Wire On/Off) parameter (also from the Menu area’s Kit/Pad page) from “off” to “on” and vice-versa. For more details, refer to Internal Design of the DTX700 (see page 3).
PadPadCtrlTypeHH FuncHH MIDI ChHH MIDI TypeSnaresOn/OffSnaresAdjustSnareBuzzResonanceLevel
DTX700 Reference Manual 29

KIT
Settings: off, snares, tuning, tempo, filter, snaresOn/Off
NOTE• The initial default setting of the PadCtrlType (Pad Control Type)
parameter depends on the drum kit selected.
• The settings available for the PadCtrlType (Pad Control Type) parameter depend on the trigger input jack that the pad has been plugged into. For example, the settings “snares” and “snaresOn/Off” are available only when the [qSNARE] trigger input jack is being used.
Hi-hat Function (HH Func)
Use this parameter to specify how a hi-hat controller connected to the [HI-HAT CONTROL] trigger-input jack is to function.
Settings: hi-hat, MIDI
NOTE• When this parameter is set to “hi-hat” and “on” has been
selected for the SendHH (Send Hi-hat Controller) parameter from the Menu area’s Utility/MIDI page, Control Change 4 messages corresponding to the degree to which the hi-hat controller is depressed will be sent to external MIDI devices on MIDI channel 10.
• When this parameter is set to “MIDI”, MIDI messages are sent regardless of the setting of the SendHH (Send Hi-hat Control-ler) parameter from the Menu area’s Utility/MIDI page.
Hi-hat MIDI Channel (HH MIDI Ch)
If “MIDI” has been set for the HH Func (Hi-hat Function) param-eter (also from the Menu area’s Kit/Pad page), use this parameter to set the MIDI channel for output of the MIDI messages gener-ated by the hi-hat controller.
Settings: 1 to 16
NOTE• If “hi-hat” has been set for the HH Func (Hi-hat Function)
parameter (also from the Menu area’s Kit/Pad page), this set-ting will be displayed as “--” and modification will not be possi-ble.
Hi-hat MIDI Type (HH MIDI Type)
If “MIDI” has been set for the HH Func (Hi-hat Function) param-eter (also from the Menu area’s Kit/Pad page), use this parameter to set the type of MIDI messages generated by the hi-hat control-ler.
Settings: CC01 to CC95 (Control Change), AT (Aftertouch), PBup (Pitch Bend up), PBdwn (Pitch Bend down)
NOTE• If “hi-hat” has been set for the HH Func (Hi-hat Function)
parameter (also from the Menu area’s Kit/Pad page), this set-ting will be displayed as “-----” and modification will not be pos-sible.
Snare Wire On/Off (SnaresOn/Off)
Use this parameter to control the behavior of the pad connected to the [qSNARE] trigger input jack. If set to “on”, the voices assigned to the SnareHd, SnareOp, and SnareCl pads will be out-put. If set to “off”, meanwhile, the voices assigned to the SnrHd-Off, SnrOpOff, and SnrClOff pads will be output. For more details, refer to page 3.
Settings: off, on
Snare Wire Adjustment (SnaresAdjust)
Use this parameter to adjust the tightness of the snare wire. Higher values correspond to tighter snare wires and vice-versa.
Settings: 1 to 15
NOTE• When you adjust this parameter, the Decay parameter* from
the Menu area’s Kit/Voice page also changes. (*: Applies only when the VoiceCategory parameter has been set to “SnareHd” or “SnareOp”.)
SnareBuzz
Use this parameter to specify how the snare wire effect resonates with kick and tom sounds. The higher the setting, the greater the degree of resonance. Set to “off” to prevent the snare wire from resonating.
Settings: off, 1 to 5
KIT/PAD 2/3
hi-hatThe hi-hat controller will function in the standard way for playing the hi-hat cymbal.
MIDI
When you step on the hi-hat controller, a MIDI message is output in line with the settings of the HH MIDI Ch (Hi-hat MIDI Channel) and HH MIDI Type (Hi-hat MIDI Type) parameters below.
KIT/PAD 3/3
DTX700 Reference Manual 30

KIT
ResonanceLevel
Use this parameter to specify whether the toms should resonate with kick sounds. The higher the setting, the greater the degree of resonance. Set to “0” to prevent the toms from resonating.
Settings: off, 0 to 5
KIT/JOB
List of Functions
From the Copy Pad page, you can copy settings from one pad to another within the current drum kit. Use Pad1 to select the pad whose settings are to be copied and Pad2 to select the pad whose settings are to be replaced. Then press the [F3] button (EXE-CUTE) to copy the settings.
Pad to be copied (Pad1)
Use this parameter to select the pad whose settings are to be cop-ied.
Pad to be replaced (Pad2)
Use this parameter to select the pad whose settings are to be replaced.
Settings: SnareHd, SnareOp, SnareCl, SnrHdOff, SnrOpOff, SnrClOff, Tom1Hd, Tom1Rm1, Tom1Rm2, Tom2Hd, Tom2Rm1, Tom2Rm2, Tom3Hd, Tom3Rm1, Tom3Rm2, RideBw, RideEg, RideCp, Crash1Bw, Crash1Eg, Crash1Cp, Crash2Bw, Crash2Eg, Crash2Cp, HHBwOp, HHEgOp, HHBwCl, HHEgCl, HHFtCl, HHSplsh, Kick, Pad10, Pad11Hd, Pad11Rm1, Pad11Rm2, HHKick, all (available for Pad2 only)
From the Copy Kit page, you can copy all the set-tings of any kit and replace those of the current kit, which can be selected by pressing the [KIT] button. Use Bank and Number to select the kit whose set-tings are to be copied, and the press the [F3] button (EXECUTE) to copy those settings.
Bank
Use this parameter to specify the type of kit to be copied. “PRE” refers to the Preset kits stored as the DTX700’s default settings, and “USER” refers to the User kits that can be accessed by press-ing the [KIT] button to open the Kit page.
Kit Number (Number)
Use this parameter to specify the number of the kit to be copied.
Settings: 01 to 50 when Bank is set to “PRE”01 to 60 when Bank is set to “USER”
NOTE• Preset kits are permanent settings that serve as DTX700
defaults. Accordingly, you cannot access them by pressing the [KIT] button or edit this kit data by, for example, changing a drum voice. For details regarding the makeup of kit data, see page 5.
For kit management tasks
KIT/JOB/COPY PAD
JobCopyPadCopyKitExchgPadExchgKitClearPadClearKit
KIT/JOB/COPY KIT
DTX700 Reference Manual 31

KIT
From the Exchange Pad page, you can swap the set-tings of a pair of pads. Use Pad1 and Pad2 to select the pads, and then press the [F3] button (EXECUTE) to exchange their settings.
Pad1, Pad2
Use these parameters to select the two pads whose settings are to be swapped.
Settings: SnareHd, SnareOp, SnareCl, SnrHdOff, SnrOpOff, SnrClOff, Tom1Hd, Tom1Rm1, Tom1Rm2, Tom2Hd, Tom2Rm1, Tom2Rm2, Tom3Hd, Tom3Rm1, Tom3Rm2, RideBw, RideEg, RideCp, Crash1Bw, Crash1Eg, Crash1Cp, Crash2Bw, Crash2Eg, Crash2Cp, HHBwOp, HHEgOp, HHBwCl, HHEgCl, HHFtCl, HHSplsh, Kick, Pad10, Pad11Hd, Pad11Rm1, Pad11Rm2, HHKick
On this page, you can select two kits whose settings are to be swapped (i.e., Kit1 and Kit2). You then press the [F3] button (EXECUTE) to exchange their settings.
Kit1, Kit2
Use these parameters to select the two kits whose settings are to be swapped.
Settings: 01 to 60
From the Clear Pad page, you can initialize individ-ual pads from the current drum kit (i.e., restore their default settings). Use the Pad parameter to select the pad whose settings are to be initialized, and then press the [F3] button (EXECUTE).
Pad
Use this parameter to select the pad whose settings are to be ini-tialized.
Settings: SnareHd, SnareOp, SnareCl, SnrHdOff, SnrOpOff, SnrClOff, Tom1Hd, Tom1Rm1, Tom1Rm2, Tom2Hd, Tom2Rm1, Tom2Rm2, Tom3Hd, Tom3Rm1, Tom3Rm2, RideBw, RideEg, RideCp, Crash1Bw, Crash1Eg, Crash1Cp, Crash2Bw, Crash2Eg, Crash2Cp, HHBwOp, HHEgOp, HHBwCl, HHEgCl, HHFtCl, HHSplsh, Kick, Pad10, Pad11Hd, Pad11Rm1, Pad11Rm2, HHKick
From the Clear Kit page, you can initialize the cur-rent drum kit. Simply press the [F3] button (EXE-CUTE) to do so.
KIT/JOB/EXCHANGE PAD
KIT/JOB/EXCHANGE KIT
KIT/JOB/CLEAR PAD
KIT/JOB/CLEAR KIT
DTX700 Reference Manual 32

SONG
: The current song number is reduced by 1.
: The current song number is increased by 1.
NOTE• If you hold down the [SHIFT] button and press the [F1] or [F2]
button, the song number will be reduced or increased in units of 10.
• See page 14 for details regarding cursor operations on Menu area pages.
List of Functions
SONG/COMMON
Loop
When this parameter is set to “on”, playback of the song will start again from the beginning whenever it finishes (i.e., looped play-back). When set to “off”, the song will be played once to the end and will then stop (i.e., one-shot playback).
Settings: off, on
Tempo
Use this parameter to set a tempo for playback of the selected song.
Settings: 30 to 300
NOTE• When a song is assigned to a kit, the kit’s tempo (see page 15)
will take priority over this setting.
Song Name (Name)
Use this parameter to set a name for the current song. A name of up to 10 characters in length can be assigned.
Setting a Song Name
1. Press the dial to call up the song naming page.
2. Move the cursor within the name field using the [F1] and [F3] buttons and select a character for that position by turning the dial or pressing the [-/DEC] and [+/INC] but-tons. The following characters can be used.
NOTE• If you hold down the [SHIFT] button and press the [F1]
or [F3] button, the cursor will move to the start or end of the song name field.
• If you hold down the [SHIFT] button and press the [-/DEC] or [+/INC] button, or alternatively, hold down the [SHIFT] button and turn the dial, the cursor will jump between the “ ”, “0”, “A”, “a”, and “~” characters.
CommonLoopTempoName
MIDITransmitVolumePanMSBLSBPCVarSend(Dry)ChoSendRevSend
JobClearClearAllCopyImprtSMF
MemInfo
For settings affecting all songs
SONG/COMMON
DTX700 Reference Manual 33

SONG
DTX700 Reference Manual 34
3. When you have entered the required name, press the dial or the [EXIT] button to return to the previous page.
4. Press the [STORE] button and the dial to store your new setting.
SONG/MIDI
: The current MIDI channel number is reduced by 1.
: The current MIDI channel number is increased by 1.
q MIDI Channel (Ch)
Use this parameter to select the current MIDI channel number (1 to 16).
Settings: 1 to 16
Transmit
Use this parameter to specify which MIDI messages the current song will send to the internal tone generator and external MIDI devices on the selected MIDI channel.
Settings: off, all, PC
Volume
Use this parameter to set the MIDI volume (Control Change 7) sent by the current song. In terms of the internal tone generator, this value affects all voices played on the MIDI channel indicated by q.
Settings: 0 to 127
NOTE• If “off” or “PC” has been selected for the Transmit parameter
above, this setting will be displayed as “---” and modification will not be possible.
• If you change the volume setting for MIDI channel 10, the cur-rent kit’s Volume parameter setting from the Menu area’s Kit/Common page will also change to this new value.
Panorama (Pan)
Use this parameter to set the stereo panning (Control Change 10) sent by the current song on the selected MIDI channel. In terms of the internal tone generator, this value affects all voices on that channel.
Settings: L64 to C to R63
NOTE• If “off” or “PC” has been selected for the Transmit parameter
above, this setting will be displayed as “---” and modification will not be possible.
q MIDI Channel (Ch)
Use this parameter to select the current MIDI channel number.
Settings: 1 to 16
Bank Select MSB (MSB)
Use this parameter to set a Bank Select MSB value sent by the current song on the selected MIDI channel.
Settings: 000 to 127
Bank Select LSB (LSB)
Use this parameter to set a Bank Select LSB value sent by the current song on the selected MIDI channel.
Settings: 000 to 127
Program Change (PC)
Use this parameter to set a Program Change number sent by the current song on the selected MIDI channel.
Settings: 000 to 128
NOTE• If “off” has been selected for the Transmit parameter above,
this setting will be displayed as “---” and modification will not be possible.
To select a DTX700 drum kit, set parameters for MIDI channel 10 as follows. Setting a Program Change number for this MIDI channel ensures that the kit will change immediately whenever the song is played.
MSB = 125, LSB = 001, PC = Number of desired kit
For MIDI-related settings
SONG/MIDI 1/3
off No MIDI messages will be sent.
all All MIDI messages set here will be sent.
PCOnly Program Change messages, including Bank Select MSB and LSB messages, will be sent.
q SONG/MIDI 2/3
q

SONG
q MIDI Channel (Ch)
Use this parameter to select the current MIDI channel number.
Settings: 1 to 16
Variation Send Level (VarSend(Dry))
Use this parameter to set the variation-effect send level to be sent by the current song on the selected MIDI channel.
Settings: 0 to 127
NOTE• If “off” or “PC” has been selected for the Transmit parameter
above (see page 34), this setting will be displayed as “---” and modification will not be possible.
• This parameter cannot be set for MIDI channel 10. Accord-ingly, it will be displayed as “---” when that channel has been selected.
Chorus Send Level (ChoSend)
Use this parameter to set the chorus-send level to be sent by the current song on the selected MIDI channel.
Settings: 0 to 127
NOTE• If “off” or “PC” has been selected for the Transmit parameter
above (see page 34), this setting will be displayed as “---” and modification will not be possible.
• If you change the chorus send level for MIDI channel 10, the current kit’s ChoSend (Chorus Send Level) setting (see page 26) will also change to this new value.
Reverb Send Level (RevSend)
Use this parameter to set the reverb-send level to be sent by the current song on the selected MIDI channel.
Settings: 0 to 127
NOTE• If “off” or “PC” has been selected for the Transmit parameter
above (see page 34), this setting will be displayed as “---” and modification will not be possible.
• If you change the reverb send level for MIDI channel 10, the current kit’s Reverb Send Level (RevSend) setting (see page 27) will also change to this new value.
SONG/JOB
You can use the Clear Current Song (Clear) page to delete all of the current User song’s data.
CAUTION• When a User song is cleared, its data is completely erased
from the DTX700’s memory. Be sure, therefore, to always save important song data on a USB memory device or the like before clearing it.
• After clearing a song, be sure to store your new settings.
From the Clear All Songs (Clear All) page, you can delete all User songs.
CAUTION• When a User song is cleared, its data is completely erased
from the DTX700’s memory. Be sure, therefore, to always save important song data on a USB memory device or the like before clearing it.
• After clearing songs, be sure to store your new settings.
SONG/MIDI 3/3
q
For song management tasks
SONG/JOB/CLEAR
SONG/JOB/CLEAR ALL
DTX700 Reference Manual 35

SONG
You can use the Copy Song (Copy) page to copy another song into the current User song, replacing it completely.
Bank
Use this parameter to select the type of song to copy. “PRE” refers to the Preset songs stored as the DTX700’s default settings; “USER” refers to the User songs that can be accessed by pressing the [SONG] button; and “RECORDER” refers to the recording made using the [REC] button.
Settings: USER, PRE, RECORDER
Number
Use this parameter to select the number of the song to be copied.
Settings: PRE 1 to 63, USER 1 to 93
NOTE• No value can be set for this parameter if Bank has been set to
“RECORDER”.
From the Import SMF page, you can import a stan-dard MIDI file (SMF) into the DTX700 from a USB memory device for use as a User song. These files contain sequenced MIDI data and have a “.mid” file extension. It should be noted that the DTX700 sup-ports Format 0 SMFs only.
SONG/MEMORY INFO
To confirm the status of memory usage for song data, navigate to the Menu area’s Song/MemInfo (Memory Info) page.
q Memory available (KB)
This indicates the amount of unused song memory in kilobyte (KB) units.
w Memory availability ratio (%)
This indicates how much of the total song memory is currently unused in percentage format.
e Total memory (KB)
This indicates the total song memory in kilobyte (KB) units.
SONG/JOB/COPY
SONG/JOB/IMPORT SMF
For checking song memory status
SONG/MEMORY INFO
w eq
DTX700 Reference Manual 36

UTILITY
List of FunctionsNOTE• See page 14 for details regarding cursor operations on Menu
area pages.
UTILITY/GENERAL
MasterVolume
Use this parameter to set the master volume of the DTX700’s internal tone generator. If a small value is set here, the [MAS-TER] dial on the front panel will have very little effect in increas-ing the output volume.
Settings: 0 to 127
Master Tuning (MasterTune)
Use this parameter to tune the internal tone generator (i.e., adjust its basic pitch) in units of 0.1 cents. The value in parentheses shows the corresponding tuning (of A above middle C) in Hertz.
Settings: -102.4 to +0.0 to +102.3
NOTE• A cent is a unit of pitch defined as one hundredth of a semi-
tone. (100 cents = 1 semitone)
Panorama Depth (PanDepth)
Use this parameter to adjust the width of the DTX700’s overall stereo-panning field, while maintaining the individual pan set-tings for drum and musical instrument sounds.
Settings: 1 to 127
GeneralMasterVolumeMasterTunePanDepthAuxOutSelPlayCountAutoPowerOffLCD Mode
MasterEQLowGainLowFreqLowQLowShapeMidGainMidFreqMidQHighGainHighFreqHighQHighShape
PadPadFunc
CC ChCC Val
FootClosePosFootSplashSensHH-KickVelSensCymbalChokeRate
EffectSwVariationChorusReverbSnareBuzzResonance
MIDIMIDI IN/OUTThruPortLocalCtrlMIDI SyncClockOutSeqCtrlMergeRcv10chRcvPCRcvPC10chPolyAfterSendHHDeviceNo.
FactSetPowerOn Auto
For settings affecting the entire system
UTILITY/GENERAL 1/3
UTILITY/GENERAL 2/3
DTX700 Reference Manual 37

UTILITY
Auxiliary Output Selection (AuxOutSel)
Use this parameter to indicate where audio input via the [AUX IN] jack will be output.
Settings: L&R+ph, phones
PlayCount
Use this parameter to activate (on) or deactivate (off) a two-mea-sure lead in before a song starts playing.
Settings: off, on
AutoPowerOff
Use this parameter to set the amount of time for which the DTX700 must be idle before it will turn off automatically. In addition to settings of 5, 10, 15, 30, 60, and 120 minutes, you can disable this function by selecting “off”.
Settings: off, 5, 10, 15, 30, 60, 120
LCD Mode
Use this parameter to switch the screen display mode between normal (i.e., dark letters on a bright background) and reverse (i.e., the opposite).
Settings: normal, reverse
UTILITY/MASTER EQ
Setting the Master Equalizer
The parameters from the Menu area’s Utility/Master EQ page can be used to adjust the master equalizer that shapes the tone of voices, songs, and other audio output. In specific terms, this three-band mas-ter equalizer allows the signal level to be freely boosted or cut around a center frequency specified for each of the bands. In addition, the “low” and “high” frequency bands can be set to either shelv-ing or peaking type equalization.
NOTE• The settings on this page will change if you adjust the master
equalizer from the Kit area (accessed by pressing the [KIT] and [F1] buttons).
• Master equalization has no effect on audio input via the [AUX IN] jack (see page 7).
L&R+phThe auxiliary-input audio will be output via the OUTPUT jacks ([L/MONO] and [R]) and the [PHONES] jack.
phonesThe auxiliary-input audio will be output via the [PHONES] jack only.
UTILITY/GENERAL 3/3
For master equalizer settings
UTILITY/MASTER EQ 1/5 to 5/5
Gain
Low High
Frequency (Hz)
Q
Three EQ bands
Mid
DTX700 Reference Manual 38

UTILITY
LowGain, MidGain, and HighGain
Use these parameters to boost or cut the center-frequency levels of the low, mid, and high frequency bands, respectively.
Settings: -12 to +0 to +12
LowFreq, MidFreq, and HighFreq
Use these parameters to set the center frequencies of the low, mid, and high frequency bands, respectively.
Settings: LowFreq: 32Hz to 2.0kHz when LowShape is set to “shelving”63Hz to 2.0kHz when LowShape is set to “peaking”
MidFreq: 100Hz to 10kHz
HighFreq: 500Hz to 16kHz
Low Resonance (LowQ), Mid Resonance (MidQ), and High Resonance (HighQ)
Use these parameters to specify widths for the low, mid, and high frequency bands, respectively. If you set a large value, a narrower band of frequencies will be affected and the tone will change markedly around the center frequency. If you set a smaller value, a wider band of frequencies will be affected and the tone will change gradually around the center frequency.
Settings: 0.1 to 12.0
NOTE• If the LowShape or HighShape parameter has been set to
“shelving”, the corresponding width (Q) setting will be displayed as “---” and modification will not be possible.
LowShape and HighShape
Use these parameters to set EQ types for the low and high fre-quency bands, respectively.
Settings: shelving, peaking
• ShelvingSignals at all frequencies either above or below the specified frequency will be boosted or cut.
• PeakingSignals at frequencies in the vicinity of the center frequency will be boosted or cut.
Q=0.1
Q=12.0
Frequency (Hz)
Center frequency
EQ low EQ high
GainCenter frequency
GainCenter
frequency
Frequency (Hz) Frequency (Hz)
GainCenter frequency
Frequency (Hz)
DTX700 Reference Manual 39

UTILITY
DTX700 Reference Manual 40
UTILITY/PAD
The parameters from the Menu area’s Utility/Pad page can be used to assign functions to pads and foot-switches.
PAD
Press this button to open a popup window for selecting the pad to be set. You can also strike a pad to select it.
AUDITION
By pressing the [F3] button (AUDITION), you can play the sound assigned to the selected pad without actually striking it. This can prove highly useful when you need to listen to the assigned sound while making settings.
Pad Function (PadFunc)
Use this parameter to specify a function (such as kit, song, or tempo selection) to be performed instead of playing a sound when the current pad is struck. Note that you can strike a pad or select it using the [F1] button (PAD) to make it the current pad.
Settings: off, inc kitNo, dec kitNo, inc songNo, dec songNo, inc tempo, dec tempo, tap tempo, clickOn/Off, effectOn/Off, CC01 to CC95
Control-Change Send Channel (CC Ch)
Use this parameter to set a MIDI channel for sending the MIDI Control Change message selected using the PadFunc (Pad Func-tion) parameter.
Settings: 1 to 16
Control Change Value (CC Val)
Use this parameter to set a value for the MIDI Control Change message selected using the PadFunc (Pad Function) parameter.
Settings: 0 to 127
Foot Closed Position (FootClosePos)
Use this parameter to adjust the position at which the hi-hat switches from open to closed when the hi-hat controller is oper-ated. The lower the value, the smaller the virtual opening between the top and bottom hi-hats.
Settings: -32 to +0 to +32
Splash Sensitivity (FootSplashSens)
Use this parameter to set the degree of sensitivity for detecting hi-hat foot splashes. The higher the value, the easier it will be to pro-duce a foot-splash sound with a hi-hat controller. High values may, however, result in splash sounds being unintentionally pro-duced when, for example, you depress the hi-hat controller lightly as you keep time. It is a good idea to set this parameter to “off” if you do not want to play foot splashes.
Settings: off, 1 to 127
HH-Kick Velocity Sensitivity (HH-KickVelSens)
Use this parameter to set the sensitivity of the DTX700 to opera-tion of the foot controller connected via the [!2 HH-KICK] trig-ger input jack. The larger the setting, the louder the sound produced when the controller is lightly depressed.
Settings: 0 to 127
CymbalChokeRate
Use this parameter to specify how quickly the cymbal sound is to decay when the choking or muting technique is used. The larger the value, the faster the sound will decay.
Settings: -20 to +0 to +20
For pad-related settings
UTILITY/PAD 1/2
off Sounds will be produced in the normal way.
inc kitNo The kit number will be increased by 1.
dec kitNo The kit number will be decreased by 1.
inc songNo The song number will be increased by 1.
dec songNo The song number will be decreased by 1.
inc tempo The tempo will be increased by 1 bpm.
dec tempo The tempo will be decreased by 1 bpm.
tap tempoThe pad or footswitch can be used to tap the tempo.
clickOn/Off The click track will be toggled on or off.
effectOn/Off The effects will be toggled on or off.
CC01 to CC95
A MIDI Control Change message of the corre-sponding number will be sent to the DTX700’s internal tone generator and connected MIDI devices.
UTILITY/PAD 2/2

UTILITY
DTX700 Reference Manual 41
UTILITY/EFFECT SW
When the parameters from the Utility/Effect Switch page are set to “enable”, the corresponding effects will be toggled on and off in response to simultaneous pressing of the [SHIFT] and [F2] but-tons in the Kit area (accessed by pressing the [KIT] button). If set to “disable”, meanwhile, this key combina-tion will have no effect on the status of the corresponding effects.
Variation : Variation effect (see page 27)Chorus : Chorus effect (see page 27)Reverb : Reverb effect (see page 27)SnareBuzz : Snare buzz effect (see page 30)Resonance : Resonance effect (see page 31)
Settings: disable, enable
UTILITY/MIDI
MIDI IN/OUT
Use this parameter to specify whether the exchange of MIDI mes-sages with external devices is to be performed via the MIDI con-nectors or the [USB TO HOST] port.
Settings: MIDI, USB
MIDI Thru Port (ThruPort)
When the DTX700 receives MIDI messages from a computer connected via USB, it can relay messages received via a specific port to the [MIDI OUT] connector so that they can be output to other external MIDI devices. Use this parameter to specify that port.
Settings: 1, 2
Local Control (LocalCtrl)
Use this parameter to enable (“on”) or disable (“off”) playing of the internal tone generator using pads and songs. Normally, this is set to “on”, meaning that the tone generator is locally controlled. If set to “off”, the pads and external controllers are essentially disconnected from the internal tone generator – in other words, no sound is produced by the DTX700 when you strike them. Irre-spective of this parameter’s setting, DTX700 performance data is output via the [MIDI OUT] connector and MIDI data from other devices is accepted for processing via the [MIDI IN] connector. An “off” setting can prove highly useful when you wish to record your drum performances as MIDI data on a hardware sequencer or DAW software.
Settings: off, on
MIDI Synchronization (MIDI Sync)
Use this parameter to specify whether songs and the click track are to play at the tempo set for the DTX700 or are to be synchro-nized with external MIDI devices based on MIDI Clock messages (i.e., F8 Timing Clock) received from them.
Settings: int, ext, auto
NOTE• In order to successfully synchronize the DTX700 whenever
this parameter is set to “ext” or “auto”, the connected external MIDI device or computer must be configured to send MIDI Clock messages.
ClockOut
Use this parameter to enable (“on”) or disable (“off”) the sending of MIDI Clock messages (i.e., F8 Timing Clock) via the [MIDI OUT] connector.
Settings: off, on
For enabling and disabling effects
UTILITY/EFFECT SW
For MIDI-related settings
UTILITY/MIDI 1/3
int
Songs and the click track will play at the current DTX700 tempo setting. Use “int” when the drum trigger module is to be used alone or as the mas-ter clock source for other equipment.
ext
The DTX700 will be synchronized with MIDI Clock messages received via MIDI. Use “ext” when an external MIDI device is to be used as the master clock source for synchronized playback.
auto
MIDI Clock messages received via MIDI will be prioritized over the DTX700’s current tempo. In other words, playback will be synchronized to MIDI Clock messages whenever they are received, and the internal tempo will be used in all other cases.

UTILITY
Sequencer Control (SeqCtrl)
Use this parameter to specify whether or not System Realtime messages (i.e., FA Start, FB Continue, and FC Stop) will be sent and received via MIDI.
Settings: off, in, out, in/out
NOTE• If “start”, “continue”, or “stop” has been set for the MessageType
parameter from the Menu area’s Kit/MIDI/Assign page, the SeqCtrl (Sequencer Control) setting will have no effect and the corresponding message (i.e., FA Start, FB Continue, or FC Stop) will be output.
MIDI Merge (Merge)
The MIDI Merge function allows you to mix MIDI messages received via the [MIDI IN] connector with performance data pro-duced by playing the DTX700, and to output this mixed MIDI data via the [MIDI OUT] connector. Set this parameter to “on” to enable the merging of MIDI messages in this way.
Settings: off, on
Channel 10 Receive (Rcv10ch)
Use this parameter to enable (“on”) or disable (“off”) the receipt of MIDI messages sent by external devices on Channel 10. If set to “off”, the internal tone generator will play voices on Channel 10 in response only to input from pads connected to the DTX700.
Settings: off, on
Program Change Receive (RcvPC)
Use this parameter to enable (“on”) or disable (“off”) the receipt of MIDI Program Change messages. If set to “off”, voices will be changed based only on drum-kit voice settings when a new kit is selected. If you want voices on all MIDI channels to change in line with song settings and in response to signals from external MIDI devices, this parameter should be set to “on”.
Settings: off, on
Channel-10 Program Change Receive (RcvPC10ch)
Use this parameter to enable (“on”) or disable (“off”) the receipt of MIDI Program Change messages sent on MIDI channel 10. If you want kits to change in line with song settings or in response to signals from external MIDI devices, this parameter should be set to “on”. Note that this setting takes effect only when “on” is also selected for the RcvPC (Program Change Receive) parame-ter (on this page).
Settings: off, on
Polyphonic Aftertouch (PolyAfter)
Use this parameter to enable (“on”) or disable (“off”) the exchange of polyphonic aftertouch with external MIDI devices.
Settings: off, on
Send Hi-hat Controller (SendHH)
Use this parameter to enable (“on”) or disable (“off”) the sending of MIDI messages corresponding to continuous motion of a hi-hat controller between the open and closed positions.
Settings: off, on
NOTE• If “hi-hat” is selected for the HH Func (Hi-hat Function) param-
eter from the Menu area’s Kit/Pad page, MIDI messages will be sent only when this parameter is set to “on”.
• If “MIDI” is selected for the HH Func (Hi-hat Function) parame-ter from the Menu area’s Kit/Pad page, MIDI messages will always be sent, regardless of whether this parameter is set to “on” or “off”.
UTILITY/MIDI 2/3
off System Realtime messages are neither sent nor received.
inSystem Realtime messages are received but not sent.
out System Realtime messages are sent but not received.
in/outSystem Realtime messages are sent and received.
UTILITY/MIDI 3/3
DTX700 Reference Manual 42

UTILITY
Device Number (DeviceNo.)
Use this parameter to set a MIDI device number for the DTX700. In order to successfully exchange bulk data, parameter changes, and other system exclusive MIDI messages, this setting must match the Device Number of the external MIDI device.
Settings: 1 to 16, all, off
UTILITY/FACTORY SET
From the Factory Set page, you can restore all of the DTX700’s user data (i.e., all User kits, User trigger setups, User songs, waves, and utility settings) to their default conditions.
PowerOn Auto
If you select the “PowerOn Auto” checkbox, the Factory Set (i.e., default settings) will be restored each time you turn on your DTX700.
Restoring Defaults
1. Press the [F3] button (EXECUTE). You will be asked to confirm that you wish to restore the Factory Set.
2. To proceed, press the dial. Alternatively, you can press the [EXIT] button to cancel the process.The following message is displayed during the restoration process.
CAUTION• Whenever the instrument is reset in this way, any settings
you have made will be overwritten with the corresponding defaults. All important user-defined data should, there-fore, be saved on a USB memory device (see page 57) in advance.
allSystem exclusive messages for all MIDI device numbers will be received. In addition, the DTX700 will transmit messages using Device Number 1.
off
System exclusive messages such as bulk dump and parameter changes will be neither transmitted nor received. An error message will be displayed if an attempt is made to perform such an opera-tion.
For restoring default settings
UTILITY/FACTORY SET
DTX700 Reference Manual 43

TRIGGER
This section provides a description of the Menu area’s Trigger pages. The characteristics of the trig-ger signals output from pads when they are played depend on a range of different pad design factors. The Trigger pages allow you to optimize each pad’s trigger signals for processing by the DTX700 and to save your settings as trigger setup data.: The current trigger setup number is reduced by 1.
: The current trigger setup number is increased by 1.
NOTE• If you hold down the [SHIFT] button and press the [F1] or [F2]
button, the current trigger setup number will be reduced or increased in units of 10.
• See page 14 for details regarding cursor operations on Menu area pages.
List of Functions
TRIGGER/NAME
Trigger Setup Name (Name)
From the Trigger Setup Name (Name) page, you can assign a name of up to 12 characters in length to the current trigger setup. Move the cursor within the name field using the [F1] and [F3] buttons and select a character for that position by turning the dial or pressing the [-/DEC] and [+/INC] buttons. The following char-acters can be used.
NOTE• If you hold down the [SHIFT] button and press the [F1] or [F3]
button, the cursor will move to the start or end of the trigger setup name field.
• If you hold down the [SHIFT] button and press the [-/DEC] or [+/INC] button, or alternatively, hold down the [SHIFT] button and turn the dial, the cursor will jump between the “ ”, “0”, “A”, “a”, and “~” characters.
NameName
PadCurve
VelCurvePadType
PadTypeGainRejectTimeMinLevelMaxLevelMinVelocityMaxVelocityWaitTime Head/Bow OpenEdgeOffset CloseCupOffsetSensitivity Head/Bow OpenEdge CloseCupNoiseFltrTbl
CrssTalk
JobCopyPadCopyTrg
For naming trigger setups
TRIGGER/NAME
DTX700 Reference Manual 44

TRIGGER
TRIGGER/PAD
: A popup window appears so that a pad can be selected for editing. The current pad is indicated at the top of the display (i.e., “Snare” in this case).
: The sound assigned to the current pad is played.
Velocity Curve (VelCurve)
Use this parameter to select a velocity curve for the current pad. A velocity curve determines how the relative strength of playing affects the signal produced. For example, with the “loud2” veloc-ity curve shown below, relatively loud sounds (i.e., high veloci-ties) can be produced even with softer playing. In contrast, the “hard2” curve only produces loud sounds when the pad in ques-tion is struck quite hard.
Settings: loud2, loud1, normal, hard1, hard2
For pad-related trigger settings
TRIGGER/PAD
TRIGGER/PAD/CURVE
loud2 loud1 normal hard1 hard2
Trigger input level (i.e., strength of playing) m
Vel
ocity
m
DTX700 Reference Manual 45

TRIGGER
PadType
Use this parameter to specify a type for the current pad.
Settings: KP125W/125, KP65, XP120/100 Snare, XP120/100 Tom, XP80 Snare, XP80 Tom, XP70 Snare, XP70 Tom, XP120/100/80 Snare, XP80/70 Tom, TP120/100 Snare, TP120/100 Tom, TP65S Snare, TP65S Tom, TP65S HiHat, TP65, PCY155, PCY135, PCY150S, PCY130SC, PCY130S/130, PCY100, PCY100 HiHat, PCY65S/65, PCY155/135, RHH135, RHH130, DT Snare, DT HiTom, DT LoTom, DT Kick, TRG Snare, TRG HiTom, TRG LoTom, TRG Kick
Gain
Use this parameter to set the level of gain (or amplification) that is applied to the input signal from the selected pad before it is converted into a trigger signal. With a high setting, all input sig-nals above a certain level will be amplified to the same level (i.e., the maximum level). This means that variation in the softness or hardness with which the pad is struck can be smoothed out. Meanwhile, when a low setting is used, the softness or hardness of playing will be reflected to a much greater degree in the output trigger signal, allowing for more expressive performances.
Settings: 1 to 64
RejectTime
Use this parameter to specify the time period after a pad is struck during which a second input signal will be ignored. The larger the value set here, the longer the period during which a second sound will not be produced.
Settings: 4ms to 500ms
NOTE• In the following special case, a second sound will be produced
during the reject time.
The struck pad has a type (as set on this, the Menu area’s Trigger/Pad/Pad Type page) that does not start with “DT”, and in addition, the trigger level of the second strike within the reject time is at least twice as strong as that of the first.
TRIGGER/PAD/PAD TYPE 1/6
Tip: Pad typesIn order to ensure that you get the best sound from each and every pad, we have prepared a full range of optimized trigger parameters (i.e., various values related to pad input signals and the like), and named them accordingly. These groupings of parameters are referred to as “pad types”. Given that pads come in many different varieties, such as snares, toms, cymbals, and kick drums, it follows that pad characteristics vary widely. The DTX700 comes preloaded with pad types for each different set of characteristics, allowing you to use them to their maximum potential.
TRIGGER/PAD/PAD TYPE 2/6
DTX700 Reference Manual 46

TRIGGER
Minimum Level (MinLevel)Maximum Level (MaxLevel)
Use these parameters to set the range of input signals (in percent-age format) that will be converted into trigger signals. Any input signals at the minimum level or lower will not be converted into a trigger signal, and therefore, will not produce any sound. Mean-while, input signals at the maximum level or higher will result in trigger signals with the Maximum velocity (see below).
Settings: 0% to 99% for Minimum Level1% to 100% for Maximum Level
Minimum Velocity (MinVelocity)Maximum Velocity (MaxVelocity)
Use these parameters to specify the maximum and minimum velocities corresponding to the Maximum Level and Minimum Level (see above). When struck, the current pad will produce sounds within these two velocities.
Settings: 0 to 126 for Minimum Velocity1 to 127 for Maximum Velocity
WaitTime
These parameters are used to set the time until the current pad detects a trigger signal. In specific terms, they define how long it takes for detection of the peak trigger signal in order that the strength of playing can be accurately reflected in the sound gen-erated. In the case of two-zone and three-zone pads, each zone has a different setting.
Head/Bow
This parameter sets the detection time for the pad’s head (or bow, in the case of cymbal pads).
Settings: 1 to 64
OpenEdgeOffset
This parameter sets the detection time for the pad’s open rim (or edge, in the case of cymbal pads).
Settings: 0 to 64
TRIGGER/PAD/PAD TYPE 3/6 IMPORTANT
In normal circumstances, there is no need to modify any of the following three sets of parameters – WaitTime, Sensitivity and NoiseFilterTbl (Noise Filter Table). Please bear in mind that setting these parameters to a value not appropriate for the pad in question can lead to unpredictable results when you play it.
TRIGGER/PAD/PAD TYPE 4/6
DTX700 Reference Manual 47

TRIGGER
Closed Cup Offset (CloseCupOffset)
This parameter sets the detection time for the pad’s closed rim (or cup, in the case of cymbal pads).
Settings: 0 to 64
• The following diagrams show how these zones apply to snare and tom pads (left) and cymbal pads (right).
NOTE• Larger values correspond to a longer delay before sound out-
put and vice-versa. If you must make an adjustment, try to do so in a way that does not hinder your performances.
Sensitivity
These parameters are used to set the sensitivity of the pad. In the case of two-zone and three-zone pads, each zone has a different setting.
Head/Bow
This parameter sets the sensitivity for the pad’s head (or bow, in the case of cymbal pads).
Settings: 1.0 to 2.0, XP120/100, XP80, XP70, XP-A, XP-B, XP-C, XP-OpR, TP-ClR
OpenEdge
This parameter sets the sensitivity for the pad’s open rim (or edge, in the case of cymbal pads).
Settings: 1.0 to 2.0, XP120/100, XP80, XP70, XP-A, XP-B, XP-C, XP-OpR, TP-ClR
Closed Cup (CloseCup)
This parameter sets the sensitivity for the pad’s closed rim (or cup, in the case of cymbal pads).
Settings: 1.0 to 2.0, XP120/100, XP80, XP70, XP-A, XP-B, XP-C, XP-OpR, TP-ClR
Noise Filter Table (NoiseFltrTbl)
This parameter is used as a countermeasure in situations where, for whatever reason, noise enters the trigger signals output when the pad is struck or other instability in trigger signals leads to sounds not being generated correctly.
Settings: 1 to 10
NOTE• Larger values can, in cases where the pad is struck multiple
times in rapid succession, result in sounds being dropped. If you must make an adjustment, try to do so in a way that does not hinder your performances.
The term “crosstalk” refers to the output of trigger signals from a pad other than the one that was stuck as a result of vibration or interference between pads. From the Menu area’s Trigger/Pad/Crosstalk page, you can set input levels below which trigger signals will not be produced, thus preventing cross-talk.
q RejectLevel (From All)
Use this parameter to specify a level for preventing crosstalk from the DTX700’s other pads. If the input level produced at the cur-rent pad is lower than this level whenever any of the other pads are struck, that input will be treated as crosstalk and no sound will be produced. Although higher settings are more effective in pre-venting crosstalk, they can also make it difficult to play multiple pads at the same time.
Settings: 0% to 99%
TRIGGER/PAD/PAD TYPE 5/6
Closed rim zone Cup zone
Open rim zone Head zone Edge zone Bow zone
TRIGGER/PAD/PAD TYPE 6/6
TRIGGER/PAD/CROSS TALK
q
we
DTX700 Reference Manual 48

TRIGGER
w RejectLevel
Use this parameter to specify a level for preventing crosstalk from the pad(s) indicated by e. If the input level produced at current pad (selected using [F1]) is lower than this level whenever the pad(s) indicated by e are struck, it will be treated as crosstalk and no trigger signal will be generated. Although higher settings are more effective in preventing crosstalk, they can also make it difficult to play multiple pads at the same time.
Settings: 0% to 99%
e From
Use this parameter to specify a pad or group of pads causing crosstalk in the current pad. You can also strike a pad to select it.
Settings: Snare, Tom1, Tom2, Tom3, Ride, Crash1, Crash2, HiHat, Kick, Pad10, Pad11
NOTE• When more than one pad is selected for the From parameter,
the name of the first one is indicated, followed by a “+” symbol.
Setting Procedure
1. Select the pad to be set (i.e., the current pad) either by striking it or by pressing the [F1] button (PAD) to open a popup window and making a selection by turning the dial.
2. Turn the dial to move the cursor to the row shown below and press the dial.
The following popup window will appear.
: All selections are cleared.
: All pads are selected.
q indicates the name of the trigger input jack for the selected checkbox.
w indicates the number of the trigger input jack.
3. Using the dial, move the cursor to the trigger input jack of any pad causing crosstalk in the current pad. Press the dial to select that pad. You can press again to deselect the pad.
4. Press the [EXIT] button to return to the previous page.
q
w
DTX700 Reference Manual 49

TRIGGER
TRIGGER/JOB
From the Copy Pad page, you can copy data from the current trigger setup on an individual pad basis. Use Pad1 and Pad2 to select the pads, and then press the [F3] button (EXECUTE) to copy the set-tings.
Pad1
Use this parameter to set the pad whose settings are to be copied. You can also strike a pad to select it.
Pad2
Use this parameter to set the pad whose settings are to be replaced. You can also strike a pad to select it.
Settings: Snare, Tom1, Tom2, Tom3, Ride, Crash1, Crash2, HiHat, Kick, Pad10, Pad11
From the Copy Trigger page, you can copy data into the current trigger setup. Use Bank and Number to select the trigger setup whose settings are to be copied, and then press the [F3] button (EXECUTE) to copy the data.
Bank
Use this parameter to indicate the bank containing the trigger setup whose data is to be copied. “PRE” refers to the trigger set-ups stored as the DTX700’s default settings, and “USER” refers to the trigger setups that can be accessed by pressing the [KIT] button followed by the [F2] button (TRIGGER) to open the Trig-ger Setup page.
Settings: PRE, USER
Number
Use this parameter to specify the number of the trigger setup whose settings are to be copied.
Settings: 01 to 09 when Bank is set to “PRE”01 to 20 when Bank is set to “USER”
For trigger management tasks
TRIGGER/JOB/COPY PAD
TRIGGER/JOB/COPY TRIGGER
DTX700 Reference Manual 50

CLICK
List of FunctionsNOTE• See page 14 for details regarding cursor operations on Menu
area pages.
CLICK
Click Voice (Voice)
Use this parameter to select from a range of different sounds for use with the click track.
Settings: Metronome1, Metronome2, Cowbell, Stick, Human
Click-track Output Selection (OutputSel)
Use this parameter to specify where the click track will be output when activated. In a live-performance setting, for example, you would normally want the click track to be output to headphones only, and in such a case, “phones” should be selected here.
Settings: L&R+ph, phones
Click-track MIDI In (MIDI In)
Use this parameter to specify whether or not click-track sounds are to be produced based on MIDI Note On messages received via the [MIDI IN] connector. When set to “on”, the DTX700 operates as follows.
• A click-track accent sound will be produced upon the receipt of a MIDI note with the note number set by the MIDI Note-Acc (MIDI Accent Number) parameter (also from the Menu area’s Click page).
• A click-track quarter note sound will be produced upon the receipt of a MIDI note with the note number set by the MIDI Noteq (MIDI Quarter-note Number) parameter (also from the Menu area’s Click page).
Settings: off, on
Click-track MIDI Out (MIDI Out)
Use this parameter to turn the output of click-track MIDI events (i.e., MIDI Note On messages) on and off. When set to “on”, the DTX700 operates as follows.
• A MIDI note with the note number set by the MIDI NoteAcc (MIDI Accent Number) parameter (also from the Menu area’s Click page) will be produced for each click-track accent sound.
• A MIDI note with the note number set by the MIDI Noteq (MIDI Quarter-note Number) parameter (also from the Menu area’s Click page) will be produced for each click-track quarter note sound.
Settings: off, on
NOTE• Regardless of this parameter’s setting, no MIDI Note On mes-
sages will be produced for click-track sounds other than accents and quarter notes.
For click-track settings
CLICK 1/2
L&R+phThe click track will be output via the OUTPUT jacks ([L/MONO] and [R]) and the [PHONES] jack.
phonesThe click track will be output via the [PHONES] jack only.
VoiceOutputSelMIDI InMIDI OutMIDI NoteAccMIDI Noteq
CLICK 2/2
DTX700 Reference Manual 51

CLICK
MIDI Accent Number (MIDI NoteAcc)
Use this parameter to assign a MIDI note number to click-track accent sounds.
Settings: off, C#-2 to F#8
If the MIDI In (Click-track MIDI In) parameter (also from the Menu area’s Click page) is set to “on”, a click-track accent sound will be produced each time a MIDI note with the note number set here is received.
NOTE• If this parameter is set to “off”, no click-track accent sounds will
be produced in response to received MIDI notes.
• If the same value is set for this parameter and the MIDI Noteq (MIDI Quarter-note Number) parameter (also from the Menu area’s Click page), the same sound will be produced for all beat timings.
If the MIDI Out (Click-track MIDI Out) parameter (also from the Menu area’s Click page) is set to “on”, a MIDI Note On message with the note number set here will be produced for each click-track accent sound.
NOTE• If this parameter and the MIDI Noteq (MIDI Quarter-note Num-
ber) parameter (also from the Menu area’s Click page) are both set to “off”, no MIDI Note On messages will be output for click-track sounds. If, however, this parameter is set to “off” but the MIDI Noteq (MIDI Quarter-note Number) parameter is set to a value other than “off”, MIDI Note On messages with the corresponding note number will be output for all click-track sounds.
MIDI Quarter-note Number (MIDI Noteq)
Use this parameter to assign a MIDI note number to click-track quarter note sounds.
Settings: off, C#-2 to F#8
If the MIDI In (Click-track MIDI In) parameter (also from the Menu area’s Click page) is set to “on”, a click-track quarter-note sound will be produced each time a MIDI Note On message with the note number set here is received.
NOTE• If this parameter is set to “off”, no click-track quarter-note
sounds will be produced in response to received MIDI notes.
If the MIDI Out (Click-track MIDI Out) parameter (also from the Menu area’s Click page) is set to “on”, a MIDI Note On message with the note number set here will be produced for each click-track quarter-note sound.
NOTE• If this parameter is set to “off”, no MIDI Note On messages will
be produced for click-track quarter-note sounds.
DTX700 Reference Manual 52

WAVE
: The current wave number is reduced by 1.
: The current wave number is increased by 1.
: The current wave is played while the button is held down.
NOTE• If you hold down the [SHIFT] button and press the [F1] or [F2]
button, the current wave number will be reduced or increased in units of 10.
• See page 14 for details regarding cursor operations on Menu area pages.
List of Functions
WAVE/COMMON
PlayMode
Use this parameter to set the way in which the selected wave will be played when assigned to a pad. For details on editing start, end, and loop points, see the descriptions of this page’s Start, End, and Loop parameters.
• oneshot: The wave will be played once only from the start point to the end point. This mode is normally selected for drums, special effects, and other non-looped sounds.
• loop: The wave will be played continuously, first from the start point to the end point, and then repeatedly from the loop point to the end point.
Settings: oneshot, loop
CommonPlayModeStartLoopEndDecayHHCtrlSensName
JobImport
WavePadAssign
ImportAllNormalizeDeleteDeleteAllOptimize
MemInfo
For settings affecting all waves
WAVE/COMMON 1/3
One-shot playback
Looped playback
Start point End point
End pointStart point Loop point
DTX700 Reference Manual 53

WAVE
Wave TrimmingStart
This is the position at which playback will start. In other words, no data in front of this point (i.e., with a smaller position value) will be played.
Settings: 00000 and higher
Loop
This is the position at which looping will start. If “loop” has been selected for the PlayMode parameter (also from the Menu area’s Wave/Common page), playback will loop continuously between this point and the end point.
Settings: 00000 and higher
End
This is the position at which playback or looping will end. In other words, no data behind this point (i.e., with a larger position value) will be played.
Settings: 00001 and higher
Decay
Use this parameter to set the rate at which the playback volume of the wave decays. At a setting of 127, the volume remains con-stant. Lower values produce a faster rate of decay. This setting applies to both one-shot and looped playback modes.
Settings: 0 to 127
Hi-hat Control Sensitivity (HHCtrlSens)
Use this parameter to specify how the playback volume of the wave decays in response to operation of a hi-hat controller con-nected to the [HI-HAT CONTROL] jack. The smaller the value, the faster the rate of decay.
Settings: -64 to +0 to +64
Wave Name (Name)
Use this parameter to set a wave name of up to 10 characters in length. Move the cursor within the name field using the [F1] and [F3] buttons and select a character for that position by turning the dial. The following characters can be used.
NOTE• If you hold down the [SHIFT] button and press the [F1] or [F3]
button, the cursor will move to the start or end of the wave name field.
• If you hold down the [SHIFT] button and press the [-/DEC] or [+/INC] button, or alternatively, hold down the [SHIFT] button and turn the dial, the cursor will jump between the “ ”, “0”, “A”, “a”, and “~” characters.
WAVE/COMMON 2/3
WAVE/COMMON 3/3
DTX700 Reference Manual 54

WAVE
WAVE/JOB
From the Job page, you can create waves by import-ing WAV or AIFF files from a USB memory device into the DTX700’s internal memory and delete previ-ously imported waves among other tasks.
Whenever you press the [F3] button (EXECUTE) on any of the pages accessed via the Wave/Job page, a confirmation panel will be displayed. If you decide to proceed with the corresponding operation, the content of the DTX700’s internal memory will be permanently affected.
Using the Import page, you can import a WAV or AIFF file from a USB memory device’s root directory into the DTX700’s internal memory.
Wave
Use this parameter to select a wave file from the USB memory device to be imported into the DTX700.
PadAssign
Use this parameter to assign the selected wave to a trigger input source once imported. If “off” is selected, no assignment will be made.
Settings: off, SnareHd, SnareOp, SnareCl, SnrHdOff, SnrOpOff, SnrClOff, Tom1Hd, Tom1Rm1, Tom1Rm2, Tom2Hd, Tom2Rm1, Tom2Rm2, Tom3Hd, Tom3Rm1, Tom3Rm2, RideBw, RideEg, RideCp, Crash1Bw, Crash1Eg, Crash1Cp, Crash2Bw, Crash2Eg, Crash2Cp, HHBwOp, HHEgOp, HHBwCl, HHEgCl, HHFtCl, HHSplsh, Kick, Pad10, Pad11Hd, Pad11Rm1, Pad11Rm2, HHKick
Using the Import All page, you can import all WAV and AIFF files from a USB memory device’s root directory into the DTX700’s internal memory.
From the Normalize page, you can increase the vol-ume of the currently selected wave.
Ratio
Use this parameter to specify how much the wave’s volume is to be increased. Generally, a ratio of 100% or lower is used. With a setting of 100%, the volume will be increased to the maximum possible level without clipping. (Ratios greater than 100% can be specified; however, the wave may become distorted as a result.)
Settings: 1 to 800
From the Delete page, you can delete the wave cur-rently selected on the Wave/Job page.
For wave management tasks
WAVE/JOB
WAVE/JOB/IMPORT
WAVE/JOB/IMPORT ALL
WAVE/JOB/NORMALIZE
WAVE/JOB/DELETE
DTX700 Reference Manual 55

WAVE
From the Delete All page, you can delete all waves from the DTX700’s internal wave memory.
From the Optimize Memory page, you can maximize the amount of unused wave memory. In order to do this, the content of the DTX700’s internal wave mem-ory is rearranged in order to make more memory available. Optimization can be an effective way to increase the amount of memory available for waves.
WAVE/MEMORY INFO
To confirm the status of memory usage for wave data, navigate to the Menu area’s Wave/MemInfo (Memory Info) page.
q Memory available (MB)
This indicates the amount of unused wave memory in megabyte (MB) units.
w Memory availability ratio (%)
This indicates how much of the total wave memory is currently unused in percentage format.
e Total memory (MB)
This indicates the total wave memory in megabyte (MB) units.
WAVE/JOB/DELETE ALL
WAVE/JOB/OPTIMIZE
For checking internal memory status
WAVE/MEMORY INFO
w eq
DTX700 Reference Manual 56

FILE
A number of terms will be used in the following descriptions of file management functions and opera-tions from the Menu area’s File pages. Please take a moment to familiarize yourself with their meanings in order that these functions and operations can be more easily understood.FileThe term “file” is used to define a collection of data stored on a USB memory device. The exchange of data between the DTX700 and USB memory devices is carried out in the form of files.
File nameAs with your computer, the DTX700 can assign names to indi-vidual files. These names are used to tell files apart, and for this reason, no two files within a specific directory can share the same file name. Although computers can handle very long file names, even including non-English characters, the DTX700 requires that names be limited to alphanumeric characters.
File extensionThe three letters following the period at the end of a file name – such as “.mid” and “.wav” – are referred to as a “file exten-sion”. The type of data contained within the file is identified by the file extension. Please note that, although the DTX700 assigns file extensions to file names, they are not displayed on-screen in order to make more efficient use of space.
File sizeThe amount of memory needed to store a file is indicated by the file size. These sizes and also the capacities of memory devices are presented in standard computer format using B (bytes), KB (kilobytes), MB (megabytes), and GB (gigabytes). (1 KB is equivalent to 1,024 bytes, 1 MB is equivalent to 1,024 KB, and 1 GB is equivalent to 1,024 MB.)
USB memory deviceThe term “USB memory device” is used to refer to flash mem-ory and other USB memory units used for the storage and retrieval of files.
DirectoryA hierarchical directory system is used on memory devices in order to group files together according to type or application. In this regard, a “directory” is equivalent to a folder as used on a computer. As with files, you can assign names to individual directories. DTX700 file operations are carried out inside a set of special directories created within a USB memory device when it is formatted from the Menu area’s File/Format page. Please note that the DTX700 does not display this directory structure on-screen.
FormatThe operation of initializing a USB memory device is referred to as “formatting”. Whenever you format a USB memory device using the DTX700, any previously created files and directories (or folders) will be erased and special directories for file operations will be created.
Save, loadThe term “save” refers to the writing of data created on the DTX700 to a USB memory device for storage, while “load” refers to the reading of files from the memory device into the instrument’s internal memory.
List of Functions
NOTE• See page 14 for details regarding cursor operations on Menu
area pages.
Carry out the following steps to save a file on a USB memory device.
Procedure
1. Plug a USB memory device that has been formatted on the DTX700 (see page 62) into the [USB TO DEVICE] port on the side panel.
2. Navigate to the Menu area’s File/Save page.The page will appear as follows.
\YAMAHADTX700 ALL : All
ALLKIT : All kitALLSNG : All songALLTRG : All triggerALLWAV : All waveUTL : Utility
FILE/SAVE
SaveLoadRenameDeleteFormatMemInfo
DTX700 Reference Manual 57

FILE
3. Select the file type.Move the cursor to the Type row, press the dial, and select the type of file you wish to save.
Settings: All, AllKit, AllWave, AllSong, AllTrigger, Utility
NOTE• If you select “AllWave” despite wave data having not yet
being created, a “No Wave Data” error message will be displayed and no data will be saved.
4. Enter a name for the file to be saved.Move the cursor to the Name row and press the dial to call up the file naming page.
Entering file names
4-1 Move the cursor within the name field using the [F1] and [F3] buttons and select a character for that posi-tion by turning the dial or pressing the [-/DEC] and [+/INC] buttons. A name of up to 8 characters in length can be assigned to files. The following charac-ters can be used.
NOTE• If you hold down the [SHIFT] button and press the
[F1] or [F3] button, the cursor will move to the start or end of the file name field.
• If you hold down the [SHIFT] button and press the [-/DEC] or [+/INC] button, or alternatively, hold down the [SHIFT] button and turn the dial, the cur-sor will jump between the “ ”, “0”, “A”, and “~” char-acters.
4-2 When you have entered the required name, press the dial or the [EXIT] button to return to the previous page.
NOTE• Any space characters included in file names will
be automatically replaced with “_” (i.e., an under-score).
5. Press the [F3] button (EXECUTE). You will be asked to confirm that the file is to be saved. Press the dial to proceed. Alternatively, you can press the [EXIT] button to return to Step 2 above without saving.
If a file of the same name already exists, you will be asked to confirm whether it is to be overwritten as shown below. If you wish to set a different file name to avoid overwrit-ing, press the [EXIT] button to return to the page from Step 2 above.
6. Press the dial to save the file. The following message will be displayed as the data is being saved. If you press the [EXIT] button at this time, the save process will be aborted and you will be returned to the page from Step 2 above.
CAUTION• Do not unplug the USB memory device from the
[USB TO DEVICE] port or turn off either the mem-ory device or the DTX700 while data is being saved. Failure to observe this precaution can lead to the memory device or the DTX700 being permanently damaged.
When the data has been saved, you will be returned to the page from Step 2 above.
AllAll User data – i.e., all kits, waves, songs, and triggers in addition to utility data
AllKit All kit data
AllWave All wave data
AllSong All song data
AllTrigger All trigger data
Utility Utility data
DTX700 Reference Manual 58

FILE
Carry out the following steps to load a file saved on a USB memory device into the DTX700.
Procedure
1. Plug the USB memory device containing the saved file into the [USB TO DEVICE] port on the side panel.
2. Navigate to the Menu area’s File/Load page. The page will appear as follows.
3. Select the file type. Move the cursor to the Type row, press the dial, and select the type of file you wish to load. The supported types are as follows.
Settings: All, AllKit, Kit, AllWave, Wave, AllSong, Song, All-Trigger, Trigger, Utility
4. Select the file you wish to load. Move the cursor to the File row, and then select the file to be loaded by turning the dial or pressing the [-/DEC] and [+/INC] buttons. Only those files matching your selected file type will be presented for loading. If you have opted to load a single file, you will first of all need to select the All file that contains it (for example, when loading a single User kit, you first select a file saved with the type “AllKit”). It is not, however, possible to load a single file when an All type has been selected for loading.
5. When you have selected the file to be loaded, press the [F3] button.
Case 1: If “All”, “AllKit”, “AllWave”, “AllSong”, “All-Trigger”, or “Utility” was selected:
Press the [F3] button (EXECUTE) and proceed to Step 7.
Case 2: If “Kit”, “Wave”, “Song”, or “Trigger” was selected:
Press the [F3] button (NEXT >>) and proceed to Step 6.
6. Select the required package of data from inside the selected file.
6-1 Move the cursor to Src or Dst and press the dial. Src indicates the file that will be loaded (i.e., the source), and Dst indicates where it will be saved within the DTX700 (i.e., the destination).
6-2 Turn the dial or press the [-/DEC] and [+/INC] but-tons to select the file you wish to load and the num-ber of the User kit, User wave, User song, or User trigger to be overwritten.
6-3 When you have set either Src or Dst, press the dial once again.
When loading a kit:
Settings: 01 to 60
When loading a wave:
Settings: 001 to 500
When loading a song:
Settings: Src 01 to 98, Dst 01 to 93
NOTE• Src = 98 corresponds to data recorded by press-
ing the [REC] button.
FILE/LOAD
AllAll User data – i.e., all User kits, User waves, User songs, and User triggers in addition to utility data
AllKit All User kit data
Kit A single User kit
AllWave All wave data
Wave A single User wave
AllSong All User song data
Song A single User song
AllTrigger All User-trigger data
Trigger A single User trigger setup
Utility Utility data
DTX700 Reference Manual 59

FILE
When loading a trigger:
Settings: 01 to 20
7. When you have finished making your selections, press the [F3] button.You will be asked to confirm that the file is to be loaded.
8. Press the dial to begin loading.The following message will be displayed as the data is being loaded.
CAUTION• Do not unplug the USB memory device from the
[USB TO DEVICE] port or turn off either the mem-ory device or the DTX700 while data is being loaded. Failure to observe this precaution can lead to the memory device or the DTX700 being perma-nently damaged.
When the data has been loaded, you will be returned to the page from Step 5 or 6 accordingly.
Carry out the following steps to rename a file saved on a USB memory device.
Procedure
1. Plug the USB memory device containing the file to be renamed into the [USB TO DEVICE] port on the side panel.
2. Navigate to the Menu area’s File/Rename page.The page will appear as follows.
3. Use the Type parameter to select the type of file to be renamed.
3-1 Turn the dial to move the cursor to the Type row, and then press the dial.
3-2 Turn the dial to select the type of file to be renamed.
Settings: All, AllKit, AllWave, AllSong, AllTrigger, Util-ity
3-3 When you have made your selection, press the dial once again.
4. Select the file to be renamed.
4-1 Turn the dial to move the cursor to the File row, and then press the dial.
4-2 Turn the dial to select the file to be renamed.
4-3 When you have made your selection, press the dial once again.
FILE/RENAME
AllAll User data – i.e., all User kits, User waves, User songs, and User triggers in addition to utility data
AllKit All User kit data
AllWave All wave data
AllSong All User song data
AllTrigger All User-trigger data
Utility Utility data
DTX700 Reference Manual 60

FILE
5. Set a new name for the file.
Move the cursor to the Name row and press the dial to call up the file naming page.
Entering file names
5-1 Move the cursor within the name field using the [F1] and [F3] buttons and select a character for that posi-tion by turning the dial or pressing the [-/DEC] and [+/INC] buttons. The following characters can be used.
NOTE• If you hold down the [SHIFT] button and press the
[F1] or [F3] button, the cursor will move to the start or end of the file name field.
• If you hold down the [SHIFT] button and press the [-/DEC] or [+/INC] button, or alternatively, hold down the [SHIFT] button and turn the dial, the cur-sor will jump between the “ ”, “0”, “A”, and “~” char-acters.
5-2 When you have entered the required name, press the dial or the [EXIT] button to return to the previous page.
NOTE• Any space characters included in file names will
be automatically replaced with “_” (i.e., an under-score).
6. When you have set the new file name, press the [F3] but-ton (EXECUTE). You will be asked to confirm that the file is to be renamed.
7. Press the dial to rename the file.When the renaming process has been completed, the mes-sage “Completed.” will be displayed and you will be returned to the page from Step 2 above.
CAUTION• Do not unplug the USB memory device from the
[USB TO DEVICE] port or turn off either the mem-ory device or the DTX700 while a file is being renamed. Failure to observe this precaution can lead to the memory device or the DTX700 being permanently damaged.
Carry out the following steps to delete files saved on a USB memory device.
Procedure
1. Plug the USB memory device containing the file(s) to be deleted into the [USB TO DEVICE] port on the side panel.
2. Navigate to the Menu area’s File/Delete page.The page will appear as follows.
3. Select the type of file you wish to delete.
3-1 Turn the dial to move the cursor to the Type row, and then press the dial.
3-2 Select the type of file to be deleted by turning the dial or pressing the [-/DEC] and [+/INC] buttons.
Settings: All, AllKit, AllWave, AllSong, AllTrigger, Util-ity
3-3 When you have made your selection, press the dial once again.
FILE/DELETE
AllAll User data – i.e., all User kits, User waves, User songs, and User triggers in addition to utility data
AllKit All User kit data
AllWave All wave data
AllSong All User song data
AllTrigger All User-trigger data
Utility Utility data
DTX700 Reference Manual 61

FILE
4. Turn the dial to move the cursor to the File row, and then press the dial.
5. Select the file to be deleted by turning the dial or pressing the [-/DEC] and [+/INC] buttons.Only those files matching your selected file type from the previous step will be presented for deletion.
6. Press the [F3] button (EXECUTE).You will be asked to confirm that data is to be deleted.
7. Press the dial to begin deleting.When the deletion process has been completed, the mes-sage “Completed.” will be displayed and you will be returned to the page from Step 2 above.
CAUTION• Do not unplug the USB memory device from the
[USB TO DEVICE] port or turn off either the mem-ory device or the DTX700 while data is being deleted. Failure to observe this precaution can lead to the memory device or the DTX700 being perma-nently damaged.
Certain types of USB memory device must be for-matted before they can be used with the DTX700. The correct way to format such a device is described below.
CAUTION• All data on the USB memory device will be deleted during
the formatting process. Before formatting such a device, therefore, ensure that any important data it contains is backed up.
NOTE• In certain cases, USB memory devices formatted on a com-
puter will not be recognized by the DTX700. Be sure, there-fore, to always use the drum trigger module to format memory devices that will be used with it.
Procedure
1. Plug the USB memory device to be formatted into the [USB TO DEVICE] port on the side panel.
2. Navigate to the Menu area’s File/Format page and press the [F3] button (EXECUTE). You will be asked to confirm that the USB memory device is to be formatted.
3. Press the dial to begin the formatting process.The following message will be displayed as the device is being formatted.
CAUTION• When a USB memory device is being formatted, it
must not be unplugged from the [USB TO DEVICE] port; furthermore, neither the memory device nor the DTX700 should be turned off at this time. Fail-ure to observe this precaution can lead to the mem-ory device or the DTX700 being permanently damaged.
When the formatting process has been completed, the message “Completed.” will be displayed and you will be returned to the page from Step 2 above.
FILE/FORMAT
DTX700 Reference Manual 62

FILE
To confirm the memory-usage status of the cur-rently-connected USB memory device, navigate to the Menu area’s File/MemInfo (Memory Info) page.
q Memory available (MB)
This indicates the amount of unused USB-device memory in megabyte (MB) units.
w Memory availability ratio (%)
This indicates how much of the total USB-device memory is cur-rently unused in percentage format.
e Total memory (MB)
This indicates the total USB-device memory in megabyte (MB) units.
NOTE• The units used here will depend on the corresponding memory
size (i.e., KB for kilobytes, MB for megabytes, and GB for giga-bytes).
FILE/MEMORY INFO
w eq
DTX700 Reference Manual 63

Troubleshooting
Check connections as follows.• Ensure that the DTX700 is properly connected to headphones or an external audio system, such as an amplifier and/or speakers.
• Ensure that the cables you are using are in good condition.
Confirm whether volumes and/or output levels are set correctly using the following.• Volume controllers on amplifiers and/or speakers connected to the DTX700.
• The [MASTER] knob on the DTX700 front panel.
• The sliders on the DTX700 front panel.
• The Volume parameter from the Menu area’s Kit/Common page. (See page 15.)
• The Volume parameter from the Menu area’s Kit/Voice page. (See page 18.)
• The MasterVolume parameter from the Menu area’s Utility/General page. (See page 37.)
• The trigger output level of any pads with a dial allowing this to be adjusted.
Check relevant trigger settings as follows.• Ensure that the PadType parameter from the Menu area’s Trigger/Pad/Pad Type page has been set correctly. (See page 46.)
• Ensure that the VelCurve (Velocity Curve) parameter from the Menu area’s Trigger/Pad/Curve page and the Gain parameter from the Trigger/Pad/Pad Type page have been set appropriately. (See pages 45, 46.)
• Ensure that the MinLevel (Minimum Level) parameter from the Menu area’s Trigger/Pad/Pad Type page has not been set too high, as this can prevent sound from being output. (See page 47.)
Check relevant effect and filter settings as follows.• If using filters, re-adjust your cutoff-frequency settings as they often prevent sound from being output.
• Ensure that the Attack (Attack Time) and Decay (Decay Time) parameters from the Menu area’s Kit/Voice page have been set appropriately. (See page 18.)
Check relevant MIDI settings as follows.• Ensure that the MessageType parameter from the Menu area’s Kit/MIDI/Assign page is set to “note”.
• Ensure that the VoiceNumber parameter from the Menu area’s Kit/Voice page is not set to “no assign.” (See pages 17, 20.)
• Ensure that the VelLimitLo (Velocity Limit: Low) parameter from the Menu area’s Kit/MIDI/Assign page is not set too high. (Pads will produce sound only when struck harder than the value set here. See page 22.)
• Ensure that the TrgVel (Trigger Velocity) parameter from the Menu area’s Kit/MIDI/Assign page is not set too low. (Low trigger veloc-ities result in low output volumes. See page 23.)
• Ensure that the LocalCtrl (Local Control) parameter from the Menu area’s Utility/MIDI page is set to “on”. (See page 41.)
• Ensure that the Note parameter for all layers on the Menu area’s Kit/MIDI/Assign page have not been set to “off”, “skip”, or a value marked with as asterisk (*). (In such a case, no layer will be configured to produce a sound. See page 21.)
If an assigned wave does not play, try the following.• Ensure that the data for the wave assigned to the pad in question has not been deleted.
• If you restored the Factory Set, ensure that the wave data has been loaded back in from a USB memory device. (Waves are not included when only kit data is loaded from a USB memory device. See page 59.)
Check relevant pad settings as follows.• Ensure that the PadFunc (Pad Function) parameter from the Menu area’s Utility/Pad page is set to “off”. (See page 40.)
No sound is produced when a pad is struck, or the volume is lower than expected.
DTX700 Reference Manual 64

Troubleshooting
If an external instrument connected via MIDI does not produce sound as expected, try the following.• Ensure that MIDI cables have been correctly connected.
• Ensure that the MIDI IN/OUT parameter from the Menu area’s Utility/MIDI page has been set correctly. (If set to “USB”, MIDI data will not be sent to external MIDI devices connected via MIDI cables. See page 41.)
• Ensure that the DTX700 is sending data on the MIDI channel on which the external tone generator is set to receive it. (See page 20 for details regarding general MIDI settings, or page 34 for details regarding MIDI settings for song playback.)
• Ensure that the MIDI Switch parameter from the Menu area’s Kit/MIDI/TG MIDI Switch page is set to “on”. (MIDI messages are not sent when the external MIDI switch is turned off, meaning that you will be unable to play external MIDI devices using your DTX700. See page 23.)
• Ensure that the PadFunc (Pad Function) parameter from the Menu area’s Utility/Pad page is set to “off”. (No sound will be produced by any pad with a function assignment. See page 40.)
• Ensure that the MessageType parameter from the Menu area’s Kit/MIDI/Assign page is set to “note”. (No sound will be produced for any other setting. See page 20.)
• Ensure that the VelLimitLo (Velocity Limit: Low) parameter from the Menu area’s Kit/MIDI/Assign page is not set too high. (Pads will produce sound only when struck harder than the value set here. See page 22.)
• Ensure that the MinLevel parameter from the Menu area’s Trigger/Pad/Pad Type page has not been set too high, as this can pre-vent sound from being output. (See page 47.)
If foot closed hi-hat sounds cannot be played, try the following.• Ensure that you are operating the hi-hat controller in a firm and full manner.
• Ensure that the hi-hat controller is not configured to produce a kick drum sound (i.e., Double Bass mode). To do so, press the [INST] button to access the Instrument page, and then hold down the [SHIFT] button and press the [F2] button (DBL BASS).
• Lower the setting of the FootClosePos (Foot Closed Position) parameter from the Menu area’s Utility/Pad page. (See page 40.)
It is difficult to produce hi-hat sounds, note the following.• In certain cases, hi-hat sounds will be more difficult to produce when the hi-hat controller is configured to produce a kick drum
sound (i.e., Double Bass mode).
If the volumes of the DTX700 and external audio devices are not well balanced, proceed as follows.• Individually adjust the output volumes of the DTX700 and the external audio devices.
If headphones are connected but nothing can be heard in them, proceed as follows.• Ensure that the [PHONES] knob is set to an appropriate volume.
If the sliders have no effect on volumes, proceed as follows.• Ensure that the SliderSelect parameter from the Menu area’s Kit/Voice page is set to one of the sliders for the pad in question. (If
set to “no assign”, none of the sliders will adjust the pad’s volume.)
If you cannot lower the pad song volume, proceed as follows.• Adjust the pad song volume using the Accompaniment fader from the Volume page, accessed by pressing the [SONG] button and
then the [F1] button (VOLUME).
If a pad produces a sound other than that intended, try the following.• Ensure that trigger setups have been configured correctly.
• If an external MIDI instrument played from the DTX700 does not produce the expected sounds, review its voice settings for the MIDI channel on which the DTX700 is sending data, and ensure that they are appropriate for the MIDI data being sent.
• Adjust the setting of the FootSplashSens (Foot Splash Sensitivity) parameter from the Menu area’s Utility/Pad page. (Hi-hat splash sounds will not be produced if “off” has been set here. See page 40.)
If pads are producing only sounds at very high volumes (i.e., high velocities), try the following.• Ensure that the Gain parameter from the Menu area’s Trigger/Pad/Pad Type page is not set too high. (See page 46.)
• Adjust the setting of the VelCurve (Velocity Curve) parameter from the Menu area’s Trigger/Pad/Curve page. (See page 45.)
• Ensure that the TrgVel (Trigger Velocity) parameter from the Menu area’s Kit/MIDI/Assign page has been set appropriately. (If, for example, this parameter is set to “127”, the maximum velocity will be produced even when the pad is struck lightly. See page 23.)
• Ensure that you are using only the recommended Yamaha external pads. (Products from other manufacturers can output exces-sively large signals.)
Sounds continue to play without end, are distorted, or are stuttered, etc.
DTX700 Reference Manual 65

Troubleshooting
If sounds output from the DTX700 appear to be distorted, try the following.• Ensure that effects have been set appropriately. (Sound can be distorted with certain combinations of effect type and parameter
settings. See page 7.)
• Ensure that the Filter parameter from the Menu area’s Kit/Voice page has been set appropriately. (Depending on the type of sound being filtered, certain resonance settings (Q) can produce distortion. See page 19.)
• Lower the DTX700’s master volume.
If sounds play endlessly and do not stop, try the following.• Check whether the RcvKeyOff (Receive Key Off) parameter from the Menu area’s Kit/MIDI/Assign page has been set to “off”. If so,
certain types of voice will play endlessly when triggered. (See page 22. Note that you can silence all voices at any time by holding down the [SHIFT] button and pressing the [EXIT] button. )
• If the voice in question is a wave, check whether the PlayMode parameter from the Menu area’s Wave/Common page is set to “loop”. If so, certain types of voice will play endlessly when triggered. (See page 53.)
If sounds stop unexpectedly during rolls and flams, try the following.• Check the Mode parameter from the Menu area’s MIDI/Assign page and remove any unnecessary note assignments for stack or
alternate playing.
• Ensure that the Mono/Poly (Polyphony) parameter from the Menu area’s Kit/Voice page is set to “poly”. (See page 19.)
If certain voices are not played during rolls and flams, proceed as follows.• Lower the setting of the RejectTime parameter from the Menu area’s Trigger/Pad/Pad Type page. (See page 46.)
If the DTX700 sounds like it is out of tune or playing the wrong note, try the following.• Adjust the setting of the MasterTune parameter from the Menu area’s Utility/General page. (See page 37.)
• Adjust the setting of the Tune parameter from the Menu area’s Kit/Voice page. (See page 18.)
If effects cannot be applied, try the following.• Turn off the Effect Bypass ([KIT]m[SHIFT]+[F2]).
• Ensure that “enable” has been selected for the effect(s) in question on the Menu area’s Utility/Effect Switch page. (See page 41.)
• Ensure that the VarSend(Dry) (Variation Send Level), ChoSend (Chorus Send Level), and RevSend (Reverb Send Level) parame-ters from the Menu area’s Kit/Voice page have been set appropriately. (See page 19.)
• Ensure that the ChoSend (Chorus Send Level) and RevSend (Reverb Send Level) parameters from the Menu area’s Kit/Effect/Mixer page have been set appropriately. (See pages 26, 27.)
• Ensure that the Type parameter from the Menu area’s Kit/Effect/Variation page has not been set to “No Effect”. (See page 27.)
• Ensure that the Type parameter from the Menu area’s Kit/Effect/Chorus page has not been set to “No Effect”. (See page 27.)
• Ensure that the Type parameter from the Menu area’s Kit/Effect/Reverb page has not been set to “No Effect”. (See page 27.)
If a performance recorded as song data sounds different when played back, try the following.• Turn off the Kit Lock. To do so, press the [KIT] button to access the Kit page, and then hold down the [SHIFT] button and press the
[F1] button (KIT LOCK).
• Ensure that the Rcv10ch (Channel 10 Receive), RcvPC (Program Change Receive), and RcvPC10Ch (Channel-10 Program Change Receive) parameters from the Menu area’s Utility/MIDI page are all set to “on”.
If the volumes of sounds produced by different pads are poorly balanced, proceed as follows.• Ensure that the sliders on the front panel have been set appropriately.
If unintended sounds are also produced when playing a pad, proceed as follows.• Check whether these sounds have been assigned to layers B, C, or D for the pad in question, and if so, remove them.
If changing one pad’s sound leads to other pad sounds also changing, proceed as follows.• Ensure that the same note number has not been assigned to each of the pads using the Note parameter from the Menu area’s Kit/
MIDI/Assign page.
If a variation effect is applied to a two-zone or three-zone pad, but the sound from only one of the zones appears to change, proceed as follows.
• Apply the effect to each zone individually.
DTX700 Reference Manual 66

Troubleshooting
If song playback does not stop as expected when you press the [>/] button, proceed as follows.• Hold down the [SHIFT] button and press and hold the [EXIT] button for at least one second.
If the Decay parameter from the Menu area’s Kit/Voice page or the Instrument page has no effect on a wave, pro-ceed as follows.
• Ensure that the Decay parameter from the Menu area’s Wave/Common page is set to a value less than 127.
If hi-hat sounds are occasionally produced even though the hi-hat controller is configured to produce a kick drum sound (i.e., Double Bass mode), proceed as follows.
• Select the hi-hat pad and increase the setting of the MinLevel (Minimum Level) parameter from the Menu area’s Trigger/Pad/Pad Type page. Note that if this setting is too high, it may become difficult to play the hi-hat.
If song playback cannot be started, try the following.• Ensure that the currently selected song actually contains data.
• If the MIDI Sync (MIDI Synchronization) parameter from the Menu area’s Utility/MIDI page has been set to “ext”, ensure that the DTX700 receives MIDI Clock messages correctly from an external MIDI device or a computer.(See page 41.)
If a song plays endlessly and does not stop, proceed as follows.• Hold down the [SHIFT] button and press the [EXIT] button.
If you are attempting to change a wave’s tempo, note the following.• Waves have fixed tempos. They will always play at the tempo of the original imported file regardless of drum kit tempo and other
similar settings.
If a parameter setting you wish to change is displayed as “---” and cannot be modified, try the following.• Ensure that the PadFunc (Pad Function) parameter from the Menu area’s Utility/Pad page is set to “off”. (See page 40.)
• Ensure that the Note parameter from the Menu area’s Kit/MIDI/Assign page has not been set to “off” for all four layers, A through D. (See page 21.)
If a pad controller does not work as expected, try the following.• Ensure that the PadFunc (Pad Function) parameter from the Menu area’s Utility/Pad page is not set to “off”.
• Avoid holding the rim while adjusting the pad controller as this can prevent it from working properly.
If you are trying to record multiple songs using the [REC] button, note the following.• The DTX700 can only store one recorded song at a time. If a new recording is made, the current one will be overwritten.
If you cannot change the current kit using the dial or the [-/DEC] and [+/INC] buttons, proceed as follows.• Turn off the kit lock. To do so, press the [KIT] button to access the Kit page, and then hold down the [SHIFT] button and press the
[F1] button (KIT LOCK).
If double triggers are being produced, try the following.• Ensure that trigger setups have been configured correctly.
• If the pad or drum trigger in question features a controller for adjusting output or sensitivity, turn it downward.
• Ensure that the Gain parameter from the Menu area’s Trigger/Pad/Pad Type page is not set too high. (See page 46.)
• Ensure that you are using only the recommended Yamaha drum triggers or trigger sensors. (Products from other manufacturers can output excessively large signals, which in turn can result in double triggering.)
• Ensure that the heads are not vibrating in an irregular manner, and mute them if so required.
• Ensure that drum triggers are attached in the vicinity of the rim and not near the center of the head.
• Ensure that no other objects are coming into contact with the drum trigger.
• Raise the setting of the RejectTime parameter from the Menu area’s Trigger/Pad/Pad Type page. (Avoid setting too large a reject time, as this can make it impossible to accurately detect flams, rolls, and the like. See page 46.)
Values cannot be changed or buttons do not work as expected, etc.
Multiple sounds are produced when a single pad is struck.
DTX700 Reference Manual 67

Troubleshooting
If crosstalk is occurring (i.e., sound is produced by a pad other than the one that was struck), try the following.• Ensure that trigger setups have been configured correctly.
• Ensure that the RejectLevel parameter from the Menu area’s Trigger/Pad/Crosstalk page is set appropriately. (See page 48.)
• If using a separately-sold pad featuring a level adjuster, ensure that the level is set appropriately.
• Ensure that the MinLevel (Minimum Level) parameter from the Menu area’s Trigger/Pad/Pad Type page has been set appropriately. (See page 47.)
If only one voice is produced when two pads are played simultaneously, try the following.• Ensure that trigger setups have been configured correctly.
• Go to the Menu area’s Trigger/Pad/Pad Type page, select the pad for which a sound is not being produced, and raise the value of its Gain parameter. (See page 46.)
• Go to the Menu area’s Trigger/Pad/Pad Type page, select the pad for which a sound is not being produced, and lower the value of its MinLevel (Minimum Level) parameter. (See page 47.)
• Go to the Menu area’s Kit/Voice page and check whether both pads have been assigned to the same alternate group using the Alt-Group parameter. In certain cases, this can lead to only one sound being produced. (See page 20.)
• Ensure that the TrgAltGrp (Trigger Alternate Group) parameter from the Menu area’s Kit/MIDI/Assign page is set to “off”. (See page 23.)
If consistent, reliable trigger signals cannot be produced using an acoustic drum, try the following.• Ensure that you are using a high-quality drum trigger such as the DT20, and that it is secured firmly in place using adhesive tape.
(Remember to also remove any old tape.)
• Carry out the checks listed above in the section “No sound is produced when a pad is struck, or the volume is lower than expected.”.
• Ensure that the signal cable is securely plugged into the jack on the DT20 or other drum trigger.
If closed hi-hat sounds cannot be played, proceed as follows.• Ensure that the Type parameter from the Menu area’s Trigger/Pad/Pad Type page is set correctly. (See page 46.)
If, when using a cymbal pad, edge and cup sounds cannot be played or the choking technique does not work, pro-ceed as follows.
• Ensure that the Type parameter from the Menu area’s Trigger/Pad/Pad Type page is set correctly. (A suitable cymbal-pad type must be selected for the pad being used. See page 46.)
If hi-hat splash sounds are not produced as expected, try the following.• Ensure that the foot controller is correctly connected to the [HI-HAT CONTROL] trigger input jack.
• Adjust the setting of the FootSplashSens (Foot Splash Sensitivity) parameter from the Menu area’s Utility/Pad page. (Hi-hat splash sounds will not be produced if “off” has been set here. See page 40.)
If a hi-hat controller connected via the [HH-KICK] trigger input jack does not work as expected, try the following.• Ensure that the hi-hat controller is connected to the DTX700 using the correct type of cable.
• Ensure that you are using an HH65 Hi-hat Controller. (Other types will not operate correctly with the DTX700.)
• Ensure that the Cubase Remote function is not turned on.
Optional add-on products do not operate as expected.
Nothing happens when buttons on the front panel are pressed.
DTX700 Reference Manual 68

Troubleshooting
If data cannot be saved on a USB memory device, try the following.• Ensure that the USB memory device in question has been formatted using the DTX700. (See page 62.)
• Ensure that the USB memory device in question has not been write-protected.
• Ensure that there is sufficient free space on the USB memory device to save the data. (You can check the amount of free space available on the Menu area’s File/Memory Info page. See page 63.)
If a standard MIDI file cannot be read from a USB memory device, try the following.• Ensure that the standard MIDI file in question is of Format 0. (Format 1 files cannot be read.)
• Ensure that the file to be read is located within the USB memory device’s root directory (that is, not within any folder).
If a wave file cannot be read from a USB memory device, try the following.• Ensure that the wave file in question is 16-bit.
• Ensure that there is sufficient free space in the DTX700 to load the wave file.
• Ensure that the USB memory device in question has been formatted using the DTX700. (See page 62.)
• Ensure that the file to be read is located within the USB memory device’s root directory (that is, not within any folder).
• If using USB cables, ensure that they are connected correctly.
• Ensure that the MIDI IN/OUT parameter from the Menu area’s Utility/MIDI page has been set correctly. (If you want to exchange MIDI data with a computer via USB, ensure that the MIDI IN/OUT parameter is set to “USB”. Alternatively, if you want to exchange MIDI data with external devices via MIDI cables, ensure that this parameter is set to “MIDI”. See page 41.)
If starting a sequencer connected via MIDI causes the DTX700 to also start playback or vice-versa, proceed as fol-lows.
• Ensure that the SeqCtrl (Sequencer Control) parameter from the Menu area’s Utility/MIDI page has been set correctly. (See page 42.)
If the Cubase Remote function cannot be activated, try the following.• Ensure that the DTX700 and the computer have been correctly connected.
• Ensure that the MIDI IN/OUT parameter from the Menu area’s Utility/MIDI page has been set correctly. (In order to enable commu-nication with a computer via USB, ensure that this parameter is set to “USB”. See page 41.)
If the Cubase Remote function does not work as expected, proceed as follows.• Ensure that the DTX700 Extension has been installed on the computer in question.
If data cannot be exchanged with DAW applications, note the following.• When the Auto Power-Off function activates to turn off the DTX700, any connection with DAW software will be lost. To restore this
connection, close the DAW application, turn the DTX700 back on, and then launch the application once again. It is advisable to dis-able the Auto Power-Off function when exchanging data with a computer.
Difficulties are experienced with procedures involving USB memory devices.
MIDI data cannot be exchanged with a computer or external MIDI device.
DTX700 Reference Manual 69