dyno-scan for palm os user guide - auterra · auxiliary port pinouts 70 analog in 70 digital in 71...
TRANSCRIPT

User Guide

Warnings The exclamation point within the triangle is a warning sign alerting you of important instructions accompanying the product. Please observe all warnings.
Do not operate DashDyno while the vehicle is in motion. DashDyno can be mounted inside the vehicle but it should not be used in such a manner as to distract the operator from the operation of the vehicle. Driving requires the full attention of the driver. Operating or observing the DashDyno will cause driver distraction and could cause a fatal accident.
Do not mount DashDyno so it interferes with a vehicle airbag. When mounting DashDyno inside a vehicle, take care not to locate the device over an airbag or within the deployment path of an airbag. An airbag is also known as a Supplementary Restraint System (SRS), Air Cushion Restraint System (ACRS), or Supplemental Inflatable Restraint (SIR).
Do not operate the vehicle indoors. A running engine produces lethal carbon monoxide exhaust fumes that can seriously harm or kill you if inhaled. Only run the vehicle motor outdoors with proper ventilation. Many scan tool operations do not require a running motor.
Ensure the DashDyno and cables do not interfere with the vehicle controls. A cable dangling in front of the foot pedals, gear shifter, or steering wheel can interfere with vehicle operation and cause a fatal accident. Always ensure the DashDyno and cables are securely fastened out of the way. If the DashDyno cannot be safely attached as to not interfere with the vehicle controls, then do not drive the vehicle with the DashDyno connected to the vehicle.
Never race or exceed the posted speed limit while on public highways. The dynamometer operations require accelerating to high speeds. Always uses a closed course raceway when performing dynamometer and acceleration tests.

Terms of Use The Software contains proprietary and confidential information that is protected by applicable intellectual property and other laws. You may not modify or sell works based on the Software.
The Software is for your personal use. We grant you a personal and non-exclusive license to use the object code version of the Software on a single Windows-based personal computer; provided that you do not (and do not allow any third party to) copy, modify, reverse engineer, create derivative works from, assign or otherwise transfer any right in the Software; and you will not modify the Software by any means.
Disclaimer
The “Product” is the complete DashDyno SPD device and the Dyno-Scan for Windows software including hardware, software, user manual, and packaging.
Auterra, LLC assumes no responsibility for any loss or claim by third parties, which arise through the use of this Product. Auterra, LLC assumes no responsibility for any damage or loss caused by deletion of data as a result of a Product malfunction. Be sure to backup copies of all important data on other media to protect against data loss.
The Software, and all accompanying files, data and materials, are provided "as is" without warranty of any kind, either expressed or implied, including, but not limited to, the implied warranties of merchantability and fitness for a particular purpose. The entire risk as to the quality and performance of the Software is with you. Should the Software prove defective, you assume the cost of all necessary servicing, repair or correction.
AUTERRA, OR ITS PRINCIPALS, SHAREHOLDERS, OFFICERS, EMPLOYEES, AFFILIATES, CONTRACTORS, SUBSIDIARIES, OR PARENT ORGANIZATIONS, SHALL NOT BE LIABLE FOR ANY INCIDENTAL, INDIRECT OR CONSEQUENTIAL DAMAGES OR OTHER DAMAGES INCLUDING BUT NOT LIMITED TO, LOSS OF PROFITS, LOSS OF REVENUE, LOSS OF DATA, LOSS OF USE OF THE PRODUCT OR ANY ASSOCIATED EQUIPMENT, DOWNTIME AND CONSUMER’S TIME OR FOR BREACH OF ANY EXPRESS OR IMPLIED WARRANTY OR CONDITION, DAMAGE TO THE VEHICLE, BREACH OF CONTRACT, NEGLIGENCE, STRICT LIABILITY OR ANY OTHER LEGAL THEORY RELATED TO THIS PRODUCT.
Copyright
2007-2010 Auterra, LLC. All rights reserved.
Trademarks DashDyno™, DashDyno SPD™ and Dyno-Scan™ are trademarks of Auterra, LLC. Windows® is a registered trademark of Microsoft Corporation. Google and Google Earth are trademarks of Google Inc.
ii Preface
Contents
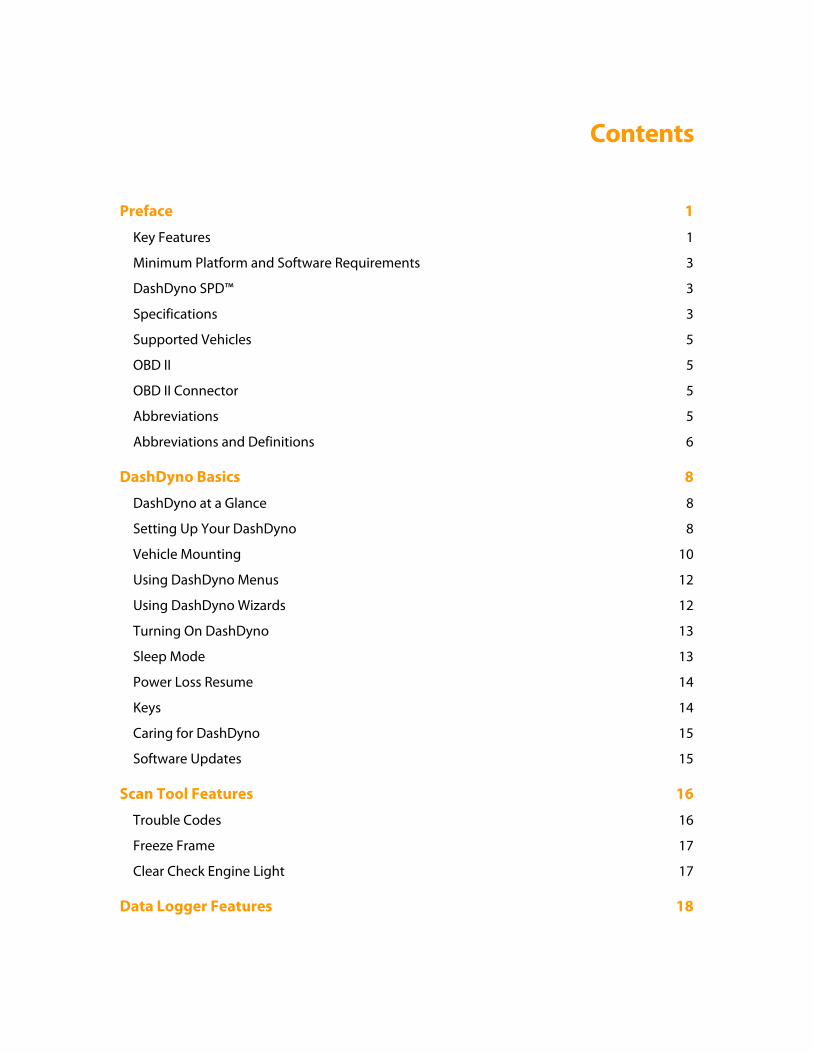
Preface 1 Key Features 1 Minimum Platform and Software Requirements 3 DashDyno SPD™ 3 Specifications 3 Supported Vehicles 5 OBD II 5 OBD II Connector 5 Abbreviations 5 Abbreviations and Definitions 6
DashDyno Basics 8 DashDyno at a Glance 8 Setting Up Your DashDyno 8 Vehicle Mounting 10 Using DashDyno Menus 12 Using DashDyno Wizards 12 Turning On DashDyno 13 Sleep Mode 13 Power Loss Resume 14 Keys 14 Caring for DashDyno 15 Software Updates 15
Scan Tool Features 16 Trouble Codes 16 Freeze Frame 17 Clear Check Engine Light 17
Data Logger Features 18

Theory of Operation 18 Sample Speed 19 Parameters 19
Enhanced OBD II Parameters 27 Parameter Select Wizard 27
Screen Configuration 28 Alarms 29
Meter 2 Screen 29 Meter 4 Screen 30 Line Graph Screen 30 Bar Graph Screen 31 Gauge Screen 32 List Screen 32 Oscilloscope Screen 32 Live Data and Playback Modes 33
Switching Modes 33 Pause/Play 34 Record 34 Playback 34
Analog Inputs 35 Digital Input 35 Connect Simulation 36
Dynamometer Features 37 Theory of Operation 37
DashDyno SPD™ Dynamometer 37 Automatic Transmissions 38
Dyno Files 38 Dyno Setup File 39
Drag Coefficient and Frontal Area 39 Tire Diameter 40 Dyno Setup File Usage 41
ii

Gear Ratio Screen 41 Measuring Overall Gear Ratio 41 Calculating Overall Gear Ratio 42 Confirming Gear Ratio Result 42 Automatic Transmissions 42
Dynamometer Getting Started 43 Power Torque Screen 43
Power Torque Statistics 44 Power Torque Run Do’s and Don’ts 44
Acceleration Screen 45 Acceleration Run Statistics 47 Acceleration Run Do’s and Don’ts 47
Performance Screen 48 Trip Computer 48
Preferences 50 Vehicle Speed Correction 51 Distance Correction 52 MPG Correction 53 Boost Calibration 54 Engine Size 55 Fuel Type 55 Fuel Cost 55 Case Temperature 55 Auto-Record 56
Files 58 Create Files 58
Create Alarm File 59 Create Screen Setup File 59 Create Dyno Setup File 59 Create Formula File 59
Delete Files 59
iii
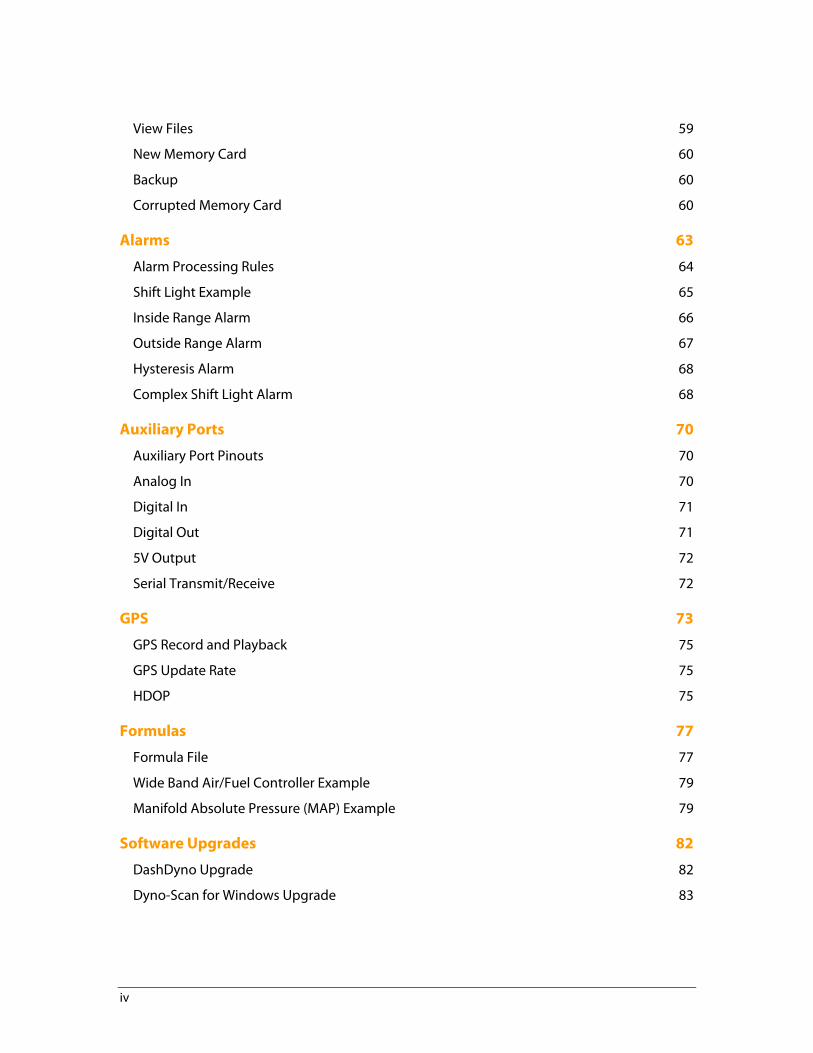
View Files 59 New Memory Card 60 Backup 60 Corrupted Memory Card 60
Alarms 63 Alarm Processing Rules 64 Shift Light Example 65 Inside Range Alarm 66 Outside Range Alarm 67 Hysteresis Alarm 68 Complex Shift Light Alarm 68
Auxiliary Ports 70 Auxiliary Port Pinouts 70 Analog In 70 Digital In 71 Digital Out 71 5V Output 72 Serial Transmit/Receive 72
GPS 73 GPS Record and Playback 75 GPS Update Rate 75 HDOP 75
Formulas 77 Formula File 77 Wide Band Air/Fuel Controller Example 79 Manifold Absolute Pressure (MAP) Example 79
Software Upgrades 82 DashDyno Upgrade 82 Dyno-Scan for Windows Upgrade 83
iv
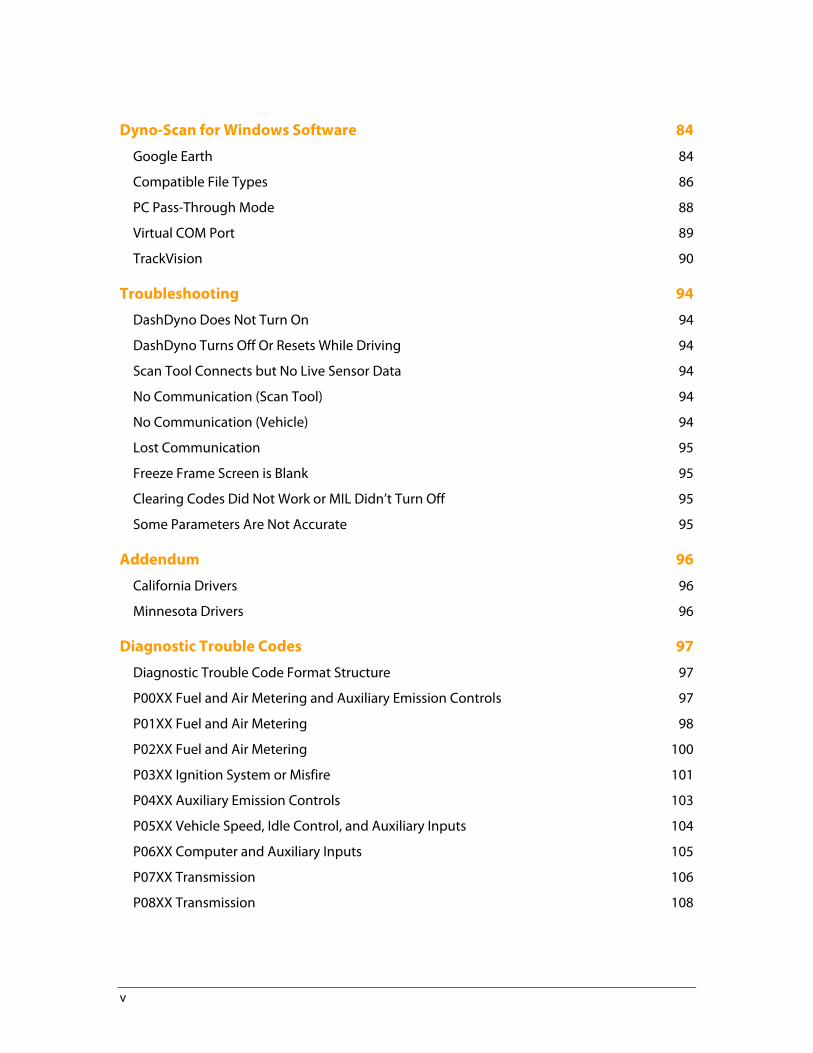
Dyno-Scan for Windows Software 84 Google Earth 84 Compatible File Types 86 PC Pass-Through Mode 88 Virtual COM Port 89 TrackVision 90
Troubleshooting 94 DashDyno Does Not Turn On 94 DashDyno Turns Off Or Resets While Driving 94 Scan Tool Connects but No Live Sensor Data 94 No Communication (Scan Tool) 94 No Communication (Vehicle) 94 Lost Communication 95 Freeze Frame Screen is Blank 95 Clearing Codes Did Not Work or MIL Didn’t Turn Off 95 Some Parameters Are Not Accurate 95
Addendum 96 California Drivers 96 Minnesota Drivers 96
Diagnostic Trouble Codes 97 Diagnostic Trouble Code Format Structure 97 P00XX Fuel and Air Metering and Auxiliary Emission Controls 97 P01XX Fuel and Air Metering 98 P02XX Fuel and Air Metering 100 P03XX Ignition System or Misfire 101 P04XX Auxiliary Emission Controls 103 P05XX Vehicle Speed, Idle Control, and Auxiliary Inputs 104 P06XX Computer and Auxiliary Inputs 105 P07XX Transmission 106 P08XX Transmission 108
v
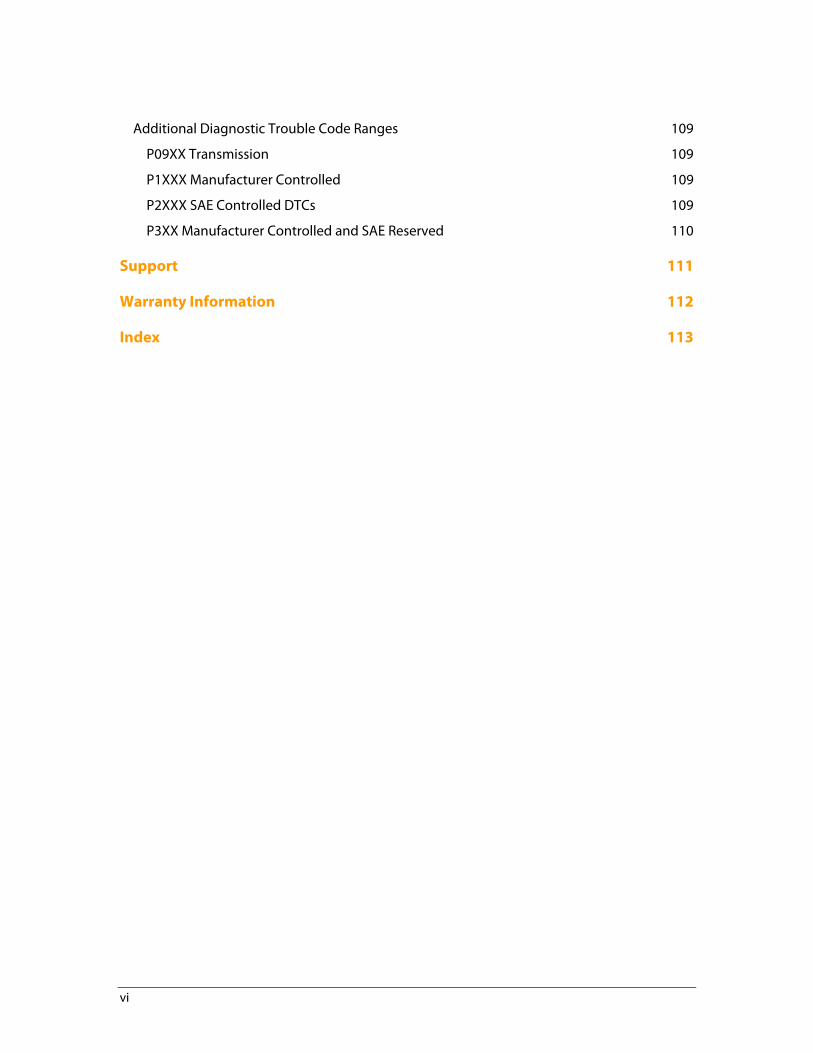
Additional Diagnostic Trouble Code Ranges 109 P09XX Transmission 109 P1XXX Manufacturer Controlled 109 P2XXX SAE Controlled DTCs 109 P3XX Manufacturer Controlled and SAE Reserved 110
Support 111
Warranty Information 112
Index 113
vi

CHAPTER 1
Preface
Congratulations on your purchase of a DashDyno SPD™. Please take time to read through these operating instructions and become familiar with the operating procedure.
Auterra DashDyno SPD™ is unique product that combines a scan tool, performance meter, a data logger and more into one, easy to use portable instrument for the automotive enthusiast.
The scan tool functions can read and clear trouble codes, turn off the “Check Engine” light, and display a vehicle freeze frame. The performance meter includes features such as a dynamometer, acceleration tests, and fuel economy measurements. And the data logger records all live sensor data to the expansion SD card.
Key Features DashDyno SPD ™ offers a multitude of diagnostic and performance-measuring features:
•
•
•
•
•
•
•
•
•
•
•
•
•
•
All 1996 and later vehicles supported, including American, Asian, and European
Easy installation – no hard wiring required
Compatible with Dyno-Scan for Windows PC software for PC-based diagnostics
Can be dash mounted or handheld
Quick release windshield mount option
Powerful 32-bit microprocessor
Backlit high-contrast LCD display with temperature contrast compensation
280 selectable parameters and simultaneously record up to 16
Records GPS data using an external GPS receiver
View GPS data within Google Earth1
Powered from an OBD II cable or an A/C wall adapter
Measures Horsepower and Torque
0-60mph, 1/8 and 1/4 mile, and top speed
Two trip computers with instant and average fuel economy
1 Dyno-Scan for Windows software required
1 Preface

• SD / MMC card slot for recording data
•
•
•
•
•
•
•
•
•
•
•
•
•
•
•
•
•
•
•
•
•
•
•
•
•
•
•
•
Auto power-on when vehicle is started
Playback recorded data and use fast forward/reverse for quick navigation
Three user programmable alarm lights
Record / play and keyboard shift key indicator lights
8 button backlit keypad with secondary functions
USB port for connection to a PC
Two expansion ports for optional accessories and sensor logging
Four external analog inputs, a digital input, a digital output, and a serial port
Analog input range select (0-6V, 0-12V and 0-24V)
2-channel digital oscilloscope mode
Customizable sensor conversion formulas
Software wizards offer step by step guidance
Read and clear diagnostic trouble codes
Enhanced and generic code definitions displayed on screen
Turn off Check Engine or Service Engine Soon light
Line graphs, bar graphs, meters and gauges
All graph screens zoom in/out and scroll right/left
Axis labels auto-hide after 3 seconds providing unobstructed graph views
Min/max axis labels update with zoom and scroll
256-point per channel buffer on graph screens
Corrects measurements for inaccurate speedometer due to non-stock tire size
J1850 (VPW, PWM), ISO 9141, ISO 14320 (KWP), and ISO 15765 (CAN bus) protocols
CAN bus 6x mode reads six sensors at once from the vehicle
Easy installation – plugs into the vehicle OBD II diagnostic port
Low-profile OBD II cable connector
Compatible with the Dyno-Scan for Windows PC software
Free software upgrades installed through the mini USB port
1-year warranty
2 Preface
Minimum Platform and Software Requirements DashDyno does not require a PC. However, you must have one of the following operating systems with Microsoft Internet Explorer 5.01 or later installed on your computer to run the Dyno-Scan™ for Windows PC software:
•
•
•
•
•
•
•
•
•
•
•
•
•
•
•
•
•
•
•
•
•
Microsoft® Windows® 98
Microsoft® Windows® 98 Second Edition
Microsoft® Windows® Millennium Edition (Windows Me)
Microsoft® Windows NT® 4 (Workstation or Server) with Service Pack 6a
Microsoft® Windows® 2000 (Professional, Server, or Advanced Server)
Microsoft® Windows® XP (Home or Professional, 32-bit and 64-bit)
Microsoft® Windows® XP Media Center Edition
Microsoft® Windows® XP Tablet PC Edition
Microsoft® Windows® Server 2003 family
Microsoft® Windows® Vista (all editions, 32-bit and 64-bit)
Microsoft® Windows® 7 (all editions, 32-bit and 64-bit)
Minimum hardware requirements:
Pentium 166MHz or faster
64MB of RAM or higher
DashDyno SPD™ The DashDyno SPD™ includes many different components. Some items are optional and not included with all versions of the product.
DashDyno SPD™
Quick Start Guide
Electronic User’s Manual
OBD II Cable
Quick Release Suction Cup Windshield Mount
AC adapter
USB Cable
Dyno-Scan™ for Windows software
Specifications DashDyno SPD™ product specifications:
3 Preface

Size 5.2” W x 2.4” H x 1.4” D
Processor 32-bit, software upgradeable
Screen High contrast monochrome, white LED backlit
Keys Backlit silicon rubber
Expansion Slot Support for MultiMediaCard, SD and SDIO cards
File Formats FAT12, FAT16, FAT32
Card Size 2GB max
Power OBD II cable or AC adapter
Sleep Mode Auto power-off
Keypad Backlit, secondary function keys
Aux Port 1 Mini-DIN, four analog inputs, 5V output
Aux Port 2 Mini-DIN, one digital input, one digital output, serial port, 5V output
Aux 5V Output Current limited 25mA max (combined both ports)
Analog Inputs Selectable ranges of 0-6V, 0-12V or 0-24V, 10-bit ADC
Analog Input Impedance
95k ohm 6V range, 62k ohm 12V range, 54k ohm 24V range
Oscilloscope Mode 200Hz bandwidth, 1mS sample rate
Digital Input 24V max, 4V high min, 1.6V low min
Digital Output Open Collector, 15V max, 75ma sink max
External GPS Baud 4800, 9600, 19200, 38400
External GPS Protocol NMEA 0183
USB Port Mini USB type B
OBD II Port Modular
OBD II Cable 6ft, low-profile OBD II connector
Alarm Lights Three high intensity LEDs
Mounting Two brass 8-32 rear mounting screw holes
Windshield Mount Suction cup with quick release
OBD II Protocols J1850 (VPW, PWM), ISO 9141, ISO 14320 (KWP), and ISO 15765 (CAN bus) protocols
4 Preface
Ambient Temperature Operation
14ºF to 131ºF (-10ºC to 55ºC)
Ambient Temperature Storage - Short Term
-4ºF to 140ºF (-20ºC to 60ºC)
Ambient Temperature Storage – Long Term
32ºF to 86ºF (0ºC to 30ºC)
Supported Vehicles DashDyno supports all 1996 and newer vehicles, including American, European, and Asian models. Some 1994 and 1995 vehicles are also supported with a sticker under the hood indicating OBD II compliance. All vehicles sold in the US model year 1996 and newer are OBD II compliant and do not require the under hood sticker.
OBD II OBD II stands for On-Board Diagnostics second generation. OBD II was incorporated on some 1994 and 1995 model-year vehicles and was required for all 1996-and-later vehicles.
OBD II is a series of government regulations intended to reduce in-use vehicle emissions by continually monitoring for failure and/or deterioration of the powertrain and its emission-control systems. A Malfunction Indicator Light (i.e. Check Engine light or Service Engine Soon light) visible to the vehicle operator will be illuminated and a Diagnostic Trouble Code set when either there is a failure of a monitored component/system or any of the sensed parameters deteriorates such that the vehicle's emissions would exceed the relevant standard by approximately 50 percent.
The OBD II standard makes the Auterra DashDyno SPD™ universal to all automobiles, since all newer vehicles sold must conform to these government regulations.
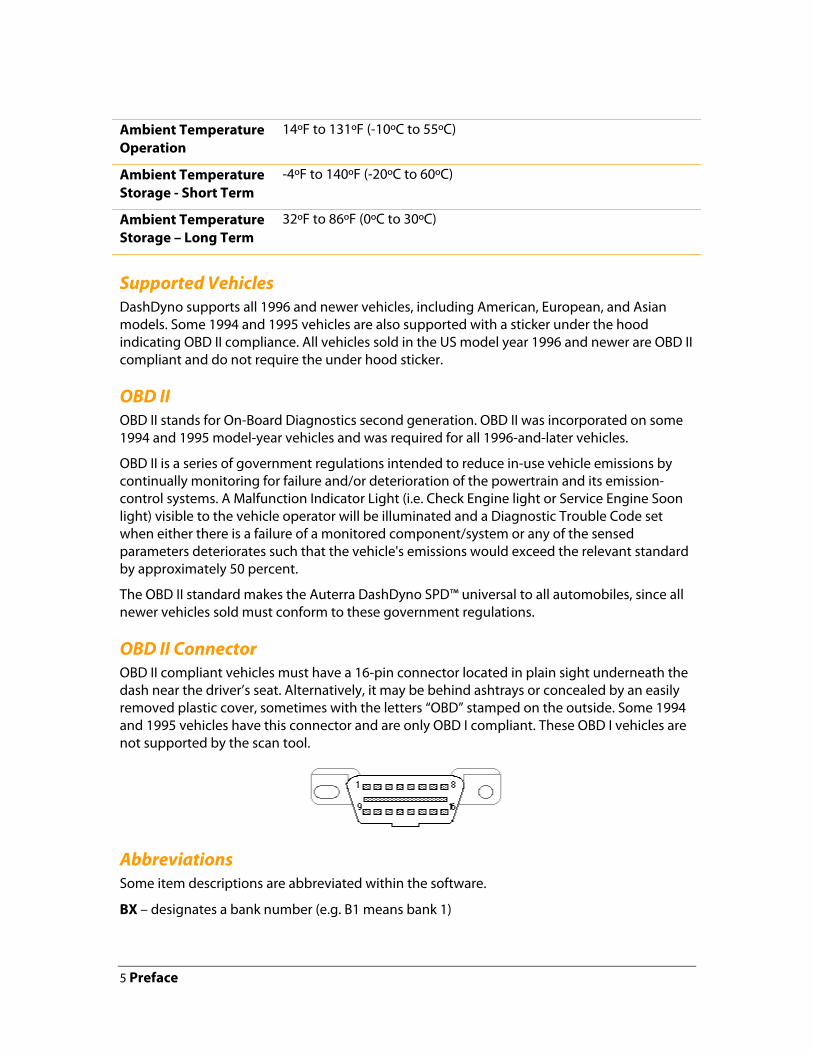
OBD II Connector OBD II compliant vehicles must have a 16-pin connector located in plain sight underneath the dash near the driver’s seat. Alternatively, it may be behind ashtrays or concealed by an easily removed plastic cover, sometimes with the letters “OBD” stamped on the outside. Some 1994 and 1995 vehicles have this connector and are only OBD I compliant. These OBD I vehicles are not supported by the scan tool.
Abbreviations Some item descriptions are abbreviated within the software.
BX – designates a bank number (e.g. B1 means bank 1)
5 Preface

SX – designates a sensor number (e.g. S1 means sensor 1)
BX-SX – designates a bank-sensor combination (e.g. B1-S2 means bank 1 – sensor 2)
Abbreviations and Definitions A/F – Air Fuel
AFR – Air Fuel Ratio
A/T – Automatic Transmission
Check Engine Light – also known as a MIL (Malfunction Indicator) light.
CHT – Cylinder Head Temperature
Closed Loop – In closed loop operation the oxygen sensors are used to adjust the fuel mixture. See open loop.
DTC – Diagnostic Trouble Code
Dyno - Dynamometer
EBCM – Electronic Brake Control Module
EBTCM – Electronic Brake Traction Control Module
ECU – Emission Control Unit (i.e. the vehicle’s on-board computer)
EGR – Exhaust Gas Recirculation
EFI – Electronic Fuel Injection
EMR – Electronic Module Retard
ESC – Electronic Spark Control
EST – Electronic Spark Timing
EVAP – Evaporative Emission
Fuel Trim – engine computer function that keeps the air/fuel mixture close to ideal.
GPS – Global Positioning System
HC – Hydrocarbons
HEI – High Energy Ignition
HO2S – Heated Oxygen Sensor
Horsepower – a unit of measure to express the rate at which mechanical energy is expended.
HP – Horsepower
M/T – Manual Transmission
MAF – Mass Air Flow
6 Preface

MIL – Malfunction Indicator Light (i.e. “Check Engine” or “Service Engine Soon” light on the vehicle’s instrument panel).
NOx – Oxides of Nitrogen
O2 – Oxygen
Open Loop – used to describe the fuel mixture when the oxygen sensors are not being used, usually when the engine is cold or if a malfunction preventing closed loop operation is detected. See closed loop.
PCM – Power Control Module
PID – Parameter ID is a number used to designate a particular vehicle sensor.
PTO – Power Take-Off
RPM – Revolutions per Minute
SAE – Society of Automotive Engineers
Scan Tool – a computer that reads out OBD II values from the vehicle.
Service Engine Soon – also known as a MIL light.
SFI – Sequential Fuel Injection
TBI – Throttle Body Injection
TCM – Transmission Control Module
TCS – Traction Control Switch
TFT – Transmission Fluid Temperature
Torque - Torque is a measure of the force acting on an object causing that object to rotate.
TP – Throttle Position
TPS – Throttle Position Sensor
VAC – Vacuum
VIN – Vehicle Identification Number
VSS – Vehicle Speed Sensor
7 Preface
CHAPTER 2
DashDyno Basics
Getting started with your DashDyno is easy, and this section shows you how.
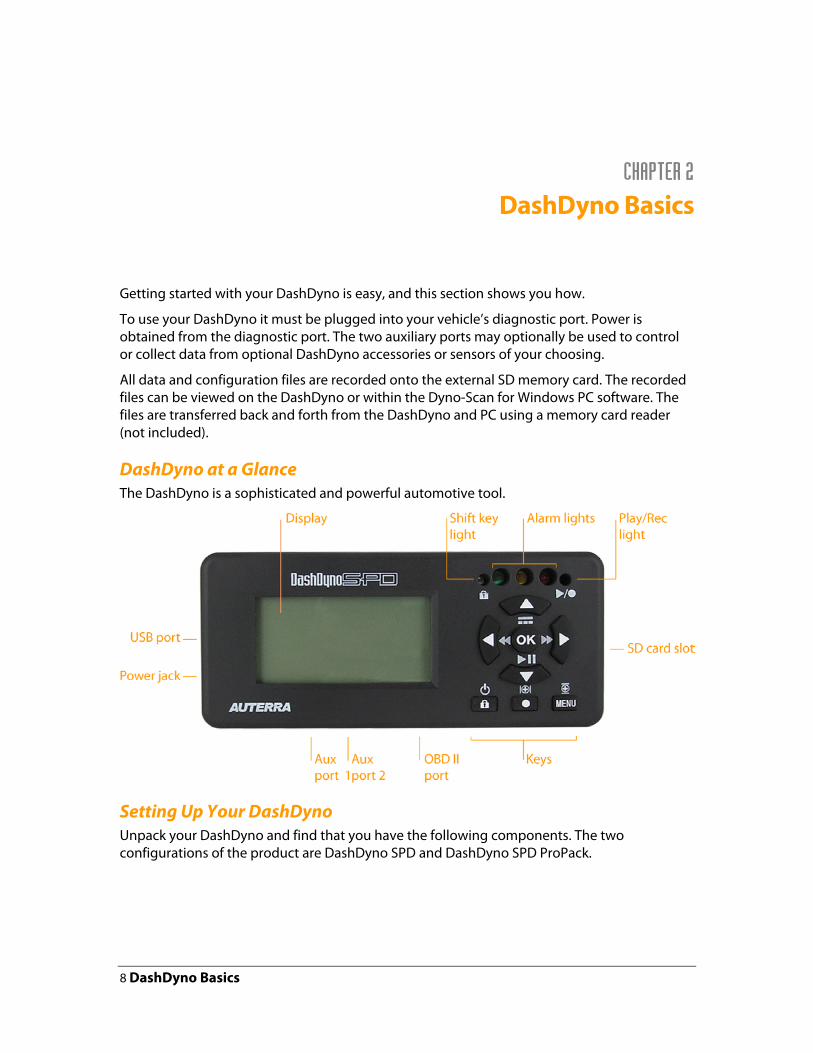
To use your DashDyno it must be plugged into your vehicle’s diagnostic port. Power is obtained from the diagnostic port. The two auxiliary ports may optionally be used to control or collect data from optional DashDyno accessories or sensors of your choosing.
All data and configuration files are recorded onto the external SD memory card. The recorded files can be viewed on the DashDyno or within the Dyno-Scan for Windows PC software. The files are transferred back and forth from the DashDyno and PC using a memory card reader (not included).
DashDyno at a Glance The DashDyno is a sophisticated and powerful automotive tool.
Setting Up Your DashDyno Unpack your DashDyno and find that you have the following components. The two configurations of the product are DashDyno SPD and DashDyno SPD ProPack.
8 DashDyno Basics
• DashDyno SPD™
•
•
•
•
•
•
•
•
•
Quick Start Guide
Electronic User Manual
Dyno-Scan™ for Windows software
OBD II Cable
Quick Release Suction Cup Windshield Mount (ProPack)
Female Quick Release Mounting Screws (ProPack)
Cable Tie (ProPack)
AC Adapter (ProPack)
USB Cable (ProPack)
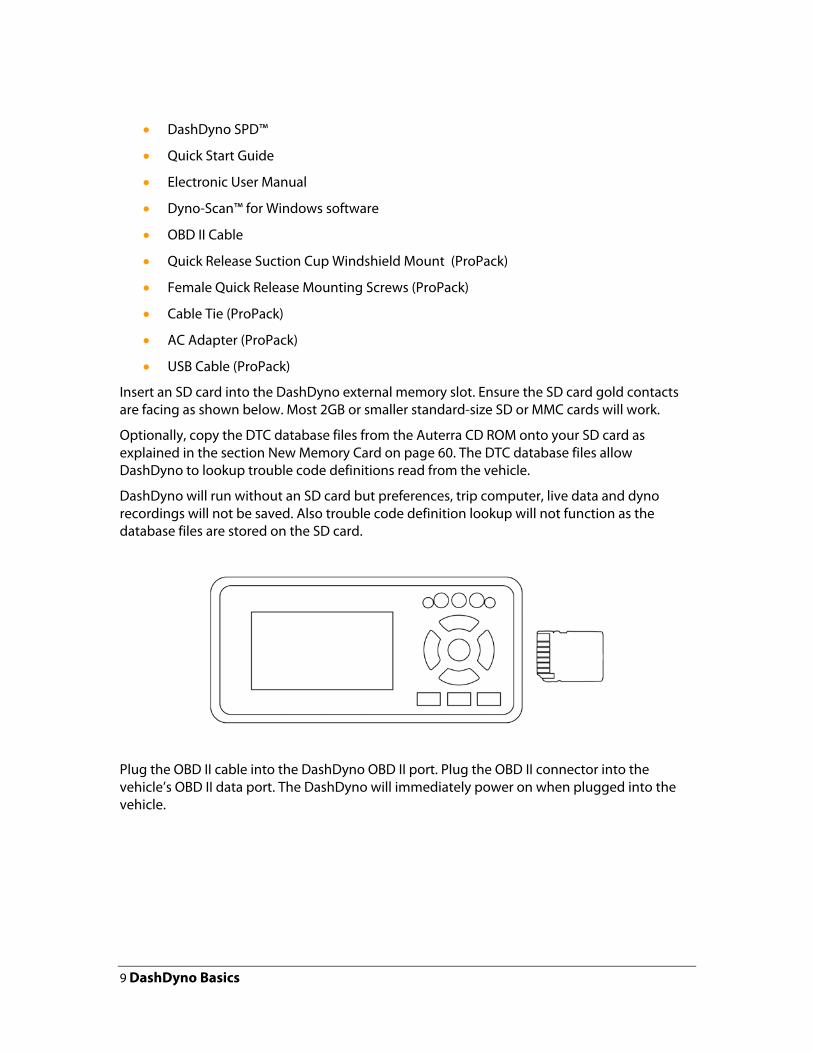
Insert an SD card into the DashDyno external memory slot. Ensure the SD card gold contacts are facing as shown below. Most 2GB or smaller standard-size SD or MMC cards will work.
Optionally, copy the DTC database files from the Auterra CD ROM onto your SD card as explained in the section New Memory Card on page 60. The DTC database files allow DashDyno to lookup trouble code definitions read from the vehicle.
DashDyno will run without an SD card but preferences, trip computer, live data and dyno recordings will not be saved. Also trouble code definition lookup will not function as the database files are stored on the SD card.
Plug the OBD II cable into the DashDyno OBD II port. Plug the OBD II connector into the vehicle’s OBD II data port. The DashDyno will immediately power on when plugged into the vehicle.
9 DashDyno Basics

Turn the vehicle ignition to the ON position. The vehicle does not need to be running.
Select the Connect > Connect to Vehicle menu option. After a few seconds, the DashDyno will be connected to the vehicle. Upon connection, a ‘i’ symbol will be located in the upper left corner of the screen indicating live information is coming from the vehicle.
To remove the DashDyno from the vehicle, just unplug the OBD II cable. The cable can be unplugged from either the vehicle or the DashDyno. Before unplugging, ensure you are not recording or reading from the external memory card (Play/Rec LED is not illuminated).
Vehicle Mounting DashDyno may be mounted inside the vehicle using the suction cup windshield mount. This mount offers a quick release feature for easily removal of the device from the vehicle.
10 DashDyno Basics

Base Mount
Male Quick Release
Female Quick Release
Connect the male quick release to the base mount with the two screws and two lock nuts provided.
Connect the female quick release to the rear of the DashDyno with the two screws provided. Ensure the female quick release tab is pointed upwards. Be careful not to over tighten.
The DashDyno with the female quick release is inserted over the male quick release. Pull the female quick release tab back slightly when inserting and removing the device.
The suction cup on the base windshield mount should be placed flat against the inside of the vehicle windshield. The two tabs on the base are rotated clockwise to lock the mount in position. To remove, rotate the tabs counter clockwise.
When selecting a mounting location, ensure it does not interfere with the visibly or controls of the vehicle. The OBD II cable will need to be routed to the vehicle OBD II connector such that it does not dangle in front of the vehicle foot pedals, steering wheel, air bags, or other controls. Use the supplied cable tie to securely the cable out of the way. If you need more cable ties, any home improvement or computer store will carry them.
11 DashDyno Basics

Ensure the DashDyno and cables do not interfere with the vehicle controls. A cable dangling in front of the foot pedals, gear shifter, or steering wheel can interfere with vehicle operation and cause a fatal accident. Always ensure the DashDyno and cables are securely fastened out of the way. If the DashDyno cannot be safely attached as to not interfere with the vehicle controls, then do not drive the vehicle with the DashDyno connected to the vehicle.
Do not mount DashDyno so it interferes with a vehicle airbag. When mounting DashDyno inside a vehicle, take care not to locate the device over an airbag or within the deployment path of an airbag. An airbag is also known as a Supplementary Restraint System (SRS), Air Cushion Restraint System (ACRS), or Supplemental Inflatable Restraint (SIR).
Do not attempt to operate the DashDyno while driving a vehicle. Driving requires the full attention of the driver. Operating or observing the DashDyno will cause driver distraction and could cause a fatal accident.
Using DashDyno Menus After the splash screen, the main menu screen is displayed. Up and down arrows will scroll through the list of menu options. Press OK to select an option. Press MENU to return to a previous screen.
Using DashDyno Wizards Wizards are used to quickly step you through complex operations. The upper right corner of the display shows the wizard position when active. The two numbers represent the current and total steps within the wizard.
12 DashDyno Basics

Pressing the OK or Right button answers questions and moves the wizard forward. If you make a mistake, use the Left key to go back within the wizard. Not every operation will require executing all steps. Depending on your answers, some wizard steps may be skipped.
Pressing the MENU key terminates the wizard partway through. If partially completed, the software will take the answers provided up to that point and, if possible, act upon those answers. After becoming familiar with the software, this can speed some operations by bypassing unneeded steps.
Turning On DashDyno DashDyno is powered from either the OBD II cable connected to your vehicle, or an optional AC adapter connected to the power jack. The DashDyno will automatically power on when plugged into either source. Do not connect both power sources simultaneously.
If DashDyno enters sleep mode, it may be turned on by either pressing the Power On button or starting the vehicle engine.
Sleep Mode The DashDyno will self-power down if:
1
2
No key is pressed for 60 seconds if the user interface displays a non-data collection screen (e.g. a menu).
The vehicle ECU fails to respond for 60 seconds if the user interface displays a data collection screen (e.g. Meter 2).
When you remove your key from the vehicle, the vehicle ECU will stop responding. Therefore, if you exit your vehicle while on a live data screen, the DashDyno will automatically self-power down.
Starting the engine will automatically wake DashDyno from sleep mode if, before entering sleep mode, the vehicle was detected using the Connect > Connect to Vehicle menu option. Alternative, DashDyno can be powered on again by pressing the Power On button. The DashDyno will resume exactly where it left off.
13 DashDyno Basics
The default 60 seconds can be changed using the Preferences menu Power Down Timeout. The self-power down can be prevented by selecting Never from the Preferences > Power Down Mode menu option, useful for hybrid vehicles.
Power Loss Resume When DashDyno is plugged in it will automatically auto-detect the vehicle and resume operation on the last used Live Data or Trip Computer screen. The last used parameters and alarms are automatically restored.
The Power Loss Resume feature will activate only if DashDyno is powered on by plugged in to the vehicle (or AC adapter).
The Preferences > Power Loss Resume menu option turns this feature on and off.
Keys DashDyno has primary and secondary function keys. The Key Lock button toggles between the primary and secondary keys. When locked into the secondary mode, the shift key / lock light will illuminate.
Holding a key down will cause the key to repeat, useful for scrolling.
Key Name Function
OK Selects a menu option.
Menu Returns to the previous menu.
Key Lock Selects the primary or secondary function keys. When the secondary keys are active, the shift key light is illuminated.
Record Starts recording.
Up Moves the selected item up.
Down Moves the selected item down.
Left Moves the selected item left.
Right Moves the selected item right.
Play/Pause In live data mode, starts or pauses live data. In playback mode,
plays or pauses the recorded file.
Fast Reverse Moves the playback position backwards.
Fast Forward Moves the playback position forwards.
Line Select Each press cycles through showing both lines, line 1, and line 2 on graph screens.
14 DashDyno Basics

Zoom Y Zooms the y-axis (vertical) on graph screens.
Zoom X Zoom the x-axis (horizontal) on graph screens.
Power On Powers the device on when in sleep mode.
Caring for DashDyno Observe these precautions when taking care of your DashDyno.
•
•
•
Use a soft, dry cloth to clean your DashDyno; do not use any liquid cleaners.
Do not open the casing of the DashDyno. There are no user serviceable parts inside and opening will invalidate the product warranty.
Do not expose your DashDyno to high or low temperatures, which might cause permanent damage. For example, don’t leave it in the car on a hot summer day or during a cold winter night.
Software Updates Check the Auterra website periodically to download software updates at www.auterraweb.com.
15 DashDyno Basics

CHAPTER 3
Scan Tool Features
With a DashDyno, you can diagnose problems with your vehicle. This section shows you how.
To get started with the scan tool features:
1
2
3
4
1
2
3
4
Connect the DashDyno to your vehicle.
Turn the vehicle ignition ON.
Select the Connect > Connect to Vehicle menu option.
Go back to the main menu by pressing the MENU button.
Trouble Codes When the vehicle Check Engine light illuminates, it means the on-board vehicle computer has detected a problem with your vehicle. The codes detected will be displayed on the Stored Trouble Codes screen.
Two categories of trouble codes exist: generic and enhanced. Generic codes are standardized and common to all vehicle manufacturers. Enhanced codes are not uniquely defined and may overlap with another manufacture, or even the same manufacturer. For instance, multiple definitions may exist for code P1234. Ford may define it as “Engine Oil Pressure Too Low”, but Toyota’s definition could mean something different like “System Voltage Unstable”.
There are four types of trouble codes: P (Powertrain), B (Body), C (Chassis), and U (Network Communication). The scan tool reads and clears all P-codes and, depending on the vehicle, B, C, and U-codes as well2.
To read stored trouble codes:
Select the Scan Tool > Stored Trouble Codes menu option.
If codes are stored, they will appear on screen within 30 seconds.
Use the Up/Down key to highlight a diagnostic trouble code. Press the OK button.
The code definition will display within a few seconds.
2 Not all vehicles support retrieving and clearing B, C, and U-codes.
16 Scan Tool Features
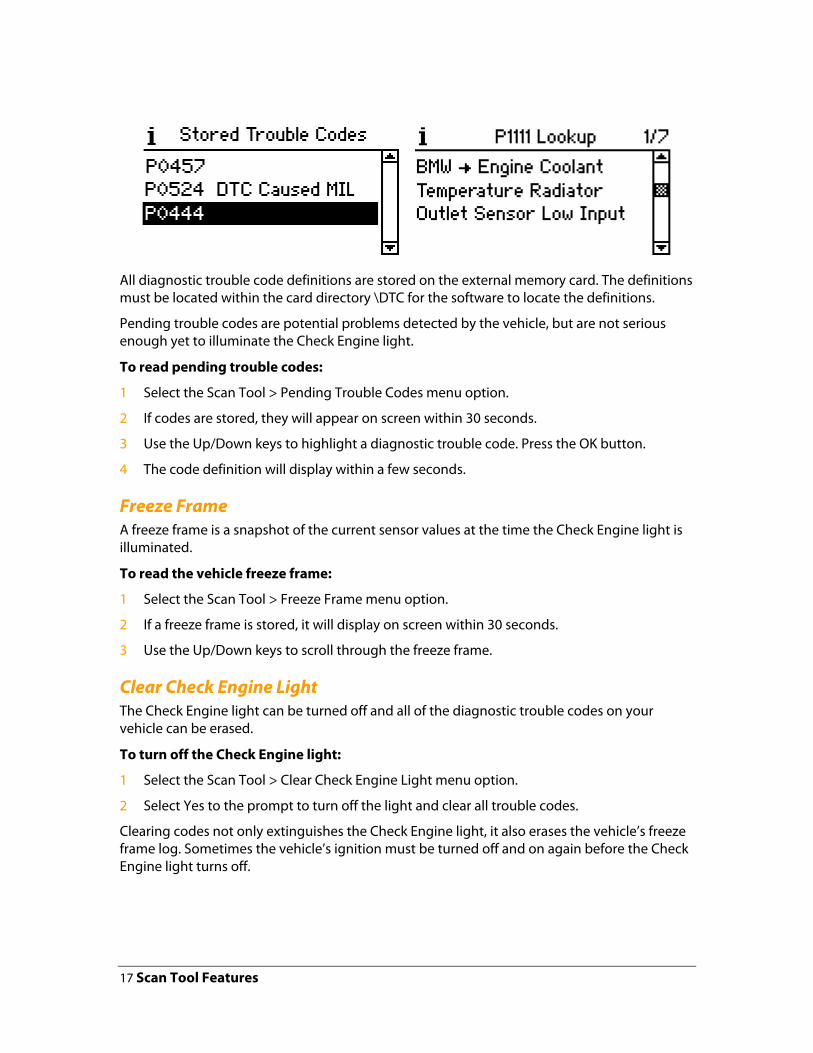
All diagnostic trouble code definitions are stored on the external memory card. The definitions must be located within the card directory \DTC for the software to locate the definitions.
Pending trouble codes are potential problems detected by the vehicle, but are not serious enough yet to illuminate the Check Engine light.
To read pending trouble codes:
1
2
3
4
1
2
3
1
2
Select the Scan Tool > Pending Trouble Codes menu option.
If codes are stored, they will appear on screen within 30 seconds.
Use the Up/Down keys to highlight a diagnostic trouble code. Press the OK button.
The code definition will display within a few seconds.
Freeze Frame A freeze frame is a snapshot of the current sensor values at the time the Check Engine light is illuminated.
To read the vehicle freeze frame:
Select the Scan Tool > Freeze Frame menu option.
If a freeze frame is stored, it will display on screen within 30 seconds.
Use the Up/Down keys to scroll through the freeze frame.
Clear Check Engine Light The Check Engine light can be turned off and all of the diagnostic trouble codes on your vehicle can be erased.
To turn off the Check Engine light:
Select the Scan Tool > Clear Check Engine Light menu option.
Select Yes to the prompt to turn off the light and clear all trouble codes.
Clearing codes not only extinguishes the Check Engine light, it also erases the vehicle’s freeze frame log. Sometimes the vehicle’s ignition must be turned off and on again before the Check Engine light turns off.
17 Scan Tool Features

CHAPTER 4
Data Logger Features
DashDyno contains powerful data logging features. The data logger reads data from different sources such as the vehicle ECU and analog inputs and records them to the external memory card. Alarms can be set to trigger when any parameter value is exceeded. Alarm actions consist of illuminating/flashing one or more alarm lights or activating a digital output switch.
Up to 16 parameters can be recorded simultaneously. Recorded data files can be played back on any of the data logger screens. The maximum recording length is only limited by the size of the external memory card. All data is individually time stamped.
Live data can be viewed in many different formats including meters, gauges, line graphs, bar graphs, and lists.
Screen setup is easy with wizards stepping you though the process. Once a screen is setup, the configuration may be saved to the external memory card for easy recall.
DashDyno and Dyno-Scan for Windows use the same file format so data can be easily exchanged between the two systems.
To get started with the data logger features:
1
2
3
4
Connect the DashDyno to your vehicle.
Turn the vehicle ignition ON.
Select the Connect > Connect to Vehicle menu option.
Go back to the main menu by pressing the MENU button.
Theory of Operation A data logger is a device that records data over time. Each data sample is time stamped and saved for later analysis and graphing. Whether on the racetrack or driving around town, data logging provides a detailed view of how your vehicle is operating in real world situations.
Types of data vary widely, from engine RPM, air/fuel ratio and ignition timing advance to custom analog inputs from sensors of your choosing or even GPS data. Data collected from the vehicle OBD II diagnostic port and aux ports are stored to the external SD card.
Data obtained from the OBD II diagnostic port use well-established units of measure. For example, engine coolant temperature uses either °F or °C.
Data can be obtained from the aux port analog inputs, which can be connected to almost any sensor. The analog inputs measure voltage. However, sometimes it’s desirable to convert the
18 Data Logger Features
measured raw sensor voltage into another more convenient units of measure. For instance, if measuring the voltage from a pressure sensor its nice to have it converted to psi. The formula feature provides this functionality. See Formulas on page 77 for more information.
Recorded data can be played back directly on DashDyno. Optionally, it may be opened by a Windows PC and analyzed within the Dyno-Scan for Windows software package.
Sample Speed The data logger captures data from the vehicle’s diagnostic port and on-board hardware peripherals simultaneously. The speed at which data is collected depends on the input source.
The vehicle diagnostic port sample rate may be set to high (fast as possible), medium (every 3 seconds) or low (every 10 seconds).
On non-CAN bus equipped vehicles, one sensor at a time is polled from the vehicle. On a CAN bus equipped vehicle with the CAN 6x option set to On, up to 6 parameters can be read at one time speeding data throughput considerably.
When the sample speed is set to high; the data is polled as fast as possible from the vehicle. The more vehicle parameters monitored, the slower the data rate for any one sensor. For instance, if parameter ‘A’ by itself can be polled every 50mS, then monitoring three parameters means parameter ‘A’ will be updated every 150mS.
With CAN 6x mode, up to 6 sensors can be monitored at one time without appreciably degrading the timing responsiveness.
On-board analog and digital inputs are all sampled at 100mS intervals (10 times per second). The number of vehicle parameters does not degrade the 100mS-sampling interval.
Each data value captured is time stamped and stored to the external memory card.
Parameters DashDyno supports 280 selectable parameters. Parameters marked with an asterisk (*) are obtained from on-board auxiliary ports. The remaining parameters are obtained from the vehicle diagnostic port.
Each parameter name ending with a number (e.g. “Average Economy 2”) provides the same data value as the non-numeric ending parameter. The distinction is the same parameter is obtained from the vehicle in different ways.
User defined formula parameters can also be added to the parameter list. See Formulas on page 77 for more information.
Not every vehicle supports all parameters. A custom list of parameters is created unique to the vehicle connected.
Parameter Parameter Parameter
*GPS HDOP *GPS Satellites *GPS Speed
Commanded Wastegate A Commanded Wastegate B Control Module Voltage
Long Term Sec Fuel TrimB3 Long Term Sec Fuel TrimB4 Manifold Surface Temp
19 Data Logger Features

Air Flow Rate From MAP Air Fuel Ratio Air Fuel Ratio B1-S1 Air Fuel Ratio B1-S1 2 Air Fuel Ratio B1-S2 Air Fuel Ratio B1-S2 2 Air Fuel Ratio B1-S3 Air Fuel Ratio B1-S3 2 Air Fuel Ratio B1-S4 Air Fuel Ratio B1-S4 2 Air Fuel Ratio B2-S1 Air Fuel Ratio B2-S1 2 Air Fuel Ratio B2-S2 Air Fuel Ratio B2-S2 2 Air Fuel Ratio B2-S3 Air Fuel Ratio B2-S3 2 Air Fuel Ratio B2-S4 Air Fuel Ratio B2-S4 2 *Analog In 1 - 12V *Analog In 1 - 24V *Analog In 1 - 6V *Analog In 2 - 12V *Analog In 2 - 24V *Analog In 2 - 6V *Analog In 3 - 12V *Analog In 3 - 24V *Analog In 3 - 6V *Analog In 4 - 12V *Analog In 4 - 24V *Analog In 4 - 6V Average Economy Average Speed Battery Voltage Boost Pressure Digital In 1 Distance Traveled Drive Time Fuel Cost Fuel Rate Fuel Used Idle Percent Idle Time Instant Economy Absolute Evap Vapor Pres Absolute Load Value Absolute Throttle Pos B
Distance Since DTCs Clrd Distance Traveled MIL On DPF Delta Pressure B1 DPF Delta Pressure B2 DPF Inlet Pressure B1 DPF Inlet Pressure B2 DPF Inlet Temp B1 DPF Inlet Temp B2 DPF Outlet Pressure B1 DPF Outlet Pressure B2 DPF Outlet Temp B1 DPF Outlet Temp B2 Driver Demand Torque EGR A Error EGR B Error EGR Error EGR Temperature B1-S1 EGR Temperature B1-S2 EGR Temperature B2-S1 EGR Temperature B2-S2 Engine Coolant Temp Engine Coolant Temp 1 Engine Coolant Temp 2 Engine Fuel Rate Engine Oil Temp Engine Reference Torque Engine RPM Engine Torque Idle Point 1 Engine Torque Point 2 Engine Torque Point 3 Engine Torque Point 4 Engine Torque Point 5 Equivalence Ratio B1-S1 Equivalence Ratio B1-S1 2 Equivalence Ratio B1-S2 Equivalence Ratio B1-S2 2 Equivalence Ratio B1-S3 Equivalence Ratio B1-S3 2 Equivalence Ratio B1-S4 Equivalence Ratio B1-S4 2 Equivalence Ratio B2-S1 Equivalence Ratio B2-S1 2 Equivalence Ratio B2-S2 Equivalence Ratio B2-S2 2 Equivalence Ratio B2-S3 Equivalence Ratio B2-S3 2
Mass Air Flow A Mass Air Flow B Minutes Run with MIL On NOx Concentration B1-S1 NOx Concentration B2-S1 O2 B1-S1 Wide Range mA O2 B1-S1 Wide Range V O2 B1-S2 Wide Range mA O2 B1-S2 Wide Range V O2 B1-S3 Wide Range mA O2 B1-S3 Wide Range V O2 B1-S4 Wide Range mA O2 B1-S4 Wide Range V O2 B2-S1 Wide Range mA O2 B2-S1 Wide Range V O2 B2-S2 Wide Range mA O2 B2-S2 Wide Range V O2 B2-S3 Wide Range mA O2 B2-S3 Wide Range V O2 B2-S4 Wide Range mA O2 B2-S4 Wide Range V O2 Sensor B1-S1 O2 Sensor B1-S2 O2 Sensor B1-S3 O2 Sensor B1-S4 O2 Sensor B2-S1 O2 Sensor B2-S2 O2 Sensor B2-S3 O2 Sensor B2-S4 PM Mass Concentrate B1-S1 PM Mass Concentrate B2-S1 Reagent Tank Level Rel Throttle A Position Rel Throttle B Position Relative Accel Pedal Pos Relative Intake Air A Relative Intake Air B Relative Throttle Position Run Time NOx Warn Short Fuel Trim B1-S1 Short Fuel Trim B1-S2 Short Fuel Trim B1-S3 Short Fuel Trim B1-S4 Short Fuel Trim B2-S1 Short Fuel Trim B2-S2 Short Fuel Trim B2-S3
20 Data Logger Features

Absolute Throttle Pos C Absolute Throttle Position Accelerator Pedal Pos D Accelerator Pedal Pos E Accelerator Pedal Pos F Actual EGR A Duty Actual EGR B Duty Actual Engine Torque Air Flow Rate From MAF Alcohol Fuel Percentage Ambient Air Temperature Avg Demanded Consumption Avg Reagent Consumption Barometric Pressure Boost Pressure A Boost Pressure B Calculated Load Catalyst Temp B1-S1 Catalyst Temp B1-S2 Catalyst Temp B2-S1 Catalyst Temp B2-S2 Chrg Air Cooler Temp B1S1 Chrg Air Cooler Temp B1S2 Chrg Air Cooler Temp B1S2 Chrg Air Cooler Temp B2S1 Cmd Boost Pressure A Cmd Boost Pressure B Cmd Fuel Rail Pressure A Cmd Fuel Rail Pressure B Cmd Injection Pressure A Cmd Injection Pressure B Cmd Throttle Actuator A Cmd Throttle Actuator B Cmd Variable Turbo A Cmd Variable Turbo B Command Throttle Actuator Commanded EGR Commanded EGR A Duty Commanded EGR B Duty Commanded Equival Ratio Commanded Evap Purge Commanded Intake Air A Commanded Intake Air B
Equivalence Ratio B2-S4 Equivalence Ratio B2-S4 2 Evap System Vapor Pres Evap System Vapor Press Exhaust Gas Temp B1-S1 Exhaust Gas Temp B1-S2 Exhaust Gas Temp B1-S3 Exhaust Gas Temp B1-S4 Exhaust Gas Temp B2-S1 Exhaust Gas Temp B2-S2 Exhaust Gas Temp B2-S3 Exhaust Gas Temp B2-S4 Exhaust Pressure B1 Exhaust Pressure B2 Fuel Injection Timing Fuel Level Input Fuel Rail Press Rel Manifold Fuel Rail Pressure Fuel Rail Pressure (abs) Fuel Rail Pressure (gauge) Fuel Rail Pressure A Fuel Rail Pressure B Fuel Rail Temp A Fuel Rail Temp B Hybrid Battery Pack Life Ignition Timing Advance Injection Pressure A Injection Pressure B Intake Air Temp B1-S1 Intake Air Temp B1-S2 Intake Air Temp B1-S3 Intake Air Temp B2-S1 Intake Air Temp B2-S2 Intake Air Temp B2-S3 Intake Air Temperature Intake Manifold Abs PresA Intake Manifold Abs PresB Intake Manifold Pressure Long Term Fuel Trim B1 Long Term Fuel Trim B2 Long Term Fuel Trim B3 Long Term Fuel Trim B4 Long Term Sec Fuel Trim B1 Long Term Sec Fuel TrimB2
Short Fuel Trim B2-S4 Short Term Fuel Trim B1 Short Term Fuel Trim B2 Short Term Fuel Trim B3 Short Term Fuel Trim B4 Shrt Term Sec Fuel Trim B1 Shrt Term Sec Fuel TrimB2 Shrt Term Sec Fuel TrimB3 Shrt Term Sec Fuel TrimB4 Time Since DTCs Cleared Time Since Engine Start Total Engine Idle Time Total Engine Run Time Total Engine Run w/PTO Total Run w/IE-ACED 1 Total Run w/IE-ACED 10 Total Run w/IE-ACED 2 Total Run w/IE-ACED 3 Total Run w/IE-ACED 4 Total Run w/IE-ACED 5 Total Run w/IE-ACED 6 Total Run w/IE-ACED 7 Total Run w/IE-ACED 8 Total Run w/IE-ACED 9 Turbo A In Compressor Turbo A In Turbine Temp Turbo A Inlet Pressure Turbo A Out Compressor Turbo A Out Turbine Temp Turbo A RPM Turbo B In Compressor Turbo B In Turbine Temp Turbo B Inlet Pressure Turbo B Out Compressor Turbo B Out Turbine Temp Turbo B RPM Variable Turbo A Variable Turbo B Vehicle Speed Warm-ups Since DTCs Clrd Wastegate A Wastegate B
21 Data Logger Features
Air Fuel Ratio – overall air to fuel ratio of the vehicle being commanded.
Air Fuel Ratio BX-SX (up to 8) – air to fuel ratio of the vehicle computed for one bank (i.e. one oxygen sensor).
Analog In (4 inputs, 3 ranges each) – the analog input voltage measured on the DashDyno auxiliary port.
Average Economy – the average fuel economy of the vehicle over time.
Battery Voltage – the vehicle battery voltage.
Boost Pressure – the pressure measured within the intake manifold.
Digital In 1 – the digital input state (high or low) measured on the DashDyno auxiliary port.
Distance Traveled – distance traveled by the vehicle. This is not the odometer.
Drive Time – the engine running time.
Fuel Cost – the cost per gallon or liter of fuel.
Fuel Used – amount of fuel used by the vehicle.
Idle Percent – the ratio of Drive Time vs. Idle Time.
Idle Time – the engine idling time defined as the motor running with the vehicle speed at 0.
Instant Economy – is defined as the instantaneous fuel economy of the vehicle (e.g. MPG).
GPS HDOP - horizontal dilution of precision. A measure of the GPS receiver’s position horizontal accuracy. The lower the number the more accurate the reading.
GPS Satellites – the number of satellites currently being tracked by an external GPS receiver.
GPS Speed – the speed of the vehicle as reported by an external GPS receiver.
Absolute Evap Vapor Pres – the evaporative system vapor pressure normally obtained from a sensor located in the fuel tank or a sensor in an evaporative system vapor line.
Absolute Load Value – indicates a percentage of peak available torque. The normalized value of air mass per intake stroke displayed as a percent.
Absolute Throttle Position (up to 3) – the absolute throttle position (not the relative or learned) throttle position. Usually above 0% at idle and less than 100% at full throttle.
Accelerator Pedal Pos (up to 4) – the absolute pedal position (not the relative or learned) pedal position.
Actual EGR A Duty (up to 2) – actual EGR displayed as a percent.
Actual Engine Torque – the calculated output torque of the engine.
Air Flow Rate From MAF – indicates the airflow rate as measured by the mass airflow sensor.
Alcohol Fuel Percentage – percentage of alcohol fuel contained in ethanol or methanol fuels.
Ambient Air Temperature – displays the ambient air temperature.
22 Data Logger Features
Avg Demanded Consumption – average demanded reagent consumption by the engine system either over the previous complete 48 hour period of engine operation or the period needed for a demanded reagent consumption of at least 15 liters, whichever is longer.
Avg Reagent Consumption – average reagent consumption by the engine system either over the previous complete 48 hour period of engine operation or the period needed for a demanded reagent consumption of at least 15 liters, whichever is longer.
Barometric Pressure – barometric pressure normally obtained from a dedicated barometric sensor. Note some weather services report barometric pressure adjusted to sea level. In these cases, the reported value may not match the displayed value.
Boost Pressure A (up to 2) –the actual turbocharger/supercharger pressure.
Calculated Load Value – indicates a percentage of peak available torque. Reaches 100% at wide open throttle at any altitude or RPM for both naturally aspirated and boosted engines.
Catalyst Temp Bank X – Sensor X (up to 4) –the catalyst substrate temperature.
Chrg Air Cooler Temp BXSX – (up to 4) – the charge air cooler temperature.
Cmd Boost Pressure A (up to 2) – the ECU commanded turbocharger/supercharger pressure.
Cmd Fuel Rail Pressure A (up to 2) – the commanded fuel rail pressure when the reading is referenced to atmosphere (gauge pressure).
Cmd Injection Pressure A (up to 2) – the commanded injection control pressure.
Cmd Throttle Actuator A (up to 2) – the commanded throttle actuator. 0% fully closed and 100% fully open.
Cmd Variable Turbo A (up to 2) – the variable geometry turbocharger commanded vane position as a percent.
Commanded Throttle Actuator – displays 0% when the throttle is commanded closed and 100% when the throttle commanded open.
Commanded EGR (up to 3) – display 0% when the EGR is commanded off, 100% when the EGR system is commanded on, and if the EGR is duty cycled somewhere between 0% and 100%.
Commanded Equival Ratio – the commanded equivalence ratio (also known as lambda) while the fuel system. Fuel systems that use conventional oxygen sensors display the commanded open loop equivalence ratio while the system is in open loop. Should report 100% when in closed loop fuel. Fuel systems that utilize wide-range/linear oxygen sensors shall display the commanded ratio in both open-loop and closed-loop operation.
Commanded Evap Purge – displays 0% when no evaporative purge is commanded and 100% at the maximum commanded purge position/flow.
Commanded Intake Air A (up to 2) – the commanded air intake displayed as a percent. Also known as EGR Throttle on compression ignition engineers.
Commanded Wastegate A (up to 2) – the commanded wastegate position as a percent. 0% is fully closed (full boost) and 100% fully open (dump boost).
23 Data Logger Features

Control Module Voltage – power input to the control module. Normally the battery voltage, less any voltage drop between the battery and the control module.
Distance Since DTCs Cleared – distance accumulated since DTCs where cleared with a scan tool.
Distance Traveled MIL On – accumulates the vehicle distance traveled while the MIL light is illuminated.
DPF Delta Pressure BX (up to 2) – diesel particulate filter delta pressure.
DPF Inlet Pressure BX (up to 2) – diesel particulate filter inlet pressure.
DPF Inlet Temp BX (up to 2) – diesel particulate filter inlet temperature.
DPF Outlet Pressure BX (up to 2) – diesel particulate filter outlet pressure.
DPF Outlet Temp BX (up to 2) – diesel particulate filter outlet temperature.
Driver Demand Torque – the requested torque output of the engine by the driver.
EGR Error (up to 3) – error as percent of actual commanded EGR. Negative percent is less than commanded and positive is more than commanded.
EGR Temperature BX-SX (up to 4) – the EGR gas temperature.
Engine Coolant Temp (up to 3) – engine coolant temperature derived from an engine coolant temperature sensor or a cylinder head temperature sensor.
Engine Fuel Rate – amount of fuel consumed by the engine per unit of time in liters per hour.
Engine Oil Temp – engine oil temperature.
Engine Reference Torque – display the engine reference torque value. This value does not change.
Engine RPM – displays the current engine revolutions per minute value.
Engine Torque Idle Point – the torque limit that indicates the available engine torque that can be provided by the engine at idle speed.
Engine Torque Point X (up to 4) – the torque limit that indicates the available engine torque that can be provided by the engine point X of the engine map.
Equivalence Ratio BX-SX (up to 16) - is defined as the ratio of the fuel-to-oxidizer ratio to the stoichiometric fuel-to-oxidizer ratio.
Evap System Vapor Press – evaporative system vapor pressure normally obtained from a sensor located in the fuel tank.
Exhaust Gas Temp BX-SX – exhaust gas temperature.
Exhaust Gas Pressure BX – exhaust gas pressure.
Fuel Injection Timing – the start of the mail fuel injection relative to Top Dead Center (TDC). Positive degrees indicate before TDC. Negative degrees indicate after TDC.
24 Data Logger Features

Fuel Level Input – indicates the nominal fuel tank liquid fill capacity as a percent of maximum.
Fuel Rail Press Rel Manifold – displays the fuel rail pressure referenced to the manifold vacuum (relative pressure).
Fuel Rail Pressure – indicates the fuel rail pressure at the engine referenced to atmosphere (gauge pressure).
Fuel Rail Pressure (abs) – fuel rail pressure at the engine when the reading is absolute.
Fuel Rail Pressure (gauge) – displays the fuel injection rail pressure at the engine when the reading is referenced to atmosphere (gauge pressure).
Fuel Rail Pressure A (up to 2) – fuel rail pressure when the reading is referenced to atmosphere (gauge pressure).
Fuel Rate – the rate at which fuel is consumed by the engine in gallons/hour or liters/hour.
Fuel Rail Temp A (up to 2) – the fuel rail temperature.
Hybrid Battery Pack Life – the percent remaining life for the hybrid battery pack.
Ignition Timing Advance – ignition timing advance for #1 cylinder (not including any mechanical advance).
Injection Pressure A (up to 2) - the injection control pressure.
Intake Air Temp BX-SX – displays the intake manifold air temperature.
Intake Air Temperature – displays the intake manifold air temperature.
Intake Manifold Abs PresA (up to 2) – intake manifold absolute pressure.
Intake Manifold Pressure – indicates the manifold pressure derived from a Manifold Absolute Pressure sensor.
Long Term Fuel Trim-BX (up to 4) – indicates the correction being used by the fuel control system in both open and closed loop modes of operation.
Long Term Fuel Trim BX-SX (up to 8) - indicates the correction being used by the fuel control system in both open and closed loop modes of operation.
Manifold Surface Temp – intake manifold surface temperature.
Mass Air Flow A (up to 2) – airflow rate as measured by a vehicle MAF sensor or an equivalent source.
Minutes Run with MIL On – accumulated minutes of engine run time while the MIL light is on.
NOx Concentration BX-SX (up to 2) – NOx concentration.
O2 Sensor BX-SX Wide Range mA (up to 8) – shows milliamps for linear or wide-ratio oxygen sensors.
25 Data Logger Features

O2 Sensor BX-SX Wide Range V (up to 8) – shows voltage for linear or wide-ratio oxygen sensors.
O2 Sensor BX-SX (up to 8) – indicates the voltage for conventional 0 to 1V oxygen sensors. O2 sensors with a different full-scale voltage shall be normalized to this range or, if a wide range sensor, may use the wide range parameters instead.
PM Mass Concentration BX-SX (up to 2) – particulate matter mass concentration.
Reagent Tank Level – nominal reagent tank liquid fill capacity as a percent of maximum.
Rel Throttle A Position (up to 2) - relative or “learned” throttle position.
Relative Throttle Position – relative or “learned” throttle position.
Relative Accel Pedal Pos - relative or “learned” pedal position.
Relative Intake Air A (up to 2) – actual intake airflow position displayed as a percent. Also knows as EGR Throttle Position on compression ignition engines.
Run Time NOx Warn – run time of the engine while NOx warning mode is activated.
Short Term Fuel Trim-BX (up to 4) – indicates the correction being used by the closed loop fuel algorithm. If the fuel system is open loop, 0% correction should be reported.
Short Term Fuel Trim BX-SX (up to 8) - indicates the correction being used by the closed loop fuel algorithm. If the fuel system is open loop, 0% correction should be reported.
Short Term Sec Fuel Trim BX (up to 4) – short term secondary O2 sensor fuel trim shall indicate the correction being utilized by the closed-loop fuel algorithm. If the fuel system is open loop, 0% correction should be reported.
Time Since DTCs Cleared – engine run time accumulated since DTCs were cleared.
Time Since Engine Start – indicates the elapsed time since the engine was started while the engine is running.
Total Engine Idle Time – total engine idle time for the life of vehicle.
Total Engine Run Time – total engine run time for the life of vehicle.
Total Engine Run w/PTO – total engine run time with PTO (power take off) engaged for the life of the vehicle.
Total Run w/IE-ACED X (up to 10) – total engine run time with Emission Increasing Auxiliary Emission Control Device active for the life of the vehicle.
Turbo A In Compressor (up to 2) – turbocharger compressor inlet temperature.
Turbo A In Turbine Temp (up to 2) – turbocharger turbine inlet temperature.
Turbo A Inlet Pressure (up to 2) – turbocharger inlet pressure.
Turbo A Out Compressor (up to 2) – turbocharger compressor outlet temperature.
Turbo A Out Turbine Temp (up to 2) – turbocharger turbine outlet temperature.
Turbo A RPM (up to 2) – turbocharger revolutions per minute.
26 Data Logger Features
Variable Turbo A (up to 2) – variable geometry turbocharger actual vane position as a percent. 0% when vanes are fully bypassed and 100% when the vanes are fully utilized.
Vehicle Speed – displays the vehicle road speed.
Warm-ups Since DTCs Cleared – number of warm-up cycles since all DTCs were cleared via a scan tool. A warm-up is defined as the coolant temperature rising by at least 22°C (40°F) and the engine temperature reaches at a minimum 70°C (160°F) (60°C (140°F) for diesels).
Wastegate A (up to 2) – actual wastegate position as a percent. 0% wastegate is off (allow full boost) and 100% fully open (dump boost).
Enhanced OBD II Parameters DashDyno can display and record enhanced OBD II parameters depending on the vehicle make. Enhanced parameters are additional manufacturer-specific sensor options. Enhanced parameters are marked with the § symbol (e.g. § Knock Feedback).
To enable enhanced parameters, go to the Preferences > Vehicle Make menu option and select the make of your vehicle. After selecting the make, all Data Logger screens will show the enhanced parameter options.
Select “All” for the make if your vehicle make is not listed. When “All” is selected, no enhanced parameters are displayed.
When a Vehicle Make is selected, the enhanced parameters are always shown on the Parameter Select Wizard list regardless whether your vehicle actually supports them. Not every vehicle will support the enhanced parameters. If the enhanced parameter does not return live data, then your vehicle does not support the parameter.
Some enhanced parameter categories supported are:
•
•
•
•
Knock Retard
Misfire Cylinder Counts
Transmission Temperature
And more. See the Auterra web site for the currently supported lists.
Parameter Select Wizard All data logger screens use the same wizard to select parameters. Press the OK button to access the parameter select wizard on a data logger screen, such as Datalogger > Meter 2.
27 Data Logger Features

TIP! As a shortcut, you can press the MENU button at any time during the wizard to early terminate the wizard and return to the data logger screen. The software will use the all the entries you entered up to that point. This will save time by skipping unused questions.
To view live data by setting up the screen manually:
1
2
3
4
5
6
7
1
2
3
4
5
6
7
1
2
3
4
5
6
7
8
From any data logger screen, press OK.
Live or Playback – select View Live Data.
Setup Method – select Setup Screen Manually.
Parameter 1 – select your first parameter to monitor and press OK.
Parameter N – continue to select parameters. You can select as many parameters as the screen allows or select the <none> parameter when you are done. For instance, Meter 4 allows a maximum of four parameters.
Done or Advanced – select Done.
The software will exit the wizard and live data for your parameters will show.
To change the live data parameters viewed:
From any data logger screen, press the OK button.
Live or Playback – select View Live Data.
Setup Method – select Setup Screen Manually.
Parameter 1 – select a new parameter for parameter 1 and press OK. Notice the software automatically pre-selects the current parameter 1 setting.
Parameter N – select a new parameter for the additional parameters.
Done or Advanced – select Done.
The software will exit the wizard and the changed live data parameters will show.
Screen Configuration Screen configurations can be saved to the external memory card and recalled later.
To save a screen configuration:
From a data logger screen, press OK.
Live or Playback – select View Live Data.
Setup Method – select Setup Screen Manually.
Parameter 1 – select a new parameter for parameter 1 and press OK.
Parameter N – select additional parameters as desired.
Done or Advanced – select Advanced Options.
Sample Speed – select High sampling speed.
Set Alarms? – select Don’t Set Alarms.
28 Data Logger Features
9 Save Config? – select Save Configuration.
10
11
12
1
2
3
4
5
1
2
3
4
5
6
7
8
9
10
11
New Config File? – select Create New File.
New Screen File – enter a file name up to eight characters and press OK. Up/Down keys select the letter, the Right key moves to the next character.
The screen configuration is now saved.
To open a screen configuration:
From any data logger screen, press OK.
Live or Playback – select View Live Data.
Setup Method – select Open Screen Config File.
Screen File – select the file to open and press OK.
The software exits the wizards and displays the parameters within the screen config file.
Alarms Alarms can be set to trigger on one or more parameters. Complex alarm triggers can be achieved by saving multiple rules into an alarm file. See Alarms on page 63 to create an alarm file.
Once the alarm file is created, it can be used within the parameter select wizard.
To set alarms while data logging:
From any data logger screen, press OK.
Live or Playback – select View Live Data.
Setup Method – select the Setup Screen Manually.
Parameter 1 – select your first parameter to monitor and press OK.
Parameter N – continue to select parameters. You can select as many parameters as the screen allows or select the <none> parameter when you are done. For instance, Meter 4 allows a maximum of four parameters.
Done or Advanced – selected Advanced Options.
Sample Speed – select High sampling speed.
Set Alarms? – select Set Alarms.
Alarm File – select the alarm file to use and press OK.
Press the MENU button to return to the data logger screen.
The software will now show live data and monitor for alarms as specified within the alarm file.
Meter 2 Screen Meter 2 allows viewing two parameters with a large font.
29 Data Logger Features

Meter 4 Screen Meter 4 allows viewing up to four parameters with a medium font.
Line Graph Screen Live Graph allows viewing up to two parameters graphed as lines. A movable marker allows extracting values at any point along the graph. Range high/low values display anytime the marker is moved or the graph is zoomed. After a few seconds, the range high/low values disappear for an unobstructed view of the graph.
The graph has a 256-point deep buffer that extends beyond the viewable area. The live 1 and 2 marker values update showing the data values under the marker as is moves through the buffer.
The Line Select button cycles between displaying both lines, line 1 and line 2. When a single line is shown, the zoom and y-axis scroll only affects the active line.
Live data or playback data can be paused using the Play/Pause button to allow for analysis.
30 Data Logger Features
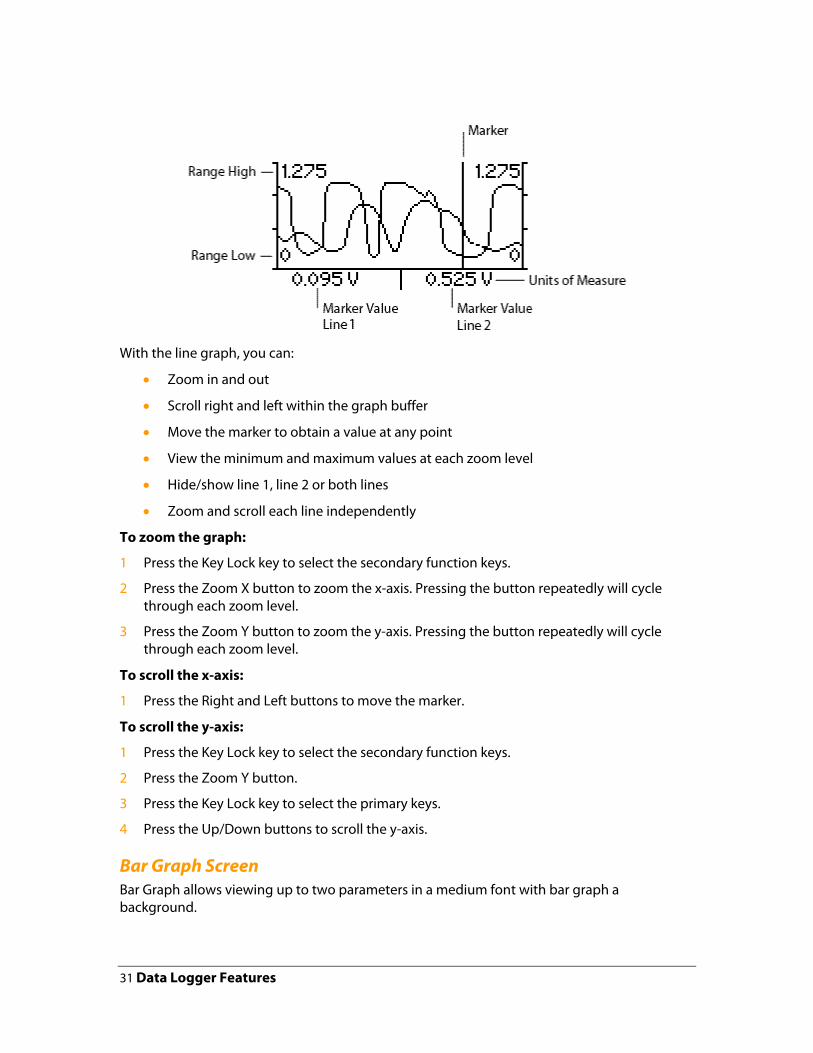
With the line graph, you can:
•
•
•
•
•
•
1
2
3
1
1
2
3
4
Zoom in and out
Scroll right and left within the graph buffer
Move the marker to obtain a value at any point
View the minimum and maximum values at each zoom level
Hide/show line 1, line 2 or both lines
Zoom and scroll each line independently
To zoom the graph:
Press the Key Lock key to select the secondary function keys.
Press the Zoom X button to zoom the x-axis. Pressing the button repeatedly will cycle through each zoom level.
Press the Zoom Y button to zoom the y-axis. Pressing the button repeatedly will cycle through each zoom level.
To scroll the x-axis:
Press the Right and Left buttons to move the marker.
To scroll the y-axis:
Press the Key Lock key to select the secondary function keys.
Press the Zoom Y button.
Press the Key Lock key to select the primary keys.
Press the Up/Down buttons to scroll the y-axis.
Bar Graph Screen Bar Graph allows viewing up to two parameters in a medium font with bar graph a background.
31 Data Logger Features

Gauge Screen Gauge allows viewing one parameter in a round gauge format.
List Screen List allows viewing up to 16 parameters in scrollable list format.
Oscilloscope Screen Oscilloscope allows viewing two analog input parameters on a line graph. Each parameter may select any input voltage range: 0-6V, 0-12V or 0-24V.
The Oscilloscope screen differs from the Line Graph screen in that it monitors only the auxiliary port analog inputs and the sample rate is 1mS. This high sample rate allows viewing and recording higher frequency analog signals not possible with the other data logger screens.
32 Data Logger Features
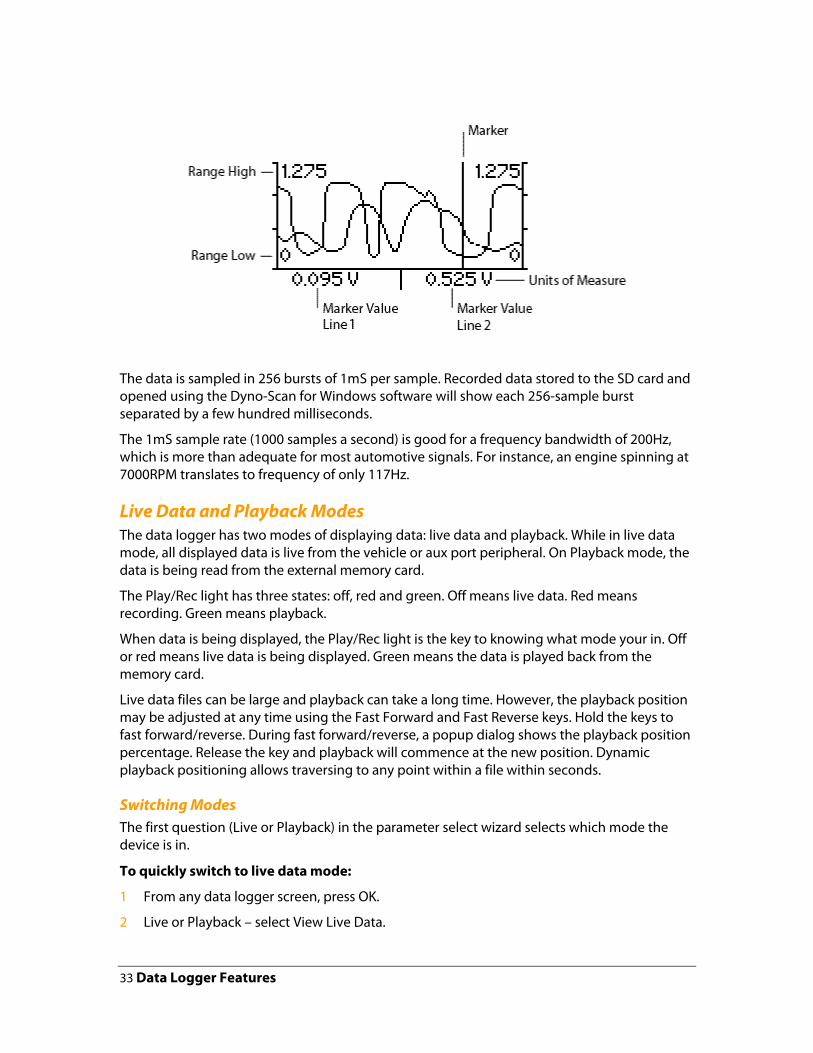
The data is sampled in 256 bursts of 1mS per sample. Recorded data stored to the SD card and opened using the Dyno-Scan for Windows software will show each 256-sample burst separated by a few hundred milliseconds.
The 1mS sample rate (1000 samples a second) is good for a frequency bandwidth of 200Hz, which is more than adequate for most automotive signals. For instance, an engine spinning at 7000RPM translates to frequency of only 117Hz.
Live Data and Playback Modes The data logger has two modes of displaying data: live data and playback. While in live data mode, all displayed data is live from the vehicle or aux port peripheral. On Playback mode, the data is being read from the external memory card.
The Play/Rec light has three states: off, red and green. Off means live data. Red means recording. Green means playback.
When data is being displayed, the Play/Rec light is the key to knowing what mode your in. Off or red means live data is being displayed. Green means the data is played back from the memory card.
Live data files can be large and playback can take a long time. However, the playback position may be adjusted at any time using the Fast Forward and Fast Reverse keys. Hold the keys to fast forward/reverse. During fast forward/reverse, a popup dialog shows the playback position percentage. Release the key and playback will commence at the new position. Dynamic playback positioning allows traversing to any point within a file within seconds.
Switching Modes The first question (Live or Playback) in the parameter select wizard selects which mode the device is in.
To quickly switch to live data mode:
1
2
From any data logger screen, press OK.
Live or Playback – select View Live Data.
33 Data Logger Features

3 Press the MENU button to return to the data logger screen.
To quickly switch to playback mode:
1
2
3
1
2
3
4
5
6
7
1
2
3
4
From any data logger screen, press OK.
Live or Playback – select View/Create Playback File.
Press the MENU button to return to the data logger screen.
Pause/Play When in live data mode, pressing the Play/Pause key pauses live data. Pressing again resumes live data.
When in playback mode, the Play/Pause key pauses playback. Pressing again resumes playback.
Record All data logger screens may record live data. A live data file must be created to store the data. A dyno setup file must also be created at least once. See Create Files on page 58 for more information.
To record live data:
Go to any data logger screen and select one or more parameters (see Parameter Select Wizard).
Once one or more parameters are being displayed on-screen, press OK to start the parameter select wizard again.
Live or Playback – select View/Create Playback Files.
New Live Data File? – select Create New File.
New Live Data File – enter a file name up to eight characters and press OK. Up/Down keys select the letter, the Right key moves to the next character.
With the parameters now displayed on-screen, press the Record button to start recording to the file you just created.
When done recording, press the Record key again.
Playback Live data recorded files can be played back on any data logger screen.
To playback a live data file:
From any data logger screen, press OK.
Live or Playback – select View/Create Playback Files.
New Live Data File? – select View Existing File.
Live Data File – highlight the file to playback and press OK.
34 Data Logger Features

5 Parameter 1 – select your first parameter to monitor and press OK. Note the parameters list only shows the parameters recorded within the file.
6
7
8
9
1
2
3
4
5
6
7
8
9
Parameter N – continue to select recorded parameters. Select the <none> parameter when you are done.
Now you are on a data logger screen. To start the data playback, press the Play/Pause button to start playback. The Play/Rec light will turn green.
During playback, you can press Pause to pause playback.
Pressing and holding the Fast Forward and Fast Reverse keys adjusts the playback position.
Many times you want to record data using the screen configuration file to setup your screen.
To record live data using a screen configuration file:
From any data logger screen, press OK.
Live or Playback – select View Live Data.
Setup Method – select Open Screen Config File.
Screen File – highlight the file to open and press OK. All the parameters within the screen configuration file are now displayed.
Press OK from the data logger screen to start the parameter select wizard again.
Live or Playback – select View/Create Playback File.
New Live Data File? – select Create New File.
New Live Data File - enter a file name up to eight characters and press OK. Up/Down keys select the letter, the Right key moves to the next character.
With the parameters now displayed on-screen, press Record to start recording to the file you just created.
Analog Inputs Four analog inputs are available on auxiliary port 1. Each analog input has three ranges: 0-6V, 0-12V, and 0-24V. The ranges are selectable within the software by selecting the appropriate parameter. For instance, to measure 0-12V on analog input 1, select the parameter Analog In 1 – 12V. See Auxiliary Ports on page 70 for more information.
The analog in parameters are enabled by turning On the Preferences > Analog In Parameters menu option.
Digital Input One digital input is available on auxiliary port 2. To measure the digital input, select the parameter Digital In 1. See Auxiliary Ports on page 70 for more information.
The digital input parameter is enabled by turning On the Preferences > Analog In Parameters menu option.
35 Data Logger Features

Connect Simulation The software has a built-in vehicle simulation that can be used to practice with the features without being connected to vehicle. This mode is accessed from the Connect > Connection Simulation menu option.
36 Data Logger Features

CHAPTER 5
Dynamometer Features
The dynamometer features are designed for easy operation and this section shows how.
Dyno operations require driving the vehicle while the software records performance data. For increased safety, the software does not require user intervention during the test runs. All data is recorded for later analysis and flashing lights are used to convey instructions to the user while driving.
Theory of Operation A dynamometer, or dyno for short, is used to measure the power produced by an engine. Traditionally automotive dynos were either crankshaft dynamometers or chassis dynamometers.
Crankshaft dynos require the motor to be removed from the vehicle. The power is measured directly at the crankshaft, or flywheel, and is not affected by transmission and axle powertrain losses. Vehicle manufacturers spec crankshaft power on new cars and trucks.
Chassis dynos test the entire vehicle. The vehicle is tied down to a large machine and the drive wheels are placed over a rotating drum. The chassis dyno tests the entire powertrain system, not just the crankshaft power. This is a more realistic test since it measures the power delivered to the wheels, not just the crankshaft. As such, the power figures measured are always less than with a crankshaft dyno since the powertrain causes some power loss.
DashDyno SPD™ Dynamometer DashDyno uses the OBD II computer port located on all 1996 and newer automobiles to compute engine power, acceleration times, fuel economy, and more.
DashDyno tests the vehicle in a completely real world situation that includes powertrain losses, drag from disk brakes and wheel bearings, tire rolling resistance, etc. – everything a vehicle sees on the street.
Aerodynamic drag is compensated for within the calculations. So, whether your vehicle has the aerodynamics of a Chevy Suburban or a Porsche 911, the power calculations can correct for losses due to wind drag.
Weather conditions affect the output of an internal combustion motor. A correction factor is applied to compensate the measurements for weather conditions and elevation. The industry standard document for horsepower and torque corrections is SAE J1349. DashDyno applies this correction factor to all horsepower and torque measurements.
37 Dynamometer Features

By applying these correction factors to the dyno results, a vehicle dyno'd in Denver on a hot day will give the same results as a chilly day in San Diego. Using the DashDyno, measurements generated are comparable with one another the world over.
The dyno runs are performed in a single gear. Any gear will work, however increased accuracy is obtained if the software has an increased measurement duration. For instance, the time to accelerate from 1000 RPM to 5000 RPM in 1st gear is a shorter duration than it would be in 3rd gear. Therefore, using 2nd or 3rd gear for dyno runs offers longer test durations for greater accuracy.
Extensive comparison testing on a Dynojet chassis dynamometer has shown the DashDyno to be extremely accurate.
Automatic Transmissions All automatic transmissions are equipped with a torque converter. The torque converter is designed to slip under certain conditions, such as at low RPM and under heavy load. When the torque converter slips, the gear ratio is artificially lower and the RPM is higher than if the torque converter is locked up in direct drive. At cruising speeds and under low load requirements, the torque converter locks up for increased fuel economy.
Under heavy acceleration, the slippage is greatest below 3000 RPM. Above 3000 RPM the slippage is still evident but to a lesser degree.
A slipping torque converter is perfectly normal. Automatic transmissions are designed to slip, which gives them some advantages when towing a heavy load. However, this causes an anomaly known to all chassis dynos and the DashDyno.
Since the RPM is higher than normal while the torque converter is slipping below 3000 RPM, the power vs. torque graphs may display an unnaturally large swell below 3000 RPM. This swell is the torque converter multiplying the engine’s available torque. The swell is normal and all dynos exhibit this behavior. The power torque figures above 3000 RPM are the real numbers generally used for evaluation.
Dyno Files The Dynamometer feature use three storage file types:
Power Torque – stores Power and Torque run data.
Acceleration – stores Acceleration run data.
Dyno Setup – stores dyno setup variables such as vehicle weight, elevation, humidity, etc.
The Power Torque files can be viewed and created on the Dynamometer > Power Torque screen.
The Acceleration files can be viewed and created on the Dynamometer > Acceleration screen.
The Dyno Setup files can be viewed and created on the Files > View Files > View Dyno Setup or Files > Create Files > Create Dyno Setup screen respectively.
38 Dynamometer Features

Dyno Setup File The Dyno Setup files are created on the Files > Create Files > Create Dyno Setup menu option. A wizard will walk you through setting each file attribute:
Weight – weight of the vehicle including passengers during the run.
Gear Ratio – the overall gear ratio of the vehicle, which includes transmission and axle.
Tire Diameter – the vehicle tire diameter.
Temperature – current outside temperature.
Elevation – elevation at the test track.
Humidity – current outside humidity.
Pressure – current outside altimeter pressure available from www.nws.noaa.gov. Altimeter pressure is different than barometric pressure.
Drag Coefficient – drag coefficient of vehicle.
Frontal Area – the frontal area of the vehicle.
Once Dyno Setup file is created, the parameters can be reviewed at Files > View Files > View Dyno Setup.
The software measures the gear ratio for you. See Gear Ratio Screen on page 41 for more information.
Drag Coefficient and Frontal Area Common drag coefficients are usually in the range of 0.25 to 0.45 – the lower the number the less wind drag on the vehicle.
Frontal areas are usually in the range of 17 to 28 sq. ft – the lower the number the less frontal area. Smaller vehicles have lower frontal areas.
The table below lists drag coefficients to gain an understanding for these numbers.
Vehicle Drag Coefficient Frontal Area (sq/ft)
2005 BMW 325i 0.30 22.7
2005 Chevrolet Corvette Z06 0.31 22.4
2006 Porsche Cayman 0.29 21.3
1999 Chevy Cavalier 0.36 21.5
2000 Ford Taurus 0.32 23.7
2000 Chevy Silverado 1500 2WD 0.45 28.0
2000 Ford Explorer 0.45 25.8
2002 Honda Insight 0.25 20.5
39 Dynamometer Features
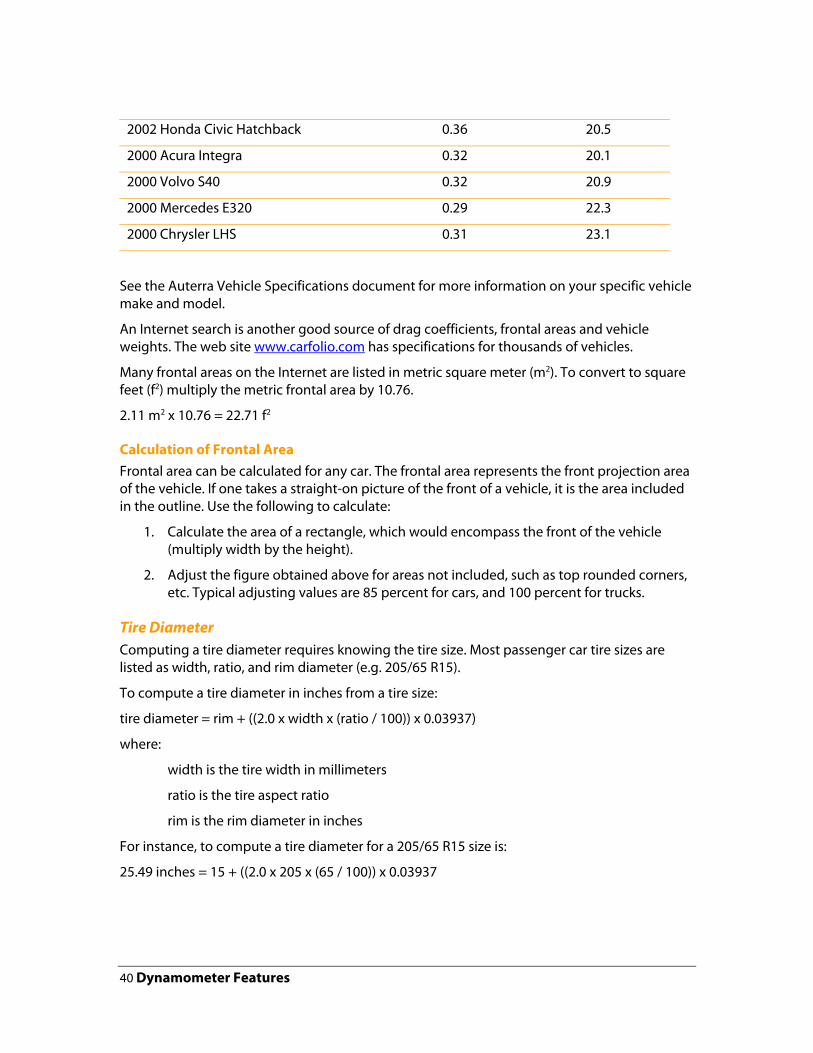
2002 Honda Civic Hatchback 0.36 20.5
2000 Acura Integra 0.32 20.1
2000 Volvo S40 0.32 20.9
2000 Mercedes E320 0.29 22.3
2000 Chrysler LHS 0.31 23.1
See the Auterra Vehicle Specifications document for more information on your specific vehicle make and model.
An Internet search is another good source of drag coefficients, frontal areas and vehicle weights. The web site www.carfolio.com has specifications for thousands of vehicles.
Many frontal areas on the Internet are listed in metric square meter (m2). To convert to square feet (f2) multiply the metric frontal area by 10.76.
2.11 m2 x 10.76 = 22.71 f2
Calculation of Frontal Area Frontal area can be calculated for any car. The frontal area represents the front projection area of the vehicle. If one takes a straight-on picture of the front of a vehicle, it is the area included in the outline. Use the following to calculate:
1. Calculate the area of a rectangle, which would encompass the front of the vehicle (multiply width by the height).
2. Adjust the figure obtained above for areas not included, such as top rounded corners, etc. Typical adjusting values are 85 percent for cars, and 100 percent for trucks.
Tire Diameter Computing a tire diameter requires knowing the tire size. Most passenger car tire sizes are listed as width, ratio, and rim diameter (e.g. 205/65 R15).
To compute a tire diameter in inches from a tire size:
tire diameter = rim + ((2.0 x width x (ratio / 100)) x 0.03937)
where:
width is the tire width in millimeters
ratio is the tire aspect ratio
rim is the rim diameter in inches
For instance, to compute a tire diameter for a 205/65 R15 size is:
25.49 inches = 15 + ((2.0 x 205 x (65 / 100)) x 0.03937
40 Dynamometer Features

Many large truck tire sizes are sized differently. These tires are listed as diameter, width, and rim diameter (e.g. 31x10.5 R16). In this case, the first number is used as the tire diameter, in inches (e.g. 31”).
Manufacturers are usually off very slightly from the indicated tire size. Many manufactures list the exact tire diameter on their website. If available, use the tire diameter listed on the manufacturer’s datasheet.
Dyno Setup File Usage The Dyno Setup file stores vehicle setup variables. When a power torque run is performed, the current Dyno Setup file set on the Preferences > Default Dyno Setup menu option is copied into the Power Torque file. Similarly, the current Dyno Setup file is copied into the Acceleration file for acceleration runs.
Once the settings are copied from the Dyno Setup file to the Power Torque or Acceleration file, there is no tie to the original Dyno Setup file. Meaning if you change a Dyno Setup file, it does not affect any stored Power Torque or Acceleration properties.
Gear Ratio Screen DashDyno measures the overall gear ratio of the vehicle. The Gear Ratio screen is accessed from the Dynamometer > Gear Ratio menu option.
Measuring Overall Gear Ratio Measuring the vehicle gear ratio involves keeping the vehicle speed steady while the software computes an overall gear ratio. The overall gear ratio changes with each transmission gear. Therefore, the software computes one overall gear ratio per gear ratio run (e.g. overall gear ratio for 2nd gear). The overall gear ratio is the combination of the transmission gear ratio and the final drive gear ratio.
To measure gear ratio:
1
2
3
4
5
6
7
Select the Dynamometer > Gear Ratio screen.
Press OK to start the Gear Ratio wizard.
Enter Tire Diameter – enter Tire Diameter.
Ready to Start? – select Start Run.
The software will display a gauge and start to count down. During this time, get the vehicle moving in the gear the run is going to be performed in (e.g. 2nd gear). The vehicle RPM should be between 3000 and 4000 RPM for best results. Once the gear and RPM is achieved, keep the throttle steady and clutch peddle out (if a manual transmission).
At the end of the countdown, the green alarm light will flash. This means data is being collected.
After the data is collected, the four-grid screen will show and the Gear Ratio is displayed in the lower right cell.
41 Dynamometer Features

Calculating Overall Gear Ratio The overall gear ratio can also be computed if the tire diameter and RPM at a given speed is known. The following formula computes the overall vehicle gear ratio used by the dyno software:
overall gear ratio = RPM x tire diameter / MPH x 336
Example car:
3.57 = 3000 RPM x 26” / 65 MPH x 336
The preferred method is to use the DashDyno to compute the overall gear ratio.
Confirming Gear Ratio Result The Gear Ratio screen in the lower left cell shows the value “Speed (Comp)”. This is the speed computed from the gear ratio located in the Gear Ratio cell.
Speed (Comp) will only display if a value is entered into the Gear Ratio cell. This requires running the Gear Ratio wizard.
If the Vehicle Speed cell and the Speed (Comp) cell values closely match throughout the RPM range then the gear ratio and tire diameter values are correct for this vehicle. If they do not match, adjust then re-run the Gear Ratio wizard.
Procedure to confirm a gear ratio is correct:
1
2
3
4
Keep a steady speed at 2000 RPM.
Confirm the Vehicle Speed and Speed (Comp) values match.
Increase speed to a steady 4000 RPM.
Confirm the Vehicle Speed and Speed (Comp) values match.
Always have a passenger confirm gear ratio is correct. Driving requires the full attention of the driver. Operating or observing the DashDyno while driving will cause driver distraction and could cause a fatal accident.
Computing a gear ratio requires an accurate speedometer. If the vehicle’s tire size is either smaller or larger than stock and the speedometer has not been recalibrated to the new wheel size, then the computed gear ratio will be incorrect. This will make the horsepower and torque figures higher or lower than expected.
Automatic Transmissions The software uses the gear ratio on the power torque run, which is performed under heavy acceleration. The gear ratio run, however, is performed under essentially a no-load condition where the torque converter slippage is negligible. Therefore, for automatic transmissions the measured gear ratio may have to be lowered by 5 to 15% to account for the torque converter slippage. Otherwise, the power and torque curves may show lower than expected results.
42 Dynamometer Features
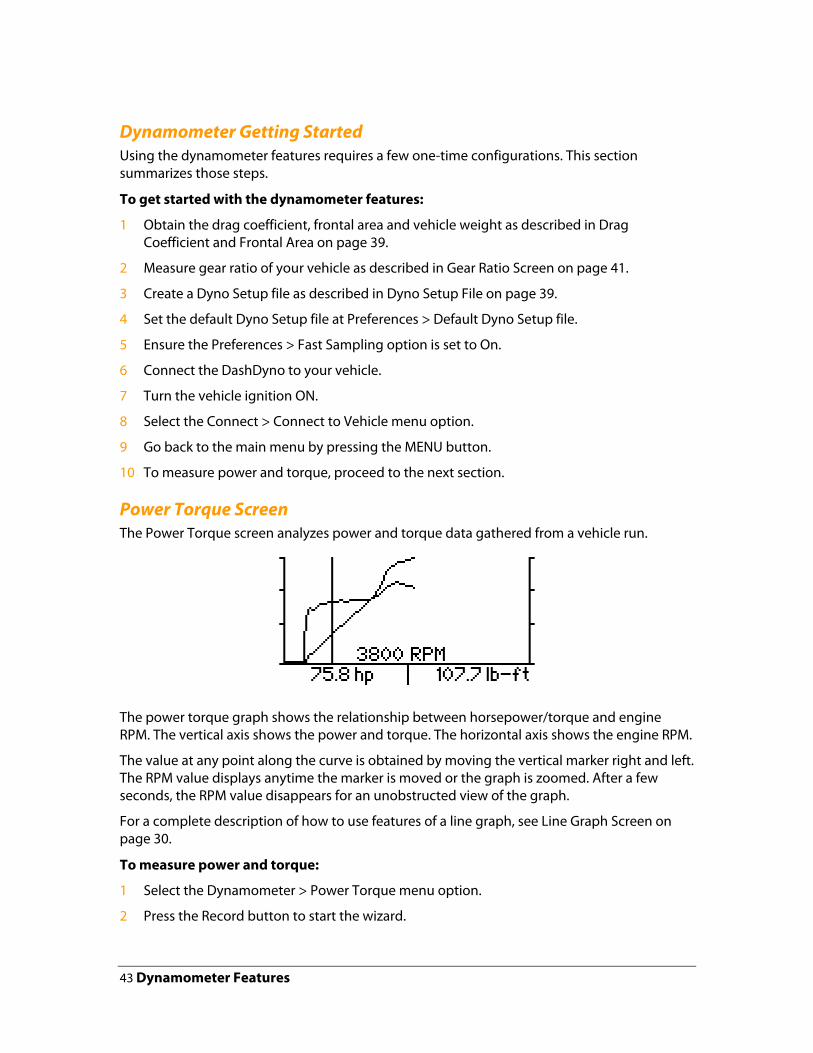
Dynamometer Getting Started Using the dynamometer features requires a few one-time configurations. This section summarizes those steps.
To get started with the dynamometer features:
1
2
3
4
5
6
7
8
9
10
Obtain the drag coefficient, frontal area and vehicle weight as described in Drag Coefficient and Frontal Area on page 39.
Measure gear ratio of your vehicle as described in Gear Ratio Screen on page 41.
Create a Dyno Setup file as described in Dyno Setup File on page 39.
Set the default Dyno Setup file at Preferences > Default Dyno Setup file.
Ensure the Preferences > Fast Sampling option is set to On.
Connect the DashDyno to your vehicle.
Turn the vehicle ignition ON.
Select the Connect > Connect to Vehicle menu option.
Go back to the main menu by pressing the MENU button.
To measure power and torque, proceed to the next section.
Power Torque Screen The Power Torque screen analyzes power and torque data gathered from a vehicle run.
The power torque graph shows the relationship between horsepower/torque and engine RPM. The vertical axis shows the power and torque. The horizontal axis shows the engine RPM.
The value at any point along the curve is obtained by moving the vertical marker right and left. The RPM value displays anytime the marker is moved or the graph is zoomed. After a few seconds, the RPM value disappears for an unobstructed view of the graph.
For a complete description of how to use features of a line graph, see Line Graph Screen on page 30.
To measure power and torque:
1
2
Select the Dynamometer > Power Torque menu option.
Press the Record button to start the wizard.
43 Dynamometer Features

3 New Power File? – select Create New File.
4
5
6
7
8
9
10
11
1
2
3
1
2
New Power File – enter a file name up to eight characters and press OK. Up/Down keys select the letter, the Right key moves to the next character.
Dyno Setup File – select a dyno setup file to use for the dyno run.
Set Alarms? – select Don’t set Alarms. Optionally an alarm file can be selected, but the alarms may only be triggered in response to the Engine RPM parameter.
Ready to Start? – select Start Run to start the test.
A gauge screen will display and a countdown will start.
During the countdown, get the vehicle moving in the gear the run is going to be performed in (e.g. 2nd gear). The vehicle RPM during the countdown should be relatively low, under 2000 RPM, the throttle steady, and clutch out (if a manual transmission).
At the end of the countdown, the green alarm light will flash. Now floor the accelerator to achieve maximum acceleration.
Once maximum RPM is reached, either shift to the next higher gear or decelerate the vehicle by letting off the accelerator. The software will automatically show the power torque graph.
To open a power torque file:
Press the OK key.
Stats or Open File? – select Open Dyno Run File.
Power Torque File – highlight the file to open and press OK.
Power Torque Statistics The Power Run Stats screen calculates the peak horsepower and torque at RPM values for the currently opened Power Torque file.
Power – peak horsepower at RPM during the run.
Torque – peak torque at RPM during the run.
To view power torque graph statistics:
On the Power Torque screen, press the OK key.
Stats or Open File? – select View Run Statistics.
Power Torque Run Do’s and Don’ts For safety and the most accuracy from the software, please follow the guidelines below.
Keep your attention on driving – the software is designed to require no user intervention when a run is performed. Start the power torque run while the vehicle is stopped. During the countdown, accelerate to the correct gear and starting RPM. A green alarm light flash signals when to accelerate the vehicle.
44 Dynamometer Features

Consistent vehicle setup – use the same tire pressure, same number of passengers, no A/C, windows rolled up, low beams on, radio and other accessories off.
Automatic transmission – most automatic transmissions will want to downshift under hard acceleration. Experiment with higher starting RPM or roll the throttle on slowly at first to prevent a downshift.
Manual transmission – ensure the clutch is completely out when the data collection starts.
Steady throttle – do not “blip” the throttle during the countdown period. Keep the throttle and RPM steady.
Maximum throttle – keep the throttle fully floored until maximum RPM is achieved. A dip in the RPM will cause the power torque graphs to terminate early3.
Dyno setup – try to obtain current temperature, humidity, elevation, and altimeter pressure before each day of runs.
Head/Tail Wind – a windy day will skew the power/torque results higher or lower depending on the wind direction. A relatively calm day provides the best results.
Level Ground – an uphill climb will make the power/torque lower and conversely a downhill run will have higher than expected values. Level ground provides the best results.
Heat soak – repeated runs will cause the intake manifold temperature to increase. Hot air is less dense and causes a reduction in power/torque. Just note that the first run may have slightly higher values than subsequent runs if performed back-to-back.
Acceleration Screen The Acceleration screen analyzes acceleration data gathered from a vehicle run.
The acceleration graph shows the relationship between vehicle speed vs. time. The vertical axis shows the vehicle speed in MPH. The horizontal axis shows the time in seconds.
The value at any point along the curve is obtained by moving the vertical marker right and left.
For a complete description of how to use features of a line graph, see Line Graph Screen on page 30.
To measure acceleration:
3 Use common sense – let off the accelerator if something gets in the way of the vehicle.
45 Dynamometer Features

1 Select the Dynamometer > Acceleration menu option.
2
3
4
5
6
7
8
Press the Record button to start the wizard.
New Accel File? – select Create New File.
New Accel File – enter a file name up to eight characters and press OK. Up/Down keys select the letter, the Right key moves to the next character.
Dyno Setup File – select a dyno setup file to use for the dyno run.
Set Alarms? – select Don’t set Alarms. Optionally an alarm file can be selected, but the alarms may only be triggered in response to the Vehicle Speed parameter.
Ready to Start? – select Start Run to start the test.
The acceleration run is performed from a standing start. When status field says “Ready” in the upper right corner means the software is waiting for the vehicle to start accelerating. The acceleration run does not use RPM like a power torque run does. Therefore, while waiting to accelerate you may rev the motor or do whatever else you think will achieve the quickest acceleration time
9
1
The acceleration screen will record up thought the ¼ mile. It will terminate automatically if the vehicle begins to slow down or the maximum test time has expired.
As you accelerate down the track, you may stop the acceleration run at different data points depending on the data you’re trying to collect.
60 MPH – if acceleration stops after 60 MPH is reached, the 0-60 time will be computed.
1/8 mile – if acceleration stops after 1/8 mile reached, the 1/8-mile time and speed is computed.
1/4 mile – if acceleration stops after 1/4 mile reached, the 1/4-mile time and speed is computed. In addition, a 1/4-mile horsepower value is computed.
Its best to accelerate slightly beyond a data point to ensure the software captures the vehicle passing through the data point at maximum acceleration. For instance, don’t let off the accelerator at exactly 60 MPH. Accelerate just beyond 60 for a second or two to achieve the best results.
To open an acceleration file:
Press the OK key.
46 Dynamometer Features
2 Stats or Open File? – select Open Dyno Run File.
3
1
2
Acceleration File – highlight the file to open and press OK.
Acceleration Run Statistics The Accel Run Stats screen computes times and horsepower values based upon how fast the vehicle accelerates.
Top Speed – maximum speed achieved during the run.
Zero to 60 mph – how fast in seconds the vehicle traveled from 0 to 60 MPH.
Zero to 100 mph - how fast in seconds the vehicle traveled from 0 to 100 MPH.
1/8 Mile – time and speed the vehicle was traveling at the 1/8-mile mark.
1/4 Mile – time and speed the vehicle was traveling at the 1/4-mile mark.
Quarter Mile HP – a rough calculation of horsepower based strictly on 1/4-mile time and vehicle weight.
Zero (0) will be displayed if the vehicle didn’t travel far enough to compute that statistic.
To view acceleration graph statistics:
On the Acceleration screen, press the OK key.
Stats or Open File? – select View Run Statistics.
Acceleration Run Do’s and Don’ts For safety and the most accuracy from the Dyno software, please follow the guidelines below.
Keep your attention on driving – the software is designed to require no user intervention when a run is performed.
Consistent vehicle setup – use the same tire pressure, same number of passengers, no A/C, windows rolled up, low beams on, radio and other accessories off.
Head/Tail Wind – a windy day will skew the acceleration results higher or lower depending on the wind direction. A relatively calm day provides the best results.
Level Ground – an uphill climb will make the acceleration lower and conversely a downhill run will have higher than expected values. Level ground provides the best results.
Heat soak – repeated runs will cause the intake manifold temperature to increase. Hot air is less dense and causes a reduction in power/torque. Just note that the first run may have slightly faster values than subsequent runs if performed back-to-back.
Accelerate Just Past Data Point - accelerate slightly beyond a data point (e.g. 60 MPH, 1/8 mile, or 1/4 mile) to ensure the software captures the vehicle passing through the data point at maximum acceleration
47 Dynamometer Features
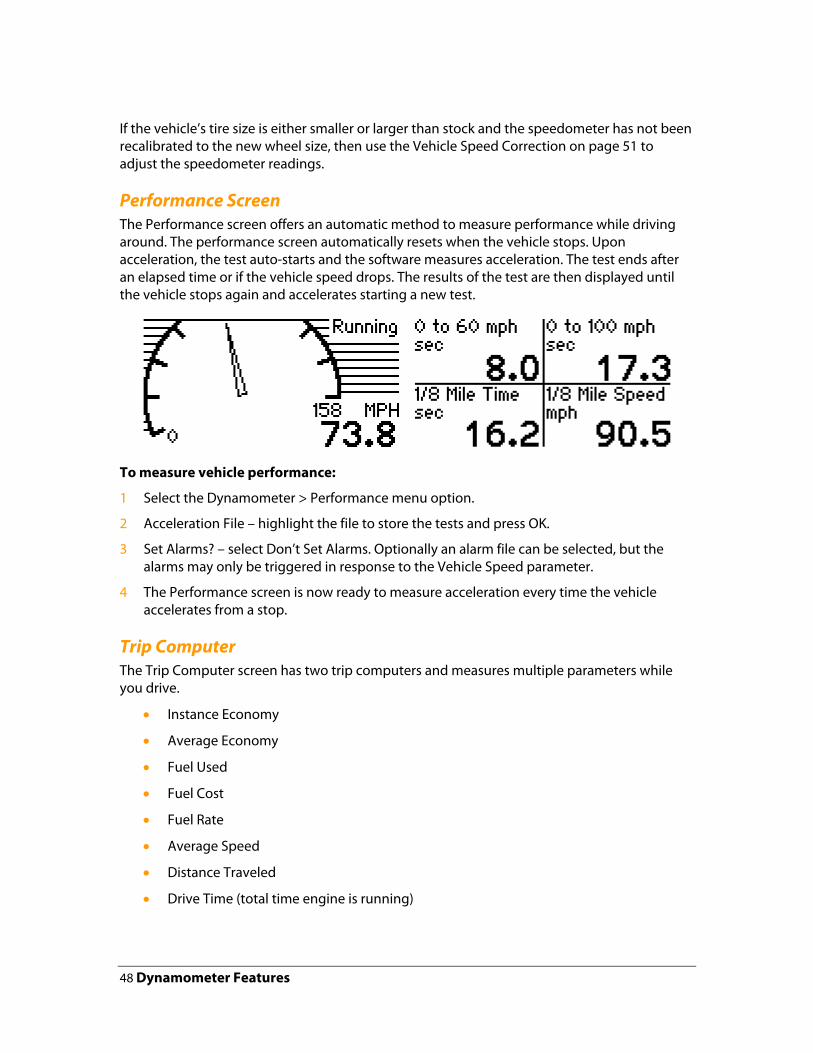
If the vehicle’s tire size is either smaller or larger than stock and the speedometer has not been recalibrated to the new wheel size, then use the Vehicle Speed Correction on page 51 to adjust the speedometer readings.
Performance Screen The Performance screen offers an automatic method to measure performance while driving around. The performance screen automatically resets when the vehicle stops. Upon acceleration, the test auto-starts and the software measures acceleration. The test ends after an elapsed time or if the vehicle speed drops. The results of the test are then displayed until the vehicle stops again and accelerates starting a new test.
To measure vehicle performance:
1
2
3
4
•
•
•
•
•
•
•
•
Select the Dynamometer > Performance menu option.
Acceleration File – highlight the file to store the tests and press OK.
Set Alarms? – select Don’t Set Alarms. Optionally an alarm file can be selected, but the alarms may only be triggered in response to the Vehicle Speed parameter.
The Performance screen is now ready to measure acceleration every time the vehicle accelerates from a stop.
Trip Computer The Trip Computer screen has two trip computers and measures multiple parameters while you drive.
Instance Economy
Average Economy
Fuel Used
Fuel Cost
Fuel Rate
Average Speed
Distance Traveled
Drive Time (total time engine is running)
48 Dynamometer Features

• Idle Time (total time engine is running with vehicle speed at 0 MPH)
•
•
•
•
Idle Time Percent (idle time vs. drive time percent)
Engine RPM
Intake Air Temp
Calculated Load
For an accurate Fuel Cost reading, set the cost per gallon/liter on the Preferences > Fuel Cost menu option. If the Preferences > Units of Measure is set to Metric, the Fuel Cost is the cost per liter.
Use the up/down arrows to display each page within the trip computer. Use the right/left keys to switch between trip computer 1 and 2.
The trip statistics are stored to the external memory card, so when you return to the screen the last values are remembered. Each trip computer may be independently reset at anytime.
To use the trip computer:
1
1
2
3
1
2
Select the Dynamometer > Trip Computer menu option.
To reset the trip computer:
Select the Dynamometer > Trip Computer menu option.
Press the OK key.
Select Yes to reset the trip computer statistics.
To switch between data parameters and trip computer 1 and 2:
Press the up/down arrow keys to view different data parameters.
Press the right/left arrow keys to switch trip computers.
49 Dynamometer Features

CHAPTER 6
Preferences
Preferences allow you to set the global system settings, which are saved to the external memory card. Every time the DashDyno powers on or when a new card is inserted, the settings saved on the external memory card are loaded and used.
When setting a preference, always press OK to save/change the setting. Pressing MENU on a preference dialog will cancel a change and revert to the previous setting.
Preference Function
Vehicle Make Set the vehicle make to display enhanced OBD II parameters (see Enhanced OBD II Parameters on page 27). Select “All” if your vehicle make is not listed.
Default Dyno Setup Specifies the default dyno setup file to be used on the dynamometer features.
Reset Logger Fuel Econ Reset the fuel economy related parameters used on the data logger screens.
Contrast Sets the LCD display contrast.
Backlight Sets the intensity of the LCD display backlight.
Units of Measure English or Metric units of measure.
Fast Sampling Allows faster data sampling on some vehicle protocols.
CAN 6x Allows querying 6 sensors at a time on CAN bus equipped vehicles.
Power Down Mode Timeout, RPM or Never. Timeout means if the vehicle ECU stops communicating or no keys are pressed, the device will self-power down. RPM means if the vehicle RPM goes to 0 then self-power down. Use the RPM option if DashDyno does not self-power down using Timeout. Never means the device will not self-power down.
Power Down Timeout The timeout delay, in seconds, before self-power down.
50 Preferences

MPG Correction Percent correction factor of the computed MPG.
Distance Corr Percent correction factor of the distance traveled.
Vehicle Speed Corr Percent correction factor for the vehicle speed. Used to correct for an inaccurate speedometer due to non-stock tires sizes.
Boost Calibration Boost pressure calibration.
Case Temperature The current internal temperature inside the case.
GPS Baud Rate Sets the GPS baud rate on auxiliary port 2.
Fuel Type Gas or diesel.
Fuel Cost Average cost per gallon or liter of the fuel currently in the gas tank. Use to compute the Fuel Cost live data parameter.
Engine Size Engine size in liters.
GPS Parameters Set to ‘On’ to show GPS parameters (e.g. GPS Speed) in the Data Logger Parameter Select screens. ‘Off’ hides these parameters if you are not using a GPS.
Analog In Parameters Set to ‘On’ to show auxiliary port analog in and digital in parameters (e.g. Analog In 1 – 12V) in the Data Logger Parameter Select screens. ‘Off’ hides these parameters if you are not using the analog inputs.
Power Loss Resume Auto-connect to the vehicle and switch to the last Live Data or Trip Computer screen.
Auto-Record Automatically starts recording data when DashDyno is plugged in or the vehicle is started. See Auto-Record on page 56.
About Shows the software versions within the product.
Vehicle Speed Correction The vehicle speed correction preference adjusts the vehicle speed sensor readings to accommodate a vehicle with an inaccurate speedometer. This is a global setting and adjusts the vehicle speed measurements on all DashDyno screens (e.g. trip computer screen, acceleration screen, data logger screens, etc…).
The vehicle speed correction preference does not adjust the vehicle dashboard speedometer nor does it calibrate the vehicle speedometer.
If your vehicle is equipped with a stock tire size you leave this setting at 0.0%.
51 Preferences

Always compute and adjust the vehicle speed correction first before measuring and adjusting the distance correction or MPG correction.
To compute and adjust the vehicle speed correction factor using is GPS:
1
2
3
4
5
6
7
8
9
10
11
12
13
1
2
3
4
Select the Preferences > Vehicle Speed Corr menu option.
Enter Vehicle Speed Corr – enter 0.
Select the Data Logger > Meter 2 screen.
Press OK.
Live or Playback – select View Live Data.
Setup Method – select Setup Screen Manually.
Parameter 1 – select Vehicle Speed and press OK.
Press MENU.
Drive the vehicle and keep the vehicle speed stead (e.g. 30 MPH).
Have a passenger note the DashDyno Vehicle Speed and the GPS speed.
Compute an error percentage:
vehicle speed correction = ((GPS speed - DashDyno vehicle speed ) / GPS speed) x 100
Example:
7.3% = ((30.0 MPH – 27.8 MPH) / 30.0 MPH) x 100
Select the Preferences > Vehicle Speed Corr menu option.
Enter Vehicle Speed Corr – enter the computed correction factor.
Distance Correction The distance correction preference fine-tunes the accuracy of the Distance Traveled parameter, if necessary.
The distance correction preference does not adjust the vehicle odometer nor does it calibrate the vehicle speedometer.
The Distance Traveled parameter is used within the Instant MPG and Average MPG parameter computations. Therefore, an accurate Distance Traveled parameter ensures greatest accuracy of these parameters.
To compute and adjust the distance correction preference using your vehicle odometer:
Select the Preferences > Distance Corr menu option.
Enter Distance Corr – enter 0.
Go to the Dynamometer > Trip Computer screen.
Press OK.
52 Preferences

5 Reset Trip Computer? – select Yes.
6
7
8
9
10
1
2
3
4
5
6
7
8
9
Reset the vehicle’s trip computer odometer to 0.
Drive the vehicle for 25 to 50 miles. Always have the Trip Computer screen displayed when driving the vehicle.
Compare the DashDyno trip computer Distance value and the vehicle’s odometer mileage. Compute an error percentage:
distance correction = ((odometer distance - DashDyno distance ) / odometer distance) x 100
Example:
3.3% = ((27.5 miles – 26.6 miles) / 27.5 miles) x 100
Select the Preferences > Distance Corr menu option.
Enter Distance Corr – enter the computed correction factor.
Alternatively a GPS may be used in place of the odometer in the above procedure if the vehicle speedometer is not accurate.
MPG Correction The MPG correction preference fine-tunes the accuracy of the Instant MPG, Average MPG and Fuel Used parameters due to different fuels or minor vehicle sensor variances.
The MPG correction preference does not adjust the amount of fuel used by the vehicle.
Always compute and adjust the distance correction first before measuring and adjusting MPG correction.
To compute and adjust the MPG correction preference:
Select the Preferences > MPG Correction menu option.
Enter MPG Correction – enter 0.
Fill up your vehicle gas tank.
Go to the Dynamometer > Trip Computer screen.
Press OK.
Reset Trip Computer? – select Yes.
Drive the vehicle normally until the tank is near empty. Always have the Trip Computer screen displayed when driving the vehicle.
Fill up the vehicle and note the gallons used to fill up the vehicle.
Compute the error in the DashDyno Fuel Used parameter and the gallons used to fill up the gas tank.
MPG correction = ((DashDyno fuel used - gas pump gallons) / gas pump gallons) x 100
Example:
53 Preferences

-1.2% = ((25.3 gallons – 25.6 gallons) / 25.6 gallons) x 100
10
11
1
2
3
4
5
6
7
8
9
10
Select the Preferences > MPG Correction menu option.
Enter MPG Correction – enter the computed correction factor.
Boost Calibration Two different methods are used for expressing pressure: gauge pressure and absolute pressure. Gauge pressure is referenced to atmospheric pressure. The atmospheric pressure at sea level is about 14.7psi and changes slightly with atmospheric conditions. Absolute pressure is referenced to 0psi. The relationship between the pressures can be expressed as follows:
absolute pressure = gauge pressure + atmospheric pressure
The Boost Pressure parameter measures the absolute pressure within the vehicle’s intake manifold. To measure gauge pressure, enter a Boost Cal offset. Gauge pressure can be expressed as follows:
gauge pressure = absolute pressure – atmospheric pressure
The Boost Cal allows entering the atmospheric pressure, in psi, such that a gauge pressure reading may be obtained.
boost pressure = absolute pressure – Boost Cal
Two factors affect the Boost Cal accuracy: weather conditions and elevation changes, the later being more significant. Enter a new Boost Cal for the most accurate gauge pressure measurements.
See Manifold Absolute Pressure (MAP) Example on page 79 for a discussion of gauge vs. absolute pressure readings.
The boost calibration does not adjust the turbo boost pressure of the vehicle.
To compute a Boost Calibration correction factor:
Connect DashDyno to your vehicle.
Ensure your vehicle is not running.
Select the Preferences > Boost Calibration menu option.
Enter Boost Cal – enter 0.
Select the Data Logger > Meter 2 screen.
Press OK.
Live or Playback – select View Live Data.
Setup Method – select Setup Screen Manually.
Parameter 1 – select Boost Pressure and press OK.
Press MENU.
54 Preferences
11 The boost pressure parameter will display. This is your Boost Cal correction factor. With the Boost Cal preference at 0 and the vehicle off, the Boost Pressure value shown is atmospheric pressure.
12
13
•
•
•
•
•
Select the Preferences > Boost Calibration menu option.
Enter the boost calibration pressure value measured above.
Engine Size The Engine Size preference is used in the following parameters: Instant Economy 2, Average Economy 2, Fuel Used 2 and Air Flow Rate From MAP. Ensure you enter an accurate engine size (in liters) if you use these parameters.
Fuel Type The Fuel Type preference is used to adjust the fuel economy-related parameters. Ensure you enter the correct fuel type: gas or diesel.
Fuel Cost The Fuel Cost preference is used to enter the cost per gallon of the fuel currently in the vehicle gas tank. This value is used to correctly display the Fuel Cost live data parameter. If the Preferences > Units of Measure is set to Metric, the Fuel Cost is the cost per liter.
Case Temperature A temperature sensor inside the case monitors the internal device temperature. Case temperature is used to:
Automatically adjust the LCD display contrast based on temperature
Reduce power consumption during high-heat conditions
Prevent operation if the device is too hot
LCD-type displays darken as the temperature increases. To compensate, the contrast is automatically adjusting based on the internal case temperature for a clear display over a wide range of operating temperatures.
Please see Caring for DashDyno on page 15 and Specifications on page 3 for information about storage and ambient operational temperature ranges.
The temperature sensor is also utilized to protect against usage during abnormal temperature extremes.
If the internal case temperature exceeds 140ºF (60ºC) power consumption is reduced by:
Turning off the keypad backlight
Reducing the LCD display backlight to 50% intensity
If the internal case temperature exceeds 158ºF (70ºC) an error message is displayed for 5 seconds and then powered down.
55 Preferences

The temperature is displayed on the Preferences > Case Temperature menu. To refresh the temperature value, press and hold the OK key while highlighting the Case Temperature menu option.
Auto-Record Auto-Record is used to automatically record data every time the DashDyno is plugged in or the vehicle engine is started. A new live data file is created on the SD card each time. The file name is in the format of AR_n.ld where ‘n’ is any number (e.g. AR_1.ld, AR_2.ld…. AR_10.ld, etc.) The numeric portion of the file auto-increments each time a new file is created.
Auto-Record is highly useful for long-term data recording over days, week or even months. The Auto-Record feature, once initially setup, does not require operator intervention; just plug in the DashDyno and it starts recording. This facilitates using DashDyno in a long-term vehicle data gathering study. If the DashDyno ever gets unplugged, simply plugging it in again automatically starts the Auto-Record feature.
A new live data file is created every time the DashDyno is plugged in or the vehicle engine is started. A unique file name is created by auto-incrementing the numeric portion of an AR_n.ld file starting at 1 (e.g. AR_1.ld, AR_2.ld, AR_3.ld, and so on). Creating new files minimizes data loss if the DashDyno is accidentally unplugged during recording.
The numerous files created during the Auto-Record can be merged together using the Dyno-Scan for Windows software Merge Files feature. Merge Files takes multiple live data recorded files and combines them into a single live data file for analysis. This allows viewing long-term data in a single file or exporting large amounts of data to a CSV spreadsheet file. See the Dyno-Scan for Windows user guide for information regarding the Merge Files feature.
A file called AUTO_REC.sc must be located in the SD card SCREEN directory. This is the screen configuration file that will be used to setup the screen every time the Auto-Record starts. You create the AUTO_REC.sc file in any of the Data Logger screens (e.g. Meter 4) during the wizard setup screen titled “Save Config?”. Whichever Data Logger screen you create the screen configuration file is the screen that Auto-Record will use to record your data. See Screen Configuration on page 28 for information on creating screen configuration files.
To setup the Auto-Record feature:
1
2
3
See Screen Configuration on page 28 and create a new screen configuration file. The screen configuration file must be named AUTO_REC.
Alternatively, if you already have a screen configuration file created with DashDyno software Ver A: 3.2.0 or higher, using your desktop or laptop PC you can rename one of your existing screen configuration files within your SD card SCREEN directory to be named AUTO_REC.sc.
You should now have an AUTO_REC.sc file in your SD card SCREEN directory. Insert the SD card into DashDyno if not already inserted.
Select the Preferences > Auto-Record menu option to ‘On’.
56 Preferences

4 The Auto-Record feature is now configured. Every time the DashDyno is plugged in or the vehicle is engine is started, DashDyno will automatically switch to the Data Logger screen and start recording.
5 Select the Preferences > Auto-Record to ‘Off’ to disable the Auto-Record feature.
57 Preferences

CHAPTER 7
Files
The DashDyno uses the external memory card to store all user data, including recorded data, screen configuration, user preferences, and diagnostic trouble code definitions.
Upon inserting a new card, the DashDyno will create the necessary directory structures. Each directory contains different file types.
Directory Name File Type File Extension
ACCEL Acceleration files. .ac
ALARM Alarm files. .al
DSETUP Dyno setup files. .ds
DTC Diagnostic trouble code definition files. .bin
FORMULA Formula files. .fo
LIVE Live data files. .ld
POWER Power torque files. .pt
SCREEN Screen configuration files. .sc
PREFS User preferences files.
The memory card can be ejected or inserted while the DashDyno is powered. Ensure you are not recording before ejecting the card.
The DashDyno can create any file type, except the diagnostic trouble code definition files located in the DTC directory. These files are created by Auterra and included on your memory card. If you need to reinstall these files onto a new card, your Auterra DashDyno CD ROM has copies.
Creating, deleting and viewing files are all performed on DashDyno.
Create Files Creating files on DashDyno is easy with wizards asking you simple questions. Alarm, Dyno Setup, Formula and Screen files can be created on the Files main menu option. Other file types are created with the Record button on the Dynamometer or Data Logger screens.
58 Files

When creating files the software automatically generates a unique, unused file name (e.g. FILE1). You can either use this default file name, or using the Up/Down/Left/Right arrow keys enter a name of your choosing.
Create Alarm File See Alarms on page 63 for more information on how to create an Alarm file.
Create Screen Setup File A screen setup file can be created in one of two ways. First, it can be created within the Files > Create Files > Create Screen menu option. Or it can be created as part of setting up parameters on a data logger screen. See Parameter Select Wizard on page 27 for how to create a screen setup file.
Create Dyno Setup File See Dyno Setup File on page 39 for information on how to create a Dyno Setup file.
Create Formula File See Formula File on page 77 for information on how to create a Formula file.
Delete Files All file types can be deleted from accessing the Files > Delete Files menu option. All files are deleted the same way.
To delete a acceleration file:
1
2
3
•
•
•
•
1
2
Select the Files > Delete Files > Delete Acceleration menu option.
Highlight the file to delete and press OK.
Select Yes to delete the file.
View Files Configuration type files can be viewed from the Files > View Files menu option. Other file types like recordings must be viewed with the Data Logger or Dynamometer screens. A viewed file below cannot be edited.
Alarm File
Dyno Setup File
Formula File
View Screen File
To view an alarm file:
Select the Files > View Files > View Alarm menu option.
Highlight the file to view and press OK.
59 Files

3 A scrollable screen lists parameters set for each alarm.
New Memory Card To ready a new memory card for use:
1
2
3
4
5
6
7
1
2
3
1
2
3
4
5
Unplug the DashDyno from the vehicle or AC adapter.
Insert the new memory card.
Power on the DashDyno. At power-up, the necessary subdirectories are created.
Eject the memory card from the DashDyno.
Insert the memory card into a PC memory card reader.
Copy all DTC files from the Auterra CD ROM to the \DTC directory on the memory card. The files are named Acura.bin, Audi.bin, etc…
The new memory card is now ready for use.
Backup To backup your data from the external memory card, you’ll need a Windows PC and a card reader.
Eject the memory card from the DashDyno.
Insert the memory card into the PC card reader.
Copy the entire contents of the memory card to you PC for backup.
Corrupted Memory Card If the DashDyno has trouble reading or writing files, it could mean the memory card has been corrupted. If corrupted, it can be repaired. A corruption can occur if power is lost while writing to the memory card. A Windows PC and a card reader are required for the fix.
To scan the disk for errors on a PC:
Insert the SD card into the card reader.
Select Properties by right clicking on the card reader drive letter.
Select the Tools tab.
Click the Check Now… button in the Error-checking section.
Select the options as shown in the dialog below and press Start.
60 Files

6 The disk should now be free of any errors and ready for use. You may now need to perform the procedure described in section New Memory Card.
In some instances, it may be required to reformat the card.
All data will be lost on the external drive if formatted. Backup all data on the card before formatting.
To reformat a SD card:
1
2
3
Select Format… by right clicking the card reader drive letter.
Select either FAT or FAT32 as the file system type.
Press Start.
61 Files

4 The card is now formatted. Now ready it for use as explained in section New Memory Card.
62 Files
CHAPTER 8
Alarms
An alarm file stores the alarm trigger rules that you define. Multiple alarm rules can be stored within a single file making sophisticated triggering scenarios possible.
This section explains how to create the Alarm file on the DashDyno. You can also create an alarm file using the Dyno-Scan for Windows software. See the DashDyno Files section within the Dyno-Scan for Windows user guide for information on how to create an Alarm file using your PC.
Five items are required to define each alarm. A wizard steps you through the process.
Alarm Parameter Function
Parameter The parameter to monitor for the alarm condition.
Alarm Threshold Value of the parameter to trigger at.
Set Alarm When The alarm can be triggered when the value is greater than the alarm threshold or less than the alarm threshold.
Reset Alarm When The alarm can be reset when the parameter value returns inside the trigger range, or it may never be reset. If the ‘never’ option is used, then another alarm should be used to control when the alarm action is turned off.
Alarm Action The action taken when the alarm is triggered, such as turning an alarm light on or off, or setting the output switch state.
Any parameter can be used for an alarm, such as the Engine RPM parameter. Numerous alarm actions are possible:
•
•
•
•
•
•
•
All Alarm Lights On
All Alarm Lights Off
All Alarm Lights Flash
Green Light On
Green Light Off
Green Light Flash
Yellow Light On
63 Alarms

• Yellow Light Off
•
•
•
•
•
•
•
•
•
•
•
•
•
Yellow Light Flash
Red Light On
Red Light Off
Red Light Flash
Output Switch Close
Output Switch Open
To create alarms, you need to select parameters. Vehicle related parameters are only available when you’re connected to a vehicle or if you use the Connect > Connect Simulation option. The connect simulation provides access to all possible parameters. Your vehicle may not support every parameter.
Alarm Processing Rules The alarm feature allows one or more alarms to be stored into a single alarm file. The simplest way to create an alarm is to use 1 alarm per alarm light. For instance, three alarms can be used to illuminate the alarm lights when the RPM increases.
Alarm 1 turns the green light on when RPM is >3000
Alarm 2 turns the yellow light on when RPM >4000
Alarm 3 turns the red light on when RPM is >5000
More complex alarm triggers can be achieved by overlapping alarms, meaning using more than one alarm to control the behavior of a single alarm light(s). Here are some reasons to use overlapping alarms.
Inside Range - Triggering an alarm when the sensor value is inside a range (e.g. turn on the green alarm light when the coolant temperature is between 200 and 240 degrees).
Outside Range - Triggering an alarm with the sensor value is outside a range (e.g. turn on the red alarm light when the coolant temperature is less than 200 or greater than 240 degrees).
Hysteresis - Turn an alarm light on at one sensor threshold and off at another (e.g. turn on the red light when the coolant temperature exceeds 240 degrees and turn if back off only after it cools to below 200).
Complex Alarms - Create complex illumination scenarios by overlapping multiple alarms on a single alarm light (e.g. turn the green light on >3000 RPM, yellow light on >4000 RPM and flash all lights >5000 RPM).
Knowing how the alarm-processing algorithm prioritizes alarms allows you to create complex alarm files. The alarm-processing algorithm follows these rules:
64 Alarms

Alarm Processing Rule 1 – alarms triggered last takes precedence when multiple alarms overlap on an alarm light(s).
Alarm Processing Rule 2 – alarms are evaluated in the order that they were created.
Rule 1 means that if you have two alarms governing a single alarm light, the last alarm to trigger always takes effect. This is easier to explain given a simple example.
Assume two alarms are created for the green alarm light: alarm 1 turns the green light on steady and alarm 2 flashes the green light. If alarm 2 flashes the green light and while alarm 2 is active, alarm 1 triggers a steady green light. Alarm 1 occurred last and therefore it takes precedence over the alarm 2 action.
Rule 2 means if a single sensor data value causes multiple overlapped alarms to trigger, the alarm created last within the file has precedence. Again, a simple example helps to illustrate.
Assume you have two alarms: alarm 1 turns the green light on when the engine RPM <4000 RPM and alarm 2 turns the green light off when <3000 RPM. The green alarm light is on and the engine RPM is 4500 RPM. The engine RPM then drops to 2000 RPM. Both alarms trigger, however alarm 2 takes precedence and therefore the green light is turned off.
Shift Light Example To understand how multiple alarms provide the utmost flexibility, let’s create a shift light alarm file. Assume we want the green light to illuminate at 4500 RPM, yellow at 5000 RPM and red at 5500 RPM.
You can also use the Dyno-Scan for Windows software to easily create this shift light alarm file. See the DashDyno Files section within the Dyno-Scan for Windows user guide for information on how to create the shift alarm file using your PC.
1
2
3
4
5
6
7
8
9
10
11
12
13
Select the Files > Create Files > Create Alarm menu option.
Alarm Parameter 1 – highlight the Engine RPM and press OK.
Alarm Threshold – enter the first RPM threshold of 4500 RPM and press OK.
Set Alarm When – select Greater Than Threshold.
Reset Alarm When – select Below Trigger Threshold.
Alarm Action – select Green Light On.
Add Another Alarm? – select Add Another Alarm.
Alarm Parameter 2 – highlight the Engine RPM and press OK.
Alarm Threshold – enter the second RPM threshold of 5000 RPM and press OK.
Set Alarm When – select Greater Than Threshold.
Reset Alarm When – select Below Trigger Threshold.
Alarm Action – select Yellow Light On.
Add Another Alarm? – select Add Another Alarm.
65 Alarms
14 Alarm Parameter 3 – highlight the Engine RPM and press OK.
15
16
17
18
19
20
21
22
Alarm Threshold – enter the first RPM threshold of 5500 RPM and press OK.
Set Alarm When – select Greater Than Threshold.
Reset Alarm When – select Below Trigger Threshold.
Alarm Action – select Red Light On.
Add Another Alarm? – select Don’t Add Another Alarm.
New Alarm File? – select Create New File.
New Alarm File – enter the alarm file name and press OK.
Config File Saved – the file is now saved and ready for use. See Alarms on page 29 for how to use your newly created alarm file.
Inside Range Alarm Triggering an alarm when the sensor value is inside a particular range requires four alarms created in the correct order.
The table below shows the settings required to create an inside range alarm. This example illuminates the green light when the engine coolant temperature is between 150 and 220.
Alarm Alarm Parameter Value
Parameter Engine Coolant Temp
Alarm Threshold 150
Set Alarm When Greater Than Threshold
Reset Alarm When Never, Another Alarm Used
Alarm 1
Alarm Action Green Light On
Parameter Engine Coolant Temp
Alarm Threshold 220
Set Alarm When Less Than Threshold
Reset Alarm When Never, Another Alarm Used
Alarm 2
Alarm Action Green Light On
Parameter Engine Coolant Temp
Alarm Threshold 150
Set Alarm When Less Than Threshold
Reset Alarm When Never, Another Alarm Used
Alarm 3
Alarm Action Green Light Off
66 Alarms

Parameter Engine Coolant Temp
Alarm Threshold 220
Set Alarm When Greater Than Threshold
Reset Alarm When Never, Another Alarm Used
Alarm 4
Alarm Action Green Light Off
Outside Range Alarm Triggering an alarm when the sensor value is outside a particular range requires four alarms created in the correct order.
The table below shows the settings required to create an outside range alarm. This example illuminates the red light when the engine coolant temperature is below 150 or above 220.
Alarm Alarm Parameter Value
Parameter Engine Coolant Temp
Alarm Threshold 150
Set Alarm When Greater Than Threshold
Reset Alarm When Never, Another Alarm Used
Alarm 1
Alarm Action Red Light Off
Parameter Engine Coolant Temp
Alarm Threshold 220
Set Alarm When Less Than Threshold
Reset Alarm When Never, Another Alarm Used
Alarm 2
Alarm Action Red Light Off
Parameter Engine Coolant Temp
Alarm Threshold 150
Set Alarm When Less Than Threshold
Reset Alarm When Never, Another Alarm Used
Alarm 3
Alarm Action Red Light On
Parameter Engine Coolant Temp
Alarm Threshold 220
Set Alarm When Greater Than Threshold
Alarm 4
Reset Alarm When Never, Another Alarm Used
67 Alarms

Alarm Action Red Light On
Hysteresis Alarm Triggering an alarm with a different ascending and descending limit requires two alarms created in the correct order.
The table below shows the settings required to create a hysteresis alarm. Suppose you wanted to illuminate the red light when the coolant temperature reaches 240 degrees, but don’t want to turn off the light until the temperature cools to 200 or less.
Alarm Alarm Parameter Value
Parameter Engine Coolant Temp
Alarm Threshold 240
Set Alarm When Greater Than Threshold
Reset Alarm When Never, Another Alarm Used
Alarm 1
Alarm Action Red Light On
Parameter Engine Coolant Temp
Alarm Threshold 200
Set Alarm When Less Than Threshold
Reset Alarm When Below Trigger Threshold
Alarm 2
Alarm Action Red Light Off
Complex Shift Light Alarm Alarms rules can be combined in even more complex ways to create very unique triggering scenarios.
This example shows how to create a sequential shift light that illuminates the green light at >3000 RPM, yellow light at >4000 RPM and then flashes all the lights >5000 RPM. To create your own unique shift light alarm file, replace the 3000, 4000 and 5000 numbers below with your own RPM values.
Alarm Alarm Parameter Value
Parameter Engine RPM
Alarm Threshold 5000
Set Alarm When Greater Than Threshold
Reset Alarm When Below Trigger Threshold
Alarm 1
Alarm Action All Lights Flash
Alarm 2 Parameter Engine RPM
68 Alarms

Alarm Threshold 3000
Set Alarm When Greater Than Threshold
Reset Alarm When Never, Another Alarm Used
Alarm Action Green Light On
Parameter Engine RPM
Alarm Threshold 5000
Set Alarm When Less Than Threshold
Reset Alarm When Never, Another Alarm Used
Alarm 3
Alarm Action Green Light On
Parameter Engine RPM
Alarm Threshold 3000
Set Alarm When Less Than Threshold
Reset Alarm When Never, Another Alarm Used
Alarm 4
Alarm Action Green Light Off
Parameter Engine RPM
Alarm Threshold 4000
Set Alarm When Greater Than Threshold
Reset Alarm When Never, Another Alarm Used
Alarm 5
Alarm Action Yellow Light On
Parameter Engine RPM
Alarm Threshold 5000
Set Alarm When Less Than Threshold
Reset Alarm When Never, Another Alarm Used
Alarm 6
Alarm Action Yellow Light On
Parameter Engine RPM
Alarm Threshold 4000
Set Alarm When Less Than Threshold
Reset Alarm When Never, Another Alarm Used
Alarm 7
Alarm Action Yellow Light Off
69 Alarms

CHAPTER 9
Auxiliary Ports
DashDyno has two female 8-pin mini DIN auxiliary input ports to connect optional Auterra accessories or your own sensors.
Auxiliary Port Pinouts Aux 1 and Aux 2 ports on the DashDyno each perform different functions.
Each female mini DIN has 8 pins numbered as follows:
Aux 1 Pin Function Aux 2 Pin Function
1 +5V output, 25mA max* 1 +5V output, 25mA max*
2 Analog In 1 2 Digital Out 1
3 Spare 3 Serial Transmit
4 Spare 4 Serial Receive
5 Analog In 2 5 Spare
6 Analog In 3 6 Spare
7 Analog In 4 7 Digital In 1
8 Ground 8 Ground
* 25mA maximum from both pins combined.
Analog In The analog inputs have selectable ranges of 0-6V, 0-12V or 0-24V. Actual voltage range for each scale is 6.2V, 12.4V and 24.7V. Maximum input voltage is 24.7V on any range.
The analog in parameters are enabled by turning On the Preferences > Analog In Parameters menu option.
70 Auxiliary Ports

Most sensors on the vehicle are grounded already. Therefore, when connecting an aux port analog input to a vehicle sensor it’s not necessary to run a ground wire from the sensor back to the aux port ground pin 8.
If the sensor is not tied to vehicle ground, or if the signal levels are very low or if electrical interference is being picked up, a ground wire can be run back to the aux port pin 8.
Digital In The digital input maximum input voltage is 24V. A logic high is 4V or higher and a logic low is 1.6V or lower.
The digital in parameter is enabled by turning On the Preferences > Analog In Parameters menu option.
Digital Out The digital output is an open drain FET. It can switch 15V maximum and sink a 75mA maximum.
The picture below offers a simple representation of the digital output 1 electrical connection supported. If your device has a digital in control signal, when the DashDyno digital out 1 switch is closed the aux 2 pin 2 will be grounded.
71 Auxiliary Ports

5V Output A +5V output on the both aux connectors can be used for powering a low-power device. The combined current draw from both connectors is limited to 25mA maximum.
Serial Transmit/Receive The transmit/receive pins are used to communicate with an external peripheral device, such as a GPS. Custom driver software is required to communicate with an external device. Auterra will make software drivers and peripherals available.
72 Auxiliary Ports
CHAPTER 10
GPS
An external GPS receiver may be connected to DashDyno auxiliary port 2 using the DashDyno serial cable. The GPS receiver must support serial communication and the NMEA 0183 protocol. Most handheld GPS receivers from makers such as Garmin, Magellan and Lowrance will support these features.
A GPS receiver allows vehicle georeferenced positions to be recorded with your vehicle sensor data. The recorded data is analyzed on a PC and provides you a means to correlate sensor values with a vehicle position anywhere on Earth.
Five items are required to support GPS data logging:
•
•
•
•
•
DashDyno SPD
DashDyno Serial Cable (p/n C-160)
GPS Receiver
GPS Receiver Serial Cable (9-pin DSUB)
Dyno-Scan for Windows software4
4 Allows viewing recorded GPS positional data within Google Earth
73 GPS

Your GPS receiver must be configured to output serial data. A setup menu on your GPS receiver will enable the NMEA output and a communication baud rate. Ensure the baud rate selected on your GPS receiver matches the DashDyno baud rate set at the Preferences > GPS Baud Rate menu.
There may be multiple NMEA settings on your GPS receiver. It may be necessary to experiment with different settings until one is selected that outputs the necessary information required by DashDyno.
To connect a GPS to DashDyno:
1
2
3
4
5
6
7
8
9
10
11
Set the Preferences > GPS Parameters option to On.
Select a GPS baud rate from the Preferences > GPS Baud Rate menu. 19200 is the most common baud rate setting.
Connect the DashDyno serial cable to the DashDyno auxiliary port 2.
Connect the GPS receiver serial cable to your GPS receiver.
Connect the GPS receiver serial cable to the DashDyno serial cable.
Ensure you are outside with a clear view of the sky and wait for the GPS to acquire a satellite lock.
Set the NMEA and baud rate settings on your GPS receiver. Ensure the baud rate on the GPS receiver matches the baud rate on DashDyno.
Select the Data Logger > Meter 4 screen.
Press OK to start the Parameter Select Wizard.
Live or Playback – select View Live Data.
Setup Method – select Setup Screen Manually.
74 GPS

12 Parameter 1 – select GPS Satellites and press OK.
13
14
15
Press MENU to return to the Meter 4 screen.
If the GPS and DashDyno are communicating, the GPS Satellites parameter will display the number of satellites being tracked (e.g. 5). If three dashes are displayed (- - -), the GPS and DashDyno are not communicating. Adjust the baud rate and NMEA setting on the GPS receiver until the GPS Satellites parameter shows the number of satellites.
Now that the GPS and DashDyno are communicating, try the GPS HDOP and GPS Speed parameters. Both should show a number. If not, adjust only the NMEA setting on the GPS receiver until all GPS parameters are able to show value.
GPS Record and Playback The GPS parameters are enabled by turning On the Preferences > GPS Parameters option. You can record and playback GPS parameters (e.g. GPS Satellites) on the data logger screens. In addition to the GPS parameter, GPS positional coordinates are also saved to the SD card. GPS positional information is saved to the SD card as long as at least one GPS parameter is being recorded. See Record on page 34 for more information about recording data.
While you can view GPS parameters such as GPS Speed on DashDyno, you cannot view GPS positional information. DashDyno does not display a GPS map. GPS positional information is recorded to the SD card for viewing within Dyno-Scan for Windows software package. See Google Earth on page 84 for more information regarding viewing GPS data on a PC.
GPS Update Rate The GPS positional data is extremely useful in correlating logged sensor data to a vehicle’s georeferenced position when analyzed on the PC. Most handheld GPS receivers have a 1-second update rate. This rate is enough to provide an excellent vehicle position-to-data correlation.
HDOP GPS HDOP (Horizontal Dilution Of Precision) parameter is a measure of the GPS receiver’s horizontal positional accuracy. The lower the number the more accurate the positional data. The table below summarizes different ranges of HDOP.
HDOP Rating Description
1 Ideal This is the highest possible confidence level.
2-3 Excellent Positional measurements are considered accurate enough to meet all but the most sensitive applications.
4-6 Good Positional measurements could be used to make reliable vehicle location.
7-8 Moderate The fix quality could be improved. A more open view of the sky is recommended.
75 GPS

9-20 Fair Represents a low confidence level. A very rough estimate of the current location only.
21-50 Poor At this level, measurements are inaccurate by as much as a hundred yards.
76 GPS

CHAPTER 11
Formulas
Formulas allow applying a custom equation to any auxiliary port analog input voltage. A scale factor, offset, parameter name, units of measure, minimum and maximum values are all configurable.
Often an analog input is connected to a vehicle sensor. Typically a sensor outputs an analog voltage signal (e.g. 0 to 5V). For conversion into the correct units of measure, a user defined scale and offset is applied to the voltage measurement.
The formula applied to an analog input is:
value = (voltage x scale) + offset
where:
voltage is the voltage measured at the auxiliary port analog input
scale is the user defined scale factor
offset is the user defined offset
Formula File A formula file saves the formula parameters to the external memory card. Seven items are required to define each formula. A wizard steps you through the process.
Formula Parameter Function
Formula Parameter The analog input parameter to apply the formula.
Formula Name The name of your formula.
Units Name The units of measure for the formula.
Scale The formula scale factor.
Offset The formula offset.
Minimum Value The minimum computed formula value when the sensor reads 0V.
Maximum Value The maximum computed formula value when the sensor is at the maximum voltage.
77 Formulas
Formula files are accessed under the Files menu option. One formula file stores one formula parameter. Once a formula file is created, it is accessible from any Data Logger screen using the Parameter Select Wizard. Formula parameters can be viewed and recorded just like any other parameter by selecting the Formula Name. See Parameter Select Wizard on page 27.
A maximum of four formula parameters are used within the Parameter Select Wizard. If there are more than four formula files stored, the extra files are ignored. The formula parameters used by the Parameter Select Wizard are stored within the FORMULA directory on the external memory card. Each Formula Name must be unique and only one formula is allowed per analog input.
When a formula parameter is monitored, every voltage reading is converted using the user defined formula units of measure. Formulas always use two digits of numeric precision after the decimal point (e.g. 1.23).
Formula files may be viewed on the Files > View Files > View Formula screen. See View Files on page 59 for more information.
To create a formula:
1
2
3
4
5
6
7
8
9
10
11
1
2
3
4
5
6
Set the Preferences > Analog In Parameters option to On.
Select the Files > Create Files > Create Formula menu option.
Formula Parameter - select Analog In 1 – 6V.
Formula Name – enter a parameter name for your formula such as TEST FORMULA.
Units Name – enter a units of measure for your formula such as AFR.
Scale – enter a scale factor such as 2.
Offset – enter an offset such as 10.0.
Minimum Value – enter the minimum computed formula value when 0V is read at the analog input port such as 0.
Maximum Value – enter the maximum computed formula value when the analog input port is reading the maximum voltage such as 20.
New Formula File? – select Create New File.
New Formula File – enter a formula file name.
To view a formula parameter:
From any data logger screen, press OK.
Live or Playback – select View Live Data.
Setup Method – select Setup Screen Manually.
Parameter 1 – select your formula parameter name and press OK.
Parameter N – continue to select parameters. You can select as many parameters as the screen allows or select the <none> parameter when you are done.
Done or Advanced – select Advanced Options.
78 Formulas
7 Sample Speed – select High sampling speed.
8
9
10 The software will exit the wizard and formula parameter measurements will show.
Set Alarms? – select Don’t Set Alarms.
Save Config? – select Don’t Save Configuration.
Wide Band Air/Fuel Controller Example An oxygen sensor measures the vehicle air/fuel ratio. Oxygen sensors come in two types: narrow band and wide band. A narrow band oxygen sensor can measure lean/rich conditions but obtaining an exact air/fuel ratio (e.g. 14.7 to 1) is not possible. A wide band sensor allows precise air/flow ratio readings across a broad range.
Many newer vehicles come with a wide band sensor from the factory. If so, you can access the air/fuel ratio from the vehicle’s OBD II diagnostic port (see Parameters on page 19). If your vehicle has a narrow band sensor, then an air/fuel ratio controller is required.
There are many wide band oxygen sensor controllers on the market. A threaded female “bung” is welded into your exhaust pipe to hold the wide band sensor within the exhaust gas. A controller reads the air/fuel ratio (AFR) from the wide band oxygen sensor.
Most wide band controllers are able to output the air/fuel ratio as a linear analog voltage. For instance, a 0 to 5V analog output signal may be configured for linear response between 7.35 AFR (0V) and 22.39 AFR (5V).
The analog output of the wide band controller is connected to an analog input on DashDyno aux 1 port. If the controller has an analog ground, connect the controller analog ground to the aux 1 port ground.
To convert AFR assuming a range of 0V = 7.35 AFR and 5V = 22.39 AFR, use these values:
Formula Parameter Value
Scale 3.00
Offset 7.35
Manifold Absolute Pressure (MAP) Example The Motorola MPX4250 MAP series sensor measures absolute pressure, useful for measuring turbo boost pressure, or vacuum, within the intake manifold. DashDyno can measure pressure from an external pressure sensor using an analog input and a formula.
79 Formulas

Two different methods are used for expressing pressure: gauge pressure and absolute pressure. Gauge pressure is referenced to atmospheric pressure. The atmospheric pressure at sea level is about 14.7psi and changes slightly with atmospheric conditions. Absolute pressure is referenced to 0psi. The relationship between the pressures can be expressed as follows:
absolute pressure = gauge pressure + atmospheric pressure
The MPX4250 sensor outputs a 0.2V to 4.9V signal for an absolute pressure range of 2.9 to 36.3psi. Since the sensor reads absolute pressure, it will measure about 14.7psi with nothing connected to the pressure port fitting.
One can easily connect the MPX4250 pressure sensor to DashDyno for pressure measurements. Since the maximum current draw is 10mA, the DashDyno may power this device directly without an external power source.
DashDyno Aux 1 Port Motorola MPX4250AP
Pin 1 (+5V) Pin 3 (Vs)
Pin 2 (Analog In 1) Pin 1 (Vout)
Pin 8 (Ground) Pin 2 (GND)
A formula parameter will convert the pressure sensor voltage output into absolute pressure in psi (pounds/square inch). Use these values to convert voltage to absolute pressure in psi:
Formula Parameter Value
Scale 7.11
Offset 1.51
Conversion to gauge pressure requires knowing the atmospheric pressure. The atmospheric pressure is obtained from www.nws.noaa.gov or other weather web sites. Atmospheric pressure is usually given in inches of mercury (inHg). To convert from inHg to psi:
pressure = atmosphere x .491
where:
80 Formulas

pressure is the pressure in psi
atmosphere is the atmospheric pressure in inHg
.491 is the inHg to psi conversion factor constant
With the atmospheric pressure in psi, a new formula offset is computed to convert the absolute pressure into gauge pressure.
gauge offset = 1.51 – atmospheric pressure
where:
gauge offset is the new offset to use within the formula
1.51 is the MPX4250 sensor offset constant in psi
atmospheric pressure is the pressure in psi
Assuming an atmospheric pressure of 14.7psi, use these values to covert voltage into gauge pressure to in psi:
Formula Parameter Value
Scale 7.11
Offset 13.19
A simple table expresses how atmospheric pressure changes with altitude.
Altitude Pressure (inHg) Pressure (psi)
0 29.92 14.70
1,000 28.86 14.17
2,000 27.82 13.66
3,000 26.82 13.17
4,000 25.84 12.69
5,000 24.89 12.22
10,000 20.58 10.12
81 Formulas

CHAPTER 12
Software Upgrades
DashDyno SPD and Dyno-Scan for Windows are both software upgradeable. Upgrades are downloaded from Auterra’s Internet web site www.auterraweb.com.
DashDyno Upgrade The software is uploaded to the DashDyno through the USB port using a Windows PC. Holding the MENU key when the DashDyno powers on puts the DashDyno into flash upgrade mode.
The USB driver must be installed before the software upgrade is performed. See Virtual COM Port on page 89 for more information.
Please observe these precautions when upgrading your software:
•
•
•
•
1
Shutdown unnecessary software application before upgrading your software.
Do not interrupt the software upload once the software upgrade process begins.
Do not unplug the DashDyno during the software upgrade.
Do not use your PC while the software is being upgraded.
Once the USB driver is properly installed on your Windows PC you can upgrade the software.
To upgrade the DashDyno software:
Go to www.auterraweb.com and download the latest DashDyno Flash Updater program.
2
3
4
5
Install the program onto your Windows PC.
Connect the DashDyno to your PC using a USB cable.
Hold the MENU key while you either (a) plug in the A/C adapter into the power jack or (b) plug the OBD II cable into the vehicle. The screen will remain blank and some alarm lights may illuminate indicating the device is in flash update mode.
Start the DashDyno Flash Updater software.
82 Software Upgrades

6
7
8
9
10
Select the virtual COM port used by DashDyno. See Virtual COM Port on page 89 for more information.
Select Speed as High. If your computer is having trouble upgrading, then try Low speed.
Press the Update Software button. Do no disturb the software upgrade process. Depending on the speed of your computer and the Speed selection, the software upgrade will take from 2 to 10 minutes.
If the software upgrade fails, shutdown the Flash Updater program and repeat the process starting from step 3.
After the upgrade is complete, the DashDyno will restart automatically. The Preferences > About menu option will show the software version next to the “Ver A:” prompt.
Dyno-Scan for Windows Upgrade See the Dyno-Scan for Windows user manual or Auterra web site for instructions on upgrading the software.
83 Software Upgrades

CHAPTER 13
Dyno-Scan for Windows Software
The Dyno-Scan for Windows software is included with some configurations of the DashDyno SPD product. To install the software, please refer to the Dyno-Scan for Windows user manual.
DashDyno can be used as the link between your PC and the vehicle. The Dyno-Scan for Window software includes the USB driver necessary to connect the DashDyno to your Windows PC.
With the Dyno-Scan for Windows software, you can:
•
•
•
•
•
Connect to a vehicle and use all the features within the Dyno-Scan for Windows software.
Access more diagnostic data than with DashDyno alone.
View Live Data, Acceleration, Power Torque and Dyno Setup files created on the DashDyno.
Modify or create Live Data, Acceleration, Power Torque and Dyno Setup files and copy them to DashDyno.
View recorded GPS data in Google Earth.
Viewing files created on the DashDyno requires ejecting the SD card and inserting the card into a PC card reader. The PC card reader will allow reading the DashDyno files on your PC.
Connecting to a vehicle using the Dyno-Scan for Windows software requires using the DashDyno’s PC Pass-Through Mode.
Google Earth Google Earth is a geographic information system (GIS) and provides a 3D software representation of Earth using satellite imagery. It provides you with the ability to move about the Earth and view any location on the planet from any altitude or viewing angle. Google Earth is a free application and may be downloaded from http://earth.google.com. Ensure you are running version 4.1 or higher.
DashDyno and Dyno-Scan for Windows utilize Google Earth to correlate recorded vehicle sensor data with the vehicle’s georeferenced position on Earth. This is an extremely powerful tool in analyzing vehicle data whether on a racetrack, off road or around town.
DashDyno records OBD II vehicle sensors data, analog voltages and GPS data onto the SD card. Dyno-Scan for Windows then opens the file and if it contains GPS data, Dyno-Scan for Windows interactively sends coordinate information to Google Earth. You do not need to
84 Dyno-Scan for Windows Software
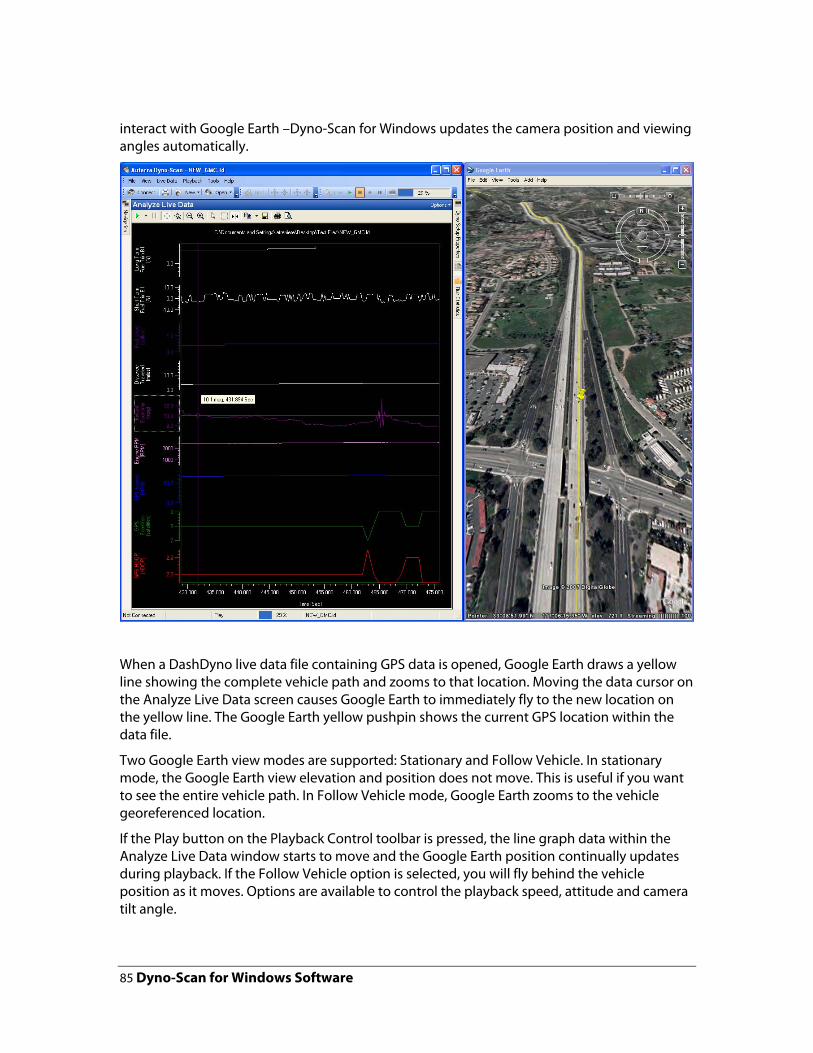
interact with Google Earth –Dyno-Scan for Windows updates the camera position and viewing angles automatically.
When a DashDyno live data file containing GPS data is opened, Google Earth draws a yellow line showing the complete vehicle path and zooms to that location. Moving the data cursor on the Analyze Live Data screen causes Google Earth to immediately fly to the new location on the yellow line. The Google Earth yellow pushpin shows the current GPS location within the data file.
Two Google Earth view modes are supported: Stationary and Follow Vehicle. In stationary mode, the Google Earth view elevation and position does not move. This is useful if you want to see the entire vehicle path. In Follow Vehicle mode, Google Earth zooms to the vehicle georeferenced location.
If the Play button on the Playback Control toolbar is pressed, the line graph data within the Analyze Live Data window starts to move and the Google Earth position continually updates during playback. If the Follow Vehicle option is selected, you will fly behind the vehicle position as it moves. Options are available to control the playback speed, attitude and camera tilt angle.
85 Dyno-Scan for Windows Software

See the Dyno-Scan for Windows software user manual for more information on using the Google Earth features.
Compatible File Types DashDyno and Dyno-Scan for Windows use the same file format. The files may be copied back and forth between the two systems. The compatible file formats are:
•
•
•
•
1
2
3
4
5
6
7
Live Data
Acceleration
Power Torque
Dyno Setup
To open a live data file stored on DashDyno:
Eject the SD card from the DashDyno SD card slot.
Insert the SD card into an external memory card reader connected to your PC.
Start the Dyno-Scan for Windows software.
From the Navigation docking window, select the Analyze Live Data icon.
Select the File > Open > Live Data File… menu option.
Open a live data file from within the LIVE directory on the SD card. For instance, the live data file could be stored at F:\LIVE\MYDATA.ld.
The Analyze Live Data screen now displays the recorded data.
86 Dyno-Scan for Windows Software
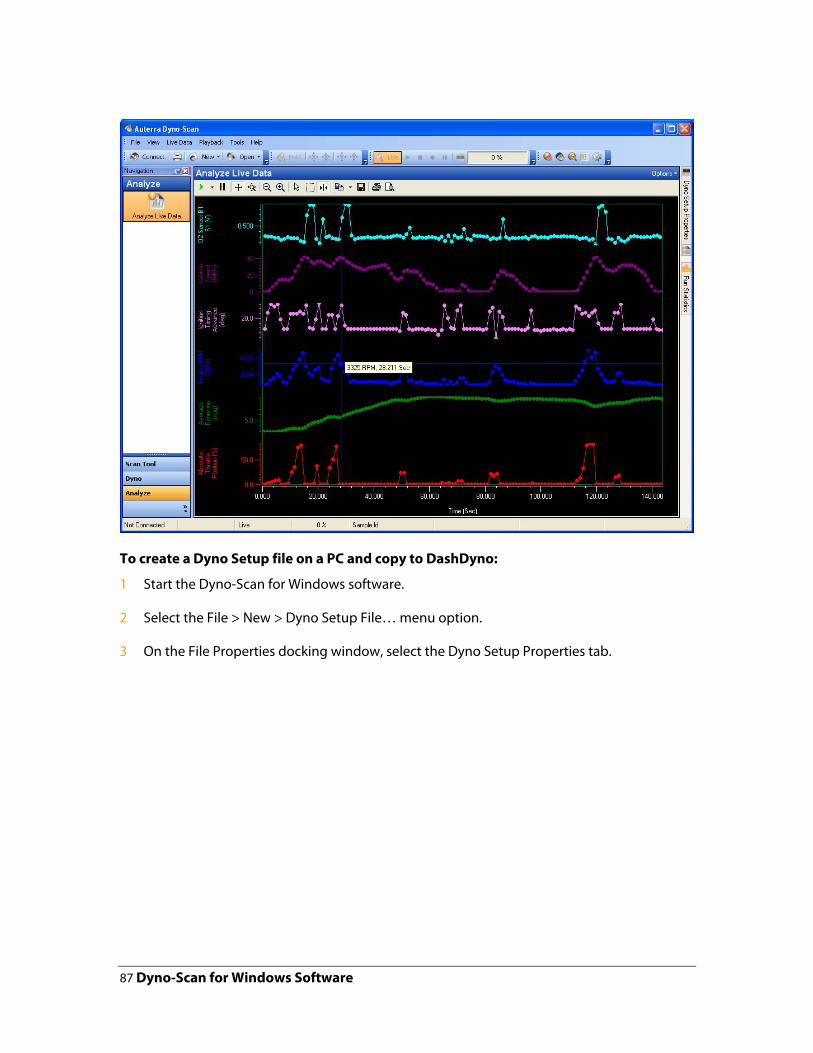
To create a Dyno Setup file on a PC and copy to DashDyno:
1
2
3
Start the Dyno-Scan for Windows software.
Select the File > New > Dyno Setup File… menu option.
On the File Properties docking window, select the Dyno Setup Properties tab.
87 Dyno-Scan for Windows Software

4
5
6
7
8
9
1
2
3
4
Enter your Dyno Setup parameters such as vehicle weight, elevation, etc.
Eject the DashDyno SD card from the SD card slot.
Insert the SD card into an external memory card reader connected to your PC.
Copy the Dyno Setup file from your PC to the DSETUP directory located on the SD card. For instance, copy the file to F:\DSETUP\MYSETUP.ds.
Return the SD card to DashDyno.
The Dyno Setup file you created on the PC is now ready for use on DashDyno.
PC Pass-Through Mode The DashDyno may be used as a pass-through device allowing you to use the Dyno-Scan for Windows software with your vehicle.
After the USB driver is installed and the DashDyno is plugged into your PC, a virtual COM port will be assigned on your PC. This virtual COM port (e.g. COM5) is set within the Dyno-Scan for Windows software under the Tools > Options menu.
To use the DashDyno as a PC link to your vehicle:
Connect the DashDyno to your vehicle OBD II connector.
Connect the DashDyno to your PC using the USB cable.
Select the Vehicle Connect > PC Pass-Through Mode menu option on the DashDyno. Leave DashDyno on the PC Pass-Through Mode screen the entire time.
Start the Dyno-Scan for Windows software.
88 Dyno-Scan for Windows Software
5 Select the Tools > Options menu on the Windows software and select the correct virtual COM port assigned to the DashDyno.
6
7
8
1
2
3
4
5
6
7
Turn the vehicle ignition to the ON position (vehicle does not have to be running).
Press the Connect button on the Dyno-Scan for Windows software to connect to the vehicle.
The Dyno-Scan for Windows software is now connected to your vehicle and ready for use.
Virtual COM Port When the DashDyno SPD is plugged into the PC, the driver will create a virtual COM port and assign it a number. The Windows Device Manager shows all assigned port numbers.
To view the virtual COM port assigned within Device Manager:
Click on “Start” and then “Control Panel”.
Switch to Classic View (if in Category View).
Double click on “System”.
Select the Hardware tab.
Press the “Device Manager” button.
Click on the “+” next to Port.
The entry labeled “Auterra USB OBD II Adapter” shows the virtual COM port for the USB OBD II adapter. Physical COM ports are also shown if you are using a serial OBD II adapter.
89 Dyno-Scan for Windows Software
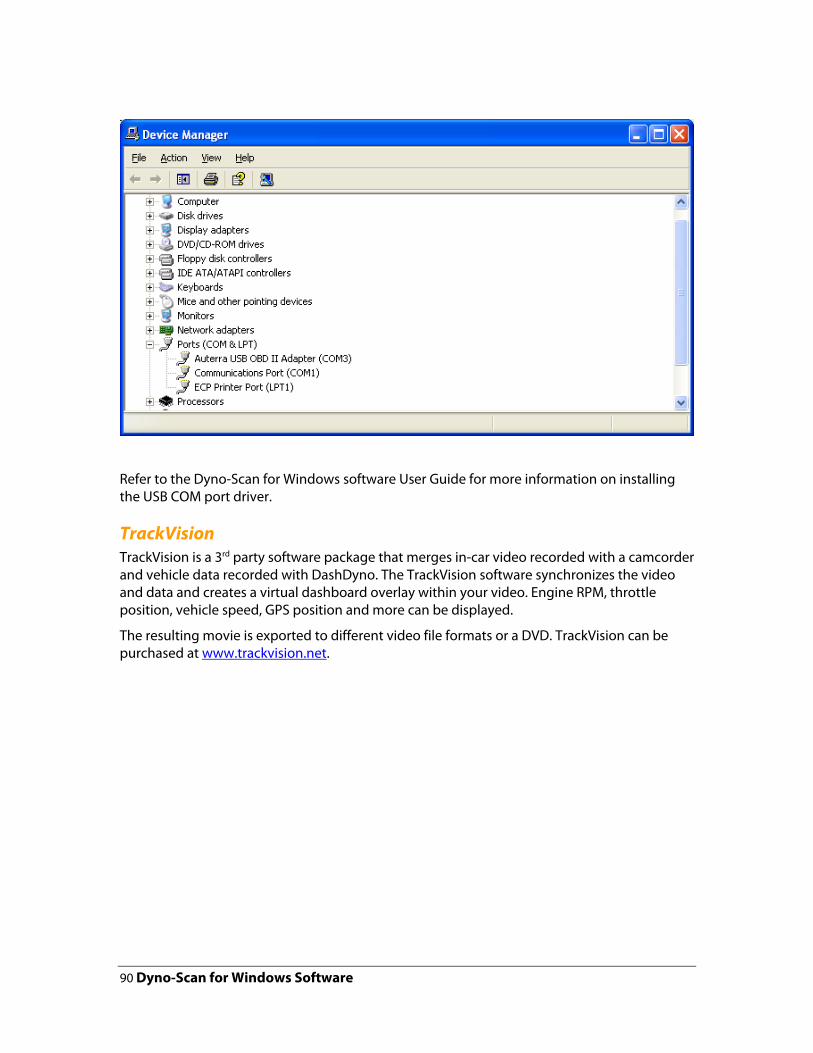
Refer to the Dyno-Scan for Windows software User Guide for more information on installing the USB COM port driver.
TrackVision TrackVision is a 3rd party software package that merges in-car video recorded with a camcorder and vehicle data recorded with DashDyno. The TrackVision software synchronizes the video and data and creates a virtual dashboard overlay within your video. Engine RPM, throttle position, vehicle speed, GPS position and more can be displayed.
The resulting movie is exported to different video file formats or a DVD. TrackVision can be purchased at www.trackvision.net.
90 Dyno-Scan for Windows Software

DashDyno supports exporting these parameters to TrackVision:
•
•
•
•
•
•
•
•
•
•
•
•
1
2
3
GPS Position (Latitude and Longitude)
Engine RPM
Throttle Position
Vehicle Speed
Engine Coolant Temperature
Intake Manifold Pressure
Ambient Air Temperature
Air Flow Rate From MAF
O2 B1-S1 Wide Range V
O2 B1-S2 Wide Range V
O2 Sensor B1-S1
O2 Sensor B1-S2
To create videos with TrackVision, you’ll need these items:
DashDyno SPD
External GPS
TrackVision software
91 Dyno-Scan for Windows Software

4 Camcorder
5
1
2
3
4
5
6
7
8
In-Vehicle Camcorder Mount
Mount the DashDyno, GPS and camcorder inside the vehicle. Connect the GPS to DashDyno. See GPS on page 73 for information on connecting a GPS.
The DashDyno and camcorder are not connected together and record independent of each other. The recorded vehicle data and video is later synchronized using the TrackVision software.
Select the DashDyno parameters you want to record. Start recording on DashDyno then start the camcorder recording. With DashDyno and the camcorder now recording, drive your vehicle. When done, stop the DashDyno and camcorder recording.
Follow these basic steps to create your TrackVision movie.
Eject the SD card from DashDyno and insert it into your PC’s card reader.
Start the Dyno-Scan for Windows software.
Select the Export > TrackVision File… menu option. Select the Live Data file recorded on the DashDyno SD card within the LIVE directory.
Select the destination CSV file (e.g. myfile.csv). The DashDyno data is now output into a CSV format readable by TrackVision.
Transfer your camcorder video onto your PC into a TrackVision compatible file format (e.g. .mpg, .wmv or .avi). See your camcorder documentation for specific instructions on how to import video onto your Windows PC.
Start the TrackVision software.
Select the camcorder Video Input file (created by your camcorder) and Data Logger Input file (created by DashDyno and exported as a CSV file).
Follow the TrackVision instructions on how to synchronize the Video Input and Data Logger Input and create the final movie.
92 Dyno-Scan for Windows Software

93 Dyno-Scan for Windows Software
CHAPTER 14
Troubleshooting
This section contains solutions for common problems encountered with the scan tool.
DashDyno Does Not Turn On If DashDyno does not turn on when plugged into the vehicle, check the vehicle fuse box for a blown fuse. A blown fuse can prevent power from reaching the OBD II connector and prevent DashDyno from powering on.
DashDyno Turns Off Or Resets While Driving Ensure the OBD II cable is securely plugged into the vehicle’s OBD II connector. A loose cable can cause an intermittent connection. If necessary, you may want to zip tie the OBD II cable connector to the vehicle.
Scan Tool Connects but No Live Sensor Data If no live data is displayed within the Data Logger screens, try the following remedies:
1. Disable the Fast Sampling option in the Preferences > Fast Sampling menu option.
2. Disable the CAN 6x communication option in the Preferences > CAN 6x menu option.
No Communication (Scan Tool) If the No Communication (Scan Tool) dialog appears, this means the software cannot communicate with the vehicle. Try the following remedies:
1. Ensure the vehicle ignition is turned on. Vehicle does not have to be running; however, it can be.
2. Try selecting the Connect > Connect to Vehicle menu option again.
3. Ensure the DashDyno OBD II cable is securely plugged into the vehicle’s OBD II connector.
4. Ensure the vehicle is OBD II compliant.
5. Ensure no vehicle fuses are blown. OBD II adapter power is derived from the vehicle and a blown fuse could prevent power from reaching the scan tool.
No Communication (Vehicle) If the No Communication (Vehicle) dialog appears, see No Communication (Scan Tool).
94 Troubleshooting

Lost Communication If the Lost Communication dialog appears, this means the software initially established communication but subsequently lost it. Try the following remedies:
1. Ensure the OBD II cable is securely plugged into the vehicle’s OBD II connector.
Freeze Frame Screen is Blank If the vehicle has not detected a failure that caused the Check Engine to illuminate, the data for the Freeze Frame screen will be blank.
Clearing Codes Did Not Work or MIL Didn’t Turn Off There are a few possible causes for the check engine light not to extinguish or the DTCs to reappear. First, if the problem is not fixed the DTC may return immediately for problems such as misfires, open or shorted sensors, etc. Second, some vehicles can't be running when the memory is cleared. In these cases, ensure the key is on but the engine is off before attempting to clear the memory. Last, some vehicles require, after the codes are cleared, for the ignition key to be turned off and then on again before the MIL light actually turns off.
Some Parameters Are Not Accurate The Distance Traveled, Average MPG, Instant MPG, and Fuel Used accuracy can be adjusted by the correction factors located on the Preferences menu. Ensure your connection factors are set correctly. See Preferences on page 50for more information.
95 Troubleshooting

CHAPTER 15
Addendum
California Drivers California Vehicle Code Section 26708 (a) (1) provides that "No persons shall drive any motor vehicle with an object or material placed, displayed, installed, affixed, or applied upon the windshield or side or rear windows." Drivers in California should not use a suction mount on their windshield, side or rear windows.
Minnesota Drivers Minnesota Statute 2005: 167.71 prohibits any objects suspended between the driver and the windshield, other than sun visors and rearview mirrors and electronic toll collection devices;"
Auterra, LLC bears no responsibility for any fines, penalties or damage that may be incurred by disregarding these notices. Auterra encourages you to obey all applicable laws Local, State and Federal laws. Other Local, State or Federal agencies may, or in the future, have similar laws. Check with your local Department of Motor Vehicles for current regulations regarding suction cup windshield mounted devices. If you are driving through other states, it’s your responsibility to conform to the laws within each state you travel.
Auterra, LLC may have other vehicle mounting options available. Contact Auterra or visit our web site www.auterrweb.com.
96 Addendum

APPENDIX A
Diagnostic Trouble Codes
A Diagnostic Trouble Code (DTC) is a 5-digit value starting with a letter.
The DTC’s codes listed here are common to all manufacturers. These generic Diagnostic Trouble Codes are those codes where industry uniformity has been achieved. However, each vehicle manufacturer may optionally create new codes beyond the generic ones. The DashDyno can read and display generic and enhanced manufacturer specific codes.
The DTC database files included with DashDyno incorporates thousands of more codes, both generic and enhanced, than those listed here. The following listing simply provides an overview of the types of codes available.
Diagnostic Trouble Code Format Structure The Diagnostic Trouble Code numbering follows a standardized structure. All Diagnostic Trouble Codes have a letter followed by a 4-digit number (e.g. P1234). The first letter indicates the type of code:
P = Powertrain C = Chassis B = Body U = Network Communication The remaining 4-digit number specifies the problem within that system.
P00XX Fuel and Air Metering and Auxiliary Emission Controls P0010 “A” Camshaft Position Actuator Circuit (Bank 1) P0011 “A” Camshaft Position - Timing Over-Advanced or System Performance (Bank 1) P0012 “A” Camshaft Position - Timing Over-Retarded (Bank 1) P0013 “B” Camshaft Position - Actuator Circuit (Bank 1) P0014 “B” Camshaft Position - Timing Over-Advanced or System Performance (Bank 1) P0015 “B” Camshaft Position -Timing Over-Retarded (Bank 1) P0020 “A” Camshaft Position Actuator Circuit (Bank 2) P0021 “A” Camshaft Position - Timing Over-Advanced or System Performance (Bank 2) P0022 “A” Camshaft Position - Timing Over-Retarded (Bank 2) P0023 “B” Camshaft Position - Actuator Circuit (Bank 2) P0024 “B” Camshaft Position - Timing Over-Advanced or System Performance (Bank 2) P0025 “B” Camshaft Position - Timing Over-Retarded (Bank 2) P0030 HO2S Heater Control Circuit (Bank 1 Sensor 1) P0031 HO2S Heater Control Circuit Low (Bank 1 Sensor 1) P0032 HO2S Heater Control Circuit High (Bank 1 Sensor 1) P0033 Turbo Charger Bypass Valve Control Circuit
97 Diagnostic Trouble Codes
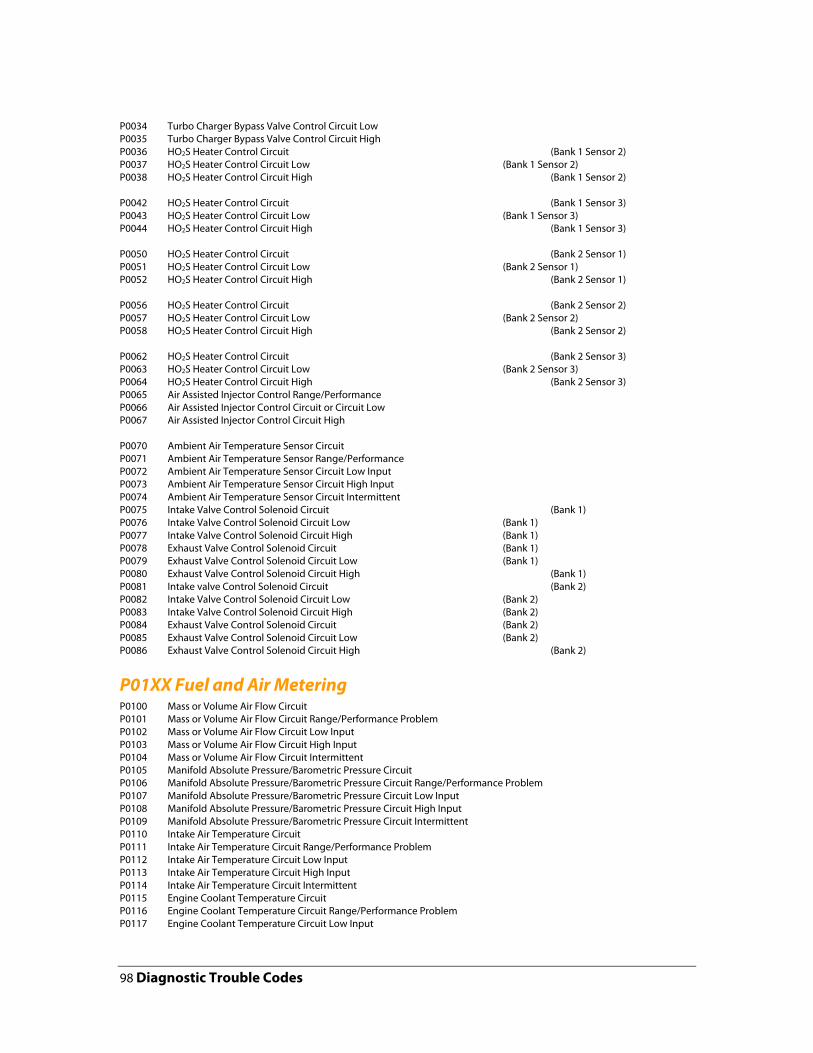
P0034 Turbo Charger Bypass Valve Control Circuit Low P0035 Turbo Charger Bypass Valve Control Circuit High P0036 HO2S Heater Control Circuit (Bank 1 Sensor 2) P0037 HO2S Heater Control Circuit Low (Bank 1 Sensor 2) P0038 HO2S Heater Control Circuit High (Bank 1 Sensor 2) P0042 HO2S Heater Control Circuit (Bank 1 Sensor 3) P0043 HO2S Heater Control Circuit Low (Bank 1 Sensor 3) P0044 HO2S Heater Control Circuit High (Bank 1 Sensor 3) P0050 HO2S Heater Control Circuit (Bank 2 Sensor 1) P0051 HO2S Heater Control Circuit Low (Bank 2 Sensor 1) P0052 HO2S Heater Control Circuit High (Bank 2 Sensor 1) P0056 HO2S Heater Control Circuit (Bank 2 Sensor 2) P0057 HO2S Heater Control Circuit Low (Bank 2 Sensor 2) P0058 HO2S Heater Control Circuit High (Bank 2 Sensor 2) P0062 HO2S Heater Control Circuit (Bank 2 Sensor 3) P0063 HO2S Heater Control Circuit Low (Bank 2 Sensor 3) P0064 HO2S Heater Control Circuit High (Bank 2 Sensor 3) P0065 Air Assisted Injector Control Range/Performance P0066 Air Assisted Injector Control Circuit or Circuit Low P0067 Air Assisted Injector Control Circuit High P0070 Ambient Air Temperature Sensor Circuit P0071 Ambient Air Temperature Sensor Range/Performance P0072 Ambient Air Temperature Sensor Circuit Low Input P0073 Ambient Air Temperature Sensor Circuit High Input P0074 Ambient Air Temperature Sensor Circuit Intermittent P0075 Intake Valve Control Solenoid Circuit (Bank 1) P0076 Intake Valve Control Solenoid Circuit Low (Bank 1) P0077 Intake Valve Control Solenoid Circuit High (Bank 1) P0078 Exhaust Valve Control Solenoid Circuit (Bank 1) P0079 Exhaust Valve Control Solenoid Circuit Low (Bank 1) P0080 Exhaust Valve Control Solenoid Circuit High (Bank 1) P0081 Intake valve Control Solenoid Circuit (Bank 2) P0082 Intake Valve Control Solenoid Circuit Low (Bank 2) P0083 Intake Valve Control Solenoid Circuit High (Bank 2) P0084 Exhaust Valve Control Solenoid Circuit (Bank 2) P0085 Exhaust Valve Control Solenoid Circuit Low (Bank 2) P0086 Exhaust Valve Control Solenoid Circuit High (Bank 2)
P01XX Fuel and Air Metering P0100 Mass or Volume Air Flow Circuit P0101 Mass or Volume Air Flow Circuit Range/Performance Problem P0102 Mass or Volume Air Flow Circuit Low Input P0103 Mass or Volume Air Flow Circuit High Input P0104 Mass or Volume Air Flow Circuit Intermittent P0105 Manifold Absolute Pressure/Barometric Pressure Circuit P0106 Manifold Absolute Pressure/Barometric Pressure Circuit Range/Performance Problem P0107 Manifold Absolute Pressure/Barometric Pressure Circuit Low Input P0108 Manifold Absolute Pressure/Barometric Pressure Circuit High Input P0109 Manifold Absolute Pressure/Barometric Pressure Circuit Intermittent P0110 Intake Air Temperature Circuit P0111 Intake Air Temperature Circuit Range/Performance Problem P0112 Intake Air Temperature Circuit Low Input P0113 Intake Air Temperature Circuit High Input P0114 Intake Air Temperature Circuit Intermittent P0115 Engine Coolant Temperature Circuit P0116 Engine Coolant Temperature Circuit Range/Performance Problem P0117 Engine Coolant Temperature Circuit Low Input
98 Diagnostic Trouble Codes
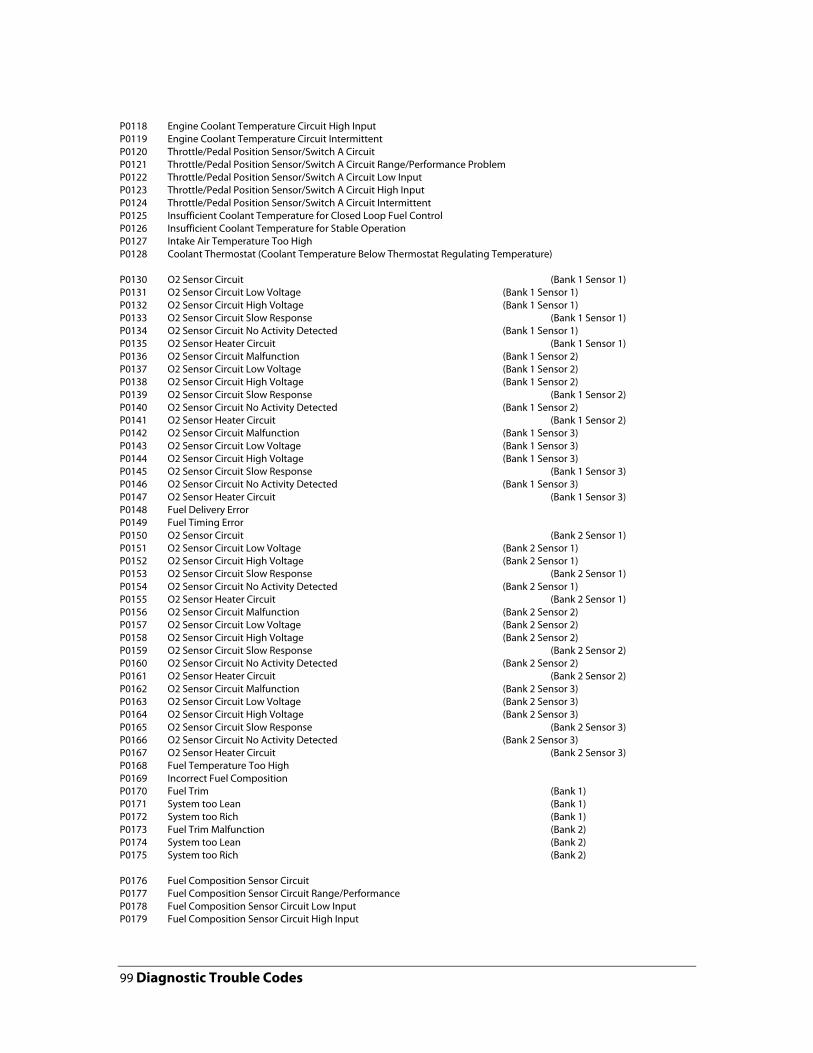
P0118 Engine Coolant Temperature Circuit High Input P0119 Engine Coolant Temperature Circuit Intermittent P0120 Throttle/Pedal Position Sensor/Switch A Circuit P0121 Throttle/Pedal Position Sensor/Switch A Circuit Range/Performance Problem P0122 Throttle/Pedal Position Sensor/Switch A Circuit Low Input P0123 Throttle/Pedal Position Sensor/Switch A Circuit High Input P0124 Throttle/Pedal Position Sensor/Switch A Circuit Intermittent P0125 Insufficient Coolant Temperature for Closed Loop Fuel Control P0126 Insufficient Coolant Temperature for Stable Operation P0127 Intake Air Temperature Too High P0128 Coolant Thermostat (Coolant Temperature Below Thermostat Regulating Temperature) P0130 O2 Sensor Circuit (Bank 1 Sensor 1) P0131 O2 Sensor Circuit Low Voltage (Bank 1 Sensor 1) P0132 O2 Sensor Circuit High Voltage (Bank 1 Sensor 1) P0133 O2 Sensor Circuit Slow Response (Bank 1 Sensor 1) P0134 O2 Sensor Circuit No Activity Detected (Bank 1 Sensor 1) P0135 O2 Sensor Heater Circuit (Bank 1 Sensor 1) P0136 O2 Sensor Circuit Malfunction (Bank 1 Sensor 2) P0137 O2 Sensor Circuit Low Voltage (Bank 1 Sensor 2) P0138 O2 Sensor Circuit High Voltage (Bank 1 Sensor 2) P0139 O2 Sensor Circuit Slow Response (Bank 1 Sensor 2) P0140 O2 Sensor Circuit No Activity Detected (Bank 1 Sensor 2) P0141 O2 Sensor Heater Circuit (Bank 1 Sensor 2) P0142 O2 Sensor Circuit Malfunction (Bank 1 Sensor 3) P0143 O2 Sensor Circuit Low Voltage (Bank 1 Sensor 3) P0144 O2 Sensor Circuit High Voltage (Bank 1 Sensor 3) P0145 O2 Sensor Circuit Slow Response (Bank 1 Sensor 3) P0146 O2 Sensor Circuit No Activity Detected (Bank 1 Sensor 3) P0147 O2 Sensor Heater Circuit (Bank 1 Sensor 3) P0148 Fuel Delivery Error P0149 Fuel Timing Error P0150 O2 Sensor Circuit (Bank 2 Sensor 1) P0151 O2 Sensor Circuit Low Voltage (Bank 2 Sensor 1) P0152 O2 Sensor Circuit High Voltage (Bank 2 Sensor 1) P0153 O2 Sensor Circuit Slow Response (Bank 2 Sensor 1) P0154 O2 Sensor Circuit No Activity Detected (Bank 2 Sensor 1) P0155 O2 Sensor Heater Circuit (Bank 2 Sensor 1) P0156 O2 Sensor Circuit Malfunction (Bank 2 Sensor 2) P0157 O2 Sensor Circuit Low Voltage (Bank 2 Sensor 2) P0158 O2 Sensor Circuit High Voltage (Bank 2 Sensor 2) P0159 O2 Sensor Circuit Slow Response (Bank 2 Sensor 2) P0160 O2 Sensor Circuit No Activity Detected (Bank 2 Sensor 2) P0161 O2 Sensor Heater Circuit (Bank 2 Sensor 2) P0162 O2 Sensor Circuit Malfunction (Bank 2 Sensor 3) P0163 O2 Sensor Circuit Low Voltage (Bank 2 Sensor 3) P0164 O2 Sensor Circuit High Voltage (Bank 2 Sensor 3) P0165 O2 Sensor Circuit Slow Response (Bank 2 Sensor 3) P0166 O2 Sensor Circuit No Activity Detected (Bank 2 Sensor 3) P0167 O2 Sensor Heater Circuit (Bank 2 Sensor 3) P0168 Fuel Temperature Too High P0169 Incorrect Fuel Composition P0170 Fuel Trim (Bank 1) P0171 System too Lean (Bank 1) P0172 System too Rich (Bank 1) P0173 Fuel Trim Malfunction (Bank 2) P0174 System too Lean (Bank 2) P0175 System too Rich (Bank 2) P0176 Fuel Composition Sensor Circuit P0177 Fuel Composition Sensor Circuit Range/Performance P0178 Fuel Composition Sensor Circuit Low Input P0179 Fuel Composition Sensor Circuit High Input
99 Diagnostic Trouble Codes

P0180 Fuel Temperature Sensor A Circuit P0181 Fuel Temperature Sensor A Circuit Range/Performance P0182 Fuel Temperature Sensor A Circuit Low Input P0183 Fuel Temperature Sensor A Circuit High Input P0184 Fuel Temperature Sensor A Circuit Intermittent P0185 Fuel Temperature Sensor B Circuit P0186 Fuel Temperature Sensor B Circuit Range/Performance P0187 Fuel Temperature Sensor B Circuit Low Input P0188 Fuel Temperature Sensor B Circuit High Input P0189 Fuel Temperature Sensor B Circuit Intermittent P0190 Fuel Rail Pressure Sensor Circuit P0191 Fuel Rail Pressure Sensor Circuit Range/Performance P0192 Fuel Rail Pressure Sensor Circuit Low In put P0193 Fuel Rail Pressure Sensor Circuit High Input P0194 Fuel Rail Pressure Sensor Circuit Intermittent P0195 Engine Oil Temperature Sensor P0196 Engine Oil Temperature Sensor Range/Performance P0197 Engine Oil Temperature Sensor Low P0198 Engine Oil Temperature Sensor High P0199 Engine Oil Temperature Sensor Intermittent
P02XX Fuel and Air Metering P0200 Injector Circuit P0201 Injector Circuit - Cylinder 1 P0202 Injector Circuit - Cylinder 2 P0203 Injector Circuit - Cylinder 3 P0204 Injector Circuit - Cylinder 4 P0205 Injector Circuit - Cylinder 5 P0206 Injector Circuit - Cylinder 6 P0207 Injector Circuit - Cylinder 7 P0208 Injector Circuit - Cylinder 8 P0209 Injector Circuit - Cylinder 9 P0210 Injector Circuit - Cylinder 10 P0211 Injector Circuit - Cylinder 11 P0212 Injector Circuit - Cylinder 12 P0213 Cold Start Injector 1 P0214 Cold Start Injector 2 P0215 Engine Shutoff Solenoid P0216 Injector/Injection Timing Control Circuit P0217 Engine Coolant Over Temperature Condition P0218 Transmission Fluid Over Temperature Condition P0219 Engine Over Speed Condition P0220 Throttle/Pedal Position Sensor/Switch “B” Circuit P0221 Throttle/Pedal Position Sensor/Switch “B” Circuit Range/Performance Problem P0222 Throttle/Pedal Position Sensor/Switch “B” Circuit Low Input P0223 Throttle/Pedal Position Sensor/Switch “B” Circuit High Input P0224 Throttle/Pedal Position Sensor/Switch “B” Circuit Intermittent P0225 Throttle/Pedal Position Sensor/Switch “C” Circuit P0226 Throttle/Pedal Position Sensor/Switch “C” Circuit Range/Performance Problem P0227 Throttle/Pedal Position Sensor/Switch “C” Circuit Low Input P0228 Throttle/Pedal Position Sensor/Switch “C” Circuit High Input P0229 Throttle/Pedal Position Sensor/Switch “C” Circuit Intermittent P0230 Fuel Pump Primary Circuit P0231 Fuel Pump Secondary Circuit Low P0232 Fuel Pump Secondary Circuit High P0233 Fuel Pump Secondary Circuit Intermittent P0234 Turbo/Super Charger Overboost Condition P0235 Turbo/Super Charger Boost Sensor “A” Circuit P0236 Turbo/Super Charger Boost Sensor “A” Circuit Range/Performance P0237 Turbo/Super Charger Boost Sensor “A” Circuit Low P0238 Turbo/Super Charger Boost Sensor “A” Circuit High P0239 Turbo/Super Charger Boost Sensor “B” Circuit
100 Diagnostic Trouble Codes

P0240 Turbo/Super Charger Boost Sensor “B” Circuit Range/Performance P0241 Turbo/Super Charger Boost Sensor “B” Circuit Low P0242 Turbo/Super Charger Boost Sensor “B” Circuit High P0243 Turbo/Super Charger Wastegate Solenoid “A” P0244 Turbo/Super Charger Wastegate Solenoid “A” Range/Performance P0245 Turbo/Super Charger Wastegate Solenoid “A” Low P0246 Turbo/Super Charger Wastegate Solenoid “A” High P0247 Turbo/Super Charger Wastegate Solenoid “B” P0248 Turbo/Super Charger Wastegate Solenoid “B” Range/Performance P0249 Turbo/Super Charger Wastegate Solenoid “B” Low P0250 Turbo/Super Charger Wastegate Solenoid “B” High P0251 Injection Pump Fuel Metering Control “A” (Cam/rotor/Injector) P0252 Injection Pump Fuel Metering Control “A” Range/Performance (Cam/Rotor/Injector) P0253 Injection Pump Fuel Metering Control “A” Low (Cam/Rotor/Injector) P0254 Injection Pump Fuel Metering Control “A” High (Cam/Rotor/Injector) P0255 Injection Pump Fuel Metering Control “A” Intermittent (Cam/Rotor/Injector) P0256 Injection Pump Fuel Metering Control “B” (Cam/Rotor/Injector) P0257 Injection Pump Fuel Metering Control “B” Range/Performance (Cam/Rotor/Injector) P0258 Injection Pump Fuel Metering Control “B” Low (Cam/Rotor/Injector) P0259 Injection Pump Fuel Metering Control “B” High (Cam/Rotor/Injector) P0260 Injection Pump Fuel Metering Control “B” Intermittent (Cam/Rotor/Injector) P0261 Cylinder 1 Injector Circuit Low P0262 Cylinder 1 Injector Circuit High P0263 Cylinder 1 Contribution/Balance P0264 Cylinder 2 Injector Circuit Low P0265 Cylinder 2 Injector Circuit High P0266 Cylinder 2 Contribution/Balance P0267 Cylinder 3 Injector Circuit Low P0268 Cylinder 3 Injector Circuit High P0269 Cylinder 4 Contribution/Balance P0270 Cylinder 4 Injector Circuit Low P0271 Cylinder 4 Injector Circuit High P0272 Cylinder 4 Contribution/Balance P0273 Cylinder 5 Injector Circuit Low P0274 Cylinder 5 Injector Circuit High P0275 Cylinder 5 Contribution/Balance P0276 Cylinder 6Injector Circuit Low P0277 Cylinder 6 Injector Circuit High P0278 Cylinder 6 Contribution/Balance P0279 Cylinder 7 Injector Circuit Low P0280 Cylinder 7 Injector Circuit High P0281 Cylinder 7 Contribution/Balance P0282 Cylinder 8 Injector Circuit Low P0283 Cylinder 8 Injector Circuit High P0284 Cylinder 8 Contribution/Balance P0285 Cylinder 9 Injector Circuit Low P0286 Cylinder 9 Injector Circuit High P0287 Cylinder 9 Contribution/Balance P0288 Cylinder 10 Injector Circuit Low P0289 Cylinder 10 Injector Circuit High P0290 Cylinder 10 Contribution/Balance P0291 Cylinder 11 Injector Circuit Low P0292 Cylinder 11 Injector Circuit High P0293 Cylinder 11 Contribution/Balance P0294 Cylinder 12 Injector Circuit Low P0295 Cylinder 12 Injector Circuit High P0296 Cylinder 12 Contribution/Balance P0298 Engine Oil Over Temperature
P03XX Ignition System or Misfire P0300 Random/Multiple Cylinder Misfire Detected
101 Diagnostic Trouble Codes
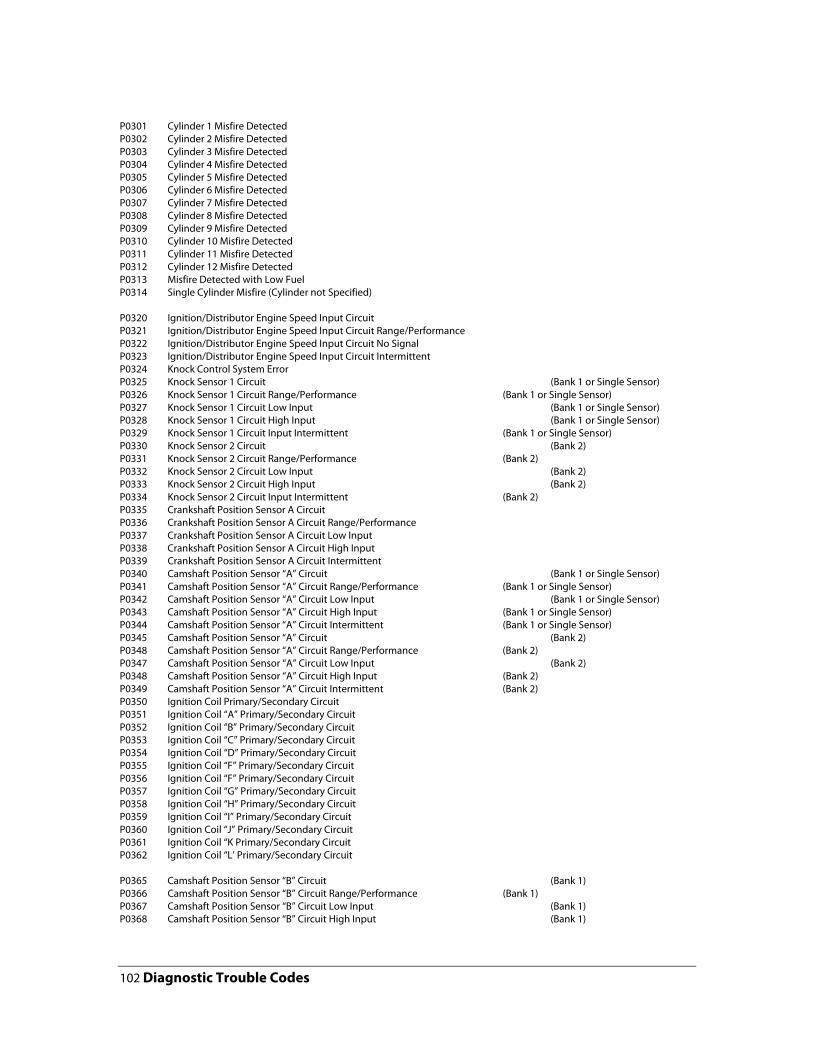
P0301 Cylinder 1 Misfire Detected P0302 Cylinder 2 Misfire Detected P0303 Cylinder 3 Misfire Detected P0304 Cylinder 4 Misfire Detected P0305 Cylinder 5 Misfire Detected P0306 Cylinder 6 Misfire Detected P0307 Cylinder 7 Misfire Detected P0308 Cylinder 8 Misfire Detected P0309 Cylinder 9 Misfire Detected P0310 Cylinder 10 Misfire Detected P0311 Cylinder 11 Misfire Detected P0312 Cylinder 12 Misfire Detected P0313 Misfire Detected with Low Fuel P0314 Single Cylinder Misfire (Cylinder not Specified) P0320 Ignition/Distributor Engine Speed Input Circuit P0321 Ignition/Distributor Engine Speed Input Circuit Range/Performance P0322 Ignition/Distributor Engine Speed Input Circuit No Signal P0323 Ignition/Distributor Engine Speed Input Circuit Intermittent P0324 Knock Control System Error P0325 Knock Sensor 1 Circuit (Bank 1 or Single Sensor) P0326 Knock Sensor 1 Circuit Range/Performance (Bank 1 or Single Sensor) P0327 Knock Sensor 1 Circuit Low Input (Bank 1 or Single Sensor) P0328 Knock Sensor 1 Circuit High Input (Bank 1 or Single Sensor) P0329 Knock Sensor 1 Circuit Input Intermittent (Bank 1 or Single Sensor) P0330 Knock Sensor 2 Circuit (Bank 2) P0331 Knock Sensor 2 Circuit Range/Performance (Bank 2) P0332 Knock Sensor 2 Circuit Low Input (Bank 2) P0333 Knock Sensor 2 Circuit High Input (Bank 2) P0334 Knock Sensor 2 Circuit Input Intermittent (Bank 2) P0335 Crankshaft Position Sensor A Circuit P0336 Crankshaft Position Sensor A Circuit Range/Performance P0337 Crankshaft Position Sensor A Circuit Low Input P0338 Crankshaft Position Sensor A Circuit High Input P0339 Crankshaft Position Sensor A Circuit Intermittent P0340 Camshaft Position Sensor “A” Circuit (Bank 1 or Single Sensor) P0341 Camshaft Position Sensor “A” Circuit Range/Performance (Bank 1 or Single Sensor) P0342 Camshaft Position Sensor “A” Circuit Low Input (Bank 1 or Single Sensor) P0343 Camshaft Position Sensor “A” Circuit High Input (Bank 1 or Single Sensor) P0344 Camshaft Position Sensor “A” Circuit Intermittent (Bank 1 or Single Sensor) P0345 Camshaft Position Sensor “A” Circuit (Bank 2) P0348 Camshaft Position Sensor “A” Circuit Range/Performance (Bank 2) P0347 Camshaft Position Sensor “A” Circuit Low Input (Bank 2) P0348 Camshaft Position Sensor “A” Circuit High Input (Bank 2) P0349 Camshaft Position Sensor “A” Circuit Intermittent (Bank 2) P0350 Ignition Coil Primary/Secondary Circuit P0351 Ignition Coil “A” Primary/Secondary Circuit P0352 Ignition Coil “B” Primary/Secondary Circuit P0353 Ignition Coil “C” Primary/Secondary Circuit P0354 Ignition Coil “D” Primary/Secondary Circuit P0355 Ignition Coil “F” Primary/Secondary Circuit P0356 Ignition Coil “F” Primary/Secondary Circuit P0357 Ignition Coil “G” Primary/Secondary Circuit P0358 Ignition Coil “H” Primary/Secondary Circuit P0359 Ignition Coil “I” Primary/Secondary Circuit P0360 Ignition Coil “J” Primary/Secondary Circuit P0361 Ignition Coil “K Primary/Secondary Circuit P0362 Ignition Coil “L’ Primary/Secondary Circuit P0365 Camshaft Position Sensor “B” Circuit (Bank 1) P0366 Camshaft Position Sensor “B” Circuit Range/Performance (Bank 1) P0367 Camshaft Position Sensor “B” Circuit Low Input (Bank 1) P0368 Camshaft Position Sensor “B” Circuit High Input (Bank 1)
102 Diagnostic Trouble Codes

P0369 Camshaft Position Sensor “B” Circuit Intermittent (Bank 1) P0370 Timing Reference High Resolution Signal “A” P0371 Timing Reference High Resolution Signal “A” Too Many Pulses P0372 Timing Reference High Resolution Signal “A” Too Few Pulses P0373 Timing Reference High Resolution Signal “A” Intermittent/Erratic Pulses P0374 Timing Reference High Resolution Signal “A” No Pulse P0375 Timing Reference High Resolution Signal “B” P0376 Timing Reference High Resolution Signal “B” Too Many Pulses P0377 Timing Reference High Resolution Signal “B” Too Few Pulses P0378 Timing Reference High Resolution Signal “B” Intermittent/Erratic Pulses P0379 Timing Reference High Resolution Signal “B” No Pulses P0380 Glow Plug/Heater Circuit “A” P0381 Glow Plug/Heater Indicator Circuit P0382 Glow Plug/Heater Circuit “B” P0385 Crankshaft Position Sensor “B” Circuit P0386 Crankshaft Position Sensor “B” Circuit Range/Performance P0387 Crankshaft Position Sensor “B” Circuit Low Input P0388 Crankshaft Position Sensor “B” Circuit High Input P0389 Crankshaft Position Sensor “B” Circuit Intermittent P0390 camshaft Position Sensor “B” Circuit P0391 Camshaft Position Sensor “B” circuit Range/Performance (Bank 2) P0392 Camshaft Position Sensor “B” Circuit Low Input (Bank 2) P0393 Camshaft Position Sensor “B” Circuit High Input (Bank 2) P0394 Camshaft Position Sensor “B” Circuit Intermittent (Bank 2)
P04XX Auxiliary Emission Controls P0400 Exhaust Gas Recirculation Flow P0401 Exhaust Gas Recirculation Flow Insufficient Detected P0402 Exhaust Gas Recirculation Flow Excessive Detected P0403 Exhaust Gas Recirculation Control Circuit P0404 Exhaust Gas Recirculation Control Circuit Range/Performance P0405 Exhaust Gas Recirculation Sensor “A” Circuit Low P0406 Exhaust Gas Recirculation Sensor “A” Circuit High P0407 Exhaust Gas Recirculation Sensor “B” Circuit Low P0408 Exhaust Gas Recirculation Sensor “B” Circuit High P0409 Exhaust Gas Recirculation Sensor “A” Circuit P0410 Secondary Air Injection System P0411 Secondary Air Injection System Incorrect Flow Detected P0412 Secondary Air Injection System Switching Valve “A” Circuit P0413 Secondary Air Injection System Switching Valve “A” Circuit Open P0414 Secondary Air Injection System Switching Valve “A” Circuit Shorted P0415 Secondary Air Injection System Switching Valve “B” Circuit P0416 secondary Air Injection System Switching Valve “B’ Circuit Open P0417 secondary Air Injection System Switching Valve “B” Circuit Shorted P0416 Secondary Air Injection System Relay “A” Circuit P0419 Secondary Air injection System Relay “B” Circuit P0420 Catalyst System Efficiency Below Threshold (Bank 1) P0421 Warm Up Catalyst Efficiency Below Threshold (Bank 1) P0422 Main Catalyst Efficiency Below Threshold (Bank 1) P0423 Heated Catalyst Efficiency Below Threshold (Bank 1) P0424 Heated Catalyst Temperature Below Threshold (Bank 1) P0425 Catalyst Temperature Sensor (Bank 1) P0426 Catalyst Temperature Sensor Range/Performance (Bank 1) P0427 Catalyst Temperature Sensor Low Input (Bank 1) P0428 Catalyst Temperature Sensor High Input (Bank 1) P0429 Catalyst Heater Control Circuit (Bank 1) P0430 Catalyst System Efficiency Below Threshold (Bank 2) P0431 Warm Up Catalyst Efficiency Below Threshold (Bank 2) P0432 Main Catalyst Efficiency Below Threshold (Bank 2) P0433 Heated Catalyst Efficiency Below Threshold (Bank 2) P0434 Heated Catalyst Temperature Below Threshold (Bank 2)
103 Diagnostic Trouble Codes

P0435 Catalyst Temperature Sensor (Bank 2) P0436 Catalyst Temperature Sensor Range/Performance (Bank 2) P0437 Catalyst Temperature Sensor Low Input (Bank 2) P0438 Catalyst Temperature Sensor High Input (Bank 2) P0439 Catalyst Heater Control Circuit (Bank 2) P0440 Evaporative Emission Control System P0441 Evaporative Emission Control System Incorrect Purge Flow P0442 Evaporative Emission Control System Leak Detected (small leak) P0443 Evaporative Emission Control System Purge Control Valve Circuit P0444 Evaporative Emission Control System Purge Control Valve Circuit Open P0445 Evaporative Emission Control System Purge Control Valve Circuit Shorted P0446 Evaporative Emission Control System Vent Control Circuit P0447 Evaporative Emission Control System Vent Control Circuit Open P0448 Evaporative Emission Control System Vent Control Circuit Shorted P0449 Evaporative Emission Control System Vent Valve/Solenoid Circuit P0450 Evaporative Emission Control System Pressure Sensor P0451 Evaporative Emission Control System Pressure Sensor Range/Performance P0452 Evaporative Emission Control System Pressure Sensor Low Input P0453 Evaporative Emission Control System Pressure Sensor High input P0454 Evaporative Emission Control System Pressure Sensor Intermittent P0455 Evaporative Emission Control System Leak Detected (gross leak) P0456 Evaporative Emission Control System Leak Detected (very small leak) P0457 Evaporative Emission Control System Leak Detected (fuel cap loose/off) P0460 Fuel Level Sensor Circuit P0461 Fuel Level Sensor Circuit Range/Performance P0462 Fuel Level Sensor Circuit Low Input P0463 Fuel Level Sensor Circuit High Input P0464 Fuel Level Sensor Circuit Intermittent P0465 EVAP Purge Flow Sensor Circuit P0466 EVAP Purge Flow Sensor Circuit Range/Performance P0467 EVAP Purge Flow Sensor Circuit Low Input P0468 EVAP Purge Flow Sensor Circuit High Input P0469 EVAP Purge Flow Sensor Circuit Intermittent P0470 Exhaust Pressure Sensor P0471 Exhaust Pressure Sensor Range/Performance P0472 Exhaust Pressure Sensor Low P0473 Exhaust Pressure Sensor High P0474 Exhaust Pressure Sensor Intermittent P0475 Exhaust Pressure Control Valve P0476 Exhaust Pressure Control Valve Range/Performance P0477 Exhaust Pressure Control Valve Low P0478 Exhaust Pressure Control Valve High P0479 Exhaust Pressure Control Valve Intermittent P0480 Cooling Fan 1 Control Circuit P0481 Cooling Fan 2 Control Circuit P0482 Cooling Fan 3 Control Circuit P0483 Cooling Fan Rationality Check P0484 Cooling Fan Circuit Over Current P0485 Cooling Fan Power/Ground Circuit P0486 Exhaust Gas Recirculation Sensor “B” Circuit P0487 Exhaust Gas Recirculation Throttle Position Control Circuit P0488 Exhaust Gas Recirculation Throttle Position Control Range/Performance P0491 Secondary Air Injection System (Bank 1) P0492 Secondary Air Injection System (Bank 2)
P05XX Vehicle Speed, Idle Control, and Auxiliary Inputs P0500 Vehicle Speed Sensor P0501 Vehicle Speed Sensor Range/Performance P0502 Vehicle Speed Sensor Circuit Low Input P0503 Vehicle Speed Sensor Intermittent/Erratic/High P0505 Idle Control System
104 Diagnostic Trouble Codes

P0506 Idle Control System RPM Lower Than Expected P0507 Idle Control System RPM Higher Than Expected P0508 Idle Control System Circuit Low P0509 Idle Control System Circuit High P0510 Closed Throttle Position Switch P0512 Starter Request Circuit P0513 Incorrect Irnmobilizer Key (“Immobilizer pending SAE J1930 approval) P0515 Battery Temperature Sensor Circuit P0516 Battery Temperature Sensor Circuit Low P0517 Battery Temperature Sensor Circuit High P0520 Engine Oil Pressure Sensor/Switch Circuit P0521 Engine Oil Pressure Sensor/Switch Range/Performance P0522 Engine Oil Pressure Sensor/Switch Low Voltage P0523 Engine Oil Pressure Sensor/Switch High Voltage P0524 Engine Oil Pressure Too Low P0530 A/C Refrigerant Pressure Sensor Circuit P0531 A/C Refrigerant Pressure Sensor Circuit Range/Performance P0532 A/C Refrigerant Pressure Sensor Circuit Low Input P0533 A/C Refrigerant Pressure Sensor Circuit High Input P0534 Air Conditioner Refrigerant Charge Loss P0540 Intake Air Heater Circuit P0541 Intake Air Heater Circuit Low P0542 Intake Air Heater Circuit High P0544 Exhaust Gas Temperature Sensor Circuit (Bank 1) P0545 Exhaust Gas Temperature Sensor Circuit Low (Bank 1) P0546 Exhaust Gas Temperature Sensor Circuit High (Bank 1) P0547 Exhaust Gas Temperature Sensor Circuit (Bank 2) P0548 Exhaust Gas Temperature Sensor Circuit Low (Bank 2) P0549 Exhaust Gas Temperature Sensor Circuit High (Bank 2) P0550 Power Steering Pressure Sensor Circuit P0551 Power Steering Pressure Sensor Circuit Range/Performance P0552 Power Steering Pressure Sensor Circuit Low Input P0553 Power Steering Pressure Sensor Circuit High Input P0554 Power Steering Pressure Sensor Circuit Intermittent P0560 System Voltage P0561 System Voltage Unstable P0562 System Voltage Low P0563 System Voltage High P0564 Cruise Control Multi-Function Input Signal P0565 Cruise Control On Signal P0566 Cruise Control Off Signal P0567 Cruise Control Resume Signal P0568 Cruise Control Set Signal P0569 Cruise Control Coast Signal P0570 Cruise Control Accel Signal P0571 Cruise Control/Brake Switch A Circuit P0572 Cruise Control/Brake Switch A Circuit Low P0573 Cruise Control/Brake Switch A Circuit High P0574 Cruise Control System - Vehicle Speed Too High P0575 Cruise Control Input Circuit P0576 Cruise Control Input Circuit Low P0577 Cruise Control input Circuit High P0578 through P0580 Reserved for Cruise Control Codes
P06XX Computer and Auxiliary Inputs P0600 Serial Communication Link P0601 Internal Control Module Memory Check Sum Error
105 Diagnostic Trouble Codes
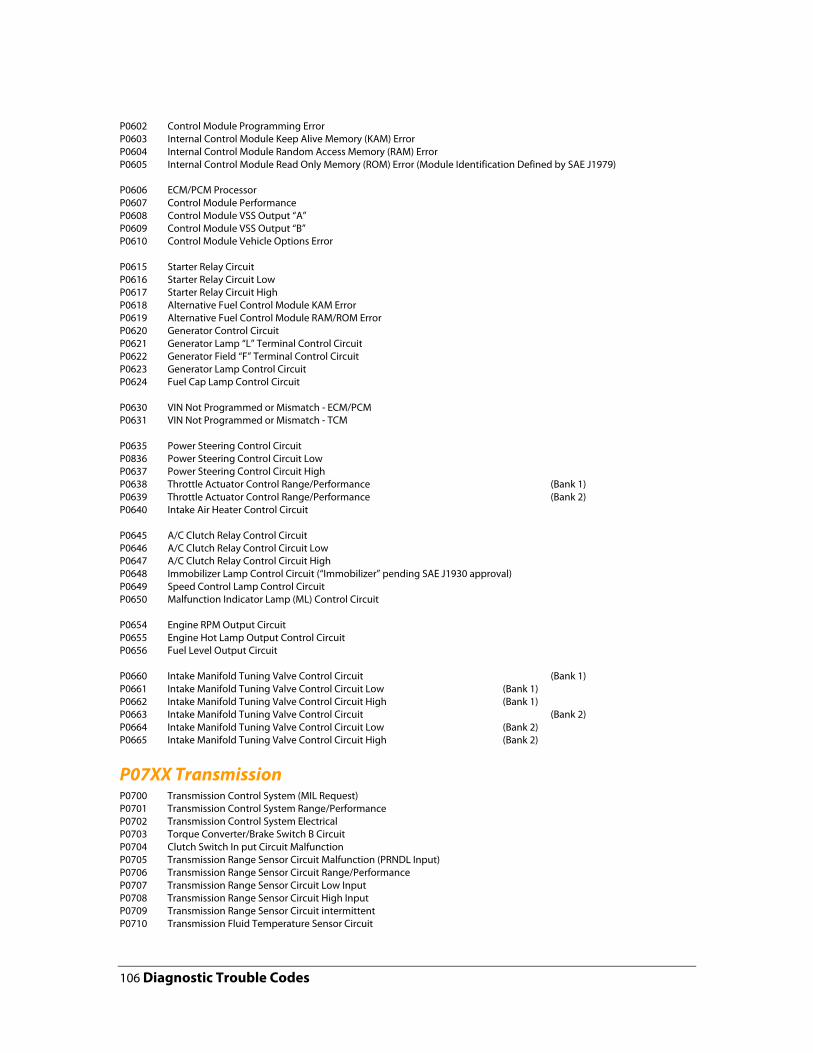
P0602 Control Module Programming Error P0603 Internal Control Module Keep Alive Memory (KAM) Error P0604 Internal Control Module Random Access Memory (RAM) Error P0605 Internal Control Module Read Only Memory (ROM) Error (Module Identification Defined by SAE J1979) P0606 ECM/PCM Processor P0607 Control Module Performance P0608 Control Module VSS Output “A” P0609 Control Module VSS Output “B” P0610 Control Module Vehicle Options Error P0615 Starter Relay Circuit P0616 Starter Relay Circuit Low P0617 Starter Relay Circuit High P0618 Alternative Fuel Control Module KAM Error P0619 Alternative Fuel Control Module RAM/ROM Error P0620 Generator Control Circuit P0621 Generator Lamp “L” Terminal Control Circuit P0622 Generator Field “F” Terminal Control Circuit P0623 Generator Lamp Control Circuit P0624 Fuel Cap Lamp Control Circuit P0630 VIN Not Programmed or Mismatch - ECM/PCM P0631 VIN Not Programmed or Mismatch - TCM P0635 Power Steering Control Circuit P0836 Power Steering Control Circuit Low P0637 Power Steering Control Circuit High P0638 Throttle Actuator Control Range/Performance (Bank 1) P0639 Throttle Actuator Control Range/Performance (Bank 2) P0640 Intake Air Heater Control Circuit P0645 A/C Clutch Relay Control Circuit P0646 A/C Clutch Relay Control Circuit Low P0647 A/C Clutch Relay Control Circuit High P0648 Immobilizer Lamp Control Circuit (“Immobilizer” pending SAE J1930 approval) P0649 Speed Control Lamp Control Circuit P0650 Malfunction Indicator Lamp (ML) Control Circuit P0654 Engine RPM Output Circuit P0655 Engine Hot Lamp Output Control Circuit P0656 Fuel Level Output Circuit P0660 Intake Manifold Tuning Valve Control Circuit (Bank 1) P0661 Intake Manifold Tuning Valve Control Circuit Low (Bank 1) P0662 Intake Manifold Tuning Valve Control Circuit High (Bank 1) P0663 Intake Manifold Tuning Valve Control Circuit (Bank 2) P0664 Intake Manifold Tuning Valve Control Circuit Low (Bank 2) P0665 Intake Manifold Tuning Valve Control Circuit High (Bank 2)
P07XX Transmission P0700 Transmission Control System (MIL Request) P0701 Transmission Control System Range/Performance P0702 Transmission Control System Electrical P0703 Torque Converter/Brake Switch B Circuit P0704 Clutch Switch In put Circuit Malfunction P0705 Transmission Range Sensor Circuit Malfunction (PRNDL Input) P0706 Transmission Range Sensor Circuit Range/Performance P0707 Transmission Range Sensor Circuit Low Input P0708 Transmission Range Sensor Circuit High Input P0709 Transmission Range Sensor Circuit intermittent P0710 Transmission Fluid Temperature Sensor Circuit
106 Diagnostic Trouble Codes

P0711 Transmission Fluid Temperature Sensor Circuit Range/Performance P0712 Transmission Fluid Temperature Sensor Circuit Low Input P0713 Transmission Fluid Temperature Sensor Circuit High Input P0714 Transmission Fluid Temperature Sensor Circuit Intermittent P0715 Input/Turbine Speed Sensor Circuit P0716 input/Turbine Speed Sensor Circuit Range/Performance P0717 Input/Turbine Speed Sensor Circuit No Signal P0718 Input/Turbine Speed Sensor Circuit Intermittent P0719 Torque Converter/Brake Switch B Circuit Low P0720 Output Speed Sensor Circuit P0721 Output Speed Sensor Circuit Range/Performance P0722 Output Speed Sensor Circuit No Signal P0723 Output Speed Sensor Circuit Intermittent P0724 Torque Converter/Brake Switch B Circuit High P0725 Engine Speed Input Circuit P0726 Engine Speed Input Circuit Range/Performance P0727 Engine Speed Input Circuit No Signal P0728 Engine Speed Input Circuit Intermittent P0730 Incorrect Gear Ratio P0731 Gear 1 Incorrect Ratio P0732 Gear 2 Incorrect Ratio P0733 Gear 3 Incorrect Ratio P0734 Gear 4 Incorrect Ratio P0735 Gear 5 Incorrect Ratio P0736 Reverse Incorrect Ratio P0737 TCM Engine Speed Output Circuit P0739 TCM Engine Speed Output Circuit Low P0739 TCM Engine Speed Output Circuit High P0740 Torque Converter Clutch Circuit P0741 Torque Converter Clutch Circuit Performance or Stuck Off P0742 Torque Converter Clutch Circuit Stuck On P0743 Torque Converter Clutch Circuit Electrical P0744 Torque Converter Clutch Circuit Intermittent P0745 Pressure Control Solenoid “A” P0746 Pressure Control Solenoid “A” Performance or Stuck Off P0747 Pressure Control Solenoid “A” Stuck On P0748 Pressure Control Solenoid “A” Electrical P0749 Pressure Control Solenoid “A” Intermittent P0750 Shift Solenoid “A” P0751 Shift Solenoid “A” Performance or Stuck Off P0752 Shift Solenoid “A” Stuck On P0753 Shift Solenoid “A” Electrical P0754 Shift Solenoid “A” Intermittent P0765 Shift Solenoid “B” P0756 Shift Solenoid “B” Performance or Stuck Off P0757 Shift Solenoid “B” Stuck On P0758 Shift Solenoid “B” Electrical P0759 Shift Solenoid “B” Intermittent P0760 Shift Solenoid “C” P0761 Shift Solenoid “C” Performance or Stuck Off P0762 Shift Solenoid “C” Stuck On P0763 Shift Solenoid “C” Electrical P0764 Shift Solenoid “C” Intermittent P0765 Shift Solenoid “C” P0766 Shift Solenoid “D” Performance or Stuck Off P0767 Shift Solenoid “D” Stuck On P0768 Shift Solenoid “D” Electrical P0769 Shift Solenoid “D” Intermittent P0770 Shift Solenoid “E” P0771 Shift Solenoid “E” Performance or Stuck Off P0772 Shift Solenoid “E” Stuck On P0773 Shift Solenoid “E” Electrical P0774 Shift Solenoid “E” Intermittent
107 Diagnostic Trouble Codes

P0775 Pressure Control Solenoid “B” P0776 Pressure Control Solenoid “B” Performance or Stuck Off P0777 Pressure Control Solenoid “B” Stuck On P0778 Pressure Control Solenoid “B” Electrical P0779 Pressure Control Solenoid “B” Intermittent P0780 Shift P0781 1-2 Shift P0782 2-3 Shift P0783 3-4 Shift P0784 4-5 Shift P0785 Shift/Timing Solenoid P0786 Shift/Timing Solenoid Range/Performance P0787 Shift/Timing Solenoid Low P0788 Shift/Timing Solenoid High P0789 Shift/Timing Solenoid Intermittent P0790 Normal/Performance Switch Circuit P0791 Intermediate Shaft Speed Sensor Circuit P0792 Intermediate Shaft Speed Sensor Circuit Range/Performance P0793 Intermediate Shaft Speed Sensor Circuit No Signal P0794 Intermediate Shaft Speed Sensor Circuit Intermittent P0795 Pressure Control Solenoid “C” P0796 Pressure Control Solenoid “C” Performance or Stuck off P0797 Pressure Control Solenoid “C” Stuck On P0798 Pressure Control Solenoid “C” Electrical P0799 Pressure Control Solenoid “C” Intermittent
P08XX Transmission P0801 Reverse Inhibit Control Circuit P0803 1-4 Upshift (Skip Shift) Solenoid Control Circuit P0804 1-4 Upshift (Skip Shift) Lamp Control Circuit P0805 Clutch Position Sensor Circuit P0806 Clutch Position Sensor Circuit Range/Performance P0807 Clutch Position Sensor Circuit Low P0808 Clutch Position Sensor Circuit High P0809 Clutch Position Sensor Circuit Intermittent P0810 Clutch Position Control Error P0811 Excessive Clutch Slippage P0812 Reverse Input Circuit P0813 Reverse Output Circuit P0814 Transmission Range Display Circuit P0815 Upshift Switch Circuit P0816 Downshift Switch Circuit P0817 Starter Disable Circuit P0818 Driveline Disconnect Switch Input Circuit P0820 Gear Lever X-Y Position Sensor Circuit P0821 Gear Lever X Position Circuit P0822 Gear Lever Y Position Circuit P0823 Gear Lever X Position Circuit Intermittent P0824 Gear Lever Y Position Circuit Intermittent P0825 Gear Lever Push-Pull Switch (Shift Anticipate) P0830 Clutch Pedal Switch “A” Circuit P0831 Clutch Pedal Switch “A” Circuit Low P0832 Clutch Pedal Switch “A” Circuit High P0833 Clutch Pedal Switch “B” Circuit P0834 Clutch Pedal Switch “B” Circuit Low P0835 Clutch Pedal Switch “B” Circuit High P0836 Four Wheel Drive (4WD) Switch Circuit P0837 Four Wheel Drive (4WD) Switch Circuit Range/Performance P0838 Four Wheel Drive (4WD) Switch Circuit Low
108 Diagnostic Trouble Codes
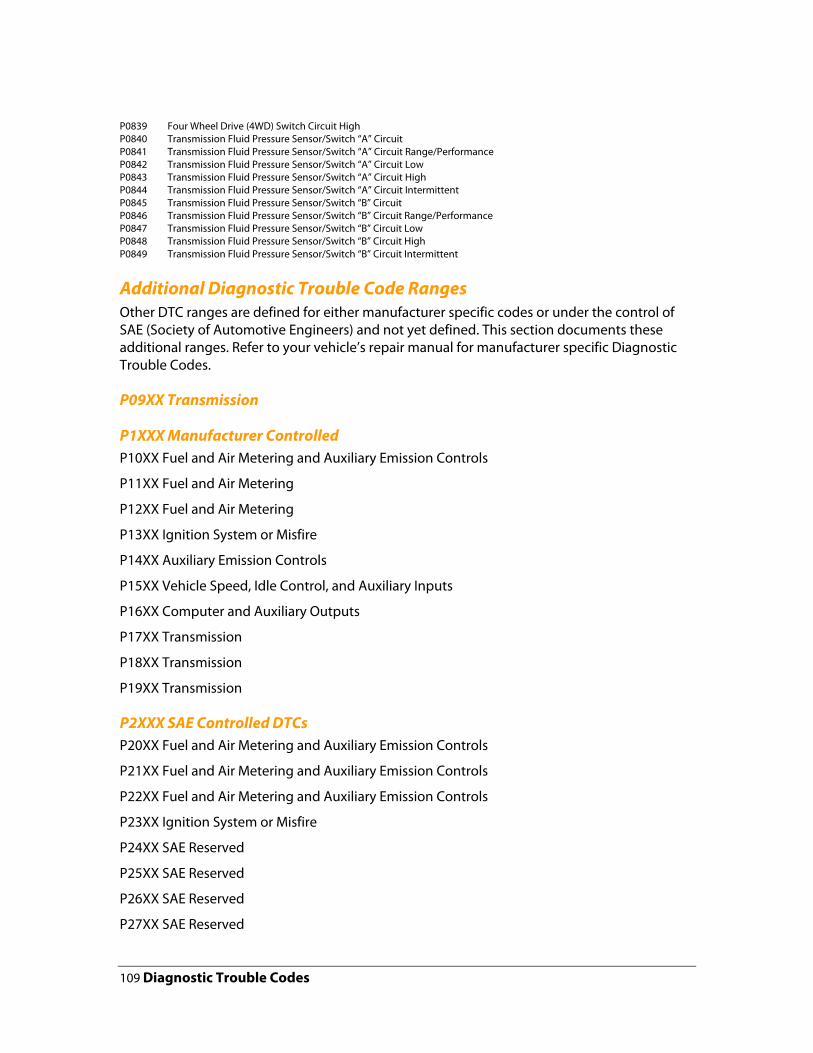
P0839 Four Wheel Drive (4WD) Switch Circuit High P0840 Transmission Fluid Pressure Sensor/Switch “A” Circuit P0841 Transmission Fluid Pressure Sensor/Switch “A” Circuit Range/Performance P0842 Transmission Fluid Pressure Sensor/Switch “A” Circuit Low P0843 Transmission Fluid Pressure Sensor/Switch “A” Circuit High P0844 Transmission Fluid Pressure Sensor/Switch “A” Circuit Intermittent P0845 Transmission Fluid Pressure Sensor/Switch “B” Circuit P0846 Transmission Fluid Pressure Sensor/Switch “B” Circuit Range/Performance P0847 Transmission Fluid Pressure Sensor/Switch “B” Circuit Low P0848 Transmission Fluid Pressure Sensor/Switch “B” Circuit High P0849 Transmission Fluid Pressure Sensor/Switch “B” Circuit Intermittent
Additional Diagnostic Trouble Code Ranges Other DTC ranges are defined for either manufacturer specific codes or under the control of SAE (Society of Automotive Engineers) and not yet defined. This section documents these additional ranges. Refer to your vehicle’s repair manual for manufacturer specific Diagnostic Trouble Codes.
P09XX Transmission
P1XXX Manufacturer Controlled P10XX Fuel and Air Metering and Auxiliary Emission Controls
P11XX Fuel and Air Metering
P12XX Fuel and Air Metering
P13XX Ignition System or Misfire
P14XX Auxiliary Emission Controls
P15XX Vehicle Speed, Idle Control, and Auxiliary Inputs
P16XX Computer and Auxiliary Outputs
P17XX Transmission
P18XX Transmission
P19XX Transmission
P2XXX SAE Controlled DTCs P20XX Fuel and Air Metering and Auxiliary Emission Controls
P21XX Fuel and Air Metering and Auxiliary Emission Controls
P22XX Fuel and Air Metering and Auxiliary Emission Controls
P23XX Ignition System or Misfire
P24XX SAE Reserved
P25XX SAE Reserved
P26XX SAE Reserved
P27XX SAE Reserved
109 Diagnostic Trouble Codes

P28XX SAE Reserved
P29XX SAE Reserved
P3XX Manufacturer Controlled and SAE Reserved P30XX Fuel and Air Metering and Auxiliary Emission Controls
P31XX Fuel and Air Metering and Auxiliary Emission Controls
P32XX Fuel and Air Metering and Auxiliary Emission Controls
P33XX Ignition System Misfire
P34XX SAE Reserved
P35XX SAE Reserved
P36XX SAE Reserved
P37XX SAE Reserved
P38XX SAE Reserved
P39XX SAE Reserved
110 Diagnostic Trouble Codes

APPENDIX B
Support
Technical support is offered on our products via email. Please note technical support cannot assist you in diagnosing and repairing your vehicle. Support is limited to operation of the scan tool only.
Technical support is provided at: [email protected].
When contacting technical support please provide the following information:
• Year of Vehicle (e.g. 1997) • Make (e.g. Chevrolet) • Model (e.g. K1500 Pickup Extended Cab) • Problem encountered, be specific as possible. List any error messages displayed by the
software. • Version of Auterra software. On DashDyno the version is located on the Preferences >
About menu. On Dyno-Scan for Windows the version is located on the Help > About Auterra Dyno-Scan… menu.
111 Support

APPENDIX C
Warranty Information
Auterra warranties the DashDyno SPD hardware for 1 year. Damage caused by misuse or modification is not covered.
Auterra is not responsible for damage to vehicle caused by misuse or otherwise. Auterra's sole liability is limited to the repair or replacement of the scan tool while under warranty.
30-day money back guarantee. If for any reason you are not satisfied with the Auterra DashDyno, you can return it to Auterra for a refund less shipping charges. The 30-day money back guarantee only applies to purchases made from our website. Auterra resellers have their own return policies.
The scan tool must be undamaged and contain all original packing, supplied materials, and the original receipt or packing slip. No refunds if the scan tool arrives at Auterra after 30-days. Email or write Auterra for a RMA before returning. Returns received without an RMA number will be refused.
When contacting Auterra for an RMA please provide the following information:
• Reason for returning the scan tool • Year of Vehicle (e.g. 1997) • Make (e.g. Chevrolet) • Model (e.g. K1500 Pickup Extended Cab) • Problem encountered, if any.
Email for an RMA at: [email protected].
112 Warranty Information

Index
16-pin, 5
a tire diameter, 40
accuracy, 38, 44, 47
Aerodynamic, 37
automatic transmissions, 38
Check Engine, 1, 5, 6, 7, 17, 95
correction factor, 37
Diagnostic Trouble Code, 5, 6, 97, 109
Diagnostic Trouble Codes, 97, 109
drag coefficients, 39, 40
DTC, 6, 95, 97, 109
dynamometers, 37
Dynojet, 38
ECU, 6
enhanced, 97
Fast Sampling, 94
Features, 1
File Properties, 39
Freeze Frame, 95
Frontal areas, 39
gear ratio, 38, 39, 41, 42
Lost Communication, 95
MIL, 6, 7, 24, 25, 95, 106
No Communication, 94
OBD II, 5
OBD II adapter, 94
OBD II Cable, 3, 5, 9
OBD II compliant, 5, 94
OBD II connector, 5, 94, 95
Options, 106
RMA, 112
Run Statistics, 47
safety, 37, 44, 47
Software Requirements, 3
support, 111
Supported Vehicles, 5
tire diameter, 39, 41, 42
torque converter, 38, 42
Updates, 15
VIN, 7, 106
113 Index