e-config installation guidelines - ibm www page e-config installation guidelines page 1 of 43...
TRANSCRIPT

Document: e-config_Upgrade_Installation_Guidelines_v1 Date: 18-Jan-2013 Owner: e-config Team Status: FINAL Subject: e-config Installation Guidelines Page 1 of 43
e-config Upgrade Installation Guidelines
Version 1.0
Author: e-config Team
Owner: e-config Team

Document: e-config_Upgrade_Installation_Guidelines_v1 Date: 18-Jan-2013 Owner: e-config Team Status: FINAL Subject: e-config Installation Guidelines Page 2 of 43
Document History
Revision History
Date of this revision: 18-Jan-2013
Revision Number
Revision Date
Summary of Changes Changes marked
1.0 18-Jan-2013 Document Publication (N)

Document: e-config_Upgrade_Installation_Guidelines_v1 Date: 18-Jan-2013 Owner: e-config Team Status: FINAL Subject: e-config Installation Guidelines Page 3 of 43
Contents
1. INTRODUCTION ...................................................................................................................... 5 1.1 Key things to remember .................................................................................................................. 5 1.2 References ........................................................................................................................................ 5
2. HARDWARE / SOFTWARE REQUIREMENTS ...................................................................... 6 2.1 Minimum Hardware Requirements ................................................................................................. 6 2.2 Software Requirements ................................................................................................................... 6
3. LIMITATIONS / KNOWN ISSUES ........................................................................................... 7 3.1 Known Issues ................................................................................................................................... 7
3.1.1 run_epadm.exe does not launch preferred web browser ......................................................... 7 3.1.2 Uninstalling Microsoft Office 2007 or 2010 (32-bit) when e-config installed makes e-config
unusable .................................................................................................................................. 7 3.1.3 Installing e-config on Win7 64-bit host system while XP mode is active causes installation
conflicts when sharing host C drive ......................................................................................... 7 3.2 Limitations ........................................................................................................................................ 8
3.2.1 Unable to install to Windows Reserved Directories ................................................................. 8 3.2.2 Unable to run e-config with User authority after installing to Program Files / Program Files
(x86) ........................................................................................................................................ 8 3.2.3 e-config unusable with 64-bit version of Microsoft Office ......................................................... 9 3.2.4 e-padm installation applet not compatible with 64-bit Internet Explorer ................................... 9 3.2.5 e-padm installation applet will not load with 64-bit JRE ........................................................... 9 3.2.6 e-config cannot be installed on Linux ....................................................................................... 9 3.2.7 e-config users who performed data migration may receive an error message “Runtime error:
94” and e-config application may become unresponsive ......................................................... 9 3.2.8 e-config displays an error message ‘MFC Application has crashed’ when closing ................ 10
4. FIRST-TIME INSTALLATION ON XP ................................................................................... 11 4.1 e-config Installation ....................................................................................................................... 11
5. UPGRADE INSTALLATION ON XP ..................................................................................... 14 5.1 e-config Upgrade............................................................................................................................ 14
6. UPDATE INSTALLATION ON XP ......................................................................................... 17 6.1 e-config Update .............................................................................................................................. 17
7. UNINSTALLING ON XP ........................................................................................................ 19
8. FIRST-TIME INSTALLATION ON WINDOWS 7 .................................................................. 21 8.1 e-config Installation ....................................................................................................................... 21
9. UPDATE INSTALLATION ON WINDOWS 7 ........................................................................ 26 9.1 e-config Update .............................................................................................................................. 26
10. UNINSTALLING ON WINDOWS 7 ........................................................................................ 29
11. SPECIAL CONSIDERATIONS USING XP MODE AND WINDOWS 7 64-BIT SIMULTANEOUSLY .............................................................................................................. 33
11.1 Disabling Integrated Features Option in XP Mode ...................................................................... 34
12. MOVING FROM USING XP MODE TO NATIVE WINDOWS 7 64-BIT FOR E-CONFIG .... 35

Document: e-config_Upgrade_Installation_Guidelines_v1 Date: 18-Jan-2013 Owner: e-config Team Status: FINAL Subject: e-config Installation Guidelines Page 4 of 43
12.1 Installing on Windows 7 64-bit with e-config installed in XP Mode ........................................... 35 12.2 Moving files from XP Mode to e-config installed on Windows 7 64-bit Host ............................ 35
12.2.1 Migrating the e-config database ............................................................................................. 36 12.2.2 Moving files in econfig\userdata on XP Mode to Windows 7 64-bit Host ............................... 39
12.3 Continuing to use old version of e-config in XP Mode ............................................................... 40 12.4 Uninstalling e-config in XP Mode ................................................................................................. 40
13. TROUBLESHOOTING ........................................................................................................... 41 13.1 Disk space warning message received during installation ........................................................ 41 13.2 “Package was removed – Administration updated” error in e-padm ........................................ 41 13.3 Prompted for administrator ID during installation ...................................................................... 42
14. GETTING SUPPORT ............................................................................................................. 43

Document: e-config_Upgrade_Installation_Guidelines_v1 Date: 18-Jan-2013 Owner: e-config Team Status: FINAL Subject: e-config Installation Guidelines Page 5 of 43
1. Introduction The IBM Configurator for e-business (e-config) is a PC-based hardware and software configurator for POWER Systems (rack/tower and blades), and GTS/ISS, System z™ and S/390 Servers, Storage, Retail Store Solutions, iSeries™ and AS/400® Servers and Software and pSeries® and RS/6000® Systems and Software (except SP).
The suite of tools enables a user to configure multiple product lines, view all of the selections from a main view, verify product availability, view the system diagram, price the system and submit the order to manufacturing for processing.
The e-config application is being updated to work with a new version of the core engine code, including updated installation tools. The core engine of the tool has been changed to provide critical updates (removing the dependencies on MS JVM, MS Visual Studio 6 and MS Jet; migrate to current version of MS Access; and provide support for Windows 7 for both 32-bit and 64-bit).
1.1 Key things to remember
1. As part of the new e-config release, Administrator authority is required to install e-config but is not required to run e-config.
2. Installation steps documented for Microsoft Windows 7 Professional (32-bit and 64-bit) also apply to Microsoft Vista Business (32-bit).
1.2 References
The data migration installation, prerequisites and guidelines referred to in this installation guide will be provided in a separate document found at the link below. Newer versions of the document(s) listed below will take precedence.
Ref. # Document Name Version # Date Available
1 e-config Data Migration Guidelines 1.0 18-Jan-2013
Document: e-config_Upgrade_Installation_Guidelines_v1 Date: 18-Jan-2013 Owner: e-config Team Status: FINAL Subject: e-config Installation Guidelines Page 6 of 43
2. Hardware / Software Requirements
2.1 Minimum Hardware Requirements
XP minimum requirements:
1.2 GHz CPU (Intel Pentium, Intel Celeron)
500 MB RAM
400 MB disk space for e-config
Network interface: 10 MB for LAN connection Vista and Windows 7 minimum requirements:
1GHz CPU
1 GB RAM (32-bit) or 2 GB RAM (64-bit)
16 GB disk space for OS, 400 MB for e-config
Network interface: 10 MB for LAN connection In order to maximize the performance of e-config, it is recommended machines should have a minimum 1.2 GHz or faster processing speed for 32-bit testing, 500MB or more of memory, and at least 2GB free space on the hard drive. 64-bit machines should have a minimum of 4 GB of memory
2.2 Software Requirements
Supported Operating System:
Windows XP Professional with SP3
Vista Business (32-bit) with SP2
Windows 7 Professional (32-bit) with SP1
Windows 7 Professional (64-bit) with SP1 Required Software:
32-bit Java Runtime Environment 1.4.2, 1.5.x, 1.6.x for XP
32-bit Java Runtime Environment 1.6.0_35 or higher 1.6.x version for Vista or Windows 7 One of the following supported 32-bit browsers:
o Internet Explorer 7.x, 8.x, 9.x
o Mozilla Firefox 3.0.x or higher

Document: e-config_Upgrade_Installation_Guidelines_v1 Date: 18-Jan-2013 Owner: e-config Team Status: FINAL Subject: e-config Installation Guidelines Page 7 of 43
3. Limitations / Known Issues If having problems with the installation, read though this section to determine if your problems are addressed and follow the suggested resolution. If the problem is not addressed, contact the Help Desk. Contact information can be found at http://www.ibm.com/services/econfig/announce/support.htm
Workarounds for known issues have been included. Items identified as a limitation may not currently have a work around.
The latest list of known problems can be found on the e-padm Known Problems page.
3.1 Known Issues
3.1.1 run_epadm.exe does not launch preferred web browser
Problem: The run_epadm.exe utility only launches the default browser
Cause: This is by design. The correct 32-bit browser version is invoked with the correct elevated privileges needed to install e-config.
Resolution: Use the launched browser for the installation or change the default web browser used on the system.
3.1.2 Uninstalling Microsoft Office 2007 or 2010 (32-bit) when e-config installed makes e-config unusable
Problem: e-config becomes unusable after uninstalling Microsoft Office 2007 or 2010.
Cause: This is caused by the shared MS Access engine being removed by the Office uninstall.
Resolution: Reinstall Microsoft Office 2007 or 2010 32-bit version. If you are not able to reinstall Microsoft
Office 2007 or 2010, install the Microsoft Access Database Engine 2010 32-bit redistributable package. http://www.microsoft.com/en-us/download/details.aspx?id=13255
3.1.3 Installing e-config on Win7 64-bit host system while XP mode is active causes installation conflicts when sharing host C drive
Problem: e-padm does not recognize components are already installed when installing in both XP mode on
Windows 7 64-bit and the Windows 7 64-bit host system.
Cause: When ‘Integration Features’ are enabled in XP mode and the C: drive is shared, the host system is
getting updates from the XP mode virtual image which can cause a conflict when installing on the host system.
Resolution: Disable the C: share in XP mode prior to installing/uninstalling on the host system. See Section 11 for detailed information.

Document: e-config_Upgrade_Installation_Guidelines_v1 Date: 18-Jan-2013 Owner: e-config Team Status: FINAL Subject: e-config Installation Guidelines Page 8 of 43
3.2 Limitations
3.2.1 Unable to install to Windows Reserved Directories
Problem: An error is received trying to install to the Windows reserved directories listed below:
C:\ C:\WINNT C:\WINDOWS C:\Documents and Setting C:\Shared Folders C:\ProgramData C:\Users
C:\Program Files *
Cause: This is by design.
Resolution: Install to a location other than the listed Windows reserved directories, preferably c:\econfig.
*NOTE: On Windows 7 64-bit, c:\Program Files is only used for 64-bit applications. Users can install to c:\Program Files on 32-bit operating systems or c:\Program Files (x86) on Windows 7 64-bit but will receive the following warning from e-padm:
3.2.2 Unable to run e-config with User authority after installing to Program Files / Program Files (x86)
Problem: e-config will not launch after installing to c:\Program Files\ or c:\Program Files (x86)\ directories in
Windows 7 when user is logged on with non-administrator authority.
Cause: Due to the enhanced security in Windows 7, additional user privileges are needed to run e-config
from the Program Files or Program Files (x86) Windows reserved directories.
Resolution: If it is necessary to run e-config while logged on with normal user level authority, install to a
location other than c:\Program Files\ or c:\Program Files (x86)\.

Document: e-config_Upgrade_Installation_Guidelines_v1 Date: 18-Jan-2013 Owner: e-config Team Status: FINAL Subject: e-config Installation Guidelines Page 9 of 43
3.2.3 e-config unusable with 64-bit version of Microsoft Office
Problem: e-config will not install when 64-bit Microsoft Office is installed or e-config becomes unusable after 64-bit version of Microsoft Office is installed.
Cause: There are several known conflicts with the 64-bit version of Microsoft Office and applications that are part of the core underlying technology used in e-config. Please see http://go.microsoft.com/fwlink/?LinkID=245825 for information on known compatibility issues.
This issue can also be caused by having the Microsoft Access database engine (x64) installed on the machine.
Resolution: Uninstall the 64-bit Microsoft Office (or Microsoft Access database engine (x64) and install a 32-
bit version of Microsoft Office.
3.2.4 e-padm installation applet not compatible with 64-bit Internet Explorer
Problem: e-padm applet will not load or operate correctly when a 64-bit version of Internet Explorer is used.
Cause: e-padm is a 32-bit application and only works with 32-bit browsers.
Resolution: Launch e-padm using a 32-bit browser
3.2.5 e-padm installation applet will not load with 64-bit JRE
Problem: The e-padm applet will not load or operate correctly when a 64-bit version of a Java Runtime
Environment is installed.
Cause: e-padm is a 32-bit application and only works with the 32-bit JRE versions.
Resolution: Uninstall the 64-bit JRE and install a 32-bit JRE
3.2.6 e-config cannot be installed on Linux
Problem: The e-config application cannot be installed on Linux.
Cause: e-config is built around technologies that utilize the Microsoft Windows operating systems and cannot run natively on Linux.
Resolution: On your Linux machine, install e-config within a virtual client running a supported Microsoft operating system.
3.2.7 e-config users who performed data migration may receive an error message “Runtime error: 94” and e-config application may become unresponsive
Problem: After performing the database migration and updating to the new e-config release, end users who launch e-config and choose to launch the automatic customer dialog receive a runtime error ‘94’ after which e-config becomes unresponsive

Document: e-config_Upgrade_Installation_Guidelines_v1 Date: 18-Jan-2013 Owner: e-config Team Status: FINAL Subject: e-config Installation Guidelines Page 10 of 43
Cause: This is caused by a specific problem in migrating portfolios to the new database and reading the customer information from the new core database’s migrated records and the option ‘Automatically launch customer dialog’ is selected.
Resolution: If e-config is unresponsive and cannot be exited normally, please open Task Manager and end
processes for SCPortfolio.exe (and salesec.exe, if present in the process list). On re-launching e-config, choose radio button for ‘Leave customer blank’ and do not select ‘Automatically launch customer dialog’. Users can still load the appropriate portfolio by choosing File -> Open.
3.2.8 e-config displays an error message ‘MFC Application has crashed’ when closing
Problem: The e-config application may display an error message ‘MFC Application has crashed’ when user chooses to close e-config by using the windows-close button (found at the top right corner of the e-config window).
Cause: Intermittent problem is caused by application timing issue where application closes before all
memory is released.
Resolution: This does not cause any data loss as problem is happening during application exit. User can re-
launch e-config and continue to work.

Document: e-config_Upgrade_Installation_Guidelines_v1 Date: 18-Jan-2013 Owner: e-config Team Status: FINAL Subject: e-config Installation Guidelines Page 11 of 43
4. First-time Installation on XP The following instructions are intended for XP users that are installing e-config for the first time on XP.
Users that have uninstalled e-config but are reinstalling on the same machine will go through the same steps as a First-time installation but will get the data migration message described in Section 5 and will have to choose to stop the installation to perform the optional data migration step or continue with the installation without data migration.
4.1 e-config Installation
Users should continue to use their normal portals to install e-config. Access instructions can be found at http://www.ibm.com/services/econfig/announce/access.htm.
A Java Runtime Environment must be installed prior to starting the installation. Please see supported version in Section 2.2.
1. Logon to the machine with Administrator authority
2. Logon to portal (Partnerworld, PC/S, IBMLink, CRM, etc.) and navigate to the e-config installation
page. LAN users will continue to connect to their local network.
3. Select Install/Update on the e-padm page then click Continue
4. Select models and price files you would like to install
Document: e-config_Upgrade_Installation_Guidelines_v1 Date: 18-Jan-2013 Owner: e-config Team Status: FINAL Subject: e-config Installation Guidelines Page 12 of 43
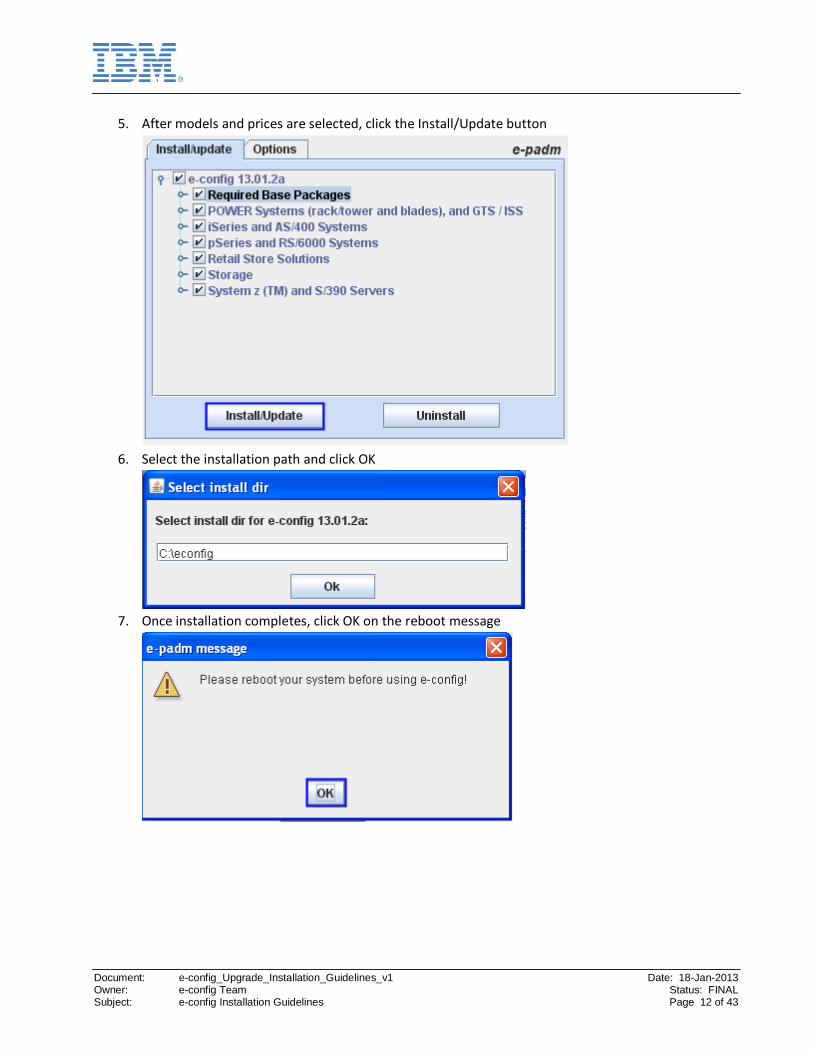
5. After models and prices are selected, click the Install/Update button
6. Select the installation path and click OK
7. Once installation completes, click OK on the reboot message
Document: e-config_Upgrade_Installation_Guidelines_v1 Date: 18-Jan-2013 Owner: e-config Team Status: FINAL Subject: e-config Installation Guidelines Page 13 of 43
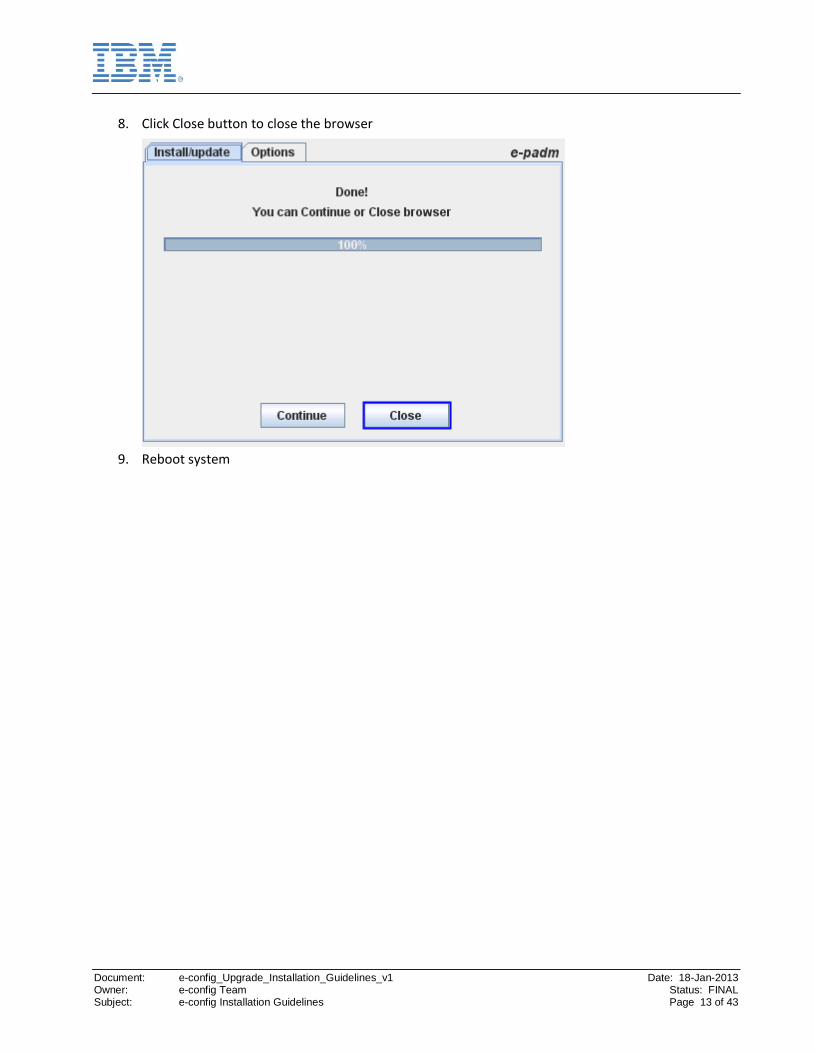
8. Click Close button to close the browser
9. Reboot system

Document: e-config_Upgrade_Installation_Guidelines_v1 Date: 18-Jan-2013 Owner: e-config Team Status: FINAL Subject: e-config Installation Guidelines Page 14 of 43
5. Upgrade Installation on XP The following instructions are intended for XP users that have a current production version e-config installed on their system.
If you have portfolios in your database that you want migrated to the new version of e-config, follow the steps in e-config Data Migration Guidelines prior to beginning the installation to save time. If you choose not to do the migration prior to the upgrade installation, you will receive a warning during the install process that you have an un-migrated database and an option to stop the installation to perform the migration.
NOTE: Data migration is an OPTIONAL step and is not required to install e-config. Users must be aware that if they do not perform data migration they will not have their portfolios in the new version of e-config.
5.1 e-config Upgrade
Users should continue to use their normal portals to install e-config. Access instructions can be found at http://www.ibm.com/services/econfig/announce/access.htm.
A Java Runtime Environment must be installed prior to starting the installation. Please see supported version in Section 2.2.
1. Logon to the machine with Administrator authority
2. Logon to portal (Partnerworld, PC/S, IBMLink, CRM, etc.) and navigate to the e-config installation
page. LAN users will continue to connect to their local network.
3. Select Install/Update on the e-padm page then click Continue
4. Several packages will show ‘NEW’ next to them. Click the Install/Update button

Document: e-config_Upgrade_Installation_Guidelines_v1 Date: 18-Jan-2013 Owner: e-config Team Status: FINAL Subject: e-config Installation Guidelines Page 15 of 43
5. If you have not migrated your database, you will receive the following message
6. If you want to migrate your database, click Yes to stop the installation and follow the instructions
in the e-config Upgrade Data Migration Guidelines document
7. If you want to continue with an empty database (existing portfolios within your current database
will not be migrated), click No
8. Once installation completes, click OK on the reboot message

Document: e-config_Upgrade_Installation_Guidelines_v1 Date: 18-Jan-2013 Owner: e-config Team Status: FINAL Subject: e-config Installation Guidelines Page 16 of 43
9. Click Close button to close the browser
10. Reboot system
Document: e-config_Upgrade_Installation_Guidelines_v1 Date: 18-Jan-2013 Owner: e-config Team Status: FINAL Subject: e-config Installation Guidelines Page 17 of 43
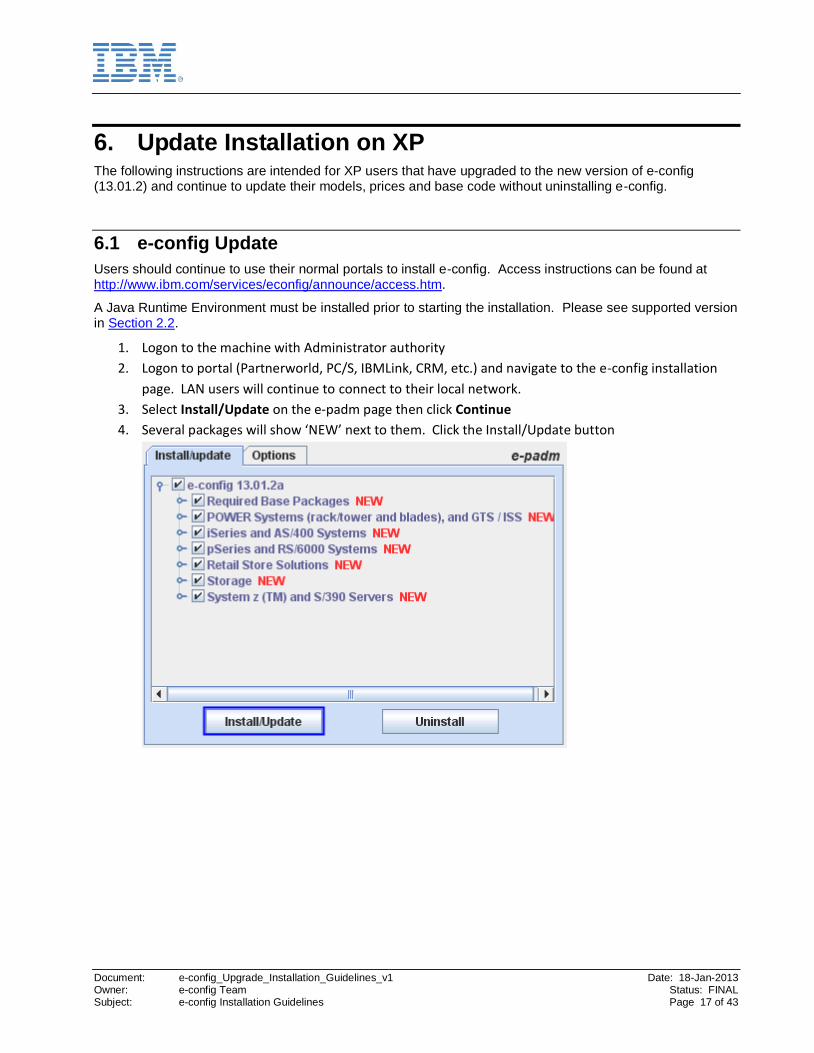
6. Update Installation on XP The following instructions are intended for XP users that have upgraded to the new version of e-config (13.01.2) and continue to update their models, prices and base code without uninstalling e-config.
6.1 e-config Update
Users should continue to use their normal portals to install e-config. Access instructions can be found at http://www.ibm.com/services/econfig/announce/access.htm.
A Java Runtime Environment must be installed prior to starting the installation. Please see supported version in Section 2.2.
1. Logon to the machine with Administrator authority
2. Logon to portal (Partnerworld, PC/S, IBMLink, CRM, etc.) and navigate to the e-config installation
page. LAN users will continue to connect to their local network.
3. Select Install/Update on the e-padm page then click Continue
4. Several packages will show ‘NEW’ next to them. Click the Install/Update button
Document: e-config_Upgrade_Installation_Guidelines_v1 Date: 18-Jan-2013 Owner: e-config Team Status: FINAL Subject: e-config Installation Guidelines Page 18 of 43
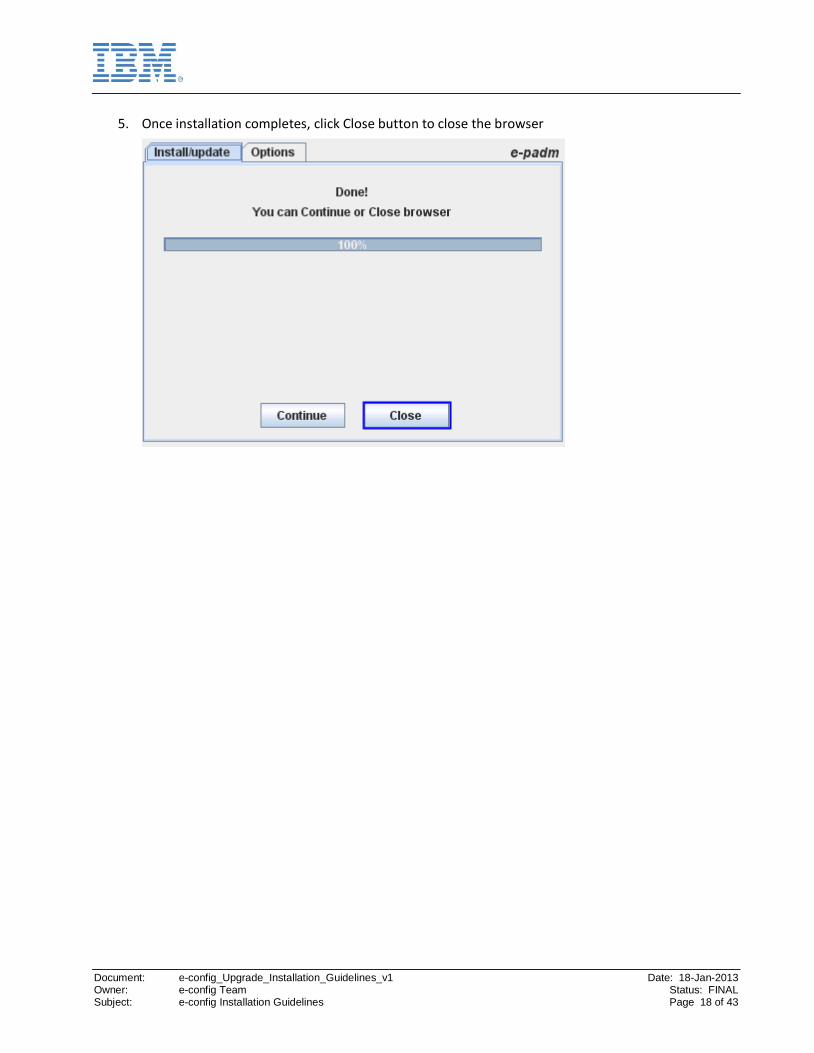
5. Once installation completes, click Close button to close the browser

Document: e-config_Upgrade_Installation_Guidelines_v1 Date: 18-Jan-2013 Owner: e-config Team Status: FINAL Subject: e-config Installation Guidelines Page 19 of 43
7. Uninstalling on XP Although the application can be uninstalled from the Uninstall icon in the e-config folder, the recommended method is to uninstall though e-padm.
1. Logon to the machine with Administrator authority
2. Logon to portal (Partnerworld, PC/S, IBMLink, CRM, etc.) and navigate to the e-config installation
page. LAN users will continue to connect to their local network.
3. Select Install/Update on the e-padm page then click Continue
4. Click Uninstall button
5. Click Yes to Confirm uninstall

Document: e-config_Upgrade_Installation_Guidelines_v1 Date: 18-Jan-2013 Owner: e-config Team Status: FINAL Subject: e-config Installation Guidelines Page 20 of 43
6. Do not close the browser while the uninstall process is running. NOTE: The more packages that
were installed initially, the longer it will take to uninstall
7. Select Yes to preserve Profile settings or No to remove Profile settings
8. Click Close button to close the browser

Document: e-config_Upgrade_Installation_Guidelines_v1 Date: 18-Jan-2013 Owner: e-config Team Status: FINAL Subject: e-config Installation Guidelines Page 21 of 43
8. First-time Installation on Windows 7 The following instructions are intended for Windows 7 or Vista users that are installing e-config for the first time on Windows 7 or Vista.
Users that have uninstalled e-config but are reinstalling on the same machine will go through the same steps as a First-time installation but will get the data migration message described in Section 5 and will have to choose to stop the installation to perform the optional data migration step or continue with the installation without data migration.
8.1 e-config Installation
Users should continue to use their normal portals to install e-config. Access instructions can be found at http://www.ibm.com/services/econfig/announce/access.htm.
A Java Runtime Environment must be installed prior to starting the installation. Please see supported version in Section 2.2.
1. Logon to the machine with Administrator authority
2. Logon to portal (Partnerworld, PC/S, IBMLink, CRM, etc.) and navigate to the e-config installation
page. LAN users will continue to connect to their local network.
3. Select the Preparations link in the left navigation bar

Document: e-config_Upgrade_Installation_Guidelines_v1 Date: 18-Jan-2013 Owner: e-config Team Status: FINAL Subject: e-config Installation Guidelines Page 22 of 43
4. Scroll down to the section For Windows Vista 32-bit and Windows 7 Professional Users and
download the file run_epadm.exe
5. Close your browser
6. Double click on the file run_epadm.exe
7. Click Yes on the User Account Control message

Document: e-config_Upgrade_Installation_Guidelines_v1 Date: 18-Jan-2013 Owner: e-config Team Status: FINAL Subject: e-config Installation Guidelines Page 23 of 43
8. In the browser window that is opened, Logon to portal (Partnerworld, PC/S, IBMLink, CRM, etc.) and
navigate to the e-config installation page
9. Select Install/Update on the e-padm page then click Continue
10. Select models and price files you would like to install

Document: e-config_Upgrade_Installation_Guidelines_v1 Date: 18-Jan-2013 Owner: e-config Team Status: FINAL Subject: e-config Installation Guidelines Page 24 of 43
11. After models and prices are selected, click the Install/Update button
12. Select the installation path and click OK
13. Once installation completes, click OK on the reboot message

Document: e-config_Upgrade_Installation_Guidelines_v1 Date: 18-Jan-2013 Owner: e-config Team Status: FINAL Subject: e-config Installation Guidelines Page 25 of 43
14. Click Close button to close the browser
15. Reboot system

Document: e-config_Upgrade_Installation_Guidelines_v1 Date: 18-Jan-2013 Owner: e-config Team Status: FINAL Subject: e-config Installation Guidelines Page 26 of 43
9. Update Installation on Windows 7 The following instructions are intended for Windows 7 users that have upgraded to the new version of e-config (13.01.2) and continue to update their models, prices and base code without uninstalling e-config.
9.1 e-config Update
Users should continue to use their normal portals to install e-config. Access instructions can be found at http://www.ibm.com/services/econfig/announce/access.htm.
A Java Runtime Environment must be installed prior to starting the installation. Please see supported version in Section 2.2.
The utility run_epadm.exe is downloaded to the local system.
1. Double click on the file run_epadm.exe
2. Click Yes on the User Account Control message

Document: e-config_Upgrade_Installation_Guidelines_v1 Date: 18-Jan-2013 Owner: e-config Team Status: FINAL Subject: e-config Installation Guidelines Page 27 of 43
3. In the browser window that is opened, Logon to portal (Partnerworld, PC/S, IBMLink, CRM, etc.) and
navigate to the e-config installation page
4. Select Install/Update on the e-padm page then click Continue
5. Several packages will show ‘NEW’ next to them. Click the Install/Update button

Document: e-config_Upgrade_Installation_Guidelines_v1 Date: 18-Jan-2013 Owner: e-config Team Status: FINAL Subject: e-config Installation Guidelines Page 28 of 43
6. Once installation completes, click Close button to close the browser

Document: e-config_Upgrade_Installation_Guidelines_v1 Date: 18-Jan-2013 Owner: e-config Team Status: FINAL Subject: e-config Installation Guidelines Page 29 of 43
10. Uninstalling on Windows 7 Although the application can be uninstalled from the Uninstall icon in the e-config folder, the recommended method is to uninstall through e-padm.
1. Logon to the machine with Administrator authority
2. Double click on the file run_epadm.exe
3. Click Yes on the User Account Control message

Document: e-config_Upgrade_Installation_Guidelines_v1 Date: 18-Jan-2013 Owner: e-config Team Status: FINAL Subject: e-config Installation Guidelines Page 30 of 43
4. In the browser window that is opened, Logon to portal (Partnerworld, PC/S, IBMLink, CRM, etc.) and
navigate to the e-config installation page
5. Select Install/Update on the e-padm page then click Continue
6. Click Uninstall button

Document: e-config_Upgrade_Installation_Guidelines_v1 Date: 18-Jan-2013 Owner: e-config Team Status: FINAL Subject: e-config Installation Guidelines Page 31 of 43
7. Click Yes to Confirm uninstall
8. Do not close the browser while the uninstall process is running.
NOTE: The more packages that were installed initially, the longer it will take to uninstall
9. Select Yes to preserve Profile settings or No to remove Profile settings

Document: e-config_Upgrade_Installation_Guidelines_v1 Date: 18-Jan-2013 Owner: e-config Team Status: FINAL Subject: e-config Installation Guidelines Page 32 of 43
10. Click Close button to close the browser

Document: e-config_Upgrade_Installation_Guidelines_v1 Date: 18-Jan-2013 Owner: e-config Team Status: FINAL Subject: e-config Installation Guidelines Page 33 of 43
11. Special Considerations Using XP Mode and Windows 7 64-bit Simultaneously
What Is Windows XP Mode? Windows XP Mode is a virtual machine package for Windows Virtual PC that contains a pre-installed, licensed copy of Windows XP Professional SP3 as its guest operating system on a licensed Windows 7 Professional 64-bit machine. Pre-installed integration components let applications running within the virtualized environment appear in the operating system Start menu as if they were running directly on the host computer.
Windows XP Mode applications are run in a Terminal Services session in the virtualized instance. The applications are accessed via Remote Desktop Protocol by a client running on the Windows 7 host computer.
Using Windows XP Mode
Windows XP Mode runs in a separate window on the Windows 7 desktop, much like a program, except it is a fully functional version of the operating system. In Windows XP Mode, you can run Internet Explorer 7 or Internet Explorer 8 (IE6 is not supported. Users should update XP Mode to install the supported IE7 or IE8.), access your physical computer’s CD/DVD drive, install programs, save files, and perform other tasks as if you were using a computer running.
Be aware that Windows Virtual PC includes some new improvements, such as the ability to access the computer’s physical hard disk drives (including the host operating system’s volumes) through a virtual machine and USB support.
Because the host’s operating system volumes are shared by default, conflicts can arise between the host system and XP Mode. If you need to install and run e-config in Windows 7 64-bit and XP Mode, ensure the ‘Integrated Features’ option is disabled described in Section 11.1, then follow the instructions to install e-config in Windows 7 64-bit described in Section 8. To install e-config in XP Mode, follow the XP instructions described in Section 4 for a new install or Section 5 for an upgrade install.

Document: e-config_Upgrade_Installation_Guidelines_v1 Date: 18-Jan-2013 Owner: e-config Team Status: FINAL Subject: e-config Installation Guidelines Page 34 of 43
11.1 Disabling Integrated Features Option in XP Mode
In the XP Mode session, go to Tools -> Settings -> Integration Features in the VM
Uncheck Windows7 OS (C:) and click OK
Shutdown VM (The VM must be shut down, reboot does not work)
Restart VM and verify Windows 7 64-bit host C drive no longer accessible

Document: e-config_Upgrade_Installation_Guidelines_v1 Date: 18-Jan-2013 Owner: e-config Team Status: FINAL Subject: e-config Installation Guidelines Page 35 of 43
12. Moving from using XP Mode to native Windows 7 64-bit for e-config
The following instructions are intended for XP Mode users that would like to move from XP mode to the native Windows 7 64-bit environment.
NOTE: It is not required to uninstall the existing e-config installation that is in the XP Mode VM, however the models and application will expire making any configurations created with this level subject to order rejection.
12.1 Installing on Windows 7 64-bit with e-config installed in XP Mode
Follow the steps in Section 11.1 to disable the shared C:\ drive
Follow the steps in Section 8.1 to install e-config on Windows 7
12.2 Moving files from XP Mode to e-config installed on Windows 7 64-bit Host
The following steps assume the e-config installation described in Section 12.1 has been completed. Do not move the files in \econfig\userdata to the Host Windows 7 64-bit system and place them in \econfig\userdata prior to installing e-config. Moving the files to this location prior to installing e-config may result in data loss.
If you would like to migrate the existing data that is contained in your database installed in XP Mode, see Section 12.2.1.
If you do not need the existing portfolios from the current e-config database, or there are no portfolios to migrate, then it is not necessary to continue with the data migration steps and can continue directly to Section 12.2.2.

Document: e-config_Upgrade_Installation_Guidelines_v1 Date: 18-Jan-2013 Owner: e-config Team Status: FINAL Subject: e-config Installation Guidelines Page 36 of 43
12.2.1 Migrating the e-config database
If any portfolios have been saved to the e-config database on the Windows 7 64-bit installation, go to File -> Export Portfolio… and export all portfolios in the database. Close e-config.
On the Host Windows 7 64-bit system, open Windows explorer and navigate to the \econfig\userdata directory and rename the file econfig.accdb to econfig.accdb.old. Click Yes on the warning to rename the file.
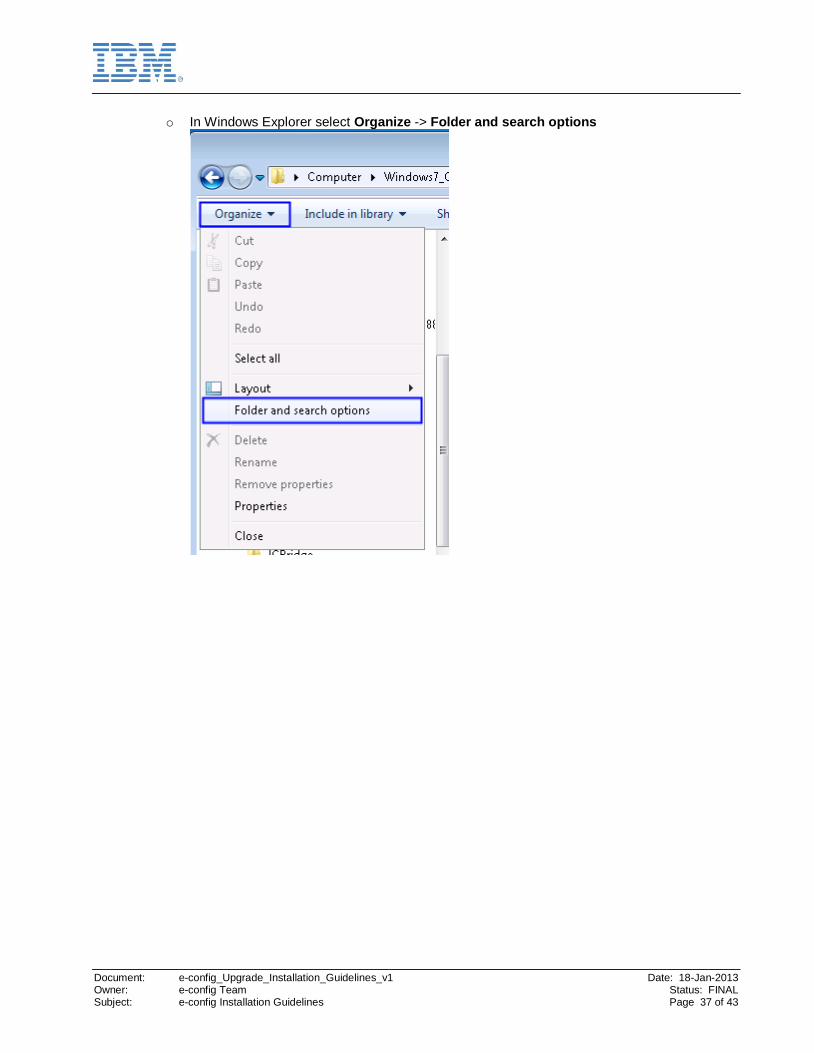
NOTE: If you do not see the file name econfig.accdb and only see econfig you will need to update your View properties.
Document: e-config_Upgrade_Installation_Guidelines_v1 Date: 18-Jan-2013 Owner: e-config Team Status: FINAL Subject: e-config Installation Guidelines Page 37 of 43
o In Windows Explorer select Organize -> Folder and search options

Document: e-config_Upgrade_Installation_Guidelines_v1 Date: 18-Jan-2013 Owner: e-config Team Status: FINAL Subject: e-config Installation Guidelines Page 38 of 43
o Select the View tab and Uncheck the option Hide extensions for known file types and click OK
Logon to the XP Mode session
Follow the instructions described in the Data Migration Guidelines document to create a migrated econfig.accdb file in your econfig\userdata directory in XP Mode.
Re-enable sharing the C:\ drive in the Integrated Features option in XP Mode.
Shutdown VM (The VM must be shut down, reboot does not work)
Restart VM and verify Windows 7 64-bit host C drive is now accessible
On the XP Mode system, copy files econfig.accdb, econfig.mdb, econfig.mdb.bak, econfig.mdb.SrcBackup* and DataMigration [econfig.mdb]txt from \econfig\userdata to \econfig\userdata on the Host Windows 7 64-bit system

Document: e-config_Upgrade_Installation_Guidelines_v1 Date: 18-Jan-2013 Owner: e-config Team Status: FINAL Subject: e-config Installation Guidelines Page 39 of 43
Launch e-config on Windows 7 64-bit system
Select File -> Import and select the files previously exported
12.2.2 Moving files in econfig\userdata on XP Mode to Windows 7 64-bit Host
Re-enable sharing the C:\ drive in the Integrated Features option in XP Mode.
On the Host Windows 7 64-bit system, open Windows Explorer, navigate to the shared drive containing XP mode and navigate to \econfig\userdata
Copy all contents with the exception of ecconfig.accdb and econfig.accdb.bak to
\econfig\userdata on the Host Windows 7 64-bit system.
Document: e-config_Upgrade_Installation_Guidelines_v1 Date: 18-Jan-2013 Owner: e-config Team Status: FINAL Subject: e-config Installation Guidelines Page 40 of 43
12.3 Continuing to use old version of e-config in XP Mode
If you choose to continue using the old version of e-config in XP Mode after migrating to Windows 7 64-bt, the following steps must be taken.
Follow the steps in Section 11.1 to disable the shared C:\ drive on the VM session
On the XP Mode system, rename the file econfig.mdb.SrcBackup* to econfig.mdb
Launch e-config
12.4 Uninstalling e-config in XP Mode
Although it’s not required to uninstall e-config installed in XP Mode, it’s recommended that if e-config is installed in the Host Windows 7 64-bit environment, e-config should be uninstalled from XP mode.
Follow the steps in Section 11.1 to disable the shared C:\ drive
Logon to XP Mode VM session
Follow the steps in Section 7 to uninstall e-config
Document: e-config_Upgrade_Installation_Guidelines_v1 Date: 18-Jan-2013 Owner: e-config Team Status: FINAL Subject: e-config Installation Guidelines Page 41 of 43
13. Troubleshooting The troubleshooting section contains a list of common problems that may occur during the installation process.
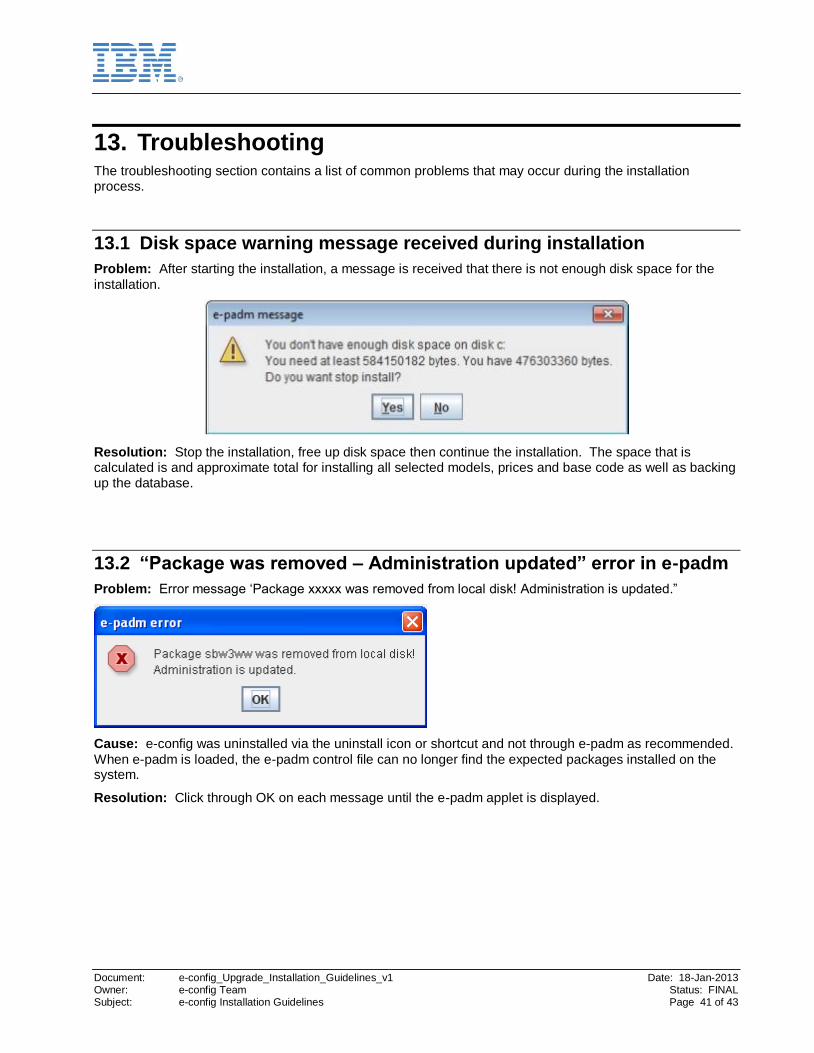
13.1 Disk space warning message received during installation
Problem: After starting the installation, a message is received that there is not enough disk space for the
installation.
Resolution: Stop the installation, free up disk space then continue the installation. The space that is calculated is and approximate total for installing all selected models, prices and base code as well as backing up the database.
13.2 “Package was removed – Administration updated” error in e-padm
Problem: Error message ‘Package xxxxx was removed from local disk! Administration is updated.”
Cause: e-config was uninstalled via the uninstall icon or shortcut and not through e-padm as recommended.
When e-padm is loaded, the e-padm control file can no longer find the expected packages installed on the system.
Resolution: Click through OK on each message until the e-padm applet is displayed.

Document: e-config_Upgrade_Installation_Guidelines_v1 Date: 18-Jan-2013 Owner: e-config Team Status: FINAL Subject: e-config Installation Guidelines Page 42 of 43
13.3 Prompted for administrator ID during installation
Problem: When running the installation in e-padm, user is prompted to enter an Administrator ID and
password several times during the installation on Windows 7 and Vista. Even with entering the administrator password multiple times, the installation does not complete correctly.
Cause: The browser was not launched with the correct permissions to install to the machine.
Resolution: Cancel the current installation. Launch the web browser with the run_epadm.exe utility that can
be found on the Preparations page in e-padm and start the installation again.
Document: e-config_Upgrade_Installation_Guidelines_v1 Date: 18-Jan-2013 Owner: e-config Team Status: FINAL Subject: e-config Installation Guidelines Page 43 of 43
14. Getting Support To get support for any issues you may run into during the installation process; contact the e-config Help Desk. Contact information can be found on the e-config home page under the Support link.
END OF DOCUMENT