e-pay user guide by alphabeta consulting limited liability partnership
DESCRIPTION
e-Pay User Guide By Alphabeta Consulting Limited Liability Partnership. Posting Transactions. New Features - PowerPoint PPT PresentationTRANSCRIPT

e-Pay User Guide
ByAlphabeta Consulting
Limited Liability Partnership

Posting TransactionsPosting Transactions
New Features1.Posting transactions with only the Bank: Card E-Pay 5.0 has advanced enhancement features that allows you to post transactions with only the bank card after a successful log on. The eliminates the use of Temporary Cards for posting transactions2.Accounts numbers are tied to revenue codes thereby allowing the system to automatically select the account number when you select the revenue code3.Assessment reference numbers are also automatically selected where the number is available and where there is non, the system allows you to manually fill in the field
2

Posting TransactionsPosting Transactions
Log on•Insert your e-TCC card (log on Card) inside your card reader and connect to your system•Double-click ePaycient shortcut on your desktop
3Close the form to continue

Posting TransactionsPosting Transactions
4
System automatically picks you PayerId from your log on (e-TCC card and inserts it in the User Name field
Type in your passwordSelect your Location
Replace your Log on Card with the Bank Card Click Ok

Posting TransactionsPosting Transactions
5
From File, Select Post Transaction

Posting TransactionsPosting Transactions
6
Notice the message, No User Card found, Do you want to post for a remote Payer?
Click Yes

Posting TransactionsPosting Transactions
7
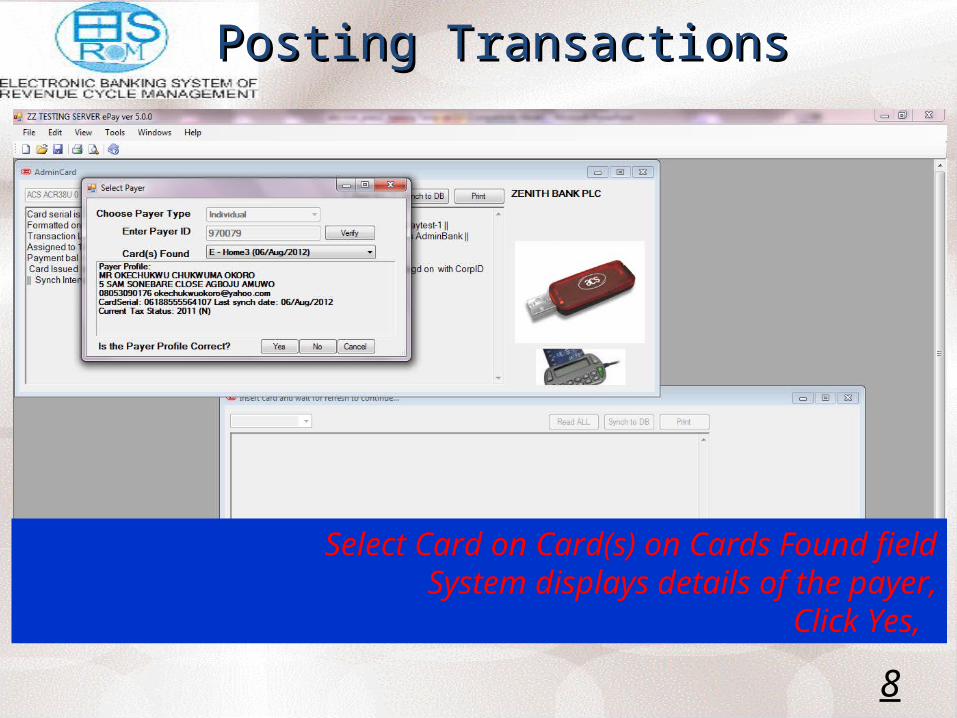
Select the User type e.g. IndividualType in PayerID
Click VerifyType in your Password, to log on to the database
Click Ok
Posting TransactionsPosting Transactions
8
Select Card on Card(s) on Cards Found fieldSystem displays details of the payer,
Click Yes,

Posting TransactionsPosting Transactions
9
Select the Agency RefSelect the Revenue Code, the system automatically selects the account
number as shownPress the tab key on the Keyboard, the system will search for
Assessment Reference No, and automatically fill it in where available, otherwise the System will display a message as shown
Click Ok

Posting TransactionsPosting Transactions
10
Type in Assessment Ref.Type in Amount
Type in Deposit Slip RefType in Applied Date
Click Pay to Bank

Posting TransactionsPosting Transactions
11
Please check if the information is correct,If not, click No wait and make corrections
If information is correct, click Yes, Post

Posting TransactionsPosting Transactions
12
Print Receipt and give to payer

Enhancements

OverviewOverview
• E-Pay Version 5.0 has the ability to handle cashless payments in line with CBN policy
• It establishes a clear-cut distinction of all user roles for control and security purposes
• E-Pay version 5.0 widens the payment channels and opportunities available to payers to make their payments to LASG
14

EnhancementsEnhancements
• Major enhancements to handle non cash payments are as follows:– Payer can physically visit the bank and request for
transfer of funds from their bank account unto the e-TCC, m-TCC or c-TCC. This serves as pre-funding such that the payer can subsequently utilise the balance on the card to make payments to any LASG Agency
– Similarly payers can now remotely initiate payments in lieu of physically visiting the bank’s branch. In this case, he simply visits the banks website and effect tansfer of fund from his account unto the e-TCC, m-TCC or c-TCC card
15

Major Enhancements Major Enhancements
– The payer can from at any time initiate transfer of funds from his e-TCC, m-TCC or c-TCC to the account of the desired LASG entity
• In all instances, the balance of funds on the card is tracked and updated whenever the card is synchronised at any e-Service centre including the banks
16

Procedures Procedures
• Procedures for preloading cards and making remote payments are as follows:– Tellers
• Tellers can load user cards (e-TCC, m-TCC, c-TCC) remotely• Tellers can now remotely post transactions for users if directed
– Payers • Payers can now post LASG transactions from the comfort of their
offices and homes using their preloaded user cards (e-TCC, m-TCC, c-TCC)
• The payer only needs to pre-load the card at the bank
• The payer can preload his card at the bank in two ways
17

ProcedureProcedure
– Payer goes to the bank to preload card– Teller receives funds from payer and posts same into
designated Till Account and payers card– Payer can then use the card to effect payment to LASG as
desiredPayer can also instruct his bank to transfer funds from his account to his e-TCC, m-TCC or c-TCC card through the banks website. When the bank effects the transfer, the payer will synchronise the card to update the card with the transferred sum. The payer can then effect payment to LASG as desired
18

Making Remote PaymentMaking Remote Payment
To make remote payment to an Agency of Government, the process will be as follows:•Payer logs on to bank’s website and makes payment to a designated Till Account. (the Till Account is similar to the Account the bank will have received the payment if the payer had physically brought the cheque to the bank. (Accounting Entry: Dr Payer, Cr Till Account)•Payer sends details of payment – Agency Code, Revenue Code to bank•Bank processes payment on e-Pay as a remote payment on behalf of the payer (Accounting Entry: Dr Till Account, Cr Agency Account)•E-Pay generates online receipt which is emailed to payer. The concerned Agency is notified and payers profile upadted on EBS-RCM
19

Loading PrepaymentLoading Prepayment
To load prepayment, Here is the procedure to follow•Payer logs on to bank’s site and makes payment to a designated Till Account (Accounting Entry, Dr payer, cr Till Account)•Payer notifies bank that this is a prepayment•Bank processes payment on e-Pay as a remote payment on behalf of the payer (Accounting Entry, Dr Till Account, Cr STO prepaid account)•E-Pay generates online receipt which is emailed to the payer•Payer synchronises card to update his payment balance•Payer uses card to make direct payment to desired LASG Agency from his office or home etc.
20

To Preload Card on e-PayTo Preload Card on e-Pay
Log on to e-Pay with your e-TCC card•With your e-TCC card inside your card reader and connected to your system•Click ePayclient shortcut on your desktop
21

Log on to e-PayLog on to e-Pay
22
Close the window to continue

Log on to e-PayLog on to e-Pay
23
Notice username field is automatically updatedSupply your password
Select your locationClick ok

Preload CardPreload Card
24
Remove your e-TCC card and switch in your Bank CardFrom File select Post Transaction

Preload CardPreload Card
25
Select Post Transaction

Preload CardPreload Card
26
Select Yes on the message box

Preload CardPreload Card
27
Select Payer typeType in Payer Id
Click verify to display new windowType in password to log on to server
Click ok

Preload CardPreload Card
28
Select active card

E-Banking OperationsE-Banking Operations
29
Select Yes if card is ok to display post transaction windowTo post remote transaction, post transaction as Assessment.
To preload card click Prepayment tab

Preload CardPreload Card
30
Complete form with payment details as shownClick pay to bank to generate a preview

Preload CardPreload Card
31
Select No Wait to make changesSelect Yes post if information is correct

Preload CardPreload Card
32
Print receipt and give to payerNote payer needs to synchronise card to update payment
information

AdministratorAdministrator
33
• An administrator has the following roles:• Set up Supervisors and Tellers• Maintain Supervisors and Tellers• Set up posting limits for Tellers• View posting profile of Tellers

AdministratorsAdministratorsLog on•An Administrator can log on to e-Pay only after he has registered his finger print on e-Pay
34

AdministratorAdministrator
Log on•With your e-TCC card inside your card reader and connected to your system•Double-click ePaycient shortcut on your desktop and
35

AdministratorAdministrator
Log on
36
Close this form to continue

AdministratorAdministrator
Log on
37
Supply your passwordSelect your location

AdministratorAdministrator
Log on
38
Insert the bank cardInsert the user card
Connect the Biometric ScannerType in Password to display finger print verification window
Place required finger print and click match

AdministratorAdministrator
Manage User Profile
39
Select Tools>Manage Local Data > User Management

AdministratorAdministrator
Manage User Profile
40
Supply your passwordClick Ok

AdministratorAdministrator
Manage User Profile
41
Supply your passwordClick Ok
Match your finger print

AdministratorAdministrator
Manage User Profile
42
On the Window that appears, select appropriate button for required task
To manage Users, select Users button, (this is by default)Click drop-down to display tasks
Select Retrieve Users

AdministratorAdministrator
Manage User Profile
43
Number of rows displayedClick ok to display users

AdministratorAdministrator
Manage User Profile
44
To assign role to a user highlight the user

AdministratorAdministrator
Manage User Profile
45To assign role to a user highlight the userFrom the drop-down select task as shown

AdministratorAdministrator
Manage User Profile
46
To set Limit, Highlight UserFrom the drop-down, select Set Limit

AdministratorAdministrator
Manage User Profile
47
Type in Transaction LimitType in Total Limit
Click Execute

AdministratorAdministrator
Manage User Profile
48
Type in passwordClick ok to display finger print verification window
Click with your finger on the scanner, click match

AdministratorAdministrator
Manage User Profile
49
User limit setFollow this procedure to suspend user, change user level
and download supervisor profile

AdministratorAdministrator
Change User Level
50
Highlight the userFrom the drop down, select change user level to display
New User level drop down

AdministratorAdministrator
Change User Level
51From drop-down select required level
Click Execute

SupervisorSupervisor
To Over ride Payer Limit
52Payer pays above set transaction Limit
System displays message as shown

SupervisorSupervisor
To Over ride Payer Limit
53Payer pays above set transaction Limit
System displays message as shownClose the message box and log to display log on window
Type in your password Click ok

SupervisorSupervisor
To Over ride Payer Limit
54
Preview window is displayedClick post to display message for override

SupervisorSupervisor
To Over ride Payer Limit
55
Supervisor types in his PID as shownClick Match to post transaction

Feedback
56