e46 pzev/sulev (m56) fuel tanks: replacement and … · attached e46 sulev fuel tank recovery...
TRANSCRIPT
E46 PZEV/SULEV (M56) FUEL TANKS: REPLACEMENT AND PARTS RETURN PROCEDURE
New information provided by this revision is preceded by this symbol .
This Service Information bulletin replaces SI B16 01 04 dated May 2015
What’s New:
• Emphasis of bulletin changed from tank disposal to tank recovery
• Fuel tank recovery procedure (added)
• Parts information section updated.
• Warranty Information section has been updated.
MODELE46 - 3 Series with the M56 Engine (Produced 2003 to 2006)
SITUATIONBMW of North America, LLC (“BMW NA”) will begin offering factory remanufactured fuel tank assemblies for E46 (3 Series) PZEV/SULEV (Model vehicles with the M56 engine).
BMW NA will start to collect E46 PZEV/SULEV (M56) tanks that are in good shape and meet a weight requirement that ensures proper drainage. All tanks deemed to be in good condition will be used to support the remanufacturing process that has been established for these tanks.
IMPORTANT: Damage caused by improper removal of the tank that prevents the tank from being remanufactured will cause the debit of the claim or core charge.
If you have recently performed such a repair and still have the tank or plan to replace a tank, please submit an IDS ticket to the WPRC and inform your TSE
Specific instructions will then be provided as to what you need to do with the tank.
With the IDS ticket please indicate:
The VIN the tank is associated to.
The quantity of used E46 tanks you have on site for inspection & pickup.
Whether it is a warranty core return or customer pay core return.
NO FUEL TANKS SHOULD BE SHIPPED FROM YOUR CENTER TO THE WPRC!
Please hold the fuel tank on-site for inspection and supplemental draining by the TSE after following the initial draining procedure (see attached).
SI B16 03 17Fuel Supply Systems
July 2018Technical Service
Page 1 of 4TIS Service Bulletin
8/1/2018https://www.bmwtis.net/tiscode/cgi-bin/bulletin.aspx?sie_path=/tsb/bulletins/htm_store/467...
All tanks will need to be inspected and weighed (must be less than 40 lbs.) by your TSE in order to confirm they have been effectively drained, once inspected and/or drained again the tanks can be prepared for local pickup by a transport company (FedEx LTL Transport).
Please ensure that your workshop technicians and parts department personnel handle the removed fuel tank(s) properly, to avoid unnecessary damage to the tank or the box that the tank was shipped in.
Please ensure that the fuel filler neck remains in place and do not drill any holes in the fuel tank to drain the fuel!
Follow the attached instructions on how to use the special siphon hose to drain the tank while still in the vehicle and again after removal.
PART RETENTIONE46 PZEV/SULEV (M56) fuel tank replacements that are reimbursed through a DCSnet claim submission are the property of BMW NA.
Your center is responsible for the proper identification, storage and documentation of these parts (Part Number, VIN, RO and claim number as applicable). They must be held in a secure retention area with no direct exposure to the weather.
Since the box that the tank is shipped in will be used to return the tank, it must remain dry and undamaged, otherwise dedicated local pickup cannot occur until a replacement box is obtained.
Upon notification of claim payment by BMW NA through DCSnet, a corresponding DCSnet generated Part Return/Hold tag will be created. Please use the attached procedure to prepare the fuel tank for transport inspection by the TSE.
Warning: Used fuel tanks are classified as dangerous goods (DG) by the Department of Transportation (DOT) and require special preparation, packing and labeling for transport.
Your center is responsible for following all federal, state and local rules and regulations that apply to the proper documentation and shipping of Hazardous Material.
As listed in the “Ship To” address section of the Part Return tag, the requested E46 PZEV/SULEV (M56) fuel tanks must be held at your facility for transport inspection and local pickup.
Please DO NOT return these fuel tanks to “Lighting Resources.”
Your center can use the Labelmaster® Dangerous Goods Information System (DGIS) or the FedEx Ship Manager for Hazardous Material for proper shipping procedures and guidelines once directed to do so. Additional information for the DGIS can be found in SI B01 22 16.
PROCEDURERepair Preparation:
Important:
Please order an E46 SULEV (PZEV) Fuel Tank Return Kit (P/N 16 11 8 699 011) for each tank that will be used to prepare the tank for storage and transport.
The kits are not available through the RDC
All return kits must be ordered via the Virtual Warehouse
Orders can be placed using the Clear View site (https://clearview.excelda.com) or through your DMS
Refer to Aftersales Bulletin #: B-2-0317-0401 “BMW Aftersales Business Development & Marketing Clear View Ordering Portal Update: Ordering and Drop Ship Now Available”
Page 2 of 4TIS Service Bulletin
8/1/2018https://www.bmwtis.net/tiscode/cgi-bin/bulletin.aspx?sie_path=/tsb/bulletins/htm_store/467...
All orders will be visible in your DMS/Atlas and you will be invoiced directly
Each kit contains the plugs, caps, labels, absorbing mat and wire ties needed to secure the fuel tank for packaging and shipping using the original box. The kit does not contain duct tape.
The original box that contained the replacement fuel tank will be needed for the part return process.
Refer to the attached procedure to properly extract the fuel from the fuel tank and prepare it for temporary storage and shipment using a dedicated local pick-up (FedEx LTL Service - FedEx BOL template is attached) once approved by TSE.
IMPORTANT:
Extracting Fuel and Replacing Fuel Tank:
Note: Do not drill any holes in the fuel tank to drain the fuel. The fuel tank must be received intact
without any damage.
1. Before removing the fuel tank from the vehicle, extract as much fuel as possible using the attached E46 SULEV Fuel Tank Recovery procedure.
The procedure steps MUST be followed as described in the attached document.
Note: Disregard any previous communication and information about removing the filler neck
“in-vehicle” by cutting or breaking it to expedite the tank’s removal.
2. Replace the fuel tank as per Repair Instruction 16 11 032 “Removing and installing/replacing fuel tank (M56) and continue using the attached procedure.
PARTS INFORMATIONIMPORTANT! Do not damage the new fuel tank shipping box. The defective core fuel tank must be returned in that box.
WARRANTY INFORMATIONE46 (3 Series) SULEV/PZEV (M56) fuel tank replacements reimbursed by BMW NA through a claim submission.
Please claim the following work time labor operation and FRU allowance for performing the additional work to process the fuel tank for pickup.
Part Number Description Quantity
16 11 8 699 011 E46 SULEV (PZEV) Fuel Tank Return Kit 1
16 11 6 763 569 Fuel tank, metal with filler pipe 1
or Or
16 11 7 464 403 RMFD Fuel tank, metal with filler pipe
16 11 7 222 391 Fuel Filler Cap 1
NPN Duct Tape (Local Source) See below
Page 3 of 4TIS Service Bulletin
8/1/2018https://www.bmwtis.net/tiscode/cgi-bin/bulletin.aspx?sie_path=/tsb/bulletins/htm_store/467...
Work time labor operation code 16 99 000 is not considered a Main labor operation. Also, since the “work time” FRU allowance to be claimed is specified, a separate punch time is not required. However, it still requires an explanation on the repair order and in the claim comments section.
And:
Sublet Materials – Duct Tape
Posted: Monday, July 2, 2018
ATTACHMENTSView PDF attachment B160317_Procedure.
Defect Code: Refer to KSD2 Claim with the defect code that applies to the fuel tank replacement
Labor Operation: Labor Allowance: Description:
16 99 000 5 FRUWork time for the additional work to process the requested fuel tank to be held/stored until local inspection and pickup can be arranged
Sublet Code 4 Up to $1.00Sublet reimbursement, up to the amount listed for (NPN) bulk quantity duct tape, which is required to process the fuel tank for return
[ Copyright ©2018 BMW of North America, Inc. ]
Page 4 of 4TIS Service Bulletin
8/1/2018https://www.bmwtis.net/tiscode/cgi-bin/bulletin.aspx?sie_path=/tsb/bulletins/htm_store/467...

SI B16 03 17 Procedure June 2018
1
E46 SULEV Fuel Tank Recovery Procedure IMPORTANT!
Read this instruction before removing the fuel tank from the vehicle. These detailed steps must be performed correctly so that the fuel extraction is safe and efficient. Additional items needed for this procedure:
Angle finder or similar angle measuring device.
Always wear the proper protective clothing as per local and state laws.
SI B16 03 17 Procedure June 2018
2
Procedure:
Part 1: Draining Tank in and out of vehicle.
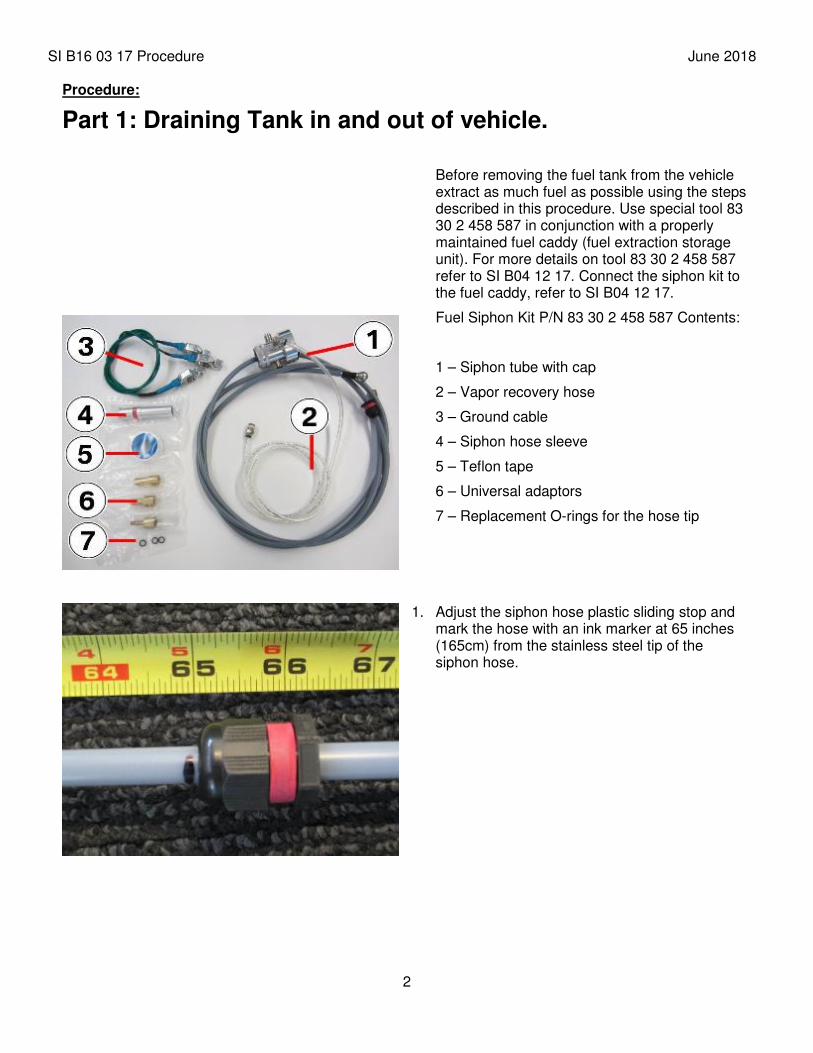
Before removing the fuel tank from the vehicle extract as much fuel as possible using the steps described in this procedure. Use special tool 83 30 2 458 587 in conjunction with a properly maintained fuel caddy (fuel extraction storage unit). For more details on tool 83 30 2 458 587 refer to SI B04 12 17. Connect the siphon kit to the fuel caddy, refer to SI B04 12 17.
Fuel Siphon Kit P/N 83 30 2 458 587 Contents:
1 – Siphon tube with cap
2 – Vapor recovery hose
3 – Ground cable
4 – Siphon hose sleeve
5 – Teflon tape
6 – Universal adaptors
7 – Replacement O-rings for the hose tip
1. Adjust the siphon hose plastic sliding stop and mark the hose with an ink marker at 65 inches (165cm) from the stainless steel tip of the siphon hose.
SI B16 03 17 Procedure June 2018
3
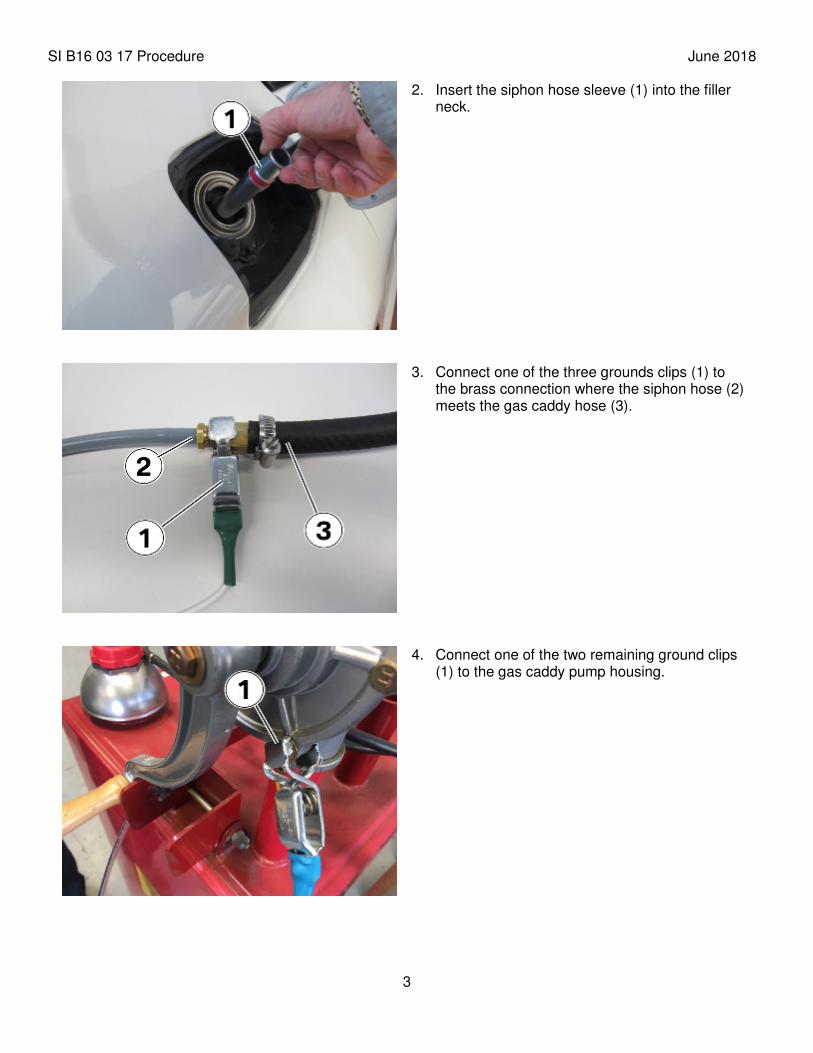
2. Insert the siphon hose sleeve (1) into the filler neck.
3. Connect one of the three grounds clips (1) to the brass connection where the siphon hose (2) meets the gas caddy hose (3).
4. Connect one of the two remaining ground clips (1) to the gas caddy pump housing.
SI B16 03 17 Procedure June 2018
4
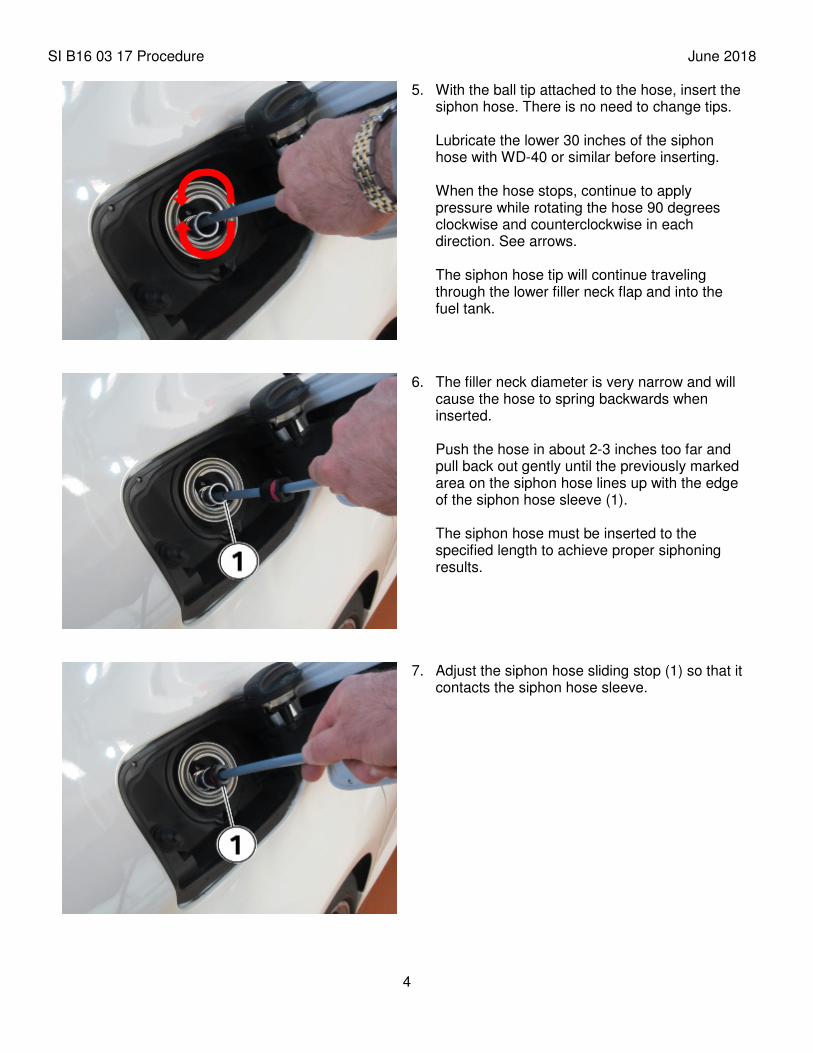
5. With the ball tip attached to the hose, insert the siphon hose. There is no need to change tips. Lubricate the lower 30 inches of the siphon hose with WD-40 or similar before inserting.
When the hose stops, continue to apply pressure while rotating the hose 90 degrees clockwise and counterclockwise in each direction. See arrows. The siphon hose tip will continue traveling through the lower filler neck flap and into the fuel tank.
6. The filler neck diameter is very narrow and will cause the hose to spring backwards when inserted. Push the hose in about 2-3 inches too far and pull back out gently until the previously marked area on the siphon hose lines up with the edge of the siphon hose sleeve (1). The siphon hose must be inserted to the specified length to achieve proper siphoning results.
7. Adjust the siphon hose sliding stop (1) so that it contacts the siphon hose sleeve.
SI B16 03 17 Procedure June 2018
5
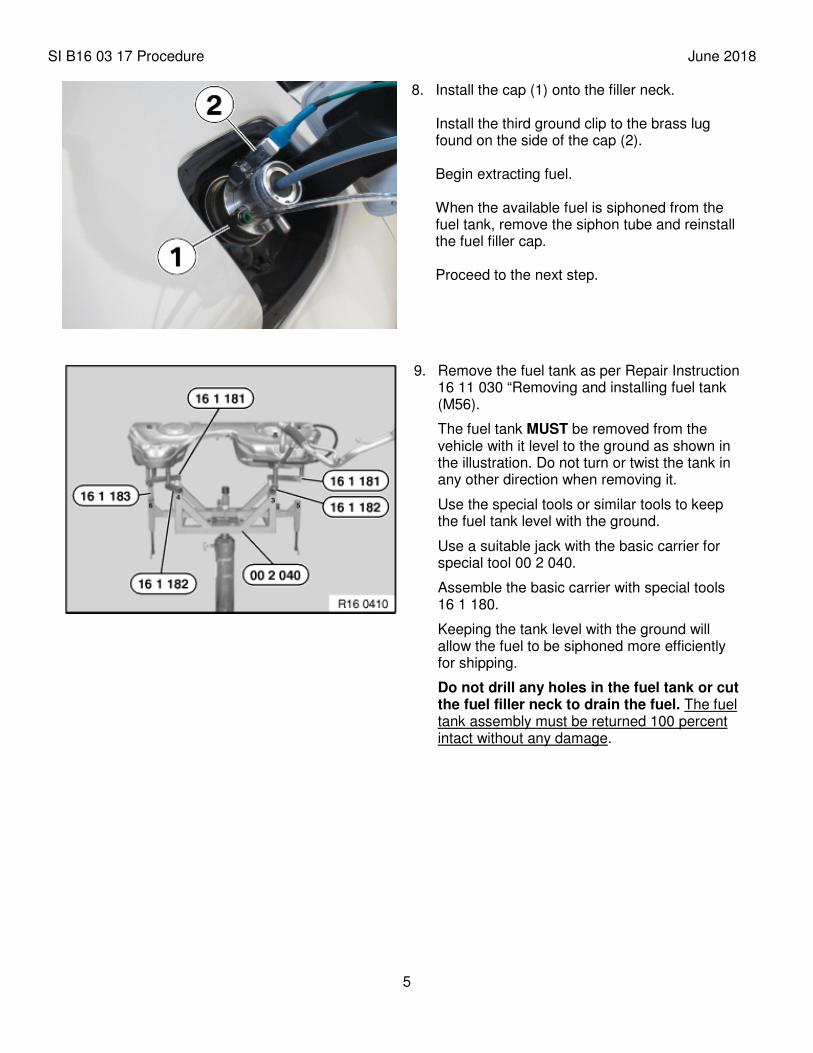
8. Install the cap (1) onto the filler neck. Install the third ground clip to the brass lug found on the side of the cap (2). Begin extracting fuel. When the available fuel is siphoned from the fuel tank, remove the siphon tube and reinstall the fuel filler cap. Proceed to the next step.
9. Remove the fuel tank as per Repair Instruction 16 11 030 “Removing and installing fuel tank (M56).
The fuel tank MUST be removed from the vehicle with it level to the ground as shown in the illustration. Do not turn or twist the tank in any other direction when removing it.
Use the special tools or similar tools to keep the fuel tank level with the ground.
Use a suitable jack with the basic carrier for special tool 00 2 040.
Assemble the basic carrier with special tools 16 1 180.
Keeping the tank level with the ground will allow the fuel to be siphoned more efficiently for shipping.
Do not drill any holes in the fuel tank or cut the fuel filler neck to drain the fuel. The fuel tank assembly must be returned 100 percent intact without any damage.
SI B16 03 17 Procedure June 2018
6
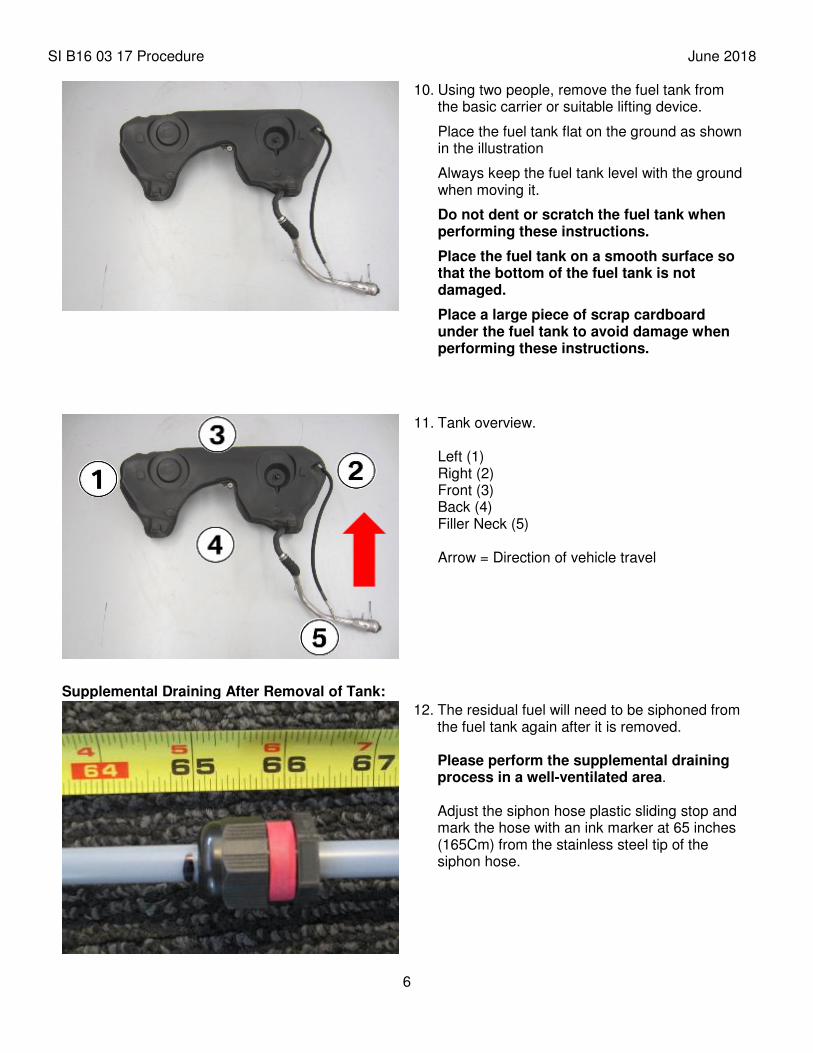
10. Using two people, remove the fuel tank from the basic carrier or suitable lifting device.
Place the fuel tank flat on the ground as shown in the illustration
Always keep the fuel tank level with the ground when moving it.
Do not dent or scratch the fuel tank when performing these instructions.
Place the fuel tank on a smooth surface so that the bottom of the fuel tank is not damaged.
Place a large piece of scrap cardboard under the fuel tank to avoid damage when performing these instructions.
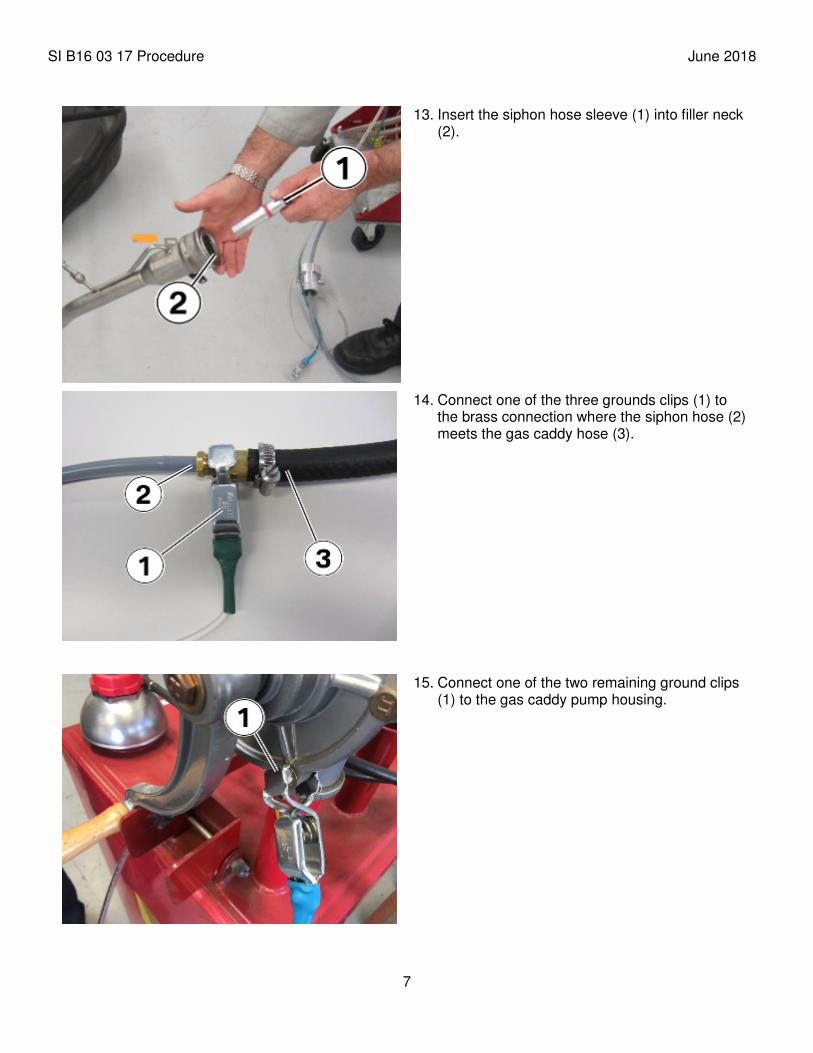
11. Tank overview.
Left (1) Right (2) Front (3) Back (4) Filler Neck (5) Arrow = Direction of vehicle travel
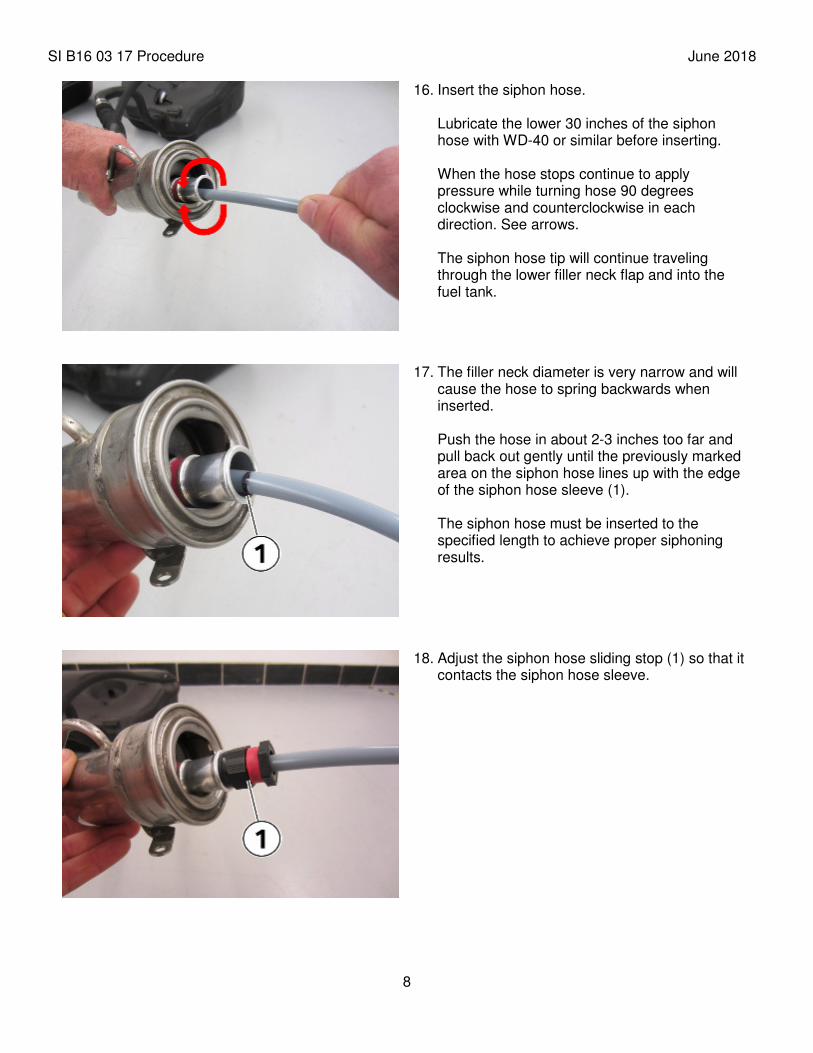
Supplemental Draining After Removal of Tank:
12. The residual fuel will need to be siphoned from the fuel tank again after it is removed. Please perform the supplemental draining process in a well-ventilated area. Adjust the siphon hose plastic sliding stop and mark the hose with an ink marker at 65 inches (165Cm) from the stainless steel tip of the siphon hose.
SI B16 03 17 Procedure June 2018
7
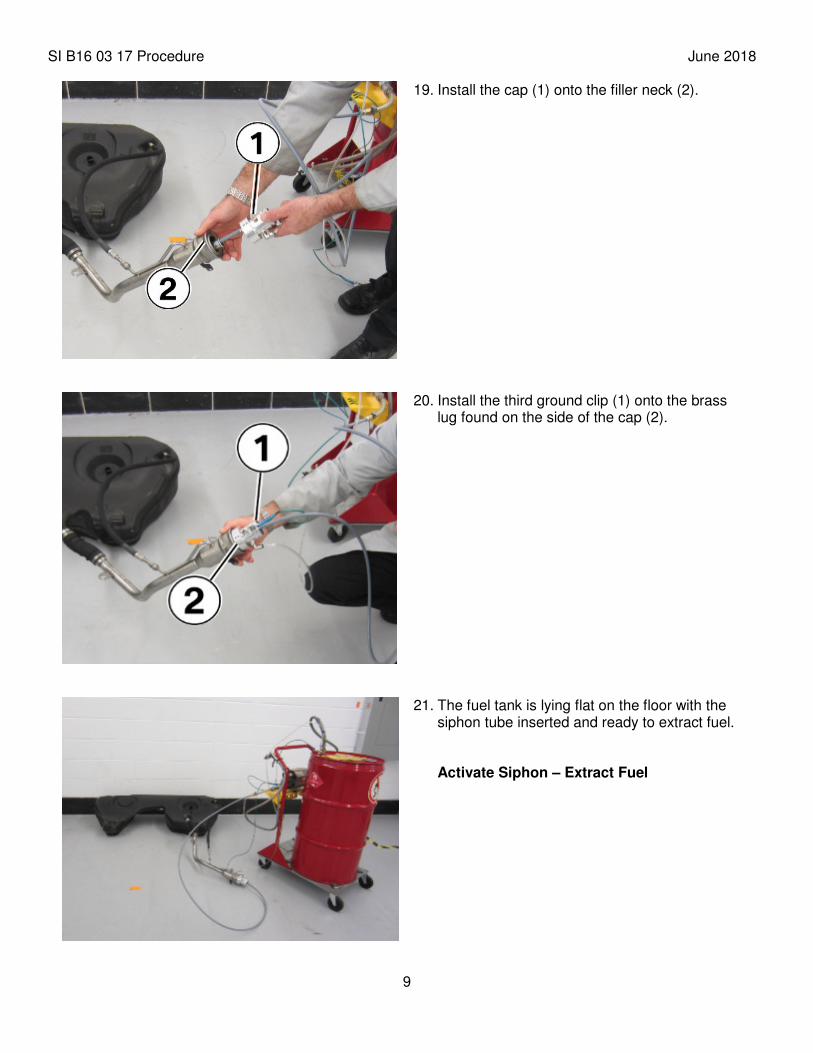
13. Insert the siphon hose sleeve (1) into filler neck (2).
14. Connect one of the three grounds clips (1) to the brass connection where the siphon hose (2) meets the gas caddy hose (3).
15. Connect one of the two remaining ground clips (1) to the gas caddy pump housing.
SI B16 03 17 Procedure June 2018
8
16. Insert the siphon hose. Lubricate the lower 30 inches of the siphon hose with WD-40 or similar before inserting.
When the hose stops continue to apply pressure while turning hose 90 degrees clockwise and counterclockwise in each direction. See arrows. The siphon hose tip will continue traveling through the lower filler neck flap and into the fuel tank.
17. The filler neck diameter is very narrow and will cause the hose to spring backwards when inserted. Push the hose in about 2-3 inches too far and pull back out gently until the previously marked area on the siphon hose lines up with the edge of the siphon hose sleeve (1). The siphon hose must be inserted to the specified length to achieve proper siphoning results.
18. Adjust the siphon hose sliding stop (1) so that it contacts the siphon hose sleeve.
SI B16 03 17 Procedure June 2018
9
19. Install the cap (1) onto the filler neck (2).
20. Install the third ground clip (1) onto the brass lug found on the side of the cap (2).
21. The fuel tank is lying flat on the floor with the siphon tube inserted and ready to extract fuel. Activate Siphon – Extract Fuel
SI B16 03 17 Procedure June 2018
10
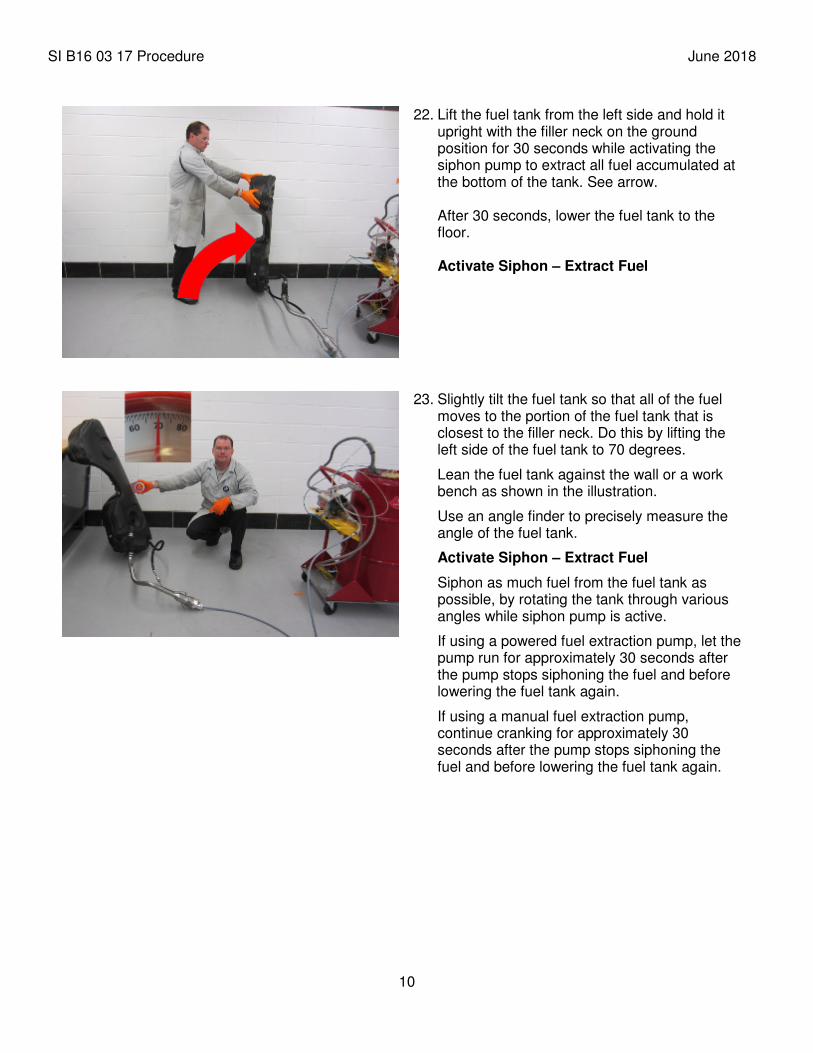
22. Lift the fuel tank from the left side and hold it upright with the filler neck on the ground position for 30 seconds while activating the siphon pump to extract all fuel accumulated at the bottom of the tank. See arrow. After 30 seconds, lower the fuel tank to the floor. Activate Siphon – Extract Fuel
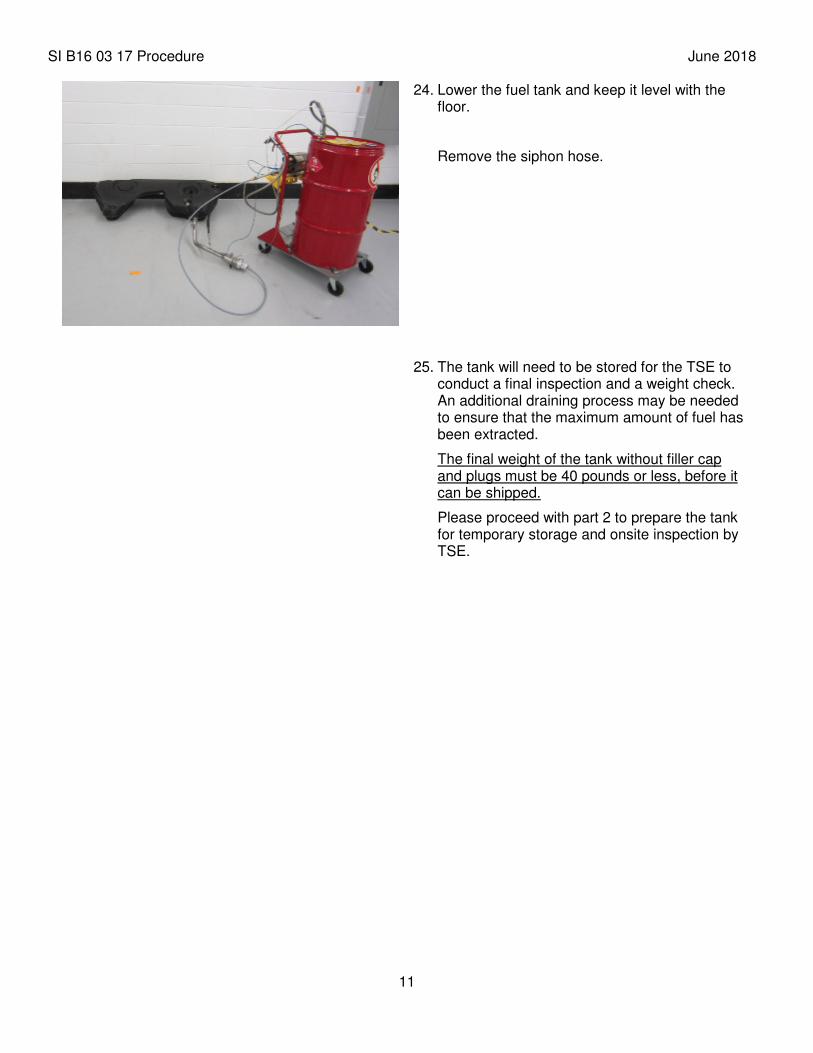
23. Slightly tilt the fuel tank so that all of the fuel moves to the portion of the fuel tank that is closest to the filler neck. Do this by lifting the left side of the fuel tank to 70 degrees.
Lean the fuel tank against the wall or a work bench as shown in the illustration.
Use an angle finder to precisely measure the angle of the fuel tank.
Activate Siphon – Extract Fuel
Siphon as much fuel from the fuel tank as possible, by rotating the tank through various angles while siphon pump is active.
If using a powered fuel extraction pump, let the pump run for approximately 30 seconds after the pump stops siphoning the fuel and before lowering the fuel tank again.
If using a manual fuel extraction pump, continue cranking for approximately 30 seconds after the pump stops siphoning the fuel and before lowering the fuel tank again.
SI B16 03 17 Procedure June 2018
11
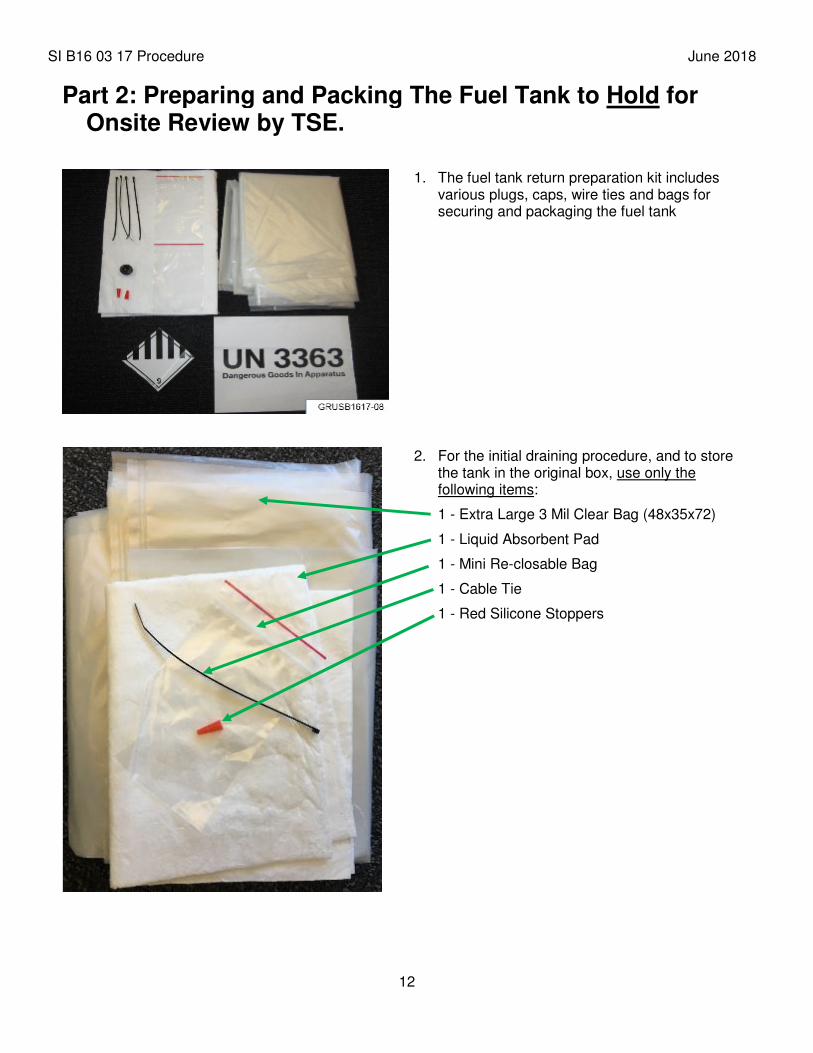
24. Lower the fuel tank and keep it level with the floor.
Remove the siphon hose.
25. The tank will need to be stored for the TSE to conduct a final inspection and a weight check. An additional draining process may be needed to ensure that the maximum amount of fuel has been extracted.
The final weight of the tank without filler cap and plugs must be 40 pounds or less, before it can be shipped.
Please proceed with part 2 to prepare the tank for temporary storage and onsite inspection by TSE.
SI B16 03 17 Procedure June 2018
12
Part 2: Preparing and Packing The Fuel Tank to Hold for Onsite Review by TSE.
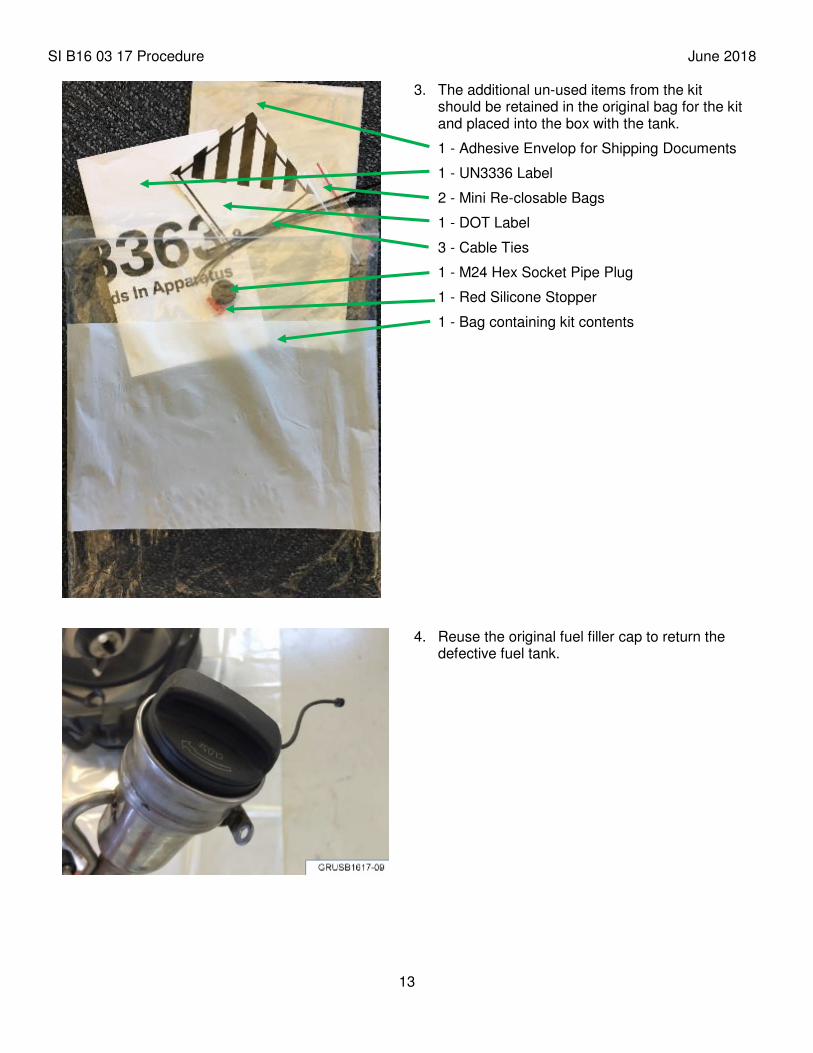
1. The fuel tank return preparation kit includes various plugs, caps, wire ties and bags for securing and packaging the fuel tank
2. For the initial draining procedure, and to store the tank in the original box, use only the following items:
1 - Extra Large 3 Mil Clear Bag (48x35x72)
1 - Liquid Absorbent Pad
1 - Mini Re-closable Bag
1 - Cable Tie
1 - Red Silicone Stoppers
SI B16 03 17 Procedure June 2018
13
3. The additional un-used items from the kit should be retained in the original bag for the kit and placed into the box with the tank.
1 - Adhesive Envelop for Shipping Documents
1 - UN3336 Label
2 - Mini Re-closable Bags
1 - DOT Label
3 - Cable Ties
1 - M24 Hex Socket Pipe Plug
1 - Red Silicone Stopper
1 - Bag containing kit contents
4. Reuse the original fuel filler cap to return the defective fuel tank.
SI B16 03 17 Procedure June 2018
14
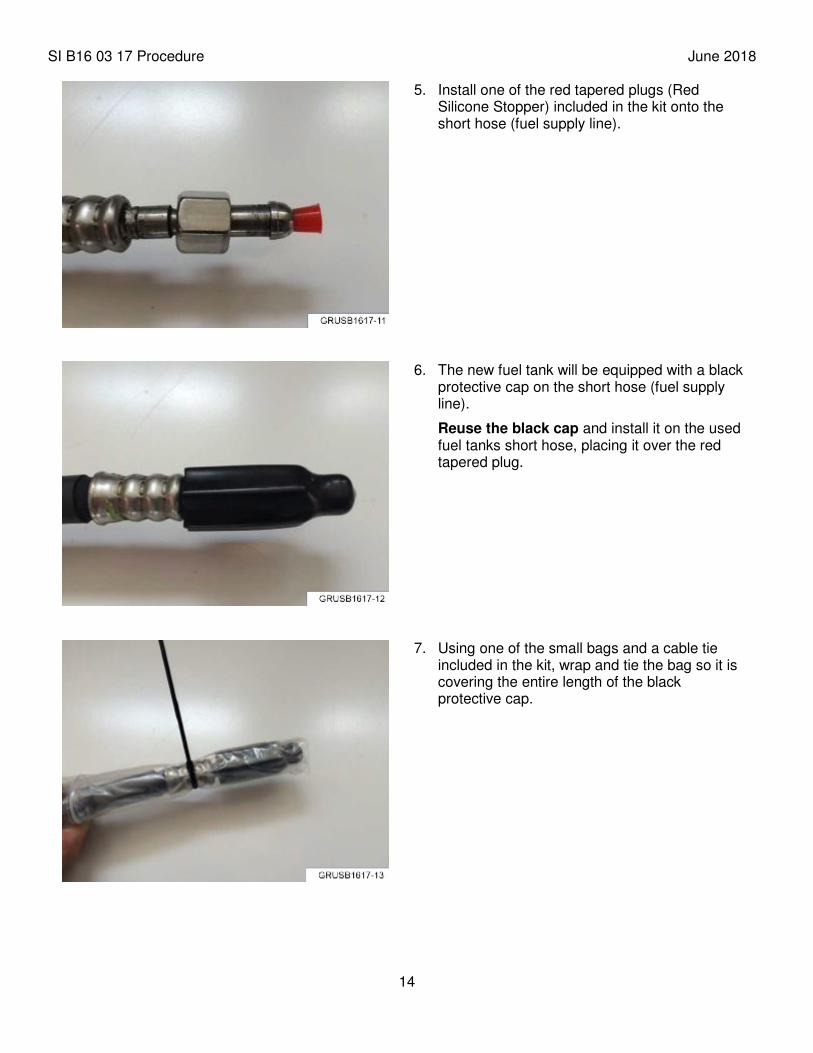
5. Install one of the red tapered plugs (Red Silicone Stopper) included in the kit onto the short hose (fuel supply line).
6. The new fuel tank will be equipped with a black protective cap on the short hose (fuel supply line).
Reuse the black cap and install it on the used fuel tanks short hose, placing it over the red tapered plug.
7. Using one of the small bags and a cable tie included in the kit, wrap and tie the bag so it is covering the entire length of the black protective cap.
SI B16 03 17 Procedure June 2018
15
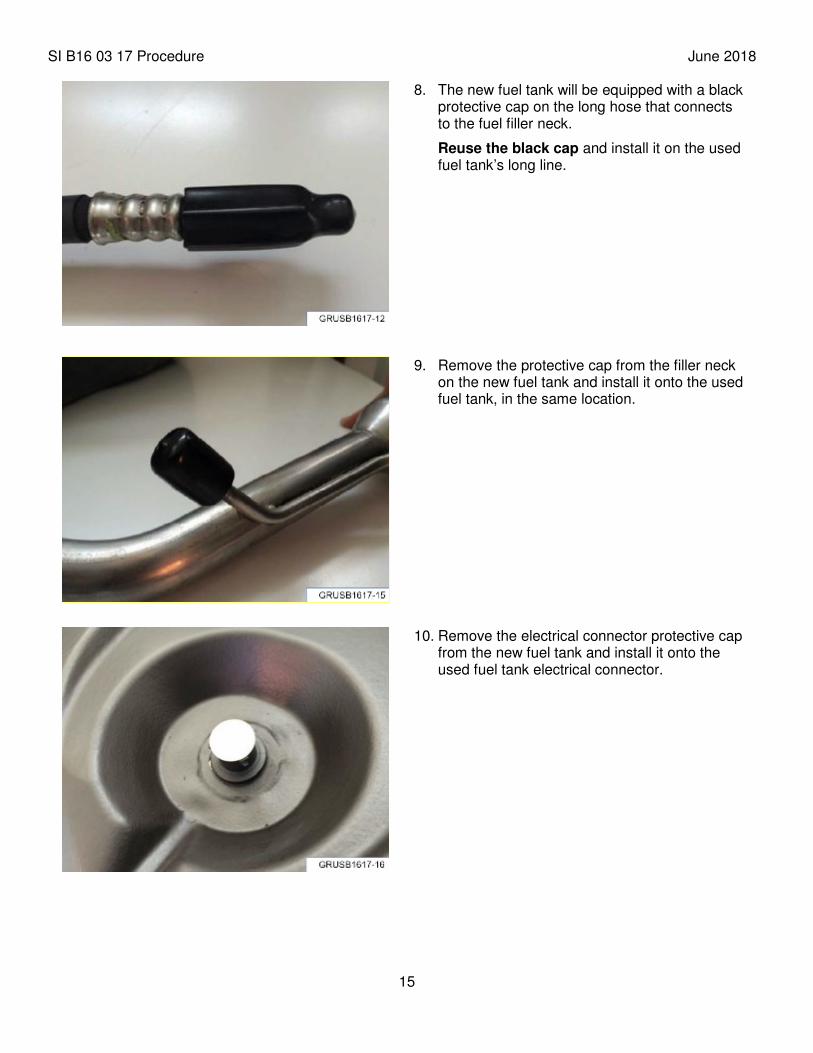
8. The new fuel tank will be equipped with a black protective cap on the long hose that connects to the fuel filler neck.
Reuse the black cap and install it on the used fuel tank’s long line.
9. Remove the protective cap from the filler neck on the new fuel tank and install it onto the used fuel tank, in the same location.
10. Remove the electrical connector protective cap from the new fuel tank and install it onto the used fuel tank electrical connector.
SI B16 03 17 Procedure June 2018
16
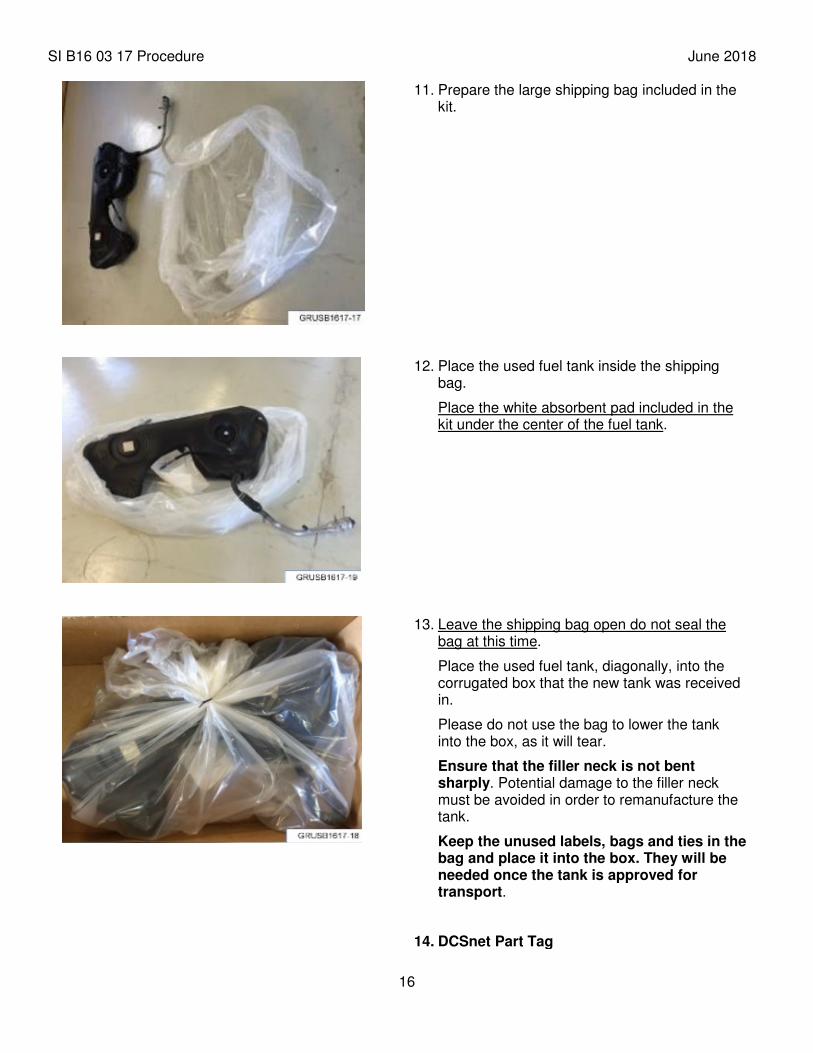
11. Prepare the large shipping bag included in the kit.
12. Place the used fuel tank inside the shipping bag.
Place the white absorbent pad included in the kit under the center of the fuel tank.
13. Leave the shipping bag open do not seal the bag at this time.
Place the used fuel tank, diagonally, into the corrugated box that the new tank was received in.
Please do not use the bag to lower the tank into the box, as it will tear.
Ensure that the filler neck is not bent sharply. Potential damage to the filler neck must be avoided in order to remanufacture the tank.
Keep the unused labels, bags and ties in the bag and place it into the box. They will be needed once the tank is approved for transport.
14. DCSnet Part Tag

SI B16 03 17 Procedure June 2018
17
a. DO NOT SHIP/RETURN THIS OR ANY USED TANK TO THE WPRC OR RDC. Create/submit an IDS ticket to the WPRC indicating the VIN and that a tank is available for pickup.
• Inform your TSE.
• Further instructions for next steps will be provided once the TSE has confirmed the weight and inspected the tank.
b. Print and attach the corresponding DCSnet Part Return Tag or Core Return Tag to the fuel tank.
c. Pre-tag the corrugated box to identify this item and secure it in your center’s parts retention area.
All tanks should be retained whether in warranty or out of warranty.
Any damage attributed to removal, where the tank cannot be remanufactured, will be subject to a claim or core charge adjustment.