eam installation guide - questsupport-public.cfm.quest.com/44021_eam_installation_guide.pdf · this...
TRANSCRIPT

EAM 9.0.2
Installation Guide
Copyright 2017 One Identity LLC.
ALL RIGHTS RESERVED.This guide contains proprietary information protected by copyright. The software described in this guide is furnished under a software license or nondisclosure agreement. This software may be used or copied only in accordance with the terms of the applicable agreement. No part of this guide may be reproduced or transmitted in any form or by any means, electronic or mechanical, including photocopying and recording for any purpose other than the purchaser’s personal use without the written permission of One Identity LLC .The information in this document is provided in connection with One Identity products. No license, express or implied, by estoppel or otherwise, to any intellectual property right is granted by this document or in connection with the sale of One Identity LLC products. EXCEPT AS SET FORTH IN THE TERMS AND CONDITIONS AS SPECIFIED IN THE LICENSE AGREEMENT FOR THIS PRODUCT, ONE IDENTITY ASSUMES NO LIABILITY WHATSOEVER AND DISCLAIMS ANY EXPRESS, IMPLIED OR STATUTORY WARRANTY RELATING TO ITS PRODUCTS INCLUDING, BUT NOT LIMITED TO, THE IMPLIED WARRANTY OF MERCHANTABILITY, FITNESS FOR A PARTICULAR PURPOSE, OR NON-INFRINGEMENT. IN NO EVENT SHALL ONE IDENTITY BE LIABLE FOR ANY DIRECT, INDIRECT, CONSEQUENTIAL, PUNITIVE, SPECIAL OR INCIDENTAL DAMAGES (INCLUDING, WITHOUT LIMITATION, DAMAGES FOR LOSS OF PROFITS, BUSINESS INTERRUPTION OR LOSS OF INFORMATION) ARISING OUT OF THE USE OR INABILITY TO USE THIS DOCUMENT, EVEN IF ONE IDENTITY HAVE BEEN ADVISED OF THE POSSIBILITY OF SUCH DAMAGES. One Identity make no representations or warranties with respect to the accuracy or completeness of the contents of this document and reserves the right to make changes to specifications and product descriptions at any time without notice. One Identity do not make any commitment to update the information contained in this document.If you have any questions regarding your potential use of this material, contact:One Identity LLC.Attn: LEGAL Dept4 Polaris WayAliso Viejo, CA 92656Refer to our Web site (http://www.OneIdentity.com) for regional and international office information.
PatentsOne Identity is proud of our advanced technology. Patents and pending patents may apply to this product. For the most current information about applicable patents for this product, please visit our website at http://www.OneIdentity.com/legal/patents.aspx.
TrademarksOne Identity and the One Identity logo are trademarks and registered trademarks of One Identity LLC. in the U.S.A. and other countries. For a complete list of One Identity trademarks, please visit our website at www.OneIdentity.com/legal. All other trademarks are the property of their respective owners.
Legend
WARNING: A WARNING icon indicates a potential for property damage, personal injury, or death.
CAUTION: A CAUTION icon indicates potential damage to hardware or loss of data if instructions are not followed.
IMPORTANT, NOTE, TIP, MOBILE, or VIDEO: An information icon indicates supporting information.
EAM Installation GuideUpdated - November 2017Version - 9.0.2
Contents
Preface 8
Overview 9
The EAM Software Suite 9
The EAM Security Services 9
EAM Components 10
Updating EAM 11
EAM Architecture 11
EAM with an LDAP Directory 11
EAM in the Cloud 12
EAM and Your Corporate LDAP Directory Infrastructure 14
Separation of the EAM Data 14
Inter Domain and Multi Domain 15
Examples of Supported Active Directory Infrastructures 17
Multi-Domain Infrastructure 18
Active Directory + AD LDS Infrastructure 19
Preparing the Storage of Security Data in the LDAP Directory 21
Active Directory 22
Global Installation Process within an Active Directory Infrastructure 22
Extending the Schema and Setting ACLs 25
Setting Indexes on Active Directory Attributes (Optional) 35
Indexes on Standard Attributes 35
Indexes on EAM Specific Attributes 36
Configuring Secure Authentication and Data Securization 37
Active Directory + AD LDS 37
Extending the Schema of AD LDS 40
Preparing the AD LDS Instance Administrator Account 41
Setting ACLs on AD LDS 41
Setting Indexes on AD LDS Attributes 42
Setting Indexes on Standard Attributes 42
Setting Indexes on EAM Specific Attributes 42
Configuring Secure Authentication and Data Securization 43
EAM 9.0.2 Installation Guide 3

OpenLDAP 43
Extending the Schema of an OpenLDAP Directory 43
Setting ACLs on an OpenLDAP Directory 44
Setting Indexes on OpenLDAP Attributes 45
Setting Indexes on Standard Attributes 45
Setting Indexes on EAM Specific Attributes 46
Integrating SAMBA 46
Configuring Secure Authentication 47
Configuring Data Securization 48
Netscape iPlanet/Sun Java System/Red Hat/Fedora Directory Server 49
Extending the Schema of a Netscape iPlanet/Sun Java System/Red Hat/Fedora Directory Server 49
Setting ACLs on a Netscape iPlanet/Sun Java System/Red Hat/Fedora Directory Server 50
Standard Storage Mode 50
Cooperative Storage Mode 51
Setting Indexes on Netscape iPlanet/Sun Java System/Red Hat/Fedora Directory Server Attributes 52
Setting Indexes on Standard Attributes 52
Setting Indexes on EAM Specific Attributes 53
Configuring Secure Authentication 54
Configuring Data Securization 54
Novell eDirectory 56
Extending the Schema of a Novell eDirectory 56
Setting ACLs for Delegation (Optional) 56
Setting Indexes on Novell eDirectory Attributes 57
Setting Indexes on Standard Attributes 57
Setting Indexes on EAM Specific Attributes 58
Configuring Secure Authentication (Optional) 59
Configuring Data Securization 60
IBM Tivoli Directory Server 61
Extending the Schema of an IBM Tivoli Directory Server 61
Setting ACLs on an IBM Tivoli Directory Server 61
Setting Indexes on IBM Tivoli Directory Server Attributes 62
Configuring Secure Authentication 62
Configuring Data Securization 63
EAM 9.0.2 Installation Guide 4

Atos DirX Directory 64
Directory Requirements 64
Extending the Schema of an Atos DirX Directory 64
Setting ACLs on an Atos DirX Directory 65
Managing Anonymous Access Denial 65
Deploying a Workstation LDAP User Account 66
Installing EAM Controllers and Audit Databases 68
Starting the Administration Tools window 68
Running the Default Objects Creation Tool 70
Initializing the Primary Controller 71
Initializing an Associated Controller 73
Publishing a New Token Data File 73
Defining Administrative Tokens for Self Service Password Request 74
Importing an External Key 74
Importing/Exporting the Controller Key 75
Installing and Configuring the Audit Databases 76
Creating Audit V2 Tables in an Existing Local Audit Database 79
Setting up the Connection to the Local Audit Database 81
Defining a Master Audit Database 83
Updating the Audit Translation Data 88
Preparing the EAM Controller Configuration 90
Declaring the Technical Accounts Used by the EAM Controllers 90
Securing the EAM Web Service 90
Setting the Primary Administrator 91
Defining the Password for the Provisioning Connector Account 92
Installing EAM Controller Software 93
Installing the Reporting Service 95
Installing the Reporting Service on a MySQL Database 97
Preparing the Installation 97
Executing the Installation 98
Installing the Reporting Service on an (Microsoft) SQL Server Database 101
Preparing the Installation 101
Executing the Installation 101
Installing and Configuring the Software Modules on the Workstations 105
EAM 9.0.2 Installation Guide 5

Configuring Workstations 106
EAM Configuration with Active Directory 106
EAM Configuration with a User Database or Directory other than Microsoft Active Directory 109
Installing Microsoft Redistributable 113
Installing an EAM Client 113
Installing Cloud E-SSO 118
Installing French Healthcare Smart Cards (CPS) 120
Activating Smart Card Readers and PCSC on Remote Workstations 121
Installing Finger Vein Biometric Drivers 122
Modifying the Possible Domains List 123
Enabling the Self Service Password Request (SSPR) Feature 124
Installing the Self Service Password Request 124
Installing on an Apache server 124
Installing on an IIS server 129
Installing the IIS Server 129
Registering the .Net Framework to IIS 129
Providing Registry Access to IIS 130
Checking the .NET Application and Rights 130
Executing the SSPR Installation with IIS 132
Configuring the IIS Web Site 134
Replacing the private key and certificate of the SSPR server 136
Enabling the "unlocking of a user primary account" feature 137
Enabling One-Time Password (OTP) Authentication 139
RSA Authentication Manager 139
RADIUS plugin 141
Enabling the Group Membership Modification Feature 143
Centralizing Parameters Using Group Policy Objects (GPO) 145
Creating and Configuring Group Policy Objects Using ADMX Files 146
Description of the EAM Administrative Template 147
Installing EAM MSI Packages in Silent Mode 164
Installing Microsoft Redistributable in Silent Mode 165
Installing EAM Controller in Silent Mode 166
Installing EAM Client in Silent Mode 168
EAM 9.0.2 Installation Guide 6

Installing Cloud E-SSO in Silent Mode 174
Installing EAM Web Server in Silent Mode 175
Installing HLLAPI Wrapper in Silent Mode (64-bit clients only) 176
Enhancing EAM 178
Enhancing Security 178
Encrypting the LDAP Connection 178
Deactivating the Web Service Role on a Controller 178
Encrypting the Client Workstation/Controller Connection 179
Enhancing Performance 179
Activating Traces 181
Retrieving the Serial Number on MiFARE and MiFARE DESFire RFID Badges 184
Parameters Description 185
Configuring the MiFARE and MiFARE DESFire RFID Parameters 188
Resetting the MiFARE and DESFire RFID Parameters 190
About us 191
Contacting us 191
Technical support resources 191
EAM 9.0.2 Installation Guide 7

Preface
Subject This guide describes how to install and configure Enterprise Access Management (EAM); which gathers Authentication Manager and Enterprise SSO modules.
Audience This guide is intended for:
l System Integrators.
l Administrators.
Required Software EAM 9.0 evolution 2 and later versions. For more information about the versions of the required operating systems and software solutions quoted in this guide, please refer to One Identity EAM Release Notes.
Typographical Conventions
Bold Indicates:
l Interface objects, such as menu names, buttons, icons and labels.
l File, folder and path names.
l Keywords to which particular attention must be paid.
Italics - Indicates references to other guides.
Code - Indicates portions of program codes, command lines or messages displayed in command windows.
CAPITALIZATI ON Indicates specific objects within the application (in addition to standard capitalization rules).
< > Identifies parameters to be supplied by the user.
WARNING: A WARNING icon indicates a potential for property damage, personal injury, or death.
CAUTION: A CAUTION icon indicates potential damage to hardware or loss of data if instructions are not followed.
IMPORTANT, NOTE, TIP, MOBILE, or VIDEO: An information icon indicates supporting information.
Documentation support
The information contained in this document is subject to change without notice. As our products are continuously enhanced, certain pieces of information in this guide can be incorrect. Send us your comments or suggestions regarding the documentation on the One Identity support website.
EAM 9.0.2 Installation Guide
Preface8

1
Overview
Enterprise Access Management solution enables you to deploy a high level of security. It uses the corporate LDAP directory of your company to manage Single Sign-On (SSO) on this distributed LDAP architecture. Enterprise Access Management also provides Single Sign-On in the Cloud, allowing to save SSO data in the Cloud instead of the LDAP directory of your company.
This guide explains how to install Enterprise Access Management, or EAM, (EAM gathers Authentication Manager and Enterprise SSO modules).
The EAM Software Suite
The EAM Security Services
EAM is composed of several software applications, which run through a middleware, called the EAM Security Services. It is a Windows service, which is automatically installed during the EAM installation process. It provides the following services:
l Authentication (by passwords, smart cards, USB tokens, biometrics, mobile devices...).
l Single Sign-On: retrieval of the SSO policy and management of the users’ secure SSO data depending on the authentication method.
l Administration: daily administration tasks and creation and management of the SSO policy.
l Audit.
IMPORTANT: The EAM applications do not run directly with the LDAP directory of your company with your users’ tokens. All the operations are performed by the Security Services, in a secure system environment.
The Security Services work directly with the corporate LDAP directory, except for the audit and administration services, for which it can use the EAM Controller.
EAM 9.0.2 Installation Guide
Overview9

EAM Components
Enterprise SSO
Enterprise SSO is the single sign-on (SSO) engine. It is installed on the client workstations. This software module offers many optional components.
Authentication Manager
Authentication Manager software module allows you to enforce users’ authentication and to use other authentication sources than Active Directory. When installed, it is used instead of the standard Windows log on dialog box.
Authentication Manager allows users to log on their workstation using several authentication methods, as login/password, smart cards, biometrics or mobile phone authentication methods.
It allows you also to manage primary authentication policies: authentication methods authorized by workstations or by users.
EAM Controller
The EAM Controller is an administration server that enables the management of administration profiles.
The administration actions are not directly sent from the workstations to the LDAP account of the EAM administrator, but through the EAM Controller: upon the EAM installation, you will have to define an LDAP account that will be used by the EAM Controller to perform any EAM administration action on the LDAP directory.
You do not have to set different ACLs depending on the EAM administrators. You just have to set ACLs only once, on the LDAP account used by the EAM Controller, which manages the administration requests depending on the administration profiles defined using EAM Console.
The EAM Controller runs also as the EAM audit server. It retrieves audit information of the EAM workstations in an SQL database. The pieces of audit data are available through EAM Console, either globally, or contextually (that is depending on the selected audited EAM object).
EAM Console
EAM Console is a centralized administration and audit consultation tool that can be installed on any EAM workstation client. This administration console allows you also to define extended security policies by managing Access Points, and by defining authentication scheduling.
NOTE: For details on supported authentication devices, see One Identity EAM Release NotesReplace this text with a description of a feature that is noteworthy.
EAM 9.0.2 Installation Guide
Overview10
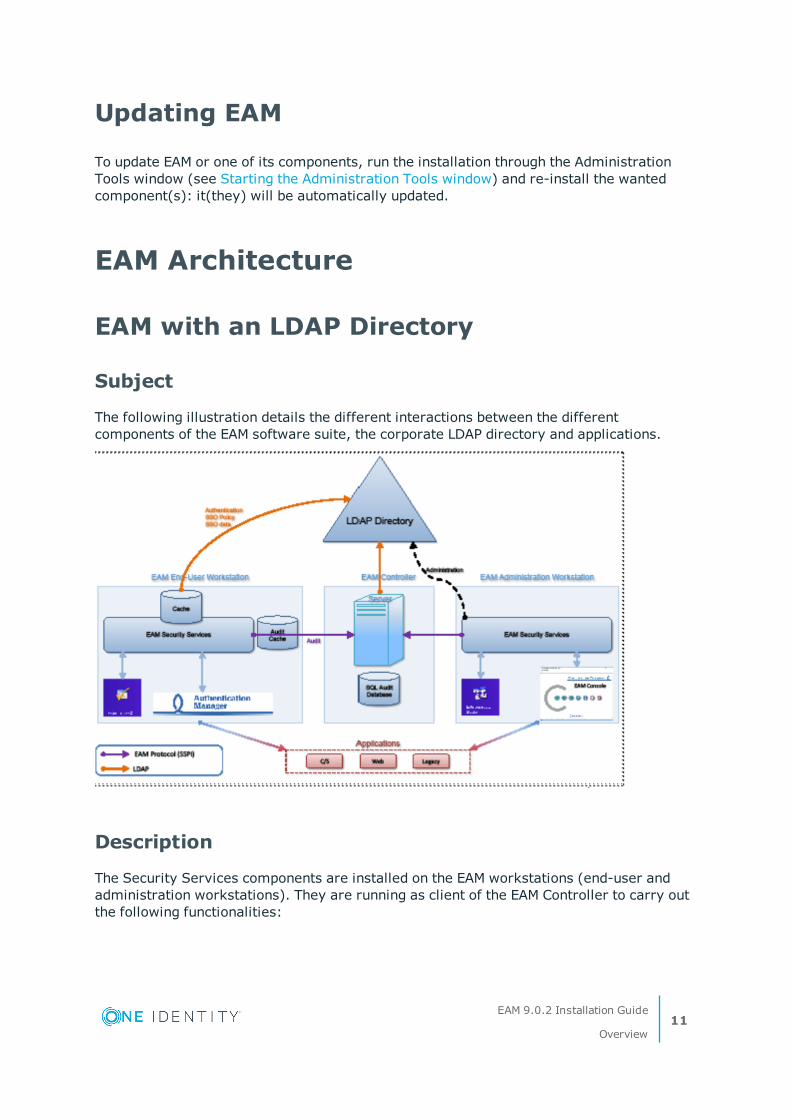
Updating EAM
To update EAM or one of its components, run the installation through the Administration Tools window (see Starting the Administration Tools window) and re-install the wanted component(s): it(they) will be automatically updated.
EAM Architecture
EAM with an LDAP Directory
Subject
The following illustration details the different interactions between the different components of the EAM software suite, the corporate LDAP directory and applications.
Description
The Security Services components are installed on the EAM workstations (end-user and administration workstations). They are running as client of the EAM Controller to carry out the following functionalities:
EAM 9.0.2 Installation Guide
Overview11

l Sending Audit events.
l Enabling the administration of the EAM security objects.
It allows EAM users to authenticate to their corporate LDAP directory, either using their usual authentication interface, or using Authentication Manager if installed on the workstation.
The authentication allows EAM users to:
l Get the SSO security policies stored in the directory.
l Get their specific container used to store their SSO data.
l Get cipher keys to secure their stored SSO data. Each EAM user has a unique key pair.
The EAM Controller gathers all the audit events sent by the EAM workstations in an SQL database.The link between the EAM workstations and the EAM Controller is secure (SSPI). An audit cache located on the EAM workstation manages network flows and stores the audit events if the workstation is disconnected from the network.
In disconnected mode, the administration actions are no longer carried out by the EAM applications (through the Security Services running as client of the EAM Controller), but directly by the EAM Controller.
EAM in the Cloud
Subject
The following illustration details the different interactions between the different components of the EAM software suite, the Cloud and applications.
EAM 9.0.2 Installation Guide
Overview12

Description
Only Enterprise SSO is installed on the user’s workstation, along with the E-SSO cache. Instead of being stored in the company’s LDAP directory, the SSO data as well as the other components are stored in the Cloud.
IMPORTANT: To create technical definitions on applications available on customer site only, Enterprise-SSO in registry mode is mandatory.
The user authenticates with his e-mail address and his Cloud password; the latter is locally stored on his workstation. The user has to enter it only once per workstation.
EAM 9.0.2 Installation Guide
Overview13

NOTE:
The password can also be stored encrypted in the LDAP directory by activating the following registry key on the client workstation: HKLM\SOFTWARE\Policies\Enatel\SSOWatch\CommonConfig\CloudADAttribute, which contains the name of the attribute of type OCTET STRING of the user class objects. The user must be able to modify the value of this attribute; therefore it is recommended to create an attribute dedicated to Cloud E-SSO.When this option is activated, Enterprise SSO is available on all the workstations of the company without any password to enter.
The SSO data is then downloaded through an HTTPS request sent to a Web service. The URL of this Web service is written during the installation under the following registry value:
HKEY_LOCAL_MACHINE\SOFTWARE\Enatel\SSOWatch\CommonConfig\DefaultCloudServer REG_SZ
The SSO Data is stored in C:\Users\username\AppData\Local\Evidian\EAM.
For more information on installing Cloud E-SSO, see Installing Cloud E-SSO.
EAM and Your Corporate LDAP Directory Infrastructure
Since EAM works directly with the directory in place to deploy the SSO policies, you must take into account your directory infrastructure before starting the installation process. The following sub-sections introduces EAM concepts related with directory infrastructure, and provides examples that may correspond to your situation.
Separation of the EAM Data
Subject
Depending on your LDAP directory infrastructure, you may not want to modify the schema of your corporate LDAP directory. In this case, it is possible to separate the storage of the EAM data.
NOTE: This feature is available with some of the LDAP directories supported by EAM. For details, see One Identity EAM Release Notes.
EAM 9.0.2 Installation Guide
Overview14

Example
For example, if you are using an Active Directory infrastructure, you can use an AD LDS (formerly named ADAM) directory to store the EAM configuration and the SSO data. In this mode, the Active Directory service is the identities directory, and AD LDS is an EAM dedicated directory used to store EAM data.
NOTE: The authentication process is not modified, as a user who authenticates to an Active Directory service can authenticate to an AD LDS service using the same creden-tials, through the Kerberos SSO mechanisms.
AD LDS Architecture
The following illustration shows an EAM architecture using an Active Directory service combined with an EAM dedicated AD LDS (formerly named ADAM) infrastructure.
Inter Domain and Multi Domain
Subject
This section introduces two EAM specific concepts dealing with Active Directory infrastructures: inter domain and multi domain.
NOTE:These concepts imply that your directory infrastructure is not a single domain infrastructure.
EAM 9.0.2 Installation Guide
Overview15

Inter-Domain
The inter domain concept refers to the EAM users. It consists in setting up EAM so that a user of one domain can authenticate on workstations of another domain.
For example, to set up EAM inter domain, you must follow the following requirements:
l A relationship trust must be set up between the domains.
l Users’ workstations must be members of their respective domains.
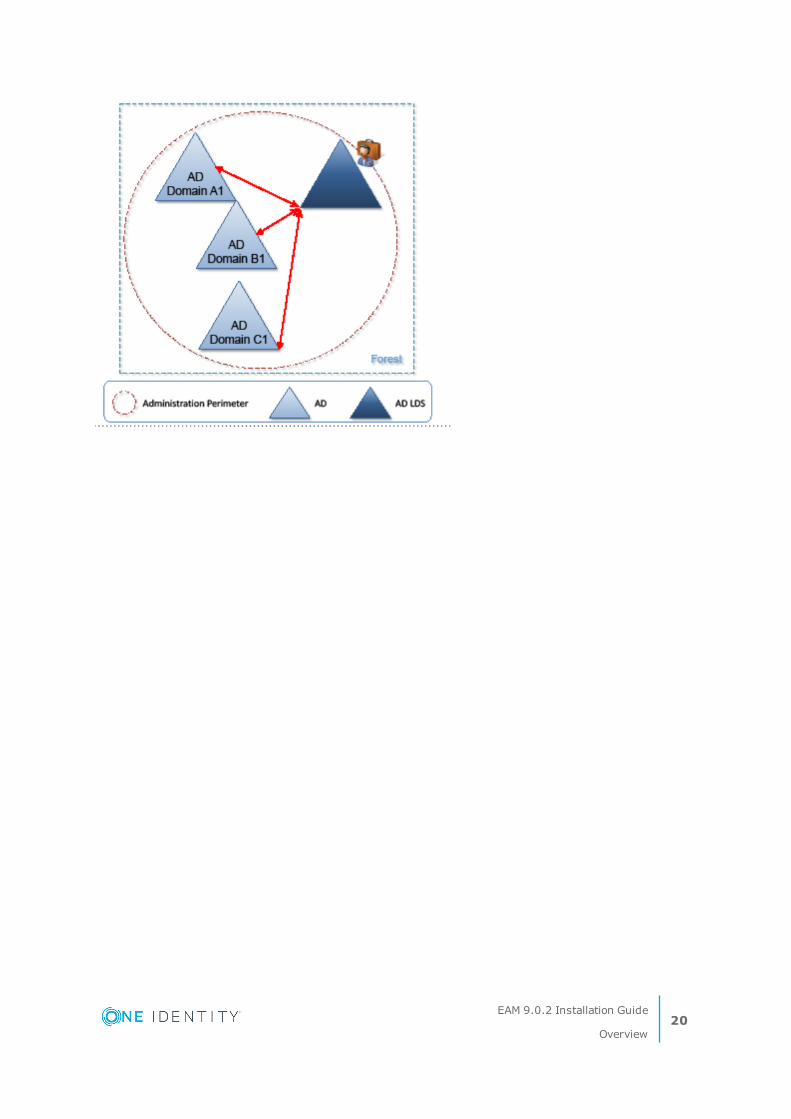
Multi-Domain
The multi domain concept refers to the EAM administrators. It consists in setting up EAM so that an EAM administrator can manage several domains at the same time using the EAM administration console.
The following illustration shows an EAM solution running in a multi domain configuration.
NOTE: Inter-domain can exist in a multi-domain configuration.
EAM 9.0.2 Installation Guide
Overview16

For an example of AD+AD LDS multi domain infrastructure, see Active Directory + AD LDS Infrastructure.
Examples of Supported Active Directory Infrastructures
Consider the following Active Directory infrastructure:
In this organization, the Active Directory infrastructure consists of the following:
l Two Forests: Forest 1 and Forest 2.
l Forest 1 is composed as follows:
l Domain A1 is the root domain.
l Domain B1 is the child domain of the parent domain Domain A1.
l Domain C1 is the child domain of the parent domain Domain B1.
EAM 9.0.2 Installation Guide
Overview17
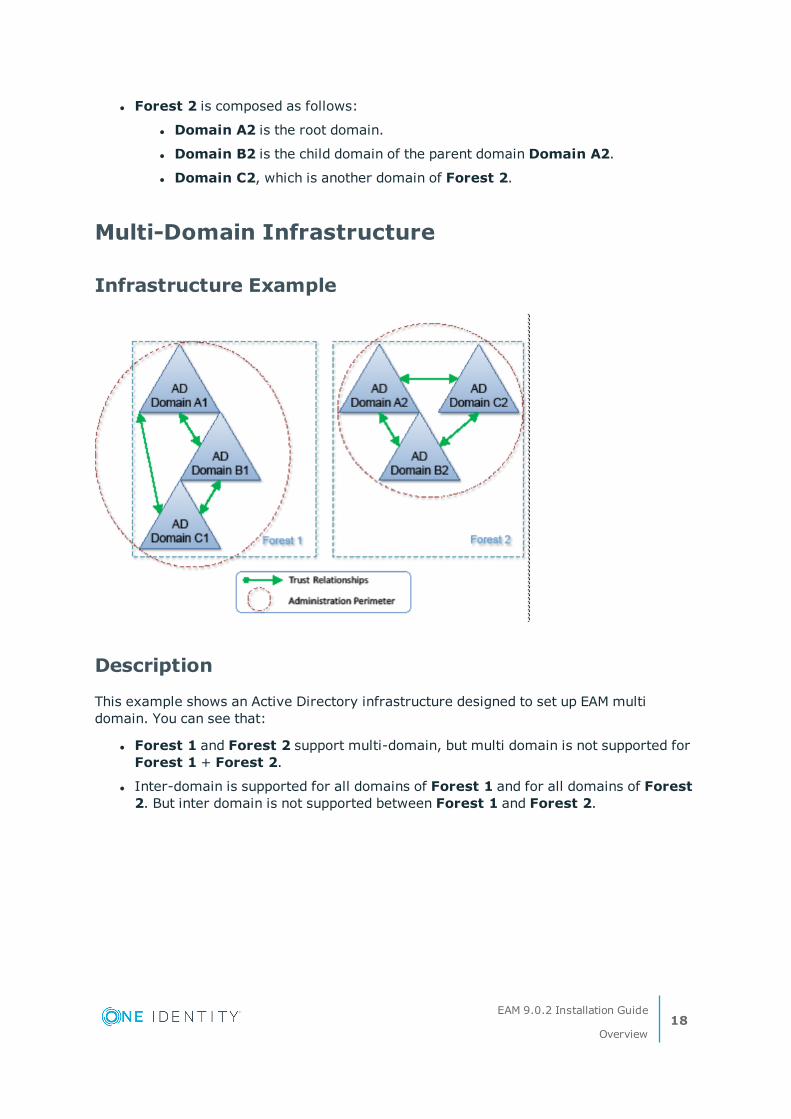
l Forest 2 is composed as follows:
l Domain A2 is the root domain.
l Domain B2 is the child domain of the parent domain Domain A2.
l Domain C2, which is another domain of Forest 2.
Multi-Domain Infrastructure
Infrastructure Example
Description
This example shows an Active Directory infrastructure designed to set up EAM multi domain. You can see that:
l Forest 1 and Forest 2 support multi-domain, but multi domain is not supported for Forest 1 + Forest 2.
l Inter-domain is supported for all domains of Forest 1 and for all domains of Forest 2. But inter domain is not supported between Forest 1 and Forest 2.
EAM 9.0.2 Installation Guide
Overview18

Active Directory + AD LDS Infrastructure
AD + AD LDS Infrastructure
The following example shows an Active Directory infrastructure combined with an EAM dedicated AD LDS infrastructure. You can see that there is one AD LDS instance for one Active Directory domain.
AD + AD LDS Multi Domain Infrastructure
The following example infrastructure shows an AD LDS infrastructure with AD multi domain.
EAM 9.0.2 Installation Guide
Overview19
EAM 9.0.2 Installation Guide
Overview20
2
Preparing the Storage of Security Data in the LDAP Directory
Subject
To implement the EAM environment, you have to create objects used by EAM in the LDAP directory. These objects will allow you to create security rules and to store the users’ single sign-on data. These pieces of data are ciphered.
EAM supports the following types of LDAP directory for storing user security data:
l Active Directory.
l Active Directory Lightweight Directory Services (AD LDS - formerly named ADAM)
l Netscape iPlanet/Sun Java System/Red Hat/Fedora Directory Server.
l OpenLDAP Directory Server.
l Novell eDirectory.
l IBM Tivoli Directory Server (ITDS).
l Atos DirX Directory.
NOTE:For information on the supported versions of the listed LDAP directories, see One Identity EAM Release Notes.
EAM 9.0.2 Installation Guide
Preparing the Storage of Security Data in the LDAP Directory21

Active Directory
Global Installation Process within an Active Directory Infrastructure
Subject
Depending on your Active Directory infrastructure, you may have to install several types of EAM Controllers. This section describes a multi domain architecture example. This may help you define your own software architecture depending on your requirements.
Definitions
There are three types of controllers that you can or must install depending on your needs:
l The primary controller is mandatory. It corresponds to the first server that you install in a domain.
l Secondary controllers, which correspond to other servers that you install in the same directory domain as the primary controller. Secondary controllers are redundant servers: if a controller is unavailable for any reason, user and administrator stations will just connect to another available controller:
l If you are working in a multi-domain environment, you must install Associated controllers. These controllers are always installed after the primary controller, in
EAM 9.0.2 Installation Guide
Preparing the Storage of Security Data in the LDAP Directory22
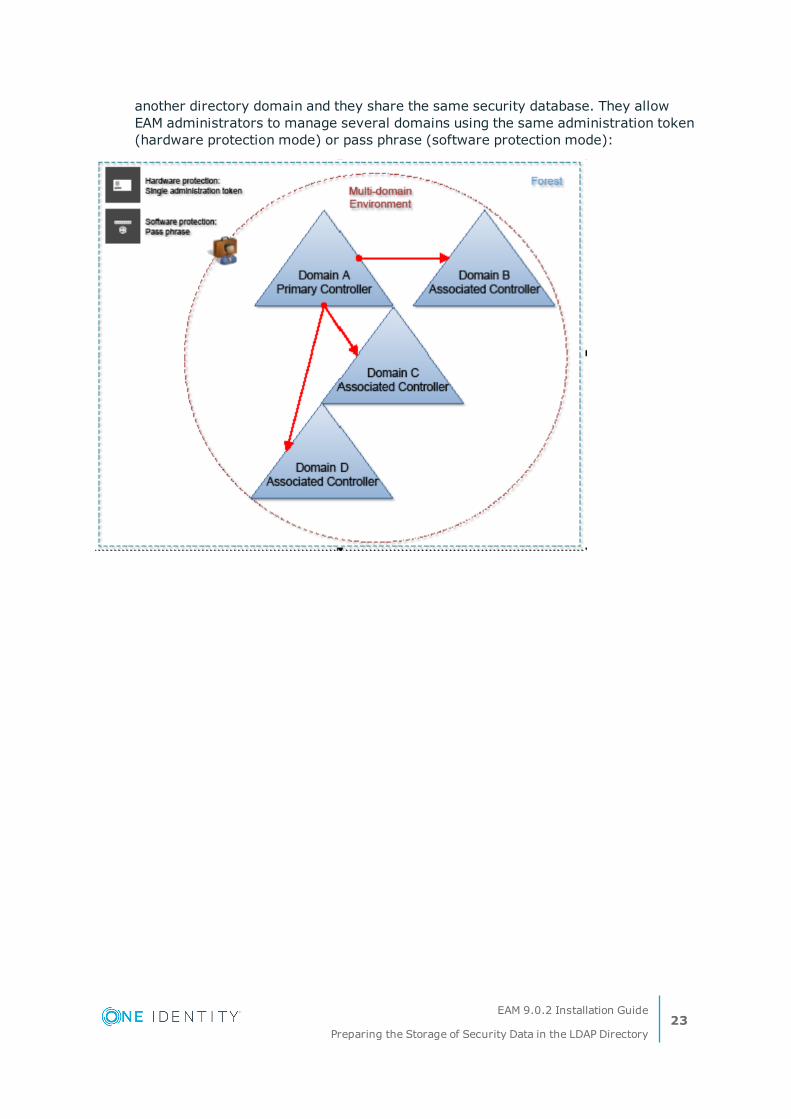
another directory domain and they share the same security database. They allow EAM administrators to manage several domains using the same administration token (hardware protection mode) or pass phrase (software protection mode):
EAM 9.0.2 Installation Guide
Preparing the Storage of Security Data in the LDAP Directory23
Multi Domain Architecture Example
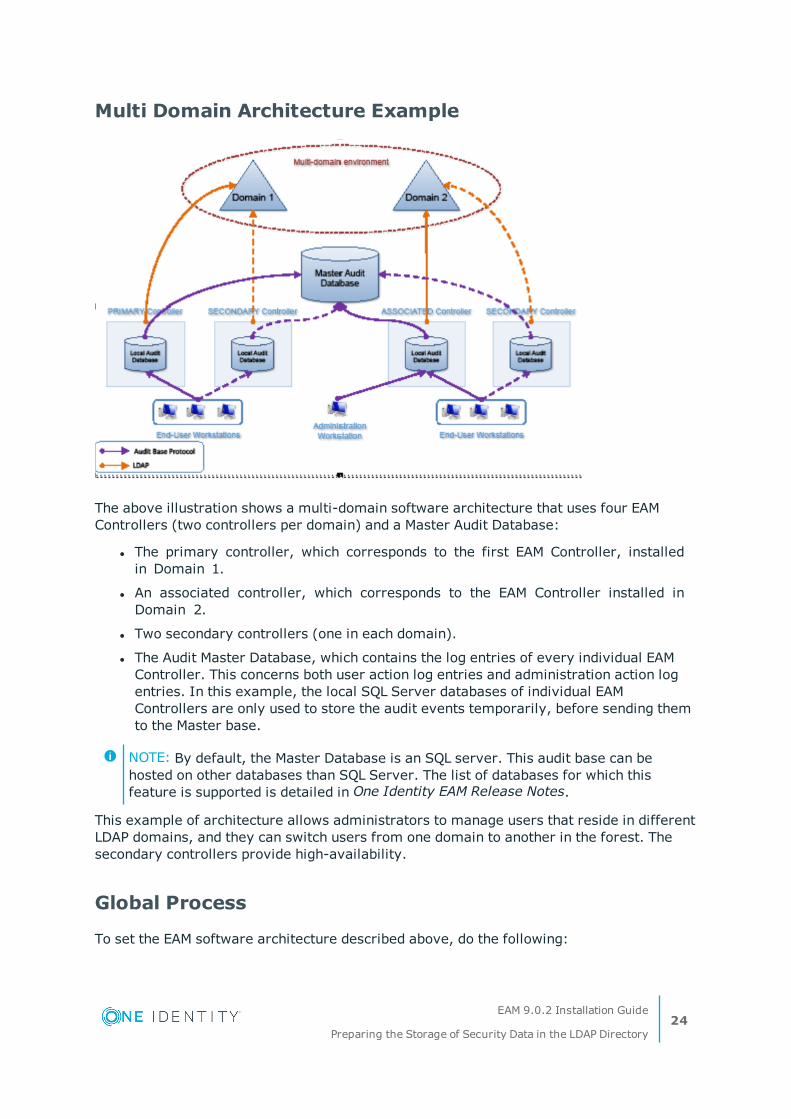
The above illustration shows a multi-domain software architecture that uses four EAM Controllers (two controllers per domain) and a Master Audit Database:
l The primary controller, which corresponds to the first EAM Controller, installed in Domain 1.
l An associated controller, which corresponds to the EAM Controller installed in Domain 2.
l Two secondary controllers (one in each domain).
l The Audit Master Database, which contains the log entries of every individual EAM Controller. This concerns both user action log entries and administration action log entries. In this example, the local SQL Server databases of individual EAM Controllers are only used to store the audit events temporarily, before sending them to the Master base.
NOTE: By default, the Master Database is an SQL server. This audit base can be hosted on other databases than SQL Server. The list of databases for which this feature is supported is detailed in One Identity EAM Release Notes.
This example of architecture allows administrators to manage users that reside in different LDAP domains, and they can switch users from one domain to another in the forest. The secondary controllers provide high-availability.
Global Process
To set the EAM software architecture described above, do the following:
EAM 9.0.2 Installation Guide
Preparing the Storage of Security Data in the LDAP Directory24
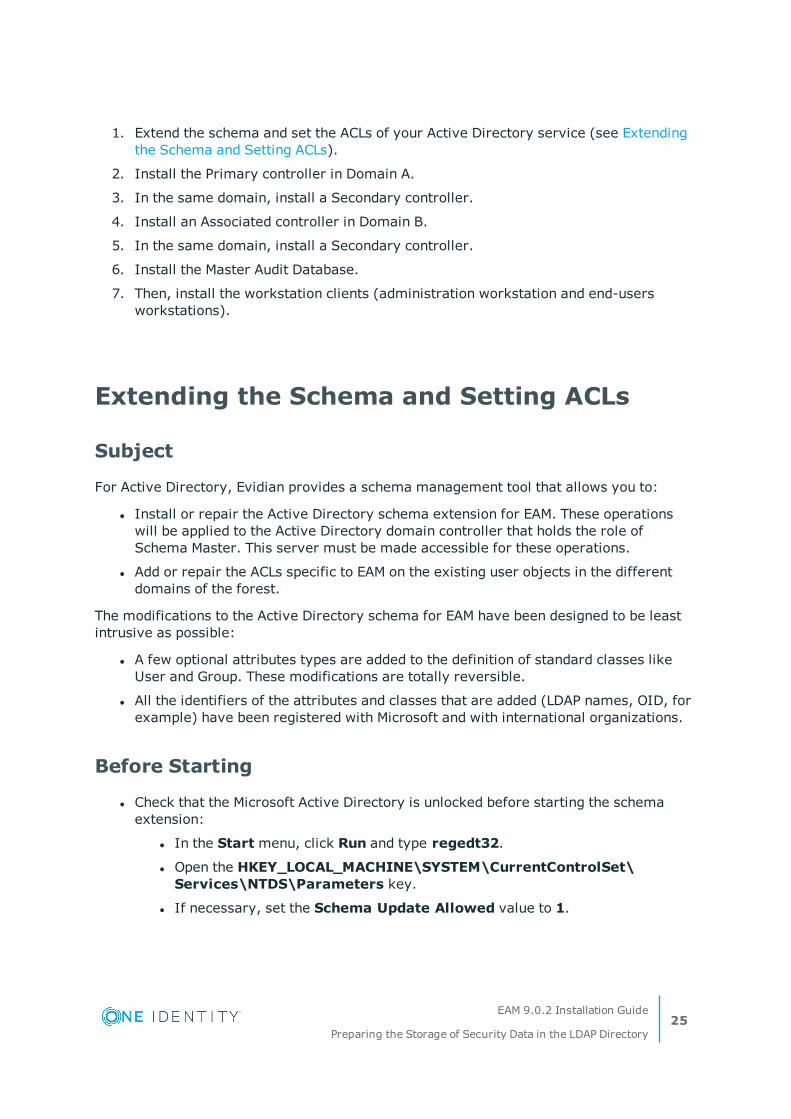
1. Extend the schema and set the ACLs of your Active Directory service (see Extending the Schema and Setting ACLs).
2. Install the Primary controller in Domain A.
3. In the same domain, install a Secondary controller.
4. Install an Associated controller in Domain B.
5. In the same domain, install a Secondary controller.
6. Install the Master Audit Database.
7. Then, install the workstation clients (administration workstation and end-users workstations).
Extending the Schema and Setting ACLs
Subject
For Active Directory, Evidian provides a schema management tool that allows you to:
l Install or repair the Active Directory schema extension for EAM. These operations will be applied to the Active Directory domain controller that holds the role of Schema Master. This server must be made accessible for these operations.
l Add or repair the ACLs specific to EAM on the existing user objects in the different domains of the forest.
The modifications to the Active Directory schema for EAM have been designed to be least intrusive as possible:
l A few optional attributes types are added to the definition of standard classes like User and Group. These modifications are totally reversible.
l All the identifiers of the attributes and classes that are added (LDAP names, OID, for example) have been registered with Microsoft and with international organizations.
Before Starting
l Check that the Microsoft Active Directory is unlocked before starting the schema extension:
l In the Start menu, click Run and type regedt32.
l Open the HKEY_LOCAL_MACHINE\SYSTEM\CurrentControlSet\Services\NTDS\Parameters key.
l If necessary, set the Schema Update Allowed value to 1.
EAM 9.0.2 Installation Guide
Preparing the Storage of Security Data in the LDAP Directory25

NOTE: You do not have to restart your computer..
l EAM requires at least one dedicated user account to extend the Active Directory schema and to apply ACLs on the domain. This account must exist before starting the installation procedure, as the wizard will prompt you for account credentials.
So make sure you have a user account in the Active Directory forest which allows you to:
l Modify the Active Directory schema (members of the Schema Admins group have this right).
l Apply EAM ACLs on your domain (members of the Domain Admins group have this right).
NOTE: You are advised to use only one account that is at the same time member of the Schema Admins and of the Domain Admins groups. If it is not possible (depending on your Active Directory design), you can use two different accounts.
l Each EAM Controller requires one dedicated user account to perform operations on the directory (such as the execution of administration requests, read and save operations on audit events, modifications on EAM objects). To simplify the configuration and the use of the solution, it is strongly recommended to gather these dedicated user accounts in Local groups, as detailed in the following procedure.
NOTE:
l You may find the term "technical account" throughout this manual. We use this term to designate these EAM Controllers dedicated accounts.
l You may find the term "technical account" throughout this manual. We use this term to designate these EAM Controllers dedicated accounts
1. Start Active Directory Users and Computers.
2. Create one Local Group for each domain of the forest.
3. Create one technical account for each EAM Controller that you will install on the domain, and define it as a member of the Local Group just created.
EAM 9.0.2 Installation Guide
Preparing the Storage of Security Data in the LDAP Directory26

l
IMPORTANT:
For each technical account, enable the Password never expires option.
Each technical account must have the SE_RESTORE_NAME privilege. To be sure about it, add the technical account in the Backup Operators group of each domain.Each technical account must have the right to force the password change of users. To assign this right, using Active Directory Users and Computers, start the Delegation of Control wizard (right-click the container(s) where the users that will have their passwords reset are located and select Delegate control), and delegate control of the following common task: Reset user passwords and force password change at next logon. Repeat the same operation on the AdminSDHolder container.In multi-domain mode, each technical account must be included in the other local groups..
l Start Active Directory Sites and Services and for each domain controller of your forest, select NTDS Settings, then, in the right panel, right-click the connection objects and select Replicate now, as shown below:
l If you are setting-up an inter-domain Active Directory infrastructure, you may have to deploy a domain account for WGSS to do LDAP requests to avoid Kerberos-related problems, as described in Deploying a Workstation LDAP User Account.
l Windows 2000 Service Pack 2 servers only: if the Schema Master (which is the domain controller on which the schema extension operation is performed) is a Windows 2000 Service Pack 2 server, you must define, on each of your workstation clients, the UseCustomApplicationClass registry variable (DWORD) with value 1, in HKLM\Software\Enatel\Framework\Directory or HKLM\Software\Policies\Enatel\Framework\Directory.
EAM 9.0.2 Installation Guide
Preparing the Storage of Security Data in the LDAP Directory27
Procedure
IMPORTANT: If you are installing EAM in multi-domain mode, read the following:
l You must extend the schema and set ACLs only to install the EAM primary controller.
l To install an associated controller, you just have to set ACLs.
l Do not use this tool to install a secondary controller.
1. On the domain controller where you want to install the primary or the associated EAM controller, open the root folder of the Authentication Manager or Enterprise SSO installation package and run start.hta.
The EAM installation window appears.
NOTE: If the window does not appear, do the following:
l Browse the downloaded installation package and open the folder corres-ponding to your Windows system processor: E-SSO for 32 bits processors and E-SSO.x64 for 64 bits processors.
l Browse the TOOLS directory, and run WGAdSetup\WGADSetup.exe, and go to Step 4 of the current procedure.
2. In the Advanced Installation area, click one of the following, depending on your Windows system processor:
l Enterprise Access Management services: for 32 bits processors.
l Enterprise Access Management services - x64: for 64 bits processors.
The Administration Tools interface appears:
EAM 9.0.2 Installation Guide
Preparing the Storage of Security Data in the LDAP Directory28
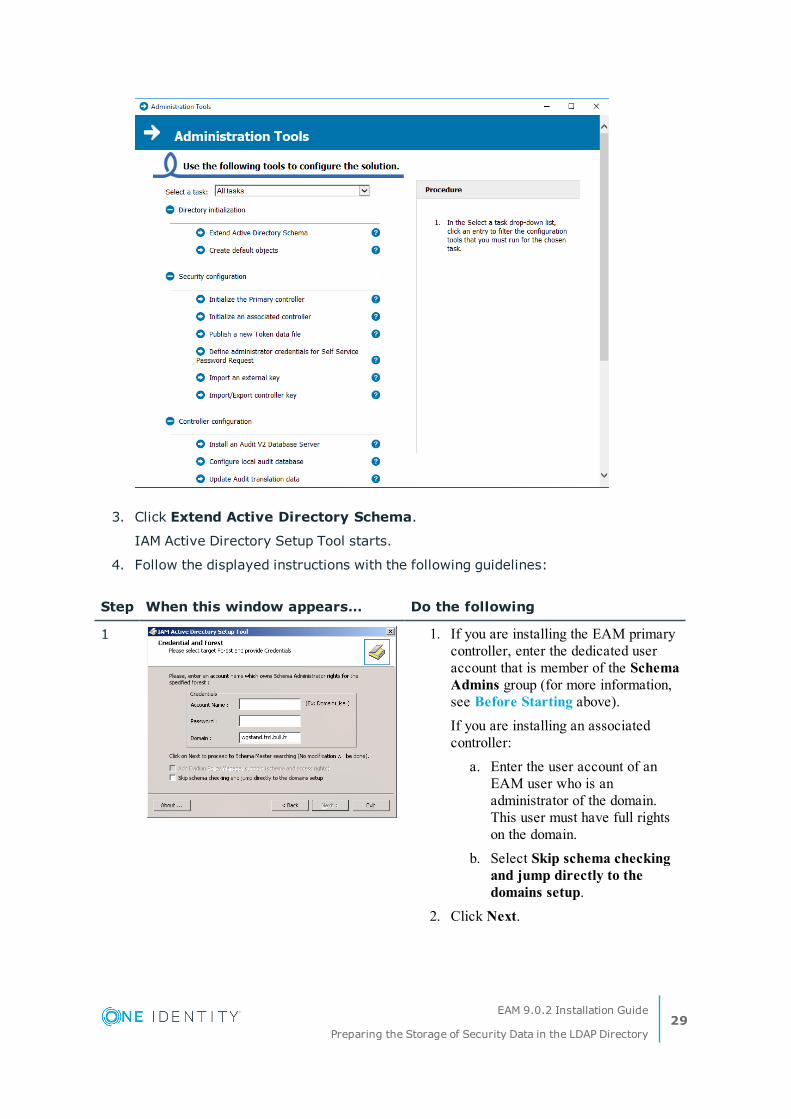
3. Click Extend Active Directory Schema.
IAM Active Directory Setup Tool starts.
4. Follow the displayed instructions with the following guidelines:
Step When this window appears… Do the following
1 1. If you are installing the EAM primary controller, enter the dedicated user account that is member of the Schema Admins group (for more information, see Before Starting above).If you are installing an associated controller: a. Enter the user account of an
EAM user who is an administrator of the domain. This user must have full rights on the domain.
b. Select Skip schema checking and jump directly to the domains setup.
2. Click Next.
EAM 9.0.2 Installation Guide
Preparing the Storage of Security Data in the LDAP Directory29

Step When this window appears… Do the following
2 Click Next.
3 Click Next.
4 Click Yes.
5 At this step, the Active Directory schema extension is done. Click Next.
EAM 9.0.2 Installation Guide
Preparing the Storage of Security Data in the LDAP Directory30

Step When this window appears… Do the following
6 At this step, you have two possibilities:
l If the user account declared at Step 1 is also a member of the Domain Admins group, click Next and see Step 8.
l If not, change the user account: click Exit, restart the wizard and see Step 7.
7 1. Enter a user account that is member of the Domain Admins group (for more information, see Before Starting above).
2. Select Skip schema checking and jump directly to the domains setup.
3. Click Next.
8 1. Check that the selected domain is correct.
2. Click Next.
EAM 9.0.2 Installation Guide
Preparing the Storage of Security Data in the LDAP Directory31
Step When this window appears… Do the following
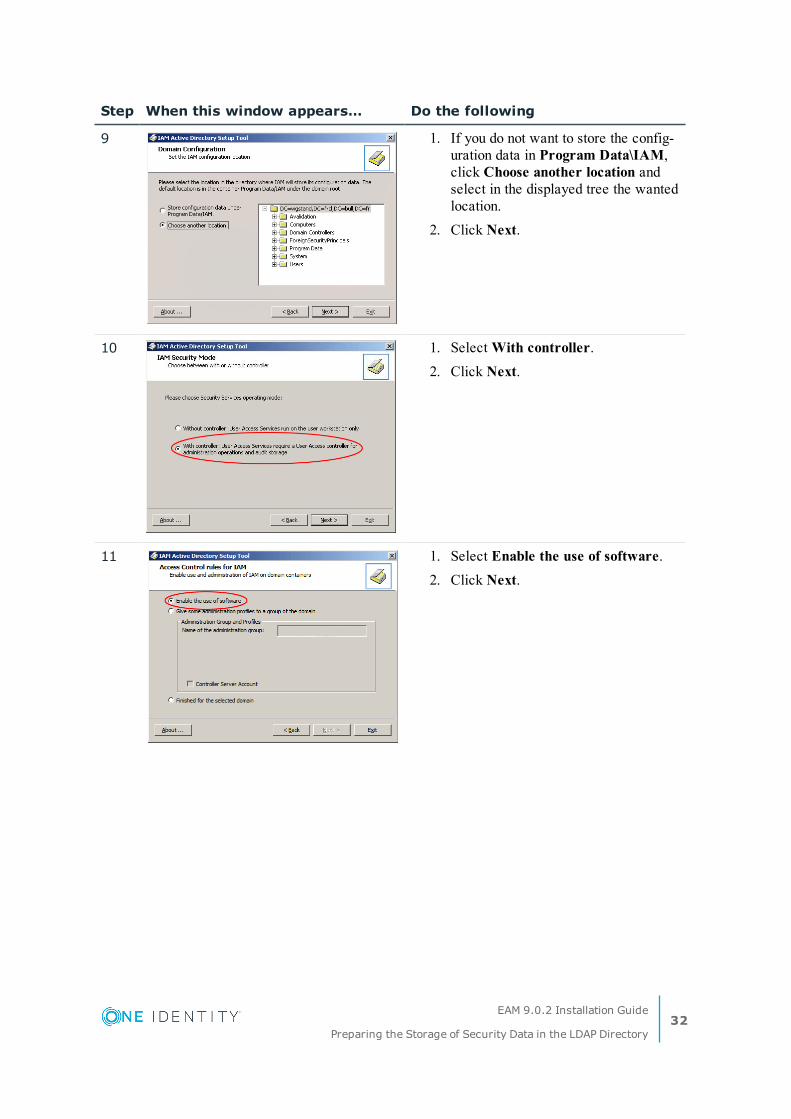
9 1. If you do not want to store the config-uration data in Program Data\IAM, click Choose another location and select in the displayed tree the wanted location.
2. Click Next.
10 1. Select With controller. 2. Click Next.
11 1. Select Enable the use of software. 2. Click Next.
EAM 9.0.2 Installation Guide
Preparing the Storage of Security Data in the LDAP Directory32

Step When this window appears… Do the following
12 1. Read carefully the displayed instructions. As explained, it is strongly recommended to select Enable (or Keep, in case of update) the access control for members of protected groups.
2. Click Next.
13 1. Select the mandatory container Program Data\IAM or the location where you store the configuration data.
2. Select the following containers: l The Users and Groups who
will use EAM. l The SSO Applications and SSO
Objects. l The computers where EAM is
installed. 3. Click Apply changes. 4. Click Next.
14 If you have created a Local Group to gather the technical accounts used by the EAM controller (for more information, see Before Starting above), select Give some administration profiles to a group of the domain and enter the Group name. Then, select the Controller Server Account check box and click Next.Otherwise, see Step 17.
EAM 9.0.2 Installation Guide
Preparing the Storage of Security Data in the LDAP Directory33
Step When this window appears… Do the following
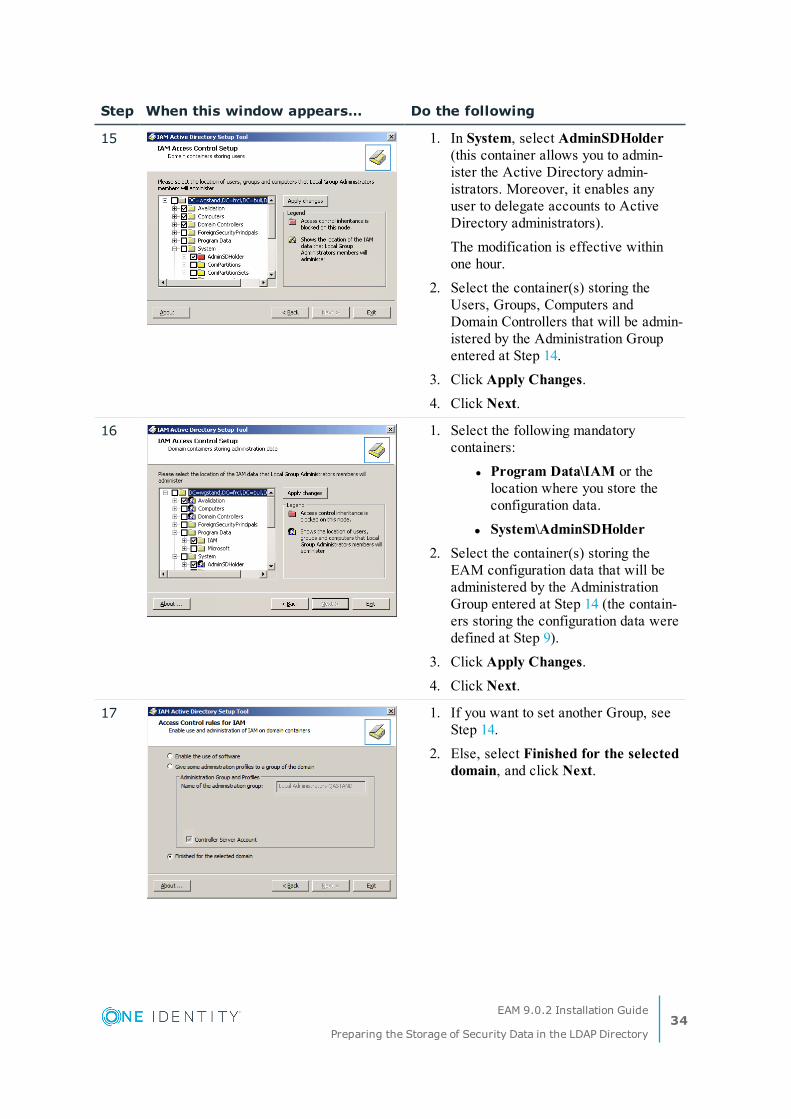
15 1. In System, select AdminSDHolder (this container allows you to admin-ister the Active Directory admin-istrators. Moreover, it enables any user to delegate accounts to Active Directory administrators).The modification is effective within one hour.
2. Select the container(s) storing the Users, Groups, Computers and Domain Controllers that will be admin-istered by the Administration Group entered at Step 14.
3. Click Apply Changes. 4. Click Next.
16 1. Select the following mandatory containers:
l Program Data\IAM or the location where you store the configuration data.
l System\AdminSDHolder 2. Select the container(s) storing the
EAM configuration data that will be administered by the Administration Group entered at Step 14 (the contain-ers storing the configuration data were defined at Step 9).
3. Click Apply Changes. 4. Click Next.
17 1. If you want to set another Group, see Step 14.
2. Else, select Finished for the selected domain, and click Next.
EAM 9.0.2 Installation Guide
Preparing the Storage of Security Data in the LDAP Directory34

Step When this window appears… Do the following
18 If you want to set ACLs on another domain (inter-domain or multi-domain infrastructures), or if you want to modify a configuration, select Configure another domain and click Next (see Step 8).Else, select Exit this program and click Exit.
NOTE: During the existing schema validation phase, objects that use EAM object identifiers may be detected. If this is the case, software from other suppliers that do not adhere to Microsoft’s recommendations for extending the Active Directory schema may have been installed. In these circumstances, contact the One Identity support center.
Setting Indexes on Active Directory Attributes (Optional)
Subject
IMPORTANT: This task is optional and may be done only if the directory repository has not been installed and configured in a standard way.
It is recommended to set indexes on both standard attributes and EAM specific attributes.
Before Starting
You must know how to set indexes manually.
Indexes on Standard Attributes
General Use
It is strongly recommended to index the following attributes:
EAM 9.0.2 Installation Guide
Preparing the Storage of Security Data in the LDAP Directory35
l cn.
l objectCategory.
l member.
l dNSHostName.
l objectGUID.
Custom LDAP Attributes Stored on the Authentication Token
When using a custom LDAP attribute stored on the authentication token, this attribute must be indexed for presence and equality searches.
User Search for Delegation
When searching users to which delegate an account, several attributes are used to search the directory using a substring match. These attributes must be indexed for substring search. By default, the attributes used are:
l cn.
l sn.
l givenName.
l mail.
Since administrators can change the attributes used for this search by modifying the UserSearchFilter registry value, check if the attributes you choose are indexed.
Indexes on EAM Specific Attributes
The following specific attributes must be indexed:
l enatelUserSecurityProfileObject.
l enatelApplicationProfileObject.
l enatelUserEntityObject.
l enatelComputerSecurityProfileObject.
If you plan smart card authentication, set the following attributes:
l enatelSerialNumber.
l enatelTokenClassName.
l enatelTokenState.
If you plan cluster management, index the enatelPrettyName attribute (used for the alias feature) for performance reasons.
If you want to use Web Access Manager with EAM, set the following attributes:
EAM 9.0.2 Installation Guide
Preparing the Storage of Security Data in the LDAP Directory36
l enatelAccountBaseID.
l enatelPersonalApplicationId.
Configuring Secure Authentication and Data Securization
With Active Directory, EAM uses automatically the most secure available method. No configuration is needed.
Active Directory + AD LDS
Subject
Microsoft Active Directory Lightweight Directory Services (AD LDS) is an LDAP directory service that runs as a user service, rather than as a system service.
The use of AD LDS with EAM allows you to store all EAM data (configuration objects, user security data, access information and so on) in the AD LDS directory, while the users data remains in the enterprise Active Directory. In this case, no modification is made to the Active Directory (no schema extension, no ACL modification or object creation.)
This section explains how to extend the schema of AD LDS and set some access control rules (ACL).
Multi Domain Architecture Example
If you want to work in a multi domain AD LDS environment, you must first install all the necessary AD domain controllers and then install the AD LDS directory.
EAM 9.0.2 Installation Guide
Preparing the Storage of Security Data in the LDAP Directory37
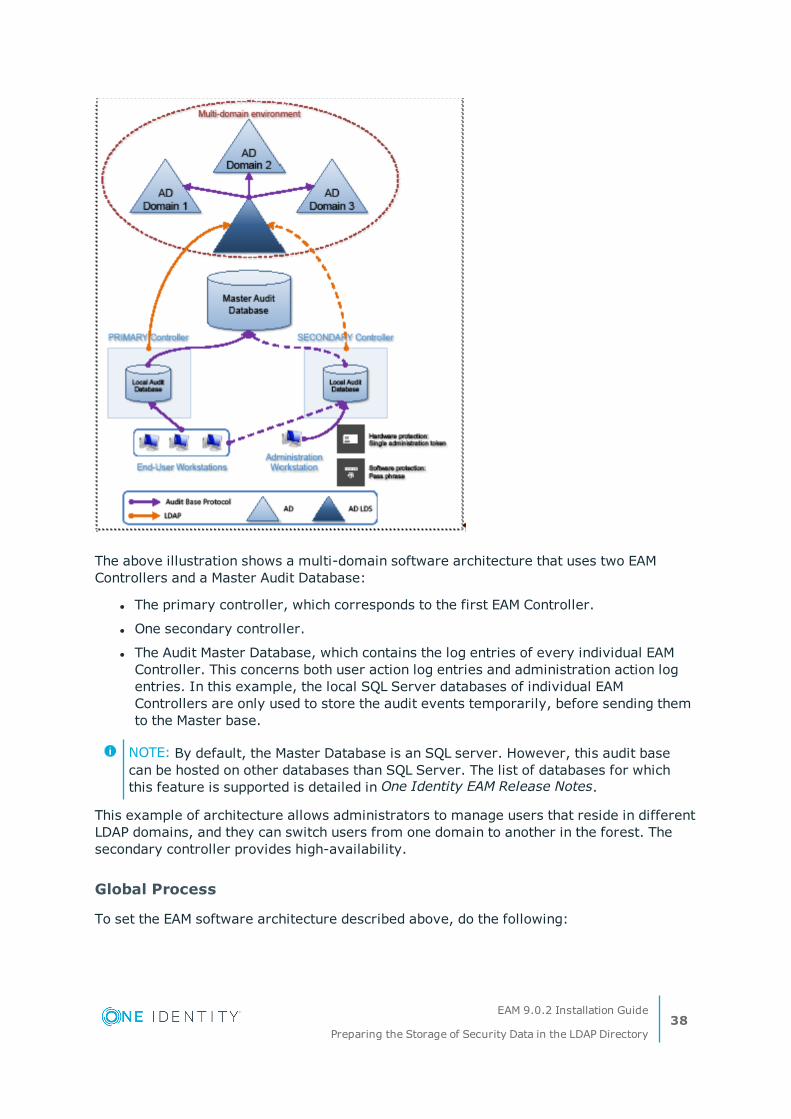
The above illustration shows a multi-domain software architecture that uses two EAM Controllers and a Master Audit Database:
l The primary controller, which corresponds to the first EAM Controller.
l One secondary controller.
l The Audit Master Database, which contains the log entries of every individual EAM Controller. This concerns both user action log entries and administration action log entries. In this example, the local SQL Server databases of individual EAM Controllers are only used to store the audit events temporarily, before sending them to the Master base.
NOTE: By default, the Master Database is an SQL server. However, this audit base can be hosted on other databases than SQL Server. The list of databases for which this feature is supported is detailed in One Identity EAM Release Notes.
This example of architecture allows administrators to manage users that reside in different LDAP domains, and they can switch users from one domain to another in the forest. The secondary controller provides high-availability.
Global Process
To set the EAM software architecture described above, do the following:
EAM 9.0.2 Installation Guide
Preparing the Storage of Security Data in the LDAP Directory38

1. Extend the Schema and Set the ACLs of your AD LDS (see Extending the Schema of AD LDS and Setting ACLs on AD LDS).
2. Install the Primary controller.
3. Install a Secondary controller.
4. Install the Master Audit Database.
5. Then, install the workstation clients (administration workstation and end-users workstations).
Before Starting
l Download and install AD LDS from the Microsoft web site.
NOTE: For more information on supported versions and operating systems on which it can be installed, see One Identity EAM Release Notes.
l Create an AD LDS instance with at least one partition and with the following parameters and restrictions:
Parameters:
Wizard Window Name
EAM Requirements
"Setup Options" Choose Unique instance.
"Application Directory Partition"
Choose Yes
"ADAM Administrators" An AD LDS administrator is an account with control over the AD LDS instance.
l You must select an account in the Active Directory domain, not a local account.
l In case of a multi domain architecture, you are advised to select an account with the Reset Password permission, to change the primary passwords of the Active Directory users. This permis-sion is not mandatory if you do not need to use EAM Console to change user passwords (case of a EAM installation in session authentication mode for example).
l This account must have the SE_RESTORE_NAME privilege. To be sure about it, add the user in the local Backup Operators group.
"Importing LDIF Files" Import all LDIF files. The MS-User.LDF file is mandatory.
Restrictions:
EAM 9.0.2 Installation Guide
Preparing the Storage of Security Data in the LDAP Directory39

l The Distinguished Name of the AD LDS partition must not include the Naming Context of an existing Windows domain. For example, if your domain naming context is DC=domain,DC=com, do not set CN=SSO,DC=domain,DC=COM as your AD LDS naming context.
l AD LDS must not be installed on a Domain Controller.
l EAM uses the Kerberos protocol for authenticating to LDAP with AD LDS servers. To avoid Kerberos-related problems, read carefully the following:
l Enter the real fully qualified DNS name (and not an DNS alias) to set the name of the AD LDS host, and NOT its IP address (if you enter an IP address, the Kerberos authentication is not guaranteed to be yielded and you may have Kerberos errors.).
l If despite the restriction you absolutely need to install AD LDS on a Domain Controller, some functionalities won’t not work properly. In this case, you must deploy a domain account for each EAM Security Services (wgss) (see Deploying a Workstation LDAP User Account).
NOTE: For more information on how to create an AD LDS instance, please refer to the Microsoft website and documentation.
Extending the Schema of AD LDS
Procedure
In a command line console, change to the %WINDIR%\ADAM directory and type the following command for each of the provided LDIF files:
ldifde -i -v -k -s <host:port> -f <file.ldif> -c "CN=Schema,CN=Configuration,DC=X" #schemaNamingContext -b <user> <domain> <password>
IMPORTANT: Do not replace the following string: "CN=Sche-ema,CN=Configuration,DC=X"..
Where:
String Description
<host:port> The AD LDS server hostname and TCP port.For example: adam.domain.local:389.
<file.ldif> The provided ldif file, which is located in the TOOLS\ESSODirectory\AD LDS (users in AD) directory.
<user> The user name of the AD LDS administrator chosen during the instance installation.
EAM 9.0.2 Installation Guide
Preparing the Storage of Security Data in the LDAP Directory40

String Description
<domain> The NetBios domain of the user.
<password> The user password.
NOTE: ldifde is located in the %WINDIR%\ADAM directory.
Once you have run the command for each of the LDIF files, the AD LDS schema is extended.
Preparing the AD LDS Instance Administrator Account
The Windows account you chose when setting the AD LDS instance to be the administrator of this instance (see the Before Starting of Preparing the Storage of Security Data in the LDAP Directory) must have the SE_RESTORE_NAME privilege in the local computer policy. To do so, set this account in the Backup Operators local group of the local computer.
Setting ACLs on AD LDS
Subject
You must set some access control rules on the partition, for the domain users to store and retrieve data in AD LDS. For that, the ACL-ADAM-EXTMGR.cmd file is provided in the Authentication Manager or Enterprise SSO installation package.
Procedure
1. Edit the ACL-ADAM-EXTMGR.cmd file located in the TOOLS\ESSODirectory\AD LDS (users in AD) directory.
2. In the ACL-ADAM-EXTMGR.cmd file, uncomment the following lines:
l set DSACLS=dsacls.exe or set DSACLS=%WINDIR%\ADAM\dsacls.exe, depending on your system:
l If the EAM Controller is installed on Windows Server 2008 (or above), uncomment the following line:
EAM 9.0.2 Installation Guide
Preparing the Storage of Security Data in the LDAP Directory41
set DSACLS=dsacls.exe
l If the EAM Controller is not installed on Windows Server 2008 (or above), uncomment the following line:set DSACLS=%WINDIR%\ADAM\dsacls.exe
l set HOSTNAME=myadamserver.domain.com:port Replace myadamserver.domain.com with the fully qualified AD LDS host name and TCP port.
l set LDAPROOT=o=my,c=rootReplace o=my,c=root with the partition root chosen during the AD LDS instance installation.
3. Copy the ACL-ADAM-EXTMGR.cmd file in the %WINDIR%\ADAM directory.
4. In a command line console, change to the %WINDIR%\ADAM and run the ACL-ADAM-EXTMGR.cmd script.
Setting Indexes on AD LDS Attributes
Setting Indexes on Standard Attributes
The following standard attributes must be indexed:
l cn.
l objectCategory.
l member.
l objectGUID.
Setting Indexes on EAM Specific Attributes
The following EAM specific attributes must be indexed:
l enatelUserSecurityProfileObject.
l enatelApplicationProfileObject.
l enatelUserEntityObject.
l enatelComputerSecurityProfileObject.
If you plan smart card authentication, set the following attributes:
l enatelSerialNumber.
l enatelTokenClassName.
l enatelTokenState.
EAM 9.0.2 Installation Guide
Preparing the Storage of Security Data in the LDAP Directory42
If you want to use Web Access Manager with EAM, set the following attributes:
l enatelAccountBaseID.
l enatelPersonalApplicationId.
Configuring Secure Authentication and Data Securization
With AD LDS, EAM uses automatically the most secure available method. No configuration is needed.
OpenLDAP
IMPORTANT: The configuration of EAM Services with an OpenLDAP directory requires advanced skills and integration service is required. Please contact One Identity services at srv-expertise@one identity.com.
l It is strongly recommended to set up your OpenLDAP directory with TLS support (Transport Layer Security) to secure critical data (as user account parameters, passwords…).
l It is also recommended to set up the SASL/DIGEST-MD5 authentication on your directory to secure authentication.
l The OpenLDAP installation must include the following schema definitions in the slapd.conf file:
l core.schema
l cosine.schema
l inetorgperson.schema
Extending the Schema of an OpenLDAP Directory
Subject
To extend the schema of an existing OpenLDAP directory, the wiseguard.schema file is provided on the Authentication Manager or Enterprise SSO installation package, in TOOLS\ESSODirectory\OpenLDAP.
EAM 9.0.2 Installation Guide
Preparing the Storage of Security Data in the LDAP Directory43

Procedure
Include the EAM schema definition after the standard schema definitions by adding the following command line in slapd.conf:
include <file path>/wiseguard.schema
Setting ACLs on an OpenLDAP Directory
Subject
To position ACLs on an OpenLDAP directory, use the wiseguard-em.acl file located on the Authentication Manager or Enterprise SSO installation package, in TOOLS\ESSODirectory\OpenLDAP.
Before Starting
If you want to authenticate as an administrator in EAM, you must create a user or a group of users and give it administration rights in the directory.
Procedure
Edit slapd.conf to set your ACLs, with the following guidelines:
l The access directive, which is used to set ACLs is complex. It allows very fine control over who can access what objects and attributes and under what conditions. The side-effect of this complexity and power is that it is very easy to get the access directive wrong. You must thoroughly test ACL directives with all possible permissions.
l The access directive may be placed in either the global or the database section of slapd.conf.
l Multiple access directives may be included.
l The order of the access directives is very important. If possible, it is strongly recommended to set them in the following order:
l rootDSE.
l Password.
l Directory administrators.
l EAM.
l Others.
EAM 9.0.2 Installation Guide
Preparing the Storage of Security Data in the LDAP Directory44
Example
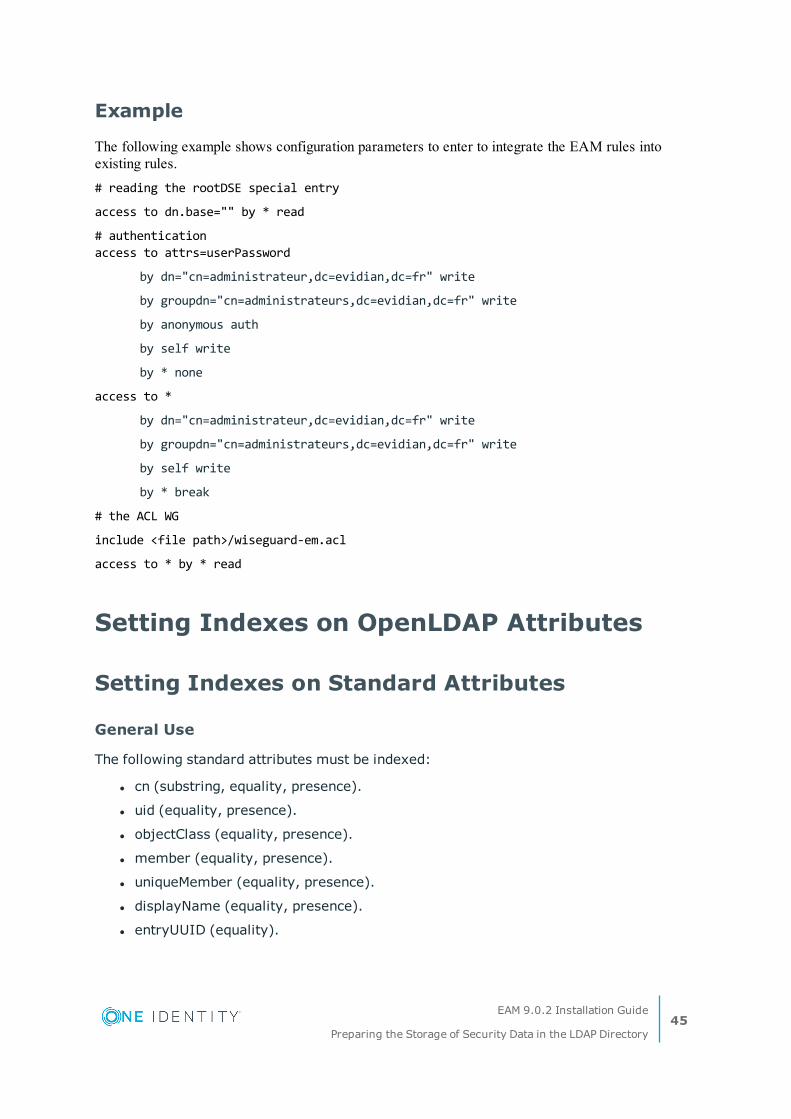
The following example shows configuration parameters to enter to integrate the EAM rules into existing rules.# reading the rootDSE special entry
access to dn.base="" by * read
# authenticationaccess to attrs=userPassword
by dn="cn=administrateur,dc=evidian,dc=fr" write
by groupdn="cn=administrateurs,dc=evidian,dc=fr" write
by anonymous auth
by self write
by * none
access to *
by dn="cn=administrateur,dc=evidian,dc=fr" write
by groupdn="cn=administrateurs,dc=evidian,dc=fr" write
by self write
by * break
# the ACL WG
include <file path>/wiseguard-em.acl
access to * by * read
Setting Indexes on OpenLDAP Attributes
Setting Indexes on Standard Attributes
General Use
The following standard attributes must be indexed:
l cn (substring, equality, presence).
l uid (equality, presence).
l objectClass (equality, presence).
l member (equality, presence).
l uniqueMember (equality, presence).
l displayName (equality, presence).
l entryUUID (equality).
EAM 9.0.2 Installation Guide
Preparing the Storage of Security Data in the LDAP Directory45
Custom LDAP Attributes Stored on the Authentication Token
When using a custom attribute stored on the authentication token, this attribute must be indexed for presence and equality searches.
User Search for Delegation
When searching users to which delegate an account, several attributes are used to search the directory using a substring match. These attributes must be indexed for substring search. By default, the attributes used are:
l cn
l sn
l givenName
l mail
Since the administrator can change the attributes used for this search by modifying the UserSearchFilter registry value, he has to check if the attributes he chooses are indexed.
Setting Indexes on EAM Specific Attributes
To set the indexes definitions for EAM specific attribute types, open the wiseguard-extmgr.indexes file. This file is located in TOOLS\ESSODirectory\OpenLDAP (in the Authentication Manager or Enterprise SSO installation package). Just include it in your slapd.conf configuration file.
IMPORTANT: As the indexes are subsequently changed, the directory needs to be re-indexed using slapindex with the following guidelines:
l Stop the slapd daemon before using slapindex.
l If you have several slapd.conf files, check that you specify the right one.
l The slapd daemon must be able to write on the created index files.
Integrating SAMBA
You can combine EAM with a SAMBA domain controller storing its data in an OpenLDAP server.
We provide slapd-samba-extmgr-sample.conf, a sample OpenLDAP configuration file showing how to integrate EAM ACLs and SAMBA ACLs. This file is located in TOOLS\ESSODirectory\OpenLDAP (in the Authentication Manager or Enterprise SSO installation package).
SAMBA manages its own computer objects. In order that ESSO uses the SAMBA computer objects, instead of creating new ones, you must enable integration of SAMBA computer
EAM 9.0.2 Installation Guide
Preparing the Storage of Security Data in the LDAP Directory46

objects in EAM. See EAM Configuration with a User Database or Directory other than Microsoft Active Directory in Configuring Workstations.
SAMBA uses non-standard LDAP group entries, using the posixGroup objectClass, which is not handled by EAM in the default configuration. For EAM to use the SAMBA group objects, you must enable integration of SAMBA group objects in EAM. See EAM Configuration with a User Database or Directory other than Microsoft Active Directory in Configuring Workstations.
If passwords are synchronized from the SAMBA controller to the OpenLDAP server (and not from OpenLDAP to SAMBA), you must enable password synchronization from the SAMBA controller to the OpenLDAP server in EAM. Thus, when a user changes his password, the password change operation will then use Microsoft APIs calls to the SAMBA controller, and not LDAP request to the OpenLDAP server, which would have caused a password desynchronization between SAMBA and OpenLDAP. See EAM Configuration with a User Database or Directory other than Microsoft Active Directory in Configuring Workstations.
Configuring Secure Authentication
Subject
With OpenLDAP, EAM supports DIGEST-MD5 SASL mechanisms. This section explains how to configure EAM for DIGEST-MD5 with OpenLDAP.
Before Starting
Configure OpenLDAP for DIGEST-MD5: you must configure the matching between SASL authentication identity and directory users. For an authentication based on the uid attribute, you must put the following directives in the slapd.conf file:
sasl-regexp
uid=(.*),cn=digest-md5,cn=auth
ldap:///dc=evidian,dc=fr??subtree?(uid=$1)
NOTE: With OpenLDAP using DIGEST-MD5 implies that user passwords are stored in clear text in the directory.
Procedure
In the Windows registry set the following value (DWORD type) to 1:
HKLM/Software/Enatel/WiseGuard/FrameWork/Directory/LdapAuthMethod
EAM 9.0.2 Installation Guide
Preparing the Storage of Security Data in the LDAP Directory47
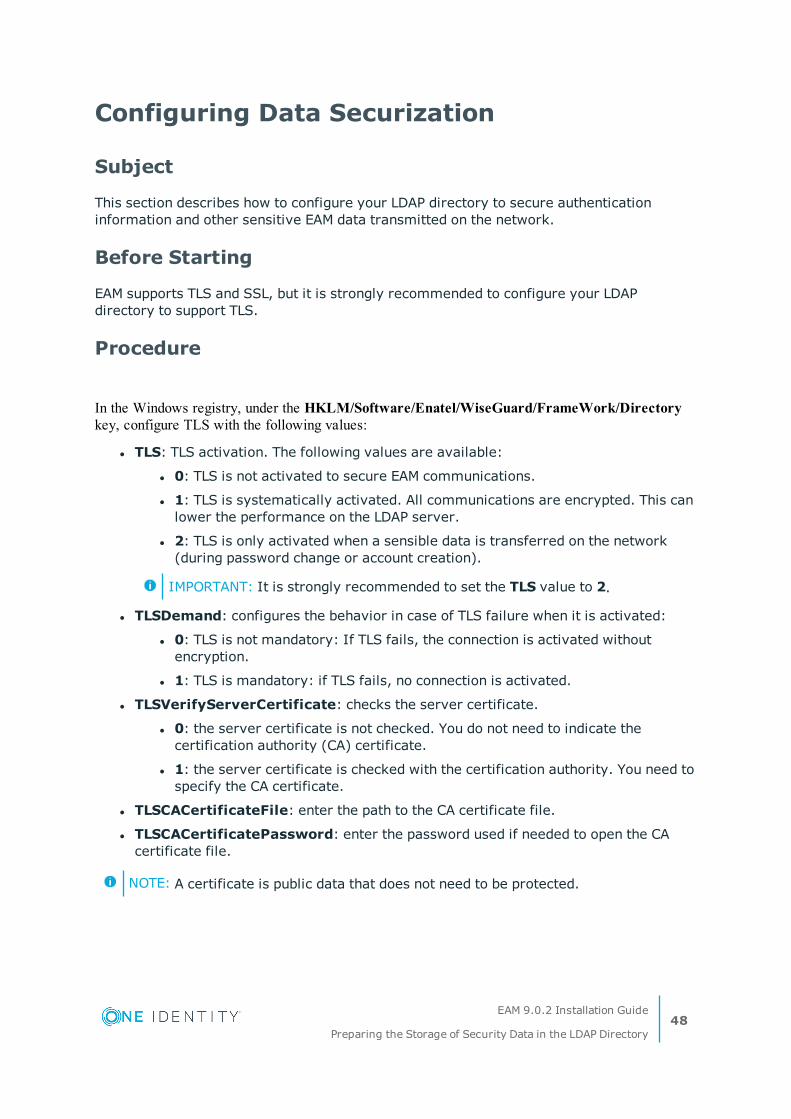
Configuring Data Securization
Subject
This section describes how to configure your LDAP directory to secure authentication information and other sensitive EAM data transmitted on the network.
Before Starting
EAM supports TLS and SSL, but it is strongly recommended to configure your LDAP directory to support TLS.
Procedure
In the Windows registry, under the HKLM/Software/Enatel/WiseGuard/FrameWork/Directory key, configure TLS with the following values:
l TLS: TLS activation. The following values are available:
l 0: TLS is not activated to secure EAM communications.
l 1: TLS is systematically activated. All communications are encrypted. This can lower the performance on the LDAP server.
l 2: TLS is only activated when a sensible data is transferred on the network (during password change or account creation).
IMPORTANT: It is strongly recommended to set the TLS value to 2.
l TLSDemand: configures the behavior in case of TLS failure when it is activated:
l 0: TLS is not mandatory: If TLS fails, the connection is activated without encryption.
l 1: TLS is mandatory: if TLS fails, no connection is activated.
l TLSVerifyServerCertificate: checks the server certificate.
l 0: the server certificate is not checked. You do not need to indicate the certification authority (CA) certificate.
l 1: the server certificate is checked with the certification authority. You need to specify the CA certificate.
l TLSCACertificateFile: enter the path to the CA certificate file.
l TLSCACertificatePassword: enter the password used if needed to open the CA certificate file.
NOTE: A certificate is public data that does not need to be protected.
EAM 9.0.2 Installation Guide
Preparing the Storage of Security Data in the LDAP Directory48

Netscape iPlanet/Sun Java System/Red Hat/Fedora Directory Server
Extending the Schema of a Netscape iPlanet/Sun Java System/Red Hat/Fedora Directory Server
Subject
To extend the schema of an existing iPlanet/Sun Java System/Red Hat/Fedora Directory Server, a file is provided on the Authentication Manager or Enterprise SSO installation package, in TOOLS\ESSODirectory\Oracle DSEE - RedHat DS - 389 DS\wiseguard-schema.ldif.
IMPORTANT: The configuration of SSO for Java requires advanced skills. To deliver SSO access to Java applications, integration service is required. Please contact One Identity services at srv-expertise@one identity.com..
Before Starting
To extend the schema, the user needs to have the permission to create new objects.
Procedure
Extend the schema by typing the following command:
ldapmodify -h <host> –p <port> -D <administrator DN> -w <administrator password> -f wiseguard-schema.ldif
Where:
String Description
<host> LDAP server hostname.
<port> TCP port number of the LDAP server instance you want to configure.
<administrator DN> DN of the instance administrator.
<administrator password>
Password of the instance administrator.
EAM 9.0.2 Installation Guide
Preparing the Storage of Security Data in the LDAP Directory49
Setting ACLs on a Netscape iPlanet/Sun Java System/Red Hat/Fedora Directory Server
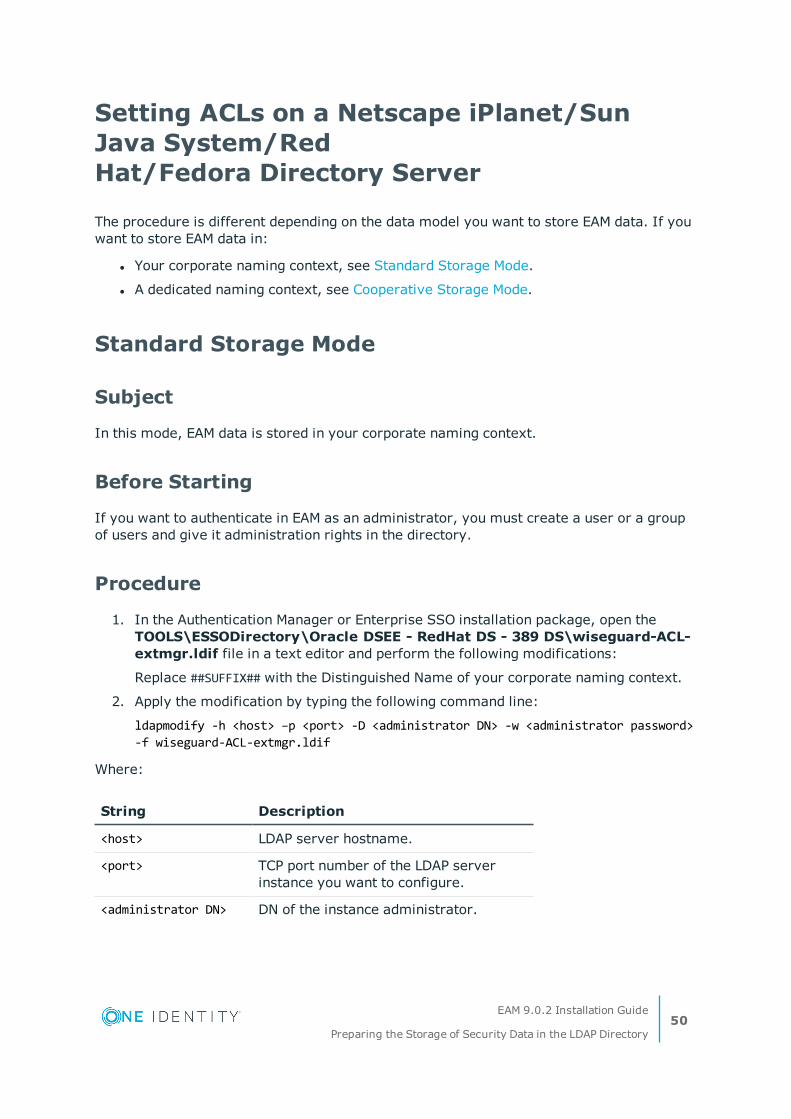
The procedure is different depending on the data model you want to store EAM data. If you want to store EAM data in:
l Your corporate naming context, see Standard Storage Mode.
l A dedicated naming context, see Cooperative Storage Mode.
Standard Storage Mode
Subject
In this mode, EAM data is stored in your corporate naming context.
Before Starting
If you want to authenticate in EAM as an administrator, you must create a user or a group of users and give it administration rights in the directory.
Procedure
1. In the Authentication Manager or Enterprise SSO installation package, open the TOOLS\ESSODirectory\Oracle DSEE - RedHat DS - 389 DS\wiseguard-ACL-extmgr.ldif file in a text editor and perform the following modifications:
Replace ##SUFFIX## with the Distinguished Name of your corporate naming context.
2. Apply the modification by typing the following command line:
ldapmodify -h <host> –p <port> -D <administrator DN> -w <administrator password> -f wiseguard-ACL-extmgr.ldif
Where:
String Description
<host> LDAP server hostname.
<port> TCP port number of the LDAP server instance you want to configure.
<administrator DN> DN of the instance administrator.
EAM 9.0.2 Installation Guide
Preparing the Storage of Security Data in the LDAP Directory50

String Description
<administrator password>
Password of the instance administrator.
Cooperative Storage Mode
Subject
In this mode, EAM data is stored in a dedicated naming context. The ACLs are set on this naming context.
Before Starting
IMPORTANT: Before carrying out the following procedure, create the EAM default objects, as described in Running the Default Objects Creation Tool..
If you want to authenticate in EAM as an administrator, you must create a user or a group of users and give it administration rights in the directory.
Procedure
1. In the Authentication Manager or Enterprise SSO installation package, open the TOOLS\ESSODirectory\Oracle DSEE - RedHat DS - 389 DS\wiseguard-ACL-cooperativemode-extmgr.ldif file in a text editor and perform the following modifications:
l Replace ##SUFFIX## with the Distinguished Name of the dedicated naming context.
l Replace ##AUTHSUFFIX## with the Distinguished Name of your corporate naming context.
l Replace ##WGFOREIGNOBJECTS## with the Distinguished Name of the container of the EAM naming context storing the user’s personal EAM data.
NOTE: To know the value of this DN, you must have previously created the EAM default objects. By default the value of this DN is: ou=IAMFo-oreignObjects,ou=Default, ou=ESSO,<dedicated suffix>.
Apply the modification by typing the following command line:
ldapmodify -h <host> –p <port> -D <administrator DN> -w <administrator password> -f wiseguard-ACL-cooperativemode-extmgr.ldif
Where:
EAM 9.0.2 Installation Guide
Preparing the Storage of Security Data in the LDAP Directory51

String Description
<host> LDAP server hostname.
<port> TCP port number of the LDAP server instance you want to configure.
<administrator DN> DN of the instance administrator.
<administrator password> Password of the instance administrator.
Setting Indexes on Netscape iPlanet/Sun Java System/Red Hat/Fedora Directory Server Attributes
Setting Indexes on Standard Attributes
General UseThe following standard attributes must be indexed:
IMPORTANT: Set these attributes in the corporate and in the EAM dedicated naming contexts.
l cn (substring, equality, presence).
l uid (equality, presence).
l objectClass (equality, presence).
l member (equality, presence).
l uniqueMember (equality, presence).
l displayName (equality, presence).
l nsuniqueid (equality).
Custom LDAP Attributes Stored on the Authentication TokenWhen using a custom attribute stored on the authentication token, this attribute must be indexed for presence and equality searches.
IMPORTANT: Set this attribute in the corporate naming context only.
User Search for DelegationWhen searching users to which delegate an account, several attributes are used to search the directory using a substring match. These attributes must be indexed for substring
EAM 9.0.2 Installation Guide
Preparing the Storage of Security Data in the LDAP Directory52

search.
IMPORTANT: Set these attributes in the corporate naming context only.
By default, the attributes used are:
l cn
l sn
l givenName
l mail
Since the administrator can change the attributes used for this search by modifying the UserSearchFilter registry value, he has to check if the attributes he chooses are indexed.
Setting Indexes on EAM Specific Attributes
The following EAM specific attributes must be indexed:
IMPORTANT: Set these specific attributes in the EAM dedicated naming context only.
l enatelUserSecurityProfileObject (equality, presence).
l enatelApplicationProfileObject (equality, presence).
l enatelUserEntityObject (equality, presence).
l enatelComputerSecurityProfileObject (presence).
l enatelApplicationObject (equality, presence).
l enatelSSOParameterObject (equality, presence).
l enatelSSOParameterPresetId (equality, presence).
l enatelScheduleObject (equality, presence).
l enatelPasswordFormatObject (equality, presence).
l enatelPasswordChangePolicyObject (equality, presence).
l enatelUserEntityObject (equality, presence).
l enatelAllowedApplicationMask (equality, presence).
l enatelUserRoleObject (equality, presence).
l enatelAccountType (equality, presence).
l enatelSoftwareModuleType (equality, presence).
l enatelAuditId (equality, presence).
l enatelAuditFilterObject (equality, presence).
If you plan smart card authentication, set the following attributes:
l enatelSerialNumber (equality, presence).
l enatelTokenClassName (equality, presence).
EAM 9.0.2 Installation Guide
Preparing the Storage of Security Data in the LDAP Directory53
l enatelTokenState (equality, presence).
If you want to use Web Access Manager with EAM, set the following attributes:
l enatelAccountBaseID (equality, presence).
l enatelPersonalApplicationId (equality, presence).
Configuring Secure Authentication
Subject
With Netscape iPlanet/Sun Java System/Red Hat/Fedora Directory Server, EAM supports DIGEST-MD5 SASL mechanisms. This section explains how to configure EAM for DIGEST-MD5 with Netscape iPlanet/Sun Java System/Red Hat/Fedora Directory Server.
IMPORTANT: This task is optional. Carry out the following procedure only if required.
Before Starting
Configure iPlanet/Sun Java System/Red Hat/Fedora Directory Server for DIGEST-MD5.
Depending on your directory version, to secure authentication in EAM it may be necessary to modify the password encryption method, so that the user password can be stored in clear text in your directory.
Procedure
In the Windows registry set the following value (DWORD type) to 1:
HKLM/Software/Enatel/WiseGuard/FrameWork/Directory/LdapAuthMethod
Configuring Data Securization
Subject
This section describes how to configure your LDAP directory to secure authentication information and other sensitive EAM data transmitted on the network.
Before Starting
EAM supports TLS and SSL, but it is strongly recommended to configure your LDAP directory to support TLS.
EAM 9.0.2 Installation Guide
Preparing the Storage of Security Data in the LDAP Directory54

Procedure
In the Windows registry, under the HKLM/Software/Enatel/WiseGuard/FrameWork/Directory key, configure TLS with the following values:
l TLS: TLS activation. The following values are available:
l 0: TLS is not activated to secure EAM communications.
l 1: TLS is systematically activated. All communications are encrypted. This can lower the performance on the LDAP server.
l 2: TLS is only activated when a sensible data is transferred on the network (during password change or account creation).
IMPORTANT: It is strongly recommended to set the TLS value to 2
l TLSDemand: configures the behavior in case of TLS failure when it is activated:
l 0: TLS is not mandatory: If TLS fails, the connection is activated without encryption.
l 1: TLS is mandatory: if TLS fails, no connection is activated.
l TLSVerifyServerCertificate: checks the server certificate.
l 0: the server certificate is not checked. You do not need to indicate the certification authority (CA) certificate.
l 1: the server certificate is checked with the certification authority. You need to specify the CA certificate.
l TLSCACertificateFile: enter the path to the CA certificate file.
l TLSCACertificatePassword: enter the password used if needed to open the CA certificate file.
NOTE: A certificate is public data that does not need to be protected.
l TLSCACertificateFileFormat (file format used to store the certificate):0 - OpenSSL PEM file (Base 64 encoding) or certificate file in the ASCII format of Directory Server.
EAM 9.0.2 Installation Guide
Preparing the Storage of Security Data in the LDAP Directory55

Novell eDirectory
Extending the Schema of a Novell eDirectory
Subject
To extend the schema of a Novell eDirectory, the file wiseguard-schema.ldif is provided in the directory TOOLS\ESSODirectory\Novell eDirectory of the Authentication Manager or Enterprise SSO installation package. This contains the definition of the Evidian objects.
Procedure
Extend the schema using one of the following commands:
ldapmodify -c -h <host> -p <port>
-D <super-user DN> -w <super-user password>
-f wiseguard-schema.ldif
or:
ice -S LDIF -f wiseguard-schema.ldif
-D LDAP -s <host> -p <port>
-d <super-user DN> -w <super-user password>
Where:
l <host> is replaced by your LDAP server hostname.
l <port> is replaced by the port number of your LDAP server.
l <super-user DN> is replaced by the distinguished name of your directory super-user.
l <super-user password> is replaced by the password of the super-user.
Setting ACLs for Delegation (Optional)
Subject
To enable EAM account delegation, users must be able to search the directory for other users. The file wiseguard-delegation-ACL.ldif in the directory TOOLS\ESSODirectory\Novell eDirectory of the Authentication Manager or Enterprise SSO installation package is used to give the necessary access rights for this operation.
NOTE: This procedure can be performed at any time.
EAM 9.0.2 Installation Guide
Preparing the Storage of Security Data in the LDAP Directory56
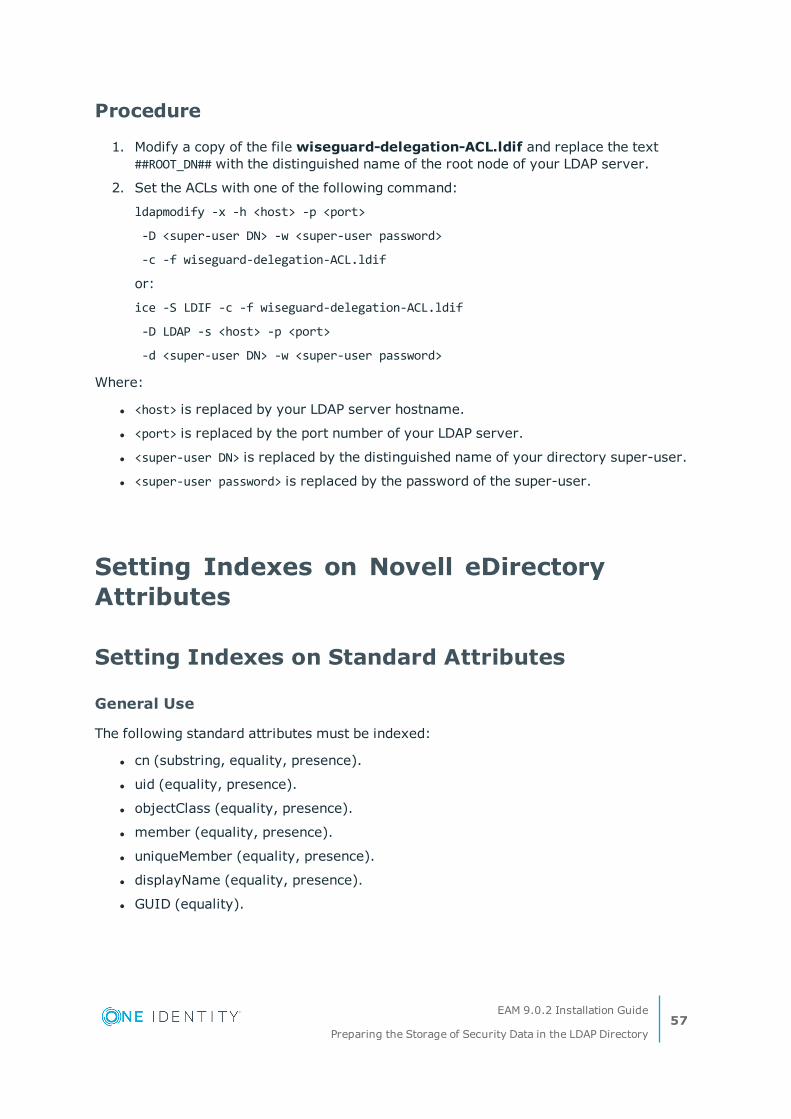
Procedure
1. Modify a copy of the file wiseguard-delegation-ACL.ldif and replace the text ##ROOT_DN## with the distinguished name of the root node of your LDAP server.
2. Set the ACLs with one of the following command:
ldapmodify -x -h <host> -p <port>
-D <super-user DN> -w <super-user password>
-c -f wiseguard-delegation-ACL.ldif
or:
ice -S LDIF -c -f wiseguard-delegation-ACL.ldif
-D LDAP -s <host> -p <port>
-d <super-user DN> -w <super-user password>
Where:
l <host> is replaced by your LDAP server hostname.
l <port> is replaced by the port number of your LDAP server.
l <super-user DN> is replaced by the distinguished name of your directory super-user.
l <super-user password> is replaced by the password of the super-user.
Setting Indexes on Novell eDirectory Attributes
Setting Indexes on Standard Attributes
General Use
The following standard attributes must be indexed:
l cn (substring, equality, presence).
l uid (equality, presence).
l objectClass (equality, presence).
l member (equality, presence).
l uniqueMember (equality, presence).
l displayName (equality, presence).
l GUID (equality).
EAM 9.0.2 Installation Guide
Preparing the Storage of Security Data in the LDAP Directory57

Custom LDAP Attributes Stored on the Authentication Token
When using a custom attribute stored on the authentication token, this attribute must be indexed for presence and equality searches.
User Search for Delegation
When searching users to which delegate an account, several attributes are used to search the directory using a substring match. These attributes must be indexed for substring search. By default, the attributes used are:
l cn
l sn
l givenName
l mail
Since the administrator can change the attributes used for this search by modifying the UserSearchFilter registry value, he has to check if the attributes he chooses are indexed.
Setting Indexes on EAM Specific Attributes
The following specific attributes must be indexed:
l enatelUserSecurityProfileObject (equality, presence)
l enatelApplicationProfileObject (equality, presence)
l enatelTokenClassName (equality, presence)
l enatelSerialNumber (equality, presence)
l enatelTokenState (equality, presence)
l enatelUserEntityObject (equality, presence)
l enatelSoftwareModuleType (equality, presence)
l enatelComputerSecurityProfileObject (presence)
l enatelSSOParameterPresetId (equality, presence)
l enatelComputerObject (equality, presence)
l enatelAccountBaseID (equality, presence)
l enatelAdmObject (equality, presence)
l enatelTokenType (equality, presence)
l enatelSSOKeys (presence)
l enatelGlobalCertificateState (equality, presence)
l enatelAccountType (equality, presence)
l enatelAllowedApplicationMask (equality, presence)
l enatelApplicationObject (equality, presence)
EAM 9.0.2 Installation Guide
Preparing the Storage of Security Data in the LDAP Directory58

l enatelSSOParameterObject (equality, presence)
l enatelUserRoleObject (equality, presence)
l enatelUserLocalAccountName (equality, presence)
l enatelPasswordChangePolicyObject (equality, presence)
l enatelExpirationDate (ordering, equality, presence)
l enatelTokenPinState (equality, presence)
l enatelLentUntil (ordering, equality, presence)
l enatelPersonalApplicationId (equality, presence)
Configuring Secure Authentication (Optional)
Subject
With Novell eDirectory, EAM supports the following SASL mechanisms:
l DIGEST-MD5.
l NMAS: the SASL/NMAS mechanism allows the use of NMAS modular authentication from Novell, and allows a choice between available authentication sequences. EAM only supports the NDS sequence, which consists in a secure authentication with login and password.
This section explains how to configure EAM for DIGEST-MD5 and NMAS with Novell eDirectory.
IMPORTANT: It is strongly recommended to use the NMAS mechanism.This task is optional. Carry out the following procedure only if required.
Before Starting
To use NMAS authentication, the Novell NMAS Client software must be installed on your EAM Controller.
Procedure
In the Windows registry, set the DWORD value HKLM/Software/Enatel/WiseGuard/FrameWork/Directory/LdapAuthMethod as follows:
l for NMAS: 4.
l for DIGEST-MD5: 1.
EAM 9.0.2 Installation Guide
Preparing the Storage of Security Data in the LDAP Directory59

Configuring Data Securization
Subject
This section describes how to configure your LDAP directory to secure authentication information and other sensitive EAM data transmitted on the network.
Before Starting
EAM supports TLS and SSL, but it is strongly recommended to configure your LDAP directory to support TLS.
Procedure
In the Windows registry, under the HKLM/Software/Enatel/WiseGuard/FrameWork/Directory key, configure TLS with the following values:
l TLS: TLS activation. The following values are available:
l 0: TLS is not activated to secure EAM communications.
l 1: TLS is systematically activated. All communications are encrypted. This can lower the performance on the LDAP server.
l 2: TLS is only activated when a sensible data is transferred on the network (during password change or account creation).
IMPORTANT: It is strongly recommended to set the TLS value to 2.
l TLSDemand: configures the behavior in case of TLS failure when it is activated:
l 0: TLS is not mandatory: If TLS fails, the connection is activated without encryption.
l 1: TLS is mandatory: if TLS fails, no connection is activated.
l TLSVerifyServerCertificate: checks the server certificate.
l 0: the server certificate is not checked. You do not need to indicate the certification authority (CA) certificate.
l 1: the server certificate is checked with the certification authority. You need to specify the CA certificate.
l TLSCACertificateFile: enter the path to the CA certificate file.
l TLSCACertificatePassword: enter the password used if needed to open the CA certificate file.
NOTE: A certificate is public data that does not need to be protected.
EAM 9.0.2 Installation Guide
Preparing the Storage of Security Data in the LDAP Directory60
IBM Tivoli Directory Server
Extending the Schema of an IBM Tivoli Directory Server
Subject
To extend the schema of an IBM Tivoli Directory Server, two files are provided on the Authentication Manager or Enterprise SSO installation package, in TOOLS\ESSODirectory\IBM Tivoli Directory Server:
l wiseguard.at
l wiseguard.oc
Before Starting
IMPORTANT:User objects must possess the enatelUser auxiliary class to be able to use EAM.
Procedure
1. Start the IBM Tivoli Directory Server (ITDS) server configuration tool.
2. Click the Manage schema files section.
3. Add the following file in this exact order:
l wiseguard.at
l wiseguard.oc
Setting ACLs on an IBM Tivoli Directory Server
Subject
This section explains how to set ACLs on an IBM Tivoli Directory Server.
EAM 9.0.2 Installation Guide
Preparing the Storage of Security Data in the LDAP Directory61

Before Starting
IMPORTANT: Users must possess the following entry in their ACL (ibm-filterAclEntry attribute):
id:<DN>:(objectClass=*):object:ad:system:rsc:normal:rws c:restricted:rwsc:sensitive:rwsc
Where the <DN> string must be replaced with the user DN.
Procedure
To set EAM access permissions on the directory, apply the following LDIF file on the directory root:
dn: <DNSuffixe>
changetype: modify
add: ibm-filterAclEntry
ibm-filterAclEntry: group:CN=ANYBODY:(objectClass=*):system:rsc:restricted:rsc:normal:rsc
ibm-filterAclEntry: group:CN=AUTHENTICATED:(objectClass=enatelSSOStorage):object:a
ibm-filterAclEntry: group:CN=AUTHENTICATED:(&(objectClass=enatelSSOAccount)(enatelAccountType=3)):object:d:system:rsc:normal:rwsc:restricted:rwsc:sensitive:rwsc
ibm-filterAclEntry: access-id:CN=THIS:(objectClass=inetOrgPerson):at.userPassword:w
ibm-filterAclEntry: access-id:CN=THIS:(objectClass=enatelComputer):at.userPassword:w
Where:
The <DNSuffixe> string must be replaced with the directory suffix.
Setting Indexes on IBM Tivoli Directory Server Attributes
On IBM Tivoli Directory Server, indexes are set during the schema extension.
Configuring Secure Authentication
Subject
With IBM Directory Server, EAM supports DIGEST-MD5 SASL mechanisms. This section explains how to configure EAM for DIGEST-MD5 with IBM Directory Server.
EAM 9.0.2 Installation Guide
Preparing the Storage of Security Data in the LDAP Directory62

Before Starting
l The IBM LDAP client is mandatory to perform a DIGEST-MD5 authentication toward IBM Tivoli Directory Server.
l Configure IBM Tivoli Directory Server for DIGEST-MD5:
With IBM Tivoli Directory Server, it implies that user passwords are stored in clear text in the directory or with the iMask symmetrical encryption.
Procedure
In the Windows registry set the following value (DWORD type) to 1:HKLM/Software/Enatel/WiseGuard/FrameWork/Directory/LdapAuthMethod
Configuring Data Securization
Subject
This section describes how to configure your LDAP directory to secure authentication information and other sensitive EAM data transmitted on the network.
Before Starting
EAM supports TLS and SSL, but it is strongly recommended to configure your LDAP directory to support TLS.
Procedure
In the Windows registry, under the HKLM/Software/Enatel/WiseGuard/FrameWork/Directory key, configure TLS with the following values:
l TLS: TLS activation. The following values are available:
l 0: TLS is not activated to secure EAM communications.
l 1: TLS is systematically activated. All communications are encrypted. This can lower the performance on the LDAP server.
l 2: TLS is only activated when a sensible data is transferred on the network (during password change or account creation).
IMPORTANT: It is strongly recommended to set the TLS value to 2.
l TLSDemand: configures the behavior in case of TLS failure when it is activated:
l 0: TLS is not mandatory: If TLS fails, the connection is activated without encryption.
EAM 9.0.2 Installation Guide
Preparing the Storage of Security Data in the LDAP Directory63

l 1: TLS is mandatory: if TLS fails, no connection is activated.
l TLSVerifyServerCertificate: checks the server certificate.
l 0: the server certificate is not checked. You do not need to indicate the certification authority (CA) certificate.
l 1: the server certificate is checked with the certification authority. You need to specify the CA certificate.
l TLSCACertificateFile: enter the path to the CA certificate file.
l TLSCACertificatePassword: enter the password used if needed to open the CA certificate file.
NOTE: A certificate is public data that does not need to be protected.
l TLSCACertificateFileFormat file format used to store the certificate:1 - IBM Keyring "CMS" file.
Atos DirX Directory
Directory Requirements
EAM requires that EAM users have a unique directory attribute that distinguishes each from the others. For Atos DirX Directory, this attribute is the LDAP uid attribute.
E-SSO account entries must be of LDAP object class inetOrgPerson.
Extending the Schema of an Atos DirX Directory
The DirX Directory schema must be extended to allow the creation of EAM objects. The TOOLS\ESSODirectory\Atos DirX Directory\esso-dirx-schema.ldif file in the EAM installation package contains the schema modifications.
Procedure
Extend the schema by executing the following command on the DirX Directory workstation:dirxmodify -h <host> -p <port> -D <administrator DN> -w <administrator password> -f esso-dirx-schema.ldif -v -e error.txt
where:
EAM 9.0.2 Installation Guide
Preparing the Storage of Security Data in the LDAP Directory64

l <host> is the hostname of the DirX server.
l <port> is the port number of the DirX server.
l <administrator DN> is the LDAP DN of a directory administrator who has the right to modify the directory schema.
l <administrator password> is the password of the directory administrator.
NOTE: After executing the command, check the error.txt file for possible error messages.
Setting ACLs on an Atos DirX Directory
To give the necessary permissions to EAM users, EAM ACLs must be set in the Atos DirX Directory.
Procedure
1. Copy the TOOLS\ESSODirectory\Atos DirX Directory folder containing the files to set the ACLs from the EAM installation package to the DirX Directory workstation.
2. Modify the local copy of the esso-dirx-params.tcl file.
3. Provide the DNs of the directory administrator, EAM controller group and DirX administration point which will hold the ACLs.
NOTE: These names are in DirX DAP DN format.
4. In the same folder, execute the dirxcp esso-dirx-acl.tcl command to set the ACLs.
NOTE: Enter the administrator password if prompted.
Managing Anonymous Access Denial
If the directory your are connecting to enforces an anonymous access denial (bind), you can set the following registry value on all the EAM controllers and workstations to cope with this directory policy: HKLM\SOFTWARE[\Policies]\Enatel\WiseGuard\FrameWork\Directory\AnonymousBindForbidden (REG_DWORD) = 0x01
IMPORTANT: This registry value must be set before starting the EAM Administration Tools (WGAdminTools).
EAM 9.0.2 Installation Guide
Preparing the Storage of Security Data in the LDAP Directory65
Deploying a Workstation LDAP User Account
Subject
You can force EAM to use a given LDAP account to do requests on the directory server.
Before starting
Make sure the dedicated user is created in your directory.
IMPORTANT: If you are using Active Directory, the user must belong to the "Domain Computers" group.
Procedures
From a domain controller
1. At the Windows prompt, change to the C:\Program Files\Common Files\Evidian\WGSS folder and type the following command: wgss /c
The Administration Tools appears.
2. Fill in the LDAP Admin User Name (if you are working with Active Directory, do not forget the Domain name) and Password fields, and click the Get Encrypted Credentials button to generate and copy the encrypted string in the clipboard.
3. Deploy the following registry value on all the workstation clients using GPO (for more details, see Centralizing Parameters Using Group Policy Objects (GPO)): in HKEY_LOCAL_MACHINE\SOFTWARE\Enatel\WiseGuard\Framework\FmkServer, create the following value:
l Name: AccessPointLdapCredentials.
l Type: String.
l Value: paste the encrypted string copied in the clipboard.
From an EAM workstation (Access Point)
To use this account on a single workstation, do the following procedure:
1. Open the root folder of the EAM installation package and run start.hta.
EAM 9.0.2 Installation Guide
Preparing the Storage of Security Data in the LDAP Directory66

2. In the Advanced Installation area, click either Enterprise Access Management services (if you are running the 32-bit version of Windows), or Enterprise Access Management services - x64 (Windows 64-bit version).
The Administration Tools interface appears.
3. In Controller configuration, click Configure Directory and Audit login/password.
The Controller Configuration window appears.
4. Complete the Access point account tabbed panel and click OK.
EAM 9.0.2 Installation Guide
Preparing the Storage of Security Data in the LDAP Directory67

3
Installing EAM Controllers and Audit Databases
Subject
Evidian provides a set of administration tools which allow you to:
l Initialize the LDAP directory by creating default objects which are necessary for the use of EAM modules.
l Create the security database in the directory.
l Publish your specific token configurations in the directory.
l Install and configure the audit databases.
l Declare the technical accounts used by the EAM Controllers.
l Install EAM controllers.
This section details how to start and use the administration tools.
Before Starting
l You must have prepared the LDAP Directory (see Preparing the Storage of Security Data in the LDAP Directory).
l Log on to the domain as an LDAP directory administrator.
Starting the Administration Tools window
Subject
The Administration Tools window is a task-oriented interface that allows you to configure your EAM solution.
EAM 9.0.2 Installation Guide
Installing EAM Controllers and Audit Databases68
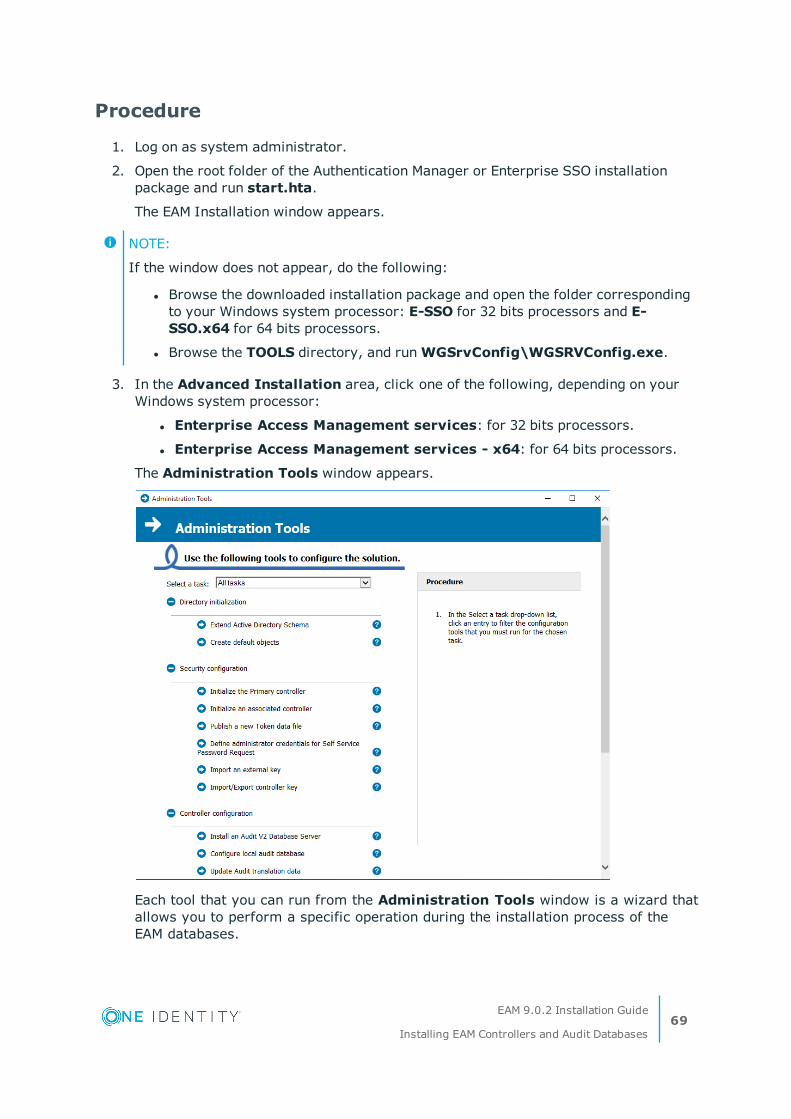
Procedure
1. Log on as system administrator.
2. Open the root folder of the Authentication Manager or Enterprise SSO installation package and run start.hta.
The EAM Installation window appears.
NOTE:
If the window does not appear, do the following:
l Browse the downloaded installation package and open the folder corresponding to your Windows system processor: E-SSO for 32 bits processors and E-SSO.x64 for 64 bits processors.
l Browse the TOOLS directory, and run WGSrvConfig\WGSRVConfig.exe.
3. In the Advanced Installation area, click one of the following, depending on your Windows system processor:
l Enterprise Access Management services: for 32 bits processors.
l Enterprise Access Management services - x64: for 64 bits processors.
The Administration Tools window appears.
Each tool that you can run from the Administration Tools window is a wizard that allows you to perform a specific operation during the installation process of the EAM databases.
EAM 9.0.2 Installation Guide
Installing EAM Controllers and Audit Databases69

Running the Default Objects Creation Tool
Subject
The "Default objects creation" tool initializes the LDAP directory with default EAM objects.
Restrictions
Use this tool only if you are installing primary or associated EAM controllers.
Before Starting
Depending on your directory type, the Default Objects creation must be executed with:
l Active Directory: a domain administrator.
l AD LDS: the Active Directory account which was selected to be the administrator of the AD LDS instance or a member of the Roles > Administrators group of the AD LDS instance.
l Oracle DSEE, RedHat DS, 389 DS: your LDAP directory administrator account (such as CN=Directory Manager).
l OpenLDAP: the super user defined in the rootdn directive (such as cn=Manager,dc=example,dc=com).
l DirX: the user defined in the rootdn directive (such as cn=admin,o=my-company).
l Other directories: the DN of the directory administrator account.
Procedure
1. In the Administration Tools window, click Create default objects.
The LDAP directory initialization wizard appears.
2. Follow carefully the displayed instructions (for more details, see section Hint just below).
EAM 9.0.2 Installation Guide
Installing EAM Controllers and Audit Databases70

Hint
Filling in the "LDAP configuration - Directory initialization" Window
The wizard allows you to choose the administration mode.
The following window appears.
To extend the administration capabilities of the solution, click Activate advanced administration mode (for more information on advanced administration mode, see One Identity EAM Console - Guide de l'administrateur).
IMPORTANT:The advanced administration mode cannot be changed later. If this is a new installation, this mode is recommended. If you are upgrading, existing admin-istration profiles will be migrated.
Initializing the Primary Controller
Subject
This section describes how to use the Primary server initialization tool, which creates the EAM security database in the directory. For your security database you can choose either software or hardware protection.
Before Starting
l If you use the hardware protection mode:
l You must have the Security Module, its associated PIN code and smart card reader.
EAM 9.0.2 Installation Guide
Installing EAM Controllers and Audit Databases71

l Connect the smart card reader on the computer.
l If you use the software protection mode, you must provide a pass phrase.
Procedure
1. In the Administration Tools window, click Initialize the Primary controller.
The primary controller initialization wizard appears.
2. Follow the displayed instructions (for more details, see section Hint just below).
Hint
Filling in the Protection mode window
The wizard allows you to choose the protection mode for your security database.
The following window appears.
l In software protection mode, administration keys are protected by a pass phrase.
l In hardware protection mode, administration encryption keys are protected by cryptographic smart cards. In this mode, smart cards are required to perform EAM administration tasks.
For more information on protection mode, see One Identity EAM Console - Guide de l'administrateur.
EAM 9.0.2 Installation Guide
Installing EAM Controllers and Audit Databases72

Initializing an Associated Controller
Subject
This section describes how to use the Associated controller initialization tool, which creates the EAM security database from the primary controller.
Before Starting
The Primary controller must be installed.
You must have the Security Module and its PIN code. It is strongly recommended to use the same security module as the primary server to allow administrators to manage several servers.
Restriction
IMPORTANT: You must install Associated controllers only if you are implementing an EAM software architecture in a multi-domain environment.
Procedure
1. In the Administration Tools window, click Initialize an associated controller.
The associated controller initialization wizard appears.
2. Follow the displayed instructions.
Publishing a New Token Data File
Subject
This task is optional: if your organization needs to use smart cards or USB tokens which are not supported by EAM, you can import a personalization file in the LDAP directory, so that the use of specific smart card becomes possible.
NOTE: To know the list of standard smart cards supported by EAM, see One Identity EAM Release Notes.
The token personalization file is an XML file provided by Evidian.
EAM 9.0.2 Installation Guide
Installing EAM Controllers and Audit Databases73

Before Starting
Make sure you have the appropriate token personalization XML file.
Procedure
1. In the Administration Tools window, click Publish a new Token data file.
The wizard appears.
2. Follow the displayed instructions.
Defining Administrative Tokens for Self Service Password Request
See Enabling the Self Service Password Request (SSPR) Feature .
Importing an External Key
Subject
This task allows you to import the public key of an external application into the EAM security directory, in order to allow EAM users to share their accounts with the external application. It is used for example to enable the Mobile E-SSO feature. For more information, see Mobile E-SSO Installation and Configuration Guide.
Before Starting
The public key must be available as a PEM file.
Procedure
1. In the Administration Tools window, click Import an external key.
The wizard appears.
2. Follow the displayed instructions.
EAM 9.0.2 Installation Guide
Installing EAM Controllers and Audit Databases74
NOTE: If you are using Active Directory as the EAM security repository, when the wizard asks you to enter the login/password of an administrator account, use the account who is member of the Domain Admins group and that you have specifically created to install EAM.
Importing/Exporting the Controller Key
Subject
This task allows you to export the key of the primary controller to a secondary or associated controller. The server key is exported in an authentication description file and protected by password, then this key is imported into the secondary or associated server.
Before Starting
Before importing or exporting the controller key, make sure EAM Security Services are started.
Procedure
1. In the domain where the primary controller is installed, in the Administration Tools window, click Import/Export controller key.
The controller key management window appears.
2. Select Export server key.
a. Enter and confirm password to protect the key.
b. Click the Select button to create the authentication description file and click Ok.
3. In the domain where the secondary or associated controller is installed, in the Administration Tools window, click Import/Export server key.
The controller key management window appears.
4. Select Import server key.
a. Enter and confirm password.
b. Select the key file to be imported into a secondary or associated controller and click Ok.
EAM 9.0.2 Installation Guide
Installing EAM Controllers and Audit Databases75
Installing and Configuring the Audit Databases
Subject
All audit events received by EAM Controllers are stored in a local audit database. If several controllers are installed or if you plan to install several controllers, they must share the same audit database.
To achieve this, you can either:
l Install a single database server and configure all EAM controllers to use that database as their local audit database (not recommended).
l Install a local audit database on each EAM controller and set up a master audit database in which all controllers upload all their events.
The second solution provides the best performances. Indeed, the unavailability of the master audit database (for example during maintenance periods) does not prevent the collect of audit events from a workstation.
SQL scripts for creating the Audit V2 structure are available in the installation package, in the following folder: \TOOLS\WGSrvConfig\Support
These scripts are templates that you must analyze and adapt to your environment before executing them. If you need to store audit events in another type of database server than those listed below, please contact your Evidian representative.
l For MySQL Server: MYSQLV2.sql
l For Microsoft SQL Server: MSSQLV2.sql
l For PostGreSQL: PostgreSQLV2.sql
l For Oracle: OracleV2.sql
IMPORTANT:
l If you want to migrate an existing EAM Audit database from V1 format to the V2 format, please contact your Evidian representative.
l If you need another base, please contact your Evidian representative. For an Oracle database, you can follow the instructions in the OracleV2.sql file
Architecture Example
The following figure describes the use of a master audit database along with EAM:
EAM 9.0.2 Installation Guide
Installing EAM Controllers and Audit Databases76

All audit events received by the EAM Controller are stored in the local EAM audit cache (1). This local audit database prevents from losing audit events whenever the master database is not available.
The EAM Controller regularly uploads the content of the local audit cache to the master database (3), through a local OLE DB or ODBC driver (2). Once an audit record was successfully sent to the master database, it is removed from the local EAM audit cache.
NOTE:
l All requests for audit events issued from EAM Console query the master database, and not the local EAM audit cache.
l If the master database is not available, audit queries are not possible.
If there are connection problems between the local and master audit database, then the EAM Controller can send the content of its local database to a designated delegate controller. The latter then stores this content in its local database to be sent to the master audit database. This requires additional configuration: see Windows registry at the end of this Section for more information.
Installation processes
To install and configure an audit database, you must:
1. Install a supported database server (MySQL server, Microsoft SQL server...). Please refer to the product documentation for details on the installation procedure.
EAM 9.0.2 Installation Guide
Installing EAM Controllers and Audit Databases77

IMPORTANT: f you plan to install MySQL server, read the following:
l You must use the following database instance name: MySQLESSO.
l Make sure the ODBC connector is installed upon the MySQL server install-ation. You are strongly advised to use ODBC connector version 5.1 (you may experience problems with version 5.2). You can download connectors at the following URL: http://dev.mysql.-com/downloads/connector/odbc/5.1.html#downloads.
EAM 9.0.2 Installation Guide
Installing EAM Controllers and Audit Databases78
2. Create the database audit tables, as detailed in Creating Audit V2 Tables in an Existing Local Audit Database.
3. Set up the connection between the EAM controller and the local audit database: see Setting up the Connection to the Local Audit Database.
4. Insert or update audit translation data, as described in Updating the Audit Translation Data.
To set up an architecture using a master audit database, you must:
Install and configure the local audit database on the EAM primary controller.
Install a master audit database, using the same procedure as for the local audit database, as described in Creating Audit V2 Tables in an Existing Local Audit Database.
Configure the master audit database, as detailed in Defining a Master Audit Database.
IMPORTANT: You must install and configure the master audit database right after installing the first local audit database (the configuration of the master audit database is described in Defining a Master Audit Database
Install and configure the local audit database on the other EAM controllers.
To set up an architecture using a single database server (not recommended), you must:
1. Install and configure the local audit database, either on a dedicated computer or on an EAM controller.
2. Set up the connection between the other EAM controllers and the local audit database: see Setting up the Connection to the Local Audit Database.
Creating Audit V2 Tables in an Existing Local Audit Database
IMPORTANT: The wizard supports the following database servers:
l MySQL Server.
l SQL Server.
l PostgreSQL
1. In the Administration Tools window, click Install an Audit V2 Database Server.
The installation wizard appears.
2. Follow the displayed instructions with the following guidelines:
EAM 9.0.2 Installation Guide
Installing EAM Controllers and Audit Databases79

When this window appears Do the following
1. Click Create audit database tables in an existing database server.
The wizard detects the database server(s) installed on the system and displays them in the drop-down list.
2. Select the wanted database server.
3. Click Next.
The wizard retrieves the necessary information from the existing database server.
1. Make sure the SQL script path is correct and modify it if necessary.
2. Type the name and password of the super user of the existing database server.
NOTE:
if this password is modified, you must modify the Audit V2 connection parameters by following the procedure explained in Setting up the Connection to the Local Audit Database.
3. Click Next.
The table creation starts.
IMPORTANT: If you create the audit V2 tables in an existing MySQL database, the connection to the EAM Controller is also set up by the wizard: the EAM local audit database is operational when the wizard completes. If the existing database installed on the EAM Controller is not a MySQL database, or if you want to set up the connec-tion through the local OLE DB and/or ODBC driver, you must set up the connection parameters as detailed in "Setting up the Connection to the Local Audit Database".
EAM 9.0.2 Installation Guide
Installing EAM Controllers and Audit Databases80
Setting up the Connection to the Local Audit Database
Subject
This section describes how to set up the link between the EAM Controller and the local audit database.
Before Starting
You have created the audit V2 tables as detailed in Creating Audit V2 Tables in an Existing Local Audit Database.
Procedure
1. In the Administration Tools window, click Configure local audit database.
The wizard appears.
2. Depending on the audit database server, do one of the following:
a. To set up connection parameters for a Microsoft SQL Server 2000 (and previous):
l Click Use Evidian EAM embedded database and enter the administrator's password.
l If SQL Server is not installed on the EAM Controller, click the Advanced button to set a specific instance and the administrator's name (optional).
l Click Apply.
b. To set up connection parameters for any other supported databases (including Microsoft SQL Server 2005 and above):
l Select Use existing corporate database, click the button and complete the displayed window as follows:
Provider tab: select the OLE DB provider corresponding to the data you want to access:
Database OLE DB Provider
Microsoft SQL Server 2005(and above)
Microsoft OLE DB Provider for SQL server
MySQL Microsoft OLE DB Provider for ODBC Drivers
EAM 9.0.2 Installation Guide
Installing EAM Controllers and Audit Databases81

Database OLE DB Provider
IMPORTANT: you are strongly advised to use ODBC connector version 5.1 (you may experience problems with version 5.2).
Oracle Oracle Provider for OLE DB
PostGreSQL Microsoft OLE DB Provider for ODBC Drivers
IMPORTANT: not supported on Windows 64-bit version.
Connection tab:
lConnection tab:Select the data source name of the configured ODBC driver (MySQL or PostGreSQL) or the server name (Microsoft SQL Server or Oracle) corresponding to the data you want to access.
NOTE: Enter the NETBIOS name if you want to use the Windows authentication.
Select the authentication method to connect to the server:- Use Windows NT Integrated security for Windows authentication.OR- Use a specific user name and password for a specific SQL account.If required, provide the login and password used to authenticate to the data source.Note: for Microsoft SQL servers, you can enter an:- SQL account.OR- Active Directory account if you have selected the Windows Integrated Authentication.Select the Allow saving password check box.
Select the database name that you want access (the database must exist).
These connection parameters are stored in the strongly encrypted area of the EAM configuration data.
l Click OK.
NOTE: If you have selected the Windows authentication, you must enter the Active Directory account credentials to connect to the database, such as DOMAIN\loginName.
l Select in the Table name drop-down list the proper audit table.
EAM 9.0.2 Installation Guide
Installing EAM Controllers and Audit Databases82

l Click the Verify button to check the configuration settings.
IMPORTANT:When using the Windows authentication:The account password should never expire in order to allow the EAM controller to work continuously.If the account password is changed, the configuration must be re-executed. When changing the account password, the administrator must make sure the User must change password at next login check box is not selected.
l Click Apply.
If necessary, restart EAM Security Services to take configuration changes into account.
Defining a Master Audit Database
Subject
This section describes how to set the master audit database connection parameters.
Before Starting
l There is only one master audit database for all EAM servers.
l Before defining a master audit database for a controller, the local database must have been previously created, as explained in Installing and Configuring the Audit Databases.
EAM 9.0.2 Installation Guide
Installing EAM Controllers and Audit Databases83

Procedure
1. Make sure the database client software (Oracle or Microsoft SQL Server) or the ODBC driver (MySQL) is installed on the EAM Controller and configured.
2. Make sure the structure of the Audit V2 tables has been created in the database server of the master database. To do so, use the administration tools of the database server by executing the appropriate SQL script.
3. In the Administration Tools window, click Define a master Audit database.
4. Select Upload audit events in a centralized master database, and complete the window as detailed below:
a. Master Database connection parameters area:
l Microsoft SQL Server 2000 (and previous): click SQL Server database and fill in the Server name, Database name, Login, Password and Confirmation fields.
l For any other supported databases (including Microsoft SQL Server 2005 and above), select Connect through an OLE DB Provider, click the button and complete the displayed window as follows:
Provider tab: select the OLE DB provider corresponding to the database you want to access.
Database OLE DB Provider
Microsoft SQL Server 2005(and above)
Microsoft OLE DB Provider for SQL server
EAM 9.0.2 Installation Guide
Installing EAM Controllers and Audit Databases84

Database OLE DB Provider
MySQL Microsoft OLE DB Provider for ODBC Drivers
IMPORTANT: you are strongly advised to use ODBC connector version 5.1 (you may experience problems with version 5.2).
Oracle Oracle Provider for OLE DB
PostGreSQL Microsoft OLE DB Provider for ODBC Drivers
IMPORTANT: not supported on Windows 64-bit version.
Connection tab: Select the Data Source Name (DSN) of the configured ODBC driver (MySQL or PostGreSQL) or the server name (Microsoft SQL Server or Oracle) corresponding to the data you want to access.
IMPORTANT: if the wanted name does not appear in the list, the client database software (SQL server client, Oracle client, MySQL or PostGreSQL ODBC Driver) is not properly configured. Refer to the database documentation to configure it. When using an ODBC driver, you must select a DSN previously declared using the Microsoft ODBC Data Source Administrator tool (click Administrative Tools\Data Sources (ODBC) to start it).
Select the authentication method to connect to the server:
l Use Windows NT Integrated security for Windows authentication.
OR
l Use a specific user name and password for a specific SQL account
NOTE: For Microsoft SQL servers, you can enter an SQL account. If you have selected the Windows Integrated Authentication, enter an Active Directory account .
Select the Allow saving password check box.
Select the database name that you want access (the database must exist).
NOTE: These connection parameters are stored in the strongly encrypted area of the EAM configuration data.
l Click OK.
NOTE: If you have selected the Windows authentication, you must enter the Active Directory account credentials to connect to the database, such as DOMAIN\-loginName.
EAM 9.0.2 Installation Guide
Installing EAM Controllers and Audit Databases85

IMPORTANT: When using the Windows authentication:
l The account password should never expire in order to allow the EAM controller to work continuously.
l If the account password is changed, the configuration must be re-executed. When changing the account password, the administrator must make sure the User must change password at next login check box is not selected..
b. Master Database table area:
Select the name of the table where EAM audit events are to be stored.
For Audit V2, the name of the table to use in case of a master database is v_iamaudit or dbo.v_iamaudit for SQL Server.
c. Master database table size management area
If you want that the EAM Controller sends e-mails to database or security administrators whenever the master database reaches a size threshold, fill in the following fields:
l Size warning thresholdSize threshold (in number of audit records: about 2 KB are required for each record).
l Administrator’s e-mailE-mail address of the database administrator.
l also send e-mail toA set of comma-separated list of e-mail addresses of other administrators.
l SMTP serverName of the SMTP server in charge of routing e-mails.
E-mails are sent to the database administrator (with copy to co-administrators) once the master database reaches the specified size. Even though the master database reached the specified size, the EAM Controller still uploads audit events to the master database.
d. Upload periodicity area:
This area allows you to configure when EAM audit events are uploaded to this master database. Specify a fixed daily hour (for example at 02:00 everyday) or a frequency (every days, every 4 hours, every minute for example).
e. Local database management area:
You may also indicate that local audit events should be uploaded to the master database as soon as the local SQL Server database reaches a maximum size. For this purpose, indicate the maximum size (in number of stored events) and how often EAM should check the size of the local audit SQL Server database (every 120 seconds for example).
EAM 9.0.2 Installation Guide
Installing EAM Controllers and Audit Databases86
Windows registry
Registry values regarding the configuration of the master audit database are located in the following registry key: HKEY_LOCAL_MACHINE\SOFTWARE\Enatel\WiseGuard\FrameWork\AuditMasterSrv
l In case of communication issues between the master audit database and the EAM Controller, you can set the following values to force the appropriate SQL syntax:
l UseOracleSyntax (REG_DWORD) = 1.
l UseSQLServerSyntax (REG_DWORD) = 1.
NOTE: If required, you can also set these two values in HKEY_LOCAL_MACHINE\SOFTWARE\Enatel\WiseGuard\FrameWork\AuditSrv, which is the registry key related to the config-uration of the local audit database.
l In case of communication issues between the master and local audit databases, you can set the following values to force the delegation to another controller:
IMPORTANT: These values should only be used as an exceptional measure and only in case of slow network.
l Delegator EAM controller:
l UploadThruControllers (REG_DWORD) = DNS.name.of.delegate.controller[:port] [, another.dns.name[:port] ...].This value must contain the name of the delegate controller to which the delegator will send the content of its Local database. If several delegate controllers are defined in the corporate network, the controller names must be comma separated.The existing connection parameters for both Local database and Master database must not be changed. The Master database connection parameters are used by the delegator controller to read audit events and provide them to the EAM Console.The existing upload frequency configuration parameters must not be changed as they are used by this audit upload delegation mechanism.
l MaxCacheSize (REG_DWORD) = number of events to send at a time to the delegate controller.This registry value contains the number of events in the Local size that triggers the audit upload. For a frequent audit upload, this parameter is usually set to a small value. For the purpose of this audit upload delegation mechanism, you should set this parameter to a reasonably large value: Evidian recommends 1024 (0x400 in hexadecimal).
l Delegate EAM controller:Evidian recommends the installation of a dedicated EAM controller. Before installing this controller, the following registry value must be set in HKEY_LOCAL_MACHINE\SOFTWARE\Enatel\WiseGuard\FrameWork\Debug: DontDeclareSrv (REG_DWORD) = 0x01.Once it is set, the delegate EAM controller does not appear as a Controller in
EAM 9.0.2 Installation Guide
Installing EAM Controllers and Audit Databases87
the Directory: no workstation will ever try to connect to it. This will ensure that this delegate controller is exclusively used by the delegator controller(s). For more information on the installation of an additional EAM controller, see Installing EAM Controller Software.
The delegate controller must be configured, including the connection to its audit database(s). To avoid additional delays while viewing audit events gathered by the delegator controller, you should either:
l Configure the delegate controller to use the Central database as its Local database. In this case, you must not configure a Master database on this delegate controller.
l Install a Local database on the controller, set the Central database as its Master database and set the Audit upload frequency parameters to ensure that events received from the delegate controller(s) are sent to the Master database every 5 minutes (or once the Local database contains 10 events).
One Identity recommends the second configuration (connect the Local database to the Central database with no defined Master database) as it avoids an additional delay between the generation of the audit event on a workstation and its availability for administrators using the Console.
Updating the Audit Translation Data
Subject
This section explains how to import the audit events translation data, so that audit events can be easily read.
Procedure
1. In the Administration Tools window, click Update Audit translation data.
The Insert/Update Audit MetaData window appears.
EAM 9.0.2 Installation Guide
Installing EAM Controllers and Audit Databases88

The metadata XML file location field is already filled-in.
2. Select a category to display the errors and resources translations that are about to be imported:
l Errors column: the list of available translations of errors found in the selected folder, for the selected category.
l Resources column: the list of available translations of resources (type, attribute, known values of objects appearing in audit events) found in the selected folder, for the selected category.
3. Select the check box(es) corresponding to the audit database(s) in which you want to import translations.
NOTE:
l If no master database is configured on the controller, the second check box does not appear.
l When a master database is used by a controller, you do not have to import the translation data in the controller local database.
4. Click Import.
A confirmation window appears.
EAM 9.0.2 Installation Guide
Installing EAM Controllers and Audit Databases89
Preparing the EAM Controller Configuration
Declaring the Technical Accounts Used by the EAM Controllers
Before Starting
l The technical accounts are created and configured. For details, see one of the following sections depending on your LDAP directory type:
l Active Directory: see Extending the Schema and Setting ACLs.
l Active Directory + AD LDS: see Preparing the AD LDS Instance Administrator Account.
l In non-Microsoft directory servers, this account must be an administrator of the directory.
l If you are using a local SQL Server database, you must have installed the audit database, as described in Installing and Configuring the Audit Databases.
l You must have configured the audit database, as described in Setting up the Connection to the Local Audit Database.
Procedure
1. In the Administration Tools window, click Configure Directory and Audit login/password.
The Controller Configuration window appears.
2. Declare the technical account that will be used by the EAM Controller to connect to the directory.
Securing the EAM Web Service
IMPORTANT: The QRentry and Reporting Service functions can only be used with the EAM Web Service
Procedure
EAM 9.0.2 Installation Guide
Installing EAM Controllers and Audit Databases90

1. In the Administration Tools window > Controller configuration, click Configure Directory and Audit login/password.
The Controller Configuration window appears.
2. Select the Web Service Security tab.
3. Select the Key and Certificate file to use.As an alternative, you can generate your own test certificate by clicking the Generate button.
4. If the certificate file is password protected, select the corresponding check box and enter the password.
5. Select the Certification path validation file to use.
6. Click OK.
The EAM Web Service is now secure.
Setting the Primary Administrator
Subject
By default, the super administrator is the user who created the database. However, you can select a specific user to be the Primary Administrator of the EAM solution.
Procedure
1. In the Administration Tools window > Controller configuration, click Configure Directory and Audit login/password.
The Controller Configuration window appears.
2. Select the Primary Administrator Account tab.
3. Enter the login name or the DN of the user you want to select.
EAM 9.0.2 Installation Guide
Installing EAM Controllers and Audit Databases91
4. Click OK.
The selected user is now the Primary Administrator of the solution.
Defining the Password for the Provisioning Connector Account
Subject
The E-SSO Provisioning connector enables the:
l Password synchronization between the account base of a client application and Active Directory.
l Regular and automatic password renewal.
To enable this connector, you must set the admin login of the administrator account of the target application in the EAM console (see One EAM Console - Guide de l'administrateur) and associate it with a password, as described in the following procedure.
Description
The following illustration details how the E-SSO provisioning connector works:
IMPORTANT: Password provisioning may slow down the sending of the login/-password to the application. To avoid this, you can activate the window masking option in the application window (see Enterprise SSO - Guide de l'administrateur).
Procedure
1. In the Administration Tools window > Controller configuration, click Configure Directory and Audit login/password.
The Controller Configuration window appears.
2. Select the Provisioning connectors tab.
3. Enter the login name or the DN of the user you want to select.
4. Enter the password and confirm it.
5. Click OK to validate or Apply to associate passwords to other administrator accounts.
The administrator account is now created.
EAM 9.0.2 Installation Guide
Installing EAM Controllers and Audit Databases92

NOTE: If there are several accounts, they appear in the Login drop down list.
To delete an account:
a. Select it in the drop down list.
b. Erase the password fields.
c. Click Apply.
Installing EAM Controller Software
Subject
This section explains how to install an EAM Controller, which is made of the following components:
l EAM server, which is used by the EAM Clients during some operations (administration, audit...). This module must be installed on a clearly identified machine.
l EAM Console, which is the administration console. This module can be installed on any client workstations.
NOTE: To use EAM Console, EAM Controller must be installed on a computer. For more information, see EAM Architecture.
Depending on your needs, you may install these two modules on the same workstation or separately.
Interactive/Silent Mode Installation
The EAM Controller is delivered as installation packages using the Microsoft Windows Installer (MSI) format.
You can install this package:
l In interactive mode: follow the instructions of the installation wizard, as described in the following procedure.
l In silent mode: command line options allow you to specify installation options for each of the installation package: see Installing EAM MSI Packages in Silent Mode.
EAM 9.0.2 Installation Guide
Installing EAM Controllers and Audit Databases93

Before Starting
l You must have prepared the LDAP Directory (see Preparing the Storage of Security Data in the LDAP Directory).
l You must have installed the Security and Audit databases (see Installing EAM Controllers and Audit Databases).
l Configure the EAM Security Services (see Configuring Workstations).
l Make sure you have installed the Microsoft Redistributable as explained in Installing Microsoft Redistributable.
l Check that your Windows operating system is supported by EAM. For details, see One Identity EAM Release Notes.
Procedure
1. Start the Administration Tools window (see Starting the Administration Tools window).
2. In the Administration Tools, click Install EAM Controller.
The EAM Controller installation wizard appears.
NOTE: If the EAM Console installation wizard does not automatically appear, from the Authentication Manager or Enterprise SSO installation package browse the INSTALL directory and double-click ESSOController.msi.
Follow the displayed instructions and the guidelines given in the following Controller Wizard Window Description section.
3. Restart the workstation.
If you have installed Authentication Manager, the Authentication Manager authentication window appears.
Controller Wizard Window Description
"Select Installation Type" and "Select Features" Windows Description
To choose the components to install, click Custom in the Select Installation Type window.
EAM 9.0.2 Installation Guide
Installing EAM Controllers and Audit Databases94

l The feature selection window appears:
l Enterprise Access Management Controller: EAM server installation.
l Enterprise Access Management Console: EAM Console software module installation.
l Proximity devices plugin: this feature is necessary if you want to manage RFID devices from EAM Console.
l Supported languages: possible language of EAM modules.
Installing the Reporting Service
Subject
The reporting service enables to generate PDF reports for:
l EAM administrators from the EAM console.
l End-users from Authentication Manager.
Description
The reporting service must be installed on a controller. As this is not a mandatory module, you can install one or several controllers with a reporting service. In that case, the administrator must specify which controller hosting the reporting service he wants to use to create reports. The PDF report files are then generated locally on the controller.
This reporting service connects to the:
EAM 9.0.2 Installation Guide
Installing EAM Controllers and Audit Databases95

l UAS web service hosted by the UAS security services.
l Local and existing SQL database server to store:
l Its own configuration, such as predefined tools, plugins and models.
l Temporarily the data collected to build the reports.
IMPORTANT:
l The reporting service is compatible only with MySQL and (Microsoft) SQL Server databases.
l If the audit database is manually modified (emptied for example), reports using both the audit database and the directory can provide inaccurate inform-ation.
Architecture Example
The following figure describes the use of a reporting service along with EAM:
EAM 9.0.2 Installation Guide
Installing EAM Controllers and Audit Databases96
Before Starting
The following elements/pieces of software must be installed and configured:
l At least one EAM Controller must be installed: seeInstalling EAM Controller Software.
IMPORTANT: The EAM Controller must be installed before securing the Web Service.
l You have secured the Web Service role as described in Securing the EAM Web Service.
l Java Runtime Environment on the same platform as the operating system, for more information on the version, see One Identity EAM Release Notes.
IMPORTANT: If the JRE is not installed when the Reporting Server installation starts, a window asking you to install the JRE will appear. Make sure to install the correct version: 32 or 64 bits.
l Local audit database with the related Java Connector, for more information on the version, see One Identity EAM Release Notes.
If you have a:
l MySQL database: go to Installing the Reporting Service on a MySQL Database.
l (Microsoft) SQL Server database: go to Installing the Reporting Service on an (Microsoft) SQL Server Database.
Installing the Reporting Service on a MySQL Database
Preparing the Installation
Checking the MySQL Configuration
For the reporting service to operate correctly, you must check the values of some important MySQL parameters, such as:
l max_allowed_packet: maximum packet length to send/receive to/from the MySQL server. Its value must be set to 32Mb.
l wait_timeout: number of seconds the MySQL server waits for an activity on a connection before closing it. Its value must be set to the minimum default value 28800 seconds.
IMPORTANT: To be persistent, these parameters must be customized by the database administrator in the MySQL initialization file in the [mysqld] section.
EAM 9.0.2 Installation Guide
Installing EAM Controllers and Audit Databases97

Managing databases
The installation wizard creates:
l Two databases for its own purpose, in addition to the existing iamaudit database:
l iar_db: to store its own configuration such as predefined tools (to log, sign reports, notify end of report generation, etc.), plugins (available connectors, data providers, etc.), models, etc.
l iar_wdb: to temporarily store the data collected to create the reports.
IMPORTANT: The iar_wdb database does not need to be saved or dumped since it is temporary, whereas the iar_db database should be added to your own process of database backup.
l An SQL user for the reporting service named ureport and checks that the user has sufficient rights in both databases described previously.
NOTE: These installation steps are executed by the SQL account used by the control-ler account.
Executing the Installation
Procedure
1. Start the Administration Tools window (see Starting the Administration Tools window).
2. In the Administration Tools, click Install a Reporting Server.
EAM 9.0.2 Installation Guide
Installing EAM Controllers and Audit Databases98

The Reporting Server installation wizard appears.
3. Click Next to start the installation and follow the displayed instructions with the following guidelines:
NOTE: If you did not install the elements described in Before Starting above, the installation wizard will ask you to install them and will then restart.
When this window appears Do the following
The wizard detects whether the following elements are installed and/or configured:
l The current workstation is an EAM Controller.
l The Web Service role is secure.
l The EAM Web Service certificate is valid.
If all the ticks are green click Next, otherwise go back to Before Starting above to finish the configuration of the required elements/pieces of software.
EAM 9.0.2 Installation Guide
Installing EAM Controllers and Audit Databases99

When this window appears Do the following
The wizard detects whether the reporting database is configured by checking if the following elements are created and/or configured:
l Local DB server is created.
l Reporting DB user exists.
l Reporting DB exists.
l Reporting tables exist.
Create these elements by clicking the corresponding Create buttons; if all the ticks are green click Next.
NOTE: the account used to connect to the Reporting databases is the ureport user.
1. Select the Install Reporting Server check box and enter the Package and Destination paths.
2. Select the Install Java Database Connector check box and check that the Jar archive path is correct.If you have not downloaded it, click the Download button.
NOTE: Network paths are not supported.
3. Click Next.
If you want to sign the generated PDF reports, fill-in the Signature certificate field.If the certificate file is password protected, select the corresponding check box and enter the password.As an alternative, you can generate your own test certificate by clicking the Generate button.
Click Next.
Click Finish to close the Wizard and start the Reporting Server.
EAM 9.0.2 Installation Guide
Installing EAM Controllers and Audit Databases100

Installing the Reporting Service on an (Microsoft) SQL Server Database
Preparing the Installation
To be able to execute the installation, you must first complete the following steps:
1. Create the technical account used by the reporting module named ureport with the following properties:
l The account password must never expire.
l This account must have the db_datareader right on the esso database.
2. With the administrator account named sa, execute the following SQL scripts:
l iar_mssql_create_db.sql (under TOOLS\WGSrvConfig\Support) to create the following databases:
l iar_db: to store its own configuration such as predefined tools (to log, sign reports, notify end of report generation, etc.), plugins (available connectors, data providers, etc.), models, etc.
l iar_wdb: to temporarily store the data collected to create the reports.
IMPORTANT: The iar_wdb database does not need to be saved or dumped since it is temporary, whereas the iar_db database should be added to your own process of database backup.
l iar_mssql_create_tables.sql (under TOOLS\WGSrvConfig\Support) to create the reporting tables.
Executing the Installation
Procedure
1. Start the Administration Tools window (see Starting the Administration Tools window).
2. In the Administration Tools, click Setup a Reporting Server.
EAM 9.0.2 Installation Guide
Installing EAM Controllers and Audit Databases101

The Reporting Server installation wizard appears.
3. Click Next to start the installation and follow the displayed instructions with the following guidelines:
NOTE: If you did not install the elements described in Before Starting above, the installation wizard will ask you to install them and will then restart.
When this window appears Do the following
The wizard detects whether the following elements are installed and/or configured:
l The current workstation is an EAM Controller.
l The Web Service role is secure.
l The EAM Web Service certificate is valid.
If all the ticks are green click Next, otherwise go back to Before Starting above to finish the configuration of the required elements/pieces of software.
EAM 9.0.2 Installation Guide
Installing EAM Controllers and Audit Databases102
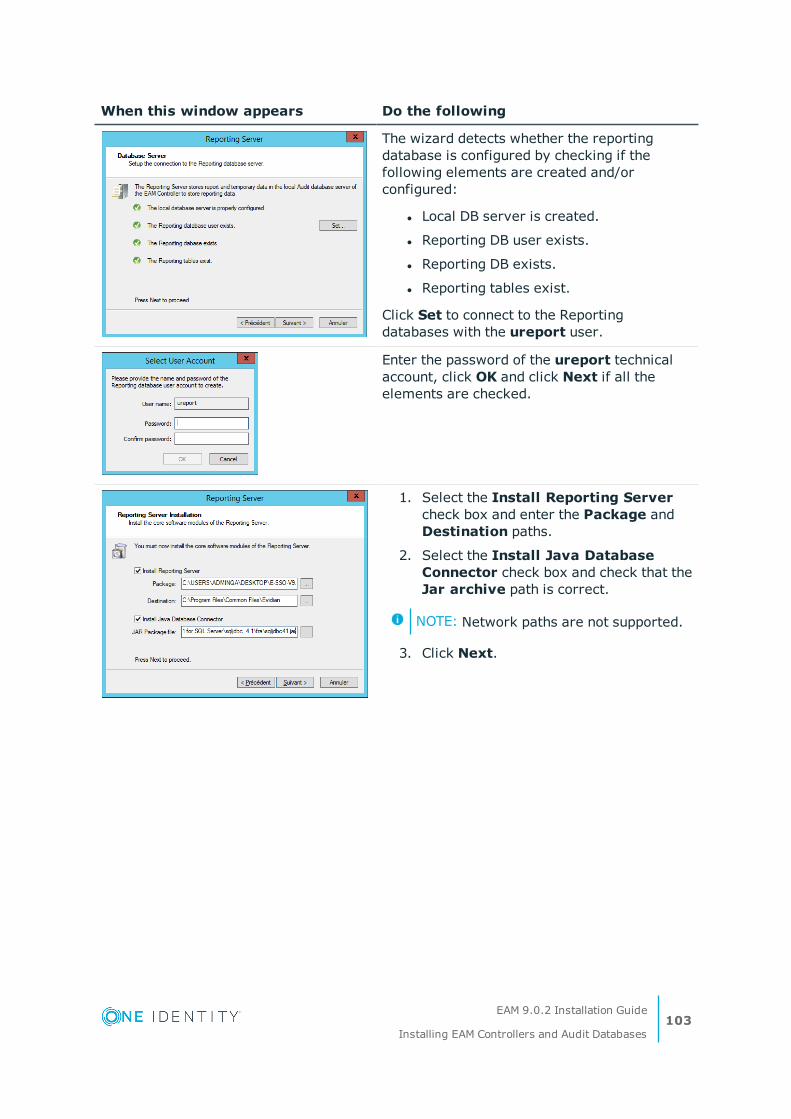
When this window appears Do the following
The wizard detects whether the reporting database is configured by checking if the following elements are created and/or configured:
l Local DB server is created.
l Reporting DB user exists.
l Reporting DB exists.
l Reporting tables exist.
Click Set to connect to the Reporting databases with the ureport user.
Enter the password of the ureport technical account, click OK and click Next if all the elements are checked.
1. Select the Install Reporting Server check box and enter the Package and Destination paths.
2. Select the Install Java Database Connector check box and check that the Jar archive path is correct.
NOTE: Network paths are not supported.
3. Click Next.
EAM 9.0.2 Installation Guide
Installing EAM Controllers and Audit Databases103
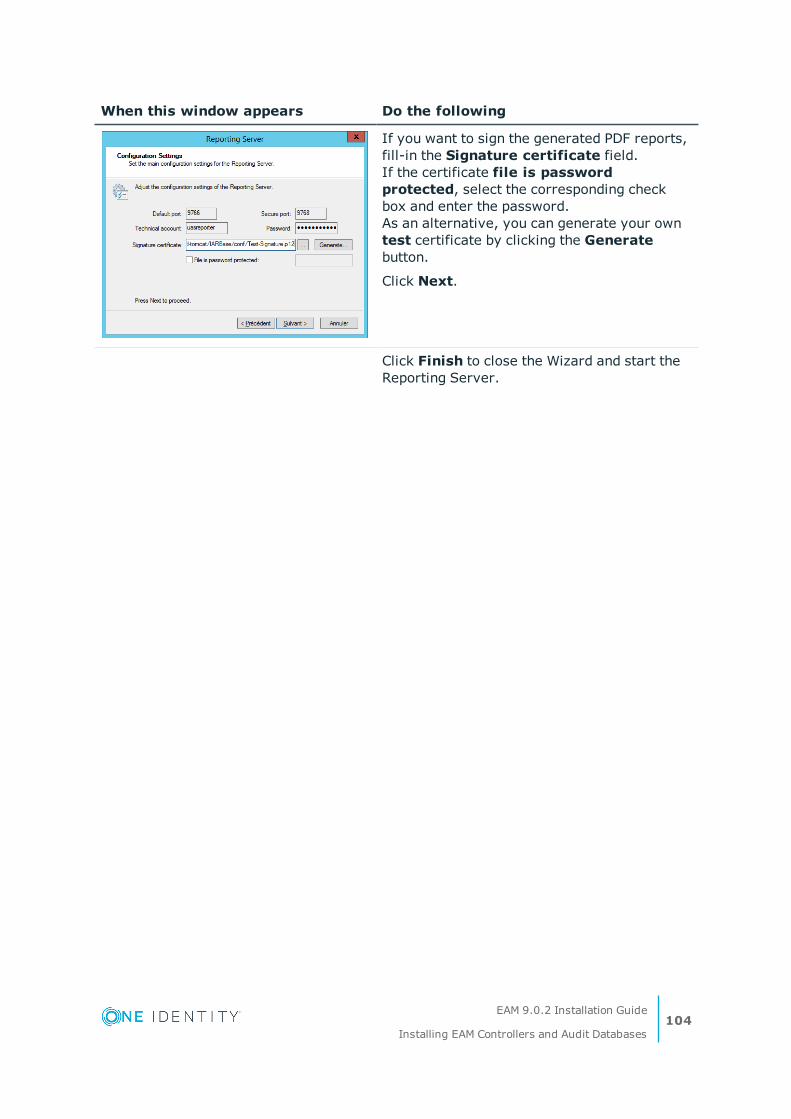
When this window appears Do the following
If you want to sign the generated PDF reports, fill-in the Signature certificate field.If the certificate file is password protected, select the corresponding check box and enter the password.As an alternative, you can generate your own test certificate by clicking the Generate button.
Click Next.
Click Finish to close the Wizard and start the Reporting Server.
EAM 9.0.2 Installation Guide
Installing EAM Controllers and Audit Databases104
4
Installing and Configuring the Software Modules on the
Workstations
Subject
After the initialization of the EAM security database, you must install and configure the software modules on all the workstations that will run in the EAM environment. All these workstations must at least run the Enterprise SSO software module. Depending on your needs, you can also install the Authentication Manager and/or the EAM Console modules.
Interactive/Silent Mode
The EAM software suite is delivered as installation packages using the Microsoft Windows Installer 2.0 (MSI) format. You can install these packages either in interactive mode (following the instructions of the installation wizard), or in silent mode using any software distribution tool. Command line options allow you to specify installation options for each of the software suite package.
As they are in MSI format, you can install these packages on many workstations if these workstations are member of a Windows domain, using the MSI distribution functionality of Windows Server operating systems (Group Policies (GPO)). This section describes how to install and configure the software modules workstation by workstation. For more information on how to:
l Install EAM software MSI packages in silent mode, see Installing EAM MSI Packages in Silent Mode.
l Deploy EAM modules on workstations using GPO, see Centralizing Parameters Using Group Policy Objects (GPO).
Localization
The EAM software suite applications support several languages, and use the language defined in the regional settings of the users workstations without any further installation. Nevertheless, depending on your installation package, you may find several installation
EAM 9.0.2 Installation Guide
Installing and Configuring the Software Modules on the Workstations105

packages using several languages for one application. The language of the selected installation package will be the language of the installation wizard and of the labels of the Windows Start menu.
Configuring Workstations
Subject
Before or after installing the software modules, you must configure the workstation, except for the Authentication Manager module for which you must configure the workstation before its installation.
Procedure
1. Start the Administration Tools window (see Starting the Administration Tools window).
2. In the Select a task list, select Install software modules.
3. In the Software Installation task list, click Configure workstation.
The Configuration Assistant appears.
4. Follow the displayed instructions in the wizard windows with the following guidelines:
l To configure the EAM workstation with Active Directory, see EAM Configuration with Active Directory.
l To configure EAM workstation with another user database or directory, see EAM Configuration with a User Database or Directory other than Microsoft Active Directory.
EAM Configuration with Active Directory
The following table explains how to configure an EAM workstation to work with Active Directory.
EAM 9.0.2 Installation Guide
Installing and Configuring the Software Modules on the Workstations106

Step When this window appears… Do the following
1 l If you have been supplied with a license key file: a. In the Customer ID
field, type your Customer ID provided by your Evidian repres-entative.
b. Click Import to select your license key file.The license keys are saved and appear in the table.
c. Click Next.
If you have been supplied with license keys:
a. In the Customer ID field, type your Customer ID.
b. For each license key you have, select the license name in the Select license list.
c. Type the license keys in the corresponding field and click Add.The license keys are saved and appears in the table.
d. Click Next.
To delete a license key, double-click it.
2 1. Select with a Controller. 2. Click Next.
EAM 9.0.2 Installation Guide
Installing and Configuring the Software Modules on the Workstations107

Step When this window appears… Do the following
3 1. Select Microsoft Active Directory.
2. Click Next.
4 1. Select a security database storage:
l A security database stored in the domain directory, then go to step 6.
l Otherwise, a security database stored in an AD LDS server, then go to step 5.
2. Click Next.
5 1. Configure the parameters to access to the LDAP server.
2. Click Next.
EAM 9.0.2 Installation Guide
Installing and Configuring the Software Modules on the Workstations108
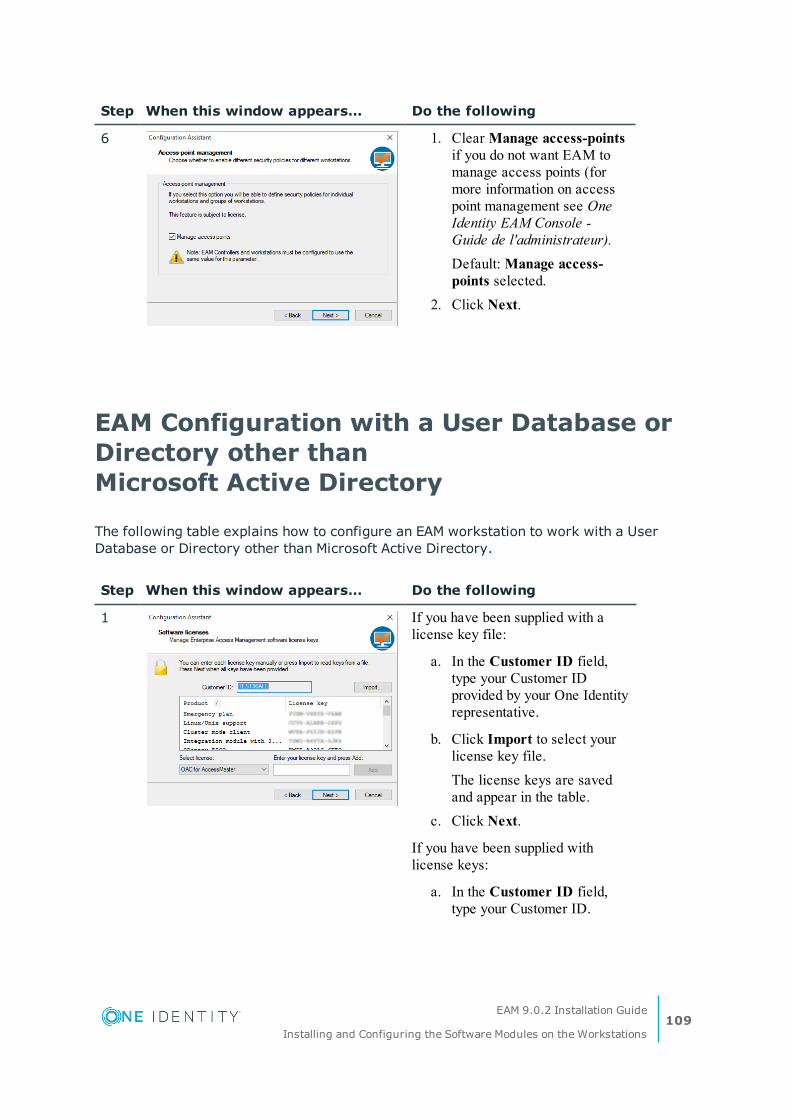
Step When this window appears… Do the following
6 1. Clear Manage access-points if you do not want EAM to manage access points (for more information on access point management see One Identity EAM Console - Guide de l'administrateur).Default: Manage access-points selected.
2. Click Next.
EAM Configuration with a User Database or Directory other than Microsoft Active Directory
The following table explains how to configure an EAM workstation to work with a User Database or Directory other than Microsoft Active Directory.
Step When this window appears… Do the following
1 If you have been supplied with a license key file:
a. In the Customer ID field, type your Customer ID provided by your One Identity representative.
b. Click Import to select your license key file.The license keys are saved and appear in the table.
c. Click Next.
If you have been supplied with license keys:
a. In the Customer ID field, type your Customer ID.
EAM 9.0.2 Installation Guide
Installing and Configuring the Software Modules on the Workstations109

Step When this window appears… Do the following
b. For each license key you have, select the license name in the Select license list.
c. Type the license keys in the corresponding field and click Add.The license keys are saved and appears in the table.
d. Click Next.
Note: to delete a license key, double-click it.
2 1. Select with a Controller. 2. Click Next.
3 1. Select one of the user authen-tication database, other than Microsoft Active Directory.
2. Click Next.
EAM 9.0.2 Installation Guide
Installing and Configuring the Software Modules on the Workstations110

Step When this window appears… Do the following
4 1. Configure the parameters to access to the LDAP server.
2. Click Next.
5 1. Configure LDAP security options.
l LDAP authentication mechanismDepending on your directory type, see "Configuring Secure Authentication" in Preparing the Storage of Security Data in the LDAP Directory.
l LDAP data privacyDepending on your directory type, see "Configuring Data Securization" in Preparing the Storage of Security Data in the LDAP Directory.
2. Click Next.
EAM 9.0.2 Installation Guide
Installing and Configuring the Software Modules on the Workstations111

Step When this window appears… Do the following
6 1. Configure your network environment.
l To synchronize passwords from the SAMBA controller to the OpenLDAP server, select Passwords are synchronized only from MS Windows domain to LDAP server and fill in the Netbios names of the SAMBA domain and the SAMBA controller.
l To manage SAMBA computer object, select Integrate with SAMBA computer objects.
l To manage SAMBA group object, select Support SAMBA group.
2. Click Next.
For more information, see Integrating SAMBA
7 1. Clear Manage access-points if you do not want EAM to manage access points (for more information on access point management see One Identity EAM Console - Guide de l'administrateur).Default: Manage access-points selected.
2. Click Next.
EAM 9.0.2 Installation Guide
Installing and Configuring the Software Modules on the Workstations112
Installing Microsoft Redistributable
Subject
Before installing an EAM Client or Controller, you must install Microsoft Visual C++ 2012 Redistributable as explained in the following procedure.
Interactive/Silent Mode Installation
The Microsoft Visual C++ 2012 Redistributable is delivered as an installation package using the Microsoft Windows Installer (MSI) format.
You can install this package:
l In interactive mode: follow the instructions of the installation wizard, as described in the following procedure.
l In silent mode: command line options allow you to specify installation options for each of the installation package: see Installing EAM MSI Packages in Silent Mode.
Procedure
1. Start the Administration Tools window (see Starting the Administration Tools window).
2. In the Select a task list, select Install software modules.
3. In the Software Installation task list, click Install Microsoft Redistribuables and follow the displayed instructions.
IMPORTANT: If Microsoft Redistributable is already installed on the worksta-tion, the Install Microsoft Redistribuables link does not appear.
The installation starts.
Installing an EAM Client
Subject
INFODOC: Attention, section en doublon avec le CH2 du guide "E-SSO – Getting Started with SSOWatch". Si cette section subit des mises à jour, ne pas oublier de les reporter dans le guide "E-SSO – Getting Started with SSOWatch".The EAM Client installation wizard allows you to install simultaneously all the EAM software modules on a workstation.
The EAM software modules are:
EAM 9.0.2 Installation Guide
Installing and Configuring the Software Modules on the Workstations113

l Authentication Manager
Authentication Manager is the authentication software module.
l Enterprise SSO
Enterprise SSO is the secure single sign-on (SSO) software module.You can install it on a single workstation or deploy it on all the workstations of an enterprise network. This section explains how to install it on a workstation.
To install Cloud E-SSO, see Installing Cloud E-SSO.
For information on enterprise-wide installation, see Centralizing Parameters Using Group Policy Objects (GPO), and Enterprise SSO - Guide de l'administrateur.
l Enterprise Access Management Console
EAM Console is the administration console. This module can be installed on any client workstations.
Interactive/Silent Mode Installation
The EAM Client is delivered as installation packages using the Microsoft Windows Installer (MSI) format.
You can install this package:
l In interactive mode: follow the instructions of the installation wizard, as described in the following procedure.
l In silent mode: command line options allow you to specify installation options for each of the installation package: see Installing EAM MSI Packages in Silent Mode.
Before Starting
Make sure you have installed the Microsoft Redistributable as explained in Installing Microsoft Redistributable.
Make sure you have enough available hard disk space.
NOTE: For more information on versions and hardware requirements, see One Identity EAM Release Notes.
If you want to install the SSOJava plug-in (which is an installation feature of Enterprise SSO), a supported Java version must imperatively be already installed on your workstation (for more details about the supported JRE versions, see One Identity EAM Release Notes).
Close all running applications.
EAM 9.0.2 Installation Guide
Installing and Configuring the Software Modules on the Workstations114

Procedure
1. Start the Administration Tools window (see Starting the Administration Tools window).
2. In the Select a task list, select Install software modules.
3. In the Software Installation task list, click Install EAM Client.
NOTE: If the Client installation wizard does not appear: from the downloaded install-ation package browse the INSTALL directory and double-click ESSOAgent.msi.
The EAM Client installation wizard appears.
4. Follow the displayed instructions and the guidelines given in the following Client Wizard Window Description section.
5. Restart the workstation.
If you have installed Authentication Manager, the Authentication Manager authentication window appears.
Client Wizard Window Description
"Select Installation Type" and "Select Features" Window Description
To choose the components to install, click Custom in the Select Installation type window.
The feature selection window appears:
EAM 9.0.2 Installation Guide
Installing and Configuring the Software Modules on the Workstations115
l Authentication Manager: Authentication Manager software module installation, which includes the following selectable features:
IMPORTANT:
l For performance reasons, you are advised to select only the required features.
l The selection of the Authentication Manager features is available only for Windows systems from Windows 7 and above.
l Password and OTP authentication.
l Smart card authentication.
l RFID authentication.
l Biometrics authentication.
NOTE: For details on the supported authentication devices, see One Identity EAM Release Notes.
l Mobile authentication: users who forgot their password can use their mobile phone to log on to Windows. Administrators can use their mobile phone to log on as local administrators. For more information, see QRentry - Guide de l’utilisateur.
l SSPR authentication: users who forgot their password must answer security questions to open a session. For more information, see Authentication Manager Self Service Password Request Administrator's Guide.
NOTE:
l You can select only this option (without any other listed under the Authentication Manager node) to enable SSPR while keeping the standard Windows authentication.
l On Windows 7/2008 (and above) clients, this option can be combined with Integration with Windows Authentication (see below) to add the SSPR option to the Smart Card Logon mode.
l Cluster and transparent locking: this feature must be installed to enable the cluster mode and the transparent locking. For more information, see Authentication Manager Cluster Administrator’s Guide.
l Biometrics Enrollment tool: installs the biometrics enrollment wizard on the workstation, which allows a user to enroll his/her biometric data for fingerprint authentication. For more information on the EAM biometrics feature, see Authentication Manager pour Windows - Guide de l'utilisateur.
l Enterprise SSO: Enterprise SSO software module installation, which includes the following selectable features:
l Integration with Windows Authentication: launches transparently Enterprise SSO at session startup using the user Windows credentials. If this feature is not installed, Enterprise SSO will be launched automatically, but it will ask the user for his/her credentials.
EAM 9.0.2 Installation Guide
Installing and Configuring the Software Modules on the Workstations116
IMPORTANT: If you select this option to implement the Smart Card Logon mode, by default this feature supports only the Microsoft Credential Provider tile. On Windows 7/2008 (and above) systems, you can extend smart card logon to non-Microsoft credential providers, by creating under HKLM\Software\Enatel\WiseGuard\FrameWork\ Authentication the following value:
l Value name: AltSmartCardCredentialProviders
l Value type: REG_SZ (String value).
l Data: the credential provider GUID. (example: {6012D512-EEBB-41E2-8842-28611CD7FE9E}). For information on the credential provider GUID, see the vendor documentation.
l Old IE Plugin: this deprecated Internet Explorer plug-in must only be installed for compatibility reasons with the previous EAM versions.
l Java plugin: allows Enterprise SSO to access Java applicationsIf you select this feature, make sure a supported Java version is already installed on your workstation.
IMPORTANT:
l If you update your Java version, Enterprise SSO must be reinstalled.
l The configuration of SSO for Java requires advanced skills. To deliver SSO access to Java applications, integration service is required. Please contact Evidian services [email protected]..
l Personal SSO Studio: allows a single user to configure the applications for which he/she wants to enable SSO.
l Enterprise SSO Studio: this feature is dedicated to administrators: the SSO configuration is shared by a number of users.
l Multi User Desktop: provides a single Windows Desktop to display all the user applications and launches a single instance of Enterprise SSO engine. For more information, please refer to Authentication Manager Session Management Administrator’s Guide.
IMPORTANT: This option is incompatible with Authentication Manager and Integ-ration with Windows.
l Public Access FUS: allows authorized users to share a workstation without having to restart a Windows session. On smart card, RFID badge or fingerprints detection, Enterprise SSO prompts the user to type his/her PIN code or password and starts the SSO engine. The engine stops at smart card or RFID badge withdrawal, or fingerprints detection.
IMPORTANT: This option is incompatible with Authentication Manager and Integ-ration with Windows.
EAM 9.0.2 Installation Guide
Installing and Configuring the Software Modules on the Workstations117
l FUS extension DLL: the FUS Extension DLL feature is designed to help you configure automated actions on running applications when Enterprise SSO starts or stops on a workstation configured for Fast User Switching without Authentication Manager installed. For details, see Authentication Manager Session Management Administrator’s Guide.
To install Cloud E-SSO, see Installing Cloud E-SSO.
l EAM Console: EAM Console software module installation.
If EAM Console has already been installed on the machine (with the EAM Controller), the EAM Console feature does not appear in the window.
l Supported languages.
You need a specific license to install the Japanese Resources.
Installing Cloud E-SSO
Before Starting
l Make sure you have installed the Microsoft Redistributable as explained in Installing Microsoft Redistributable.
l Make sure you have enough available hard disk space.
For more information on versions and hardware requirements, see One identity EAM Release Notes.
l If you want to install the SSOJava plug-in (which is an installation feature of Enterprise SSO), a supported Java version must imperatively be already installed on your workstation (for more details about the supported JRE versions, see One Identity EAM Release Notes).
l Close all running applications.
Procedure
1. From the EAM installation package browse the INSTALL directory and double-click ESSOCloud.msi.
The Cloud E-SSO Engine installation wizard appears.
2. Click Next to start the installation and follow the displayed instructions with the following guidelines:
EAM 9.0.2 Installation Guide
Installing and Configuring the Software Modules on the Workstations118

When this window appears Do the following
Click I accept the license agreement and click Next.
Select the folder where you want to install Enterprise SSO and click Next.
Note: we recommend that you do not modify the destination folder.
Select the Typical installation and click Next.
NOTE: for Cloud E-SSO to work correctly, we recommend that you select the Typical installation to install all the necessary components.
EAM 9.0.2 Installation Guide
Installing and Configuring the Software Modules on the Workstations119
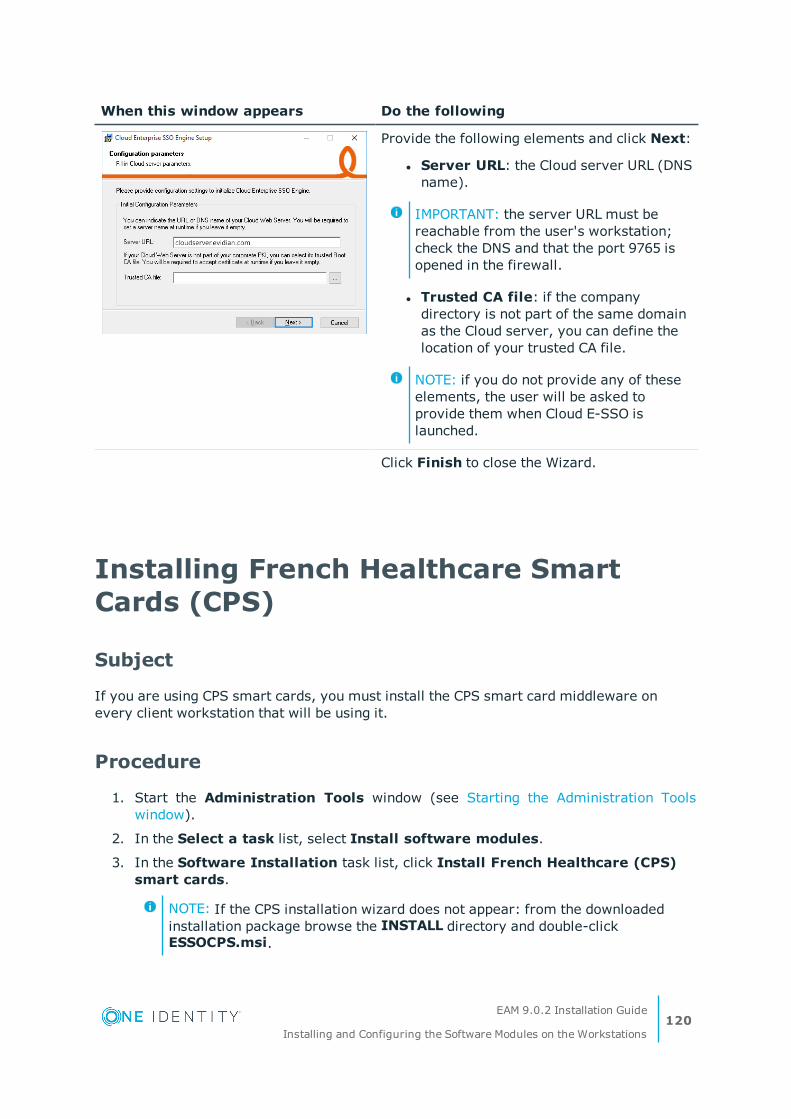
When this window appears Do the following
Provide the following elements and click Next:
l Server URL: the Cloud server URL (DNS name).
IMPORTANT: the server URL must be reachable from the user's workstation; check the DNS and that the port 9765 is opened in the firewall.
l Trusted CA file: if the company directory is not part of the same domain as the Cloud server, you can define the location of your trusted CA file.
NOTE: if you do not provide any of these elements, the user will be asked to provide them when Cloud E-SSO is launched.
Click Finish to close the Wizard.
Installing French Healthcare Smart Cards (CPS)
Subject
If you are using CPS smart cards, you must install the CPS smart card middleware on every client workstation that will be using it.
Procedure
1. Start the Administration Tools window (see Starting the Administration Tools window).
2. In the Select a task list, select Install software modules.
3. In the Software Installation task list, click Install French Healthcare (CPS) smart cards.
NOTE: If the CPS installation wizard does not appear: from the downloaded installation package browse the INSTALL directory and double-click ESSOCPS.msi.
EAM 9.0.2 Installation Guide
Installing and Configuring the Software Modules on the Workstations120

The CPS installation wizard appears.
4. Follow the displayed instructions.
The CPS smart card middleware is installed as a Windows service.
Activating Smart Card Readers and PCSC on Remote Workstations
Subject
Some environments such as Citrix or VMWare are not able to display smart card readers or PSCS when they are used remotely. Therefore, a local workstation connecting to one of these remote environments cannot use the smart card authentication method.
Description
EAM offers you the possibility to achieve this with the remote PCSC via a virtual channel between the remote EAM workstation and the local EAM workstation. All smart card accesses are performed by EAM on the local workstation on demand by EAM on the remote workstation.
Pre-requisite
On the local workstation (client side), the smart card authentication method must be activated.
The Dynamic Virtual Channel Client plugin is a Windows dll which is installed by the EAM Client installation package.
Procedure
On the remote workstation (server side), set the following registry key to activate the remote smart card reader:
HKEY_LOCAL_MACHINE\SOFTWARE\[policies]\Enatel\WiseGuard\FrameWork\Authentication\
l Name: VirtualChannelRemoteToken
l Type: REG_DWORD
EAM 9.0.2 Installation Guide
Installing and Configuring the Software Modules on the Workstations121

l Values:
l 0 (default): disabled.
l 1: enabled.
IMPORTANT:For VMWare remote workstations, the virtual channel implementation is specific. You must set an additional registry key to configure it on the VMWare remote workstation:
l Name: VMWareVirtualChannel
l Type: REG_DWORD
l Values:
l 0 (default): disabled.
l 1: enabled.
Installing Finger Vein Biometric Drivers
Subject
If you are using Hitachi finger vein biometrics, you must install finger vein biometric drivers on every client workstation that will be using it.
Restriction
This feature is not available in Japan.
Procedure
1. Start the Administration Tools window (see Starting the Administration Tools window).
2. In the Select a task list, select Install software modules.
3. In the Software Installation task list, click Install finger vein biometric drivers.
NOTE: If the installation does not starts: from the downloaded installation package browse the DRIVERS directory and double-click BioHitachi_Install.exe.
The installation proceeds.
EAM 9.0.2 Installation Guide
Installing and Configuring the Software Modules on the Workstations122

Modifying the Possible Domains List
Subject
Upon the EAM installation process in multi-domain mode, you may need to modify the list of possible domains displayed by the authentication windows of EAM workstation clients. The following procedure describes how to modify the possible domains list.
Restrictions
Only for EAM in multi-domain mode with Active Directory or Active Directory/AD LDS architectures.
Procedure
1. On the wanted EAM Controller, start Registry Editor.
2. In the HKLM\Software\Enatel\WiseGuard\FrameWork\Directory, add the following value:
Value Type
Value Name Value
String PossibleDomainsList Domain1 [...] DomainN.
EAM 9.0.2 Installation Guide
Installing and Configuring the Software Modules on the Workstations123

5
Enabling the Self Service Password Request (SSPR) Feature
Subject
The Self Service Password Request feature allows users to unlock their Windows access by themselves. For example, they can reset their primary password by answering a series of questions, either using the Questions answers tile of Authentication Manager (if installed on workstations) and/or the Evidian EAM Web portal.
This section describes how to install and activate the Self Service Password Request (SSPR) feature, from downloaded Enterprise SSO or Authentication Manager installation packages. You can install these components on any supported Windows systems.
Installing the Self Service Password Request
The SSPR feature can be installed on the following servers:
l Apache: see Installing on an Apache server.
l IIS: see Installing on an IIS server.
Installing on an Apache server
Interactive/Silent Mode Installation
The SSPR feature is delivered as installation packages using the Microsoft Windows Installer (MSI) format.
You can install this package:
EAM 9.0.2 Installation Guide
Enabling the Self Service Password Request (SSPR) Feature124

l In interactive mode: follow the instructions of the installation wizard, as described in the following procedure.
l In silent mode: command line options allow you to specify installation options for each of the installation package: see Installing EAM MSI Packages in Silent Mode. The silent installation can only be used for updating the web server: the MSI does not include the Apache server installation, which is a prerequisite for the Self-Service Password Request and the EAM API.
Before Starting
The SSPR feature requires a dedicated user account to perform operations in the directory. This account must exist before starting the installation procedure, as the wizard will prompt you for account credentials. The following procedure details how to create and configure this account:
From a workstation where EAM Console is installed, do the following:
l Create or select in your directory a user account that will be used exclusively for the Self Service Password Request (SSPR) feature.
IMPORTANT: Enable the Password never expires option for this account.
l If you start EAM Console in hardware protection mode, assign a smart card to this user account using EAM Console, with the following guidelines (this card will be used by the EAM Security Services to enable the SSPR feature):
l The assigned smart card must not expire.
l The owner of this token must have the Delegate the right to retrieve SSO data administration right.
IMPORTANT: The smart card must be permanently connected to the SSPR server, to allow users to reset their password.
l The user must have authenticated at least once on EAM; so that specific administration rights to manage SSPR can be delegated to him/her:
l In classic administration mode: SSO Data Recoverer administration role.
l In advanced administration mode:
l Self Service Password Request: Answer deletion l Self Service Password Request: Challenge generation l Self Service Password Request: Reset attempt counter
l User:password modification.
Restrictions
l If you have downloaded the installation packages, do not start the following procedure from a network drive: copy the installation packages locally before
EAM 9.0.2 Installation Guide
Enabling the Self Service Password Request (SSPR) Feature125
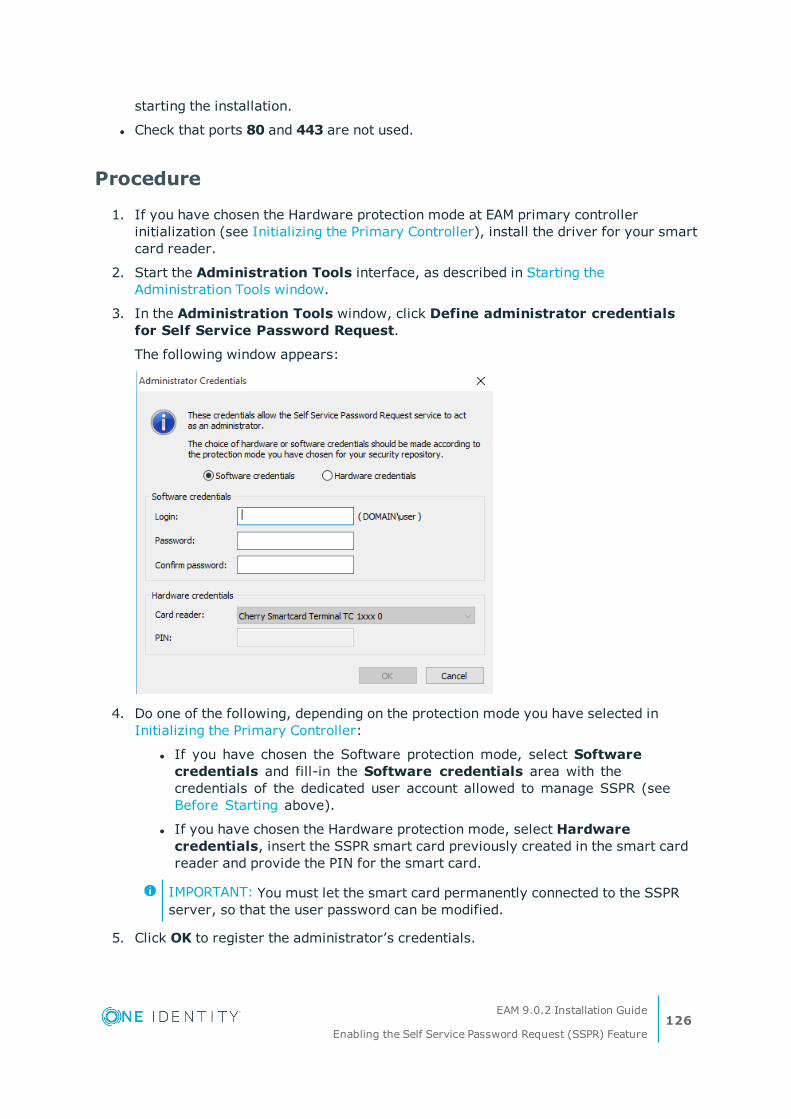
starting the installation.
l Check that ports 80 and 443 are not used.
Procedure
1. If you have chosen the Hardware protection mode at EAM primary controller initialization (see Initializing the Primary Controller), install the driver for your smart card reader.
2. Start the Administration Tools interface, as described in Starting the Administration Tools window.
3. In the Administration Tools window, click Define administrator credentials for Self Service Password Request.
The following window appears:
4. Do one of the following, depending on the protection mode you have selected in Initializing the Primary Controller:
l If you have chosen the Software protection mode, select Software credentials and fill-in the Software credentials area with the credentials of the dedicated user account allowed to manage SSPR (see Before Starting above).
l If you have chosen the Hardware protection mode, select Hardware credentials, insert the SSPR smart card previously created in the smart card reader and provide the PIN for the smart card.
IMPORTANT: You must let the smart card permanently connected to the SSPR server, so that the user password can be modified.
5. Click OK to register the administrator’s credentials.
EAM 9.0.2 Installation Guide
Enabling the Self Service Password Request (SSPR) Feature126

6. In the Select a task drop-down list, click Install Self Service Password Request:
7. If you are installing SSPR on a workstation where no other EAM software module is running, click Configure workstation and follow the displayed instructions (for details, see Configuring Workstations).
8. Click Install EAM Web Server.
You can also start the installation wizard by double-clicking TOOLS\APACHE\WGInstaller.exe.
The following window appears.
EAM 9.0.2 Installation Guide
Enabling the Self Service Password Request (SSPR) Feature127

If a previous version of the SSPR is already installed, the wizard prompts you to select the features to be updated.
9. Do the following:
a. Select the Self Service Password Request check box.
b. To use the SSPR server with Authentication Manager, select the Web Service check box. The IIS check box is automatically disabled.
In case of update:
l The Apache component is not updated automatically: to do so, you must uninstall it as well as the EAM Web Server component, clear the corresponding directories and registry, and re-install the EAM Web Server. The latter will detect the absence of the Apache component and reinstall the latest version.
l You can also start the setup wizard by double-clicking ESSOWebServer.msi. For 32-bit environment, run the 32-bit package located in E-SSO\INSTALL. For 64-bit environment, you can either run the 64-bit package located in E-SSO.X64\INSTALL, or the 32-bit package, depending on your configuration. For more details, see the Important note above.
c. To use the Reveal application password and Account delegation features in the EAM Portal, select the Self Admin. portal check box.
10. Click the Install (or Update) button to launch installation.
During the installation process, the Apache web server icon appears on the task bar.
NOTE: This Apache web server runs with the Apache mod_ssl module, PHP (used by the EAM web portal) and the gSOAP module (used by Authentication Manager in connected mode).
IMPORTANT:
l The Apache web server listens on ports 80 and 443 (SSL). These port numbers cannot be changed.
l The Web Server is configured in SSL mode by default.
EAM 9.0.2 Installation Guide
Enabling the Self Service Password Request (SSPR) Feature128
11. Declare the server and the users allowed to use the SSPR feature. For more information, see Authentication Manager Self Service Password Request Administrator's Guide.
Installing on an IIS server
Installing the IIS Server
Procedure
1. From the Windows Configuration panel, select the Programs and Features.
2. Click Turn Windows features on or off.
Depending on your platform, you must either:
l Add a Role.
OR
l Select the IIS Feature.
3. Select the following check boxes:
l .NET Framework (later than version 4), including ASP.NET.
l Internet Information Services including .Net Extensibility and HTTP Redirection.
4. Click OK.
The IIS Server installation starts.
Registering the .Net Framework to IIS
Procedure
From a command prompt, execute the following command line:%windir%\Microsoft.NET\FrameWork\v4.0.30319\aspnet_regiis.exe -ir
EAM 9.0.2 Installation Guide
Enabling the Self Service Password Request (SSPR) Feature129

Providing Registry Access to IIS
The EAM Web Portal must have read access to the HKEY_LOCAL_MACHINE\SECURITY\Policy\Secrets registry key and all its sub-keys and values. You can either:
l Add read access to the local IIS_IUSRS user,
OR
l Check that the EAM Web Portal IIS application runs as Local System user.
Checking the .NET Application and Rights
Procedures
Checking the .NET 4 Application Pool
1. Open the Server Manager window and browse down in the Connections panel to the IIS Web Server.
2. In the Actions panel, click Add Application Pool.
The Add Application Pool window appears.
3. Enter a pool name. Example: .NET 4 Syst Integrated.
4. In the drop down lists, check that .Net Framework 4 version and classic pipeline mode are selected.
5. Select the Start application pool immediately check box.
6. Click OK.
7. If the IIS application is to run as local system, select your application pool and in the Actions panel, click Advanced Settings.
The Advanced Settings window appears.
EAM 9.0.2 Installation Guide
Enabling the Self Service Password Request (SSPR) Feature130

8. In the Process Model area, check that the Identity element is set to LocalSystem.
Click OK.
Checking .NET Framework Rights on the IIS Server
1. In the Server Manager, click the IIS Server host to display the associated features in the main panel.
2. Double-click ISAPI and CGI Restrictions.
3. Make sure ASP.NET version 4 is allowed for 32 bits applications, for both 32 bits
EAM 9.0.2 Installation Guide
Enabling the Self Service Password Request (SSPR) Feature131
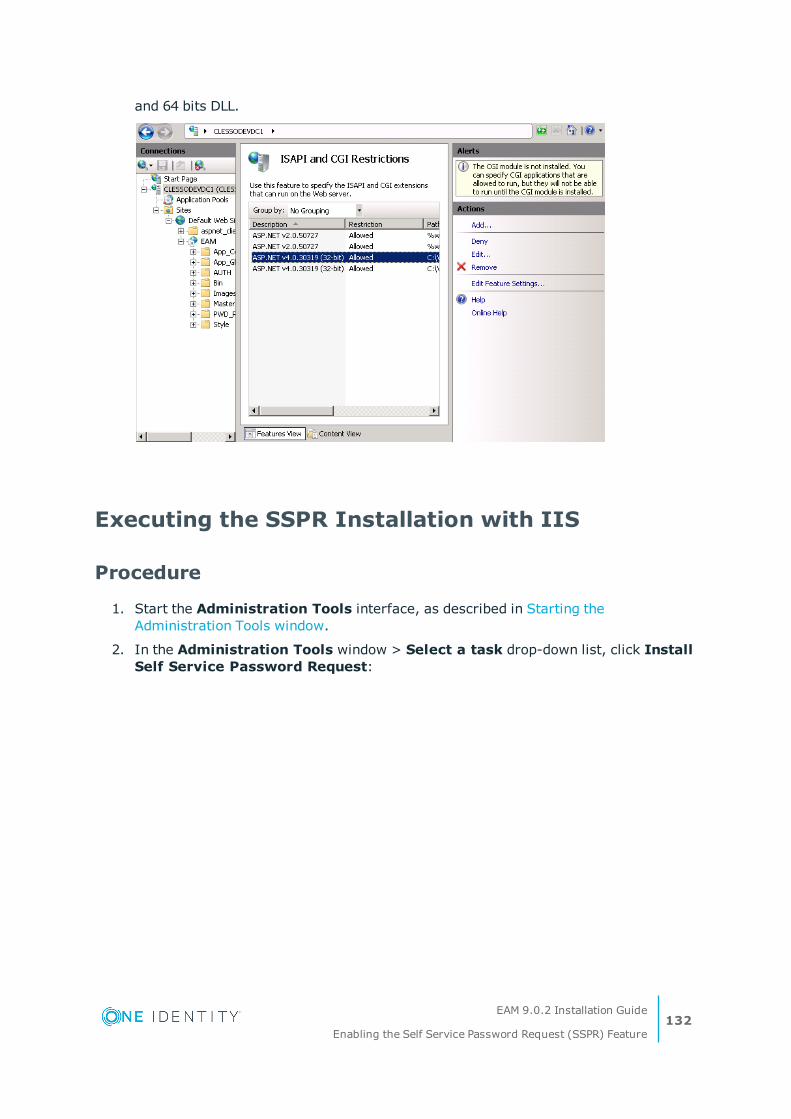
and 64 bits DLL.
Executing the SSPR Installation with IIS
Procedure
1. Start the Administration Tools interface, as described in Starting the Administration Tools window.
2. In the Administration Tools window > Select a task drop-down list, click Install Self Service Password Request:
EAM 9.0.2 Installation Guide
Enabling the Self Service Password Request (SSPR) Feature132
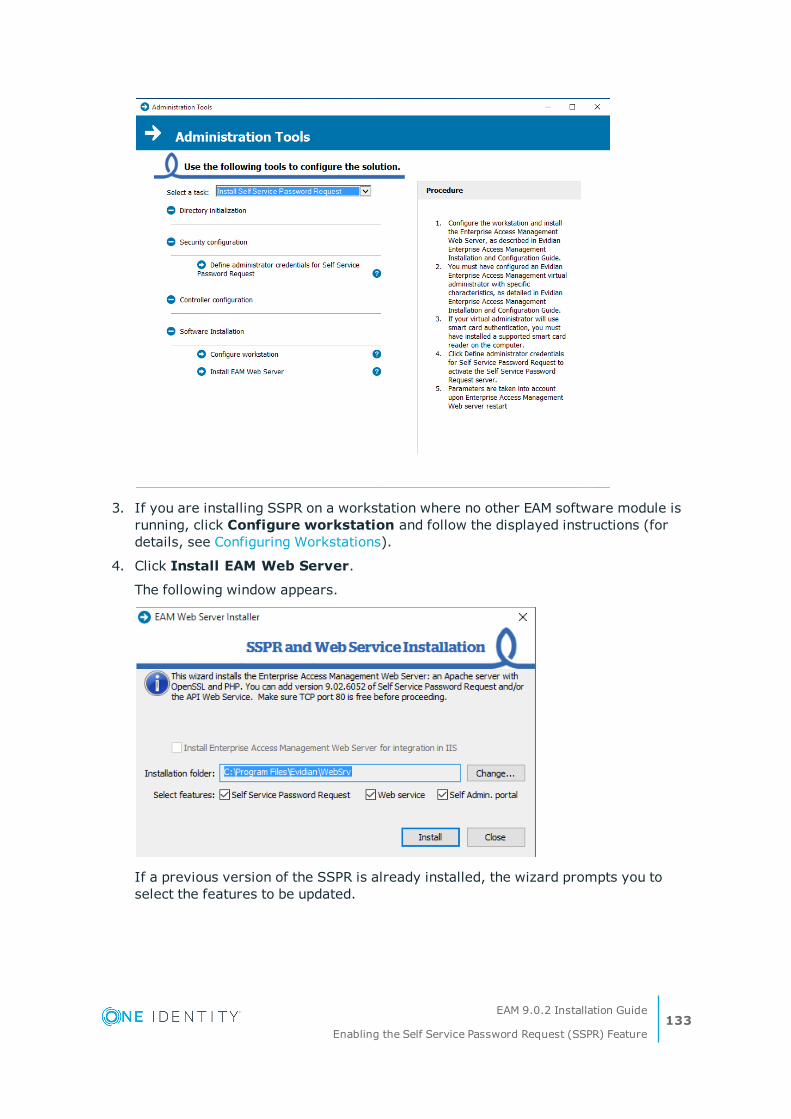
3. If you are installing SSPR on a workstation where no other EAM software module is running, click Configure workstation and follow the displayed instructions (for details, see Configuring Workstations).
4. Click Install EAM Web Server.
The following window appears.
If a previous version of the SSPR is already installed, the wizard prompts you to select the features to be updated.
EAM 9.0.2 Installation Guide
Enabling the Self Service Password Request (SSPR) Feature133
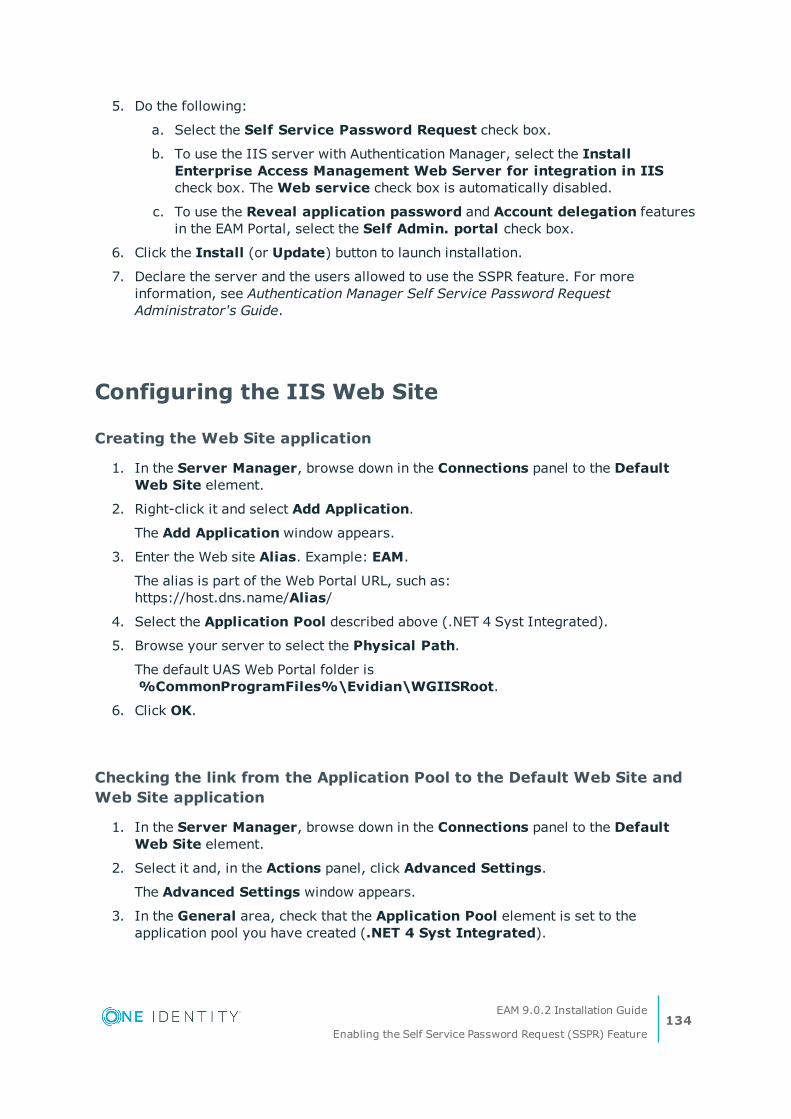
5. Do the following:
a. Select the Self Service Password Request check box.
b. To use the IIS server with Authentication Manager, select the Install Enterprise Access Management Web Server for integration in IIS check box. The Web service check box is automatically disabled.
c. To use the Reveal application password and Account delegation features in the EAM Portal, select the Self Admin. portal check box.
6. Click the Install (or Update) button to launch installation.
7. Declare the server and the users allowed to use the SSPR feature. For more information, see Authentication Manager Self Service Password Request Administrator's Guide.
Configuring the IIS Web Site
Creating the Web Site application
1. In the Server Manager, browse down in the Connections panel to the Default Web Site element.
2. Right-click it and select Add Application.
The Add Application window appears.
3. Enter the Web site Alias. Example: EAM.
The alias is part of the Web Portal URL, such as:https://host.dns.name/Alias/
4. Select the Application Pool described above (.NET 4 Syst Integrated).
5. Browse your server to select the Physical Path.
The default UAS Web Portal folder is %CommonProgramFiles%\Evidian\WGIISRoot.
6. Click OK.
Checking the link from the Application Pool to the Default Web Site and Web Site application
1. In the Server Manager, browse down in the Connections panel to the Default Web Site element.
2. Select it and, in the Actions panel, click Advanced Settings.
The Advanced Settings window appears.
3. In the General area, check that the Application Pool element is set to the application pool you have created (.NET 4 Syst Integrated).
EAM 9.0.2 Installation Guide
Enabling the Self Service Password Request (SSPR) Feature134

4. Click OK.
5. In the Connections panel > Default Web Site element, select the Web site application you have created (EAM).
6. In the Actions panel, click Advanced Settings.
The Advanced Settings window appears.
7. In the General area, check that the Application Pool element is set to the application pool you have created (.NET 4 Syst Integrated).
8. Click OK.
Setting the Web Site Default Page
1. In the Server Manager, browse down in the Connections panel to the Web site application you have created (EAM).
2. Select it and, in the main panel, double-click Default Document.
If default.aspx is not in the list, you must add it.
3. In the Actions panel, click Add.
4. Enter default.aspx and click OK.
5. Select default.aspx and, in the Actions panel, click Move Up until it is in first position in the list.
Securing the Web Site
1. In the Server Manager, browse down in the Connections panel to the Web site application you have just created.
2. Select it and, in the Actions panel, click Bindings.
The Site Bindings window appears.
3. Click Add.
The Add Site Binding window appears.
4. In the Type drop down list, select https.
5. In the Port field, enter 443.
6. In the SSL certificate drop down list, select the host SSL certificate.
Refer to Microsoft Windows documentation to install a host certificate on your IIS Server machine.
7. Click OK twice to close the Bindings windows.
EAM 9.0.2 Installation Guide
Enabling the Self Service Password Request (SSPR) Feature135
Replacing the private key and certificate of the SSPR server
Subject
The SSPR, server runs as an Apache 2.4 Web server with mod_ssl installed. Upon installation, a temporary set of certificates are generated to enable a secure user authentication. It is recommended that you replace these temporary certificates with certificates generated using your own PKI.
The company certificate used for the SSPR server must comply with the following certificate content requirements.
NOTE: For more information about Apache2.4 SSL configuration, refer to: http://ht-tpd.apache.org/docs/2.4/en/mod/mod_ssl.html.
To replace the private key and certificate of the SSPR server with your own company certificate, execute the following procedure.
Requirements
l The public key certificate must contain the DNS host name of the Reset Password server:
l In the CN part of the subject of the certificate.
l And/or in a Netscape SSL server name extension.
l And/or as a DNS name in a subjectAltName extension
If the SSPR server has several DNS names and aliases, they must all appear as a DNS name in a subjectAltName.
l To avoid users getting a warning message, the public key certificate must be signed by a company Certificate Authority with its certificate already deployed on the users' workstations.
l To enable an automatic start of the SSPR server without entering a password, place the private key in its unencrypted form within the private key file.
Procedure
1. Set the private key in the %ProgramFiles%\Evidian\WebSrv\Apache2.4\conf\server.key file.
2. Set the public key certificate in the %ProgramFiles%\Evidian\WebSrv\Apache2.4\conf\server.crt file.
3. Make sure the path to the above files are properly set in the %ProgramFiles%\Evidian\WebSrv\Apache2.4\conf\extra\httpd-ssl.conf file as follows:
EAM 9.0.2 Installation Guide
Enabling the Self Service Password Request (SSPR) Feature136

a. SSLCertificateKeyFile option must contain the full path name of the private key file.
b. SSLCertificateFile option must contain the full path name of the public key certificate file.
IMPORTANT: Both files must have a PEM format.
Enabling the "unlocking of a user primary account" feature
Subject
The unlocking of a user primary account is one of the features provided with the Self-Service Password Reset feature. It is only available through the EAM Web portal. It is intended for users who have locked their primary accounts by typing a wrong password several times in a row.
The following procedure details how to enable this feature, which consists in delegating to the dedicated technical account(s) used by the EAM controllers the following tasks:
l Reset user passwords and force password change at next logon.
l The Write authorization on the lockoutTime property, only on the User objects.
Restriction
The following procedure must be performed only if EAM is used with Active Directory or AD LDS directories.
NOTE: If you are using another supported LDAP directory, the feature is automat-ically enabled upon EAM installation. Refer to Evidian EAM Portal - Guide de l’utilisateur to test it.
Procedure
1. From the Active Directory domain controller, launch Active Directory Users and Computers.
2. Right-click the Organization of the users you want to enable the feature, and select Delegate Control.
The Delegation of Control Wizard starts.
EAM 9.0.2 Installation Guide
Enabling the Self Service Password Request (SSPR) Feature137

3. Select the group containing the technical accounts of the EAM controllers (Active Directory only), or each technical account individually if necessary.
4. Read the instructions of the wizard to delegate to the selected technical account(s) the following common task: Reset user passwords and force password change at next logon.
5. Repeat Select the group containing the technical accounts of the EAM controllers (Active Directory only), or each technical account individually if necessary. to start again the Delegation of Control wizard.
6. On the Tasks to Delegate page, select Create a custom task to delegate and click Next.
7. On the Active Directory Object Type page, click Only the following objects in the folder and select User objects. Click Next.
8. On the Permissions page, select Property-specific and select Write lockoutTime. Click Next then Finish.
9. Repeat the previous steps to grant the same rights on the System\AdminSDHolder container.
IMPORTANT:
l The AdminSDHolder container is protected and may be hidden. To display it, in the View menu of the Active Directory Users and Computer snap-in, click View Advanced Features.
l Any modification of the AdminSDHolder container takes about one hour to be effective..
10. For AD LDS, to give the super user the rights to unlock a user primary account, proceed as follows:
a. From the Active Directory domain controller, launch the command prompt as an administrator.
b. Execute the following command:dsacls CN=AdminSDHolder,CN=System,DC=[domain-name] /G "[super-user]:RPWP;lockouttime;"
EAM 9.0.2 Installation Guide
Enabling the Self Service Password Request (SSPR) Feature138
6
Enabling One-Time Password (OTP) Authentication
The OTP authentication method is a two-factor authentication method that allows users to authenticate by giving a login name and a password that is valid only once (in contrast to static passwords). OTP are dynamically generated by a token, which is owned by the user.
To enable the OTP authentication in EAM, you must have one of the following products:
l RSA Authentication Manager software. When this software is installed and configured to run with EAM, users can authenticate even if they are not connected to the EAM controller (offline mode).
l A RADIUS plugin (which authenticates against a RADIUS server): this configuration supports only the online mode.
IMPORTANT: EAM supports only one activated OTP authentication method at a time.
RSA Authentication Manager
Subject
The RSA Authentication Manager software consists of the following main components:
l Authentication Server, which manages authentication operations.
l Internal database, required for policy data.
l RSA Security Console, to administer the system.
These components are configured differently depending on which type of installation you choose. The "primary instance" installation type is mandatory. Then, depending on the installation process you have planned to deploy the RSA software, you may also need one or more "replica instances" (for failover) and one or more "server nodes" for improved performance.
To enable authentication operations, your system must also include RSA authentication agents. These components are installed on the user workstations. The RSA authentication
EAM 9.0.2 Installation Guide
Enabling One-Time Password (OTP) Authentication139
agent sends the OTP entered by the user to RSA Authentication Manager for validation. If the OTP is correct, the Windows session opens.
To enable the EAM one-time password authentication method within an RSA architecture, you must install an RSA authentication agent on each one of your EAM controller. To enable the offline mode, you must also install an RSA authentication agent on each EAM workstation that may support this mode.
Before Starting
The RSA primary instance is installed on a dedicated server, as detailed in the RSA Authentication Manager documentation, available at the following URL: https://knowledge.rsasecurity.com (registration required).
Procedure
1. Import the system configuration file (sdconf.rec). This file is required by the RSA authentication agent to communicate with the RSA authentication server.
You may also need the server certificate file (server.cer) to enable the automatic registration of the users’ computers in the internal database of the RSA primary instance and/or to allow users to authenticate with a SecurID 800 authenticator connected to the USB port.
Depending on the RSA Authentication Manager version, these files can be generated from the RSA Security Console (version 7.1 and later), or are located in the ACEDATA directory on the RSA primary instance (version 6.1 and later).
2. Install an RSA authentication agent on each one of your EAM controllers, with the following guidelines:
l To install the software on a single computer, run the MSI file on the local computer. For a large-scale deployment, use the configuration wizard.
l If you need to import sdconf.ref only, select the Typical installation type. To import sdconf.ref and server.cer, you must select the Custom installation.
l Select Challenge all users except administrators to allow the local administrator to authenticate using the standard authentication method (password or smart card).
3. From the RSA administration console, do the following:
l Register the authentication agent(s) you have installed.
l Create your organizational hierarchy and access users from the EAM directory.
l Enable users for authentication and assign them RSA SecurID tokens.
NOTE: For detailed information on how to use RSA Security Console and RSA Operations Console, please refer to the RSA Authentication Manager administrator’s Guide.
EAM 9.0.2 Installation Guide
Enabling One-Time Password (OTP) Authentication140
4. Test authentication to secure the communication between the authentication agent(s) and RSA Authentication Manager:
l Log on to the EAM Controller using an administrator account.
l Start the RSA Control Center, and in the Advanced Tools panel, click Test Authentication.
Upon a successful authentication test, RSA Authentication Manager creates a node secret for the agent and stores it in the internal database. A copy of this node secret is encrypted and stored on the agent.
5. Repeat Step Test authentication to secure the communication between the authentication agent(s) and RSA Authentication Manager:Log on to the EAM Controller using an administrator account.Start the RSA Control Center, and in the Advanced Tools panel, click Test Authentication. for each EAM Controller.
IMPORTANT: At the end of this step, the OTP authentication in online mode is available. If you do not need to enable the offline mode, you must now configure EAM to enable the OTP authentication method, as detailed in One Identity EAM Console - Guide de l'administrateur.
6. To prepare EAM for the offline mode, install RSA authentication agents on the wanted EAM workstations.
7. From the RSA administration console, register the authentication agent(s) you have installed, enable users for authentication in offline mode and assign them RSA SecurID tokens.
8. Set the acednt.dll, sdmsg.dll, sdconf.rec and securid.exe files in the Windows/system32 folder of your EAM controller.
IMPORTANT: To authenticate with RSA OTP in cache mode, your must also set these files in the same folder on the user workstation.
9. You must now configure EAM to enable the OTP authentication method in offline mode, as detailed in One Identity EAM Console - Guide de l'administrateur.
Hiding the RSA authentication tile
If you install the RSA authentication agent on a computer where EAM Authentication Manager is already installed, the RSA authentication tile appears among the Authentication Manager tiles. To make the RSA authentication tile disappear, you must set the WGSafeGina.dll in the following registry key: HKLM\SOFTWARE\Microsoft\WindowsNT\CurrentVersion\ Winlogon\GinaDLL.
RADIUS plugin
l Copy and paste the following XML code:
EAM 9.0.2 Installation Guide
Enabling One-Time Password (OTP) Authentication141

<token_class id="OTP" display_name="OTP">
<token_config>
<custom_otp_dll>CustomOTPExtensionRadius.dll</custom_otp_dll>
<ldap_attribute>sAMAccountName</ldap_attribute>
</token_config>
<data_structure>
<module id="0x0100">
</module>
<module id="0x0200">
</module>
</data_structure>
</token_class>
NOTE:
l Custom_otp_dll indicates the name of the .dll file to associate with the OTP method.
l ldap_attribute is the LDAP attribute that collects the Radius login depending on the E-SSO login.
l Enter the following keys in the registry base:
IMPORTANT: These registry keys must be set on all controllers.
Value Type Key
Radius Server String HKEY_LOCAL_MACHINE\SOFTWARE\ Enatel\WiseGuard\FrameWork\Radius\Server
Port DWORD HKEY_LOCAL_MACHINE\SOFTWARE\ Enatel\WiseGuard\FrameWork\Radius\Port
Radius Server Secret
String HKEY_LOCAL_MACHINE\SOFTWARE\ Enatel\WiseGuard\FrameWork\Radius\Secret
EAM 9.0.2 Installation Guide
Enabling One-Time Password (OTP) Authentication142

7
Enabling the Group Membership Modification Feature
Subject
You can add or remove Users and Access Points from groups directly through the EAM console, without using a third-party group management console. To enable this feature, you must enable the EAM Controllers to modify group memberships, by delegating the Modify the membership of a group task to their dedicated technical accounts.
Restriction
IMPORTANT: The following procedure must be performed only if EAM is used with Active Directory or AD LDS directories.
NOTE: If you are using another supported LDAP directory, the feature is automat-ically enabled.
Procedure
1. Launch the Active Directory Users and Computer tool on the Active Directory domain controller.
2. Right-click the Organization of the users or machines you want to modify and select Delegate Control.
The Delegation of Control Wizard starts.
3. Press the Next button and then the Add button.
4. Select the group containing the technical accounts of the EAM Controllers (Active Directory only), or each technical account individually if necessary.
EAM 9.0.2 Installation Guide
Enabling the Group Membership Modification Feature143

5. Click the Next button and select the Modify the membership of a group check-box.
6. Click the Next button and then the Finish button to close the Wizard.
The delegation of control is complete.
For details on how to use this feature, refer to One Identity EAM Console - Guide de l'administrateur.
EAM 9.0.2 Installation Guide
Enabling the Group Membership Modification Feature144

8
Centralizing Parameters Using Group Policy Objects (GPO)
Subject
This section describes how to apply registry-based policy settings to servers and user computers running EAM using the Group Policy Management Console. It is intended to system administrators who want to use Group Policy to manage EAM workstations.
NOTE: If you are new to Group Policy, it is strongly recommended to read the following documentation before going further:
l Windows 2008 Server and above: http://technet.microsoft.com/en-us/lib-rary/cc709647%28v=ws.10%29
l Windows 7 and above: http://technet.microsoft.com/en-us/lib-rary/hh147307%28v=ws.10%29
You will add to the Administrative Templates extension administrative template files provided by Evidian.
These files allow you to set EAM policy settings pertaining to the registry and distribute them to EAM workstations, in the HKEY_LOCAL_MACHINE\SOFTWARE\Policies\Enatel registry key.
IMPORTANT: These parameters supersede the local parameters, which are located in HKEY_LOCAL_MACHINE\SOFTWARE\Enatel.
Windows Server 2008 introduces a new format for displaying registry-based policy settings and uses a new standard-based, XML file format known as ADMX files. These new files replace ADM files; which used their own markup language.
This section covers the procedures for creating GPO using ADMX files.
Restrictions
l The following procedures apply only to EAM workstations that are members of a Windows domain.
EAM 9.0.2 Installation Guide
Centralizing Parameters Using Group Policy Objects (GPO)145
l When an IAM server is in the same domain as the E-SSO controller (which is the most common) and GPOs are applied to all the workstations of this domain, the middleware configuration of the IAM workstation is modified. However, since this middleware configuration is different than the E-SSO one, you must add a restriction for the application of E-SSO GPOs on the IAM workstations.
Creating and Configuring Group Policy Objects Using ADMX Files
Restriction
ADMX files are XML-based administrative template files that were introduced in Windows Vista and Windows Server 2008. They are not compatible with earlier versions of the operating system.
Before Starting
l Check that the administrative template files are available. These files are located in the Authentication Manager or Enterprise SSO installation package, in TOOLS\ADMX
l If you need more details on the following procedure, seehttp://technet.microsoft.com/en-us/library/cc748955
Procedure
1. Select the ADMX and ADML files that you need according to the following guidelines:
l UserAccess.admx and UserAccessLicenses.admx are mandatory.
l Depending on your Evidian solution, select one of the available configuration file (UserAccessConfiguration<config>,where <config> represents an architecture (example: MicrosoftADwithADLS).
l Select one of the available license file according to your EAM license (example: copy UserAccessLicencesX.admx if you have the Evidian X License).
l ADML files are language-specific resource files. They are located in the language subfolder (example: EN-US for United States English). Copy the equivalent files (UserAccess.adml, UserAccessLicenses.adml, UserAccessConfiguration<config>.adml and UserAccessLicences<Licence>.adml).
2. Store these files in the PolicyDefinitions folder on a domain controller:
EAM 9.0.2 Installation Guide
Centralizing Parameters Using Group Policy Objects (GPO)146
NOTE:
l You must be a member of the Domain Administrator group in Active Directory.
l It is recommended that you create this folder on the primary domain controller, in order to use these files more quickly
l ADMX files are stored in %systemroot%\SYSVOL\domain\policies\PolicyDefinitions.
l ADML files are stored in %systemroot%\sysvol\domain\policies\PolicyDefinitions\<LANG>, where <LANG> represents the language identifier (example: EN-US).
NOTE: As the Domain Controllers are replicated, the files are automat-ically copied to the other servers.
3. Click Start\Run and type gpmc.msc to launch the Group Policy Management Console (GPMC).
NOTE: If the GPMC is not installed on your domain controller, open an elevated command prompt and type ServerManagercmd -install gpmc to install it.
4. From the GPMC, right-click the Group Policy Objects node and create a new GPO.
5. Right-click the GPO you created and select Edit.
All the ADMX files located in the PolicyDefinitions folder are automatically read.
6. Select a subfolder and double-click a GPO to edit settings as appropriate.
Description of the EAM Administrative Template
The EAM administrative template allows you to configure registry entries taking action on the following modules:
l Enterprise SSO.
l Authentication Manager.
l EAM Security Services.
The following tables describe briefly each parameter of the ADMX file.
NOTE: The following tables list the entirety of the parameters, regardless of the file extension (ADMX). Entries are not relevant to admx files.
EAM 9.0.2 Installation Guide
Centralizing Parameters Using Group Policy Objects (GPO)147

Enterprise SSO Parameters
l Enterprise SSO Common Parameters
These parameters are located in:
HKLM\SOFTWARE\Policies\Enatel\SSOWatch\CommonConfig
Value Name Value Type
Description/
Default Value
LCID DWORD User interface language.
l 0: Default.
l 409: English.
l 40C: French.
l 407: German.
l 411: Japanese.
AllowSmartCardInactivityTimer
DWORD Time in second before locking Enterprise SSO.
It concerns only smart card authentication.
DontUseSmartCardInOTP
DWORD If the value is set to 1, Enterprise SSO stores the user primary password in the directory to use it for SSO. This way, the smart card logon is ignored.
l HLL API Parameters
HLL API plug-in global configuration parameters. For more information, see Enterprise SSO - Guide de l'administrateur).
These parameters are located in:
HKLM\SOFTWARE\Policies\Enatel\SSOWatch\HllAPI
Value Name Value Type
Description/
Default Value
EnableMultiEmulator DWORD Enterprise SSO starts the HllAPI plug-in with several emulators, specified in the n value.
n: number of emulators.
EAM 9.0.2 Installation Guide
Centralizing Parameters Using Group Policy Objects (GPO)148
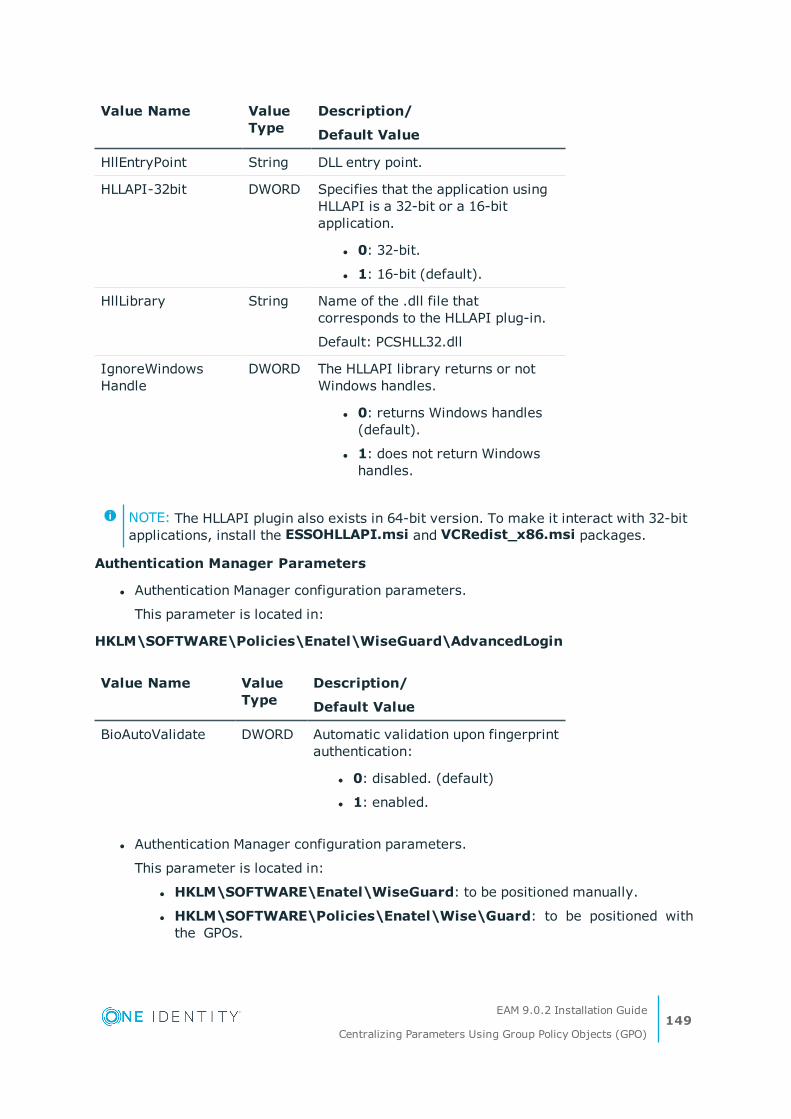
Value Name Value Type
Description/
Default Value
HllEntryPoint String DLL entry point.
HLLAPI-32bit DWORD Specifies that the application using HLLAPI is a 32-bit or a 16-bit application.
l 0: 32-bit.
l 1: 16-bit (default).
HllLibrary String Name of the .dll file that corresponds to the HLLAPI plug-in.
Default: PCSHLL32.dll
IgnoreWindowsHandle
DWORD The HLLAPI library returns or not Windows handles.
l 0: returns Windows handles (default).
l 1: does not return Windows handles.
NOTE: The HLLAPI plugin also exists in 64-bit version. To make it interact with 32-bit applications, install the ESSOHLLAPI.msi and VCRedist_x86.msi packages.
Authentication Manager Parameters
l Authentication Manager configuration parameters.
This parameter is located in:
HKLM\SOFTWARE\Policies\Enatel\WiseGuard\AdvancedLogin
Value Name Value Type
Description/
Default Value
BioAutoValidate DWORD Automatic validation upon fingerprint authentication:
l 0: disabled. (default)
l 1: enabled.
l Authentication Manager configuration parameters.
This parameter is located in:
l HKLM\SOFTWARE\Enatel\WiseGuard: to be positioned manually.
l HKLM\SOFTWARE\Policies\Enatel\Wise\Guard: to be positioned with the GPOs.
EAM 9.0.2 Installation Guide
Centralizing Parameters Using Group Policy Objects (GPO)149

Value Name Value Type
Description/
Default Value
UnlockWithWindowsAccount DWORD Unlocking a Smart Card session with Windows credentials.
l 0: disabled. (default)
l 1: enabled.
DisplayAuthMethodIcon DWORD Displaying authentication method icon in the Session Unlocking window.
l 0: disabled. (default)
l 1: enabled.
EAM Security Services Parameters
l Installation Type
EAM installation type.
These parameters are located in:
HKLM\SOFTWARE\Policies\Enatel\WiseGuard\FrameWork\Config
Value Name Value Type
Description/
Default Value
ManageAccessPoints DWORD Access point management:
l 0: EAM does not manage access points.
l 1: EAM manages access points (default).
NOTE: this value must not be modified in the registry. To modify it, use the wgss config-uration file.
For more information on access point management see One Identity EAM Console - Guide de l'administrateur).
RegisterSoftwareModules
DWORD Management of software module objects in the directory:
l 0: Software module objects
EAM 9.0.2 Installation Guide
Centralizing Parameters Using Group Policy Objects (GPO)150

Value Name Value Type
Description/
Default Value
are not managed in the directory.
l 1: Software module objects are managed in the directory (default).
WGSS Parameters
Parameters to deploy a domain account for EAM to do LDAP requests. For more information, see Deploying a Workstation LDAP User Account.
This parameter is located in:
HKLM\SOFTWARE\Policies\Enatel\WiseGuard\FrameWork\FmkServer
Value Name Value Type
Description/
Default Value
AccessPointLdapCredentials
String Access Point LDAP account. This value is ciphered.
Security Directory
Configuration of the EAM security database.
These parameters are located in:
HKLM\SOFTWARE\Policies\Enatel\WiseGuard\FrameWork\Directory
Value Name Value Type
Description/
Default Value
BlobCompression DWORD
Enables binary data compression:
l 0: off.
l 1: on.
DirectoryType DWORD
User database or directory:
l 0: Windows Worksta-tion/SAM Base
EAM 9.0.2 Installation Guide
Centralizing Parameters Using Group Policy Objects (GPO)151
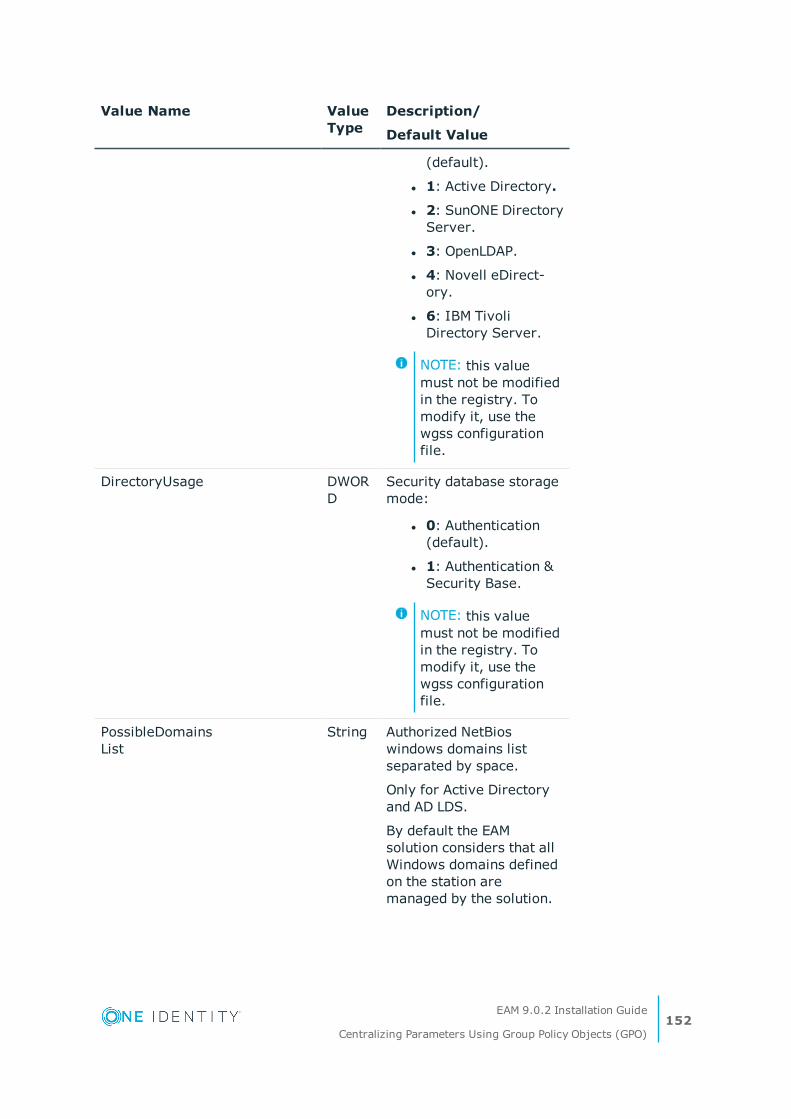
Value Name Value Type
Description/
Default Value
(default).
l 1: Active Directory.
l 2: SunONE Directory Server.
l 3: OpenLDAP.
l 4: Novell eDirect-ory.
l 6: IBM Tivoli Directory Server.
NOTE: this value must not be modified in the registry. To modify it, use the wgss configuration file.
DirectoryUsage DWORD
Security database storage mode:
l 0: Authentication (default).
l 1: Authentication & Security Base.
NOTE: this value must not be modified in the registry. To modify it, use the wgss configuration file.
PossibleDomainsList
String Authorized NetBios windows domains list separated by space.
Only for Active Directory and AD LDS.
By default the EAM solution considers that all Windows domains defined on the station are managed by the solution.
EAM 9.0.2 Installation Guide
Centralizing Parameters Using Group Policy Objects (GPO)152

Value Name Value Type
Description/
Default Value
If it is not the case, the key must be set to indicate the list of the configured domains.
NOTE: EAM Console displays error messages when it tries to connect to a domain not managed.
EnterpriseUserAuthentication
DWORD
Security data location:
0: store EAM data in enterprise Directory (default).
1: store EAM data in another Directory or Naming Context.
NOTE: this value must not be modified in the registry. To modify it, use the wgss configuration file.
SSL DWORD
SSL:
l 0: SSL disabled (default).
l 1: SSL enabled.
NOTE: this value must not be modified in the registry. To modify it, use the wgss configuration file.
LdapAuthMethod DWORD
Authentication method:
l 0: simple clear-text authentication (default).
EAM 9.0.2 Installation Guide
Centralizing Parameters Using Group Policy Objects (GPO)153

Value Name Value Type
Description/
Default Value
l 1: SASL/DIGEST-MD5 authentication.
l 2: SASL/NMAS authentication (Novell specific).
NOTE: this value must not be modified in the registry. To modify it, use the wgss configuration file.
TLS DWORD
TLS:
l 0: TLS is not activated (default).
l 1: TLS is always activated.
l 2: TLS is only activated when a sensible data is transferred on the network (during password change or account creation).
NOTE: this value must not be modified in the registry. To modify it, use the wgss configuration file.
TLSDemand DWORD
TLS demand:
l 0: TLS is not mandatory: If TLS fails, the connection is activated without encryption.(default).
l 1: TLS is mandatory: if TLS fails, no connection
EAM 9.0.2 Installation Guide
Centralizing Parameters Using Group Policy Objects (GPO)154

Value Name Value Type
Description/
Default Value
is activated.
NOTE: this value must not be modified in the registry. To modify it, use the wgss configuration file.
ServerList String List of servers.
NOTE: this value must not be modified in the registry. To modify it, use the wgss configuration file.
RootLdapDN String Root object DN.
NOTE: this value must not be modified in the registry. To modify it, use the wgss configuration file.
SearchResultSizeLimit
DWORD
Maximum number of elements returned by request:
l no limit (default).
l 10 (min.).
UserSearchFilter String Attributes used by search request for the delegation.
ldapAttName=Label,…
Example:
UserPrincipalName=Label,...
AccessResolutionByGroups DWORD
Authorization of access request on groups:
l 0: access request
EAM 9.0.2 Installation Guide
Centralizing Parameters Using Group Policy Objects (GPO)155

Value Name Value Type
Description/
Default Value
not authorized.
l 1: access request authorized (default).
AccessResolutionByUO DWORD
Authorization of access request on organizational units:
l 0: access request not authorized.
l 1: access request authorized (default).
AccessResolutionByGroupOfGroups
DWORD
Authorization access request on groups of groups:
l 0: access request not authorized.
l 1: access request authorized (default).
LdapAPIDir String LDAP library binaries location path.
MustChangePasswordOnWindows
DWORD
Password must be changed on Windows (useful if a synchronization takes place):
l 0: LDAP server (default).
l 1: MS Windows domain.
NOTE: this value must not be modified in the registry. To modify it, use the wgss configuration file.
ExtendedGroupIntegration
DWORD
Support of special type of groups for SAMBA integration:
EAM 9.0.2 Installation Guide
Centralizing Parameters Using Group Policy Objects (GPO)156
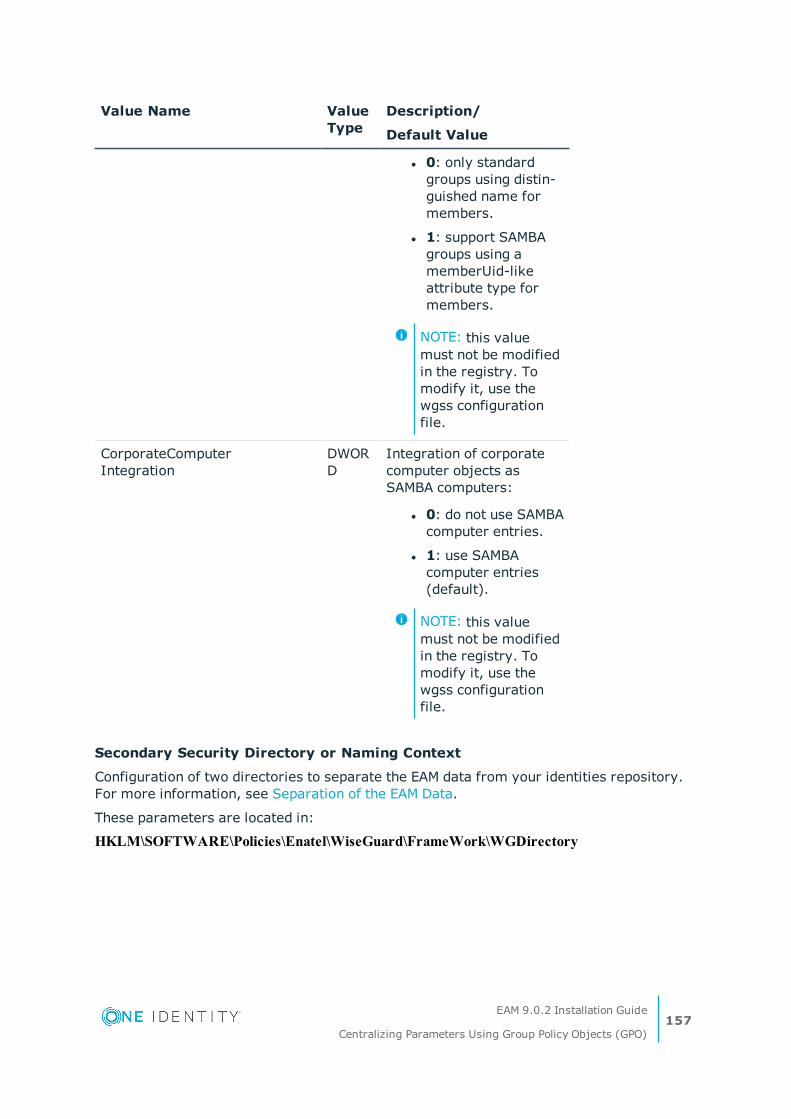
Value Name Value Type
Description/
Default Value
l 0: only standard groups using distin-guished name for members.
l 1: support SAMBA groups using a memberUid-like attribute type for members.
NOTE: this value must not be modified in the registry. To modify it, use the wgss configuration file.
CorporateComputerIntegration
DWORD
Integration of corporate computer objects as SAMBA computers:
l 0: do not use SAMBA computer entries.
l 1: use SAMBA computer entries (default).
NOTE: this value must not be modified in the registry. To modify it, use the wgss configuration file.
Secondary Security Directory or Naming Context
Configuration of two directories to separate the EAM data from your identities repository. For more information, see Separation of the EAM Data.
These parameters are located in:
HKLM\SOFTWARE\Policies\Enatel\WiseGuard\FrameWork\WGDirectory
EAM 9.0.2 Installation Guide
Centralizing Parameters Using Group Policy Objects (GPO)157
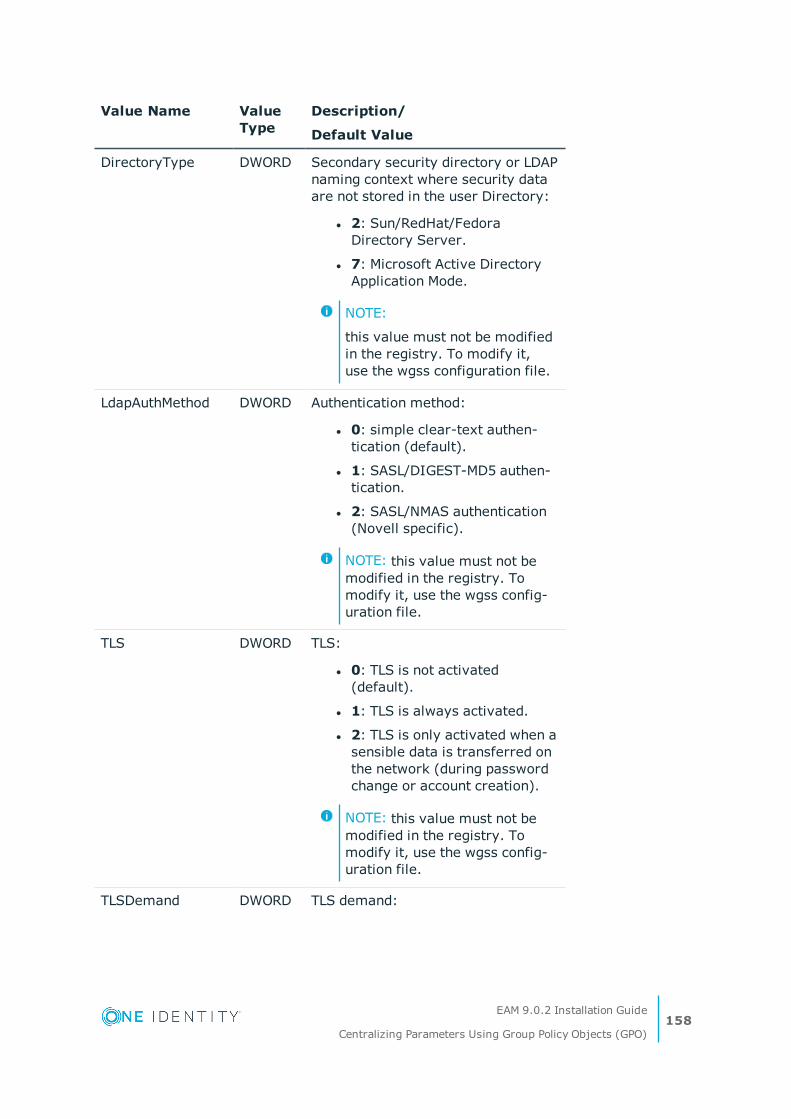
Value Name Value Type
Description/
Default Value
DirectoryType DWORD Secondary security directory or LDAP naming context where security data are not stored in the user Directory:
l 2: Sun/RedHat/Fedora Directory Server.
l 7: Microsoft Active Directory Application Mode.
NOTE:
this value must not be modified in the registry. To modify it, use the wgss configuration file.
LdapAuthMethod DWORD Authentication method:
l 0: simple clear-text authen-tication (default).
l 1: SASL/DIGEST-MD5 authen-tication.
l 2: SASL/NMAS authentication (Novell specific).
NOTE: this value must not be modified in the registry. To modify it, use the wgss config-uration file.
TLS DWORD TLS:
l 0: TLS is not activated (default).
l 1: TLS is always activated.
l 2: TLS is only activated when a sensible data is transferred on the network (during password change or account creation).
NOTE: this value must not be modified in the registry. To modify it, use the wgss config-uration file.
TLSDemand DWORD TLS demand:
EAM 9.0.2 Installation Guide
Centralizing Parameters Using Group Policy Objects (GPO)158
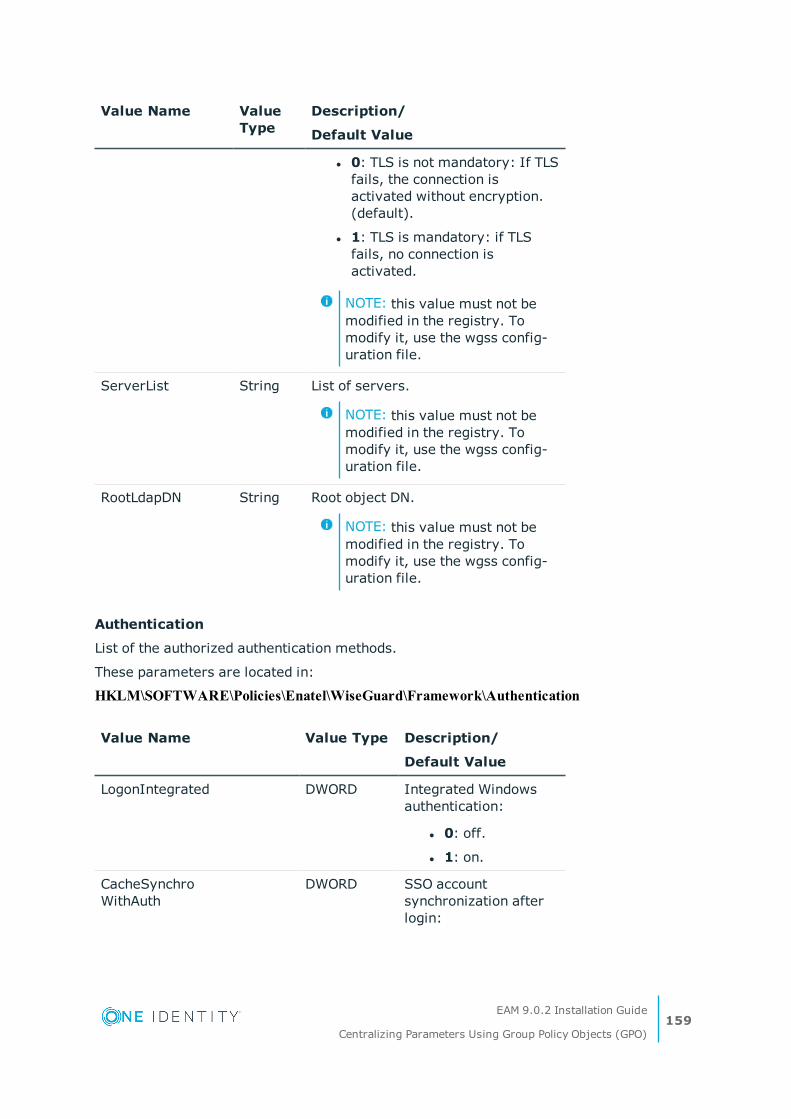
Value Name Value Type
Description/
Default Value
l 0: TLS is not mandatory: If TLS fails, the connection is activated without encryption.(default).
l 1: TLS is mandatory: if TLS fails, no connection is activated.
NOTE: this value must not be modified in the registry. To modify it, use the wgss config-uration file.
ServerList String List of servers.
NOTE: this value must not be modified in the registry. To modify it, use the wgss config-uration file.
RootLdapDN String Root object DN.
NOTE: this value must not be modified in the registry. To modify it, use the wgss config-uration file.
Authentication
List of the authorized authentication methods.
These parameters are located in:
HKLM\SOFTWARE\Policies\Enatel\WiseGuard\Framework\Authentication
Value Name Value Type Description/
Default Value
LogonIntegrated DWORD Integrated Windows authentication:
l 0: off.
l 1: on.
CacheSynchroWithAuth
DWORD SSO account synchronization after login:
EAM 9.0.2 Installation Guide
Centralizing Parameters Using Group Policy Objects (GPO)159

Value Name Value Type Description/
Default Value
l 0: off.
l 1: on.
WaitBeforeLogonScript
DWORD Time to wait before activation user shell (only in "stub" mode):
l 0 (default).
l -1
ManualPwdChangeMandatory DWORD In case the manual password change policy detects expiration date of the password when the user authenticates offline, this option can force the user to authenticate when the directory is available again, so that he/she can manually change his/her directory password.
l 0 (default): no authentication forced in the user session. No manual password change.
l 1: authentication forced in the user session, so that he.she can manually change his/her directory password.
Single Sign-On
These parameters are located in:
HKLM\SOFTWARE\Policies\Enatel\WiseGuard\FrameWork\SingleSignOn
EAM 9.0.2 Installation Guide
Centralizing Parameters Using Group Policy Objects (GPO)160

Value Name Value Type
Description/
Default Value
SyncTokenAndSessionKeys
DWORD Enables the SSO keys synchronization: if the user AD password has been modified with another tool than EAM, the user SSO data cannot be deciphered with the new AD password when the user authenticates on the workstation.
l 1: when the user authenticates on the workstation, SSO data is deciphered with the session key.
l 0 (default): no synchronization is performed.
Audit / Log
Tuning and customizing of the EAM log.
These parameters are located in:
HKLM\SOFTWARE\Policies\Enatel\WiseGuard\FrameWork\Audit
Value Name Value Type
Description/
Default Value
QueueSize DWORD Audit buffer size:
l Default: 50 events.
l Minimum: 10.
QueueFlushTimeOut DWORD Time interval between buffer flush (in minutes):
l Default: 60.
l Minimum: 1.
CustomExtension String DLL of audit extension.
Network Cache
Activation and performance tuning of the EAM network cache.
These parameters are located in:
HKLM\SOFTWARE\Policies\Enatel\WiseGuard\FrameWork\Cache
EAM 9.0.2 Installation Guide
Centralizing Parameters Using Group Policy Objects (GPO)161
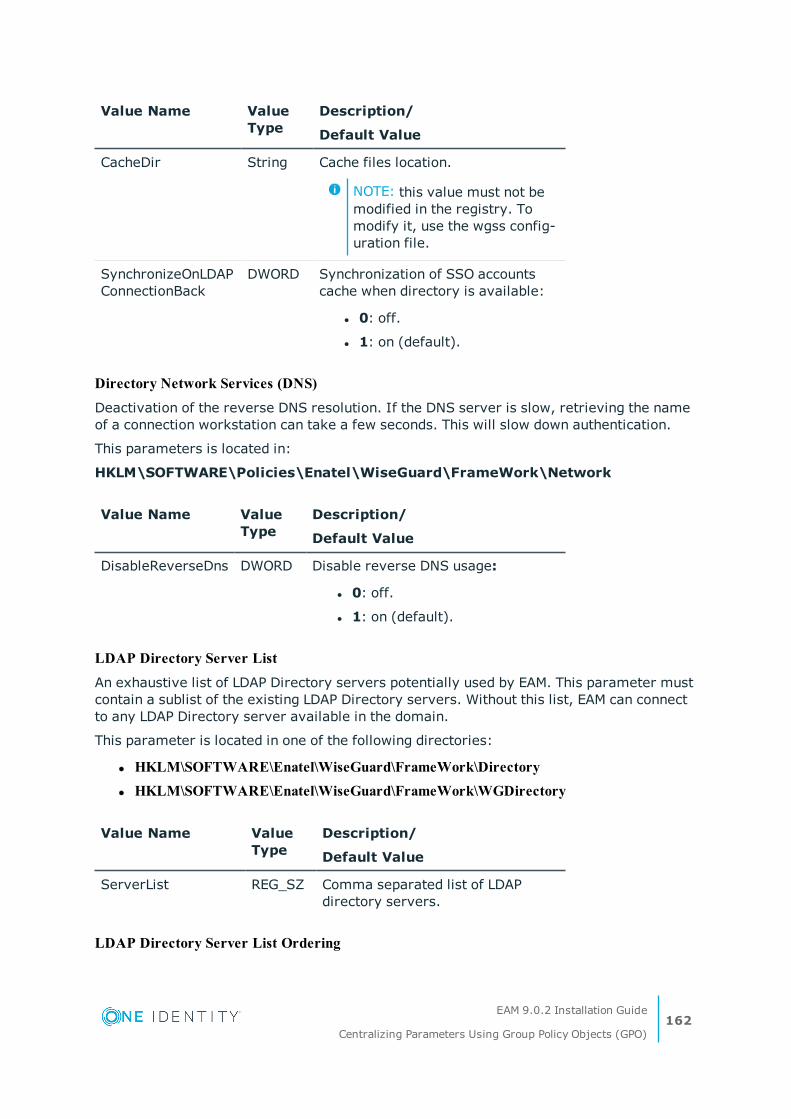
Value Name Value Type
Description/
Default Value
CacheDir String Cache files location.
NOTE: this value must not be modified in the registry. To modify it, use the wgss config-uration file.
SynchronizeOnLDAPConnectionBack
DWORD Synchronization of SSO accounts cache when directory is available:
l 0: off.
l 1: on (default).
Directory Network Services (DNS)
Deactivation of the reverse DNS resolution. If the DNS server is slow, retrieving the name of a connection workstation can take a few seconds. This will slow down authentication.
This parameters is located in:
HKLM\SOFTWARE\Policies\Enatel\WiseGuard\FrameWork\Network
Value Name Value Type
Description/
Default Value
DisableReverseDns DWORD Disable reverse DNS usage:
l 0: off.
l 1: on (default).
LDAP Directory Server List
An exhaustive list of LDAP Directory servers potentially used by EAM. This parameter must contain a sublist of the existing LDAP Directory servers. Without this list, EAM can connect to any LDAP Directory server available in the domain.
This parameter is located in one of the following directories:
l HKLM\SOFTWARE\Enatel\WiseGuard\FrameWork\Directory l HKLM\SOFTWARE\Enatel\WiseGuard\FrameWork\WGDirectory
Value Name Value Type
Description/
Default Value
ServerList REG_SZ Comma separated list of LDAP directory servers.
LDAP Directory Server List Ordering
EAM 9.0.2 Installation Guide
Centralizing Parameters Using Group Policy Objects (GPO)162
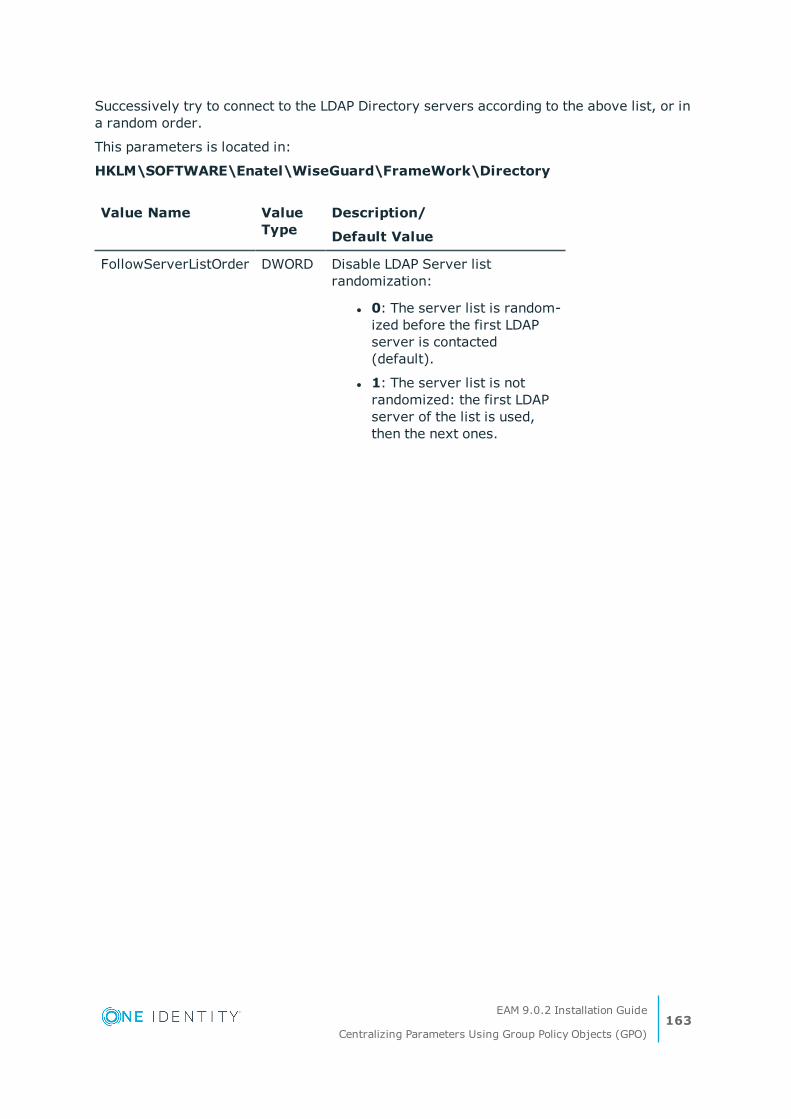
Successively try to connect to the LDAP Directory servers according to the above list, or in a random order.
This parameters is located in:
HKLM\SOFTWARE\Enatel\WiseGuard\FrameWork\Directory
Value Name Value Type
Description/
Default Value
FollowServerListOrder DWORD Disable LDAP Server list randomization:
l 0: The server list is random-ized before the first LDAP server is contacted (default).
l 1: The server list is not randomized: the first LDAP server of the list is used, then the next ones.
EAM 9.0.2 Installation Guide
Centralizing Parameters Using Group Policy Objects (GPO)163

9
Installing EAM MSI Packages in Silent Mode
Subject
This section describes the parameters that can be used when installing EAM MSI packages in silent mode.
IMPORTANT: The (silent) installation of MSI packages does not include the config-uration of the computer.
Silent installation can be performed through the msiexec command, which is part of the Microsoft Windows Installer. For more details, refer to Windows Installer Microsoft documentation.
This section explains how to silently install the following elements:
l Microsoft Visual C++ 2012 Redistributable: see Installing Microsoft Redistributable in Silent Mode.
l EAM Controller: see Installing EAM Controller in Silent Mode.
l EAM Client: see Installing EAM Client in Silent Mode.
l EAM Web Server: see Installing EAM Web Server in Silent Mode.
l HLLAPI Wrapper: see Installing HLLAPI Wrapper in Silent Mode (64-bit clients only).
Silent Installation Methods
To perform a silent installation of an MSI package, you can use one of the following method:
l Use of the MSI properties MODULES and TRANSLATIONS of msiexec
This method is strongly recommended, when available.These properties facilitate the installation or upgrade of already installed MSI packages, according to the operating system: when MODULES and/or TRANSLATIONS properties are used when installing MSI package, the mandatory and hidden MSI features are automatically selected according to the operating system.
EAM 9.0.2 Installation Guide
Installing EAM MSI Packages in Silent Mode164

These properties must be used with INSTALLMODE=Custom parameter and must not be used with ADDLOCAL parameter.
l Use of the MSI property ADDLOCAL of msiexec
Each feature can be added as values of this property.
Before Starting
Make sure you have the Microsoft Windows Installer version 3.0 (or later version).
Installing Microsoft Redistributable in Silent Mode
Subject
The Microsoft Visual Microsoft Visual C++ 2012 Update 4 runtime libraries are delivered as a separate MSI package: the VCRedist_x86.msi (or the VCRedist_x64.msi for x64 platforms).
The installation of this MSI package is a prerequisite to the installation of any EAM software module. It must be installed once on each workstation and does not need to be updated.
Procedure
In the ADDLOCAL property of the msiexec command, add the wanted feature name (see "Feature Name" column in the following Features table):
Use ADDLOCAL=CRT_WinSXS or ADDLOCAL=ALL msiexec parameters
Features
The VCRedist_x86.msi (or the VCRedist_x64.msi for x64 platforms) contains the following selectable features:
Feature Name Description
CRT_WinSXS Studio 2012 Update 4 Redistributable.
EAM 9.0.2 Installation Guide
Installing EAM MSI Packages in Silent Mode165

Installing EAM Controller in Silent Mode
Subject
The ESSOController.msi gathers all software modules required to install an EAM Controller.
IMPORTANT: This package does not include the configuration of the computer.
Procedure
Installation using the ADDLOCAL property of msiexec
In the ADDLOCAL property of the msiexec command, add the wanted feature names (see "Feature Name" column in the following Features table).
IMPORTANT: It is mandatory to select the parent feature in order to select a sub-feature. For example, it is necessary to select the Translation feature to select the german feature.
Installation using the MODULES and TRANSLATIONS properties of msiexec
In the MODULES property of the msiexec command, add the short name of the wanted features (see "Short Name" column in the following Features table).
In the TRANSLATIONS property of the msiexec command, add the short name of the wanted languages.
IMPORTANT: In this case, the ADDLOCAL parameter must not be used.
Example
The following command line installs the EAM Controller with EAM Console without RFID, with all required hidden/mandatory MSI features:
msiexec /qn /l*v <pathToLogFile> /i <pathToESSOController.MSI> /qn /norestart INSTALLMODE=Custom /PASSIVE MODULES=CSL TRANSLATIONS=DE
Features
The following table gives the list of features that can be selected to perform a silent installation of EAM Controller.
NOTE: Feature and short names are case sensitive.
EAM 9.0.2 Installation Guide
Installing EAM MSI Packages in Silent Mode166
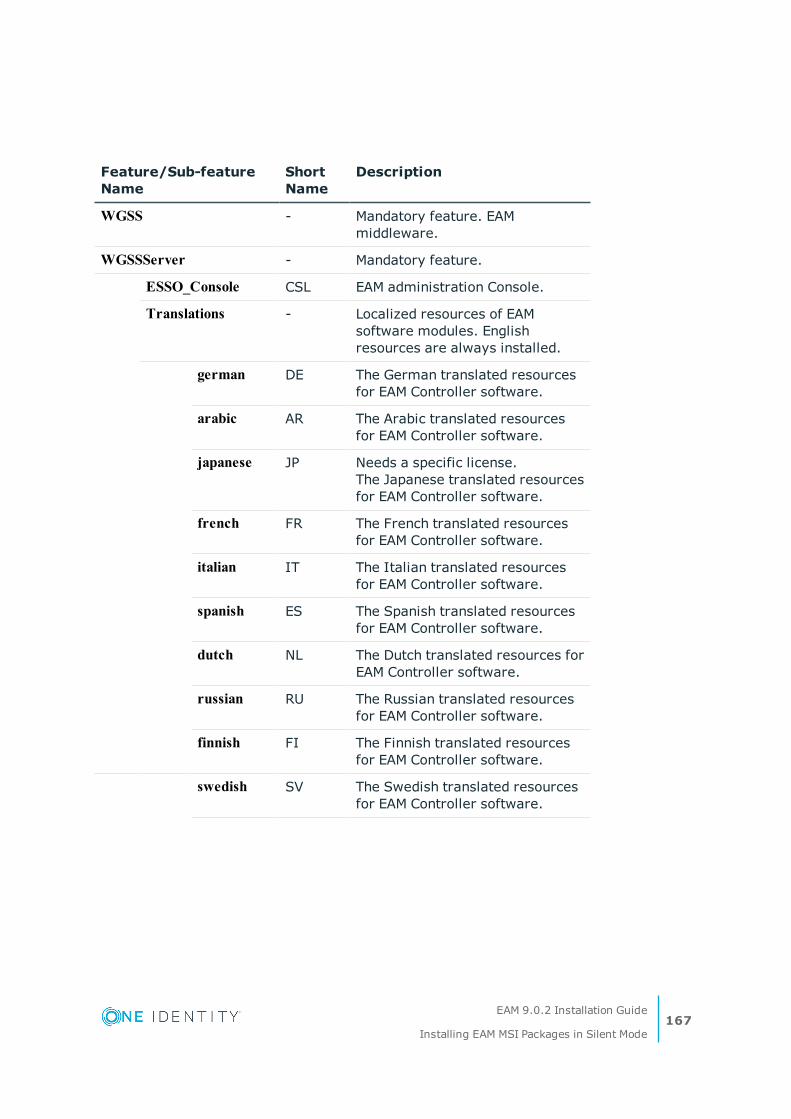
Feature/Sub-feature Name
Short Name
Description
WGSS - Mandatory feature. EAM middleware.
WGSSServer - Mandatory feature.
ESSO_Console CSL EAM administration Console.
Translations - Localized resources of EAM software modules. English resources are always installed.
german DE The German translated resources for EAM Controller software.
arabic AR The Arabic translated resources for EAM Controller software.
japanese JP Needs a specific license.The Japanese translated resources for EAM Controller software.
french FR The French translated resources for EAM Controller software.
italian IT The Italian translated resources for EAM Controller software.
spanish ES The Spanish translated resources for EAM Controller software.
dutch NL The Dutch translated resources for EAM Controller software.
russian RU The Russian translated resources for EAM Controller software.
finnish FI The Finnish translated resources for EAM Controller software.
swedish SV The Swedish translated resources for EAM Controller software.
EAM 9.0.2 Installation Guide
Installing EAM MSI Packages in Silent Mode167

Installing EAM Client in Silent Mode
Subject
The ESSOAgent.msi gathers all software modules that may be installed on a user’s workstation.
IMPORTANT: This package does not include the configuration of the workstation.
Procedure
Installation using the ADDLOCAL property of msiexec
In the ADDLOCAL property of the msiexec command, add the wanted feature names (see "Feature Name" column in the following Features table).
IMPORTANT: It is mandatory to select the parent feature in order to select a sub-feature.Examples:
To select the SSOJava feature it is necessary to select the SSOWatch feature.To select the GinaStub feature it is necessary to select both WindowsStub and SSOWatch features.
Example
The following command line installs the EAM Client with Authentication Manager, EAM Console without RFID management, Enterprise SSO with Personal SSO Studio and Enterprise SSO Studio and the Java plug-in, along with German resources (with all required hidden/mandatory MSI features):
l On a Windows XP system:
msiexec /qn /l*v <pathToLogFile> /i <pathToESSOAgent.MSI> /norestart /PASSIVE ADDLOCAL=WGSS,EssoErrors,Advanced_Login,Gina_NTWG_Gina,WG_Safe_Gina,ESSO_Console,SSOWatch,SSOJava,Studio_Enterprise,Studio_Personal,translations,german
l On Windows 7 systems and above:
msiexec /qn /l*v <pathToLogFile> /i <pathToESSOAgent.MSI> /norestart /PASSIVE ADDLOCAL=WGSS,EssoErrors,Sens,Advanced_Login, VistaCP,WGSens,ESSO_Console,SSOWatch,SSOJava, Studio_Enterprise,Studio_Personal,translations,german, devista
EAM 9.0.2 Installation Guide
Installing EAM MSI Packages in Silent Mode168
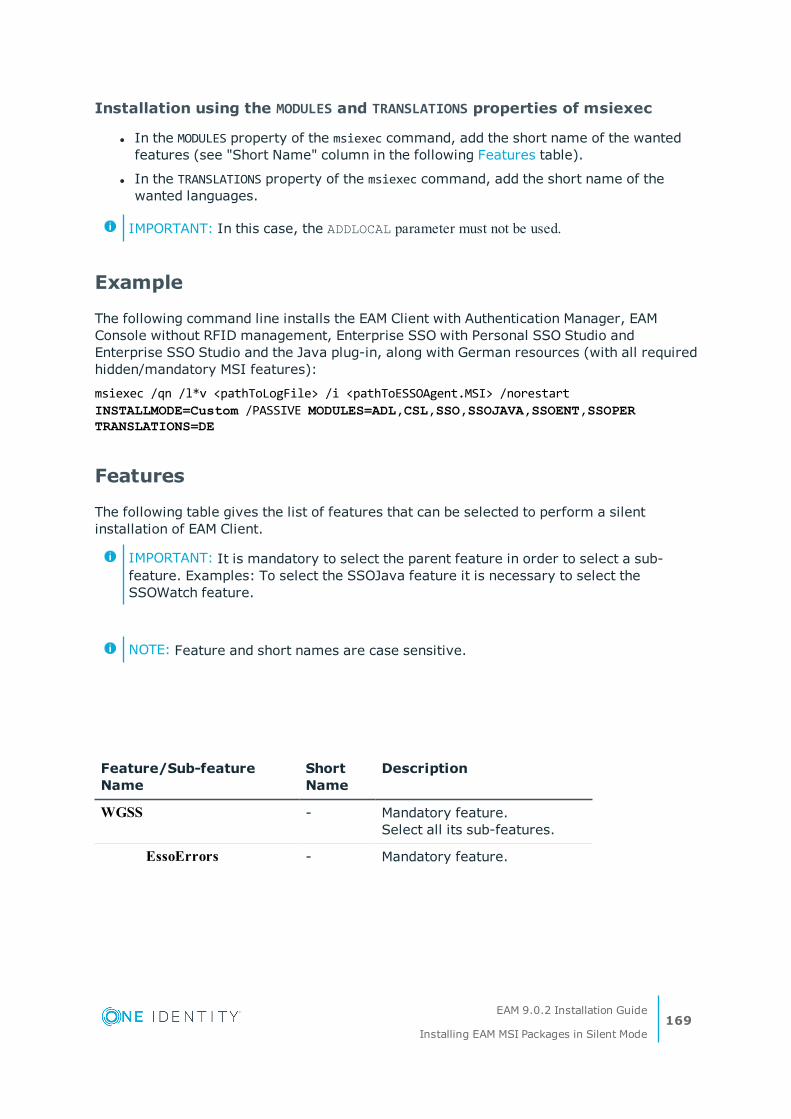
Installation using the MODULES and TRANSLATIONS properties of msiexec
l In the MODULES property of the msiexec command, add the short name of the wanted features (see "Short Name" column in the following Features table).
l In the TRANSLATIONS property of the msiexec command, add the short name of the wanted languages.
IMPORTANT: In this case, the ADDLOCAL parameter must not be used.
Example
The following command line installs the EAM Client with Authentication Manager, EAM Console without RFID management, Enterprise SSO with Personal SSO Studio and Enterprise SSO Studio and the Java plug-in, along with German resources (with all required hidden/mandatory MSI features):
msiexec /qn /l*v <pathToLogFile> /i <pathToESSOAgent.MSI> /norestart INSTALLMODE=Custom /PASSIVE MODULES=ADL,CSL,SSO,SSOJAVA,SSOENT,SSOPER TRANSLATIONS=DE
Features
The following table gives the list of features that can be selected to perform a silent installation of EAM Client.
IMPORTANT: It is mandatory to select the parent feature in order to select a sub-feature. Examples: To select the SSOJava feature it is necessary to select the SSOWatch feature.
NOTE: Feature and short names are case sensitive.
Feature/Sub-feature Name
Short Name
Description
WGSS - Mandatory feature. Select all its sub-features.
EssoErrors - Mandatory feature.
EAM 9.0.2 Installation Guide
Installing EAM MSI Packages in Silent Mode169
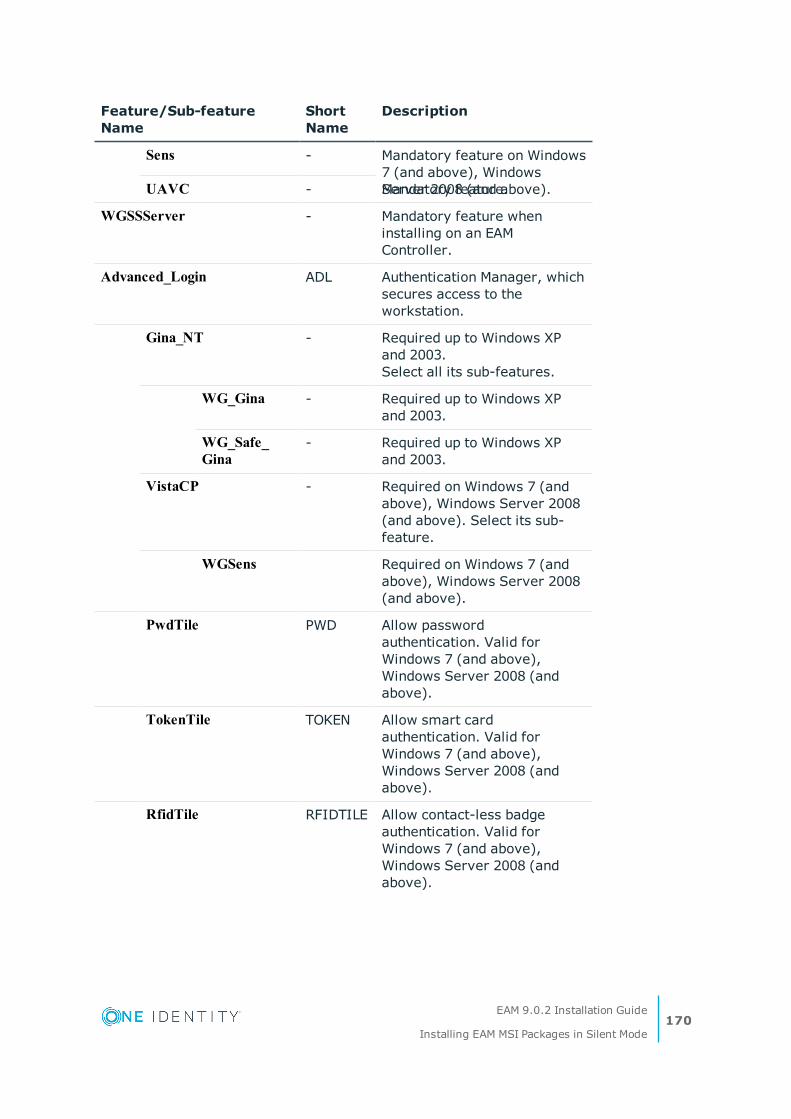
Feature/Sub-feature Name
Short Name
Description
Sens - Mandatory feature on Windows 7 (and above), Windows Server 2008 (and above).UAVC - Mandatory feature.
WGSSServer - Mandatory feature when installing on an EAM Controller.
Advanced_Login ADL Authentication Manager, which secures access to the workstation.
Gina_NT - Required up to Windows XP and 2003.Select all its sub-features.
WG_Gina - Required up to Windows XP and 2003.
WG_Safe_Gina
- Required up to Windows XP and 2003.
VistaCP - Required on Windows 7 (and above), Windows Server 2008 (and above). Select its sub-feature.
WGSens Required on Windows 7 (and above), Windows Server 2008 (and above).
PwdTile PWD Allow password authentication. Valid for Windows 7 (and above), Windows Server 2008 (and above).
TokenTile TOKEN Allow smart card authentication. Valid for Windows 7 (and above), Windows Server 2008 (and above).
RfidTile RFIDTILE Allow contact-less badge authentication. Valid for Windows 7 (and above), Windows Server 2008 (and above).
EAM 9.0.2 Installation Guide
Installing EAM MSI Packages in Silent Mode170

Feature/Sub-feature Name
Short Name
Description
BioTile BIO Allow biometrics authentication. Valid for Windows 7 (and above), Windows Server 2008 (and above).
MobileTile MOBILE Allow mobile phone authentication. Valid for Windows 7 (and above), Windows Server 2008 (and above).
SsprTile SSPR Allow SSPR and Q&A authentication. Valid for Windows 7 (and above), Windows Server 2008 (and above).
ClusterTile CLUSTER Allow transparent locking and Cluster automatic logging. Valid for Windows 7 (and above), Windows Server 2008 (and above).
SSOWatch SSO Evidian Enterprise SSO, which provides Single Sign On to applications.
BioEnroll SSOBIO Enables users to enroll their biometrics authentication data.
WindowsStub SSOWIN Automatically opens Enterprise SSO with user's Windows credentials if Authentication Manager is not installed.
GinaStub - Required up to Windows XP and 2003.
VistaWrapper - Required on Windows 7 (and above), Windows Server 2008 (and above).
IEPLUGIN SSOIE Obsolete Internet Explorer plug-in (with BHO).
SSOJava SSOJAVA Provides Single Sign On to
EAM 9.0.2 Installation Guide
Installing EAM MSI Packages in Silent Mode171
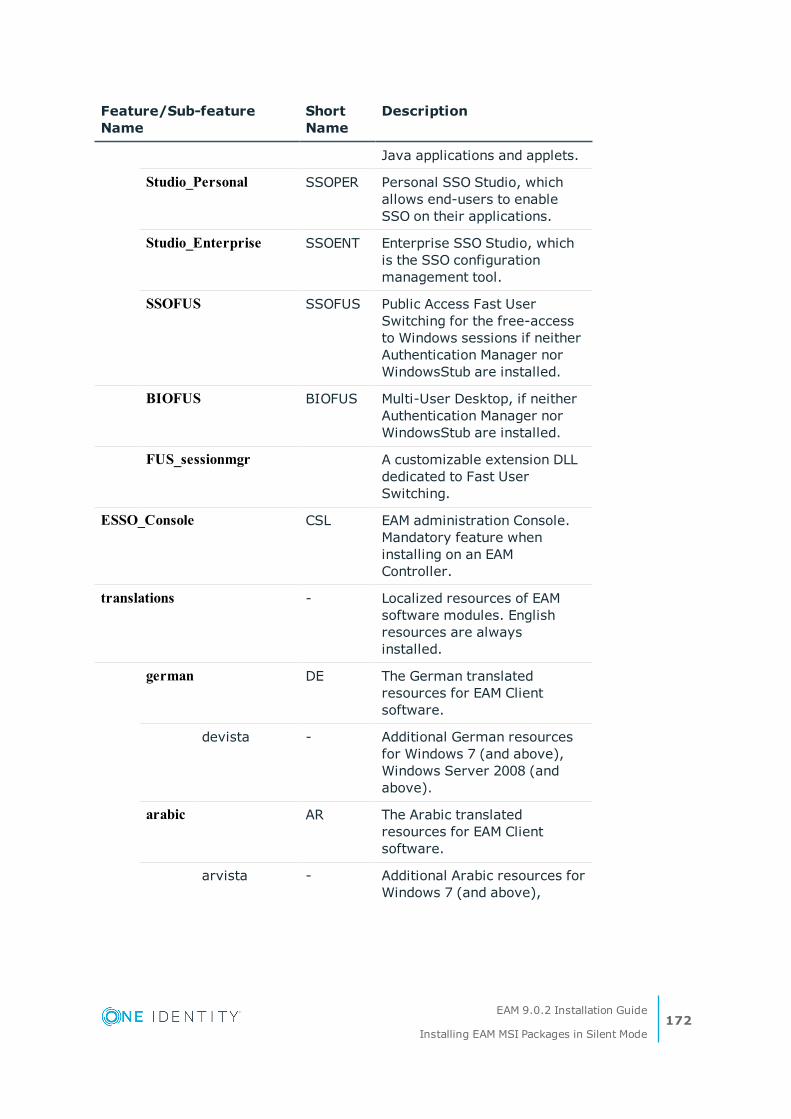
Feature/Sub-feature Name
Short Name
Description
Java applications and applets.
Studio_Personal SSOPER Personal SSO Studio, which allows end-users to enable SSO on their applications.
Studio_Enterprise SSOENT Enterprise SSO Studio, which is the SSO configuration management tool.
SSOFUS SSOFUS Public Access Fast User Switching for the free-access to Windows sessions if neither Authentication Manager nor WindowsStub are installed.
BIOFUS BIOFUS Multi-User Desktop, if neither Authentication Manager nor WindowsStub are installed.
FUS_sessionmgr A customizable extension DLL dedicated to Fast User Switching.
ESSO_Console CSL EAM administration Console.Mandatory feature when installing on an EAM Controller.
translations - Localized resources of EAM software modules. English resources are always installed.
german DE The German translated resources for EAM Client software.
devista - Additional German resources for Windows 7 (and above), Windows Server 2008 (and above).
arabic AR The Arabic translated resources for EAM Client software.
arvista - Additional Arabic resources for Windows 7 (and above),
EAM 9.0.2 Installation Guide
Installing EAM MSI Packages in Silent Mode172
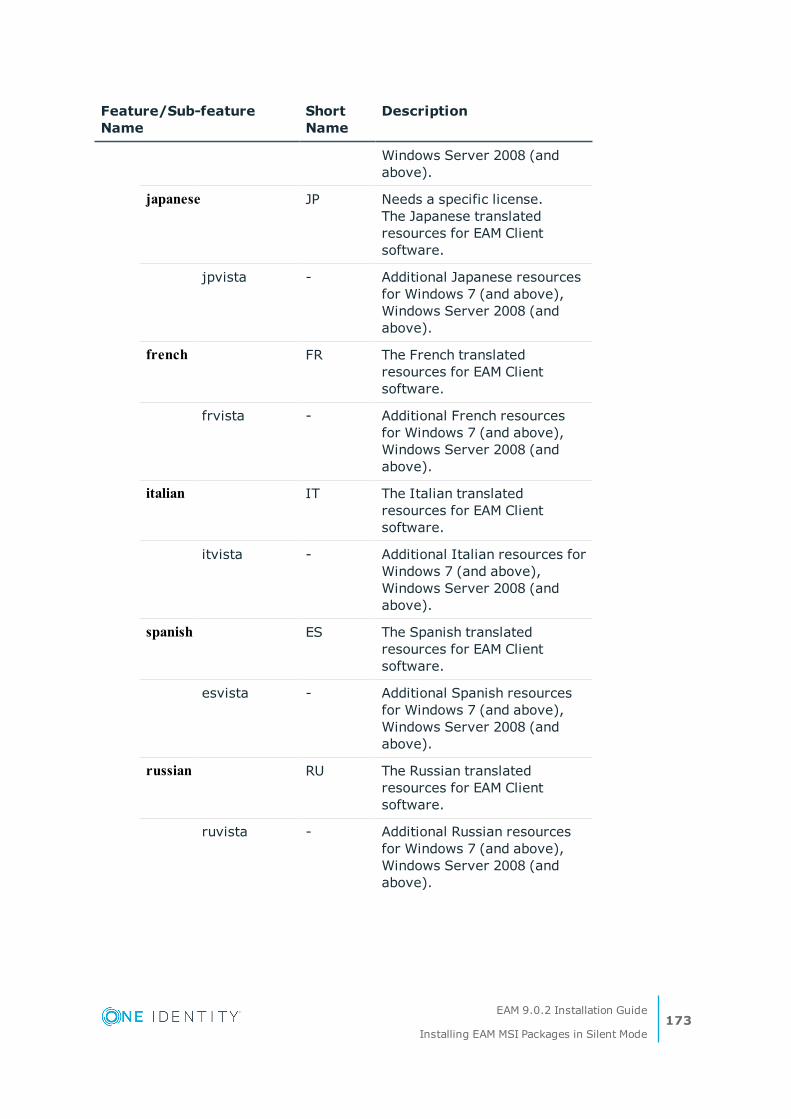
Feature/Sub-feature Name
Short Name
Description
Windows Server 2008 (and above).
japanese JP Needs a specific license.The Japanese translated resources for EAM Client software.
jpvista - Additional Japanese resources for Windows 7 (and above), Windows Server 2008 (and above).
french FR The French translated resources for EAM Client software.
frvista - Additional French resources for Windows 7 (and above), Windows Server 2008 (and above).
italian IT The Italian translated resources for EAM Client software.
itvista - Additional Italian resources for Windows 7 (and above), Windows Server 2008 (and above).
spanish ES The Spanish translated resources for EAM Client software.
esvista - Additional Spanish resources for Windows 7 (and above), Windows Server 2008 (and above).
russian RU The Russian translated resources for EAM Client software.
ruvista - Additional Russian resources for Windows 7 (and above), Windows Server 2008 (and above).
EAM 9.0.2 Installation Guide
Installing EAM MSI Packages in Silent Mode173
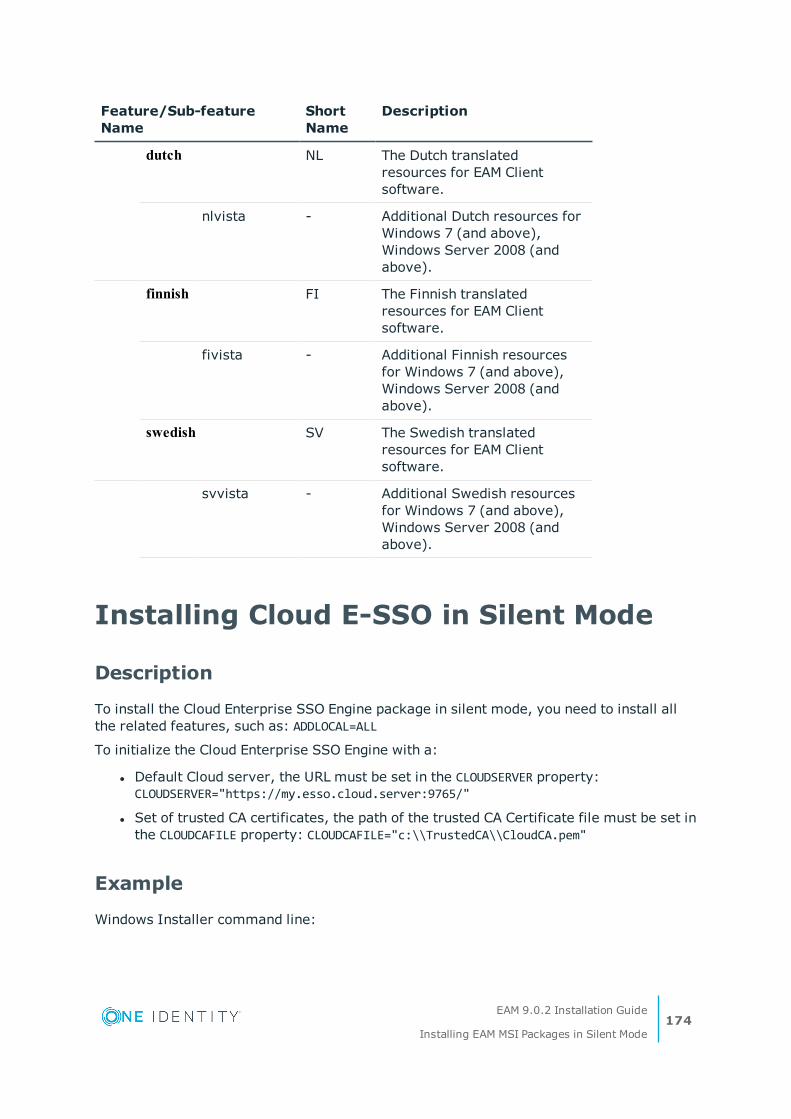
Feature/Sub-feature Name
Short Name
Description
dutch NL The Dutch translated resources for EAM Client software.
nlvista - Additional Dutch resources for Windows 7 (and above), Windows Server 2008 (and above).
finnish FI The Finnish translated resources for EAM Client software.
fivista - Additional Finnish resources for Windows 7 (and above), Windows Server 2008 (and above).
swedish SV The Swedish translated resources for EAM Client software.
svvista - Additional Swedish resources for Windows 7 (and above), Windows Server 2008 (and above).
Installing Cloud E-SSO in Silent Mode
Description
To install the Cloud Enterprise SSO Engine package in silent mode, you need to install all the related features, such as: ADDLOCAL=ALL
To initialize the Cloud Enterprise SSO Engine with a:
l Default Cloud server, the URL must be set in the CLOUDSERVER property: CLOUDSERVER="https://my.esso.cloud.server:9765/"
l Set of trusted CA certificates, the path of the trusted CA Certificate file must be set in the CLOUDCAFILE property: CLOUDCAFILE="c:\\TrustedCA\\CloudCA.pem"
Example
Windows Installer command line:
EAM 9.0.2 Installation Guide
Installing EAM MSI Packages in Silent Mode174
MSIEXEC.EXE /I ESSOCloud.msi ADDLOCAL="ALL" CLOUDSERVER="https://my.esso.cloud.server:9765/" CLOUDCAFILE="c:\\TrustedCA\\CloudCA.pem" /qn
Installing EAM Web Server in Silent Mode
Subject
The ESSOWebServer.msi gathers all software modules that may be installed on a web server.The silent installation can only be used for updating the web server: the MSI does not include the Apache server installation, which is a prerequisite for the Self-Service Password Reset and the EAM API.
IMPORTANT: This package does not include the configuration of the computer.
Procedure
Installation using the ADDLOCAL property of msiexec
In the ADDLOCAL property of the msiexec command, add the wanted feature names (see "Feature Name" column in the following Features table).
IMPORTANT: It is mandatory to select the parent feature in order to select a subfea-ture.
Installation using the MODULES and TRANSLATIONS properties of msiexec
Procedure
In the MODULES property of the msiexec command, add the short name of the wanted features (see "Short Name" column in the following Features table).
In the TRANSLATIONS property of the msiexec command, add the short name of the wanted languages.
IMPORTANT:In this case, the ADDLOCAL parameter must not be used.
EAM 9.0.2 Installation Guide
Installing EAM MSI Packages in Silent Mode175

Example
The following command line installs the EAM Self-Service for Password Reset (with all required hidden/mandatory MSI features):msiexec /qn /l*v <pathToLogFile> /i <pathToESSOWebServer.MSI> /qn /norestart INSTALLMODE=Custom /PASSIVE MODULES=SSPR
Features
The following table gives the list of features that can be selected to perform a silent installation of EAM Client.
NOTE: Feature and short names are case sensitive.
Feature name Short Name
Description
WEB - Optional feature.
WGSSSERVER - Mandatory feature when installing on an EAM Controller.
ESSO_WGAPI - Mandatory feature.
APACHE_WEB - Installs EAM Web Portal in Apache Web Server.
ESSO_SSPR SSPR EAM Self Service for Password Request.
ESSO_SSAP SSAP EAM Self-Service for Administration Portal.
ESSO_WSAPI WSAPI EAM API Web Service.
IIS_Web - Installs EAM as an IIS site.
Installing HLLAPI Wrapper in Silent Mode (64-bit clients only)
Subject
The HLLAPI Wrapper is delivered as a separate MSI package: ESSOHllAPI.msi, located in the ESSO.x64\Install folder of the installation packages.
EAM 9.0.2 Installation Guide
Installing EAM MSI Packages in Silent Mode176
IMPORTANT:The following procedure must be performed to run the HLLAPI plugin with 32-bit emulators only.
Procedure
In the ADDLOCAL property of the msiexec command, add the feature HllAPIWrapper feature (single and mandatory feature).
NOTE: The MODULES property of the msiexec command is not supported.
EAM 9.0.2 Installation Guide
Installing EAM MSI Packages in Silent Mode177
10
Enhancing EAM
Enhancing Security
Subject
You can customize EAM security to fit your security needs by reading the following sections.
Encrypting the LDAP Connection
By default, the connection to the Active Directory is not encrypted as the sensitive data transmitted through this channel is already encrypted.
However, you can activate the encryption of the LDAP connection by setting the following registry key: HKEY_LOCAL_MACHINE\SOFTWARE\Enatel\WiseGuard\FrameWork\Directory\GSSEncryption DWORD 1
Deactivating the Web Service Role on a Controller
By default, all the services are activated on a EAM controller, including the Web Service:
EAM 9.0.2 Installation Guide
Enhancing EAM178

If you are not using this Web Service, you should deactivate it by clearing the corresponding check box (Directory Panel > Access Point (EAM Controller) > Configuration tab).
Encrypting the Client Workstation/Controller Connection
Subject
By default, the connection between the client workstation and the controller is SSPI-encrypted. However, you can use an alternate encryption method by setting the following registry key: HKEY_LOCAL_MACHINE\SOFTWARE\Enatel\WiseGuard\FrameWork\FmkServer\DontUseSSPIWithServer DWORD 1
Once it is set, you can obtain an AES 128 encryption.
Enhancing Performance
Subject
You can customize EAM to fit your performance needs by reading the following section.
EAM 9.0.2 Installation Guide
Enhancing EAM179
Saving Directory Space
Description
When the primary account is stored, the following additional parameters are also stored:
l Short name (john)
l NT4 name (WINDOMAIN\john)
l User principal name ([email protected])
You can save some space in the Active Directory by setting the following registry value:
HKEY_LOCAL_MACHINE\SOFTWARE\Enatel\WiseGuard\FrameWork\SingleSignOn\CleanWindowsParam REG_DWORD 1
This value deletes the additional parameters which are now stored only when a delegation using the primary account has been activated.
EAM 9.0.2 Installation Guide
Enhancing EAM180
11
Activating Traces
Subject
To diagnose unexpected results from an installation program, you can activate traces as described in the following procedure.
Before Starting
l Create the folder that will store your trace files (C:\Traces for example).
l If you want to trace Password Reset, create a specific folder (C:\TracesRP for example).
Procedure
1. Start Registry Editor.
2. Create the HKEY_LOCAL_MACHINE\SOFTWARE\Enatel\WiseGuard\Debug key.
3. Create the following values:
Value Type
Value Name Value
String TraceDir Location of the trace files (C:\Traces for example)
DWORD TraceLevel Enter a value between 0 and 5:
l 0: no trace.
l 5: traces return highly detailed information.
DWORD MaxFileSize Maximum size in KB of the trace files.
DWORD LimitedLogFiles 2 by default.
EAM 9.0.2 Installation Guide
Activating Traces181

Value Type
Value Name Value
Maximum number of trace files (enter a value between 2 and 10).
DWORD TraceDurationHours The number of hours that must be covered by the trace files.
0 (default): disabled.
non-null value: enabled.
When the current trace file for a given process reaches the MaxFileSize, the first trace file is identified for this process that was the last to be modified before the last TraceDurationHours hours:
l If none of the existing files match this criteria, a new trace file is generated with current index +1.
l If an existing file matches this criteria, the contents of this file is erased and this file is used as the next trace file; any file with a greater index is deleted.
IMPORTANT: if TraceDurationHours is set to a non-null value, the LimitedLogFiles registry value is ignored.
NOTE: if this value is enabled, the number of trace files used for a given active process can be very high. This number decreases when the process is not active.
4. If you want to trace Password Reset, create the HKEY_LOCAL_MACHINE\SOFTWARE\Enatel\WiseGuard\Framework\ResetPassword key, with the following value:
Value Type
Value Name
Value
String TraceDir Location of the trace files (C:\TracesRP for example)
5. Restart your workstation.
When the user log on his/her workstation, the following trace files are created in the specified directory:
EAM 9.0.2 Installation Guide
Activating Traces182
l WGSSxxxx.log: traces of the EAM Security Services service.
l ssoenginexxxx.log: traces of the Enterprise SSO engine.
l ssoenginexxxx.log: traces of the Enterprise SSO engine.
l winlogonxxxx.log: Authentication Manager traces.
l WGConfigxxxx.log: traces of WGConfig.exe, which allows you to configure the EAM Security Services on the EAM workstations.
l SSOBuilderxxxx.log: traces of Enterprise SSO Studio.
l SENSxxxx.log: traces of the EAM Session Manager service.
l BIOFUSxxxx.log: traces of the Multi-User Desktop.
l LogonUIxxxx.log: traces of Authentication Manager (Windows 7 and above) with the method as a suffix (eg. LogonUI(Pwd), LogonUI(Bio)).
l UAPnAgentxxxx.log: traces of the XenApp session management by Enterprise SSO Engine.
l Credentialmanagerxxxx.log: traces of the Credential Manager.
EAM 9.0.2 Installation Guide
Activating Traces183
12
Retrieving the Serial Number on MiFARE and MiFARE DESFire RFID
Badges
Subject
This section explains how to retrieve the serial number of an RFID badge from a specific memory block of the badge, in sector 1.
On MiFARE and MiFARE DESFire badges, a sector is a set of 4 blocks, each block containing 16 bytes. Reading serial number from sector 1 means reading serial number from block 4.
Description
To locate the serial number in the block of data, a given number of Most Significant Bytes or MSB (the left part of the block) and a given number of Least Significant Bytes or LSB (the right part of the block) are ignored. The remaining middle set of bytes is then written in ASCII to build the serial number. All leading 0 are removed.
Example
If... Then...
l the block of data contains:
00 01 02 03 04 05 06 07 08 09 0A 0B 0C 0D 0E 0FMSB ---> <--- LSBAND
l the MSB is 6
only 7 bytes are used to build the serial number. The serial number value is then 60708090A.
EAM 9.0.2 Installation Guide
Retrieving the Serial Number on MiFARE and MiFARE DESFire RFIDBadges
184

If... Then...
AND l the LSB is 5
no block number is set the default serial number (extracted from the UID of the badge) is used.
a valid block number is set and an error occurs
no serial number is returned: the badge is ignored.
Before Starting
l Configuration parameters define how the serial number must be extracted from a MiFARE or DESFire RFID badge.
l All configuration parameters are stored in the Windows registry.
Parameters Description
Description
The parameters can be defined as a GPO. In this case, they are located in the following registry key:HKEY_LOCAL_MACHINE\Software\Policies\Enatel\WiseGuard\FrameWork\PCSC
If parameters are defined locally on the workstation, they are located in:HKEY_LOCAL_MACHINE\Software\Enatel\WiseGuard\FrameWork\PCSC
IMPORTANT: A GPO-defined configuration parameter overrules a local parameter.
The following registry values can be defined in the above GPO or local keys.
Badge Type
Name Type Description
MiFARE MiFAREBlockNumber REG_DWORD Mandatory.The block number to read.Values: 0 … 15
MiFAREBlockKey REG_SZ The encrypted value of the key used to read the data block. Once decrypted, the key must contain 12 hexadecimal digits.
EAM 9.0.2 Installation Guide
Retrieving the Serial Number on MiFARE and MiFARE DESFire RFIDBadges
185

Badge Type
Name Type Description
Default key value: FFFFFFFFFFFF
MiFAREBlockMask REG_SZ The mask applied to ignore invalid badges. Must contain 32 hexadecimal digits.Default value (no mask): FFFFFFFFFFFFFFFFFFFFFFFFFFFFFF
MiFAREIgnoreMSB REG_DWORD The number of MSB (left) bytes to ignore when extracting the serial number from the block of data.Values: 0 … 15Default value: 6
MiFAREIgnoreLSB REG_DWORD
The number of LSB (right) bytes to ignore when extracting the serial number from the block of data.Values: 0 … 15Default value: 5
DESFire DESFireATR REG_SZ Optional.The DESFire ATR used to detect badges.Default value: 3B8180018080.
DESFireMask REG_SZ Optional.The ATR mask used to detect badges.Default value: FFFFFFFFFFFF.
DesFIREAID REG_SZ The application ID.
DesFIREAuthMode REG_DWORD
Authentication mechanism.Set the value to 0 (for AES) as any other value is unsupported.
DesFIREKey REG_SZ Contains the filled-in key value, encrypted with an EAM hard coded key.
DesFIREKeyNo REG_DWORD
The key number.
DesFIREKeyVer REG_DWORD
The key version.
DesFIREFileMode REG_DWORD
File communication mode.Set the value to 0 (for Encrypted) as any
EAM 9.0.2 Installation Guide
Retrieving the Serial Number on MiFARE and MiFARE DESFire RFIDBadges
186
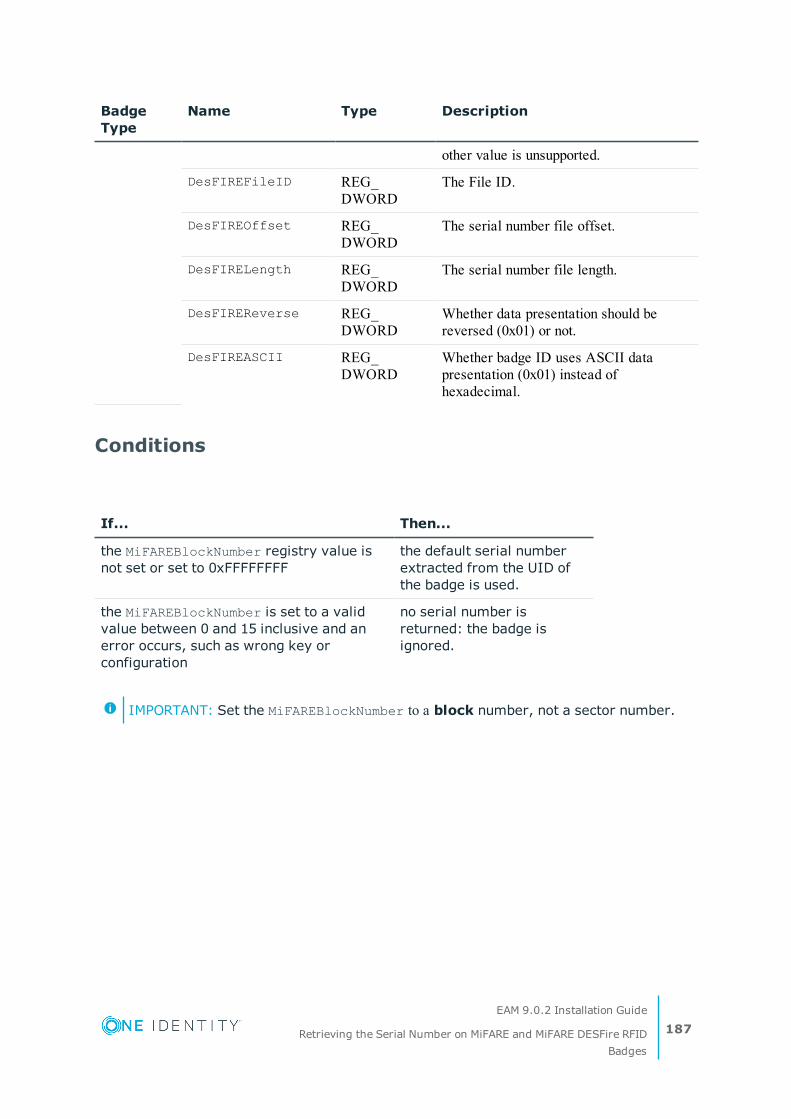
Badge Type
Name Type Description
other value is unsupported.
DesFIREFileID REG_DWORD
The File ID.
DesFIREOffset REG_DWORD
The serial number file offset.
DesFIRELength REG_DWORD
The serial number file length.
DesFIREReverse REG_DWORD
Whether data presentation should be reversed (0x01) or not.
DesFIREASCII REG_DWORD
Whether badge ID uses ASCII data presentation (0x01) instead of hexadecimal.
Conditions
If... Then...
the MiFAREBlockNumber registry value is not set or set to 0xFFFFFFFF
the default serial number extracted from the UID of the badge is used.
the MiFAREBlockNumber is set to a valid value between 0 and 15 inclusive and an error occurs, such as wrong key or configuration
no serial number is returned: the badge is ignored.
IMPORTANT: Set the MiFAREBlockNumber to a block number, not a sector number.
EAM 9.0.2 Installation Guide
Retrieving the Serial Number on MiFARE and MiFARE DESFire RFIDBadges
187
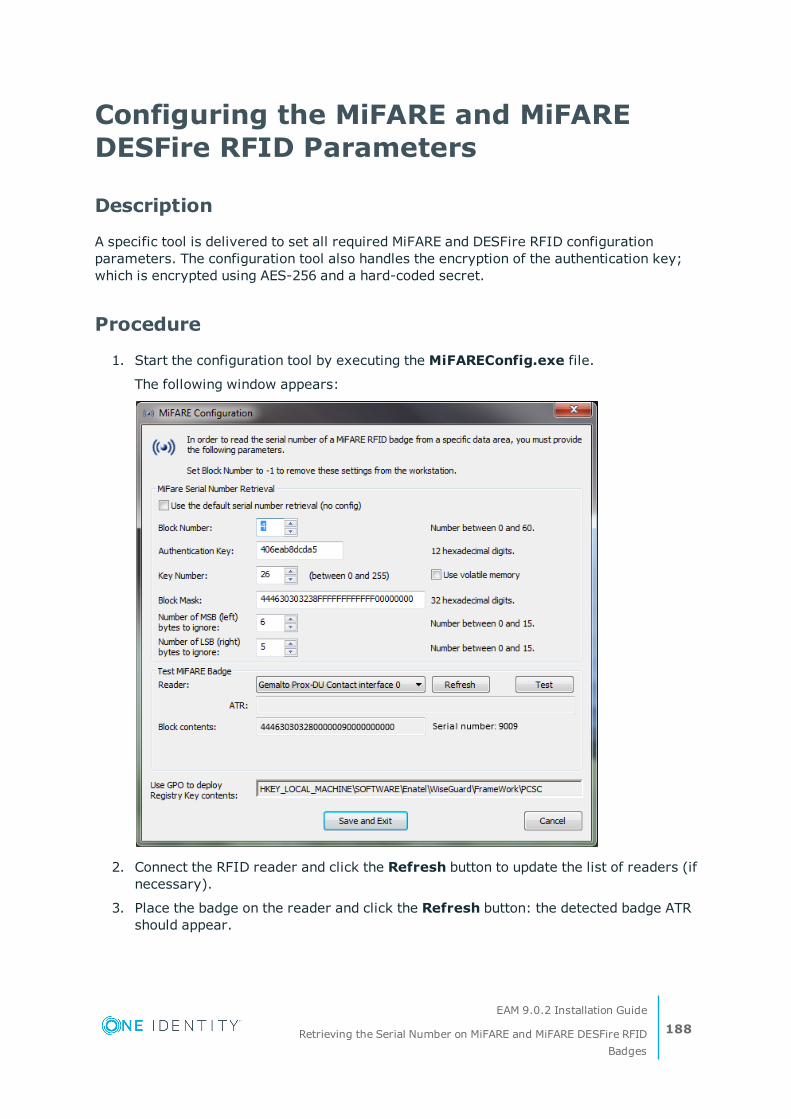
Configuring the MiFARE and MiFARE DESFire RFID Parameters
Description
A specific tool is delivered to set all required MiFARE and DESFire RFID configuration parameters. The configuration tool also handles the encryption of the authentication key; which is encrypted using AES-256 and a hard-coded secret.
Procedure
1. Start the configuration tool by executing the MiFAREConfig.exe file.
The following window appears:
2. Connect the RFID reader and click the Refresh button to update the list of readers (if necessary).
3. Place the badge on the reader and click the Refresh button: the detected badge ATR should appear.
EAM 9.0.2 Installation Guide
Retrieving the Serial Number on MiFARE and MiFARE DESFire RFIDBadges
188

4. Provide the serial number retrieval parameters:
l Block Number. Do not provide a sector number.
l Authentication Key. Default value: FFFFFFFFFFFF.
l Block Mask. Use:
l FF to match all byte values.
l 00 to ignore a byte.
l Number of MSB (left) bytes to ignore.
l Number of LSB (right) bytes to ignore
If an RFID reader is already connected, go to step 5.
5. Press the Test button to check parameters and retrieve the serial number of the detected badge.
If... Then...
all parameters are correct the contents of the selected block and the extracted serial number are displayed.
the authentication key does not grant access to the selected block
an explicit error message is displayed under the Block contents field.
the authentication key is correct and the contents of the selected block do not match the provided mask
the serial number is shown but an error message indicates the mismatch:
the MiFARE badge is a DESFire badge
the following window appears:
EAM 9.0.2 Installation Guide
Retrieving the Serial Number on MiFARE and MiFARE DESFire RFIDBadges
189

If... Then...
Fill-in both Authentication key and Application ID fields according to the MSB-LSB order.Click OK to validate the configuration settings.
6. Once all parameters are correct, click the Save and Exit button to save all parameters in the Windows Registry of the workstation.
7. Deploy these values on other workstations using GPO.
The MiFARE or DESFire RFID parameters have been configured.
Resetting the MiFARE and DESFire RFID Parameters
Procedure
1. Execute the MiFAREConfig.exe file.
2. Set the Block Number to -1.
3. Click the Save and Exit button.
The MiFARE or DESFire RFID parameters have been reset.
EAM 9.0.2 Installation Guide
Retrieving the Serial Number on MiFARE and MiFARE DESFire RFIDBadges
190

About us
About us
Contacting us
For sales or other inquiries, visit https://www.oneidentity.com/company/contact-us.aspx or call +1-800-306-9329.
Technical support resources
Technical support is available to One Identity customers with a valid maintenance contract and customers who have trial versions. You can access the Support Portal at https://support.oneidentity.com/.
The Support Portal provides self-help tools you can use to solve problems quickly and independently, 24 hours a day, 365 days a year. The Support Portal enables you to:
l Submit and manage a Service Request
l View Knowledge Base articles
l Sign up for product notifications
l Download software and technical documentation
l View how-to-videos
l Engage in community discussions
l Chat with support engineers online
l View services to assist you with your product
EAM 9.0.2 Installation Guide
About us191