ear piercing training manual - caflon - the safer way to...
TRANSCRIPT


Ear percingtraining manualwith the Ca�on Blu Disposable Ear Piercing System
Manufacturer and Distributor of Ear Piercing Equipment
This manual will cover the following aspects of ear piercing Information about Ca�on Ca�on earrings The anatomy of the ear: which area of the ear to pierce Contra indications of ear piercing Step by step ear piercing using the Ca�on Blu System Aftercare Potential problems and further information

Welcome to the Ca�on Blu ear piercing training manual. The aim of this manual is to provide the user with clear and precise information on howto pierce a client’s ears using the Ca�on Blu Ear Piercing System.
Ear piercing using Ca�on Systems is a safe and useful pro�t making service requiring little in the way of �nancial investment, using minimalamounts of space, and taking just a short amount of time. Pro�t margins are also good making the Ca�on Ear Piercing Systems a wise and safeinvestment.
Involved in the manufacture and distribution of high quality ear piercing equipment and hypo-allergenic fashion earrings.
One of the largest manufacturers and distributors of ear piercing equipment in the world with distribution in over 78 countries.
The Ca�on collection of ear studs includes all stones and shapes of fashion. All are precision turned on Swiss Escomatic Machines.
Ca�on has available a wide range of sales and marketing aids, Natural Solution and antiseptic wipes, as well as starter kits designed especiallyfor the ear piercing beginner.
Range of earringsCa�on ear studs are made from hypoallergenic material meaning they do not cause allergies or irritations.
And are available in many di�erent styles and sizes such as 24ct gold plate, white stainless and Titanium.
All studs are supplied in validated pre-sterilised blister packs using Ethylene Oxide Gas and Gas permeating paper.
Every pair of earrings therefore has been individually sterilised.
Compliant with EC Nickel Directive 94/27/EC
Introduction
A British based company
Ear percing training manual

Outer ear
The lobe is the soft area of the ear and consists of skincovering connective fatty tissue. It is the area of the earwhich can be pierced. The healing period is 4-6 weeks.
The cartilage area is a type of elastic tissue covered byskin and �ne hair. The area which can be pierced is the�at upper part of the cartilage area indicated by thediagram below. Due to the nature of piercing the cartilageit is very important to advise the client that thoughpiercing this part of the ear can be safely done with theCa�on Blu system, extra care must be taken in caring forthis type of piercing. The healing period is at least 12weeks.
What area of the ear can you pierce with Ca�on Blu?
The Ca�on Blu Ear Piercing System is not speci�callydesigned to pierce any other part of the body and should only be used to pierce the shaded areas of the ear indicated in this diagram.
Pinna
Cartilage
AuricleExternal ear canal
Lobe
<< Anatomy of outer ear
Ear percing training manual

Contra indications of ear piercingContra indications for ear piercing normally involve the client having a condition which means they might be prone to infection or slow to heal from any potential infections, a physical injury, or some kind of obstruction.
If a client is su�ering from any of the following then they should seek medical advice before you pierce their ears.
- Circulation disorders
- High or low Blood Pressure
- History of Thrombosis / Embolism
- Epilepsy (Epileptics must be accompanied by
- someone if you are to pierce their ears)
- Pregnancy
- Diabetes (healing time)
- Dysfunctions of the Nervous System
- Skin disorders (eczema, psoriasis...)
- Bruises or recent Haemorrhage or Swelling
- Scar tissue or Keloids
- Warts or Moles (you may pierce through freckles)
- Cuts, Abrasions or recent operations
If in doubt do not pierce.
Ear percing training manual
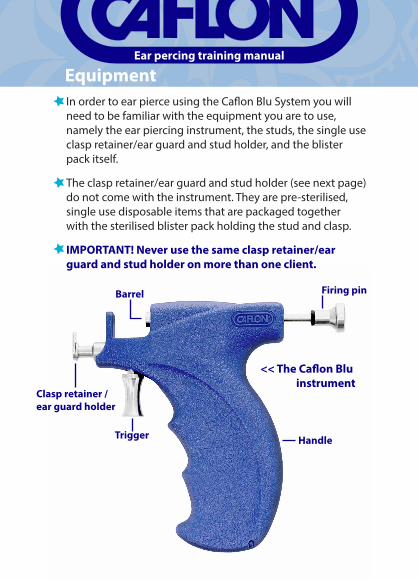
EquipmentIn order to ear pierce using the Ca�on Blu System you will need to be familiar with the equipment you are to use, namely the ear piercing instrument, the studs, the single useclasp retainer/ear guard and stud holder, and the blister pack itself.
The clasp retainer/ear guard and stud holder (see next page) do not come with the instrument. They are pre-sterilised, single use disposable items that are packaged togetherwith the sterilised blister pack holding the stud and clasp.
IMPORTANT! Never use the same clasp retainer/ear guard and stud holder on more than one client.
Barrel Firing pin
Clasp retainer / ear guard holder
Trigger Handle
<< The Ca�on Blu instrument
Ear percing training manual

Ear percing training manual
Plastic blister pack
Blu plastic mount >>
Contents of Blister packClasp >>
Clasp retainer /ear guard >>
Stud >>
Stud holder >>
Mini (Blue) Regular (White) Large (Beige)
A Clip >>
Tyvek paper(Clasp retainer/ear guard and stud retainerlocated inside blister pack.)
Ear percing training manual
Step-by-step Ear PiercingSTEP 1: PREPARING YOURSELF AND THE CLIENTClients will normally �t into ‘nervous’ or ‘non nervous’ categories. Obviously ‘nervous’ clients are potentially more di�cult to deal with. However most of their anxiety will usually be associated with the thought that the piercing may be painful. They may have had a painful ear piercing experience previously. These kinds of clients need to be relaxed through reassurance that the Ca�on Blu System allows for quick and easy ear piercing.
Seat the client on a stool or chair which is at the right height for you tocomplete the piercing. You should not have to reach up or down in order to pierce the client’s ears.
Ask the client to select the style of stud to be used for piercing fromthe Ca�on sample board
Explain the piercing procedure and have the client read and sign theear piercing registration book and after-care instructions.
Check thoroughly for contra indications. If in doubt do not complete thepiercing.
Now wash your hands thoroughly or scrub them with a chlorahexidinebased surgical hand cleaner, dry them and then ideally you should put on single use disposable gloves as an additional precaution.
Have the client remove any earrings they are wearing.
Clip back any hair away from the ears.
Check the client’s ears for epidermoid cycts which are embedded skin tissue enclosing foreign debris. When you pinch the ear, if you feel a small, hard lump that can be moved, it is an epidermoid cyst. If you can see and feel a lump that does not move, it is scar tissue. Cysts are notvisible and can be moved, scar tissue is visible and does not move. Never pierce through a cyst as it will cause it to rupture releasing debris into the surrounding tissue which can cause infection. You should also not pierce straight through keloids, which are large visible lumpy scar tissue. The rule to follow is:
Keloids/scar tissue, pierce 3 – 4mm away from it.If hole is open, pierce 1cm away from it.
Ear percing training manual
Ear percing training manual
You will need to pierce further away if the hole is open because aninaccurate piercing could lead to one large hole in the lobe. Additionally, itavoids the clasps overlapping at the back of the ear.
You may pierce through an old hole as long as there is no heavy scartissue present.
After examining the ear(s) thoroughly cleanse the area to be pierced frontand back with an antiseptic wipe, be sure to use a separate wipe for eachear. This will safeguard against infection.
Allow 2 minutes for the antiseptic to soak in and the ear to dry thoroughly.
During this time you should demonstrate to the client the noise theinstrument will make when you eventually pierce their ears. If familiar withthis sound they are unlikely to move during the piercing, lessening thelikelihood of an inaccurate piercing.
To demonstrate the noise:
Take the instrument in your preferred hand.
Pull back hard on the �ring pin until it locks.
Place the instrument close to the client’s ear.
Tell them that they are about to hear the noise the instrument will make.
Fire the instrument by squeezing the trigger.
Once the ear is dry you should use the non toxic marking pen to mark a spot on the ear where it will be pierced. No other type of pen should be used.
Using a mirror, show the client the spot marked on the ear.
Only if the client agrees the mark is in the correct place should you proceedwith the piercing.
If they state a preference for another spot then wipe o� the original markusing another antiseptic wipe and repeat the previous marking instructions.
Only when the client is happy with the positioning of the mark should thepiercing take place.
Step-by-step Ear Piercing
Preparing the equipmentEar percing training manual
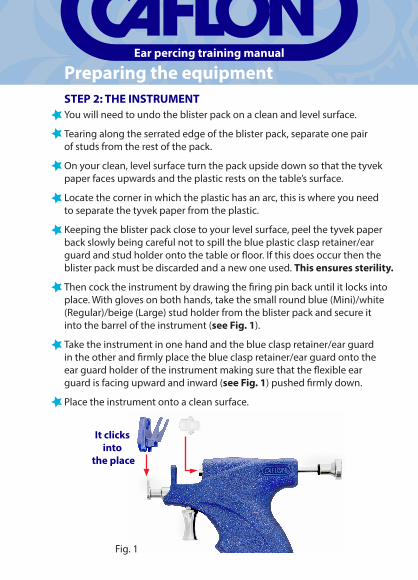
You will need to undo the blister pack on a clean and level surface.
Tearing along the serrated edge of the blister pack, separate one pair of studs from the rest of the pack.
On your clean, level surface turn the pack upside down so that the tyvek paper faces upwards and the plastic rests on the table’s surface.
Locate the corner in which the plastic has an arc, this is where you need to separate the tyvek paper from the plastic.
Keeping the blister pack close to your level surface, peel the tyvek paper back slowly being careful not to spill the blue plastic clasp retainer/ear guard and stud holder onto the table or �oor. If this does occur then the blister pack must be discarded and a new one used. This ensures sterility.
Then cock the instrument by drawing the �ring pin back until it locks into place. With gloves on both hands, take the small round blue (Mini)/white(Regular)/beige (Large) stud holder from the blister pack and secure it into the barrel of the instrument (see Fig. 1).
Take the instrument in one hand and the blue clasp retainer/ear guard in the other and �rmly place the blue clasp retainer/ear guard onto the ear guard holder of the instrument making sure that the �exible ear guard is facing upward and inward (see Fig. 1) pushed �rmly down.
Place the instrument onto a clean surface.
It clicks into
the place
STEP 2: THE INSTRUMENT
Fig. 1

Ear percing training manual
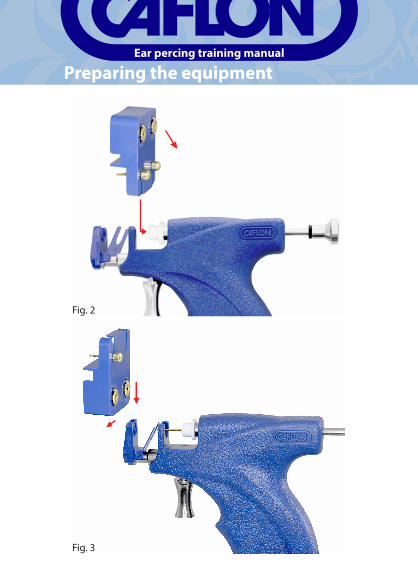
Next, hold the clear blister pack containing the plastic stud and clasp mount in one hand and carefully remove the blue mount ensuring not to touch the sterile studs and clasps.
Holding the blue mount by the sides, the stud and clasps should be facing upwards.
With the mount in one hand take the ear piercing instrument in the other and using the mount, insert the exposed head of the ear piercing stud into the round plastic stud holder previously inserted onto the barrel of the instrument then twist the mount upwards to release the stud from the mount leaving the stud in the plastic stud holder. (see Fig. 2).
Ensuring that the instrument remains level, invert the plastic mount and slide the corresponding clasp onto the plastic clasp retainer/ear guard previously loaded onto the instrument (see Fig. 3).
Place the plastic mount containing the remaining stud and clasp in the upright posi-tion on a nearby clean surface ready to be used on the second piercing if required.
The instrument is now loaded and you are ready to pierce. Follow the instructions on piercing the client’s ear on the next page.
Once you have completed the �rst piercing, repeat the above process for the second piercing.
These two operations are extremely simple to perform but you may need to practice a few times to become pro�cient.
Remember that once loaded, always keep the instrument in a horizontal position to prevent the stud and clasp from falling out.
Preparing the equipment
Ear percing training manual
Fig. 2
Fig. 3
Preparing the equipment
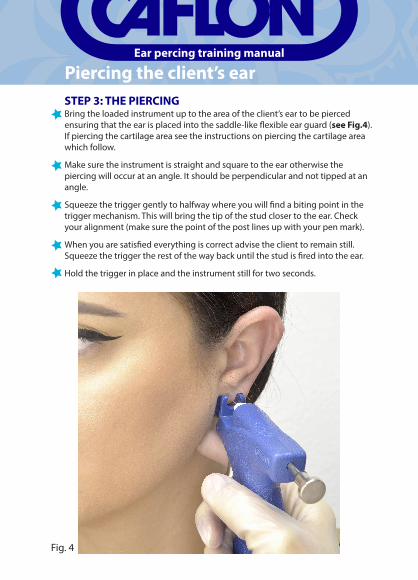
Bring the loaded instrument up to the area of the client’s ear to be piercedensuring that the ear is placed into the saddle-like �exible ear guard (see Fig.4).If piercing the cartilage area see the instructions on piercing the cartilage areawhich follow.
Make sure the instrument is straight and square to the ear otherwise thepiercing will occur at an angle. It should be perpendicular and not tipped at anangle.
Squeeze the trigger gently to halfway where you will �nd a biting point in thetrigger mechanism. This will bring the tip of the stud closer to the ear. Checkyour alignment (make sure the point of the post lines up with your pen mark).
When you are satis�ed everything is correct advise the client to remain still.Squeeze the trigger the rest of the way back until the stud is �red into the ear.
Hold the trigger in place and the instrument still for two seconds.
Piercing the client’s earSTEP 3: THE PIERCING
Ear percing training manual
Fig. 4
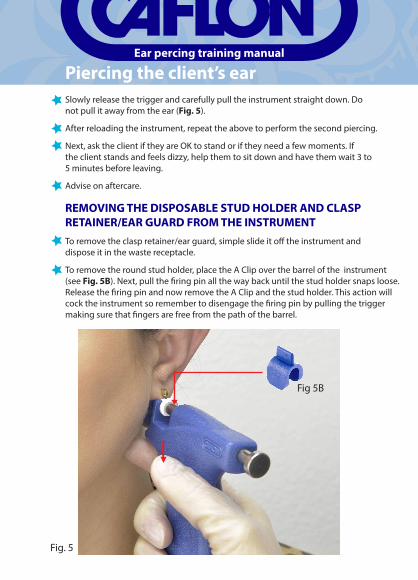
Fig. 5
Fig 5B
Piercing the client’s earEar percing training manual
To remove the clasp retainer/ear guard, simple slide it o� the instrument and dispose it in the waste receptacle.
To remove the round stud holder, place the A Clip over the barrel of the instrument (see Fig. 5B). Next, pull the �ring pin all the way back until the stud holder snaps loose. Release the �ring pin and now remove the A Clip and the stud holder. This action will cock the instrument so remember to disengage the �ring pin by pulling the trigger making sure that �ngers are free from the path of the barrel.
REMOVING THE DISPOSABLE STUD HOLDER AND CLASP RETAINER/EAR GUARD FROM THE INSTRUMENT
Slowly release the trigger and carefully pull the instrument straight down. Donot pull it away from the ear (Fig. 5).
After reloading the instrument, repeat the above to perform the second piercing.
Next, ask the client if they are OK to stand or if they need a few moments. Ifthe client stands and feels dizzy, help them to sit down and have them wait 3 to5 minutes before leaving.
Advise on aftercare.

If you are piercing through the cartilage area of the ear, special care must be taken during both the piercing procedure and during the after care period.
IMPORTANT! Alert your client that the healing time for the cartilage area can take up to 12 weeks. Reinforce the fact that due to the nature of piercing the cartilage area extra care should be taken to ensure proper after care is followed.
If pain, redness or swelling persists, advise them to seek medical attention immediately.
Failure to do so may lead to permanent damage to the ear.
PIERCING THE CARTILAGE AREA OF THE EAR
When piercing the cartilage area of the ear, only pierce the upper �at area. Never pierce through the curled edge of the cartilage area or too close to the edge of the ear as this may cause the cartilage to split. Also, never pierce through scar tissue in the cartilage area, avoiding all visible capillaries.
Prepare the piercing area as instructed previously.
Have the client tilt their head all the way back so that they are facing skyward. This action makes it easier to position the instrument for piercing while maintaining the instrument in the all important horizontal position which ensures that the clasp will not fall out before the piercing.
If the client has very thick or heavily curled cartilage, you must pull the cartilage to “unroll it”. This ensures that the instrument can be properly positioned.
Once the instrument is positioned and ready for �ring, follow the same procedure described when piercing the lobe previously.
Piercing the client’s earEar percing training manual

After careIf the instructions on how to pierce ears contained in this manual arefollowed stringently then potential problems following a piercing will have been minimised. However, the importance of aftercare cannot beover-emphasised.
The client should be given the following advice for aftercare.
TO PREVENT INFECTIONAvoid any unnecessary handling of the ears and studs.
Wash hands thoroughly before touching studs or ear.
Tie hair back.
Cleanse front and back of the ear twice a day with CAFLON Natural Solution (4 times for cartilage) without removing studs. Then rotate studs 2 or 3 times, 180° left and 180° right, i.e. a half turn only, thus avoiding hair wrapping around the post at the back of the lobe. In between cleansing, the ear should be kept DRY.
Keep hair spray, soap, shampoo and other preparations away from theear. After shampooing, the ear should be rinsed with clean water andcleansed with CAFLON Natural Solution as described above. Beauty orhair treatments should be avoided for 24 hours.
The piercing area should be CLEANSED with CAFLON Natural Solutionthen kept DRY, especially after bathing, swimming or exercise.
Do not replace studs with other earrings during the initial 6 weekhealing period (12 weeks for cartilage).
Do not push the butter�y clasp along the post toward the ear. TheButter�y clasp should always be positioned at the end of the post.
Feel the position each time you clean the ear - it must feel smooth. This ensures that the earrings remains LOOSE during the healing period. This is essential as tightness may lead to in�ammation.
Do Not
Ear percing training manual

TO PREVENT PIERCINGS FROM CLOSING
After care
Leave studs in the ears for 6 weeks continuously (12 weeks for cartilage).
After 6 weeks (12 weeks for cartilage), the stud can be removed andother post-type earrings may be worn continuously for 6 to 12 months.
Ca�on Natural Care Solution should be suggested to your client. This wayyou can be sure that the client receives the correct solution for aftercare.
During the �rst year of piercing the client should avoid going longer than24 hours without wearing earrings. This will ensure that the piercingswill not close.
Use only post-style earrings continuously for the �rst 6 months afterpiercing. The post should be surgical stainless steel or other hypo-allergenic material.
Minor pain/redness may occur immediately - this is normal. This willsettle within 48 hours provided proper aftercare is carried out. If unduepain/swelling/redness occurs at any time, seek medical advice before removing the earpiercing studs.
EAR CARTILAGE
If the client follows these aftercare instructions faithfully they will, in later years, have a small smooth round hole in each ear – never a slit.
Due to the nature of ear cartilage, extra care should be observed duringthe healing period.
Minor pain/redness may occur immediately - this is normal. This will settle within 48 hours provided proper aftercare is carried out. If undue pain/swelling/redness occurs at any time, seek medical advice. Do not remove studs before the relevant medical advice. Failure to properly follow aftercare procedures or to seek immediate medical advice, should a problem occur, may result in permanent damage to the ear cartilage.
Ear percing training manual

Potential problemsEar piercing is a relatively simple and straightforward procedure in which nothing can go wrong providing you stringently follow the instructions contained in this manual.
The rate at which individuals heal after a piercing can vary enormously, but an average would be 4 – 6 weeks for lobe and 12 weeks for the cartilage.
Perhaps the worst scenario you might expect is that the client will move as you �re the gun. This will inevitably result in an inaccurate piercing.
If this happens do not remove the ear stud as the ear will bleed. Advise them to leave the stud in overnight, then remove the stud and let the hole heal over.
This advice also applies to the client who decides, despite the fact that you’ve followed the instructions in the manual, that they do not like the piercing. Advise them to leave the stud in overnight, then remove the studs and allow the hole to heal over.
Ear percing training manual

Further informationProviding you have followed and understood the instructions contained in this manual, you should now be capable of piercing ears using the Ca�on Blu Disposable System.
However, there are still a number of issues relevant to ear piercing which the piercing process itself does not cover.
EAR PIERCING LEGISLATION
In England and Wales current ear piercing legislation falls under the Local Government (Miscellaneous Provisions) Act, 1982.
This means that the Local Authority has the power to implement the aspects of the Act that relate to ear piercing in their area.
The Act provides that ear piercing may only be carried out by a person in premises registered by the Local Authority.
You should always check with your local health authority to �nd out if there are any possible licenses, fees, regulations or requirements which need to be obtained or followed before performing any ear piercings in your establishment.
Current legislation
Ear percing training manual
The London area is di�erent to the rest of England and Wales in that that there are 2 other Acts under which Boroughs may regulate skin piercing. The Greater London Council (General Powers) Act 1981 and the London Local Authorities Act 1991.
Anyone intending to pierce ears in premises in the London area shouldcontact their Local Environmental Health Authority for advice.
The Local Authority does have the power to inspect both registeredpremises and premises in which it suspects skin piercing is taking placewithout a registration.
Fees for licensing and registration can vary enormously. Details can beobtained from your Local Authority.
Legislation regarding ear piercing is currently under review. With theadvent of much more sterile and hygienic ear piercing, such as theCa�on Disposable System, ear piercing is now much safer andcarries no hygiene risk.
In our commitment to constantly provide the best possible service toour clients, Ca�on takes a proactive approach to ear piercingregulations by contacting many of the individual Local Authoritiesthroughout the United Kingdom to ensure that the best and the fairestpossible regulations covering ear piercing are implemented by thedi�erent boroughs. Should you have any questions with regard to thesematters, please contact us. Our professional and experienced sta� willgladly assist you in this area.
THE FUTURE OF REGULATION
Ear percing training manual
Further information
Ca�on equipment is covered by Product Liability Insurance. However, as an individual you will require your own insurance cover.Many companies now require evidence of some form of ear piercing training such as that o�ered by Ca�on before issuing insurance cover.
The Ca�on training system is particularly relevant in this respect in that models are used during training as opposed to ear cards. This means that you will already be experienced when you pierce a client’s ears for the �rst time. Should you wish to be included in our next training seminar in your area, please contact our Head O�ce to �nd out when the next Ca�on training specialist will be in your area.
Do not pierce anyone under the age of 16 without the the presence of a parent or legal guardian. Failing such may expose you to criminal charges of grievous bodily harm to a child despite the fact that the childconsented without the permission of a parent or legal guardian.
A general rule to follow would be to exercise caution when piercing the ears of anyone under the age of 16. Such clients should be accompanied by an adult. Do not accept consent by telephone or letter. It is stronglyadvisable to have the parent of legal guardian read and sign the release form in your presence.
Though piercing the ears of small children is perfectly safe using the Ca�on systems, one should always strongly caution the parent that due to the child’s age, aftercare may be di�cult for the child to follow. Parents should assume the responsibility of ensuring that the child’s piercings are properly maintained and to seek medical attention at the slightest hint of a problem.
AGE RESTRICTION
INSURANCE
Ear percing training manual
Insurance and Age Restriction