easy pattern making - · pdf fileeasy pattern making 39 3. being very careful not to cut your...
TRANSCRIPT
37
Easy pattern makingEasy pattern makingEasy pattern makingEasy pattern making
It It It It isisisis easy! easy! easy! easy!
A lot of people think all pattern making must be hard. It’s easy! All you need are some paper towels, your puppet, some scissors, and a little P&P (practice and patience). By actually shaping the pattern directly on your puppet (a technique called “draping”), you can see just what you need to do to make it fit right.
The two patterns shown in this chapter, the basic pattern front and (what else?) the basic pattern back, are essential for making many of the costumes in this book. In the chapters that follow, you can learn ways to modify the basic pattern pieces to create a wide variety of shirts, robes, vests, suits, coats, and dress tops. (And, as the “Choosing fabric” chapter explains, you can get a lot of variety out of each pattern just by using different types of fabric.)
I like to use paper towels for pattern making because they’re more flexible than regular paper, more durable than tissue paper, and a lot cheaper than cloth. That way, you can experiment all you like without worrying about wasting fabric. And experimenting is the name of the game when it comes to pattern making!
Why not just buy patterns?
Try finding an 1820s ballgown pattern in size 2 toddler, and you’ll immediately discover the problem. Besides the lack of styles, many puppets have a size, shape, or need for openings that just doesn’t lend itself well to available patterns.
And since drastically altering an existing pattern is often harder than making one from scratch (trust me or try it yourself), get out those paper towels and give it a try! Basic pattern making is the door to a never-ending wardrobe.

Easy pattern making
38
Fitting roomFitting roomFitting roomFitting room
Loose fitting clothing is always easier to make than very tight fitting clothing. This goes double for more shapely puppets (like many marionettes). If you’re just getting started in costuming, it’s a good idea to begin with fairly loose fitting costumes first. This adds to the style of the costume and, more importantly, gives your puppet room to move around without popping seams.
Fashion designers call this extra room “design ease.” It also works as “fudge room,” because no matter how carefully you plan and measure (or don’t), it never comes out quite the way you think. The extra half an inch never hurts, and it’s generally much easier to cut off extra than it is to add more.
Get readyGet readyGet readyGet ready
If you have a hard-bodied puppet, you may want to cover it with an old nylon stocking first. That way, you can pin the pattern to the stocking as you work. For puppets who don’t mind a little acupuncture (ouch!), you can pin the pattern directly to the puppet.
Basic pattern frontBasic pattern frontBasic pattern frontBasic pattern front
Lay your puppet on a flat surface, arms spread out. Or, if you are working with a marionette or other string puppet, hang the puppet up at a comfortable work level.
1. Place a paper towel (or two) on your puppet’s body so the inside edge of the paper towel lies just past the center of your puppet’s body (as shown below).
2. Make sure the top edge of the paper towel is high enough to fold over your puppet’s shoulder, and the side edge can wrap around your puppet’s side. (If you have your puppet upright, you may need a few pins to hold the paper towel in place.)

Easy pattern making
39
3. Being very careful not to cut your puppet (or yourself), cut a curved line just below your puppet’s chin that extends from the side of the paper towel to the top. You’ve just created a neckline! Make sure the neckline is low enough not to interfere with the movement of your puppet’s head, especially if your puppet has a moving mouth or jaw that drops.
4. Cut a second curved line to make an armhole, beginning at least an inch below your puppet’s arm, making sure your puppet can move its arm freely.
That’s it! Once you’ve completed the back, you can work on fitting the front and back patterns together and shaping them to your puppet.
NOTE: After you’ve made your patterns, be sure to read the “Add seam allowance!” and “Cutting out fabric” sections at the end of this chapter. These contain crucial information about putting your patterns to work.
Basic pattern backBasic pattern backBasic pattern backBasic pattern back
Making the basic pattern back is pretty much the same as making the front. In fact, you can use the front pattern as a guide to make sure the two patterns line up along the shoulders and armholes.
1. Lay your puppet face down on a flat surface, arms spread out (or suspend it from its strings), and place a paper towel on it in the same way as the front.
2. Cut a curved line below your puppet’s head that extends from the side of the paper towel to the top of the paper towel. This line may be a little higher than in the front since you don’t have to worry so much about head movement.

Easy pattern making
40
3. Cut a curved line to make an armhole that matches the one for the basic pattern front.
Shape up your patternsShape up your patternsShape up your patternsShape up your patterns
If you’re working with a relatively flat puppet (as many hand puppets are), you probably don’t need to worry about shaping. Go ahead and skip on to the next section, “Fit the patterns to your puppet.” If you have a more shapely puppet (like many marionettes), you need to make your pattern a little more shapely too. Here’s how:
Darts. No, not that kind. These darts are little triangle-like pieces that you cut out of your pattern (and your fabric). By sewing together the edges of the opening (right sides together!), you create shape and dimension.
For most shapely puppets, the front of the pattern needs the most work. If you have a puppet with a large bustline, for example, you’ll immediately see that most of the basic pattern front does not lie flat against your
puppet’s body. What you need to fix this is, in most cases, a couple of slits in the pattern—one running horizontally across (or just above) the bustline and another running vertically across the lower part of the pattern.
There’s no solid rule for dart size, shape, or placement—it all depends on your puppet’s particular figure. It will definitely take some experimenting. To avoid going through an entire roll of paper towels, you can pinch and pin sections of pattern together, and avoid actually cutting until you’ve found the right spot.

Easy pattern making
41
You know you’re getting closer to the right combination of darts when the pattern starts to conform to your puppet’s shape.
Remember that it’s perfectly all right for the costume to be a little loose in places—the more relaxed the style, the easier your job will be. All this pattern fitting may seem like a pain now, but it’s much easier to do this at the pattern stage than after you’ve starting cutting fabric. (It’s also good practice for fitting the real costume!)
When you’ve decided where to put the darts, and about what size they should be, you’re ready to cut them out of your pattern. Darts should always be slightly curved, rather than perfectly pointy. This makes them much less visible when sewn together, and gives the finished costume a softer, more natural look.
Once you have your darts cut out, trying pinning the edges of each dart together and placing the pattern on your puppet again to see how the shaping fits. (Don’t worry about the neckline or armhole just yet.)
If the darts are just right, congratulations! (You should be writing this book instead of me.) If the darts aren’t large enough, or are coming out too pointy, try unpinning them and rounding them out a little bit more. If the darts are too large, or just don’t seem to have ended up in the right place, don’t worry—that’s why you’re using paper towels! Just make note of any places where the pattern doesn’t fit (does it need more shaping towards the top? at the waistline? some of both?) and try it again.
Once you get the darts taken care of, you probably need to readjust both the neckline and the armhole, since these tend to get pulled out of place. The easiest way I’ve found to do this is to lay your darted pattern on a fresh paper towel and trace around the darts.
1. Pin your pattern to a fresh paper towel, lining up the lower right edges as closely as possible.
2. Copy the darts from your pattern onto the new paper towel, cutting carefully along the edges of the darts.

Easy pattern making
42
3. Remove your pattern from the paper towel. You now have an exact copy of the darts.
4. Pin the edges of the darts together, then position the paper towel on your puppet.
5. You can now cut out a new neckline and a new armhole by repeating the steps in the “Basic pattern front” section (beginning on page 38).
Now that you’ve shaped up your pattern, you’re ready to fit the front and back patterns to your puppet.
NOTE: As a alternative method, you can create the darts first, then make the neckline and armhole afterwards. This saves time in not having to remake the neck and armholes, but I always find it more perplexing to shape a “blank” paper towel than one that looks like a pattern to start with.
Fit the patterns to your puppetFit the patterns to your puppetFit the patterns to your puppetFit the patterns to your puppet
Now that you’ve completed the first part of the basic pattern front and back, it’s time to put them together and see how they fit your puppet.
1. Place both the basic pattern front and back on your puppet, pinning them together at the shoulder and side seams. (You may also need to pin the inside edge of each pattern to your puppet’s body or covering to hold it in place.)

Easy pattern making
43
2. Look to see where the patterns need adjusting—often the sides stick out too far or the shoulder pieces are too long. Unpin the patterns as needed and trim them down a little bit. When in doubt, it’s always better to leave the patterns extra roomy. You can trim off any excess later.
NOTE: If you have a hard time fitting the patterns with only half a pattern front and half a pattern back, you can make copies of each piece and pin them together so you have a complete set.
3. If your puppet has a slim waist or other special shape, you can adjust for that here too.
4. Keep trimming and repinning until the patterns fit together nicely.
Now that your pattern fits your puppet, you have only one critical step left before you can use your patterns: add seam allowance!

Easy pattern making
44
Add seam allowance!Add seam allowance!Add seam allowance!Add seam allowance!
Once you have your front and back pattern pieces fitted to your puppet, you need to take them off your puppet and add seam allowance—in this book, 1/4” is the standard (as explained on page 16). This means you need to add 1/4” all the way around your patterns.
1. Lay each of your pattern pieces on fresh paper towels.
2. Mark 1/4” from the edge of each pattern in all directions (including any darts). NOTE: The edge that goes against the fold (see page 45) does not need added seam allowance since there is no seam.
3. Cut around your marks.
Now you have new patterns that include room for seam allowance!
Add room for hems and fastenersAdd room for hems and fastenersAdd room for hems and fastenersAdd room for hems and fasteners
In addition to seam allowance, you need to add at least 1/2” extra to the inside edge of either the front or back pattern (depending on where you want the costume to open and close) so you have room to hem the edges. If you want to add fasteners, you may need even more (see sidebar). When in doubt, it’s best to leave “extra” extra fabric and cut the excess off later.
Much ado about fasteners
No matter what kind of fastener you plan to use, you need extra fabric on each side of the costume opening:
✁ zippers — 3/4”
✁ buttons — 1 1/2”
✁ snaps — 1 1/2”
✁ hooks & eyes — 1/2”
✁ velcro — 1/2-1 1/2”
This room is in addition to the extra fabric your puppet may need to move around comfortably.
For information on fastener options and how to install them, check out the chapter “Zippers, buttons, & more” on page 30.

Easy pattern making
45
Cutting out fabricCutting out fabricCutting out fabricCutting out fabric
If you want good results from your patterns, there are some key points you should keep in mind when cutting out fabric:
✄ Grainline — almost all fabrics have a grainline. Well, two grainlines to be exact. They come from the threads that make up the weave of the fabric. One grainline runs parallel to the finished edge (or selvedge) and the other runs perpendicular to it. You should be able to spot the grainlines by looking closely at the fabric, especially from the backside.
All your pattern pieces should line up with the grainline as closely as possible. Why? The grainline is fabric’s natural bending point. Costumes cut with the grainline hang better and can even be easier to sew than those that go against it. It can sometimes be tempting to ignore the grainline when you’re trying to squeeze just a few more pieces out of the last bit of fabric, but keep in mind that asking fabric to bend against its grainline is like asking you to bend over without using your back, hips, or knees.
Words to know
✁ grainline — direction of the threads in a fabric (all pattern pieces must be cut parallel to the grainline)
✁ bias — imaginary line 45° from the grainline
✁ selvedges — the pre-finished edges of a fabric
✁ nap — fabrics with a pattern that must be used in a particular direction, like stripes or bunny rabbitsThese usually require extra fabric, since each piece must be cut to go with the direction of the nap. (Fabrics that have a random pattern, or none at all, are “without nap.”)

Easy pattern making
46
✄ Naps and patterns — in addition to grainlines, some fabrics also have patterns. When the pattern must be used in a particular direction, the fabric has a “nap.” Make sure when you layout your pattern pieces that the pattern goes in the same direction for all pieces. (As an exception, you may want a pattern to go in a different direction on the sleeve pieces than on the rest of the costume.)
✄ Folds — you almost always need to fold your fabric in half right sides together along the grainline before laying out your pattern pieces. You do this because, as I’m sure you’ve noticed, the patterns you’ve created only go halfway across your puppet’s body, but you need to cover both halves. To do this, you can either make two separate pieces and sew (or fasten) them together, or make a single piece that goes all the way across by cutting it on the fold. For most costumes, you’ll want one of each. The layout might look something like this:
Now that you have your basic front and basic back patterns ready to go, you’re ready to turn to the “Sleeves” chapter.
More fabric tips
If you are using a very large or conspicuous pattern (and these don’t work well for most puppets) try to make sure that you’re not cropping the pattern in an odd place.
Also try to consider how the pattern will look when the pieces are put together—perfectly symmetrical pieces can create some odd shapes.
You can avoid this problem altogether by using small prints or patternless fabrics.

47
SleevesSleevesSleevesSleeves
Sleeve stylesSleeve stylesSleeve stylesSleeve styles
Sleeves can be extremely simple, or they can be one of the fanciest parts of the costume. Some major sleeve types include:
✄ Straps — the most basic sleeve of all. Whether made from fabric (see page 113) or pieces of ribbon or trim, these work great on many dresses and jumpers. And you don’t even need a pattern!
✄ Straight sleeves — the standard way to cover your puppet’s arms. They can be long or short, loose or tight, but they all start with a pattern (described in the next section).
✄ Puff sleeves — for a fancier, ruffled look. They’re not much harder to make than straight sleeves (and even have more “fudge” room), and they can really add to your costumes. (All three dresses on the front cover of this book have puff sleeves.) To make puff sleeves, you need a modified straight sleeve pattern, some extra fabric and the gathering technique from page 22.
✄ Human hand sleeves — sleeves made to fit over your arms so your own (gloved) hands become the puppet’s hands. Human hands sleeves have a T-shape—one part for the puppet’s arm, and a perpendicular part for yours. See page 49 for instructions.
Consider this
✁ Length — if your puppet uses velcro wrist bands to hold on its arm rods, or has unfinished elbow or wrist joints, you may want long sleeves to cover them up.
✁ Tightness — looser sleeves are easier to fit and easier to get on and off. (That’s important if your puppet has to make a quick change!) Sleeves should never be so tight that they restrict arm movement.
✁ Poof — a real bonus for flat-figured hand puppets who need all the shape they can get!
Sleeves
48
Patternless sleeves (the easy way out!)Patternless sleeves (the easy way out!)Patternless sleeves (the easy way out!)Patternless sleeves (the easy way out!)
If you have a terrible time fitting sleeve patterns (as I often do!), my suggestion is: don’t. You can actually add sleeves to a costume without making a pattern at all. Just cut a rectangle of fabric large enough to generously cover your puppet’s arm on both sides, sew it to the costume, and trim off the extra. This method isn’t perfect, but it works just fine, especially for fairly flat puppets. You can finish the end of the sleeves using the “Cuffs & hems” directions from page 59.
For patternless puff sleeves, you need a rectangle of fabric 1 1/2 to 2 times wider than for a straight sleeve. This extra fabric gets squished into ruffles when you gather the top edge using the technique explained on page 22.
Make the sleeve patternMake the sleeve patternMake the sleeve patternMake the sleeve pattern
Before you can make a sleeve pattern, you need to complete the basic front and back patterns described in the “Easy pattern making” chapter so you have something to fit the sleeve to. You also need your puppet.
1. Lay your puppet on a flat surface, arms spread out, or suspend it from its strings at a comfortable level.
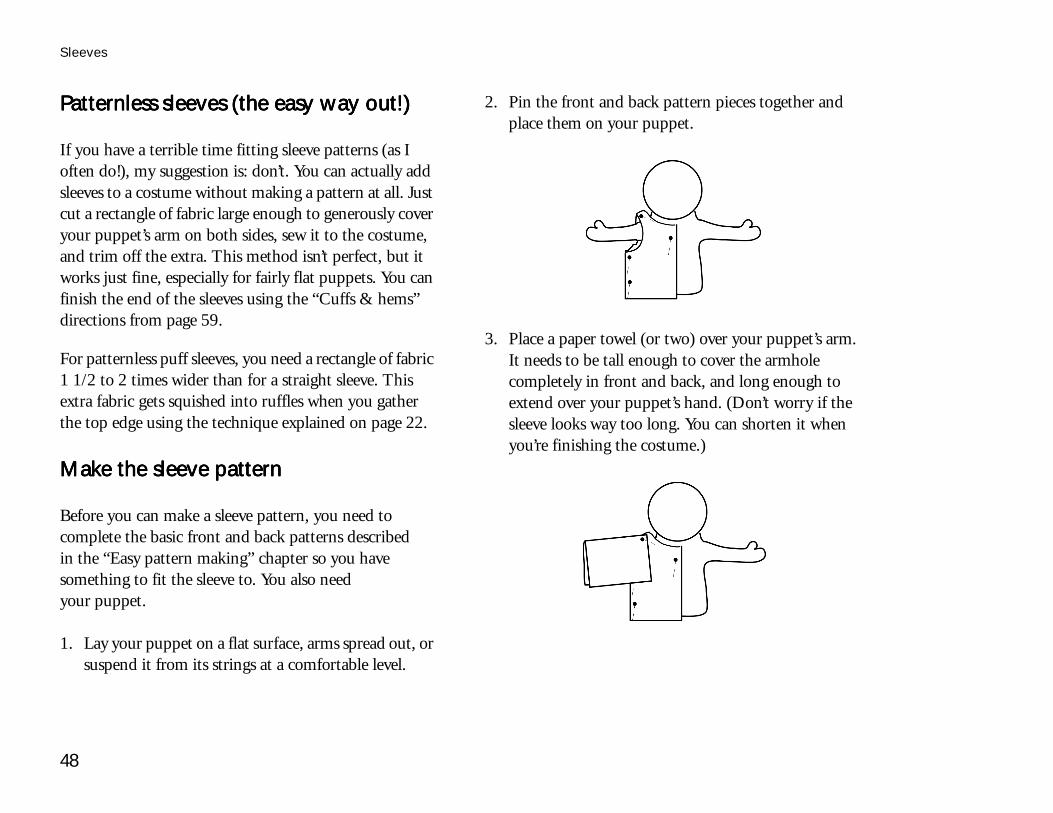
2. Pin the front and back pattern pieces together and place them on your puppet.
3. Place a paper towel (or two) over your puppet’s arm. It needs to be tall enough to cover the armhole completely in front and back, and long enough to extend over your puppet’s hand. (Don’t worry if the sleeve looks way too long. You can shorten it when you’re finishing the costume.)

Sleeves
49
4. Trim the paper towel to match the shape of the armhole in front and in back.
5. Remove the sleeve pattern and unfold it. To add seam allowance, lay the pattern on a fresh paper towel (or two) and trace 1/4” all the way around. Cut along the trace marks and you’ve got a sleeve pattern!
Puff sleeve patternsPuff sleeve patternsPuff sleeve patternsPuff sleeve patterns
To make a puff sleeve pattern, you need to start with a straight sleeve pattern by following the directions in the section above.
Place the straight sleeve pattern on a fresh paper towel (or two). Trace loosely around it, making the top part at least twice as wide as the straight sleeve.
If you want to gather the puff sleeve at the top only, make the bottom of the sleeve the same width as the straight sleeve pattern.
If you want to gather both ends, make the bottom of the sleeve twice as wide as the straight sleeve as well.
To gather the top (and if you want, the bottom) edges of the sleeve, use the gathering instructions on page 22.
Human hands sleevesHuman hands sleevesHuman hands sleevesHuman hands sleeves
Finding ready-made costumes for human hands puppets can be especially difficult. Now you don’t have to—you can make them yourself!

Sleeves
50
Because human hands sleeves need to give a bit, stretchy fabrics work best, but any fabric will do.
Make the “puppet” sleeveMake the “puppet” sleeveMake the “puppet” sleeveMake the “puppet” sleeve
You can make the puppet’s part of the sleeve the same way you would a regular puppet sleeve—just follow the pattern directions on the previous pages. Make sure the sleeves are long enough to cover your puppet’s arms with at least an inch or two to spare.
You can then cut out, sew, and attach the puppet sleeves to the costume according to the directions in the “Shirts & robes” or “Suits & coats” chapters.
Once you have the puppet sleeves completed and attached, fold the ends of each sleeve under 1/4” and iron and stitch them flat.
Now you need the “human” part of the sleeve.
Make the “human” sleeveMake the “human” sleeveMake the “human” sleeveMake the “human” sleeve
1. Cut a piece of fabric wide enough to wrap loosely around your arm (plus 1/2”) and long enough to extend from your wrist to halfway between your elbow and shoulder (plus 2 or 3 inches).
2. Fold the fabric in half lengthwise right sides together and stitch the edge opposite the fold.
3. Turn the sleeve right side out and make a second sleeve the same way.
Finish the human sleevesFinish the human sleevesFinish the human sleevesFinish the human sleeves
To make sure the sleeve stays secure around the puppet’s glove (and your arm), you should finish both ends of the human sleeve with elastic. Elastic comes in various widths—1/2” works best. You need about 1 1/2 yards of elastic to finish the ends of both sleeves.

Sleeves
51
Cut two pieces of elastic long enough to wrap around a human wrist securely but without cutting off any circulation. If you can’t find a length that works for everyone who might use the costume (a real challenge when you’re on a puppet team!), use the largest possible measurement. Those with smaller wrists can tighten the sleeve with safety pins.
The other two lengths of elastic need to be long enough to wrap snugly but comfortably around the human performer’s bicep. (Again, you may need to compromise a bit on this one—when in doubt, go with the largest measurement.)
Once you have the elastic cut, you can insert it into the ends of the sleeves.
1. Fold one end of the sleeve under about 1” (or 1/2” wider than the elastic you’re using, whichever is larger).
2. Starting at the sleeve’s seam, stitch 1/4” from the edge, stopping when you get within 1/2” of your starting point. (You need this opening to insert the elastic.)
3. Put a safety pin through one end of the elastic. Pin the other end to the edge of the sleeve. (This keeps it from getting pulled all the way in.)

Sleeves
52
4. Insert the safety pin into the opening in the end of the sleeve and begin pushing it through.
5. The fabric should begin to bunch up, but that’s okay. Just keep smoothing out the bunches and pushing the pin through until it comes out the other side.
6. Make sure there are no twists in the elastic (if there are, you need to pull the elastic out and try again). Then remove both pins, overlap the ends of the elastic, and stitch them together.
7. Slip the elastic into the cuff and stitch across the opening. Once you smooth the gathers out, you may want to stitch over the elastic here and there to keep it from twisting.
There! You’ve got the elastic through one end of one sleeve…only three more to go!
Put the sleeves togetherPut the sleeves togetherPut the sleeves togetherPut the sleeves together
Once your human and puppet sleeves are complete, you need to sew them together.
1. Place the human sleeve on the puppet sleeve, right sides together. The two sleeves should be perpendicular to each other, forming a “T.”
2. Stitch the sleeves together.
3. Attach the other puppet and human sleeves together in the same way and you’re finished!