easycal user guide_english
TRANSCRIPT

8/7/2019 EASYCAL User Guide_english
http://slidepdf.com/reader/full/easycal-user-guideenglish 1/32
EASYCAL™ User Guide Version 4.0

8/7/2019 EASYCAL User Guide_english
http://slidepdf.com/reader/full/easycal-user-guideenglish 2/322 EASYCAL™ User Guide · Version 4.0 · Status: December 2006
E A S Y C A L ™
U s e r G
u i d e Contents
1. Your License Agreement ..................................................................................................................... 3
1.1 Object of Agreement .....................................................................................................................3
1.2 Grant of license ............................................................................................................................3
1.3 Copyright .....................................................................................................................................3
1.4 Warranty ......................................................................................................................................3
1.5 Duties of the Licensee ...................................................................................................................3
1.6 Alterations to the Software ............................................................................................................. 3
2. Introduction to the software ............................................................................................................... 4
2.1 Program features ..........................................................................................................................4
2.2 System requirements .....................................................................................................................4
2.2.1 Hardware ...........................................................................................................................4
2.2.2 Software ............................................................................................................................4
2.3 Installing the program on your PC ...................................................................................................4
2.4 Uninstalling the program ................................................................................................................5
2.5 Starting EASYCAL™ (for the first time) ...........................................................................................5
2.6 Basic settings ...............................................................................................................................5
3. Main Menu .........................................................................................................................................6
3.1 Calibration of Liquid Handling Instruments .......................................................................................6
3.1.1 Entry of measuring results ...................................................................................................6
3.1.2 Entry of tolerance limits .......................................................................................................9
3.1.3 Data analysis .................................................................................................................... 10
3.1.4 Save present test (permanently) and Intervall entry ............................................................... 10
3.2 Calibration of volumetric instruments of glass/plastic ...................................................................... 11
3.2.1 Entry of measuring results ................................................................................................. 11
3.2.2 Entry of tolerance limits ..................................................................................................... 14
3.2.3 Data analysis .................................................................................................................... 14
3.2.4 Save present test (permanently) and Intervall entry ............................................................... 15
4. Test History ....................................................................................................................................... 15
4.1 Selecting records from history ..................................................................................................... 15
4.2 Deleting records from history ....................................................................................................... 15
4.3 Display selected records from history (filter) ................................................................................... 16
4.4 Printing records from history ....................................................................................................... 16
4.4.1 Printing a single record ...................................................................................................... 16
4.4.2 Printing several records ..................................................................................................... 16
4.4.3 Printing of the list of datasets ............................................................................................ 16
4.5 Archiving .................................................................................................................................... 17
4.6 "Details" of measuring results ...................................................................................................... 17
4.7 Graph ....................................................................................................................................... 17
5. Tests to be carried out within this month.......................................................................................... 18
6. Preferences ...................................................................................................................................... 186.1 Enter company and language ........................................................................................................ 18
6.2 Enter (external) calibration lab ...................................................................................................... 18
6.3 List of: Test operator/Balances/Thermometers/Liquid Handling/Glass-/Plastic/Norms ..................... 18
6.4 Manage EASYCAL™ data ............................................................................................................19
6.5 Interface ....................................................................................................................................21
6.6 Printer settings ...........................................................................................................................21
7. Basics for calculations ......................................................................................................................22
7.1 General definitions ......................................................................................................................22
7.2 Basics .......................................................................................................................................23
7.3 Calculations for Glass/Plastics ..................................................................................................... 24
7.4 Calculations for Liquid Handling ....................................................................................................28
8. Troubleshooting ................................................................................................................................ 2981 Printing problems ........................................................................................................................29
8.2 Memory problems ........................................................................................................................30
9. Index ....................................................................................................................................... 31

8/7/2019 EASYCAL User Guide_english
http://slidepdf.com/reader/full/easycal-user-guideenglish 3/32EASYCAL™ User Guide · Version 4.0 · Status: December 2006 3
E A S Y C A L ™
U s e r G
u i d e
Registered Trademarks
Microsoft®, MS-Windows®: Microsoft Corporation; Netware®, NOVELL®-Netware: Novell, Inc.
Eppendorf®: Eppendorf AG; Gilson®: Gilson Inc.
Adobe® Acrobat®: Adobe Systems Inc., Paintbrush®: Zsoft Corporation
Any trademarks not listed here are property of their respective owners.
1 Your Licence Agreement
The following License Agreement between you (”the Licensee”) and the company BRAND GMBH + CO KG (theManufacturer of the software, referred to as ”BRAND”), becomes valid with the unpacking and/or installation or use ofthe accompanying EASYCAL™ software (”the software”):
1.1 Object of Agreement
The object of this agreement is the software package EASYCAL™ which includes the software, the media, andaccompanying literature.
1.2 Grant of License
This license allows you to install one copy of the software on a single computer at a time, and to use it for your own private or commercial purposes.
Separate single licenses are required for: Installation of the software on a network server (except in case a separatelicense has been purchased for each computer from which the software on the server can be accessed); rental;hire; lending for use; issue of sublicenses; use for the compilation (even without charge) of test certificates for third parties. In any of these cases, please contact BRAND.
1.3 Copyright
The software is protected by international and national copyright. A copy (in whole or in part) may only be madeand stored for your own back-up or archiving purposes.
1.4 Warranty
The EASYCAL™ software was produced with Microsoft® development systems. BRAND only provides a warrantyfor those components of the software which have been produced by itself or at its instruction.BRAND guarantees:
- The function of the software according to the substantial aspects of the accompanying instruction manual for aperiod of 90 days from date of purchase.
- The functionality of the media (CD-ROM) for a period of one year from date of purchase.
Excluded from Warranty: Malfunction of the program due to improper installation of the software (not accordingto the User Guide); accident; misuse or faulty use, or failure to observe the stated hardware requirements.
In any case, the warranty is limited to the price which was actually paid for the software. In no event shall BRANDbe liable for direct or indirect damages arising from the use of the software.
1.5 Duties of the Licensee
You are obligated to install the software within 10 working days after receipt, and to examine it for completenessand functionality of the basic program functions. Any noticed or noticeable faults shall be reported to BRAND in writing within 10 further working days. Faults which are not noticeable in the course of this examination shall bereported to BRAND in writing within 10 working days after their discovery. If this obligation to examine for faultsand to report them is not complied with, the supplied software shall be deemed approved in regard to the faultin question.
1.6 Alterations to the Software
You may not reverse-engineer, decompile or disassemble the software.
Important Note
If you disagree with the above License Agreement in whole or in part, you may not install or utilize the software.In this case, please return the software in its unopened original packing to the address stated on the package,or to your dealer.

8/7/2019 EASYCAL User Guide_english
http://slidepdf.com/reader/full/easycal-user-guideenglish 4/324 EASYCAL™ User Guide · Version 4.0 · Status: December 2006
E A S Y C A L ™
U s e r G
u i d e
In order to understand the manual and the software, it is important that you are familiar with the use of MS Win-dows and related components.
2.1 Program features
EASYCAL™ is a software system that was developed using Microsoft development systems. The standardoperating system is MS Windows in the following versions: Windows 98, Windows NT; SP6, Windows 2000or Windows XP.
The contents and purpose of the program is the computer-assisted recording of measurement results in con-nection with the calibration of volumetric instruments, and the analysis of the recorded values. The softwarecan print a record of the measurements and store the results for later analysis. The test history enables theuser to re-evaluate earlier measurements, and to reprint earlier test records. A convenient search functionfacilitates retrieving earlier results.
2.2 System requirements
2.2.1 Hardware
❍ Processor with 100 MHz or better
❍ 32 MB RAM
❍ Windows® 98, Windows® 2000/NT; SP6/XP
❍ SVGA graphics card with 256 colors
❍ Mouse
❍ CD-ROM drive or floppy drive
❍ Microsoft® Paint
2.2.2 Software
EASYCAL™ requires the following software components, which must be installed on your computer duringinstallation and when the program is running:
❍ MS Windows version Windows 98, Windows NT (SP6) Windows 2000 or Windows XP.
❍ The display of graphs requires the MS Paint software, which is supplied as standard with Windows.
EASYCAL™ supports NOVELL-based networks, and networks based on ”Windows for Workgroups”.
2.3 Installing the program on your PC
2. Introduction to the software
❍ Installation during a Windows session:
❍ Make sure that no other application is running. Insert the CD.
❍ Click on ”Start” and point on ”Run”.
❍ In the ”Run” dialog box, enter the following in the command line „D:\EASYCAL\setup.exe“.
❍ Note: ”D” normally identifies the CD-ROM drive.
❍ The installation program starts up.
❍ For the installation of Acrobat® Reader, correspondingly enter ”D:\Reader\setup.exe” .
❍ Follow the instructions on screen.
Note:
Make sure, that older versions of EASYCAL™ 4.0 are completely uninstalled.

8/7/2019 EASYCAL User Guide_english
http://slidepdf.com/reader/full/easycal-user-guideenglish 5/32

8/7/2019 EASYCAL User Guide_english
http://slidepdf.com/reader/full/easycal-user-guideenglish 6/32

8/7/2019 EASYCAL User Guide_english
http://slidepdf.com/reader/full/easycal-user-guideenglish 7/32EASYCAL™ User Guide · Version 4.0 · Status: December 2006 7
E A S Y C A L ™
U s e r G
u i d e
Enter the number or the type of the thermometer used in the test. By clicking on the arrow to the right of the”Number or Type of Thermometer” entry field, you can display a list of available thermometers. One standardthermometer is already stored. The number entered allows to refer the test to the national and internationalstandards.
Atmospheric Pressure (required entry)
There are two options for entering atmospheric pressure:
1. Direct entry of local atmospheric pressure: ”Absolute atmospheric pressure [hPa]”
2. Entry of atmospheric pressure referred to sea level: ”Relative atmospheric pressure [hPa] and Altitudeof location [m]”
Type (required entry)
Click on the arrow to the right of the entry field to display the list of possible instrument types. The type youchoose must correspond to an entry in the list. When you choose Transferpette®-8 or Transferpette®-12, a newfield titled ”Number of weighings per channel” will appear to the right of the Type field. Click on this fieldto choose the number of measurements per channel. At least three measurements per channel must be made.The recommended number of weighings per channel isbetween 3 and 10 (to ISO 8655 Part 6).
Nominal Volume/Unit (required entry)
Click on the arrow to the right of the entry field to display the list of available nominal volumes. For new instru-ments, for which the list does not contain entries, you can enter any nominal volume. The ”Unit” entry field isonly available for newly entered volumes. You can choose either ml or µl as valid units. By clicking on the arrowto the right of the entry field you can view the list and choose a volume which has been saved.
Note
Use this entry field to record any damages or functional defects of the tested instrument in the test record. Alsoenter any other relevant information here, such as the type of tips used in the testing of air-interface pipettes.You can still write into the ”Note” field after the data have been saved (e.g. ”Sent in for repair”, ”Discarded”,
etc.).
Number or Type of Balance (required entry)
Note: Adding a new balance is only possible in the start window under ”Settings”. If the current number of the balance is not listed, save and close the current test. Open the ”Settings” window and then the”Balance List” window to add the new balance.
Enter the number or the type of the balance used in the test. By clicking on the arrow to the right of the”Number or Type of Balance” entry field, you can display a list of available balances. More than 100 diffe-rent balances are already stored. The number entered allows to refer the test to the national and internationalstandards.
Number or Type of Thermometer (required entry)
Note: Adding a new thermometer is only possible in the star t window under ”Settings”. If the current ther-mometer number is not listed, save and close the current test. Open the window ”Settings” and then the window ”Thermometer List” to add the new thermometer.

8/7/2019 EASYCAL User Guide_english
http://slidepdf.com/reader/full/easycal-user-guideenglish 8/328 EASYCAL™ User Guide · Version 4.0 · Status: December 2006
E A S Y C A L ™
U s e r G
u i d e
Test temperature (required entry)
The permissible temperature range for measurements is +15 °C (56 °F) to 30 °C (86 °F). Enter the measuredtemperature in °C or °F.
Test volumes/Nominal Values
The right-hand section of the entry window contains the table for entering the values you have determined in
the gravimetric test. Volumes are suggested for the selected instruments in the ”Test volume” line in the tableheader:
Column 1: Nominal volume
Column 2: 50% of nominal volume (Digital/Variable type only)
Column 3: 10% resp. 20% of nominal volume (Digital/Variable type only).
The test volumes can be modified as required by overwriting them. You can also delete individual columns;for example, if only two volumes are to be tested in a variable instrument.The ”Nominal Values” line displays the ideal measurement values, depending on the temperature.
Number of possible measured values per volume
Entry of measuring results
☞ The entry fields for measuring results have a whitebackground.
☞
Click into the first entry field ”x 1” in the first whitecolumn
☞ Manual entry of results:
Enter value ”x 1” and confirm with ENTER. Thistakes you automatically to the next entry field.Enter the remaining results.
☞ Automatic transfer of results from the
balance (optional):
If the balance is connected, results are transferred automatically from the balance (Professional Version). To trans-fer the weighed value, press either the ”Print” button on the balance, or the F2 key on your PC keyboard. Press
”ENTER” to confirm the weighed value, which will move you automatically to the next entry field (see Section 5.5”Connecting a balance”).
☞ If other columns have a white background, these have to be filled in with results also.
Traffic light function:
☞ Once at least three measuring results have been entered (concerning multichannel instruments after eachchannel), EASYCAL™ will calculate the average or tolerances and compare them with the tolerance limits se-lected in the next screen shown below. The default tolerance limits set are those defined by DIN EN ISO 8655.
☞ If the measuring results are outside the tolerances, the traffic light in the Entry of Measuring Results - LiquidHandling shows red, if they are within the tolerance limits, it will show green.
☞ Therefore, prior to entering the measuring results, please set tolerances in the screen “Entry of tolerance limits” shown below. Subsequently, the measuring results can be entered.
Instrument type Number required Max.number
Single instrument 3 45
8-channel instrument 24 240
12-channel instrument 36 360

8/7/2019 EASYCAL User Guide_english
http://slidepdf.com/reader/full/easycal-user-guideenglish 9/32EASYCAL™ User Guide · Version 4.0 · Status: December 2006 9
E A S Y C A L ™
U s e r G
u i d eNote:
The primary data according to GLP instructions will be transmitted without conversion with Factor “Z”.Double-check all entries in the window, and then click on the button ”Entry of tolerance limits” which will take you to the next screen.
☞ Click on ”Close” to interrupt the current test result entry session. You are asked whether you want to continueentering test results (”Cancel”), and whether or not you want to save the values you have already entered. If you
save the values at this point, the current instrument will not yet be stored among the ”Previous test records.”
3.1.2 Entry of tolerance limits
On the ”Tolerance limits” screen you determine the tolerance values applicable to your area of work. Thesevalues will be used later on for the analysis of all your test results.
Tolerance limits from OperatingManual: the default values can beedited.
Define your own error tolerancesin %. A = Accuracy of measurementsCV = Coefficient of variation ofmeasured values
Tolerance limits acc. to ISO 8655
(default setting)
☞ Click on ”Data analysis” to display the results of the entry of tolerance limits for the test. Instruments and valuessaved at this stage will appear among ”Previous test records” and cannot subsequently be altered (exception:”Note” field).
☞ Click on ”Back” to return to the entry of measuring results.
☞ Click on ”Close” to end the current operation. You are asked whether you want to continue entering test results(”Cancel”), and whether or not you want to save the values you have already entered. The data do not appear in”Previous test records” (see ”Data analysis”).
The test was carried out according to:
Click on the arrow to the right of the entry field to display a list of the 4 different available standards.

8/7/2019 EASYCAL User Guide_english
http://slidepdf.com/reader/full/easycal-user-guideenglish 10/3210 EASYCAL™ User Guide · Version 4.0 · Status: December 2006
E A S Y C A L ™
U s e r G
u i d e
At this point you will also be asked at which interval theinstrument has to be tested again. Please enter therequired interval in months (1-99).
When the evaluation is complete, newly entered test operators and instruments are stored in the relevantlists.
Close (end) the current operation. You candecide whether or not to save the entriesmade so far.
Start printing thetest report
3.1.3 "Data analysis"
The ”Data analysis” screen can only beopened after all the values required for data analysis have been entered.You cannot make any entries here.
Preview thetest report
3.1.4 "Save present test" (permanently) and "Intervall entry"
The ”Data analysis” screen can only be opened if allvalues required for data analysis have been entered .When you close the ”Data analysis” screen, you havethe option of saving the complete data record perma-nently. A data record that is saved in this way can thenbe viewed under ”Previous test records”. No further changes can be made once the data record except inthe ”Note” field (see Section 3.1.1. ”Note”).
Printer setup
Modify the default values if required, and click ”OK” to start printing.
The program compiles the record from a number of different components and sends this information to theselected printer. This may take some time, depending on the PC you are using.
Back to ”Entry of
tolerance limits” screen
Note:
When entering data for new instruments, please double-check the accuracy of your entries. Data saved inthe instrument table can no longer be modified.
At this point you can mark the deviceas defective.

8/7/2019 EASYCAL User Guide_english
http://slidepdf.com/reader/full/easycal-user-guideenglish 11/32EASYCAL™ User Guide · Version 4.0 · Status: December 2006 11
E A S Y C A L ™
U s e r G
u i d e3.2 Calibration of volumetric instruments of glass/plastic
Click on the gray button for the item ”Glass/Plastic”, or press F3 to open the ”Entry of measuring results” screen.
3.2.1 "Entry of measuring results"
Test operator (required entry)
Enter the name of the tester who carried out the test. Thename of the tester is automatically stored in a list. Clickon the arrow to the right of the entry field to view a list oftesters that have already been stored. You can choose thename of a tester from this list and transfer it into the entryfield.
Serial Number (required entry)
Each instrument is identified by the serial number found on it. You may also enter your own customised iden-tification. If you are testing an instrument for the first time, you must enter the instrument number in the entryfield. The number will be stored automatically in a list. Click on the arrow to the right of the entry field to viewthis list, and to choose a number already stored.
Individual test/Test of a lot
Please indicate whether a single instrument or a batch of instruments are to be tested.
Instrument, Calibration (required entry)
By default, the database contains a list of BRAND volumetric instruments of glass and plastic. By clicking onthe arrow to the right of the entry field you can view this list and choose an instrument from the list. You canalso test other instruments that are not yet included in the list. To do this, enter the name of the instrument inthe entry field. When you save your data, this entry is automatically transferred to the list.
Type (required entry)
Click on the arrow to the right of the entry field to display the list of available instrument types. The type youchoose must correspond to an entry in the list.
Class (required entry)
Click on the arrow to the right of the entry field to display the list of available calibration classes.
Trademark (required entry)
The database contains a list of registered trademarks BRAND volumetric instruments of glass and plastic. Clickon the arrow at the top right of the entry field to access the list of available trademarks.
Nominal Volume (required entry)
Click on the arrow to the right of the entry field to display the list of available nominal volumes. (For new instru-ments, which are not yet listed in the database, you can enter any nominal volume.) By clicking on the arrow tothe right of the entry field you can view this list and choose a volume which has already been saved.

8/7/2019 EASYCAL User Guide_english
http://slidepdf.com/reader/full/easycal-user-guideenglish 12/3212 EASYCAL™ User Guide · Version 4.0 · Status: December 2006
E A S Y C A L ™
U s e r G
u i d e
Subdivision (required entry)
Click on the arrow to the right of the entry field to display the list of available subdivisions for your instru-ment.
Material (required entry)
Choose the material of which your instrument is made by clicking on the arrow to the r ight of the entry field.
You can also enter materials not stored in the database. Enter the name of the material into the entry field.When you save your data, this entry is automatically transferred to the list. You need to know the expansioncoefficient of the newly entered material.
Coefficient of expansion
The coefficienct of expansion is determined automatically from the database once the material has beenchosen.
Atmospheric Pressure (required entry)
There are 2 options for entering atmospheric pressure:1. Direct entry of local atmospheric pressure: ”Absolute atmospheric pressure [hPa]”
2. Entry of atmospheric pressure referred to sea level: ”Relative atmospheric pressure [hPa] and Altitudeof location [m]”
Optionally, you may also state the ”Source for atmospheric pressure data” (e.g. barometer, weather bureau).
Test Temperature (required entry)
The permissible temperature range for measurements is +15 °C (56 °F) to 30 °C (86 °F). Enter the measuredtemperature in °C or °F.
The test was carried out according to:
Click on the arrow to the right of the entry f ield to display a list of the 4 different available standards.
Number or type of balance (required entry)
Note:
Adding a new balance is only possible in the start window under ”Settings”. If the current number of thebalance is not listed, save and close the current test. Open the ”Settings” window and then the ”Balance
list” window to add the new balance.
Enter the number or the type of the balance used in the test. By clicking on the arrow to the right of the”Number or type of balance” entry field, you can display a list of available balances. More than 100 differentbalances are already stored.The number entered allows to refer the test to the national and international standards.
Number or type of thermometer (required entry)
Note:
Adding a new thermometer is only possible in the star t window under ”Settings”. If the current thermometer number is not listed, save and close the current test. Open the window ”Settings” and then the window”Thermometer list” to add the new thermometer.
Enter the type or the number of the thermometer used in the test. By clicking on the arrow to the right ofthe ”Number or type of thermometer” entry field, you can display a list of available thermometers. Onestandard thermometer is already stored.The number entered allows to refer the test to the national and international standards.

8/7/2019 EASYCAL User Guide_english
http://slidepdf.com/reader/full/easycal-user-guideenglish 13/32EASYCAL™ User Guide · Version 4.0 · Status: December 2006 13
E A S Y C A L ™
U s e r G
u i d e
Entry of measuring results
☞ The entry fields for measuring results have a white background.
☞ In the first white column, click into the first
entry field ”x1”.
☞ Manual entry of results:
Enter measured value x1 and confirm with”ENTER”. This takes you automatically to thenext entry field. Enter the remaining results.
☞ Automatic transfer of results from the
balance (optional):
If the balance is connected, results are transferred automatically from the balance (Professional Version).To transfer the weighed value, press either the ”Print” button on the balance, or the F2 key on your PCkeyboard. Press ”ENTER” to confirm the weighed value. This takes you automatically to the next entry
field (see Section 5.5 ”Connecting a balance”).
☞ If other columns have a white background, these have to be filled in with results also.
Note
Use this entry field to record in the test record any damages or functional defects of the tested instrument.
Test Volume/Nominal Values
The right-hand section of the entry window contains the table for entering the values you have found in thegravimetric test. In the ”Test Volume” line in the table header, the following volumes are suggested for theselected instruments:
Column 1: Nominal volume
Column 2: 50 % of nominal volume
Column 3: 10 % of nominal volume
The test volumes can be modified as required by overwriting them.
Number of possible measured values for individual testing
Instrument type Number required
Calibrated to contain (In) 1
Calibrated to deliver (Ex) 3
For batch testing, up to 30 measured values are allowed.
Atmospheric Pressure (required entry)
There are two options for entering atmospheric pressure:
1. Direct entry of local atmospheric pressure: “Absolute atmospheric pressure [hPa]”
2. Entry of atmospheric pressure referred to sea level: “Relative atmospheric pressure [hPa] andAltitude of location [m]”
Note:
The primary data according to GLP instructions will be transmitted without conversion according toFactor “Z”. Double-check all entries in the window, and then click on the button „Entry of tolerance
limits“, which will take you to the next screen.

8/7/2019 EASYCAL User Guide_english
http://slidepdf.com/reader/full/easycal-user-guideenglish 14/3214 EASYCAL™ User Guide · Version 4.0 · Status: December 2006
E A S Y C A L ™
U s e r G
u i d e
3.2.2 "Entry of tolerance limits"
On the ”Entry of tolerance limits” screen you determine the tolerance values applicable to your area of work.These values will be used later on for the analysis of all your test results.
☞ Click on the ”Data analysis” button to display the results of the Entry of tolerance limits for the test.Instruments and values saved at this stage will appear in the Test History.
☞ Click on the ”Back” button to return to ”Entry of measuring results”.
☞ Click on the ”Close” button to end the current operation. You are asked whether you want to continueentering test results (”Cancel”), and whether or not you want to save the values entered so far. The data will not appear in the Test History (see ”Data analysis”).
3.2.3 "Data analysis"
The ”Data analysis” screen can only be opened if all values required for the analysis have been entered.You cannot make any entries in this window.
Printer SetupModify the default values if required, and click ”OK” to start printing.The program compiles the record from a number of different components and sends this infor-mation to theselected printer. This may take some time, depending on the PC you are using.
Cancel the current operation. You candecide whether you want to save the entriesyou have made.
Back to ”Entry of
tolerance limits” screenStart printing thetest report
Preview thetest report
User-specific tolerancelimits
Tolerance limits to DIN
Tolerance limits statedby manufacturer
Declare instrument defect
If the check reports a fault in the device, thisfield can be selected.The device should then be checked for leaksor defective components; if this cannot bedone in-house, please send it in for repair.

8/7/2019 EASYCAL User Guide_english
http://slidepdf.com/reader/full/easycal-user-guideenglish 15/32EASYCAL™ User Guide · Version 4.0 · Status: December 2006 15
E A S Y C A L ™
U s e r G
u i d e
3.2.4 "Save present test" (permanently) and "Intervall entry"
The ”Data analysis” screen can only be openedif all values required for the analysis have beenentered. When you close the ”Data analysis” screen, you have the option of saving the com-plete data record permanently. A data record thussaved can be viewed later under ”Previous test
records”. Once the record has been saved, nofurther changes can be made.
At this point you will also be asked at whichinterval the instrument has to be tested again.Please enter the required interval in months(1-99).
When the evaluation is complete, any newlyentered test operators and instruments arestored in the relevant lists.
The ”Previous test records” function allows you to view a history of earlier tests. All data records stored in the systemcan be displayed on screen, but are protected against alterations.
4.1 Selecting records from history
When the ”Previous test records” function isactivated, the following screen is displayed:
Note:
When entering data for new instruments, please double-check the accuracy of your entries. Data saved inthe instrument table can no longer be modified.
4. Test History
4.2 Deleting records from history
Highlight the record to be deleted by moving the blue bar on this record (as illustrated above). Use the up/downarrow keys ↑↓ or the mouse. Click on ”Delete” to remove the data record from history. If you wish to deleteseveral records at a time, select several subsequent records. For this purpose, please press shift and click theleft mouse button to indicate the beginning or the end of the selection. Enter the password ”EASYADMIN”. The
record highlighted in blue will be deleted. For changing the password, see 5.4 ”Manage EASYCAL™ data”.

8/7/2019 EASYCAL User Guide_english
http://slidepdf.com/reader/full/easycal-user-guideenglish 16/3216 EASYCAL™ User Guide · Version 4.0 · Status: December 2006
E A S Y C A L ™
U s e r G
u i d e
Defining the filter (Example):
☞ Use the mouse to select an option from Window 1 (e.g. ”Result”). The ”Result” line will be highlightedin blue.
☞ In Window 2, select the desired search operator. Select”=” for ”equals”.
☞ Click on the arrow in Window 3 to determine whichrecords are to be displayed: ”ok” for records with per-fect results; ”Errors” for records with faulty results.
☞ Click on the the arrow –> after Window 3 to transfer the selected operators into Window 4.
☞ Click on ”Apply”. All records that match the operators in Window 4 will be displayed.
4.3 Display selected records from history (Filter)
Click on the „Filter“ button to display one or more selected records from history.
4.4 Printing records from history
Click on the ”Print” button to print a record or a list from the pre-vious test records
4.4.1 Printing a single record
Select the record to be printed with the blue bar. Then choose”Print” / ”Test Record” and confirm by clicking ”OK” to print thetest record.
4.4.2 Printing several records
Select a number of subsequent records by pressing shift and clicking the left mouse button to indicate thebeginning or the end of the selection.
4.4.2 Printing a list of datasets
Choose ”Print”, ”List” and ”OK” to print a list of all records from history, or of the records selected throughthe ”Filter” function.
Window 1 2 3 4
Note:
There is no limit to the number of search criteria. Use ”UND” (”and”) for linking several search criteria. Incertain cases, depending on the option selected in Window 1, you can freely define the criteria in Window3 (e.g. Nominal Volume 50).
Clear filter settings
Click on ”Clear” to clear all filter settings. All filters diplayed in Window 4 will be deleted.
Close filter
Click on „Close“ to exit the filter screen.

8/7/2019 EASYCAL User Guide_english
http://slidepdf.com/reader/full/easycal-user-guideenglish 17/32EASYCAL™ User Guide · Version 4.0 · Status: December 2006 17
E A S Y C A L ™
U s e r G
u i d e4.5 Archiving
The ”Archive” function allows you to save selected records, or the entire test history, in a single file.
☞ If you wish to archive only part of the test history, use the filter to determine which records are to be saved in thefile.
☞ Choose the drive, folder and file name for the archive file.
4.6 Details of measuring results
To view details, choose the ”Details” function to open the ”Measuring Results” screen. Use the navigationbuttons to view other records.
4.7 Graph
The ”Curve” button allows you to view a graph of the various cali-bration results of an instrument.
For example, if an instrument was tested five times, you will get agraph of V
meanof the nominal volume, based on these five calibra-
tions.
You can print the graph by clicking on the “Print” button.
Navigation buttons:
= First record
= Previous record
= Next record= Last record
After locating the record for which you would like to viewthe data analysis again, click on ”Tolerance limits” toproceed to the next screen.
The ”Tolerance limits” screen shows the tolerancelimits that were applied to the test. All entry fields arelocked to prevent any subsequent alteration of data, withthe exception of the ”Note” field.
Click ”Back” to leave the ”Tolerance Limits” screen andto return to the ”Measuring Results” screen.
Click ”Data analysis” to move to the data analysisscreen.
Click ”Print test report” to print the complete testrecord for the selected record again.

8/7/2019 EASYCAL User Guide_english
http://slidepdf.com/reader/full/easycal-user-guideenglish 18/3218 EASYCAL™ User Guide · Version 4.0 · Status: December 2006
E A S Y C A L ™
U s e r G
u i d e
6.1 Company and Language
Click on ”Please define company and language” to display a windowfor entering the address of your company and to specify your preferredlanguage and the date format of the software.It is also possible to select whether the pending tests will be the first window to be displayed after starting EASYCAL™.
Click on ”Back” to save your entries and to close the window.
6.3 Lists of: Test operators/ Balances/ Thermometers/Liquid HandlingGlass-/Plastic/Norms
Click on any of the buttons „Test operator“, „Ballances“, „Thermometers“, „Liquid Handling“, „Glass/
Plastic“ or „Norms“ to open the related window.
Display of data records
Use the navigation buttons to view records stored inthe database.
= First record
= Previous record
= Next record
= Last available record
Create a new test record
Click „New“ or „F2“ to open a blank entry screen. Enter the new data.
6.2 Enter (external) calibration lab
Click on ”Enter (external) calibration lab” to display a window for entering your address and your companylogo (as a BMP file). The BMP file will automatically be converted to the required size. Both will appear on theprinted test record.
Note:
Before the first test, enter the balance and thermometer to be used.
6. Preferences
Click on „Preferences” in the main menu to open the “Enter password” window. After entering the password„EASYADMIN“ a window will be displayed that allows for editing of various lists.
5. Tests to be carried out within this month
After starting the part of the program called „Tests to be carried out within this month”, EASYCAL™ willshow the tests currently pending. By double-clicking, the tests can be selected immediately by “Carry out
test” and verified in the Entry of measuring results.

8/7/2019 EASYCAL User Guide_english
http://slidepdf.com/reader/full/easycal-user-guideenglish 19/32EASYCAL™ User Guide · Version 4.0 · Status: December 2006 19
E A S Y C A L ™
U s e r G
u i d e
6.4 Manage EASYCAL™ data
Click on ”Manage Easycal data” to open the following screen:
Create new EASYCAL™ file
To create a new empty EASYCAL™ file under a new name, select the option”Create new EASYCAL™ File”.
☞F2 opens the screen ”Create new EASYCAL™ File”.
☞ Select the drive, directory and file name for the newEASYCAL™ file.
Edit an existing record
Click „Update“ or „F3“ to overwrite data in the current record.
Delete a record
Click ”Delete” or ”F4” and confirm the deletion in order to remove the current record from the database.
Search for a record
Click ”Find” or ”F5” and enter a search term to display the desired record.
Note:
When you create a new EASYCAL™ file, choose a file name which is different from any of your savedfiles; otherwise, your existing file will be overwrit ten and thus deleted.
Open EASYCAL™ file
If one or more EASYCAL™ files are saved in your EASYCAL™directory or in another directory, you can choose which EASY-CAL™ file you wish to open.
The file open by default is ”easycal.ca4”.
Hinweis:
The name of the current EASYCAL™ file is displayed in the lower part of the main EASYCAL™ 4.0screen ”Current Database”.
☞ F3 opens the window ”Open EASYCAL™ file”.
☞ Choose the drive, directory and file name of the EASYCAL™ file you wish to open.
Note:
Use the buttons “Liquid Handling” and “Glass-/Plastic” to report the testing device as defective or torevoke these settings.If the check reports a fault in the device, this field can be selected. The device should then be checked for leaks or defective components; if this cannot be done in-house, please send it in for repair.

8/7/2019 EASYCAL User Guide_english
http://slidepdf.com/reader/full/easycal-user-guideenglish 20/3220 EASYCAL™ User Guide · Version 4.0 · Status: December 2006
E A S Y C A L ™
U s e r G
u i d e
Save EASYCAL™ file as
To create a copy of the EASYCAL™ file, select the option ”Save EASYCAL™ file as”.
☞ F4 opens the window ”Save EASYCAL™ file as”.
☞ Choose the drive, directory and file name under which the EASYCAL™ file is to be saved.
Note:
You cannot save the EASYCAL™ file under the name ”easycal.ca4”. Please choose a different file name for ”Save as”
”Read test archives”
Data which have been saved as an archive can be re-imported with this option.
☞ F5 opens the window „Read test archives“.
☞ Choose the drive, directory and file name of the archived data.
☞ Confirm with „OK“ to import the data.
Note:
Identical balance numbers: If in a previous version customer-specific balances had been entered which are iden-tical with the balance numbers of the new balances in the EASYCAL™ 4.0 database, EASYCAL™ will displaythese numbers. A prompt window will be displayed and you can easily rename the repetitive balance numbers.
Adopt data from EASYCAL™ Version 3.0x
Data which have been created in EASYCAL™ Version 3.0 can be imported with this option.
☞ F6 opens the window ”Adopt data from Version 3.0x”.
☞ Choose the drive, directory and file name of the file to be imported.☞ Select the desired *.ca3 file.
☞ Click ”Open” to import the data.
Adopt data from EASYCAL™ version 2.0x
Files from EASYCAL™ version 2.0 can be read in with this function.
☞ Press F7 to select the window „Adopt data from EASYCAL™ 2.0x”.
☞ Select the drive where the file to be imported is stored.
☞ Select the desired file.
☞ Confirm the field „Open“ to read the file.
Note:
For retrieval of historic data from EASYCAL™, such data must be read into the test history from thearchives. Then, the database can be copied from e.g. c:\programs\EASYCAL (e.g. to CD or floppy disk).[EASYCAL.cal or EASYCAL.ca3]
Adopt data from earlier versions of EASYCAL™

8/7/2019 EASYCAL User Guide_english
http://slidepdf.com/reader/full/easycal-user-guideenglish 21/32EASYCAL™ User Guide · Version 4.0 · Status: December 2006 21
E A S Y C A L ™
U s e r G
u i d e
Change Password
You can change the preferences and the password to protect your data from unauthorized access. Press F7or click on ”Password”.
Balance Test
To verify if data are sent from the balance, a data transmission test (balance test) is available (not requiredfor standard installation).☞
Activate/deactivate ”BALANCE TEST” under ”Preferences, Manage Easycal data”.☞ When activated, a red field ”BALANCE TEST” will appear in the ”Entry of Measuring Results” window.
☞ Connect the balance to the PC with an interface cable.
6.6 Install Printer
Edit the default values as required, and confirm changes by clicking ”OK”.
The balance is connected to the PC through a serial cable. Depending on the available ports, COM1 toCOM4 can be used. Before transmitting data, please verify that the interface settings on the balance and thePC are identical. The software settings are done in the menu ”Preferences/Interface” (press F 11).
For the balance settings, please refer to the instruction manual for the balance.
Settings can be edited directly with the mouse. Here is a list of parameters:
❍ Bits/seconds
Determines the data transfer speed. Available range: 300 to9600 baud.
❍ Data bits
Number of bits used to display a character.
❍ Stop bits
Number of bits to be sent after each character.
❍ Field length
Number of characters that will be sent (including CR and LF).
❍COM connectionSelect the port to be used.
❍ Record
Control of data flow by software (Xon/Xoff) or hardwarehandshake (RTS/CTS).
❍ Parity
When this is enabled, all received characters are checked for the chosen parity setting.
Important:
The balance has to be set to ”send at weight value standstill” (not to ”continuous send”). When you clickinto the fields for entering measured values and press ”Print” on the balance, or ”F2” on the PC, the sentdata (weight) should appear in the fields. If not, check the balance settings, or the interface settings for thePC and the balance.
Note:
To connect a balance to the PC, a special serial cable is required. In doubt, consult the balance manufac-turer.
6.5 Interface
8/7/2019 EASYCAL User Guide_english
http://slidepdf.com/reader/full/easycal-user-guideenglish 22/3222 EASYCAL™ User Guide · Version 4.0 · Status: December 2006
E A S Y C A L ™
U s e r G
u i d e
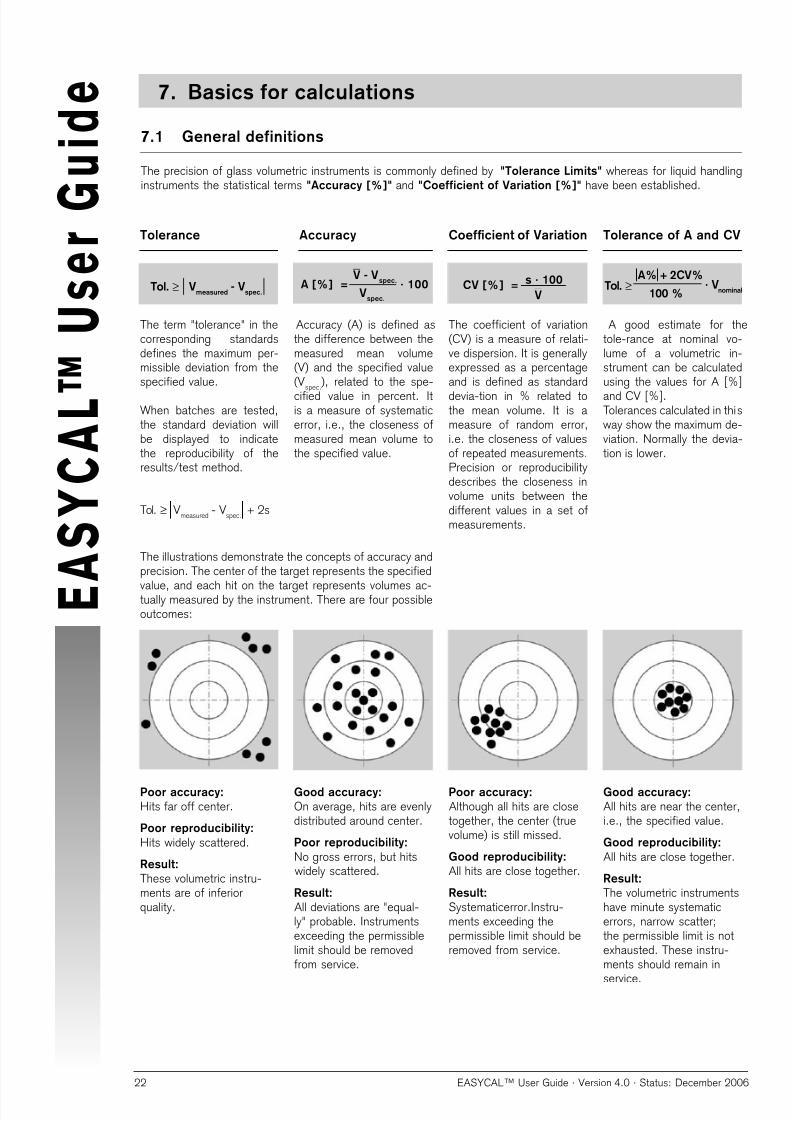
Poor accuracy:
Hits far off center.
Poor reproducibility:
Hits widely scattered.
Result:
These volumetric instru-ments are of inferior quality.
Good accuracy:
On average, hits are evenlydistributed around center.
Poor reproducibility:
No gross errors, but hits widely scattered.
Result:
All deviations are "equal-ly" probable. Instrumentsexceeding the permissiblelimit should be removedfrom service.
Poor accuracy:
Although all hits are closetogether, the center (truevolume) is still missed.
Good reproducibility:
All hits are close together.
Result:
Systematicerror.Instru-ments exceeding thepermissible limit should beremoved from service.
Good accuracy:
All hits are near the center,i.e., the specified value.
Good reproducibility:
All hits are close together.
Result:
The volumetric instrumentshave minute systematicerrors, narrow scatter;the permissible limit is notexhausted. These instru-ments should remain in
service.
A good estimate for thetole-rance at nominal vo-lume of a volumetric in-strument can be calculatedusing the values for A [%]
and CV [%].Tolerances calculated in this way show the maximum de-viation. Normally the devia-tion is lower.
The illustrations demonstrate the concepts of accuracy andprecision. The center of the target represents the specified
value, and each hit on the target represents volumes ac-tually measured by the instrument. There are four possibleoutcomes:
Coefficient of Variation AccuracyTolerance
The term "tolerance" in thecorresponding standardsdefines the maximum per-missible deviation from thespecified value.
When batches are tested,the standard deviation willbe displayed to indicatethe reproducibility of theresults/test method.
Accuracy (A) is defined asthe difference between themeasured mean volume(V) and the specified value(V
spec.), related to the spe-
cified value in percent. Itis a measure of systematicerror, i.e., the closeness ofmeasured mean volume tothe specified value.
The coefficient of variation(CV) is a measure of relati-ve dispersion. It is generallyexpressed as a percentageand is defined as standard
devia-tion in % related tothe mean volume. It is ameasure of random error,i.e. the closeness of valuesof repeated measurements.Precision or reproducibilitydescribes the closeness involume units between thedifferent values in a set ofmeasurements.
Tolerance of A and CV
Tol. ≥ Vmeasured
- Vspec.
Tol. ≥ A% + 2CV%
100 %· V
nominal
7.1 General definitions
The precision of glass volumetric instruments is commonly defined by "Tolerance Limits" whereas for liquid handlinginstruments the statistical terms "Accuracy [%]" and "Coefficient of Variation [%]" have been established.
7. Basics for calculations
A [%] = V_
- Vspec. · 100
Vspec.
CV [%] = s · 100
V_
Tol. ≥ Vmeasured
- Vspec.
+ 2s

8/7/2019 EASYCAL User Guide_english
http://slidepdf.com/reader/full/easycal-user-guideenglish 23/32EASYCAL™ User Guide · Version 4.0 · Status: December 2006 23
E A S Y C A L ™
U s e r G
u i d e7.2 Basics
The values obtained by weighing during the gravimetric test are only the mass values of the dispensed volume.In order to obtain the actual volume, an adjustment calculation must be carried out.
The necessary number of tests depends primari ly upon the skill of the tester. Generally, one test should sufficein the case of volumetric instruments made of glass/plastic; at least in case of instruments calibrated ”IN” (to
contain). In case of instruments calibrated ”EX” (to deliver), to be on the safe side, it is advisable to use themean value resulting from 3 measurements.The scatter of the individual results should not be greater than1/ 4 of the admissible error limit (tolerance) of the measuring instrument. (Example: error limit of a 10 ml bulbpipette is ±0.020 ml. The scatter of measuring results must be below ±0.005 ml. If the scatter is greater, thetesting procedure should be revised, and the test should be repeated.)
Liquid Handling instruments are normally tested at 100%, 50% and 10% of their nominal volume. For eachpartial volume, 10 measurements are required. The standard ISO 4787 describes the testing of volumetricinstruments and provides the following general equation for calculations:
Since this equation is rather cumbersome to work with, requiring a multitude of tables, we are providing a simplifiedcalculation in these Testing Instructions.
V20 = (W2 - W1) · z
Monitoring of measuring instruments, made easy:
The parameters are: V20
[ml]: volume of the instrument at 20 °C
W1
[g]: weight of the empty instrument
W2
[g]: weight of the filled instrument
z [ml/g]: factor resulting from united parameters (see Tables)
To simplify the list of measuring instruments even further, we recommend to use conformity-certifiedBLAUBRAND® volumetric instruments marked with batch number or individual serial number. The initialtesting of certified volumetric instruments can be omitted since the testing results are already confirmed in thecertificate.
V20
= (W2
- W1) ( 1 ) ( 1 -
ρL ) ( 1 - γ ( t - 20 °C))
ρW - ρL ρG

8/7/2019 EASYCAL User Guide_english
http://slidepdf.com/reader/full/easycal-user-guideenglish 24/3224 EASYCAL™ User Guide · Version 4.0 · Status: December 2006
E A S Y C A L ™
U s e r G
u i d e
7.3 Calculations for Glass/Plastics
Example:
Serial No: 95 080634
Trademark: BLAUBRAND®
Type of instrument: Standard volumetric flask
Calibration: ”IN“ (to contain)
Nominal capacity/subdivision: 100 ml
Error limit: ± 0.1 ml
Testing temperature: 23 °C
Material: DURAN®
Customer-specific marking: Test Lab FT
Empty weight of weighing vessel: W1 = 25.456 g
Weight of filled volumetric flask: W2 = 125.124 g
Factor „z“ from Table 1, medium atmospheric pressure range, since capacity of volumetric flask ≤ 250 ml:z
23 °C, DURAN®= 1.00348 ml/g
V20
= (W2
- W1) × z = (125,124 g - 25,456 g) × 1,00348 ml/g
= 100,01 ml
Factor "z"
The factor ”z” incorporates the following parameters:
■ Density of the calibration weight of the balance (ρG):
☞ 8 g/ml (see specifications provided by the balance manufacturer)
■ Density of air in relation to atmospheric pressure, temperature and relative air humidity of 40 – 90% (ρL):
☞ For all volumetric instruments (except volumetric flasks > 250 ml) the influence of atmosphericpressure in relation to the stated error limits is relatively small. Therefore, Factor ”z” should generallybe read from the table „Medium atmospheric pressure range.“ For volumetric flasks > 250 ml, selectthe appropriate table for lower, medium or upper atmospheric pressure range, according to thepresent conditions. To determine the appropriate table, measure the atmospheric pressure, or inquireat a local metereological station! (The atmospheric pressure, related to sea-level, has to be couvertedinto local level.)
■ Density of water in relation to temperature (ρW)
■ Cubic expansion coefficient of the volumetric instrument in relation to its material:
☞ DURAN®: γ = 9.9 × 10⁻⁶ °C-1
☞ AR-Glas®
: γ = 27 × 10-6 °C-1☞ PP: γ = 450 × 10-6 °C-1 (Manufacturer’s information, average value of
γ = 300 × 10-6 °C-1 to γ = 600 × 10-6 °C-1)
☞ PMP: γ = 351 × 10-6 °C-1 (Manufacturer’s information: Mitsui)
☞ Liquid Handling: (by definition) = 1
Factor ”z” takes the following parameters into account:

8/7/2019 EASYCAL User Guide_english
http://slidepdf.com/reader/full/easycal-user-guideenglish 25/32EASYCAL™ User Guide · Version 4.0 · Status: December 2006 25
E A S Y C A L ™
U s e r G
u i d e
Definitions in Test Record for Glass/Plastics
Range (of measured values) =highest value minus smallest value
Tolerance limit (mean value). Statistical value,since only part of the batch was tested.
Deviation =
Maximum deviation from nominal value inthe sample
Range <= |Tol ¼| The measuring uncer-tainty is acceptable if the ”Range” is 1/4 ofthe tolerance limit of the volumetric instru-ment.
Note:The relative humidity during the test should be between 50% ± 15%. Enter it to the record.
8/7/2019 EASYCAL User Guide_english
http://slidepdf.com/reader/full/easycal-user-guideenglish 26/3226 EASYCAL™ User Guide · Version 4.0 · Status: December 2006
E A S Y C A L ™
U s e r G
u i d e
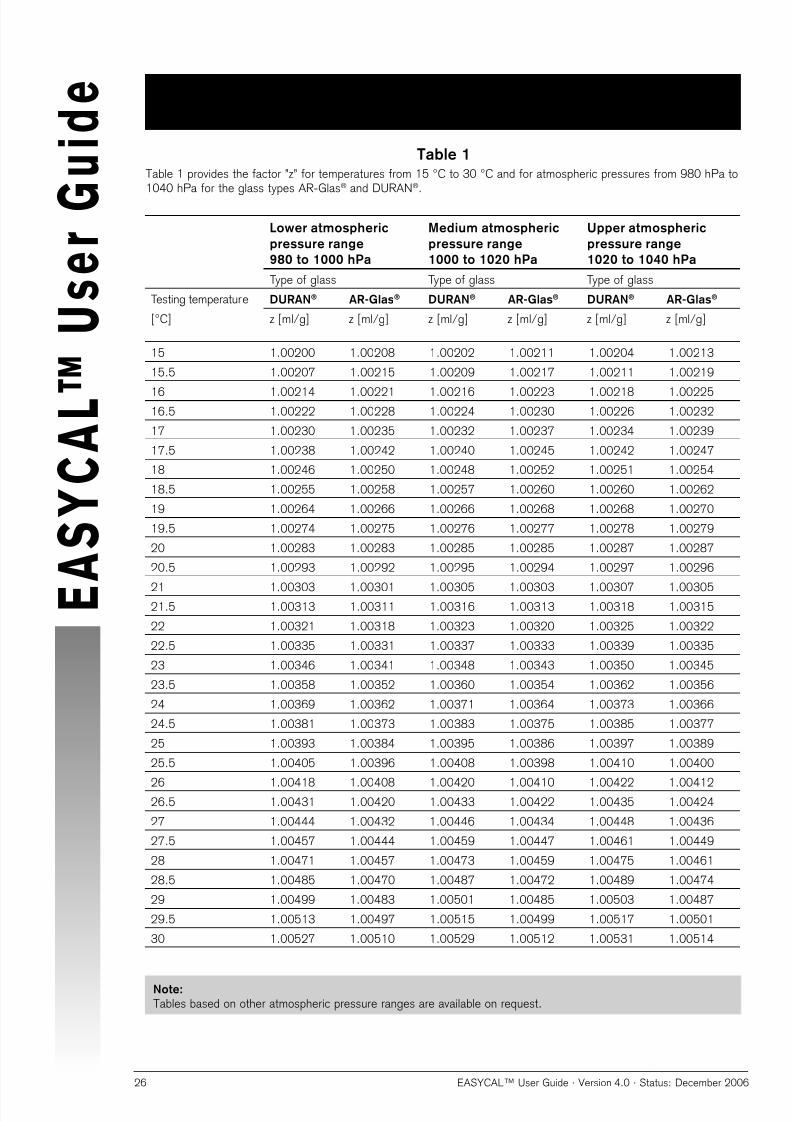
Table 1
Table 1 provides the factor ”z” for temperatures from 15 °C to 30 °C and for atmospheric pressures from 980 hPa to1040 hPa for the glass types AR-Glas® and DURAN®.
Note:
Tables based on other atmospheric pressure ranges are available on request.
Lower atmospheric
pressure range
980 to 1000 hPa
Medium atmospheric
pressure range
1000 to 1020 hPa
Upper atmospheric
pressure range
1020 to 1040 hPa
Type of glass Type of glass Type of glass
Testing temperature DURAN® AR-Glas® DURAN® AR-Glas® DURAN® AR-Glas®
[°C] z [ml/g] z [ml/g] z [ml/g] z [ml/g] z [ml/g] z [ml/g]
15 1.00200 1.00208 1.00202 1.00211 1.00204 1.00213
15.5 1.00207 1.00215 1.00209 1.00217 1.00211 1.00219
16 1.00214 1.00221 1.00216 1.00223 1.00218 1.0022516.5 1.00222 1.00228 1.00224 1.00230 1.00226 1.00232
17 1.00230 1.00235 1.00232 1.00237 1.00234 1.00239
17.5 1.00238 1.00242 1.00240 1.00245 1.00242 1.00247
18 1.00246 1.00250 1.00248 1.00252 1.00251 1.00254
18.5 1.00255 1.00258 1.00257 1.00260 1.00260 1.00262
19 1.00264 1.00266 1.00266 1.00268 1.00268 1.00270
19.5 1.00274 1.00275 1.00276 1.00277 1.00278 1.00279
20 1.00283 1.00283 1.00285 1.00285 1.00287 1.00287
20.5 1.00293 1.00292 1.00295 1.00294 1.00297 1.00296
21 1.00303 1.00301 1.00305 1.00303 1.00307 1.0030521.5 1.00313 1.00311 1.00316 1.00313 1.00318 1.00315
22 1.00321 1.00318 1.00323 1.00320 1.00325 1.00322
22.5 1.00335 1.00331 1.00337 1.00333 1.00339 1.00335
23 1.00346 1.00341 1.00348 1.00343 1.00350 1.00345
23.5 1.00358 1.00352 1.00360 1.00354 1.00362 1.00356
24 1.00369 1.00362 1.00371 1.00364 1.00373 1.00366
24.5 1.00381 1.00373 1.00383 1.00375 1.00385 1.00377
25 1.00393 1.00384 1.00395 1.00386 1.00397 1.00389
25.5 1.00405 1.00396 1.00408 1.00398 1.00410 1.00400
26 1.00418 1.00408 1.00420 1.00410 1.00422 1.0041226.5 1.00431 1.00420 1.00433 1.00422 1.00435 1.00424
27 1.00444 1.00432 1.00446 1.00434 1.00448 1.00436
27.5 1.00457 1.00444 1.00459 1.00447 1.00461 1.00449
28 1.00471 1.00457 1.00473 1.00459 1.00475 1.00461
28.5 1.00485 1.00470 1.00487 1.00472 1.00489 1.00474
29 1.00499 1.00483 1.00501 1.00485 1.00503 1.00487
29.5 1.00513 1.00497 1.00515 1.00499 1.00517 1.00501
30 1.00527 1.00510 1.00529 1.00512 1.00531 1.00514
Testing of volumetric instruments of glass
Factor "z" [ml/g]

8/7/2019 EASYCAL User Guide_english
http://slidepdf.com/reader/full/easycal-user-guideenglish 27/32EASYCAL™ User Guide · Version 4.0 · Status: December 2006 27
E A S Y C A L ™
U s e r G
u i d e
Table 2
If volumetric instruments made of plastic are to be tested, the following table provides factor ”z” for PP and PMP.
Note:
Tables based on other atmospheric pressure ranges are available on request.
Lower atmospheric
pressure range
980 to 1000 hPa
Medium atmospheric
pressure range
1000 to 1020 hPa
Upper atmospheric
pressure range
1020 to 1040 hPa
Type of plastic Type of plastic Type of plastic
Testing temperature PP PMP PP PMP PP PMP
[°C] z [ml/g] z [ml/g] z [ml/g] z [ml/g] z [ml/g] z [ml/g]
15 1.00420 1.00371 1.00423 1.00373 1.00425 1.00375
15.5 1.00406 1.00361 1.00408 1.00363 1.00410 1.00365
16 1.00391 1.00351 1.00393 1.00353 1.00395 1.0035516.5 1.00376 1.00342 1.00379 1.00344 1.00381 1.00346
17 1.00362 1.00332 1.00364 1.00334 1.00366 1.00337
17.5 1.00348 1.00324 1.00351 1.00326 1.00353 1.00328
18 1.00335 1.00315 1.00337 1.00317 1.00339 1.00319
18.5 1.00322 1.00307 1.00324 1.00309 1.00326 1.00311
19 1.00308 1.00298 1.00310 1.00301 1.00313 1.00303
19.5 1.00296 1.00291 1.00298 1.00293 1.00300 1.00295
20 1.00283 1.00283 1.00285 1.00285 1.00287 1.00287
20.5 1.00271 1.00276 1.00273 1.00278 1.00275 1.00280
21 1.00259 1.00269 1.00261 1.00271 1.00263 1.0027321.5 1.00247 1.00262 1.00249 1.00264 1.00251 1.00266
22 1.00233 1.00253 1.00235 1.00255 1.00237 1.00257
22.5 1.00225 1.00250 1.00227 1.00252 1.00229 1.00254
23 1.00214 1.00243 1.00216 1.00245 1.00218 1.00247
23.5 1.00203 1.00238 1.00205 1.00240 1.00207 1.00242
24 1.00192 1.00232 1.00194 1.00234 1.00196 1.00236
24.5 1.00182 1.00227 1.00184 1.00229 1.00186 1.00231
25 1.00172 1.00222 1.00174 1.00224 1.00176 1.00226
Testing of volumetric instruments made of plastic
Factor "z" [ml/g]

8/7/2019 EASYCAL User Guide_english
http://slidepdf.com/reader/full/easycal-user-guideenglish 28/3228 EASYCAL™ User Guide · Version 4.0 · Status: December 2006
E A S Y C A L ™
U s e r G
u i d e 7.4 Calculations for Liquid Handling
Excerpt from ISO 8655/3, Table refers to 1013 hPa
Temperature Factor z
°C ml/g
15 1.0020
15.5 1.0020
16 1.0021
16.5 1.0022
17 1.0023
17.5 1.0024
18 1.0025
18.5 1.0026
19 1.0027
19.5 1.0028
20 1.0029
Temperature Factor z
°C ml/g
20.5 1.0030
21 1.0031
21.5 1.0032
22 1.0033
22.5 1.0034
23 1.0035
23.5 1.0036
24 1.0038
24.5 1.0039
25 1.0040
25.5 1.0041
Temperature Factor z
°C ml/g
26 1.0043
26.5 1.0044
27 1.0045
27.5 1.0047
28 1.0048
28.5 1.0050
29 1.0051
29.5 1.0052
30 1.0054
Table for Liquid Handling instruments
Factor "z" [ml/g]
The following calculations must be carried out:
1. Mean weight:
x
_
=
x1
+ x2
+ x3
+ x4
+ x5
+ x6
+ x7
+ x8
+ x9
+ x10
10
2. Mean volume:
VV_
= x_
·Z ⇒ For factor z, see Table
3. Standard deviation:
s = Z ·(x
1- x_
)2 + (x2
- x_
)2 + (x3
- x_
)2 + (x4
- x_
)2 + ...(x10
- x_
)2
⇒ For factor z, see Table
9
4. Accuracy:
A [%] =V_
- Vnominal value · 100
V
nominal value
5. Coefficient of variation:
CV [%] = s · 100
V_

8/7/2019 EASYCAL User Guide_english
http://slidepdf.com/reader/full/easycal-user-guideenglish 29/32EASYCAL™ User Guide · Version 4.0 · Status: December 2006 29
E A S Y C A L ™
U s e r G
u i d e
8.1 Printing problems
Parts of the record are not printed
This problem occurs when your printer settings do not correspond to the print format settings for the records.
Example: The footer of the record is not printed, or is printed on a new page.
Possible causes
❍ The page length set for your printer is not the same as the record page length. The pagelength that was set for the printer is calculated from the maximum printable area of thepaper used (this information is given in your Printer Manual) minus the margins that wereset for the page. Compare the page length calculated in this way with the length of theEASYCAL records and, if necessary, correct the value set on the printer.
❍ The values defined for the top and/or bottom margins for printing the test records cannotbe set on your printer. For example, if the bottom margin for printing the record was set tozero in EASYCAL and you are using a laser printer, which physically cannot print to thebottom of the page, the system disables the printing of the corresponding information. Noerror message is displayed, and the surplus data is not even printed on a new page.
Each page of the record is printed on two or more pages
...as a result, nothing or only a few characters are printed on the follow-on pages.
Result:
If the calculated values are larger than the tolerance limits:
☞ Verify if the above instructions have been carefully followed step bystep.
☞ Observe the suggestions under „Troubleshooting“ in the OperatingManual.
☞ Calibrate the Transferpette (from 9/93) and Dispensette® (from 9/98)as described in the Operating Manual (recalibration is only availablefor recent models).
If these measures are not successful, you may send the instrument
to the manufacturer for calibration.
8. Troubleshooting
If the calculated values (A [%] and CV [%]) are smaller than or equal tothe tolerance limits, the instrument is in good working order.
Note:The relative humidity during the test should be between 50% ± 15%.Enter it to the record.

8/7/2019 EASYCAL User Guide_english
http://slidepdf.com/reader/full/easycal-user-guideenglish 30/3230 EASYCAL™ User Guide · Version 4.0 · Status: December 2006
E A S Y C A L ™
U s e r G
u i d e
8.2 Memory problems
The MS ACCESS database application, which forms the basis for the EASYCAL™ program, requires atleast 2 MB memory (RAM) and approx. 6 MB of free harddisk space. However, with this minimum hardwareinstallation the application will only run under ideal conditions. Under typical conditions, i.e. when other Win-dows applications are using the available resources at the same time, the following problems may occur:
Not enough memory available to run the application
The available Windows system memory is no longer sufficient to start or run the EASYCAL™ databaseapplication. This problem occurs when one or more applications have already been started under Windowsand these use (large) amounts of main memory. You can resolve this problem by closing down one or moreapplications and/or increasing the entire Windows memory capacity. You can also increase the (permanent)Windows external storage file for this purpose. For further information, refer to your Windows Manual.
Not enough system resources available to update the display
System resources are internal MS WINDOWS resources. These are used at the same time by all applicati-ons. Very graphics-oriented applications, for example, with complex images and buttons, tie up much of thesystem resources. And, of course, the EASYCAL™ database needs system resources. If these resourcesare no longer available, the above error message is displayed.Closing down other applications will help in most cases. But sometimes these applications will not free upthe resources that they used. If this is the case, the only solution is to restart Windows.
General Protection Fault
In most cases, the General Protection Fault is caused by old device drivers. For example, if
the problem always occurs when you are printing records, the printer driver you are using maybe causing the problem. Contact your supplier or the manufacturer of your hardware or the related driver for an updated driver version.
❍ This error occurs when the width and/or length of the form exceeds the printable width/length of your printer. You can adjust these values in the ”Printer Settings” window, which is displayed each timeyou want to print a record. Refer to your Printer Manual to establish the printable area of your printer. Aprintable width of 18 cm is required for printing EASYCAL records. The printable width is calculated fromthe width of the paper used minus the preset margins.
❍ The default setting for IBM PROprinter-compatible dot-matrix printers using continuous feed paper size A4 is:
Left margin 1.5 cmRight, top and bottom margin 1.0 cm
The top and bottom margin on laser printers should be set to 0.5 cm.

8/7/2019 EASYCAL User Guide_english
http://slidepdf.com/reader/full/easycal-user-guideenglish 31/32EASYCAL™ User Guide · Version 4.0 · Status: December 2006 31
E A S Y C A L ™
U s e r G
u i d e
Accuracy ........................................................ 22
Adopt data from earlier versions.................... 20
Agreement ....................................................... 3
Alterations to the software .............................. 3
Archiving .........................................................17
Atmospheric pressure; required entry .7; 12; 13
Balance .................................................7; 12; 18
Balance Test .................................................. 21
Basics ...................................................... 22; 23
Basic for calculations .................................... 22
Basic settings ................................................. 5
Calculations for Glass/Plastics ...................... 24
Calculations for Liquid Handling .................... 28
Calibration ..................................................6; 11
Calibration lab (external) .............................. 18
Change password .......................................... 21
Class ..............................................................11
Coefficient of Expansion ...........................12;24
Coefficient of Variation .................................. 22
COM connection ............................................ 21
Company and language ................................ 18
Copyright ........................................................ 3
Curve ..............................................................17
Data analysis ............................................10; 14
Declare instrument defect ........................10; 14
Definitions ..................................................... 22
Deleting ..............................................15; 16; 19
Deleting records from previous test records . 15
"Details" of measuring results ........................17
Duties of the licencee ...................................... 3
Display selected records from history (filter) 16
Enter (external) calibration lab ...................... 18
Enter firm and language ................................ 18
Entry of measuring results....................... 6; 8; 11; 13
Entry of tolerance limits ..............................9; 14
Factor ”z” ......................................24; 26; 27; 28
Filters ............................................................. 16
Format of date ........................................... 5; 18
General Protection Fault (GPF) ..................... 30
Glass-/Plastic ...........................................11; 18
Graph .............................................................17
Hardware ........................................................ 4
Humidity .................................................. 25; 29
Import data ................................................... 20
Install printer ................................................. 21
Installation the program .............................. 4; 5
Instrument .................................................6; 11
Interface ....................................................... 21Intervall entry ............................................10; 15
License Agreement ......................................... 3
Liquid Handling Instruments ....................... 6, 8
List of test operators, balances etc. .........18; 19
9. Index
Main menu ...................................................... 6
Manage EASYCAL™ data ..........................19; 20
Materials ..................................................12; 24
Measuring results ....................... 6; 8; 11; 13; 17
Memory problems ......................................... 30
Navigation buttons ...................................17; 18
Network .......................................................... 4
Nominal volume / values / unit ..............7; 8; 11
Norms ...................................................9; 12; 18
Note ...........................................................7; 13
Number of weighings ................................. 8; 13
Object of agreement ........................................ 3
Password ..................................................15, 18
Preferences ................................................... 18
Previous test records ..........................10; 15: 16
Printer setup .......................................10; 14; 21
Printing problems ......................................... 29
Printing records from history ......................... 16
Problems in using EASYCAL™ ...................... 29
Program features ............................................ 4
Range ............................................................. 25
Read test archive .......................................... 20
Record ......................................................18; 19
Save EASYCAL™ file ..................................... 20
Save present test (permanently) .........10; 15: 20
Save intervall entry ...................................10: 15
Serial number ............................................6; 11
Software ......................................................... 4
Standards .............................................9; 12; 18
Subdivision ................................................... 12
System requirements ...................................... 4
System resources ..................................... 4; 30
Test Temperature ...................................... 8; 12
Test history .........................................10; 15; 16
Test operators .............................................6; 11
Test volume ............................................... 8; 13
Thermometer ........................................7; 12; 18
Tolerance limits ...................................9; 14; 17
Tolerance ....................................8 ; 9; 14; 22; 25
Trademarks ....................................................11
Traffic light function ......................................... 8
Troubleshooting ...................................... 29; 30
Type ...........................................................7; 11
Uninstalling the program ................................ 5
Warranty .......................................................... 3
Weighings per channel ..................................... 7
Weighed values ................................6; 8; 11; 13

8/7/2019 EASYCAL User Guide_english
http://slidepdf.com/reader/full/easycal-user-guideenglish 32/32
t e d i n G e r m a n y · 0 2 0 6