echo test track pro users guide 1. training overview 2 test track pro overview accessing test track...
TRANSCRIPT

ECHO Test Track ProUser’s Guide
1

Training Overview
2
• Test Track Pro Overview• Accessing Test Track Pro• Test Track Pro Navigation
– Setting User Options– Main Defect Screen
• ECHO Trouble Ticket NCR Event Flow– Entering a New Trouble Ticket– Tracking a Defect’s Progress– Failing NCR Verification– Closing an NCR
• Frequently Asked Questions
Test Track Pro Overview
• The use of the TestTrack Pro (TTPro) COTS product is to provide a centralized bug tracking system.
• Projects’ data, in TTPro, are collectively stored in a single database which allows portability from the TestTrack Pro server location to another PC. Each project is distinct, can be configurable separately by the owner, and is capable of having its own administrators. This flexibility expands the capabilities of the workflow within the system.
• TTPro reports have a lifecycle of states through which they move (workflow milestones/events). A defect report's lifecycle starts with its submission and generally ends with its resolution. TTPro uses this lifecycle concept and manages bugs using a state transition tracking mechanism.
• There are several data elements captured within the TTP System, but there are 5 key elements that drive the flow of the system. They are:
1. Defect Number: Every problem entered into the TTP System contains an unique identifier. This numeric identifier is generated by the system for all projects which house NCRs (and Trouble Tickets).
2. Severity: The severity field is used to capture the impact (scaled 1 – 5 ) on operations.3. Project: Is the repository of the data of every defect which identifies the subsystem (i.e. TTs, NCRs) to which the
problem relates.4. Summary: (formally, Title of the problem): This field contains a brief statement of the problem. It lists within Project
window, on open of a Project as a descriptor. It is recommended that it be brief, but concise.5. State: The state is a milestone achieved in the workflow, the lifecycle of the reported defect. States has several
associated events that performs a specified action within the state called, events.
3

Accessing Test Track Pro
• To access the Test Track Pro Web Client, do the following:
1. Activate internet browser i.e., Internet Explorer, Firefox, etc.
2. Enter the URL: https://links.gsfc.nasa.gov:20072/ttweb/login.htm
• An error window entitled “Security Error: Domain Name Mismatch” may appear. Press ‘OK’ as this is not a true error.
• If pop-ups are not enabled on your browser, you will be redirected to another web page which will contain a button entitled “Go To Login.” Press this button to be redirected to the TestTrack Pro login page.
3. In the new window containing the TestTrack Pro login page, select the ECHO_TTs project to view ECHO Trouble Tickets, or the ECHO_OPS_Ncrs project to view ECHO Operational NCRs.
4. Enter your username and password and select ‘Defect List’ from the “Start At” selection box. Then press the “Login” button.
4

TestTrack Pro Navigation
• The main Defect List Window provides access to all TestTrack Pro Defect Records.
• You may change the list of displayed defects by selecting a filter from list of available filters.
• When editing a defect, the side bar links (open, assign, …) will become active for each valid workflow event.
• All new users should update their user options before creating or editing defects. Some options cannot be changed by a Test Track Pro Administrator.
5
Test Track Pro Defect Screen
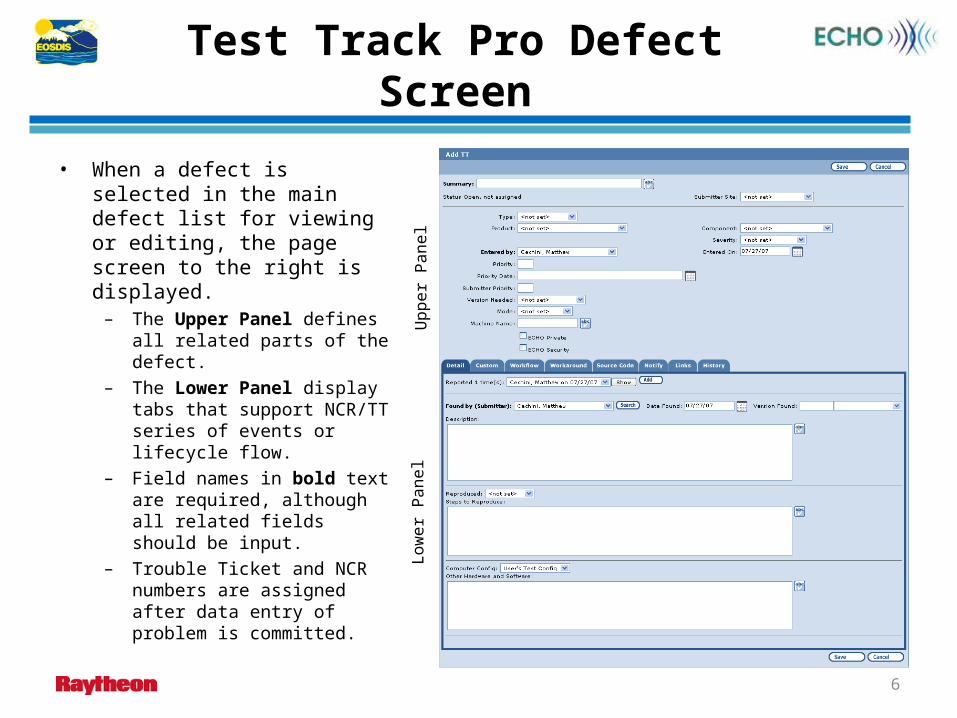
• When a defect is selected in the main defect list for viewing or editing, the page screen to the right is displayed.
– The Upper Panel defines all related parts of the defect.
– The Lower Panel display tabs that support NCR/TT series of events or lifecycle flow.
– Field names in bold text are required, although all related fields should be input.
– Trouble Ticket and NCR numbers are assigned after data entry of problem is committed.
6
Upp
er P
anel
Low
er P
anel

ECHO Trouble Ticket NCR Event Flow
7
• The diagram to the right shows the nominal flow of activity for a defect in the ECHO system.
• Notes– Multiple steps exist between when an NCR
is opened and when it is marked as fixed. These are used to facilitate internal defect tracking.
– If the submitter must fail the verification of an NCR due to an incomplete solution, the NCR is marked as Verify Failed instead of Closed and the ECHO team will revisit the issue.

Entering a New Trouble Ticket
• When adding a new Trouble Ticket, the following fields should be filled in by the submitter.
– Summary: A brief/concise description of the problem (Mandatory)
– Submitter Site: Identifies the submitter’s location.– Type: Identifies the type of problem or request that the
new Trouble Ticket is reporting. – Product: Identifies the associated subsystem.– Entered by: Identifies the individual submitting the
Trouble Ticket. This is populated by the system, but can be changed to identify another individual. (Mandatory)
– Component: Identifies the software interface.– Submitter Priority: Identifies the submitter’s priority of
this issue being resolved. (1 = High, 2 = Medium, 3 = Low)– Severity: Identifies the severity of the issue.– Entered On: Identifies the date the TT was created. This
is populated by system, but can be changed.– Mode: Identifies the ECHO Environment where the
Trouble Ticket issue was detected.– Description: A detailed, but concise description of the
problem encountered. The description should include when the problem occurred, what inputs were used, reported errors , and any associated information.
8
NOTE: You must press the Save button to commit the new Trouble Ticket.

Tracking a Defect’s Progress
• TestTrack Pro Client allows you to view all events in a Trouble Ticket or NCR’s progress towards completion. A workflow listing is automatically captured to identify the series of events or activities associated with a trouble ticket or NCR. This listing is populated after the user has committed input and the trouble ticket moves through the lifecycle of the defect.
• Follow the steps below to view a TT’s (or NCR’s) progress :1. From the main defect page, select a Trouble Ticket and press the view button. 2. From the defect window, select the “Workflow” tab found in the middle of the screen. (seen below).3. Select one of the workflow links to expand the full details for the event.
9

Failing NCR Verification
10
• To fail the verification of a Fixed NCR, follow the steps below:– Select the NCR to edit from the main defect window. – On the side bar, the Verify Failed link will be active. (seen left).– Click on the Verify Failed link and the verify failed page (seen below) will be displayed.
• When failing a Fixed NCR, the following fields should be filled in.
– Verify Failed By: Identifies the individual failing the NCR. This is populated by the system, but can be changed. (Mandatory)
– Date: Identifies the date the NCR will be marked as verify failed. This is populated by the system, but can be changed. (Mandatory)
– Notes: A detailed description of why the NCR was verify failed. (Mandatory)

Closing an NCR
• To close a Fixed NCR, follow the steps below:– Select the NCR to edit from the main defect window. – On the side bar, the Close link will be active. (seen left).– Click on the Close link and the close page (seen below) will be displayed.
11
• When closing a Fixed NCR, the following fields should be filled in.
– Closed By: Identifies the individual closing the NCR. This is populated by the system, but can be changed. (Mandatory)
– Close Date: Identifies the date the NCR will be marked as closed. This is populated by the system, but can be changed. (Mandatory)
– Close Notes: A description of how the NCR was verified and closed. (Mandatory)
– Closing Reason: Identifies the reason an NCR was closed.
Frequently Asked Questions
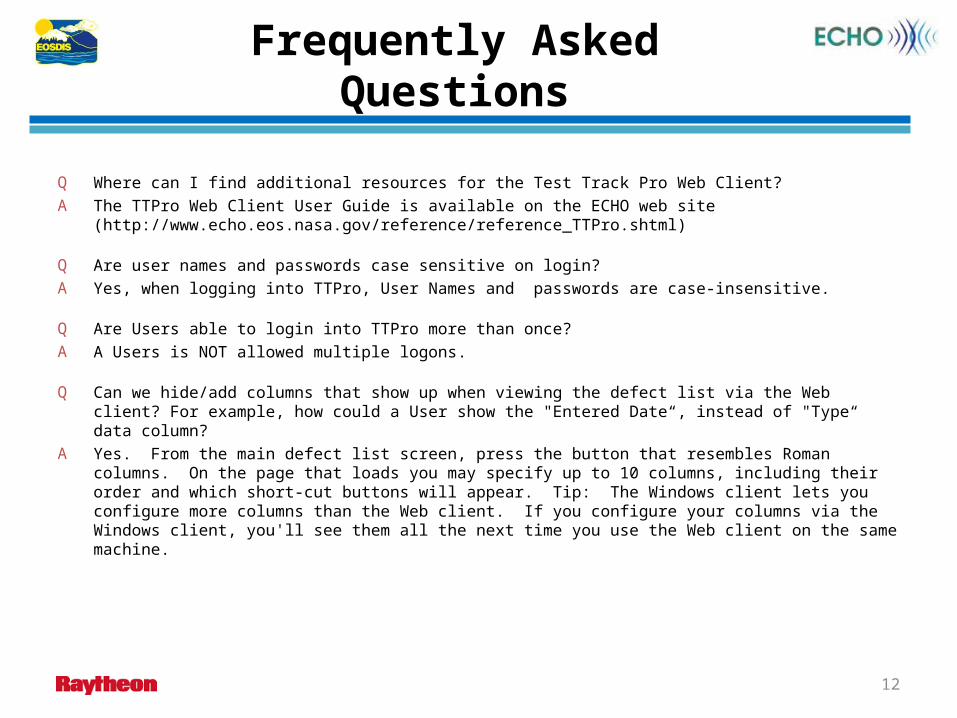
Q Where can I find additional resources for the Test Track Pro Web Client?A The TTPro Web Client User Guide is available on the ECHO web site
(http://www.echo.eos.nasa.gov/reference/reference_TTPro.shtml)
Q Are user names and passwords case sensitive on login?A Yes, when logging into TTPro, User Names and passwords are case-insensitive.
Q Are Users able to login into TTPro more than once?A A Users is NOT allowed multiple logons.
Q Can we hide/add columns that show up when viewing the defect list via the Web client? For example, how could a User show the "Entered Date“, instead of "Type“ data column?
A Yes. From the main defect list screen, press the button that resembles Roman columns. On the page that loads you may specify up to 10 columns, including their order and which short-cut buttons will appear. Tip: The Windows client lets you configure more columns than the Web client. If you configure your columns via the Windows client, you'll see them all the next time you use the Web client on the same machine.
12