eclipse's rich client platform, part 2: extending the...
TRANSCRIPT
Eclipse's Rich Client Platform, Part 2:Extending the generic workbench
Presented by developerWorks, your source for great tutorials
ibm.com/developerWorks
Table of contentsIf you're viewing this document online, you can click any of the topics below to link directly to thatsection.
1. Before you start ................................................................................... 22. Defining a view .................................................................................... 43. Integrating menu bars and dialog boxes ........................................... 154. Defining a wizard ............................................................................... 175. Defining an action.............................................................................. 216. Launching the application ................................................................. 257. Summary and resources .................................................................. 29
Eclipse's Rich Client Platform, Part 2: Extending the generic workbench Page 1 of 30

Section 1. Before you start
About this tutorialThe second of a two-part series, this tutorial explores Eclipse's Rich Client Platform(RCP). The first part of the series, Eclipse's Rich Client Platform, Part 1: Gettingstarted, began with a review of the Eclipse project and the relevance of the RCPwithin the marketplace. It discussed the Eclipse plug-in architecture and outlined thenecessary steps to implement an RCP application. After providing the necessarybackground information, you began creating a project within the Eclipse 3.0 IDE. Youdefined a plug-in manifest, were introduced to extensions and extension points, andcreated a basic perspective. Using these components, you created some additionalsupporting Java classes and launched a stand-alone RCP application.
Part 2 of this series leverages the discussion from Part 1 and explores how you canuse other Eclipse user-interface components such as views, actions, and wizards toassemble a complete application. In this tutorial, you'll create a front end for theGoogle API that will give you the ability to query and display search results fromGoogle's extensive catalog of Web sites. Having an application that demonstratessome of these technologies in action will provide you with an understanding of theRCP platform.
You should understand how to navigate Eclipse 3.0 and have a working knowledgeof Java to follow this tutorial. You do not need a background in Eclipse plug-indevelopment or an understanding of technologies such as the Standard WidgetToolkit (SWT) and JFace. Part 1 provided a brief introduction to each of thesecomplementary technologies. This tutorial explores the code and supporting files soyou can grasp how to construct an RCP application.
ToolsWhile not a prerequisite, you'll find this tutorial easier to follow if you download,install, and configure Eclipse 3.0, a 1.4 Java Virtual Machine, and Apache Ant. If youdon't have these tools installed, please reference, download, and install the followingresources:
° Eclipse 3.0 is available at: http://www.eclipse.org/downloads/index.php° Java 2 Standard Edition, Software Development Kit (SDK) is available at:
http://java.sun.com/j2se/1.4.2/download.html° Apache Ant 1.6.1 is available at: http://ant.apache.org/
About the authorJeff Gunther, a Studio B (http://www.studiob.com/) author, is the General Managerand founder of Intalgent Technologies, an emerging provider of software productsand solutions utilizing the Java 2 Enterprise Edition and Lotus Notes/Dominoplatforms. Jeff is an application and infrastructure architect with experience inarchitecting, designing, developing, deploying, and maintaining complex softwaresystems. His diverse experience includes full lifecycle development of software
ibm.com/developerWorks Presented by developerWorks, your source for great tutorials
Page 2 of 30 Eclipse's Rich Client Platform, Part 2: Extending the generic workbench
running on multiple platforms, from Web servers to embedded devices. You cancontact him at: [email protected].
Presented by developerWorks, your source for great tutorials ibm.com/developerWorks
Eclipse's Rich Client Platform, Part 2: Extending the generic workbench Page 3 of 30

Section 2. Defining a view
Overview of viewsViews within the Eclipse workbench are visual containers that allow users to displayor navigate resources of a particular type. As you begin creating views within yourown RCP application, remember to review the view's purpose before startingdevelopment. Since a view's responsibility is to display data from your domain model,group similar types of objects into the view. For example, most users of the EclipseIDE make extensive use of the tasks view within the Java perspective. This viewdisplays types of auto-generated errors, warnings, or information associated with aresource that the developer needs to review and resolve. This approach minimizesthe need for the user to toggle between views to accomplish a particular task. Thenumber of views that any application has is largely dependent on the application'ssize and complexity. The example Google application developed in this tutorial hastwo views -- one for searching and one for displaying the Web page from the searchresults, both of which you'll create in this section.
Defining an org.eclipse.ui.views extensionSimilar to other components within Eclipse, to create a new view, you must define anew extension within the project's plug-in manifest. You define views using theorg.eclipse.ui.perspectives extension point. Using the plugin.xml tab of theplug-in manifest editor within the Google project, add the following content to beginthe process of creating the views.
...<extension point="org.eclipse.ui.views">
<categoryid="com.ibm.developerworks.google.views"name="Google">
</category>
<viewid="com.ibm.developerworks.google.views.SearchView"name="Search"category="com.ibm.developerworks.google.views"class="com.ibm.developerworks.google.views.SearchView"icon="icons/google.gif">
</view>
<viewid="com.ibm.developerworks.google.views.BrowserView"name="Browser"category="com.ibm.developerworks.google.views"class="com.ibm.developerworks.google.views.BrowserView"icon="icons/google.gif">
</view>
</extension>...
The SearchView allows users to search Google and display the search results in a
ibm.com/developerWorks Presented by developerWorks, your source for great tutorials
Page 4 of 30 Eclipse's Rich Client Platform, Part 2: Extending the generic workbench
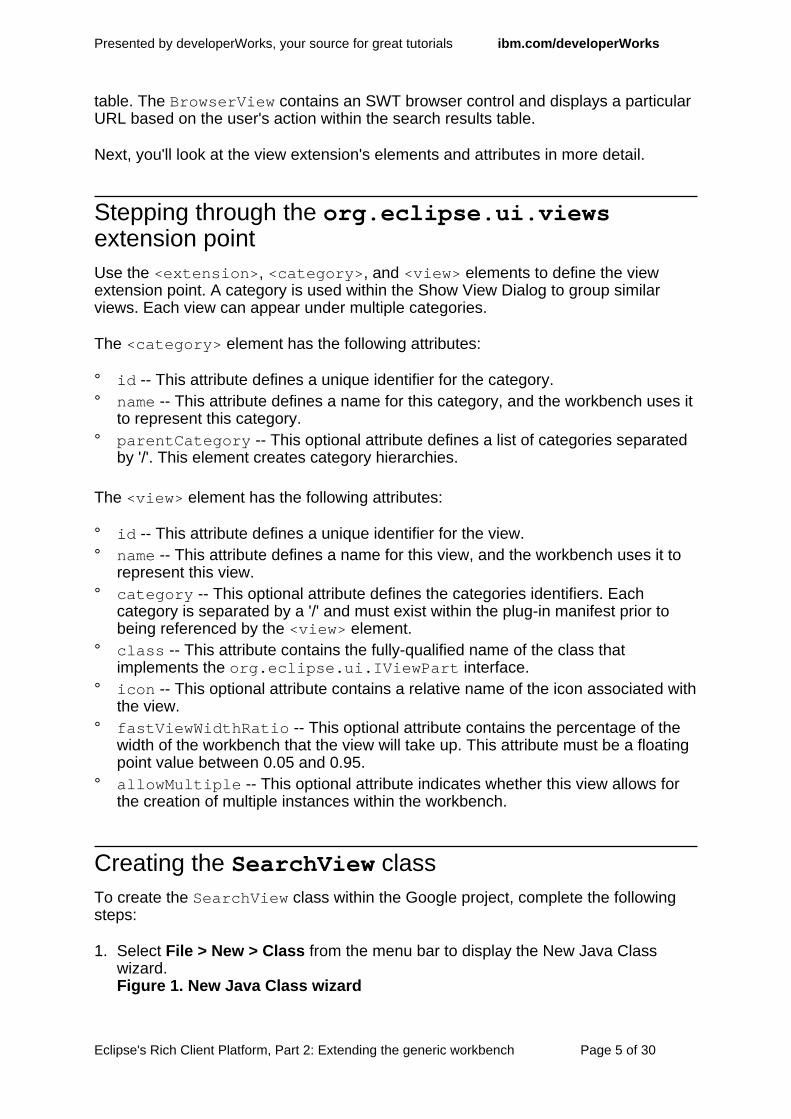
table. The BrowserView contains an SWT browser control and displays a particularURL based on the user's action within the search results table.
Next, you'll look at the view extension's elements and attributes in more detail.
Stepping through the org.eclipse.ui.viewsextension pointUse the <extension>, <category>, and <view> elements to define the viewextension point. A category is used within the Show View Dialog to group similarviews. Each view can appear under multiple categories.
The <category> element has the following attributes:
° id -- This attribute defines a unique identifier for the category.° name -- This attribute defines a name for this category, and the workbench uses it
to represent this category.° parentCategory -- This optional attribute defines a list of categories separated
by '/'. This element creates category hierarchies.
The <view> element has the following attributes:
° id -- This attribute defines a unique identifier for the view.° name -- This attribute defines a name for this view, and the workbench uses it to
represent this view.° category -- This optional attribute defines the categories identifiers. Each
category is separated by a '/' and must exist within the plug-in manifest prior tobeing referenced by the <view> element.
° class -- This attribute contains the fully-qualified name of the class thatimplements the org.eclipse.ui.IViewPart interface.
° icon -- This optional attribute contains a relative name of the icon associated withthe view.
° fastViewWidthRatio -- This optional attribute contains the percentage of thewidth of the workbench that the view will take up. This attribute must be a floatingpoint value between 0.05 and 0.95.
° allowMultiple -- This optional attribute indicates whether this view allows forthe creation of multiple instances within the workbench.
Creating the SearchView classTo create the SearchView class within the Google project, complete the followingsteps:
1. Select File > New > Class from the menu bar to display the New Java Classwizard.Figure 1. New Java Class wizard
Presented by developerWorks, your source for great tutorials ibm.com/developerWorks
Eclipse's Rich Client Platform, Part 2: Extending the generic workbench Page 5 of 30
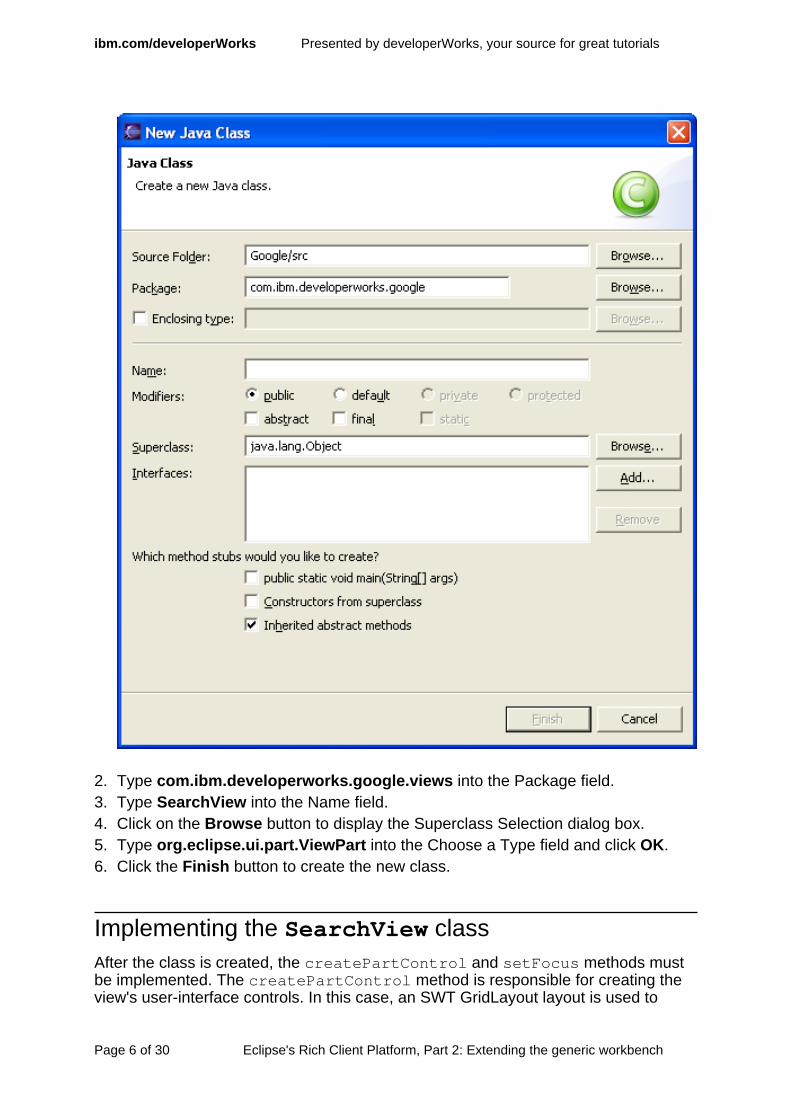
2. Type com.ibm.developerworks.google.views into the Package field.3. Type SearchView into the Name field.4. Click on the Browse button to display the Superclass Selection dialog box.5. Type org.eclipse.ui.part.ViewPart into the Choose a Type field and click OK.6. Click the Finish button to create the new class.
Implementing the SearchView classAfter the class is created, the createPartControl and setFocus methods mustbe implemented. The createPartControl method is responsible for creating theview's user-interface controls. In this case, an SWT GridLayout layout is used to
ibm.com/developerWorks Presented by developerWorks, your source for great tutorials
Page 6 of 30 Eclipse's Rich Client Platform, Part 2: Extending the generic workbench
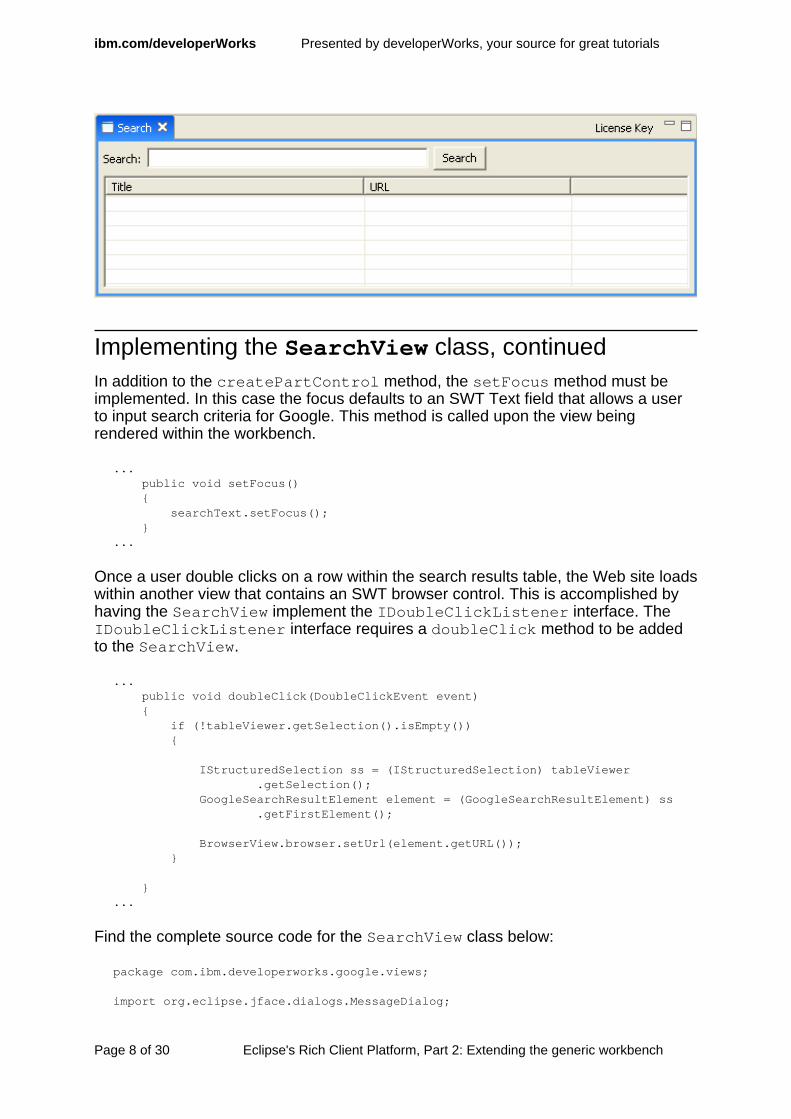
arrange the SWT label, SWT text, SWT button, and an SWT table on the view'scomposite. For more information about SWT's various layouts or how to use SWTuser-interface components, please refer to the Resources on page 29 at the end ofthis tutorial.
The code within the createPartControl method renders the user interface Figure2 shows.
...public void createPartControl(Composite parent){
GridLayout gridLayout = new GridLayout();gridLayout.numColumns = 3;gridLayout.marginHeight = 5;gridLayout.marginWidth = 5;
parent.setLayout(gridLayout);
Label searchLabel = new Label(parent, SWT.NONE);searchLabel.setText("Search:");
searchText = new Text(parent, SWT.BORDER);searchText.setLayoutData(new GridData(GridData.GRAB_HORIZONTAL
| GridData.HORIZONTAL_ALIGN_FILL));
Button searchButton = new Button(parent, SWT.PUSH);searchButton.setText(" Search ");
...GridData gridData = new GridData();gridData.verticalAlignment = GridData.FILL;gridData.horizontalSpan = 3;gridData.grabExcessHorizontalSpace = true;gridData.grabExcessVerticalSpace = true;gridData.horizontalAlignment = GridData.FILL;
tableViewer = new TableViewer(parent, SWT.FULL_SELECTION | SWT.BORDER);tableViewer.setLabelProvider(new SearchViewLabelProvider());tableViewer.setContentProvider(new ViewContentProvider());tableViewer.setInput(model);tableViewer.getControl().setLayoutData(gridData);tableViewer.addDoubleClickListener(this);
Table table = tableViewer.getTable();table.setHeaderVisible(true);table.setLinesVisible(true);
TableColumn titleColumn = new TableColumn(table, SWT.NONE);titleColumn.setText("Title");titleColumn.setWidth(250);
TableColumn urlColumn = new TableColumn(table, SWT.NONE);urlColumn.setText("URL");urlColumn.setWidth(200);
...
Figure 2. Search view of the Google application
Presented by developerWorks, your source for great tutorials ibm.com/developerWorks
Eclipse's Rich Client Platform, Part 2: Extending the generic workbench Page 7 of 30
Implementing the SearchView class, continuedIn addition to the createPartControl method, the setFocus method must beimplemented. In this case the focus defaults to an SWT Text field that allows a userto input search criteria for Google. This method is called upon the view beingrendered within the workbench.
...public void setFocus(){
searchText.setFocus();}
...
Once a user double clicks on a row within the search results table, the Web site loadswithin another view that contains an SWT browser control. This is accomplished byhaving the SearchView implement the IDoubleClickListener interface. TheIDoubleClickListener interface requires a doubleClick method to be addedto the SearchView.
...public void doubleClick(DoubleClickEvent event){
if (!tableViewer.getSelection().isEmpty()){
IStructuredSelection ss = (IStructuredSelection) tableViewer.getSelection();
GoogleSearchResultElement element = (GoogleSearchResultElement) ss.getFirstElement();
BrowserView.browser.setUrl(element.getURL());}
}...
Find the complete source code for the SearchView class below:
package com.ibm.developerworks.google.views;
import org.eclipse.jface.dialogs.MessageDialog;
ibm.com/developerWorks Presented by developerWorks, your source for great tutorials
Page 8 of 30 Eclipse's Rich Client Platform, Part 2: Extending the generic workbench
import org.eclipse.jface.viewers.DoubleClickEvent;import org.eclipse.jface.viewers.IDoubleClickListener;import org.eclipse.jface.viewers.IStructuredSelection;import org.eclipse.jface.viewers.TableViewer;import org.eclipse.swt.SWT;import org.eclipse.swt.events.SelectionEvent;import org.eclipse.swt.events.SelectionListener;import org.eclipse.swt.layout.GridData;import org.eclipse.swt.layout.GridLayout;import org.eclipse.swt.widgets.Button;import org.eclipse.swt.widgets.Composite;import org.eclipse.swt.widgets.Label;import org.eclipse.swt.widgets.Table;import org.eclipse.swt.widgets.TableColumn;import org.eclipse.swt.widgets.Text;import org.eclipse.ui.internal.dialogs.ViewContentProvider;import org.eclipse.ui.part.ViewPart;
import com.google.soap.search.GoogleSearch;import com.google.soap.search.GoogleSearchFault;import com.google.soap.search.GoogleSearchResult;import com.google. soap.search.GoogleSearchResultElement;import com.ibm.developerworks.google.GoogleApplication;
public class SearchView extends ViewPart implements IDoubleClickListener{
public static final String ID = "com.ibm.developerworks.google.views.SearchView";
private TableViewer tableViewer;
private Text searchText;
private GoogleSearchResultElement model;
public void createPartControl(Composite parent){
GridLayout gridLayout = new GridLayout();gridLayout.numColumns = 3;gridLayout.marginHeight = 5;gridLayout.marginWidth = 5;
parent.setLayout(gridLayout);
Label searchLabel = new Label(parent, SWT.NONE);searchLabel.setText("Search:");
searchText = new Text(parent, SWT.BORDER);searchText.setLayoutData(new GridData(GridData.GRAB_HORIZONTAL
| GridData.HORIZONTAL_ALIGN_FILL));
Button searchButton = new Button(parent, SWT.PUSH);searchButton.setText(" Search ");searchButton.addSelectionListener(new SelectionListener(){
public void widgetSelected(SelectionEvent e){
GoogleSearch search = new GoogleSearch();search.setKey(GoogleApplication.LICENSE_KEY);search.setQueryString(searchText.getText());try{
Presented by developerWorks, your source for great tutorials ibm.com/developerWorks
Eclipse's Rich Client Platform, Part 2: Extending the generic workbench Page 9 of 30
GoogleSearchResult result = search.doSearch();
tableViewer.setInput(model);tableViewer.add(result.getResultElements());
} catch (GoogleSearchFault ex){
MessageDialog.openWarning(e.display.getActiveShell(),"Google Error", ex.getMessage());
}
}
public void widgetDefaultSelected(SelectionEvent e)
}});
GridData gridData = new GridData();gridData.verticalAlignment = GridData.FILL;gridData.horizontalSpan = 3;gridData.grabExcessHorizontalSpace = true;gridData.grabExcessVerticalSpace = true;gridData.horizontalAlignment = GridData.FILL;
tableViewer = new TableViewer(parent, SWT.FULL_SELECTION | SWT.BORDER);tableViewer.setLabelProvider(new SearchViewLabelProvider());tableViewer.setContentProvider(new ViewContentProvider());tableViewer.setInput(model);tableViewer.getControl().setLayoutData(gridData);tableViewer.addDoubleClickListener(this);
Table table = tableViewer.getTable();table.setHeaderVisible(true);table.setLinesVisible(true);
TableColumn titleColumn = new TableColumn(table, SWT.NONE);titleColumn.setText("Title");titleColumn.setWidth(250);
TableColumn urlColumn = new TableColumn(table, SWT.NONE);urlColumn.setText("URL");urlColumn.setWidth(200);
}
public void setFocus(){
searchText.setFocus();}
public void doubleClick(DoubleClickEvent event){
if (!tableViewer.getSelection().isEmpty()){
IStructuredSelection ss = (IStructuredSelection) tableViewer.getSelection();
GoogleSearchResultElement element = (GoogleSearchResultElement) ss.getFirstElement();
BrowserView.browser.setUrl(element.getURL());}
ibm.com/developerWorks Presented by developerWorks, your source for great tutorials
Page 10 of 30 Eclipse's Rich Client Platform, Part 2: Extending the generic workbench
}}
Creating the SearchViewLabelProvider classIn the source code on the previous panel, the TableViewer object uses a classcalled SearchViewLabelProvider. In this instance, a label provider sets thecolumn's text for each row of the table. To create the SearchViewLabelProviderclass for the SearchView class within the Google project, complete the followingsteps:
1. Select File > New > Class from the menu bar to display the New Java Classwizard.
2. Type com.ibm.developerworks.google.views into the Package field.3. Type SearchViewLabelProvider into the Name field.4. Click on the Browse button to display the Superclass Selection dialog box.5. Type org.eclipse.jface.viewers.LabelProvider into the Choose a Type field and
click OK.6. Click on the Add button to display the Implemented Interfaces Selection dialog
box.7. Type org.eclipse.jface.viewers.ITableLabelProvider into the Choose an
interface field and click OK.8. Click the Finish button to create the new class.
Implementing the SearchViewLabelProvider classThe ITableLabelProvider interface requires that the getColumnImage andgetColumnText methods be implemented within the class. Since the results tabledoes not include any images, the getColumnImage method simply returns null. ThegetColumnText uses the GoogleSearchResultElement class provided by theGoogle API to set the first and second columns of the SWT table. The first columncontains the title of the search result, and the second column contains the searchresult's URL.
package com.ibm.developerworks.google.views;
...
public class SearchViewLabelProvider extends LabelProvider implementsITableLabelProvider
{
public Image getColumnImage(Object element, int columnIndex){
return null;}
public String getColumnText(Object element, int columnIndex){
switch (columnIndex)
Presented by developerWorks, your source for great tutorials ibm.com/developerWorks
Eclipse's Rich Client Platform, Part 2: Extending the generic workbench Page 11 of 30
{case 0:
return ((GoogleSearchResultElement) element).getTitle();case 1:
return ((GoogleSearchResultElement) element).getURL();
}return "";
}
}
Creating the BrowserView classNow you need to create a view to display the URL that the user selects within thesearch result table. To create the BrowserView class within the Google project,complete the following steps:
1. Select File > New > Class from the menu bar to display the New Java Classwizard.
2. Type com.ibm.developerworks.google.views into the Package field.3. Type BrowserView into the Name field.4. Click on the Browse button to display the Superclass Selection dialog box.5. Type org.eclipse.ui.part.ViewPart into the Choose a Type field and click OK.6. Click the Finish button to create the new class.
Implementing the BrowserView classAs for the SearchView class, you must implement the createPartControl andsetFocus methods in the BrowserView class. In this case, an SWT browsercontrol is embedded within the view. This control displays the Web page that the userselects within the search results table.
package com.ibm.developerworks.google.views;
import org.eclipse.swt.SWT;import org.eclipse.swt.browser.Browser;import org.eclipse.swt.layout.GridData;import org.eclipse.swt.layout.GridLayout;import org.eclipse.swt.widgets.Composite;import org.eclipse.ui.part.ViewPart;
public class BrowserView extends ViewPart{
public static final String ID = "com.ibm.developerworks.google.views.BrowserView";
public static Browser browser;
public void createPartControl(Composite parent){
GridLayout gridLayout = new GridLayout();gridLayout.numColumns = 1;gridLayout.marginHeight = 5;
ibm.com/developerWorks Presented by developerWorks, your source for great tutorials
Page 12 of 30 Eclipse's Rich Client Platform, Part 2: Extending the generic workbench

gridLayout.marginWidth = 5;parent.setLayout(gridLayout);
browser = new Browser(parent, SWT.NONE);
browser.setLayoutData(new GridData(GridData.GRAB_HORIZONTAL| GridData.GRAB_VERTICAL | GridData.FILL_HORIZONTAL| GridData.FILL_VERTICAL));
browser.setUrl("about:");
}
public void setFocus(){
browser.setFocus();
}}
Integrating the SearchView and BrowserView into aperspectiveWith the two views and supporting classes defined for your Google application, youneed to integrate these components into the existing perspective you created in Part1. Open the GooglePerspective class and modify the createInitialLayoutmethod.
Find the complete source code for the GooglePerspective class below:
package com.ibm.developerworks.google;
import org.eclipse.ui.IPageLayout;import org.eclipse.ui.IPerspectiveFactory;
import com.ibm.developerworks.google.views.BrowserView;import com.ibm.developerworks.google.views.SearchView;
public class GooglePerspective implements IPerspectiveFactory{
public static final String ID = "com.ibm.developerworks.google.GooglePerspective";
public void createInitialLayout(IPageLayout layout){
layout.setEditorAreaVisible(false);layout.addView(SearchView.ID, IPageLayout.BOTTOM, new Float(0.60)
.floatValue(), IPageLayout.ID_EDITOR_AREA);layout.addView(BrowserView.ID, IPageLayout.TOP, new Float(0.40)
.floatValue(), IPageLayout.ID_EDITOR_AREA);}
}
As Figure 3 shows, the last two lines within the createInitialLayout open theSearchView and BrowserView when the perspective is rendered. The addViewmethod contains four parameters:
1. The first parameter contains the unique identifier for the view.2. The second parameter defines the relationship to the workbench. Possible options
Presented by developerWorks, your source for great tutorials ibm.com/developerWorks
Eclipse's Rich Client Platform, Part 2: Extending the generic workbench Page 13 of 30
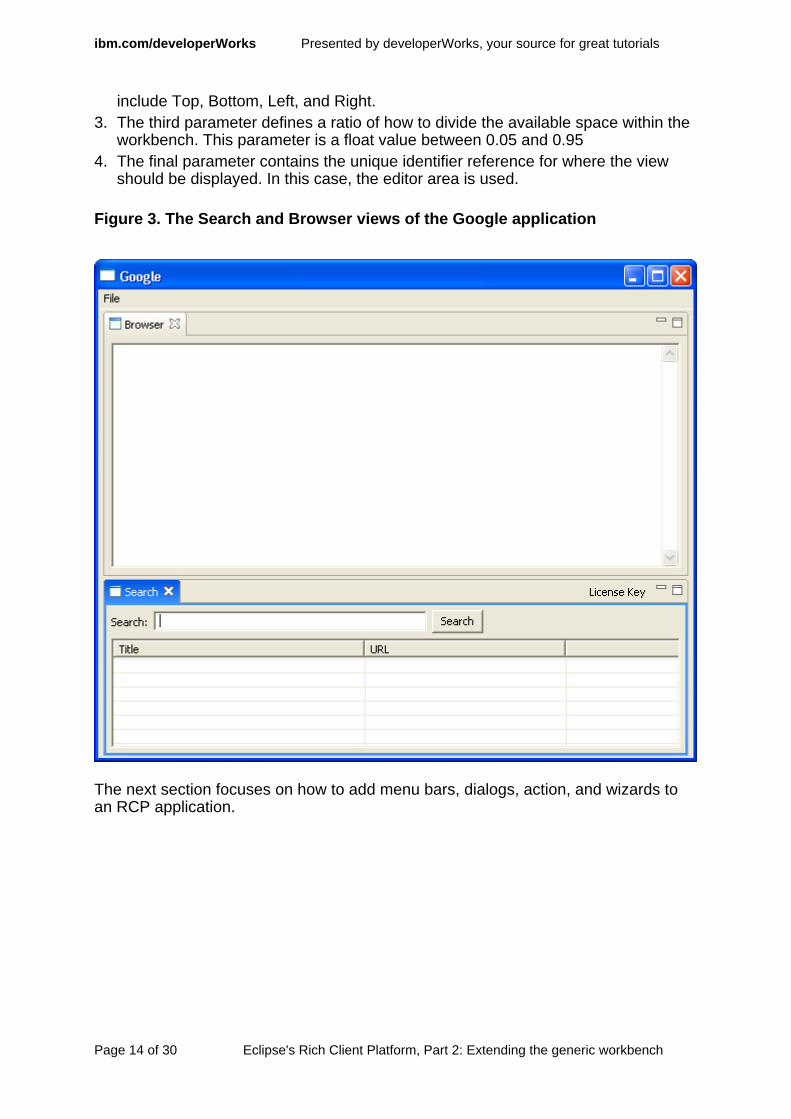
include Top, Bottom, Left, and Right.3. The third parameter defines a ratio of how to divide the available space within the
workbench. This parameter is a float value between 0.05 and 0.954. The final parameter contains the unique identifier reference for where the view
should be displayed. In this case, the editor area is used.
Figure 3. The Search and Browser views of the Google application
The next section focuses on how to add menu bars, dialogs, action, and wizards toan RCP application.
ibm.com/developerWorks Presented by developerWorks, your source for great tutorials
Page 14 of 30 Eclipse's Rich Client Platform, Part 2: Extending the generic workbench
Section 3. Integrating menu bars and dialog boxes
Adding menu bars to a perspectiveSometimes you'll want to add actions to an RCP application by creating a menu barwithin the main window. To add new items to the menu bar, you need to override thefillActionBars method within the WorkbenchAdvisor.
...public void fillActionBars(IWorkbenchWindow window,
IActionBarConfigurer configurer, int flags){
IMenuManager menuBar = configurer.getMenuManager();
MenuManager fileMenu = new MenuManager("File",IWorkbenchActionConstants.M_FILE);
fileMenu.add(new GroupMarker(IWorkbenchActionConstants.FILE_START));fileMenu.add(new GroupMarker(IWorkbenchActionConstants.MB_ADDITIONS));fileMenu.add(ActionFactory.QUIT.create(window));fileMenu.add(new GroupMarker(IWorkbenchActionConstants.FILE_END));
menuBar.add(fileMenu);}
...
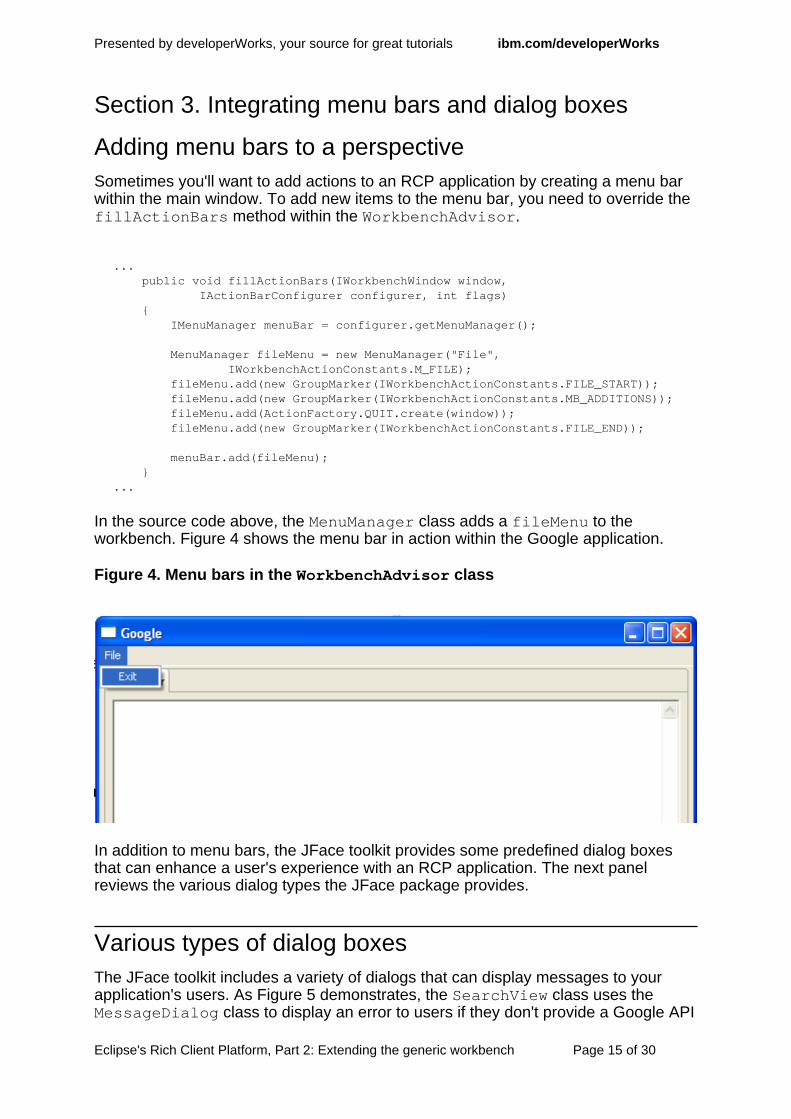
In the source code above, the MenuManager class adds a fileMenu to theworkbench. Figure 4 shows the menu bar in action within the Google application.
Figure 4. Menu bars in the WorkbenchAdvisor class
In addition to menu bars, the JFace toolkit provides some predefined dialog boxesthat can enhance a user's experience with an RCP application. The next panelreviews the various dialog types the JFace package provides.
Various types of dialog boxesThe JFace toolkit includes a variety of dialogs that can display messages to yourapplication's users. As Figure 5 demonstrates, the SearchView class uses theMessageDialog class to display an error to users if they don't provide a Google API
Presented by developerWorks, your source for great tutorials ibm.com/developerWorks
Eclipse's Rich Client Platform, Part 2: Extending the generic workbench Page 15 of 30
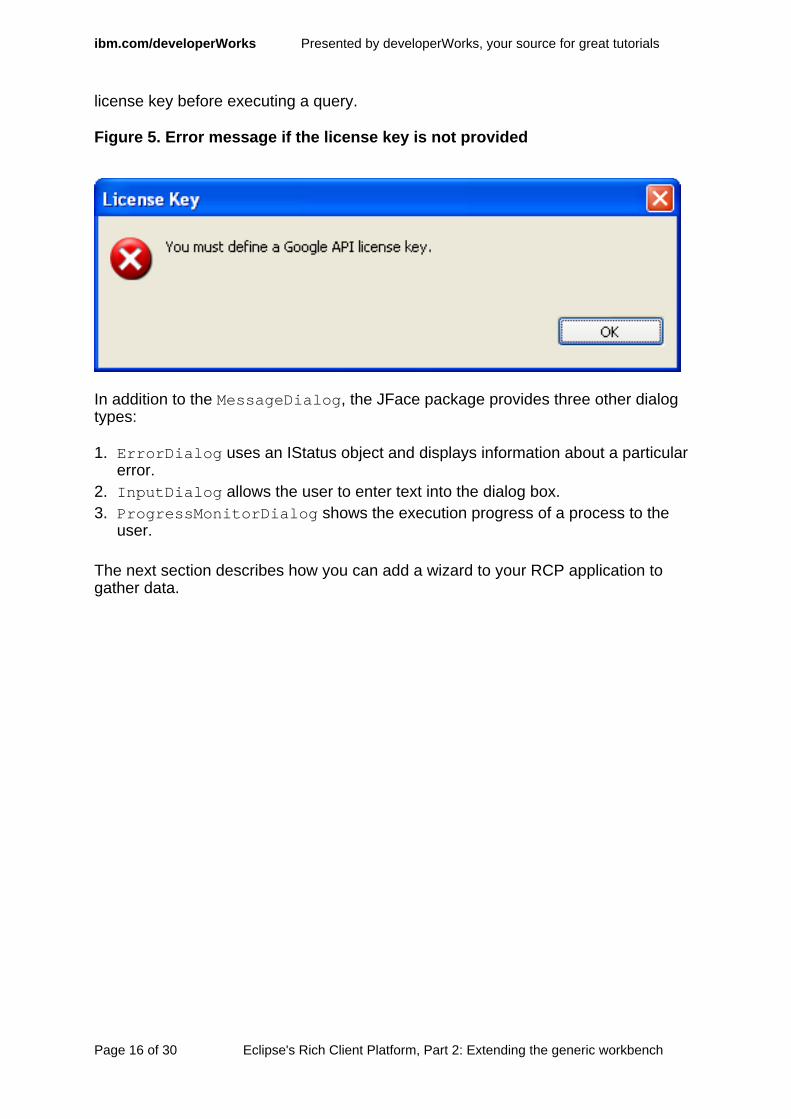
license key before executing a query.
Figure 5. Error message if the license key is not provided
In addition to the MessageDialog, the JFace package provides three other dialogtypes:
1. ErrorDialog uses an IStatus object and displays information about a particularerror.
2. InputDialog allows the user to enter text into the dialog box.3. ProgressMonitorDialog shows the execution progress of a process to the
user.
The next section describes how you can add a wizard to your RCP application togather data.
ibm.com/developerWorks Presented by developerWorks, your source for great tutorials
Page 16 of 30 Eclipse's Rich Client Platform, Part 2: Extending the generic workbench

Section 4. Defining a wizard
Overview of wizardsThe JFace toolkit includes a powerful set of user-interface components that you caneasily integrate into an RCP application. An interesting component of this toolkit isthe support for wizards. A JFace wizard, coupled with other user-interfacecomponents within the Standard Widget Toolkit (SWT), provides a flexiblemechanism to systematically gather user input and perform input validation.
Before reviewing the code and implementation details of how to create a wizard,review the purpose for a wizard within your Google application. To query the GoogleAPI, you must sign up for an account. Once your account has been activated, you'llbe provided a license key. Google currently allows each account the ability toexecute 1000 queries per day. Since you need to supply a license key as aparameter within the GoogleSearch object, you need a mechanism to gather thelicense key from the user.
As Figure 6 demonstrates, the application contains a JFace wizard consisting of onepage that requests the license key.
Figure 6. The License Key wizard within the Google application
For more information on how to create an account to access the Google API, pleaserefer to Resources on page29 .
Creating a LicenseKeyWizard classTo create a basic wizard, create a class that extendsorg.eclipse.jface.wizard.Wizard. In the Google application, a wizard will be
Presented by developerWorks, your source for great tutorials ibm.com/developerWorks
Eclipse's Rich Client Platform, Part 2: Extending the generic workbench Page 17 of 30

used to gather the user's Google API license key. To create theLicenseKeyWizard class within the Google project, complete the following steps:
1. Select File > New > Class from the menu bar to display the New Java Classwizard.
2. Type com.ibm.developerworks.google.wizards into the Package field.3. Type LicenseKeyWizard into the Name field.4. Click on the Browse button to display the Superclass Selection dialog box.5. Type org.eclipse.jface.wizard.Wizard into the Choose a Type field and click OK.6. Click the Finish button to create the new class.
Implementing the LicenseKeyWizard classAfter creating the LicenseKeyWizard class, you need to override the addPagesand performFinish methods. The addPages method adds pages to a wizardbefore it displays to the end user. The performFinish method executes when theuser presses the Finish button within the wizard. The LicenseKeyWizard gathersthe license key data and populates it to a static String variable in the class.
Find the complete source code for the LicenseKeyWizard class below:
package com.ibm.developerworks.google.wizards;
import org.eclipse.jface.wizard.Wizard;
public class LicenseKeyWizard extends Wizard{
private static String licenseKey;private LicenseKeyWizardPage page;
public LicenseKeyWizard(){
super();this.setWindowTitle("License Key");
}
public void addPages(){
page = new LicenseKeyWizardPage("licenseKey");addPage(page);
}public boolean performFinish(){
if(page.getLicenseKeyText().getText().equalsIgnoreCase("")){
page.setErrorMessage("You must provide a license key.");page.setPageComplete(false);return false;
}else{
licenseKey = page.getLicenseKeyText().getText();return true;
ibm.com/developerWorks Presented by developerWorks, your source for great tutorials
Page 18 of 30 Eclipse's Rich Client Platform, Part 2: Extending the generic workbench
}
}
public static String getLicenseKey(){
return licenseKey;}
public static void setLicenseKey(String licenseKey){
LicenseKeyWizard.licenseKey = licenseKey;}
}
Creating a LicenseKeyWizardPage classIn addition to the wizard class, each wizard must have at least one page that extendsorg.eclipse.jface.wizard.WizardPage. To create theLicenseKeyWizardPage class within the Google project, complete the followingsteps:
1. Select File > New > Class from the menu bar to display the New Java Classwizard.
2. Type com.ibm.developerworks.google.wizards into the Package field.3. Type LicenseKeyWizardPage into the Name field.4. Click on the Browse button to display the Superclass Selection dialog box.5. Type org.eclipse.jface.wizard.WizardPage into the Choose a Type field and
click OK.6. Click the Finish button to create the new class.
Implementing the LicenseKeyWizardPage classWithout a class that implements a WizardPage, the LicenseKeyWizard wouldn'thave any behavior. You can think of a wizard as a stack of cards, each with its ownlayout and design. Each WizardPage is responsible for the layout and behavior of asingle page or card within a wizard. To create a WizardPage, you need to subclassthe WizardPage base implementation and implement the createControl methodto create the specific user-interface controls.
Find the complete source code for the LicenseKeyWizardPage class below:
package com.ibm.developerworks.google.wizards;
import org.eclipse.jface.wizard.WizardPage;import org.eclipse.swt.SWT;import org.eclipse.swt.layout.GridData;import org.eclipse.swt.layout.GridLayout;import org.eclipse.swt.widgets.Composite;import org.eclipse.swt.widgets.Label;import org.eclipse.swt.widgets.Text;
Presented by developerWorks, your source for great tutorials ibm.com/developerWorks
Eclipse's Rich Client Platform, Part 2: Extending the generic workbench Page 19 of 30

public class LicenseKeyWizardPage extends WizardPage{
private Text licenseKeyText;
protected LicenseKeyWizardPage(String pageName){
super(pageName);setTitle("License Key");setDescription("Define your Google API License Key");
}
public void createControl(Composite parent){
GridLayout pageLayout = new GridLayout();pageLayout.numColumns = 2;parent.setLayout(pageLayout);parent.setLayoutData(new GridData(GridData.FILL_HORIZONTAL));
Label label = new Label(parent, SWT.NONE);label.setText("License Key:");
licenseKeyText = new Text(parent, SWT.BORDER);licenseKeyText.setLayoutData(new GridData(GridData.FILL_HORIZONTAL));
setControl(parent);}
public Text getLicenseKeyText(){
return licenseKeyText;}
public void setLicenseKeyText(Text licenseKeyText){
this.licenseKeyText = licenseKeyText;}
}
ibm.com/developerWorks Presented by developerWorks, your source for great tutorials
Page 20 of 30 Eclipse's Rich Client Platform, Part 2: Extending the generic workbench
Section 5. Defining an action
Overview of actionsActions within the Eclipse workbench are commands that the user of an applicationtriggers. In general, actions fall into three distinct categories: buttons, items within thetool bar, or items within the menu bar. For example, when you select File > New >Class from the menu bar, you're executing an action that opens the New Java Classwizard. When you execute an action within the workbench, the action's run methodperforms its particular function within the application. In addition to an action's class,an action can have other properties that control how the action is rendered within theworkbench. These properties include a text label, mouse over tool tip, and an icon.This tutorial's example Google application has two actions -- one that's used to exitthe application and one that allows users to provide their Google API license key byclicking a button located on the Search view.
This section explores how to define actions with an extension point within the plug-inmanifest. Specifically, it covers how to add an action to the pull-down menu of theSearch view.
Defining the org.eclipse.ui.viewActionsextension pointTo add a new action to a view, you must define a new extension within the project'splug-in manifest. View actions are defined using theorg.eclipse.ui.viewActions extension point. Each view has a pull-down menuthat activates when you click on the top right triangle button. Using the plugin.xml tabof the plug-in manifest editor within the Google project, add the following content tobegin the process of creating a view action:
...<extension point="org.eclipse.ui.viewActions">
<viewContributionid="com.ibm.developerworks.google.views.contribution"targetID="com.ibm.developerworks.google.views.SearchView">
<actionid="com.ibm.developerworks.google.actions.LicenseKeyAction"label="License Key"toolbarPath="additions"style="push"state="false"tooltip="Google License Key"
class="com.ibm.developerworks.google.actions.LicenseKeyAction" />
</viewContribution>
</extension>...
The LicenseKey view action allows users to set the license key that will be used toquery Google's API. The next few panels describe the
Presented by developerWorks, your source for great tutorials ibm.com/developerWorks
Eclipse's Rich Client Platform, Part 2: Extending the generic workbench Page 21 of 30

org.eclipse.ui.viewActions extension point and the steps necessary tocreate an Action class.
Stepping through the org.eclipse.ui.viewActionsextension pointBeginning with the <extension> element, a simpleorg.eclipse.ui.viewActions extension contains a <viewContribution>and <action> element.
A <viewContribution> defines a group of view actions and menus. This elementhas the following attributes:
1. id -- This attribute defines a unique identifier for the view contribution.2. targetID -- This attribute defines a registered view that is the target of the
contribution.
The <action> element has the following attributes:
° id -- This attribute defines a unique identifier for the action.° label -- This attribute defines a name for this action and, the workbench uses it
to represent this action.° menubarPath -- This optional attribute contains a slash-delimited path ('/') used
to specify the location of this action in the pull-down menu.° toolbarPath -- This optional attribute contains a named group within the toolbar
of the target view. If this attribute is omitted, the action will not appear in the view'stoolbar.
° icon -- This optional attribute contains the relative path of an icon used to visuallyrepresent the action within the view.
° disableIcon -- This optional attribute contains the relative path of an icon usedto visually represent the action when it's disabled.
° hoverIcon -- This optional attribute contains the relative path of an icon used tovisually represent the action when the mouse pointer is hovering over the action.
° tooltip -- This optional attribute defines the text for the action's tool tip.° helpContextId -- This optional attribute defines a unique identifier indicating
the action's help context.° style -- This optional attribute defines the user-interface style type for the action.
Options include push, radio, or toggle.° state -- When the style attribute is toggled, this optional attribute defines the
initial state of the action.° class -- This attribute contains the fully qualified name of the class that
implements the org.eclipse.ui.IViewActionDelegate interface.
Creating the LicenseKeyAction classTo create the LicenseKeyAction class for the SearchView class, complete the
ibm.com/developerWorks Presented by developerWorks, your source for great tutorials
Page 22 of 30 Eclipse's Rich Client Platform, Part 2: Extending the generic workbench

following steps within the Google project:
1. Select File > New > Class from the menu bar to display the New Java Classwizard.
2. Type com.ibm.developerworks.google.actions into the Package field.3. Type LicenseKeyAction into the Name field.4. Click on the Add button to display the Implemented Interfaces Selection dialog
box.5. Type org.eclipse.ui.IViewActionDelegate into the Choose an interface field and
click OK.6. Click the Finish button to create the new class.
Implementing the LicenseKeyAction classWhen an action is invoked, the action's run method executes. In the Googleapplication, the LicenseKeyAction class launches a wizard to collect the user'sGoogle API license key. In this case, this action is located in the upper-right corner ofthe search view.
Find the source code for the LicenseKeyAction class below:
package com.ibm.developerworks.google.actions;
import org.eclipse.jface.action.IAction;import org.eclipse.jface.viewers.ISelection;import org.eclipse.jface.wizard.WizardDialog;import org.eclipse.ui.IViewActionDelegate;import org.eclipse.ui.IViewPart;
import com.ibm.developerworks.google.views.SearchView;import com.ibm.developerworks.google.wizards.LicenseKeyWizard;
public class LicenseKeyAction implements IViewActionDelegate{
private SearchView searchView;
public void init(IViewPart view){
this.searchView = (SearchView) view;}
public void run(IAction action){
LicenseKeyWizard wizard = new LicenseKeyWizard();WizardDialog dialog = new WizardDialog(searchView.getViewSite()
.getShell(), wizard);dialog.open();
}
public void selectionChanged(IAction action, ISelection selection){
}
Presented by developerWorks, your source for great tutorials ibm.com/developerWorks
Eclipse's Rich Client Platform, Part 2: Extending the generic workbench Page 23 of 30
}
Before you run the Google application, verify that the project builds successfully andthat you've received a license key to use Google's API.
ibm.com/developerWorks Presented by developerWorks, your source for great tutorials
Page 24 of 30 Eclipse's Rich Client Platform, Part 2: Extending the generic workbench

Section 6. Launching the application
Exporting the applicationTo create a stand-alone version of the Google application, complete the followingsteps within the Plug-in Development Environment:
1. Select File > Export from the menu bar to display the Export dialog.Figure 7. The Export dialog
2. Select Deployable plug-ins and fragments from the list of export options.
Presented by developerWorks, your source for great tutorials ibm.com/developerWorks
Eclipse's Rich Client Platform, Part 2: Extending the generic workbench Page 25 of 30

3. Click Next to display the Export Plug-ins and Fragments page of the Exportwizard.Figure 8. Export Plug-ins and Fragments page of the Export wizard
4. Verify that the com.ibm.developerworks.google plug-in is checked.
ibm.com/developerWorks Presented by developerWorks, your source for great tutorials
Page 26 of 30 Eclipse's Rich Client Platform, Part 2: Extending the generic workbench
5. Select a directory structure under the Deploy as field.6. Click the Browse button and choose an export location.7. Click Finish to build the project.
Preparing the directory structureTo complete the stand-alone application, you need to copy some files from theEclipse IDE directory into Google's export directory. Unfortunately, Eclipse 3.0doesn't provide a tool to copy all the necessary dependent plug-ins and JAR files intothe export directory.
Complete the following steps to prepare the directory structure:
1. Copy startup.jar from the root directory of the Eclipse 3.0 IDE to the root of theGoogle application's export directory.
2. Copy the following directories from the Eclipse 3.0 IDE plugin directory to theplugin directory of the Google application's export directory:
org.eclipse.core.expressions_3.0.0org.eclipse.core.runtime_3.0.0org.eclipse.help_3.0.0org.eclipse.jface_3.0.0org.eclipse.osgi.services_3.0.0org.eclipse.osgi.util_3.0.0org.eclipse.osgi_3.0.0org.eclipse.swt.win32_3.0.0 (Windows only)org.eclipse.swt.gtk_3.0.0 (Linux only)org.eclipse.swt_3.0.0org.eclipse.ui.workbench_3.0.0org.eclipse.ui_3.0.0org.eclipse.update.configurator_3.0.0
Testing and executing the applicationAfter you've completed the task of preparing the directory, your export directoryshould have the following structure:
- google.bat (Windows only)- google.sh (Linux only)- startup.jar+ ----- plugins
+ ----- org.eclipse.core.expressions_3.0+ ----- org.eclipse.core.runtime_3.0.0+ ----- org.eclipse.help_3.0.0+ ----- org.eclipse.jface_3.0.0+ ----- org.eclipse.osgi.services_3.0.0+ ----- org.eclipse.osgi.util_3.0.0+ ----- org.eclipse.osgi_3.0.0+ ----- org.eclipse.swt.win32_3.0.0 (Windows only)+ ----- org.eclipse.swt.gtk_3.0.0 (Linux only)+ ----- org.eclipse.swt_3.0.0
Presented by developerWorks, your source for great tutorials ibm.com/developerWorks
Eclipse's Rich Client Platform, Part 2: Extending the generic workbench Page 27 of 30
+ ----- org.eclipse.ui.workbench_3.0.0+ ----- org.eclipse.ui_3.0.0+ ----- org.eclipse.update.configurator_3.0.0
To test the application, you need to create a launch script. Using your favorite texteditor, create a file named google.bat (Windows) or google.sh (Linux) with thefollowing content:
java -cp startup.jar org.eclipse.core.launcher.Main-application com.ibm.developerworks.google.GoogleApplication
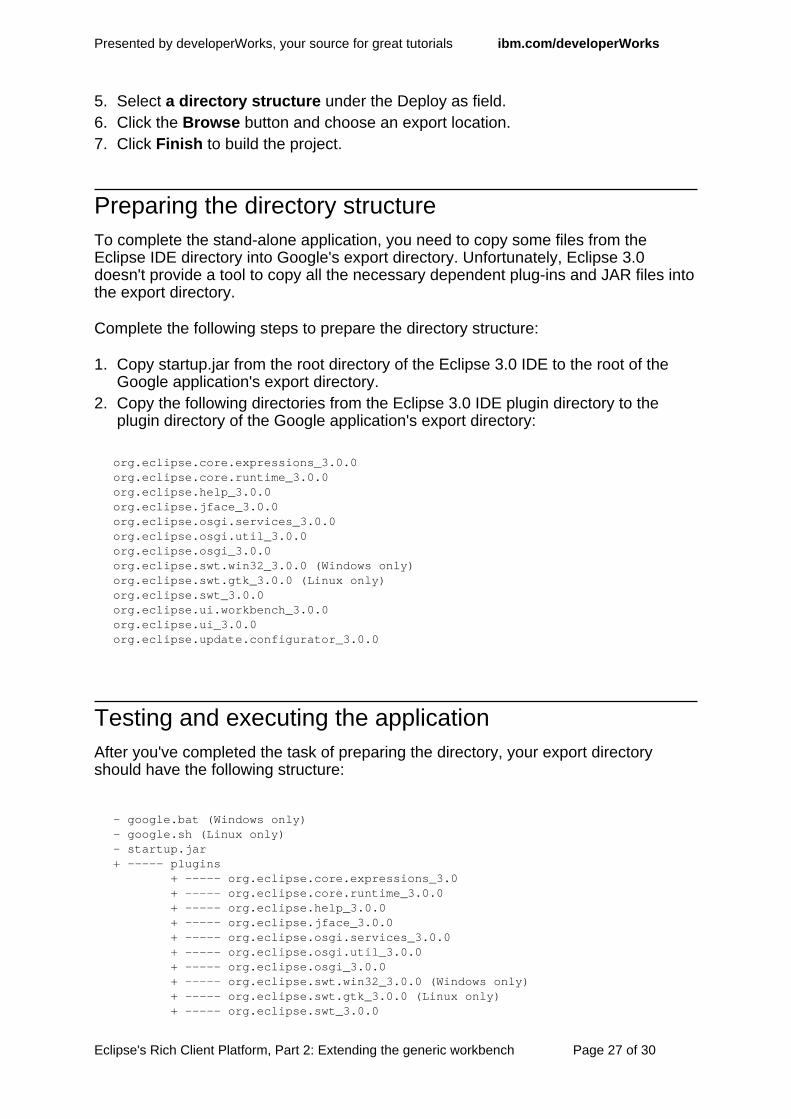
With all the classes created, the plug-in manifest defined, and all of the necessarydependencies in place, you can launch the Google application and perform a search.Figure 9 illustrates how you can use the Google API to search for the term "eclipse"and how the Eclipse project Web site is displayed.
Figure 9. Google RCP application with search results
ibm.com/developerWorks Presented by developerWorks, your source for great tutorials
Page 28 of 30 Eclipse's Rich Client Platform, Part 2: Extending the generic workbench
Section 7. Summary and resources
SummaryAs the Eclipse development team begins to establish the RCP within thedevelopment landscape, it's going to be exciting to see how the platform's strategyand technology evolves. Although the RCP concept is very new, the 3.0 release ofEclipse delivers developers a framework they can start using today. The exampleGoogle application used in this tutorial demonstrates the generic workbench andexplores how you can integrate various user-interface elements to create an elegant,cross-platform solution.
This series presented the following topics:
° An introduction to the core components that can make up an RCP applicationincluding Perspectives, Views, Actions, and Wizards.
° An exploration of how to develop an RCP through the use of extensions.° A sample RCP application that you can use to query and display search results
from Google.
Resources° Download (part2-src.zip) the companion source code package for the sample
RCP application demonstrated in this tutorial.° Download Eclipse 3.0 (http://www.eclipse.org/downloads/index.php) from the
Eclipse Foundation.° Download Java 2 SDK, Standard Edition 1.4.2
(http://java.sun.com/j2se/1.4.2/download.html) from Sun Microsystems.° Download Ant 1.6.1 (http://ant.apache.org/) or higher from the Apache Software
Foundation.° Find more resources for how to use the Standard Widget Toolkit and JFace on the
Eclipse Web site, including:° Understanding Layouts in SWT (Eclipse Website)° Building and delivering a table editor with SWT/JFace (Eclipse Website)
° Find more resources for how to use the Standard Widget Toolkit and JFace ondeveloperWorks, including:° Integrate ActiveX controls into SWT applications (developerWorks, June 2003)° Developing JFace wizards (developerWorks, May 2003)
° Find more resources for how to use Eclipse on developerWorks, including:° Developing Eclipse plug-ins (developerWorks, December 2002)° XML development with the Eclipse Platform (developerWorks, April 2003)
Colophon
This tutorial was written entirely in XML, using the developerWorks Toot-O-Matic tutorialgenerator. The open source Toot-O-Matic tool is an XSLT stylesheet and several XSLT
Presented by developerWorks, your source for great tutorials ibm.com/developerWorks
Eclipse's Rich Client Platform, Part 2: Extending the generic workbench Page 29 of 30

extension functions that convert an XML file into a number of HTML pages, a zip file, JPEGheading graphics, and two PDF files. Our ability to generate multiple text and binary formatsfrom a single source file illustrates the power and flexibility of XML. (It also saves ourproduction team a great deal of time and effort.)
For more information about the Toot-O-Matic, visitwww-106.ibm.com/developerworks/xml/library/x-toot/ .
ibm.com/developerWorks Presented by developerWorks, your source for great tutorials
Page 30 of 30 Eclipse's Rich Client Platform, Part 2: Extending the generic workbench