edirectory and os x v2 - novell · you to be able to login to the os x and authenticate to the ldap...
TRANSCRIPT

Mac OS X and Novell eDirectory Integration Prepared by: Randy Saeks

Table of Contents
Introduction ...........................................................................................................................3
Background............................................................................................................................4
Directory Setup ......................................................................................................................5
Desktop Setup...................................................................................................................... 12
Login Scripts ........................................................................................................................ 15
Managing Preferences........................................................................................................... 17
Desktop Management ........................................................................................................... 22
Putting it all together ............................................................................................................ 25
Additional Information .......................................................................................................... 27

R. Saeks July ’06 - 3 -
Introduction
The purpose of this document is to provide guidance to others trying to further integrate Apple OS X based
computers into a 3rd party directory service. This document focuses on the Novell eDirectory environment, however
the same concepts can be applied to any directory service that utilizes LDAP. This guide is aimed to build upon, and
supplement, other documents on this topic.
There are 3 main areas this document focuses on. The first is LDAP integration into eDirectory, which is covered in
the Directory Setup & Desktop Setup section. The next supplements this integration and further utilizes it to provide
management. This is outlined in the chapters Login Scripts and Managing Preferences. The last is a management
overview of the systems that can be used in Mac OS 10.4 to further streamline the support process. This is covered
in the Desktop Management section. The thought behind this piece is most organizations integrating Mac OS X
would like to have desktop management, and it might be a part of OS X that is unfamiliar. To tie these three
together, a scenario is posed, and utilizing all items above, a solution explained to show how to utilize all topics.
This is covered in the section Putting it all together.

R. Saeks July ’06 - 4 -
Background
Version three of the Lightweight Directory Access Protocol (LDAP) is incorporated into Mac OS 10.4 and 10.3. This
allows OS X machines to take better advantage of open standards. One of these advantages is the ability to utilize
LDAP for authentication, and it just so happens LDAP services are built into Netware. Using the LDAP protocol
provided by Novell and read by the OS X desktop, it is possible to have Macintosh workstation authenticates to
eDirectory to provide network services to the end user.
Mac OS 10.4 supplied the same basic levels of support offered in 10.3, however many features were enhanced
which proved it to be a much more robust operating system with greater manageability. Some of these features
include:
Spotlight Search (Client)
Software update services (Server)
Improved system Imaging (Server)
Mobile Home Directories (Client / Server)
Access Control Lists (ACLs) (Client / Server)
Enhanced MCX support though WorkGroup Manager (Server)
These features allow for better user experiences as well as providing enhanced management. These balances of
user enhancements, coupled with manageability, make 10.4 a good desktop OS in terms of usability and
manageability.

R. Saeks July ’06 - 5 -
Directory Setup
There are three ways in which it is possible to allow users to login with network-based accounts to OS X machines.
One of those is to use existing unused attributes on the user object in the Directory Service and populate them as
necessary. Using this method can pose problems later on if these attributes are needed for new functionality due to
a new feature applied to the directory. Another method is to employ static and dynamic LDAP mappings on the
client. This method can be used for some mappings, however any changes require modifying the Directory Access
configuration on the client to reflect the changes. The final way is to extend the schema. This is the preferred way
as it adds additional attributes to the schema, which are utilized only for the reason they were added. In addition,
this allows for a more manageable environment.
Using this method will ensure the potential issue of duplicate schema extensions does not occur. Also, it is much
easier to change a setting on a user account in a directory service rather than having to change static mappings on
each client. The strongest benefit of extending the network schema is to allow for a more managed environment.
Prior to the setup on the client, there are necessary object-classes that must be added to eDirectory. These
attributes can be broken down into several main areas. The object classes covered here fall into the following
categories:
User Attributes✻
Group Attributes♦
Mount Attributes✻
Computer Attributes♦
Machine List Attributes♦
Configuration Attributes♦
Additional classes and extensions may be utilized, however are not covered in this guide.
The needed attributes for a user to authenticate are Mount and User Attributes. The Mount attributes tell the
operating system where, and how, to mount the network-based location that will serve as the home for the user.
The User attributes are what OS X uses to authenticate, and identify, the user. Attributes in this group include the
Users Home Directory, password, name, unique ID, Group ID, and other settings relating to an individual.
✻ These object-classes are required for user authentication and login ♦ These object-classes are used for Management settings and policies.

R. Saeks July ’06 - 6 -
Below, a user record in ConsoleOne is shown and an explanation as to how items in the UNIX profile portion are
utilized and translate to the OS X machine for the user login and identification is given. Hopefully this will give a bit
more of a functional example as to how LDAP mappings work between OS X and eDirectory.
The User ID field functions
as the uniqueID of the user.
For our setup, we used the
employee ID number. In
the case of students, we
use the student ID number.
For auditing, try not to have
any duplicates. The next
field, Primary Group, which
is indicated in blue, is the
number associated with the
group object to which the
user belongs. Setting the
primary group to 80 sets
users as an admin on the
machine. You can manage
group preferences by
associating preferences to the group that has the same ID as the Primary Group here. This topic is covered more in
Managing Preferences. The last area of note is the section in green. This is the Unix location of the home directory
for the user. The beginning part of the path, /Network/Servers is the local file system path of the mount point. This
is read from the apple-mountDirectory attribute in eDirectory. More information on this is located after the
Directory Access mappings on the next page.
The next few pages detail the Directory Access attribute mappings. This is the area that will be utilized to map the
Apple OS X values to the corresponding attributes that reside in eDirectory. The attribute mappings listed are the
attributes currently employed in my setup. In the LDF file used to extend the schema, items deemed as
unnecessary may be removed. Also, you don’t need to apply all the attributes at once. You can add more at a later
time.
The guide I used and schema extensions can be found here: http://macenterprise.org/content/view/80/77
The attribute mappings correspond to the mappings created in Directory Access based upon the above mentioned
schema extensions. Each heading represents a Record Type. The local attribute is what is OS X calls the attribute,

R. Saeks July ’06 - 7 -
and the LDAP mapping is the eDirectory name of the attribute. Comments are also provided to help make
identifying the need of these attributes in your environment.
In addition, the filters to enter in directory access are included as well. Those are listed below. The filters allow for
the machine to rule out retrieving all attributes in the directory based on the objectClass attribute. In limiting the
attributes returned, the LDAP lookup by the DirectoryService process on the machine finishes faster. This also
reduces the load on the nldap nlm on the Novell server.
Record Type Attribute Mapping
Users apple-user
inetOrgPerson
Groups apple-group
Mounts apple-mount
Computers apple-computer
Computer Lists apple-computer-list
Config apple-configuration
Completing the mappings below in Directory Access as specified in the above mentioned document should allow for
you to be able to login to the OS X and authenticate to the LDAP Directory Services hosted on the Novell servers.

R. Saeks July ’06 - 8 -
User Attributes
Directory Access Attribute eDirectory LDAP Attribute Description
FirstName givenName The first name of the user. HomeDirectory apple-user-homeurl The URL to the homeDirectory of the user.
LastName sn The last name of the user
NFSHomeDirectory homeDirectory The path on the local file system to where the users home directory is located.
PrimaryGroupID gidNumber The numerical value of the primary group that the user belongs to.
RealName cn The users Novell login ID
UniqueID uidNumber Uniquie ID number of the user.
MCXFlags apple-mcxflags The attribute that alerts the OS there are managed settings for the user account.
MCXSettings apple-mcxsettings The XML formatted string of policies on the user account.
UserShell apple-user-class Maps the UNIX shell the user will run to an unused LDAP attribute of the user
object-class.
Group Attributes
Directory Access Attribute eDirectory LDAP Attribute Description
MCXFlags apple-mcxsettings The attribute that alerts the OS there are managed settings for the group account.
MCXSettings apple-mcxsettings The XML formatted string of policies on the group account.
PrimaryGroupID gidNumber The numerical value that is assigned to this group.
GroupMembers member Members of the group.
GroupMembership member Members of the group.
Member member Members of the group.
Mount Attributes
Directory Access Attribute eDirectory LDAP Attribute Description
VFSLinkDir apple-mountDirectory Location on the file system where the mount will be placed.
VFSOpts apple-mountOption VFS mount options
VFSType apple-mountType Type of mount
R. Saeks July ’06 - 9 -
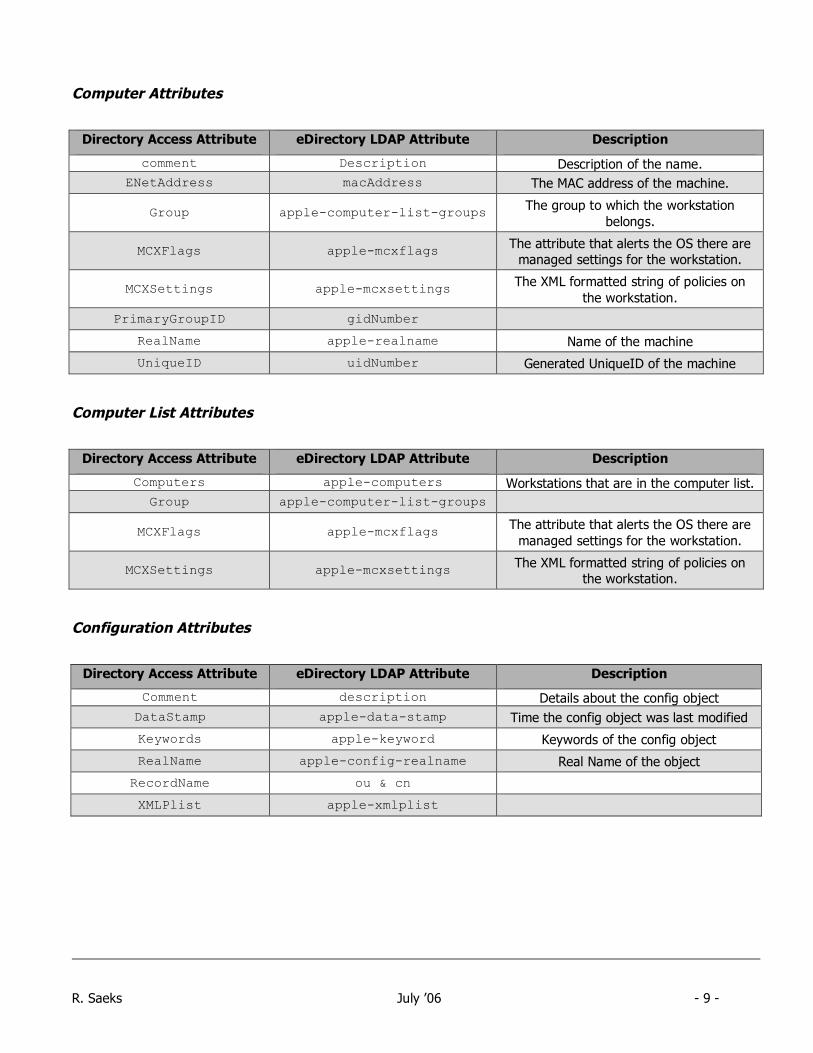
Computer Attributes
Directory Access Attribute eDirectory LDAP Attribute Description
comment Description Description of the name. ENetAddress macAddress The MAC address of the machine.
Group apple-computer-list-groups The group to which the workstation belongs.
MCXFlags apple-mcxflags The attribute that alerts the OS there are managed settings for the workstation.
MCXSettings apple-mcxsettings The XML formatted string of policies on the workstation.
PrimaryGroupID gidNumber
RealName apple-realname Name of the machine
UniqueID uidNumber Generated UniqueID of the machine
Computer List Attributes
Directory Access Attribute eDirectory LDAP Attribute Description
Computers apple-computers Workstations that are in the computer list. Group apple-computer-list-groups
MCXFlags apple-mcxflags The attribute that alerts the OS there are managed settings for the workstation.
MCXSettings apple-mcxsettings The XML formatted string of policies on the workstation.
Configuration Attributes
Directory Access Attribute eDirectory LDAP Attribute Description
Comment description Details about the config object DataStamp apple-data-stamp Time the config object was last modified
Keywords apple-keyword Keywords of the config object
RealName apple-config-realname Real Name of the object
RecordName ou & cn
XMLPlist apple-xmlplist

R. Saeks July ’06 - 10 -
Prior to jumping into the desktop setup portion, I wanted to shed some light on the Mount Objects and how they
work. A mount object needs to be created in the same ou as which the server resides that users will be mounting
for their home directories. The mount object tells the operating system where and how to mount the volume for the
user. If a file-system local home is used for users, a mount object is not required. An example of using a local
home directory is discussed later on in this document.
Below, an LDF export on an apple-mount object is shown for clarification. In addition, a screen shot from
ConsoleOne has been added to show how the fields relate to one another. Note with the information below, apple-
mountOptions is called apple-mount-options, apple-mountType is apple-mount-type, and apple-
mountDirectory is apple-mount-file. This was done since my schema extensions were based on 10.2, and I did
not update them to the 10.3 mappings. This was done so I did not have to re-populate the attributes. Line
numbers have been added for reference:
1 # 10.2.1.21:/gbncs2.data, FS, GBN, GBHS 2 dn: cn=10.2.1.21:/gbncs2.data,ou=FS,ou=GBN,o=GBHS 3 apple-mount-options: net 4 apple-mount-options: url==afp://;AUTH=NO%20USER%[email protected]:/gbncs2.data 5 apple-mount-vfstype: url 6 apple-mount-file: /Network/Servers 7 objectClass: aFPServer 8 objectClass: server 9 objectClass: top 10 objectClass: apple-mount 11 cn: 10.2.1.21:/gbncs2.data 12 ACL: 2#entry#[Public]#networkAddress 13 ACL: 16#subtree#cn=10.2.1.21:/gbncs2.data,ou=FS,ou=GBN,o=GBHS#[Entry Rights] 14 ACL: 1#subtree#ou=FS,ou=GBN,o=GBHS#[Entry Rights] 15 ACL: 3#subtree#ou=FS,ou=GBN,o=GBHS#[All Attributes Rights]

R. Saeks July ’06 - 11 -
The items to note from the LDF export on the previous page are the apple-mount-options, apple-mount-file,
and apple-mount-vfstype attributes. In addition the cn of the attribute is good to note for creating the AFP Server
object later on. Lines three and four detail the mount options. The first value in the attribute, net, indicates that
this is a network based volume, and not NFS. The next line states the AFP volume will be mounted with no
authentication, then pass along the credentials to the AFP framework to properly authenticate the user. This is
required for any users that have a network based home directory since the volume needs to be mounted before
login in order to properly mount the network home for the user at login.
The next area, line five, states the path to the network home for the user and that the volume path will be provided
by a URL. Finally, the item in line six says where in the local system to mount the volume.
When creating your AFP server object in ConsoleOne, you will want to name it in the format:
SERVERADDRESS:/server.volume

R. Saeks July ’06 - 12 -
Desktop Setup
Once the login process is setup, the next area of focus is Desktop Setup and Management. A managed desktop can
exist for each user. The user that logs in belongs to a group, which is determined via the PrimaryGroupID number
in the UNIX profile of the user. That was indicated in the blue box in the section Directory Setup. Workgroup
Manager is used to manage preferences for the group and these are retrieved from the apple-group object that
resides in eDirectory. The apple-group is nothing more than an ordinary group that has the apple-group extension
added. In doing so, some additional mac-specific attributes can now be added to the group. Furthermore, the LDAP
lookup of the group is filtered by the mapping values in Directory Access. This is accomplished with the apple-group
filter that was entered in the Directory Setup section.
WorkGroup Manger functions with the Managed Client settings. An OS X server is not required to manage groups as
WorkGroup Manager can read and write data from and to the Novell LDAP database. Utilizing the same LDAP
mappings on all the OS X machines tell the Management parts where to store, and where to read settings. This will
be talked about further in the Managing Preferences section.
The file system has some items that can’t be managed from the network, such as file permissions. Some of these
can set using loginhooks. When a user successfully logs into the system, this is a script run with root privileges.
The login and logout hooks are set in com.apple.loginwindow.plist in /var/root/Library/Preferences. The values
in the plist can be set by the following UNIX command:
sudo defaults write /var/root/Library/Preferences/com.apple.loginwindow LoginHook /path/to/script
sudo defaults write /var/root/Library/Preferences/com.apple.loginwindow LogoutHook /path/to/script
You will need to make sure the execute bit is set on these scripts. Since this only runs as the root user, you can
further restrict access to this file by setting the execute bit only for this user and additional file permissions.
All of the items pertaining to user management are placed into a directory /Library/Management. Furthermore, a
directory called profiles was created to hold the studentuser profile. This allowed for all items relating to
management to be in one central location and makes them easy to find.
There is a relatively standard desktop for users that they will see the first time they log in to the machine. The idea
was taken from the setup University of Utah has on their machines with UlabMin. A link to their page is contained in
the Additional Information section at the end of this paper.

R. Saeks July ’06 - 13 -
The setup currently in place is based on offering a more efficient and streamlined system, as well as a setup that is
consistent, to the users. We have 3 types of users in place right now. Those are student, staff, and administrators.
These general groups control what on the machine can be accessed, such as System Preferences and Applications.
On each machine there is a local account called studentuser. This was done as it was found to be more efficient
running the student account locally rather than from their Network-based home directory. This is accomplished by
creating a local account as normal on the machine called studentuser. The account was then setup with the proper
desktop icons, safari settings, and other miscellaneous preferences that don’t need to be set dynamically based on
machine location. It was also tested with students to make sure nothing was overlooked. Once ready, the apple-
user-homeurl attribute was removed from the user record, as well as the homeDirectory path, shown on page 6,
changed to /Users/studentuser.
Once the account was setup as it needed, the studentuser folder was copied to /Library/Management/profiles/. In
doing this, a pristine copy of the profile is retained. The copy was done with the root user account so file
permissions were not an issue. When using this, remember that any changes needing to be made will need to be
made with the studentuser account logged in, making the necessary changes, then copying the profile back into the
profiles directory mentioned above.
Once all the static tasks were done with the user account, dynamic tasks were set with various AppleScripts. The
AppleScripts used at login are structured in such a way that specific actions are performed which change depending
on who is logged in. One builds desktop icons for faculty, and a similar one does the same for students.
The scripts that are utilized for Faculty and Staff generate desktop shortcuts for an applications folder, Network user
folder, Network Drop Box, and the common files on the network for all faculty. Similarly to this, the student script
generates a user folder shortcut and the Network Drop Box to teacher folders. The application folder for students
resides in the profile Desktop folder, and that is re-generated at login for them. This is accomplished based on the
login hook shown page fifteen.
In addition to desktop icons, there is also an AppleScript application that checks for expired Novell passwords. There
was a need for this as a 3rd Party directory service was utilized and a built in method to notify users their password
expired was absent. Using the functionality from the Novell Client on the Windows machines as an example, we
wanted to use the number of days to notify the user rather than the number of grace logins remaining. A custom
display message box was created for them, which included an option to change their password. If the user clicks on
yes to change their password, they are redirected to the password self-service portion of iManager. This was used
since there is no built in way for OS X to change their Novell user password. Furthermore, once the password had

R. Saeks July ’06 - 14 -
zero grace logins remaining we did not want the Yes / No option as the Windows Novell Client has. We wanted it so
that the user was required to change their password. Using a UNIX Bash Shell script, a solution was created.
This script queries the LDAP server for an attribute based on the cn of who is logged into the machine. This is
accomplished by using the UNIX command whoami. Since the value of this command is determined by the mapping
in Directory Access on the user record type with the eDirectory attribute cn, it was easy to tie this to the logged in
user. Some logic was done to compare and adjust the number returned by the LDAP query into days from today
and display options to the user. A link to this AppleScript code is contained in the Additional Information Section at
the end. It is titled “LDAP Expired Password”. Thanks to John Odom and Chris Ayers from
Escambia County School District in Pensacola, FL for revising and sharing their improvements to the code.

R. Saeks July ’06 - 15 -
Login Scripts
The next few pages contain the loginhook and logouthook that runs on the machine. It shows the code and explains
what it does. The best thing to do when setting these up is to code them one command at a time. This will make
troubleshooting easier. Planning a hierarchal setup for scripts makes developing them much easier. The loginhook
should perform actions that all users, regardless of user class, will need applied to them. Doing so lets items, such
as AppleScript applications, apply to only the targeted group, which is more efficient.
The first script that I utilize is below. This is the loginhook that runs after each user authenticates. As before, line
numbers have been added for reference: 1 echo "===== LOGIN: `date` =====" >> /var/log/login.log 2 echo "$1" >> /var/log/login.log
3 if tail -1 /var/log/login.log | grep root 4 then 5 hostname=`hostname -s` 6 network_info=`ifconfig -L en0 | grep broadcast` 7 /usr/sbin/sendmail [email protected] <<EOF 8 From: root_login@$hostname 9 To: [email protected] 10 Subject: [Login] Root login detected 11 A root login was performed on $hostname with the following network information 12 $network_info 13 EOF 14 fi
#build new student profile
15 rm -R /Users/studentuser/Library 16 cp -R /Library/Management/profiles/studentuser/Library/ /Users/studentuser/Library
17 rm -R /Users/studentuser/Desktop 18 cp -R /Library/Management/profiles/studentuser/Desktop/ /Users/studentuser/Desktop
19 rm -R /Users/studentuser/Music 20 cp -R /Library/Management/profiles/studentuser/Music/ /Users/studentuser/Music
21 chmod -R 777 /Users/studentuser/Library 22 chmod -R 777 /Users/studentuser/Desktop 23 chmod -R 777 /Users/studentuser/Music 24 exit 0
Line one writes a line to the login.log file that has the login date and time. The following line will write the user ID
to the log file. Lines three though fourteen take the last person who logged in, and if it was the root user, send an
email alert to a specified email address with the name of the machine, as well as the IP address. This can be
modified for any user that you would like by adding additional if statements. This is used because in general, root
will not be logging in, and if they are, one would want to make sure it is authorized.

R. Saeks July ’06 - 16 -
The final step of the loginhook, is to copy the user profile that resides in /Library/Management/profiles/studentuser
back into /Users/studentuser, refreshing any changes made. This approach was done since it allowed for a
performance increase over running Network-based accounts and gives the users full control of items pertaining to
their session. The files copied at login are approximately 10MB. MCX settings are employed on the student user
group to mount the volume, which contains the network home folder of the user to the desktop for easy access.
There is an AppleScript application that places icons on the desktop of the student user, including a shortcut to the
network home folder.
The other script that is used is a logout hook. That script is below. 1 echo "===== LOGOUT: `date` =====" >> /var/log/login.log 2 exit 0
This script writes the logout time to the login.log file to keep track of user account activity on the machine. Once
done, it returns the machine back to the login window.

R. Saeks July ’06 - 17 -
Managing Preferences
Once the login items are set, the next piece to work with is the managed preferences. They can be broken down
into four areas; user, group, computer, and computer list. Preferences apply in the order below:
These settings are stored in an LDAP data source from the WorkGroup Manager (WGM) application. The machine
being used for WGM will need to have the same LDAP mappings as the clients. Doing so ensures that the settings
are stored in the right place to be retrieved by the client.
It is important to first plan out the user structure. What settings do you want groups to have? It is a good idea to
brainstorm what you want to happen, who you want it to happen to, then formulate ways to group things together
so you can have as many things apply at the computer and group level rather than the user level.
Currently the setup employed in my environment is for all students set with a Primary Group ID of 20. There is then
a dummy group created that holds the preferences for group ID 20. This way, preferences are organized and easier
to locate. Also, all staff members are set with the Primary Group ID value set to 40. The same setup used for
students was employed for staff; a dummy group was created with group ID 40 and the preferences applied to this
group. Finally, another group was created with group ID of 80. This is the group that will allow users to be
administrators on the machines. There currently are no preferences set to this group, except for server mounts.
This was done so the users in this group connect to the same servers as the other staff members.
One of the nice things about using the UNIX settings for a group is users merely have to have a group ID, and not
actually be in the eDirectory group. For example, setting all students with a default GroupID of 20 allows every
student within the search base defined to receive the same settings as those that are set on the student group
without adding each person into a group. The values of this attribute can be set via an LDF import.

R. Saeks July ’06 - 18 -
Below is a screen shot of a group object in ConsoleOne, and the corresponding group in Apple’s WorkGroup
Manager:
The screenshots show how these two systems talk
together over the LDAP protocol. Below, the items that
are managed though the MCX facets are displayed. On
the left, we see where those settings are stored on the
group object in eDirectory. There is an LDAP mapping
that sits on the client machines that says the apple
attribute MCXSettings will be stored in the apple-
mcxsettings attribute on the group record in
eDirectory. This tells the client machine where to store
and read the settings to and from.
One of the things to note is if everyone has a primary
group ID of 40, no matter whom they are, they will
receive the preferences for the group returned based on
the search base and settings defined in Directory Access.
If there are additional groups that you want to apply
settings to, you can simply create a group, give it a
unique group ID, and set the users you want in that
group by entering the groupID number into the Primary
Group number field on the user record. This will allow
for special groups and granular control.
One of the features shown above is boxed in blue. Mobility is a way for the network-based user account to be
cached locally using mobile home directories. This works well for laptop users, as they no longer need to be live on
the network to login. Using this, you can also set automatic synchronizing to provide data backup to users. This
can be enabled to either automatically create the account or prompt the user. It can also be associated at the
computer, group or user level.
Every preference that appears on the client can be managed, so if there are additional preference panes in use, it is
a good idea to install them on the same machine that you will be managing MCX data from. Each preference can
either be set to Always, Never, or Manage Once. Always makes it so the user cannot change the setting, while

R. Saeks July ’06 - 19 -
Never means it isn’t managed and the user has full control. Manage once allows for the preference to be set on the
machine, but is modifiable. Giving the users a simple dock at login with common items, then allowing them to
change the contents is a good way to blend simple access to applications, yet flexibility on the users behalf.
In addition to the preferences for the group, there are preferences that can be set for the workstation.
Here is a screenshot of our
Workstation container for OS
X machines. As seen to the
left, the apple-computer
object has a few attributes
with values. They are the
name of the machine, the
MAC address of the machine,
as well as the MCX flag
(apple-mcxflags on the object)
to if you wish to use the
directory-based name of the
machine for the actual
workstation name. Once the
machines have been added to
the directory, they can then be
utilized to build workstation
lists.
The image to the right shows the machine name that is desired for
the workstation, as well as the setting to “Use this name as the
Computer Name for managed clients”, the computer list to which it
belongs, and the associated MAC address of the machine.
The workstation lists, shown on the next page, allow you to group the
machines into logical lists and then apply settings to the entire group.
This has been helpful in adding printers automatically, and login
window messages that pertain to the specific lab or area.

R. Saeks July ’06 - 20 -
The green section on the
left shows the name given
to the computer list.
Member machines of the
group are indicated in red.
Think of the computers as
a pointer to the MAC
address in this example.
When the machine starts,
it queries the LDAP server
with its MAC address, and
retrieve any groups to
which the computer
belongs. Finally, the MCX
settings associated with
the group, which are
shown in the blue box,
are applied to all
members of the group.
The corresponding computer list in WGM is
shown to the right.
The settings made in WGM appear as values
on the group object in the apple-
mcxsettings attribute. This is an XML
format of the managed settings that are
desired on the machine.
One of the nice additions to 10.4 server can
be seen in the Details tab on the following
page. When clicked on, this gives a list of all
the MCX data that is managed on the object.
Sometimes there are applications that have their own plist that you want to manage. Using the details section, you
can add any plist file to a user, group, or a computer list object.

R. Saeks July ’06 - 21 -
To the left, the Details
section of WGM is displayed.
As you can see, you are
now able to see each plist
file that is managed. The
button on the bottom,
“Add”, allows for custom, or
other plist files to be added
to the object. In addition,
there is an option to edit the
settings. This allows you to
move some settings from
the “Always” to “Manage
once” class. When using
WGM in Overview mode it is
an all or nothing shot for all
preferences in the window.
If you had a plist file for, say Office, you could change the save location in just one lab from a network standpoint.
Having this ability can be a great time saver when it comes to custom applications. This also means that you can
change settings en-masse just by restarting.
An example of that scenario is if a class is taking a test in a lab, and you don’t want them to be able to save to the
network. You could change the plist file to not mount the server in that lab, as well as prevent access to thumb
drives, or the connect to server dialog. You could also change the settings for Word, find the associated plist file,
and then attach it to the computer list group for the lab. When the class is done, restart the machines, revert the
settings, and the changes are gone.

R. Saeks July ’06 - 22 -
Desktop Management
The final area when really wanting to tie all of the work together in integration is the ability to support everything that
you have just worked so hard to do. How do you do this? Well, one of the ways is to go machine to machine, but
this is not practical, and wastes time. There are two great products from Apple that can help you out on this. One of
these is an update to a product that has its roots in the pre OS X days. This application is Apple Remote Desktop
(ARD). Another product that can help out is OS X Server.
Remote Desktop has been updated to version 3, which will run $499 for unlimited clients, and $299 for 10 clients.
Education pricing is offered. In a similar fashion, OS X Server runs $499 for a 10-client copy, and $999 for unlimited
clients. Education pricing is offered as well.
ARD is Apple’s Remote Control and support tool. Using this program, it is possible to copy files, restart machines,
observe and control machines, install packages, send UNIX commands, run inventory, and countless other features.
Utilizing the items setup in the previous pages with computer names, ARD will show the name of the machine as you
entered it. This helps as you might have users that normally would call their machine “Mike’s computer”. While that
works great for them, when they need help, it is hard to find the right Mike when there are 5 of them on your
network.
Some of the new features worth mentioning are utilizing a task server, better inventory reporting, and dynamic
computer lists. A link in the Additional Information section is provided for all the new features as well as the
administration guide.
A dynamic computer list, which is
shown to the right, allows you to
filter machines into groups based on
specific criteria. For example, you
could have a list that contains
machines that have an out of date
OS. When the condition is met, they
will appear in the new group.
Similarly, you can do this with RAM,
free hard disk space, as well as
nested group membership.

R. Saeks July ’06 - 23 -
The “Send UNIX command” feature is a great way to run preventative maintenance on machines, or other fixes.
Corrupt file permissions can be fixed by running a command to either fix them, or run disk utility to repair permissions.
Any task that you can do on your machine with a UNIX command can be run on client machines remotely. You could
check for an attribute on a file, and if it is out of date, mount an AFP server, copy the file down, and unmount the
server, all without the user knowing.
However, the best new feature is the task server. The task server is a machine that you designate to be a staging
area for installing packages. ARD 2 allowed a machine to function as an inventory server so machines did not need to
be online to report back inventory data. Rather the admin machine pointed to a server, which had the inventory on it
from when the client reported it based on reporting policies. This is built upon in ARD 3 to not only include inventory,
but also software installs. The task server will wait for a client to check in with it to obtain any scheduled installs since
it was last online. If you schedule an OS update and 5 laptop users are out of the office at the time you run it, when
they connect back to the network, the ARD client on the machine will check in with the task server, and perform the
OS update.
Again, this is just a brief overview of ARD. Much more comprehensive data can be found in the ARD 3 Administrator
guide from Apple.
The other part of Desktop Management comes from the OS X Server. In addition to being a directory service, web
server, mail and chat server, and file server, OS X Server can function as a Software Update Server (SUS). This was a
new service added in 10.4. The SUS will check in with Apple’s own Software Update Servers and mirror the updates
you choose. What this means is your
machines can point to this server for
updates rather than Apple’s. In terms of
bandwidth, 10 machines getting an update
from your local network is much better than
10 machines getting the file from the
internet.
The software update server allows you to
specify which updates you want to mirror,
as well as which are enabled. If an update
is not enabled, the user cannot install it
from the Software Update panel. A screen
shot of the SUS settings is displayed to the
left.

R. Saeks July ’06 - 24 -
If you have your machines set to auto-download updates, then any updates that are needed on the client are
automatically downloaded in the background. When using this, the time it takes to download the updates is
substantially better.
So, how does SUS tie in with ARD? Simple. A UNIX command. Using the command: softwareupdate –ia will
install all available updates. Similarly, the command: softwareupdate –l will list any updates. Using these two
systems with each other allows you to remotely install approved updates.
The final way in which you can use OS X server to support OS X machines deals with the NetBoot and NetInstall
service. These two parts go hand-in-hand. One of them allows you to boot a machine from the network, GUI and all;
not just PXE. The other is a way to install packages, and even an entire OS configuration on a machine. This service,
NetInstall can be used to create an image from a machine that is setup as you want it. System Image Utility is used to
create an Install image. This creates a compressed image that will be installed, via the network, onto the client
machines you select to boot from this image.
The images are managed though Server
admin, just like the software updates
were on the previous page. You can
restrict images to specific hardware
types, so that a G5 image does not go
on a G3 machines and vice versa.
The availability of the image, as well as
the protocols to which it is provided,
can be specified as shown here.
A link is provided in the Additional
Information section to Apple’s guide on
Software Update Services and System
Imaging.

R. Saeks July ’06 - 25 -
Putting it all together
Ok, so you have made it this far. At this point I want to pose a scenario, and explain how I have used this integration
to streamline the support process. This has been a project that took almost 2 years to complete since deciding we
wanted to move forward with OS X.
Imagine a computer is sitting on a desk in another part of the building unused. Now, imagine that you have 30
minutes to get it setup for a user who had their laptop crash. What do you do? Panic? Scream? Tell them sorry it
won’t be done?
You use all the neat things you have learned, hopefully, in the past 20-some pages to get it done. How do you do it?
You have ARD, right? And an OS X Imaging server? You have all your machines added, and into computer lists with
MCX settings applied to them? Good. Just follow these six easy steps.
1. Use ARD to find the machine on the other end of the building. 2. Set the startup disk to the Network Install image you have that auto-installs over the hard drive without
asking for confirmation. 3. Get a cup of coffee as the machine images. 4. As the machine is imaging and you are enjoying your coffee, open WorkGroup Manager, find the machine,
and change the name as well as the group to the English Teachers computer list. (Those English teachers always break their laptops.)
5. Once the computer has imaged, play a game of fetch the computer. 6. Have the user log into the machine.
And look at that, you still have 4 minutes to spare. How was all that possible? ARD was used to select the NetInstall
image on the server. Once the machine was done imaging, it restarted and queried the LDAP server with its MAC
address. Based on the MAC address, the printers were auto-added to the machine based on Computer List
membership. It also has the correct computer name. And the user? They were using their Novell info to login.
Mobile Home Directories were on for the user, so once they login, the contents of their user folder were copied onto
the local hard drive, and the network-based account was cached. You also prevented this crash from happening again
by making it so the user isn’t able to change the Startup Disk to target disk mode so they can connect it to their OS 9
machine at home and trash some folders they didn’t make called etc and var. All of this was accomplished by utilizing
the LDAP services built into OS X and Novell.

R. Saeks July ’06 - 26 -
When taking two directories and tying them together to support one another, it rarely is thought of as a benefit.
Generally more work is required, more time, and people have to learn new things. However, the benefit is taking the
strengths of the two, and combining them to better support one another.
When looking at the time that it will take to do a project like this, it isn’t out of the question to say it will be 2-3
months. But in that time, you will understand what you are doing, and be able to move between the two systems
with ease, taking advantage of each.
For those of you that are familiar with ZENworks, this is a great way to provide imaging, remote control and support,
Extensible policies, application push outs, Inventory and Workstation Management, all while still using eDirectory.
There is no product from Novell that will do all this, but using tools already out there, it is possible to get an
environment exact in function, and similar in nature.
I hope that this was helpful and answered some questions that might have been in your head. I hope you have
learned more from this, just as I have writing this. If you should have any questions, comments or suggestions,
please don’t hesitate to contact me at: [email protected]

R. Saeks July ’06 - 27 -
Additional Information
This section contains links to other sites and guides that you may find useful. If there are any comments or concerns,
feel free to contact me via email, at [email protected].
Apple
Remote Desktop 3 New Features http://www.apple.com/remotedesktop/newfeatures.html Remote Desktop 3 Administration Guide http://images.apple.com/remotedesktop/pdf/ARD3_AdminGuide.pdf System Imaging and Software Update Services http://images.apple.com/server/pdfs/System_Image_and_SW_Update_v10.4C.pdf Novell
Multiple Mac Connections without Additional Logins http://www.novell.com/coolsolutions/nds/features/a_mac_ldap_connections_edir.html Leveraging eDirectory with Apple Workgroup Manager http://www.novell.com/coolsolutions/nds/features/tips/t_apple_workgroup_edir.html Student Login Versus Staff Login http://www.novell.com/coolsolutions/nnlsmag/features/trenches/tr_staff_vs_students_nls.html LDAP Expired Password http://www.novell.com/coolsolutions/tools/17053.html Integrating Mac OS X and Novell eDirectory White Paper http://whitepapers.zdnet.co.uk/0,39025945,60045021p-39000512q,00.htm MacEnterprise.org
Integrating Mac OS X 10.3 and Novell eDirectory http://macenterprise.org/content/view/80/77/ Resources http://macenterprise.org/component/option,com_weblinks/Itemid,88/ University of Utah
University of Utah Mac OS Support http://www.macos.utah.edu/Documentation/ulabmin/ulabmin.html