edit anything - grass valleycdn1.grassvalley.com/unsecure/dl/edius_8.x/documentation/gv_edi… ·...
TRANSCRIPT

EDIUS Pro 8 (Version 8.2)New Features
www.grassvalley.com
EDIT ANYTHING
F2541603022March 2016
This manual describes the new features and modifications on Version 8.2.For functions not mentioned in this manual, see the latest “EDIUS Pro 8 Topic Library”.• Note that the latest “EDIUS Pro 8 Topic Library” does not cover Version 8.2.

2
Notice to Reader f It is prohibited to copy a part or all of this product without prior permission. f The contents or specifications of this product may be changed without prior notice. f We have prepared the contents of this product to the best of our ability; however if you have any questions about the contents, or if there are any errors or missing items, please contact Grass Valley.
f However we do not take any responsibility for malfunctions arising from use, irrespective of the points outlined in the preceding paragraph.
f Irrespective of whether it was due to a usage error, Grass Valley takes no responsibility for extraordinary, incidental or derivative claims, including those for lost earnings generated by the application of this product.
f It is prohibited to analyze, reverse engineer, decompile, or disassemble any of the items included with this product, including the software, hardware, and manuals.
f Grass Valley, GV STRATUS, K2, Aurora, Summit, Infinity, and EDIUS are either registered trademarks or trademarks of Grass Valley USA, LLC in the United States and/or other countries.
f Microsoft and Windows are registered trademarks of Microsoft Corporation, USA. f Intel, Xeon, and Core Duo are trademarks or registered trademarks of Intel Corporation or its subsidiaries in the United States and other countries.
f QuickTime and QuickTime logo are trademarks used under licenses. QuickTime is a trademark registered in the United States and other countries.
f Final Cut Pro, Macintosh, and Apple ProRes are trademarks of Apple Inc., registered in the U.S. and other countries. f Adobe, Adobe logo, Adobe Reader, Photoshop, Adobe PDF and Adobe PDF logo, After Effects, Flash and Flash logo, and Adobe Flash Player are trademarks of Adobe Systems Incorporated.
f Manufactured under license from Dolby Laboratories. Dolby and the double-D symbol are trademarks or Dolby Laboratories. Unpublished work. Copyright 2003-2012 Dolby Laboratories, Inc. and Dolby Laboratories Licensing Corporation. All right reserved.
f HDV is a trademark of Sony Corporation and JVC KENWOOD Corporation. f XDCAM, XDCAM EX, XAVC, XAVC S, and SxS are trademarks of Sony Corporation. f GF is a trademark of Toshiba Corporation. f HDMI, HDMI logo, and High-Definition Multimedia Interface are trademarks or registered trademarks of HDMI Licensing, LLC. f P2, AVCCAM, AVC-Intra, and AVC-Ultra are trademarks of Panasonic Corporation. f AVCHD is a trademark of Panasonic Corporation and Sony Corporation. f EOS is a trademark of Canon Inc. f Blu-ray is a trademark of Blu-ray Disc Association. f SD card is a trademark of SD Association. f YouTube and YouTube logo are trademarks or registered trademarks of Google Inc. f Vimeo is a trademark or registered trademark of Vimeo, LLC. f The trademark, service mark, product name logo, and product name of RED are trademarks or registered trademarks of Red.com, Inc. in the United States and other countries.
f Avid, Pro Tools, Media Composer, Avid DNxHD, and Avid DNxHR are trademarks or registered trademarks of Avid Technology, Inc. or its subsidiaries in the United States.
f AMD is a trademark of Advanced Micro Devices, Inc. f Other product names or related brand names are trademarks or registered trademarks of their respective companies.
Manual Explanation f If there are any variations between the explanation in this manual and the actual application method, priority is given to the actual application method.
f The images used in this manual are prototypes and they may be different from the screens of the actual product. f This manual is written for people who have a basic knowledge of how to use a computer. If there are no special instructions, perform the same operation as a normal computer operation.
f In this manual, EDIUS Workgroup, EDIUS Pro, and EDIUS series are called “EDIUS”. f In this manual, Microsoft® Windows® operating system products are called as follows.
g Microsoft® Windows® 7 operating system: Windows 7 (collective term for Ultimate, Enterprise, Professional, Home Premium, and Home Basic)
g Microsoft® Windows® 8 operating system: Windows 8 (collective term for Enterprise, Pro, and Core Edition) g Microsoft® Windows® 8.1 operating system: Windows 8.1 (collective term for Enterprise, Pro, and Core Edition) g Microsoft® Windows® 10 operating system: Windows 10 (collective term for Enterprise, Education, Pro, and Home)
f The signs and definitions in this manual are as follows.
Signs Definitions2 This sign indicates the important point of the operation.
1 Alternative This sign indicates an alternative method for the same operation that differs from the one in the procedure.
3 Note This sign indicates cautions and restrictions on the operation.

3
DANGER
Health PrecautionsIn rare cases, flashing lights or stimulation from the bright light of a computer display or TV monitor may trigger temporary epileptic seizures or loss of consciousness. It is believed that even individuals whom have never experienced such symptoms may be susceptible. If you or close relatives have experienced any of these symptoms, consult a doctor before using this product.If you edit 3D video more than an hour continuously, take a rest of 10 to 15 minutes per hour. If you feel tired or uncomfortable, stop using the product.
CopyrightDo not use captured image/sound data created by other ones without authorization of the right holder regardless of whether it is moving or still image, except for personal fun. Also, duplication of such data is sometimes limited even for personal hobby. Please notice that we are exempted from responsibility for the use of captured data.
Copyright Copyright © 2016 Grass Valley. All rights reserved. Portions of software © 2000 - 2016, Microsoft Corporation. All rights reserved. This document may not be copied in whole or in part, or otherwise reproduced except as specifically permitted under U.S. copyright law, without the prior written consent of Grass Valley USA, LLC, P.O. Box 59900, Nevada City, California 95959-7900. This product may be covered by one or more U.S. and foreign patents.Grass Valley is a trademark of GVBB Holdings S.a.r.l.
Disclaimer Product options and specifications subject to change without notice. The information in this manual is furnished for informational use only, is subject to change without notice, and should not be construed as a commitment by Grass Valley USA, LLC. Grass Valley assumes no responsibility or liability for any errors or inaccuracies that may appear in this publication.
U.S. Government Restricted Rights Legend
Use, duplication, or disclosure by the United States Government is subject to restrictions as set forth in subparagraph (c)(1)(ii) of the Rights in Technical Data and Computer Software clause at DFARS 252.277-7013 or in subparagraph c(1) and (2) of the Commercial Computer Software Restricted Rights clause at FAR 52.227-19, as applicable.
Trademarks and Logos Grass Valley is a trademark of GVBB Holdings S.a.r.l. Grass Valley USA, LLC products are covered by U.S. and foreign patents, issued and pending. Additional information regarding Grass Valley USA, LLC trademarks and other proprietary rights may be found at www.grassvalley.com.
Grass Valley Web Site This public Web site contains all the latest manuals and documentation, and additional support information. Use the following URLhttp://www.grassvalley.com.

4
Contents
Contents Notice to Reader 2 Manual Explanation 2
DANGER 3Health Precautions 3Copyright 3
Chapter 1 New Features (Version 8.2)
Primary Color Correction 6What You Can Do with Primary Color Correction 6
What is Log? 6Adjusting with [Primary Color Correction] 6
[Primary Color Correction] Dialog Box 8Example When [Primary Color Correction] is Applied 9
Motion Tracking 11Tracking Subject in Motion and Applying Video Filter 11
[Mask] Dialog Box (Motion Tracking) 13Batch Tracking of Multiple Paths 13If Automatic Tracking Has Been Disrupted 14
Other New Features and Modifications 15EDIUS Pro 8 15GV Browser 15
Chapter 2 Appendix
Grass Valley Product Support 17Web Technical Support 17Phone Support 17Authorized Support Representative 17Our Website 17

5
Chapter 1New Features (Version 8.2)This chapter explains the new features and modifications implemented on EDIUS (Version 8.2).
Chapter 1 New Features (Version 8.2) — Primary Color Correction
6
Primary Color Correction
What You Can Do with Primary Color CorrectionYou can adjust the brightness and color by applying color grading on a clip shot in the Log format.[Primary Color Correction] has predefined color space profiles that support Log formats for each of the camera manufacturers.When a clip is recognized by its metadata as a Log file, [Primary Color Correction] filter will automatically select an optimal color space and adjust the brightness and colors.You can also select the color space manually.You can obtain preferred brightness and colors by fine adjusting the parameters.“What is Log?” (w page 6)
3 Note f Some Log formats may not be supported.
What is Log?Log is a shooting format that can maintain wide dynamic range.For videos shot in the Log format, color grading is essential. By performing color grading on a shot video with lower contrast, wider color tone range can be realized to reproduce realistic images that are closer to what it actually looks like.Even under conditions where highlight/shadow detail loss is likely to occur, shooting in the Log format will help in correcting the details later without deteriorating the image quality.“Reproducing Clouds Where Highlight Detail Loss Has Occurred” (w page 9)“Adjusting the Brightness of a Person Where Shadow Detail Loss Has Occurred Due to Backlight” (w page 9)
Adjusting with [Primary Color Correction]Example:
To adjust the brightness and colors of a source shot in the Log format (S-Log source)
r Preparation f Create a project (QFHD 3840x2160 29.97p, 10-bit). f Import the S-Log source file in the source browser, register it to the bin, and place the clip on the timeline.
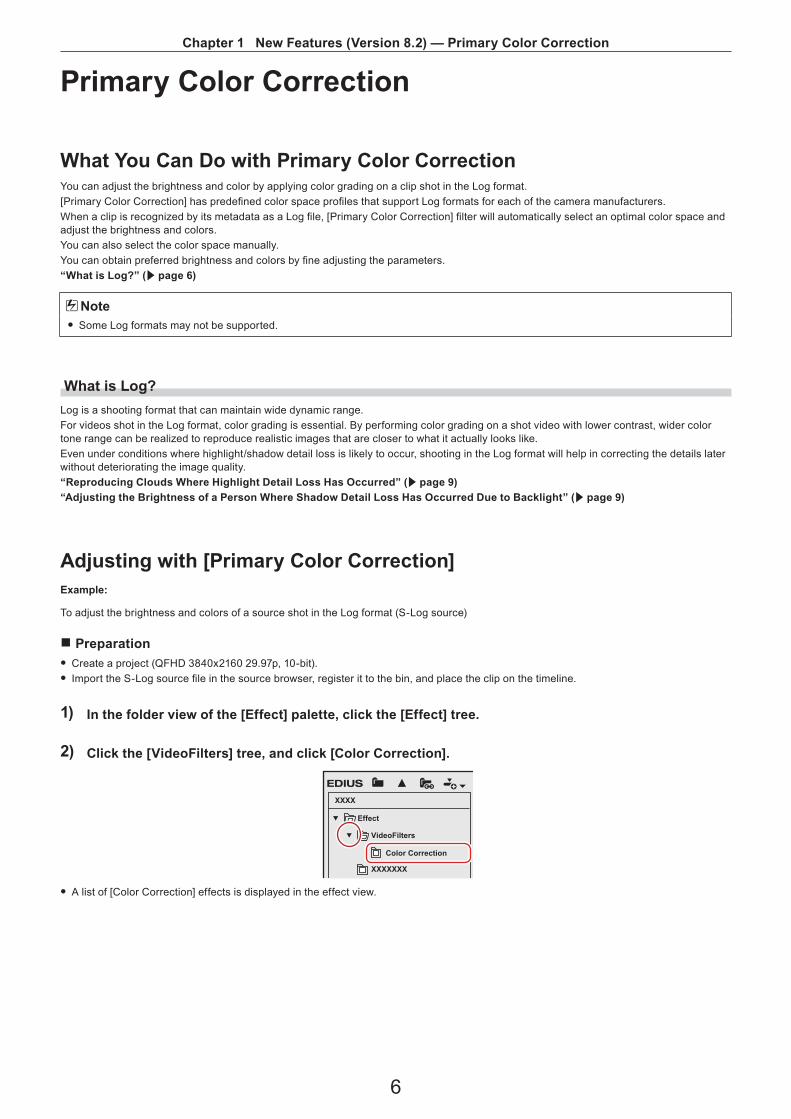
1) In the folder view of the [Effect] palette, click the [Effect] tree.
2) Click the [VideoFilters] tree, and click [Color Correction].
f A list of [Color Correction] effects is displayed in the effect view.

Chapter 1 New Features (Version 8.2) — Primary Color Correction
7
3) Drag and drop [Primary Color Correction] to the clip (video part) on the timeline.
Cur 00:00:00;00 In -- : -- : -- ; -- Out -- : -- : -- ; -- Dur -- : -- : -- ; -- Ttl 00:00:00;00
Untitled
00:00:00;00 00:00:05;00 00:00:10;00 00:00:15;00 00:00:20;00 00:00:25;00 00:00:30;00
XXXX XXXXXXXX XXXX
2 V
1 VA
VA
XXXXXX
XXXXXX
XXXXXX
XXXXXX
XXXXXX
XXXXXX
XXXXXX
XXXXXX
XXXXXX
XXXXXX
XXXXXX
XXXXXX
XXXXXX
XXXXXX
XXXXXXXXXXXXXXXXX
XXXXXXXXXXXXXX
XXXXXXXXXXXXXX
XXXXXXXXXXXXXXXXXXXXX
XXXXXXXXXXXXXX
XXX XXXXX XXXXX XXXXX
XXXXX XXXXX XXXXX
XXXXX XXXXX XXXXX
XXXXX XXXXX XXXXX
XXXXX XXXXX XXXXX
f Clips with the [Primary Color Correction] effect applied (video part) are displayed with an orange line. f When a clip is recognized as a Log file, an optimal color space will be applied automatically to adjust the brightness and color. You can view the result of the applied color space in the preview window.
f If a color space has not been applied automatically, you can open the [Primary Color Correction] dialog box to apply a color space manually. To apply a color space manually or finely adjust the brightness and colors, proceed to step 4).
4) Display the [Information] palette, and double-click [Primary Color Correction].
f The [Primary Color Correction] dialog box appears.“[Primary Color Correction] Dialog Box” (w page 8)
5) Click the list button of [Source] in [Color Space] and select a color space that is optimal for the source shot in the Log format.
f If the color space was selected automatically, this operation is not necessary.
6) While viewing the video in the preview window, make fine adjustment to the parameters.
7) Click [OK]. f The [Primary Color Correction] dialog box is closed.
2 f If real time playback is not possible after [Primary Color Correction] is applied, right-click on a clip and click [Render] to perform rendering to the clip.The rendered clip will maintain the rendered status even after being moved.(If an effect is readjusted or added, rendering is required again.)

Chapter 1 New Features (Version 8.2) — Primary Color Correction
8
[Primary Color Correction] Dialog Box
(1) [Color Space] [Source]Select a color space to apply to the clip.[Destination]Select a color space to apply when exporting.
(2) [Exposure] Adjusts the brightness.(3) [White Balance] [Temperature]
Adjusts the color temperature.[Tint]Adjusts the tint.
(4) [Lift] Locks the highlight area and adjust the brightness of the shadow area.(5) [Gamma] Adjusts the brightness of intermediate tone area.(6) [Gain] Locks the shadow area and adjust the brightness of the highlight area.(7) [Saturation] Adjusts the saturation.(8) [Curve] Adjusts the hue and saturation using the tone curves.
[Curve Detail]Moves the five points of [Curve] set by the luminosity level vertically and horizontally to adjust the brightness.
(9) [Set default parameters]
Click [Set default parameters] on the right of each item to restore the default setting for the item.Click [Set default parameters] on the bottom of the dialog box to restore the default settings for all items.
(10) Preview setting Aligns the video of a clip to which primary color correction is applied and the other clips to compare the colors.
(11) [Undo] Undoes an operation.(12) [Redo] Redoes an undone operation.
Chapter 1 New Features (Version 8.2) — Primary Color Correction
9
Example When [Primary Color Correction] is Applied
Reproducing Clouds Where Highlight Detail Loss Has Occurred
For landscape shooting, “highlight detail loss” may cause the blue sky to appear in all white or the clouds and distant mountains to be merged with each other.Standard shooting format has limited dynamic range compared to that of the Log format. With an improper exposure setting, highlight detail loss occurs, causing the color tones exceeding the upper limit of the dynamic range to be lost and all replaced by white.Thus, video shot in the standard format may not be able to reproduce the realistic image quality of material texture, etc. even if applying post-shooting color corrections, because the light condition is adjusted and recorded at the time of shooting.The Log format has wider dynamic range and enables recording of the range for the tone of light that could normally be recorded as white in the standard shooting. By performing color grading on a Log source, the color tone of areas where highlight details have been lost can be reproduced and video with realistic details like film images can be obtained.
r Example for adjustment
1) Perform steps 1) to 5) in “Adjusting with [Primary Color Correction]”. f “Adjusting with [Primary Color Correction]” (w page 6)
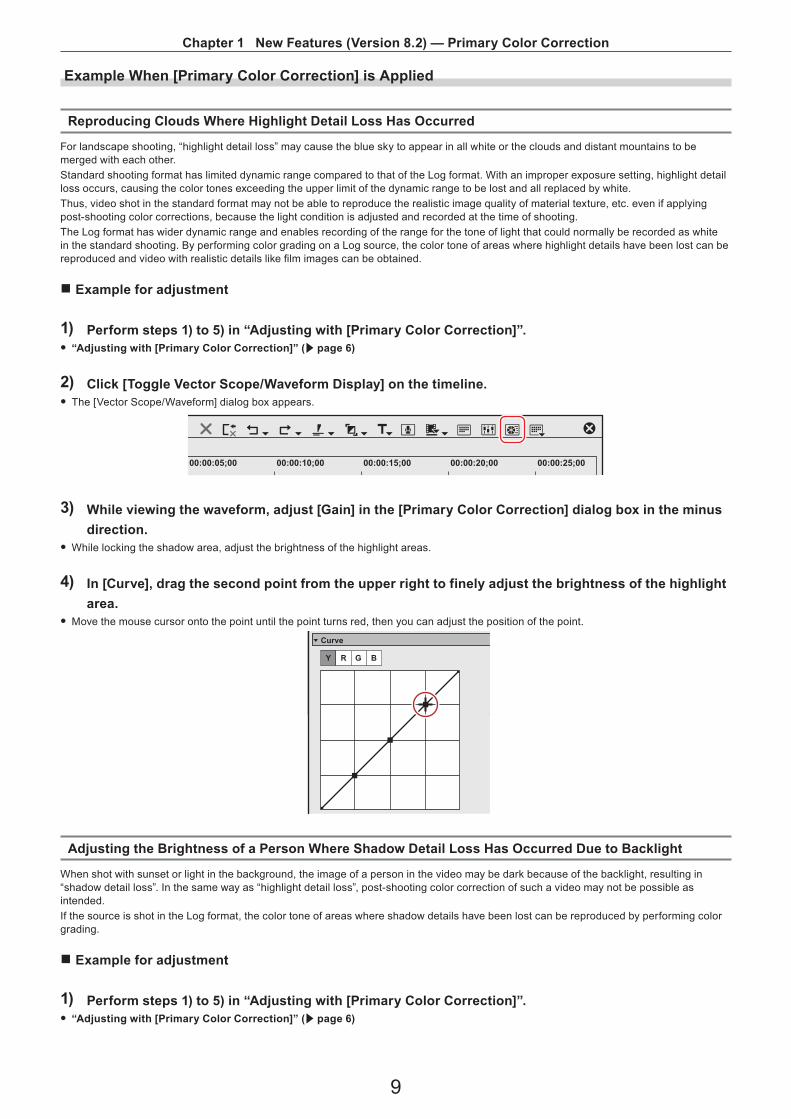
2) Click [Toggle Vector Scope/Waveform Display] on the timeline. f The [Vector Scope/Waveform] dialog box appears.
00:00:05;00 00:00:10;00 00:00:15;00 00:00:20;00 00:00:25;00
3) While viewing the waveform, adjust [Gain] in the [Primary Color Correction] dialog box in the minus direction.
f While locking the shadow area, adjust the brightness of the highlight areas.
4) In [Curve], drag the second point from the upper right to finely adjust the brightness of the highlight area.
f Move the mouse cursor onto the point until the point turns red, then you can adjust the position of the point.
Adjusting the Brightness of a Person Where Shadow Detail Loss Has Occurred Due to Backlight
When shot with sunset or light in the background, the image of a person in the video may be dark because of the backlight, resulting in “shadow detail loss”. In the same way as “highlight detail loss”, post-shooting color correction of such a video may not be possible as intended.If the source is shot in the Log format, the color tone of areas where shadow details have been lost can be reproduced by performing color grading.
r Example for adjustment
1) Perform steps 1) to 5) in “Adjusting with [Primary Color Correction]”. f “Adjusting with [Primary Color Correction]” (w page 6)

Chapter 1 New Features (Version 8.2) — Primary Color Correction
10
2) Click [Toggle Vector Scope/Waveform Display] on the timeline. f The [Vector Scope/Waveform] dialog box appears.
00:00:05;00 00:00:10;00 00:00:15;00 00:00:20;00 00:00:25;00
3) While checking the waveform, adjust [Lift] in the [Primary Color Correction] dialog box in the plus direction.
f While locking the highlight area, adjust the brightness of the shadow areas.
4) In [Curve], drag the second point from the lower left to finely adjust the brightness of the shadow area.
f Move the mouse cursor onto the point until the point turns red, then you can adjust the position of the point.
Chapter 1 New Features (Version 8.2) — Motion Tracking
11
Motion Tracking
Tracking Subject in Motion and Applying Video FilterThis feature utilizes the conventional mask function to automatically track specific parts of the subject in motion and apply [VideoFilters] effects such as [Mosaic].Multiple paths can be tracked at the same time.
Example:
To apply [Mosaic] to the face of a person approaching
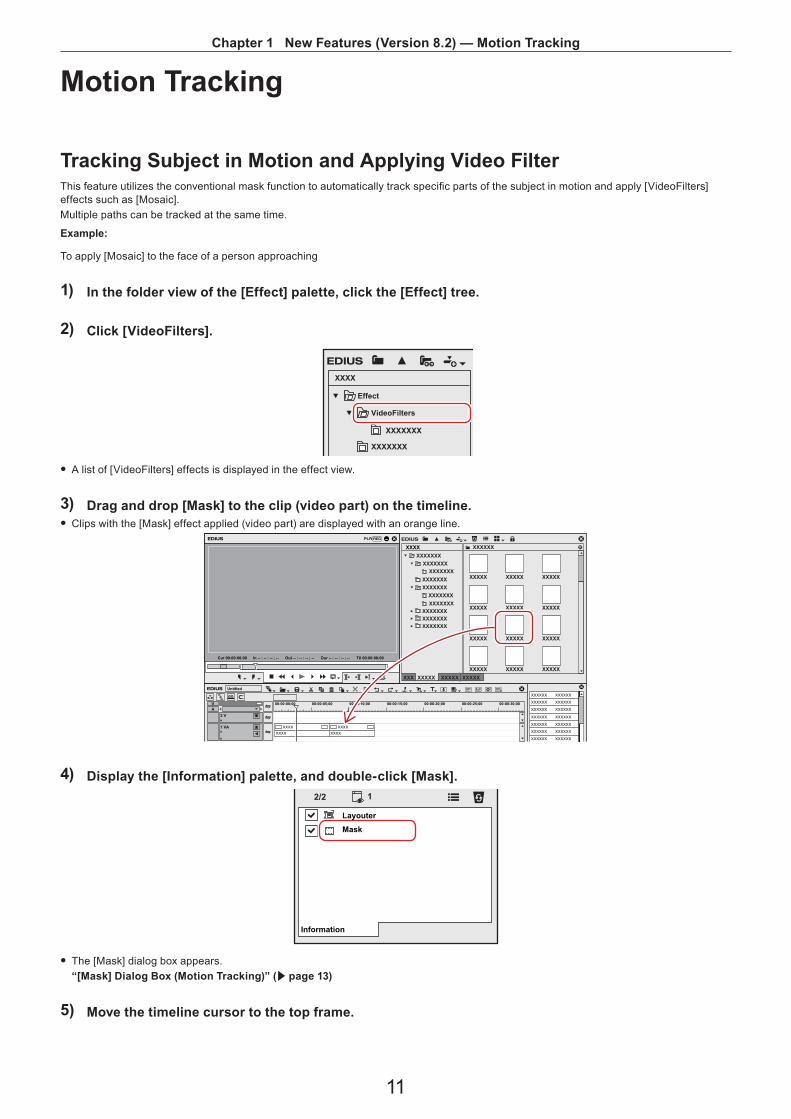
1) In the folder view of the [Effect] palette, click the [Effect] tree.
2) Click [VideoFilters].
f A list of [VideoFilters] effects is displayed in the effect view.
3) Drag and drop [Mask] to the clip (video part) on the timeline. f Clips with the [Mask] effect applied (video part) are displayed with an orange line.
Cur 00:00:00;00 In -- : -- : -- ; -- Out -- : -- : -- ; -- Dur -- : -- : -- ; -- Ttl 00:00:00;00
Untitled
00:00:00;00 00:00:05;00 00:00:10;00 00:00:15;00 00:00:20;00 00:00:25;00 00:00:30;00
XXXX XXXXXXXX XXXX
2 V
1 VA
VA
XXXXXX
XXXXXX
XXXXXX
XXXXXX
XXXXXX
XXXXXX
XXXXXX
XXXXXX
XXXXXX
XXXXXX
XXXXXX
XXXXXX
XXXXXX
XXXXXX
XXXXXXXXXXXXXXXXX
XXXXXXXXXXXXXX
XXXXXXXXXXXXXX
XXXXXXXXXXXXXXXXXXXXX
XXXXXXXXXXXXXX
XXX XXXXX XXXXX XXXXX
XXXXX XXXXX XXXXX
XXXXX XXXXX XXXXX
XXXXX XXXXX XXXXX
XXXXX XXXXX XXXXX
4) Display the [Information] palette, and double-click [Mask].
f The [Mask] dialog box appears.“[Mask] Dialog Box (Motion Tracking)” (w page 13)
5) Move the timeline cursor to the top frame.

Chapter 1 New Features (Version 8.2) — Motion Tracking
12
6) Click the draw button of ellipse and encircle the person's face with an ellipse.
7) Check [Filter] for [Inside], click , and select [Mosaic].
f Click to set the details of [Mosaic]. f You can view the result of the applied video filter in the preview window.
8) Click [Track Forward] in [Tracking].
f Tracking in the forward direction starts and a key frame will be set frame by frame. A progress bar is displayed to indicate the progress of the analysis.
f The anchor path will be displayed in the preview of the [Mask] dialog box. f Tracking will end automatically at the last frame of the clip.
9) Play back the timeline to view the video.
10) Click [OK]. f The [Mask] dialog box is closed.
2 f Set key frames can be adjusted frame by frame. f The time scale display unit of the [Mask] dialog box can be adjusted in the time scale settings or by the timeline controller. f There are two types of interpolation methods, [Hold] and [Linear].

Chapter 1 New Features (Version 8.2) — Motion Tracking
13
[Mask] Dialog Box (Motion Tracking)
(1) [Tracking] Select a tracking method and start tracking.Multiple paths can be tracked at the same time.“Batch Tracking of Multiple Paths” (w page 13)
(2) [Track Reverse] Tracks in the reverse direction from the timeline cursor position and sets key frames.Tracking will end automatically at the top frame of the clip.[Ctrl] + [,]
(3) [Track Previous Frame] Tracks one frame in the reverse direction from the timeline cursor position and sets key frame.[,]
(4) [Tracking Option] [Position]Tracks the position of the object. The default value is ON.[Scale]Tracks the size of the object. The default value is ON.[Rotate]Tracks the rotation of the object. The default value is ON.
(5) [Track Next Frame] Tracks one frame in the forward direction from the timeline cursor position and sets key frame.[.]
(6) [Track Forward] Tracks in the forward direction from the timeline cursor position and sets key frames.Tracking will end automatically at the last frame of the clip.[Ctrl] + [.]
Batch Tracking of Multiple PathsYou can select and track multiple paths at the same time.
1) Perform steps 1) to 7) in “Tracking Subject in Motion and Applying Video Filter”. f “Tracking Subject in Motion and Applying Video Filter” (w page 11) f Draw multiple paths in advance.
2) While pressing [Shift] on the keyboard, select multiple paths.
3) Click [Tracking] on the tool bar, and click a tracking method.XXXXX
f Tracking for multiple paths starts at one time and finishes automatically at the last frame.
4) Play back the timeline to view the video.

Chapter 1 New Features (Version 8.2) — Motion Tracking
14
If Automatic Tracking Has Been DisruptedTracking may be disrupted in the middle when an obstacle blocks the subject being tracked or when the motion is too fast.This section explains how to set the key frames manually on the frames from the one where automatic tracking has been disrupted to the one where automatic tracking can be resumed.You can also track in the reverse direction using [Track Reverse].
1) Perform steps 1) to 8) in “Tracking Subject in Motion and Applying Video Filter”. f “Tracking Subject in Motion and Applying Video Filter” (w page 11) f Tracking has been disrupted in the middle. Automatic tracking cannot be continued. Set key frames manually up to the frame where automatic tracking can be resumed.
2) Set key frames manually. f To set a key frame frame by frame, click [Track Next Frame]. Adjust the path position and size as necessary. f To set a key frame at a desired position, move the timeline cursor to the position to set the key frame and then adjust the path position and size. A key frame is added automatically when you edit the path. Repeat this step as necessary.
f To delete key frames collectively, drag the mouse upward to select the key frames and press [Delete] on the keyboard.
3) Move the timeline cursor to the position to start automatic tracking, and click [Track Forward] again. f Automatic tracking resumes.
4) Play back the timeline to view the video.
5) Click [OK]. f The [Mask] dialog box is closed.

Chapter 1 New Features (Version 8.2) — Other New Features and Modifications
15
Other New Features and ModificationsThis section explains other new features and modifications implemented on EDIUS (Version 8.2).
EDIUS Pro 8 f Canon RAW supported in the source browser and decoding f Sony RAW supported in the source browser and decoding f Canon RAW and Sony RAW supported in GPU acceleration f P2 AVC-Intra 422/AVC-Ultra 422/AVC-Intra LT/AVC-Intra LT 2K supported in the source browser and decoding f XDCAM Station Ver.3.0 external SSD drive supported in source browser (CIFS connection only)
GV Browser f Still image sequence function f Duplicated clip search function f Draft preview function f Color space preview function for Canon Log/Panasonic Log/Sony Log files f Import of Sony RAW and Canon RAW f Import of GPX files f File size indication when multiple files are selected f Preview image quality improvement f Korean language supported

16
Chapter 2AppendixThis chapter explains support and other information.

Chapter 2 Appendix — Grass Valley Product Support
17
Grass Valley Product SupportFor technical assistance, to check on the status of a question, or to report a new issue, contact Grass Valley Product Support via e-mail, the Web, or by phone or fax.
Web Technical SupportTo access support information on the Web, visit the product support Web page on the Grass Valley Web site. You can download software or find solutions to problems by searching our Frequently Asked Questions (FAQ) database.
r World Wide Web:http://www.grassvalley.com/support/
r Contact Customer Supporthttp://www.grassvalley.com/support/contact* Please select “Support for Professional Products” tab.
Phone SupportUse the following information to contact product support by phone during business hours. After hours phone support is available for warranty and contract customers.
United States/Americas +1 801 222 5204Europe, United Kingdom, Africa and The Middle East +44 (0) 20 8867 6305Asia (except Japan and Korea) +86 21 5869 8668
Authorized Support RepresentativeTo locate the support representative for your country, visit the following Product Support Web page on the Grass Valley Web site. f http://www.grassvalley.com/support/
Our WebsiteThe latest information of our products including this product are released on the Grass Valley website. Visit our website to download the latest drivers, utilities, applications, product manuals (online or PDF) or to see FAQs, for your better editing environment. f http://www.grassvalley.com/ f http://www.ediusworld.com/

EDIUS Pro 8 (Version 8.2) New FeaturesMarch 2, 2016
Copyright © 2016 Grass Valley. All rights reserved.