edsr100_manual
TRANSCRIPT
8/7/2019 EDSR100_manual
http://slidepdf.com/reader/full/edsr100manual 1/20
INSTRUCTION MANUAL
EDSR100DIGITAL VIDEO RECORDER
Before installing and using this unit, please read this manual carefully.
Be sure to keep the manual handy for later reference.

8/7/2019 EDSR100_manual
http://slidepdf.com/reader/full/edsr100manual 2/20
WARNINGTO REDUCE RISK OF FIRE OR ELECTRIC SHOCK,DO NOT EXPOSE THIS APPLIANCE TO RAIN OR MOISTURE.
CAUTIONDO NOT REMOVE COVER. NO USER SERVICEABLE PARTS INSIDE.
REFER SERVICING TO QUALIFIED SERVICE PERSONNEL.
WARNING:This equipment has been tested and found to comply with the limits for a Class “A” digital device,
pursuant to part 15 of the FCC Rules. These limits are designed to provide reasonable protection against
harmful interference when the equipment is operated in a commercial environment. This equipmentgenerates, uses and can radiate radio frequency energy and, if not installed and used in accordance with
the instruction manual, may cause interference to radio communications. Operation of this equipment in
a residential area is likely to cause harmful interference in which case the users will be required to
correct the interference at their own expense.
Changes or modifications not expressly approved by the party responsible for compliance could void the
user’s authority to operate the equipment.
This Class A digital apparatus meets all requirements of the Canadian Interference Causing Equipment
Regulations.
Notice:The information in this manual was current when published. The manufacturer
reserves the right to revise and improve its products. All specifications are
therefore subject to change without notice.
2
Safety Warning

8/7/2019 EDSR100_manual
http://slidepdf.com/reader/full/edsr100manual 3/20
Table of Contents
Page
Front Panel Controls……………….……………………………………………… 4 . 5. 6.
Instant Recording Controls
Normal & Instant Record Setting Menu…………………………………………………………………. 7.
Normal Playback……………………………………………………………… 8. 9. 10. 11. 12.
Normal Playback…………………………………………………………………………………………………………...
Search Playback………………………………………………………………………………………………………
Copying Images ………………………………….………………………………… 13. 14. 15.
Still Image Copy……………………………………………………………………………………………………………
Copy to Movie File……...………………………………………………………………………………………………….
Remote Controller………….…..………………………………………………………… 16.
Appendix-A/Time Lapse Mode Recording Time…….……..….…………………....…..… 17.Recording with and 80 GB HDD…..…………...………………….…………………………………………….………..
Appendix-B/ Security Lock setting………….…………………………………………… 18.
Technical Help.
Power Failure Or Power Disruption Reset / Reboot Procedure………………………… 19.
3

8/7/2019 EDSR100_manual
http://slidepdf.com/reader/full/edsr100manual 4/20
1 35 42 76 8 9 10 11 12
13
14
15
1617181920
Front Panel Control
HDD : HDD Activity, the LED will flash indicating that the HDD is active.
LAN : LAN Access, the LED will flash when the LAN is accessed.
ALARM : The LED will flash when an alarm occurs.
LED
1
2
3
POWER : Indicates Power is ON.4
STOP : Press this Button to stop Recording and Playing Back.
PLAY: Playing Back. The playback speed is shown on the LCD display,
and press to change the speed if necessary.
PAUSE: Press this Button to pause the Video playback picture.
SEARCH: Press this Button to enter the Search Playback Menu.
Display: Press this Button ON/OFF to display Time Date & HDD Specifications..
6
5
7
8
9
11
12
REV. PLAY : Reverse Play Back. The playback speed is shown on the LCD
display, and press to change the speed if necessary.
10
REC : Press this Button to start recording.
COPY: Press this Button to start copying still pictures or video stream into Compact Flash card.
Display OFFDisplay Date/Time and
HDD available space
Display Date/Time
HDD available space
Recording setting
Disk size
Play position
2002/04/24 WED 12:00:00
50 %
Buzzer : Enable
Disk Size (GB) : 80.01
Record Position : 50%
Play Position : 49%
Record Quality : STANDARD
2002/04/24 WED 12:00:00
50 %
4
2. Front Panel Controls
Keys

8/7/2019 EDSR100_manual
http://slidepdf.com/reader/full/edsr100manual 5/20
MENU : Press this Button to enter the Installation Setup menu.
Note: This area is reserved for the Technician, and should not be ACCESSED by the user.
ENTER : Press this Button to confirm the selection or data changed.13
14
Remote Control15
Jog and Shuttle Dial
Shuttle Dial : In Playback mode, turn the External Shuttle dial Clockwise
or Anti-Clockwise to fast forward/rewind the video.
In Pause mode, turn shuttle dial to forward/rewind
the pictures slowly.
Jog Dial : In Pause mode, turn the internal Jog dial forward/backward thepicture by one field. In Menu mode, please refer to
page 13 “ Menu Flow”
16
Up/ Down : (1) In Menu mode, press these Buttons Up or Down to change data.
(2) In Record/Playback mode, press these buttons for Playback & Record speeds.
Left/ Right : In Menu mode, these buttons are used to move the cursor.
17
Front Panel Control
5
IR Remote receiver

8/7/2019 EDSR100_manual
http://slidepdf.com/reader/full/edsr100manual 6/20
20
Compact Flash Card Slot: Compact Flash Card insertion bay.
Hard Disk Tray: Hard Disk holder for HDD.
2002/04/24
12:00:00
RECORD
. 002 HR In Record mode, the date/time is the current date/time and will
display RECORD and current recording rate/speed.
2002/04/24
12:00:00
PLAY
> 002 HR
In Playback mode, the date/time is the playback date/time and
displays PLAYBACK and current playback rate/speed.
19
Front Panel Control
6
2002/04/24
12:00:00
STANDARD
002 HR
In Standby mode, the date/time is the current date/time and
shows the quality and rate setting for normal recording.
18 LCD Display
2002/04/24
12:00:00
SYS LOAD
002 HR Switch on the power, “system loading” will be shown
for10 seconds, both on the LCD display & Main monitor screen.

8/7/2019 EDSR100_manual
http://slidepdf.com/reader/full/edsr100manual 7/20
7. INSTANT RECORDING
Press the REC button to commence
recording.
•The recording rate and recording quality are
set in the Record Set menu
• “ RECORD ” appears in the operating
display
• “ RECORD” appears in the LCD display.
(Press the DISPLAY button to show the
message on the screen)
Video out
LCD Display
Press the Stop Button to stop recording.
When the Hard Drive is full, the EDSR will Stop recording automatically
or Overwrite from the beginning of the HDD, as programmed.
Default setting = to Overwrite once Full.
Press the Record Button to start the recording.
REC
STOP
RECORD
002 HR
RECORD
002 HR
2002/01/01
00:00:00
7
8/7/2019 EDSR100_manual
http://slidepdf.com/reader/full/edsr100manual 8/20
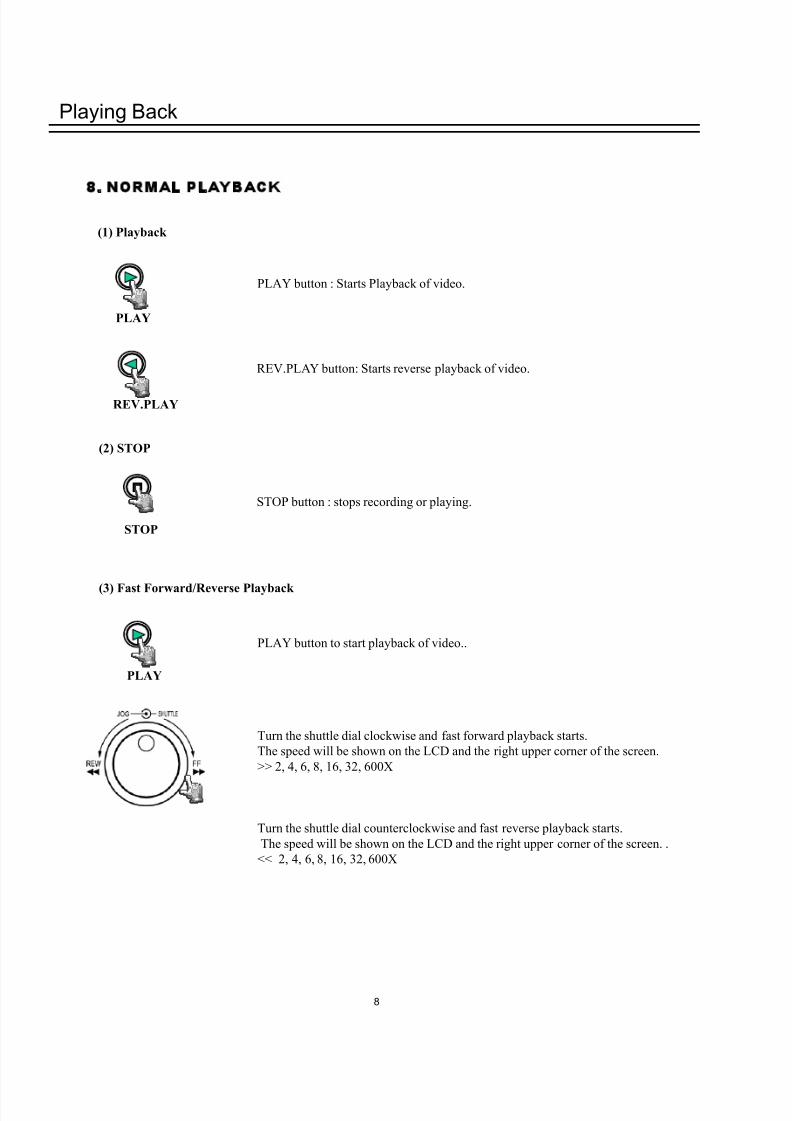
8. NORMAL PLAYBACK
PLAY button : Starts Playback of video.
(1) Playback
REV.PLAY button: Starts reverse playback of video.
STOP button : stops recording or playing.
(3) Fast Forward/Reverse Playback
PLAY button to start playback of video..
Turn the shuttle dial clockwise and fast forward playback starts.
The speed will be shown on the LCD and the right upper corner of the screen.
>> 2, 4, 6, 8, 16, 32, 600X
Turn the shuttle dial counterclockwise and fast reverse playback starts.
The speed will be shown on the LCD and the right upper corner of the screen. .
<< 2, 4, 6, 8, 16, 32, 600X
Playing Back
REV.PLAY
PLAY
PLAY
STOP
8
(2) STOP

8/7/2019 EDSR100_manual
http://slidepdf.com/reader/full/edsr100manual 9/20
Playing Back
(5) Frame/Field advance Forward/Reverse
PAUSE button: Press to freeze the picture.
Turn the jog dial clockwise to advance the still image Frame/Field by
Frame/Field .
Turn the jog dial counterclockwise to rewind the still image Frame/Field by
Frame/Field .
The Frame/Field speed will increase if the jog dial is turned quickly.
PAUSE
9
(4) Slow Forward/Reverse Playback
PAUSE button: Press to freeze playback video picture.
Turn the shuttle dial clockwise and slow forward playback starts.
The speed will show on the LCD and the right upper corner of the screen.
>> 1/2, 1/4, 1/6, 1/8, 1/10, 1/16, 1/32
Turn the shuttle dial counterclockwise and slow reverse playback starts.
The speed will show on the LCD at the the right upper corner of the screen. .
<< 1/2, 1/4, 1/6, 1/8, 1/10, 1/16, 1/32
PAUSE

8/7/2019 EDSR100_manual
http://slidepdf.com/reader/full/edsr100manual 10/20
SEARCH & PLAYBACK
(10) Segment Search Playback Note: Press the STOP Button to Stop RECORDING
before Searching for any Video Playback.
Press the SEARCH Button to enter the Search menu.
SEARCH MENU
BY SEGMENT LIST
BY ALARM LIST
BY DATA TIME
Using the keys to move the cursor to Highlight over the BY SEGMENT LIST menu ,
and press the ENTER Button to select next menu page.
SEGMENT SEARCH
1
2
3
Playing Back
SEARCH
Press key to move the cursor to Highlight the segment required for playback,
Now Press the Enter Button to select the segment and to commence playback,
( Playback commences automatically upon pressing the Enter Button..
Playback has commenced and control of Speed, Still/Pause, Reverse, Stop can be achieved
by use of the Jog Dial Control Ring, and Playback command Buttons.
10
PA
T
T
2002/04/24 19/03/29
2002/04/25 12/30/30
2002/05/20 12/00/00
PA : PRE-ALARM RECORD
T : TIMER RECORD

8/7/2019 EDSR100_manual
http://slidepdf.com/reader/full/edsr100manual 11/20
Playing Back
(11) Alarm Search Playback Note: Press the STOP Button to Stop
RECORDING before Searching for any Video
Playback.
Press the SEARCH Button to enter the Search menu.
Using the keys to move the cursor to Highlight over the BY ALARM LIST Title,
and press the ENTER Button to select next menu.
ALARM SEARCH
1
2
3
Press key to move the cursor to Highlight the segment required for playback,
Now Press the Enter Button to select the segment and to commence playback, ( this is
automatic upon pressing the Enter Button..
Playback has commenced and control of Speed, Still/Pause, Reverse can be achieved by
use of the Jog Dial Control Ring, and Playback command Buttons. Note, only the Alarm
Duration of the event selected shall be display and stop, use reverse and forward play
commands to view entire video from start to finish.
SEARCH
SEARCH MENU
BY SEGMENT LIST
BY ALARM LIST
BY DATE TIME
2002/04/24 19/03/29
2002/04/25 12/30/30
2002/05/20 12/00/00
PA
T
T
11
PA : PRE-ALARM RECORD
T : TIMER RECORD
8/7/2019 EDSR100_manual
http://slidepdf.com/reader/full/edsr100manual 12/20
Playing Back
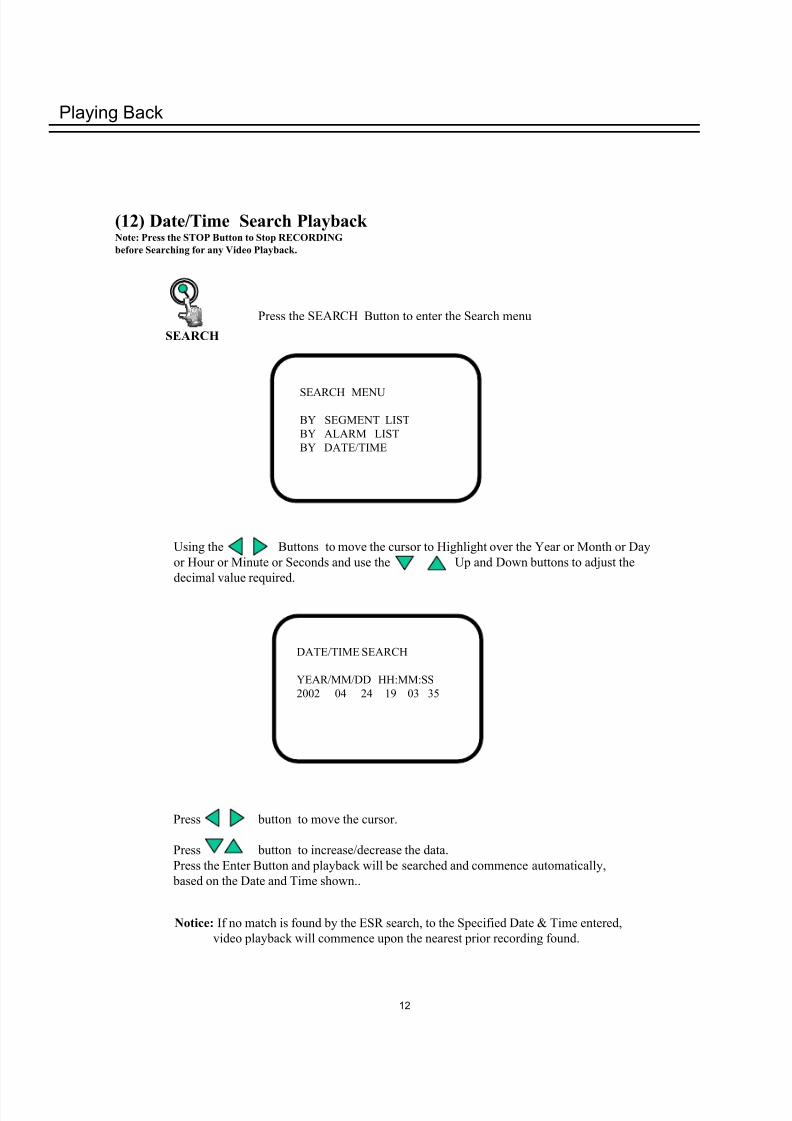
(12) Date/Time Search Playback Note: Press the STOP Button to Stop RECORDING
before Searching for any Video Playback.
Press the SEARCH Button to enter the Search menu
Using the Buttons to move the cursor to Highlight over the Year or Month or Day
or Hour or Minute or Seconds and use the Up and Down buttons to adjust the
decimal value required.
DATE/TIME SEARCH
YEAR/MM/DD HH:MM:SS
2002 04 24 19 03 35
SEARCH
Notice: If no match is found by the ESR search, to the Specified Date & Time entered,
video playback will commence upon the nearest prior recording found.
Press button to move the cursor.
Press button to increase/decrease the data.
Press the Enter Button and playback will be searched and commence automatically,
based on the Date and Time shown..
SEARCH MENU
BY SEGMENT LIST
BY ALARM LIST
BY DATE/TIME
12

8/7/2019 EDSR100_manual
http://slidepdf.com/reader/full/edsr100manual 13/20
COPY
Insert a Compact Flash card into the Compact Flash bay behind the HDD cover.
When inserting the Compact Flash card, make sure that the direction of insertion is
correct.
Press the PAUSE button to freeze the picture required for copying..
Turn the jog dial clockwise or counterclockwise to the desired image of choice.
PAUSE
Press the PLAY button to start play back.
PLAY
COPY
Once your desired image is display and Paused ,
Press the COPY button.
“ Copying …” will be shown on the monitor screen during this process.
“ Success” will be shown on the screen once the file has been transferred
successfully into the Compact Flash Card.
Notice: Copied images are stored as a single picture.
Copied files are saved as .JPG file.
13
STILL IMAGE COPY
13. COPY
8/7/2019 EDSR100_manual
http://slidepdf.com/reader/full/edsr100manual 14/20
COPY
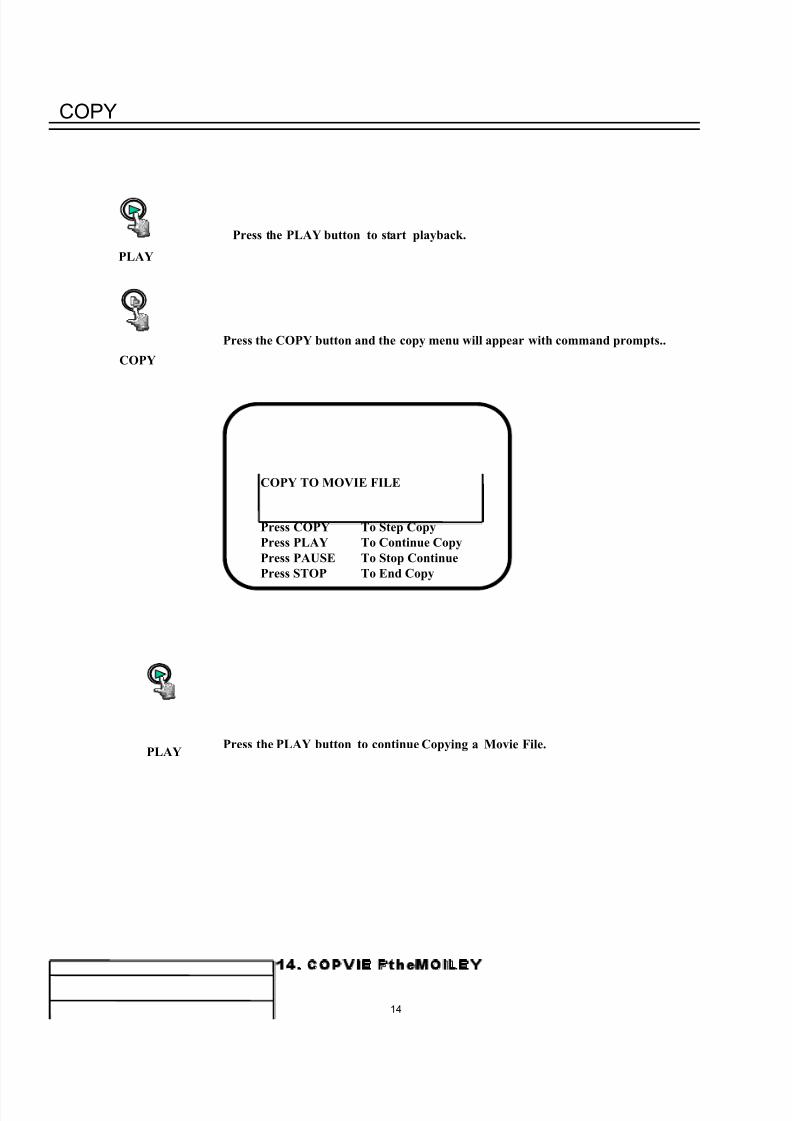
Press the COPY button and the copy menu will appear with command prompts..
COPY
14
Press the PLAY button to start playback.
PLAY
PLAYPress the PLAY button to continue Copying a Movie File.
COPY TO MOVIE FILE
Press COPY
Press PLAY
Press PAUSE
Press STOP
To Step Copy
To Continue Copy
To Stop Continue
To End Copy
14. COPY the MOVIE FILE
8/7/2019 EDSR100_manual
http://slidepdf.com/reader/full/edsr100manual 15/20
COPY
15
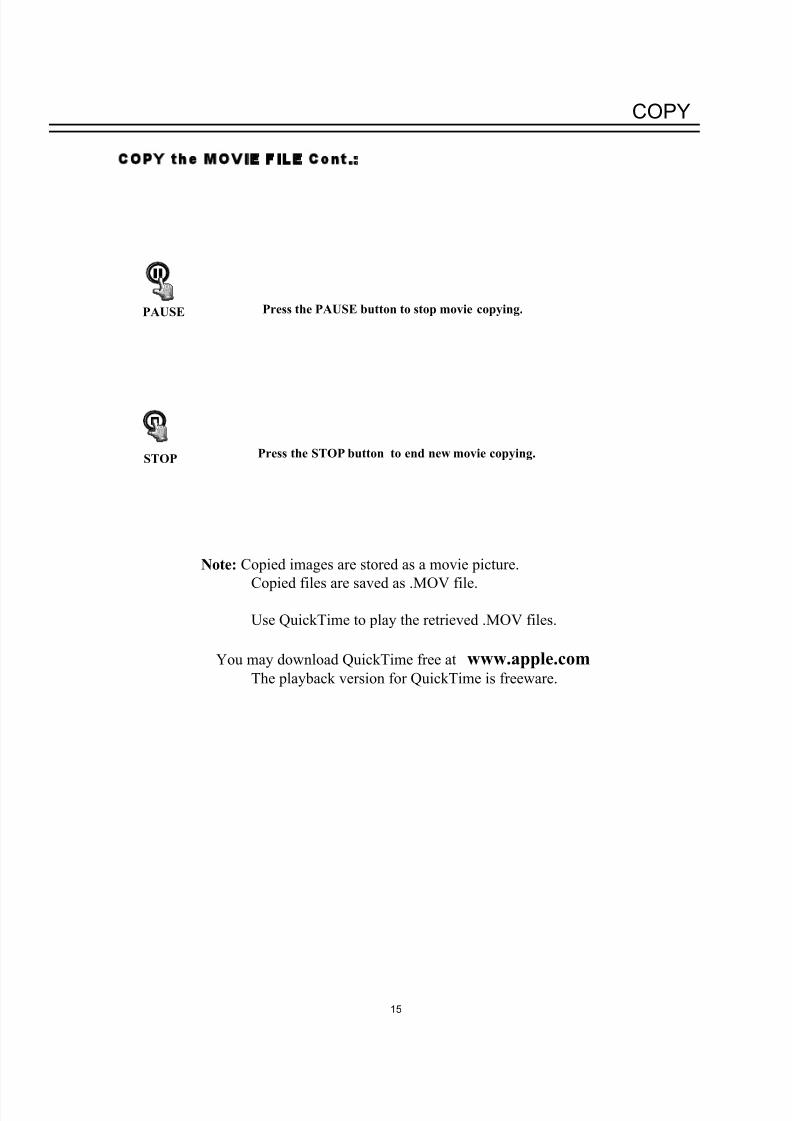
Press the PAUSE button to stop movie copying.PAUSE
Press the STOP button to end new movie copying.STOP
Note: Copied images are stored as a movie picture.
Copied files are saved as .MOV file.
Use QuickTime to play the retrieved .MOV files.
You may download QuickTime free at www.apple.comThe playback version for QuickTime is freeware.
COPY the MOVIE FILE Cont.:

8/7/2019 EDSR100_manual
http://slidepdf.com/reader/full/edsr100manual 16/20
Optional Remote Controller
The remote controller is an accessory to
enhance the handy operations of EDSR100
(Figure 1). You can operate all functions
settings via the IR remote control.
The effective distance is up to 10 meters
without any obstacle. The keypad functions are
identical to the front panel button controls.
RC-100
Figure 1
16
(Optional)
16. Remote Controller
RC-100
8/7/2019 EDSR100_manual
http://slidepdf.com/reader/full/edsr100manual 17/20
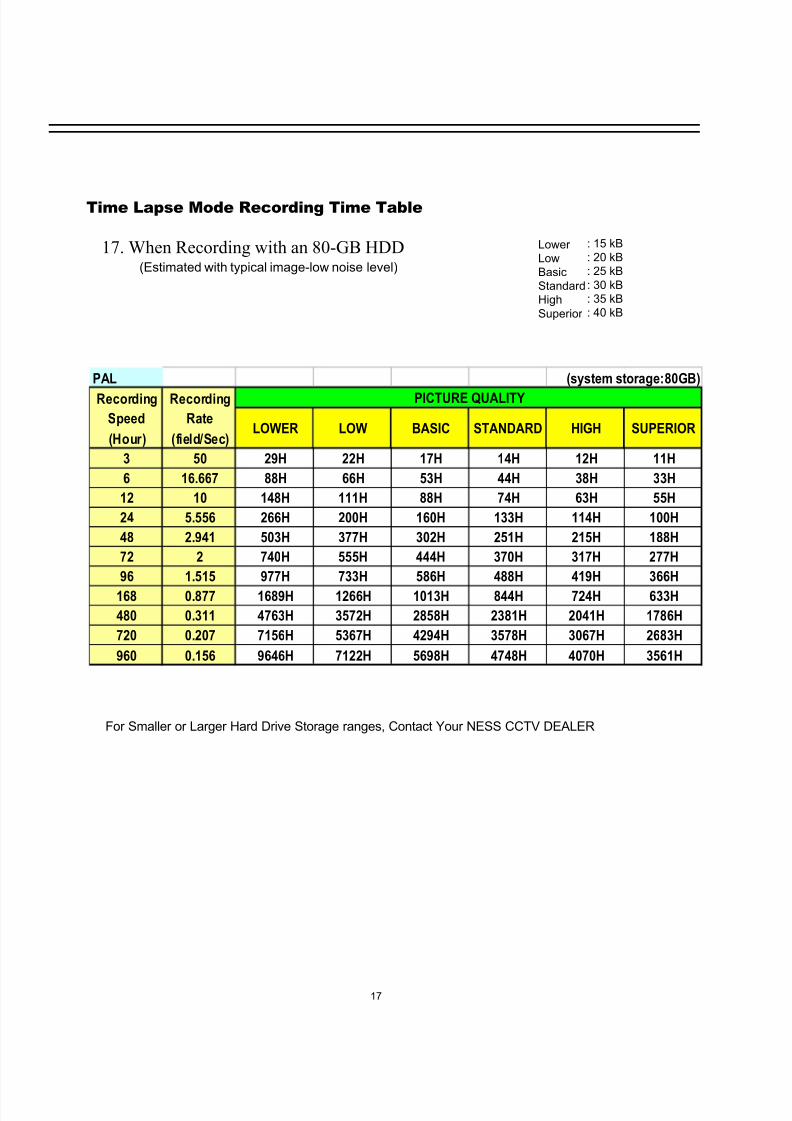
17. When Recording with an 80-GB HDD Lower
Low
Basic
Standard
High
Superior
: 15 kB
: 20 kB
: 25 kB
: 30 kB
: 35 kB
: 40 kB
(Estimated with typical image-low noise level)
Time Lapse Mode Recording Time Table
PAL (system storage:80GB)
Recording Recording
Speed Rate
(Hour) (field/Sec)
3 50 29H 22H 17H 14H 12H 11H
6 16.667 88H 66H 53H 44H 38H 33H
12 10 148H 111H 88H 74H 63H 55H
24 5.556 266H 200H 160H 133H 114H 100H
48 2.941 503H 377H 302H 251H 215H 188H
72 2 740H 555H 444H 370H 317H 277H
96 1.515 977H 733H 586H 488H 419H 366H
168 0.877 1689H 1266H 1013H 844H 724H 633H
480 0.311 4763H 3572H 2858H 2381H 2041H 1786H
720 0.207 7156H 5367H 4294H 3578H 3067H 2683H
960 0.156 9646H 7122H 5698H 4748H 4070H 3561H
PICTURE QUALITY
SUPERIORHIGHSTANDARDBASICLOWLOWER
17
For Smaller or Larger Hard Drive Storage ranges, Contact Your NESS CCTV DEALER

8/7/2019 EDSR100_manual
http://slidepdf.com/reader/full/edsr100manual 18/20
SECURITY LOCK SETTING
When you Press STOP Button, the system will ask for the password.
By entering the correct password, all buttons will be unlocked for use.STOP
REC
Press the REC Button 5 times during record mode, this will lock all
Buttons from Control on the front panel.
18
1 2 3 4 5 6 7 8KEY
Front panel Button / Number configuration.
The Default: PASSWORD = 888888By pressing the Display button ( 8 ) six times the system will UNLOCK.
NOTE: Keep this Page in a Safe Location, away from NON Users of NOTE: Keep this Page in a Safe Location, away from NON Users of the Systemthe System

8/7/2019 EDSR100_manual
http://slidepdf.com/reader/full/edsr100manual 19/20
TECH HELP: POWER FAILURE REBOOT / RESET Procedure.
Due to the sensitivity of any Digital Recorder or Computer utilizing an Hard Drive
it is vital to ensure that the system is maintained by proper power connection.
This can be achieved by providing a stable power supply ( 240VAC ).
If, Mains power is not stable and your site is affected by power black outs or
fluctuations, then it is highly recommended that you provide the EDSR system a
suitable Uninterrupted Power Supply ( UPS ). This will ensure correct and stable
operation of your video recordings to the Hard Drive and also ensure that your investment towards an NESS CCTV system is secured, resulting in many trouble
free years of operation.
If your system has experienced an power black-out and the system does not
resume operation, which was caused by a high voltage start up ( brown out ),
then the following procedure should be performed.
1) Turn Off the EDSR100, ( Switch at Rear of Unit ).
2) Open the Hard Drive Cover and disconnect the Hard Drive by turning
the Hard Drive Key Lock OFF.
3) Turn ON the EDSR100, wait for the LCD screen to display normal time date,
status information.
4) Turn ON the Hard Drive Lock, wait for the ( System Loading ) indication on the
Monitor to stop flashing and disappear, Now Press REC to resume normal
recording.
The System is now Reset and functioning properly.
If, this reboot procedure does not work first time, repeat all 4 steps,
If the system after repeating these steps does not reboot,
Call your NESS DEALER for Service attention.
19

8/7/2019 EDSR100_manual
http://slidepdf.com/reader/full/edsr100manual 20/20
Copyright NotiCe
All s svd. N a f s ublcan ma b ducd, ansmd sd n a val ssm n an fm b an mans,
lcnc, mcancal, cn, cdn, ws, wu wn mssn f Nss.
Nss svs mak cans faus and scfcans a an m wu nfcan n ns f nnduc dvlmn and mvmn.
© 2008 Nss Scu pducs p Ld ABN 28 069 984 372
Head Office:Ness Security Products Pty Ltd
ABN 28 069 984 372
Ph +61 2 8825 9222 Fax +61 2 9674 [email protected]
NSWPh 02 8825 9222 Fax 02 9674 2520
VIC
Ph 03 9875 6400 Fax 03 9875 [email protected]
QLDPh 07 3399 4910 Fax 07 3217 9711
WA
Ph 08 9328 2511 Fax 08 9227 7073
SA
Ph 08 8152 0000 Fax 08 8152 [email protected]
www.ness.com.au