edvo-kit #317 western blot analysis referwestern blotting has become a staple in almost every...
TRANSCRIPT

317.180717
317Edvo-Kit #317
Western Blot AnalysisExperiment Objective:
The objective of the experiment is for students to understand the theory and applications of Western Blot Analysis.
See page 3 for storage instructions.
SAMPLE LITERATURE
Please
refer
to in
cluded
weblin
k for c
orrect
versi
on.

PageExperiment Component 3Experiment Requirements 3
Background Information Western Blot Analysis 4
Experiment Procedures Experiment Overview 6 Electrophoresis of Proteins 7 Western Blot Procedure 11 Immunodetection 12 Study Questions 13
Instructor’s Guidelines Notes to the Instructor 14 Pre-Lab Preparations 15 Experiment Results & Analysis 18 Answers to Study Questions 19
Safety Data Sheets can be found on our website: www.edvotek.com/safety-data-sheets
EDVOTEK and The Biotechnology Education Company are registered trademarks of EDVOTEK, Inc.
Table of Contents
WESTERN BLOT ANALYSIS EDVO-Kit 317
1.800.EDVOTEK • Fax 202.370.1501 • [email protected] • www.edvotek.com
2
Duplication of any part of this document is permitted for non-profit educational purposes only. Copyright © 2018 EDVOTEK, Inc., all rights reserved. 317.180717
WESTERN BLOT ANALYSIS EDVO-Kit 317

Experiment Requirements (NOT included with this experiment)
• 12% Denaturing Polyacrylamide gels (3)• Vertical Gel Electrophoresis Apparatus (Cat. #581 recommended)• D.C. Power Supply• Shaker Platform (optional)• Adjustable Pipettes with Tips• Microtest (Microcentrifuge) Tubes• Beakers• Transfer Pipets• Graduated Cylinders• Plastic Wrap• Scissors• Trays or Containers• Forceps• Several Packs of Paper Towels• Latex or Vinyl Lab Gloves• Safety Goggles• 95-100% Methanol• Distilled Water
Experiment Components
This experiment contains enough reagents for 6 lab groups, with 2 groups sharing a gel.
Enough membrane is
provided to accommodate blotting of three 8 x 10 cm gels.
The samples, controls,
and markers are ready for electrophoresis after dilu-tion, no boiling required.
Components A - I should be stored in the refrigerator. All other
components can be stored at room temperature.
All experiment components are intended for educational research only. They are not to be used for diagnostic or drug purposes, nor administered to or consumed by humans or animals.
None of the experiment components are derived from human sources.
WESTERN BLOT ANALYSISEDVO-Kit 317
3
1.800.EDVOTEK • Fax 202.370.1501 • [email protected] • www.edvotek.com
Duplication of any part of this document is permitted for non-profit educational purposes only. Copyright © 2018 EDVOTEK, Inc., all rights reserved. 317.180717
WESTERN BLOT ANALYSISEDVO-Kit 317
Component Storage Check √
A Pre-stained Protein Standard Markers (lyophilized) Refrigerator qB Negative Control (lyophilized) Refrigerator qC BSA high concentration (lyophilized) Refrigerator qD BSA low concentration (lyophilized) Refrigerator q
Immunochemical and Blotting Reagents
E Anti-BSA Protein Antibody Refrigerator q F Secondary Antibody Conjugate Refrigerator qG Hydrogen Peroxide, stabilized Refrigerator qH Peroxide Co-substrate Refrigerator qI 10x Blocking Buffer Refrigerator qJ Powdered Milk Room Temp. qK 10x PBS Room Temp. q
Store the following components at room temperature.
• 10x Tris-Glycine-SDS Buffer (Chamber Buffer) q• 10x Tris-Glycine Powdered Buffer (Transfer Buffer) q• Practice Gel Loading Solution q• Nitrocellulose Membrane q • Filter Paper q• Large Filter Paper (Wick) q
Cells are composed of carbohydrates, lipids, nucleic acids, and proteins. Proteins are an integral part of every cell, and carry out critical cellular functions including membrane stabilization, signaling, transcription/translation, and energy production. Therefore, a wide variety of proteins exist within a given cell. Indeed, within a single human cell it is estimated that there are approximately 1010 proteins present. Problems in protein production and mutated proteins are responsible for many genetic disorders. How can we detect problems with a specific protein amongst so many other normal proteins? One method that scientists have developed is the Western Blot.
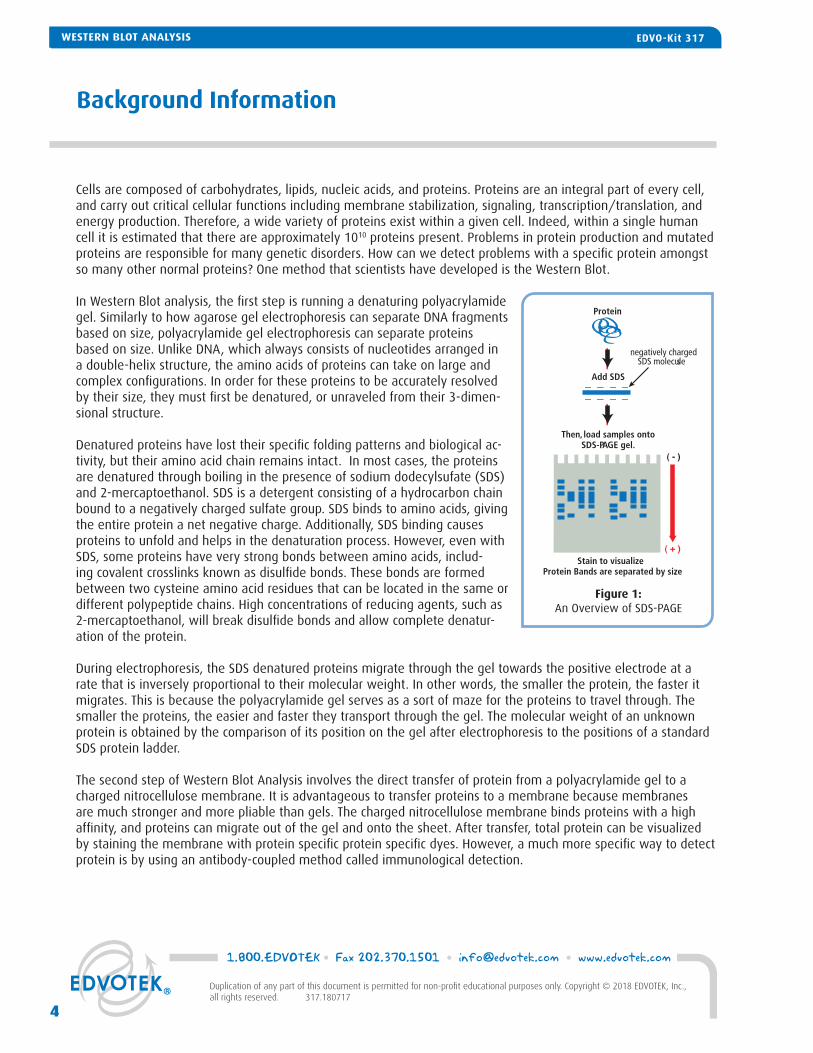
In Western Blot analysis, the first step is running a denaturing polyacrylamide gel. Similarly to how agarose gel electrophoresis can separate DNA fragments based on size, polyacrylamide gel electrophoresis can separate proteins based on size. Unlike DNA, which always consists of nucleotides arranged in a double-helix structure, the amino acids of proteins can take on large and complex configurations. In order for these proteins to be accurately resolved by their size, they must first be denatured, or unraveled from their 3-dimen-sional structure.
Denatured proteins have lost their specific folding patterns and biological ac-tivity, but their amino acid chain remains intact. In most cases, the proteins are denatured through boiling in the presence of sodium dodecylsufate (SDS) and 2-mercaptoethanol. SDS is a detergent consisting of a hydrocarbon chain bound to a negatively charged sulfate group. SDS binds to amino acids, giving the entire protein a net negative charge. Additionally, SDS binding causes proteins to unfold and helps in the denaturation process. However, even with SDS, some proteins have very strong bonds between amino acids, includ-ing covalent crosslinks known as disulfide bonds. These bonds are formed between two cysteine amino acid residues that can be located in the same or different polypeptide chains. High concentrations of reducing agents, such as 2-mercaptoethanol, will break disulfide bonds and allow complete denatur-ation of the protein.
During electrophoresis, the SDS denatured proteins migrate through the gel towards the positive electrode at a rate that is inversely proportional to their molecular weight. In other words, the smaller the protein, the faster it migrates. This is because the polyacrylamide gel serves as a sort of maze for the proteins to travel through. The smaller the proteins, the easier and faster they transport through the gel. The molecular weight of an unknown protein is obtained by the comparison of its position on the gel after electrophoresis to the positions of a standard SDS protein ladder.
The second step of Western Blot Analysis involves the direct transfer of protein from a polyacrylamide gel to a charged nitrocellulose membrane. It is advantageous to transfer proteins to a membrane because membranes are much stronger and more pliable than gels. The charged nitrocellulose membrane binds proteins with a high affinity, and proteins can migrate out of the gel and onto the sheet. After transfer, total protein can be visualized by staining the membrane with protein specific protein specific dyes. However, a much more specific way to detect protein is by using an antibody-coupled method called immunological detection.
Background Information
Figure 1: An Overview of SDS-PAGE
Stain to visualize.Protein Bands are separated by size.
Protein
Add SDS
Then, load samples onto SDS-PAGE gel.
negatively charged SDS molecules
WESTERN BLOT ANALYSIS EDVO-Kit 317
1.800.EDVOTEK • Fax 202.370.1501 • [email protected] • www.edvotek.com
4
Duplication of any part of this document is permitted for non-profit educational purposes only. Copyright © 2018 EDVOTEK, Inc., all rights reserved. 317.180717
WESTERN BLOT ANALYSIS EDVO-Kit 317

For immunological detection, the membrane is placed in blocking buffer which contains detergents and block-ing proteins that bind to all unoccupied sites on the membrane. The membrane has a limited protein-binding capacity, so by saturating the sites with a non-specific protein mixture, such as milk proteins, it ensures that no accidental contamination of the membrane occurs. The membrane is then incubated in buffer that con-tains antibody to one or more of the blotted proteins. The primary antibody binds specifically to the adsorbed protein antigen. Subsequent washings will remove excess, unbound antibody. A secondary antibody against the primary antibody is then applied. This secondary antibody recognizes the primary antibody and is often linked to an enzyme such as horseradish peroxidase for detection. It is critical that all non-bound secondary antibody is washed off, to be sure that the detection is specific to secondary antibody that is bound to the primary antibody. Finally, the membrane is incubated with a solution containing peroxidase substrates that develops a brown color when it interacts with the horseradish peroxidase on the secondary antibody.
Western blotting has become a staple in almost every laboratory because of its specificity and ability to detect small amounts of protein. It can be used for detection of mutated proteins, the absence of a protein, identification of protein binding partners, and many other research and diagnostic applications.
Step 1 - Primary Antibody
Step 2 - Secondary Antibody
Step 3 - Detect signal
Figure 2: Western Blot Detection
5
1.800.EDVOTEK • Fax 202.370.1501 • [email protected] • www.edvotek.com
Duplication of any part of this document is permitted for non-profit educational purposes only. Copyright © 2018 EDVOTEK, Inc., all rights reserved. 317.180717
WESTERN BLOT ANALYSISEDVO-Kit 317

EXPERIMENT OBJECTIVE
The objective of this experiment is for students to understand the theory and applications of Western Blot Analysis.
LABORATORY SAFETY
1. Gloves and goggles should be worn routinely as good laboratory practice.
2. Exercise extreme caution when working with equipment that is used in conjunction with the heating and/or melting of reagents.
3. DO NOT MOUTH PIPET REAGENTS - USE PIPET PUMPS.
4. Exercise caution when using any electrical equipment in the laboratory.
5. Always wash hands thoroughly with soap and water after handling reagents or biological materials in the laboratory.
LABORATORY NOTEBOOKS
Address and record the following in your laboratory notebook or on a separate worksheet.
Before starting the Experiment:
• Write a hypothesis that reflects the experiment. • Predict experimental outcomes.
During the Experiment:
• Record (draw) your observations, or photograph the results.
After the Experiment:
• Formulate an explanation from the results. • Determine what could be changed in the experiment if the experiment were repeated. • Write a hypothesis that would reflect this change.
Experiment Overview
Wear gloves and safety goggles
WESTERN BLOT ANALYSIS EDVO-Kit 317
1.800.EDVOTEK • Fax 202.370.1501 • [email protected] • www.edvotek.com
6
Duplication of any part of this document is permitted for non-profit educational purposes only. Copyright © 2018 EDVOTEK, Inc., all rights reserved. 317.180717
WESTERN BLOT ANALYSIS EDVO-Kit 317

Electrophoresis of Proteins
A polyacrylamide gel cassette in the EDVOTEK® Vertical Electrophoresis Apparatus, Model #MV10.
Negative ElectrodeBlack Dot (-)
BufferLevel
Sample Well
Long Cassette Plate
Polyacrylamide Gel
Viewing Level(cut out area on
front support panel)
Platinum wire
Short Cassette Plate
Gel CassetteClip
Micropipet withFine tip
PREPARING THE POLYACRYLAMIDE GEL AND CHAMBER
NOTE: Although precast polyacrylamide gels and protein chambers will vary slightly indesign, the procedure for their use will be similar.
1. OPEN the pouch containing the gel cassette. Remove the cassette and place on bench with the shorter front plate facing up.
2. Gels may feature a sticker or tape at the bottom of the front plate. REMOVE the tape (if present) to expose the bottom of the gel.
3. Carefully REMOVE the comb by gently pulling upwards. Pull the comb straight up to prevent damage to the wells of the gel.
4. INSERT the gel into the electrophoresis chamber. Orient the gel according to the manufacturer’s instructions. NOTE: For EDVOTEK® vertical electrophoresis chambers, the short plate should face the middle of the apparatus.
5. ADD diluted electrophoresis buffer to the chamber. The buffer should cover the top of the shorter plate.
6. RINSE each well by squirting electrophoresis buffer into the wells using a transfer pipet. Using the transfer pipet, carefully straighten any wells which may have been distorted during comb removal or rinsing.
The gel is now ready for practice gel loading or sample loading.
1. 4. 5. 6.2. 3.OPEN pouch.
REMOVE tape. REMOVE comb.
INSERT gel.
ADD buffer.
RINSE wells.
Wear gloves and safety goggles
WESTERN BLOT ANALYSISEDVO-Kit 317
7
1.800.EDVOTEK • Fax 202.370.1501 • [email protected] • www.edvotek.com
Duplication of any part of this document is permitted for non-profit educational purposes only. Copyright © 2018 EDVOTEK, Inc., all rights reserved. 317.180717
WESTERN BLOT ANALYSISEDVO-Kit 317

PRACTICE GEL LOADING (OPTIONAL)
1. PLACE a fresh tip on the micropipette. REMOVE 20 µl of practice gel loading solution.2. PLACE the lower portion of the pipette tip below the surface of the electrode buffer,
directly over a sample well. The tip should be at an angle pointed towards the well. The tip should be partially against the back plate of the gel cassette, but the tip open-ing should be over the sample well. Do not try to jam the pipette tip in between the plates of the gel cassette.
3. EJECT all the sample by steadily pressing down on the plunger of the automatic pipette. Do not release the plunger before all the sample is ejected. Premature release of the plunger will cause buffer to mix with sample in the micropipette tip. Release the pipette plunger after the sample has been delivered and the pipette tip is out of the buffer.
4. REMOVE the practice gel loading solution from the sample wells. FILL a transfer pipette with buffer and SQUIRT a stream into the sample wells. This will displace the practice gel loading solution, which will be diluted into the buffer and will not interfere with the experiment. NOTE: Practice gel loading solution must be removed from the sample wells prior to sample loading.
2 0
.0
1. 2.
2 0.0
3. 4.
Electrophoresis of Proteins, continued
Wear gloves and safety goggles
1.800.EDVOTEK • Fax 202.370.1501 • [email protected] • www.edvotek.com
8
Duplication of any part of this document is permitted for non-profit educational purposes only. Copyright © 2018 EDVOTEK, Inc., all rights reserved. 317.180717
WESTERN BLOT ANALYSIS EDVO-Kit 317

Electrophoresis of Proteins, continued
LOADING THE PROTEIN SAMPLES
Two student groups can share one gel. The first group should load samples into wells 1 - 4. The other group sharing the gel should load samples into wells 7 - 10 (see Table 1).
1. Using a fresh fine tip micropipette tip, MEASURE 20 µL of the first sample as indicated in Table 1. Sample A is the protein standard marker and should go in the first lane of your group's half of the gel.
2. PLACE the pipette tip under the buffer and directly above the sample well, resting gently against the back plate of the gel cassette.
3. Slowly DISPENSE the sample by depressing the plunger.4. REPEAT steps 1-3 for remaining samples in Table 1, changing the tip between each new sample.
NOTE: Be sure to change pipette tips between loading each sample!
RUNNING THE GEL
5. Once all samples have been loaded, carefully PLACE the cover onto the electrode terminals. 6. CONNECT the electrical leads to the power supply. 7. SET the voltage of the power supply and PERFORM electrophoresis
(See Table A for time and voltage guidelines). Allow the proteins to separate on the gel for the recommended length of time, or until the tracking dye reaches the bottom of the gel.
Note: When the current is flowing, you should see bubbles forming on the electrodes.
Time and Voltage Guidelines
MinimumVolts
100
125
150
80 min.
60 min.
50 min.
Table
ARecommended Time
Optimal
95 min.
75 min.
60 min.
Lane Sample
1
2
3
4
5
6
7
8
9
10
Sample A (Group 1)
Sample B (Group 1)
Sample C (Group 1)
Sample D (Group 1)
Sample A (Group 2)
Sample B (Group 2)
Sample C (Group 2)
Sample D (Group 2)
Table 1: Gel Loading
2 0
.0
1. 2.
2 0.0
3. 4. Repeat steps 1-3for remaining
samples.
6. 7.5.
9
1.800.EDVOTEK • Fax 202.370.1501 • [email protected] • www.edvotek.com
Duplication of any part of this document is permitted for non-profit educational purposes only. Copyright © 2018 EDVOTEK, Inc., all rights reserved. 317.180717
WESTERN BLOT ANALYSISEDVO-Kit 317

8. After the electrophoresis is finished, TURN OFF the power supply, disconnect the leads, and carefully REMOVE the cover.
9. REMOVE the gel cassette from the electrophoresis apparatus and BLOT off excess buffer with a paper towel.10. REMOVE the front plate by: a. Lay cassette down on the table and locate the gap between the front and back plates on the corners of
the cassette. b. Use a spatula, or a similarly thin object, to tork the plates apart at the upper left corner. c. Repeat in all 4 corners of the plate and, if necessary, in the center of the left and right sides of the cas-
sette. d. Continue to repeat b and c until the 2 plates loosen apart. e. Carefully remove the top plate. 11. PLACE the gel in transfer buffer and carefully REMOVE the gel from the back plate. SOAK for 10 minutes. The
gel is now ready for the Western Blot Procedure.
Electrophoresis of Proteins, continued
8. 9. 1.10. 11.
10min.10min.
1.800.EDVOTEK • Fax 202.370.1501 • [email protected] • www.edvotek.com
10
Duplication of any part of this document is permitted for non-profit educational purposes only. Copyright © 2018 EDVOTEK, Inc., all rights reserved. 317.180717
WESTERN BLOT ANALYSIS EDVO-Kit 317

Western Blot Procedure
1. Pre-soak wick, blotting paper, and nitrocellulose membranes in transfer buffer for 5-10 min. When handling nitrocellulose membranes, be sure to handle them by their edges. Carefully slide the membrane out of the blue protective covers and transfer using for-ceps to the transfer buffer.
2. Place large gel plate on top of a container approximately 16 x 9 x 4 cm (L x W x D). Add transfer buffer to the tray and place presoaked wick onto gel plate such that ends are submerged in 2 cm of transfer buffer (see Figure 2).
Wear gloves when handling nitrocellulose
membrane to avoid transferring oil from your skin which will interfere with the protein transfer.
Figure 2: Top view of the blot transfer assembly.
Glass PlatePaper Towels
Nitrocellulose MembranesGel
WickLarge Gel Plate
Container
Transfer Buffer
Blotting Paper
0.7-1.0 kg
Figure 4: Side view of the blot transfer assembly.
Transfer Buffer
Container
Large gelplate
Wick
Tracking dye
Gel
10 9 8 7 6 5 4 3 2 1
Group 2 Group 1
NitrocelluloseMembrane
NitrocelluloseMembrane
3. Flip the gel so that the ladder is now on the right, and place gel flat on top of wick. Smooth over top of gel to remove air bubbles. An easy way to smooth the gel over is to use a large pipette tip as a roller.
4. Place nitrocellulose membranes on top of the groups's respective gel lanes (Figure 3). 5. Place the two pieces of blotting paper (from step 1) on top of the membrane. Smooth over to remove all air
bubbles underneath. An easy way to smooth the gel over is to use a large pipette tip as a roller.
6. Place a 6 cm stack of paper towels on top of blotting paper. Finally, place a
1 kg weight on top of stack to complete assembly, as shown in Figure 4.
Figure 3: Placing the nitrocellulose membranes.
STOPPING POINT
Allow transfer to take placeovernight (12-15 hours).
WESTERN BLOT ANALYSISEDVO-Kit 317
11
1.800.EDVOTEK • Fax 202.370.1501 • [email protected] • www.edvotek.com
Duplication of any part of this document is permitted for non-profit educational purposes only. Copyright © 2018 EDVOTEK, Inc., all rights reserved. 317.180717
WESTERN BLOT ANALYSISEDVO-Kit 317

1. DISMANTLE the stack above the membrane. Carefully REMOVE the membrane from the gel with forceps or a spatula. VERIFY that the transfer occurred by the presence of prestained protein ladder on the membrane.
2. TRANSFER the group's membrane to a small tray or small sealable plastic bag containing 10 mL blocking buffer (membrane should be submerged) and occa-sionally agitate for 5 minutes. DISCARD the blocking buffer.
3. ADD 10 mL of primary antibody solution which has been prepared by your instructor. INCUBATE for one hour at room temperature on a rotating or shaking platform. DISCARD the primary antibody solution.
4. WASH the membrane for 5 minutes in 10 mL blocking buffer. DISCARD the block-ing buffer. REPEAT wash.
5. ADD 10 mL of secondary antibody solution which has been prepared by your instructor. INCUBATE for one hour at room temperature on a rotating or shaking platform. DISCARD the secondary antibody solution.
6. WASH the membrane for 5 minutes in 10 mL PBS. DISCARD the PBS. REPEAT wash.
7. ADD 10 mL substrate solution which has been prepared by your instructor. IN-CUBATE for 5-10 minutes or until color development is observed. DISCARD the substrate solution.
8. WASH membrane with water and then air dry on a paper towel. Alternatively, you can blot the edge of the membrane onto a paper towel.
9. COMPARE the size of the samples containing the various concentrations relative to the protein standard markers.
Immunodetection
NOTE:The lid from a micro-pipette rack (200 µL size) works well for a tray to incubate the membrane.
NOTE:Substrate is prepared by your instructor just prior to use.
1. 2. 3. 4.
10min.
WASH with 10 mlFRESH blocking
buffer.5min.
5min.1
hour
10 mlblocking
buffer.
10 ml primaryantibody solution.
DISCARD buffer.
DISCARD solution.
DISCARD buffer and REPEAT.
5.
6.
1hour
10 ml secondaryantibody solution.
DISCARD solution.
WASH with 10 mlPBS. DISCARD
PBS and REPEAT.
5min.
7. 10 mlsubstrate solution.
Until color developmentis observed.
8. WASH withwater. DISCARD.
9. COMPAREAIR DRY on apaper towel.
WESTERN BLOT ANALYSIS EDVO-Kit 317
1.800.EDVOTEK • Fax 202.370.1501 • [email protected] • www.edvotek.com
12
Duplication of any part of this document is permitted for non-profit educational purposes only. Copyright © 2018 EDVOTEK, Inc., all rights reserved. 317.180717
WESTERN BLOT ANALYSIS EDVO-Kit 317

Study Questions
Answer the following study questions in your laboratory notebook or on a separate worksheet.
1. Why are the electrophoretically fractionated proteins transferred to a membrane for immunological detection?
2. Why is the membrane blocked before incubation with milk?
3. What is the advantage of performing a Western Blot over visualizing proteins using a total protein stain?
4. What is the purpose of the negative and positive controls?
WESTERN BLOT ANALYSISEDVO-Kit 317
13
1.800.EDVOTEK • Fax 202.370.1501 • [email protected] • www.edvotek.com
Duplication of any part of this document is permitted for non-profit educational purposes only. Copyright © 2018 EDVOTEK, Inc., all rights reserved. 317.180717
WESTERN BLOT ANALYSISEDVO-Kit 317

Instructor's Guide
1.800.EDVOTEK • Fax 202.370.1501 • [email protected] • www.edvotek.com
14
Duplication of any part of this document is permitted for non-profit educational purposes only. Copyright © 2018 EDVOTEK, Inc., all rights reserved. 317.180717
INSTRUCTOR'S GUIDE WESTERN BLOT ANALYSIS EDVO-Kit 317
NOTES TO THE INSTRUCTOR
This experiment requires three 12% Denaturing Polyacrylamide Gels to be shared by the 6 student groups. Each group requires 4 sample wells.
Class size, length of laboratory sessions, and availability of equipment are factors which must be considered in the planning and the implementation of this experiment with your students. These guidelines can be adapted to fit your specific set of circumstances.
If you do not find the answers to your questions in this section, a variety of resources are continuously being added to the EDVOTEK web site. In addition, Technical Service is available from 9:00 am to 6:00 pm, Eastern time zone. Call for help from our knowledgeable technical staff at 1-800-EDVOTEK (1-800-338-6835).
Safety Data Sheets can be found on our website:www.edvotek.com/safety-data-sheets

Pre-Lab Preparations
PREPARATIONS FOR ELECTROPHORESIS OF PROTEINS
Specific Requirements for this Experiment
This experiment requires three 12% Denaturing Polyacrylamide Gels to be shared by the 6 student groups. Each group will require 4 sample wells. The protein standard marker (Component A) and Components B, C, and D must be reconstituted.
Protein Denaturation and Reconstitution of Lyophilized Proteins
1. Add 135 µL distilled water to each of the tubes, A-D. Vortex each tube for 30 seconds each, or until completely dissolved. NOTE: These samples are already denatured and do not require boiling. However, they should be loaded at room temperature. If diluting and then freezing, be sure to warm to room temperature before loading.
2. Wear safety goggles and bring a beaker of water, covered with aluminum foil, to a boil. Remove from heat.
3. Aliquot 20 µL of each sample per group.
This experiment contains practice gel loading solution. If you are unfamiliar with gel electrophoresis, it is sug-gested that you practice loading the sample wells before performing the actual experiment. Refer to instruc-tions entitled "Practice Gel Loading Instructions".
Tris-glycine-SDS Buffer (Electrophoresis Buffer Only)
1. Add 1 part EDVOTEK® 10X buffer to every 9 parts distilled water.
2. Make enough 1X buffer for the 3 electrophoresis units (2 liters for three EDVOTEK® units).
Electrophoresis Time and Voltage
Your time requirements will dictate the voltage and the length of time it will take for your samples to separate by electrophoresis. Approximate recommended times are listed in Table A.
Run the gel until the bromophenol blue tracking dye is near the bottom edge of the gel.
Time and Voltage Guidelines
MinimumVolts
100
125
150
80 min.
60 min.
50 min.
Table
ARecommended Time
Optimal
95 min.
75 min.
60 min.
15
1.800.EDVOTEK • Fax 202.370.1501 • [email protected] • www.edvotek.com
Duplication of any part of this document is permitted for non-profit educational purposes only. Copyright © 2018 EDVOTEK, Inc., all rights reserved. 317.180717
INSTRUCTOR'S GUIDEEDVO-Kit 317 WESTERN BLOT ANALYSIS

Pre-Lab Preparations
PREPARATIONS FOR WESTERN BLOT PROCEDURE(Prepare Any Time Before the Lab - Required First Day)
Tris-Glycine Buffer (Transfer Buffer Only)
1. Add the powder contents of the Tris-Glycine Buffer to a flask or beaker (larger than one liter).
2. Add 800 mL distilled or deionized water to the powdered buffer. Swirl and stir to dissolve the powder (a stir plate, if available may be useful).
3. Add 200 mL of 95-100% methanol. Mix, cover tightly, and store in the refrigerator until ready to use.
Nitrocellulose Membranes
NOTE: Wear rinsed and dried lab gloves. Powders from gloves will interfere with the procedure.
1. Keep both upper and lower protective cover sheets around the membranes and make sure the cover sheets and membrane are all aligned. Keep the membrane covered this way during all the following steps.
2. If you are using gels that are smaller or larger than the 8 x 10 cm, you must adjust the dimensions of your membrane squares accordingly. You may also have to alter the sizes of the filter paper and towels the stu-dents prepare. Larger gels may necessitate less groups.
3. Cut six membranes for the groups to share. Each membrane should be roughly the size of half a gel.
Additional Blotting Items
1. Cut two pieces of blotting paper to fit gel.
2. Cut wick to width of gel and length to overhang from edge of tray to within 1/8” edge of tray bottom.
REQUIREMENTS FOR THE FIRST DAY (Reagents for Two Groups)
• One 12% Denaturing Polyacrylamide gel • Boiled components A - D (aliquots if desired)• Practice gel loading solution (optional)• Diluted electrophoresis buffer• 100 mL of diluted transfer buffer• 2 nitrocellulose membranes • 2 filter paper pieces• Wick• Paper towels and plastic wrap• Small plastic boxes for soaking membranes and gels• Pipette• 0.7 - 1.0 kg weight• Small dish (less than width of gel) for transfer
1.800.EDVOTEK • Fax 202.370.1501 • [email protected] • www.edvotek.com
16
Duplication of any part of this document is permitted for non-profit educational purposes only. Copyright © 2018 EDVOTEK, Inc., all rights reserved. 317.180717
INSTRUCTOR'S GUIDE WESTERN BLOT ANALYSIS EDVO-Kit 317

Pre-Lab Preparations
PREPARATIONS FOR IMMUNODETECTION
Reagents for Immunodetection (Prepare on the Day of the Lab - Required Second Day)
1. Dilute 10x blocking buffer by adding 540 mL distilled water. The blocking buffer will likely precipitate during storage. Warm at 37° C for 5-10 minutes or until the precipitate has dissolved.
2. Prepare complete blocking buffer by adding the powdered milk (J) to 600 mL diluted blocking buffer (I).
3. Dilute the Anti-BSA Antibody 1:1000 by adding the entire contents of tube E to 65 mL complete blocking buffer. Rinse tube E to ensure you have all of the Anti-BSA. Refrigerate until use. Aliquot 10 mL to each group before the lab.
4. Dilute the secondary antibody 1:2000 by adding the entire contents of tube F to 65 mL complete blocking buffer. Rinse tube F to ensure you have all of the secondary antibody. Refrigerate until use. Aliquot 10 mL to each group before the lab.
5. Dilute the 10x PBS solution by adding the contents of bottle K (30 mL) to 270 mL distilled water. Dispense 25 mL for each group.
Peroxidase Substrate (Prepare During the Lab Experiment, 15-30 minutes before the last incubation)
NOTE: Do not use Methanol with acrylic materials. Methanol will destroy acrylic.
1. Dispense 68 mL of diluted phosphate buffered saline (PBS) to a clean flask or bea-ker.
2. Add peroxide co-substrate (H) to the 68 mL of PBS. Mix thoroughly by swirling or using a magnetic stir bar. There is usually undissolved material remaining.
3. Then, add 7.5 mL of Hydrogen peroxide (G). Mix well.
4. Dispense 12 mL of the peroxidase substrate for each group.
NOTE:The blocking buffer will likely precipitate during storage. Warm at 37°C for 5-10 minutes or until the precipitate has dissolved.
QUICK REFERENCE:The substrate is pre-pared for the peroxi-dase enzyme, which is attached to the anti-IgG peroxidase conjugate (secondary antibody).
Prepare the substrate 15-30 minutes before students require it for plate development (last incubation).
REQUIREMENTS FOR THE SECOND DAY (Individual Groups)
• Approximately 60 mL complete blocking buffer• 25 mL diluted PBS• 70 mL distilled water• 10 mL diluted secondary antibody conjugate• 10 mL diluted Anti-BSA Antibody• 12 mL prepared substrate
17
1.800.EDVOTEK • Fax 202.370.1501 • [email protected] • www.edvotek.com
Duplication of any part of this document is permitted for non-profit educational purposes only. Copyright © 2018 EDVOTEK, Inc., all rights reserved. 317.180717
INSTRUCTOR'S GUIDEEDVO-Kit 317 WESTERN BLOT ANALYSIS

Expected Results and Analysis
The positive control (ladder) and BSA samples should show an immunoreactive band. The immunoreactive bands roughly cor-respond to a molecular weight of 67 KD. The negative control will not have immunoreactive bands.
Lane Contents
1 A Standard Protein Markers2 B Negative Control3 C BSA high concentration4 D BSA low concentration
94,000 67,000
43,000
30,000
20,100 14,400
BSA aggregates may be present (cross-react with antibody)
BSA also used in standard
markers
1.800.EDVOTEK • Fax 202.370.1501 • [email protected] • www.edvotek.com
18
Duplication of any part of this document is permitted for non-profit educational purposes only. Copyright © 2018 EDVOTEK, Inc., all rights reserved. 317.180717
INSTRUCTOR'S GUIDE WESTERN BLOT ANALYSIS EDVO-Kit 317

Please refer to the kit insert for the Answers to
Study Questions