eecs e6893 big data analytics hw4
TRANSCRIPT

Workflow
● A sequence of tasks involved in moving from the beginning to the end of a working process
● Started on a schedule or triggered by an event
2
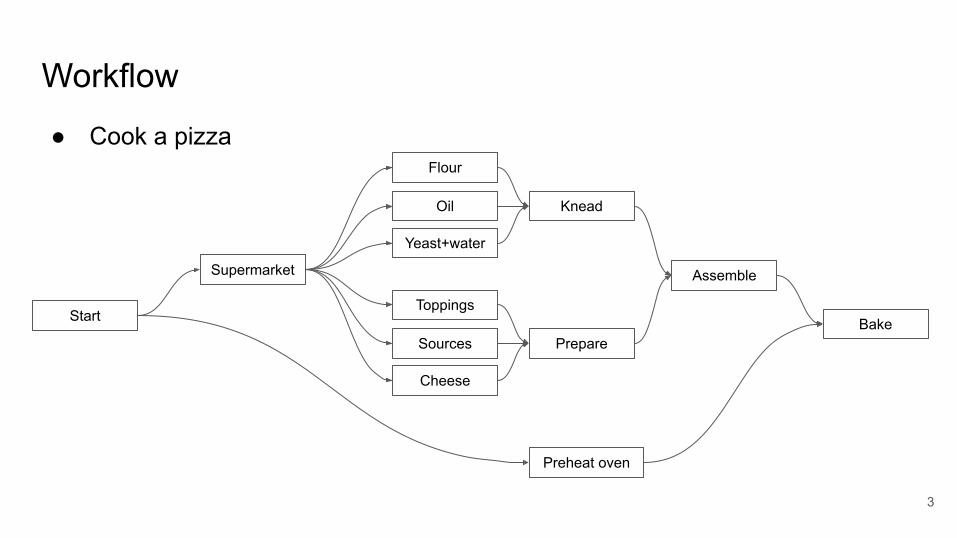
Workflow
● Cook a pizza
3
Flour
Oil
Yeast+water
Knead
Toppings
Sources
Cheese
Prepare
Assemble
Bake
Supermarket
Preheat oven
Start
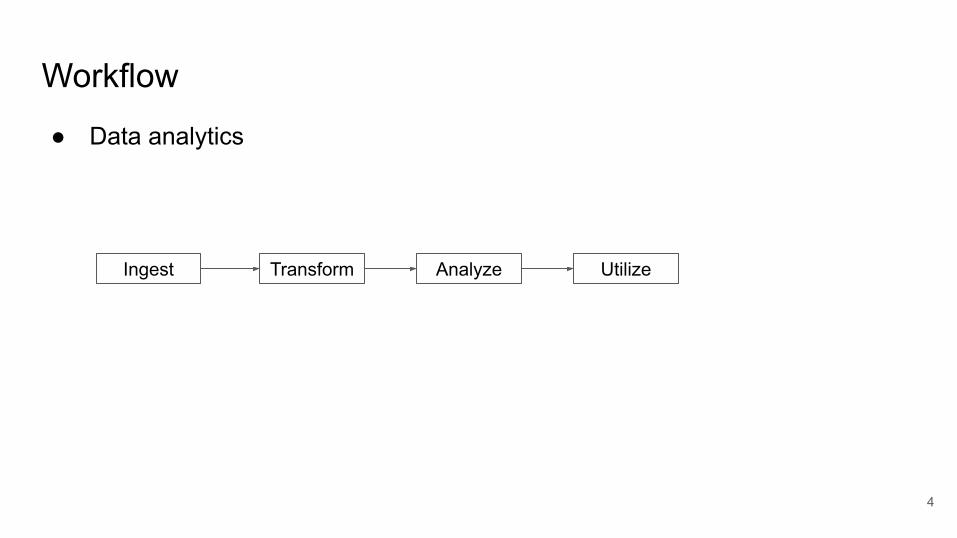
Workflow
● Data analytics
4
Ingest Transform Analyze Utilize
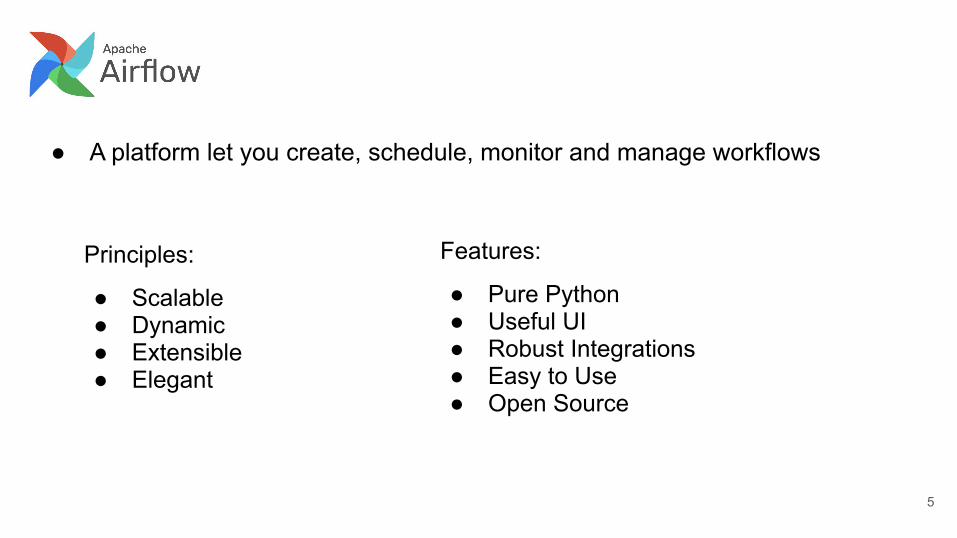
● A platform let you create, schedule, monitor and manage workflows
5
Principles:
● Scalable● Dynamic● Extensible● Elegant
Features:
● Pure Python● Useful UI● Robust Integrations● Easy to Use● Open Source
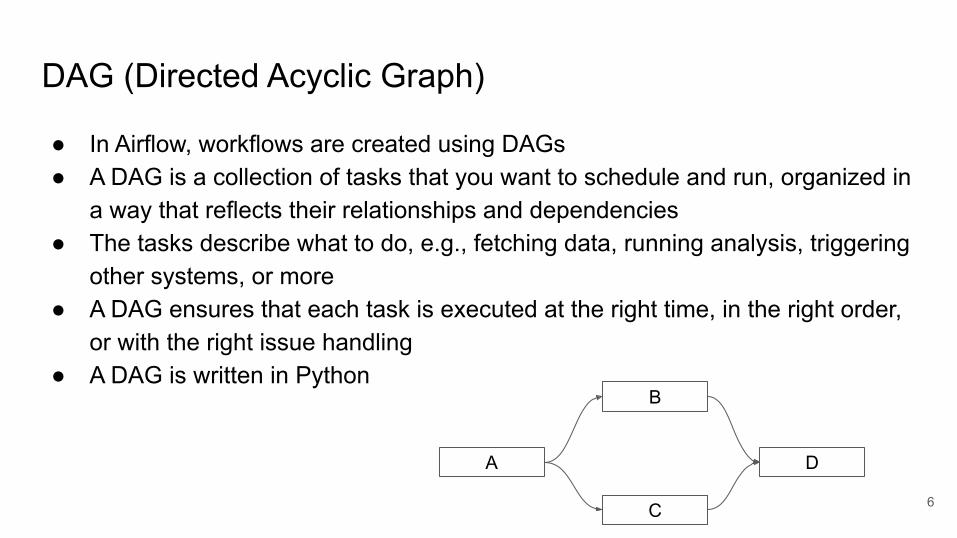
DAG (Directed Acyclic Graph)
6
● In Airflow, workflows are created using DAGs● A DAG is a collection of tasks that you want to schedule and run, organized in
a way that reflects their relationships and dependencies● The tasks describe what to do, e.g., fetching data, running analysis, triggering
other systems, or more● A DAG ensures that each task is executed at the right time, in the right order,
or with the right issue handling● A DAG is written in Python
A
B
D
C
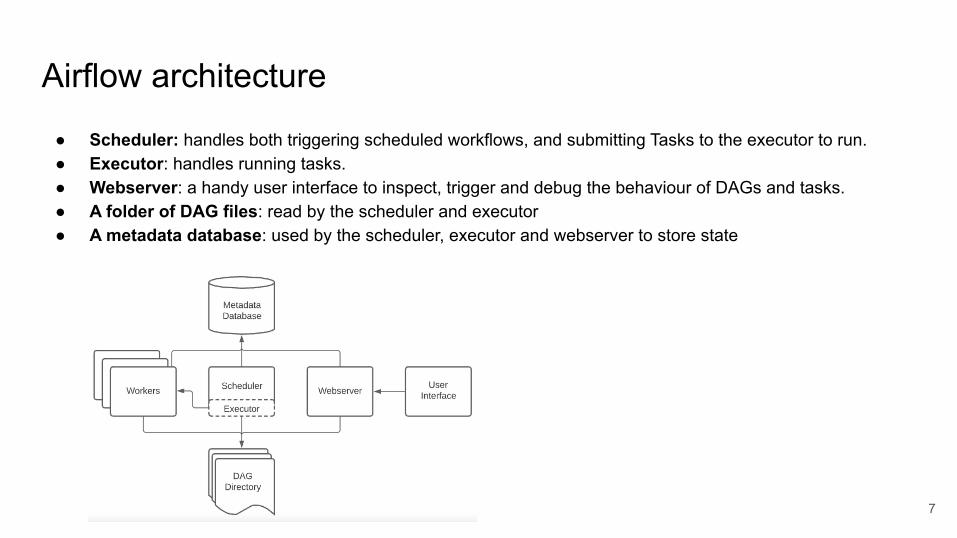
Airflow architecture
● Scheduler: handles both triggering scheduled workflows, and submitting Tasks to the executor to run.● Executor: handles running tasks. ● Webserver: a handy user interface to inspect, trigger and debug the behaviour of DAGs and tasks.● A folder of DAG files: read by the scheduler and executor● A metadata database: used by the scheduler, executor and webserver to store state
7

Airflow installation
8
Three choices
1. Install and use Airflow in the VM of GCP 2. Install and use airflow in your local machines3. Google composer
9
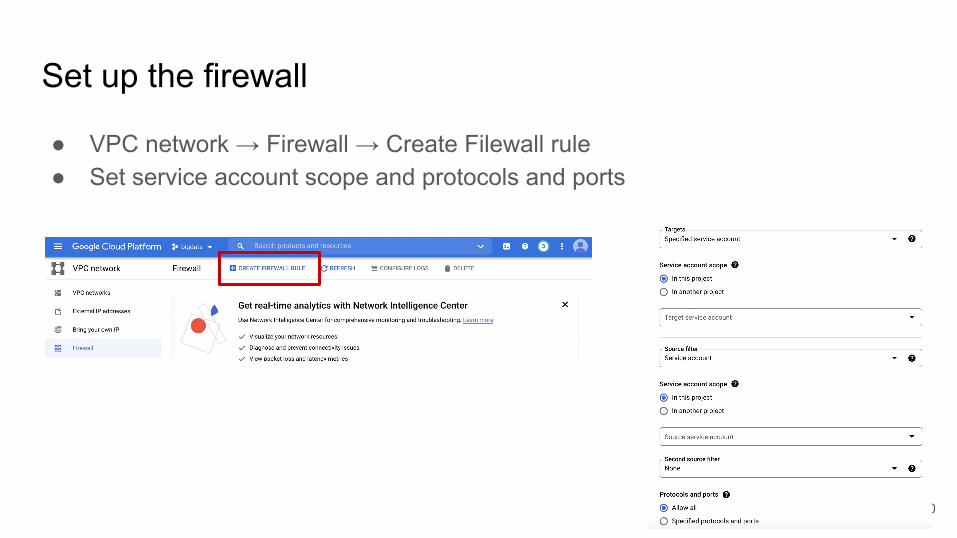
Set up the firewall
● VPC network → Firewall → Create Filewall rule● Set service account scope and protocols and ports
10
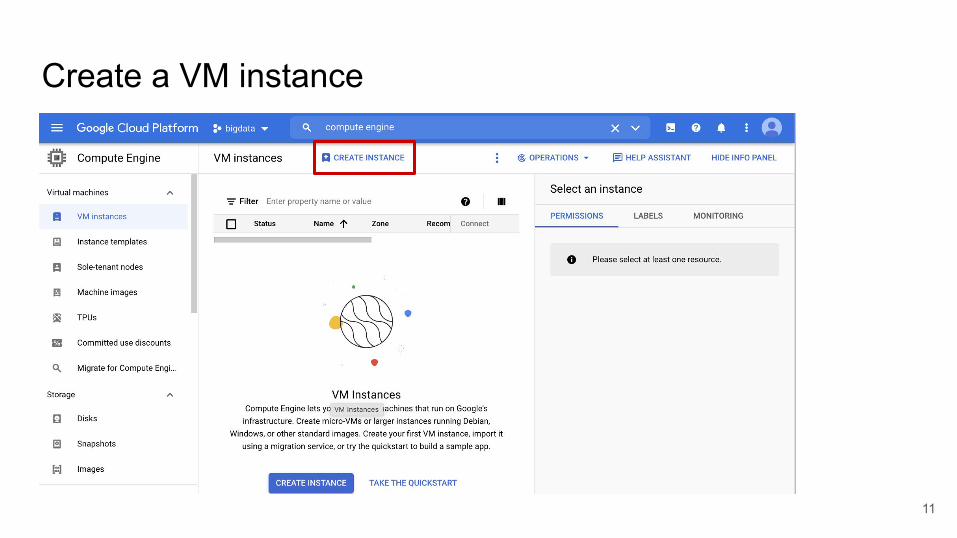
Create a VM instance
11
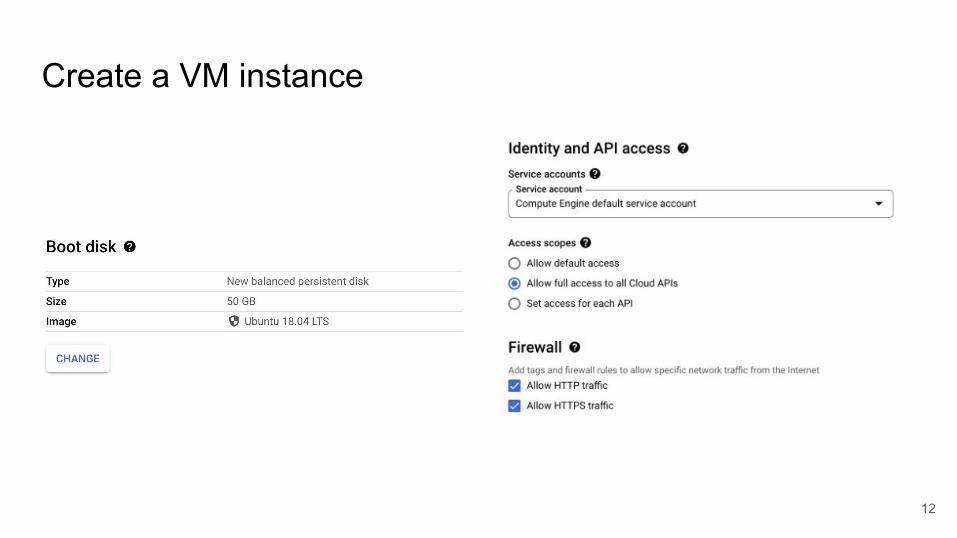
Create a VM instance
12
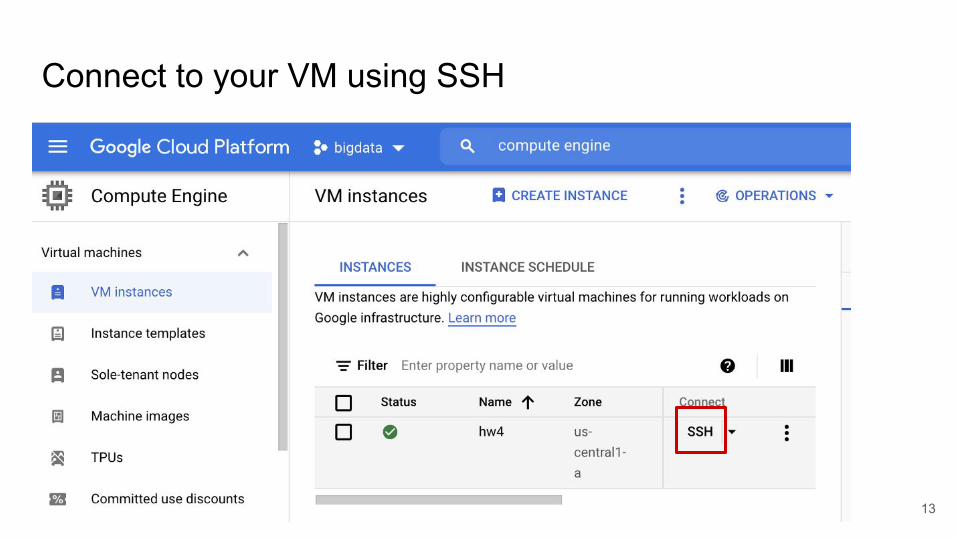
Connect to your VM using SSH
13
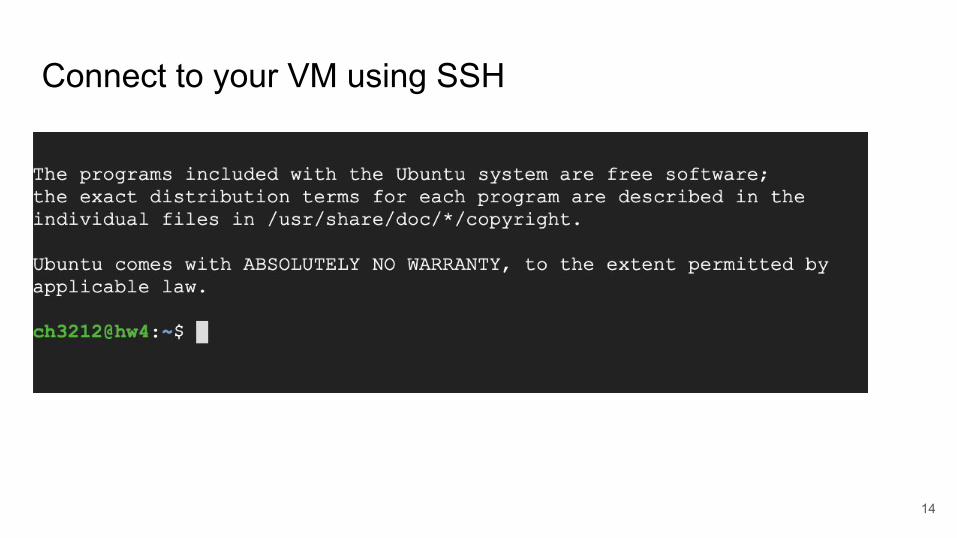
Connect to your VM using SSH
14
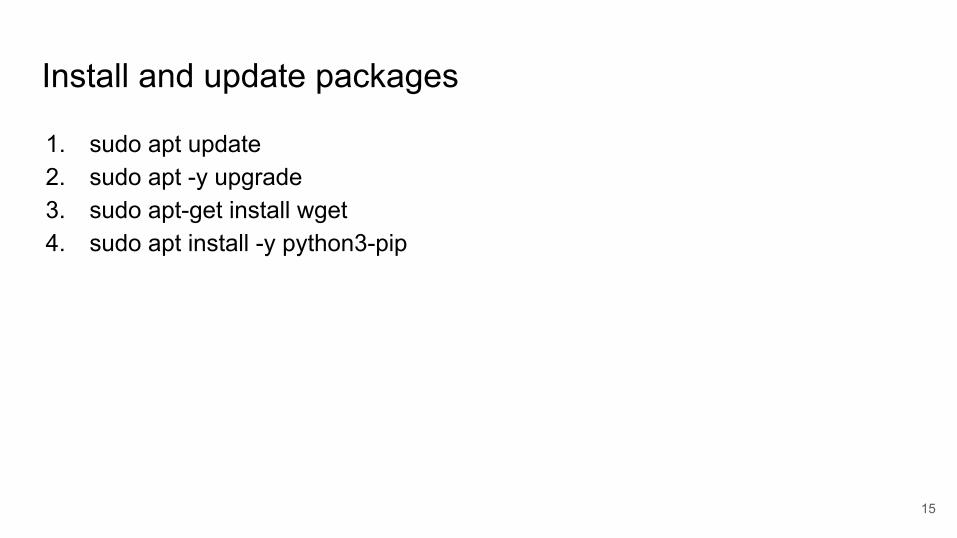
Install and update packages
15
1. sudo apt update2. sudo apt -y upgrade3. sudo apt-get install wget 4. sudo apt install -y python3-pip
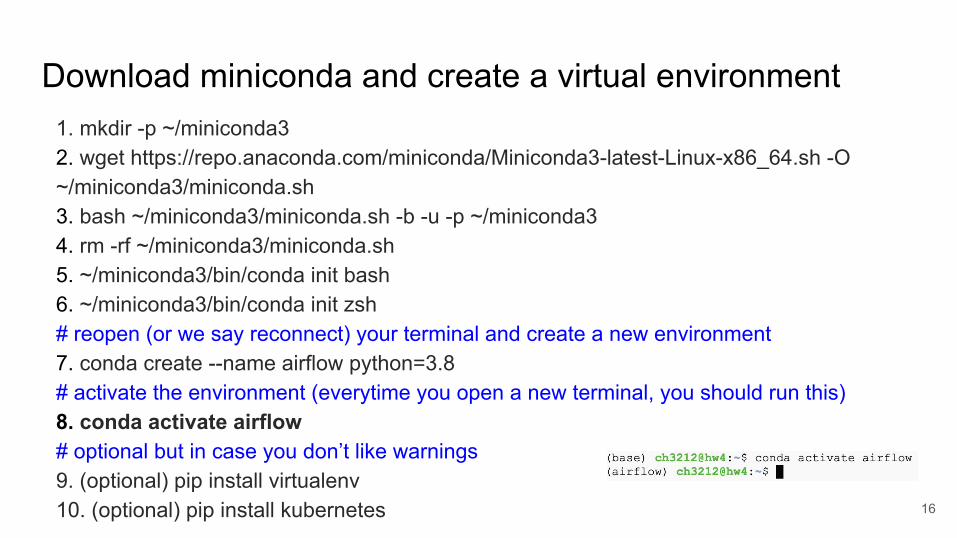
Download miniconda and create a virtual environment
16
1. mkdir -p ~/miniconda32. wget https://repo.anaconda.com/miniconda/Miniconda3-latest-Linux-x86_64.sh -O ~/miniconda3/miniconda.sh3. bash ~/miniconda3/miniconda.sh -b -u -p ~/miniconda34. rm -rf ~/miniconda3/miniconda.sh5. ~/miniconda3/bin/conda init bash6. ~/miniconda3/bin/conda init zsh# reopen (or we say reconnect) your terminal and create a new environment7. conda create --name airflow python=3.8# activate the environment (everytime you open a new terminal, you should run this)8. conda activate airflow# optional but in case you don’t like warnings 9. (optional) pip install virtualenv10. (optional) pip install kubernetes
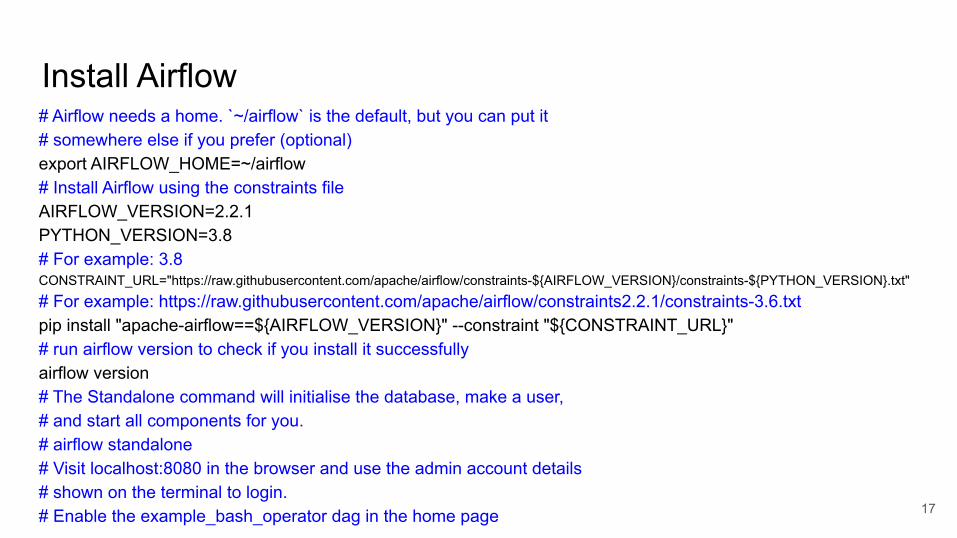
Install Airflow
17
# Airflow needs a home. `~/airflow` is the default, but you can put it# somewhere else if you prefer (optional)export AIRFLOW_HOME=~/airflow# Install Airflow using the constraints fileAIRFLOW_VERSION=2.2.1PYTHON_VERSION=3.8# For example: 3.8CONSTRAINT_URL="https://raw.githubusercontent.com/apache/airflow/constraints-${AIRFLOW_VERSION}/constraints-${PYTHON_VERSION}.txt"
# For example: https://raw.githubusercontent.com/apache/airflow/constraints2.2.1/constraints-3.6.txtpip install "apache-airflow==${AIRFLOW_VERSION}" --constraint "${CONSTRAINT_URL}"# run airflow version to check if you install it successfullyairflow version# The Standalone command will initialise the database, make a user,# and start all components for you.# airflow standalone# Visit localhost:8080 in the browser and use the admin account details# shown on the terminal to login.# Enable the example_bash_operator dag in the home page

Initialize the database, make a user, and start webserver
18
# Initialize the database, after this you will see a new folder airflow in your # $AIRFLOW_HOME which contains configuration file airflow.cfg1.airflow db init 2.airflow users create \
--username cong \--password 123456 \--firstname cong \--lastname han \--role Admin \--email [email protected]
3.airflow webserver --port 8080
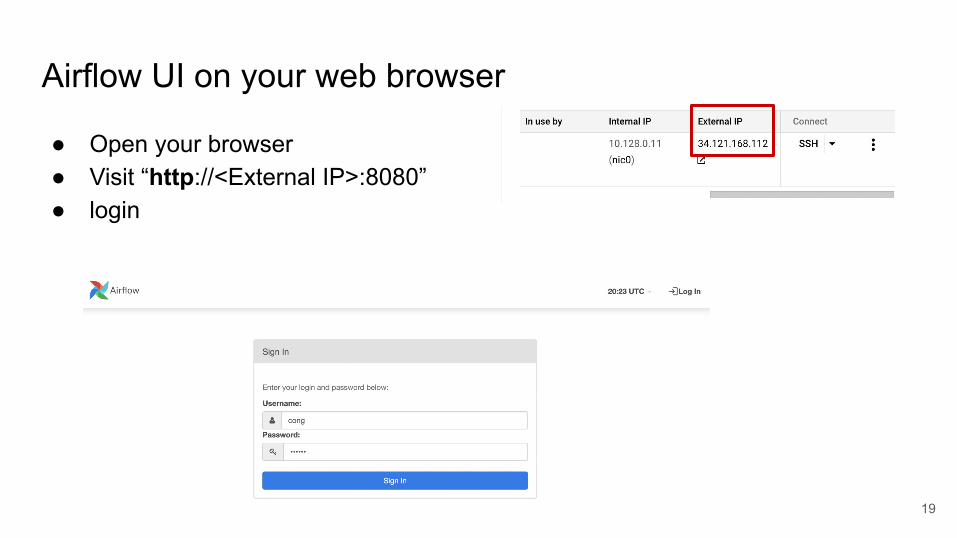
Airflow UI on your web browser
19
● Open your browser● Visit “http://<External IP>:8080”● login
Start scheduler
20
# Open a new terminal (you can use screen if you prefer to open only one # terminal)
1. conda activate airflow2. airflow db init3. airflow scheduler
Airflow examples
21
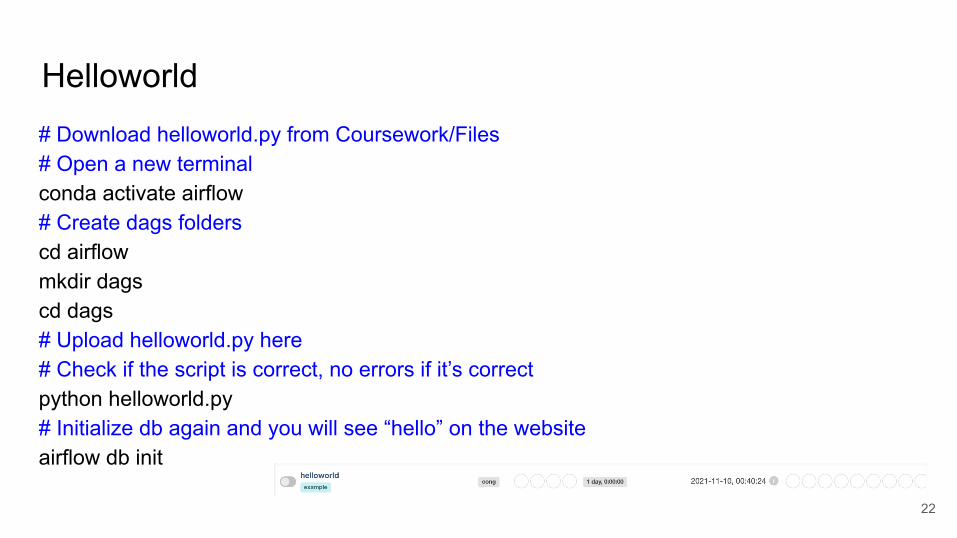
Helloworld
22
# Download helloworld.py from Coursework/Files# Open a new terminal conda activate airflow# Create dags folderscd airflowmkdir dagscd dags# Upload helloworld.py here# Check if the script is correct, no errors if it’s correctpython helloworld.py# Initialize db again and you will see “hello” on the websiteairflow db init
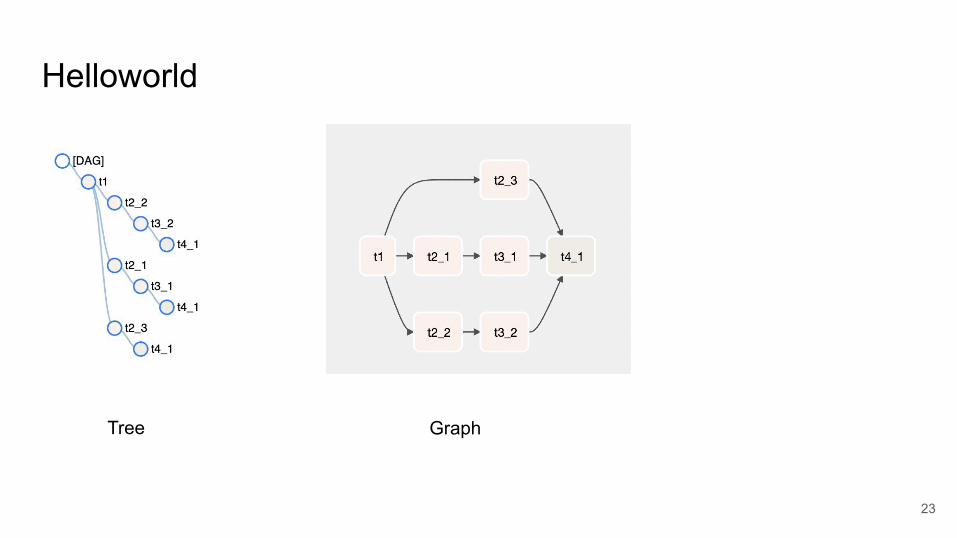
Helloworld
23
Tree Graph
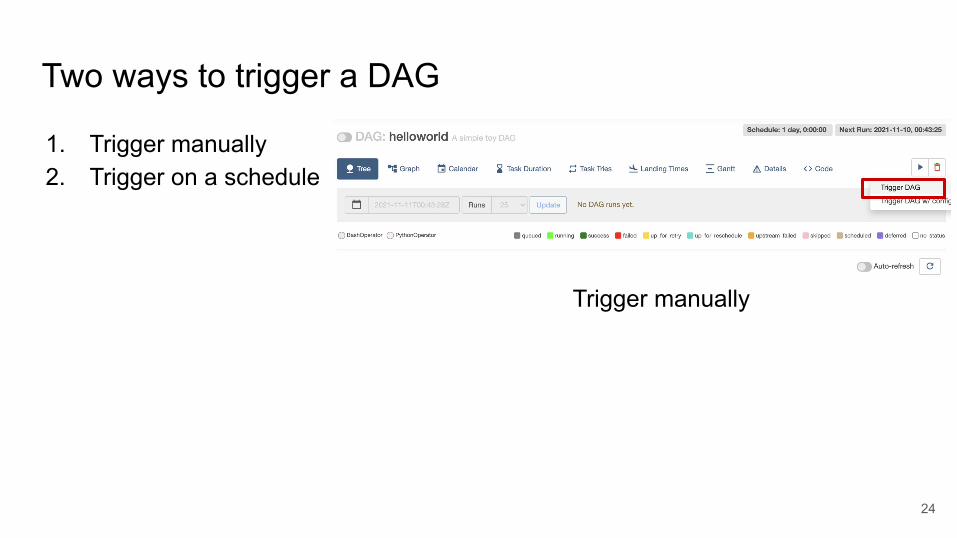
Two ways to trigger a DAG
24
1. Trigger manually 2. Trigger on a schedule
Trigger manually
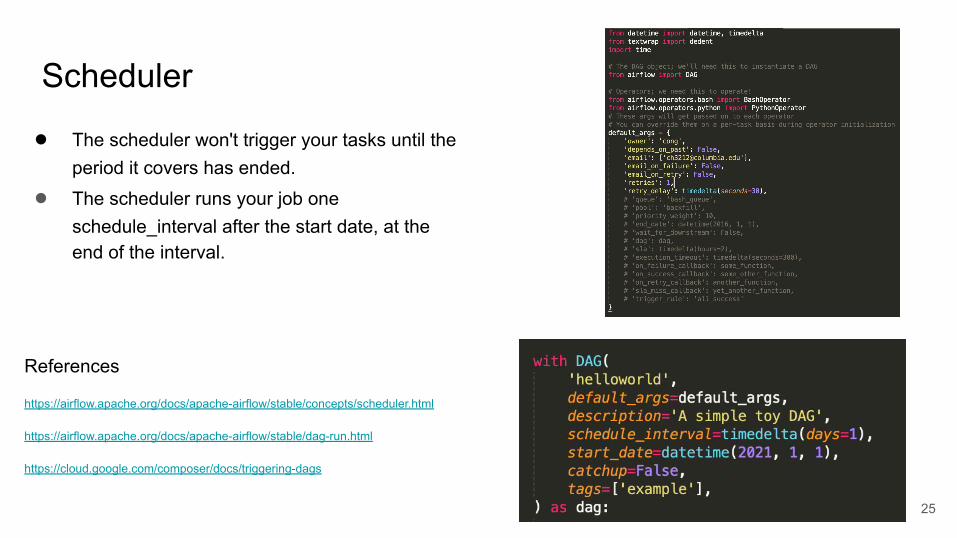
Scheduler
25
● The scheduler won't trigger your tasks until the period it covers has ended.
● The scheduler runs your job one schedule_interval after the start date, at the end of the interval.
References
https://airflow.apache.org/docs/apache-airflow/stable/concepts/scheduler.html
https://airflow.apache.org/docs/apache-airflow/stable/dag-run.html
https://cloud.google.com/composer/docs/triggering-dags
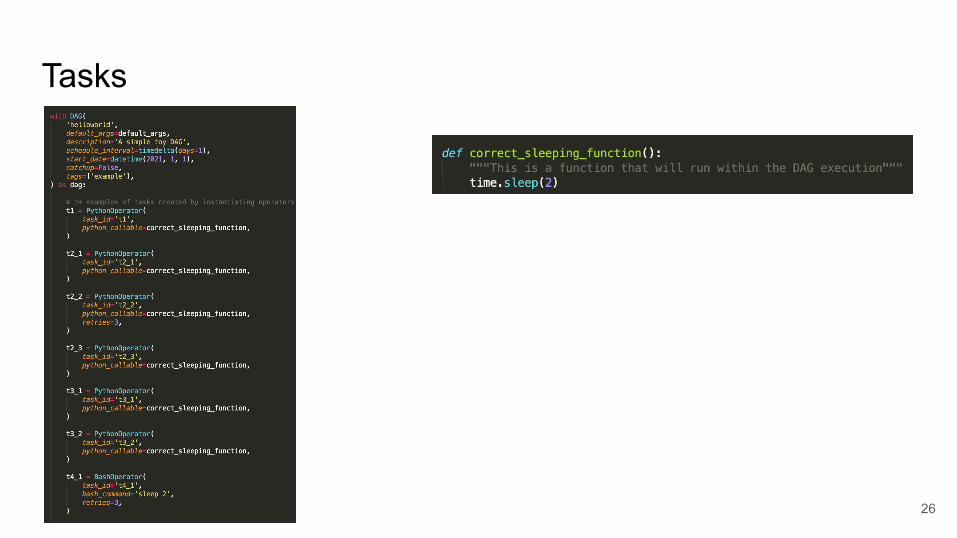
Tasks
26
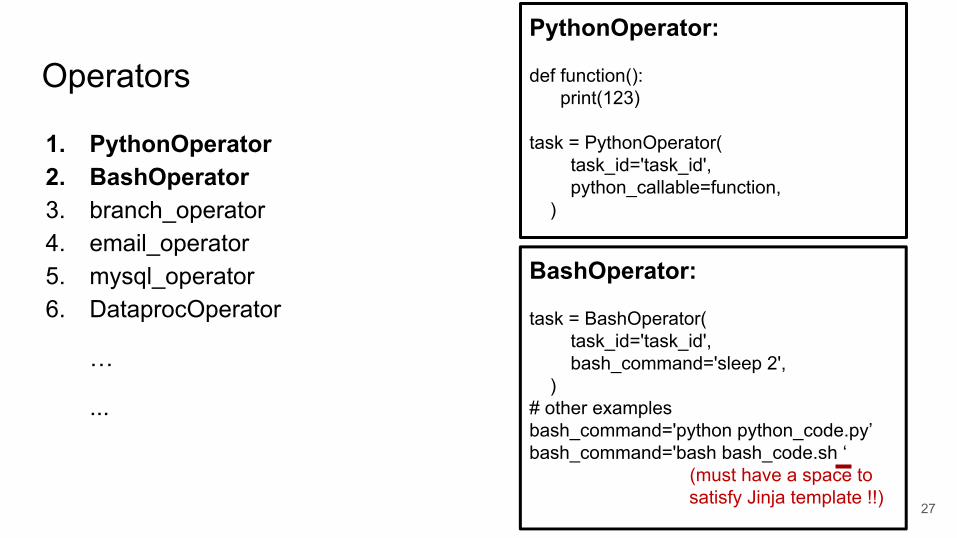
Operators
27
1. PythonOperator2. BashOperator3. branch_operator4. email_operator5. mysql_operator6. DataprocOperator
…
...
PythonOperator:
def function(): print(123)
task = PythonOperator( task_id='task_id', python_callable=function, )
BashOperator:
task = BashOperator( task_id='task_id', bash_command='sleep 2', )# other examplesbash_command='python python_code.py’bash_command='bash bash_code.sh ‘ (must have a space to satisfy Jinja template !!)
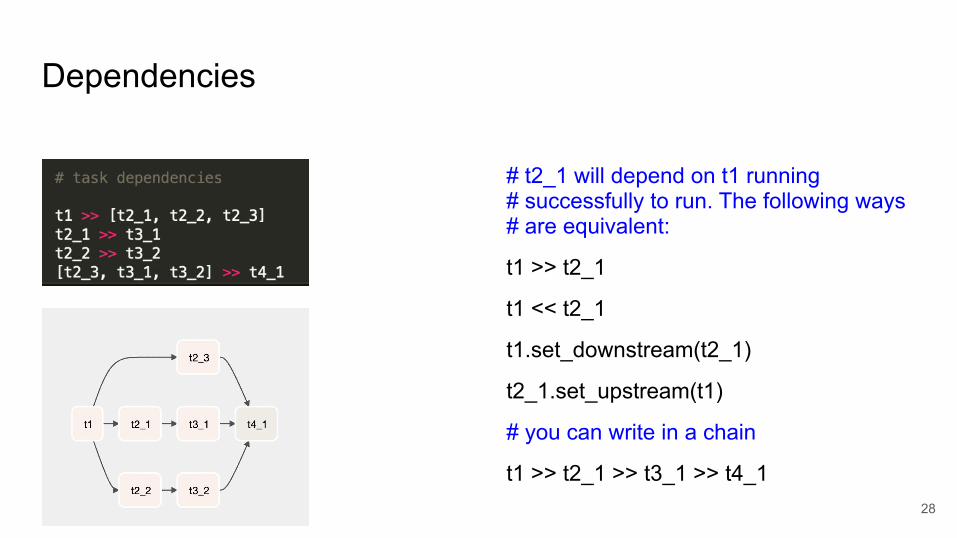
Dependencies
28
# t2_1 will depend on t1 running # successfully to run. The following ways # are equivalent:
t1 >> t2_1
t1 << t2_1
t1.set_downstream(t2_1)
t2_1.set_upstream(t1)
# you can write in a chain
t1 >> t2_1 >> t3_1 >> t4_1
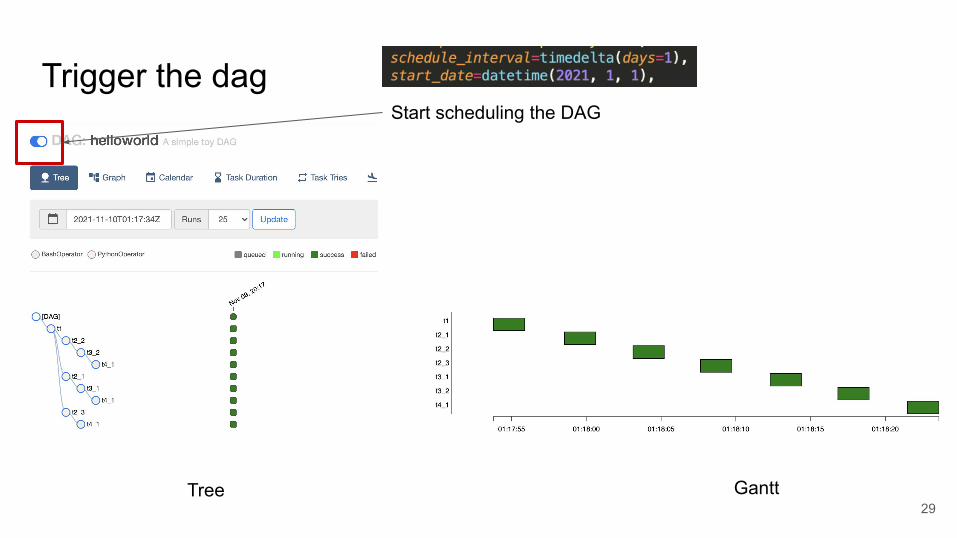
Trigger the dag
29
Start scheduling the DAG
Tree Gantt
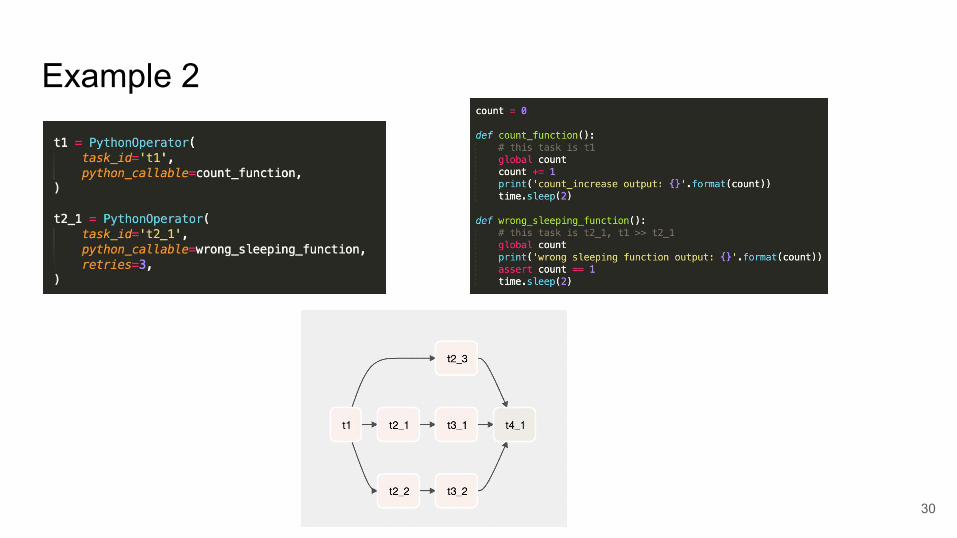
Example 2
30
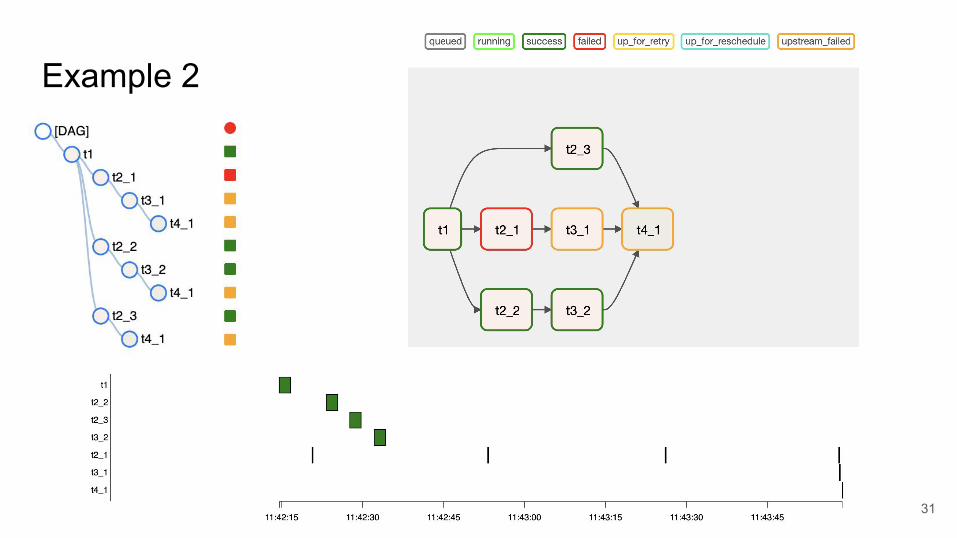
Example 2
31
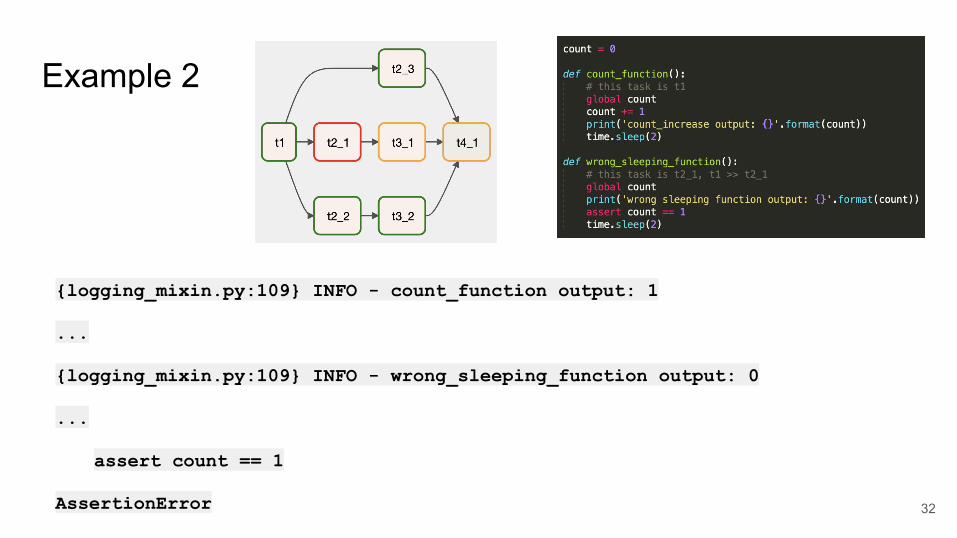
Example 2
32
{logging_mixin.py:109} INFO - count_function output: 1
...
{logging_mixin.py:109} INFO - wrong_sleeping_function output: 0
...
assert count == 1
AssertionError

Why?
33
● Airflow Python script is just a configuration file specifying the DAG's structure as code. ● Different tasks run on different workers at different points in time● Script cannot be used to cross communicate between tasks (Xcoms can)
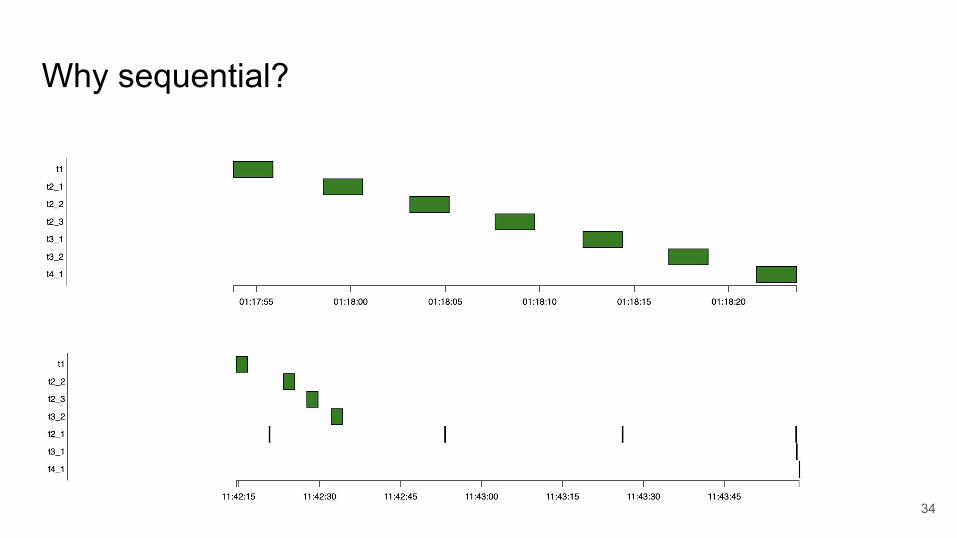
Why sequential?
34
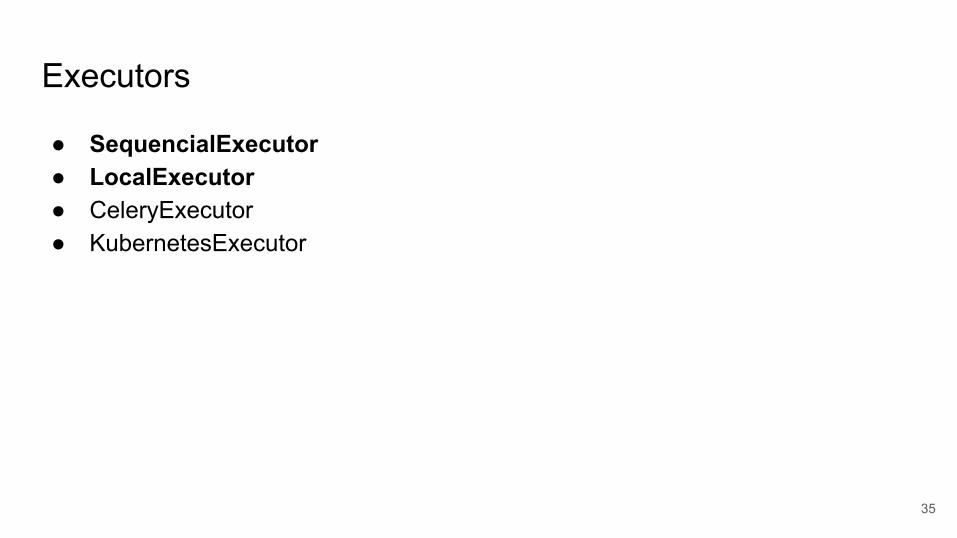
Executors
35
● SequencialExecutor● LocalExecutor● CeleryExecutor● KubernetesExecutor
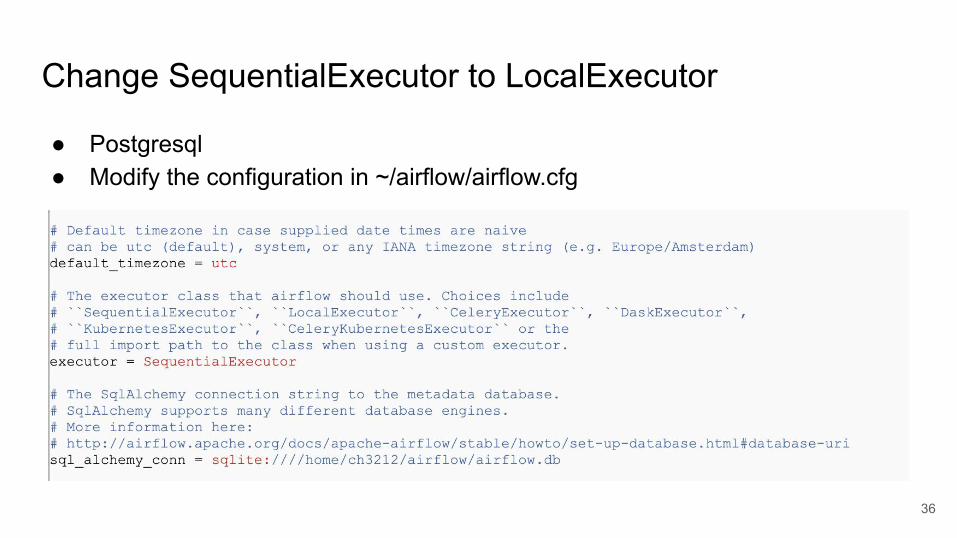
Change SequentialExecutor to LocalExecutor
36
● Postgresql● Modify the configuration in ~/airflow/airflow.cfg
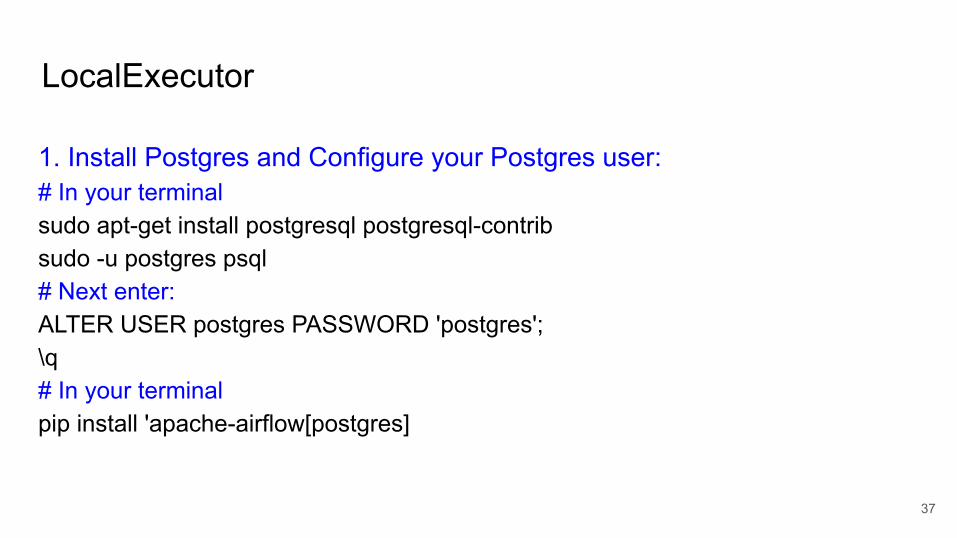
LocalExecutor
37
1. Install Postgres and Configure your Postgres user:# In your terminalsudo apt-get install postgresql postgresql-contribsudo -u postgres psql# Next enter:ALTER USER postgres PASSWORD 'postgres';\q# In your terminalpip install 'apache-airflow[postgres]

LocalExecutor
38
2. Change your SQL Alchemy Conn inside airflow.cfg:# In your terminalvim ~/airflow/airflow.cfg# you will see this linesql_alchemy_conn = sqlite:///.../airflow.db# change it to :sql_alchemy_conn = postgresql+psycopg2://postgres:postgres@localhost/postgres# Also changeExecutor = SequentialExecutor# ToExecutor = LocalExecutor
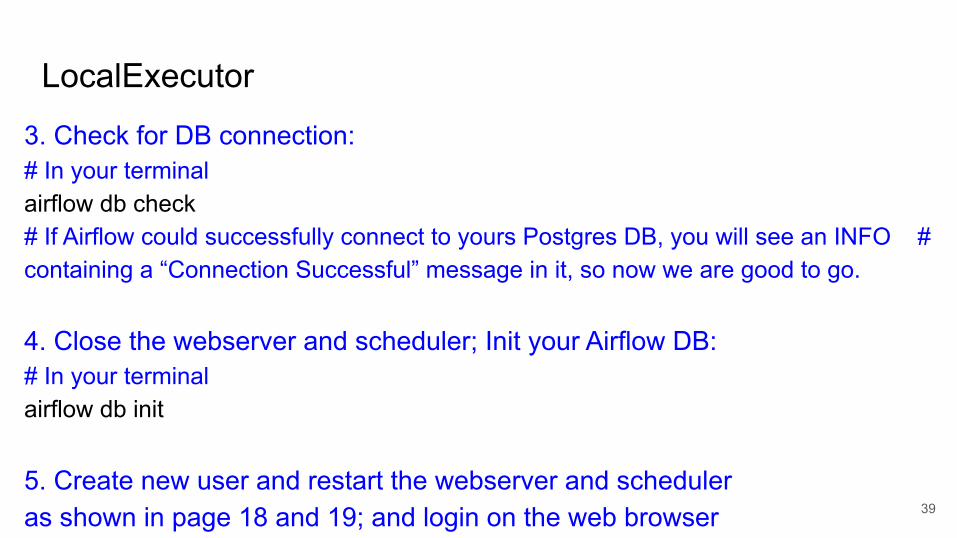
LocalExecutor
39
3. Check for DB connection:# In your terminalairflow db check# If Airflow could successfully connect to yours Postgres DB, you will see an INFO # containing a “Connection Successful” message in it, so now we are good to go.
4. Close the webserver and scheduler; Init your Airflow DB:# In your terminalairflow db init
5. Create new user and restart the webserver and scheduler as shown in page 18 and 19; and login on the web browser
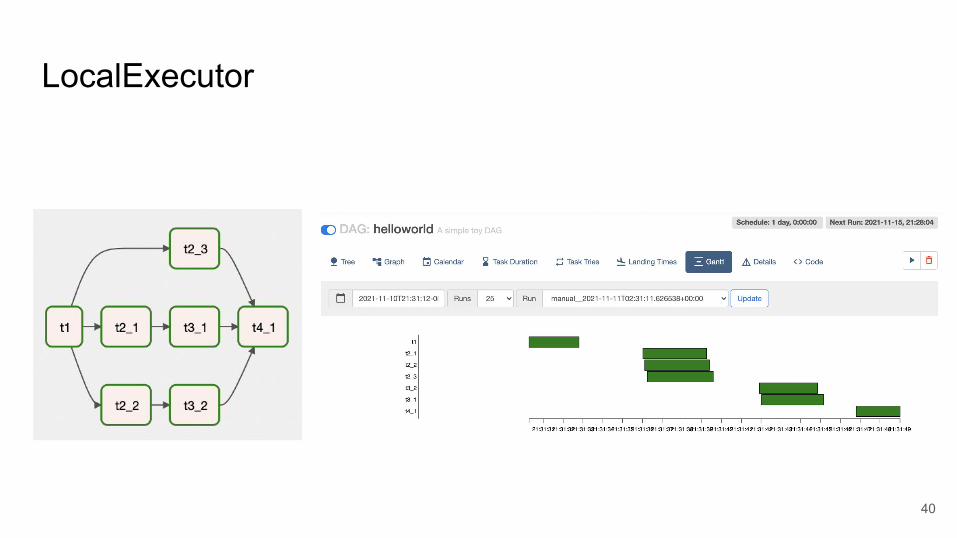
LocalExecutor
40

Take home
● DAG● Scheduler● Executor● Database ● Operator
41
● Cross communication between tasks● Schedule a job !! start data and schedule interval

Homework
42
Three tasks
● Helloworld● Build workflows● Written parts
43
44
Task 1 Helloworld
Q1.1 Install Airflow (20 pts)
Q1.2 Run helloworld (15 pts)
○ SequentialExecutor (5 pts) ○ LocalExecutor (5 pts)○ Explore other features and visualizations you can find in the Airflow UI. Choose two
features/visualizations to explain their functions and how they help monitor and troubleshoot the pipeline, use helloworld as an example. (5 pts)

45
Task 2 Build workflows
Q2.1 Implement this DAG (25 pts)
○ Tasks and dependencies (10 pts)○ Manually trigger it (10 pts)○ Schedule the first run immediately and running the program every 30 minutes (5 pts)
t1
t4
t3
t2
t5
t6
t7
t8
t9t11
t10
t12
t13
t14
t17
t15
t16
t18
t19
Python operators
Bash operators
46
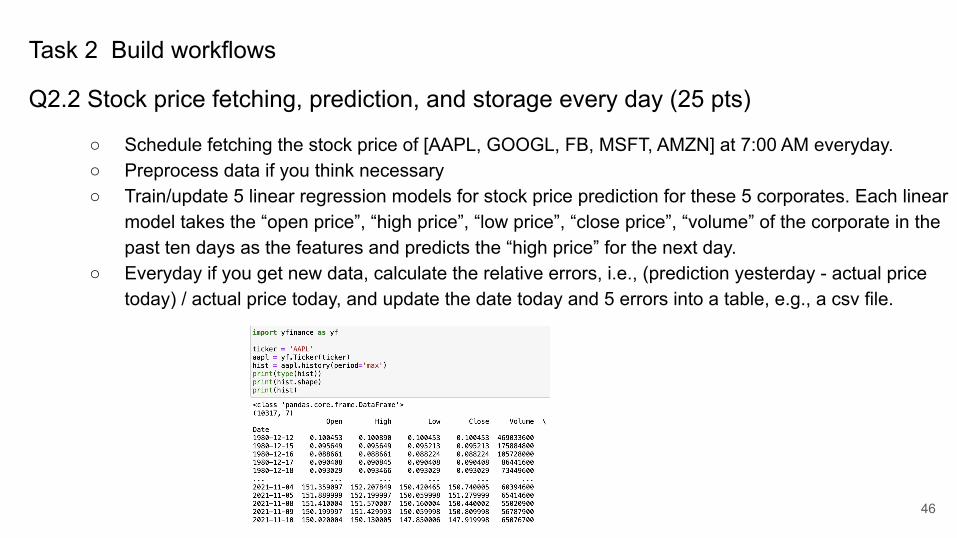
Task 2 Build workflows
Q2.2 Stock price fetching, prediction, and storage every day (25 pts)
○ Schedule fetching the stock price of [AAPL, GOOGL, FB, MSFT, AMZN] at 7:00 AM everyday.○ Preprocess data if you think necessary○ Train/update 5 linear regression models for stock price prediction for these 5 corporates. Each linear
model takes the “open price”, “high price”, “low price”, “close price”, “volume” of the corporate in the past ten days as the features and predicts the “high price” for the next day.
○ Everyday if you get new data, calculate the relative errors, i.e., (prediction yesterday - actual price today) / actual price today, and update the date today and 5 errors into a table, e.g., a csv file.
47
Task 3 Written parts
Q3.1 Answer the question (5 pts)
○ What are the pros and cons of SequentialExecutor, LocalExecutor, CeleryExecutor, KubernetesExecutor?
Q3.2 Draw the DAG of your group project (10 pts)
○ Formulate it into at least 5 tasks ○ Task names (functions) and their dependencies○ How do you schedule your tasks?
References
48
https://airflow.apache.org/docs/apache-airflow/stable/index.html
https://cloud.google.com/composer/docs