eee use jenn-aii:ia
TRANSCRIPT
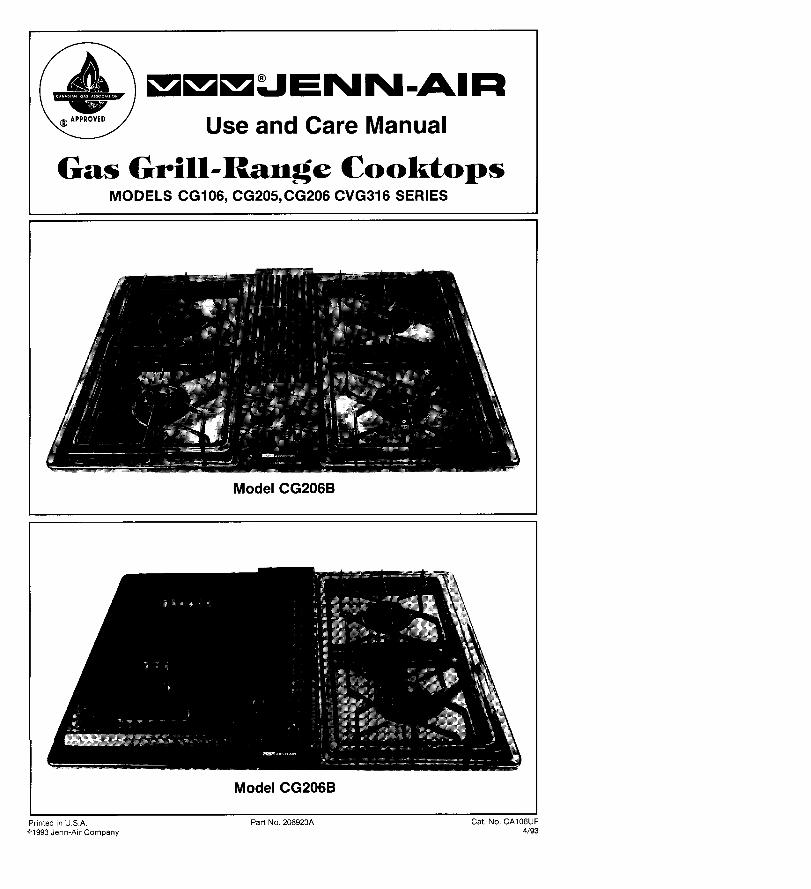
_ EEE_JENN-AIi:IUse and Care Manual
Gas Grill-Range CooktopsMODELS CG106, CG205,CG206 CVG316 SERIES
Model CG206B
Model CG206B
Printed in U.S,A. Part No. 206923A Cat, No. CA106UF
©1993 Jenn-Air Company 4/93
WARNING: If the information in this manual
is not followed exactly, a fire or explosion may
result causing property damage, personal
injury or death.
m Do not store or use gasoline or otherflammable vapors and liquids in the vicinityof this or any other appliance.
WHAT TO DO IF YOU SMELL GAS
• Do not try to light any appliance.
• Do not touch any electrical switch; do notuse any phone in your building.
• Immediately call your gas supplier from aneighbor's phone. Follow the gas supplier'sinstructions.
• If you cannot reach your gas supplier, callthe fire department.
• Extinguish any open flame.
Installation and service must be performed bya qualified installer, service agency or the gassupplier.
-- SAVE THESE INSTRUCTIONS FOR FUTURE REFERENCE --
SAFETYPRECAUTIONS
Read before operating your cooktopAll appliances -- regardless of the manufacturer -- have thepotential through improper or careless use to create safety prob-lems. Therefore the following safety precautions should beobserved:
1. Be sure your appliance is properly installed and groundedby a qualified technician.
2. Never use your appliance for warming or heating the room.This warning is based on safety considerations.
3. Children should not be left alone or unattended in areawhere appliance is in use. They should never be allowed tosit or stand on any part of the appliance.
4. Wear proper apparel. Loose-fitting or hanging garmentsshould never be worn while using the appliance.
5. Do not repair or replace any part of the appliance unlessspecifically recommended in this manual. All other servicingshould be referred to an authorized Jenn-Air ServiceContractor.
6. Do not store combustible materials, gasoline or otherflammable vapors and liquid near cooktop.
7. Do not use water on grease fires. Smother fire or flame oruse dry chemical or foam-type extinguisher.
8. Use only dry potholders. Moist or damp potholders on hotsurfaces may result in burns from steam. Do not use a towelor other bulky cloth.
9. Select cookware large enough to properly contain food andavoid boil overs or spillovers. This will save on cleaning andprevent hazardous accumulations of food, since heavysplattering or spillovers left on a cooktop can ignite. Pansize is especially important in deep fat frying.
10. Never leave cooktop unattended at Hi heat settings. Boilover causes smoking and greasy spillovers that may ignite.
11. TYPE OF COOKWARE -- Avoid pans that are unstable andeasily tipped. In choosing pans, look for easily-graspedhandles that will stay cool. Pans that are too heavy whenfilled with food can also be a hazard. If pan handles twistand cannot be tightened, discard the pan.
12. HANDLES -- Always turn pan handles to the side or backof the cooktop -- not out into the room where they areeasily hit. COOKWARE HANDLES SHOULD BE TURNEDINWARD AND NOT EXTEND OVER ADJACENT SUR-FACE BURNERS to minimize burns, ignition of flammablematerials, and spillage due to unintentional contact withthe cookware.
13. CAUTION -- Do not store items of interest to children incabinets above a cooktop--children climbing on the cook-top to reach items could be seriously injured.
14. Do not touch grill and surface burner areas or perimetertrim around cooktop. During and after use, these areas maybe hot enough to cause burns. Avoid contact with theseareas by clothing or other flammable materials until theyhave had sufficient time to cool.
15. Do not heat unopened food containers. Build-up of pres-sure may cause container to burst and result in injury.
16. Keep all controls "OFF" when unit is not in use.
17. Keep vent ducts unobstructed.18. GREASE -- Grease is flammable and should be handled
carefully. Never leave any cooking operation unattended.Let fat cool before attempting to handle it. Do not allowgrease to collect around the cooktop or in the vents. Wipeup spillovers immediately.
19. If the cooktop is installed near a window, proper precau-tions should be taken to prevent curtains from blowing overburners creating a FIRE HAZARD.
20. Do not use aluminum foil to line aeration tray or burnerbasin. Restriction of normal air flow may result in unsafeoperation.
21. Do not use cookware on the grill section of this appliance.
22. Before servicing your appliance, disconnect power to thecooktop at the main fuse or circuit breaker panel and atthe electrical receptacle.
23. Always allow hot pans to cool in a safe place out of thereach of small children.
24. A faint gas odor may indicate a gas leak. If a gas odoris detected, cut off the gas supply to the cooktop. Callyour installer or local gas company to have the possibleleak checked. Never use a match or other flame to locatea gas leak.
IMPORTANT SAFETY NOTICE AND WARNING
The California Safe Drinking Water and Toxic Enforcement Act of 1986(Proposition 65) requires the Governor of California to publish a list ofsubstances known to the State of California to cause cancer or reproductiveharm, and requires businesses to warn customers of potential exposure tosuch substances.
Users of this appliance are hereby warned that the burning of gas can resultin low-level exposure to some of the listed substances, including benzene,formaldehyde and soot, due primarily to the incomplete combustion of naturalgas or liquid petroleum (LP) fuels. Properly adjusted burners will minimizeincomplete combustion. Exposure to these substances can also be minimizedby properly venting the burners to the outdoors.
WARNING
ElectricalGroundingInstructions
This appliance is equipped with a three-prong grounding plug foryour protection against shock hazard and should be plugged directlyinto a properly grounded three-prong receptacle. Do not cut or removethe grounding prong from this plug.
About YourJenn-AirCongratulations on your choice of a Jenn-Air gas cooktop. The indoor grilling of meats,fish or fowl is an attractive and healthy way to prepare these foods. The chart belowdescribes the differences between models.
Type of BurnersModel # Shipped w/Unit Optional Accessories
CG106 Single grill AG200 -- Surface Burners
CG205 Four surface AG150- Grill Accessoryburners
CG206 Grill & two AG200 -- Surface Burnerssurface burners
CVG316 Grill & four AG200 -- Surface Burnerssurface burners
Before you begin cooking with your new cooktop, please take a few minutes to readand become familiar with the instructions in this book, Should you have any questionsabout using your Jenn-Air gas cooktop, write to us. Be sure to provide the model number.
Consumer Relations DepartmentJenn-Air Company3035 Shadeland
Indianapolis, IN 46226-0901
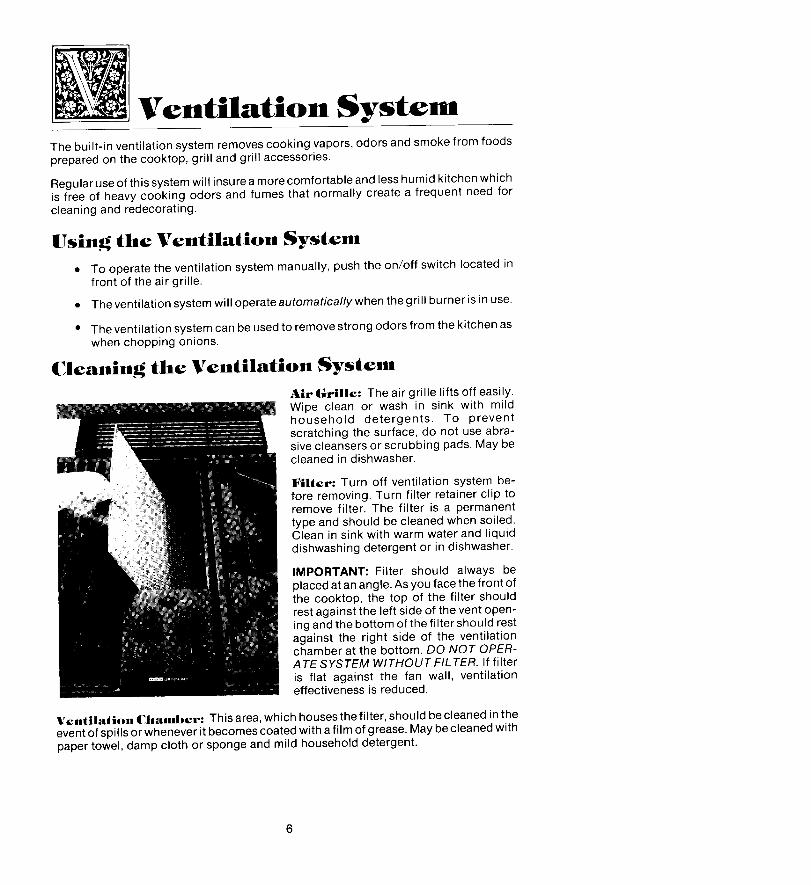
Ventilation SystemThe built-in ventilation system removes cooking vapors, odors and smoke from foodsprepared on the cooktop, grill and grill accessories.
Regular use of this system will insure a more comfortable and less humid kitchen whichis free of heavy cooking odors and fumes that normally create a frequent need forcleaning and redecorating.
Using the Ventilation System• To operate the ventilation system manually, push the on/off switch located in
front of the air grille.
• The ventilation system will operate automatically when the grill burner is in use.
• The ventilation system can be used to remove strong odors from the kitchen aswhen chopping onions.
Cleaning the Ventilation SystemAir Grille: The air grille lifts off easily.Wipe clean or wash in sink with mildhousehold detergents. To preventscratching the surface, do not use abra-sive cleansers or scrubbing pads. May becleaned in dishwasher.
Filler: Turn off ventilation system be-fore removing. Turn filter retainer clip toremove filter. The filter is a permanenttype and should be cleaned when soiled.Clean in sink with warm water and liquiddishwashing detergent or in dishwasher.
IMPORTANT: Filter should always beplaced at an angle. As you face the front ofthe cooktop, the top of the filter shouldrest against the left side of the vent open-ing and the bottom of the filter should restagainst the right side of the ventilationchamber at the bottom. DO NOT OPER-ATE SYSTEM WITHOUT FILTER. If filter
is flat against the fan wall, ventilationeffectiveness is reduced.
Ventilation Chamber: This area, which houses the filter, should be cleaned in theevent of spills or whenever it becomes coated with a film of grease. May be cleaned withpaper towel, damp cloth or sponge and mild household detergent.
Cookware Selection
Size of CookwareFlame size should be adjusted so it does not extend beyond the edge of the cookware.This instruction is based on safety considerations. Adjusting the size of the flameto fit the size of the cookware also helps to save fuel.
CAUTION: Do NOT allow large pans to contact or extend over the control knobs.Heat trapped between large pans and control knobs could possibly cause damageto the control knobs.
IMPORTANT: Leave a minimum of 11/2" between side of pan and surroundingsurfaces, such as countertop backsplash or side walls, to allow heat to escape toavoid possible damage to these areas.
Cookware Materials
Stainless steel, porcelain enamelware, glass, and glass ceramic cookware designedfor surface cooking usually heat slowly and conduct heat poorly when a large flamesize is used. Turn the knob to adjust the flame size to extend only halfway betweencenter and edge of the cookware bottom for better cooking results. Aluminum cookwareconducts heat more evenly; therefore, a slightly larger flame size can be used. Theflame can be adjusted so it comes to the edge of the cookware. The flame shouldNEVER be adjusted so that it extends beyond the bottom of the cookware.
Covered CookwareIf the cookware is covered, less fuel will be needed; therefore, a lower flame sizecan be used.
NOTE: Food will not cook any faster when more than the amount of heat neededto maintain a gentle boil is used.

How a SurfaceBurner WorksWhen the surface burner valve is turned on, gas enters the mixer tube and mixeswith air. This air and gas mixture flows to the burner head and is lighted by a sparkfrom the solid state igniter.
A properly adjusted burner with clean ports will light within a few seconds. Thecone-shaped flame will be clear blue in color with a clearly defined inner cone. Thereshould be no trace of yellow in the flame. A yellow flame indicates an impropermixture of air and gas. This wastes fuel so have a serviceman adjust the air andgas mixture by adjusting the air shutter if a yellow flame ever occurs.
The variable surface controls for the surface burners and grill burner provide flexibilityin heat setting selection.
Note: The grill can be replaced with an optional surface burner module, Model AG200.
How to Operate in the Event of a PowerFailure
Surface BurnersIn case of prolonged power failure, you can manually light the surface burner byholding a lighted match near the burner ports and slowly turning the control knobcounterclockwise (after depressing) until the gas ignites. There is no fan so smokeand condensation can gather.
GrillIN CASE OF POWER FAILURE, DO NOT USE GRILL. VENTILATION SYSTEMWILL NOT OPERATE,
Air Shutter AdjustmentTo adjust surface burner air
_ BURNER ROTATE AIR
shut_rs: _ AIR SHUTTER SHUTTER ON
Loosen fastening screw with a phillips screw _ \ MIXERHEADTO_. "_ SCREW MA_(E AIRdriver and rotate air shutter to increase or _ _ 1/. ADJUSTMENT
decrease the size of the air opening. As the _'_'_--A,R S_shutter is turned observe change in flame
appearance. Adjustment is satisfactory AIR OPENING -'____cLT(_ SOPeN JfJwhen a clearly defined, even blue flame Eresults at the Hi flame setting. Afteradjustment, tighten screw.
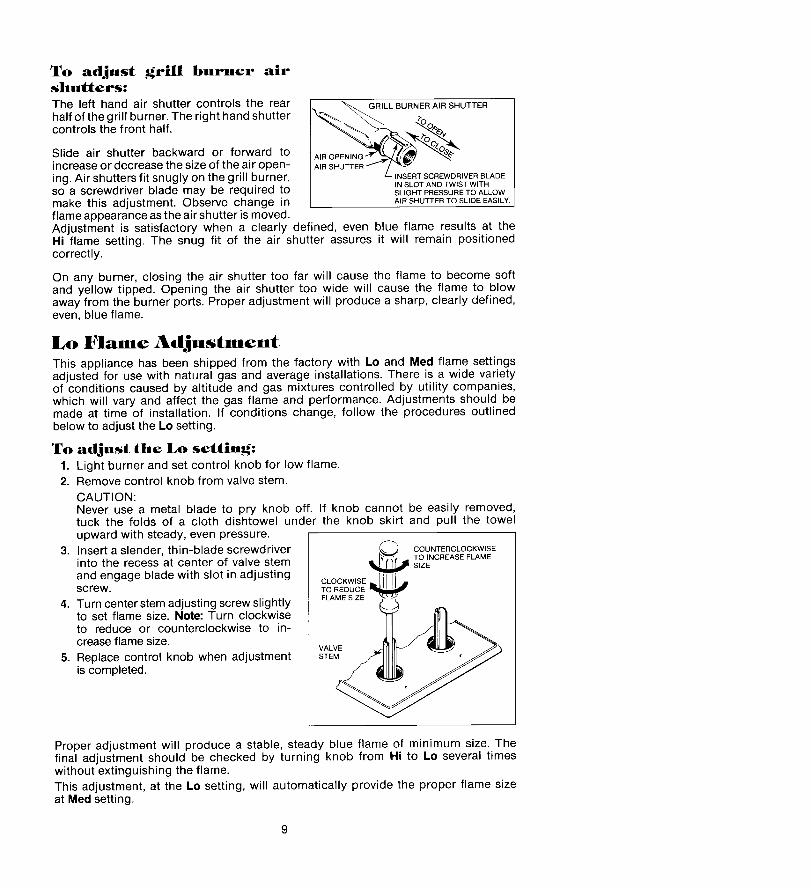
To adjust grill burner airshutters:The left hand air shutter controls the rear _ _ GRILLBURNERAIRSHUTTER
half of the grill burner. The right hand shutter _ _ _o9,_
cont rols the front half. ____c°_o_ i_"Slide air shutter backward or forward to A_ROPEN_NG_'_Jincrease or decrease the size of the air open- AIR SHUTTER _ L ,_'_=_ing. Air shutters fit snugly on the grill burner, INSERTSCREWDRIVERBLADEIN SLOT AND TWIST WITHso a screwdriver blade may be required to SLIGHTPRESSURETOALLOWmake this adjustment. Observe change in A_RSHUTTERTOSLIDEEASILY.flame appearance as the air shutter is moved.Adjustment is satisfactory when a clearly defined, even blue flame results at theHi flame setting. The snug fit of the air shutter assures it will remain positionedcorrectly.
On any burner, closing the air shutter too far will cause the flame to become softand yellow tipped. Opening the air shutter too wide will cause the flame to blowaway from the burner ports. Proper adjustment will produce a sharp, clearly defined,even, blue flame.
Lo Flame AdjustmentThis appliance has been shipped from the factory with Lo and Meal flame settingsadjusted for use with natural gas and average installations. There is a wide varietyof conditions caused by altitude and gas mixtures controlled by utility companies,which will vary and affect the gas flame and performance. Adjustments should bemade at time of installation. If conditions change, follow the procedures outlinedbelow to adjust the Lo setting.
To adjust the Lo setting:1. Light burner and set control knob for low flame.2. Remove control knob from valve stem.
CAUTION:Never use a metal blade to pry knob off. If knob cannot be easily removed,tuck the folds of a cloth dishtowel under the knob skirt and pull the towelupward with steady, even pressure.
3. Insert a slender, thin-blade screwdriver _ COUNTERCLOCKWISEI._-_*l TO INCREASE FLAME
into the recess at center of valve stem _ S_ZEand engage blade with slot in adjusting CLOCKWtSEL li_lll ,.screw. TO REDUCE
FLAME SIZE4. Turn center stem adjusting screw slightly (__ .,.,
to set flame size. Note: Turn clockwiseto reduce or counterclockwise to in-crease flame size.
VALVE
5. Replace control knob when adjustment STEMis completed.
Proper adjustment will produce a stable, steady blue flame of minimum size. Thefinal adjustment should be checked by turning knob from Hi to Lo several timeswithout extinguishing the flame.
This adjustment, at the Lo setting, will automatically provide the proper flame sizeat Med setting.
9
Surface ControlsTo Set Controls
• Since the controls are a push-turn type, they must be pushed down beforeturning. To set (from the OFF position), push down on control knob and imme-diately turn counterclockwise to the LITE position until burner ignites. Afterignition, turn knob clockwise to desired setting.
• Igniter will continue to spark until knob is turned clockwise back to or pastHi position on knob.
Control LocationsLeft Side or Single Grill
The Lo Controls are set for the grill burner. Thus, when using a surface burner,the control knob may be turned to a position lower than the Lo setting.
Right Side
Only surface burners may be used on the right side. Use the right surface burnerson Hi for large quantity cooking and canning because the BTU rate is higher. Alsouse the right surface burners on Lo for sauces and delicate items because the Losetting has a lower BTU rate.
NOTE CVG316 MODELS: "The center bay is designated for surface burners only.(SeeRight Side notes above.)
CAUTION" Do NOT allow large pans to extend over the control knobs. Heattrapped between large pans and control knobs could possibly cause damageto the control knobs.
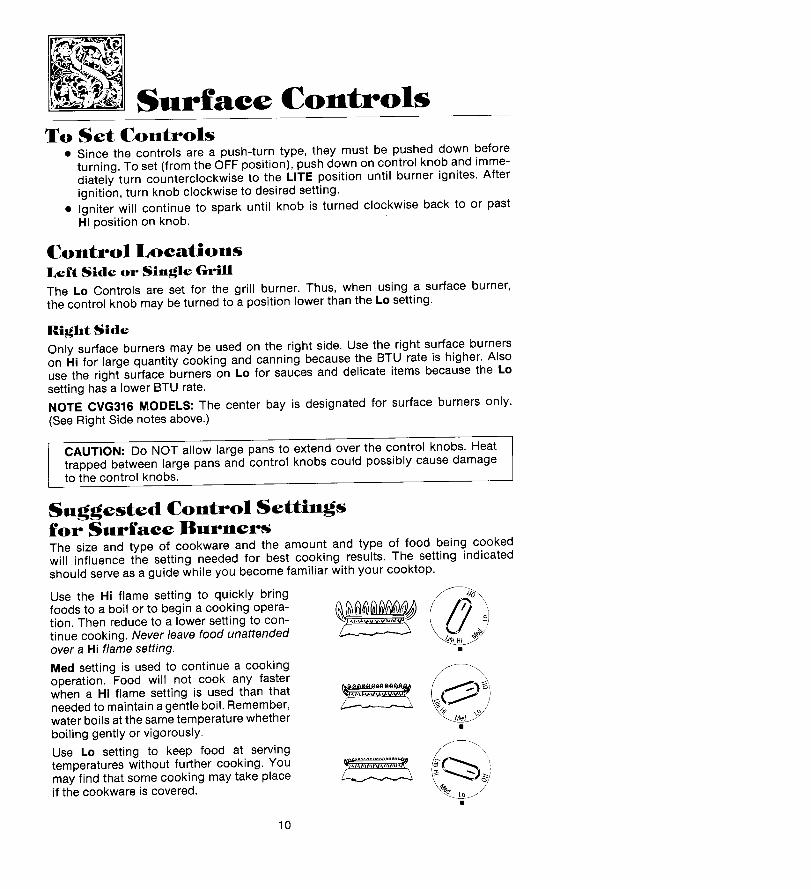
Suggested Control Settingsfor Surface BurnersThe size and type of cookware and the amount and type of food being cookedwill influence the setting needed for best cooking results. The setting indicatedshould serve as a guide while you become familiar with your cooktop.
Use the Hi flame setting to quickly bring
foods to a boil or to begin a cooking opera- __ _"l
tion. Then reduce to a lower setting to con- _tinue cooking. Never leave food unattended _ _over a Hi flame setting. •Med setting is used to continue a cookingoperation. Food will not cook any faster f \\
when a Hi flame setting is used than that _ /_O_'Ineeded to maintain a gentle boil. Remember, /___ .._water boils at the same temperature whetherboiling gently or vigorously.Use Lo setting to keep food at servingtemperatures without further cooking. Youmay find that some cooking may take placeif the cookware is covered.
10
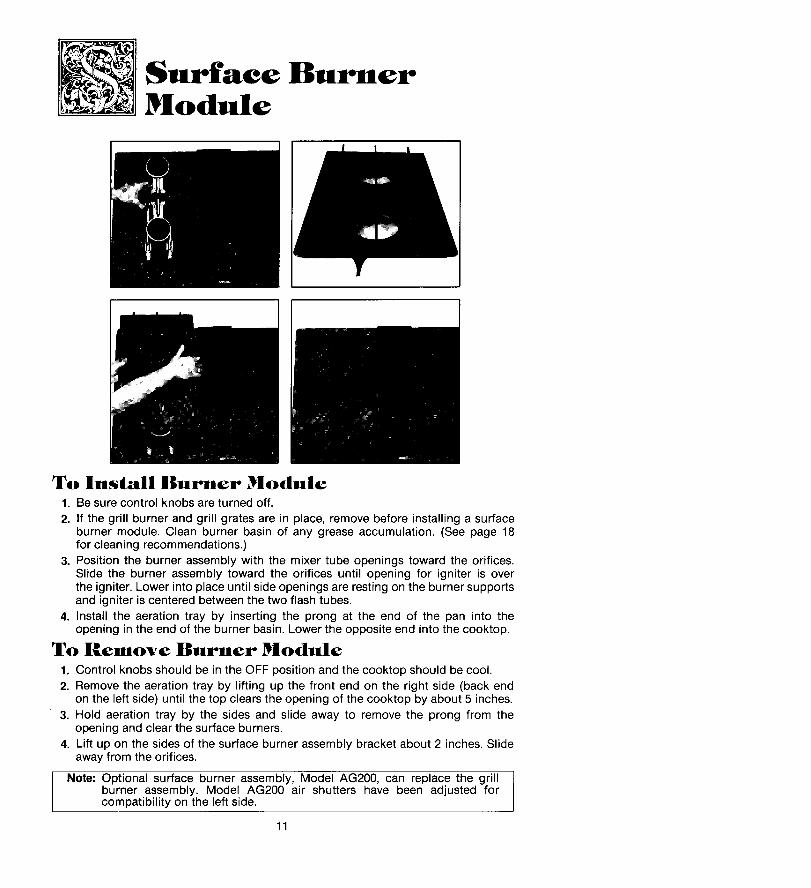
Surface BurnerModule
To Install Burner Module1. Be sure control knobs are turned off.
2. If the grill burner and grill grates are in place, remove before installing a surfaceburner module. Clean burner basin of any grease accumulation. (See page 18for cleaning recommendations.)
3. Position the burner assembly with the mixer tube openings toward the orifices.Slide the burner assembly toward the orifices until opening for igniter is overthe igniter. Lower into place until side openings are resting on the burner supportsand igniter is centered between the two flash tubes.
4. Install the aeration tray by inserting the prong at the end of the pan into theopening in the end of the burner basin. Lower the opposite end into the cooktop.
To Remove Burner Module1. Control knobs should be in the OFF position and the cooktop should be cool.
2. Remove the aeration tray by lifting up the front end on the right side (back endon the left side) until the top clears the opening of the cooktop by about 5 inches.
3. Hold aeration tray by the sides and slide away to remove the prong from theopening and clear the surface burners.
4. Lift up on the sides of the surface burner assembly bracket about 2 inches. Slideaway from the orifices.
Note: Optional surface burner assembly, Model AG200, can replace the grillburner assembly. Model AG200 air shutters have been adjusted forcompatibility on the left side.
11
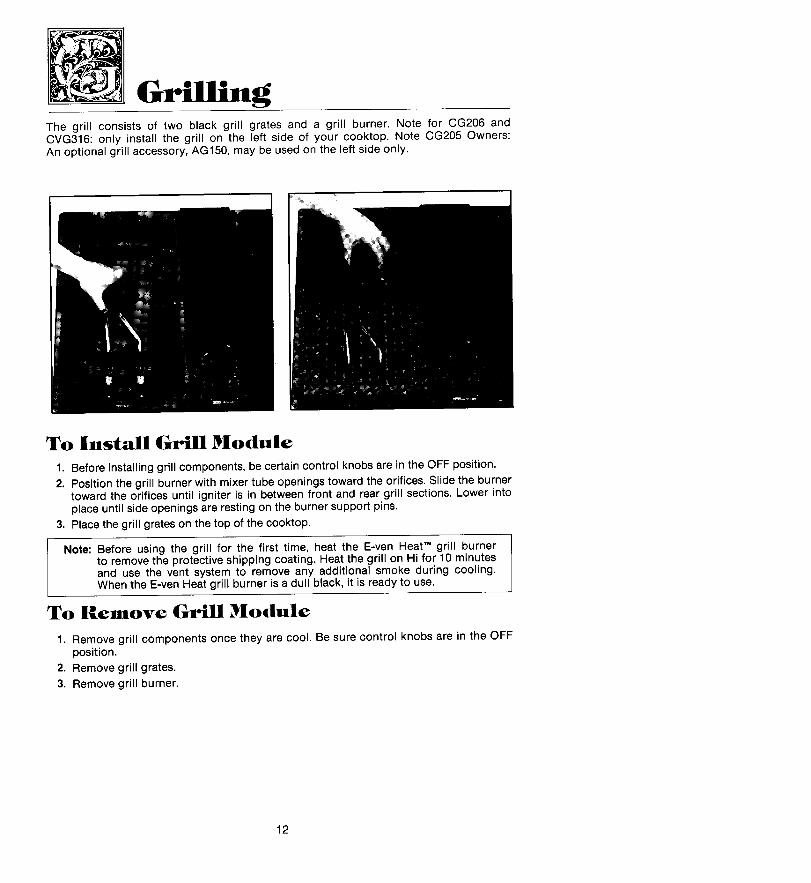
The grill consists of two black grill grates and a grill burner. Note for CG206 andCVG316: only install the grill on the left side of your cooktop. Note CG205 Owners:An optional grill accessory, AG150, may be used on the left side only.
To Install Grill Module1. Before installing grill components, be certain control knobs are in the OFF position.
2. Position the grill burner with mixer tube openings toward the orifices. Slide the burnertoward the orifices until igniter is in between front and rear grill sections. Lower intoplace until side openings are resting on the burner support pins.
3. Place the grill grates on the top of the cooktop.
Note: Before using the grill for the first time, heat the E-ven Heat TM grill burnerto remove the protective shipping coating. Heat the grill on Hi for 10 minutesand use the vent system to remove any additional smoke during cooling.When the E-ven Heat grill burner is a dull black, it is ready to use,
To Remove Grill Module
1. Remove grill components once they are cool. Be sure control knobs are in the OFFposition.
2. Remove grill grates.
3. Remove grill burner.
12
Using the Grill
• Before the first use, wash your new grill grates in hot soapy water, rinse anddry. Then "season" the surface by wiping on a thin coating of cooking oil. Removeexcess oil by wiping again with another paper towel. This procedure should berepeated after cleaning in the dishwasher since the detergent may removeseasoning.
• Seasoning prior to each use is NOT necessary. However anytime a sugar-basedmarinade (for example, barbecue sauce) is going to be used, the grates shouldbe "seasoned" prior to reheating.
• Use nonmetallic spatulas or utensils to prevent damaging the Excalibur® nonstickgrill grate finish.
• Preheat grill on Hi setting for 5 or 10 minutes. Preheating improves the flavorand appearance of meats and quickly sears the meat to help retain the juices.
• Excessive amounts of fat should be trimmed from meats. Some fat is necessary
to produce the smoke needed for that smoked, "outdoor" flavor. However, excessivefat can create cleaning and flare-up problems.
• Excessive flare-ups indicate that either the grill interior needs to be cleaned orthat excessive amounts of fat are in the meat or the meat was not properly trimmed.
• Grease drippings will occasionally ignite to produce harmless puffs of flame fora second or two. This is a normal part of the cooking process.
• NEVER LEAVE GRILL UNATTENDED DURING GRILL OPERATION.
Should sustained flare-up occur:
1. Turn on FAN manually.2. Immediately turn grill heat control knob to OFF position.3. Remove meat from grill.
IMPORTANT
• Do not use aluminum foil inside the grill area.• Do not use charcoal or wood chips in the grill area.
• Do not allow burner basin to become overloaded with grease. Clean after each use.
• Do not cover grates completely with meat. Leave air space between each steak, etc.to allow proper ventilation as well as prevent flare-ups.
13
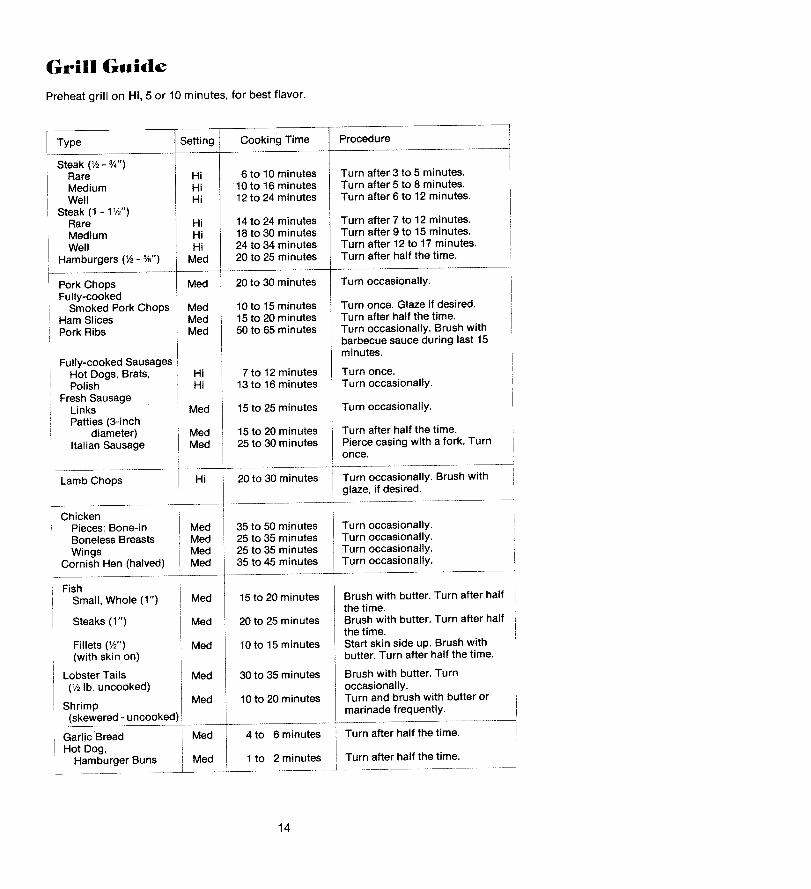
Grill Guide
Preheat grill on Hi, 5 or 10 minutes, for best flavor.
u
Type Setting Cooking Time Procedure
Steak (_ - 3/4")Rare Hi 6 to 10 minutes Turn after 3 to 5 minutes.Medium Hi 10 to 16 minutes Turn after 5 to 8 minutes.Well Hi 12 to 24 minutes Turn after 6 to 12 minutes.
Steak (1 - 1_/_'')Rare Hi 14 to 24 minutes Turn after 7 to 12 minutes.Medium Hi 18 to 30 minutes Turn after 9 to 15 minutes.Well Hi 24 to 34 minutes Turn after 12 to 17 minutes.
Hamburgers (I/2- %") Med 20 to 25 minutes Turn after half the time.
Pork Chops Med 20 to 30 minutes Turn occasionally.Fully-cooked
Smoked Pork Chops Med 10 to 15 minutes Turn once. Glaze if desired.Ham Slices Med 15 to 20 minutes Turn after half the time.Pork Ribs Med 50 to 65 minutes Turn occasionally. Brush with
barbecue sauce during last 15
Fully-cooked Sausages minutes.Hot Dogs, Brats, Hi 7 to 12 minutes Turn once.Polish Hi 13 to 16 minutes Turn occasionally.
Fresh SausageLinks Med 15 to 25minutes Turn occasionally.Patties (3-inch
diameter) Med 15 to 20minutes Turn after half the time.Italian Sausage Med 25 to 30 minutes Pierce casing with a fork. Turn
once.
Lamb Chops 20 to 30 minutes Turn occasionally. Brush withglaze, if desired.
Chicken /
Pieces: Bone-in Med I 35 to 50 minutes Turn occasionally.Boneless Breasts Med I 25 to 35 minutes Turn occasionally.Wings Med I 25 to 35 minutes Turn occasionally.
Cornish Hen (halved) Med _ 35 to 45 minutes Turn occasionally.
FishSmall, Whole (1") Med 15 to 20 minutes Brush with butter. Turn after half
the time.Steaks (1") Med 20 to 25minutes Brush with butter. Turn after half
the time.Fillets (1,_,,) Med 10 to 15minutes Start skin side up. Brush with(with skin on) butter. Turn after half the time.
Lobster Tails Med 30 to 35 minutes Brush with butter. Turn(1/2lb. uncooked) occasionally.
Shrimp Med 10 to 20minutes Turn and brush with butter or(skewered - uncooked) marinade frequently.
Garlic Bread Med 4 to 6 minutes Turn after half the time.
Hot Dog,, Hamburger Buns i Med 1 to 2 minutes Turn after half the time.
14
Grilling Tips
With your Jenn-Air grill literally any food you've considered "at its best" when preparedoutdoors can now be prepared indoors with great flavor and less fuss.
The following suggestions are good rules to follow and will increase your enjoyment ofthe equipment.
• Be sure to follow directions on page 13 for using the grill.
• Suggested cooking times and control settings are approximate due to variationsin meats. Experience will quickly indicate cooking times as well as which settingswork best.
• For best results, buy top grade meat.
• Score fat on edges of steak, but do not cut into meat, to prevent curling whilecooking.
• For the attractive "branded" look on steaks, be sure grill is preheated. Allowone side of meat to cook to desired doneness, or until juices appear on thetop surface, before turning. It takes fewer minutes to cook the second side.Turn steaks and hamburgers just once. Manipulating food causes loss of juices.
e When basting meats or applying sauces to foods, remember that excessiveamounts wind up inside your grill and do not improve the food flavor. Applysauces during the last 15 to 20 minutes of cooking time unless recipe specifiesotherwise. Plus, anytime a sugar-based marinade (for example, barbecue sauce)is going to be used, the grates should be "seasoned" prior to preheating (seepage 13).
• There are many meat marinades which will help tenderize less expensive cutsof meat for cooking on the grill.
• Certain foods, such as poultry and non-oily fish, may need some extra fat. Brushwith oil or melted butter occasionally while grilling.
• Use tongs with long handles or spatulas for turning meats. Do not use forksas these pierce the meat, allowing juices to be lost.
® To help retain meat juices, salt after turning meat or after cooking is completed.
15
Cleaning Parts ofYour CooktopControl BmobsThe knobs on the control panel can be removed with the controls in the OFF position.Pull each knob straight from the shaft. Wash knobs in warm soapy water or dishwasher;do not use abrasive cleansers or materials. To replace each knob, match flat partof knob opening with the flat of the shaft, returning in OFF position.
IMPORTANT: Never use a metal blade to pry knob off. If knob cannot be easily removed,tuck the folds of a cloth dishtowel under the knob skirt and pull the towel upwardwith steady, even pressure.
Control Knob AreaUse mild cleansers, such as soapy water or mild liquid sprays, such as 409. Wipewith sponge, damp cloth or paper towel. Do not scrub with S.O.S. pads or abrasivecleansers.
Grill GratesThese are made from cast aluminum and are coated with the Excalibur® nonstickfinish.
• After the grill gates have cooled, wipe off grates with a paper towel. Wash coolgrates (DO NOT IMMERSE HOT GRILL GRATES IN WATER) with soap ordetergent in hot water in the sink or wash them in the dishwasher. Be sure toremove all food residue before cooking on the grill grates again.
• Remove stubborn spots with a plastic mesh puff or pad. For best results, useonly those cleaning products which state they are recommended for use whencleaning nonstick surfaces.
• If grates were washed in the dishwasher, season with oil prior to grilling.
• Do not use metal brushes or abrasive scouring pads or other scrubbers intendedto clean outdoor charcoal grills. These will remove the finish as well as scratchthe grates. Do not clean in the self-cleaning oven or use oven cleaners on thegrates.
GriH BurnerThe grill burner should be cleaned after each use. It can be cleaned with a soapyS.O.S. pad or in the dishwasher. Rinse and dry thoroughly before using again. Forheavy soil, burner should be cleaned first with a soapy S.O.S. pad, rinsed and dried.Then it can be cleaned in a self-clean oven for 2 hours.
Note: Check to be sure all ports are open. To open clogged ports, insert atoothpick directly into each port.
t
Surface Burner Assembly:The surface burner assembly can be cleaned with mild detergents and a plastic scrubberor washed in the dishwasher. To prevent scratching the burner heads, do not useabrasive cleansers or scrubbing pads. Do NOT clean in a self-clean oven.FI Note; Check to be sure all ports are open. To open clogged ports, insert a I
LI toothpick directly into each port. 1
16

Cooktop
Stainless Steel Cooktop
• To clean light soil, wipe with soapy cloth or nonabrasive cleanser, such as SoftScrub. Rinse, buff with soft cloth; polish with glass cleaner if necessary.
• To clean moderate soil or discoloration of the surface (excessive heat will causea golden discoloration), clean with Zud, Bar Keepers Friend, or Luneta (Jenn-Air Model A912, Part No. 712191). With a sponge or cloth, rub cleanser withthe grain to avoid streaking the surface. Rinse well, buff dry; polish with a glasscleaner if necessary to remove cleanser residue and smudge marks.
• Heavy soil, such as burned on food soil, can be removed by first cleaning asper the instructions for moderate soil. Stubborn stains can be removed witha damp Scotch-Brite scour-pad; rub evenly with the grain to avoid streakingthe surface. Rinse well, buff with dry cloth; polish with glass cleaner if necessaryto remove cleanser residue and smudge marks. Scotch-Brite is also useful inbuffing and removing minor scratches.
• Stubborn food stains may also be removed by spraying with Easy-Off ovencleaner. Allow to set overnight, then rinse. If stains remain, clean with recom-mended cleansers such as Zud, Luneta (Jenn-Air Model A912, Part No. 712191),or Scotch-Brite scour-pad. CAUTION: When using Easy-Off, avoid spraying areasother than the stainless steel such as the air grille and control knob area.Immediately wipe up any spray from these areas with a damp cloth. Read themanufacturer's precautions on using oven cleaners. Hint: Easy-Off can be usedto clean the porcelain burner basin area.
Porcelainized Steel Cooktop
• Never wipe a warm or hot porcelain enamel surface with a damp cloth.
• For general daily cleaning and light soil, wash with warm soapy water andrinse. Polish with a dry cloth.
• For stubborn stains, clean with Cooktop Cleaning Creme (Part No. 20000001)and a sponge.
• Do NOT use abrasive or caustic cleaning agents which may permanentlydamage the finish.
Note: The porcelain enamel used on your cooktop is acid resistant, not acidproof. Therefore, acid foods (such as vinegar, tomato, milk, etc:) spilledon the cooktop should be wiped up immediately with a dry cloth.
Igniters
• It is important to keep igniter port openings clear and free of obstructionsto avoid ignition failure and possible gas buildup. If the port openings areblocked, use a toothpick to remove food particles.
• The igniter cap and stem can be cleaned with warm soapy water and a plasticscrubber. The wire electrode inside the cap can be cleaned with a small brush.Rinse and dry.
17
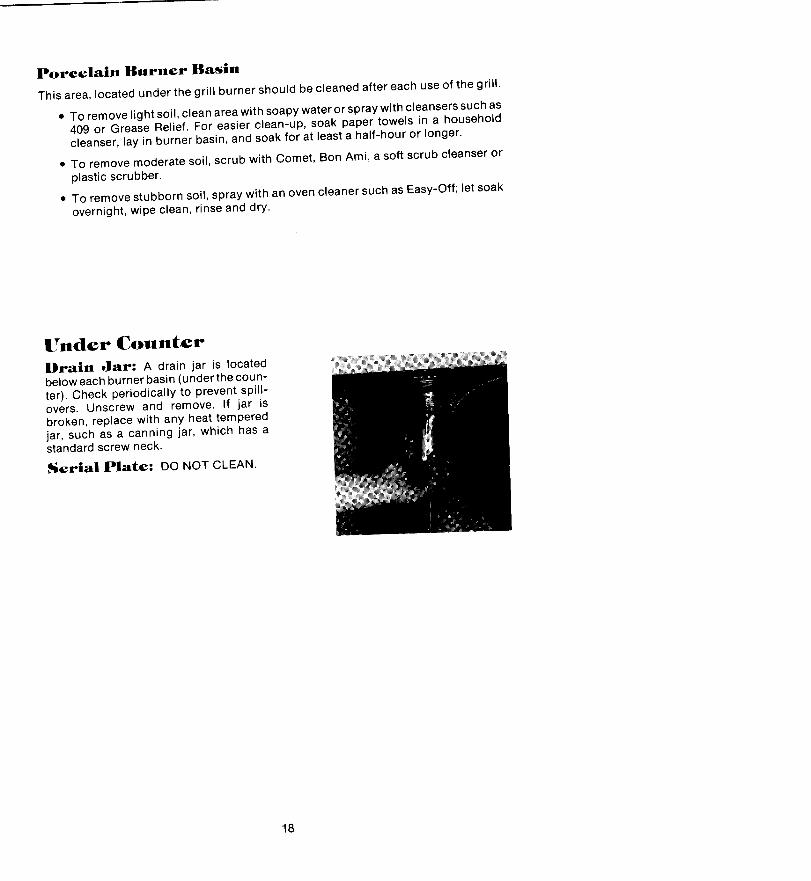
Porcelain Burner Basin
This area, located under the grill burner should be cleaned after each use of the grill.
• To remove light soil, clean area with soapy water or spray with cleansers such as409 or Grease Relief. For easier clean-up, soak paper towels in a householdcleanser, lay in burner basin, and soak for at least a half-hour or longer.
• To remove moderate soil, scrub with Comet, Bon Ami, a soft scrub cleanser orplastic scrubber.
• To remove stubborn soil, spray with an oven cleaner such as Easy-Off; let soakovernight, wipe clean, rinse and dry.
Under CounterDrain Jar: A drain jar is locatedbelow each burner basin (under the coun-ter). Check periodically to prevent spill-overs. Unscrew and remove. If jar isbroken, replace with any heat temperedjar, such as a canning jar, which has astandard screw neck.
Serial Plate: DO NOT CLEAN.
18
Ducting .InformationJenn-Air's ventilation system is designed to capture both cooking fumes and smokefrom any place on the grill surface. If the system does not, these are some ductinginstallation situations to check:
• 6" diameter round or 31/_'' x 10" rectangular ducting should be used for ductlengths 10'-60'. 5" diameter round ducting must be used if the duct length is10' or less.
• No more than three 90° elbows should be used. Distance between elbows shouldbe at least 18".
• Recommended Jenn-Air wall cap should be used. Make sure damper movesfreely when ventilation system is operating.
• There should be a minimum clearance of 6" for cooktop installed near a sidewall.
If there is not an obvious improper installation, there may be a concealed problemsuch as a pinched joint, obstruction in the pipe, etc. Installation is the responsibilityof the installer and questions should be addressed first by the installer. The installershould very carefully check the ducting installation instructions.
19
Before You Callfor ServnceCheck the following list to be sure a service call is really necessary.
If grill or surface burner fails do liglnt:
• check to be sure unit is properly connected to power supply.• check for a blown circuit fuse or a tripped main circuit breaker.• check to be sure burner ports or ignition ports are not clogged.• check to be sure regulator is set for the correct fuel.• check to be sure inlet pressure is adequate.• clean igniter (see p. 17).
If tint |lann_ is uneven:
• burner ports may be clogged.• flame setting may need to be adjusted (see p. 9).
If grill or sunri'ace burner ilanle iif|s off tlne ports:
• shutter on the mixer tube needs to be closed until flames settle on the burner
ports (see pp. 8-9).
If grill or surface burner flame is yellow in color:
• shutter on the mixer tube needs to be opened until yellow disappears (seepp. 8-9).
If You Need Service
• call the dealer from whom your appliance was purchased or the authorizedJenn-Air Service Contractor listed in the Yellow Pages. Your Jenn-Air ServiceContractor can provide better and faster service if you can accurately describeproblems and give model and serial number of the appliance. Be sure toretain proof of purchase to verify warranty status. Refer to WARRANTY forfurther information of owner's responsibilities for warranty service.
• if the dealer or service company cannot resolve the problem, write to MAYCORParts and Service Co., P.O. Box 2370, Cleveland, TN 37320-2370, 615-472-3333.
• use and care manuals, service manuals, and parts catalogs are available fromMAYCOR for a nominal charge.
All specifications subject to change by manufacturer without notice.
20
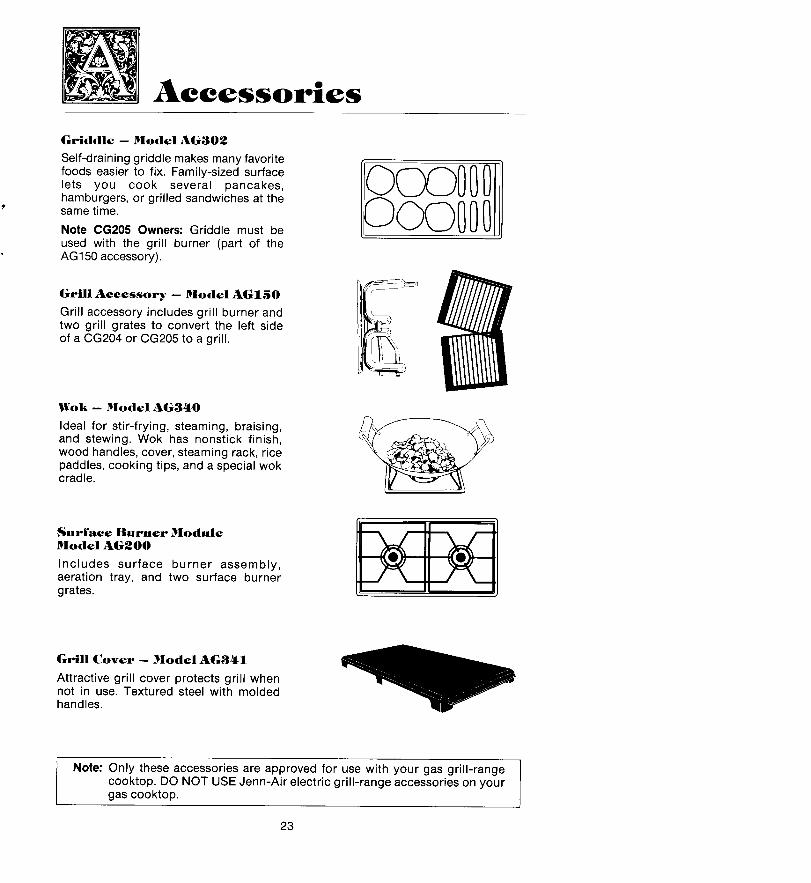
AccessoriesGriddle -- Model AG302
Self-draining griddle makes many favorite
foods easier to fix. Family-sized surface /(_)(__) (_ I I ]l
lets you cook several pancakes,hamburgers, or grilled sandwiches at the
' same time. I___(_ 0Note CG205 Owners: Griddle must beused with the grill burner (part of theAG150 accessory).
Grill Accessory -- Model AG150 I_
Grill accessory includes grill burner and , Itwo grill grates to convert the left side ._of a CG204 or CG205 to a grill, i ',_
i 1
Wok -- Model AG340
Ideal for stir-frying, steaming, braising, ./_/"ff --"'_and stewing. Wok has nonstick finish,wood handles, cover, steaming rack, ricepaddles, cooking tips, and a special wokcradle.
Surface Burner Module
Model AG200 _Includes surface burner assembly,aeration tray, and two surface burnergrates.
Grill Cover -- Model AG341
Attractive grill cover protects grill whennot in use. Textured steel with moldedhandles.
Note: Only these accessories are approved for use with your gas grill-rangecooktop. DO NOT USE Jenn-Air electric grill-range accessories on yourgas cooktop.
23